ASUSTeK Computer P527 Quad-band Smart Phone User Manual 1
ASUSTeK Computer Inc Quad-band Smart Phone Users Manual 1
Contents
- 1. USERS MANUAL
- 2. Users Manual 1
- 3. Users Manual 2
Users Manual 1

P527
User Manual

2
E3361
First Edition
September 2007
Copyright © 2007 ASUSTeK Computers, Inc. All Rights Reserved.
No part of this manual, including the products and software described in it, may be reproduced,
transmitted, transcribed, stored in a retrieval system, or translated into any language in any form or by any
means, except documentation kept by the purchaser for backup purposes, without the express written
permission of ASUS Telecom (“ASUS”).
Product warranty or service will not be extended if: (1) the product is repaired, modied or
altered, unless such repair, modication of alteration is authorized in writing by ASUS; or (2)
the serial number of the product is defaced or missing.
ASUS PROVIDES THIS MANUAL “AS IS” WITHOUT WARRANTY OF ANY KIND, EITHER
EXPRESS OR IMPLIED, INCLUDING BUT NOT LIMITED TO THE IMPLIED WARRANTIES OR
CONDITIONS OF MERCHANTABILITY OR FITNESS FOR A PARTICULAR PURPOSE. IN NO
EVENT SHALL ASUS, ITS DIRECTORS, OFFICERS, EMPLOYEES OR AGENTS BE LIABLE
FOR ANY INDIRECT, SPECIAL, INCIDENTAL, OR CONSEQUENTIAL DAMAGES (INCLUDING
DAMAGES FOR LOSS OF PROFITS, LOSS OF BUSINESS, LOSS OF USE OR DATA,
INTERRUPTION OF BUSINESS AND THE LIKE), EVEN IF ASUS HAS BEEN ADVISED OF THE
POSSIBILITY OF SUCH DAMAGES ARISING FROM ANY DEFECT OR ERROR IN THIS MANUAL
OR PRODUCT.
SPECIFICATIONS AND INFORMATION CONTAINED IN THIS MANUAL ARE FURNISHED
FOR INFORMATIONAL USE ONLY, AND ARE SUBJECT TO CHANGE AT ANY TIME WITHOUT
NOTICE, AND SHOULD NOT BE CONSTRUED AS A COMMITMENT BY ASUS. ASUS ASSUMES
NO RESPONSIBILITY OR LIABILITY FOR ANY ERRORS OR INACCURACIES THAT MAY
APPEAR IN THIS MANUAL, INCLUDING THE PRODUCTS AND SOFTWARE DESCRIBED IN IT.
Products and corporate names appearing in this manual may or may not be registered trademarks
or copyrights of their respective companies, and are used only for identication or explanation and
to the owners’ benet, without intent to infringe.

3
Table of Contents
Table of Contents ................................................................................... 3
P527 specications ............................................................................... 9
Package contents ................................................................................ 10
Getting to know your P527 ................................................................... 2
Layout ..................................................................................................... 12
Getting to know your P527 ................................................................. 13
Device components description .................................................................... 14
Device components description .................................................................... 15
Getting your device ready ................................................................... 16
Installing the SIM card and battery................................................................ 16
Charging the battery...................................................................................... 18
Starting up ............................................................................................ 19
Powering your device .................................................................................... 19
Using the stylus ............................................................................................. 19
Calibrating P527............................................................................................ 20
Locking the keys and buttons........................................................................ 20
The Today screen ................................................................................ 21
Status indicators............................................................................................ 22
Status indicators............................................................................................ 23

4
Status indicators............................................................................................ 24
Screen orientation ......................................................................................... 25
Start menu..................................................................................................... 26
ASUS Launcher .................................................................................... 27
Using the ASUS Launcher ............................................................................ 27
Using the Input Panel .......................................................................... 30
Using the Block Recognizer .......................................................................... 30
Using the On-screen keyboard ..................................................................... 31
Using the Letter Recognizer.......................................................................... 32
Using XT9 input............................................................................................. 33
Using the Transcriber .................................................................................... 34
Writing and drawing on the screen .................................................... 35
Recording voice ................................................................................... 36
Using ActiveSync™ ............................................................................. 38
Synchronizing via mini-USB .......................................................................... 40
Synchronizing with Exchange Server ................................................ 41
Setting the synchronization schedule............................................................ 43
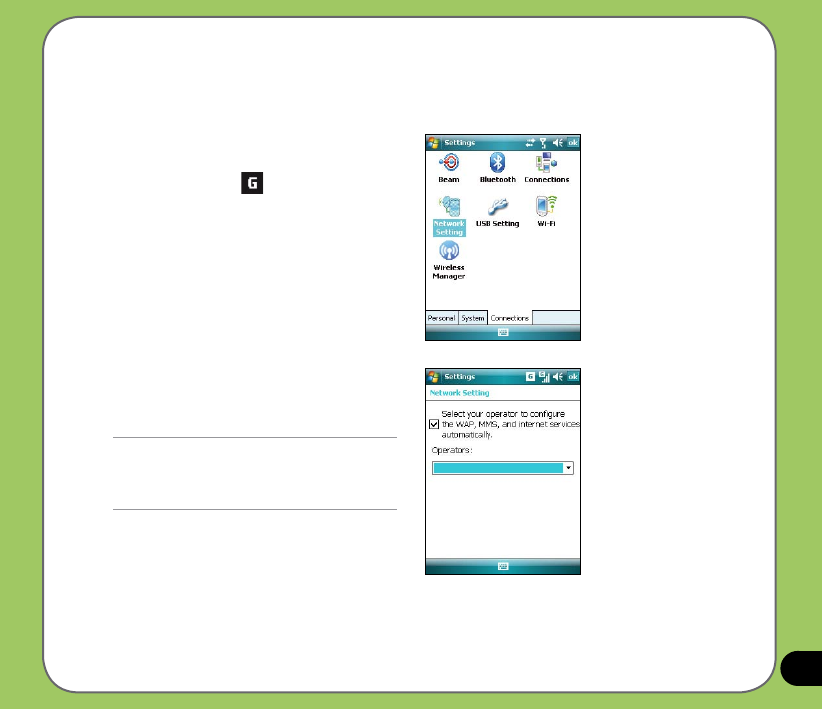
Searching information ......................................................................... 44
Getting Help ......................................................................................... 45
Using phone ......................................................................................... 48
Phone pad ..................................................................................................... 48
Adjusting the volume ..................................................................................... 48
Making a call ........................................................................................ 49

5
Using the alphanumeric keypad .................................................................... 49
Phone pad features ....................................................................................... 50
Using Smart dialer......................................................................................... 50
Making calls from Contacts ........................................................................... 51
Making calls from Call History ....................................................................... 51
Using the Speed Dial .................................................................................... 52
Using Voice Commander .............................................................................. 53
Receiving a call .................................................................................... 54
ASUS CallFilter .................................................................................... 55
Launching ASUS CallFilter ............................................................................ 55
Using ASUS CallFilter ................................................................................... 57
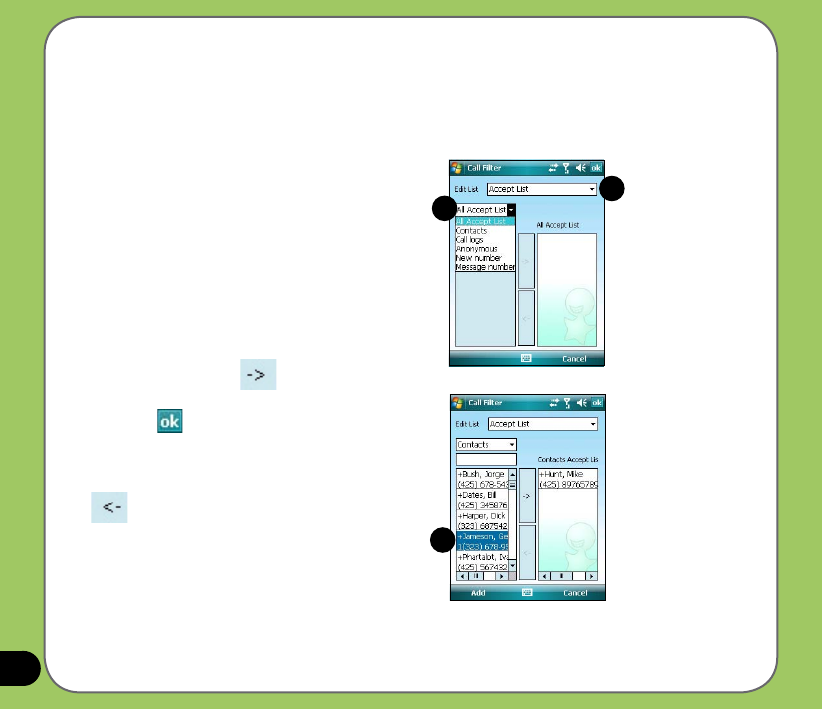
Managing the Accept list ............................................................................... 58
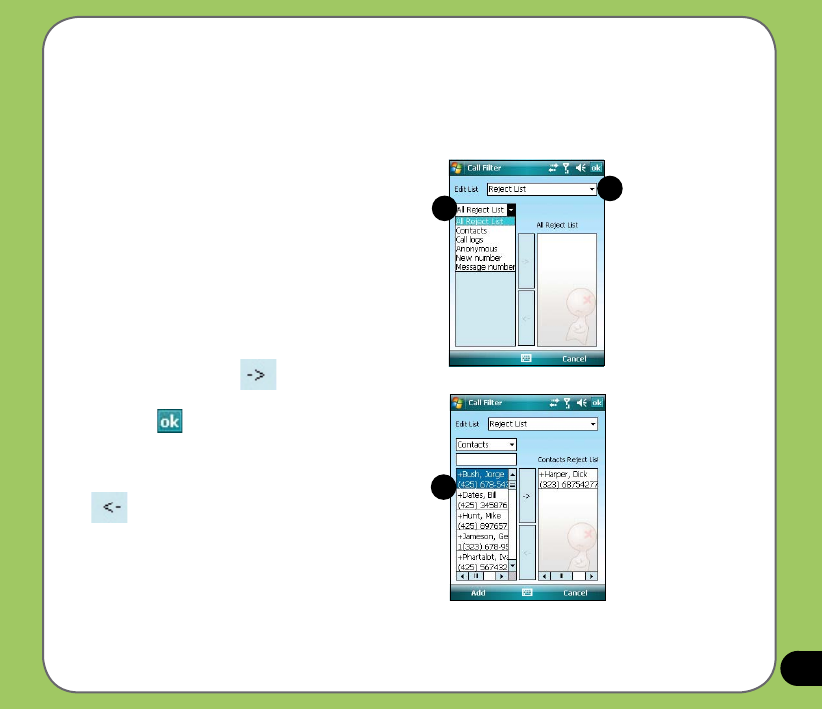
Managing the Reject list ................................................................................ 59
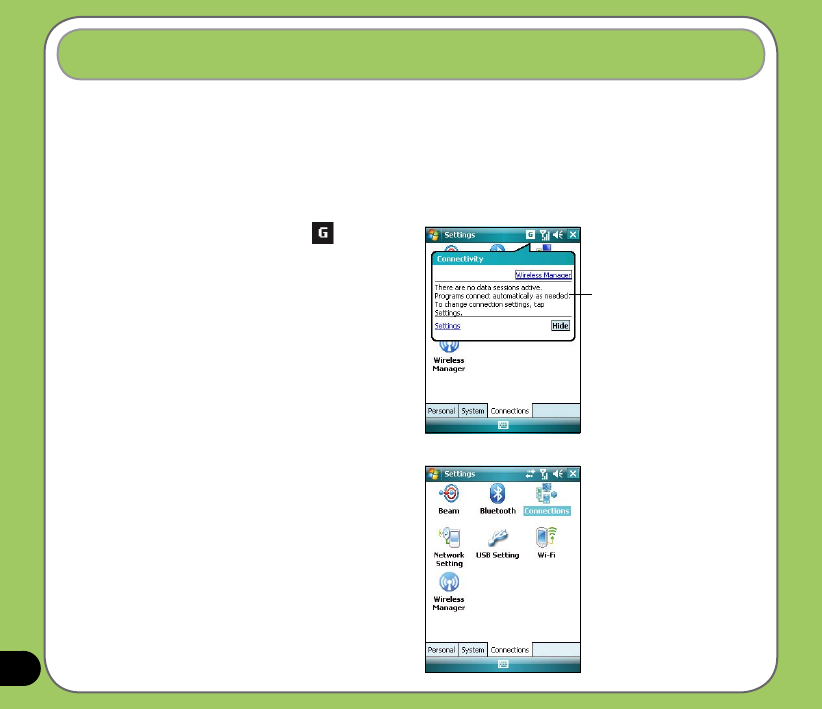
Using the Wireless Manager ............................................................... 62
Using Bluetooth® ................................................................................. 63
Overview ..................................................................................................... 63
Activating Bluetooth in your device ............................................................... 63
Adding Bluetooth devices.............................................................................. 64
Using Wi-Fi® ......................................................................................... 67
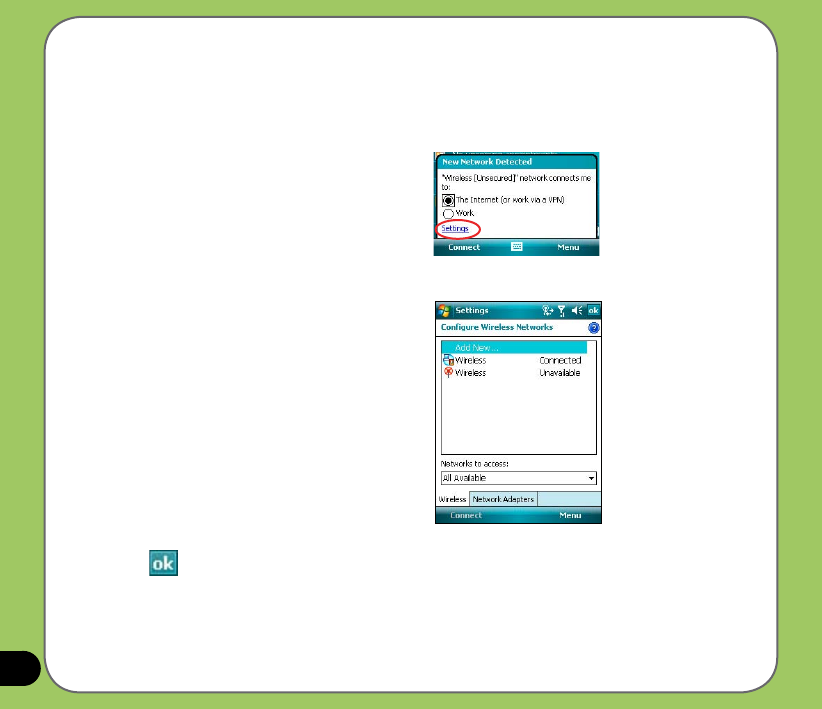
Turning on Wi-Fi ............................................................................................ 67
Conguring wireless networks ...................................................................... 68
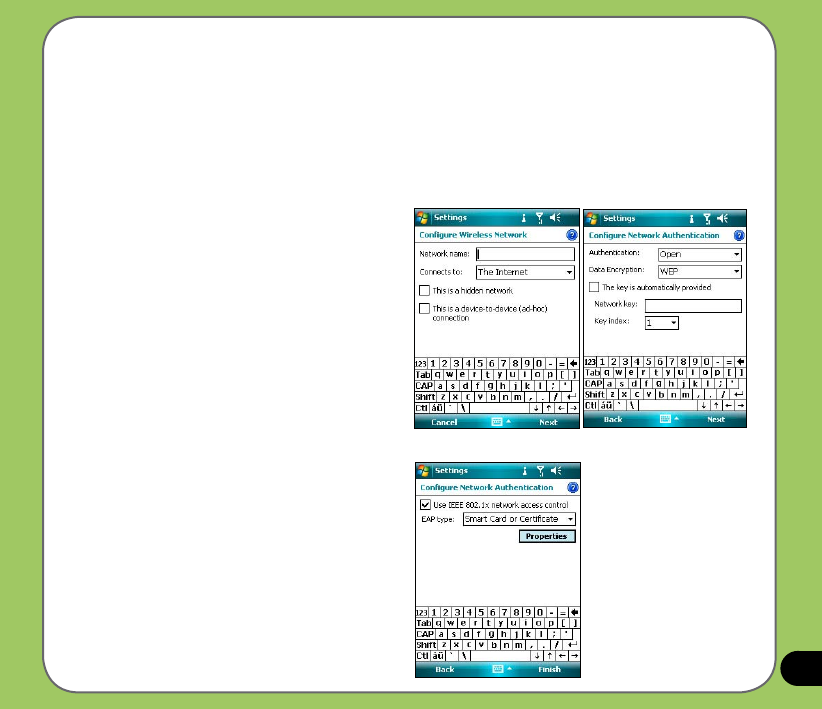
Adding a wireless network ............................................................................ 69
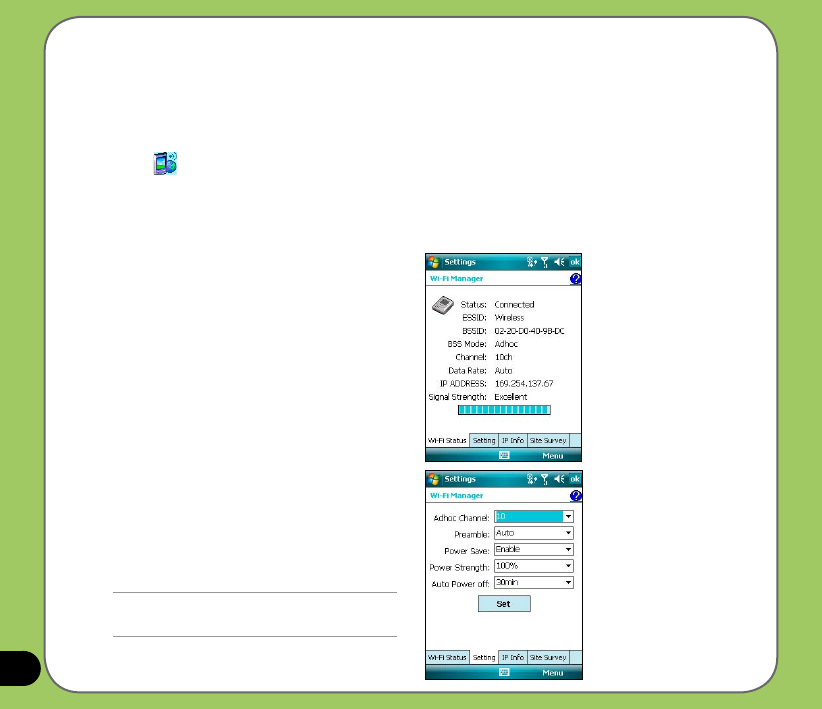
Using Wi-Fi Manager .................................................................................... 70
Setting a GPRS connection ................................................................ 72

6
Connecting GPRS ......................................................................................... 75
Disconnecting GPRS .................................................................................... 76
Using the GPRS Tool .................................................................................... 77
GPS Catcher ......................................................................................... 79
Updating GPS data ....................................................................................... 79
Setting GPS Catcher ..................................................................................... 80
Travelog ................................................................................................ 81
Turning on GPS ........................................................................................... 81
Recording Travel Track ................................................................................. 82
Exporting Route ............................................................................................ 85
Creating a New POI ..................................................................................... 88
Travelog Setting ............................................................................................ 89
GPS Setting .................................................................................................. 89
Location Courier .................................................................................. 96
Using Location Courier.................................................................................. 96
External GPS ........................................................................................ 99
Setting external GPS device ......................................................................... 99
Using the camera ............................................................................... 102
Launching the camera................................................................................. 102
Available capture modes ............................................................................. 103
Supported formats....................................................................................... 103
Camera mode screen.................................................................................. 104
Camera mode icons .................................................................................... 105
Camera options menu ................................................................................. 106

7
Taking photos ...............................................................................................111
Video mode screen ......................................................................................112
Video mode icons .........................................................................................113
Video options menu .....................................................................................114
Recording videos .........................................................................................117
Viewing pictures and videos .............................................................118
Viewing pictures and videos .........................................................................118
Remote Presenter .............................................................................. 120
Using the Remote Presenter ....................................................................... 120
Backup ................................................................................................ 127
Backing-up les ........................................................................................... 127
Restoring les ............................................................................................. 129
Backup Setting ............................................................................................ 131
Meeting Time Planner ........................................................................ 132
NewStation ......................................................................................... 134
Reading NewStation news ......................................................................... 134
Creating a new category ............................................................................ 134
Adding a new channel ................................................................................ 135
NewStation Menus ...................................................................................... 138
FM Radio ............................................................................................. 139
Listening to FM radio................................................................................... 139
Adding a new channel ................................................................................ 139
Managing My Channel list ........................................................................... 140
Conguring FM Settings.............................................................................. 141

8
Windows Live™ ................................................................................. 142
Signing up ................................................................................................... 142
Setting ring tone ................................................................................ 147
Adding ring tone to selection ....................................................................... 147
Changing the ring tone ................................................................................ 148
Wake-up setting ................................................................................. 149
Mode switcher .................................................................................... 150
Auto Cleaner ...................................................................................... 151
Setting Auto Cleaner ................................................................................... 151
System information ........................................................................... 152
Restoring default factory settings ................................................... 153
ASUS status icon ............................................................................... 156
USB setting ................................................................................................. 157
LCD Brightness ........................................................................................... 158
Battery ................................................................................................... 158
Memory ................................................................................................... 159
Storage card memory.................................................................................. 159
Programs Running in memory .................................................................... 160
Settings ................................................................................................... 160
Notices ................................................................................................ 162
RF Exposure information (SAR) ....................................................... 166
Safety information ............................................................................. 168
Contact information ........................................................................... 176

9
P527 specications
Processor TI OMAP 850
Operating System Microsoft® Windows Mobile™ 6 Professional
Memory 128 MB NAND Flash ROM
64 MB SDRAM
Display 2.6-inch, 320 x 240 TFT Touchscreen Liquid Crystal Display (LCD) with
65,536 color and LED back-lighting
Frequency band Quad-band GSM (850/900/1800/1900 MHz)
Integrated GSM/GPRS/EDGE and GPS with internal antenna
GPS Built-in SiRF star III chipset
GPRS Class B, Multislot class 10
Camera 2.0 mega-pixel Auto Focus camera
Connectivity Bluetooth : V2.0+EDR
USB : USB Client 1.1
WLAN : IEEE 802.11b+g
Battery capacity 1300 mAh Lithium Ion
Expansion slot MicroSD card slot
Audio 2.5 mm audio port
Built-in microphone and stereo output speaker
Weight 129g (with battery)
Dimension 113mm(L) x 58mm(W) x 15.4 mm(T)
Talk time* 4 hrs (*vary with different networking environment and scenario)
Standby time* 150 hrs (*vary with different networking environment and scenario)
NOTE: Specications are subject to change without notice.
10
Package contents
Check your P527 package for the following items:
P ASUS P527 device P Protection case
P Battery P Getting Started CD
P AC Adapter P User Manual
P Mini-USB cable P Quick Start Guide
P Headset P Warranty Card
P Stylus P microSD*
P Car cell phone charger* P Bonus CD*
P Car Kit (PDA holder and windshield
suction pedestal)*
P Navigation CD & manual*
*Optional, depend on the area
NOTE:
• The Protection case is only for protective usage and not a body-worn accessory.
• If any of the above items is damaged or missing, contact your retailer.
CAUTION:
• To reduce risk of re, use only correct battery type. Refer to “Installing the SIM card and battery” section for details.
• Do not attempt to disassemble or service the battery pack.
• Dispose of used batteries properly. Inquire from local authorities for proper disposal of battery.

11
Getting started
Chapter
• Getting to know your P527
• Getting your device ready
• Starting up
• The Today screen
1
12
Getting to know your P527
Components:
Power button
Jog dial
I OK button
Notication LED
Earpiece receiver
LCD touch screen
Left Soft key
Start button
Navigation Key
OK button
Call Key
Right Soft Key
End Key
Voice Commander/Record button
Clear key
Alphanumeric keypad
Location courier key
Travelog button
Bluetooth Button
FM keypad
Message button
Mode switcher button
1
2
3
4
5
6
7
8
9
10
11
12
13
14
15
16
Layout
Top features
Left side features
Front features
4
6
10
1
2
3
5
89
11 13
16
14
15
712
17
18
21
19
20
22
17
18
19
20
21
22
13
Getting to know your P527
Bottom features
Right side features
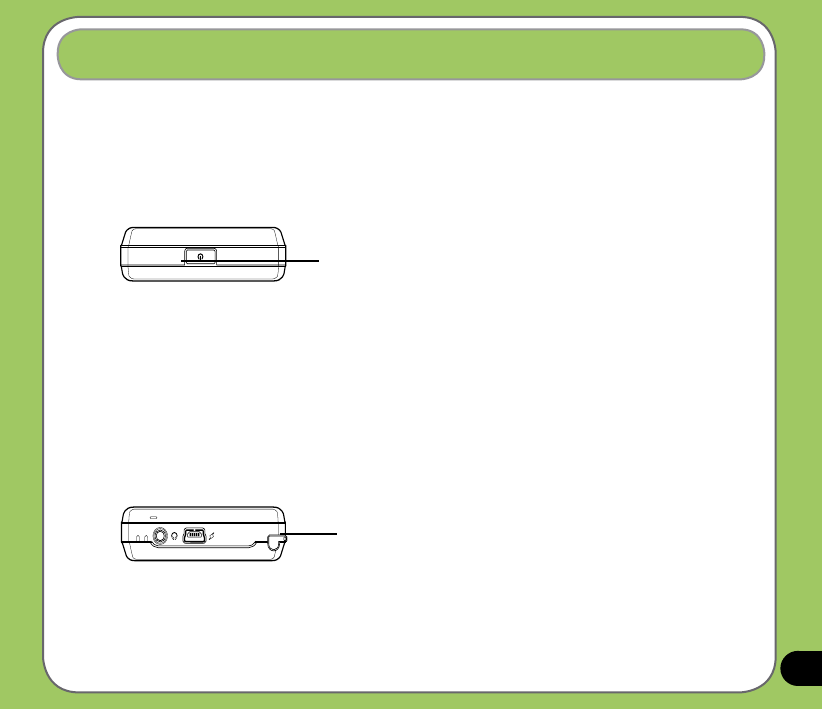
Rear features
Components:
Camera lens
Stereo speaker
Battery compartment
Hold button
Reset button
Camera button
MicroSD slot
Stylus
Headphone slot
Mini-USB connector
24
25
26
27
28
29
30
31
32
MicroSD Reset
30
28
23
25
26
27
29
24
23
31
32

14
Device components description
No. Item Description
1Power button Press once to set suspend mode or to wake device from sleep mode.
Press and hold to turn the power ON or OFF.
2Jog dial This three-direction jog dial allows you to conveniently navigate
through menus without necessarily using the stylus.
3OK button Press to conrm a command or press to close/exit an open
application.
Press and hold to adjust the voice volume.
4Notication LED This multi-color LED noties the following:
• Green - Phone fully charged.
• Flashing green - Network detected.
• Red - Phone is charging.
• Flashing red - Event notication.
• Flashing blue - Bluetooth
®
,WiFi, or GPS is ON.
5Earpiece receiver Allows you to listen to incoming/outgoing calls.
6LCD touch screen This 2.6-inch, 65,536-color, 240 x 320-resolution, touchscreen TFT
LCD allows you to write, draw, or make selections using the stylus.
7Left Soft key Performs the command indicated above the button.
8Start button Press to launch the Start menu.
9Navigation key This ve-direction navigation key allows you to navigate through
menus. Press down to conrm a command.
10 OK button Press to conrm a command or press to close/exit an open
application.
11 Call key Press to receive an incoming call or to make a call.
12 Right Soft key Performs the command indicated above the button.
13 End key Press to end a call or a GPRS connection.

15
Device components description
No. Item Description
14 Voice Commander/Record
button
Press to launch the Voice Commander application.
Press and hold to launch voice recording.
15 Clear key Press to clear enter character to the left.
16 Alphanumeric keypad Allows you to input text and numbers.
17 Location courier key Long press to launch Location courier key.
18 Travelog button Press to launch Travelog application.
19 Bluetooth button Allows you to enable or disable Bluetooth application.
20 FM keypad Press to launch FM radio application.
21 Message button Press to launch Messaging application.
22 Mode Switcher button Allows you to switch applications.
23 Camera lens 2-mega pixel xed lens for taking pictures.
24 Stereo speaker Allows you to listen audio media and phone calls.
25 Battery compartment Contains the battery that supplies power to the device.
26 Hold button Slide to enable or disable all keys including the LCD touch screen.
27 Reset button Using the stylus, press reset button to soft-reset your device
28 Camera button Press and hold over three seconds to launch the camera. In camera
mode, press to take a picture. In video mode, press to start recording
video and press again to stop.
29 Micro-SD slot Insert a Micro-SD storage card into this slot.
30 Stylus Use the stylus to write, draw, or select items on the touch screen.
31 Earphone port Plug headset accessory to this port
32 Mini-USB connector Use this connector to synchronize your data or to charge the battery.
16
Installing the SIM card and battery
Before you can make a phone call using your P527, you need to install a Subscriber Identity
Module (SIM) card. A SIM card contains your phone number, subscriber details, phonebook,
and additional phone memory.
Your P527 comes with a rechargeable Lithium-Ion battery.
New batteries come partially discharged and should be fully charged before using them. They
generally do not reach their rated capacity until they have been charged and discharged at
least four (4) times. We recommend that new batteries be charged overnight even though
they may indicate that the charge is complete after a few hours. Sometimes charging may
stop during the initial charge and it is necessary to remove the battery for approximately
fteen (15) minutes and then put it back on charge.
Getting your device ready
1. Remove the battery compartment cover.
NOTE:
When turned on, the device automatically turns off
after you open the battery compartment to prevent
data loss.
CAUTION:
Use only an ASUS qualied battery.
To install a SIM card and battery:
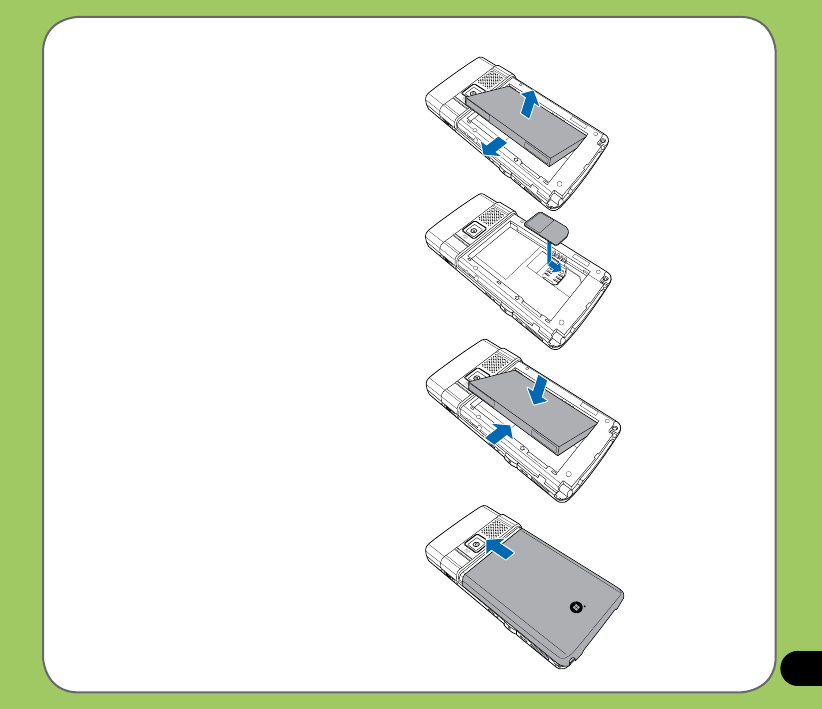
17
2. Remove the battery.
3. Insert the SIM card with its gold
contacts facing down and the notched
corner oriented to the upper left corner
of the slot as shown.
4. Replace the battery into the
compartment with its copper contacts
properly aligned to the copper
conductor on the device.
5. Replace battery compartment cover.
18
Charging the battery
The bundled battery pack is shipped partially charged. Charge the battery up to four (4) hours
before using for the rst time.
To charge battery:
1. Connect the AC adapter plug to the mini-USB connector at the bottom of the device.
2. Connect the AC power plug to a grounded wall socket or power strip.
NOTE:
• The notication LED turns red and charging battery icon appears on the status bar indicating that the battery is
charging.
• If your battery gets totally discharged, you need to recharge it for at least twenty minutes before you can turn it
back on.
19
Powering your device
Make sure that your P527 is fully-charged before starting the device for the rst time.
To turn on power:
1. Press and hold the power button.
Power button
Starting up
2. Follow onscreen instructions to align screen and set the local time zone.
Using the stylus
The stylus is a pen-like device found behind the upper right corner of your P527.
• Use the stylus to write, draw, select, or drag an item on the screen.
• Single-tap an item to select it.
• Tap and hold an item to see a menu.
Stylus

20
Calibrating P527
Calibrating your device ensures that the item you tap on the screen is activated. This involves
tapping in the center of targets that appear in various coordinates on the screen.
To calibrate your screen:
Locking the keys and buttons
You can lock the keys and buttons of your device to avoid inadvertently dialing numbers or
launching any application. To lock the keys and buttons:
1. Locate the Hold button on the right side of your device.
2. Slide the hold button downward to lock.
3. To unlock, slide the hold button upward.
Hold button
1. Tap Start > Settings > System tab
then tap Screen icon.
2. On the General tab tap Align Screen
then follow succeeding calibration
screen instructions.
MicroSD Reset
21
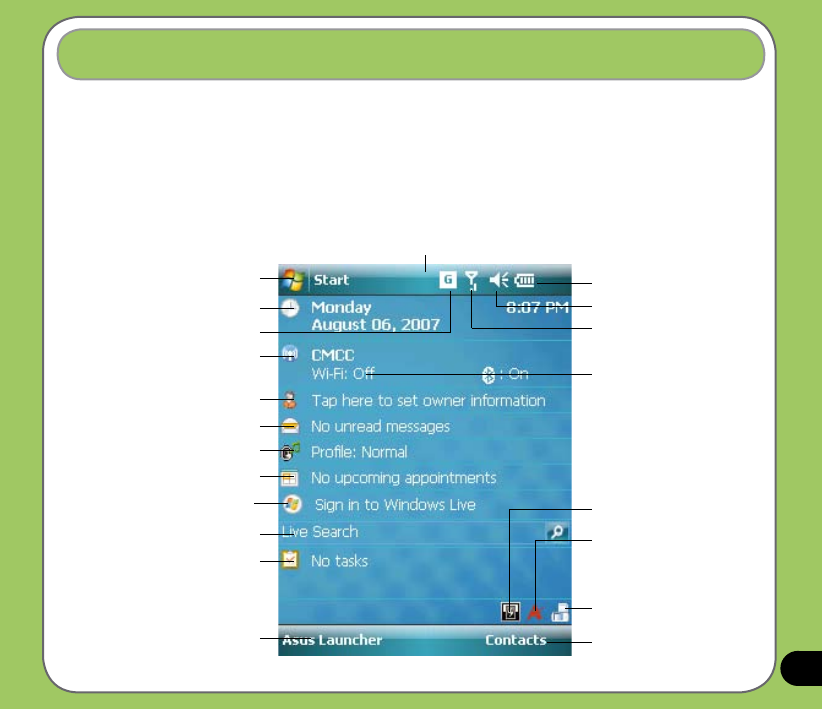
Tap to open the Start menu
Tap to setup date, time, and alarm
Tap to launch Wireless Manager
Tap to set user information
Tap to open messages
Tap to setup tasks
Tap to setup prole
Tap to launch Live search engine
Tap to display call history
Indicates the battery status
Tap to adjust volume
Displays the signal status
(The icon shows no SIM card and no signal
When no SIM card is installed.)
Tap to view connectivity status
Tap to set Call Filter
Tap to display device storage,
USB setting, LCD brightness,
battery, memory, and MicroSD
status
Tap to launch Contacts list
Tap to change screen
orientation
Displays the Bluetooth® /WiFi
connection status
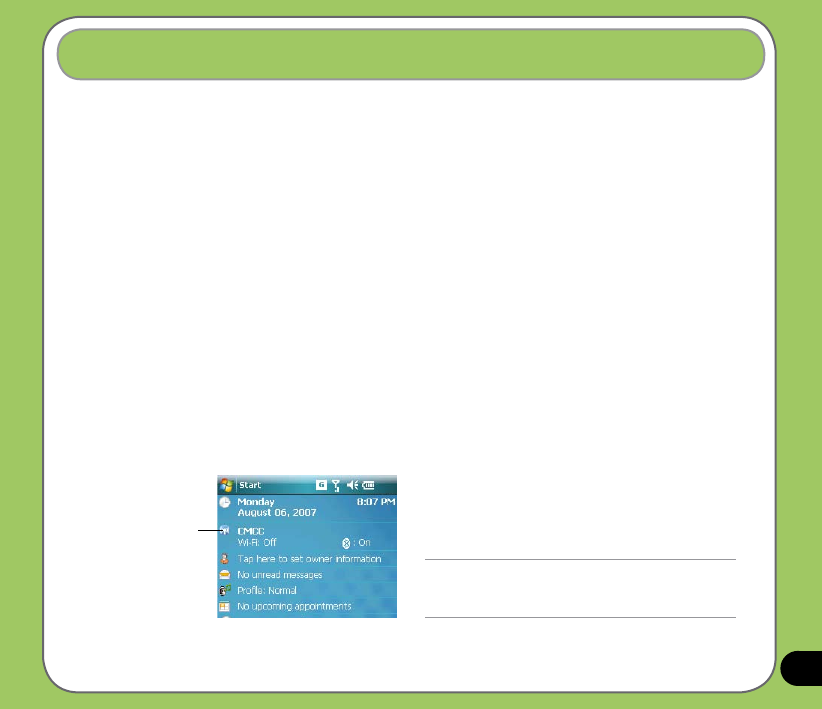
The Today screen
The Today screen displays information useful to you. You can congure the Today screen to
have all the important information you need.
• To access the Today screen, tap Start > Today.
• To personalize the Today screen, tap Start > Settings > Personal tab > Today.
The following describes the common information found on the today screen:
Status bar
Tap to read or make appointments
Tap to sign in Windows Live
22
Status indicators
Refer to the table below for the Today screen icon status indicators.
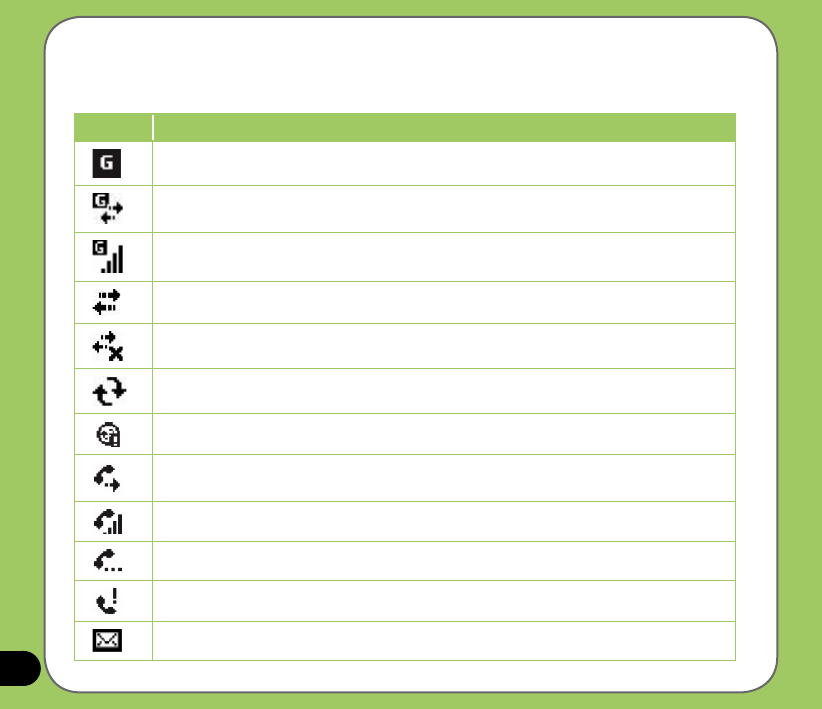
Icon Description
General Packet Radio Services (GPRS) available.
Connecting via GPRS.
Connected via GPRS.
Connecting with ActiveSync
ActiveSync connection not active.
ActiveSync synchronization in progress.
Synchronization error.
Call forwarded.
Call in progress.
Call on hold.
Missed call.
New Short Messaging Service (SMS) message.
23
Status indicators
Icon Description
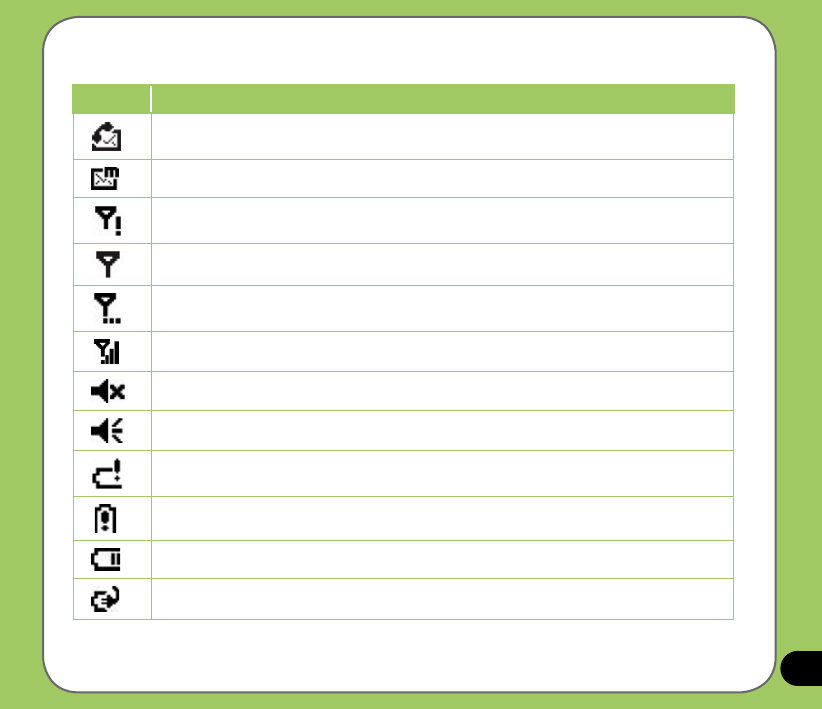
New voice mail.
New Multimedia Messaging Service (MMS) message.
No cellular phone service.
No signal.
Searching for cellular phone service.
Indicates signal strength.
Sound OFF.
Sound ON.
Battery low.
Battery extremely low.
Battery partially charged.
Battery charging.
24
Status indicators
Icon Description
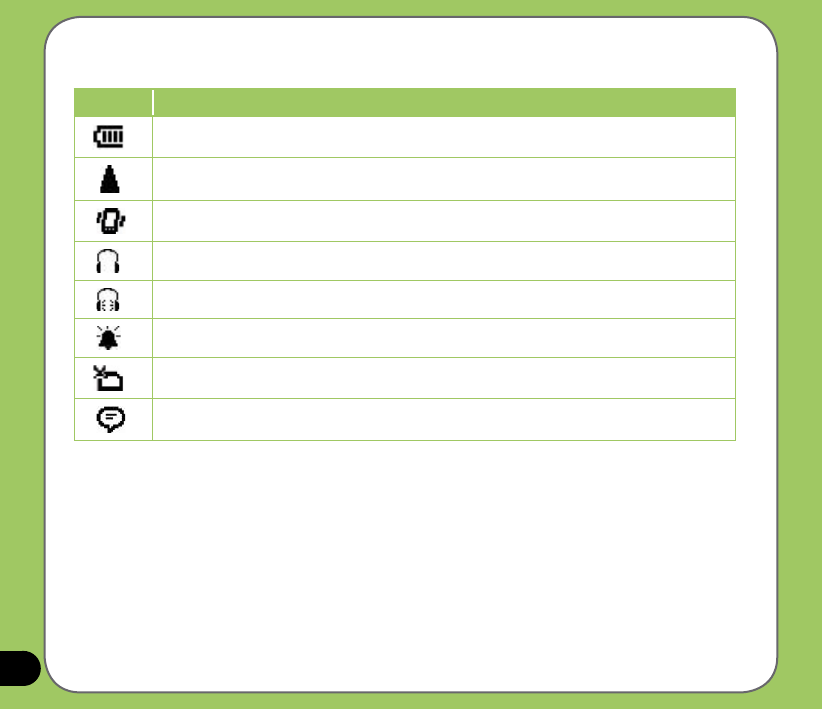
Battery fully charged.
Roaming service. This icon appears only if you have international roaming feature.
Vibrate or Meeting mode on.
Bluetooth headset connected.
Bluetooth head connected with sound.
Appears when you set the alarm
No SIM installed.
Notice indicator. Tap to view notice.

25
Screen orientation
You can set the screen to three different orientations:
1. Portrait
2. Landscape
Set to Portrait mode to get a better view or better operation of certain applications on your
device. Set to Landscape when viewing pictures, video or viewing longer text les.
To change the screen orientation, tap Start > Settings > System tab > Screen then select the
orientation you want.
You can also change the orientation by tapping the icon.
Portrait mode
Landscape mode
26
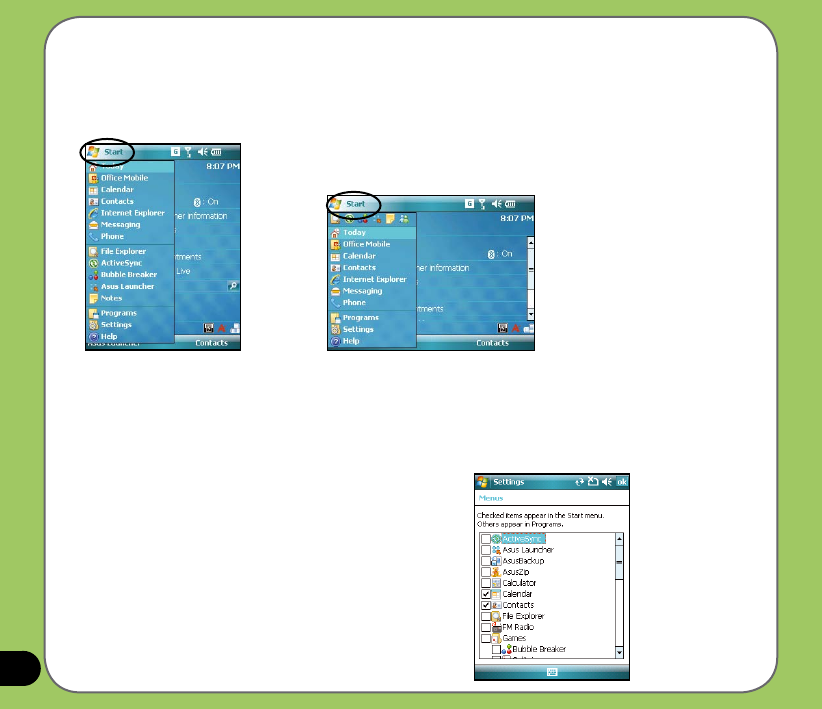
Start menu
The Start menu contains various programs and applications that you commonly use.
Tap Start to display the start menu items:
You can also customize the items that appear in the
Start menu.
To do this:
1. Tap Start > Settings > Personal tab > Menus.
2. Select the check boxes of the items you want to
appear in the Start menu. You can select up to
seven (7) items.
Portrait mode Landscape mode
27
ASUS Launcher is an alternative program that allows you to conveniently and quickly launch
applications, perform tasks, and change device settings.
You can run the Program from Start > Programs> ASUS Launcher, or tap ASUS Launcher at
the lower left corner of the Today screen.
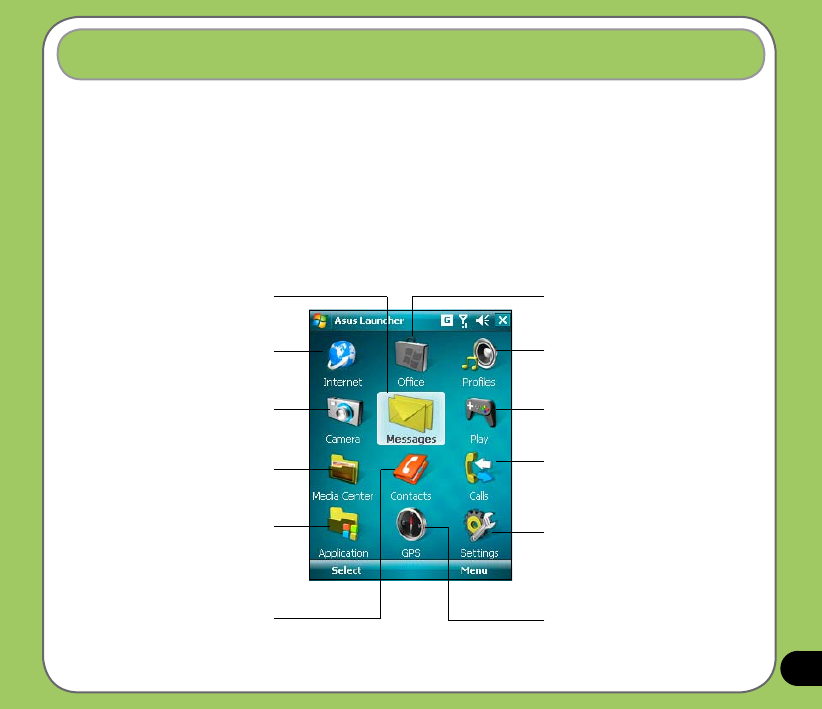
Using the ASUS Launcher
ASUS Launcher
Tap to access MS Ofce, list tasks, set
appointments, or jot notes.
Tap to modify your device prole. You can
also adjust the device audio and sound.
Tap to launch games and applications
menu.
Tap to launch Internet Explorer,
Messenger, and Windows Live.
Tap to display your call history list. You
can also make a call, send a message,
delete call history, and check or reset call
timer from this section.
Tap to access submenus and modify the
Audio, Personal, System, and Connection
settings. You can also display your device
information or restore the default settings
of your device from this option.
Tap to access messaging tools that
allows you to write/read e-mail,
MMS, or text messages.
Tap to launch camera.
Tap to launch Media Center and view
pictures/video, or search for les.
Tap to launch applications.
Tap to display the Contacts list. Tap to display items of GPS related
applications.

28

29
Entering data
Chapter
• Using the Input Panel
• Writing and drawing on the screen
• Recording voice
• Using ActiveSync™
• Synchronizing with Exchange Server
• Searching information
• Getting Help
2
30
Using the Input Panel
When you start an application or select a eld that requires text, symbols, or numbers, the
Input Panel icon appears on the menu bar. The Input Panel allows you to select various input
methods including: XT9, Block Recognizer, Keyboard, Letter Recognizer, and Transcriber.
Using the Block Recognizer
The Block Recognizer allows you to use a single stroke to write letters, numbers, symbols, or
punctuations, which are converted into typed text.
To use the Block Recognizer:
1. In an application, tap the Input Panel arrow, then tap Block Recognizer.
2. Write letters, numbers, symbols, or punctuations in the designated writing area.
Input panel
• Write letters on the abc (left) area of the box.
• Write numbers on the 123 (right) area of the box.
• Tap the special symbols button to input symbols, punctuations
and other special characters.
• Tap Help “?” button for help on how to write characters.
Tap for special
characters
31
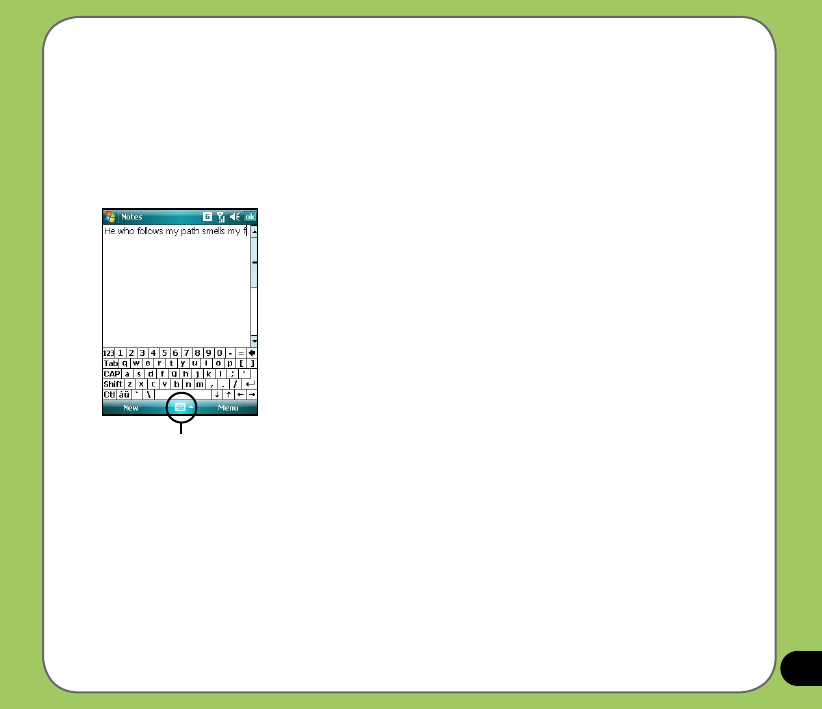
Using the On-screen keyboard
With the on-screen keyboard, you can input text, symbols, numbers, or other special
characters when input is possible.
To input text using the on-screen keyboard:
1. In an application, tap the Input Panel arrow, then tap Keyboard.
2. Input text by tapping keys on the on-screen keyboard.
Input panel
To enlarge the on-screen keyboard:
1. Tap the Input Panel arrow, then tap Option.
2. Select Keyboard from the Input Method list.
3. Tap Large Keys.

32
Using the Letter Recognizer
With the Letter Recognizer you can write individual letters, numbers, or special characters,
which are converted into typed text.
To use the Letter Recognizer:
1. In an application, tap the Input Panel arrow, then tap Letter Recognizer.
2. Write letters, numbers, symbols, or punctuations in the designated writing area.
• Write capital letters on the ABC (left) area of the box.
• Write lower case letters on the abc (middle) area of the box.
• Write numbers on the 123 (right) area of the box.
• Tap the special symbols button to input symbols, punctuations and other special
characters.
• Tap Help “?” button for help on how to write characters.
Input panel
Tap for special
characters
33
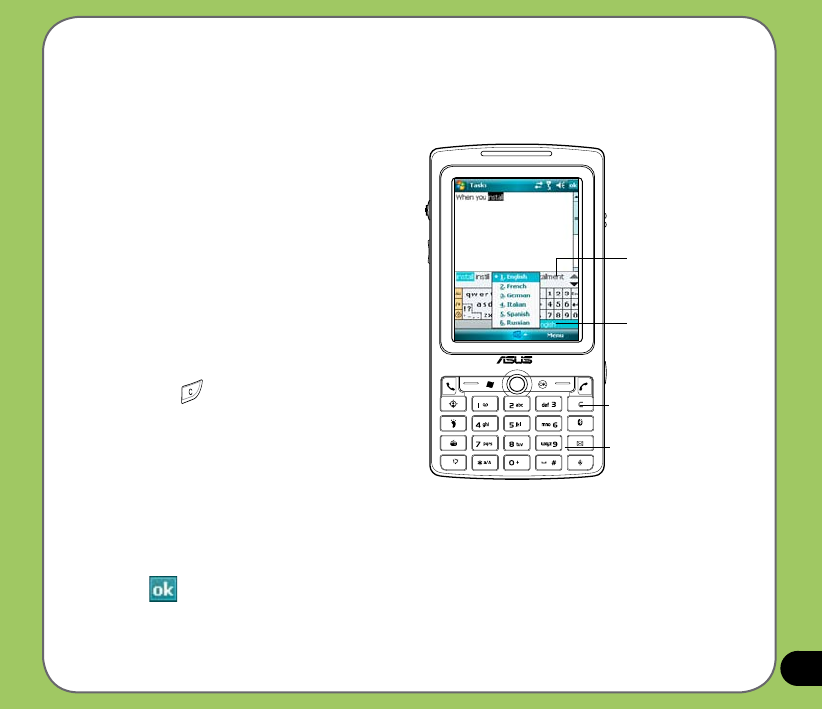
Using XT9 input
XT9 allows you to enter text in alpha-numeric format. As you key in alpha-numeric texts on the
keypad, XT9 automatically matches your input with most likely the completed word.
Press to delete character or
selected text to the left
Alpha-numeric keypad
To switch to XT9 input, tap the Input Panel
arrow, then tap XT9.
XT9 input shortcuts
• To key in a word or number, tap the
keys on the keypad.
• To insert a word or number from the
word list:
a. Use jog dial to move highlighted bar
on word list.
b. Press jog dial to add selected word
or number.
c. Press to delete previous
character or highlighted text.
Word list
Tap to select a
language.
XT9 Settings
To set XT9 according to your preference:
1. Tap Start > Programs > XT9 Settings.
2. Select your desired functions from the
listed items:
3. Tap .
34
Using the Transcriber
Transcriber is a handwriting recognition program that allows you to write in cursive, print, or
mixed styles. It reliably recognizes not only written text but also numbers and symbols. Make
sure to write legibly. See Help for more information on the Transcriber.
To use the Transcriber:
1. Start an application that accepts user input, such as Notes or Word Mobile.
2. Tap the Input Panel arrow, then tap Transcriber.
To write using Transcriber (using Notes):
1. Tap screen to position the cursor where you want the text to appear.
2. Use the stylus to write on the screen. The handwriting will be converted to text after you
lift the stylus from the screen.
To edit text:
1. Draw a line across the text you want to edit. After you lift the stylus from the screen, the
line will disappear and the selected text will be highlighted.
2. You can now rewrite the text or use the Transcriber gestures to edit your selected text.
See Help for the Transcriber gestures.
Input panel
Tap for Help

35
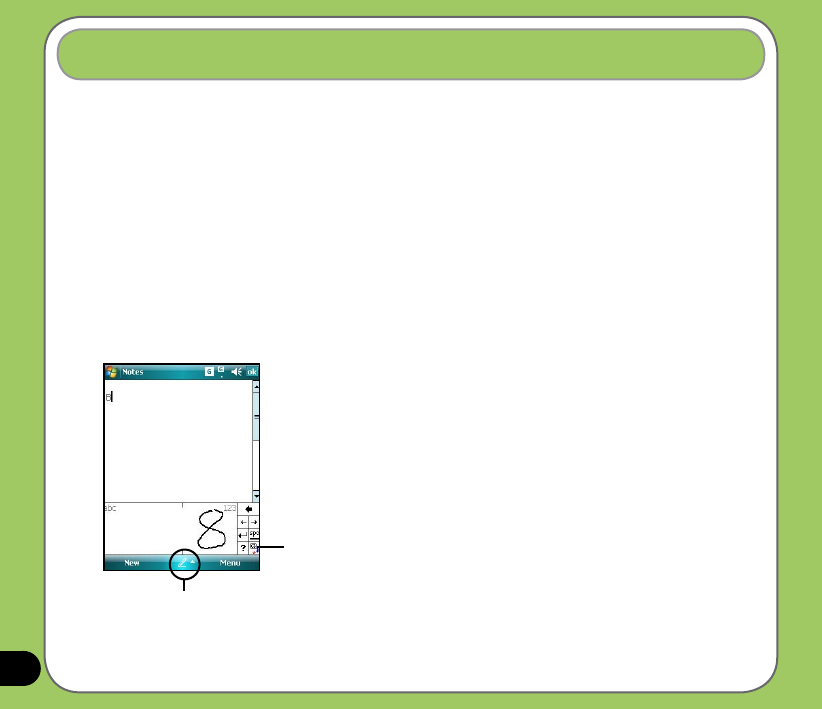
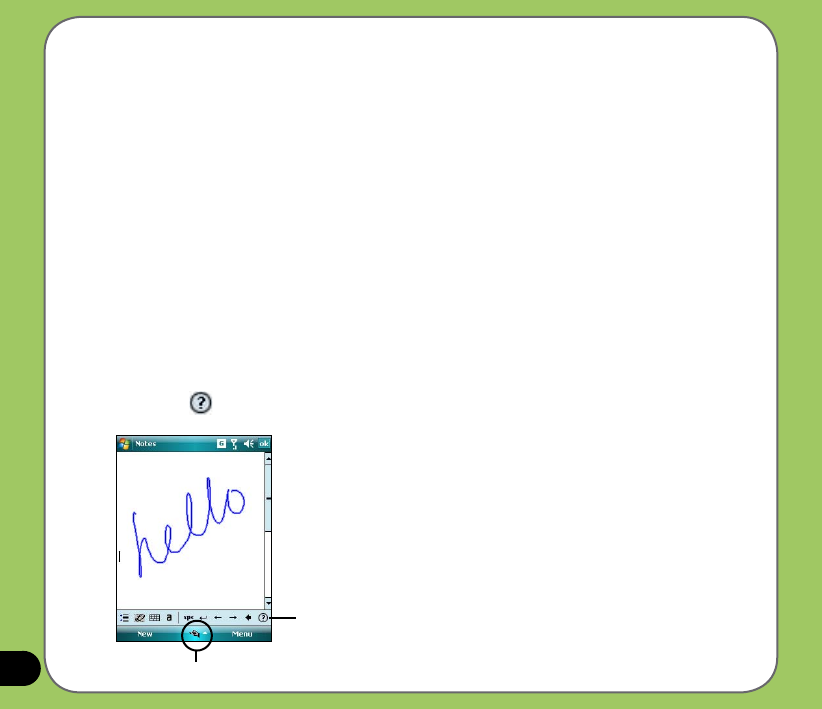
Writing and drawing on the screen
You can write or draw directly on the screen and save notes in your own handwriting. If you
prefer to use your own handwriting or use drawings in your notes, set the default input mode to
Writing. If you prefer text, set the default mode to Typing.
To set the default input mode for Notes:
1. Tap Start > Programs > Notes.
2. From the Notes list, tap Menu > Options.
3. In the Default mode: box, tap the down arrow and select any of the following:
• Writing - if you want to draw or enter handwritten text in a note.
• Typing - if you want to create a typed note.
4. Set the other options according to your preference.
5. Tap when nished.
To write a note:
1. Tap Start > Programs > Notes.
2. From the Notes list, tap New.
If you set the Default mode to Typing, a blank page appears for typed text.
If you set the Default mode to Writing, a page with horizontal lines appears for
handwritten text.
You can also tap Menu and then select/deselect Draw option to switch between typing
and writing mode.
3. Write/Draw on the screen.
4. When nished, tap to save the note and return to the Notes list.
36
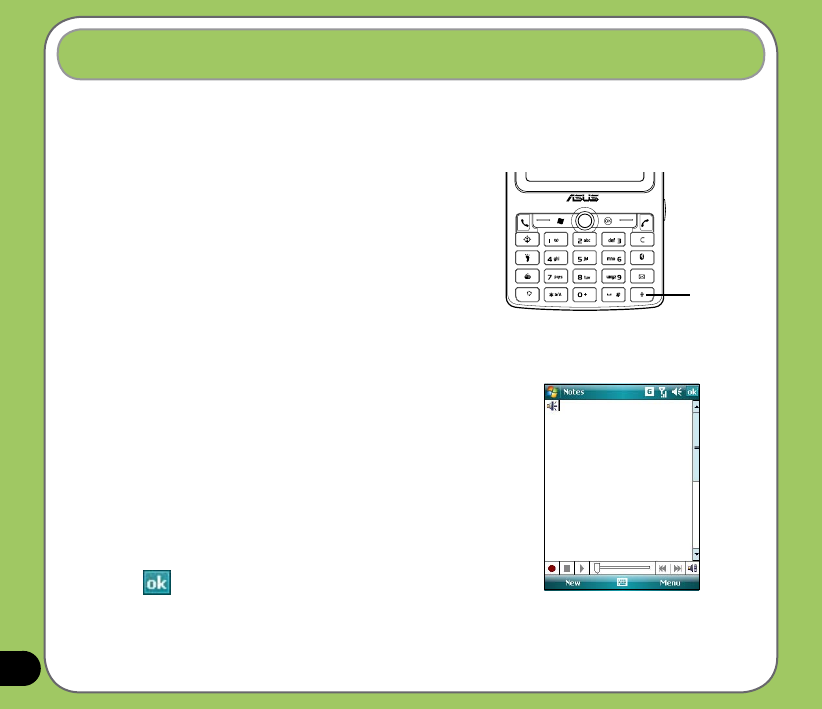
Recording voice
At any time, whether your phone is on stand-by or active mode, you can record sound, voice,
or add a recording to a note while using your device.
To create a voice recording:
Press and hold the Voice Commander button to begin
recording.
Or, you can follow the given steps:
1. Tap Start > Programs > Notes.
2. From the Notes list, tap New.
3. If you do not see the recording toolbar, tap Menu >
View Recording Toolbar.
4. Tap the record icon to begin recording.
5. Place the receiver near your mouth or source of sound.
6. Tap the stop icon when nished recording. A recording
icon appears on the note.
7. Tap .
Press and
hold to launch
voice recorder

37
To add a recording to a saved note:
1. Tap Start > Programs > Notes.
2. From the Notes list, tap to open a saved note.
3. If you do not see the recording toolbar, tap Menu > View Recording Toolbar.
4. Tap the record icon to begin recording.
5. Place the receiver near your mouth or source of sound.
6. Tap the stop icon when nished recording. A recording icon appears on the note.
7. Tap .

38
Using ActiveSync™
ActiveSync™ allows you to synchronize data in your device with data in your computer.
ActiveSync can also synchronize over a wireless or cellular network with Microsoft Exchange
Server, provided that your cellular phone service or company is running Microsoft Exchange
Server with Exchange ActiveSync. When synchronized directly with Exchange Server, you can
stay up to date even when your PC is turned off.
During synchronization, ActiveSync compares the data in your device with the data in your
computer or Exchange Server, and updates all data with recent changes.
You can select and synchronize data in the following locations using ActiveSync:
• Contacts
• Calendar
• Email
• Tasks
• Notes
• Favorites
• Files
• Media
You can also exchange data between your computer and device without synchronizing.
ActiveSync is already installed in your device, but before you can synchronize data with
your computer, you must rst install ActiveSync in your computer. Install ActiveSync from the
Microsoft Getting Started CD that came with your device package.
After you have installed ActiveSync, set up a sync relationship between your device and your
computer. ActiveSync recognizes your device and automatically transfers the synchronization
settings you have in your device.

39
If you wish to synchronize your device with Exchange Server through your company or service
provider, obtain the name of the Exchange Server, user name, password, and domain name
from your network administrator before starting the Sync Setup Wizard.
To install and congure ActiveSync in your computer:
1. Insert the Microsoft Getting Started CD that came with your device package.
2. Follow succeeding screen instructions.
3. After the setup is complete, the Sync Setup Wizard automatically starts when you connect
your device to your computer. Follow screen instructions to complete the wizard.
4. From the Sync Setup Wizard, you can:
• Congure an Exchange Server connection to synchronize directly with an Exchange
Server. Acquire from your network administrator the required parameters for input.
• Create a synchronization relationship between your computer and your device.
5. Select the information type that you want to synchronize.
6. After you nish the wizard, ActiveSync automatically synchronizes your device. You can
disconnect the device after the synchronization is complete.
NOTE:
• When connected, your device is automatically synchronized with your computer. ActiveSync synchronizes everytime
you make a change on either the device or computer.
• You cannot use WLAN to synchronize database.
• Refer to your Windows® Mobile Help, for more information about ActiveSync synchronization.
40
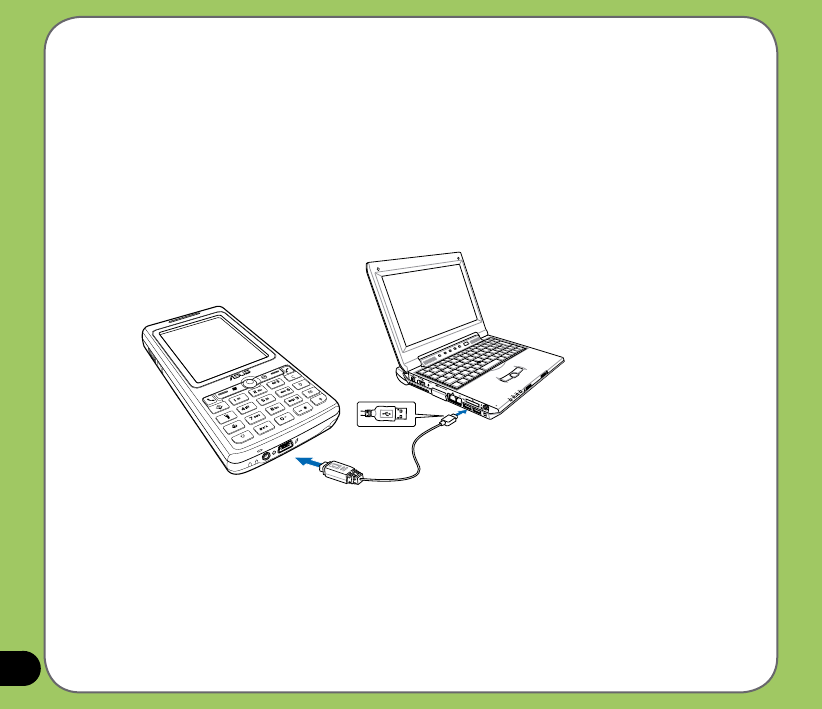
Synchronizing via mini-USB
You can connect to your device using the bundled mini-USB cable to synchronize to your
computer.
To synchronize your device via mini-USB:
1. After installing ActiveSync to your computer, connect the mini-USB plug to the mini-USB
connector at the bottom of the device.
2. Connect the other end of the USB cable to your computer. Upon connection, ActiveSync
automatically synchronizes your device.
41
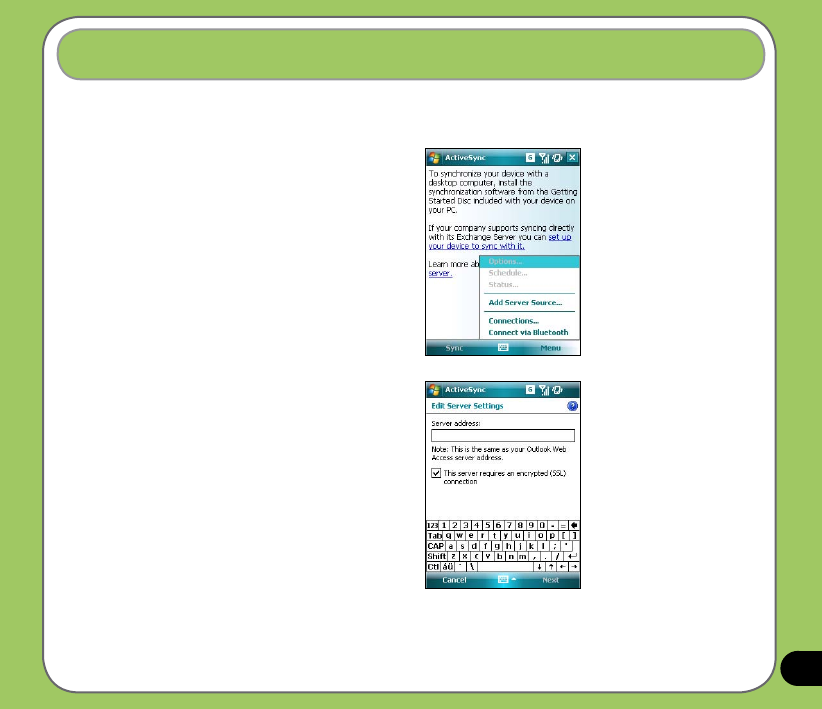
To synchronize your device with Exchange Server:
Synchronizing with Exchange Server
1. From the ActiveSync menu,
tap Menu > Add Server Source.
2. In the Server Address eld, input the
name of the server running Exchange
Server then tap Next.
If necessary, tap the check box
This server requires an encrypted
(SSL) connection.
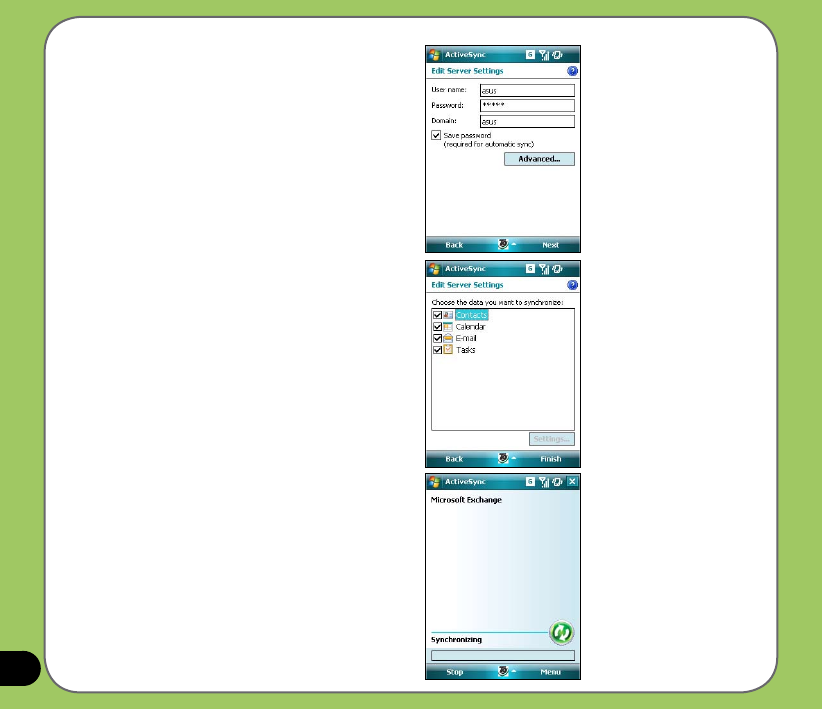
42
4. Tap the check boxes to select the data
items that you want to synchronize
with Exchange Server. To change the
available synchronization settings,
select a data item then tap Settings.
Tap Finish when done.
3. Input your name, password, and
domain then tap Next.
5. Start the sync process.
43
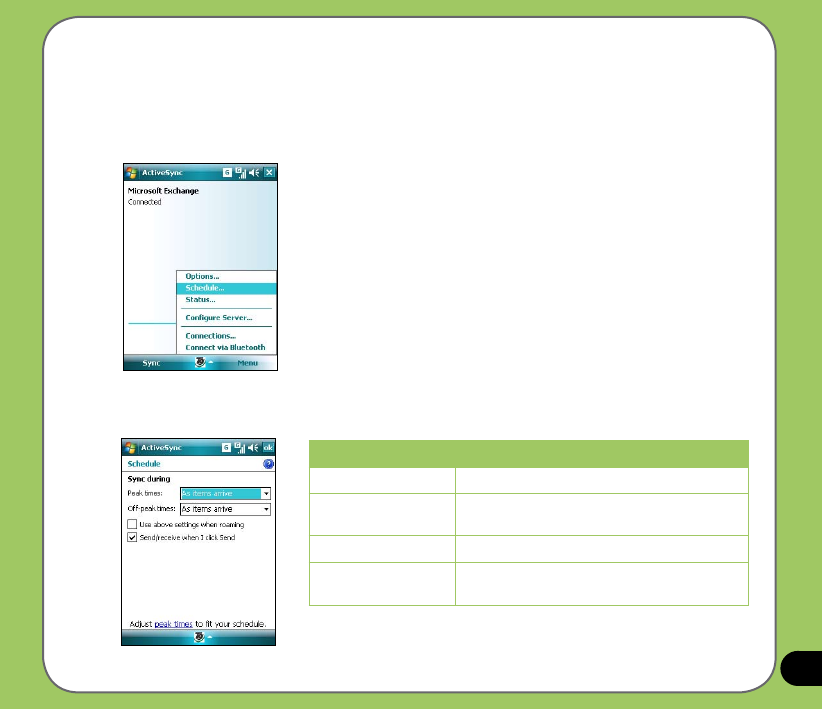
Setting the synchronization schedule
To set the synchronization with Exchange Server:
1. From the ActiveSync screen,
tap Menu > Schedule.
2. Refer to the table for input details.
Volume Recommended setup
High Select a shorter interval in the Peak times list.
Low Select As items arrive option or a longer interval
in the Off-peak times list.
While roaming Check Use above settings while roaming.
Sending messages Check Send/Receive when I click Send.
44
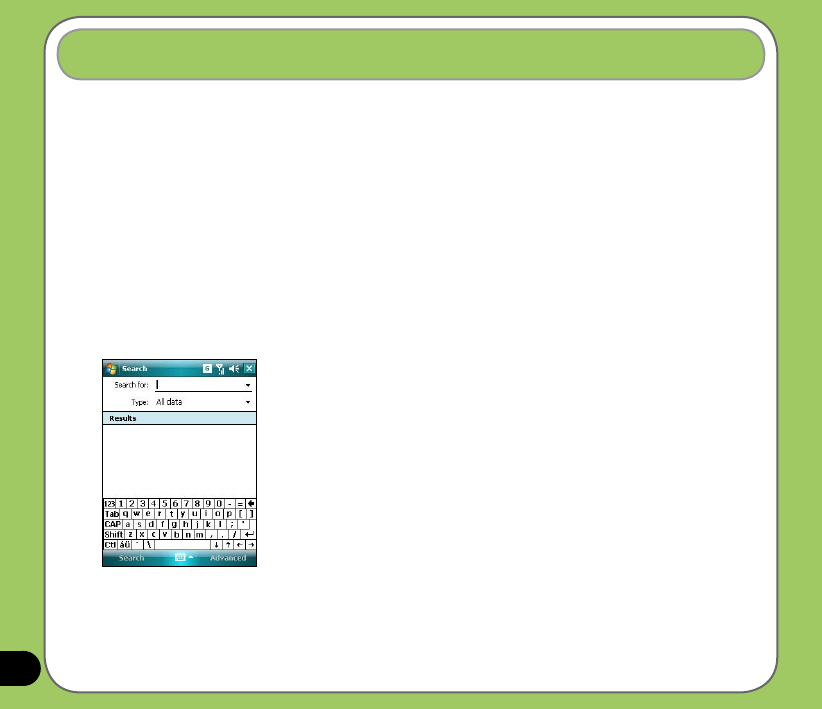
Searching information
Using the search tool, you can search for les and other items stored in your device or the
external MicroSD card. You can search by le name or by words located in various applications
including the Calendar, Contacts, Excel Mobile, Word Mobile, Outlook Mobile, Help,
Messaging, Notes, all data and Tasks. You can also lter your search to les larger than 64 KB.
To search for a le or an item:
1. Tap Start > Programs > Search.
2. In Search for eld, input the le name, word, or other information you want to search.
3. In Type eld, select the data type to help you lter your search.
4. Tap Search. Found items are listed in Results.
5. In the Results list, tap the item with the information you need.
45
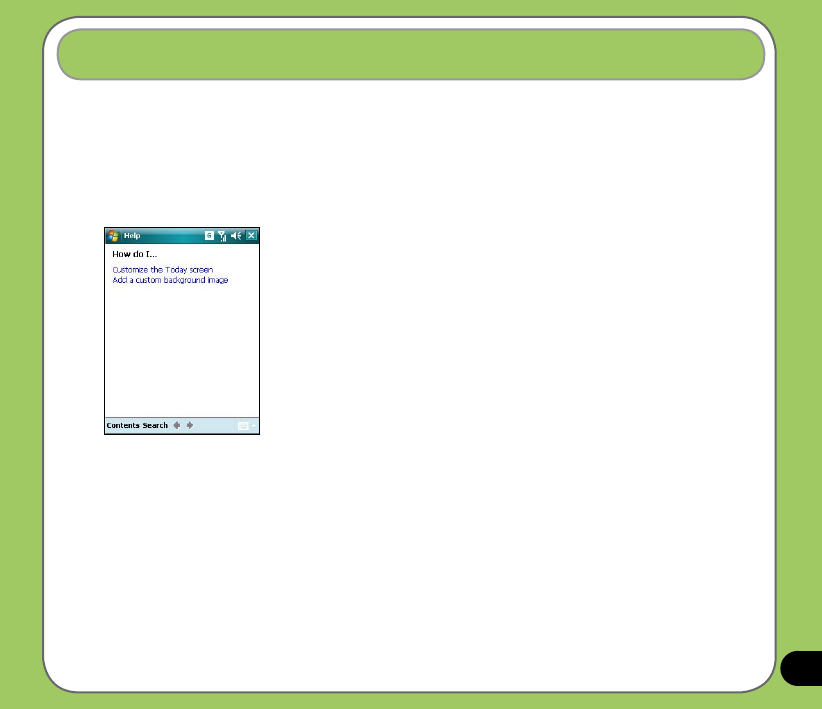
Getting Help
You can easily nd Help for using any program on the device.
To get help for a program:
• From the Today screen or program, tap Start > Help.
A page will open with links to topics that explain how to use the program.

46

47
Phone features
Chapter
• Using the phone
• Making a call
• Receiving a call
• ASUS CallFilter
3
48
Using phone
Like a standard cellular phone, you can use your P527 to make and receive calls. You can also
keep a history of calls made and received, send SMS or MMS messages, take notes while
talking, call from Contacts, and copy data from installed SIM card to your device.
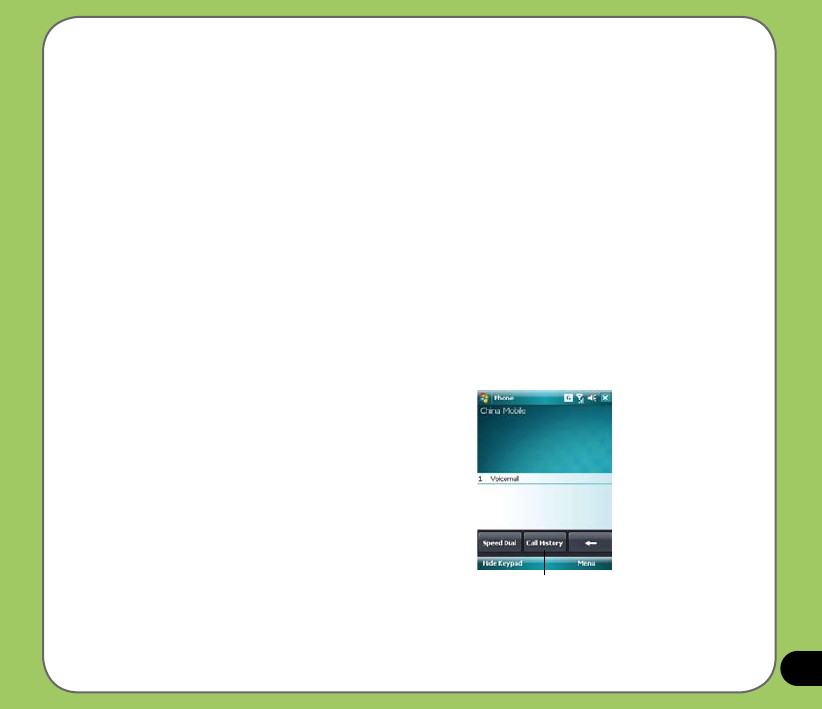
Phone pad
The phone pad allows you to easily dial and access the Contacts, Call History, Speed Dial, and
Phone settings. To launch the Phone pad, do any of the following:
• Tap Start > Phone.
• Press .
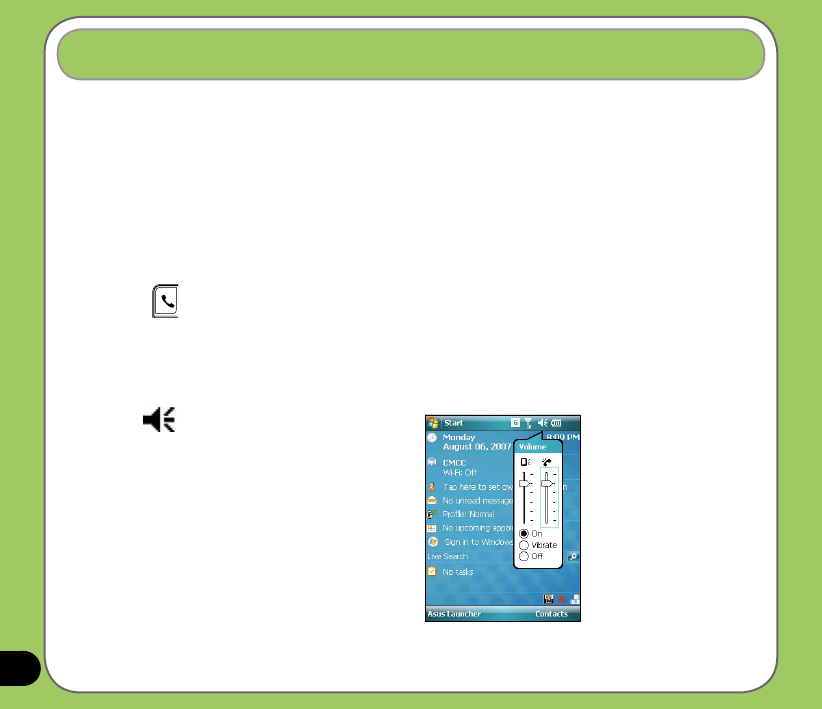
Adjusting the volume
To adjust the phone or device volume:
1. Tap from the status bar.
2. From the volume menu, you can:
• Move the slider to adjust device or
phone volume.
• Tap On, Vibrate, or Off to change the
system and ringer volume settings.
• Use the jog dial to adjust volume or set
mode.
49
You can make a phone call using the phone pad. You can also make calls directly from the
Contacts, Call History, Speed Dial, or Voice Commander.
Using the alphanumeric keypad
To make a call using the alphanumeric keypad:
1. Ensure the device is not on hold.
2. Input the number of the party you want to
call then press Call key.
If you pressed the wrong number, press Clear
key to erase number to the left.
3. Talk to the called party when connected.
4. When nished, press End key to end the call.
Making a call
Press to
end call
Press to call
dialled number Press to
clear input to
the left
Alphanumeric
keypad

50
Phone pad features
Press to hold /unhold call
Press to end call
Press to launch menu
Displays the current call status
Press to mute/unmute
Press to launch Contacts list
Press to launch keypad
Press to turn speaker ON/OFF
Press to take notes
Using Smart dialer
Smart Dialer utilizes the predened alphabets
or letters assigned to keys 2, 3, 4, 5, 6, 7, 8,
and 9. Example: has letters a, b, and
c. has d, e, f; and so on. Following
the sequence of keys pressed, Smart Dialer
displays items from your Contacts or previous
calls containing the alphabets of the pressed
key.
As shown in the example, keys 3, 4, and 2
were pressed, so all items beginning with the
letter d, e, or f; items whose second letter is g,
h, or i; and items whose third letter is a, b, or c
are displayed.
51
Making calls from Contacts
To make a call directly from Contacts:
1. Press the Right Soft key or from the Today screen, tap Contacts.
2. You can do any of the following to make a call:
• Tap name of contact, then from the Contacts screen, tap Call.
• Tap name of contact, then press the Call key.
• You can also tap and hold the contact, and from the shortcut menu tap Call Work,
Call Home, or Call Mobile.
• Tap Enter a name... then enter the name or number you want to call from
Contacts. Press the Call key to dial the highlighted item.
Making calls from Call History
To make a call from the call history:
1. Tap Start > Phone.
2. On the Phone pad, tap the Call History button.
3. Scroll to the desired contact or phone number,
then tap Call.
To look for more numbers in other categories,
tap Menu > Filter and tap a category.
Call History
button

52
Using the Speed Dial
With Speed Dial you can call frequently dialled numbers in a single press. For example, if
you assign a contact to the number 2 button in Speed Dial, press and hold to dial the
contact’s number.
To create a Speed Dial entry:
1. Make sure that the entry you want to create is already in the Contacts list.
2. Tap Start > Phone.
3. Tap the Speed Dial button on the Phone pad.
4. Tap Menu > New.
5. Tap a contact from the list then tap Select.
6. In the Location box, select an available key then tap OK.
To delete a Speed Dial entry:
• In the Speed Dial list, tap and hold an entry then tap Delete.
53
Using Voice Commander
To make a phone call using voice commander:
1. Press the Voice Commander button.
2. From the following screen, your device
asks you to “Say command.”
3. Audibly say “Call” then the name to call
from your Contact list.
4. Say “Yes” or “No” after the conrmation
question.
If you said “Yes”, the application
proceeds and dials the number;
otherwise, it returns to the Voice
Commander menu.
5. Say “Goodbye” or tap to exit Voice
Commander.
NOTES:
To use Voice Commander while using a headset, press the answer button* on the headset then follow given
instructions. (* Answer button may not be available in some headset models.)
Press to
launch Voice
Commander
54
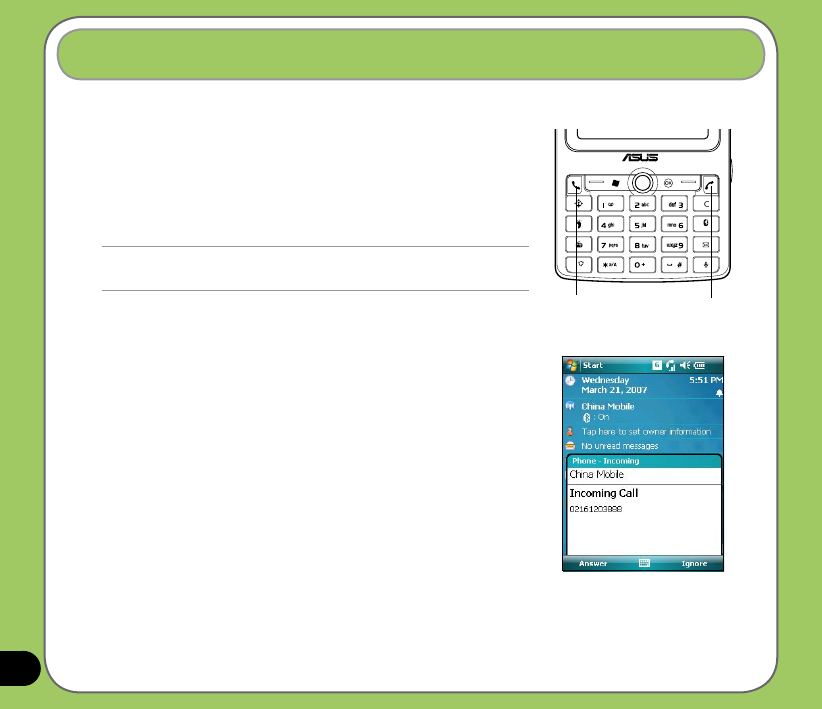
When you receive a call, a message prompts and allows you to
answer or reject the incoming call.
To answer or reject an incoming call:
• To answer a call tap Answer, or press Call key.
• To reject an incoming call, tap Ignore, or press End key.
TIP:
Press and hold Call key to switch receiver to speakerphone mode.
Receiving a call
To terminate a call:
• Tap End or press End key to terminate an incoming or
outgoing call.
The following pop-up screen appears during an incoming call:
• Tap Answer to receive call or
• Tap Ignore to dismiss call.
Call key End key
55
ASUS CallFilter
The ASUS CallFilter is a simple yet efcient utility that allows you to control all your incoming
calls. Using this utility, you can manage a list of telephone numbers from your Contacts list, Call
logs, Message number, or any unlisted telephone number that you want to accept or reject.
Launching ASUS CallFilter
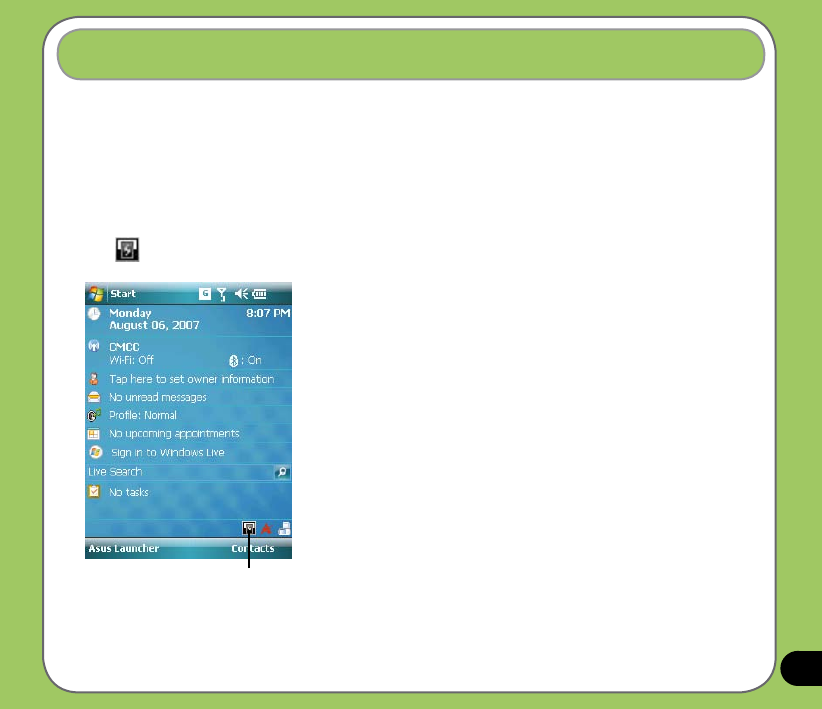
Tap from the Today screen to launch the ASUS CallFilter.
Tap to launch CallFilter
56
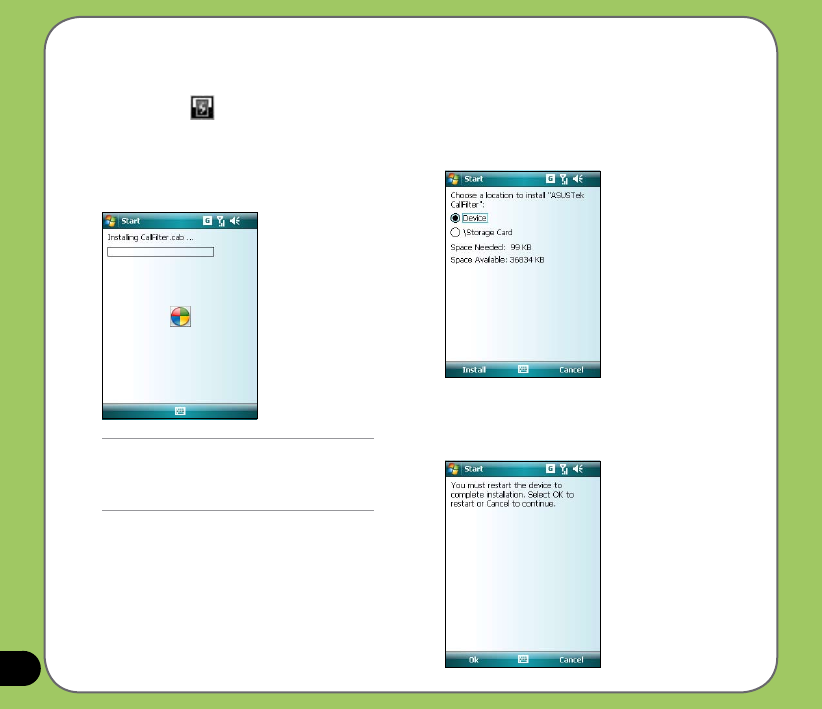
The rst time you launch ASUS CallFilter, you need to install and select the storage location for
ASUS CallFilter. The following describes the steps when running ASUS CallFilter the rst time.
1. After tapping , from the Today
screen, the utility installs the necessary
cabinet (.cab) les to your device.
Follow succeeding screen intructions to
complete the process.
2. When prompted, select storage location
then tap Install.
3. When nished, tap Ok to restart your
device.
IMPORTANT:
The installation may take a few seconds to
complete. DO NOT turn off your device during
the installation process.
57
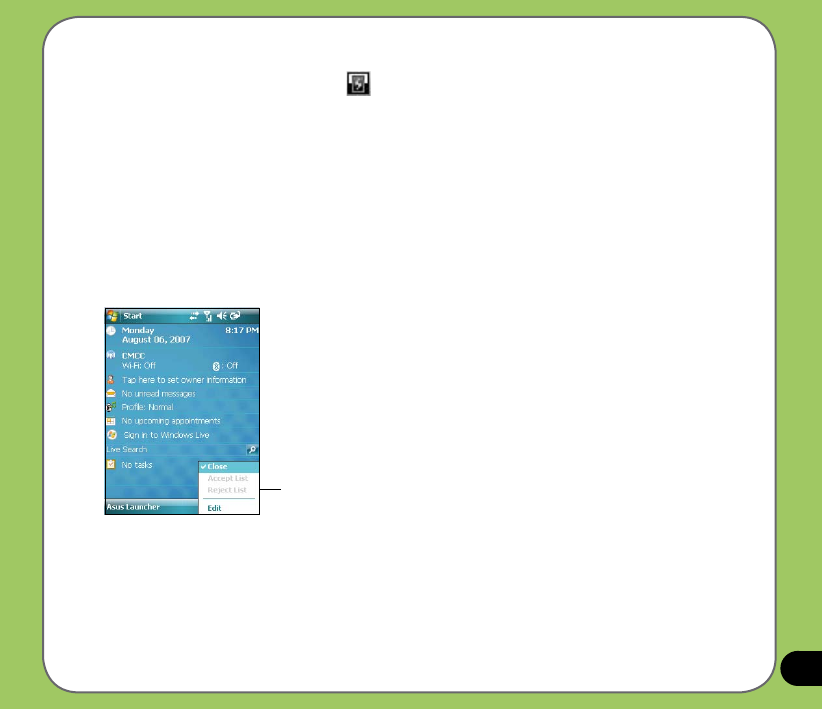
Using ASUS CallFilter
After installing the necessary les, tap to launch the ASUS CallFilter shortcut menu. The
shortcut menu allows you to conveniently activate either the Accept or Reject list.
From the shortcut menu, do any of the following:
CallFilter shortcut menu
• Tap Accept List to activate Accept list and receive only incoming calls whose numbers
are in the Accept list.
• Tap Reject List to activate Reject list and reject all incoming calls whose numbers are
in the Reject list.
• Tap Edit to open the CallFilter utility screen.
• Tap Close to deactivate CallFilter.
58
Managing the Accept list
The Accept list allows you to select telephone numbers you only want to accept. Incoming calls
that are not in the Accept list will automatically be rejected.
To add items in the Accept list:
1. From the ASUS CallFilter shortcut
menu, select Edit.
2. Select Accept List from Edit List box.
3. Select source of data. You can get
data from your Contacts, Call logs,
Message number, and you can select
any anonymous or key in a new
number.
4. From the list (e.g. Contacts), select an
item then tap Add.
You can also tap to add a new
Accept list item.
5. Click to exit.
To remove items from the Accept list, select a
contact from the Accept list then tap Remove
or .
2
3
4
59
Managing the Reject list
The Reject list allows you to select telephone numbers you want to reject. Incoming calls that are
in the Reject list will be rejected.
To add items in the Reject list:
1. From the ASUS CallFilter shortcut
menu, select Edit.
2. Select Reject List from Edit List box.
3. Select source of data. You can get
data from your Contacts, Call logs,
Message number, and you can select
any anonymous or key in a new
number.
4. From the list (e.g. Contacts), select an
item then tap Add.
You can also tap to add a new
Reject list item.
5. Click to exit.
To remove items from the Reject list, select a
contact from the Reject list then tap Remove
or .
3
4
2

60

61
Wireless features
Chapter
• Using the Wireless Manager
• Using Bluetooth®
• Using Wi-Fi
• Setting a GPRS connection
4
62
Using the Wireless Manager
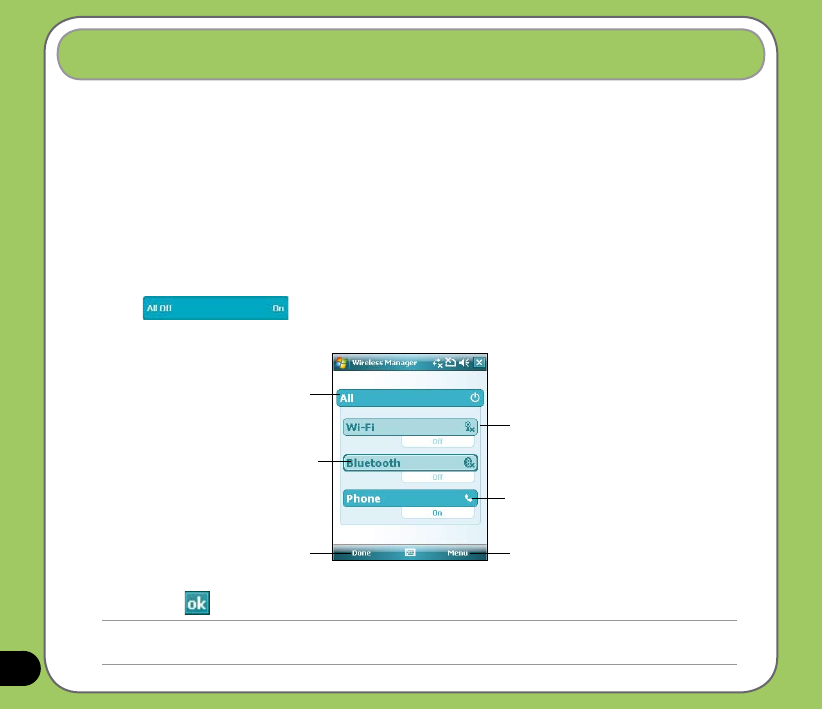
The Wireless Manager allows you to enable or disable your wireless connections in a single
location. This is a quick way to preserve battery power or to prepare your device for an
airplane ight.
To use the Wireless Manager:
1. Tap Start > Settings > Connections tab.
2. Tap Wireless Manager.
3. From the Wireless Manager screen, do any of the following:
• Tap the button for a desired wireless connection type to turn it on or off.
• Tap to turn off all wireless connections.
• Tap Menu to change settings for one of the displayed wireless connection types.
Tap to turn Wi-Fi connection on or off
Tap to turn
Phone
connection on or off
Tap to turn Bluetooth®
connection on or off
Tap to exit Wireless Manager Tap to disconnect cellular data or change
settings
4. Tap Exit or to exit Wireless Manager.
Tap to turn off all wireless
connections
.
63
Overview
Bluetooth® is a short-range wireless communications technology that allows devices with
Bluetooth capabilities to exchange data within a radius of about 10 meters (30 feet) without
requring a physical connection. With Bluetooth enabled in your device, you can:
• Connect and communicate (i.e. beam les, tasks, contacts) with other devices with
Bluetooth features.
• Use Bluetooth service. After you connect to another device or computer using
Bluetooth, you can use the services available on that device.
Activating Bluetooth in your device
Use the Wireless Manager to enable or disable Bluetooth in your device. You can access the
Wireless Manager by performing any of the following:
1. Launch the Wireless Manager. To do this, you can either:
• Tap Start > Settings > Connections tab > Wireless Manager.
• Tap the Wireless Manager icon from the Today screen.
2. From the Wireless Manager screen, tap Bluetooth.
Using Bluetooth®
NOTES:
When not in use, deactivate Bluetooth in your device to
conserve battery power.
Tap to launch
Wireless Manager
64
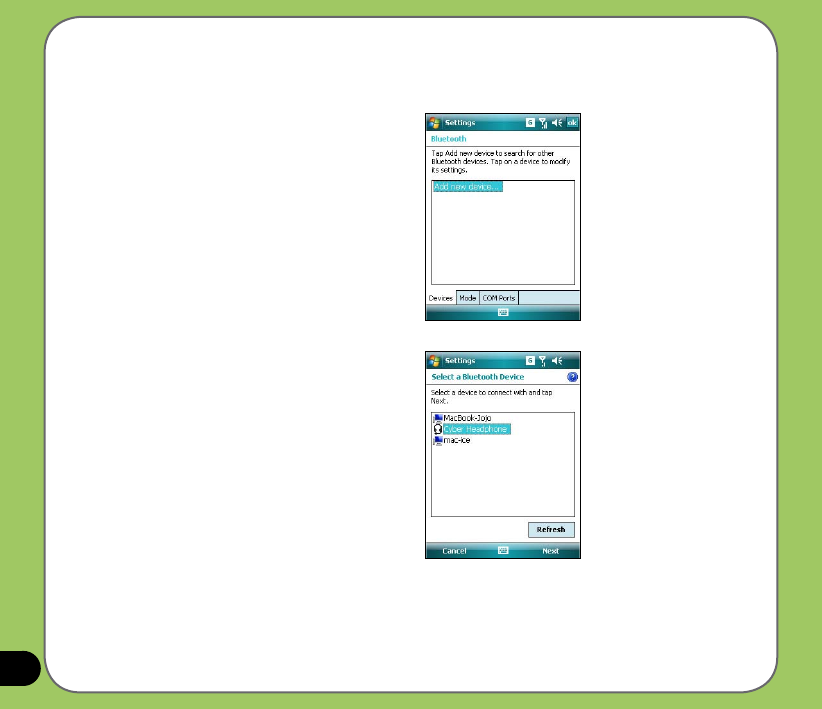
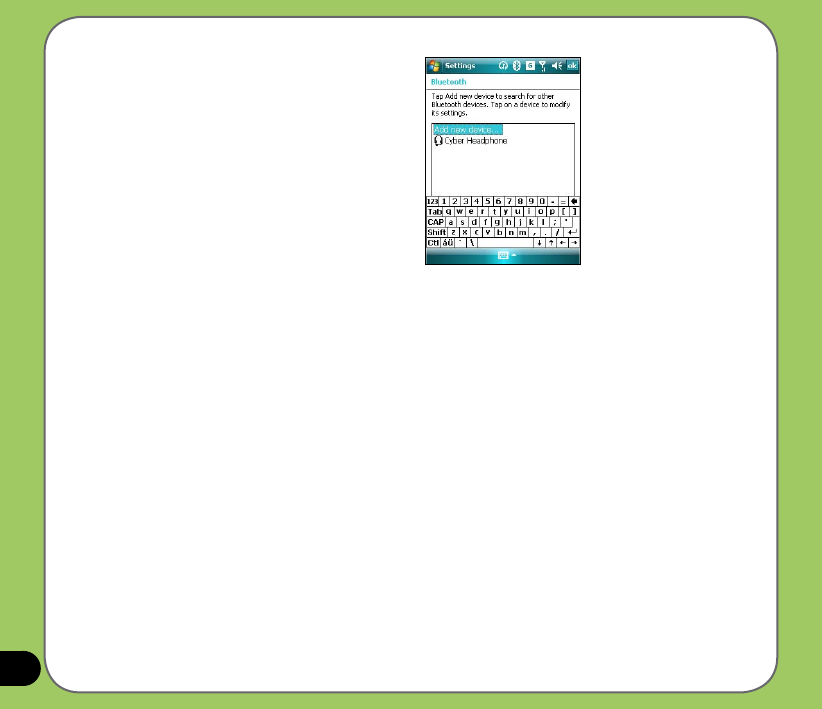
Adding Bluetooth devices
1. Ensure that Bluetooth is enabled on
the device you want to add and the
device is set as Discoverable.
2. Tap Start > Settings > Connections
then tap Bluetooth icon.
3. Tap Add new device... to search
for available Bluetooth devices. The
search may take a while.
4. Select the device you want to connect
with then tap Next or press the Right
Soft key.
65
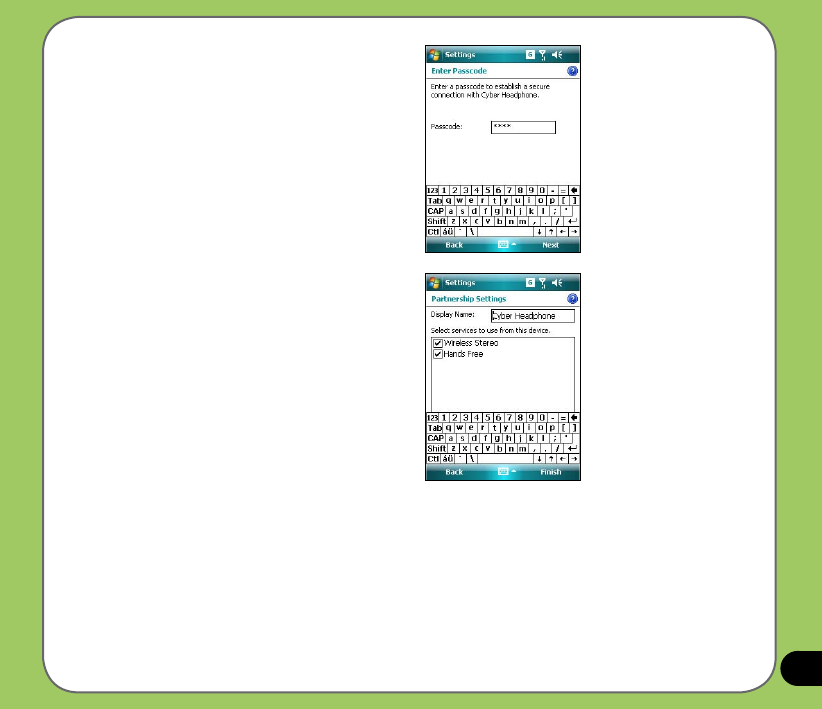
6. Enter the display name for this
connection.
5. Enter the alphanumeric passcode of
the device you want to connect then
tap Next or press the Right Soft key.
You can nd the passcode in the
documentation that came with the
other device.
66
7. Repeat steps 3 - 6 to connect more
devices.
67
Using Wi-Fi®
The Wi-Fi icon on the Today screen gives you easy
access to the Wi-Fi feature on your device. Tapping
the icon displays a menu that allows you to:
• Turn Wi-Fi on or off
• Open Wi-Fi Manager
NOTE:
You can use the Bluetooth® and Wi-Fi features
simultaneously.
Turning on Wi-Fi
To turn on Wi-Fi:
1. From the Today screen, tap > Turn on
Wi-Fi.
The Device then automatically scans for all
available wireless networks within the Wi-Fi
range.
2. From the list of detected wireless networks,
select a wireless network that you want to
connect the device to.
3. Select whether the wireless network connects
to The Internet or Work network.
4. Tap Connect. The device then connects to
the selected network.
68
To congure a wireless network:
1. To launch the Wi-Fi settings page, you
can either:
•
Tap Settings after selecting a
wireless network to connect your
device to.
•
Tap Start > Settings > Connections
tab > Wi-Fi.
2. On the Congure Wireless Networks
screen, tap an available wireless
network, then make the necessary
changes.
If the wireless network you want
to connect to is not on the list, tap
Add New.... Refer to the succeeding
sections for details on how to add new
wireless networks.
Tap the Network Adapters tab and
select an adapter. Tap an adapter to
set it if necessary.
4. Tap when done.
Conguring wireless networks
69
Adding a wireless network
If the device fails to automatically detect the wireless network you want to connect to, you can
add the network. Ask for the wireless network settings from your network administrator.
To add a wireless network:
1. To launch the Wi-Fi settings page, you
can either:
•
Tap Settings after selecting a
wireless network to connect your
device to.
•
Tap Start > Settings > Connections
tab > Wi-Fi.
Then tap Wireless > Add New....
2. Enter a name for the network and
select an item from the Connects to:
drop-down menu. Then tap Next.
3. Set authentication, data encryption,
and network key. Ask your network
administrator for these information.
Then tap Next.
4. If you need to change the EAP type,
check the adapter box and then
change the EAP type.
5. Tap Finish when done.
70
Using Wi-Fi Manager
The Wi-Fi Manager shows connection status and information on a wireless network, and
allows you to manually scan your area for available wireless networks.
To open the Wi-Fi Manager, you can either of the following:
• Tap > Wi-Fi Manager.
• Tap Start > Settings > Connections tab > Wi-Fi Manager.
There are four tabs in the Wi-Fi Manager:
Wi-Fi Status
This page shows the current
connection status and link
information.
Setting
This page allows you to dene
settings for establishing a device-to-
device wireless connection as well as
power saving settings.
NOTE:
We recommend to set the Power Save to Enable.
71
IP Info
This page shows the network information and
provides a way to get the new IP address from
the DHCP server.
The Renew button enables you to request
the DHCP server for a new IP address. This
function would take several seconds to get the
new IP address.
This Ping button serves as the network’s
diagnostic tool. It enables you to detect if your
device is connected to the network.
Site Survey
This page shows the nearest available
wireless network.
Each wireless network is preceded by an icon
for easy identication. The network channel,
ESSID, RSSI, and BSSID are also displayed
in columns.
72
Your P527 allows you to connect via General Packet Radio Service (GPRS). GPRS is a
wireless communication standard that runs at speeds of up to 115 kbps, compared to 9.6
kbps of the current Global System for Mobile Communications (GSM). It supports a wide
range of bandwidths that allows sending and receiving small bursts of data, such as email
and web browsing. To set a GPRS connection in your device:
Setting a GPRS connection
1. From the Today screen, tap on the
status bar.
2. Tap Settings on the message prompt.
3. From the Settings screen, select
the Connections tab then tap
Connections icon.
Pop-up callout

73
4. From the Connections screen, tap Add
a new modem connection.
5. Input a unique name for the connection
then select Cellular Line (GPRS) from
the modem list.
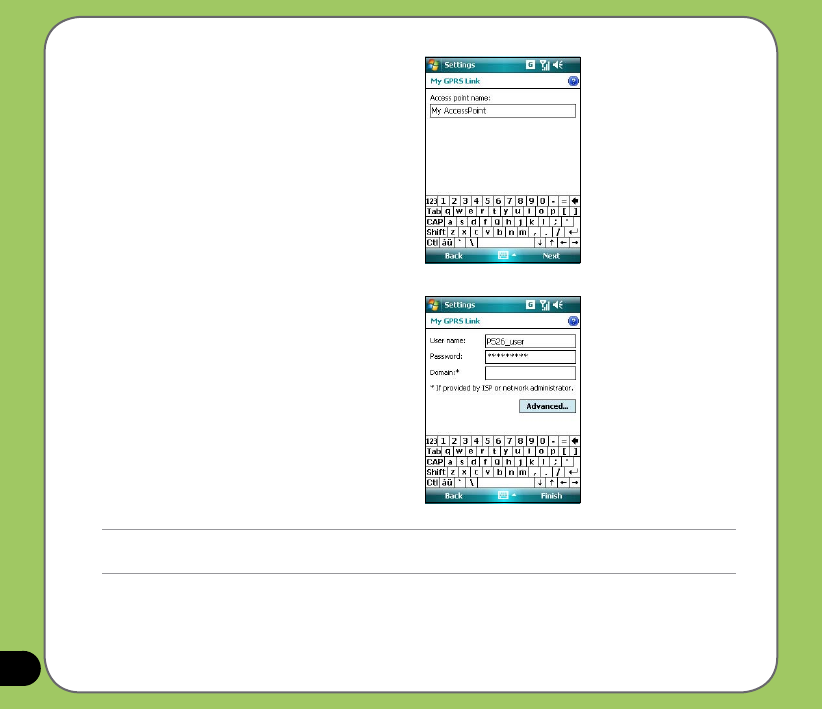
74
6. Input the Access point name.
7. Input your user name, password, and
domain then tap Finish. Contact your
network administrator for assistance.
NOTE:
The GPRS and USB connections can not be used at the same time.
75
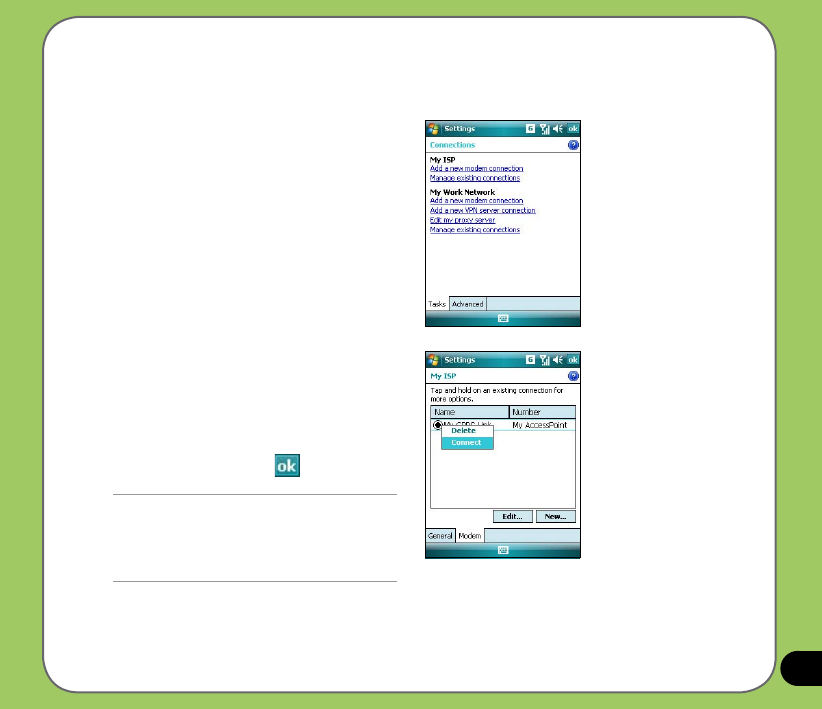
Connecting GPRS
To connect GPRS:
1. Tap Start > Settings > Connections
tab then tap Connections icon.
2. From the Connections screen, tap
Manage existing connections.
3. Tap and hold on an existing connection
then from the pop-up menu tap
Connect.
Tap Delete if you want to delete
selected connection setting.
4. When connected, tap to exit.
NOTE:
• When WLAN is used simultaneously with
the GPRS, the latter will get signal priority. We
recommend not to use WLAN and GPRS at the
same time.
76
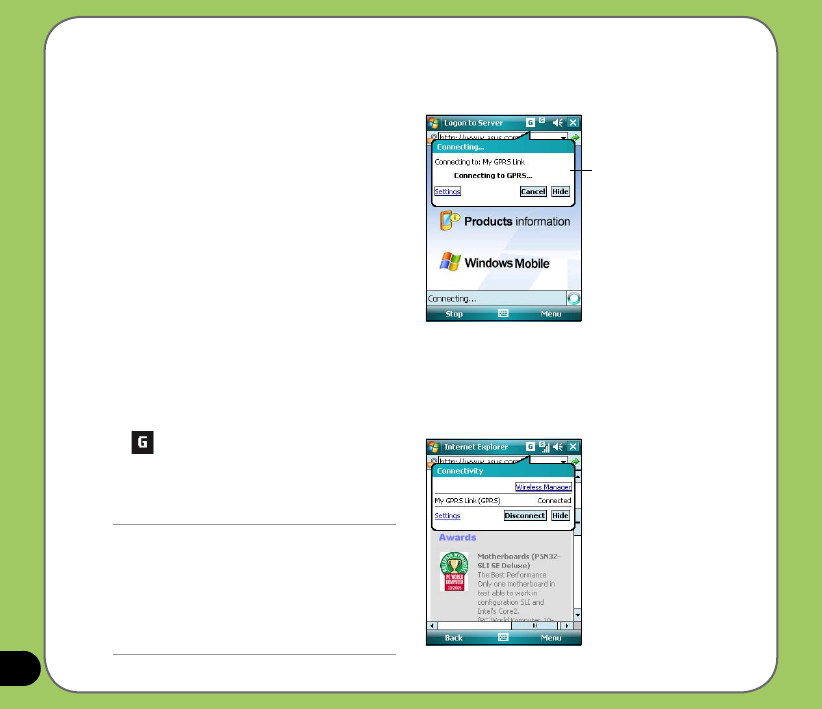
Disconnecting GPRS
To disconnect GPRS:
1. Tap from the status bar.
2. From the pop-up callout, tap
Disconnect.
If you have set a default GPRS connection, it automatically connects when you launch an
application that connects to the Internet.
1. Launch any application that connects to
the Internet (e.g. Internet Explorer).
The device will automatically connect
your default GPRS connection. A
pop-up callout appears to display the
connection status.
2. When connected, you can start
browsing the Internet. If you are using
Internet Explorer, the default site will
be displayed.
Pop-up callout
NOTE:
• If your ActiveSync is set to sync with Exchange
Server automatically, synchronization will occur
after you connect again.
• GPRS will automatically reconnect everytime
you launch an application that requires GPRS
connection (e.g., Internet Explorer or Pocket
MSN).
77
Using the GPRS Tool
The GPRS Tool allows you to conveniently select and connect to your GPRS service provider.
To connect via GPRS Tool:
1. Tap Start > Settings > Connections
tab then tap the Network Setting icon.
You can also tap on the status bar
then tap Settings from the pop-up
callout.
2. From the Network Setting screen,
select your GPRS provider from the
list.
NOTE:
• Operators vary in different regions.
• The GPRS and USB connections cannot be used
at the same time.

78
GPS features
Chapter
• GPS Catcher
• Travelog
• Location Courier
• External GPS
5
79
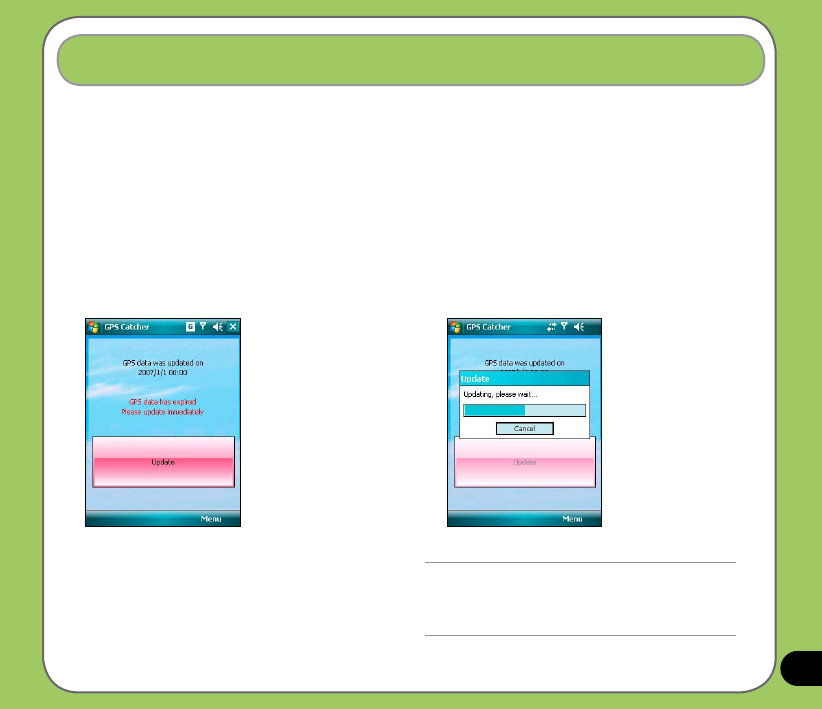
The GPS Catcher allows you to download the GPS data so that the GPS data in your device is
up-to-date. The GPS data contains important information about the status of satellite, current
date and time for determining the satellite position.
Updating GPS data
To update GPS data:
GPS Catcher
1. Tap Start > Programs > GPS Catcher. 2. Connect your device to PC with the USB
cable. Then tap Update. The update
process starts.
NOTE:
To make a successful update, make sure ActiveSync
4.5 is installed in your PC and your PC is connected to
the Internet.
80
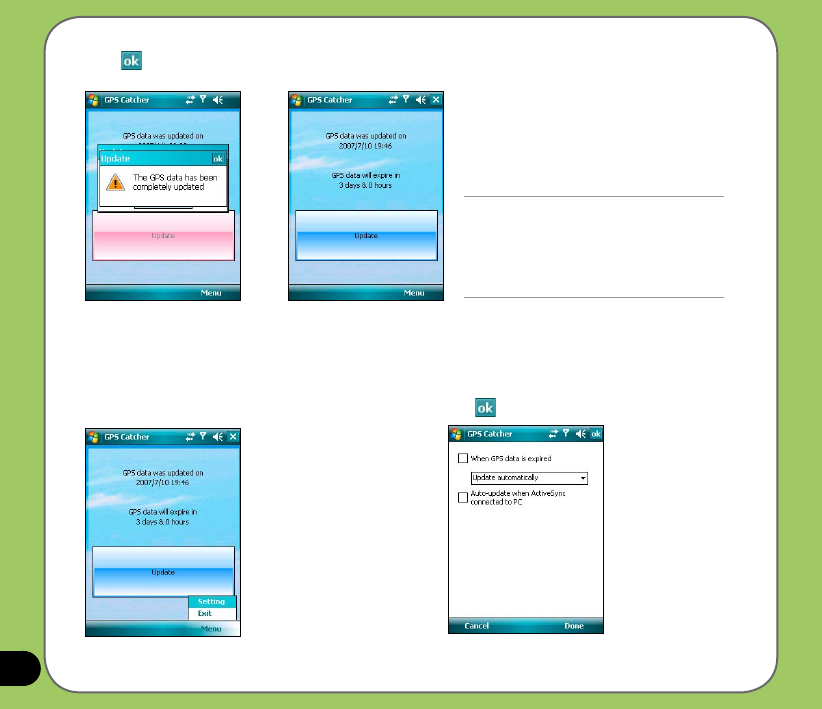
3. Tap when nished.
Setting GPS Catcher
To set GPS Catcher:
1. From the GPS Catcher screen,
tap Menu > Setting.
NOTE:
The expiration of GPS data is three days. You
need to update it when it is expired.
You can also set GPS Catcher to update
automatically, refer to the following section
Setting GPS Catcher.
2. Check the options at your preference.
Tap when nished.
81
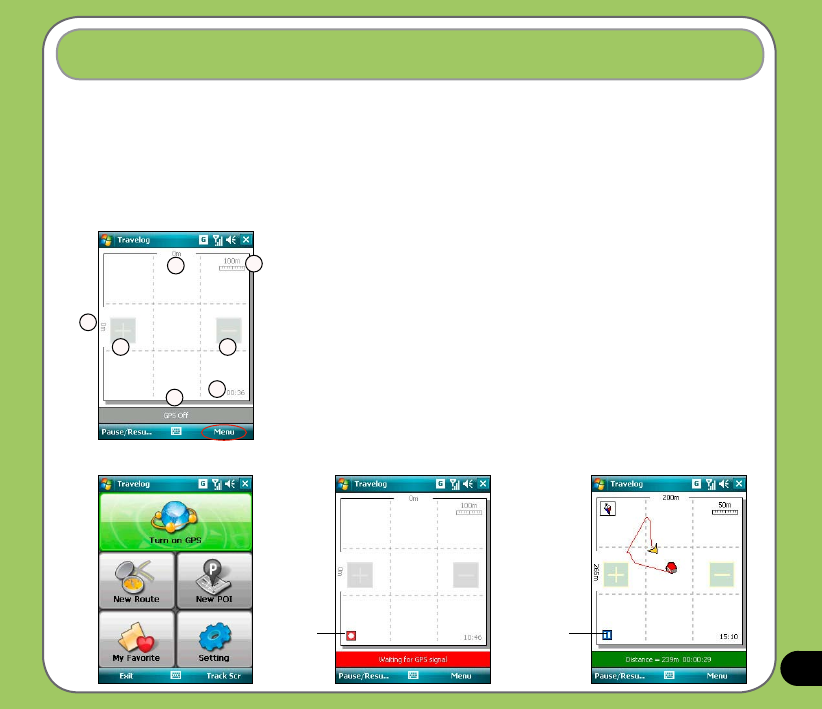
Travelog
Record
button
The Travelog allows you to record your travel track and export it to show on Google Earth.
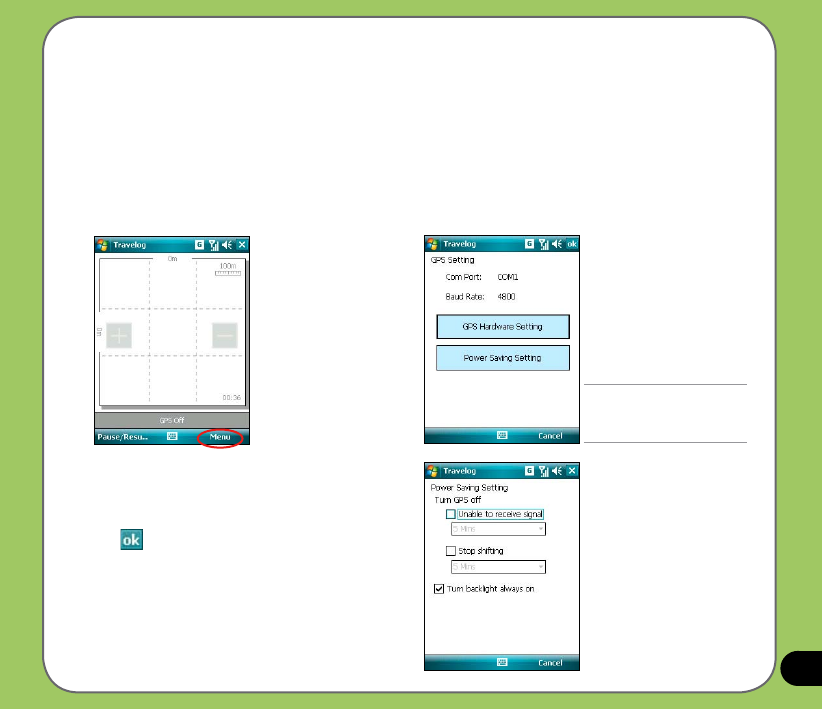
Turning on GPS
To turn on GPS:
1. Tap Start > Programs > Travelog > Menu.
1. Physical distance
2. Scale
3. Zoom in button
4. Zoom out button
5. Current time
6. Status bar
1
12
3 4
5
6
2. Tap Turn On GPS. Then the device starts searching for GPS signal.
Pause
button
82
Recording Travel Track
To record travel track:
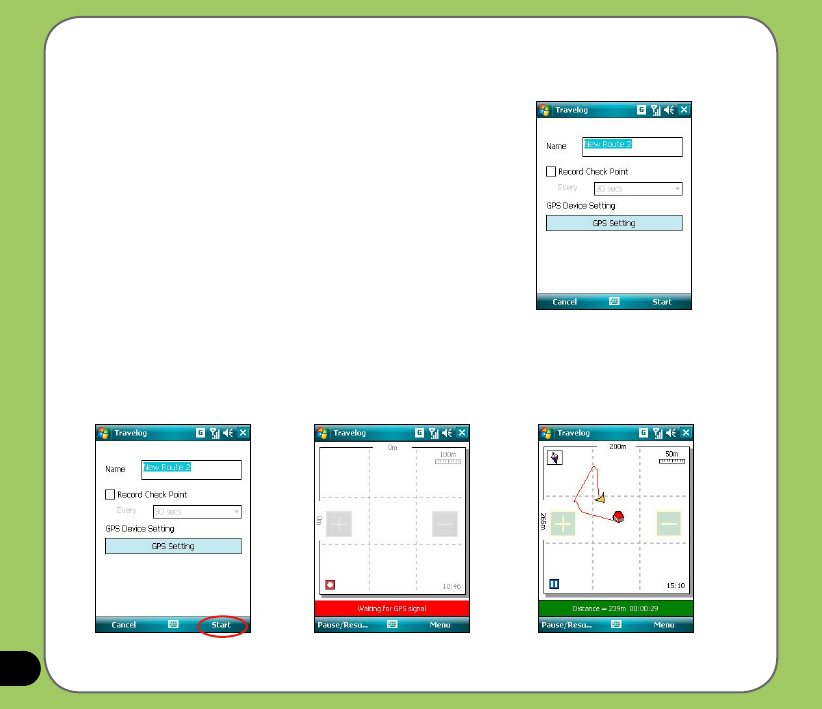
1. Tap Start > Programs > Travelog > Menu > New Route.
Enter a name for the route.
If you want to record the check point, check the Record
Check Point box and set an interval.
Refer to GPS setting in Setting Travelog section for
details about setting GPS and power saving.
2. Tap Start to begin recording your travel track.
Tap Pause/Resume to pause or resume recording.
Waiting for GPS signal Recording
83
While recording, you can view related status from the Status bar.
• When the Status bar shows current GPS position in Longitude/Latitude format, tap the
bar to display the GPS Status screen.
• When the Status bar shows trip distance and the time elapsed, tap the bar to display
the Speed screen.
• When the Status bar shows speed, elevation and direction, tap the bar to display
the Compass.
• When the Status bar shows the number of POI and check point, tap the bar to display
the GPS Status screen.
Tap to display Compass
Tap to Zoom in Tap to Zoom out
Tap to view status
Tap to pause or
resume recording
Tap to display the menu
84
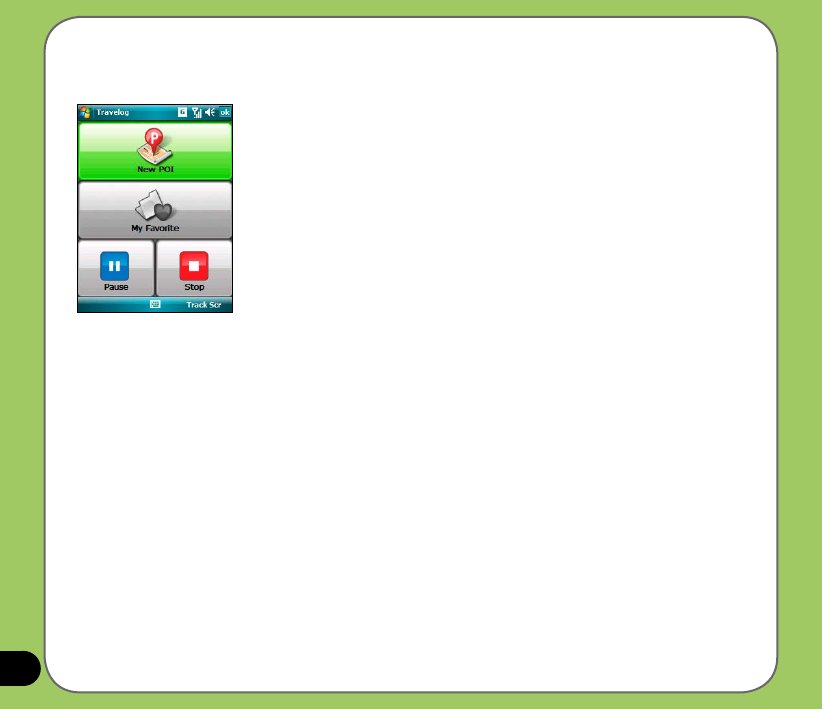
3. Tap Menu > Stop to stop recording. The
tracking records are saved in My Favorite.
• New POI: Tap to create a new POI. Refer to the following section Creating a New
POI for details.
• My Favorite: Managing all the trip or/and POI data. This function is disabled while
recording a trip.
• Pause: Tap to suspend recording a trip. GPS is still on in this mode.
• Stop: Tap to stop recording a trip and turn GPS off.
85
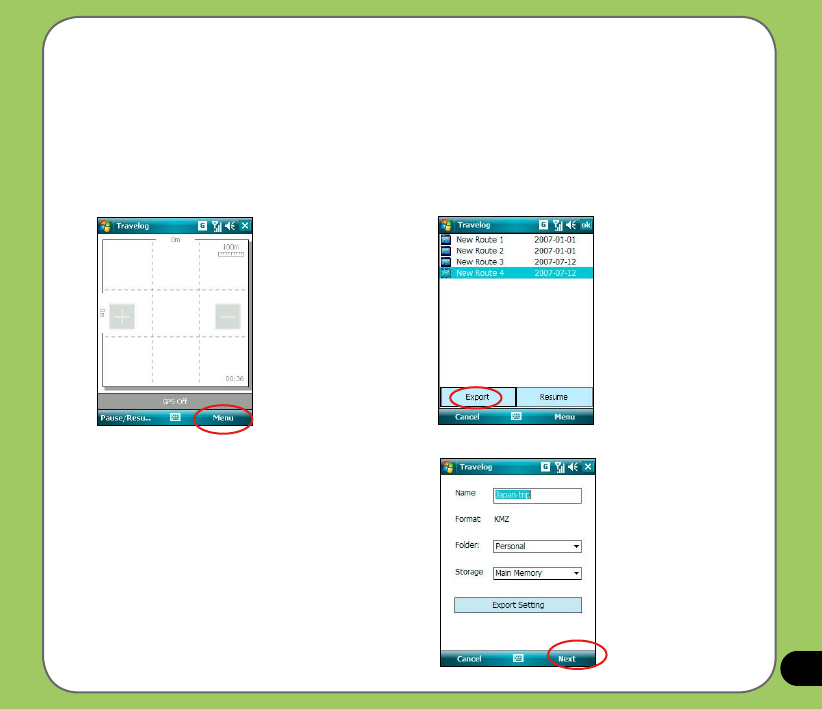
Exporting Route
You can export your trip route into KMZ le and load it on Google Earth.
To export a route:
1. From the Track screen,
tap Menu > My Favorite.
To export a route:
2. From the route list, select a route and tap
Export button.
3. Edit the route name and select the destination
folder and storage place. Then tap Next.
You can also set export settings. Refer to the
Export Setting item in the Travelog Setting
section for details.
86
4. When exporting, you can tap Cancel to
stop exporting.
5. When nished, tap on the pop-up
notication.
The display modes of routes on Google
Earth vary from the output mode and
enhanced presentation mode you set in
Export Setting. See the examples on the
next page.

87
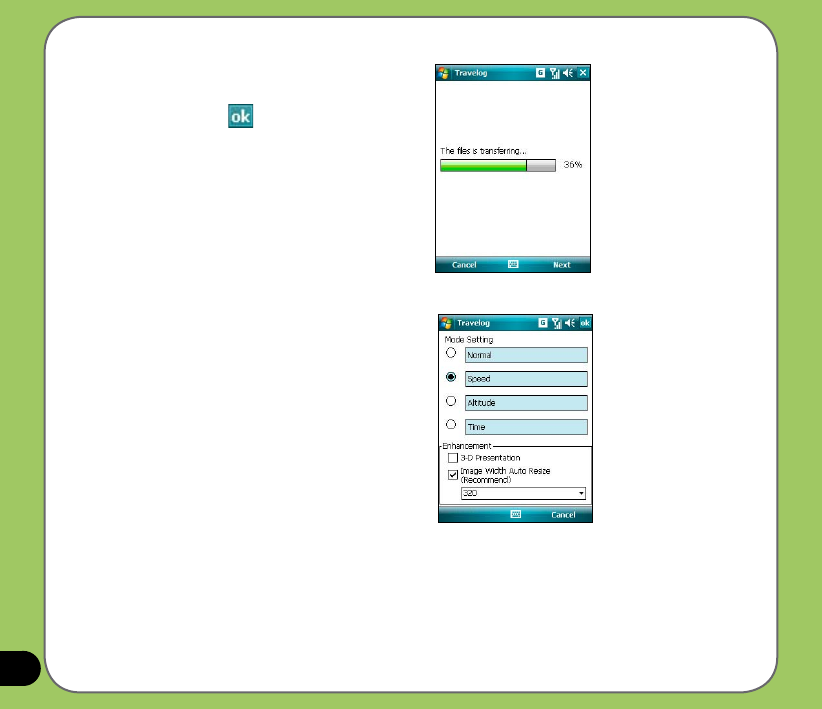
Normal Mode Speed Mode without 2-D Presentation
Speed Mode with 3-D Presentation
88
Creating a New POI
During recording travel track, you can create a new Point of Interest (POI) in current position.
To create a new POI:
1. From the Track screen, tap Menu >
New POI.
2. In the Info tab, you can edit the name of
the POI, change the icon, and add up to
three pictures for the POI.
3. In the Content tab, you can add description
to the POI. You can also change the text
font and color in the Advanced Edit.
4. Tap when nished.
NOTE:
The New POI function is disabled when GPS
is off.
89
NOTE:
Refer to the section
External GPS for details.
Travelog Setting
GPS Setting
GPS Setting allows you to set GPS mode and power saving mode while using GPS.
To set GPS and power saving:
2. Current GPS setting is showed. You can
tap GPS Hardware Setting to change the
settings.
3. Tap Power Saving Setting. Check the
options and set values at your preference.
4. Tap when nished.
1. From Track screen, tap Menu > Setting
> GPS Setting.
90
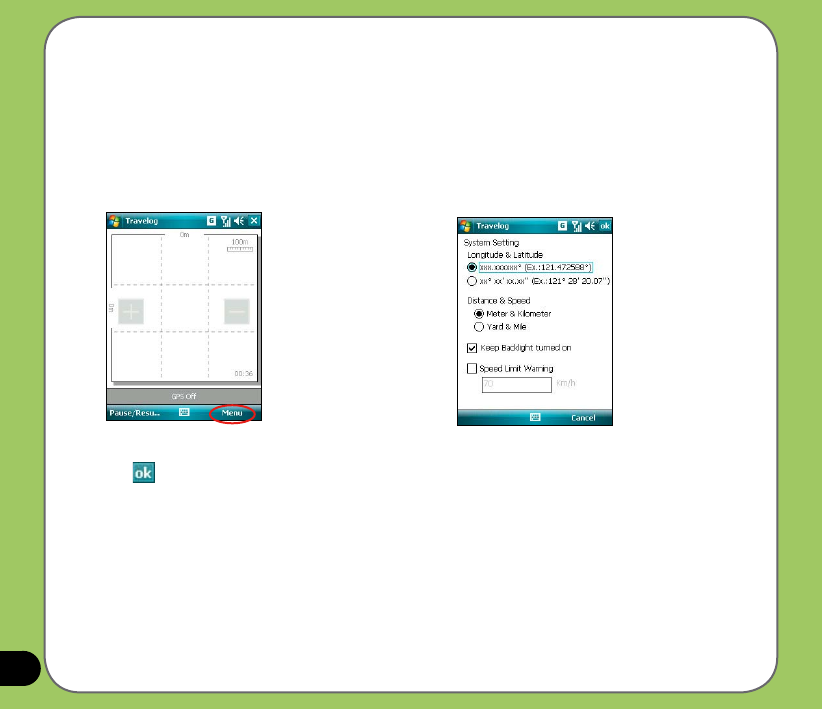
1. From Track screen, tap Menu > Setting >
System Setting.
2. Set the unit display style, backlight mode,
and speed limit.
System Setting
System Setting allows you to set the unit display style, backlight, and speed limit warning.
To set up the system setting:
3. Tap when nished.
91
1. From the Track screen, tap Menu >
Setting > Export Setting > Point Setting.
2. Tap the tabs of points at the bottom of the
screen to set each point.
Tap Change to change an icon.
Export Setting
Export Setting includes Point Setting and Mode Setting.
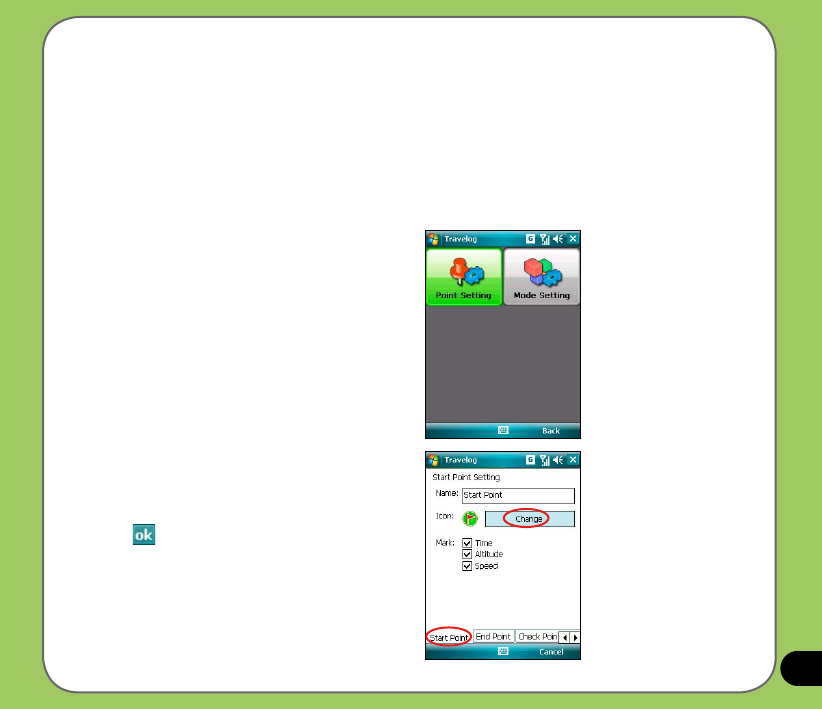
• Point Setting
Point Setting allows you to change name and icon of start/end point, check point (milestone
point), and POI point. You can also set marking-information label for the points.
To set Point Setting:
3. Tap when nished.
92
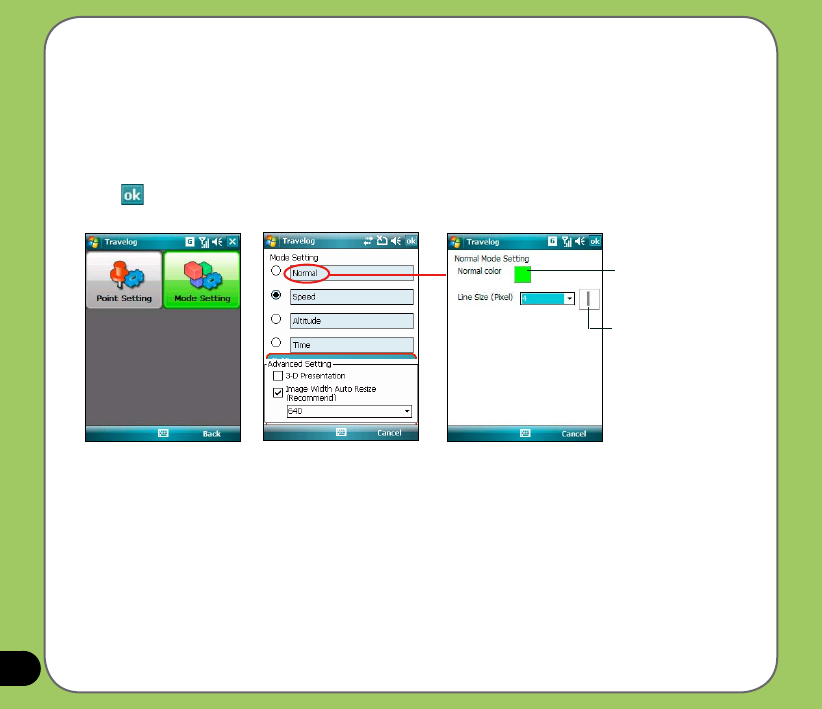
• Mode Setting
Mode Setting allows you to set the presentation features of exported data, such as digit
range, line color and size. You can also set the size and display effect of exported data.
To set Mode Setting:
1. From Track screen, tap Menu > Setting > Export Setting > Mode Setting.
2. Tap the name of mode to launch detailed mode setting. Choose color and size for line.
3. Tap when nished.
Line size preview
Tap to launch color
palette
93
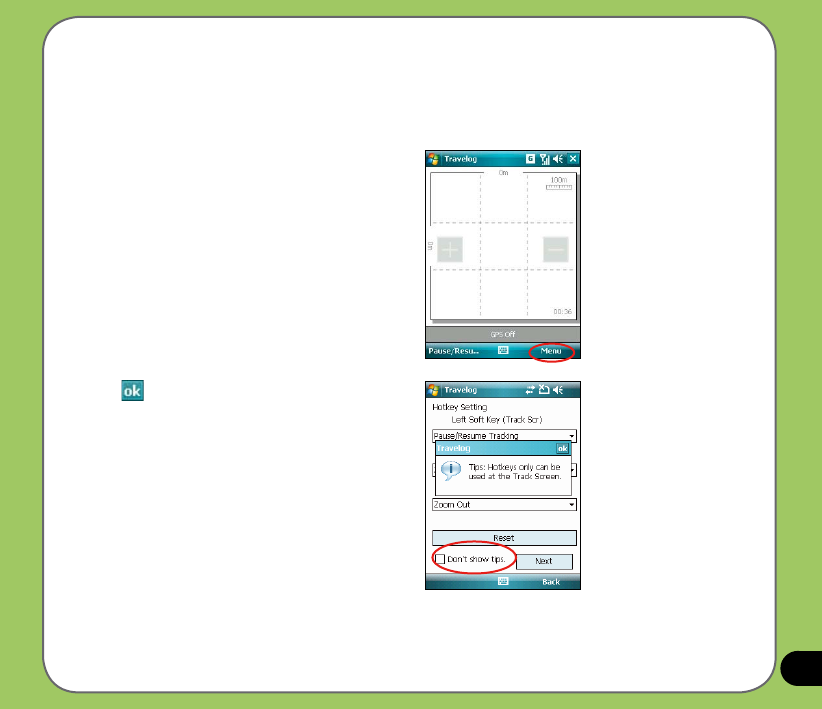
Hotkey Setting
This function allows you to assign hotkeys and apply functions conveniently while running
Travelog.
To assign hotkeys:
1. From the Track screen, tap Menu >
Setting > Hotkey Setting.
2. Tap when the tips pop up.
If you do not want it show next time, check
the Don’t show tips box.
94
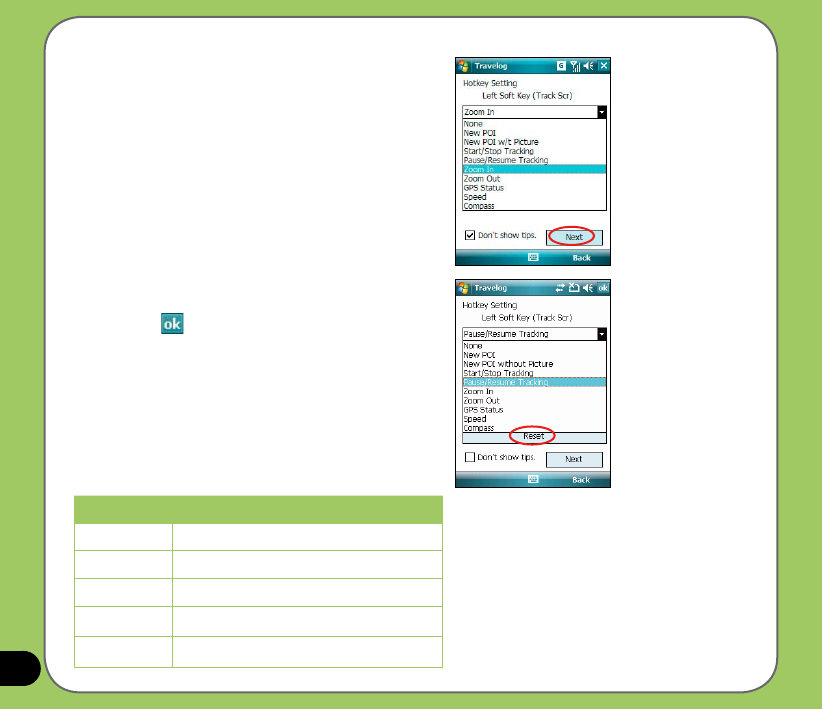
3. From the drop-down menu, choose
functions that you want to assign to the
keys. Tap Next to continue.
3. From the drop-down menu, choose
functions that you want to assign to the
keys. Tap when nished.
You can also tap Reset button to restore
the settings to default.
Keys Description
Left key Push the navigation key leftward.
Right key Push the navigation key rightward.
Up key Push the navigation key upward.
Down key Push the navigation key downward.
Center key Press the navigation key down.
95
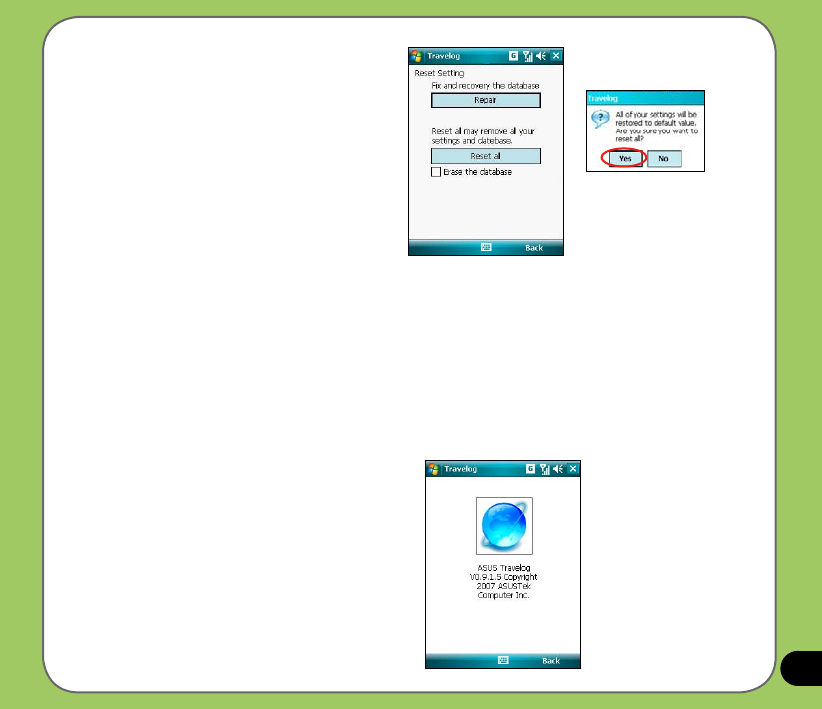
About
You can view version and copyright information of the Travelog application.
Reset All
This function allows you to reset all settings
in Travelog to default, and x and recover
database.
To reset settings and recovery database :
1. From the Setting dialog, tap Reset All
button.
2. Tap Repair button to x and recover the
database.
Tap Reset All button to reset all settings to
default. Then tap Yes from the pop-up
window to conrm.
Check the Erase the database box if you
want to clear all the database.
To view Travelog version and copyright:
From the Track screen, tap Menu >
Setting > About.
96
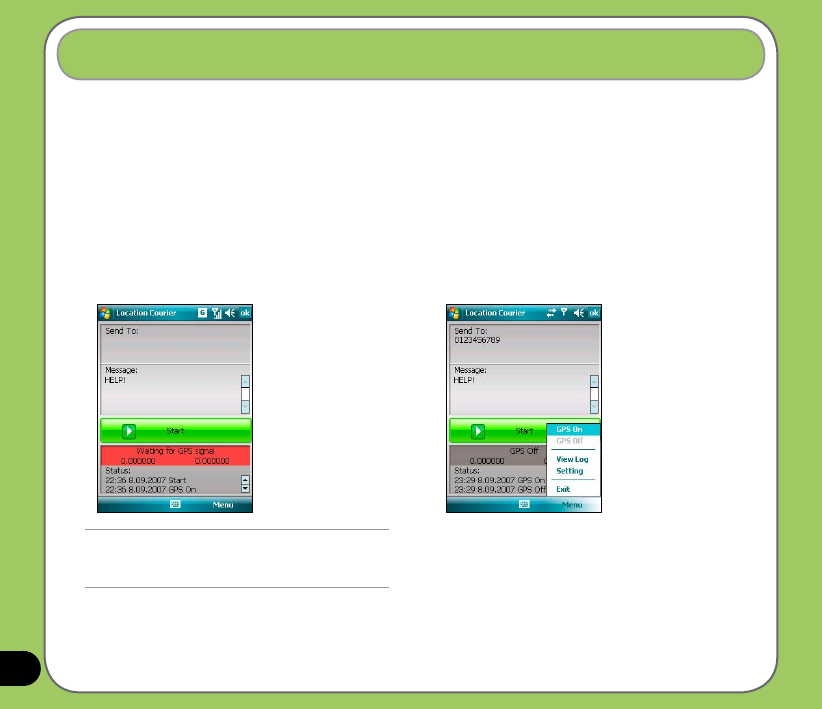
Location Courier
The Location Courier allows you to send your position through SMS messages to up to ve
receivers at the same time. You can also set a timer to send SMS messages periodically.
Using Location Courier
To use Location Courier:
1. Tap Start > Programs > Location Courier. 2. Tap Menu > Setting to edit message
content and set Location Courier
properties.
NOTE:
The GPS automatically turns on when you launch
Location Courier application.
97
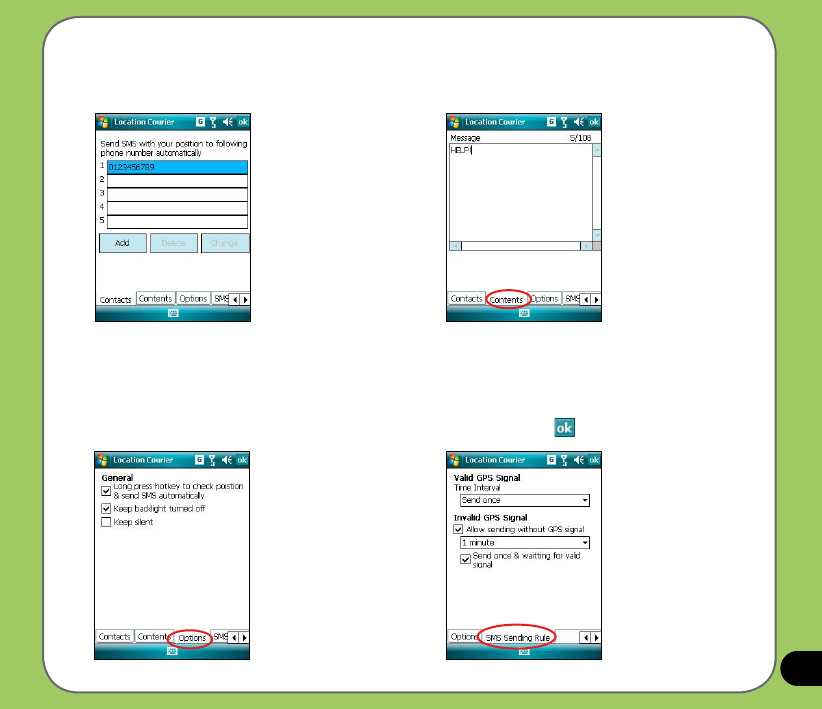
3. Enter the number which you want to send
the SMS to. Tap Add button to add a
contact from the Contacts list.
4. Tap Contents tab then enter message.
5. Tap Options tab then check your desired
properties.
6. Tap SMS Sending Rule tab then select
time interval and check your desired
properties. Tap to nish setting.
98
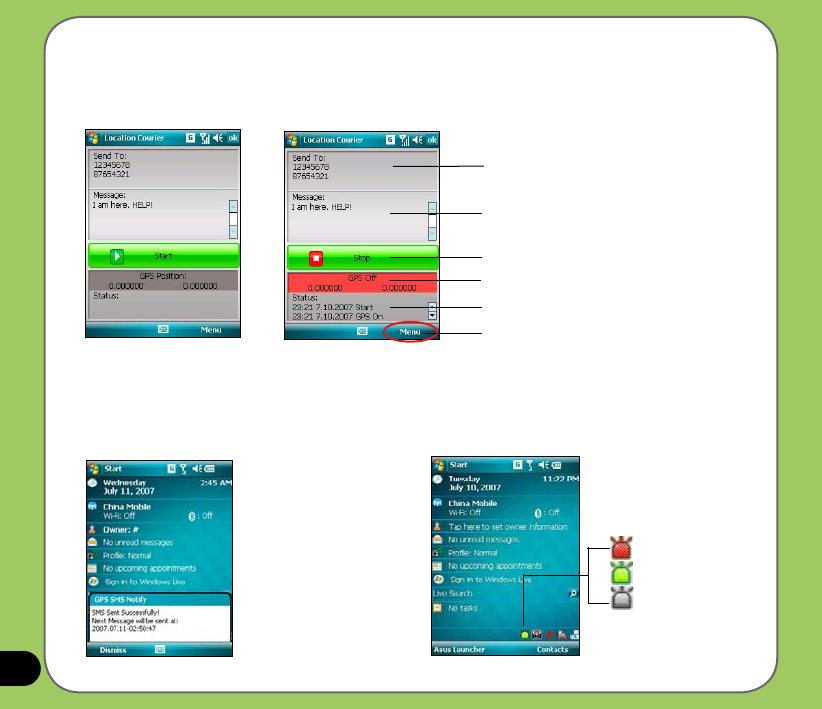
7. The message and receivers you set appear on the Location Courier screen. Tap Start to
get and send the location information through SMS. You can also turn on/off GPS or exit
the Location Courier application from Menu.
Receivers list
Message content
Stop button
GPS status
Location Courier status
Tap to display menu
A message appears. It noties that your SMS
message was sent successfully and when the
next SMS message will be sent.
While running Location Courier, you can
view GPS status from the task bar of Today
screen. You can tap the status icon to open
Location Courier screen.
Active (Red)
Waiting (Lime)
DeActive (Gray)
99
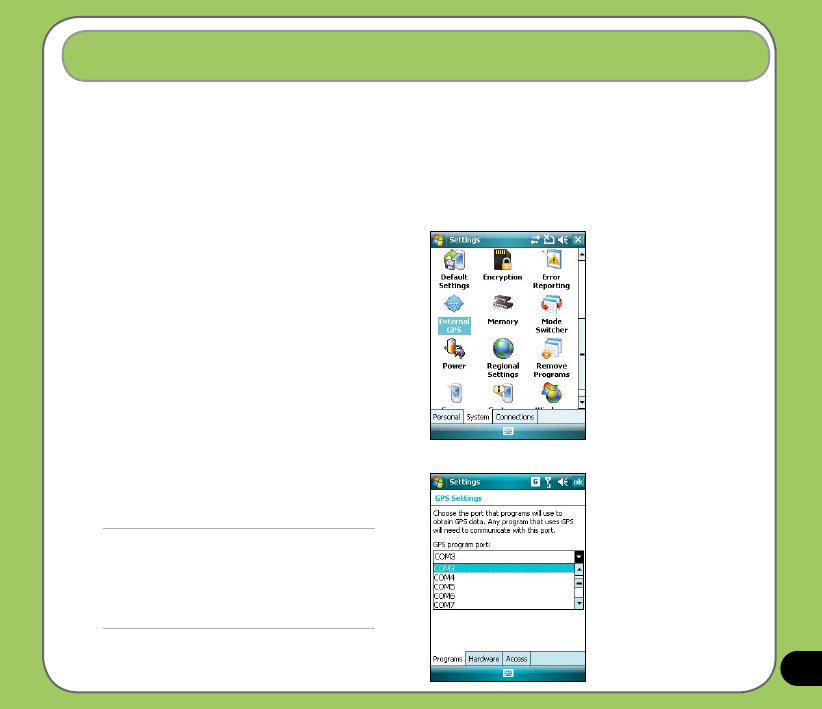
P527 allows you to use an external GPS device to receive GPS data. To use an external
device, you need to set connection between P527 and your external GPS device.
Setting external GPS device
To set an external GPS device:
External GPS
1. Tap Start > Settings > System tab >
External GPS.
2. From the Programs tab, select a program
port.
NOTE:
The other GPS application in P527 will use
the same COM Port as you set here. Ensure
that this port is also available in the other GPS
applications.
100
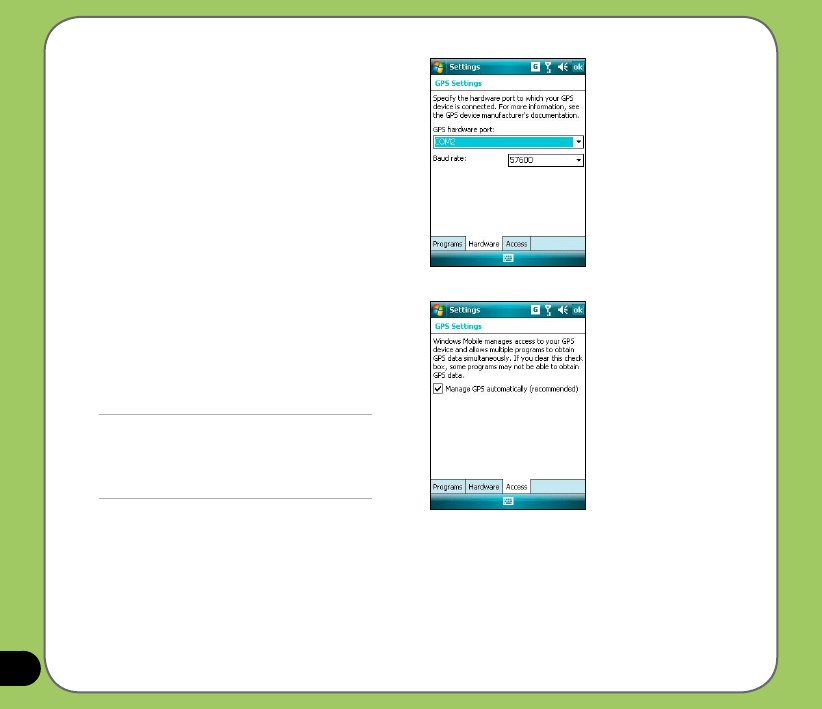
3. From the Hardware tab, specify a
hardware port and baud rate for your
external GPS device to use.
Refer to the user guide of your external
GPS device for details.
4. From the Access tab, check the Manage
GPS automatically (recommended)
check box.
NOTE:
If you clear this check box, some GPS ralted
application in P527 may not be able to obtain
GPS data.