ASUSTeK Computer PU500C Notebook PC User Manual FCC rev
ASUSTeK Computer Inc Notebook PC FCC rev
UserManual.wiki
>
ASUSTeK Computer
>
PU500C User Manual
User manual-FCC_rev
Navigation menu
Upload a User Manual
Namespaces
Wiki Guide
HTML
PDF
Info
Views
User Manual
Discussion / Help
Navigation
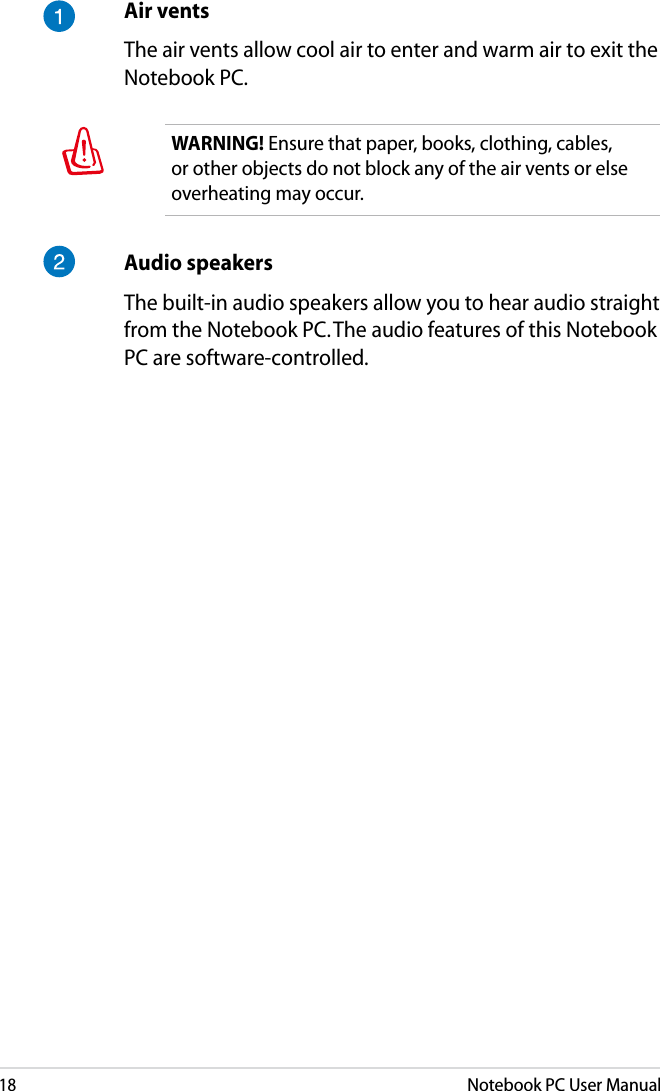

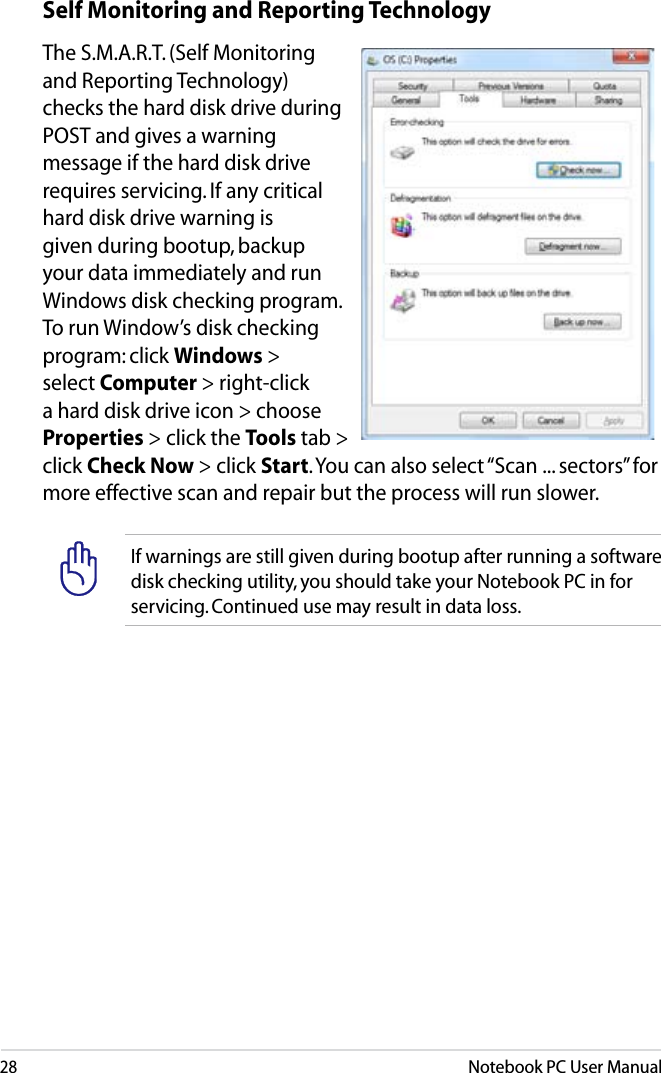
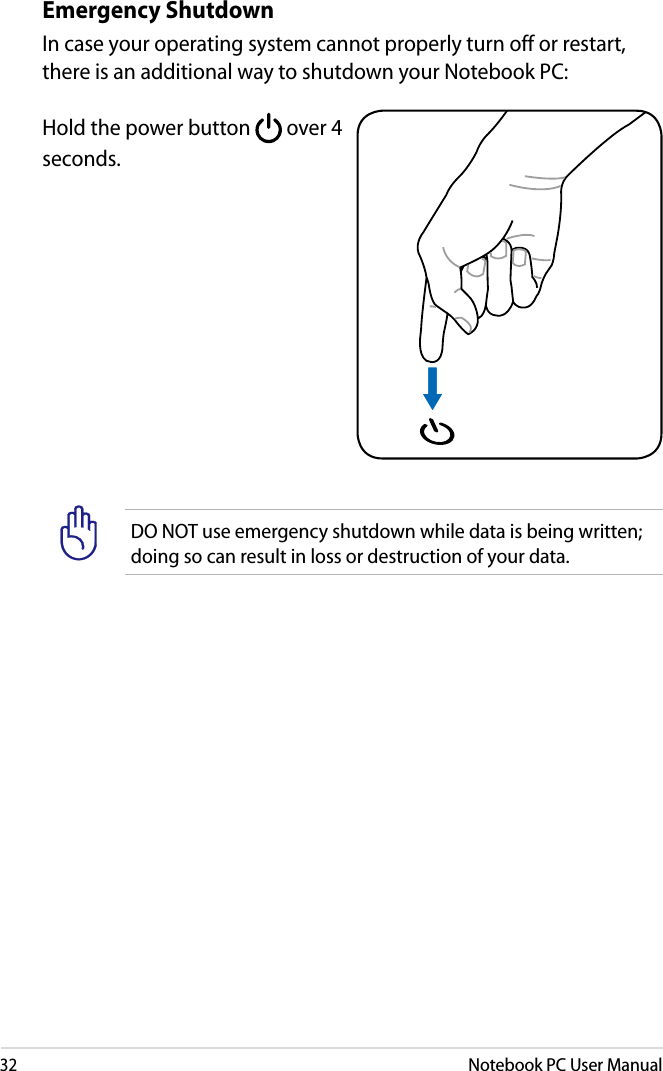
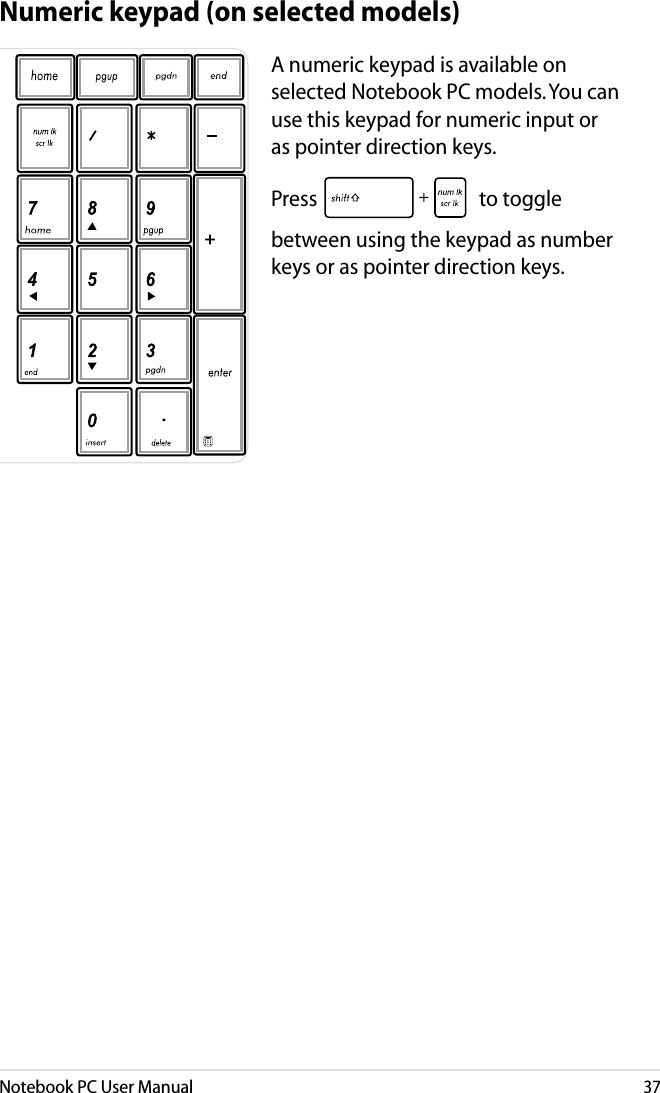
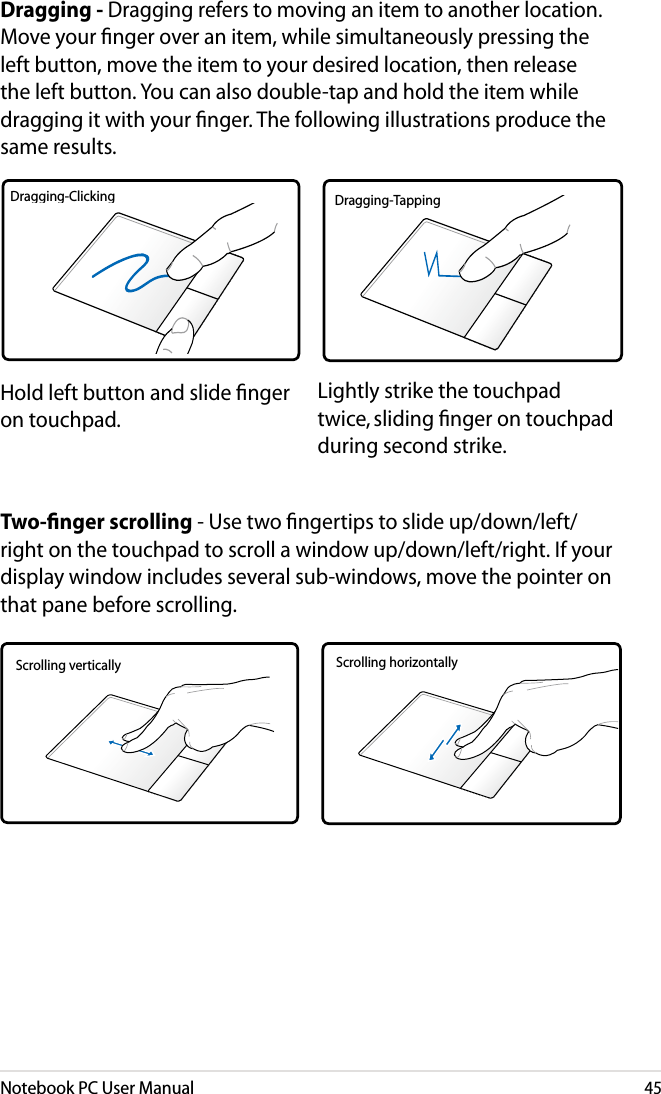
![Notebook PC User Manual27To protect the hard disk drive, always wait at least 5 seconds after turning off your Notebook PC before turning it back on. DO NOT carry or cover a Notebook PC that is powered on with any materials that will reduce air circulation such as a carrying bag.Before bootup, the display panel flashes when the power is turned on. This is part of the Notebook PC’s test routine and is not a problem with the display.Powering on the Notebook PCThe Notebook PC’s power-on message appears on the screen when you turn it on. If necessary, you may adjust the brightness by using the hot keys. If you need to run the BIOS Setup to set or modify the system configuration, press [f2] upon bootup to enter the BIOS Setup. Press [esc] and you will be presented with a boot menu with selections to boot from your available drives.The Power-On Self Test (POST)When you turn on the Notebook PC, it will first run through a series of software-controlled diagnostic tests called the Power-On Self Test (POST). The software that controls the POST is installed as a permanent part of the Notebook PC’s architecture. The POST includes a record of the Notebook PC’s hardware configuration, which is used to make a diagnostic check of the system. This record is created by using the BIOS Setup program. If the POST discovers a difference between the record and the existing hardware, it will display a message on the screen prompting you to correct the conflict by running BIOS Setup. In most cases the record should be correct when you receive the Notebook PC. When the test is finished, you may get a message reporting “No operating system found” if the hard disk was not preloaded with an operating system. This indicates that the hard disk is correctly detected and ready for the installation of a new operating system.](https://usermanual.wiki/ASUSTeK-Computer/PU500C/User-Guide-1904905-Page-27.png)
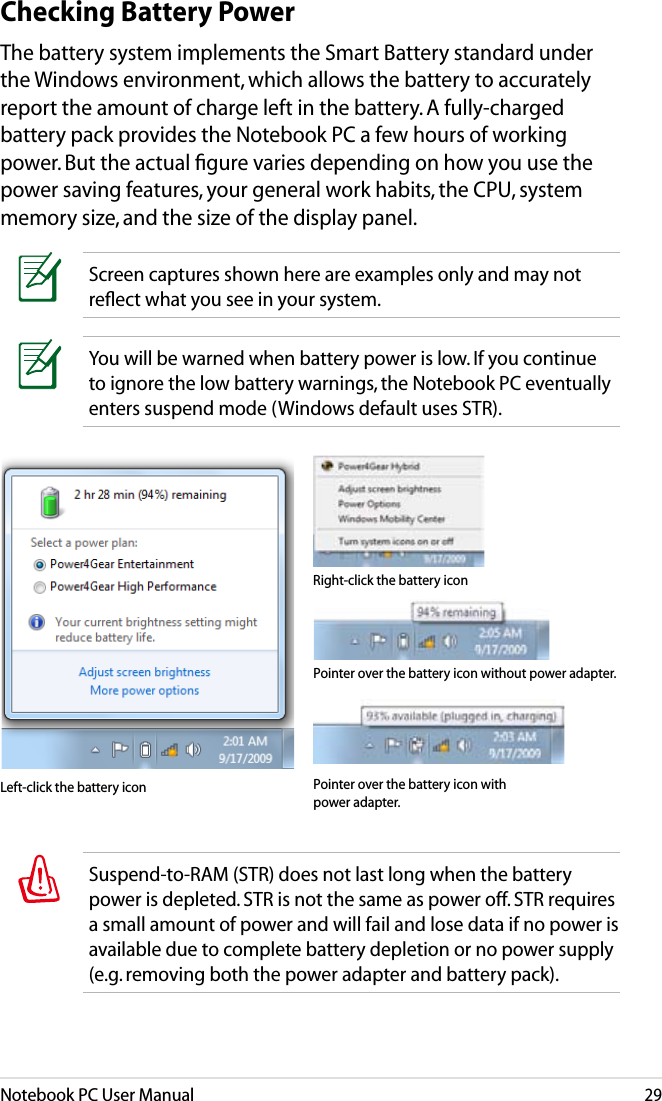
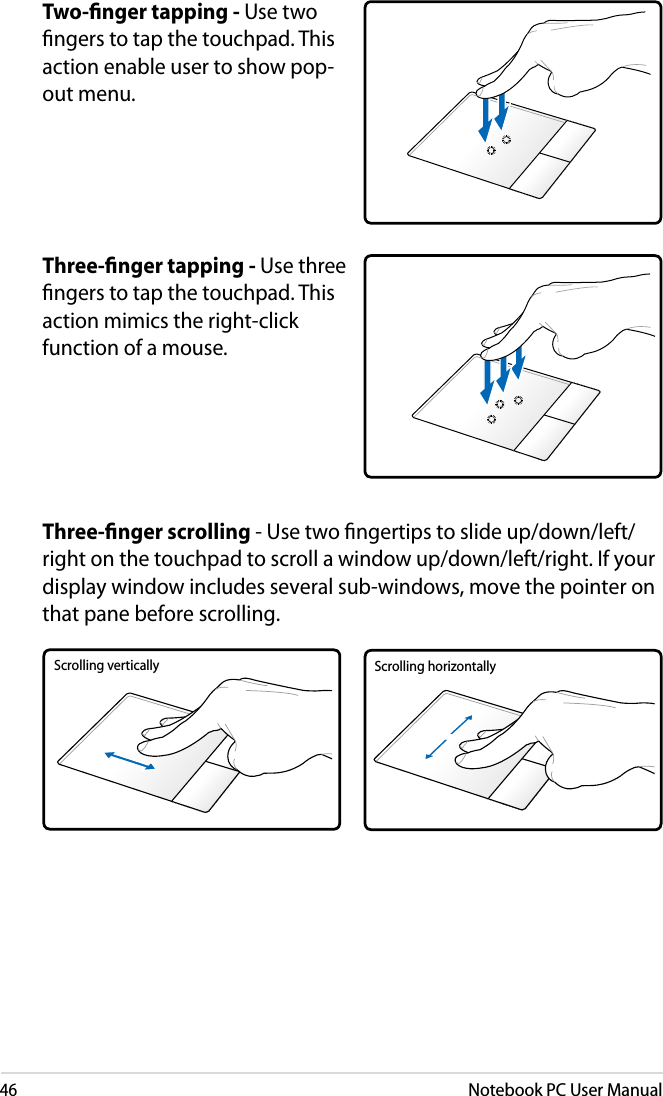
![34Notebook PC User ManualSleep is the same as Suspend-to-RAM (STR). This function stores your current data and status in RAM while many components are turned off. Because RAM is volatile, it requires power to keep (refresh) the data. Click the Windows button and the arrowhead next to the lock icon to see this option. You can also use the keyboard shortcut [Fn F1] to activate this mode. Recover by pressing any keyboard key except [Fn]. (NOTE: The power indicator will blink in this mode.)Hibernate is the same as Suspend-to-Disk (STD) and stores your current data and status on the hard disk drive. By doing this, RAM does not have to be periodically refreshed and power consumption is greatly reduced but not completely eliminated because certain wake-up components like LAN needs to remain powered. Hibernate saves more power compared to Sleep. Click the Windows button and the arrowhead next to the lock icon to see this option. Recover by pressing the power button. (NOTE: The power indicator will be off in this mode.)Thermal Power ControlThere are three power control methods for controlling the Notebook PC’s thermal state. These power control cannot be configured by the user and should be known in case the Notebook PC should enter these states. The following temperatures represent the chassis temperature (not CPU).• The fan turns on for active cooling when the temperature reaches the safe upper limit.• The CPU decreases speed for passive cooling when the temperature exceeds the safe upper limit.• The system shut down for critical cooling when temperature ex-ceeds the maximum safe upper limit.](https://usermanual.wiki/ASUSTeK-Computer/PU500C/User-Guide-1904905-Page-34.png)

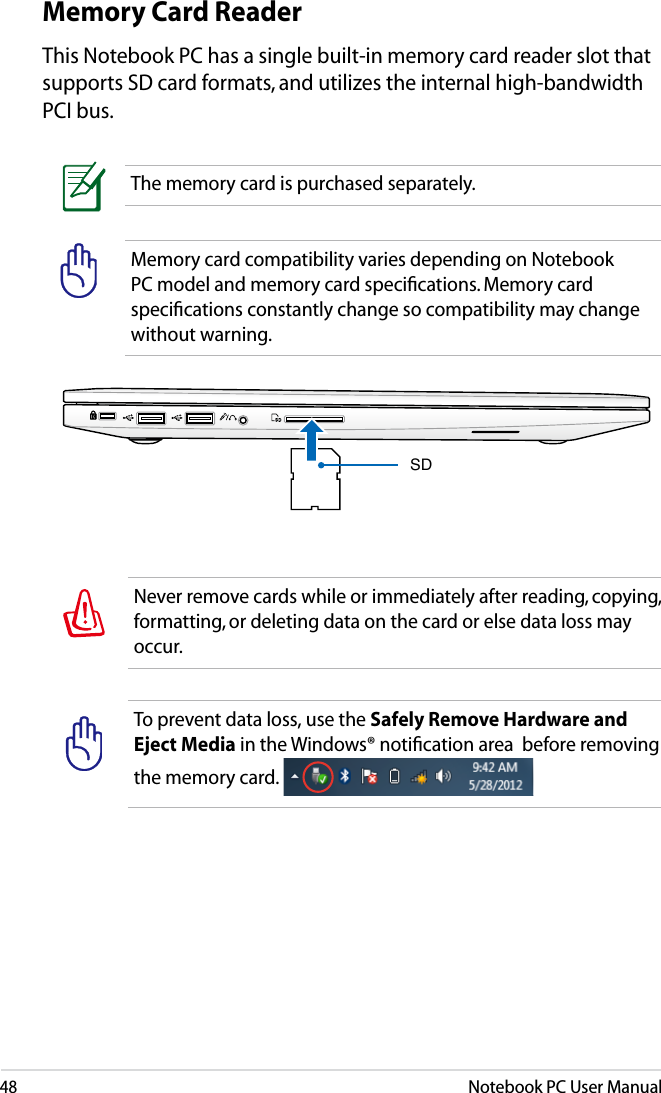


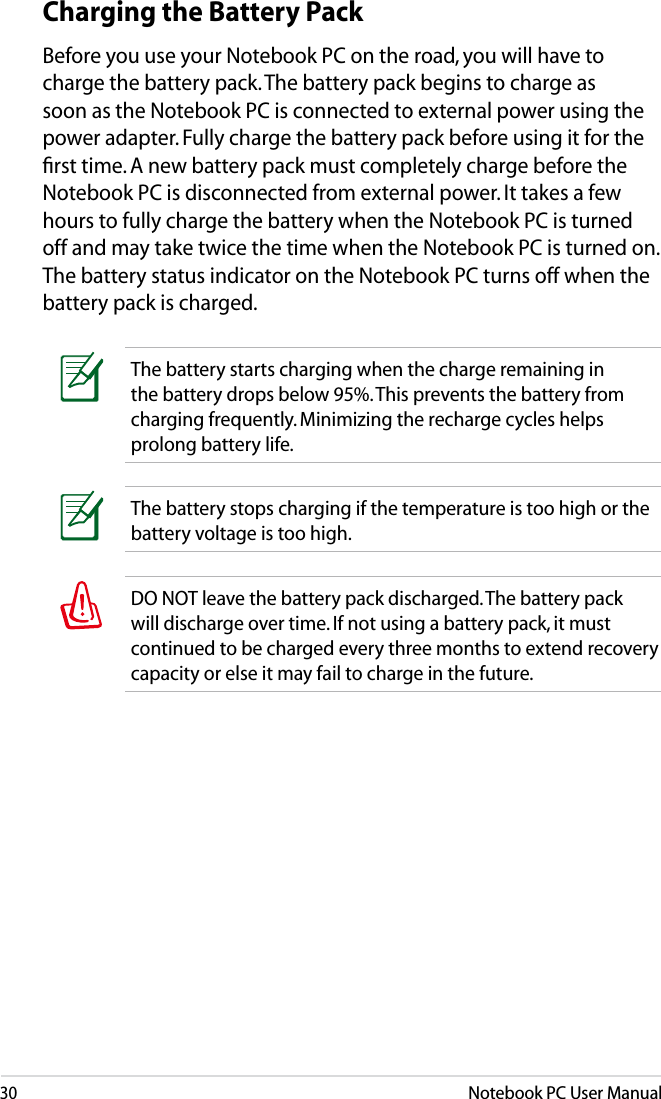
![A-4Notebook PC User ManualSystem BIOS SettingsBoot Device1. On the Boot screen, select Boot Option #1.→← : Select Screen ↑↓ : Select Item Enter : Select +/— : Change Opt. F1 : General Help F9 : Optimized Defaults F10 : Save ESC : Exit Version 2.14.1219. Copyright (C) 2011 American Megatrends, Inc. Aptio Setup Utility - Copyright (C) 2011 American Megatrends, Inc. Main Advanced Chipset Boot Security Save & Exit Boot Configuration Launch PXE OpROM [Disabled] Driver Option Priorities Boot Option Priorities Boot Option #1 [Windows Boot Manag...] Add New Boot Option Delete Boot OptionSets the system boot order2. Press [Enter] and select a device as the Boot Option #1. Version 2.14.1219. Copyright (C) 2011 American Megatrends, Inc. Aptio Setup Utility - Copyright (C) 2011 American Megatrends, Inc. Main Advanced Chipset Boot Security Save & Exit Boot Configuration UEFI Boot [Disabled] PXE ROM [Disabled] Boot Option Priorities Boot Option #1 [P0: Hitachi HTS545...] Boot Option #2 [P2: MATSHITADVD-RA...] CD/DVD ROM Drive BBS Priorities Add New Boot Option Delete Boot OptionSets the system boot orderBoot Option #1The BIOS screens in this section are for reference only. The actual screens may differ by models and territories.→← : Select Screen ↑↓ : Select Item Enter : Select +/— : Change Opt. F1 : General Help F9 : Optimized Defaults F10 : Save ESC : Exit Windows Boot Manager (PO: Hitachi HTS727575A9E364) DisabledBoot Option #1](https://usermanual.wiki/ASUSTeK-Computer/PU500C/User-Guide-1904905-Page-62.png)
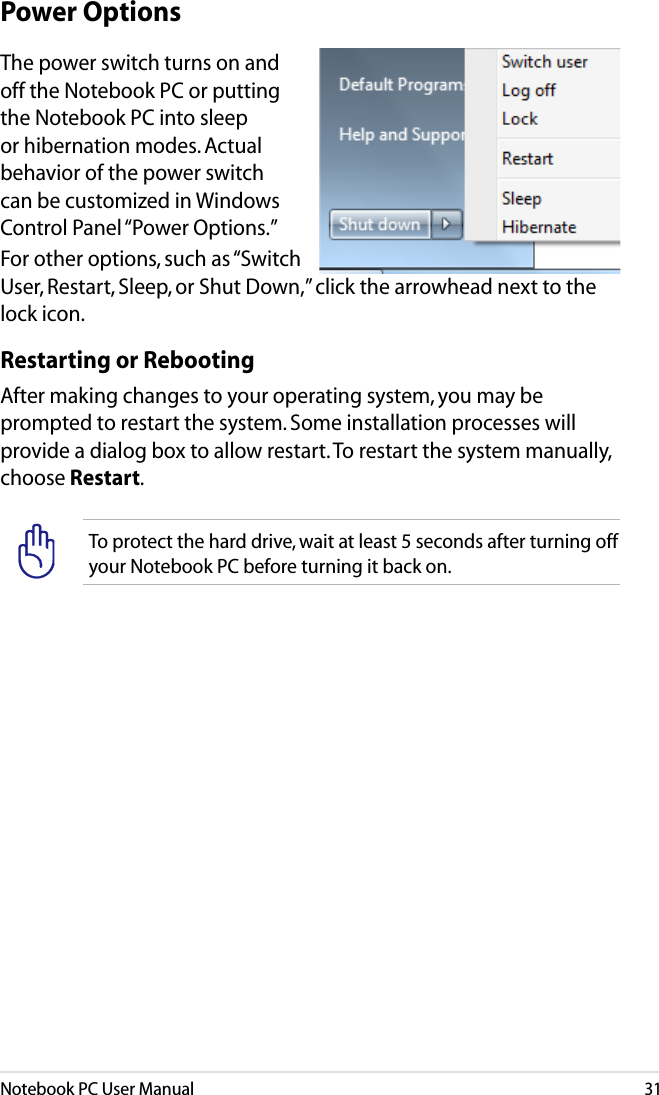
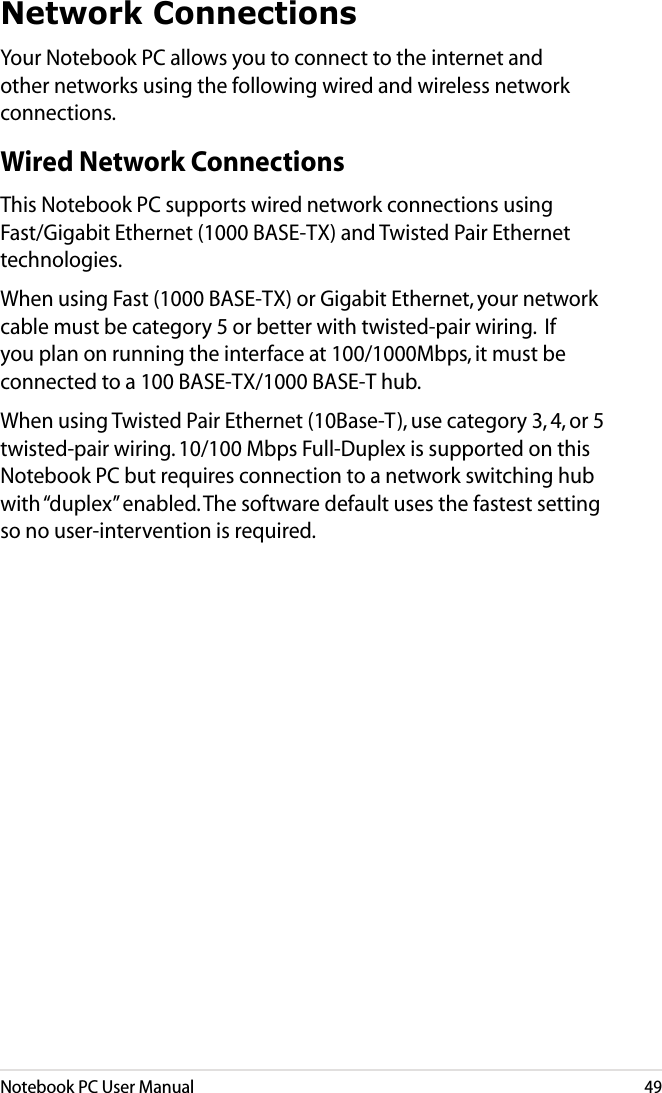
![Notebook PC User ManualA-5Security SettingTo set the password:1. On the Security screen, select Administrator Password or User Password.2. Type in a password and press [Enter].3. Re-type to conrm the password and press [Enter].4. Password is then set.To clear the password:1. On the Security screen, select Administrator Password or User Password.2. Enter the current password and press [Enter].3. Leave the Create New Password eld blank and press [Enter].4. Leave the Confirm New Password eld blank and press [Enter].5. Password is then cleared.Version 2.14.1219. Copyright (C) 2011 American Megatrends, Inc. Aptio Setup Utility - Copyright (C) 2011 American Megatrends, Inc. Main Advanced Boot Security Save & Exit Password Description If ONLY the Administrator’s password is set, then this only limits access to Setup and is only asked for when entering Setup. If ONLY the user’s password is set, then this is a power on password and must be entered to boot or enter Setup. In Setup, the User will have Administrator rights. Administrator Password Status NOT INSTALLED User Password Status NOT INSTALLED Administrator Password User Password HDD Password Status : NOT INSTALLED Set Master Password Set User Password I/O Interface SecuritySet Administrator Password.The password length must be in the following range:Minimum length 3Maximum length 20Must type with character:a-z, 0-9You will be asked to enter the User Password whenever you power on the Notebook PC (enter BIOS or OS). The Administrator Password is only asked when you would like to enter and congure the BIOS settings.→← : Select Screen ↑↓ : Select Item Enter : Select +/— : Change Opt. F1 : General Help F9 : Optimized Defaults F10 : Save ESC : Exit](https://usermanual.wiki/ASUSTeK-Computer/PU500C/User-Guide-1904905-Page-63.png)
![A-6Notebook PC User ManualI/O Interface SecurityTo lock the I/O interface:1. On the Security screen, select I/O Interface Security.2. Select an interface you would like to lock and click Lock.The I/O Interface Security settings can only be altered when you log in with Administrator privilege. Version 2.14.1219. Copyright (C) 2011 American Megatrends, Inc. Aptio Setup Utility - Copyright (C) 2011 American Megatrends, Inc. Security I/O Interface Security LAN Network Interface [UnLock] Wireless Network Interface [UnLock] HD AUDIO Interface [UnLock] SATA 2nd HDD Interface [UnLock] USB Interface SecurityIf Locked, LAN and Card Reader Interface will be disabled.LAN Network InterfaceLockUnLock→← : Select Screen ↑↓ : Select Item Enter : Select +/— : Change Opt. F1 : General Help F9 : Optimized Defaults F10 : Save ESC : Exit](https://usermanual.wiki/ASUSTeK-Computer/PU500C/User-Guide-1904905-Page-64.png)
![Notebook PC User ManualA-7USB Interface SecurityTo lock the USB interface:1. On the Security screen, select I/O Interface Security > USB Interface Security.2. Select an interface you would like to lock and click Lock.The USB Interface Security settings can only be altered when you log in with Administrator privilege. If you set USB Interface to [Lock], External Ports and CMOS Camera will be locked and hidden simultaneously. Version 2.14.1219. Copyright (C) 2011 American Megatrends, Inc. Aptio Setup Utility - Copyright (C) 2011 American Megatrends, Inc. Security USB Interface Security USB Interface [UnLock] External Ports [UnLock] Bluetooth [UnLock] Card Reader [UnLock] If Locked, all USB device will be disabledUSB InterfaceLockUnLock→← : Select Screen ↑↓ : Select Item Enter : Select +/— : Change Opt. F1 : General Help F9 : Optimized Defaults F10 : Save ESC : Exit](https://usermanual.wiki/ASUSTeK-Computer/PU500C/User-Guide-1904905-Page-65.png)
![A-8Notebook PC User ManualHDD PasswordTo set the HDD password:1. On the Security screen, click Set Master Password, type in a password and press [Enter].2. Re-type to confirm the password and press [Enter].3. Click Set User Password and repeat the previous steps to set up the user password.4. Password is then set.• The HDD Password can only be altered when you log in with Administrator privilege. • You have to set Master Password before setting the User Password.You will be asked to enter user password first (if there is one), then HDD user password when you power on the Notebook PC and cannot enter the operating system if you fail to enter the correct passwords.Version 2.14.1219. Copyright (C) 2011 American Megatrends, Inc. Aptio Setup Utility - Copyright (C) 2011 American Megatrends, Inc. Main Advanced Boot Security Save & Exit Password Description If ONLY the Administrator’s password is set, then this only limits access to Setup and is only asked for when entering Setup. If ONLY the user’s password is set, then this is a power on password and must be entered to boot or enter Setup. In Setup, the User will have Administrator rights. Administrator Password Status NOT INSTALLED User Password Status NOT INSTALLED Administrator Password User Password HDD Password Status : NOT INSTALLED Set Master Password Set User Password I/O Interface SecuritySet HDD Master Password.*** A d vi sa bl e t o P ow er Cy cl e System after Setting Hard Disk Passwords ***→← : Select Screen ↑↓ : Select Item Enter : Select +/— : Change Opt. F1 : General Help F9 : Optimized Defaults F10 : Save ESC : Exit](https://usermanual.wiki/ASUSTeK-Computer/PU500C/User-Guide-1904905-Page-66.png)

![Updating the BIOS.1. Please verify the Notebook PC’s exact model and download the latest BIOS file for your model from the ASUS website and save it in your flash disk drive.2. Connect your ash disk drive to the Notebook PC and power on the Notebook PC.3. From the BIOS Setup program, click Advanced > Start Easy Flash, then press [Enter].4. Locate the latest BIOS file and start updating the BIOS. ASUSTek Easy Flash Utility[ ]: Switch [ ] : Choose [q] : Exit [Enter]: Enter/Execute0 EFI <DIR>FLASH TYPE: Winbond 25X/Q Series Current BIOS Platform: P500CA Version: 100 Build Date: Nov 1 2012 Build Time: 09:53:29 New BIOS Platform: Unknown Version: Unknown Build Date: Unknown Build Time: Unknown5. After the BIOS update process, click Exit > Restore Defaults to restore the system to its default settings. Version 2.12.1219. Copyright (C) 2011 American Megatrends, Inc. Aptio Setup Utility - Copyright (C) 2011 American Megatrends, Inc. Main Advanced Chipset Boot Security Save & Exit POST Logo Type [Static] Start Easy Flash Play POST Sound [No] Speaker Volume [4] Internal Pointing Device [Enabled] Wake On Lid Open [Enabled] Power Off Energy Saving [Enabled] ASUS USB Charger+ in battery mode [Disabled] Intel Virtualization Technology [Enabled] Intel AES-NI [Enabled] VT-d [Enabled] SATA Configuration Graphics Configuration Intel (R) Anti-Theft Technology Configuration USB Configuration Network StackPress ENTER to run the utility to select and update BIOS.FS0 FS1→← : Select Screen ↑↓ : Select Item Enter : Select +/— : Change Opt. F1 : General Help F9 : Optimized Defaults F10 : Save ESC : Exit](https://usermanual.wiki/ASUSTeK-Computer/PU500C/User-Guide-1904905-Page-72.png)
![Notebook PC User ManualA-15Using the Recovery Partition or the DVD Recovery (for selected models) allows you to reformat your hard drive and restore your ASUS Notebook PC to its original factory settings. These recovery options also enable you to reuse the default settings of your Notebook PC to make new changes as needed.Back up all your data before performing system recovery in your Notebook PC. You may need to reinstall some software applications after the recovery process is completed. You may also be required to buy a new license to reactivate the software.Do not restart or turn off your Notebook PC during the recovery process.Using Recovery PartitionThe Recovery Partition is a reserved space in your Notebook PC's hard disk drive where you can restore the operating system, drivers, and utilities to their original factory settings. To use this option:1. Press [f9] during bootup.2. In the Windows Boot Manager, the system automatically loads the les for recovery. You can also use the up/down arrow keys to select Windows 7 or Windows Setup [EMS Enabled], then press [enter].3. Read the ASUS Preload Wizard messages then click Next.4. Select from the following partition options: Recover Windows to first partition only. This option deletes only the rst partition and allows you to keep other partitions, and to create a new system partition as drive “C”.Recovery options for your Notebook PC](https://usermanual.wiki/ASUSTeK-Computer/PU500C/User-Guide-1904905-Page-73.png)
![Notebook PC User ManualA-17Using the Recovery DVD:1. Insert the Recovery DVD into the optical drive. Your Notebook PC needs to be powered ON.2. Restart the Notebook PC and press [Esc] on bootup and select the optical drive (may be labeled as “CD/DVD”) and press [Enter] to boot from the Recovery DVD.3. Select OK to start to restore the image.4. Select OK to confirm the system recovery.Restoring will overwrite your hard drive. Ensure to back up all your important data before the system recovery.5. Follow the onscreen instructions to complete the recovery process. WARNING: DO NOT remove the Recovery disc, unless instructed to do so, during the recovery process or else your partitions will be unusable.Ensure to connect the power adapter to your Notebook PC when performing system recovery. Unstable power supply may cause recovery failure.Visit the ASUS website at www.asus.com for updated drivers and utilities.](https://usermanual.wiki/ASUSTeK-Computer/PU500C/User-Guide-1904905-Page-75.png)

![A-26Notebook PC User Manual(Reprinted from the Code of Federal Regulations #47, part 15.193, 1993. Washington DC: Office of the Federal Register, National Archives and Records Administration, U.S. Government Printing Office.)FCC Radio Frequency (RF) Exposure Caution StatementAny changes or modifications not expressly approved by the party responsible for compliance could void the user’s authority to operate this equipment. “The manufacture declares that this device is limited to Channels 1 through 11 in the 2.4GHz frequency by specified firmware controlled in the USA.”This equipment complies with FCC radiation exposure limits set forth for an uncontrolled environment. To maintain compliance with FCC RF exposure compliance requirements, please avoid direct contact to the transmitting antenna during transmitting. End users must follow the specific operating instructions for satisfying RF exposure compliance. Declaration of Conformity (R&TTE directive 1999/5/EC)The following items were completed and are considered relevant and sufficient:• Essential requirements as in [Article 3]• Protection requirements for health and safety as in [Article 3.1a]• Testing for electric safety according to [EN 60950]• Protection requirements for electromagnetic compatibility in [Article 3.1b]• Testing for electromagnetic compatibility in [EN 301 489-1] & [EN 301 489-17]• Effective use of the radio spectrum as in [Article 3.2]• Radio test suites according to [EN 300 328-2]](https://usermanual.wiki/ASUSTeK-Computer/PU500C/User-Guide-1904905-Page-84.png)