ASUSTeK Computer R1E NOTEBOOK P.C. User Manual R1E UserMan part 2
ASUSTeK Computer Inc NOTEBOOK P.C. R1E UserMan part 2
UserManual.wiki
>
ASUSTeK Computer
>
R1E User Manual
>
USERS MANUAL 2
Contents
1.
USERS MANUAL 1
2.
USERS MANUAL 2
USERS MANUAL 2
Navigation menu
Upload a User Manual
Namespaces
Wiki Guide
HTML
PDF
Info
Views
User Manual
Discussion / Help
Navigation
![344 Using the Notebook PCCD Play/PauseDuring CD stop, EHJLQV&'SOD\During CD play, SDXVHV&'SOD\CD StopDuring CD stop:(MHFWVWKH&'WUD\During CD play:6WRSV&'SOD\CD Skip to Next Track (Fast Forward) & Audio Volume UpDuring CD play, this button has two functions:Track: Push once to skip to the next WUDFNGXULQJ&'SOD\LQJAudio: +ROGGRZQWRincrease audio volume.Audio Volume ControlsFn + Speaker Icons (F10): Toggles the audio volume ON and OFFFn + Down Speaker Icon (F11): 'HFUHDVHVWKHDXGLRYROXPHFn + Up Speaker Icon (F12): Increases the audio volumeMultimedia Control Keys (on selected models)The multimedia control keys allows for convenient controlling of the multimedia application. The fol-ORZLQJGHÀQHVWKHPHDQLQJRIHDFKPXOWLPHGLDFRQWURONH\RQWKH1RWHERRN3&CD Skip to Previous Track (Rewind) & Audio Volume DownDuring CD play, this button has two functions:Track: 7KHÀUVWSXVKZLOOUHVWDUWWKHFXUUHQWWUDFN6HFRQGSXVKZLOOVNLSWRWKHprevious track.Audio:+ROGGRZQWRdecrease audio volume.Use the [Fn] key in combination with the arrow keys for CD control functions.](https://usermanual.wiki/ASUSTeK-Computer/R1E.USERS-MANUAL-2/User-Guide-830154-Page-4.png)


![47Using the Notebook PC 4These are examples of the Notebook PC connected to a Wireless Network.Desktop PCPDANotebook PCAccessPointDesktop PCPDANotebook PCWireless LAN Connection (on selected models)The optional built-in wireless LAN is a compact easy-to-use wireless Ethernet adapter. Implementing the IEEE 802.11 standard for wireless LAN (WLAN), the optional built-in wireless LAN is capable of IDVWGDWDWUDQVPLVVLRQUDWHVXVLQJ'LUHFW6HTXHQFH6SUHDG6SHFWUXP'666DQG2UWKRJRQDO)UHTXHQF\'LYLVLRQ0XOWLSOH[LQJ2)'0WHFKQRORJLHVRQ*+]*+]IUHTXHQFLHV7KHRSWLRQDOEXLOWLQZLUH-less LAN is backward compatible with the earlier IEEE 802.11 standards allowing seamless interfacing of wireless LAN standards.The optional built-in wireless LAN is a client adapter that supports Infrastructure and Ad-hoc modes JLYLQJ\RXÁH[LELOLW\RQ\RXUH[LVWLQJRUIXWXUHZLUHOHVVQHWZRUNFRQÀJXUDWLRQVIRUGLVWDQFHVXSWRmeters between the client and the access point.7RSURYLGHHIÀFLHQWVHFXULW\WR\RXUZLUHOHVVFRPPXQLFDWLRQWKHRSWLRQDOEXLOWLQZLUHOHVV/$1FRPHVwith a 64-bit/128-bit Wired Equivalent Privacy (WEP) encryption and Wi-Fi Protected Access (WPA) features.Ad-hoc modeThe Ad-hoc mode allows the Notebook PC to connect to another wireless device. No access point (AP) is required in this wireless environment.(All devices must install optional 802.11 wireless LAN adapters.)Infrastructure modeThe Infrastructure mode allows the Notebook PC and other wireless devices to join a wireless network cre-ated by an Access Point (AP) (sold separately) that provides a central link for wireless clients to commu-nicate with each other or with a wired network.(All devices must install optional 802.11 wireless LAN adapters.)](https://usermanual.wiki/ASUSTeK-Computer/R1E.USERS-MANUAL-2/User-Guide-830154-Page-17.png)
![484 Using the Notebook PC2. Press [FN F2] repeatedly until Wireless LAN ON or WLAN & Bluetooth ON is shown.Windows Wireless Network ConnectionConnecting to a network4. Right click on the network icon and select Connect to a network.3. You should see the “Not Connected” network icon.5. Select “Show Wireless” if you have many networks in your area. 6. Select the wireless network you want to con-nect to.7. When connecting, you may have to enter a password. 8. After connection has been established, “Con-nected” will be shown.2b. Or double click the Wireless Console icon on the taskbar and select either the Wireless LAN + Bluetooth or just the Bluetooth.1. Switch ON the Wireless function if necessary for your model (see switches in Section 3).](https://usermanual.wiki/ASUSTeK-Computer/R1E.USERS-MANUAL-2/User-Guide-830154-Page-18.png)
![49Using the Notebook PC 4Bluetooth Wireless Connection (on selected models)Notebook PCs with Bluetooth technology eliminates the need for cables for connecting Bluetooth-enabled devices. Examples of Bluetooth-enabled devices may be Notebook PCs, 'HVNWRS3&VPRELOHSKRQHVDQG3'$VNote: If your Notebook PC did not come with built-in Bluetooth, you need to connect a USB or ExpressCard Bluetooth module in order to use Bluetooth. Bluetooth-enabled mobile phones<RXFDQZLUHOHVVFRQQHFWWR\RXUPRELOHSKRQH'HSHQGLQJRQ\RXUPRELOHSKRQH·VFDSD-ELOLWLHV\RXFDQWUDQVIHUSKRQHERRNGDWDSKRWRVVRXQGÀOHVHWFRUXVHLWDVDPRGHPWRconnect to the Internet. You may also use it for SMS messaging. Bluetooth-enabled computers or PDAs<RXFDQZLUHOHVVFRQQHFWWRDQRWKHUFRPSXWHURU3'$DQGH[FKDQJHÀOHVVKDUHSHULSKHUDOVRUshare Internet or network connections. You may also make use of Bluetooth-enabled wireless keyboard or mouse.2b. Or double click the Wireless Console icon on the taskbar and select either the Wireless LAN + Bluetooth or just the Bluetooth.3. Select Add a Bluetooth Device on the taskbar men. 3b. Or Launch Bluetooth Devices from the Windows Control Panel.Turning ON and Launching Bluetooth UtilityThis process can be used to add most Bluetooth devices. See Appendix for complete process.2. Press [FN F2] repeatedly until Wireless LAN ONor WLAN & Bluetooth ON is shown.1. Switch ON the Wireless function if necessary for your model (see switches in Section 3).](https://usermanual.wiki/ASUSTeK-Computer/R1E.USERS-MANUAL-2/User-Guide-830154-Page-19.png)
![504 Using the Notebook PCTrusted Platform Module (TPM) (on selected models)The TPM, or Trusted Platform Module, is a security hardware device on the system board that will hold computer-generated keys for encryption. It is a hardware-based solution that an help avoid attacks by hackers looking to capture passwords and encryption keys to sensitive data. The TPM provides the abil-ity to the PC or notebook to run applications more secure and to make transactions and communication more trustworthy. The security features provided by the TPM are internally supported by the following cryptographic capa-bilities of each TPM: hashing, random number generation, asymmetric key generation, and asymmetric encryption/decryption. Each individual TPM on each individual computer system has a unique signature initialized during the silicon manufacturing process that further enhances its trust/security effectiveness. Each individual TPM must have an Owner before it is useful as a security device. TPM ApplicationsTPM is useful for any customer that is interested in providing an addition layer of security to the com-puter system. The TPM, when bundled with an optional security software package, can provide overall V\VWHP VHFXULW\ ÀOH SURWHFWLRQ FDSDELOLWLHV DQG SURWHFW DJDLQVW HPDLOSULYDF\ FRQFHUQV 730 KHOSVprovide security that can be stronger than that contained in the system BIOS, operating system, or any non-TPM application.Important: Use your TPM application’s “Restore” or “Migration” function to backup your TPM security data.Note: The TPM is disabled by default. Use BIOS setup to enable it.Enabling TPM SecurityEnter BIOS SetupSUHVV>)@RQV\VWHPVWDUWXSOn Security page, set TPM Security to [Enabled]Clearing TPM Secured DataWhen Supervisor Password is installed, TPMSecurity Clear will appear. Use this item to clear all data secured by TPM. (You have to restart the Notebook PC after setting the password to see the security clear option.)Important: Use should routinely backup your TPM secured data.](https://usermanual.wiki/ASUSTeK-Computer/R1E.USERS-MANUAL-2/User-Guide-830154-Page-20.png)
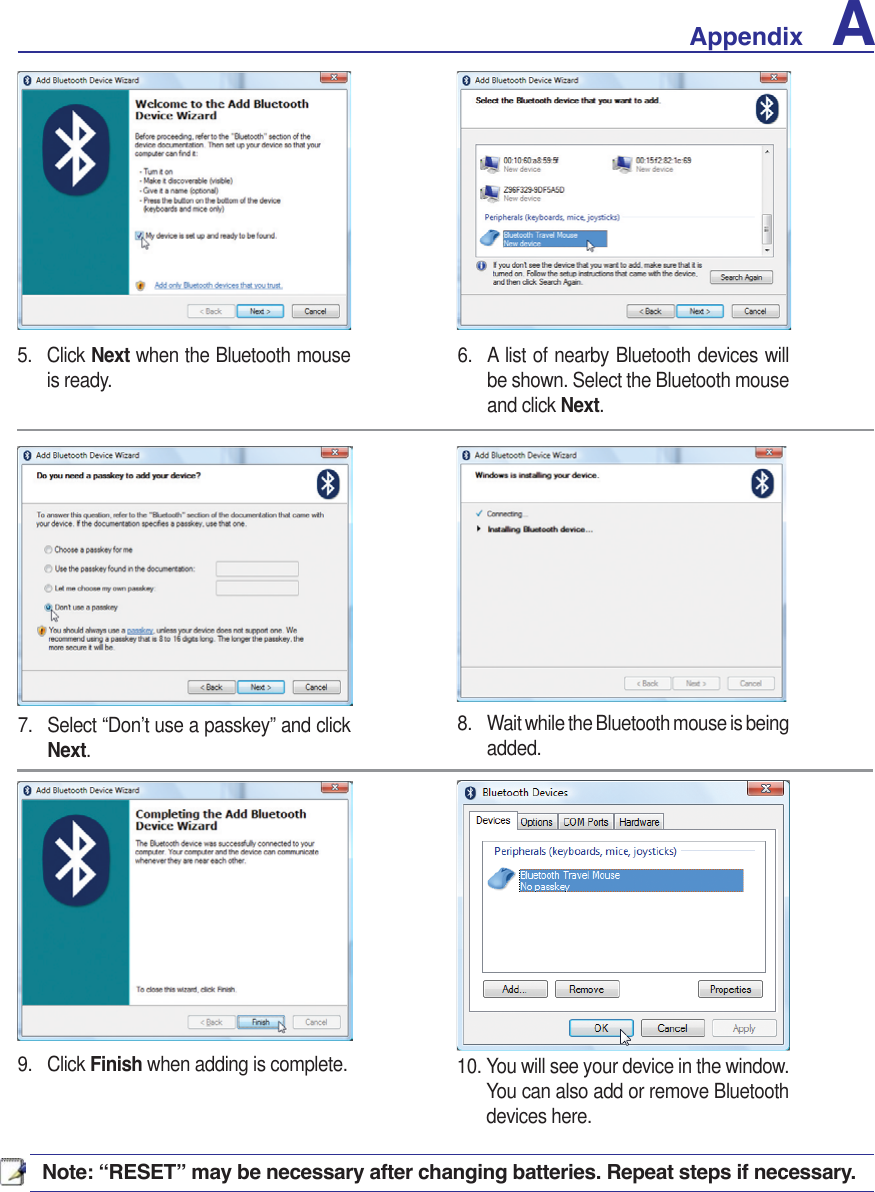
![A AppendixRESETOFF ON4. Prepare the Bluetooth mouse.• Install two “AA” batteries.• Turn ON the power switch on the bottom of the mouse. The bottom sensor should glow red.• Push the “RESET” button on the bottom of the Bluetooth mouse.Bluetooth Mouse Setup (optional)This process can be used to add most Bluetooth devices in Windows operating system.3. Select Add a Bluetooth Device on the taskbar menu.3c. If launched from the Control Panel, click Add from this screen.3b. Or Launch Bluetooth Devices from the Windows Control Panel.2b. Or double click the Wireless Console icon on the taskbar and select either the Wireless LAN + Bluetooth or just the Bluetooth.2. Press [FN F2] repeatedly until Wireless LAN ONor WLAN & Bluetooth ON is shown.1. Switch ON the Wireless function if necessary for your model (see switches in Section 3).](https://usermanual.wiki/ASUSTeK-Computer/R1E.USERS-MANUAL-2/User-Guide-830154-Page-26.png)
![A AppendixR&TTE Directive (1999/5/EC)7KHIROORZLQJLWHPVZHUHFRPSOHWHGDQGDUHFRQVLGHUHGUHOHYDQWDQGVXIÀFLHQWIRUWKH577(5DGLR& Telecommunications Terminal Equipment) directive: (VVHQWLDOUHTXLUHPHQWVDVLQ>$UWLFOH@ 3URWHFWLRQUHTXLUHPHQWVIRUKHDOWKDQGVDIHW\DVLQ>$UWLFOHD@ 7HVWLQJIRUHOHFWULFVDIHW\DFFRUGLQJWR>(1@ 3URWHFWLRQUHTXLUHPHQWVIRUHOHFWURPDJQHWLFFRPSDWLELOLW\LQ>$UWLFOHE@ 7HVWLQJIRUHOHFWURPDJQHWLFFRPSDWLELOLW\LQ>(1@>(1@ 7HVWLQJDFFRUGLQJWR>@ (IIHFWLYHXVHRIWKHUDGLRVSHFWUXPDVLQ>$UWLFOH@ 5DGLRWHVWVXLWHVDFFRUGLQJWR>(1@FCC Radio Frequency Interference Requirements7KLVGHYLFHLVUHVWULFWHGWR,1'22586(GXHWRLWVRSHUDWLRQLQWKHWR*+]IUHTXHQF\UDQJH)&&UHTXLUHVWKLVSURGXFWWREHXVHGLQGRRUVIRUWKHIUHTXHQF\UDQJHWR*+]WRUHGXFHWKHpotential for harmful interference to co-channel of the Mobile Satellite Systems.+LJKSRZHUUDGDUVDUHDOORFDWHGDVSULPDU\XVHURIWKHWR*+]DQGWR*+]EDQGVThese radar stations can cause interference with and / or damage this device.IMPORTANT: This device and its antenna(s) must not be co-located or operating in conjunction with any other antenna or transmitter.FCC Radio Frequency (RF) Exposure Caution StatementThis equipment complies with FCC RF exposure limits set forth for an uncontrolled environment. To maintain compliance with FCC RF exposure compliance requirements, please follow operation instruc-WLRQVLQWKHXVHU·VPDQXDO7KLVHTXLSPHQWLVIRURSHUDWLRQZLWKLQ*+]DQG*+]IUHTXHQF\ranges and is restricted to indoor environments only.)&&&DXWLRQ$Q\FKDQJHVRUPRGLÀFDWLRQVQRWH[SUHVVO\DSSURYHGE\WKHSDUW\UH-sponsible for compliance could void the user’s authority to operate this equipment. “The manufacturer declares that this device is limited to Channels 1 through 11 in the *+]IUHTXHQF\E\VSHFLÀHGÀUPZDUHFRQWUROOHGLQWKH86$µ](https://usermanual.wiki/ASUSTeK-Computer/R1E.USERS-MANUAL-2/User-Guide-830154-Page-30.png)
![Appendix AFrance Restricted Wireless Frequency BandsSome areas of France have a restricted frequency band. The worst case maximum authorized power indoors are: P:IRUWKHHQWLUH*+]EDQG0+]²0+] P:IRUIUHTXHQFLHVEHWZHHQ0+]DQG0+]NOTE: Channels 10 through 13 inclusive operate in the band 2446.6 MHz to 2483.5 MHz.There are few possibilities for outdoor use: On private property or on the private property of public SHUVRQVXVHLVVXEMHFWWRDSUHOLPLQDU\DXWKRUL]DWLRQSURFHGXUHE\WKH0LQLVWU\RI'HIHQVHZLWKPD[L-PXPDXWKRUL]HGSRZHURIP:LQWKH²0+]EDQG8VHRXWGRRUVRQSXEOLFSURSHUW\is not permitted. ,QWKHGHSDUWPHQWVOLVWHGEHORZIRUWKHHQWLUH*+]EDQG• Maximum authorized power indoors is 100mW • Maximum authorized power outdoors is 10mW 'HSDUWPHQWVLQZKLFKWKHXVHRIWKH²0+]EDQGLVSHUPLWWHGZLWKDQ(,53RIOHVVWKDQ100mW indoors and less than 10mW outdoors:$LQ2ULHQWDOHV $LVQH $OOLHU +DXWHV$OSHV08 Ardennes 09 Ariège 11 Aude 12 Aveyron&KDUHQWH 'RUGRJQH 'RXEV 'U{PH32 Gers 36 Indre 37Indre et Loire41 Loir et Cher45 Loiret 50 Manche 55 Meuse 58 Nièvre1RUG 2LVH 2UQH 3X\GX'{PH64Pyrénées Atlantique 3\UpQpHV %DV5KLQ +DXW5KLQ+DXWH6D{QH 6D{QHHW/RLUH75 Paris 82 Tarn et Garonne84 Vaucluse 88 Vosges 89 Yonne 90Territoire de Belfort94 Val de MarneThis requirement is likely to change over time, allowing you to use your wireless LAN card in more areas within France. Please check with ART for the latest information (www.art-telecom.fr) NOTE: Your WLAN Card transmits less than 100mW, but more than 10mW.Wireless Operation Channel for Different Domains1$PHULFD *+] &KWKURXJK&+-DSDQ *+] &KWKURXJK&K(XURSH(76, *+] &KWKURXJK&K](https://usermanual.wiki/ASUSTeK-Computer/R1E.USERS-MANUAL-2/User-Guide-830154-Page-31.png)