ASUSTeK Computer RTN12C ASUS Wireless Super SpeedN Router User Manual
ASUSTeK Computer Inc ASUS Wireless Super SpeedN Router
user manual

®
!
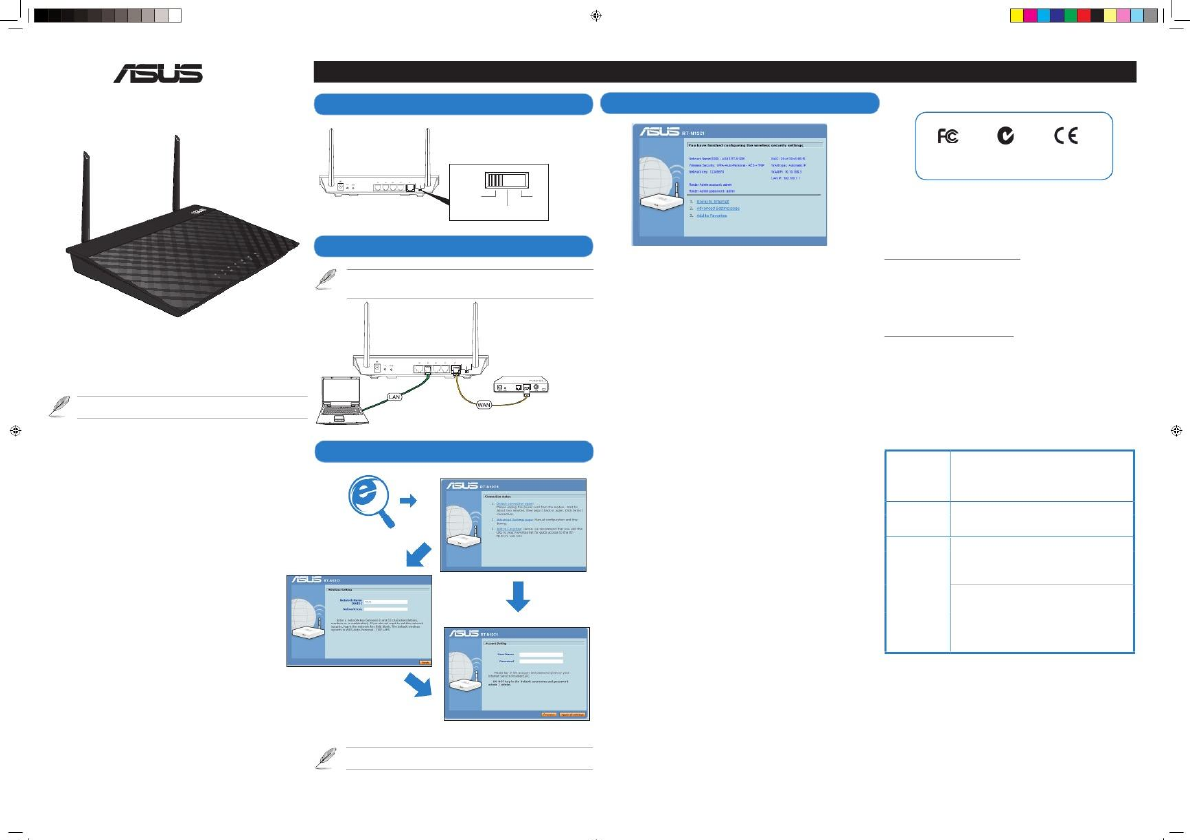
Setting up a Home Network - Router Mode
1. Choose the Route r mode .
4. Setup is comple ted.
RT
-
N12,
RT
-
N12 C1 SuperSpeed N Router
FCC Compliance
C
-
Tick Mark
CE
ROUTER
AP
REPEATER
RT
-
N12,
RT
-
N12 C1
12RT-N
Supe
r Spe
ed W
ireless
N Ro
uter
Router
Repeater
AP
ASUS Recycling/Takeback Servi ces
ASUS recycling and takeback programs come from our commitment
to the highest
standards for protecting our environment. We believe in providing solutions for you
to be able to responsibly recycle our products, batteries, other components, as well
as the packaging materials. Please go to
http://csr.asus.com/e nglis h/Takeback.htm for the detailed recycling information
in different regions.
2. Connect your devices.
繁體中文
NOTE:
Before you proceed, unplug and dis connect the wires/cables from your existing
modem setup. After two minutes, replug and reconnect the wires/cables for your network
environment.
1.
選擇路由器模式
。
2. 連接裝置。
注意: 您開始操作之前 ,請先 拔掉數 據機上 連接的 所有纜 線。兩 分鐘後 再重新 連
接。在
3. 開啟網頁瀏覽器 並按照 快速網 際網路 設定(Q I S)的步驟 操作。
注意:開啟網頁 瀏覽器 後,若 QIS 頁面沒有出現,請嘗試關閉網頁瀏
覽器的 Proxy 設定。
4. 設定完成。
REACH
Complying with the REACH
(Registration, Evaluation, Authorisation, and
Restriction of Chemicals) regulatory framework, we published the chemical
substances in our products at ASUS REACH website at
http://csr.asus.com/e nglis h/REACH.htm
簡体中文
1.
選擇路由器模式
。
2. 連接設備。
注意: 您開始操作之前 ,請先 拔掉調 制解調 器上連 接的所 有線纜 。 兩分鐘 後再重 新
連接。在
3. 開啟網頁瀏覽器 並按照 快速互 聯網設 置(Q I S)的步驟操 作。
注意:開啟網頁 瀏覽器 後,若 QIS 頁面沒有出現, 請嘗試 關閉網 頁瀏
覽器的代理設置 。
4. 設置完成。
AP
REPEATER
RT
-
N12,
RT
-
N12 C1
Quick Start Guide
NOTE:
For more details on the features of the wireless router, refer to the user manual
included in the Utility CD.
ROUTER
Bahasa Indonesia
Modem
1. Pilih mode Ro uter.
2. Sambung ka n perang kat.
CATATAN: Sebelum mela njutka n, le pas dan pu tuska n sambungan ka bel dari pemasa ngan modem y ang ada . Se te lah dua me nit, pa sang dan
sa mbung kan ke mbali kabel u ntuk lingkunga n jaringa n.
3. A ktif kan brow ser Web, ke mudian i ku ti lang kah-lang kah Quick Interne t Setup (QIS).
CATATAN: Ji ka ha laman W eb QIS tidak muncul di laya r setelah Anda m engaktifkan browser Web, nona ktif ka n pengatura n proxy di brow ser
Web.
4. Konfigura si se lesai.
Client
3. Launch the web browser and follow the Quick Inte rnet Setup (QIS) steps.
Bahasa Malaysia
1. Pilih mod P enghala.
2. Sambung ka n peranti anda.
NOTA: Se belum anda mener uskan, c abut plag dan tang galkan way ar/kabel dari per sediaan mode m anda ya ng sedia ada. Sele pas dua minit,
pa sang semula pla g dan sambung se mula way ar/kabel untu k persekitaran r angka ian anda.
3. Lanca rka n penye mak imbas web da n ikut la ngkah-lan gkah Per sediaan Interne t Pantas (QI S) .
NOTA: Jika halama n web QIS tida k munc ul selepas me lancarkan peny ema k imba s web, nya hday akan tetapan pro ksi pa da peny emak imbas
web.
4. Per sediaan selesa i.
Manufacturer:
ASUSTeK Computer Inc.
Tel:
Address:
+886
-
2
-
2894
-
3447
No. 150, LI
-
TE RD., PEITOU, TAIPEI 112,
TAIWAN
HARKORT STR.
21
-
23, 40880 RATINGEN,
GERMANY
+90 212 3311000
AYAZAGA MAH. KEMERBURGAZ CAD.
NO.10 AYAZAGA/ISTANBUL
+90 212 3567070
CEMAL SURURI CD. HALIM MERIC IS
MERKEZI
No: 15/C D:5-6 34394 MECIDIYEKOY/
ISTANBUL
ไทย
PPPoE
1. เลือกโหมด Router (เราเตอร์)
2. เชือมต่ออุปกรณ ์ ของ คุณ
หมายเหตุ:
◌่อนที คุณจะดําเนินการ ให้ถอดปล ั ก และตั ด การเชือมต่อสายไฟ/ส ายเคเบิ ลต่างๆ
จากโมเด็มทีมี อยู่ของคุ ณออกเสียก่อน หลัง จากสองนาที ก
ให้เสียบปล ั ก และเชือ มต่อสายไฟ/สายเคเบิลต่างๆ ส ําหรับส ภาพแวดล้ อมเครือ ข่ายของคุณให ม่
3. เปิ ดเว ็ บเบรา เซอร์ และท ําตามขั นต อน การต ัง ค่าอินเตอร์ เน็ตด่วน (QIS)
หมายเหตุ: ถ ้ าเว็ บเพจ QIS
ไม่ปรากฏขึนห ลั งจ ากการเปิ ดเว็ บเบร าเซอร์ ให้ปิ ดการท ํางานการต ั งค่าพร็อกซี บนเว ็ บเบรา เซอร์
4. การตั งค่า เสร็จส มบูรณ์
Authorise d
representative
in Europe :
Authorise d
distributors
in Turke y:
ASUS Computer GmbH
Address:
Türkçe
BOGAZICI BIL GISAYAR SAN. VE TIC. A.S.
Tel:
Address:
DHCP
1. Yönlendirici modunu seç in.
2. Ay gıtla rınızı bağlayın.
NOT: Deva m etme den önce, kabloları/ te lle ri mevc ut modem kurulumunu zdan çıkarın ve ba ğlantıların ı kesin. İki da kika sonra a ğ ortamınız için
kablo ları/telleri ye niden takın ve ba ğlantısını ye nide n sağlayın.
3. Web ta rayıc ınızı açın ve Quick Internet Setup (Hızl ı İ nternet Kurulum u) (QIS) adım larını izleyin.
NOT: Eğer Q IS web sayf ası web tara yıcısını başlattı ktan so nra görünm ezse, proxy ayarlarını we b taray ıcısında engelley in.
4. Kurulum ta mam lanır.
CIZGI Elektronik San. Tic. Ltd. Sti.
Tel:
Address:
EEE Yönetmeliğine Uygundur.
NOTE:
If the QIS web page does not appear after launching th
e web brows er, disable the
proxy settings on the web browser.
A6980 / Firs t Edition / Nov. 2011
A6980_RT
-
N12
-
C1_ QSG_Asian(OK).in1 1
10.11.2011 10:09:18 Uhr

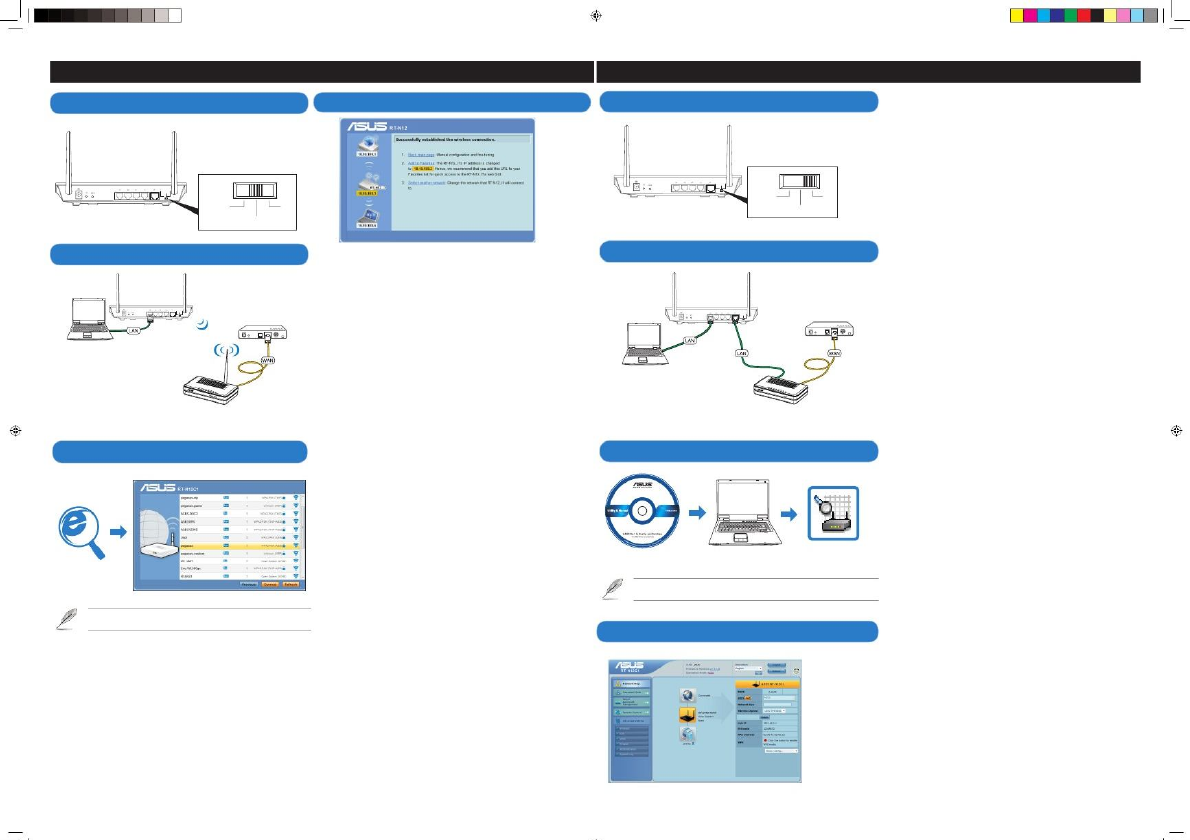
Extending Your Wireless Network
!
-
Repeater
Mode
1. Choose the Re peate r mode .
4. Setup is comple ted.
C1
!
1. Choose the AP mode.
!
Extending Your Wired Network - AP Mode
繁體中文
1.
選擇基地台
(
AP
)
模式
。
2. 連接裝置。
3. 開啟 Device Discove ry
應用程式並進行 安全設 定。
注意:欲開啟 Device Discovery 程式,點選
開始 > 程式集
> ASUS Util ity >
RT-N12B1 Wireless R outer > Device Discovery 。
4. 設定完成。
簡体中文
1.
選擇
AP
模式。
2. 連接設備。
3. 開啟
De vice
Discove ry
應用程序並進行 安全設 置。
C
C
ROUTER
AP
ROUTER
AP
REPEATER
C
注意
:
若要開啟
Device
Discover y
程序
,
點擊
【
開始
】
>
【
所有程序
】
> 【ASU S Utility 】>【RT- N12B1 Wirele ss
Router】>【D evice
Discover y】。
4.
設置完成。
C
REPEATER
RT
-
N12,
RT
-
N12 C1
Router
Repeater
AP
RT
-
N12,
RT
-
N12 C1
Router
Repeater
AP
Bahasa Indonesia
1. Pilih mode AP.
2. Sambung ka n perang kat.
3. A ktif kan u tilitas Device Discovery (Pemulihan P erangkat), kem udia n konfigurasikan pengaturan ke amana n.
CATATAN: Un tuk menga ktif kan Pene lusur an Pera ngkat, klik Mulai > P rogram > Utilita s ASU S > Rou ter Nirkabel RT-N12B1 > P enelusuran
Per angkat.
4. Konfigura si se lesai.
Bahasa Malaysia
2. Connect your devices.
繁體中文
1.
選擇中繼器模式
。
2. 連接裝置。
3. 開啟網頁瀏覽器 ,從清 單中選 擇一個 無線網 路,接 著點選
連線(Conne ct)。
注意:開啟網頁 瀏覽器 後,若 QIS 頁面沒有出現,請嘗試關閉網頁瀏
覽器的 Proxy 設定。
4. 設定完成。
2. Connect your devices.
1. Pilih mod AP .
2. Sambung ka n peranti anda.
3. Lanca rka n utiliti Pene muan P eranti dan konfigurasikan seting keselam atan.
NOTA: Untu k m elancar kan P enem uan Pera nti, klik Mu la > Atur Cara > Utiliti ASUS > P enghala Wa yar le s RT- N12B1 > Pene muan
Per anti.
4. Per sediaan selesa i.
ไทย
RT
-
N12,
RT-N12 C1
ROUTER
AP
REPEATER
簡体中文
Modem
1.
選擇中繼器模式
。
2. 連接設備。
3. 開啟網頁瀏覽器 ,從列 表中選 擇一個 無線網 絡,然 後點擊 【聯機
(Connect) 】。
注意:開啟網頁 瀏覽器 後,若 QIS 頁面沒有出現,請嘗試 關閉網 頁
瀏覽器的代理設 置。
4. 設置完成。
RT
-
N12,
RT-N12 C1
ROUTER
AP
REPEATER
Modem
1. เลือกโหมด AP
2. เชือมต่ออุปกรณ ์ ของ คุณ่
3. ปิ ดยูท ลต D evice
Discove ry (การสํารวจอุปกรณ ์) และกํ าหนดก ารตัง ค่าด ้ านความปลอ ดภั ยเ ◌ิ ◌ิ ◌้◌ี◌้
หมายเหตุ: ในการเปิ ด คุณส มบัตการสํารวจอุป กร ณ์,
คลิก เริม >
โปรแกรม > ยูทลต
ASUS > RT-N12B1
ไวร์เลส เราเตอร์ >
การสํารวจอุปกรณ ์ ิ ิ ◌ิ ◌้◌ี
4. การตั งค่า เสร็จส มบูรณ์
Türkçe
Client
Bahasa Indonesia
1. Pilih mode Re peater.
2. Sambung ka n perang kat.
3. A ktif kan brow ser Web, pi lih jaringan nir kabel dari daf ta r, lalu kli k Connect (Sambung ka n).
CATATAN: Ji ka ha laman W eb QIS tidak muncul di laya r setelah Anda m engaktifkan browser Web, nona ktif ka n pengatura n proxy di brow ser
Web.
4. Konfigura si se lesai.
1. AP m odunu s
eçin.
2. Ay gıtla rınızı bağlayın.
3. Device Discovery yardımc ı programını başlatın ve gü venlik ayar larını yapılandır ın.
NOT: Ay gıt Kurtarma yı başlatm ak iç in, Ba şla t > P rogramla r > ASUS Yardım cı Programla rı > RT-N12B1 Kablosuz Y önlendirici >
Ay gıt K urtarma ’y a tıklay ın.
4. Kurulum ta mam lanır.
Client
Bahasa Malaysia
Wireless Router
1. Pilih mod P engulang.
2. Sambung ka n peranti anda.
3. Lanca rka n penye mak imbas web, pilih ra ngkaian way arles dar i se narai, dan kli k Sambung.
NOTA: Jika halama n web QIS tida k munc ul selepas me lancarkan peny ema k imba s web, nya hday akan tetapan pro ksi pa da peny emak imbas
web.
4. Per sediaan selesa i.
Router
3. Launch the web browser, select a wire less network from the list,
and click Connect.
ไทย
1. เลือกโหมด Repeate r (รีพีตเตอร์ )
2. เชือมต่ออุปกรณ ์ ของ คุณ
3. เปิ ดเว ็ บเบรา เซอร์ เลือกเครือข่ ายไร้ส ายจากรายการ และคลิก
Connec t (เชือมต่อ)
หมายเหตุ: ถ ้ าเว็ บเพจ
QI S ไม่ปร ากฏขึนหล ั งจากการเปิดเว ็ บเบรา เซอร์
ให้ปิ ดการท ํางานการต ั งค่าพร็อกซี บนเว ็ บเบรา เซอร์
4. การตั งค่า เสร็จส มบูรณ์
3.
Launch
the
Device
Discove ry utility and
configure the security
settings .
ASUS Contact information
ASUSTeK
COMPUTER
INC.
(Asia Pacific)
Address
Website
15 Li
-
Te Road, Peitou, Taipei, Taiwan 11259
www.asus.com.tw
+886228943447
+886228907698
support.asus.com*
800
Corporate Way, Fremont, CA 94539, USA
+15029550883
+15029338713
usa.asus.com
support.asus.com*
Harkort Str. 21
-
23, D
-
40880 Ratingen, Germany
+492102959911
www.asus.com.de
www.asus.com.de/sales
+491805010923
+491805010920
+492102959911
support.asus.com*
Tü
rkçe
1. Yineley ici modunu seç in.
2. Ay gıtla rınızı bağlayın.
3. Web ta rayıc ısını başlatın, listeden ka blosu z bir ağ se çin ve Bağlan ’a tıklayın.
NOT: Eğer Q IS web sayf ası web tara yıcısını başlattı ktan so nra görünm ezse, proxy ayarlar ını we b taray ıcısında engelley in.
4. Kurulum ta mam lanır.
RT-N12
SuperSpeed N Wireless R outer
Technical Support
Telephone
Support Fax
Software download
Address
Telephone
Fax
Website
Software download
Address
Fax
Website
Online contact
ASUS COMPUTER INTERNATIONAL (America)
Utility CD
Client
Device Discovery
NOTE:
To launch Device Discovery, click
Start
>
Programs
>
ASUS Utility
>
RT-N12B1 Wireless Router > Device Discovery.
NOTE:
If the QIS web page does not appear after launching the web browser, dis
-
able the proxy s ettings on the web browser.
ASUS COMPUTER GmbH (Ge rmany and Aus tria)
4. Setup is comple ted.
Technical Support
Telephone (Component)
Telephone (System/Notebook/Eee/LCD)
Fax
Online support
* Available on this site is an online Technical Inquiry Form that you can fill out
to contact
technical support.
A6980_RT
-
N12
-
C1_ QSG_Asian(OK).in2 2
10.11.2011 10:09:22 Uhr
ThisequipmenthasbeentestedandfoundtocomplywiththelimitsforaClassB
digitaldevice,pursuanttopart15oftheFCCRules.Theselimitsaredesignedto
providereasonableprotectionagainstharmfulinterferenceinaresidential
installation.Thisequipmentgenerates,usesandcanradiateradiofrequencyenergy
and,ifnotinstalledandusedinaccordancewiththeinstructions,maycauseharmful
interferencetoradiocommunications.However,thereisnoguaranteethat
interferencewillnotoccurinaparticularinstallation.
Ifthisequipmentdoescauseharmfulinterferencetoradioortelevisionreception,
whichcanbedeterminedbyturningtheequipmentoffandon,theuseris
encouragedtotrytocorrecttheinterferencebyoneormoreofthefollowing
measures:
‐‐Reorientorrelocatethereceivingantenna.
‐‐Increasetheseparationbetweentheequipmentandreceiver.
‐‐Connecttheequipmentintoanoutletonacircuitdifferentfromthattowhichthe
receiverisconnected.
‐‐Consultthedealeroranexperiencedradio/TVtechnicianforhelp.
Changesormodificationsnotexpresslyapprovedbythepartyresponsiblefor
compliancecouldvoidtheuser'sauthoritytooperatetheequipment.
ThisequipmentcomplieswithFCCradiationexposurelimitssetforthforan
uncontrolledenvironment.
Thisequipmentshouldbeinstalledandoperatedwithminimumdistance20cm
betweentheradiator&yourbody.
ForproductavailableintheUSA/Canada,onlychannel1~11canbeoperated.
Selectionofotherchannelsisnotpossible.