ASUSTeK Computer USBACRU00 Dual-band Wireless-AC1300 USB Adapter User Manual ASUS USB AC57 QSG 12x12cm
ASUSTeK Computer Inc Dual-band Wireless-AC1300 USB Adapter ASUS USB AC57 QSG 12x12cm
UserManual.wiki
>
ASUSTeK Computer
>
USBACRU00 User Manual
User Manual
Navigation menu
Upload a User Manual
Namespaces
Wiki Guide
HTML
PDF
Info
Views
User Manual
Discussion / Help
Navigation
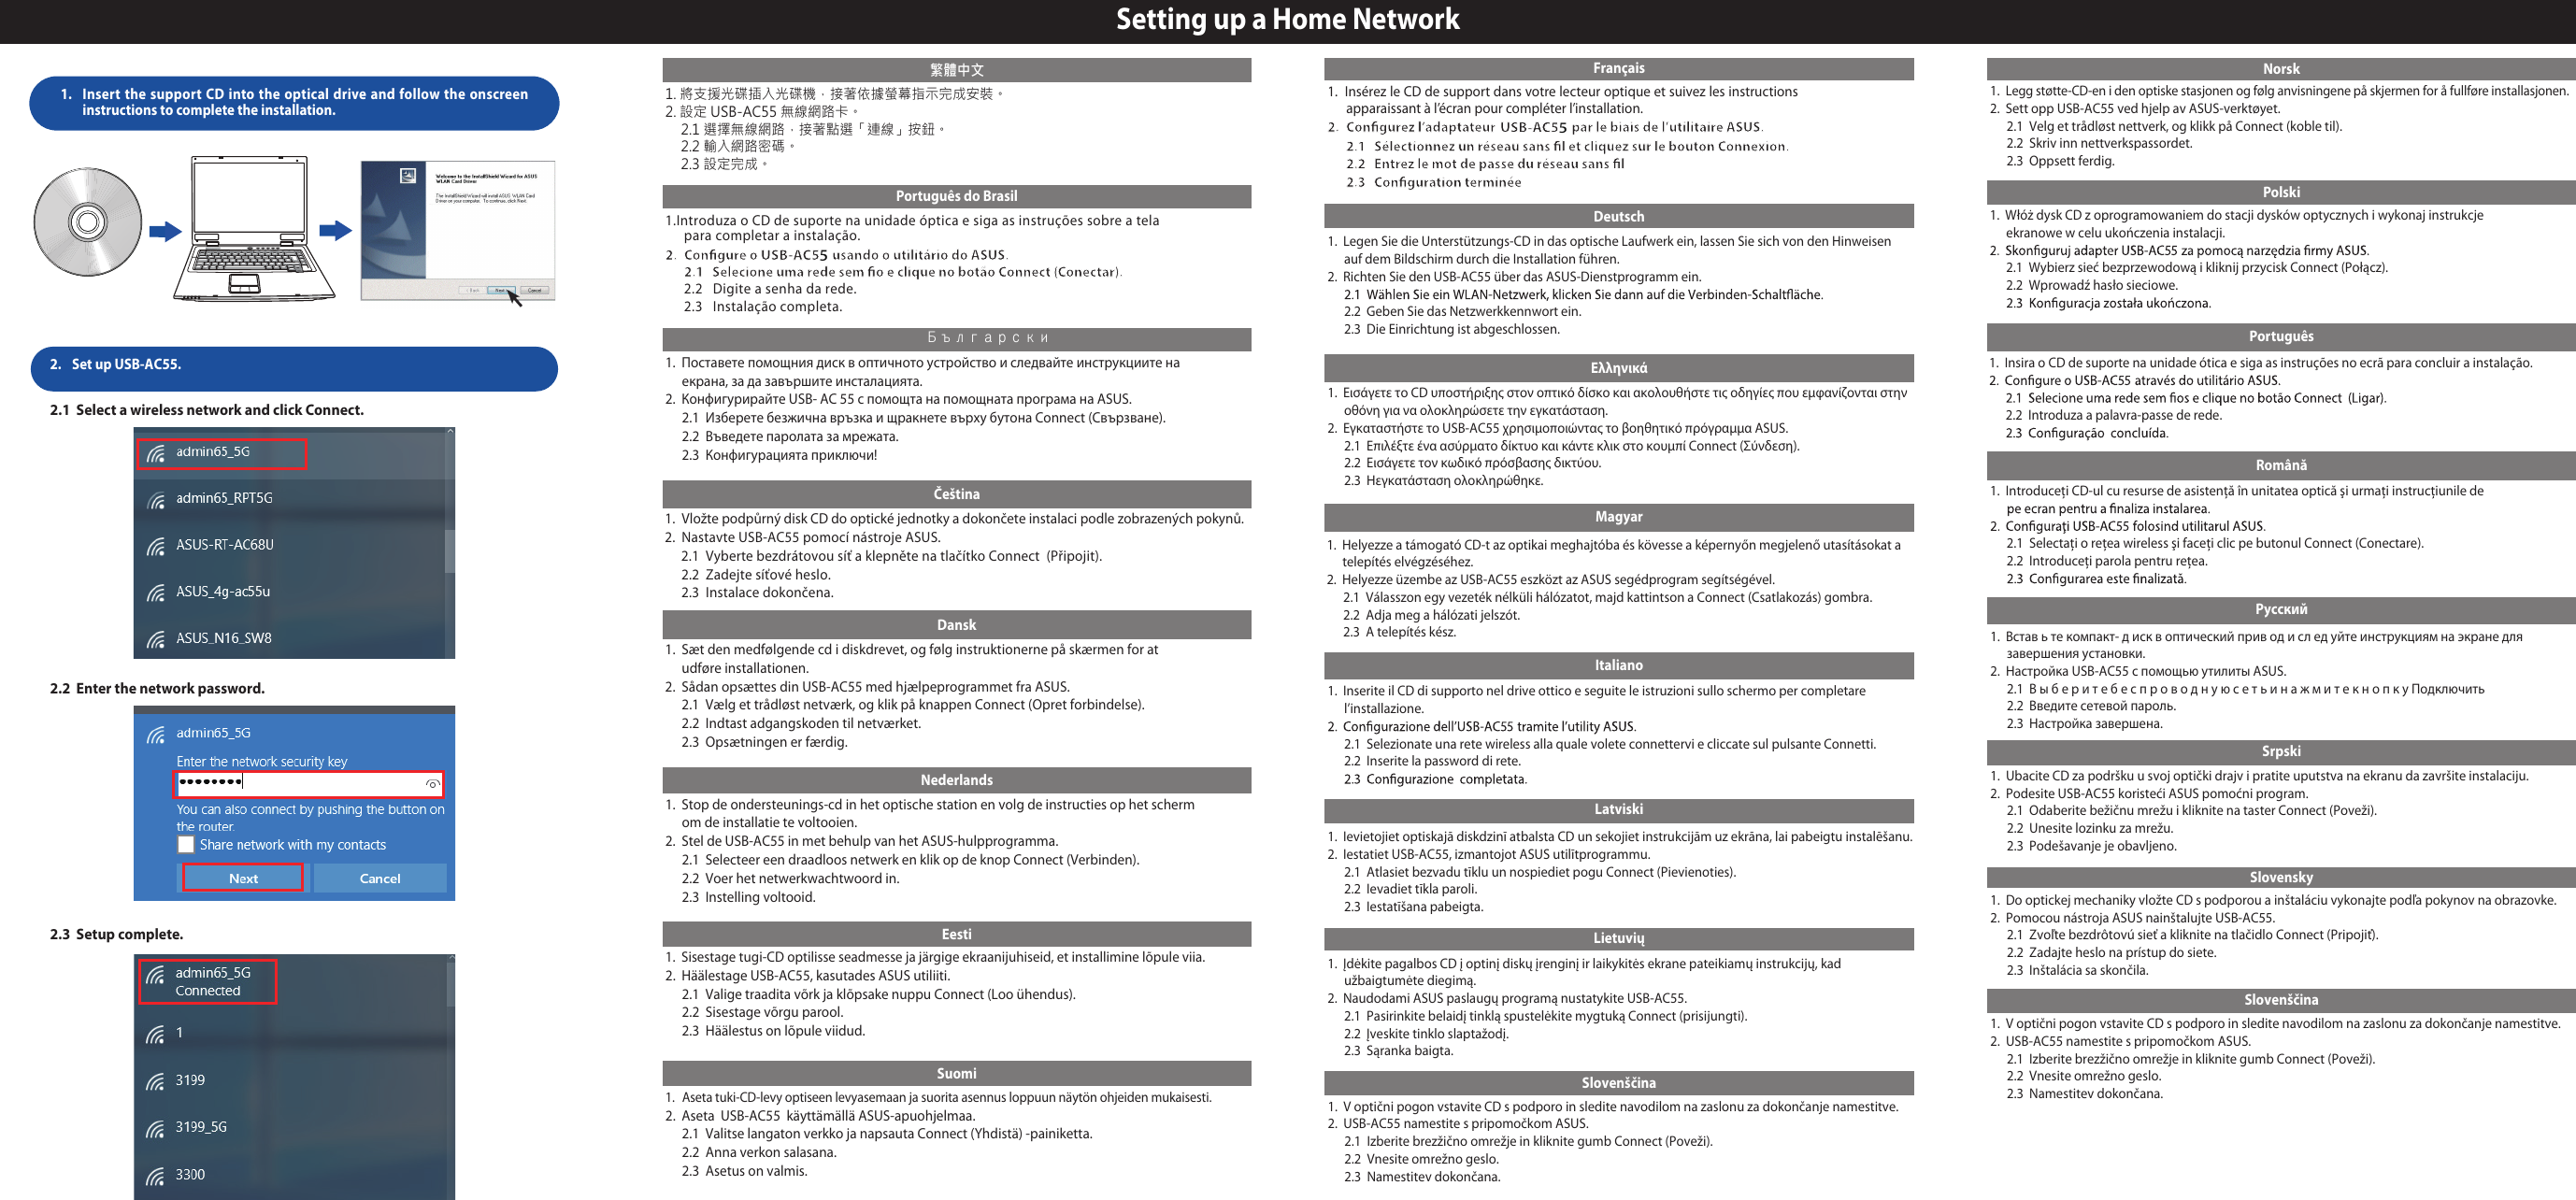
![1.Sätt i support-CD-skivan i den optiska enheten och följ instruktionerna på skärmen för att fullfölja installationen.2. Ställ in USB-AC55 med ASUS verktyget.2.1 Välj ett trådlöst nätverk och klicka på knappen Connect (anslut).2.2 Ange nätverkslösenordet.2.3 Installationen är klar.Setting up a Home NetworkNetworks Global Hotline Informationsupport E-mailNOTES: • UK network_support_uk@asus.com • For more information, visit the ASUS support site at http://support.asus.comWARNING! This product may contain chemicals known to the States of California to cause cancer and harm. Wash hands after handling.Region Country Hotline Numbers Service HoursAmericasHong Kong 00852-35824770 10:00-19:00 Mon-SatUSA 1-812-282-2787 8:30-12:00 EST Mon-FriCanada 9:00-18:00 EST Sat-SunMexico 001-8008367847 08:00-20:00 CST Mon-Fri08:00-15:00 CST SatEspañolSvenska1. Вставте компакт-диск підтримки до оптичного дисковода і виконуйте екранні інструкції, щобзавершити інсталяцію.2. Налаштуйте USB-AC55 за допомогою утиліти ASUS.2.1 Виберіть бездротову мережу і клацніть кнопку Connect (Підключитися).2.2 Введіть пароль мережі.2.3 Виконано налаштування.ПРИМІТКА : Будь ласка, використовуйте спеціальний клей, щоб закріпити антени. Клей не входить до комплекту постачанняУкраїнська1.Masukkan CD dukungan ke drive optik, lalu ikuti petunjuk di layar untuk menyelesaikan penginstalan.2.1 Pilih jaringan nirkabel, lalu klik tombol Connect (Sambungkan).2.2 Masukkan sandi jaringan.Bahasa Indonesia1. 光学ドライブにサポート CD を挿入し、画面上の指示に従ってインストールを完了します。2. ASUS ユーティリティを使用して USB-AC55 のセットアップを行います。2.1 ワイヤレスネットワークを選択し、「接続」ボタンをクリックします。2.2 ネットワークパスワードを入力してください。2.3 セットアップが完了しました。日本語1.Masukkan CD sambungan ke dalam pemacu optik dan ikut arahan pada skrin untuk melengkapkan pemasangan.2. Sediakan USB-AC55 menggunakan utiliti ASUS.2.1 Pilih rangkaian wayarles dan klik butang Connect (Sambung).2.2 Masukkan kata laluan rangkaian.2.3 Persediaan selesai.1. Inserte el CD de soporte en la unidad óptica y siga las instrucciones que aparezcan en la pantalla paracompletar la instalación.2.1 Seleccione una red inalámbrica y haga clic en el botón Connect (Conectar).2.2 Escriba la contraseña de red.Bahasa Malaysiaน่ผแ่สใ ณรูบมส้หใง้ัตดิตราก ําทอ่ืพเอจา้นหนบนอตน้ัขมาต ําทะลแ ์ฟรดไลัคิตปออนใงลนุนสบันส ์า่คง้ัต ยาส้รไยา่ขอืรคเด์รากมุ่ปกิลคะลแ ยาส้รไยา่ขอืรคเกอืลเ อ่ตมอ่ืชเ )ยา่ขอืรคเนา่ผสัหรนอ้ป์ณรูบมสจ็รสเา่คง้ัตรากไทย1. Destek CD’sini optik sürücüye takın ve kurulumu tamamlamak için ekrandaki talimatları izleyin.2. ASUS yardımcı yazılımını kullanarak USB-AC55’yı ayarlayın.2.1 Bir kablosuz ağ seçip Connect (Bağlan) düğmesine tıklayın.2.2 Ağ şifresini girin.2.3 Kurulum tamamlandı.Middle East + AfricaEgypt 800-2787349 09:00-18:00 Sun-ThuSaudi Arabia 800-1212787 09:00-18:00 Sat-WedUAE 00971-42958941 09:00-18:00 Sun-ThuTurkey 0090-2165243000 09:00-18:00 Mon-FriSouth Africa 0861-278772 08:00-17:00 Mon-FriIsrael *6557/00972-39142800 08:00-17:00 Sun-Thu*9770/00972-35598555 08:30-17:30 Sun-ThuBalkan CountriesRomania 0040-213301786 09:00-18:30 Mon-FriBosnia Herzegovina 00387-33773163 09:00-17:00 Mon-FriBulgaria 00359-70014411 09:30-18:30 Mon-Fri00359-29889170 09:30-18:00 Mon-FriCroatia 00385-16401111 09:00-17:00 Mon-FriMontenegro 00382-20608251 09:00-17:00 Mon-FriSerbia 00381-112070677 09:00-17:00 Mon-FriSlovenia 00368-59045400 08:00-16:00 Mon-Fri00368-59045401Estonia 00372-6671796 09:00-18:00 Mon-FriLatvia 00371-67408838 09:00-18:00 Mon-FriLithuania-Kaunas 00370-37329000 09:00-18:00 Mon-FriLithuania-Vilnius 00370-522101160 09:00-18:00 Mon-FriTürkçe1. 将支援光碟插入光碟机,接着依据萤幕指示完成安装。2. 设定 USB-AC55 无线网路卡。2.1 选择无线网路,接着点选「连线」按钮。2.2 输入网路密码。2.3 设定完成。简体中文Federal Communications Commission StatementThis device complies with Part 15 of the FCC Rules. Operation is subject to the following two conditions: This equipment has been tested and found to comply with the limits for a class B digital device, pursuant to Part 15 of the FCC Rules. These limits are designed to provide reasonable protection against harmful interference in a residential installation.This equipment generates, uses and can radiate radio frequency energy and, if not installed and used in accordance with the instructions, may cause harmful interference to radio communications. However, there is no guarantee that interference will not occur in a particular installation. If this equipment does cause harmful interference to radio or televison reception, which can be determined by turning the following measures: • This device may not cause harmful interference.• This device must accept any interference received, including interference that may cause undesired operation.Canada, avis d’Industry Canada (IC)Cet appareil numérique de classe B est conforme aux normes canadiennes ICES-003 et RSS-247Son fonctionnement est soumis aux deux conditions suivantes : (1) cet appareil ne doit pas causer d’interférence et (2) cet appareil doit accepter toute interférence, notamment les interférences qui peuvent Informations concernant l’exposition aux fréquences radio (RF)humains lors du fonctionnement normal.des conditions d’exposition à des appareils portables. Ce périphérique est homologué pour l’utilisation au Canada. Pour consulter l’entrée correspondant à l’appareil dans la liste d’équipement radio (REL - Radio Equipment List) d’Industry Canada rendez-vous sur: http://www.ic.gc.ca/app/sitt/reltel/srch/nwRdSrch.do?lang=engPour des informations supplémentaires concernant l’exposition aux RF au Canada rendezvous sur : http://www.ic.gc.ca/eic/site/smt-gst.nsf/eng/sf08792.html Informations concernant lexposition aux fréquences radio (RF)receiver is connected.responsible for compliance could void the user’s authority to operate the equipment.Operate the device in 5150-5250MHz frequency band for indoor use only.Prohibition of Co-locationThis device and its antenna(s) must not be co-located or operating in conjunction with any other antenna or transmitter. FCC Radiation Exposure StatementThis equipment complies with FCC RF radiation exposure limits set forth for an uncontrolled environment. This device was tested for typical lap held operations with the device contacted directly to the human body to the back side of the notebook computer. To maintain compliance with FCC RF exposure compliance requirements, avoid direct contact to the transmitting antenna during transmitting.Radio Frequency (RF) Exposure InformationLa puissance de sortie émise par l exposition aux fréquences radio d Industry Canada (IC). Utilisez lhumains lors du fonctionnement normal.Ce périphérique a été évalué et démontré conforme aux limites SAR (Speci c Absorption Rate – Taux d absorption spéci que) ddes conditions dCe périphérique est homologué pour ldans la liste dThe radiated output power of the ASUS Wireless Device is below the Industry Canada (IC) radio frequency exposure limits. The ASUS Wireless Device should be used in such a manner such that the potential for human contact during normal operation is minimized.s REL (Radio Equipment List) can be found at the following web address:http://www.ic.gc.ca/app/sitt/reltel/srch/nwRdSrch.do?lang=engNCC Warning StatementArticle 12Article 14interfere a legal communication, if an interference is found, the service will be suspended until improvement is made and the interf erence no longerexists.低功率電波輻射性電機管理辦法(1)「經型式認證合格之低功率射頻電機,非經許可,公司、商號或使用者均不得擅自變更頻率、加大功率或變更原設計之特性及功能」以及(2)「低功率射頻電機之使用不得影響飛航安全及干擾合法通信;經發現有干擾現象時,應立即停用,並改善至無干擾時方得繼續使用。前項合法通信,指依電信法規定作業之無線電通信。低功率射頻電機須忍受合法通信或工業、科學及醫療用電波輻射性電機設備之干擾」。 在5.25-5.35GHz 頻帶內操作之無線資訊傳輸設備,限於室內使用。IC Warning StatementThis radio transmitter(IC: 3568A-USBACRU00) has been approved by Industry Canada to operate With the antenna types listed below with the maximum permissible gain and required antenna impedance for each antenna type indicated. Antenna types not included in this list, having a gain greater than the maximum gain indicated for that type, are strictly prohibited for use with this device.This Class [B] digital apparatus complies with Canadian ICES-003.Cet appareil numérique de la classe [B] est conforme à la norme NMB-003 du Canada.For product available in the USA/Canada market, only channel 1~11 can be operated. Selection of other channels is not possible.This equipment complies with IC RSS-102 radiation exposure limits set forth for an uncontrolled environment.SAR test distance is 5 mm.IC Radiation Exposure Statement:This equipment complies with IC RSS-102 radiation exposure limits set forth for an uncontrolled environment.Operation is subject to the following two conditions: (1) this device may not cause interference, and (2) this device must accept any interference, including interference that may cause undesired operation of the device.• Reorient or relocate the receiving antenna• Increase the separation between the equipment and receiver• Consult the dealer or an experienced radio/TV technician for helpappareil de sans l ASUS est inférieure à la limite dappareil de sans l ASUS de façon à minimiser les contacts http://www.ic.gc.ca/app/sitt/reltel/srch/nwRdSrch.do?lang=engPour des informations supplémentaires concernant l exposition aux RF au Canada rendezvous sur :http://www.ic.gc.ca/eic/site/smt-gst.nsf/eng/sf08792.htmlREACHComplying with the REACH (Registration, Evaluation, Authorisation, and Restriction of Chemicals) regulatory framework, we published the chemical substances in our products at ASUS REACH website at http://csr.asus.com/english/REACH.htm. ManufacturerASUSTeK Computer Inc.Tel: +886-2-2894-3447Address: 4F, No. 150, LI-TE RD., PEITOU, TAIPEI 112, TAIWANAuthorised representative in EuropeASUS Computer GmbHAddress: HARKORT STR. 21-23, D-40880 RATINGEN, DEUTSCHLANDAuthorised distributors in TurkeyBOGAZICI BIL GISAYAR SAN. VE TIC. A.S. Tel: +90 212 3311000Address: AYAZAGA MAH. KEMERBURGAZ CAD. NO.10 AYAZAGA/ISTANBULCIZGI Elektronik San. Tic. Ltd. Sti. Tel: +90 212 3567070Address: CEMAL SURURI CD. HALIM MERIC IS MERKEZI No: 15/C D:5-6 34394 MECIDIYEKOY/ISTANBULKOYUNCU ELEKTRONiK BiLGi iSLEM SiST. SAN. VE DIS TIC. A.S. Tel: +90 216 5288888Address: EMEK MAH.ORDU CAD. NO:18, SARIGAZi, SANCAKTEPE ISTANBUL AEEE Yönetmeliğine Uygundur.IC lorsqu il est installé dans des produits hôtes particuliers qui fonctionnent dans exposition à des appareils portables (La distance observée pour les tests DAS est de 5 mm).utilisation au Canada. Pour consulter léquipement radio (REL - Radio Equipment List) dentr correspondant à lIndustry Canada rendez-vous sur:appareil](https://usermanual.wiki/ASUSTeK-Computer/USBACRU00/User-Guide-3841381-Page-3.png)