ASUSTeK Computer WLHDD25 WIRELESS HARD DRIVE BOX User Manual Asustek WLHDD2 5 UM EN
ASUSTeK Computer Inc WIRELESS HARD DRIVE BOX Asustek WLHDD2 5 UM EN
USERS MANUAL
¨
WL-HDD2.5
(For 802.11g Wireless Clients)
User’s Manual

ii ASUS 802.11g WL-HDD2.5
Preface
About this manual
This manual helps you install, set up and configure the ASUS WL-HDD2.5. Please preserve
this manual for ready reference and use it to familiarize yourself with the product.
Copyright information
No part of this manual, including the products and software described in it, may be repro-
duced, transmitted, transcribed, stored in a retrieval system, or translated into any language in
any form or by any means, except documentation kept by the purchaser for backup purposes,
without the express written permission of ASUSTeK COMPUTER INC. (“ASUS”).
ASUS PROVIDES THIS MANUAL “AS IS” WITHOUT WARRANTY OF ANY KIND,
EITHER EXPRESS OR IMPLIED, INCLUDING BUT NOT LIMITED TO THE IMPLIED
WARRANTIES OR CONDITIONS OF MERCHANTABILITY OR FITNESS FOR A PAR-
TICULAR PURPOSE. IN NO EVENT SHALL ASUS, ITS DIRECTORS, OFFICERS,
EMPLOYEES OR AGENTS BE LIABLE FOR ANY INDIRECT, SPECIAL, INCIDEN-
TAL, OR CONSEQUENTIAL DAMAGES (INCLUDING DAMAGES FOR LOSS OF
PROFITS, LOSS OF BUSINESS, LOSS OF USE OR DATA, INTERRUPTION OF BUSI-
NESS AND THE LIKE), EVEN IF ASUS HAS BEEN ADVISED OF THE POSSIBILITY
OF SUCH DAMAGES ARISING FROM ANY DEFECT OR ERROR IN THIS MANUAL
OR PRODUCT.
Product warranty or service will not be extended if: (1) the product is repaired, modified or
altered, unless such repair, modification of alteration is authorized in writing by ASUS; or (2)
the serial number of the product is defaced or missing.
Products and corporate names appearing in this manual may or may not be registered trade-
marks or copyrights of their respective companies, and are used only for identification or
explanation and to the owners’ benefit, without intent to infringe.
SPECIFICATIONS AND INFORMATION CONTAINED IN THIS MANUAL ARE FUR-
NISHED FOR INFORMATIONAL USE ONLY, AND ARE SUBJECT TO CHANGE AT
ANY TIME WITHOUT NOTICE, AND SHOULD NOT BE CONSTRUED AS A COM-
MITMENT BY ASUS. ASUS ASSUMES NO RESPONSIBILITY OR LIABILITY FOR
ANY ERRORS OR INACCURACIES THAT MAY APPEAR IN THIS MANUAL,
INCLUDING THE PRODUCTS AND SOFTWARE DESCRIBED IN IT.
Copyright © 2004 ASUSTeK COMPUTER INC. All Rights Reserved.
Product Name: ASUS WL-HDD2.5
Manual Revision: E1666
Release Date: May 2004

Preface
ASUS 802.11g WL-HDD2.5 iii
Regulatory information
Federal Communications Commission Statement
This device complies with Part 15 of the FCC Rules. Operation is subject to the following
conditions:
• This device may not cause harmful interference; and
• This device must accept any interference received, including interference that
may cause undesired operation.
This equipment has been tested and found to comply with the limits for a class B digital
device, pursuant to Part 15 of the Federal Communications Commission (FCC) rules. These
limits are designed to provide reasonable protection against harmful interference in a residen-
tial installation. This equipment generates, uses, and can radiate radio frequency energy and,
if not installed and used in accordance with the instructions, may cause harmful interference
to radio communications. However, there is no guarantee that interference will not occur in a
particular installation. If this equipment does cause harmful interference to radio or television
reception, which can be determined by turning the equipment off and on, the user is encour-
aged to try to correct the interference by one or more of the following measures:
• Reorient or relocate the receiving antenna.
• Increase the separation between the equipment and receiver.
• Connect the equipment into an outlet on a circuit different from that to which
the receiver is connected.
• Consult the dealer or an experienced radio/TV technician for help.
WARNING! The use of a shielded-type power cord is required in order to meet FCC emis-
sion limits and to prevent interference to the nearby radio and television reception. It is essen-
tial that only the supplied power cord be used. Use only shielded cables to connect I/O
devices to this equipment. You are cautioned that changes or modifications not expressly
approved by the party responsible for compliance could void your authority to operate the
equipment.
Reprinted from the Code of Federal Regulations #47, part 15.193, 1993. Washington DC:
Office of the Federal Register, National Archives and Records Administration, U.S. Govern-
ment Printing Office.

Preface
iv ASUS 802.11g WL-HDD2.5
CE conformity statement
The CE symbol indicates compliance of this equipment to the EMC Directive and the Low
Voltage Directive of the European Union. These markings indicate that this system meets the
following technical standards:
EN 55022 — “Limits and Methods of Measurement of Radio Interference Characteristics of
Information Technology Equipment.”
EN 55024 — “Information technology equipment - Immunity characteristics - Limits and
methods of measurement.”
EN 61000-3-2 — “Electromagnetic compatibility (EMC) - Part 3: Limits - Section 2: Limits
for harmonic current emissions (Equipment input current up to and including 16 A per
phase).”
EN 61000-3-3 — “Electromagnetic compatibility (EMC) -Part 3: Limits - Section 3: Limita-
tion of voltage fluctuations and flicker in low-voltage supply systems for equipment with
rated current up to and including 16 A.”
EN 60950 — “Safety of Information Technology Equipment.”
NOTE: EN 55022 emissions requirements provide for two classifications:
• Class A is for typical commercial areas.
• Class B is for typical domestic areas.
To determine which classification applies to your computer, examine the CE registration
label located on the back panel of the device. If the label indicates a Class A rating, the fol-
lowing warning applies to your device:
RF INTERFERENCE WARNING: This is a Class A product. In a domestic environment
this product may cause radio frequency (RF) interference, in which case the user may be
required to take adequate measures. This device is classified for use in a typical Class A
domestic environment.

Preface
ASUS 802.11g WL-HDD2.5 v
Safety information
*to be provided by the client*
Customer service information
ASUSTeK COMPUTER INC. (Asia-Pacific)
Address: 150 Li-Te Road, Peitou, Taipei, Taiwan 112
General Tel: +886-2-2894-3447
General Fax: +886-2-2894-3449
Web Site: www.asus.com.tw
Technical Support
MB/Others (Tel): +886-2-2890-7121 (English)
Notebook (Tel): +886-2-2890-7122 (English)
Desktop/Server (Tel): +886-2-2890-7123 (English)
Support Fax: +886-2-2890-7698
ASUS COMPUTER INTERNATIONAL (America)
Address: 44370 Nobel Drive, Fremont, CA 94538, USA
General Fax: +1-502-933-8713
General E-mail: tmd1@asus.com
Web Site: usa.asus.com
Technical Support
Support Fax: +1-502-933-8713
General Support: +1-502-995-0883
Notebook Support: +1-510-739-3777 x5110
Support E-mail: tsd@asus.com
ASUS COMPUTER GmbH (Germany and Austria)
Address: Harkortstr. 25, 40880 Ratingen, BRD, Germany
General E-mail: sales@asuscom.de (for marketing requests only)
General Fax: +49-2102-9599-31
Web Site: www.asuscom.de
Technical Support
Components: +49-2102-9599-0
Notebook PC: +49-2102-9599-10
Support Fax: +49-2102-9599-11
Support E-mail: www.asuscom.de/support (for online support)
ASUSTeK COMPUTER (Middle East and North Africa)
Address: P.O. Box 64133, Dubai, U.A.E.
General Tel: +9714-283-1774
General Fax: +9714-283-1775

vi ASUS 802.11g WL-HDD2.5
Table of Contents
Chapter 1 Introduction 1
Overview..................................................................................... 1
Features................................................................................ 2
System Requirements .......................................................... 3
Power Requirements............................................................ 3
Package List......................................................................... 3
Hardware Components ............................................................... 4
Ports and Buttons................................................................. 4
Status Indicators .................................................................. 5
Wireless Performance................................................................. 6
Site Topography .................................................................. 6
Range ................................................................................... 6
Site Surveys ......................................................................... 7
Roaming Between ASUS APs............................................. 7
Roaming Guidelines ............................................................ 8
Chapter 2 Getting Started 9
Setting up the ASUS WL-HDD2.5............................................. 9
Hardware Installation .......................................................... 9
Location Tips..................................................................... 12
Making Connections.......................................................... 13
AP Mode ....................................................................... 13
Network Storage Mode................................................. 14
Connecting Power......................................................... 15
Configuring the Wireless Client ............................................... 16
TCP/IP Settings ................................................................. 16
SSID Settings..................................................................... 19
Using the HDD ......................................................................... 20
Accessing the HDD ........................................................... 20
Searching for the Device............................................... 20
Locating the Device Manually...................................... 23

ASUS 802.11g WL-HDD2.5 vii
Using Internet Explorer................................................. 25
Hard Drive Pre-scan Function ........................................... 28
Formatting the Hard Disk ............................................. 28
Setting up Permissions....................................................... 30
Editing the User List ..................................................... 31
Editing the Shared Nodes List ...................................... 32
Applying the permissions ............................................. 34
Sharing Files ............................................................................. 35
Transferring Data from External Flash Memory ...................... 41
Auto-copy Function........................................................... 41
Locating the Copied Files on the HDD ............................. 42
Shutting down the ASUS WL-HDD2.5.................................... 43
Chapter 3 Software Configuration 44
Connecting to the Web Interface .............................................. 44
Wired Ethernet Connection ............................................... 44
Wireless Connection.......................................................... 44
Configuring the ASUS WL-HDD2.5 ....................................... 45
Wireless ............................................................................. 45
Interface ........................................................................ 46
Bridge............................................................................ 50
Access Control.............................................................. 52
Advanced ...................................................................... 53
Client Mode .................................................................. 55
IP Config............................................................................ 58
LAN .............................................................................. 58
DHCP server ................................................................. 59
Storage Setting................................................................... 60
Shared Nodes ................................................................ 61
Disk Tool ...................................................................... 63
System Setting ................................................................... 64
Change Password.......................................................... 64
Firmware Upgrade ........................................................ 65
Factory Default ............................................................. 66
Status and Log ................................................................... 66

viii ASUS 802.11g WL-HDD2.5
Status............................................................................. 67
Wireless......................................................................... 68
DHCP Leases ................................................................ 68
Chapter 4 Troubleshooting 69
Chapter 5 Appendix 70
Specifications............................................................................ 70

ASUS 802.11g WL-HDD2.5 1
1. Introduction
Overview
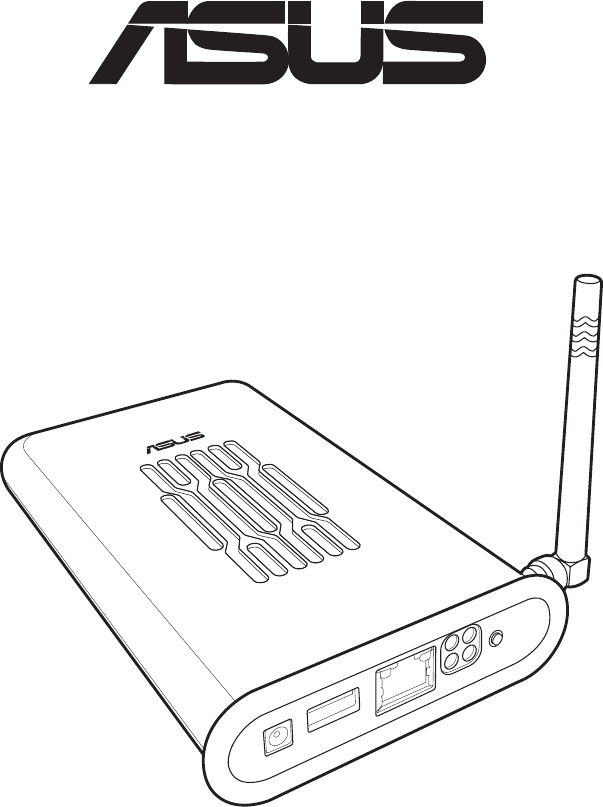
Thank you for purchasing the ASUS WL-HDD2.5. This device is a
wireless local area network (WLAN) hard disk drive (HDD) with
additional Access Point (AP) functionality. It is designed to be fully
compliant with the IEEE 802.11g standard and provides data transfer
at 54 Mbps using the OFDM (orthogonal frequency division multi-
plexing) technology. It is also backward compliant with 802.11b stan-
dards and can be adapted for wired environments for data storage.
Wireless LANs are complementary extensions to existing wired
LANs, offering mobility while maintaining continuous network con-
nectivity to both corporate and home Intranets. They add a new level
of convenience for LAN users. PC users stay connected to the net-
work anywhere throughout a building without being bound by LAN
cables. This is accomplished through the Access Point functionality
of the ASUS WL-HDD2.5. The device also has the additional advan-
tage of providing network storage with its HDD. This allows you to
share information and storage capacity through the WLAN and use
the hard disk like a public wireless folder. The large storage capacity
of the hard disk and a high speed data transfer of 54 Mbps makes the
ASUS WL-HDD2.5 a very useful tool to share music and video files.
The ASUS WL-HDD2.5 also supports automatic copying of files
from a flash memory disk to the hard disk.

2 ASUS 802.11g WL-HDD2.5
Features
The ASUS WL-HDD2.5 has the following useful features:
• 54 Mbps high speed WLAN access
– Maximum available speed of 54 Mbps over the 2.4 GHz fre-
quency band
– Compatible with existing 802.11b WLAN environments
– Auto fallback algorithm to select transmission rate
• Secure wireless connectivity
– AP mode: 64/128 bit WEP, WPA
– Client mode: 64/128 bit WEP
• Standard IDE device support
– Uses Ultra DMA 100 IDE controller
– Adapted for 2.5-inch slim hard disk drives
• Real time clock support with battery backup to synchronize the
network time.
• Auto copy function to copy data from an external flash memory
disk through USB
• Hard disk pre-scan to scan hard disk functionality at startup
• Windows-based utility to set up WLAN and HDD data access
• Wireless profile enabling connectivity for home or office envi-
ronments
• HDD access using Network Neighborhood in Windows or Samba
in Linux
• UPnP (Universal Plug and Play) feature (upgradeable)
• Firmware upgrade function using Ethernet or WLAN
ASUS 802.11g WL-HDD2.5 3
System Requirements
To begin using the ASUS WL-HDD2.5, your system must have the
following minimum requirements:
• An Ethernet (10BaseT or 10/100BaseT) adapter for wired client
• At least one 802.11g (54Mbps) or one 802.11b (11Mbps) wire-
less adapter for wireless mobile clients
• TCP/IP and an Internet browser installed
Power Requirements
The ASUS WL-HDD2.5 requires power from an external power sup-
ply. Your package ships with a 5V, 3A power adapter. Use only the
power adapter provided for safe operation.
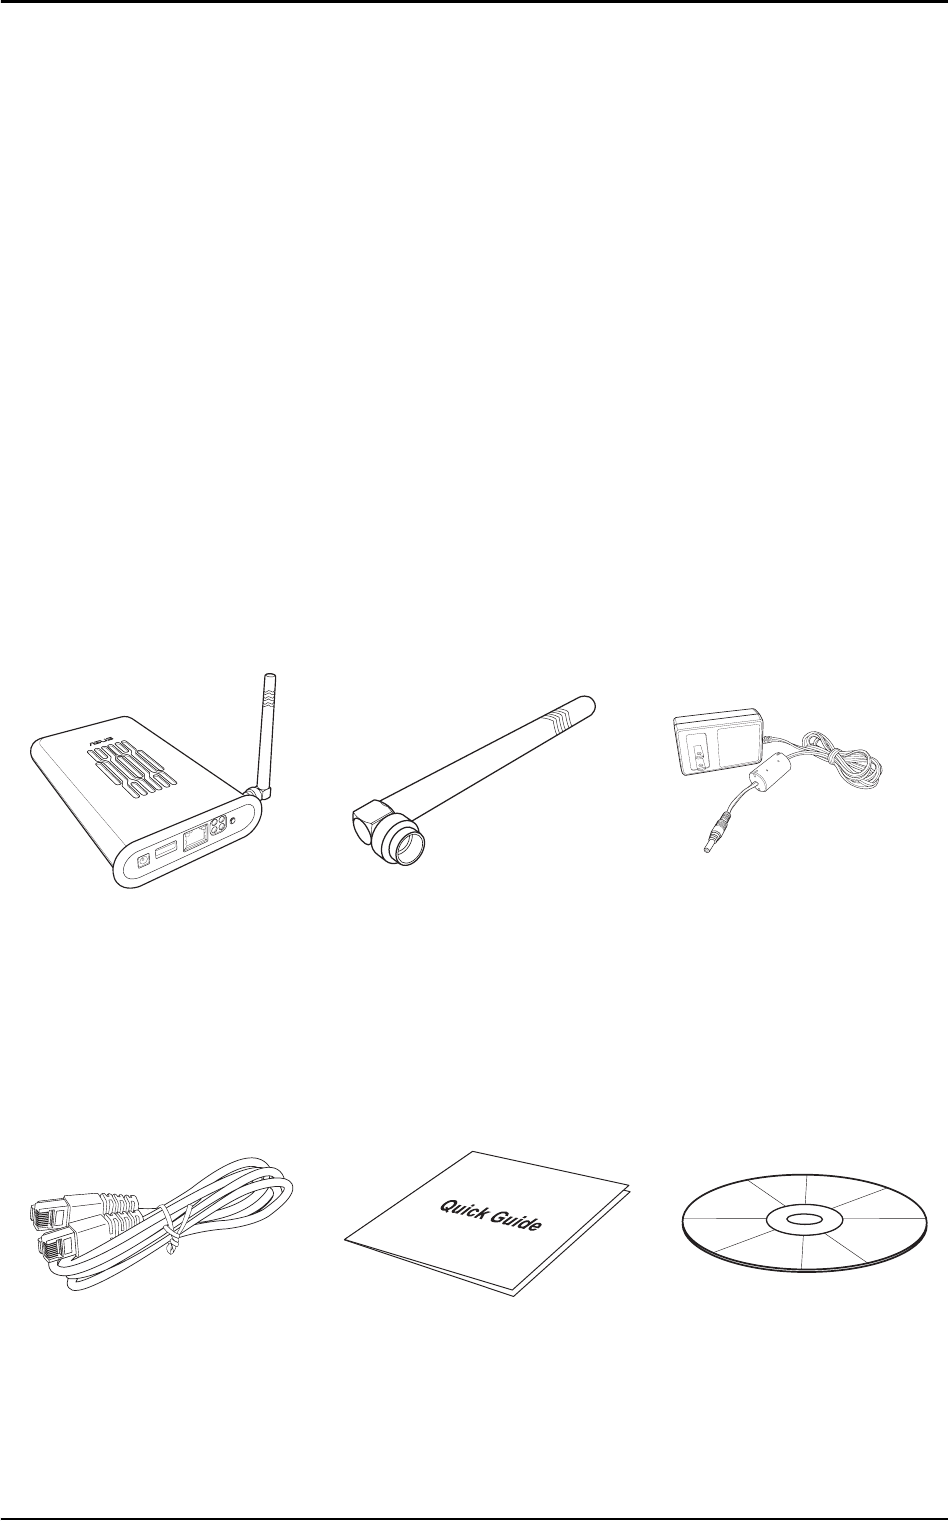
Package List
Your package contains the following items:
Quick start guide
2.4 GHz dipole
antenna
Power adapter
(5 Volts DC, 3 Amp)
Support CD
(utilities and user’s
manual)
RJ-45 Ethernet cable
(straight-through)
ASUS WL-
HDD2.5
4 ASUS 802.11g WL-HDD2.5
Hardware Components
This section gives you a tour of the different ports and status indica-
tors of the ASUS WL-HDD2.5. Refer to this section when installing
and operating your device.
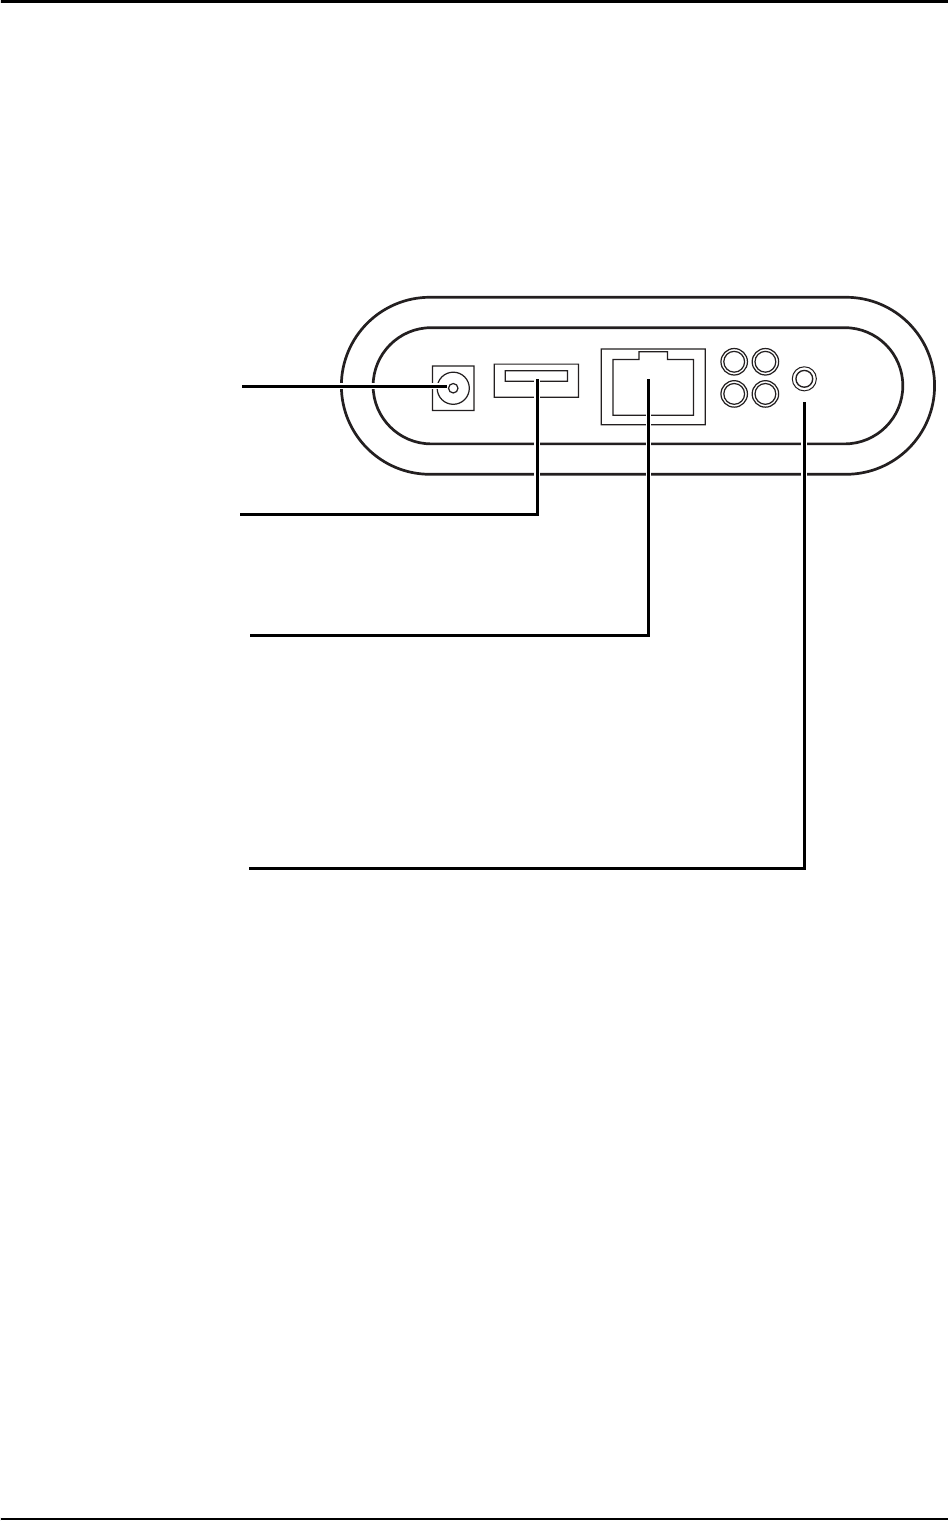
Ports and Buttons
Connect the power
adapter here.
Insert a USB flash
disk here.
Connect one end of
the RJ-45 Ethernet
cable here and the
other end to the RJ-
45 port of a network
hub, switch, or router.
Press down this but-
ton for 5 seconds to
reset the device.
ASUS 802.11g WL-HDD2.5 5
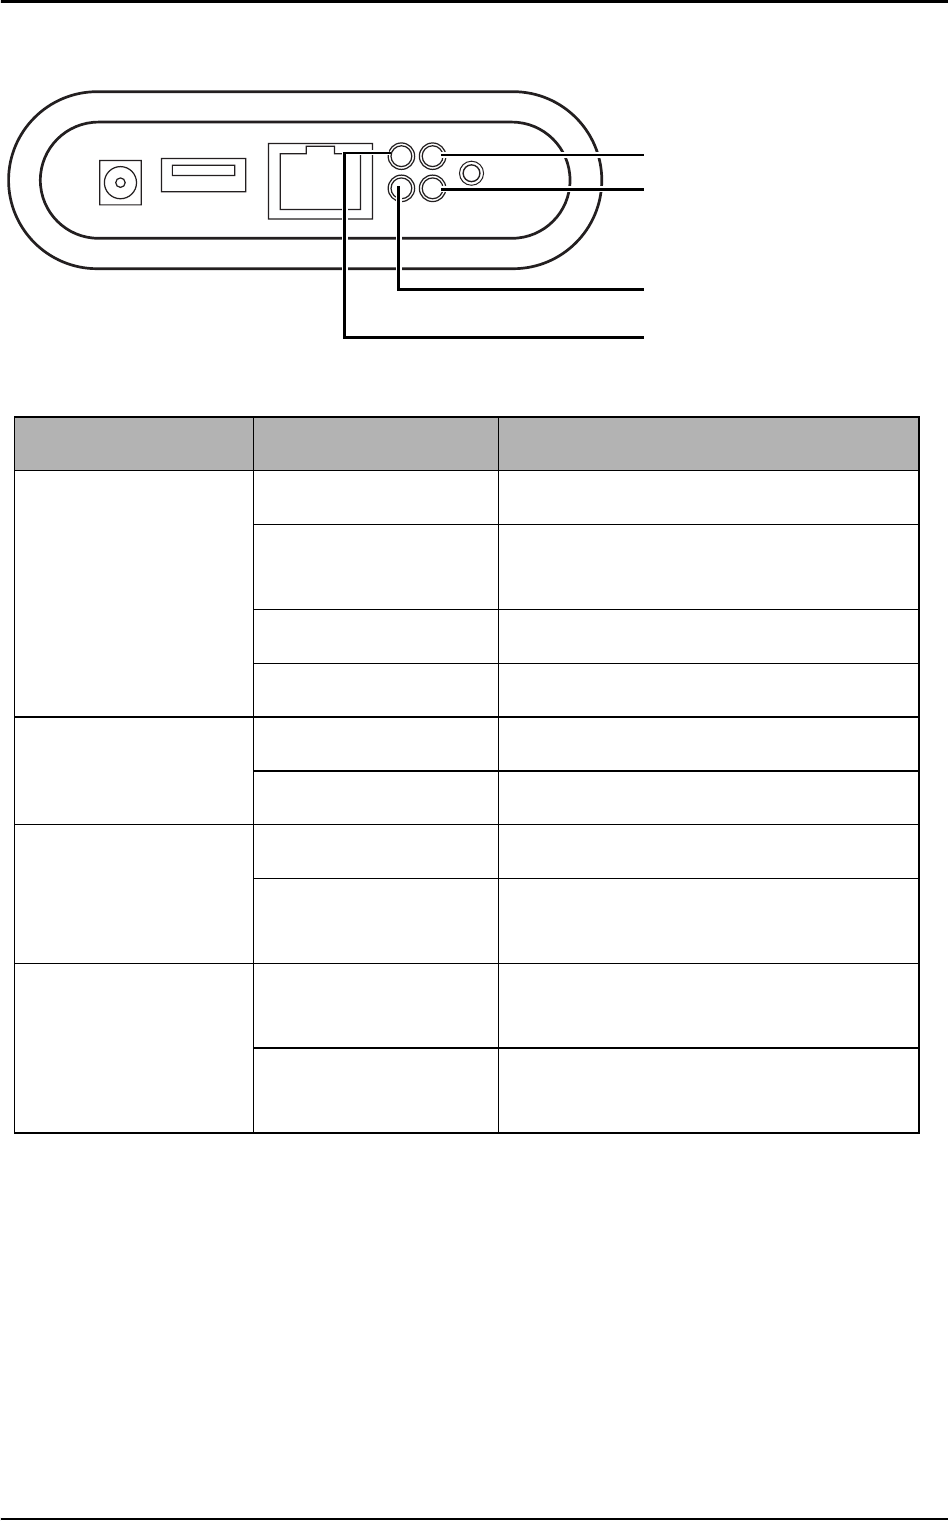
Status Indicators
POWER LED
WLAN LED
HDD LED
USB LED
LED Status Indication
USB LED Off No USB device found
Blinking (fast) Copying from the USB device to
the HDD
Blinking (slow) Partition 1 of the HDD is full
On USB device found
HDD LED Off Normal state
Blinking HDD is being accessed
WLAN LED On Normal state
Blinking Wireless packets are being trans-
mitted or received
POWER LED On Power adapter is plugged in and
the device is powered on
Blinking (slow) File system on the HDD is incon-
sistent

6 ASUS 802.11g WL-HDD2.5
Wireless Performance
This section provides a few ideas to help you improve the perfor-
mance of your WLAN.
Site Topography
For optimal performance, locate wireless mobile clients and the
ASUS WL-HDD2.5 away from transformers, heavy-duty motors, flu-
orescent lights, microwave ovens, refrigerators, and other industrial
equipment. Signal loss can occur when metal or concrete walls or
floors block transmission. Locate the ASUS WL-HDD2.5 in open
areas or add more devices (APs) as needed to improve coverage.
Microwave ovens operate in the same frequency band as the ASUS
WL-HDD2.5. Therefore, if you use a microwave oven within range of
your device, you may notice network performance degradation. How-
ever, your microwave oven and ASUS WL-HDD2.5 will continue to
function.
Range
Every environment is unique with different obstacles, barriers, mate-
rials, and so on. Therefore, it is difficult to determine the exact range
of your WLAN without testing in the specific environment. However,
you can follow some of the guidelines described in this section to esti-
mate the range of your network.
Radio signals may be reflected by some obstacles or absorbed by oth-
ers depending on their construction. For example, with two 802.11b
radios, you may achieve clear reception over a distance of up to 1000
feet in open spaces, with the two devices being in line of sight (mean-
ing they have no obstacles in a straight line between them). However,
the same two units may only achieve up to 300 feet of range when
used indoors.
By default, the ASUS WL-HDD2.5 automatically adjusts the data
rate to maintain a usable signal connection. Therefore, a client that is
close to the ASUS WL-HDD2.5 may operate at higher speeds while a
client that is on the fringe of coverage may operate at lower speeds.

ASUS 802.11g WL-HDD2.5 7
You can configure the data rates used by the ASUS WL-HDD2.5 to
improve the performance. However, if you limit the range of data
rates available to the ASUS WL-HDD2.5, you may reduce the effec-
tive wireless range of the WLAN coverage.
Site Surveys
A site survey (utility provided with ASUS WLAN cards) analyzes the
installation environment and provides users with recommendations
for equipment and its placement. The optimum placement differs
depending on the ASUS AP design and specifications.
Roaming Between ASUS APs
If there are multiple ASUS APs on the network, then a wireless
mobile client may seamlessly roam from one ASUS AP to another.
Each ASUS AP creates its own wireless cell or coverage area. This is
also known as a Basic Service Set (BSS). Any wireless mobile client
can communicate with a particular ASUS AP if it is within the ASUS
AP’s coverage area.
If the cells of multiple ASUS APs overlap, then the wireless mobile
client may switch from one ASUS AP to another as it travels through-
out the building. During the hand-off from one ASUS AP to another,
the wireless mobile client maintains an uninterrupted connection to
the network. This is known as “roaming.”
Multiple ASUS APs connected to a common Ethernet network form
an Extended Service Set (ESS). All members of an Extended Service
Set are configured with an ID, known as the SSID or ESSID. Wireless
mobile clients must be configured with the same SSID as the ASUS
APs on the network; a client can only roam between ASUS APs that
share the same SSID.

8 ASUS 802.11g WL-HDD2.5
Roaming Guidelines
• An ASUS WLAN card can only roam between APs of the same
type.
• All ASUS APs must have the same SSID.
• All ASUS WLAN cards must have the same SSID as the APs
that they will roam between.
• If WEP encryption is enabled, then all ASUS APs and client
adapters must use the same encryption level and WEP Key(s) to
communicate.
• ASUS APs’ cells must overlap to ensure that there are no gaps in
coverage and to ensure that the roaming client will always have a
connection available.
• ASUS APs that use the same Channel should be installed as far
away from each other as possible to reduce potential interference.
• It is strongly recommended that you perform a site survey using
the utility provided with the ASUS WLAN card to determine the
best location for each ASUS AP in the building.
ASUS 802.11g WL-HDD2.5 9
2. Getting Started
This chapter provides important information about installing and con-
necting your ASUS WL-HDD2.5. Read these instructions carefully to
set up your device correctly.
Setting up the ASUS WL-HDD2.5
Refer to this section to learn about installing and configuring the
ASUS WL-HDD2.5.
Hardware Installation
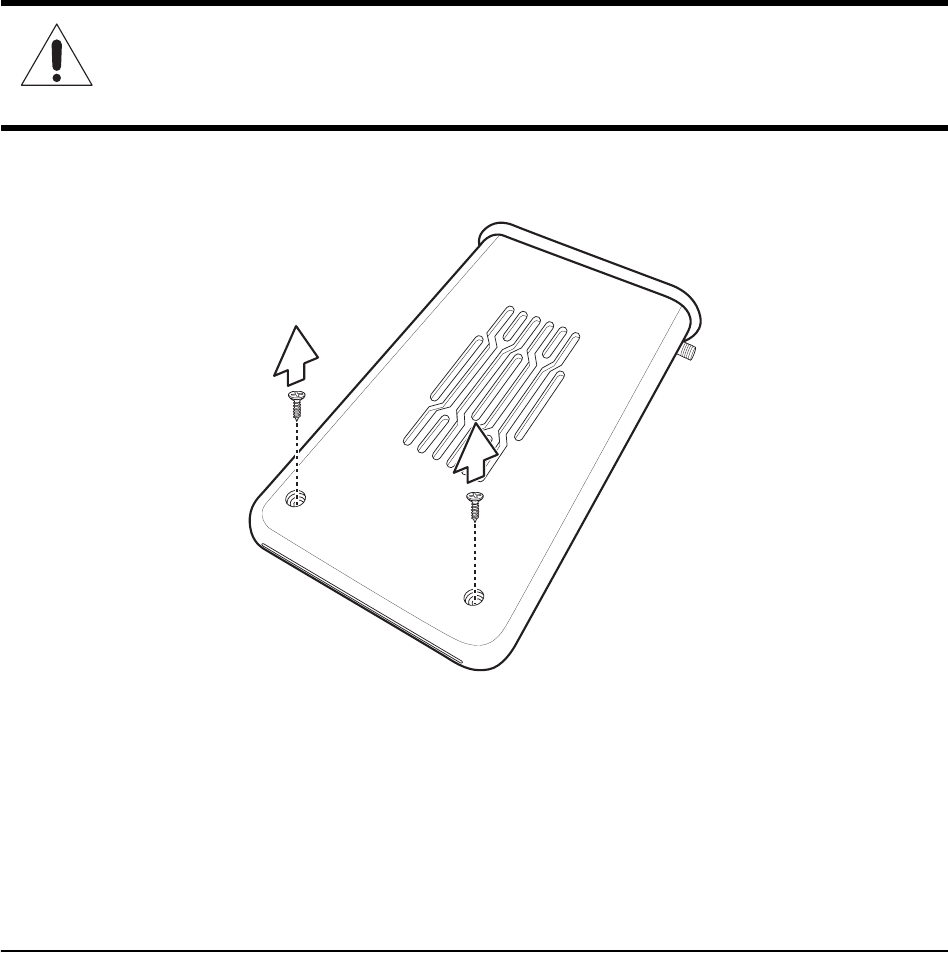
Follow these steps to insert the hard disk and assemble the device
before using it.
1. Remove the screws from the bottom.
Warning: The ASUS WL-HDD2.5 is not hot-swappable. Make
sure that it is turned off and not connected to the power outlet
when performing the following assembly procedure.
10 ASUS 802.11g WL-HDD2.5
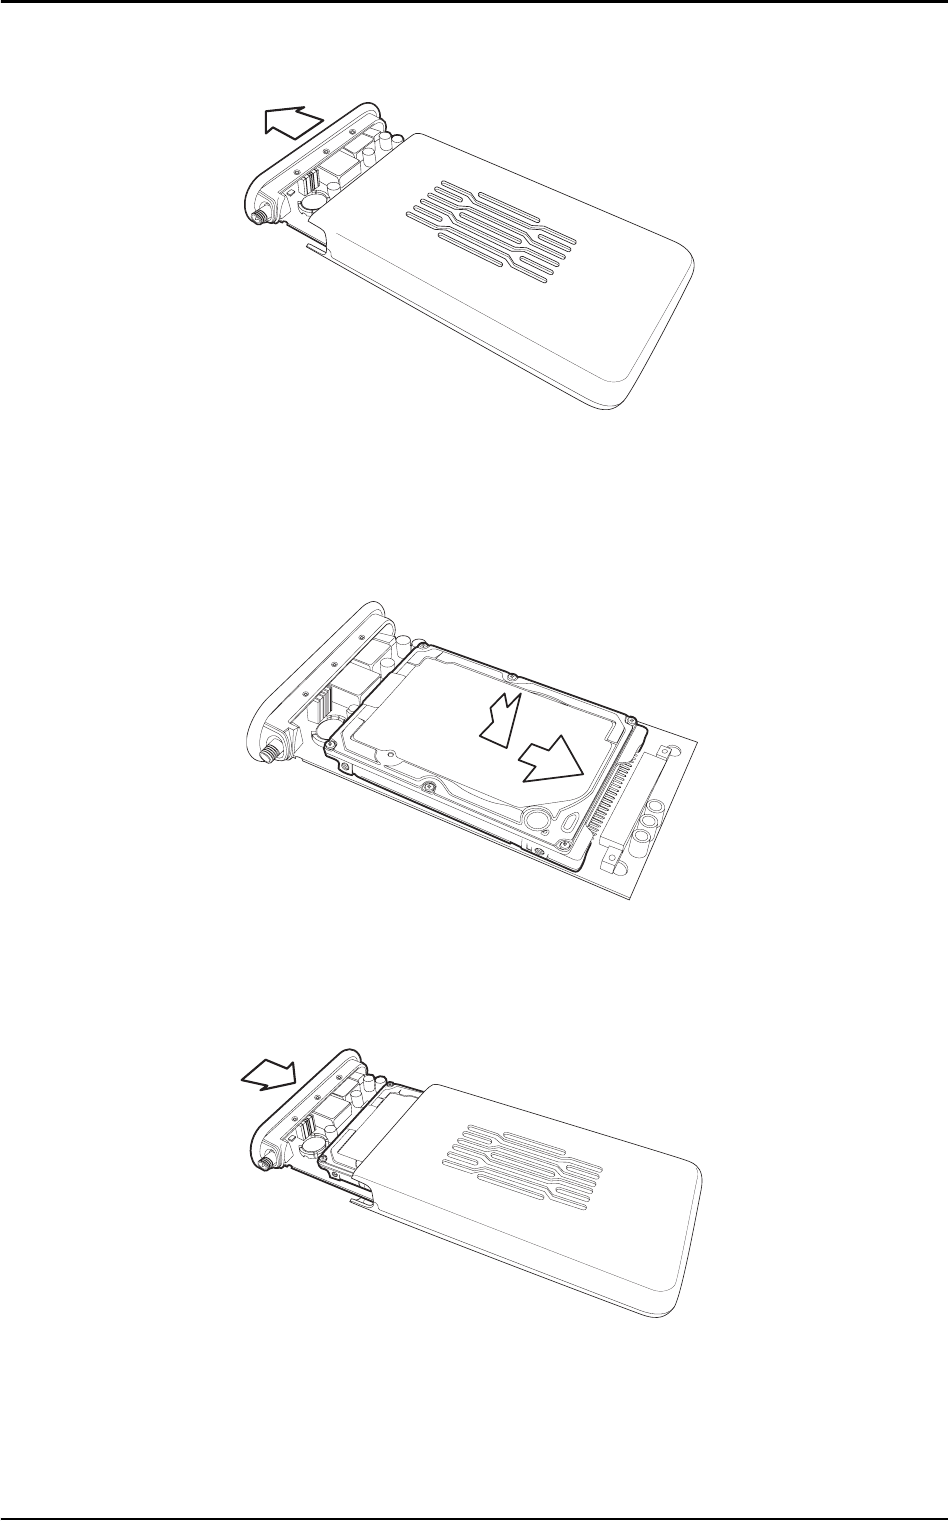
2. Remove the front cover and slide out the internal circuit board.
3. Insert the hard drive into the slot. Make sure that the hard drive
connecting pins and the connector are properly aligned for a sta-
ble connection.
4. Insert the circuit board back inside the outer shell and replace the
front cover.
ASUS 802.11g WL-HDD2.5 11
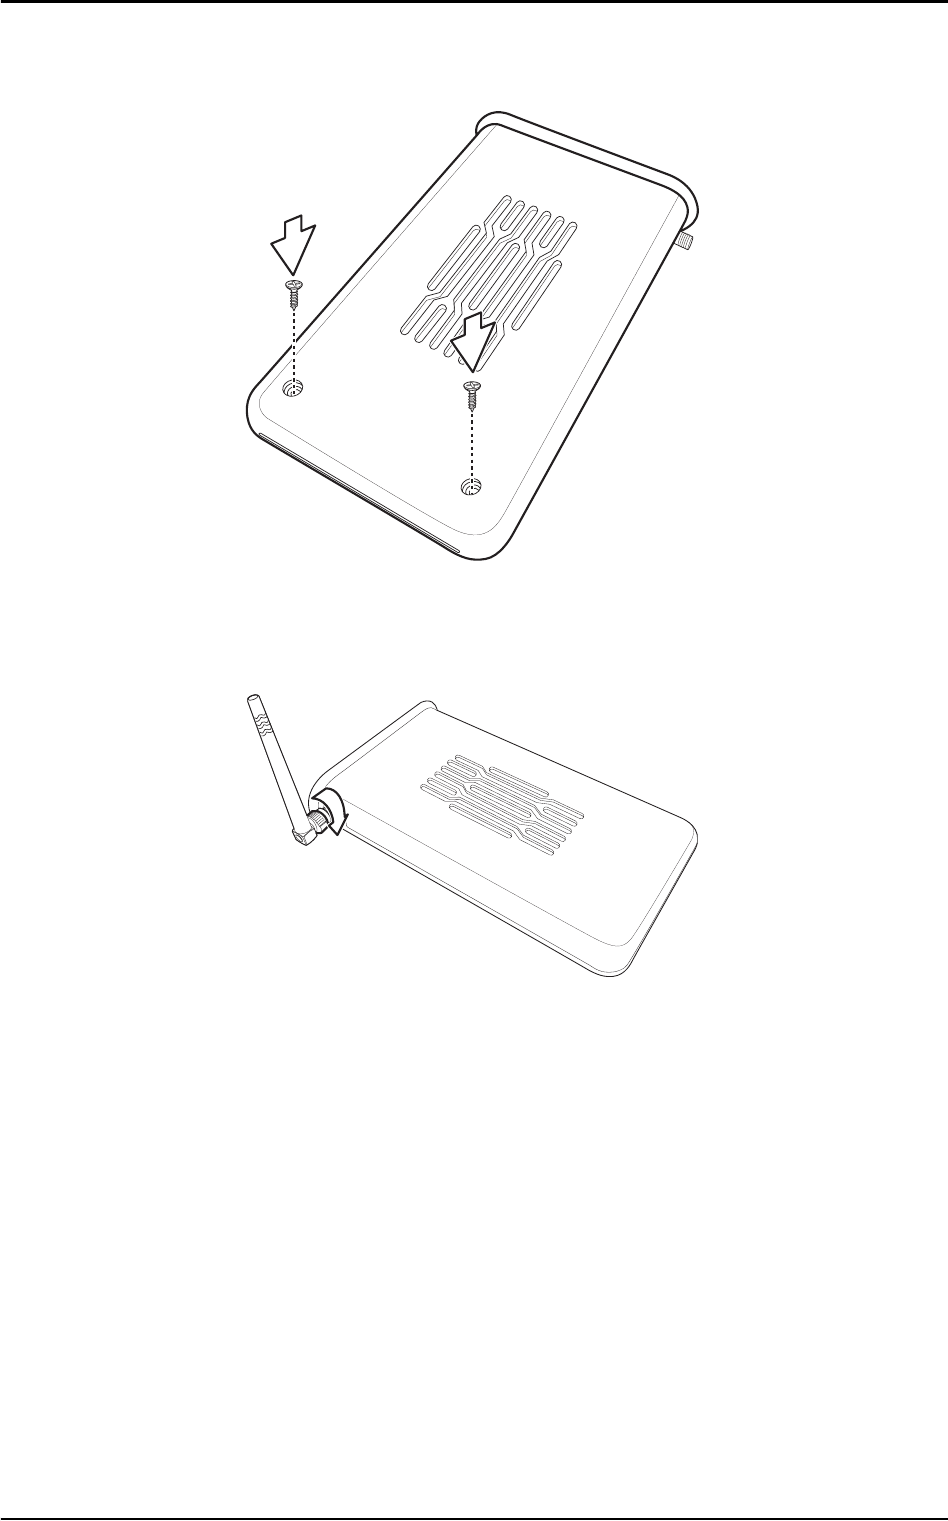
5. Replace the screws.
6. Attach the external antenna for improved performance.
12 ASUS 802.11g WL-HDD2.5
Location Tips
Determine the best location for the device while keeping in mind the
following considerations:
• The length of the Ethernet cable that connects the device to the
network must not exceed 100 meters.
• For standard placement, try to place the device on a flat, sturdy
surface as far from the ground as possible, such as on top of a
desk or bookcase, keeping clear of metal obstructions and away
from direct sunlight.
• For external antenna mounting, install the external antennas so
that they are clear of obstructions; refer to the documentation that
came with the antennas for mounting and installation instruc-
tions.
• Try to centrally locate the device and its antenna so that it will
provide coverage and access to its HDD to all of the wireless
mobile devices in the area.
• Use only the power supply that came with this unit. Other power
supplies may fit but the voltage and power may not be compati-
ble.
Note: It is the responsibility of the installer and users of the
ASUS WL-HDD2.5 to guarantee that the antenna is operated at
least 20 centimeters from any person. This is necessary to
ensure that the product is operated in accordance with the RF
Guidelines for Human Exposure which have been adopted by
the Federal Communications Commission.
ASUS 802.11g WL-HDD2.5 13
Making Connections
You can use your ASUS WL-HDD2.5 as an Access Point or as a
wireless network storage device in an existing WLAN. When the
ASUS WL-HDD2.5 is turned on, it searches for other existing Access
Points in its vicinity. If no other AP is found, it acts as an AP, while at
the same time allowing access to its HDD. If an existing WLAN and
AP is found in the vicinity, it acts as a wireless shared hard disk that
can be accessed by other wireless clients in the WLAN.
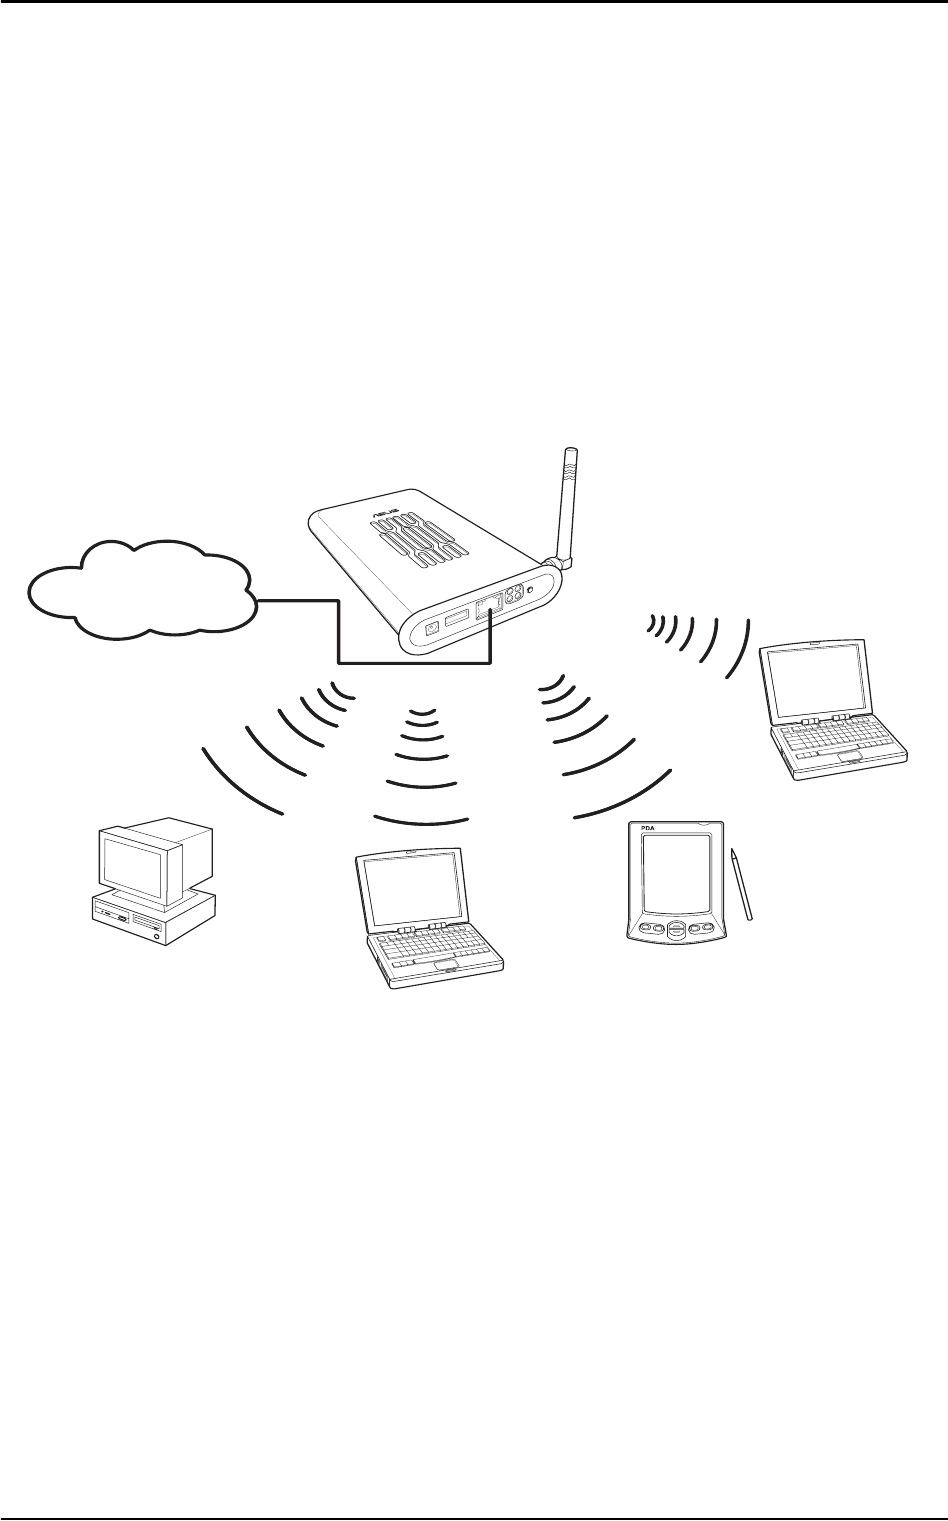
AP Mode
In order to use the ASUS WL-HDD2.5 as an AP, it has to be con-
nected to a network hub for Internet access. Attach one end of the RJ-
45 Ethernet cable to the ASUS WL-HDD2.5 and attach the other end
to the RJ-45 port of a network hub, switch, router, or patch panel (rep-
resented by the INTERNET connection in the illustration).
INTERNET
14 ASUS 802.11g WL-HDD2.5
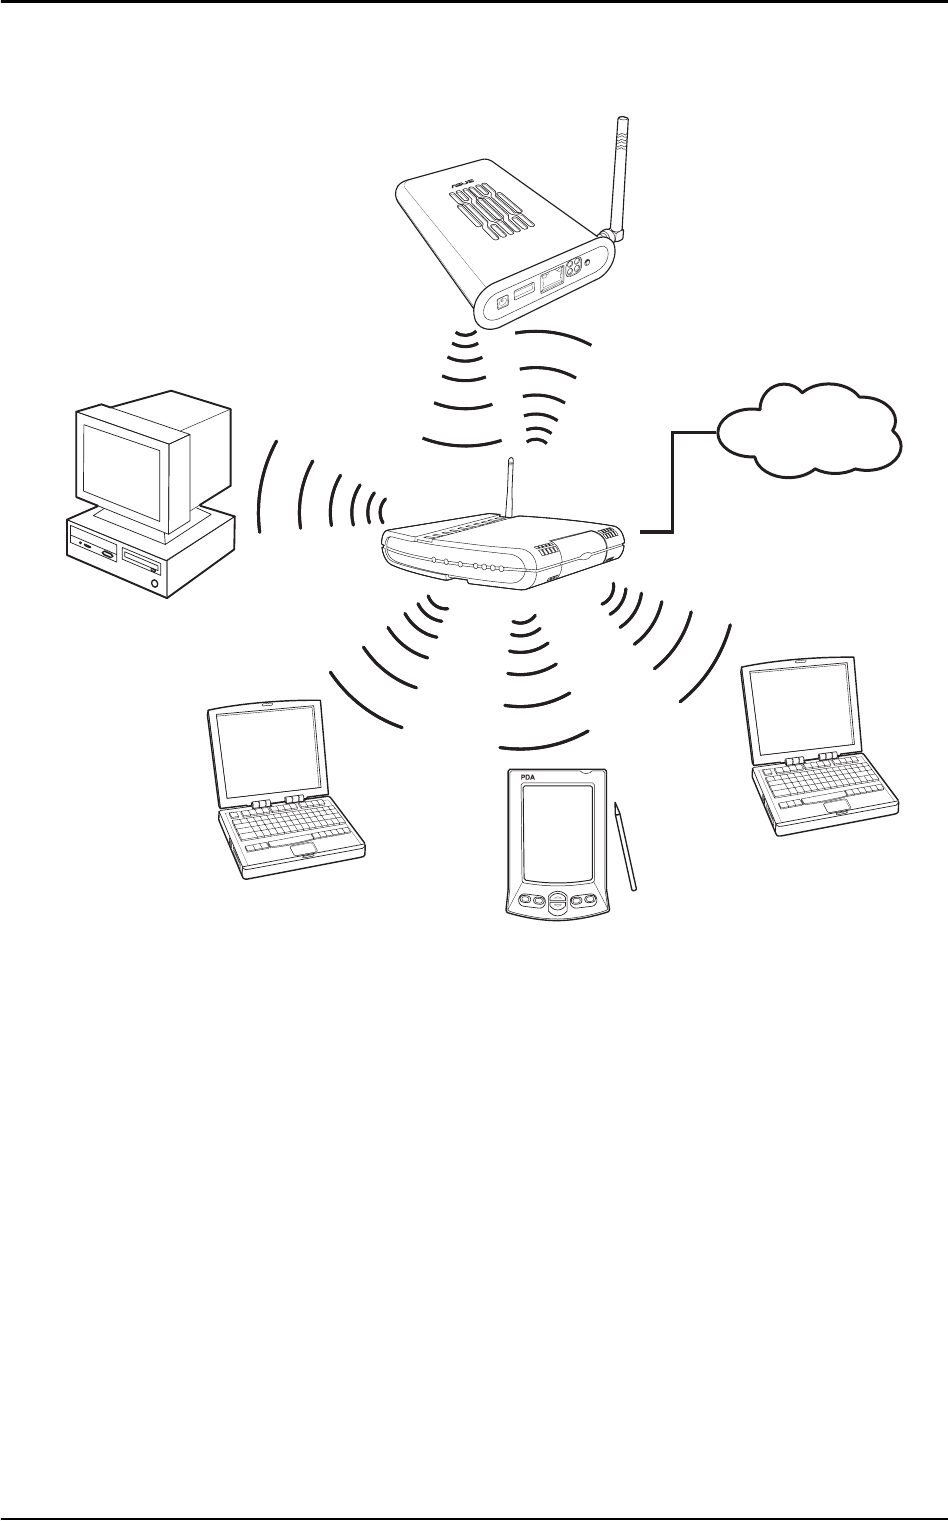
Network Storage Mode
To use the ASUS WL-HDD2.5 as a WLAN storage device in an exist-
ing network, no network cable connections to the device are required.
The wireless network consisting of an AP and one or more wireless
clients, uses the ASUS WL-HDD2.5 as a shared network hard drive.
The clients can read or write data from the device as required.
INTERNET
ASUS 802.11g WL-HDD2.5 15
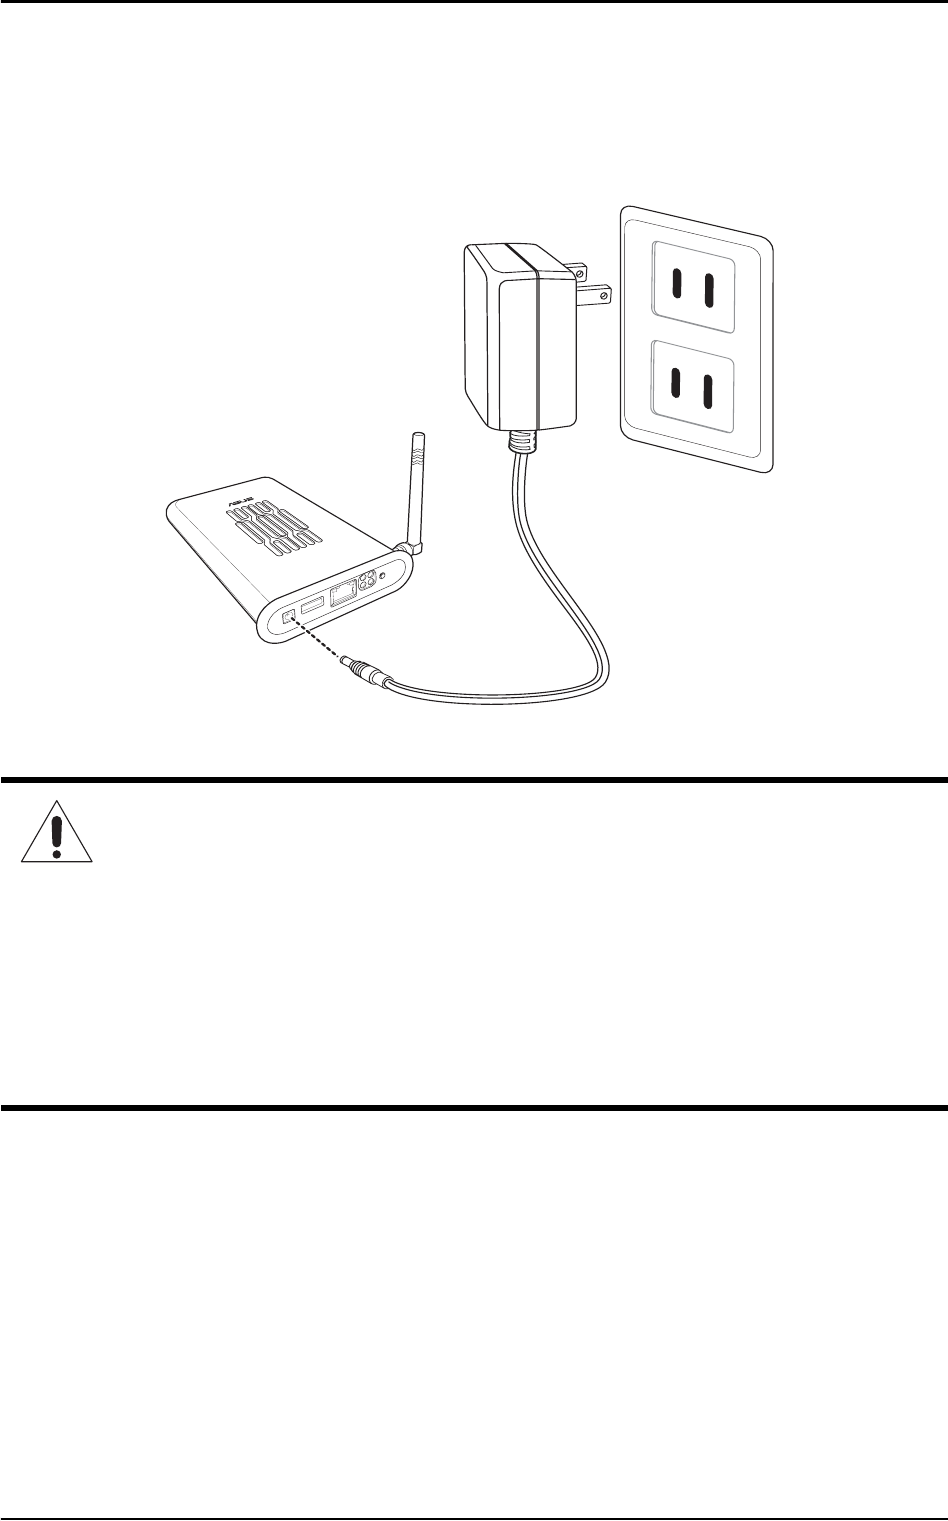
Connecting Power
Attach one end of the AC power adapter, included in the product
package, to the power jack on the device and the other end to a power
outlet. The POWER LED lights up when the unit is powered ON.
Warnings:
• Use the product only with the power adapter supplied in the
product package. Using another power supply may damage
the device.
• To shut down the ASUS WL-HDD2.5, click the Shutdown but-
ton on the web manager. This prevents damage to the hard
disk. Unplug the power cord only after shutting down the
device. See “Shutting down the ASUS WL-HDD2.5” on
page 43 for details.

16 ASUS 802.11g WL-HDD2.5
Configuring the Wireless Client
TCP/IP Settings
In order to access the shared HDD of the ASUS WL-HDD2.5 or to
use the device as an AP, you may need to configure the TCP/IP set-
tings. The TCP/IP settings should be on the IP subnet of the ASUS
WL-HDD2.5.
The following are the default IP settings of the ASUS WL-HDD2.5:
• IP address 192.168.1.1
• Subnet Mask 255.255.255.0.
If you set your computer’s (wireless client) IP manually, it needs to be
on the same segment as the ASUS WL-HDD2.5. To set the TCP/IP
settings, use the Network and Dialup Connections wizard to create
a new LAN connection and configure its TCP/IP settings as follows:
Notes:
• Change the TCP/IP settings only if the wireless network does
not support automatic IP addresses or if there is a problem
operating the device. If you are not sure about the settings, use
the default settings where the client obtains the IP address
automatically.
• Changing TCP/IP settings may require rebooting your PC
(wireless client). When rebooting, the ASUS WL-HDD2.5
should be switched ON and in the ready state.
ASUS 802.11g WL-HDD2.5 17
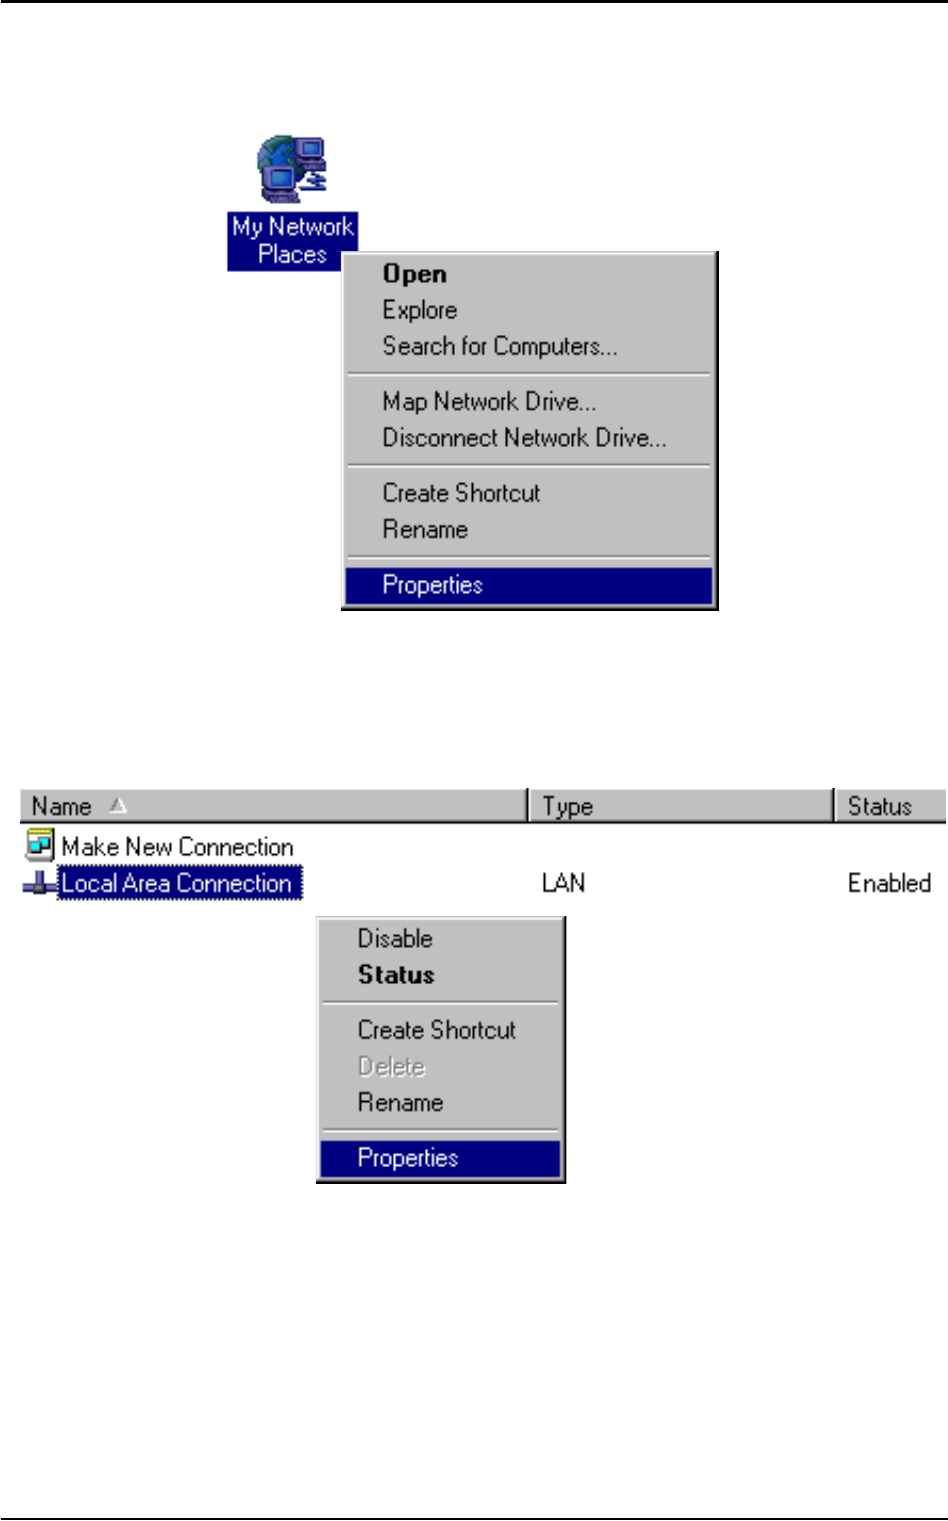
1. Right-click the My Network Places icon on the Desktop of your
PC and select Properties.
2. In the Network and Dialup Connections window displayed,
right-click the Local Area Connection that you created and
select Properties.

18 ASUS 802.11g WL-HDD2.5
3. On the General tab,
select Internet Pro-
tocol (TCP/IP), and
click Properties.
4. To set the TCP/IP
address manually,
click Use the follow-
ing IP address:, then
type the IP address
and Subnet mask as
follows:
• IP address
192.168.1.xxx (xxx
can be any number
between 2 and 254
that is not used by
another device)
• Subnet Mask
255.255.255.0 (same
as the ASUS WL-
HDD2.5)
Note: The screens shown here are from a PC running Windows
2000. They may be slightly different for Windows XP.
ASUS 802.11g WL-HDD2.5 19
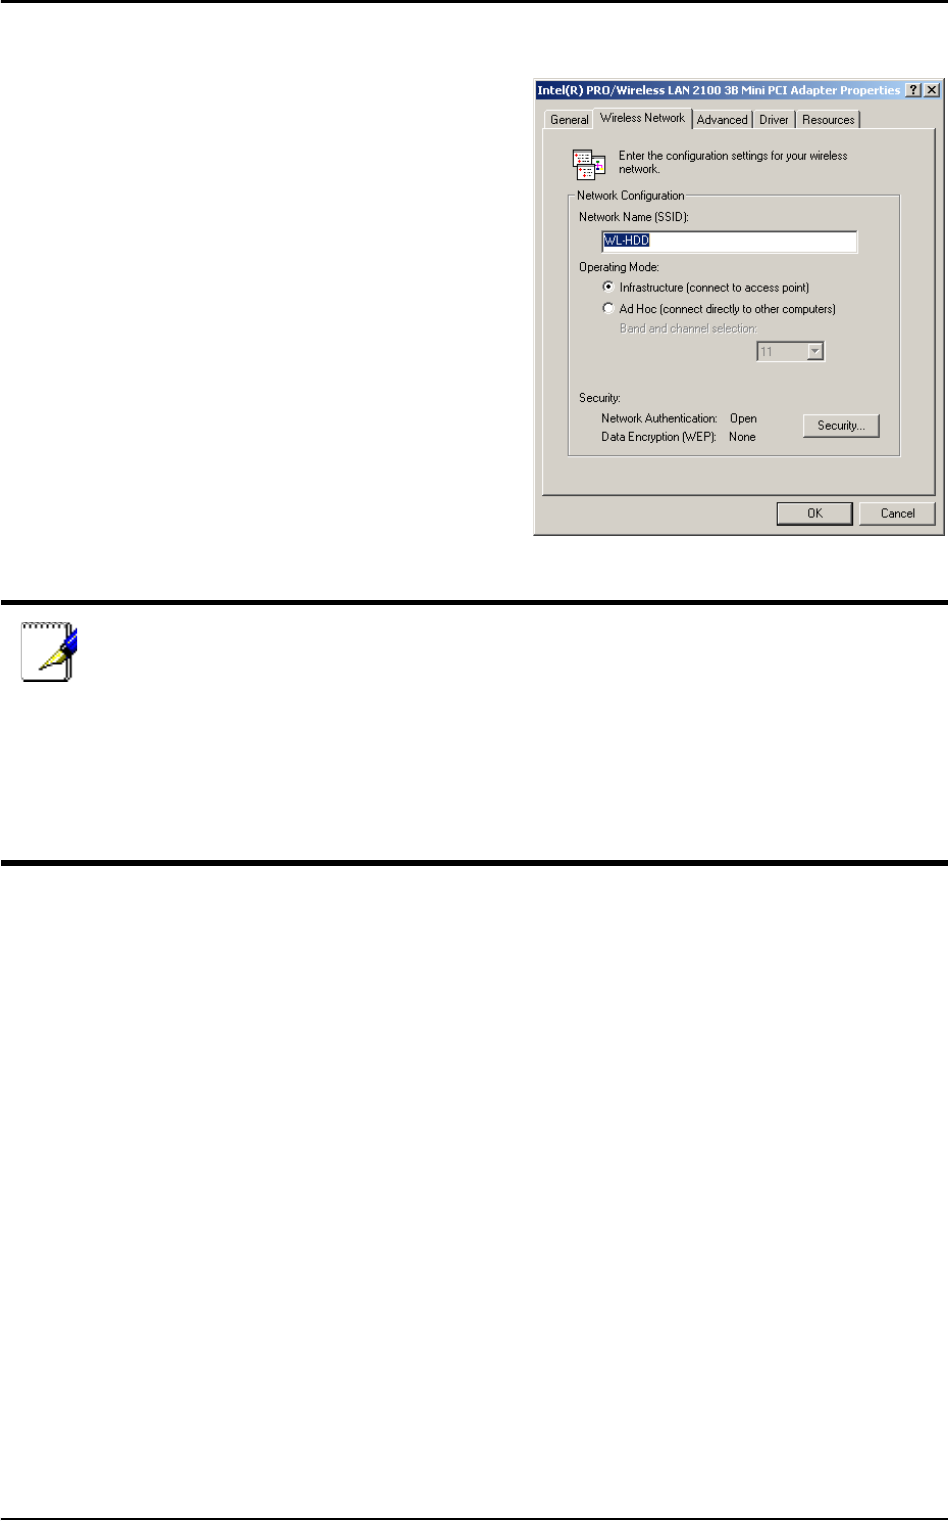
SSID Settings
The SSID or the network name of the
WLAN adapter must be configured
correctly for proper operation. Click
the LAN icon under Network and
Dialup Connections and right-click
to view its Properties. Click Config-
ure under the General tab. Then
select the Wireless Network tab.
Make sure that the Network Name is
set to WL-HDD and click OK.
Notes:
• Disable WEP and set the SSID to default for any existing wire-
less LAN device connected to your computer.
• The procedure described here may be slightly different for vari-
ous wireless adapter utilities. Refer to the documentation for
your wireless client (notebook or PDA) as well as that for the
wireless adapter for specific instructions.
20 ASUS 802.11g WL-HDD2.5
Using the HDD
Now that you have installed the ASUS WL-HDD2.5 and connected it
as required, you are ready to start using the hard drive as a network
storage device as described in the following sections.
Accessing the HDD
You can access the hard drive in the following three ways:
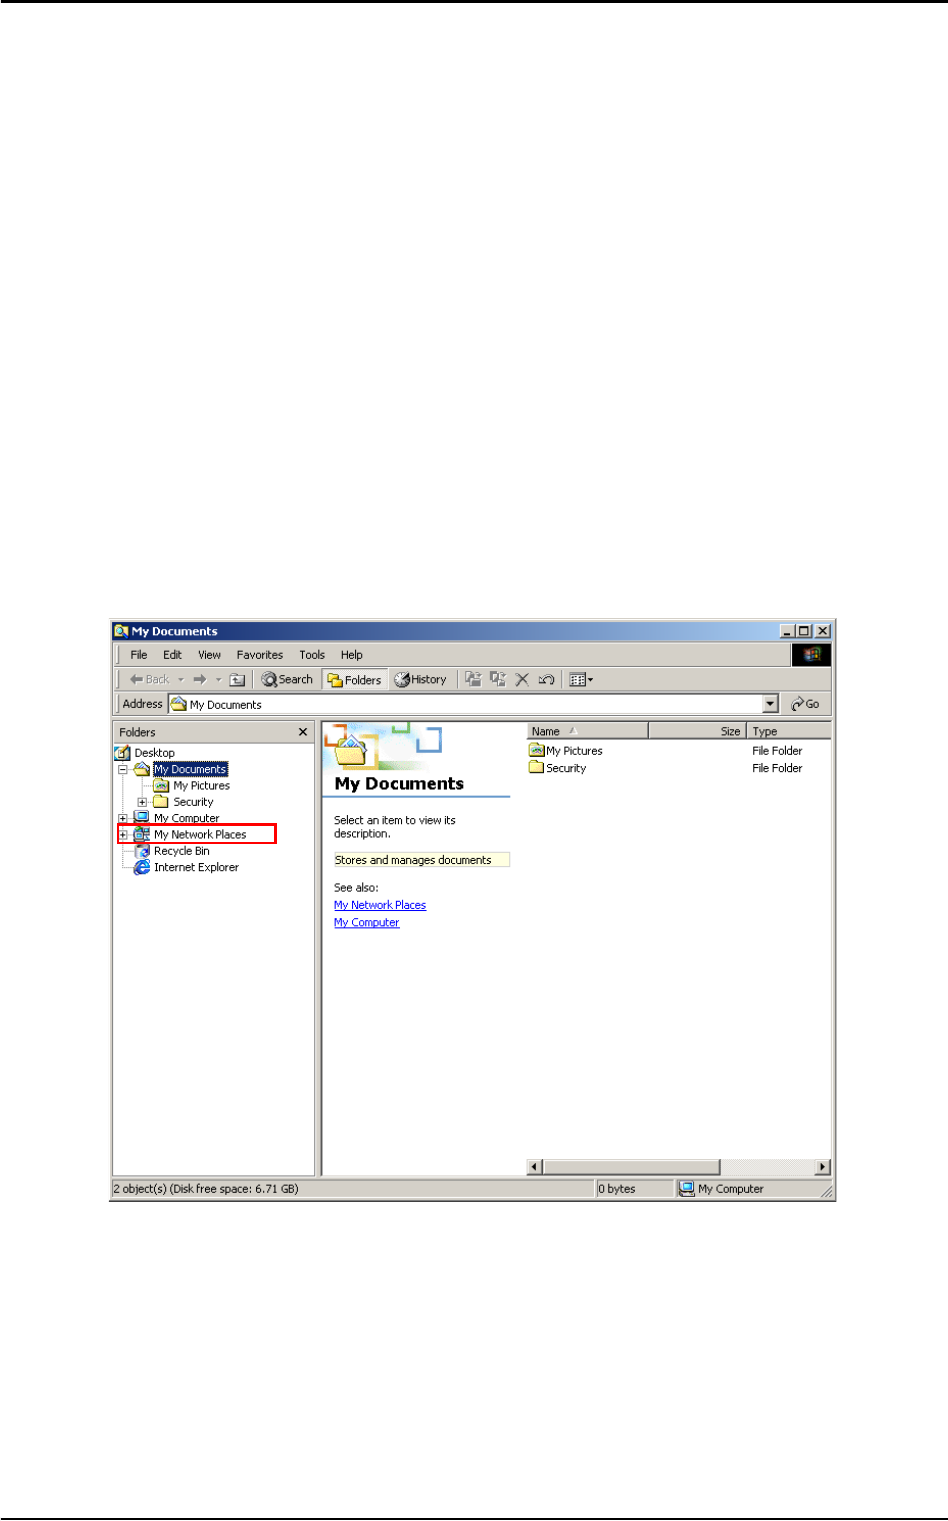
Searching for the Device
The easiest method to locate the hard disk from the network is to
search for all computers on the network and then locate the hard drive
as follows:
1. Open Windows Explorer. Then click the My Network Places
icon.
ASUS 802.11g WL-HDD2.5 21
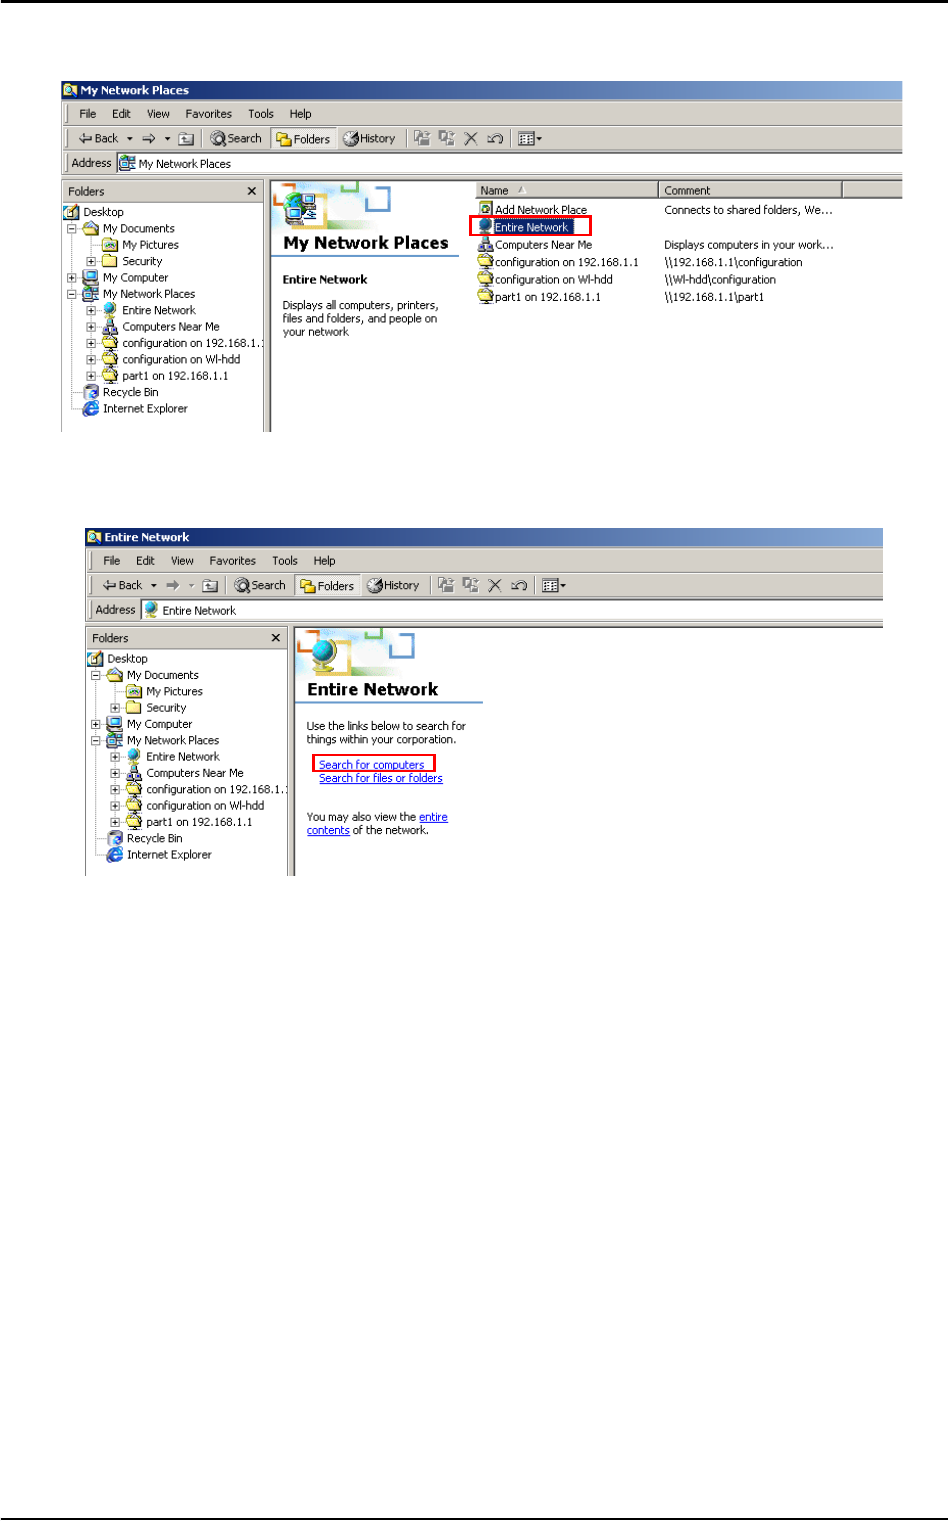
2. Double-click Entire Network.
3. Click Search for computers to start searching for the ASUS WL-
HDD2.5.
22 ASUS 802.11g WL-HDD2.5
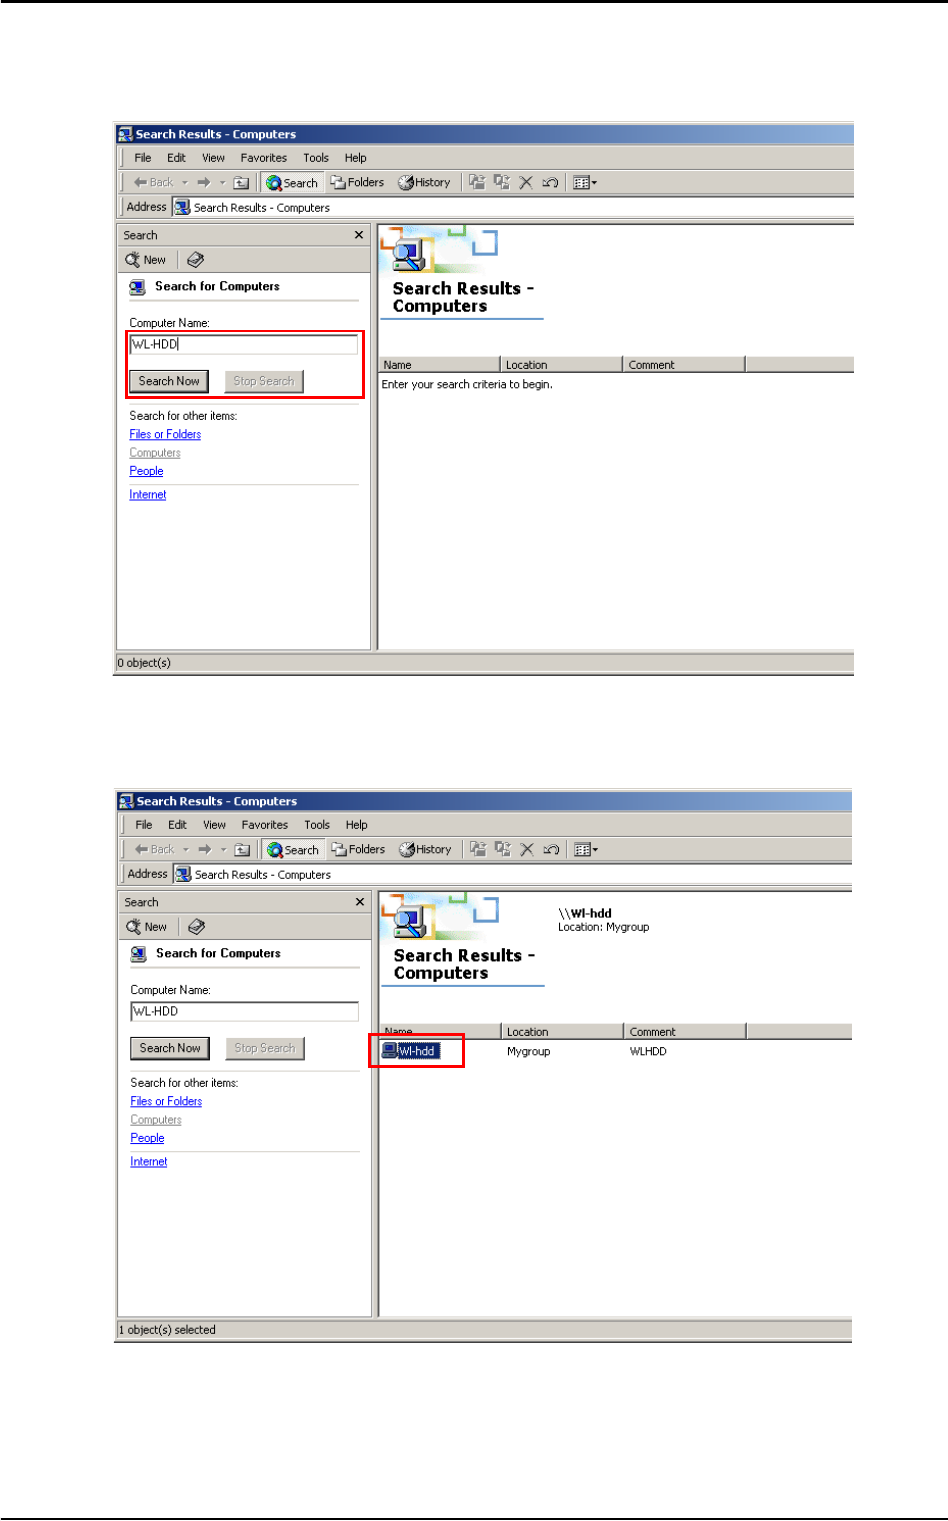
4. The search window opens. Type the device name (WL-HDD) in
the search field. Then click Search Now.
5. The search results pane shows the Wl-hdd icon. Double-click the
icon to view the contents of the hard disk.
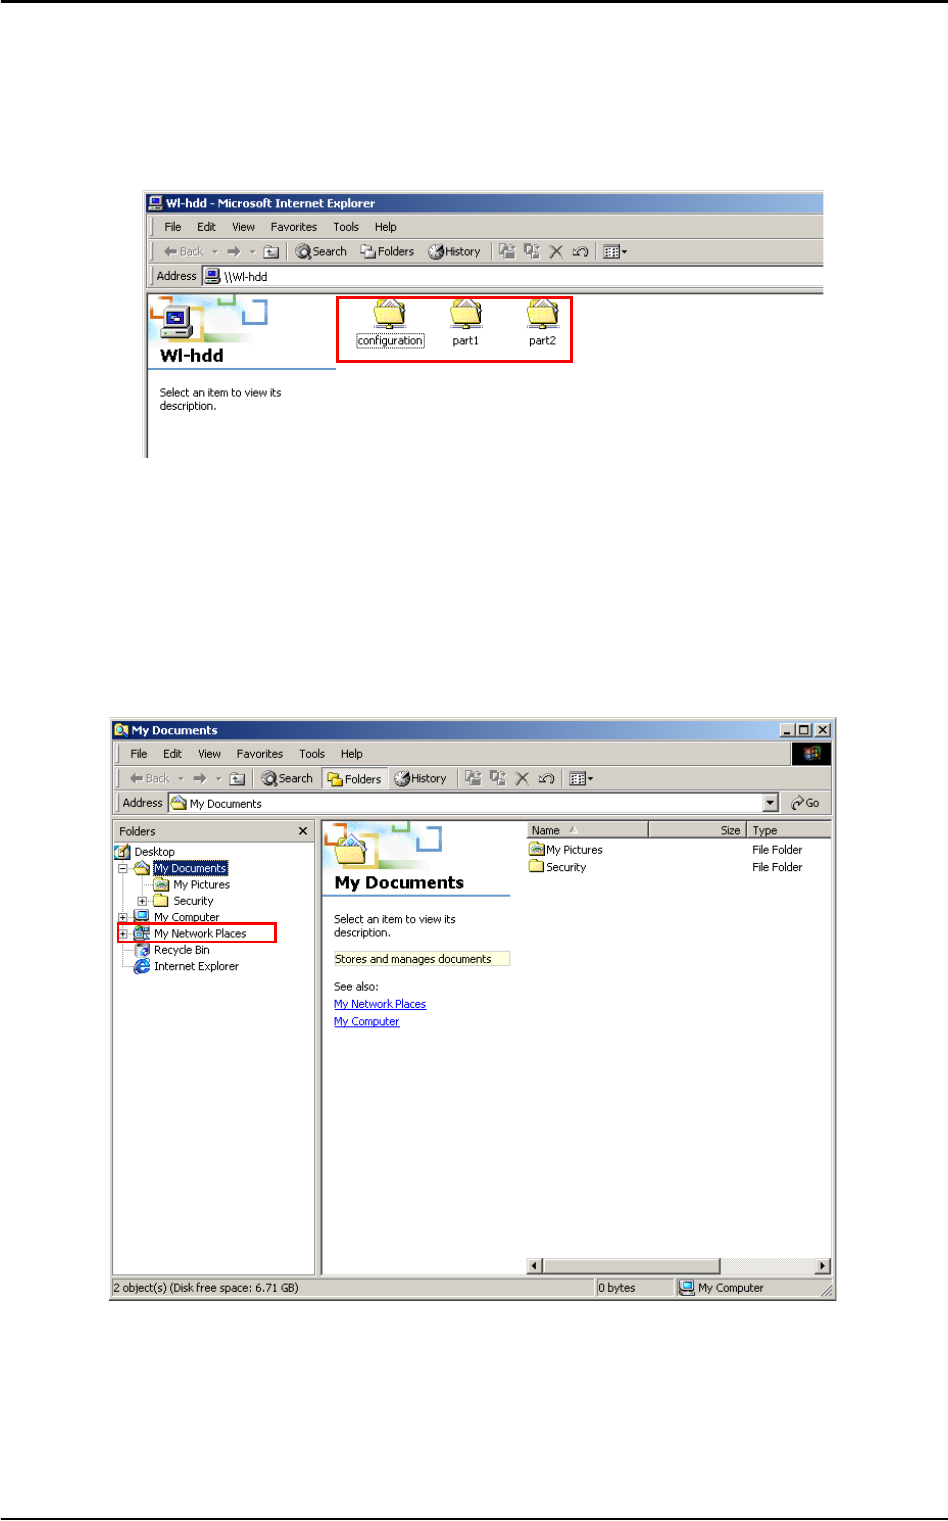
ASUS 802.11g WL-HDD2.5 23
The hard disk shows the configuration folder and the partitions
(part1,part2, etc.) on the HDD. You can set the access permissions
for the hard disk drive using the configuration utility described in
Chapter 3 (see “Shared Nodes” on page 61).
Locating the Device Manually
Follow this procedure to search for the ASUS WL-HDD2.5 manually
by browsing the contents of the entire network:
1. Open Windows Explorer. Then click the My Network Places
icon.

24 ASUS 802.11g WL-HDD2.5
2. Double-click Entire Network.
3. Click entire contents to view the components of the network.
4. Double-click the Microsoft Windows Network icon.
5. Search through the various network components displayed in the
list until you locate the Wl-hdd device. Double-click the Wl-hdd
icon to view the contents of the hard disk.
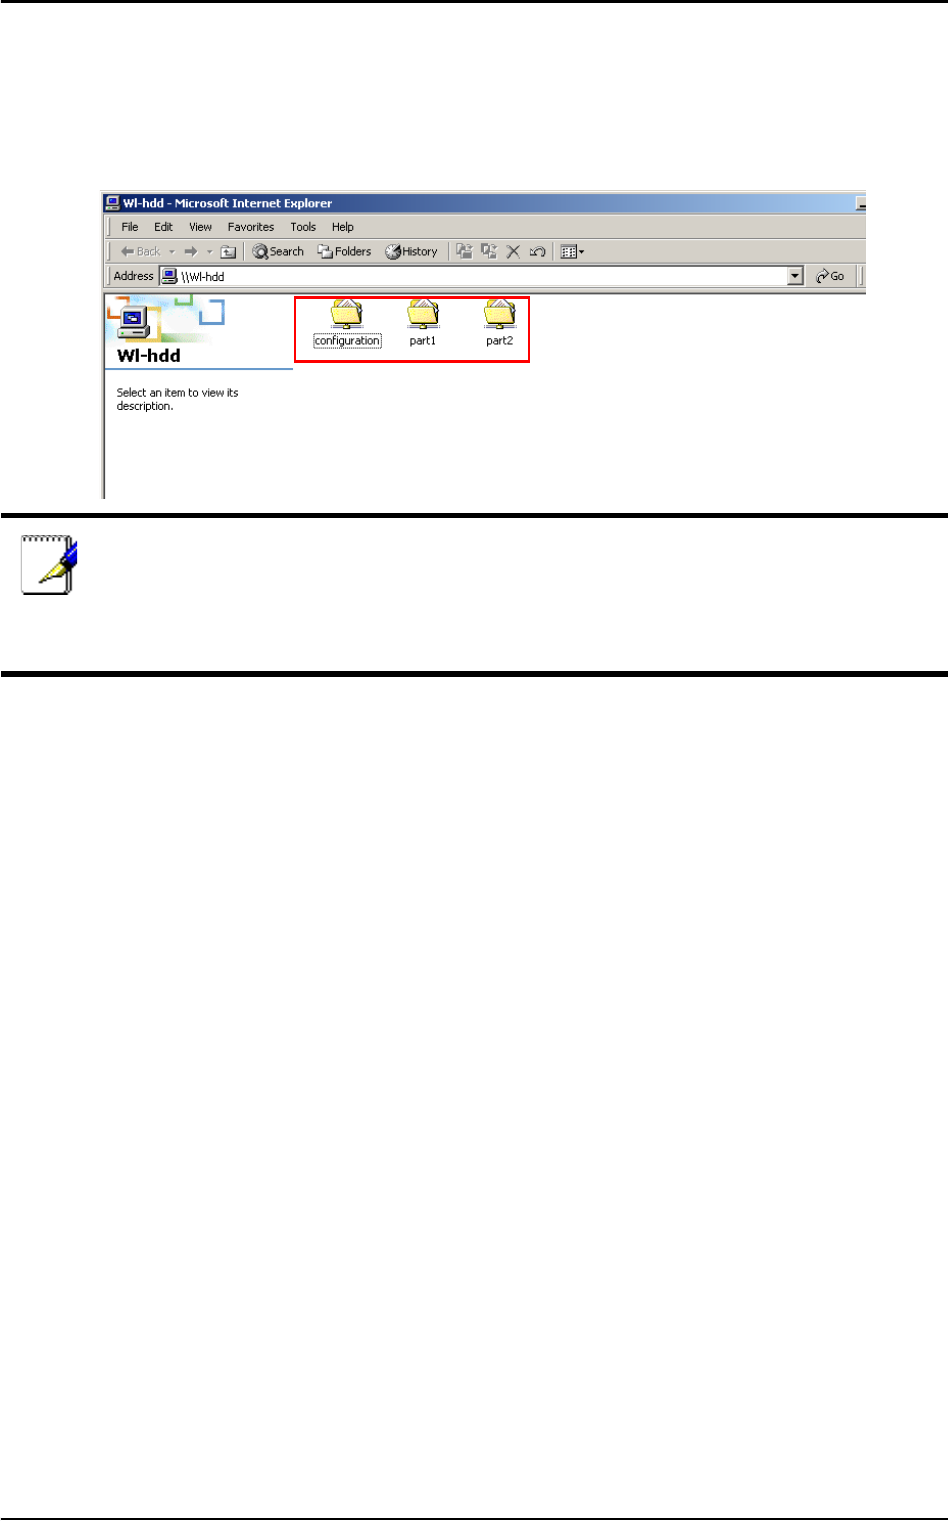
ASUS 802.11g WL-HDD2.5 25
The hard disk shows the configuration folder and the partitions
(part1,part2, etc.) on the HDD. The access permissions for the hard
disk drive can be set using the configuration utility described in Chap-
ter 3 (see “Shared Nodes” on page 61).
Using Internet Explorer
To access the HDD of the ASUS WL-HDD2.5 from a wireless client
using Internet Explorer, do the following:
1. Open the WLAN adapter utility installed on your wireless client
and scan for all available networks within range of your wireless
adapter. Refer to the user’s manual accompanying the utility for
specific instructions about how to scan for networks.
2. The network list shows the WL-HDD network. Click the WL-
HDD icon and press connect if your wireless client is not con-
nected to the device.
Note: If the WL-HDD folder contents displays only the configura-
tion folder and not the hard disk partitions, this may be because
the hard disk drive is not formatted. See “Formatting the Hard
Disk” on page 28 to learn how to format the disk.

26 ASUS 802.11g WL-HDD2.5
3. Start Internet Explorer. Type in http://192.168.1.1 in the
Address box, then click Go.
Note: If you have Windows XP running on your wireless client,
the ASUS WL-HDD2.5 icon pops up in the notification area on
the taskbar when connected.
ASUS 802.11g WL-HDD2.5 27
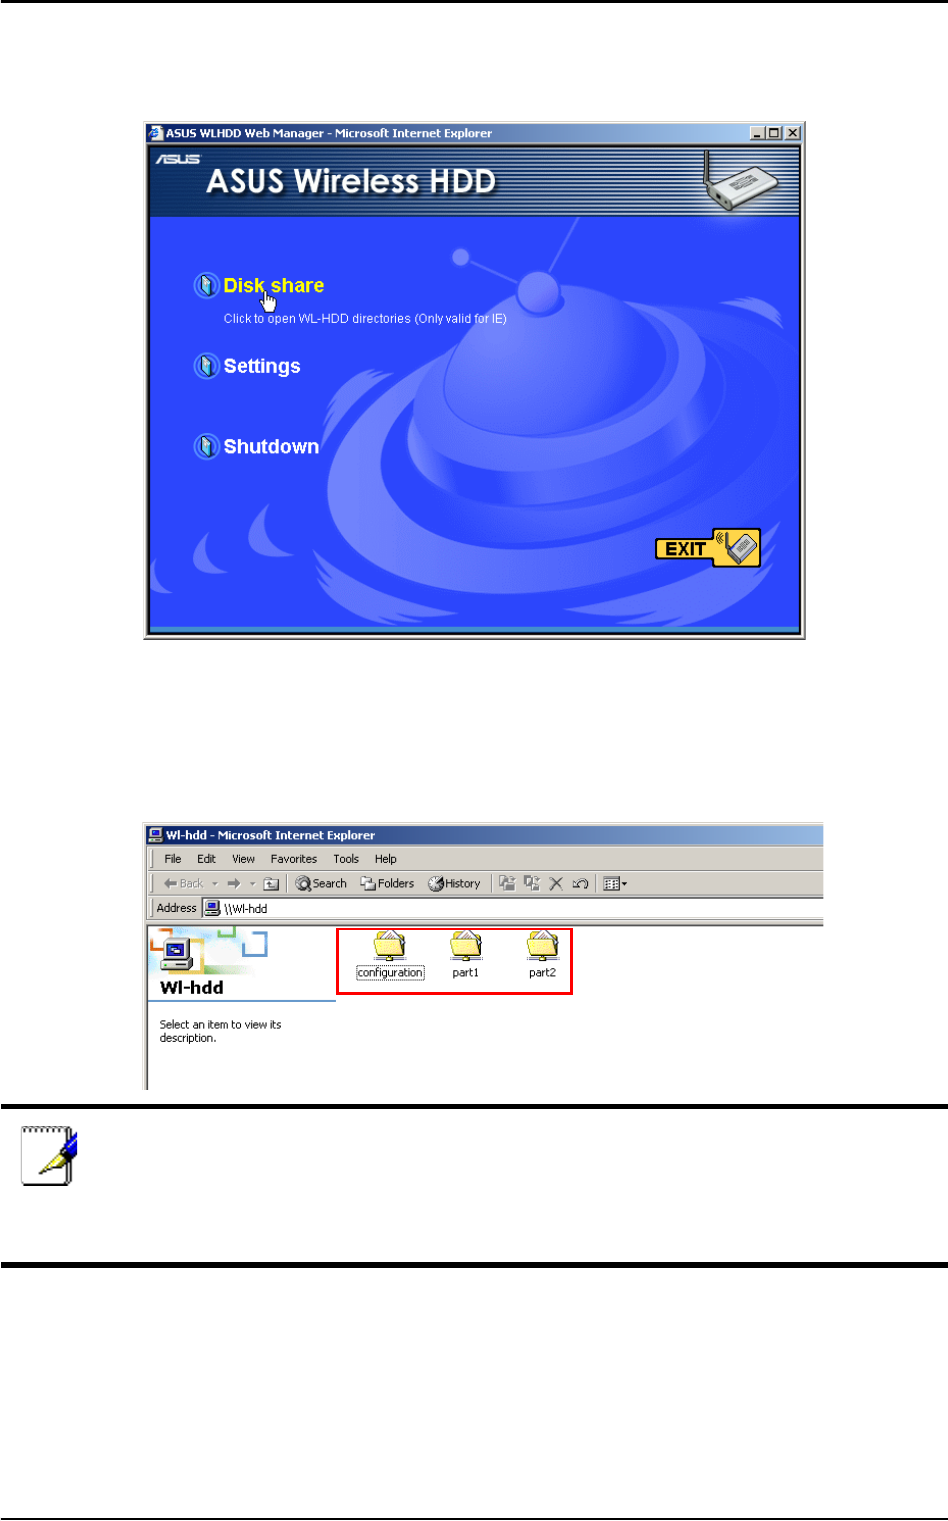
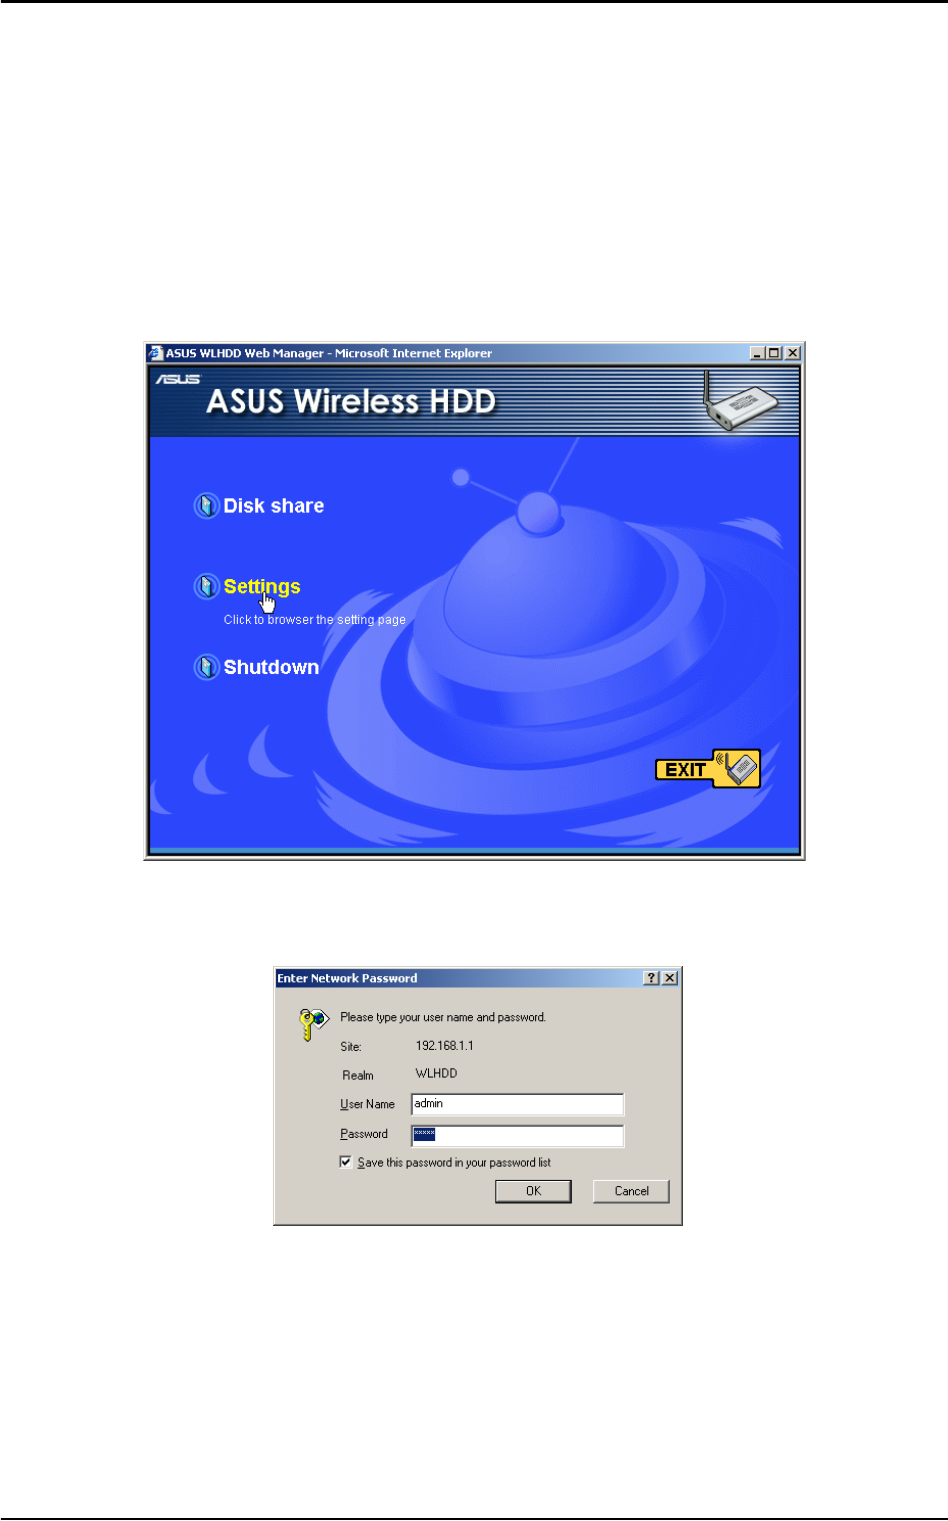
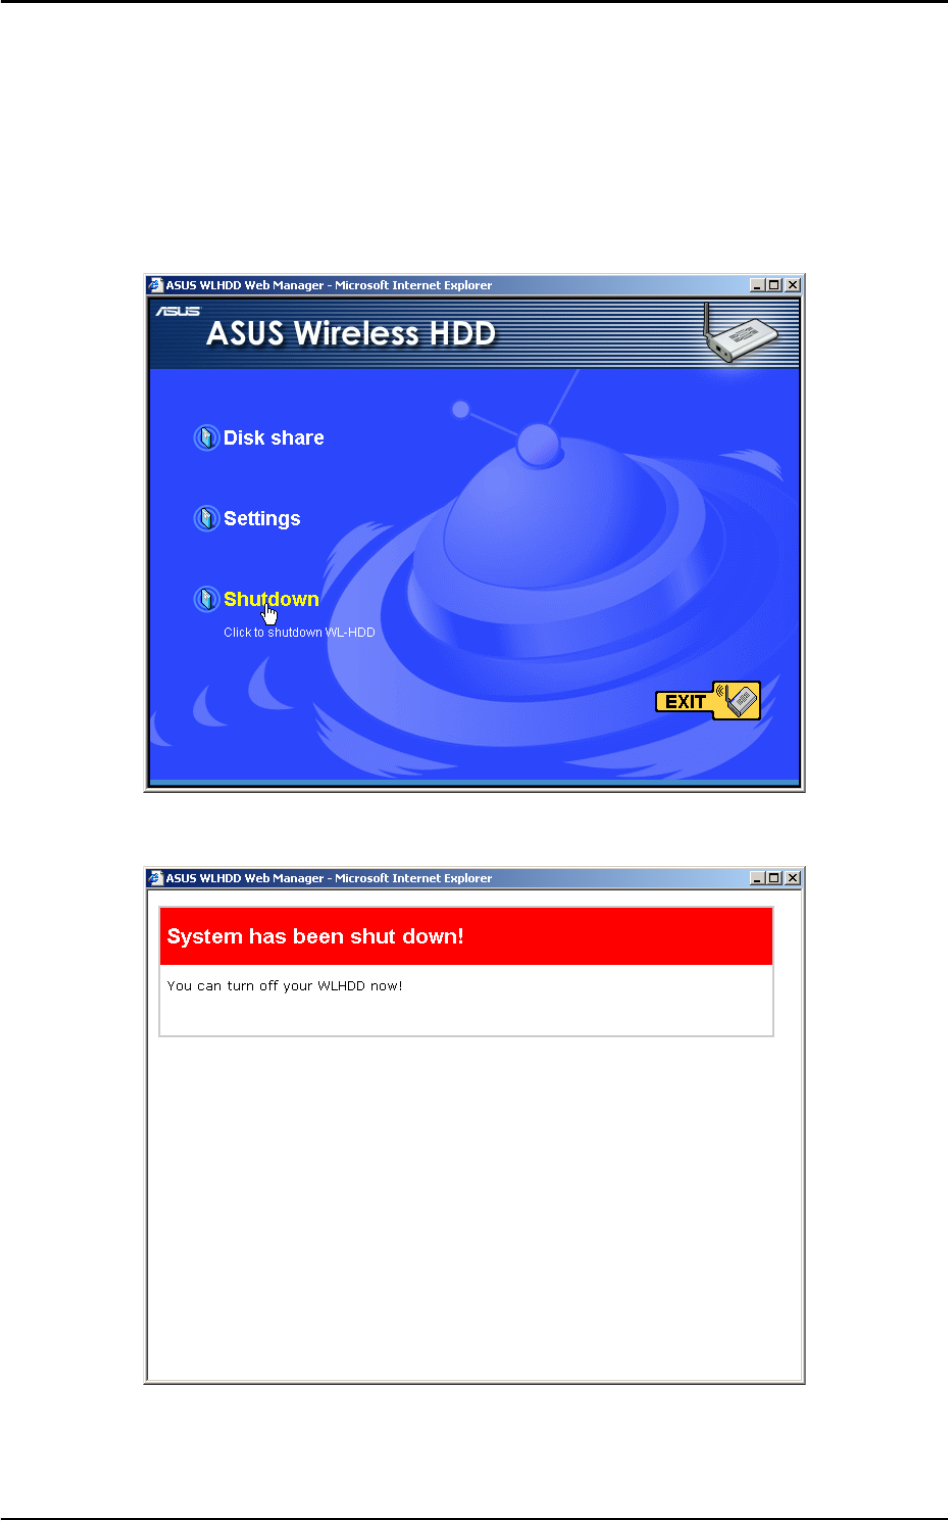
4. The ASUS WL-HDD2.5 web manager opens. Click Disk share to
view the contents of the hard disk.
The hard disk shows the configuration folder and the partitions
(part1,part2, etc.) on the HDD. The access permissions for the hard
disk drive can be set using the configuration utility described in Chap-
ter 3 (see “Shared Nodes” on page 61).
Note: If the WL-HDD folder contents displays only the configura-
tion folder and not the hard disk partitions, this may be because
the hard disk drive is not formatted. See “Formatting the Hard
Disk” on page 28 to learn how to format the disk.
28 ASUS 802.11g WL-HDD2.5
Hard Drive Pre-scan Function
When the ASUS WL-HDD2.5 is first turned on, it performs a pre-
scan of the hard disk drive to ensure that it is functioning correctly
and does not have any corrupt data. If the hard drive is not working,
has not been formatted, or has been corrupted, a message is displayed
on the screen asking you to format the hard disk.
Formatting the Hard Disk
To format the hard disk, do the following:
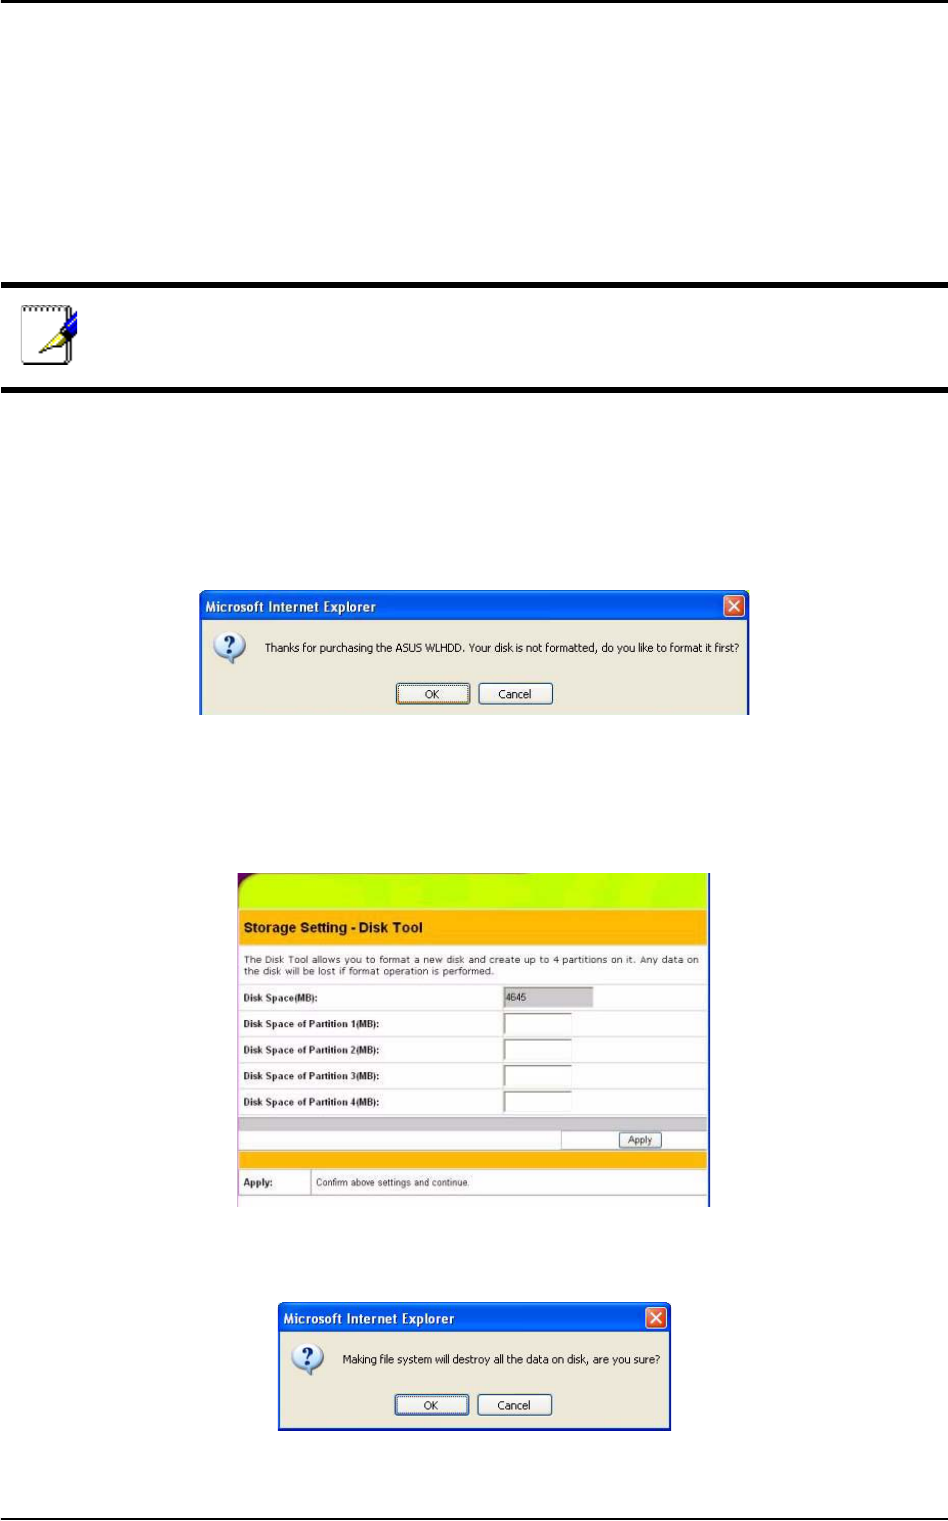
1. The pre-scan function detects the unformatted disk and prompts
you to start formatting. Click OK.
2. The Disk Tool from the Storage Setting menu opens in your
browser. This tool formats the hard disk and creates up to four (4)
partitions. Specify the size of the partitions in megabytes and click
Apply to start formatting.
3. A message is displayed on the screen to warn you that formatting
will erase all data on the disk. Click OK to continue.
Note: We recommend that you format the hard disk at least once
before using it.
ASUS 802.11g WL-HDD2.5 29
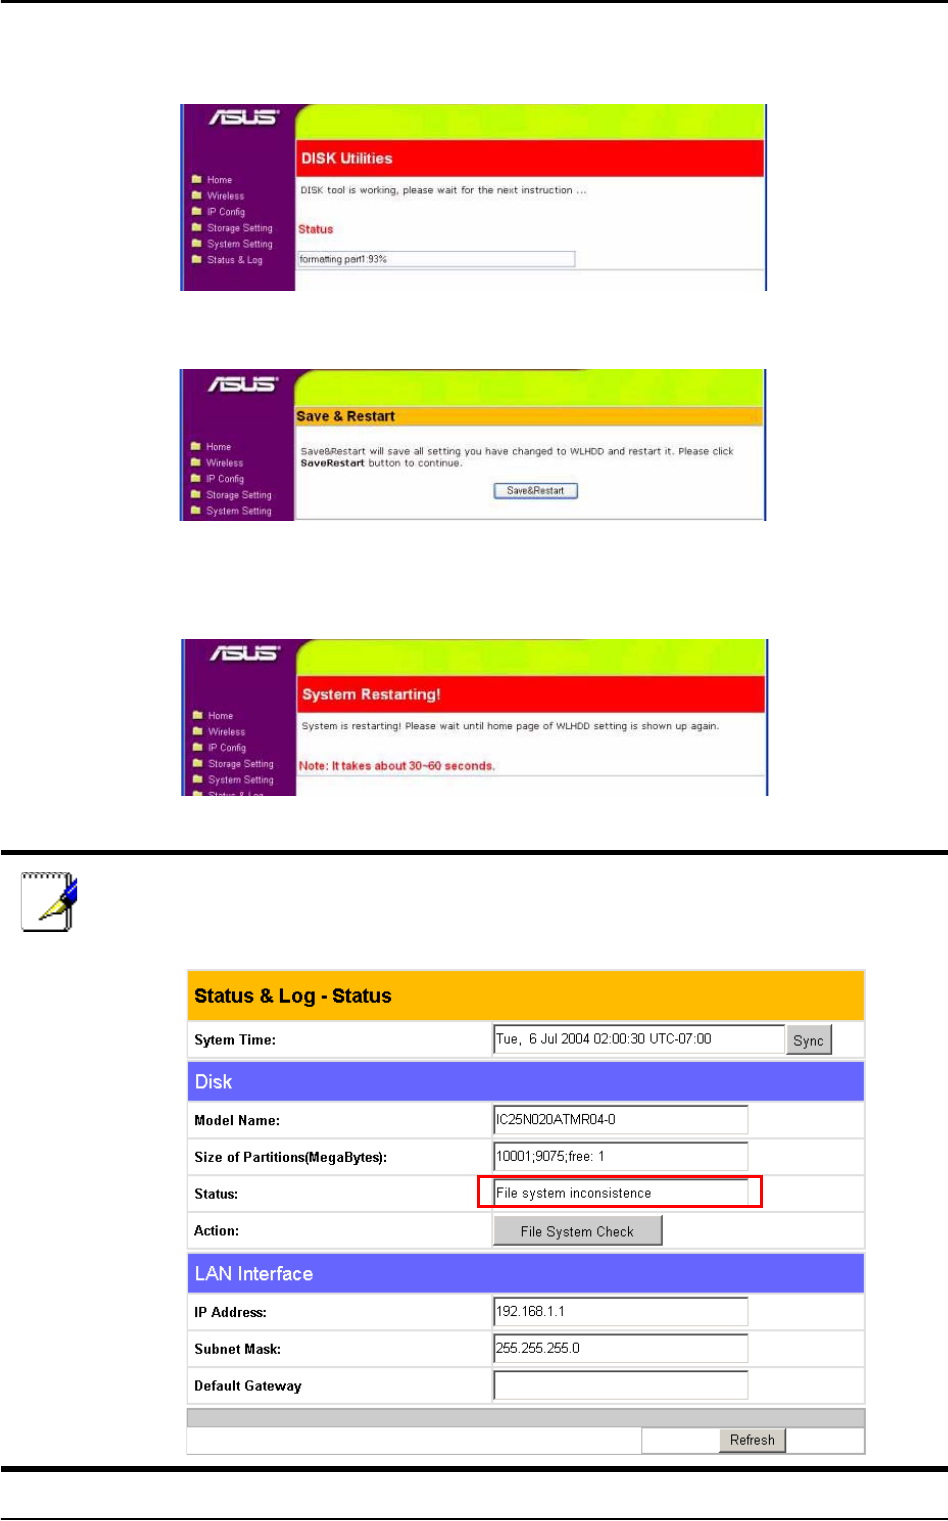
4. Formatting of the hard disk begins and the browser window dis-
plays the formatting status.
5. After formatting is completed, you are asked to restart the system.
Click Save&Restart to restart the system.
6. The browser window displays the status while the ASUS WL-
HDD2.5 restarts. Wait till the screen is refreshed before using the
system.
Note: If you view the disk status using the software configuration
tool and if the disk is corrupted (see “Status” on page 67), the fol-
lowing information is displayed.
30 ASUS 802.11g WL-HDD2.5
Setting up Permissions
You can set up the hard drive permissions so that only the specified
users can access it and write data to hard drive. This is a useful feature
so as to limit the data that is put on the network storage.
1. Open the ASUS WL-HDD2.5 web manager as described in
“Using Internet Explorer” on page 25. Then click Settings to con-
figure the settings.
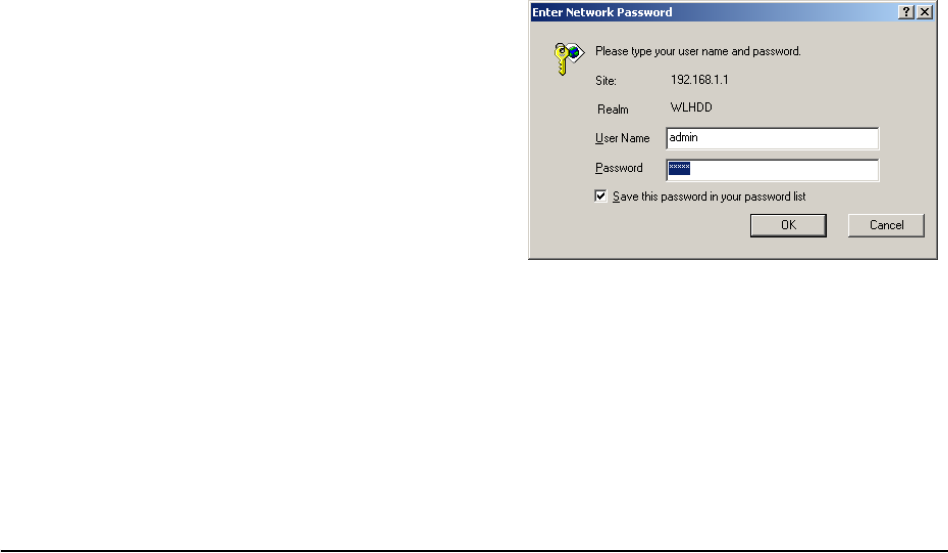
2. Type the default User name (admin) and Password (admin) in
the dialog box.
3. The ASUS WL-HDD2.5 configuration web interface is displayed.
Click the Storage Setting icon in the left pane to display the hard
disk settings. Refer to the next two sections to learn how to edit
the user and shared file lists.

ASUS 802.11g WL-HDD2.5 31
Editing the User List
The user list is a list of people who are allowed to access to the ASUS
WL-HDD2.5. You can add users and their passwords to the list and
you can also specify how many users are allowed simultaneous access
to the hard drive for optimum performance. To add users to the user
list, do the following:
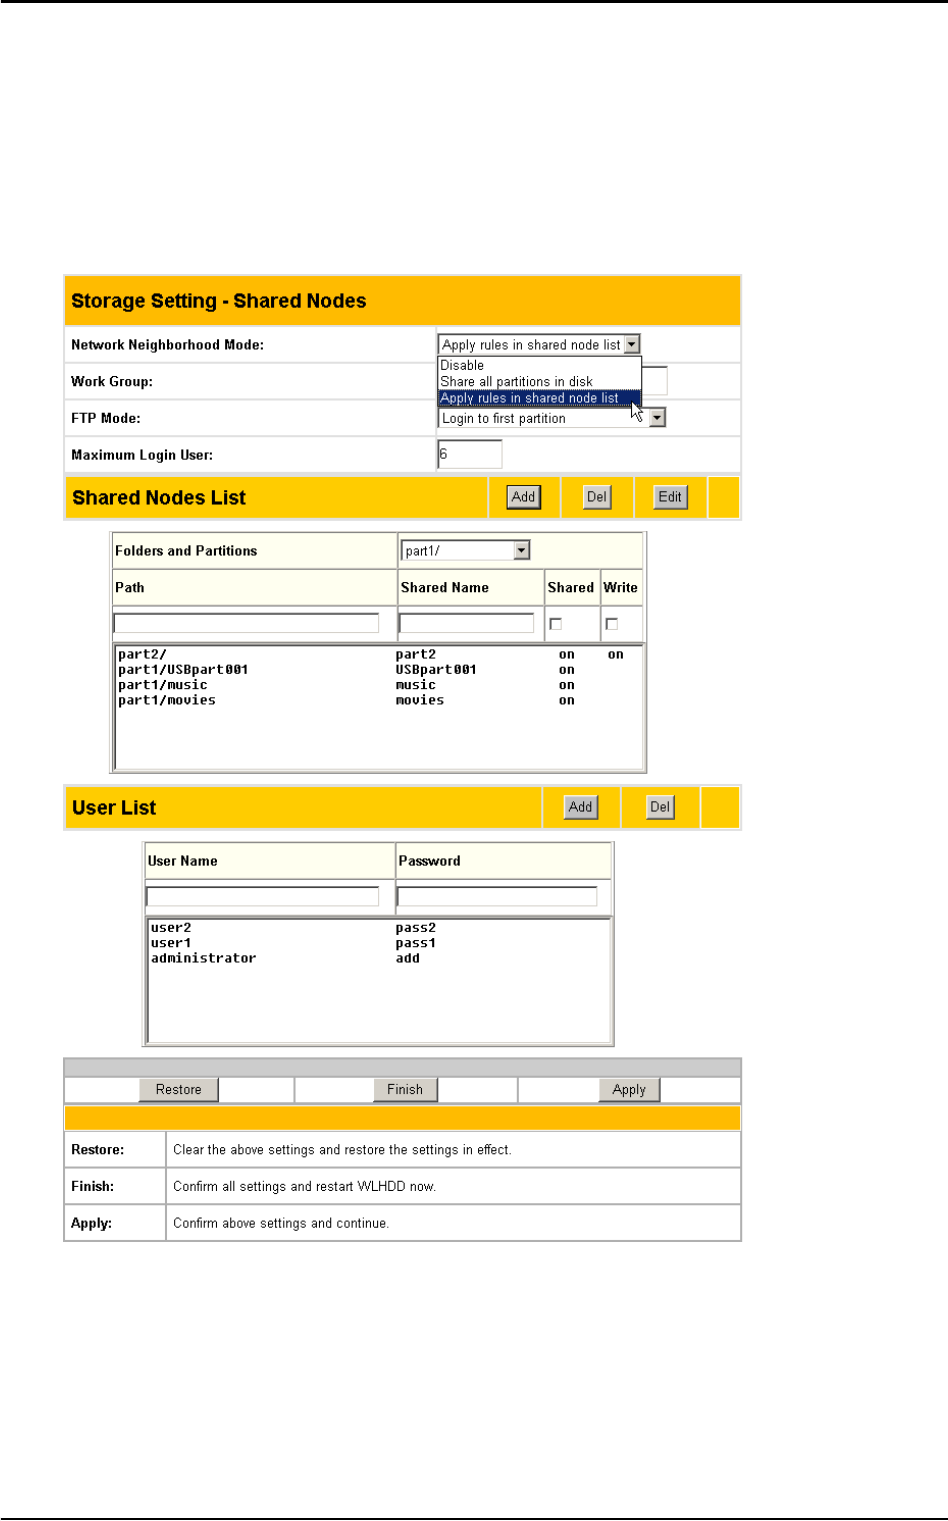
1. Under the User List on the Storage Setting - Shared Nodes
page, type the desired User Name and Password. Click Add to
add the user to the list.
2. Select a User Name from the list, then click Del to delete the user
from the list.
3. Click Apply to apply the changes or Finish to save the changes
and restart the device.
32 ASUS 802.11g WL-HDD2.5
Editing the Shared Nodes List
The shared nodes list is a list of all the folders and partitions on the
ASUS WL-HDD2.5 showing the sharing and writing permissions for
each node. You can specify which folder or partition is shared and
which can be written to. To modify the shared nodes list, do the fol-
lowing:
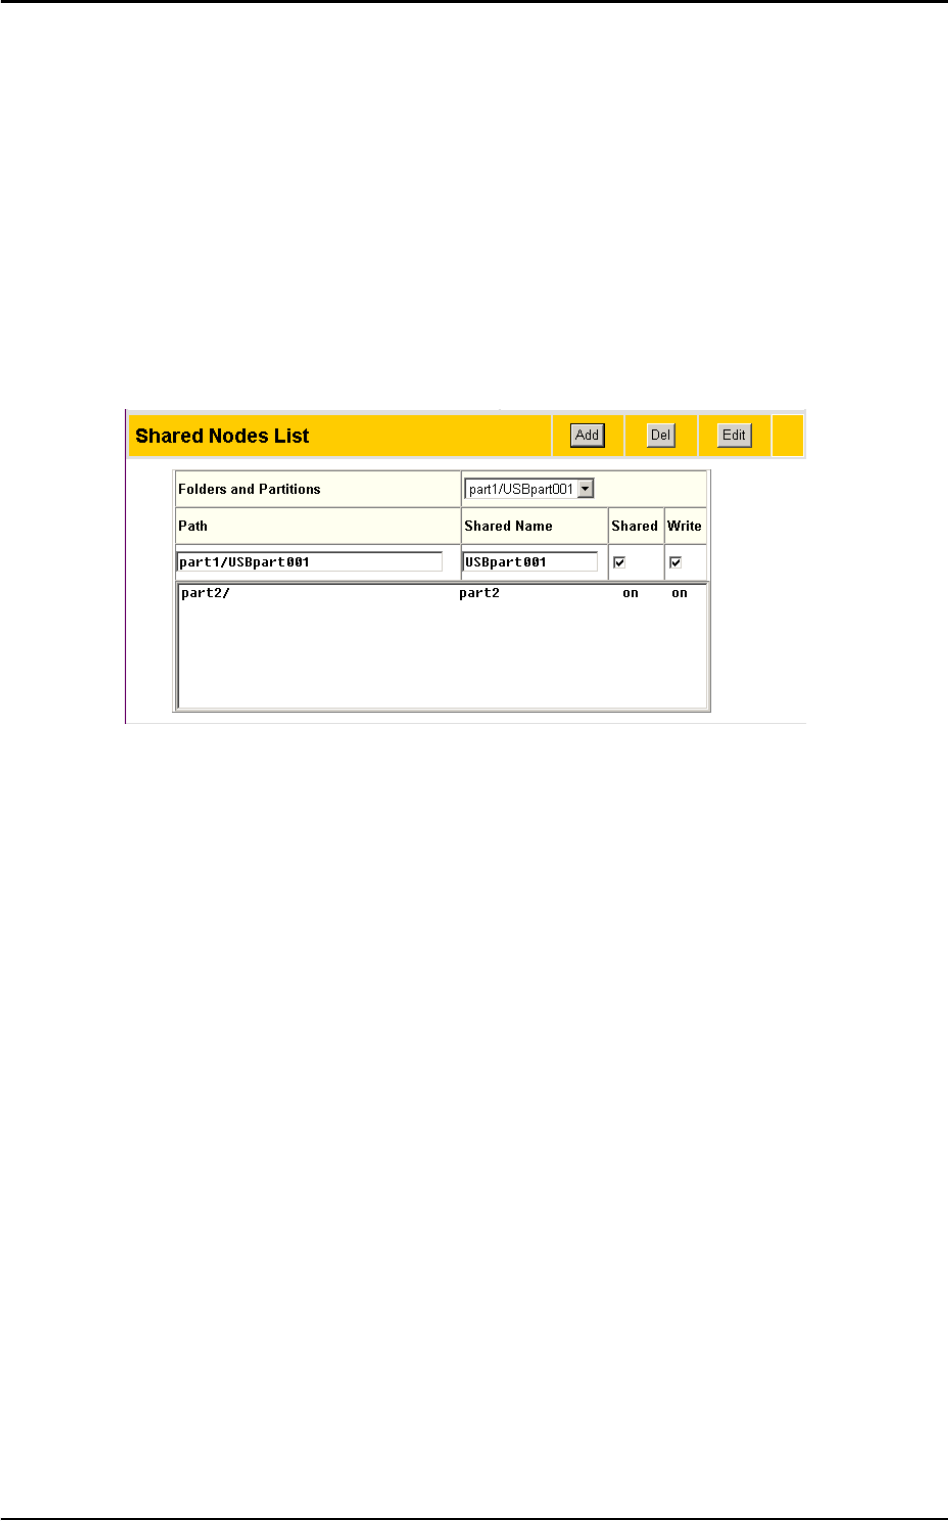
1. Under the Shared Nodes List on the Storage Setting - Shared
Nodes page, scroll to select the desired folder or partition from the
Folders and Partitions drop-down box.
2. Type the desired name in the Shared Name field. This is the
name by which users can access a specific folder or partition
using their wireless clients and even map them as logical drives if
needed.
3. Click the Shared check box to enable the folder or partition to be
shared between all users.
4. Click the Write check box to enable all users to write data to the
folder or partition.
5. Click Add to add the folder or partition to the shared nodes list.
6. Select a folder or partition from the list, then click Del to delete it
from the list.
ASUS 802.11g WL-HDD2.5 33
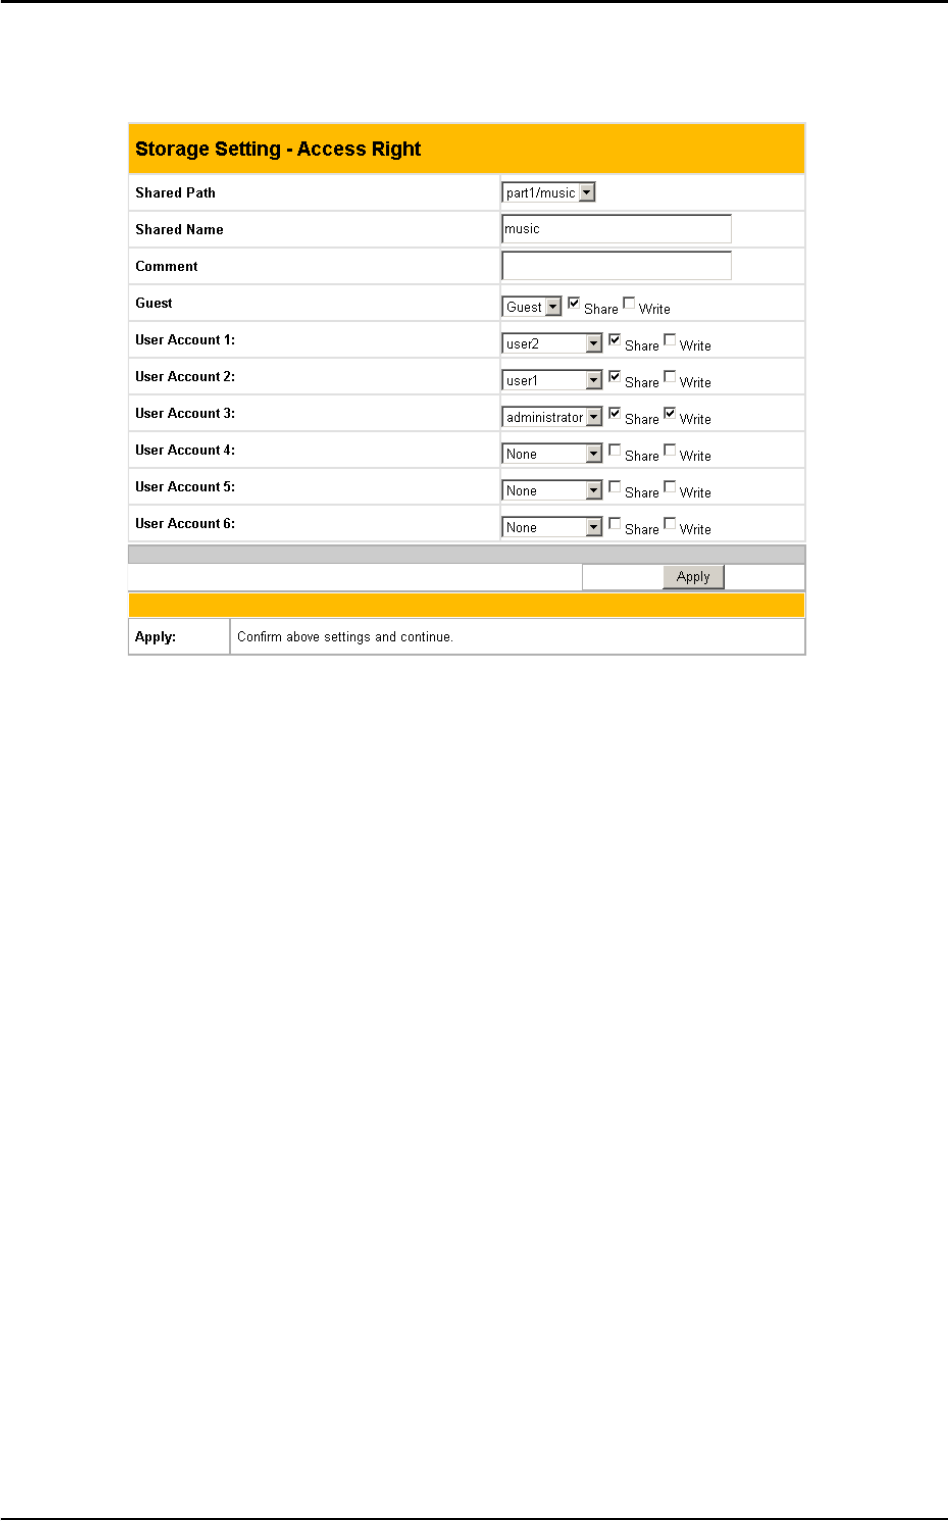
7. Select a folder or partition from the list and click Edit to modify
permissions for the user in user list.
The Access Right screen is displayed. Type in the Shared Name
and any Comments if required. Set the user permissions for the
Guest account and up to six user accounts. Select the appropriate
user account names from the drop-down box and check the Share
and Write check boxes to enable sharing and writing to the folder.
Click Apply to apply the changes to the access rights to the folder.
8. Click Apply to apply the changes or Finish to save the changes
and restart the device.
34 ASUS 802.11g WL-HDD2.5
Applying the permissions
After adding users who can access the hard drive and setting up
access rights for the hard drive’s partitions and folders, use the Net-
work Neighborhood Mode option to apply the permissions. Scroll to
select Apply rules in shared node list from the field and click Finish
to save the changes and restart the system.
ASUS 802.11g WL-HDD2.5 35
Sharing Files
The ASUS WL-HDD2.5 is primarily designed to help you share data,
music, video, or other files over the wireless LAN. You can set up this
device in your house, office, or dormitory, such that anyone can
access media files from it using a wireless connection.
To share files from the ASUS WL-HDD2.5 that has been set up as
your network storage drive, do the following:
1. Connect to the wireless network through your wireless client and
access the ASUS WL-HDD2.5 as described in “Accessing the
HDD” on page 20.
2. Type a valid user name and password to access data.
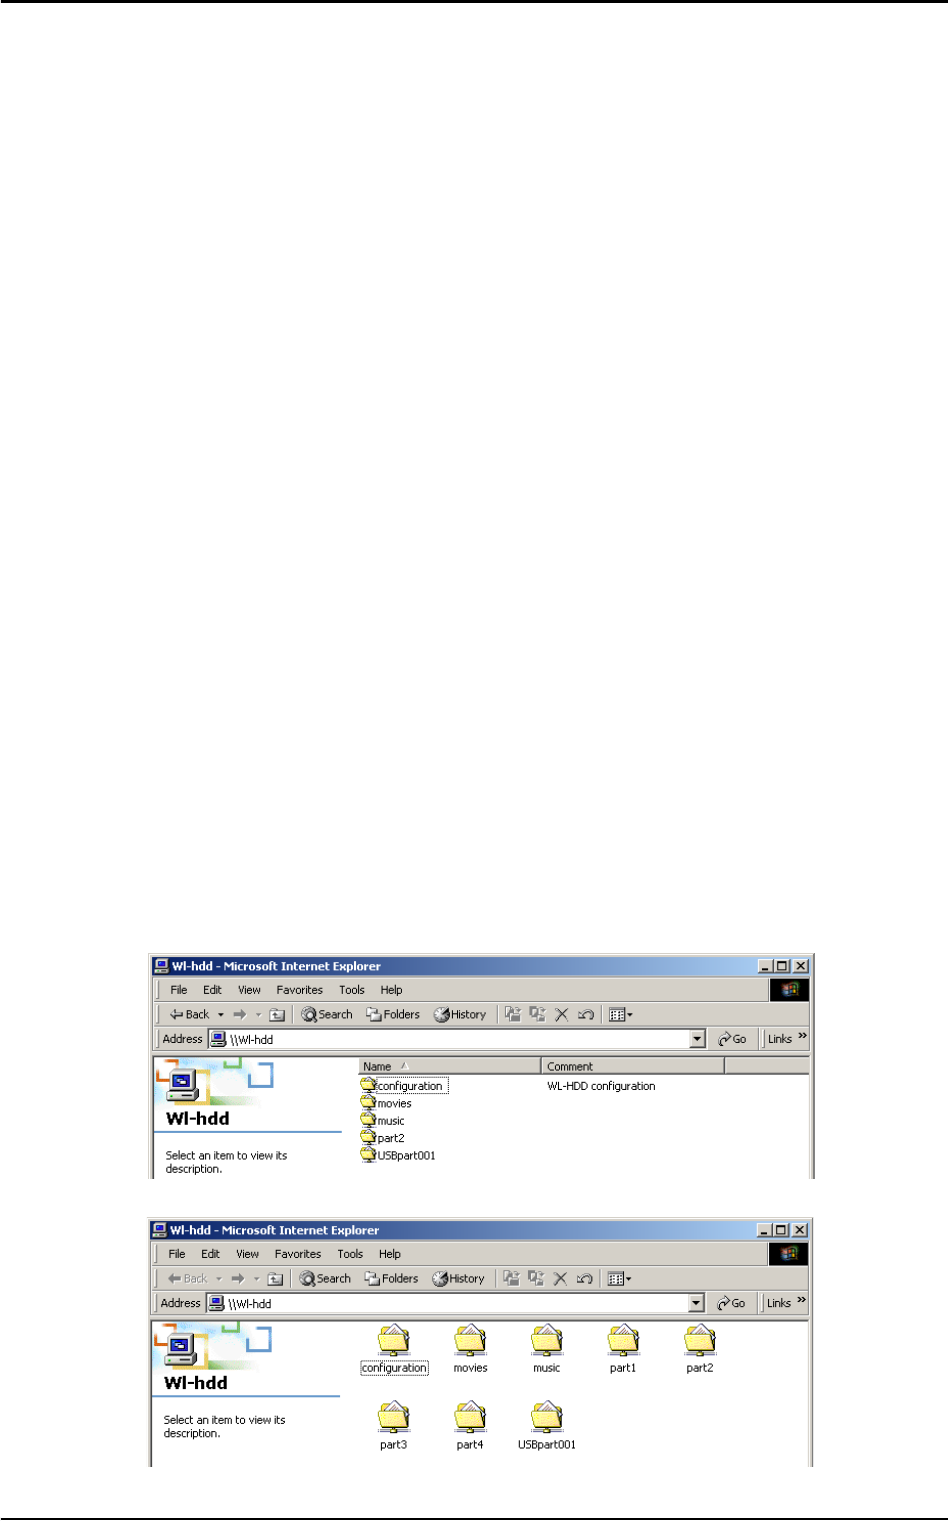
3. In order to share data from the ASUS WL-HDD2.5, you must
access the HDD using a valid user name. See “Editing the User
List” on page 31 for more details about creating users. Only the
folders and partitions that have been shared will be visible to
you.For instance, in this example, only the second partition
(part2) and the movies,music, and USBpart001 folders have
been shared. When you login as a user, only these items will be
displayed on the hard drive. However, if you log in as admin, you
can see all the contents of the hard drive including the other parti-
tions.
Logging in as ‘user’
Logging in as ‘admin’
36 ASUS 802.11g WL-HDD2.5
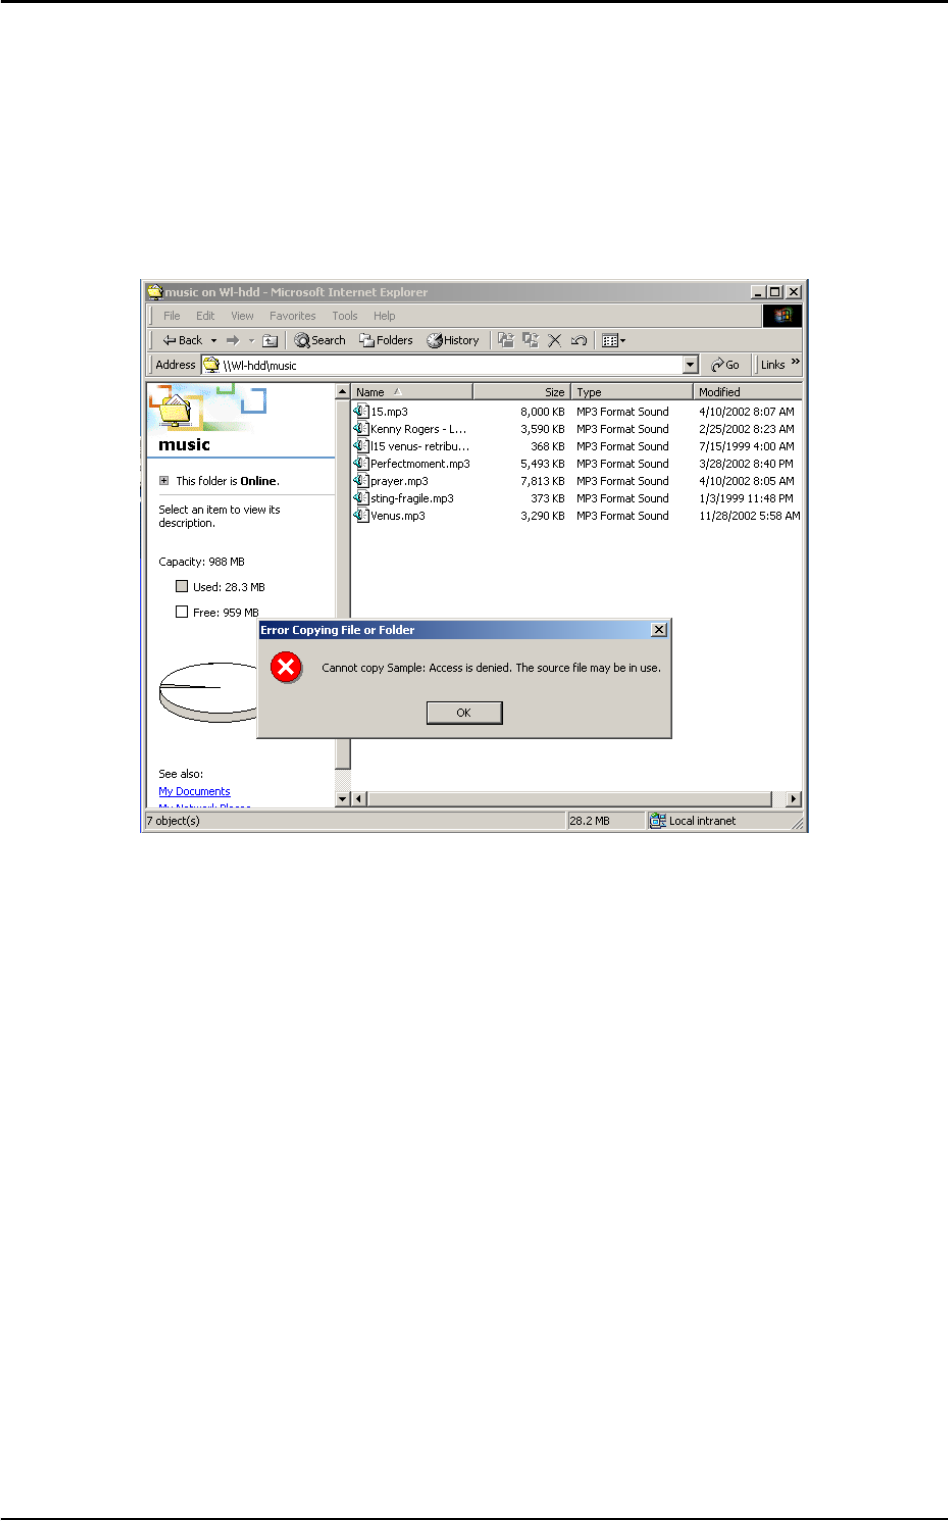
4. If you want to copy any data to the hard drive, the destination
folder or partition must be write-enabled. Make sure that the
access rights (see “Editing the Shared Nodes List” on page 32) are
set to Share – on and Write – on and then copy data to the drive.
If the write permissions are not set and you try to copy data to a
folder, the following error message will be displayed.
ASUS 802.11g WL-HDD2.5 37
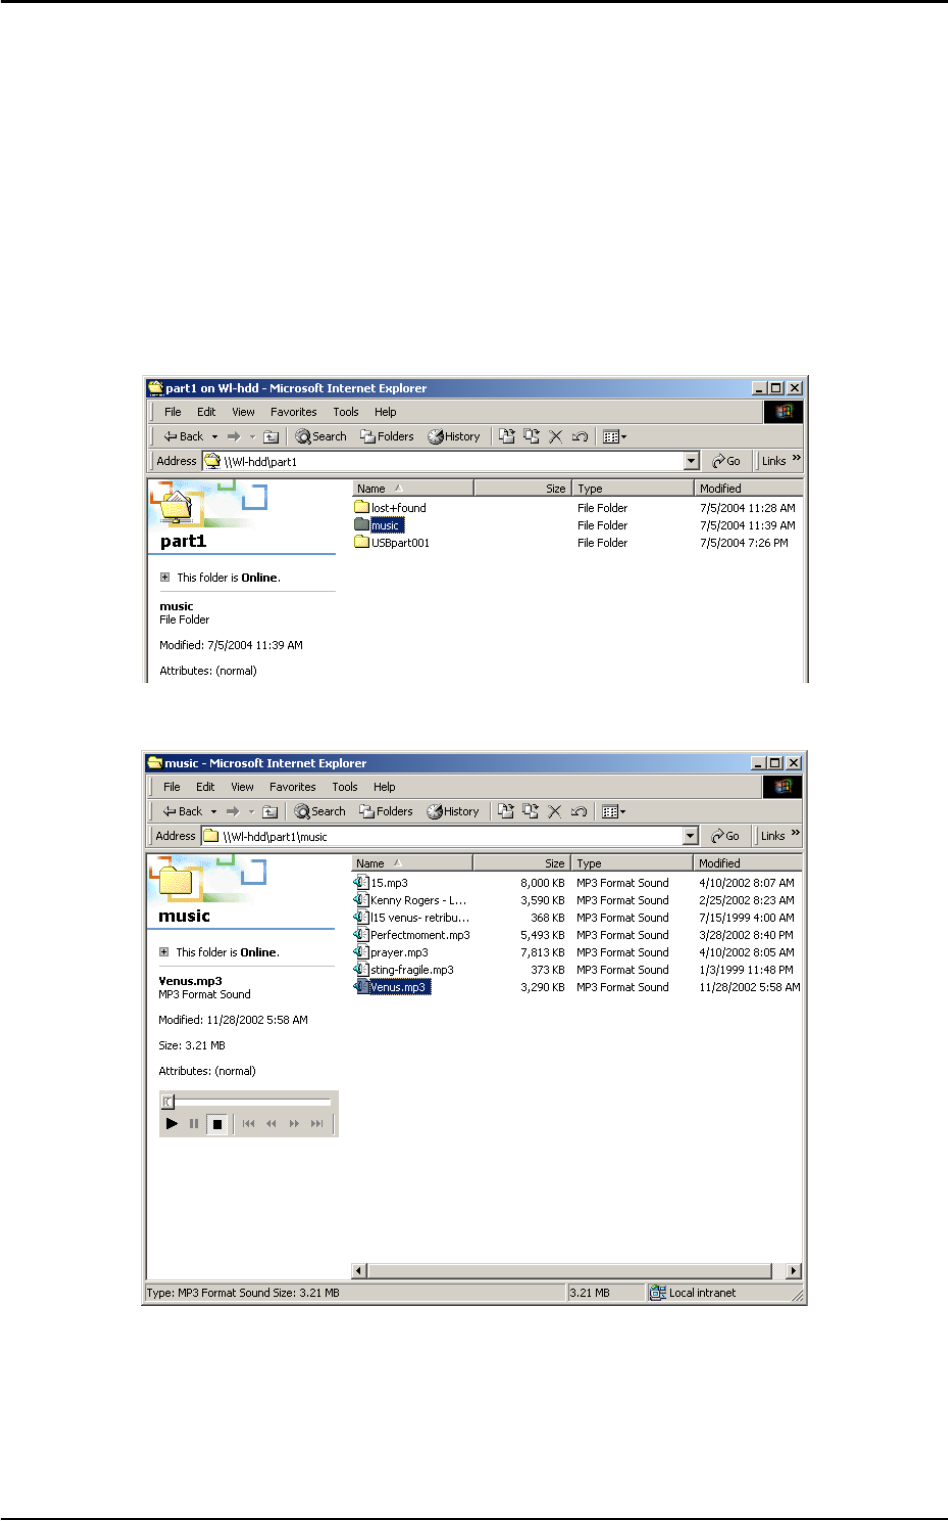
To download files from the ASUS WL-HDD2.5:
Locate the files that you wish to download and then copy them to
your local drive as needed. Note that you can only access folders that
have been shared by the administrator; see “Editing the Shared Nodes
List” on page 32. You can also search for the desired folders using the
Shared Name as the search criteria. For instance, to search for music
files stored on the music folder on the first partition (part1) on the
ASUS WL-HDD2.5, do the following:
1. Locate the music folder on the hard disk drive.
2. Double-click the folder icon to view its contents.
38 ASUS 802.11g WL-HDD2.5
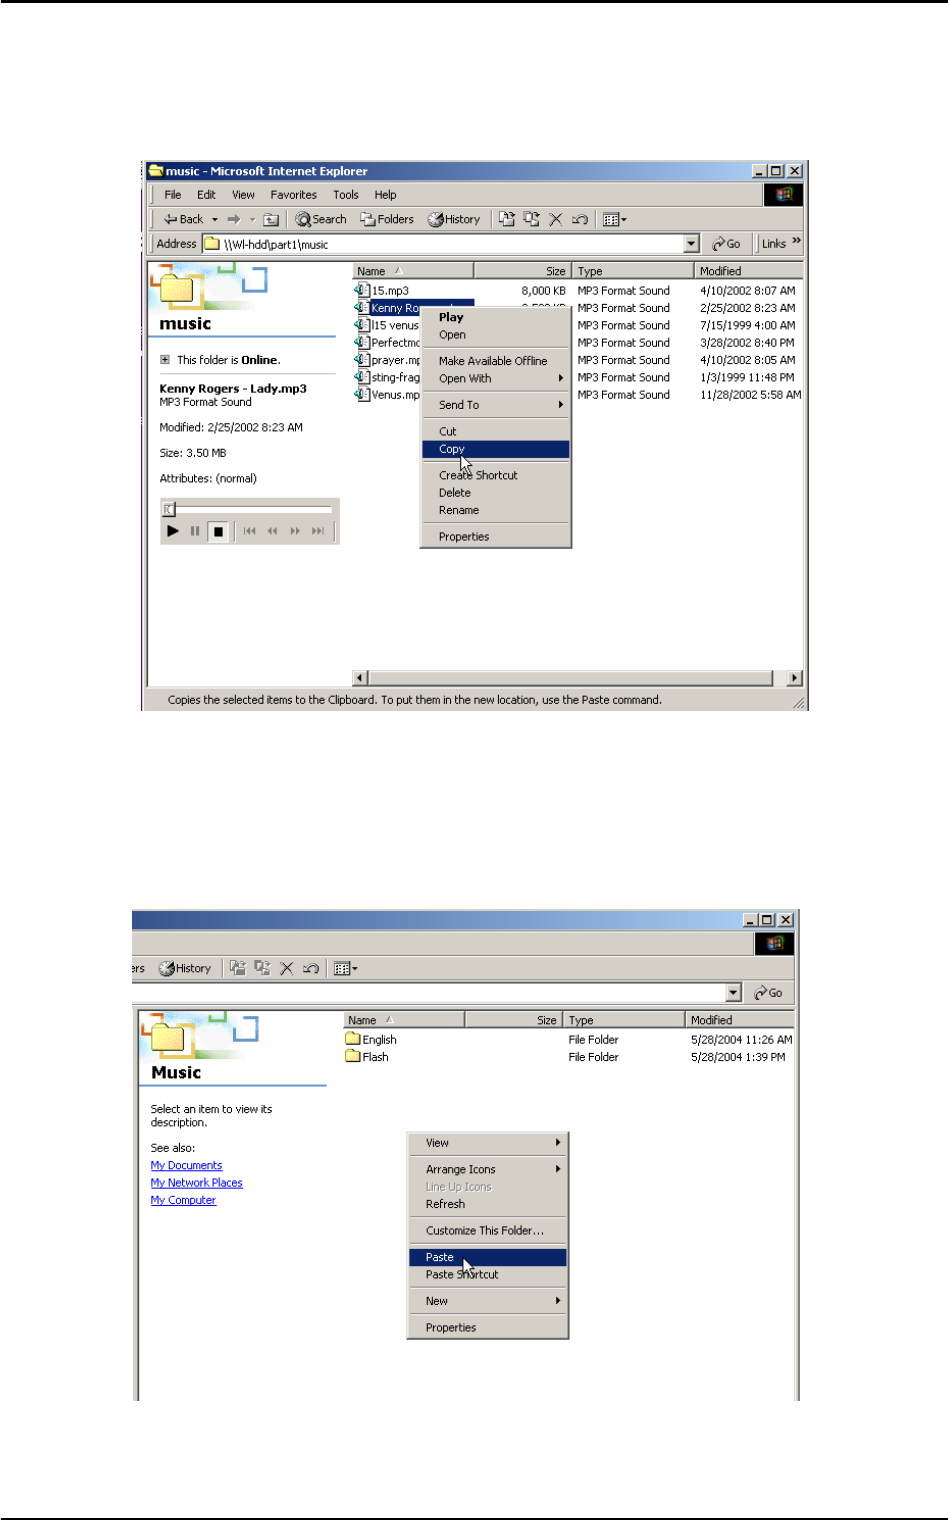
3. Right-click the file(s) that you want to download to your local
drive, to view the context menu. Select Copy from the context
menu.
4. Using Windows Explorer, navigate to the location on your local
drive where you want to download the selected file. Right-click to
view the context menu and select Paste to download the music
file.
ASUS 802.11g WL-HDD2.5 39
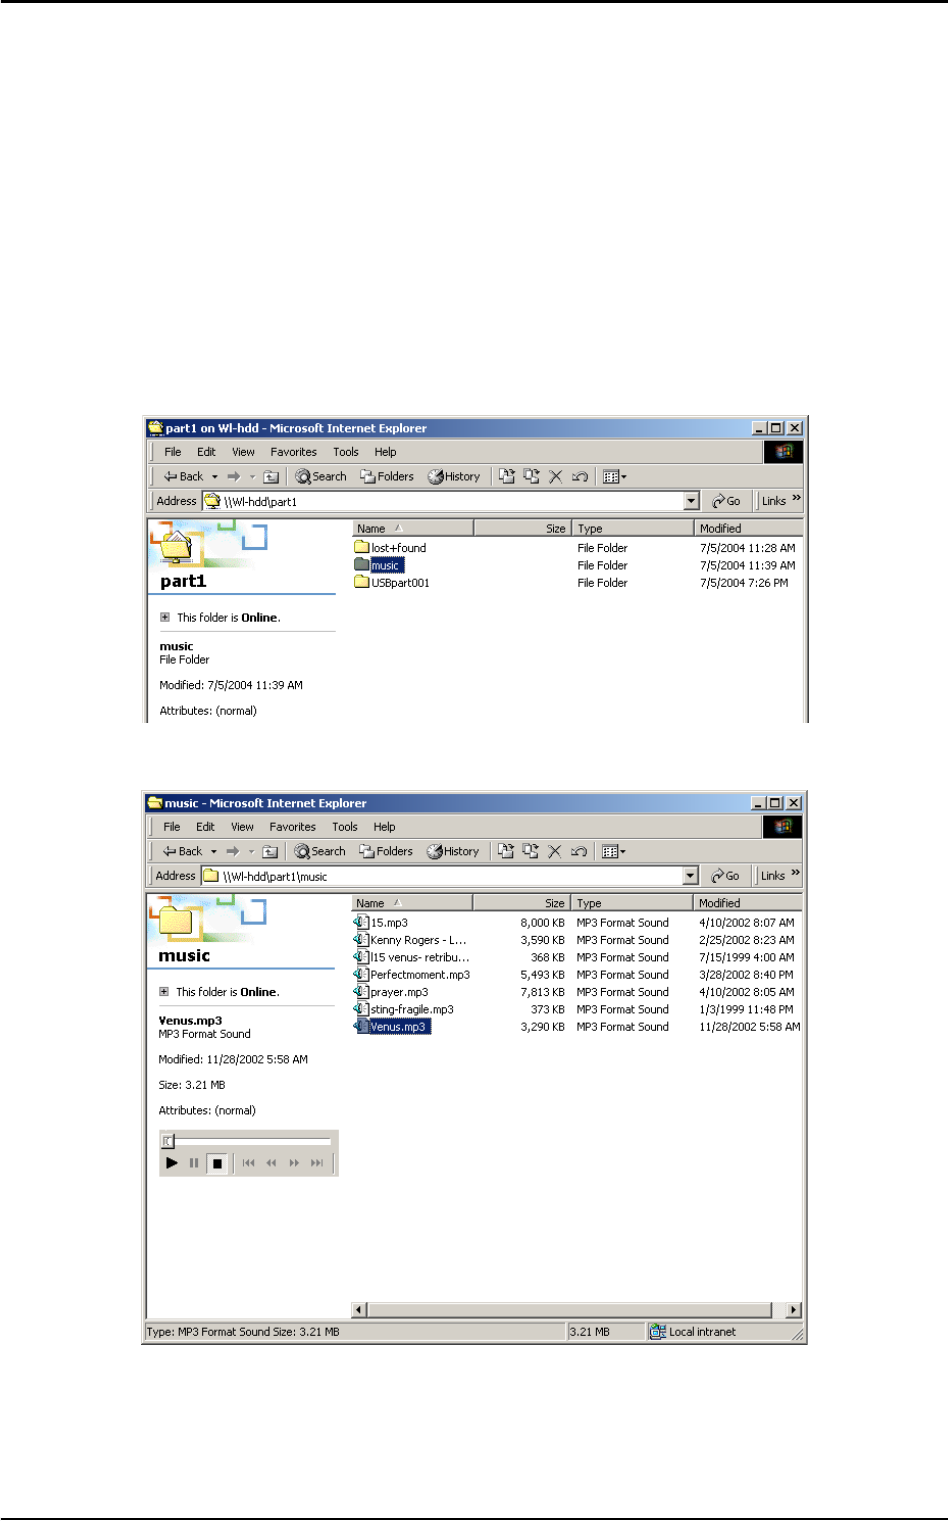
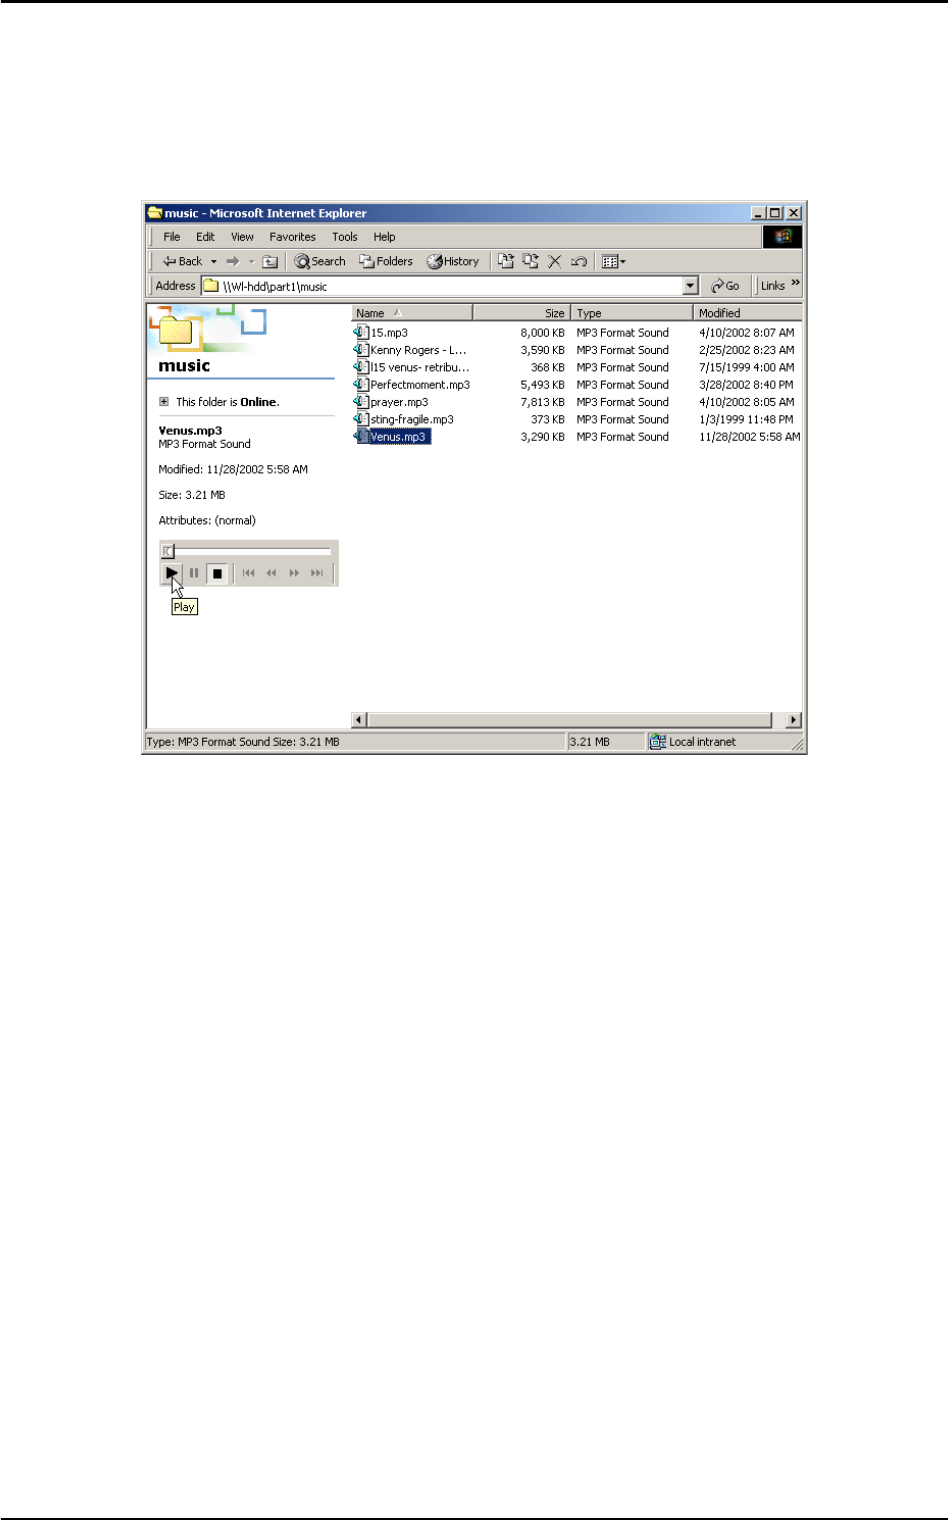
To directly play media files from the ASUS WL-HDD2.5:
You can also play back a music, video or other media file directly
from the ASUS WL-HDD2.5 without downloading it to your local
drive. The client treats the media file as a shared network file and
opens it using the appropriate application. For instance, to play back a
music file from the music folder on the first partition (part1), do the
following:
1. Locate the music folder on the hard disk drive.
2. Double-click the folder icon to view its contents.
40 ASUS 802.11g WL-HDD2.5
3. Select the music file that you want to play and double-click it to
start playing it with the default application (in this case, Windows
Media Player). Alternatively, for Windows media files, click the
Play button in the left pane to start playback.

ASUS 802.11g WL-HDD2.5 41
Transferring Data from External Flash Memory
The ASUS WL-HDD2.5 supports USB flash disks or external flash
memory cards through a USB connection to enable you to transfer
data. The device copies data automatically from the flash memory to
the hard disk when inserted into the USB slot.
Auto-copy Function
To transfer data automatically from the flash memory, connect the
USB flash memory disk to the USB port of the ASUS WL-HDD2.5.
Alternatively, to transfer the contents of other types of flash memory
cards such as CF, SD, MMC, and so on, insert the card into an exter-
nal card reader (not supplied) and connect it to the USB port using a
USB cable.
The device copies the contents of the memory disk automatically to
the hard disk. The USB light blinks quickly when copying data.
The data from the USB flash memory is copied to a folder named
USBpartxxx, where xxx is a number from 001 to 999 indicating the
order in which the data was transferred.
42 ASUS 802.11g WL-HDD2.5
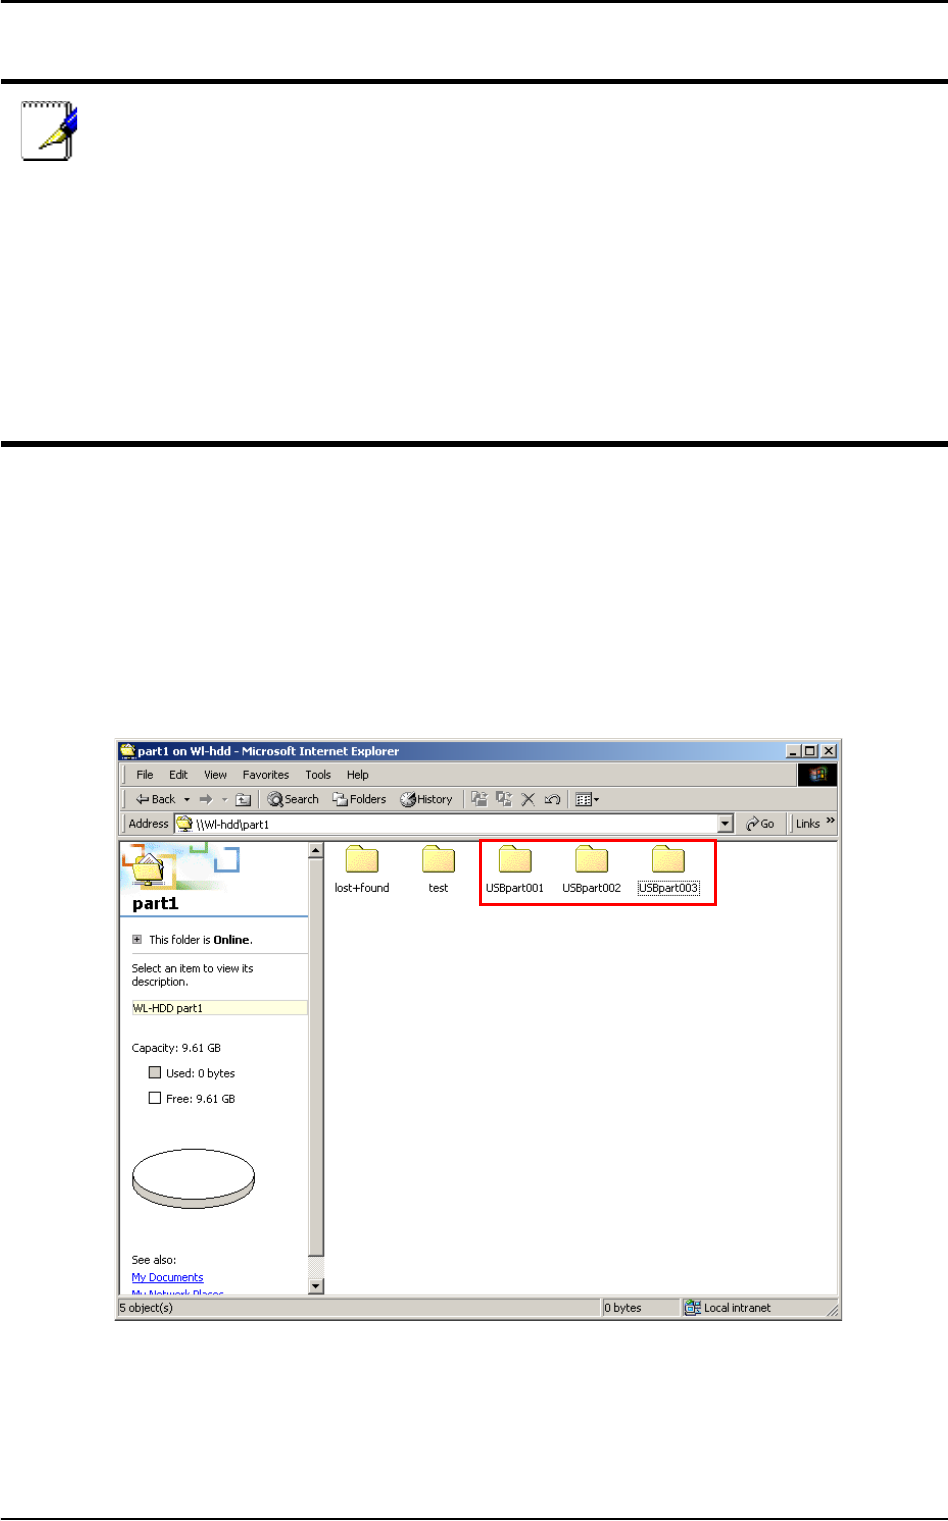
Locating the Copied Files on the HDD
To view the data transferred to the hard disk from your flash memory,
double-click the hard drive partition (part1) icon (see “Accessing the
HDD” on page 20 for more details). The contents of the flash memory
are stored under the USBpartxxx folder (where xxx is a number from
001 to 999 indicating the order in which the data was transferred).
Notes:
• When copying data automatically from a flash disk, the first
partition – part1 – is used first. All the data is copied as long as
there is free space in the first partition.
• If you remove the flash disk from the ASUS WL-HDD2.5 and
insert it again, the data is copied again to the hard disk in a
new folder with the folder name incremented by 1. For
instance, if the first time the data was copied under
USBpart005, then after removing and inserting the disk, the
data is copied again to a new folder named USBpart006.
ASUS 802.11g WL-HDD2.5 43
Shutting down the ASUS WL-HDD2.5
Use the web manager tool to shut down the ASUS WL-HDD2.5 after
using it to prevent damage to the hard disk and loss of data. To shut
down the system, do the following:
1. Click Shutdown in the web manager window.
2. The device shuts down and the following message is displayed.
3. Disconnect the power cord and shut down the system safely.
44 ASUS 802.11g WL-HDD2.5
3. Software Configuration
The ASUS WL-HDD2.5 can be configured to meet various usage sce-
narios. Some of the factory default settings may suit your usage; how-
ever, others may need to be changed.
Configuring the ASUS WL-HDD2.5 is done through a web browser.
You need a PC connected to the ASUS WL-HDD2.5 (either directly
or through a hub, with a wired or wireless connection) The web
browser acts as a configuration terminal. For the wireless connection,
you need an IEEE 802.11g/b compatible device, e.g. an ASUS
WLAN Card, installed in your portable computer.
Connecting to the Web Interface
Wired Ethernet Connection
Besides using a network hub, you can also connect a LAN cable from
your computer to the ASUS WL-HDD2.5 using either a straight or
crossover cable because the device has auto-crossover capability.
Wireless Connection
If you are using a portable computer with a wireless adapter, you can
connect to the ASUS WLAN Web Manager without a wired Ethernet
connection. Just make sure your TCP/IP settings are configured cor-
rectly as described in “TCP/IP Settings” on page 16.
To configure the ASUS
WL-HDD2.5, start your browser,
type in the IP address of the device
(192.168.1.1) in the Address box
and click Go. The ASUS
WL-HDD2.5 web manager opens.
Click Settings to configure the
device settings. A window pops up,
prompting you to enter the User name and Password in order to log
in. The factory default values are admin and admin for User name
and Password. Click OK after typing in the required values.
ASUS 802.11g WL-HDD2.5 45
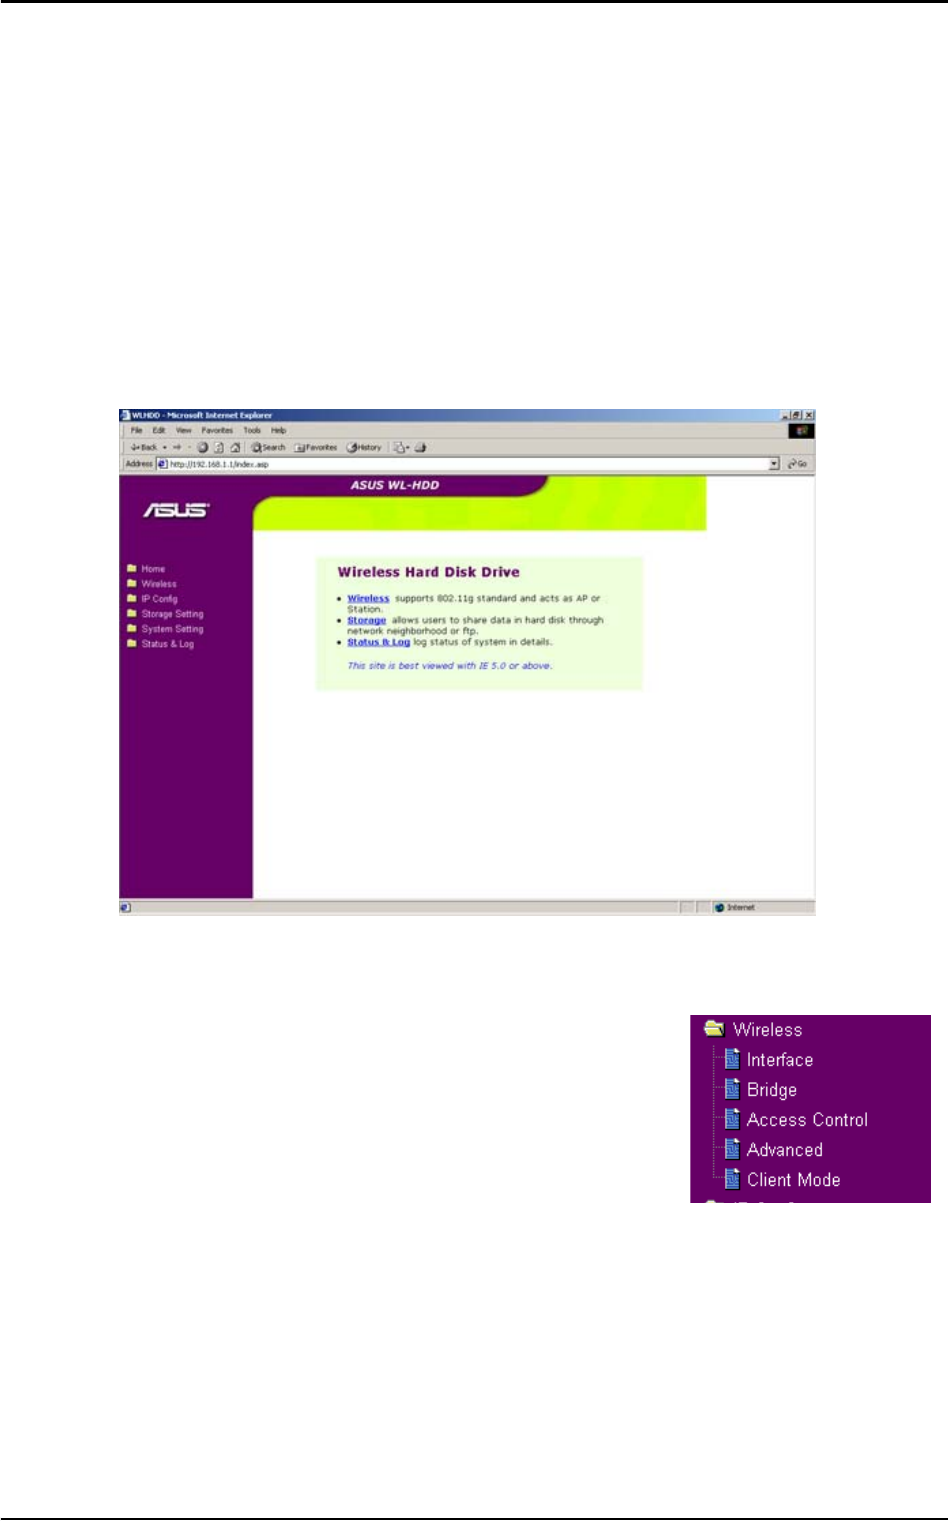
Configuring the ASUS WL-HDD2.5
After logging in, the Wireless Hard Drive home page opens. Links to
the various parameters that can be adjusted are shown in the left
panel. Click a link to configure the ASUS WL-HDD2.5 as desired.
Click Restore to clear the changes you have made and restore the pre-
vious settings. Click Finish to confirm all your settings and restart the
ASUS WL-HDD2.5. Click Apply to confirm your settings and con-
tinue without restarting the device. The following sections describe
the various configuration settings.
Wireless
Click the Wireless option on the left panel to
display its submenus. The wireless menu
enables you to configure the wireless interface
of the ASUS WL-HDD2.5, to configure its
bridge settings, to set up access blocks or
bypass, and to enable the ASUS WL-HDD2.5 to
act as an AP if no other AP is detected in its vicinity.
46 ASUS 802.11g WL-HDD2.5
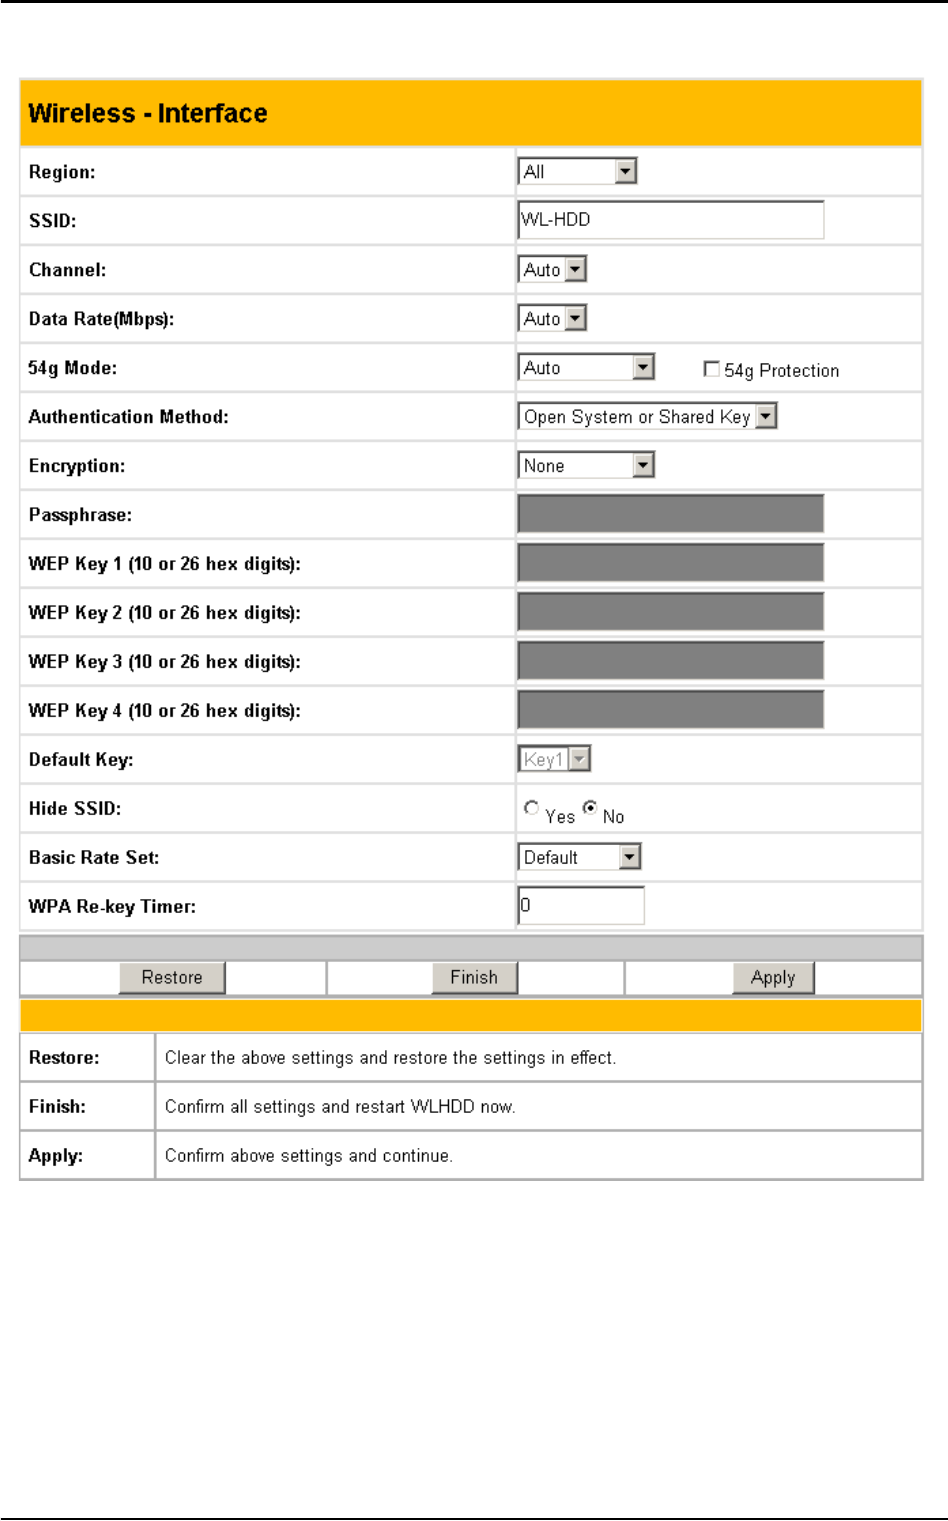
Interface
The Interface submenu has the following options:
Region: Scroll through this drop-down box to select the appropriate
region where you are located.
SSID: The SSID is an identification string of up to 32 ASCII charac-
ters unique to every AP. The SSID is also referred to as the “ESSID”
or “Extended Service Set ID.” By default, the SSID is set to

ASUS 802.11g WL-HDD2.5 47
“WL-HDD”. All the wireless clients in the vicinity must have the
same SSID in order to use the ASUS WL-HDD2.5. This field is also
used as the device name when you are looking for the ASUS
WL-HDD2.5 through the Windows Network Neighborhood function.
Channel: The 802.11g and 802.11b specification supports up to 14
overlapping channels for radio communication. Choose an appropri-
ate channel for the operating radio frequencies or choose Auto to
select a channel automatically. The available channels change accord-
ing to the Region selected.
Data Rate (Mbps): This field allows you to specify the transmission
rate. Select Auto to maximize performance.
54g Mode: This field indicates the 802.11g interface mode. Selecting
Auto allows both 802.11g and 802.11b clients to connect to the
ASUS WL-HDD2.5. Selecting 54g Only maximizes performance,
but prevents 802.11b clients from connecting to the device. If 54g
Protection is checked, G-Mode protection of 802.11g traffic is
enabled automatically in the presence of 802.11b traffic.
Authentication Method: This field enables you to set different
authentication methods for determining various encryption schemes.
The relationship between Authentication Method, Encryption, Pass-
phrase and WEP Keys is listed in the following table:
Relationship among keys:
Authentication Method Encryption Passphrase WEP Key 1~4
Open System or Shared
Key
None Not required Not required
WEP-64 bits 1~64 characters 10 hex digits
WEP-128 bits 1~64 characters 26 hex digits
Shared Key WEP-64 bits 1~64 characters 10 hex digits
WEP-128 bits 1~64 characters 26 hex digits
WPA-PSK TKIP only 8~63 characters Not required
AES only 8~63 characters Not required

48 ASUS 802.11g WL-HDD2.5
Encryption: If the Open System or Shared Key or Shared Key
authentication method is used, WEP (Wired Equivalent Privacy)
encryption is applied. If the WPA-PSK method is used, a newly pro-
posed TKIP or AES encryption in WPA is applied.
Enabling WEP can protect your data from eavesdroppers. If you do
not need this feature, select None to skip the following setting. The
ASUS WL-HDD2.5 supports both 64-bit and 128-bit encryption
using the WEP algorithm. Select the type of encryption you want to
use (64 or 128 bit) and configure one to four WEP Keys. The 128-bit
method is more secure than the 64-bit method.
64/128 bits versus 40/104 bits: You may be confused about config-
uring WEP encryption, especially when using multiple wireless LAN
products from different vendors. There are two levels of WEP
Encryption: 64 bits and 128 bits. 64-bit WEP and 40-bit WEP are the
same encryption method and can inter-operate in the wireless net-
work. This lower level of WEP encryption uses a 40 bit (10 hex digits
[0~9, a~f, and A~F]) as a “secret key” (set by user), and a 24 bit “ini-
tialization vector” (not under user control). This together makes 64
bits (40 + 24). Some vendors refer to this level of WEP as 40 bits and
others refer to this as 64 bits. Asus WLAN products use the term 64
bits when referring to this lower level of encryption. Secondly, 104 bit
WEP and 128 bit WEP are the same encryption method and can
inter-operate in the wireless network. This higher level of WEP
encryption uses 104 bits (26 hex digits) as a “secret key” (set by user),
and a 24 bit “initialization vector” (not under user control). This
together makes 128 bits (104 + 24). Some vendors refer to this level
of WEP as 104 bits and others refer to this as 128 bits. ASUS WLAN
products use the term 128 bits when referring to this higher level of
encryption.
Passphrase: If you select TKIP only or AES only as the Encryption
method, this field will be used as a password for the encryption pro-
cess. A password with 8 to 63 characters is required. If you select
WEP-64 bits or WEP-128 bits as the Encryption method, this field
will be used to generate four WEP keys automatically. A WEP key is
either 10 or 26 hexadecimal digits based on whether you select 64 bit

ASUS 802.11g WL-HDD2.5 49
or 128 bit in the WEP pull-down menu. Type a combination of up to
64 letters, numbers, or symbols in this field, which will be used to
generate the four WEP keys. If you want to type in the keys manually,
leave this field blank. The Asus WLAN family of products uses the
same algorithm to generate the keys so that all the products can use
the same WEP key.
WEP Key: At most four WEP keys can be set. A WEP key is either
10 or 26 hexadecimal digits (0~9, a~f, and A~F) based on whether
you select 64 bit or 128 bit in the WEP pull-down menu. The ASUS
WL-HDD2.5 and ALL of its wireless clients MUST have the same
default key.
Default Key: The Default Key field lets you specify which of the
four encryption keys you use to transmit data on your wireless LAN.
As long as the ASUS WL-HDD2.5 or a wireless mobile client with
which you are communicating has the same key in the same position,
you can use any of the keys as the default key. If the ASUS
WL-HDD2.5 and ALL of its wireless clients use the same four WEP
keys, select key rotation to maximize security. Otherwise, choose
one key in common as the default key.
Hide SSID : By default, No is selected so that wireless mobile users
can see your ASUS WL-HDD2.5’s SSID and join the network. If Ye s
is selected, your ASUS WL-HDD2.5 will not show in site surveys by
wireless mobile clients and they will have to manually enter your
device’s SSID. If you want to restrict access to your ASUS
WL-HDD2.5, this is a simple way to do it.
Basic Rate Set: This field indicates the basic rates that wireless cli-
ents must support. Use 1 & 2 Mbps only when backward compatibil-
ity is needed for some older wireless LAN cards with a maximum bit
rate of 2 Mbps.
Note: This function saves users from having to remember their
passwords and is compatible for all ASUS WLAN products. How-
ever, this is not as secure as the manual assignment of the keys.
50 ASUS 802.11g WL-HDD2.5
WPA Re-key Timer: This field specifies the time interval after
which the WPA group key is changed in seconds. 0 means no periodic
key-change is required.
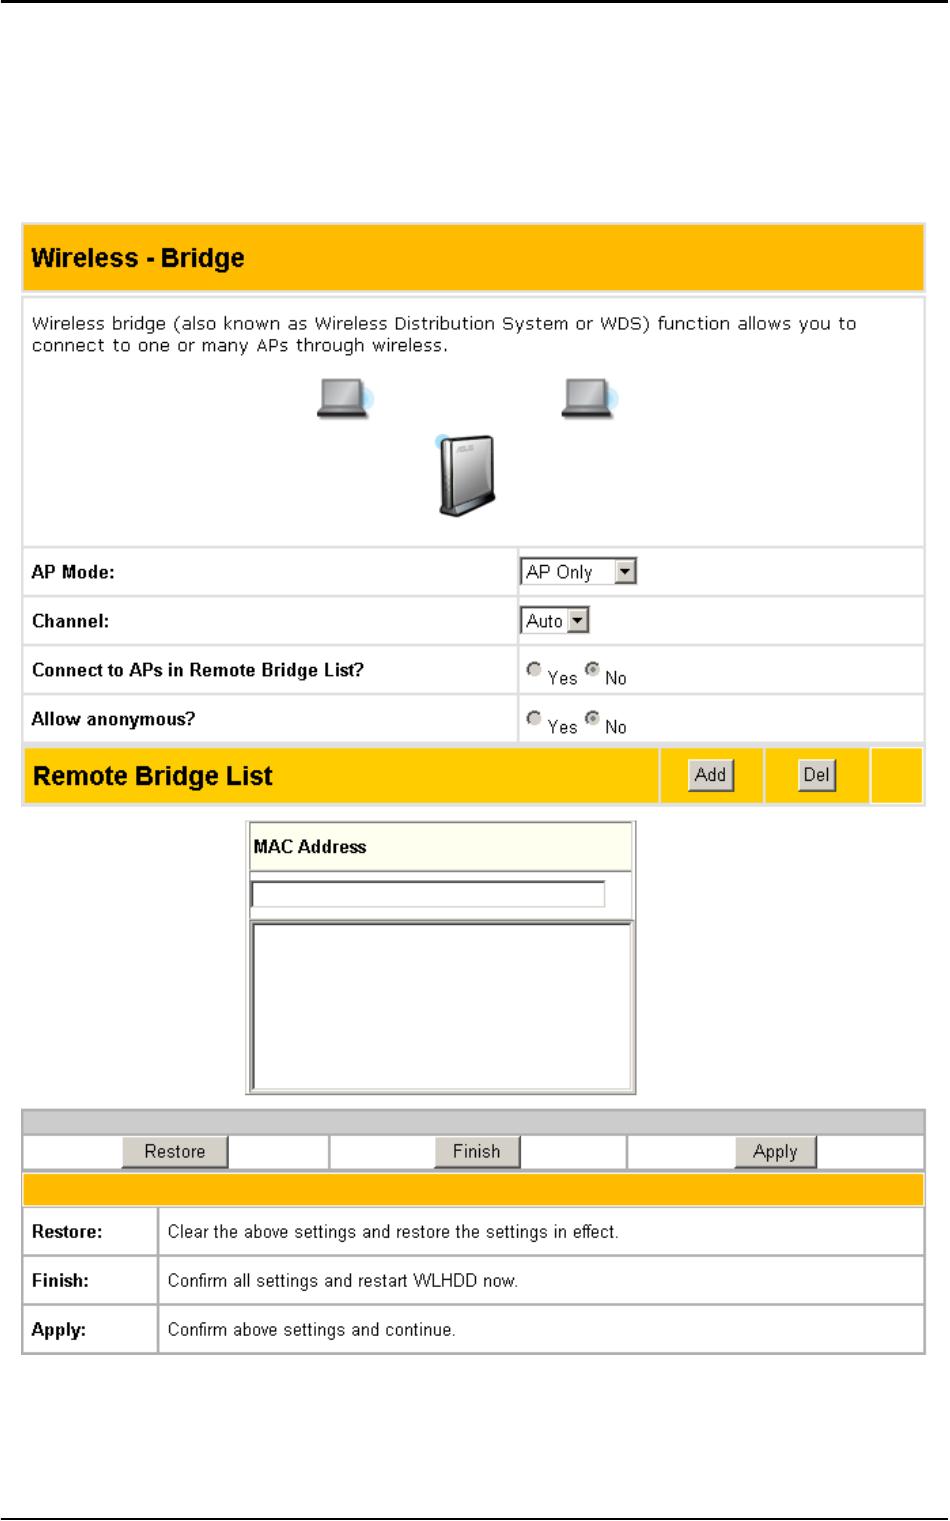
Bridge
ASUS 802.11g WL-HDD2.5 51
The bridge or WDS (Wireless Distribution System) enables you to
connect to one or many APs through a wireless connection. Choose
an AP mode and configure the WDS settings as follows:
AP Mode: AP Mode configures the ASUS WL-HDD2.5 for a spe-
cific purpose. By default, the device is set to serve as an Access Point
(AP only) where a wireless mobile client can connect wirelessly to a
wired Ethernet network. Choose WDS only for communicating with
other APs. Hybrid allows you to use the device both as an AP as well
as a wireless bridge.
Channel: All the Access Points in a Wireless Bridge mode must be
set to the same channel. The channel is set to 1 for WDS and Hybrid
AP modes.
Connect to APs in Remote Bridge List (Yes/No): Select Ye s to con-
nect to access points in the remote bridge list.
Allow anonymous? (Yes/No): Select Ye s to allow users without
accounts to connect to the AP.
Remote Bridge List: Use the remote bridge list to set up the MAC
addresses of the devices in the wireless bridge. Enter the MAC
address of the target APs in order to designate partners for your
device. Click Add to add the address or click Del to delete a selected
address.
Note: If Connect to APs in Remote Bridge List and Allow
Anonymous are both set to No, it means that this AP will not
connect with other APs and therefore the AP mode setting is set
automatically to AP Only.
52 ASUS 802.11g WL-HDD2.5
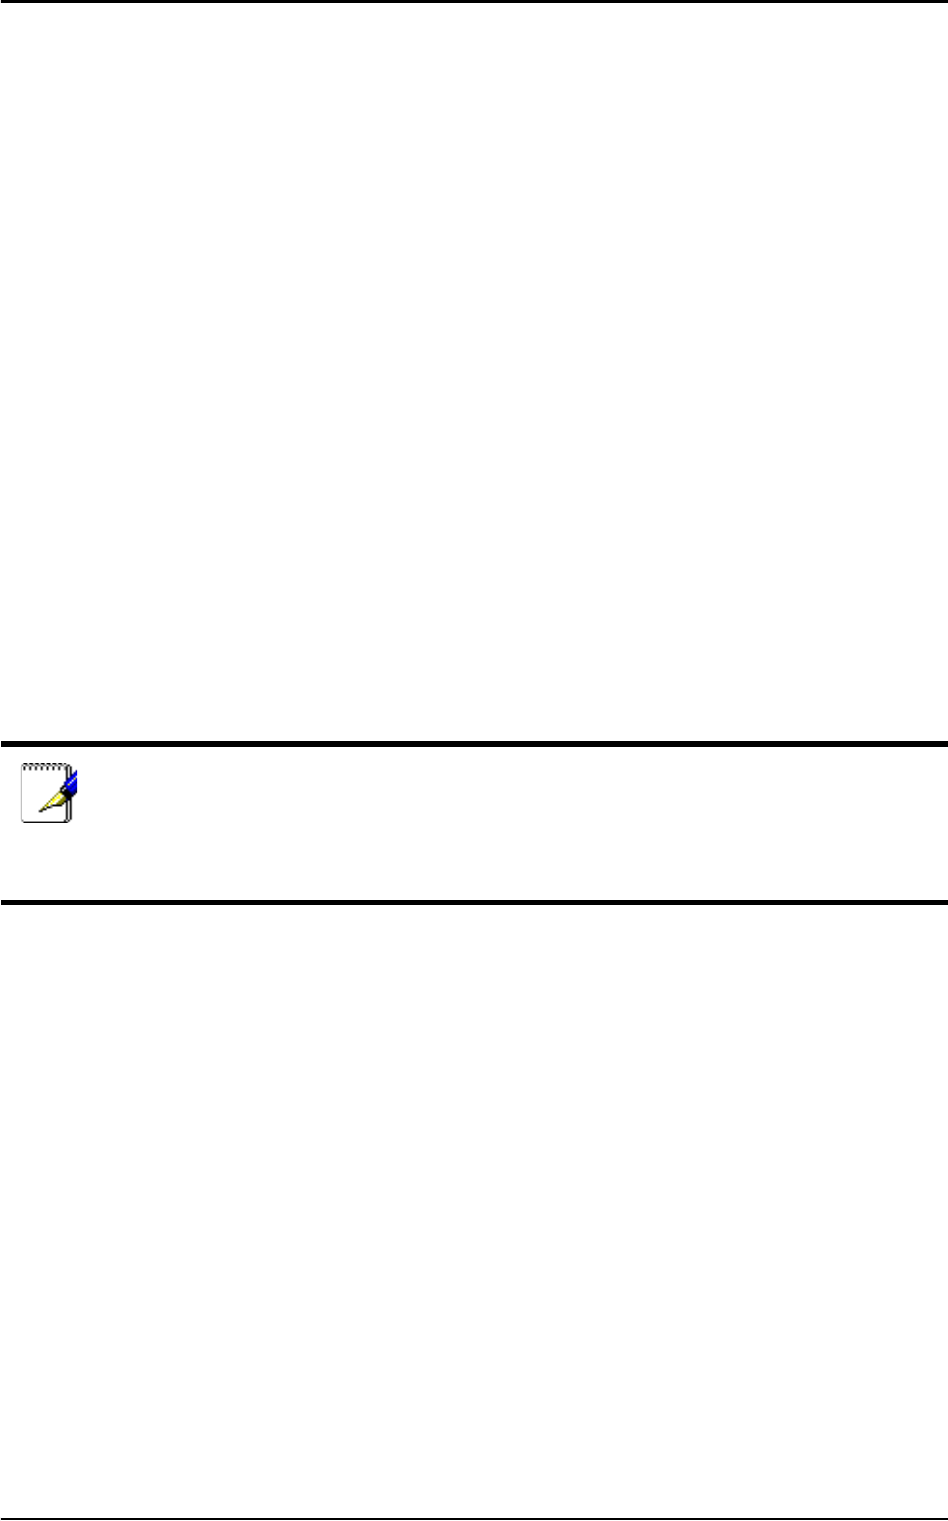
Access Control
For additional security, the ASUS WL-HDD2.5 has the ability to only
associate with or not associate with wireless mobile clients that have
their MAC address specified in this menu. The Access Control menu
enables you to block the access from certain wireless stations or to
bypass access from certain wireless stations. The menu has the fol-
lowing options:
MAC Access Mode: The default setting of Disable allows any wire-
less mobile client to connect to this device. The Accept option only
allows clients with their MAC addresses specified in the Access Con-
trol List, to connect to the device. The Reject option prevents devices
with their MAC addresses specified in the Access Control List from
connecting to this device.
ASUS 802.11g WL-HDD2.5 53
Access Control List: To add a MAC address to the Access Control
List, enter the 12 hexadecimal digits into the white box under MAC
Address and click the Add button. The MAC address will be placed
in the control list below. A total of 31 MAC addresses can be entered
into this page. For optimum use, determine which will be the lesser
value; addresses you wish to accept connections from, or addresses
you wish to reject connections from. Then, choose the appropriate
MAC Access Mode.
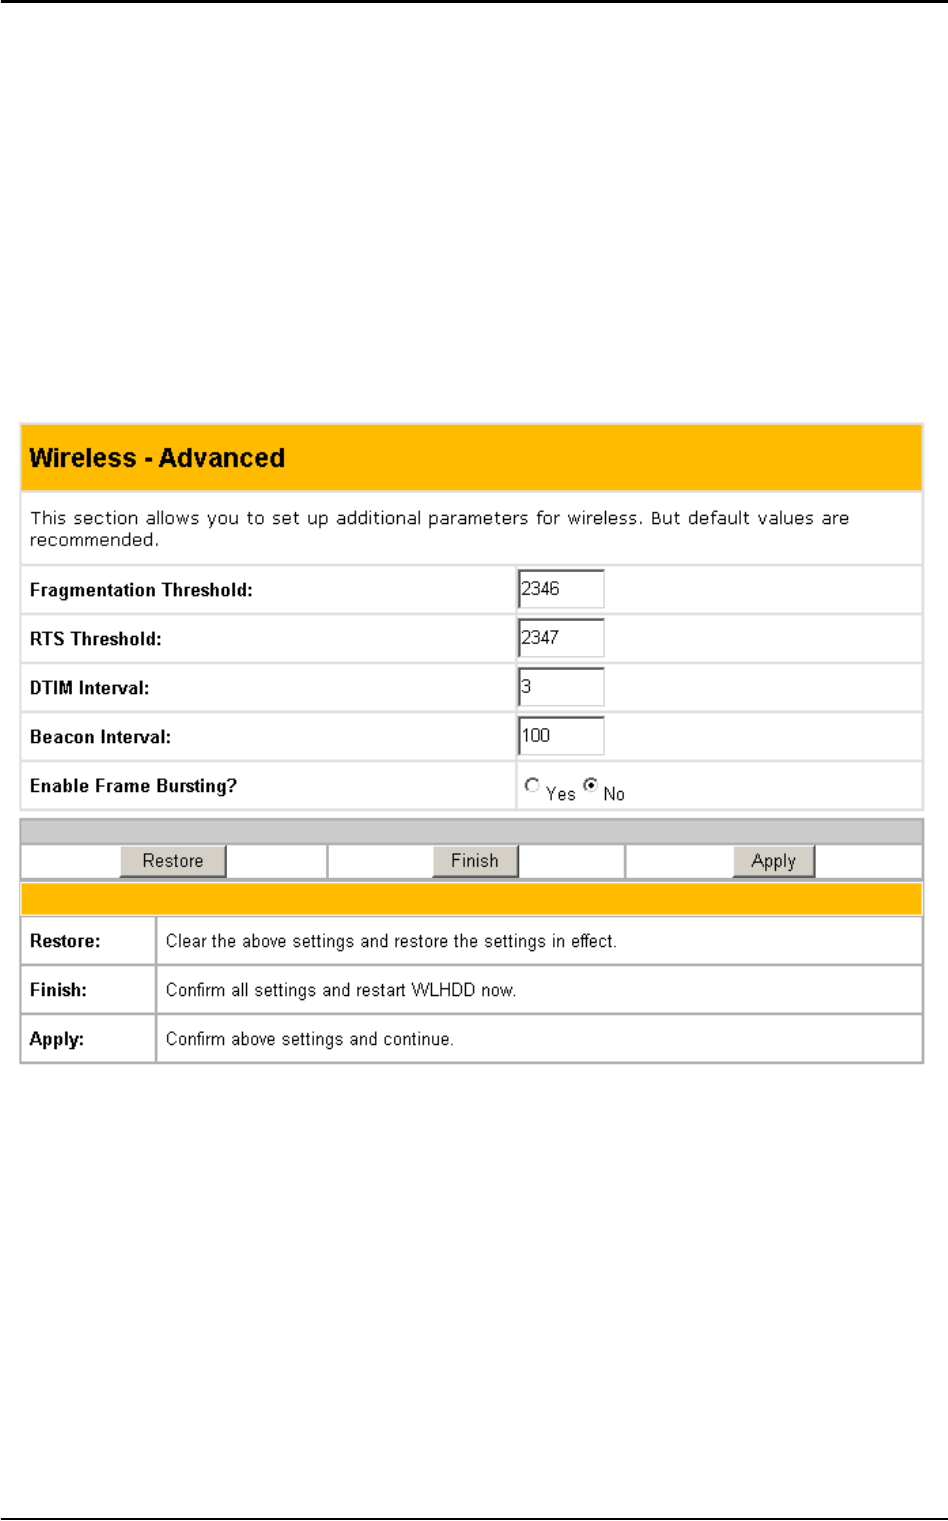
Advanced
The Advanced menu allows you to set up additional settings for the
ASUS WL-HDD2.5. However, it is recommended that you use the
default values for correct operation.
Fragmentation Threshold (256~2346): Fragmentation is used to
divide 802.11 frames into smaller pieces (fragments) that are sent sep-
arately to the destination. The use of fragmentation can increase the
reliability of frame transmissions. This field allows you to enable
fragmentation by setting a specific packet size threshold. The default
value (2346) is recommended.

54 ASUS 802.11g WL-HDD2.5
RTS Threshold (0~2347): The RTS/CTS (Request to Send/Clear to
Send) function is used to minimize collisions among wireless stations.
If you enable RTS/CTS, it will refrain from sending a data frame until
another RTS/CTS handshake in the air is completed. This field allows
you to enable RTS/CTS by setting a specific packet size threshold.
Default value 2347 is recommended.
DTIM Interval (1~255): DTIM (Delivery Traffic Indication Mes-
sage) is a kind of wireless message used to inform clients in Power
Saving Mode when to wake up to receive broadcast and multicast
messages. This field indicates the time interval in multiples of the
Beacon Interval that the system broadcasts DTIMs for clients in
Power Saving Mode. The default value (3) is recommended.
Beacon Interval (1~65535): This field indicates the time interval in
milliseconds after which the system broadcast packet, called beacon,
is sent to synchronize the wireless network. The default value
(100 milliseconds) is recommended.
Enable Frame Bursting? This field allows you to enable
frame-bursting mode to improve performance with wireless clients
that also support frame bursting.
ASUS 802.11g WL-HDD2.5 55
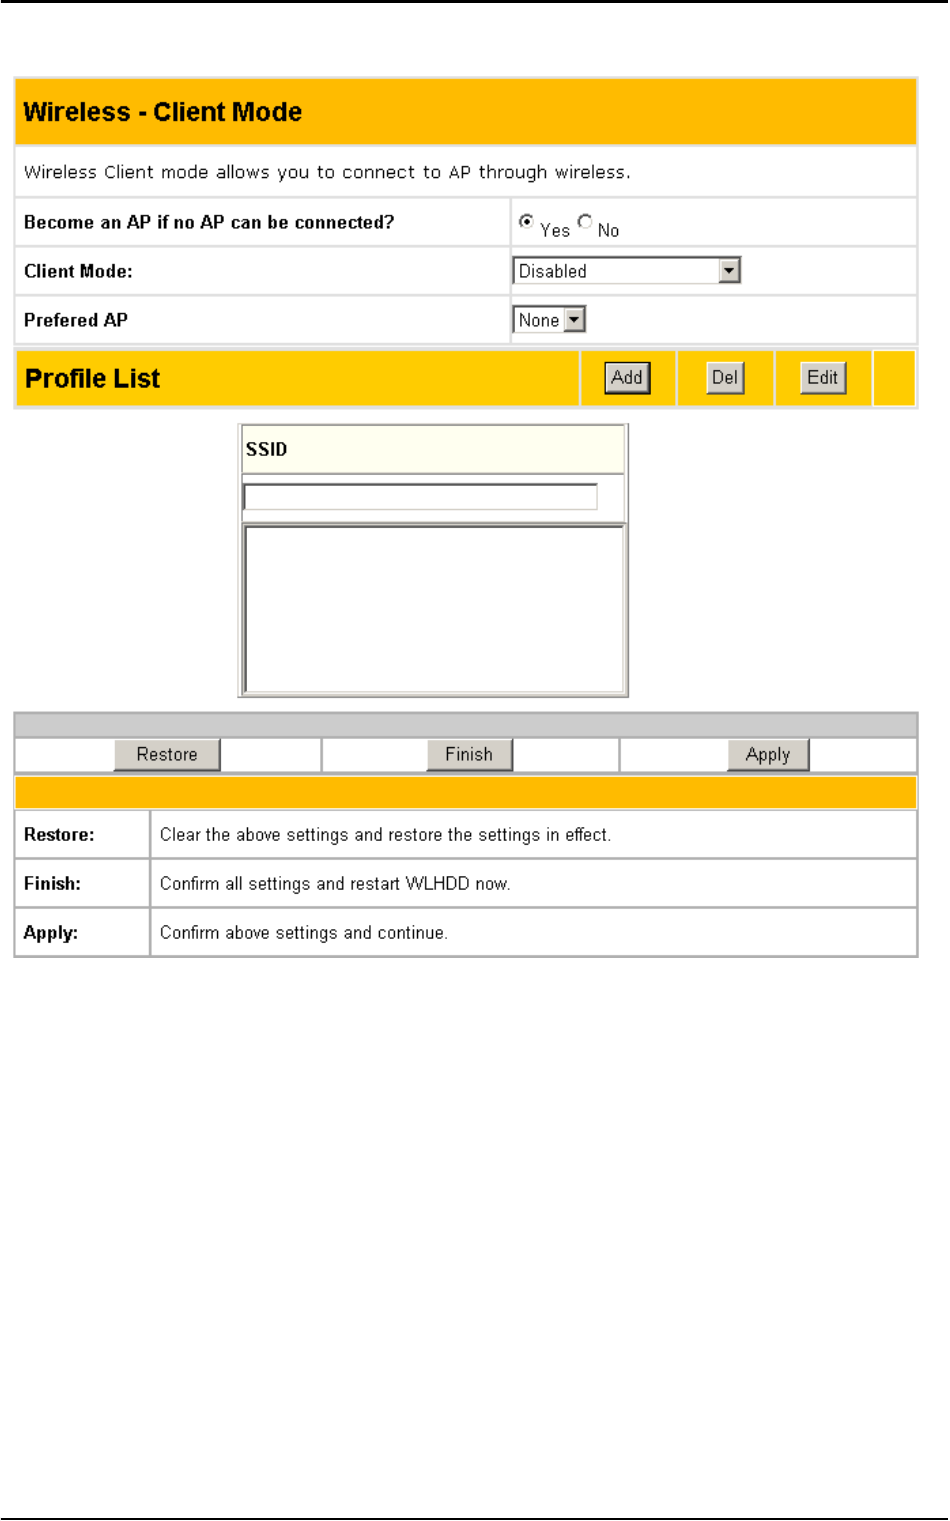
Client Mode
This menu page enables you to connect to the AP using a wireless
connection and has the following options:
Become an AP if no AP can be connected? Click Ye s to enable the
ASUS WL-HDD2.5 to be an Access Point in a wireless network, if no
other AP is detected.
Client Mode: Select Disabled if you do not want to connect to other
APs in the network. Select Connect to AP in profiles to enable the
device to connect to the APs specified in the Profile List.
Preferred AP: Scroll through this drop-down box to specify which
AP (from the Profile List) should be given preference when connect-
ing to other APs.
56 ASUS 802.11g WL-HDD2.5
Profile List: Use this option to add the SSIDs of other APs in the
WLAN, to which the ASUS WL-HDD2.5 connects. Type the SSID of
the AP under the SSID field, then click Add to add it to the Profile
List. Select an existing AP SSID, then click Del to remove it from the
list and disable connection to it. Select an existing AP SSID and click
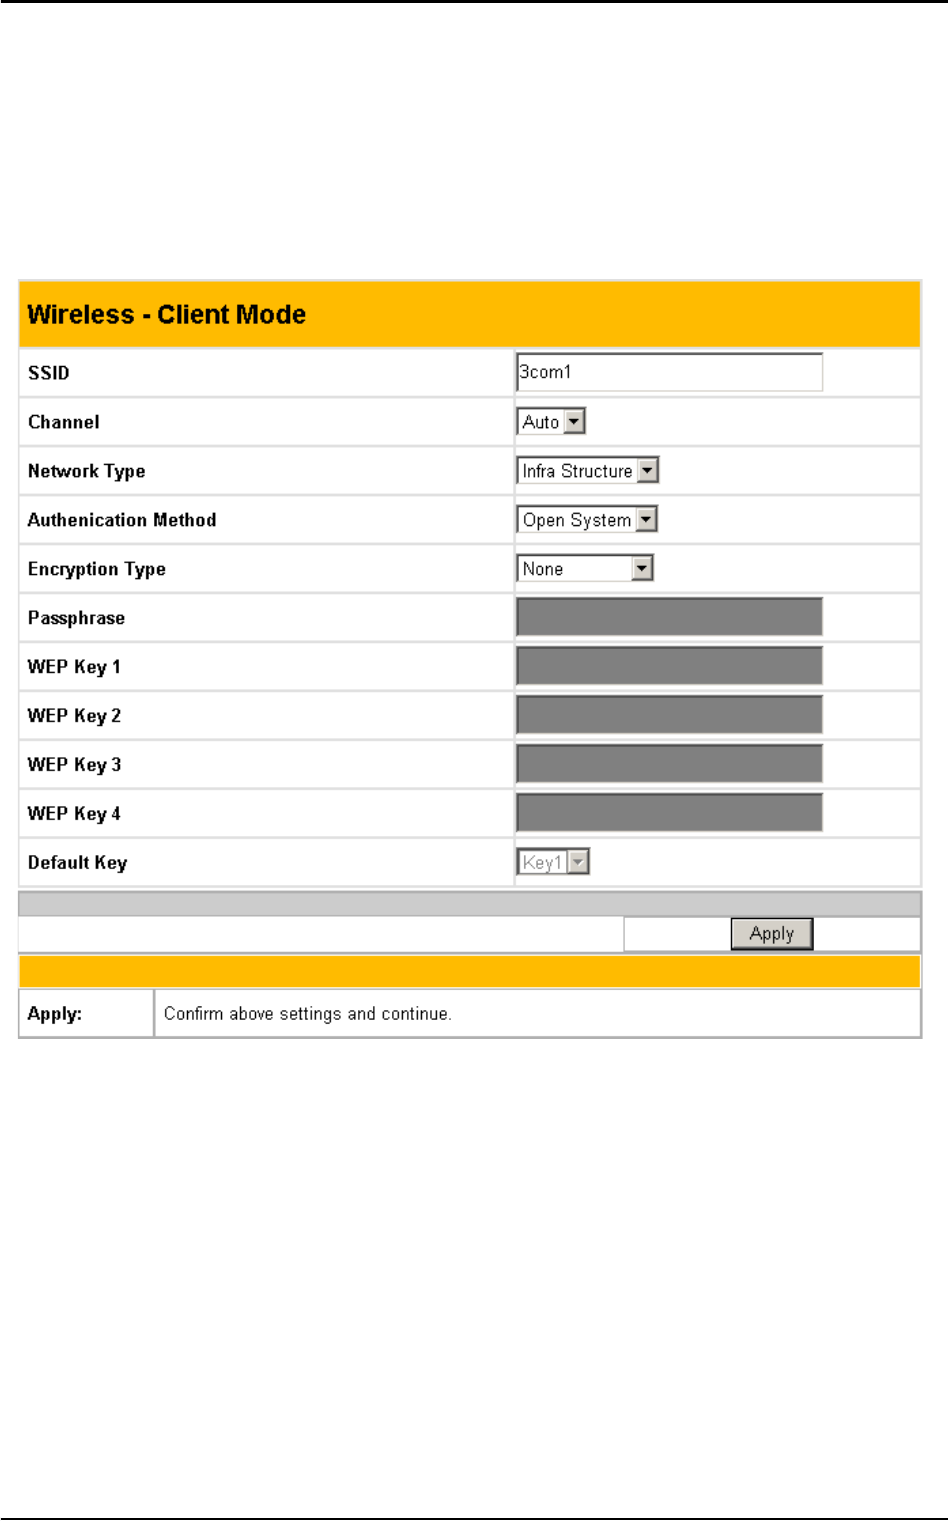
Edit to modify its connection parameters as follows:

ASUS 802.11g WL-HDD2.5 57
SSID: Type the SSID of the AP in this field.
Channel: Scroll through this drop-down box to specify the channel
for this AP. Auto is the default option.
Network Type: Specify if the network consists of other APs by
selecting the Infrastructure option or choose Ad Hoc if the network
consists of direct connections between computers.
Authentication Method: This option enables you to set the authenti-
cation method for various encryption schemes for the selected AP.
Choose Open System or Shared Key depending on the AP’s encryp-
tion system. The authentication method for the AP should be the same
as that chosen for the ASUS WL-HDD2.5 (see “Authentication
Method” on page 47).
Encryption Method: Select WEP - 64 bits or WEP - 128 bits for the
encryption method to protect your data by encrypting it. The encryp-
tion scheme for the AP should be the same as that chosen for the
ASUS WL-HDD2.5 (see “Encryption” on page 48).
Passphrase: Type in the passphrase that will be used to create one to
four WEP encryption keys. A password with 8 to 63 characters is
required. If you leave this field blank, the WEP keys are randomly
generated.
WEP Keys (1 ~ 4): The WEP keys are generated randomly or based
on your passphrase. A WEP key is either 10 or 26 hexadecimal digits
(0~9, a~f, and A~F) based on whether you select 64 bit or 128 bit in
the WEP pull-down menu.
Default Key: The Default Key field lets you specify which of the
four encryption keys you use to transmit data on your wireless LAN.
The selected AP and ALL of its wireless clients MUST have the same
default key.
58 ASUS 802.11g WL-HDD2.5
IP Config
Click the IP Config option on the left panel to
display its submenus. The IP Config submenus
provide options for your LAN and DHCP set-
tings as described in the following sections.
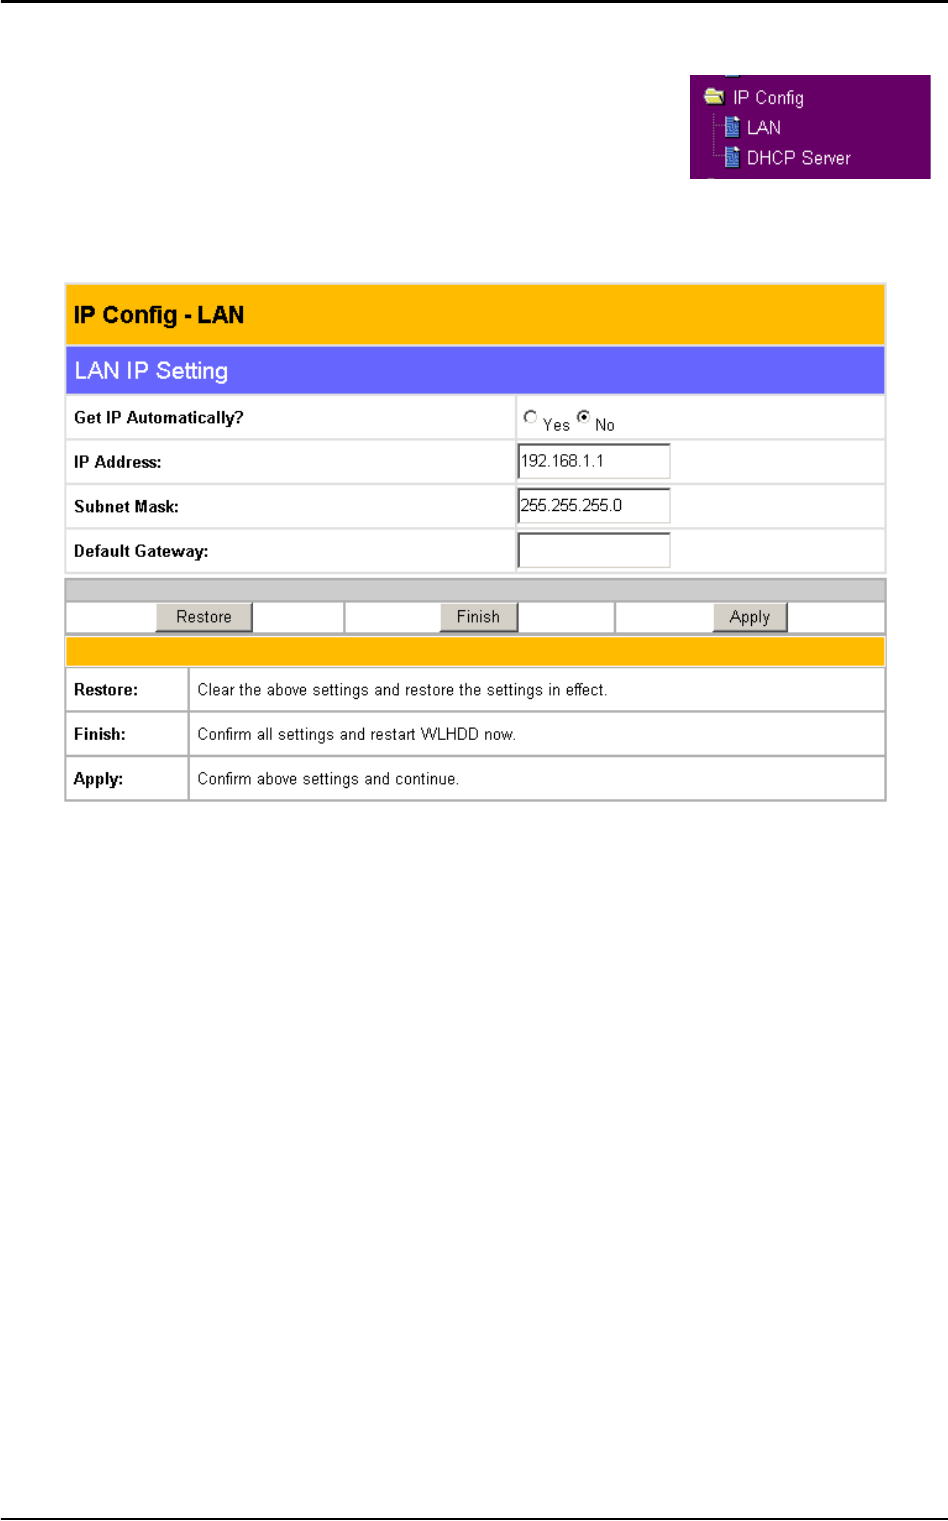
LAN
The LAN menu page has the following settings:
Get IP Automatically: Select Ye s (default) or No to get an IP
address automatically from a DHCP server.
If you select Ye s , this means that the ASUS WL-HDD2.5 will send
out a DHCP request during bootup. If you have a DHCP (Dynamic
Host Configuration Protocol) server on the network, set this option so
that the ASUS WL-HDD2.5 can receive an automatic IP address and
subnet mask assignment. The DHCP server automatically assigns the
ASUS WL-HDD2.5 an IP address when it is powered up. To deter-
mine what settings have been assigned to the ASUS WL-HDD2.5,
check the Status page (see “Status” on page 67).
If you select No, the ASUS WL-HDD2.5 accepts a static IP address.
You can manually configure the IP address and subnet mask in this
case. Enter an IP address and a subnet mask in the field provided to
assign the ASUS WL-HDD2.5 a static IP address. If you don’t know
your Gateway setting, leave it empty (not 0.0.0.0).
ASUS 802.11g WL-HDD2.5 59
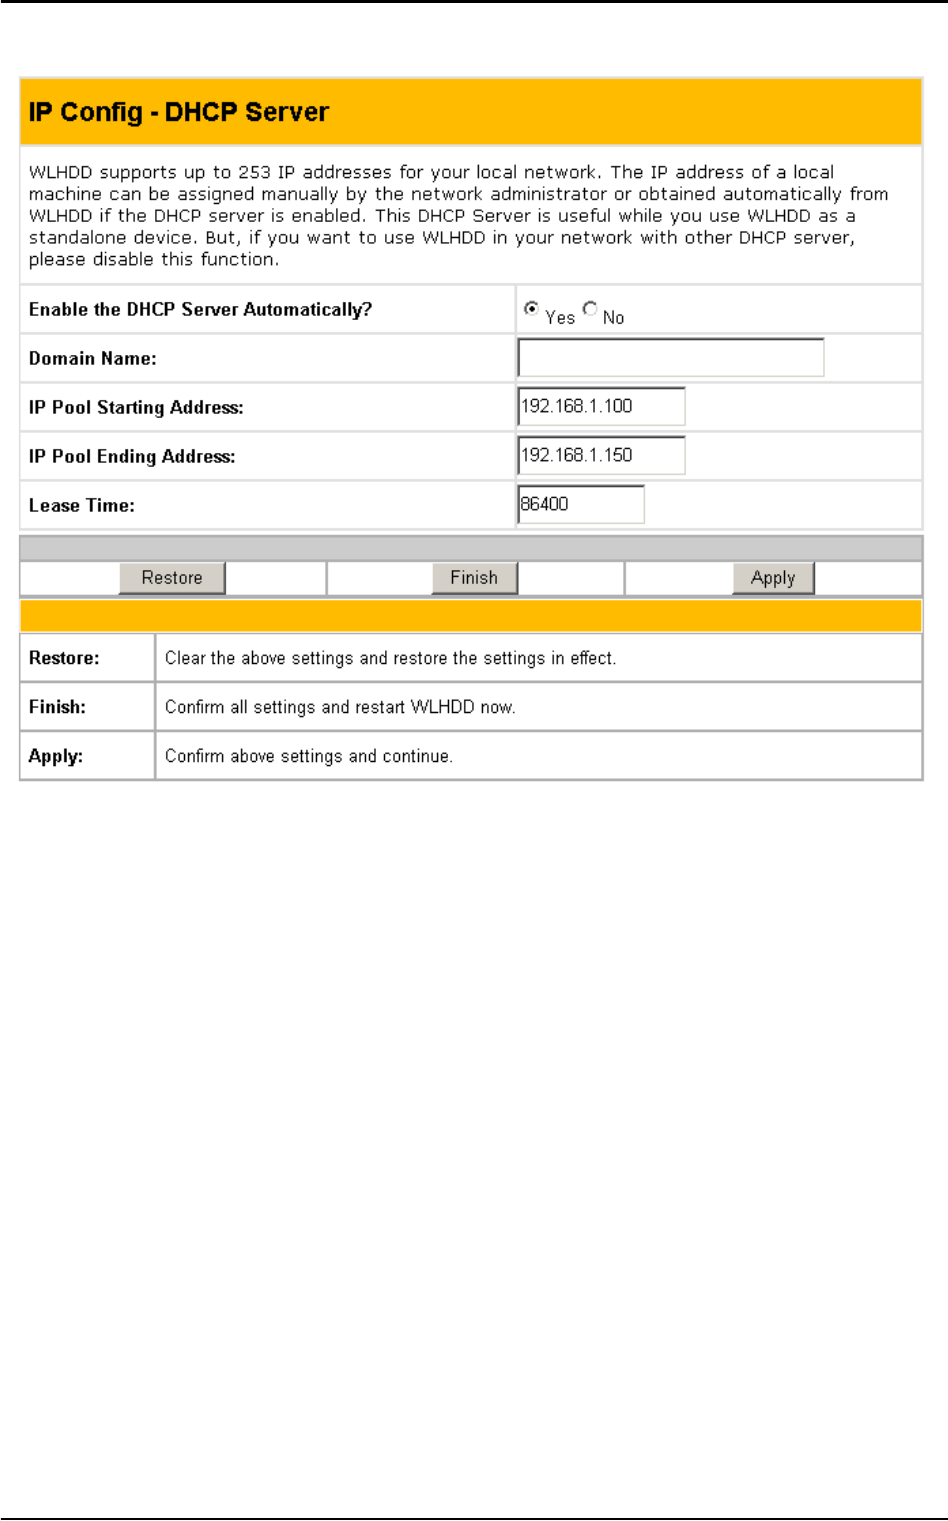
DHCP server
The ASUS WL-HDD2.5 is set up to be a DHCP server by default.
This enables it to support up to 254 IP addresses on the WLAN. The
IP address for a wireless client can be designated by the network
administrator or can be assigned by the ASUS WL-HDD2.5 automat-
ically. The following options are available on this page:
Enable the DHCP Server Automatically: Select Ye s to enable the
DHCP server and No to disable it automatically.
Domain Name: Type a domain name that will be used by the DHCP
clients.
IP Pool Starting Address: Type the IP address of the first device in
the group of DHCP clients. Make sure that it is on the same subnet
mask as the ASUS WL-HDD2.5.
IP Pool Ending Address: Type the IP address of the last device in
the group of DHCP clients. Make sure that it is on the same subnet
mask as the ASUS WL-HDD2.5.

60 ASUS 802.11g WL-HDD2.5
Lease Time: Type in the period of time over which a DHCP client
can lease an IP address.
Storage Setting
Click the Storage Setting option on the left
panel to display its submenus. The Storage Set-
ting menus enable you to configure the various
parameters of the HDD that is shared on the WLAN. Refer to the fol-
lowing sections for more details.
ASUS 802.11g WL-HDD2.5 61
Shared Nodes

62 ASUS 802.11g WL-HDD2.5
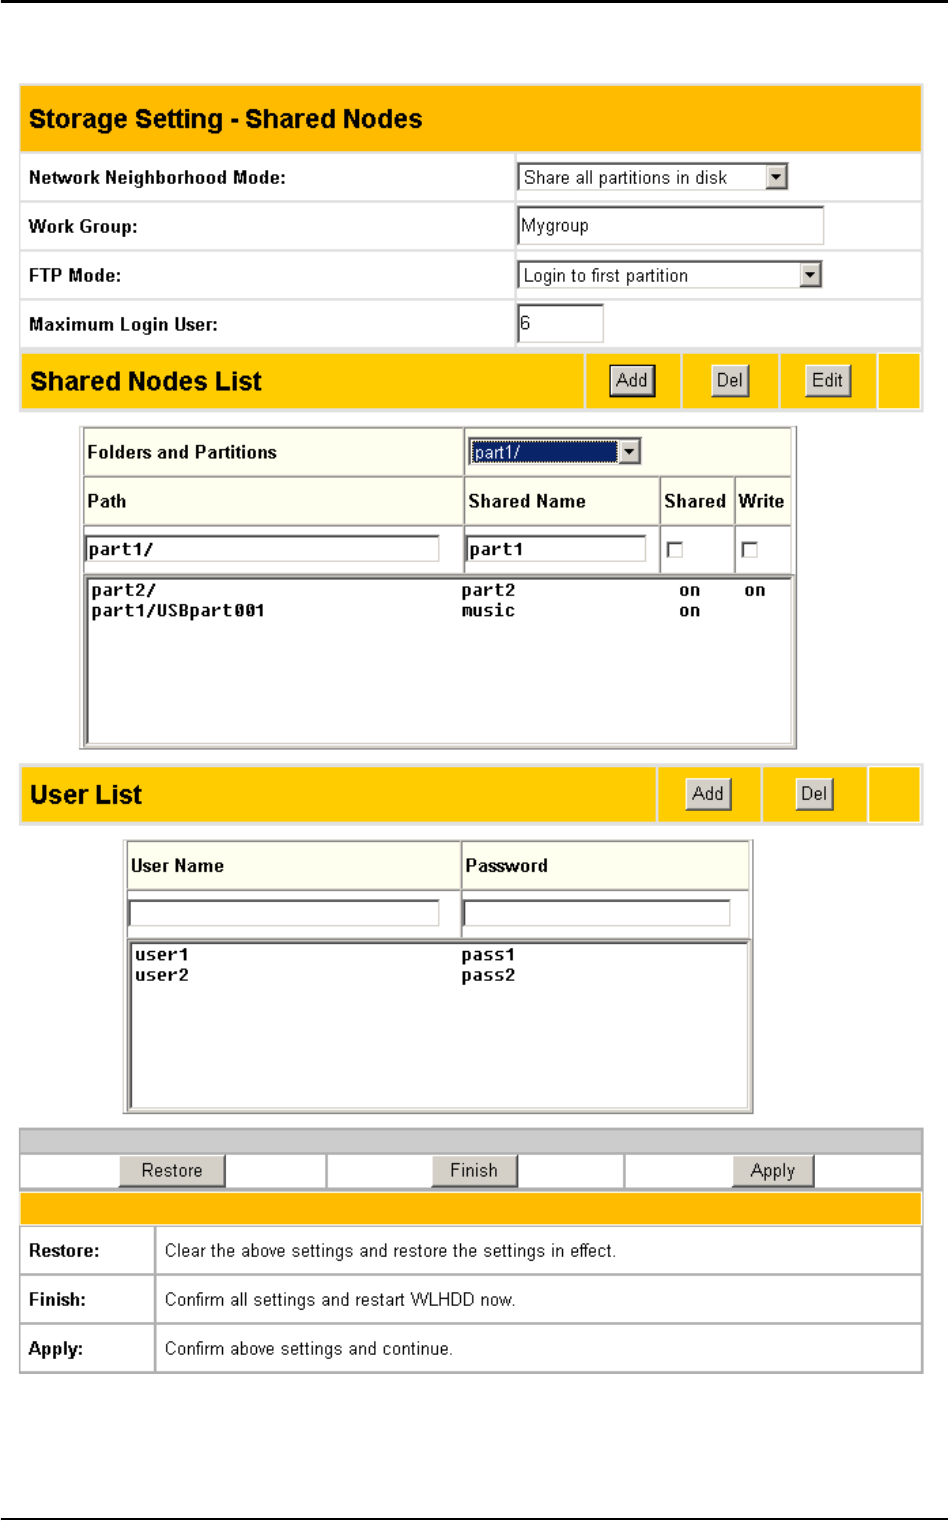
The Shared Nodes menu page enables you to set the sharing rights
and privileges for the shared partitions on the HDD of the ASUS
WL-HDD2.5. The following options are available:
Network Neighborhood Mode: Select the default setting of Share
all partitions on disk to enable sharing of all partitions on the disk.
Work Group: Specify the name of the work group to which the
device belongs. The default is Mygroup.
FTP Mode: Select the FTP Mode to specify which partitions is the
default when used by FTP clients for logging in.
Maximum Login User: Specify the maximum number of users that
can log in to access the HDD and its partitions. The default is 6.
Shared Nodes List: This option enables you set up the various parti-
tions on the HDD. The partitions are all Linux partitions. Enter in the
path for a folder or partition to be shared under Path. Type in a name
for the partition under Shared Name that will be used by wireless cli-
ents when accessing the HDD. Click the Shared check box to enable
sharing of the selected folder. Click the Write check box to enable
writing access of the selected folder. Click Add to create the partition.
To edit the properties of an existing partition, scroll through the Fold-
ers and Partitions drop-down box to choose a partition for making
changes. Make the changes desired, then click Edit to save your
changes. Click Del after selecting a partition to delete it.
User List: You can specify which users can access your HDD by cre-
ating a user list. Type in a name under User Name and its password
under Password. Only the users specified in this list will be able to
access the HDD. Click Add to add the user and Del to delete a
selected user in the list.
ASUS 802.11g WL-HDD2.5 63
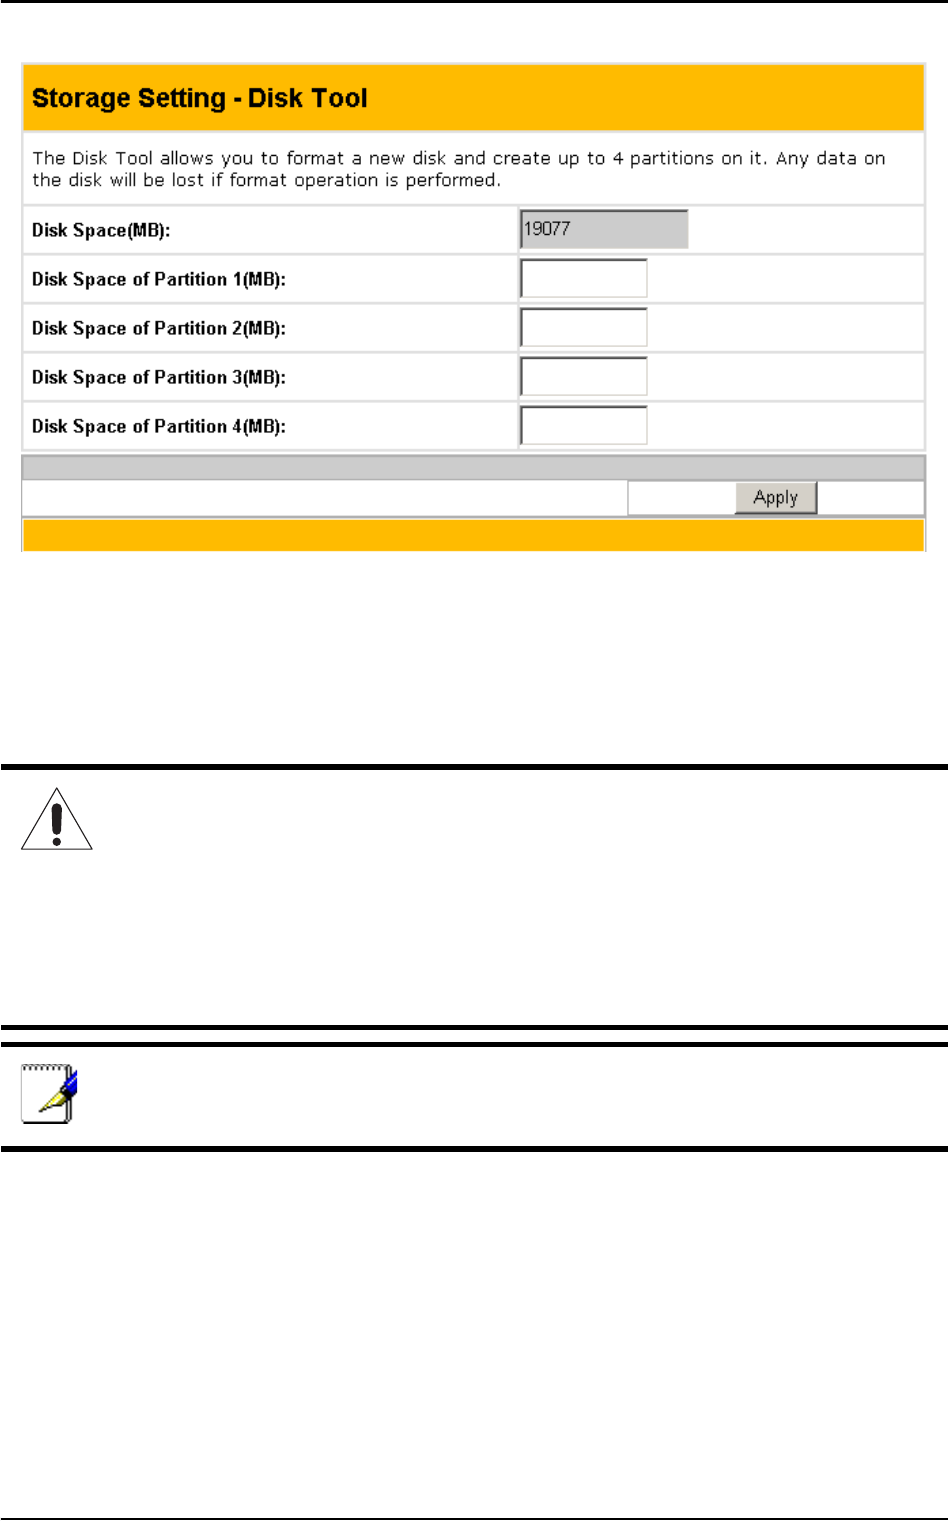
Disk Tool
The Disk Tool enables you to specify the sizes of the partitions on the
HDD. You can create up to 4 partitions on the HDD. The total disk
space is specified in the Disk Space field. Enter the size in MB for
each of the desired partitions in the Disk Space of Partition x (where
x goes from 1 through 4) fields.
Warnings:
• Any data on the hard disk will be lost after creating new parti-
tions. Make sure that the data is backed up before using this
tool.
• The hard disk is formatted using Linux partitions (EXT2). It can-
not be connected directly to a Windows system without refor-
matting. Reformatting will erase all your data.
Note: We recommend that you format the hard disk at least once
before using it.
64 ASUS 802.11g WL-HDD2.5
System Setting
Click the System Setting option on the left
panel to display its submenus. This set of menus
enables you to make changes to the system
parameters of the ASUS WL-HDD2.5. You can
change the password, upgrade the firmware from a file provided by
Asus, or restore the device to its default factory settings using this set
of menus.
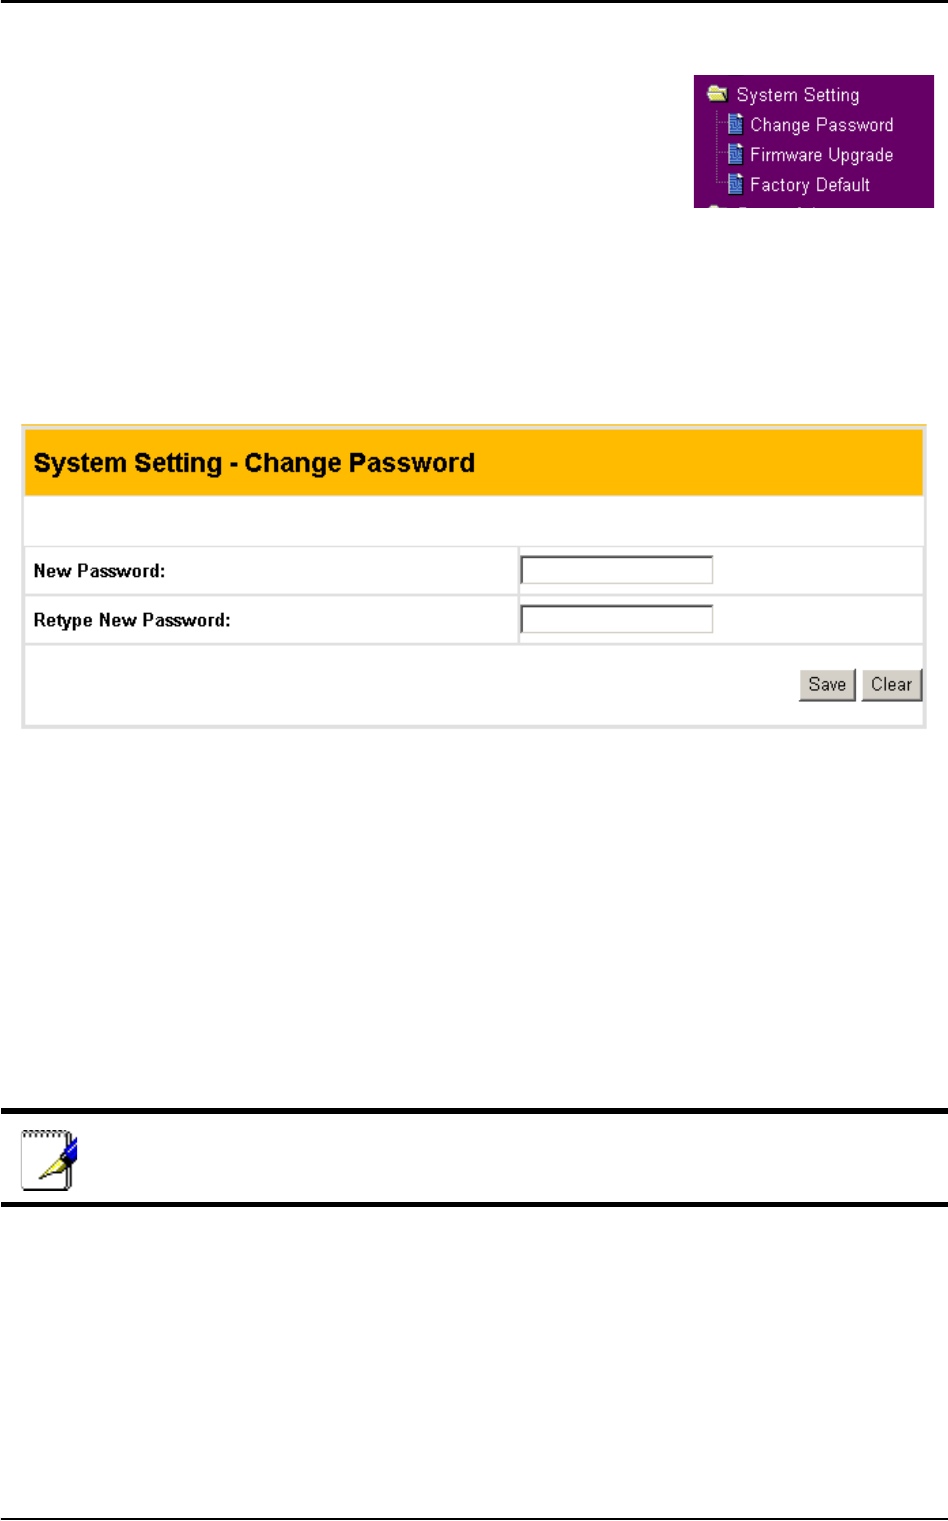
Change Password
The Change Password menu allows you to change the system pass-
word of the ASUS WL-HDD2.5. (The default password is admin.)
To change the password, enter the new password in the New Pass-
word field and enter it again for confirmation in the Retype New
Password field. Click Save to confirm your changes. You can enter
any password between 1-16 characters long (cannot be left blank). If
you forget the password at any time, you can use the Factory Default
menu (see “Factory Default” on page 66) to restore the password to
its default (admin) value.
Note: The password is case sensitive.
ASUS 802.11g WL-HDD2.5 65
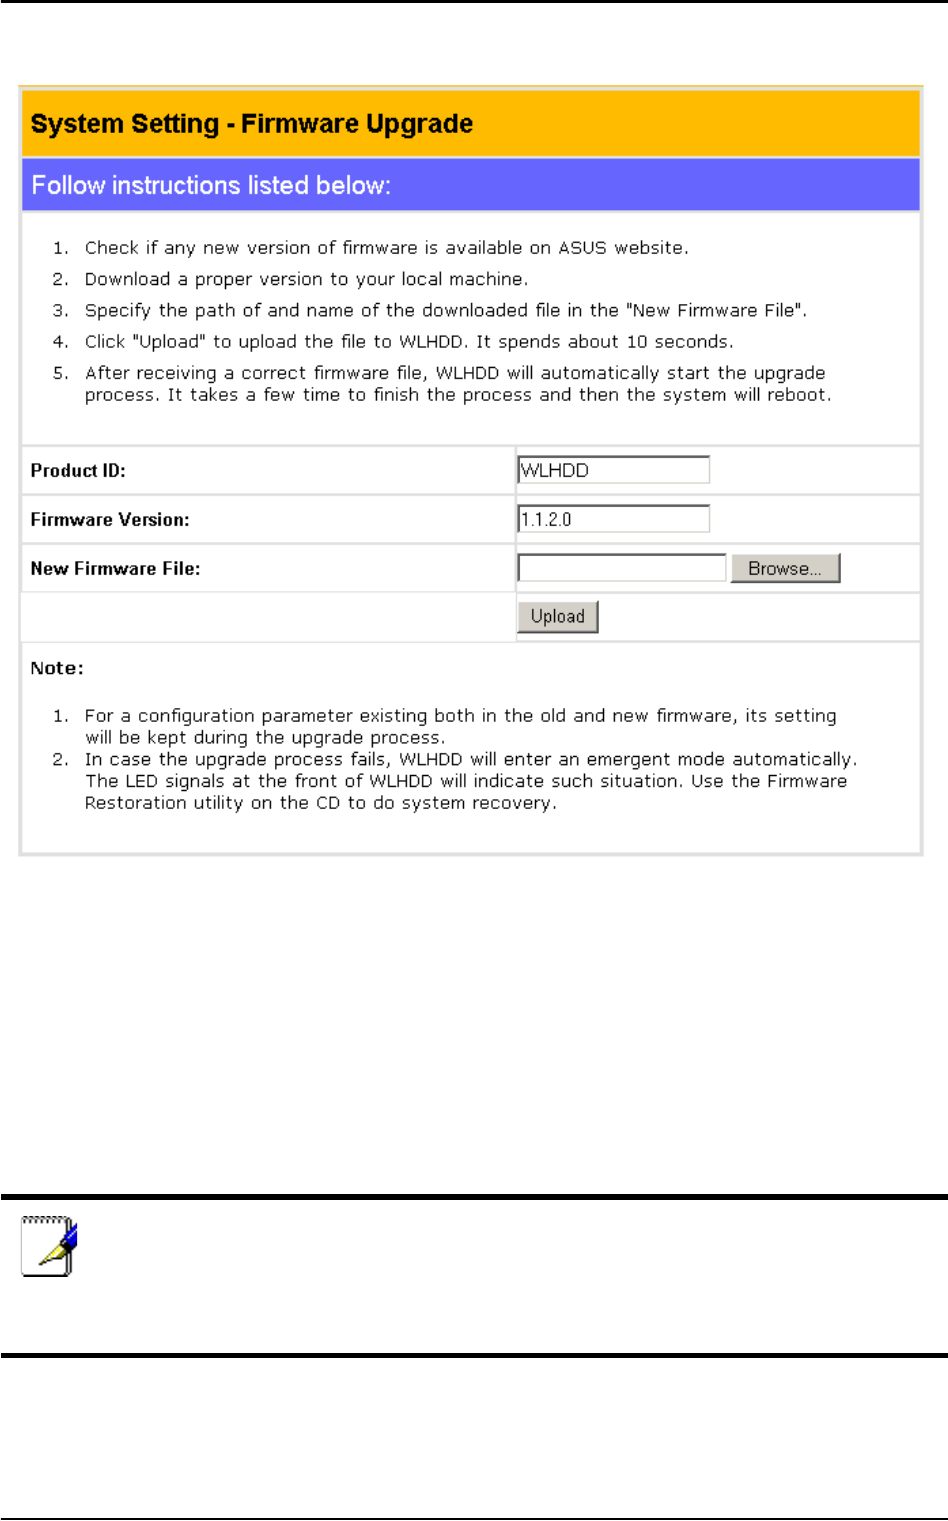
Firmware Upgrade
The Firmware Upgrade menu enables you to upload new firmware
upgrades to the ASUS WL-HDD2.5. Follow the instructions on the
screen to upgrade the firmware. The menu page displays the device
name under Product ID and the current Flash Code (Firmware) ver-
sion installed in the device under Firmware Version. Periodically, a
new Flash Code is available for the ASUS 802.11g APs on ASUS’s
Web site. Click Browse to specify the location of the new firmware
file provided by the manufacturer. Click Upload to start uploading.
Note: The firmware upgrade takes approximately 80 seconds.
The device reboots after the upload is complete. When the firm-
ware upgrade is completed, you will be directed to the home
page menu automatically.
66 ASUS 802.11g WL-HDD2.5
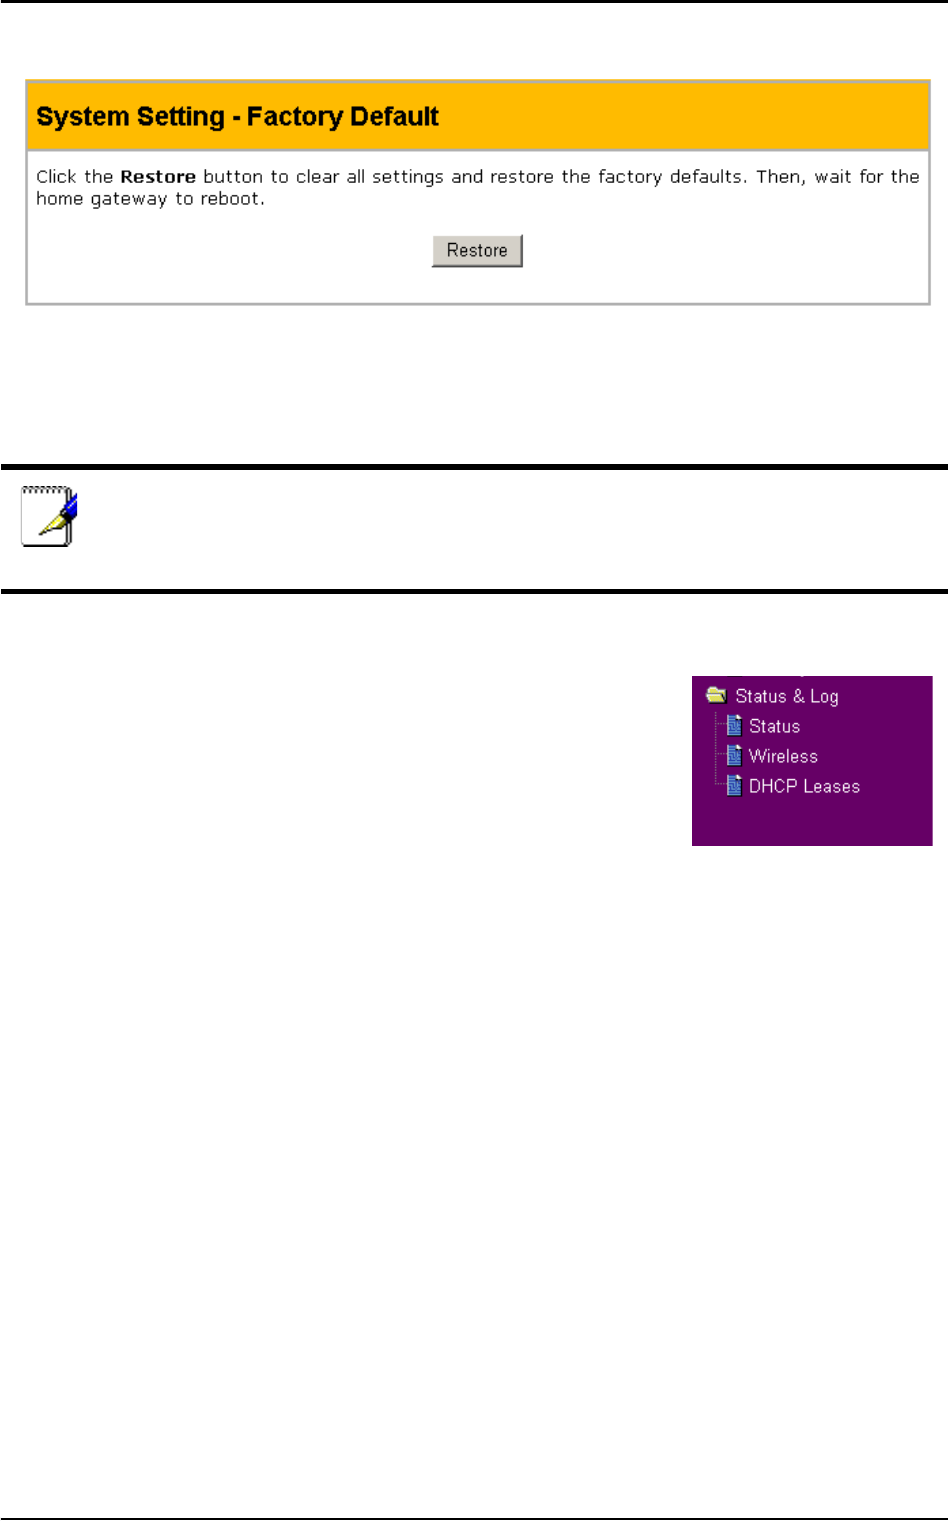
Factory Default
Use this menu to restore the ASUS WL-HDD2.5 to its default factory
settings. Click the Restore button to clear all settings and restore the
factory defaults. The device reboots after this function.
Status and Log
Click the Status and Log option on the left
panel to display its submenus. These submenus
enable you to view the status and a log report of
the ASUS WL-HDD2.5. Various system param-
eters are displayed on the Status page.
Note: You can also clear all settings and restore factory default
values by pressing and holding down the Reset button for 5 sec-
onds.
ASUS 802.11g WL-HDD2.5 67
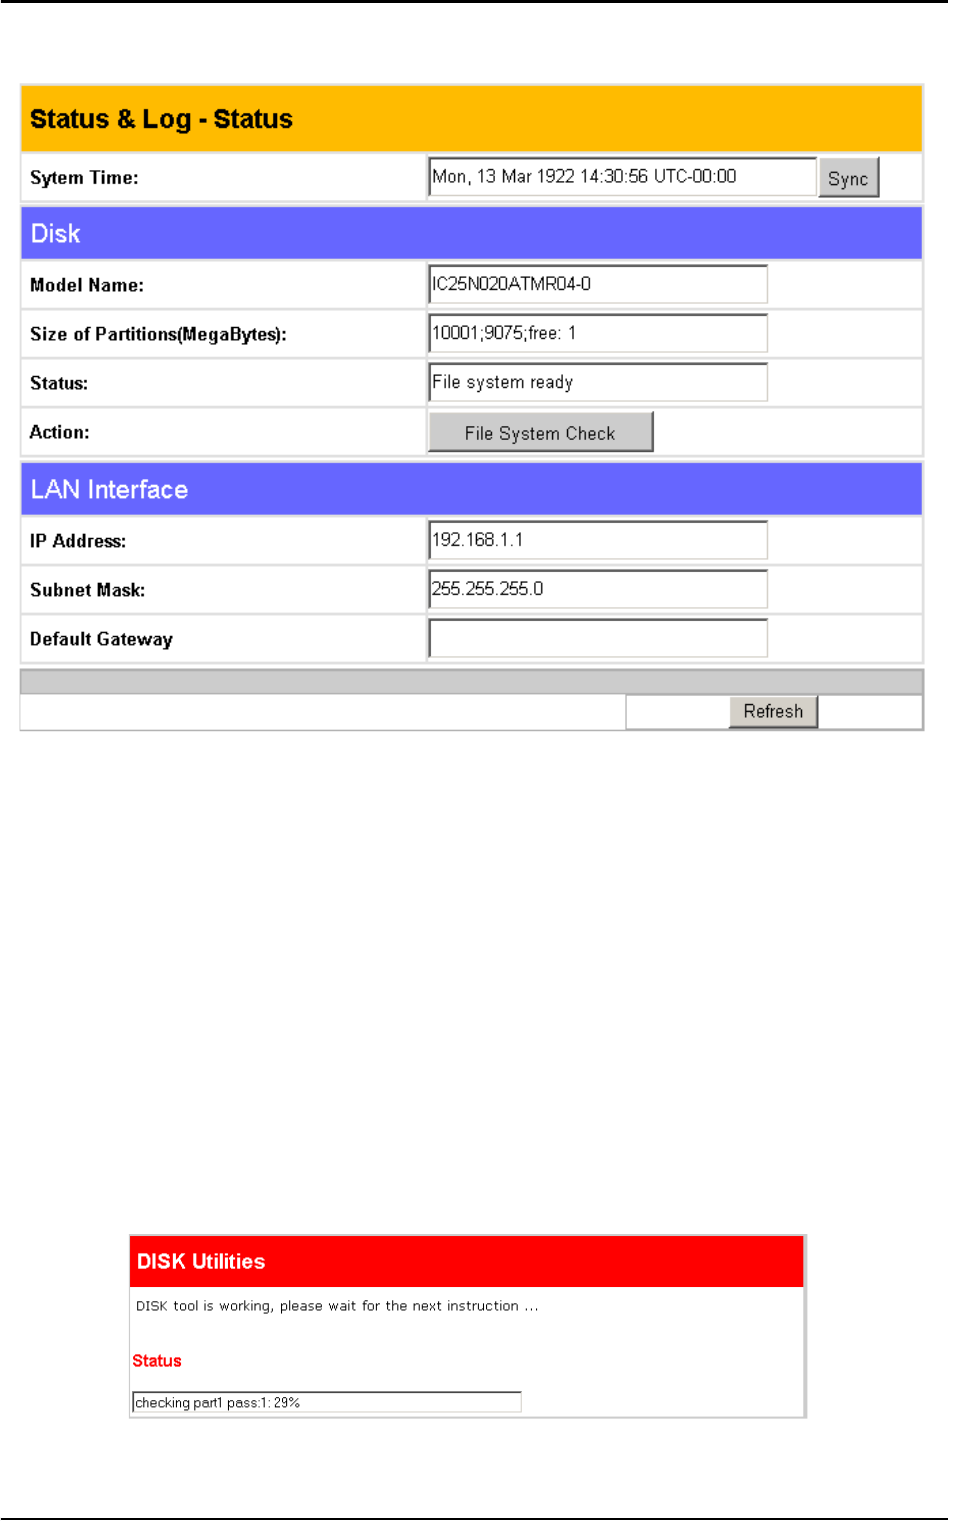
Status
The Status submenu displays the following settings:
System Time: This field displays the current system time of the
ASUS WL-HDD2.5. Click Sync to synchronize the system with that
of your wireless client.
Disk: The disk properties of the HDD are displayed in this part of the
menu page. The Model Name,Size of Partitions in megabytes along
with the number of free partitions, and File System Status are shown.
Click File System Check under Action to check the status of the file
system. This verifies that the file system on the HDD is intact and not
corrupt. The screen displays the status while the file system is being
checked.
68 ASUS 802.11g WL-HDD2.5
LAN Interface: The LAN Interface displays the IP Address,Subnet
Mask, and Default Gateway (if any) for the ASUS WL-HDD2.5.
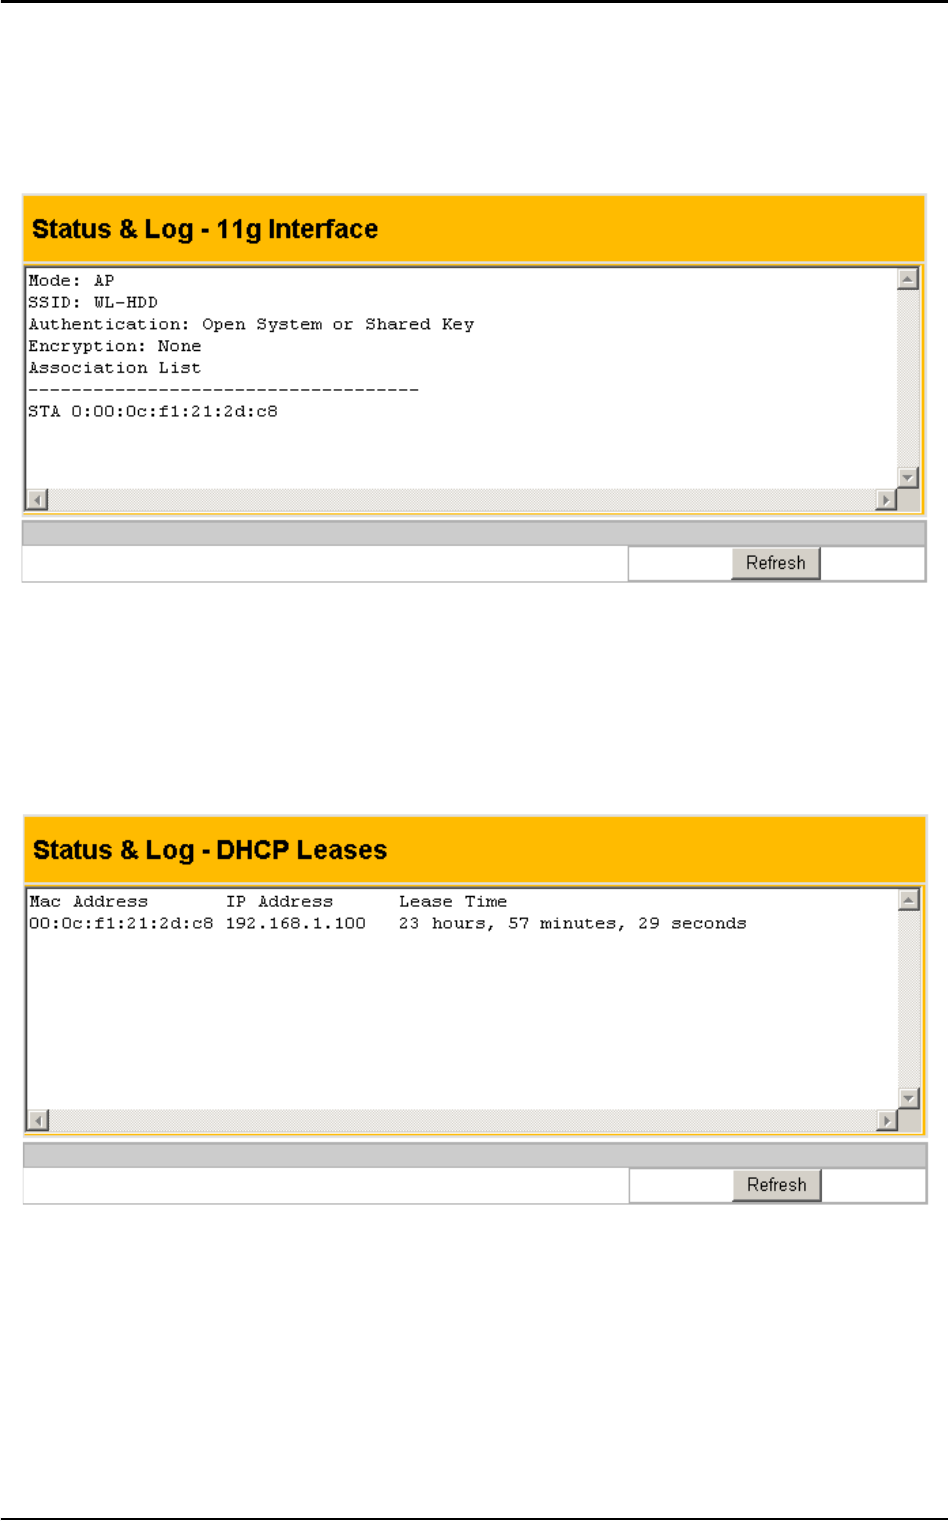
Wireless
The Wireless submenu (11g Interface) displays a log of activities per-
formed on the device. Any settings changed are displayed in this log
file.
DHCP Leases
The DHCP Leases log file shows a list of devices (clients) that access
the ASUS WL-HDD2.5 when DHCP is enabled. The MAC address of
each device, along with its IP address and lease time are displayed in
this log file.

ASUS 802.11g WL-HDD2.5 69
4. Troubleshooting
Refer to the following tips to resolve any problems that you may
encounter when using the ASUS WL-HDD2.5.
1. The ASUS WL-HDD2.5 cannot be found using the Search for
computer technique.
–Use the Device Discovery tool of the wireless utility on your
wireless client to search for the WL-HDD. If the WL-HDD
is found with a different subnet mask from your client, set
the IP of your client to the same subnet.
– If the ASUS WL-HDD2.5 is not found using Device Discov-
ery, please check your network connection.
2. Only the Configuration folder found on the WL-HDD.
– Check if the hard disk drive is mounted correctly on the
ASUS WL-HDD2.5.
– Check if the hard disk drive is formatted.
– Check if the partitions and folders are shared using the
Shared Nodes utility (see “Shared Nodes” on page 61).
3. Shared folders cannot be accessed using Windows 98 or
Windows Me.
– If you use Windows 98 or Windows Me to access the shared
folders that are protected by username and password, you
can only view the contents of the folder which uses the same
username and password pair as your wireless client.

70 ASUS 802.11g WL-HDD2.5
5. Appendix
Specifications
LAN Ethernet port Support Ethernet and 802.3 with maximum bit rate 10/
100 Mbps and auto cross-over function
(MDI/MDI-X)
Connector 1 x RJ-45 for 10/100BaseT
Antenna Support 2 (One internal inverted-F PCB antenna and one
external dipole antenna)
Connector Reverse-SMA antenna connector
LED • Power x 1
• HDD access x 1
• Wireless activity x 1
• USB copy x 1
• LAN port x 2 (Ethernet Link/Activity with 10/100 Mbps)
USB USB 1.1
RTC Supports real time clock
Reset button Push for 5 seconds to restore factory settings.
Hard disk drive 2.5-inch slim attachable hard drive
IDE controller • Ultra DMA 100
• Conforms to ATA-5 specifications
DC power adapter • AC input: 100V~240V (50~60 Hz)
• DC output: 5V with maximum 3A current
Emissions CE mark, FCC Part 15
Size 180 mm x 90 mm x 25 mm
Weight 200g
Operating
frequency
2.4 - 2.5 GHz
Spreading OFDM and DSSS
Modulation OFDM, CCK, DQPSK, DBPSK
Data rate • 802.11g: 6, 9, 12, 18, 24, 26, 54 Mbps
• 802.11b: 1, 2, 5.5, 11 Mbps

ASUS 802.11g WL-HDD2.5 71
Operation
channels
11 for North America, 14 for Japan, 13 for Europe, 3 for non-overlap-
ping
Range • Indoor 130 ft. (40m), outdoor (Line-of-Sight) 300 ft. (100m) at
11 Mbps.
• Indoor 80 ft. (25m), outdoor (Line-of-Sight) 200 ft. (60m) at
54 Mbps.
Output power • 802.11g: 13 ~ 16 dBm (at normal temperature range)
• 802.11b: 13 ~ 15 dBm (at normal temperature range)
Encryption 64/128 bit WEP, WPA-PSK, WPA
Network protocols • HTTP server
• UPnP (upgradeable)
• DHCP client
• TCP/IP
• Samba server
•FTP server
• DHCP server
Web server • HTTP based
• Dynamic or static address
Utilities • Device discovery
• Firmware restoration: Restore the firmware while system enters
rescue mode.
Management Web-based
configuration
• Internet Explorer 6 or later
• Netscape Navigator 6 or later
• Other Java-enabled browsers
System
settings
•Server name
• Workgroup (upgradeable)
• Time zone and current time
• DHCP and static IP
• Auto IP
Folder access • Shared
• Password setting
• Read or Read and Write
System tools • Reboot
• Shutdown
•Format
• Scan disk
• Firmware upgrade

72 ASUS 802.11g WL-HDD2.5
HDD functionality
and limitations
Supported file
systems
FAT, FAT32, NTFS (read-only), EXT2, EXT3
Supported
disk size
Less than 40GB
Supported file
size
Less than 2GB
System tool • File system check for EXT2 only
• Format and partition for EXT2 only
Supported
USB flash
USB flash identified as USB mass storage. Exter-
nal power is required for USB hard disk.