Users Manual

FCC Compliance Statement
This device complies with Part 15 of the FCC Rules. Operation is subject to the following
two conditions : (1) this device may not cause harmful interference, and (2) this device must
accept any interference received, including interference that may cause undesired
operation.
INFORMATION TO THE USER
This equipment has been tested and found to comply with the limits for a Class B digital
device pursuant to Part 15 of the FCC Rules. These limits are intended to provide
reasonable protection against harmful interference in a residential installation.
This equipment generates, uses and can radiate radio frequency energy and, if not installed
and used in accordance with the instructions, may cause harmful interference to radio
communication. However, there is no guarantee that interference will not occur in a
particular installation. If this equipment does cause harmful interference to radio or
television reception, which can be determined by turning the equipment off and on, the user
is encouraged to try to correct the interference by one or more of the following measures:
- Reorient or relocate the receiving antenna.
- Increase the separation between the equipment a receiver.
- Connect the equipment to an outlet in a circuit different from that to which the receiver is
connected.
- consult the dealer or an experienced radio / TV technician for help.
WARNING
Changes or modifications not expressly approved by the manufacturer may void the user’s
authorization to operate the equipment.

This user manual contains proprietary information that is protected by copyright. All
rights are reserved. No part of this user manual may be reproduced, photocopied,
transcribed, translated or transmitted in whatsoever form without the prior permission of
the manufacturer.
The size and appearance of this LCD display may be changed without notice for the
purpose of improvement.
Damage caused by using unauthorised components, and non-compliance with the
information and cautions in this user manual, is not covered by the warranty.
If you have a problem with your LCD display, please check the Troubleshooting section
in this user manual before request help from a service centre.
The information in this user manual is subject to change without notice.
If static images are displayed on the LCD for a prolonged period, the LCD display may
show screen image retention. This is not a permanent condition and the image will fade
in time. Image retention is a condition that may occur with all LCD displays.
The LCD consists of about 5 million pixels. One pixel incorporates 3 dots, and some of
the dots may be perceived as brighter or darker compared to others. Please note that
this may occur on all LCD displays and is not a product defect.
Before Use
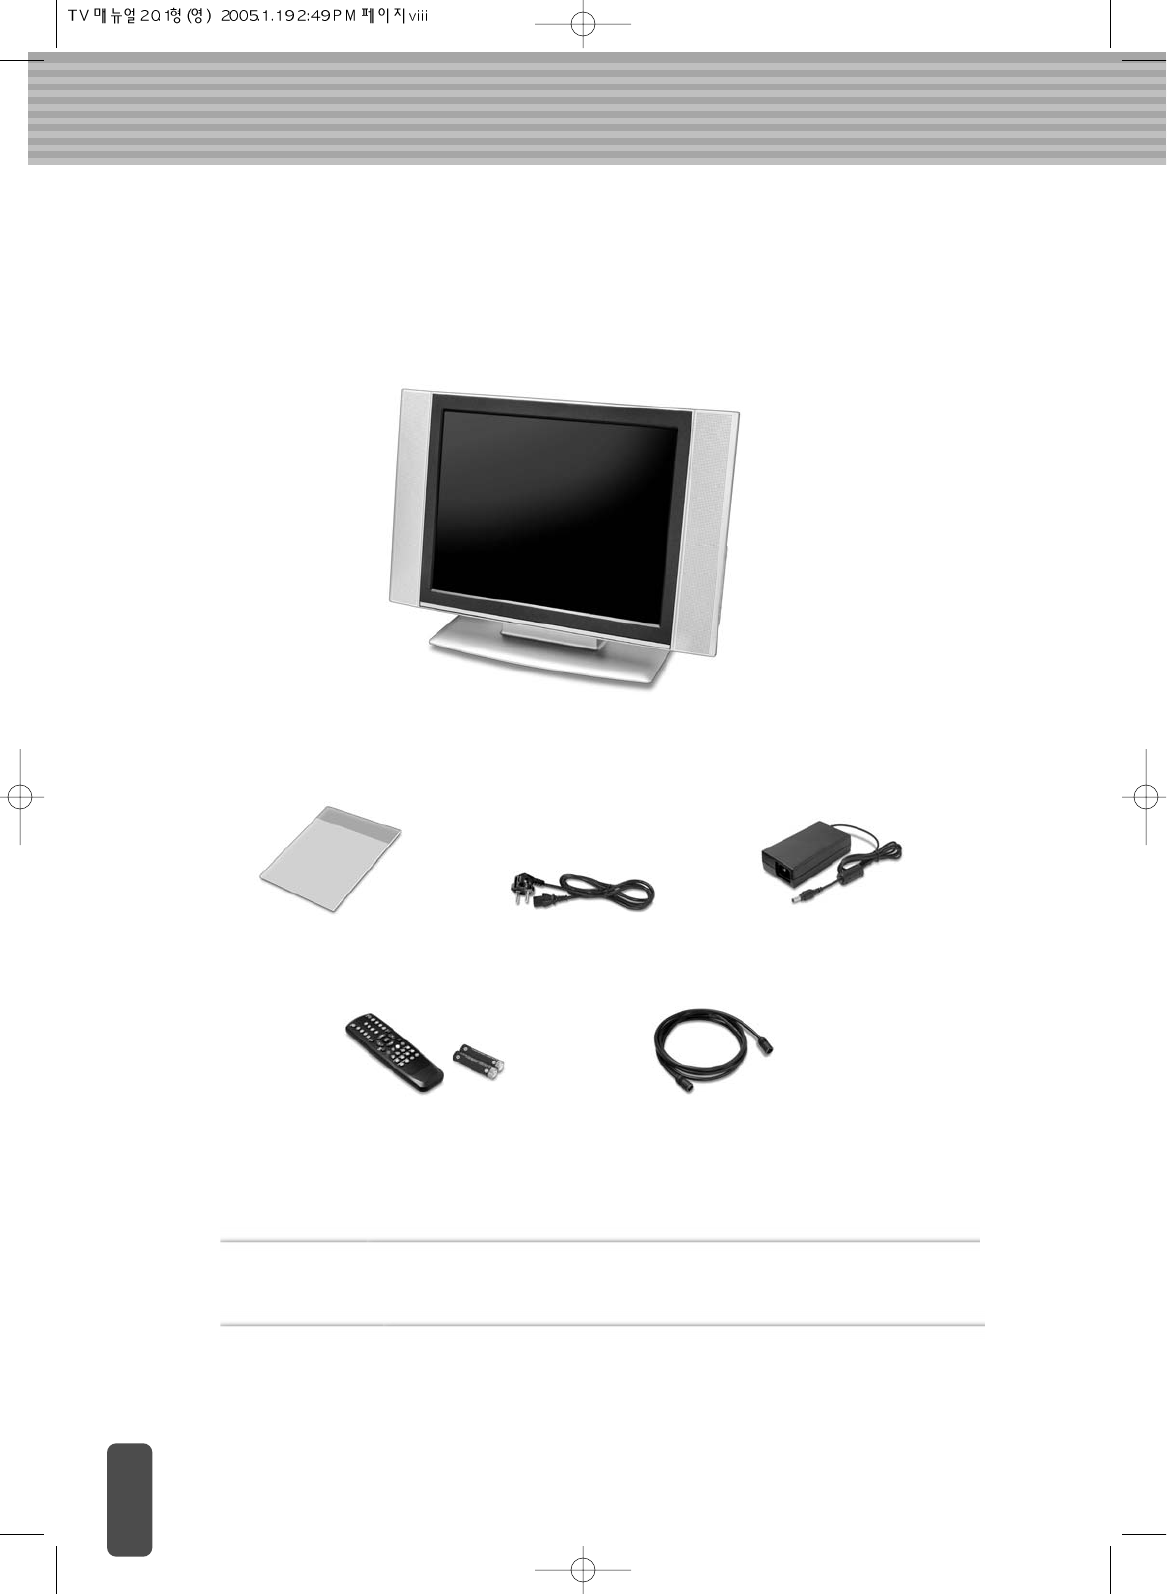
After opening the box, make sure the following items are provided with the monitor.
If you find that any of these items are missing or appear damaged, contact your dealer
immediately.
Accessories
Shapes and colours of parts are subject to change without prior notice, but their functions remain
unchanged.
LCD display
D/C Power Supply Unit
Remote Control
/Batteries(1.5V AAA type)
75Antenna-extensible
Coaxial Cable
User’s Manual Power Cable
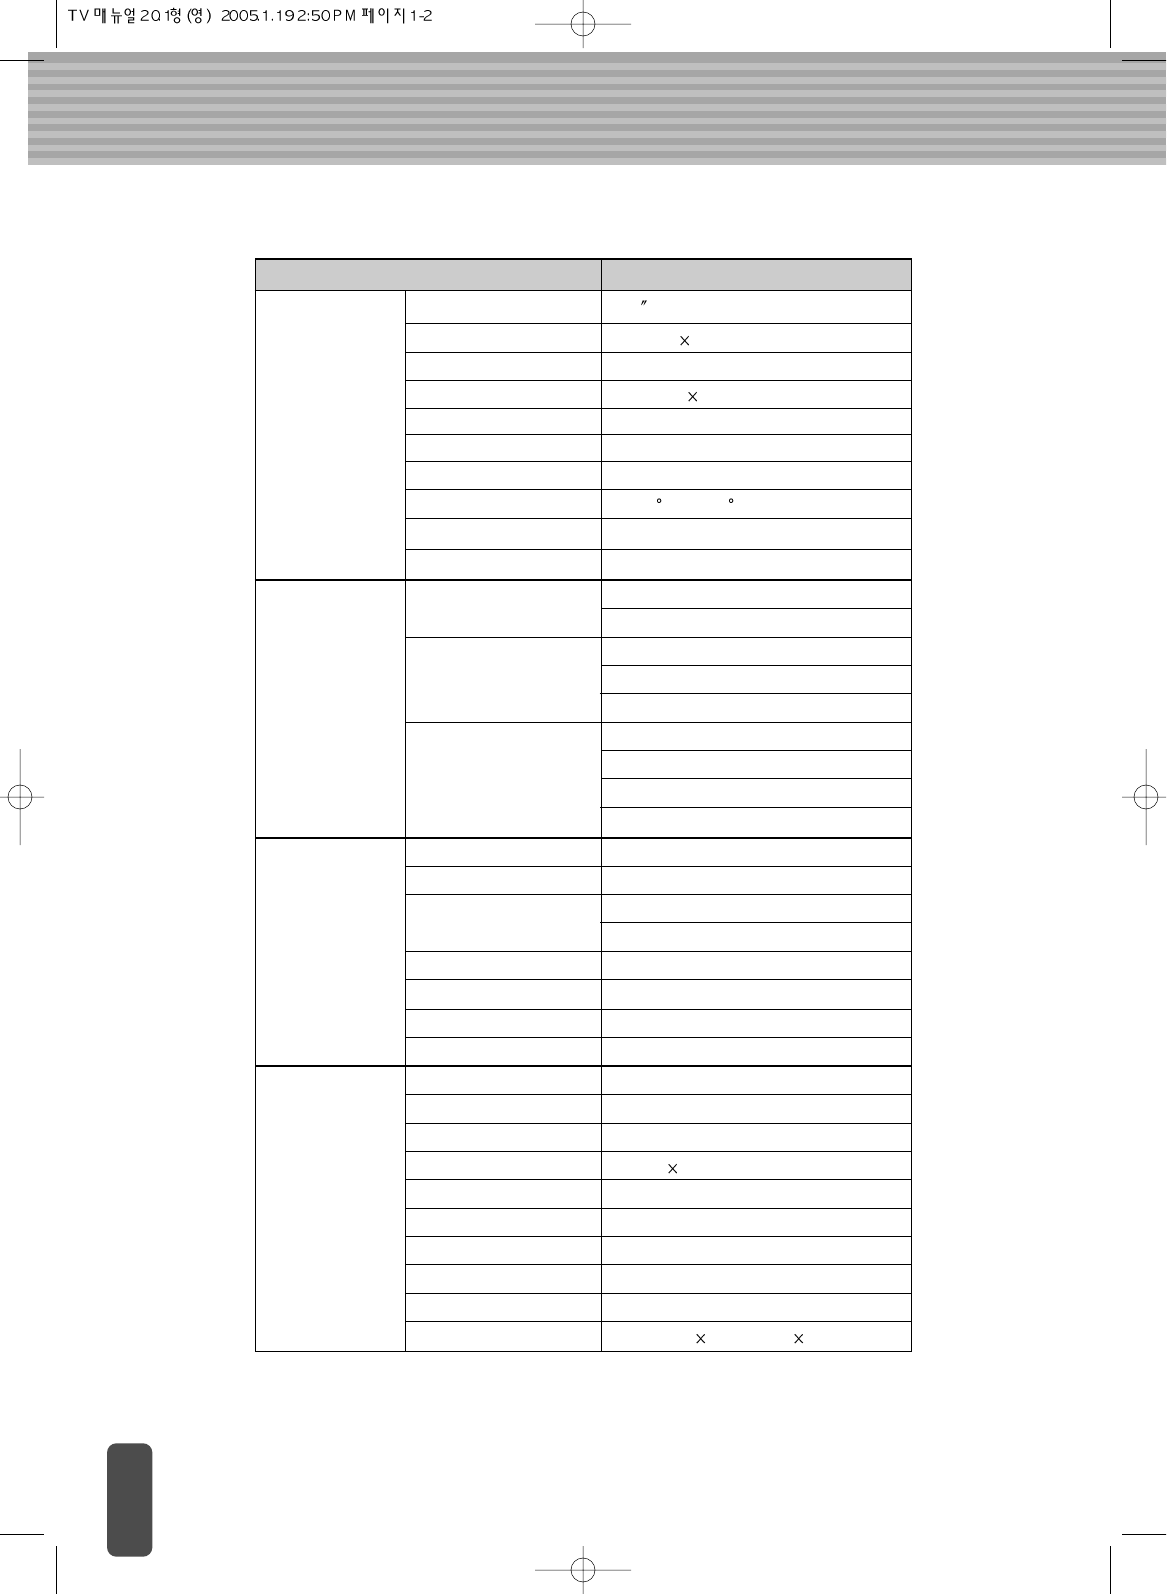
Specifications
AV201
Panel Panel Type 20.1 (51cm) TFT Color LCD
Display Area 408.0mm 306.0mm
Display Color 16.7million
Pixel Pitch 0.6375mm 0.6375mm
Contrast Ratio 350:1(Typical)
Brightness 450 cd/m2
Viewing Angle H: 140 V: 120
Scanning frequency H: 31~69kHz V: 56~85Hz
In/Out PC Analog RGB 15 pin D-Sub
PC Audio Input
Video Composite Input
S-Video Input
DVD(Y, Pb, Pr) Input
Audio Composite Input
DVD Input
Head-phone Out
Speaker Output
TV Signal Euro A/V SCART
Antenna 75 ohm Coaxial cable
Color System PAL/SECAM
NTSC
Sound System B/G, D/K, I, L/L, M
Stereo Type NICAM, A2 MTS
Text TELETEXT
V-Chip NO
Recommended Resolution 1280 x 768
Resolution 640X480(VGA)
Other Certifications UL, FCC, CE
Power Consumption 50 watts
Power Save Mode 3 watts
Speaker 5 watts 2
Plug & Play DDC 1/2 B
Screen Control OSD (On Screen Display Menu)
Weight
Power Supply DC 15 Volts
Remote control Yes
Dimensions
559.5mm(w) 422.5mm(H) 146.5mm(D)
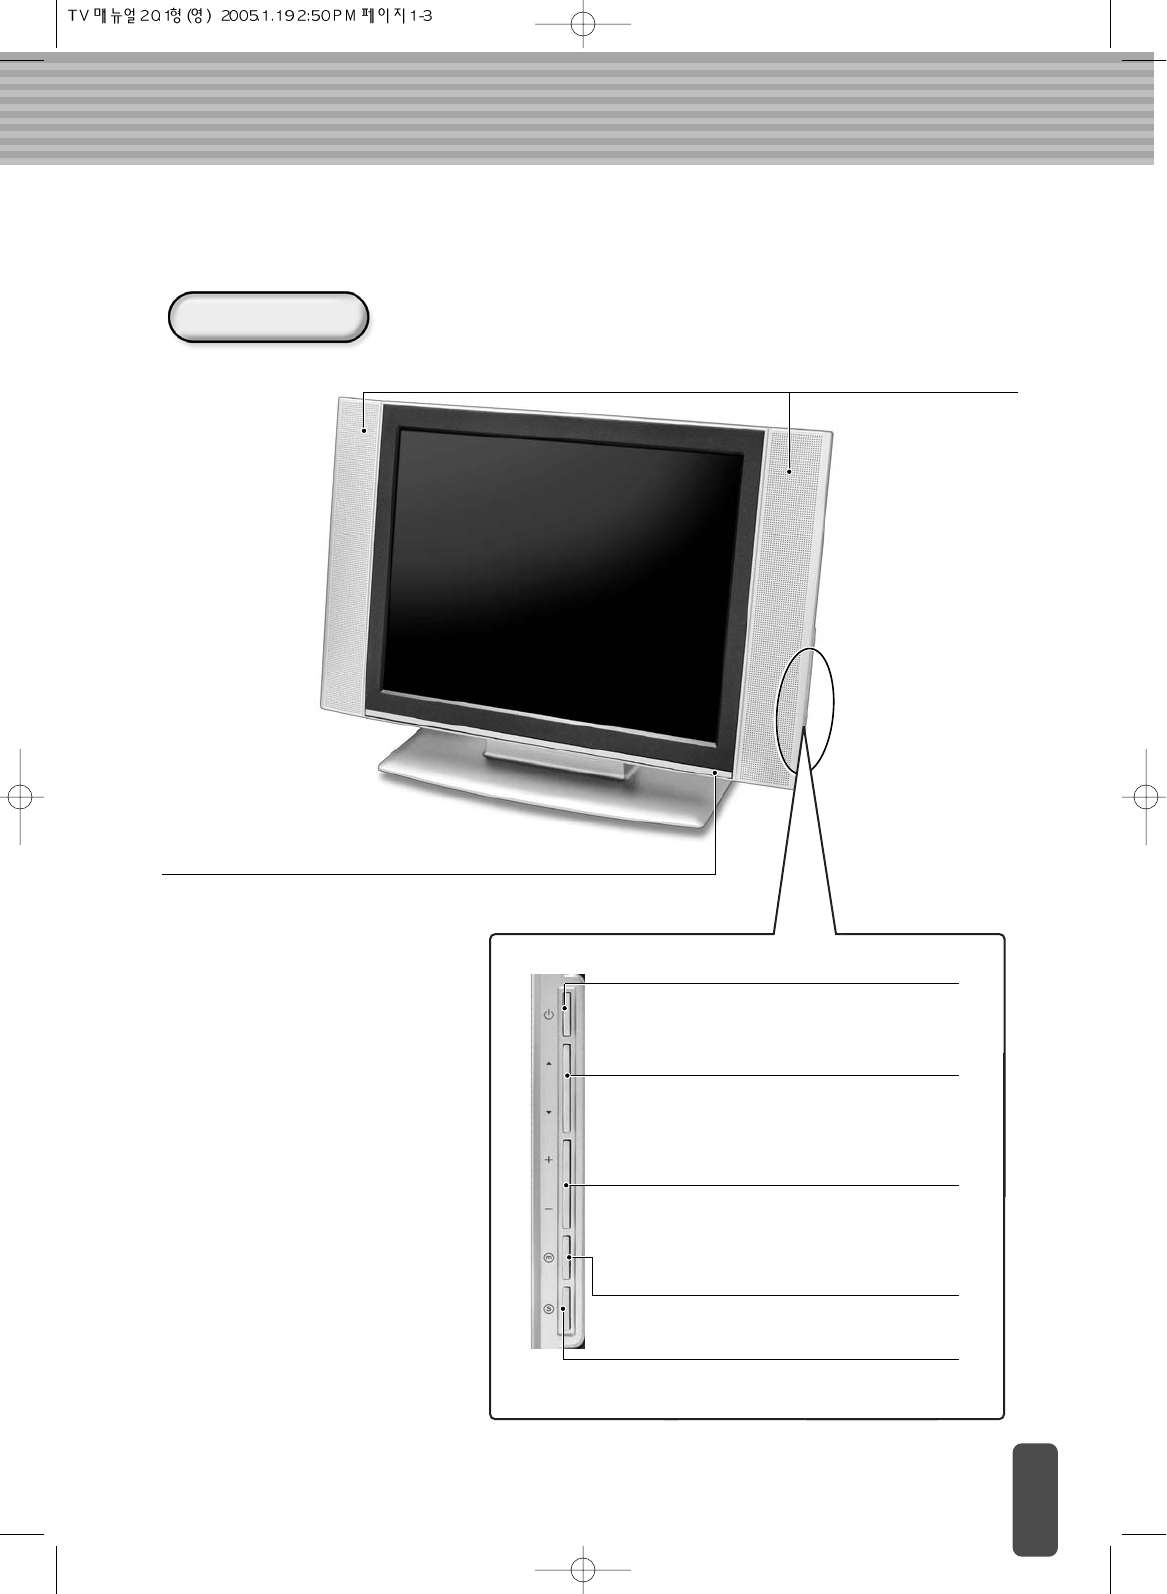
LCD Display Overview
Built-in Speaker
The built-in speaker
allows you to enjoy
sounds without
external speakers.
Front View
Power Indication Lamp/Remote Controller Receiver
If the AC adaptor is connected, the red lamp is on, and if the TV
power is turned on, the green lamp is on.
There is also a function to receive radio
waves emitted from the remote controller. Power Button
Turns power On/Off from standby mode.
(Turns On/Off the LCD display)
/Buttons
Press or to change channels. Also used
to select OSD(On Screen Display) menu.
(PC : Auto position)
+/- Buttons
Press the +(increase) or -(decrease) the
volume. Also used to increase or reduce the
value of a OSD menu.
MENU Button
Display the main OSD menu. Exit from sub-menu.
T/V Button
Select Input Sources (TV, Video, S-Video,
DVD and PC).
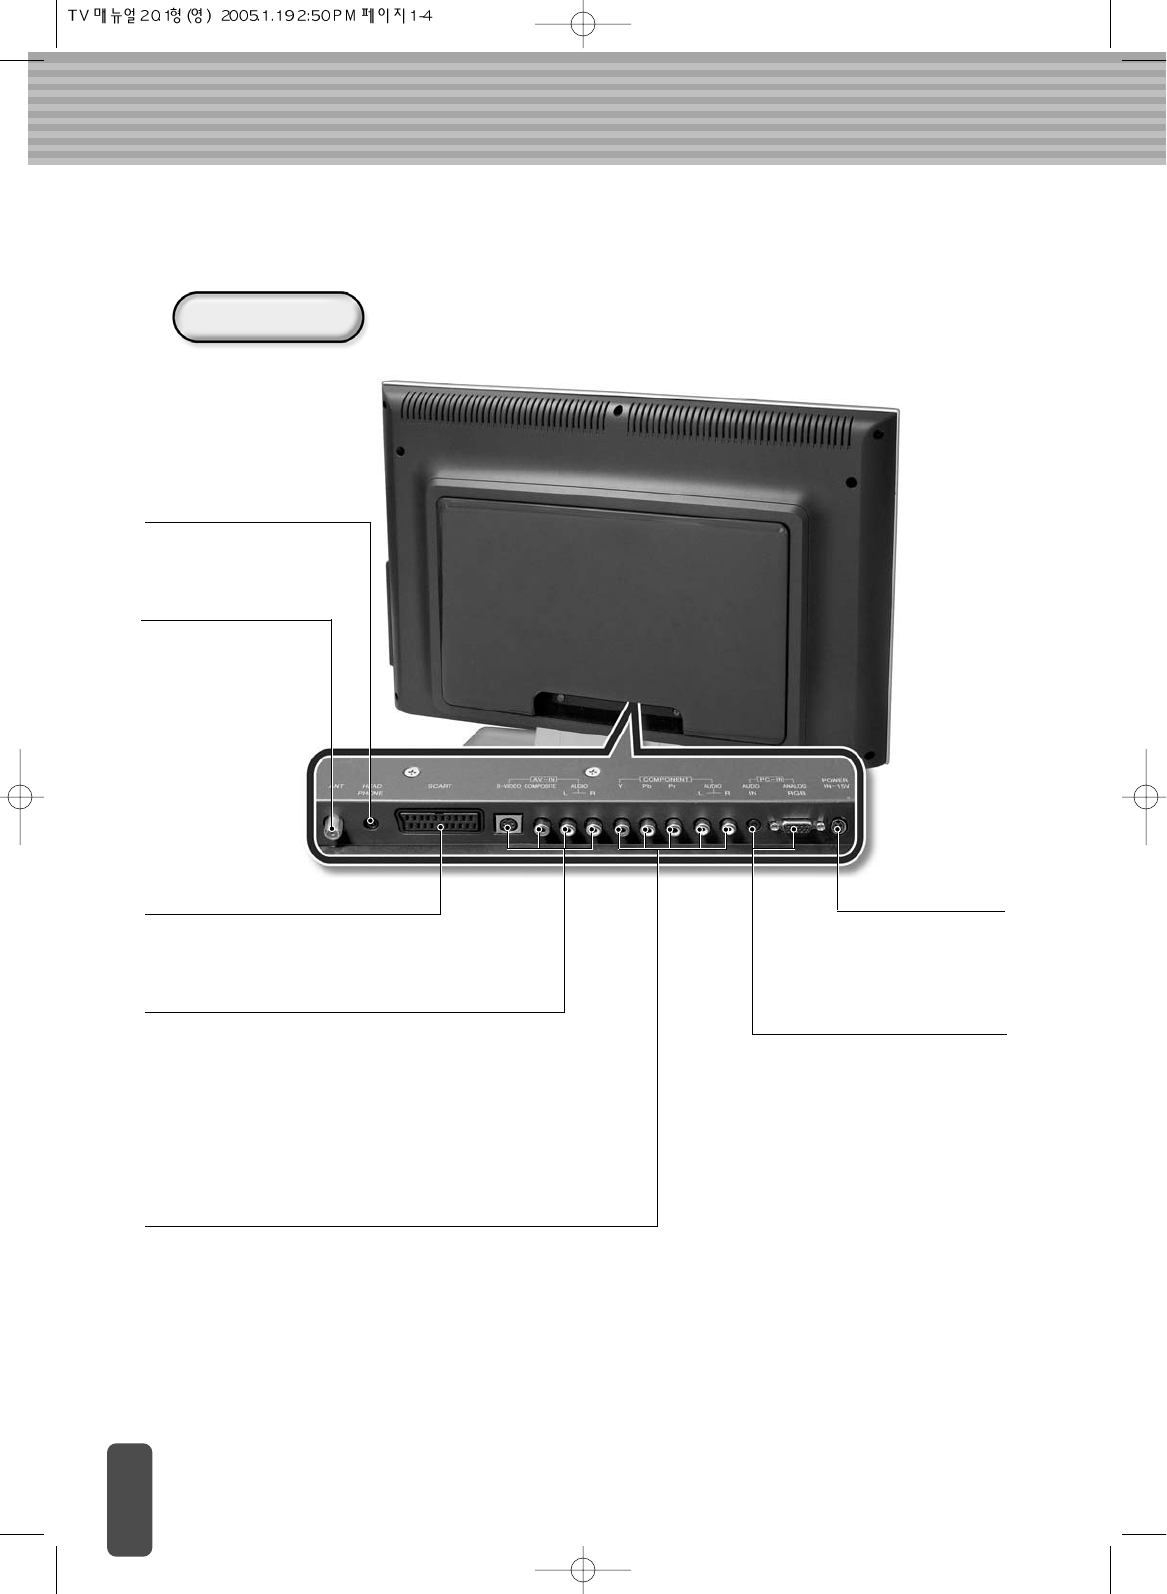
COMPONET
Y, P
b
, P
r
: Connects to the Video Input Terminal from VCR (or
DVD Player).
Audio L/R : Connects to the Audio-Left/Right cable from VCR
(or DVD Player).
POWER IN
Connect the DC
power adapter.
PC-IN
Audio IN : Connect PC Sound
Output.
ANALOG RGB : Connect analog
RGB Signal from PC.
AV-IN
S-VIDEO : Connect to the S-Video input terminal from
VCR (or DVD Player).
COMPOSITE : Connect with composite video input
terminal from VCR (or DVD Player).
Audio L/R : Connect with the Audio-Left/Right cable
from VCR (or DVD Player).
SCART(Optional)
Connect PAL-method TV Audio/Video.
ANT
Connect with an
external cable from the
external antenna
(VHF/UHF antenna,
cable TV antenna, and
satellite antenna).
Head Phone
Connect with a headphone.
Rear View
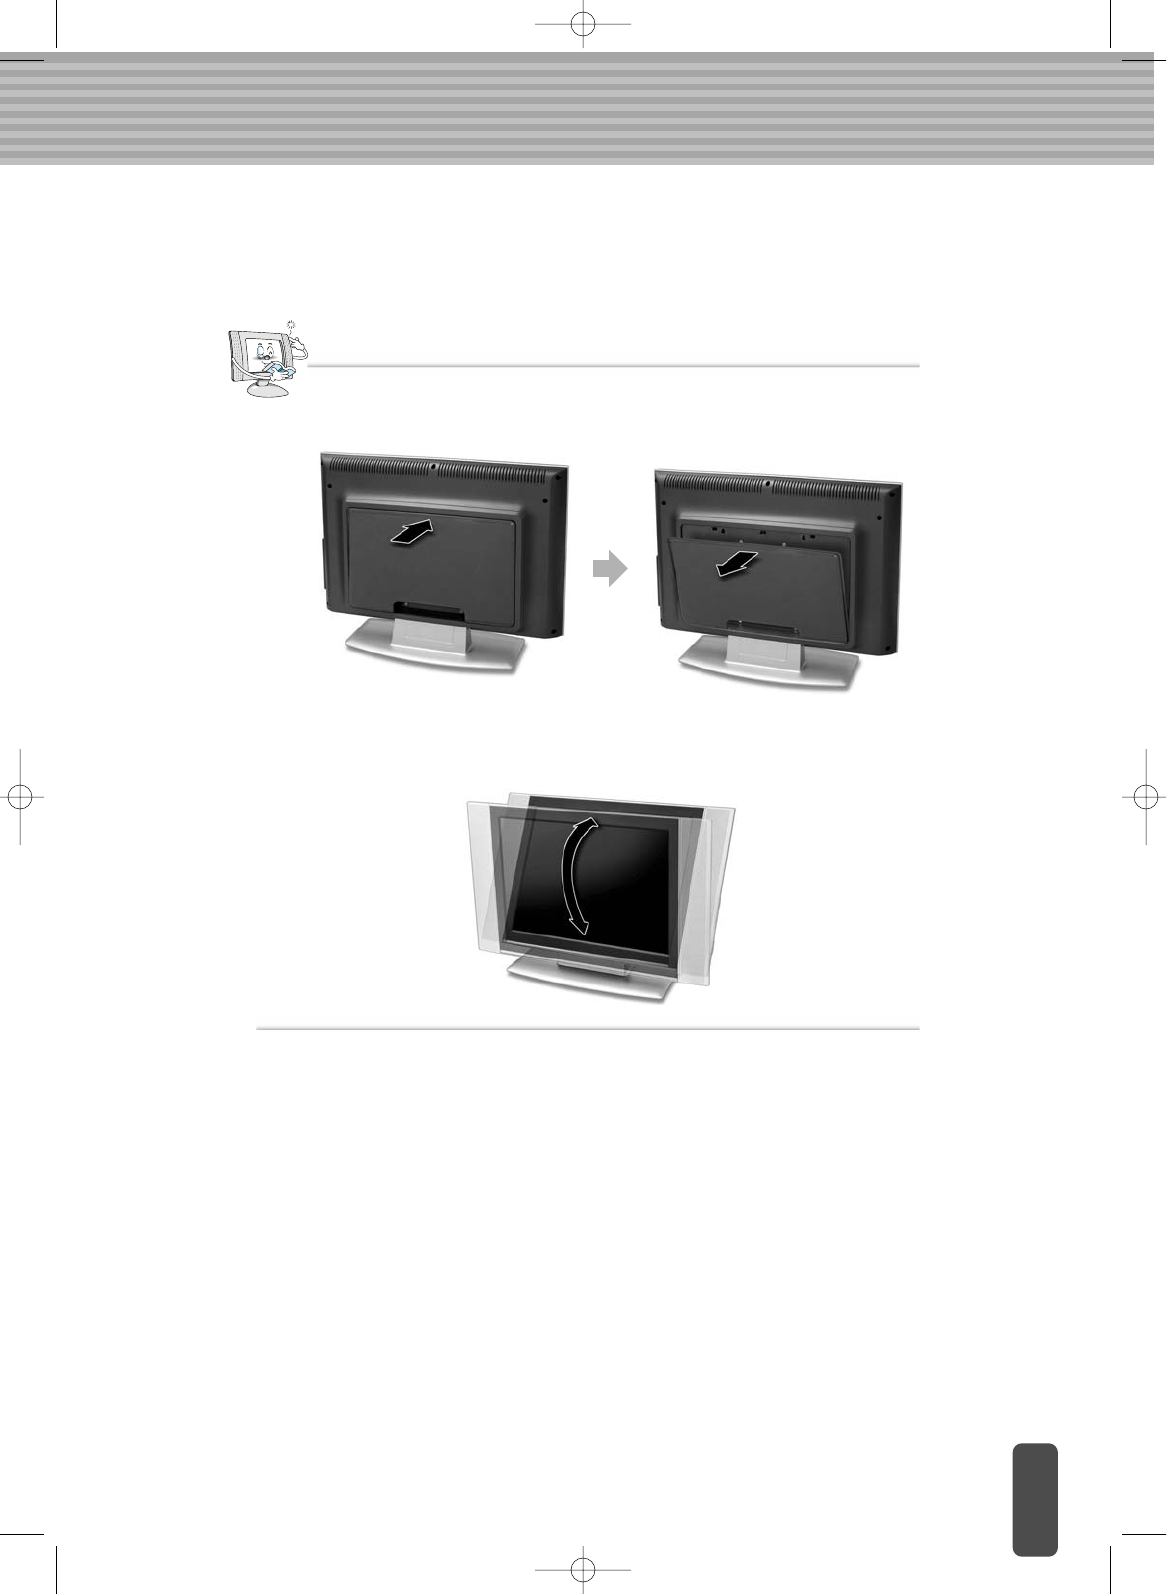
To connect the LCD display to external device, remove the rear cover by pushing
slightly as following.
Tilting
The LCD display has tilt angle of about 0 ~ 30 relative to vertical axis.
Note
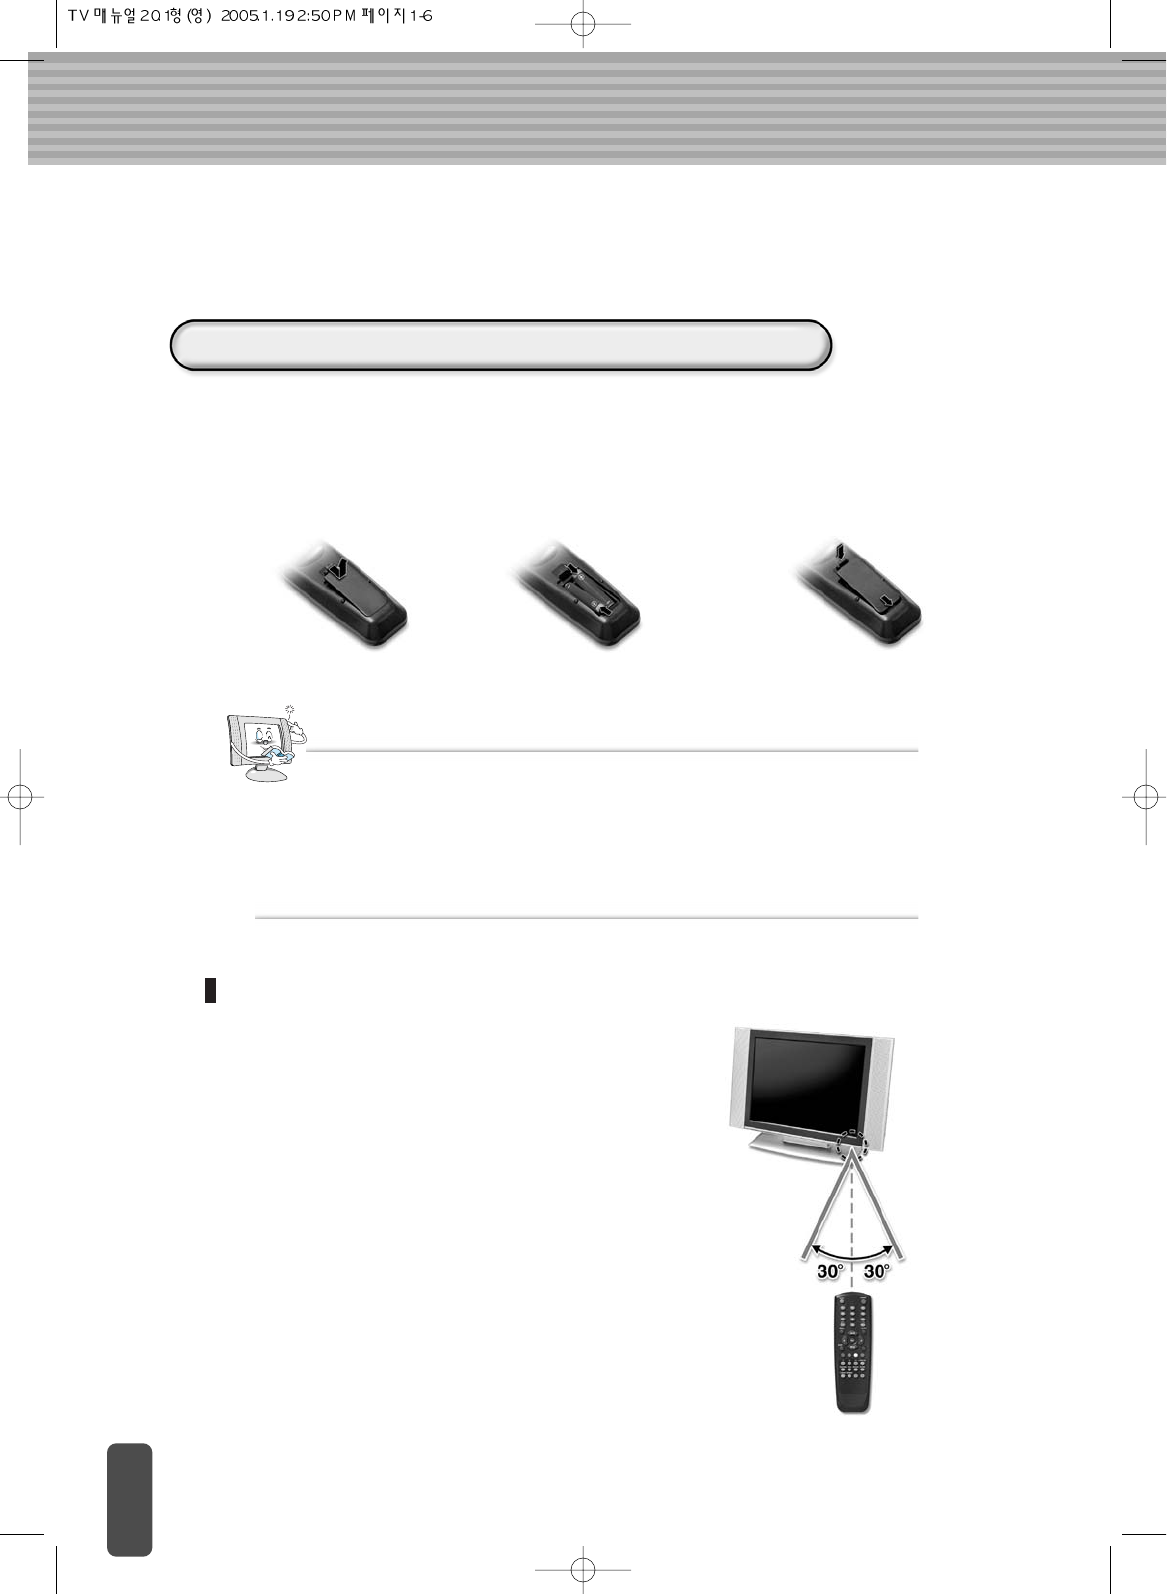
Remote control
Do not insert the batteries with the wrong polarity.
Do not put spent batteries in a fire.
Do not leave completely-used batteries in the remote control. Leaving them in place
for a long time may cause corrosion of the electrodes in the remote control.
Replace the batteries with new ones if the remote control does not work properly.
Note
Inserting the batteries in the Remote control
1
Open the cover.
2
Insert dry cells with the
correct polarity (+, -).
3
Close the cover.
You must insert or replace the batteries in the remote control.
Information on the Use of the Remote control
When using the remote control, point it towards the
remote control receiving part of the LCD Display.
The operating distance should be within 7m.
The receiving angle should be within 30 degrees.

Do not subject the remote control to shock. It may get damaged.
Be careful not to let water get into the remote control. It may cause damage
Do not dismantle the remote control.
Do not expose the remote control to direct sunlight or other strong light.
The remote control may not work properly.
Do not keep in cold or humid places. It may cause defects.
Note
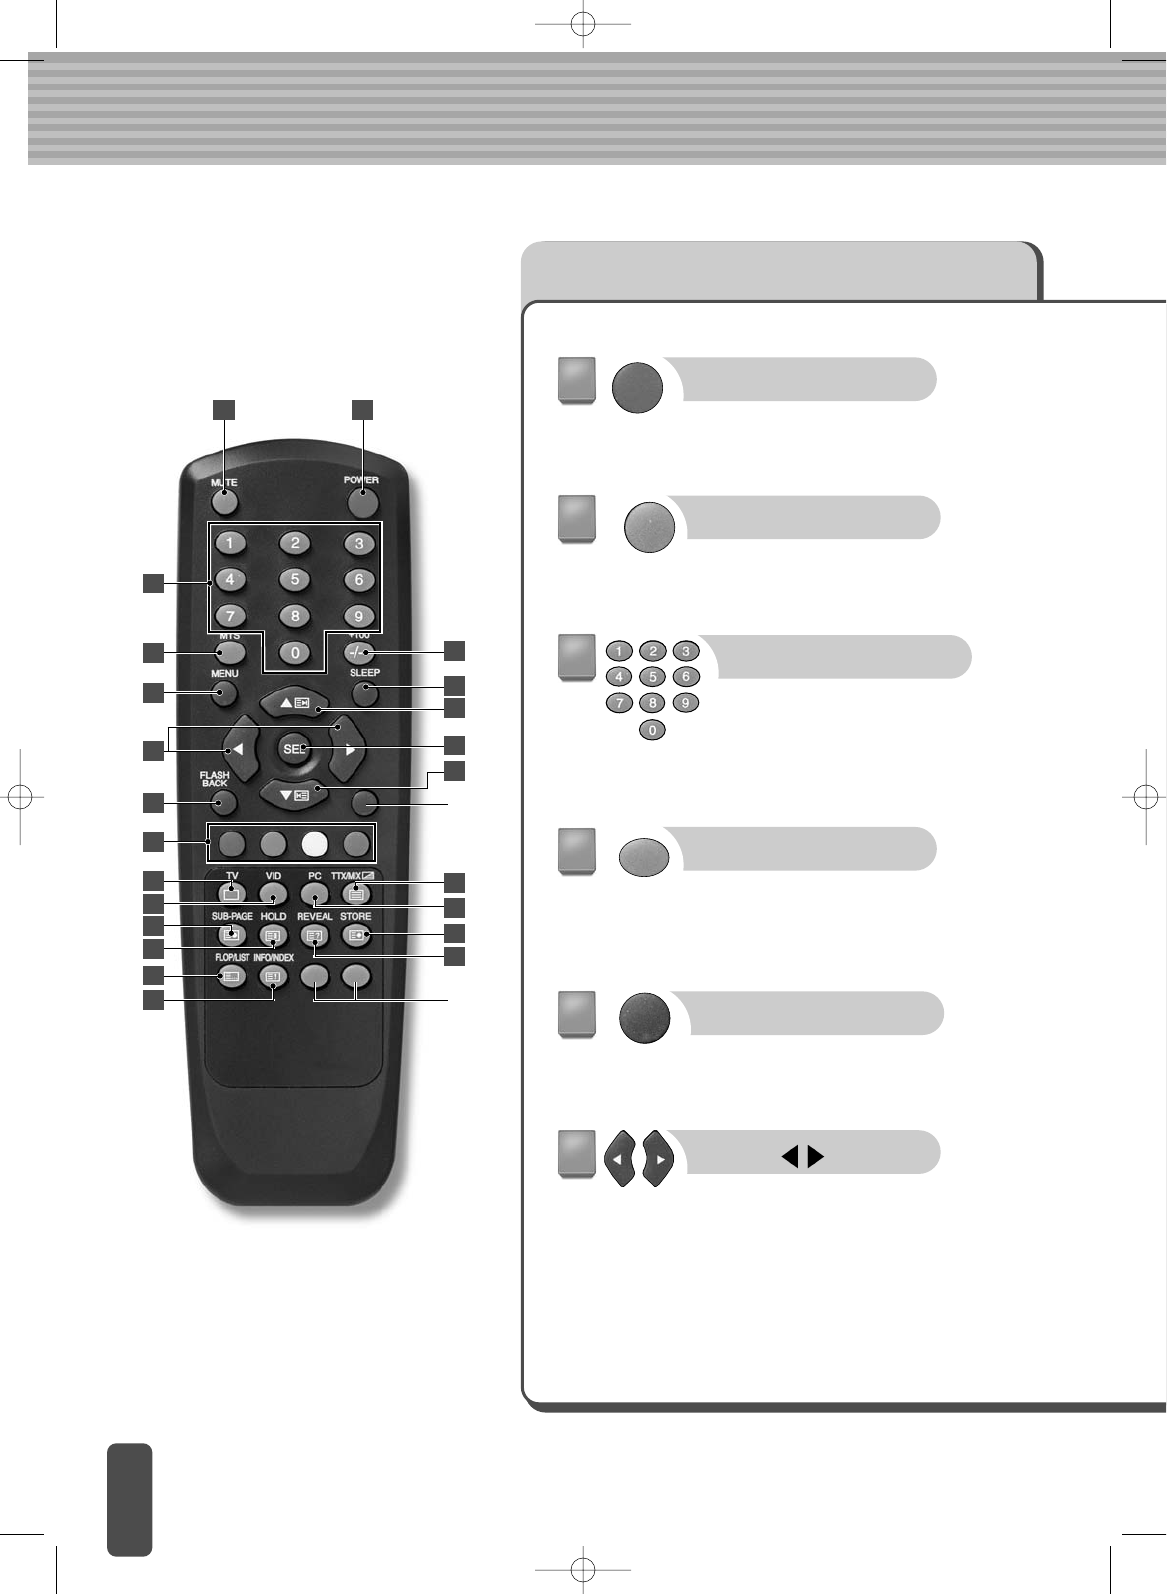
Remote control Button Functions
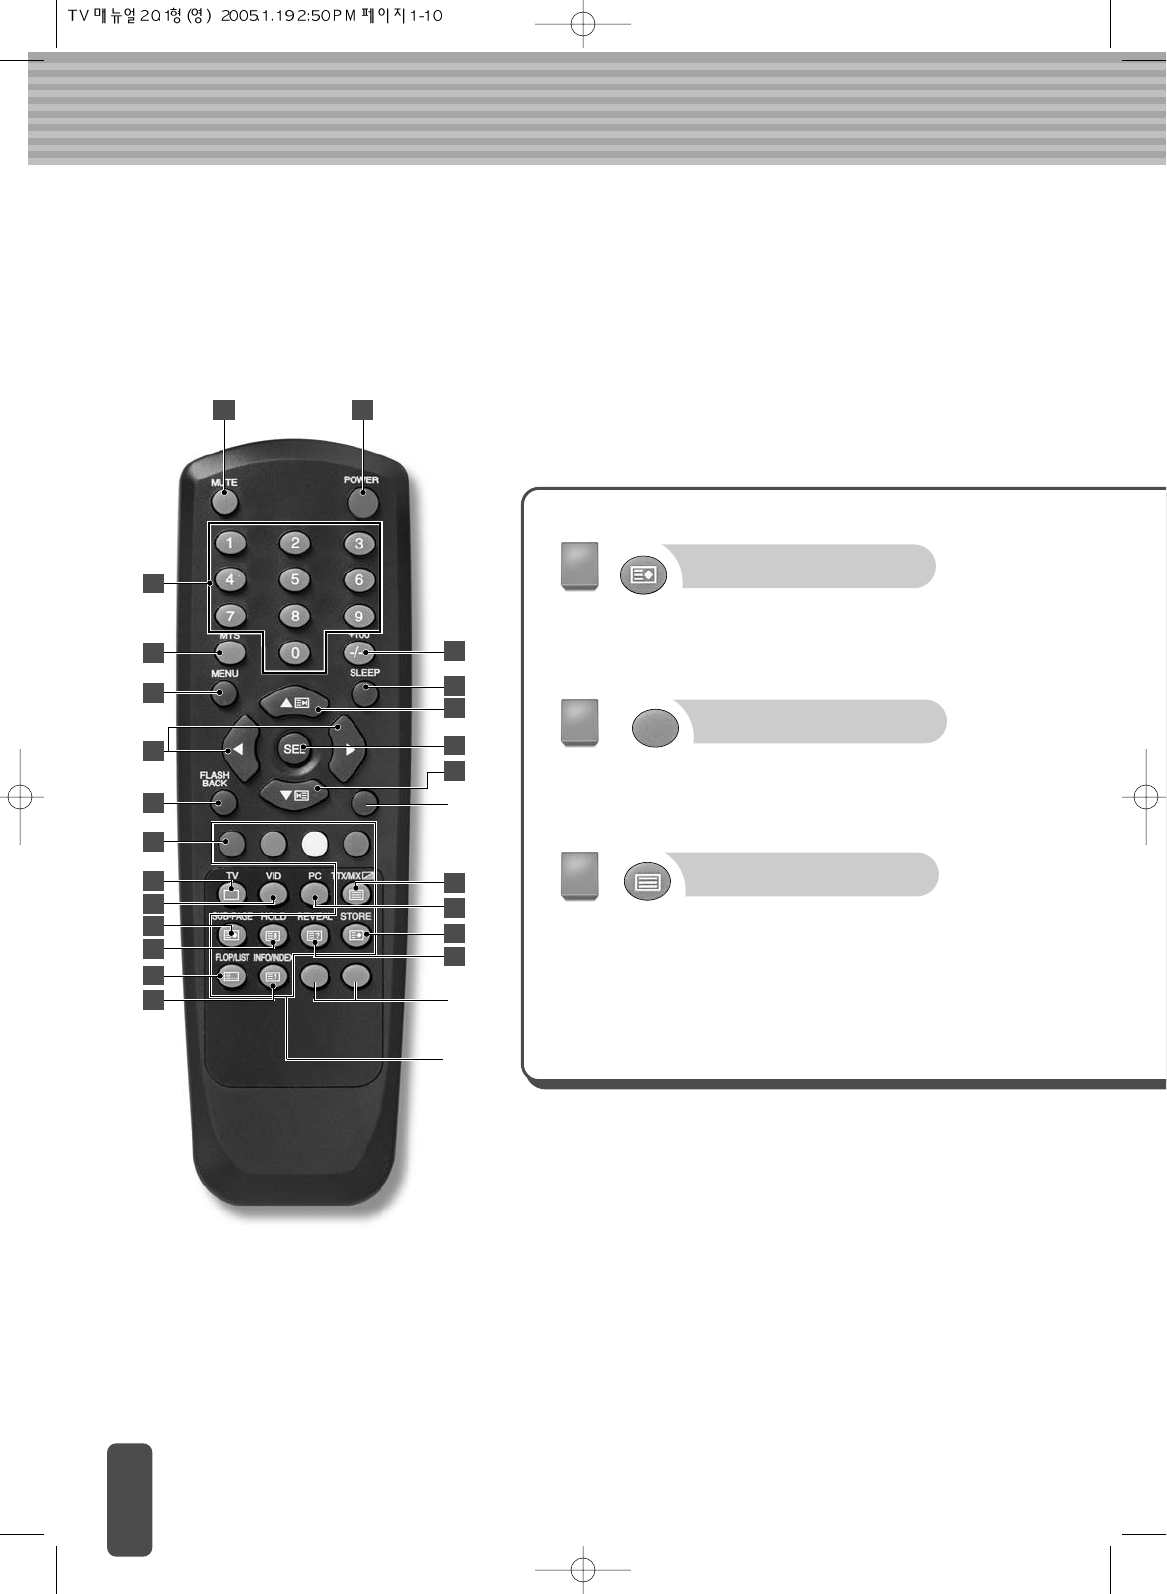
POWER
Turns the display On or Off.
MUTE
Press to temporarily cut
off the sound.
NUMBER
Direct channel select.
Direct page selection during
Teletext display.
VOL
Increases or decreases
the volume. Also used to
select the OSD main
menu, to select the sub-
menu or to change the
values in sub-menus.
MTS
Press to choose stereo,
dual or mono.
MENU
Display OSD Menu.
NOT
USED
NOT
USED
12
3
4
5
6
7
9
10
11
12
13
14
17
18
15
16
19
20
19
21
22
1
2
3
5
6
4
8
TV
Selects TV signal. Teletext
(option) Off.
VID
Press to display all available
video sources (i.e., Video,
S-video and DVD).
Select video source (Video
(composite), S-video and DVD
(composite)).
FLASHBACK
Moves to the previous TV
Channel.
It is a Quick Search
function.
Teletext
RED : Converts to the Page
linked to the RED Key.
GREEN : Converts to the Page
linked to the GREEN Key.
YELLOW : Converts to the Page
linked to the YELLOW Key.
BLUE : Converts to the Page linked
to the BLUE Key.
9
10
7
8
SUB-PAGE(option)
Displays a secondary page.
11
HOLD(option)
Maintain the Page content
as currently displayed, if it
has been changed.
12
FLOP/LIST(option)
Exchanges FLOP/LIST
mode.
13
INFO/INDEX(option)
Converts from the current
Page to the INDEX Page.
14
REVEAL(option)
Shows letters that are
hidden (not displayed),
even though they are
included in the currently
displayed Page.
15
STORE(option)
Stores the current Page
TTX/MIX(option)
TTX : Teletext On/Off
MIX : Displays the Page
currently being
displayed together
with images
PAL/
SECAM
MODEL
ONLY
18
16
NOT
USED
NOT
USED
12
3
4
5
6
7
9
10
11
12
13
14
17
18
15
16
19
20
19
21
22
8
PC
Selects PC signal.
17
SLEEP
Sets SLEEP reservation
time. When the reserved
time comes, the apparatus
is automatically turned off.
21
SEL
Select sub-menu or fix
user setting.
20
-/--(+100)
Select channels with the
number over 100.
22
CH , TELETEXT
PREVIOUS/NEXT PAGE
Press or to change
channels. Also used to
select in the OSD menu or
select the channel
providing teletext service.
19
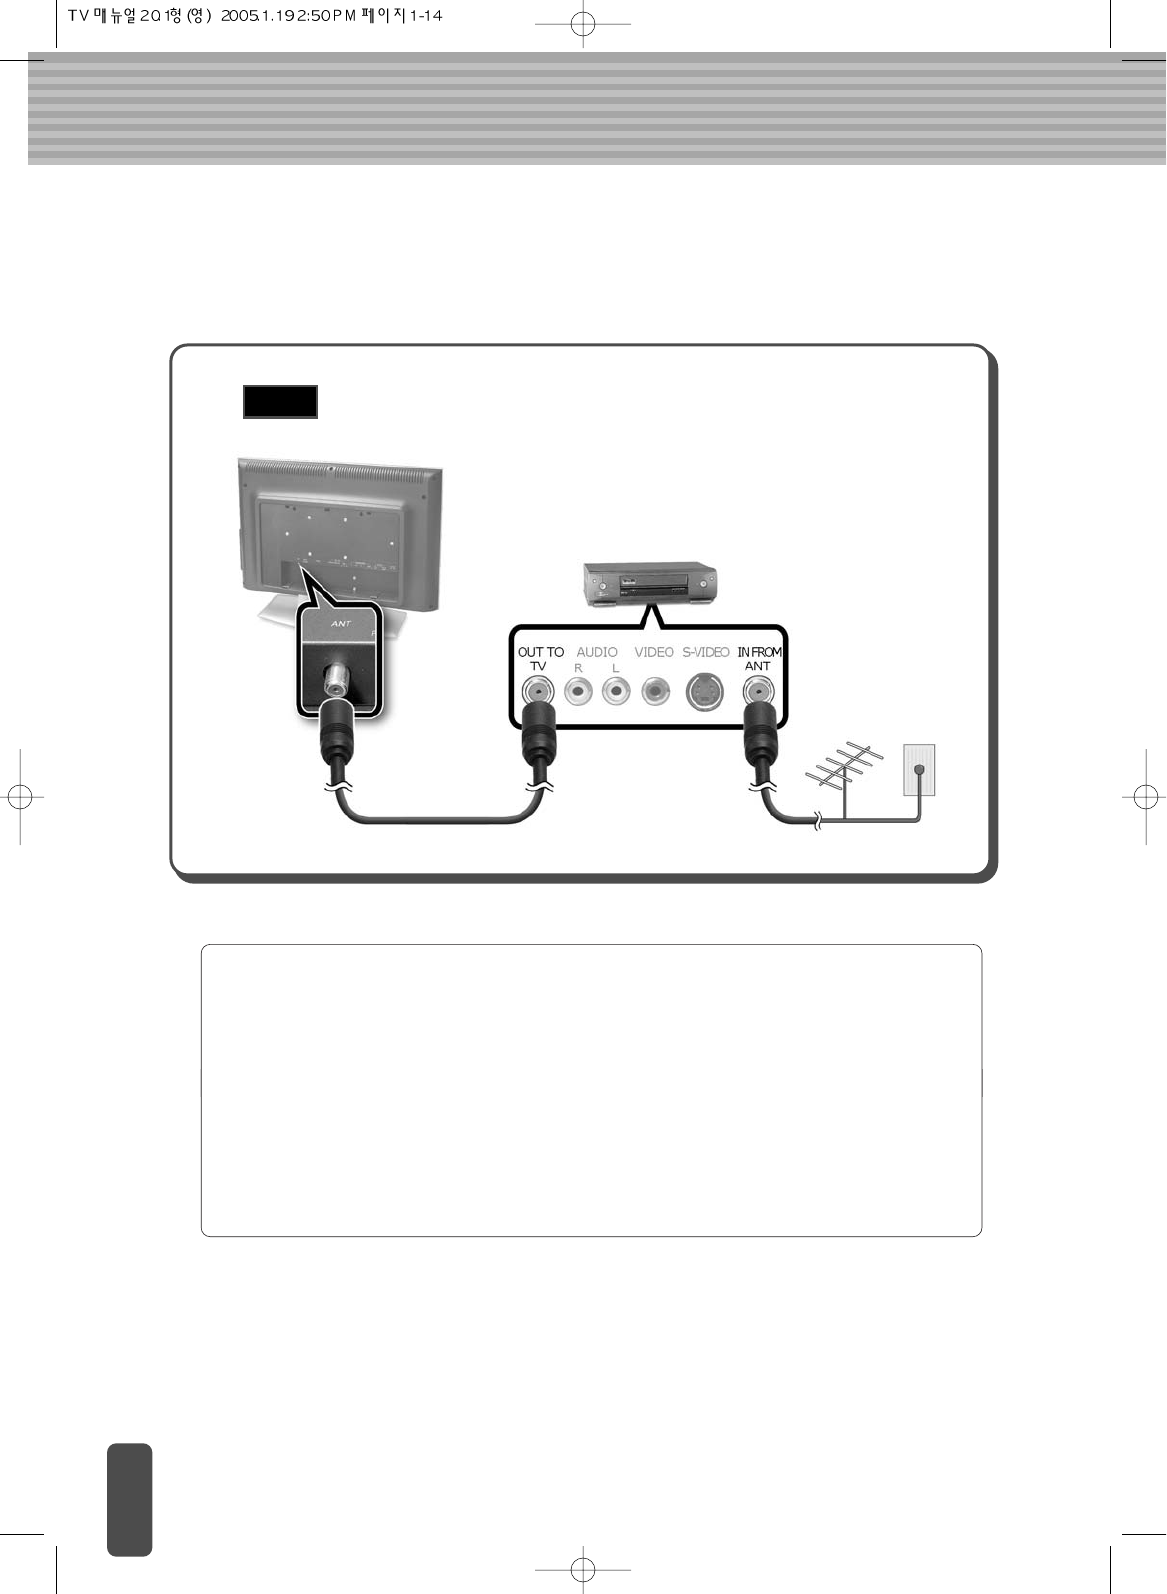
Connecting to Watch LCD Display, VCR or DVD
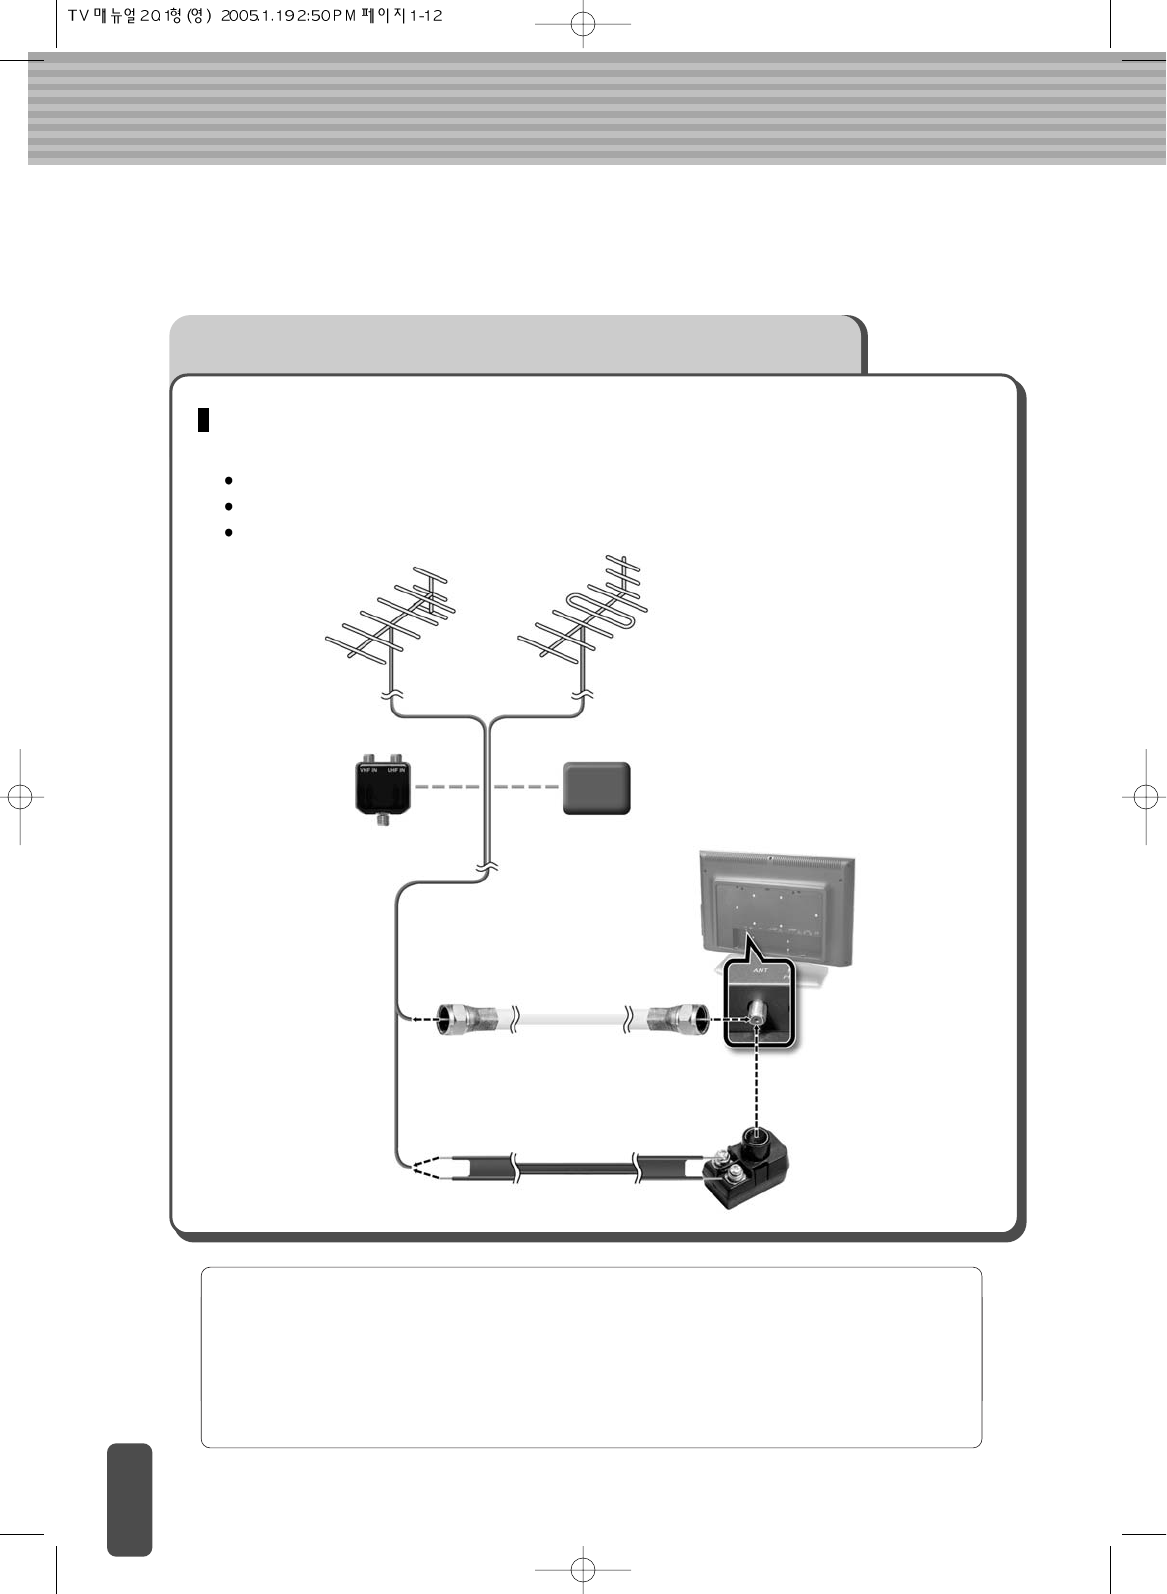
Connecting the Aerial or Cable Television Network
To view television channels correctly, a signal must be received by the set from one of
following sources:
An outdoor aerial
An indoor aerial (not recommendable)
A cable television network
1
In the first three cases, connect the aerial or network input cable to the
75 ohm coaxial socket on the rear of the TFT LCD display.
2
Press the TV button on the remote control.
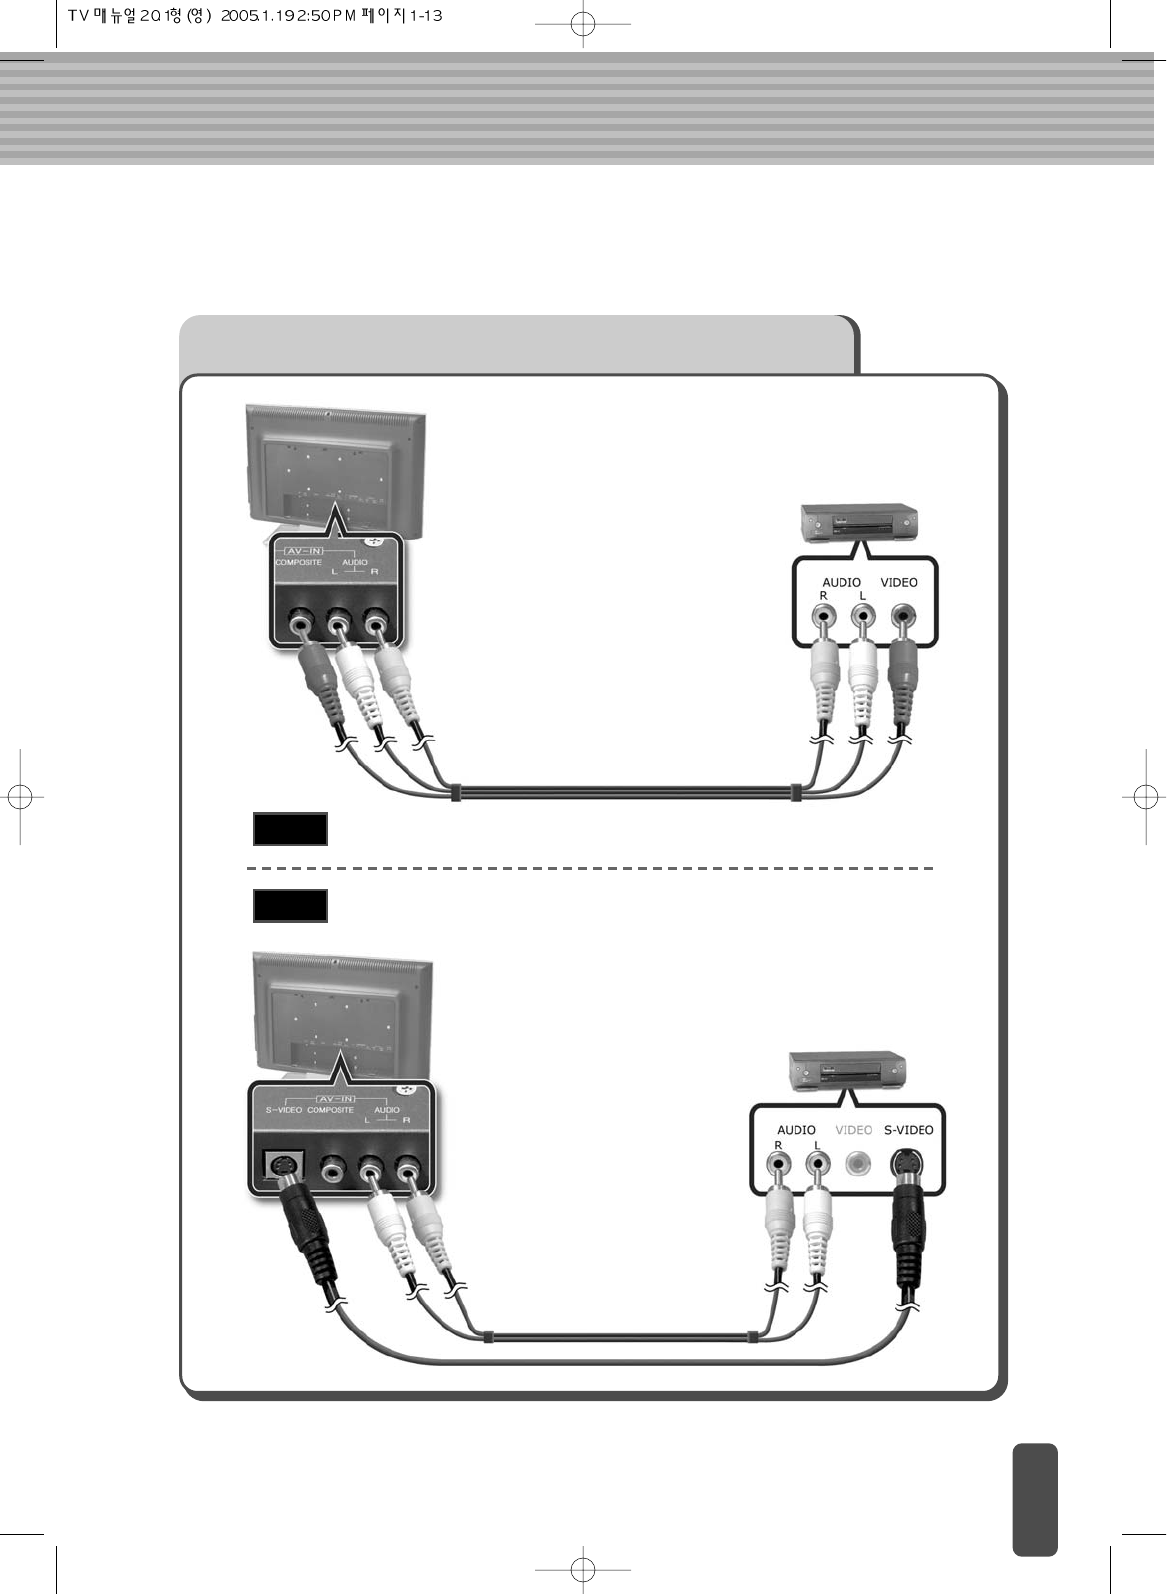
Connecting the VCR, DVD or Other External Devices
A type
B type
To connect COMPOSITE VIDEO
To connect S-VIDEO
1
Connect a set of audio cables between the component AUDIO IN jacks of
the LCD Display and the AUDIO OUT jacks of the DVD Player.
When an external device is in MONO, the audio connection cable should
be connected to ‘AUDIO L’ jack and S.MODE/MTS should be set MONO.
2
Connect video cables between the Y, Pb and Pr inputs on the LCD
Display and the Y, Pb and Pr outputs on the DVD Player.
C type To connect TV, VCR
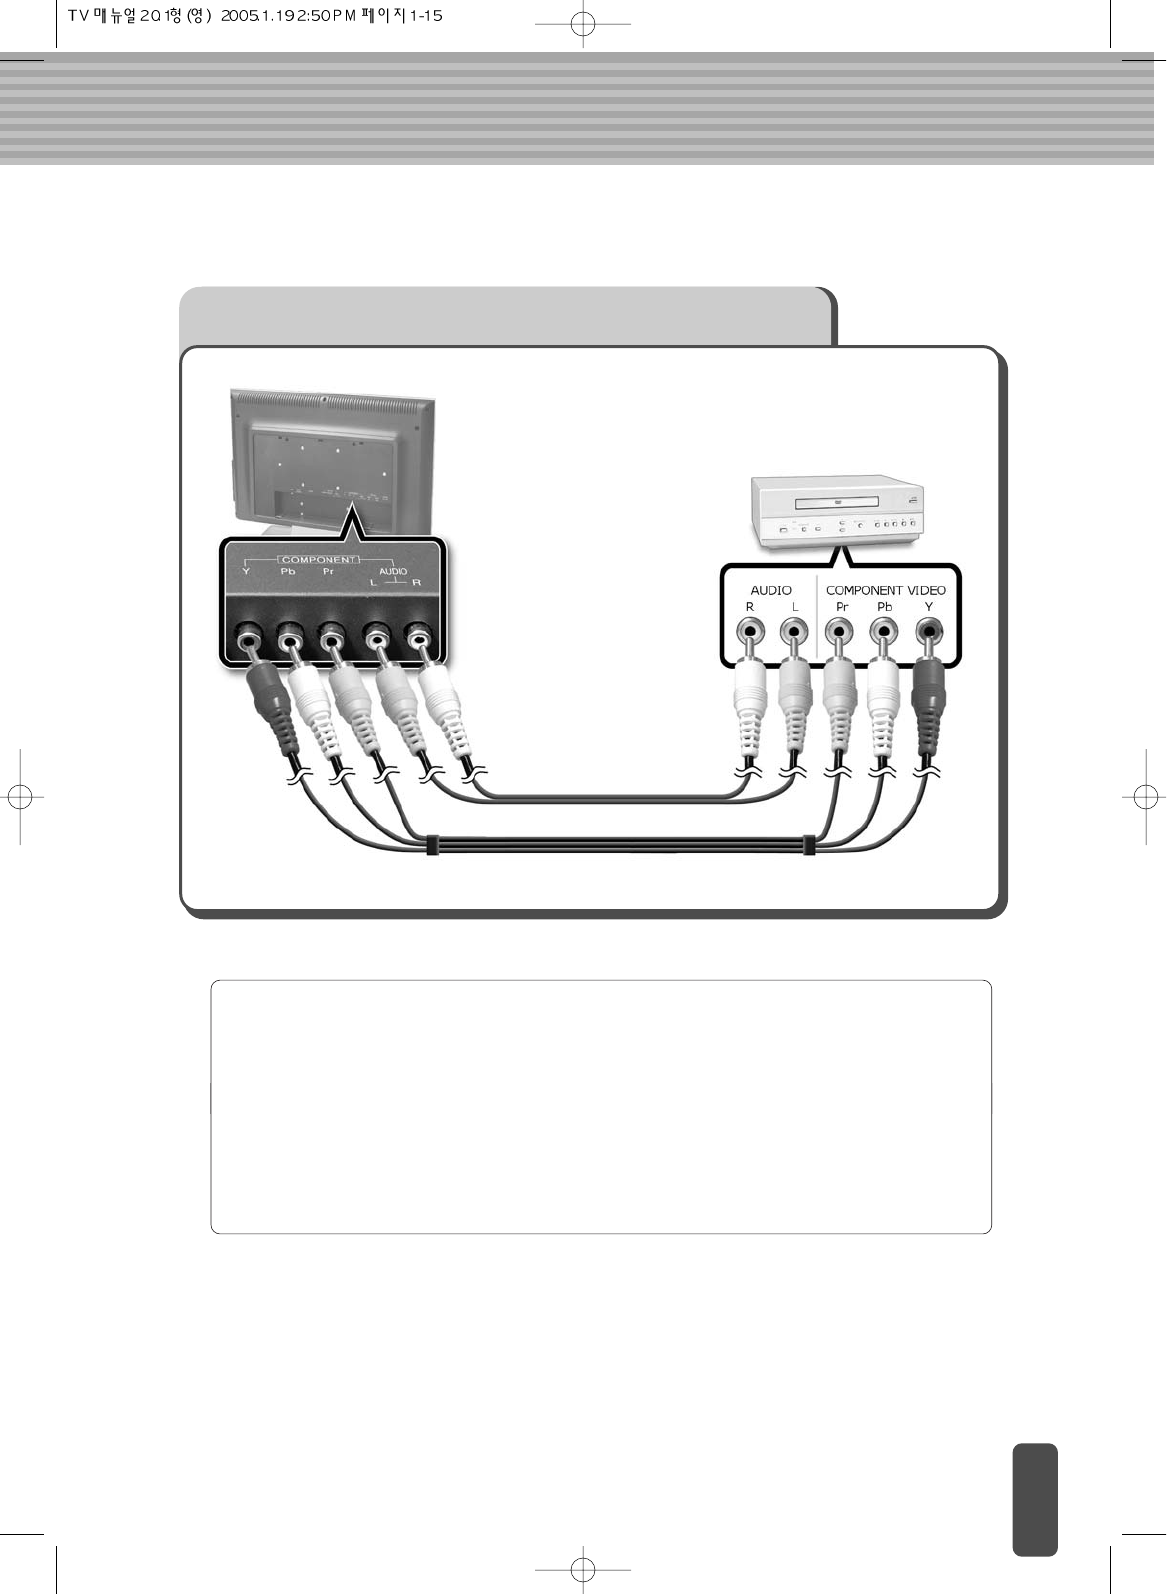
Connecting a DVD Player (Connecting to Y, Pb, Pr)
1
Connect a set of audio cables between the component AUDIO IN jacks of
the LCD Display and the AUDIO OUT jacks of the DVD Player.
2
Connect video cables between the Y, Pband Prinputs on the LCD Display
and the Y, Pband Proutputs on the DVD Player.
(Note : For an explanation of component video, see your DVD Player’s
manual.)
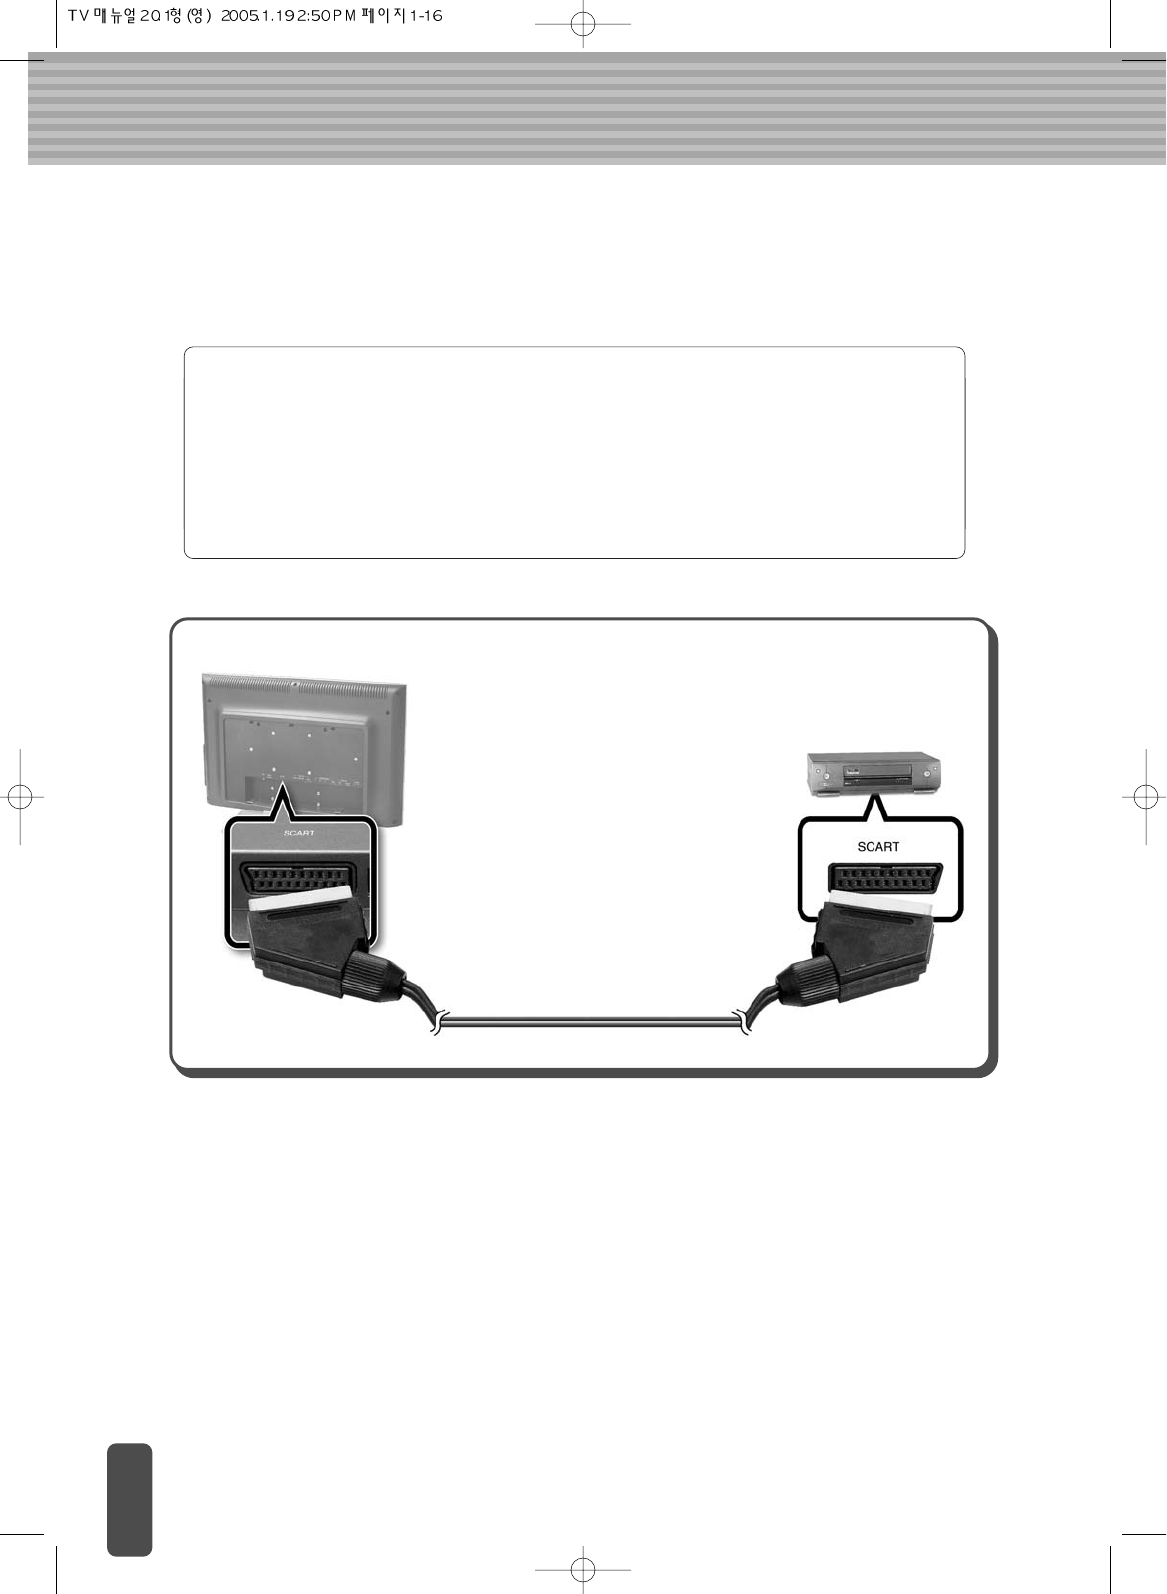
Connecting to SCART (Option)
1
Instead of the COMPOSITE or S-VIDEO, SCART can be used if the
external devices provide it.
2
Referring to the user manual of the external device, connect the SCART
cable as follows.
Connecting to a PC
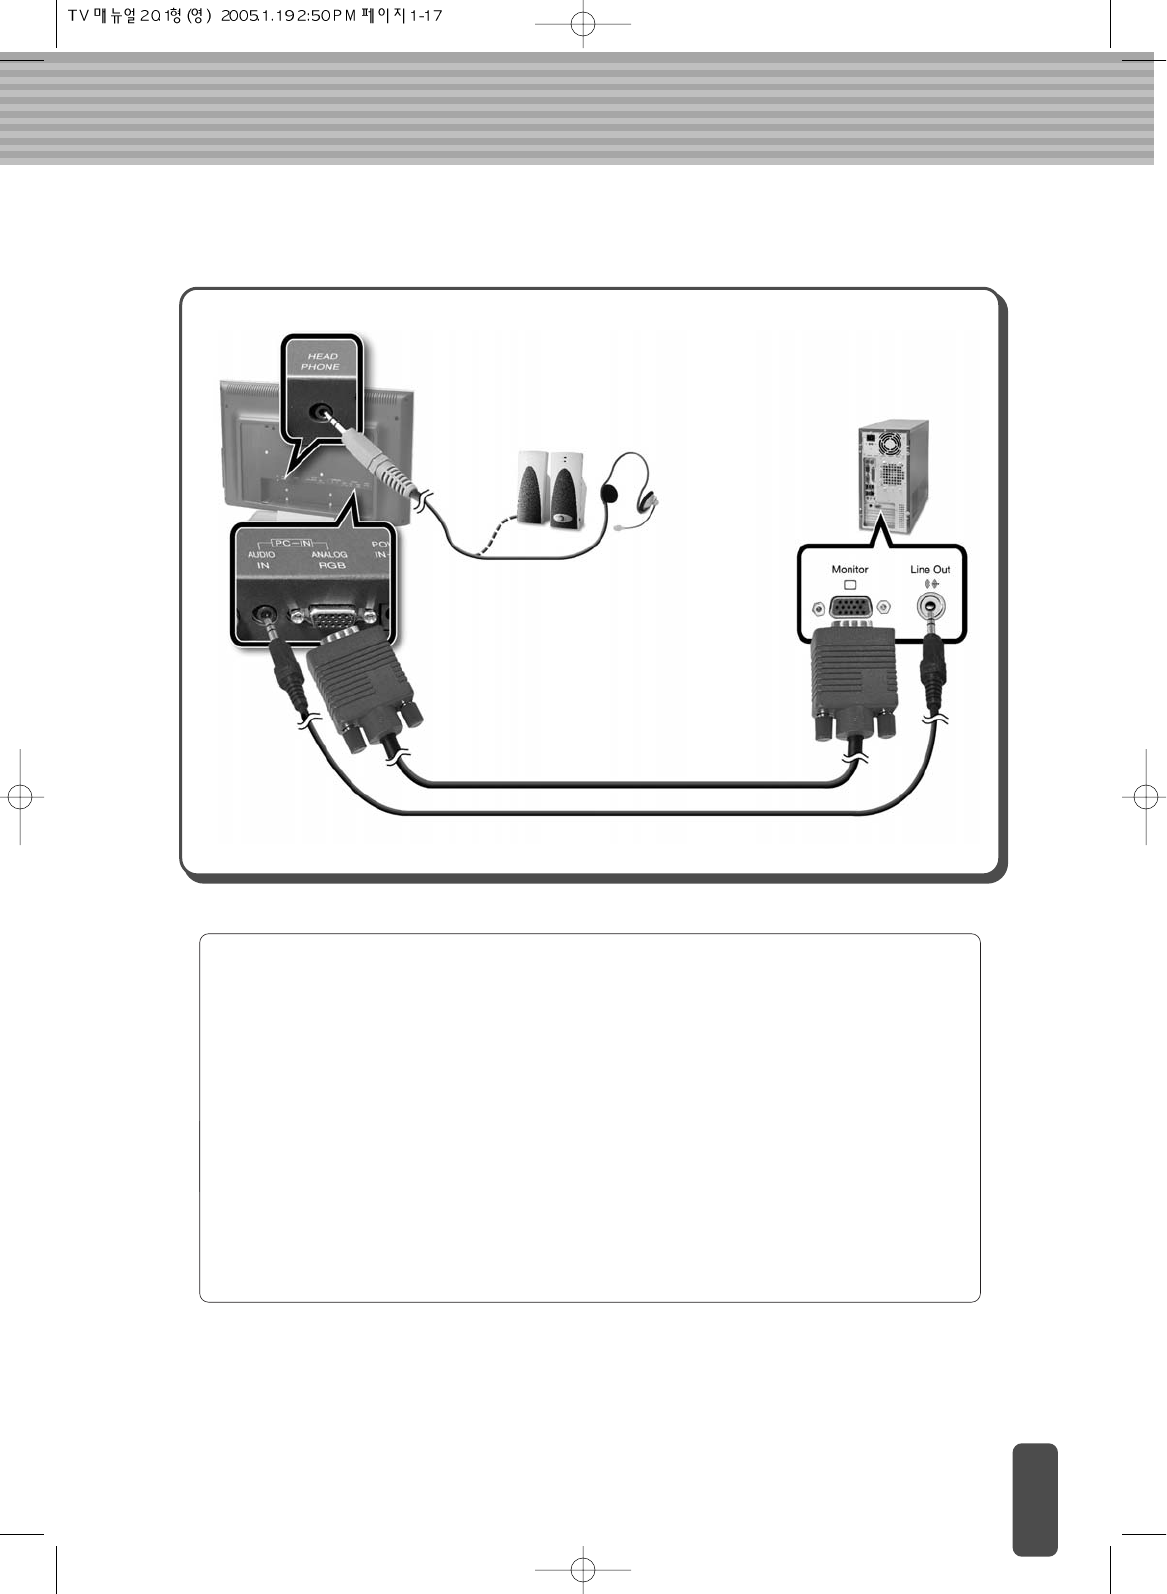
1
Turn off your computer and LCD Display.
2
Connect a PC D-Sub cable between your PC and the PC-VIDEO-IN of
the LCD Display.
Then fasten the screws on both sides of the cable.
3
Connect a PC Audio Cable between the Sound Output Jack of the sound
card on the PC and the PC-AUDIO-IN of the LCD Display.
4
Power on the computer before turning on the LCD Display.
Menu Tree
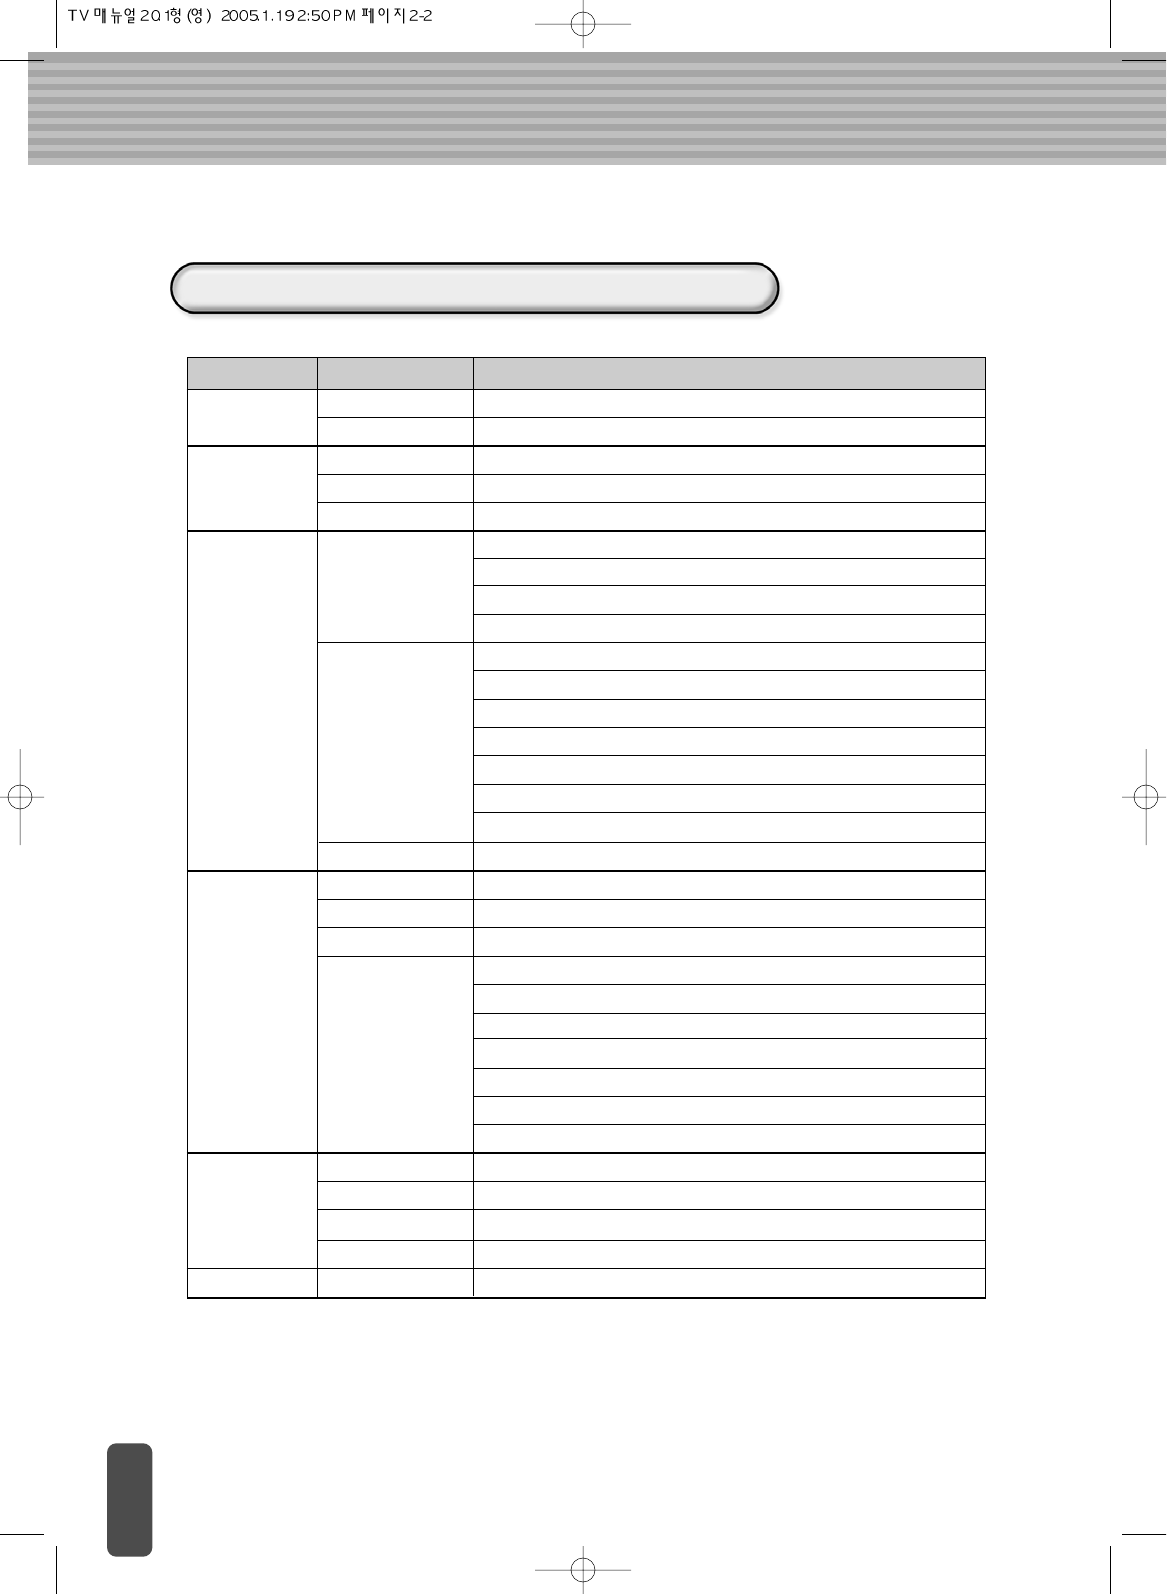
TV Menu Types and Items (PAL/SECOM)
Menu Items Items Description
BRIGHTNESS
/CONTRAST
COLOR
BRIGHTNESS
CONTRAST
SHARPNESS
COLOR
TINT
AUTO PROGRAM
MANUAL
PROGRAM
Tunes channels automatically
PROGRAM EDIT
OSD POSITION
OSD TIME
Adjusts screen sharpness
START :
Stores channels manually
Adjusts screen brightness
Adjusts screen contrast
Adjusts color intensity (with reference to white)
Adjusts screen color saturation
SYSTEM :
STORAGE FROM :
ANALOG : When connected to a PC via an analog connector (D-sub).
Manually memorize or erase the TV or CABLE channel.
SYSTEM :
CHANNEL :
FINE :
SEARCH :
NAME :
STORE :
Selects a position for the OSD screen
Adjusts the time taken for the OSD menu screen to disappear
Selects a language for the OSD menu LANGUAGE
Select an input source as appropriate for the following:
S-VIDEO : S-VHS signal input
CHANNEL
SETUP
BASS
TREBLE
Adjusts bass
Adjusts treble
Adjusts balance BALANCE
Selects the desired sound setting (Sports, Movie, Music) AUDIO MODE
AUDIO
Exits OSD Setup
EXIT
INPUT SOURCE
COMPONENT : COMPONENT (Y, Pb, Pr) input signal
SCART : SCART input signal
COMPOSITE : COMPOSITE signal input
TUNER : When connected to a TV.
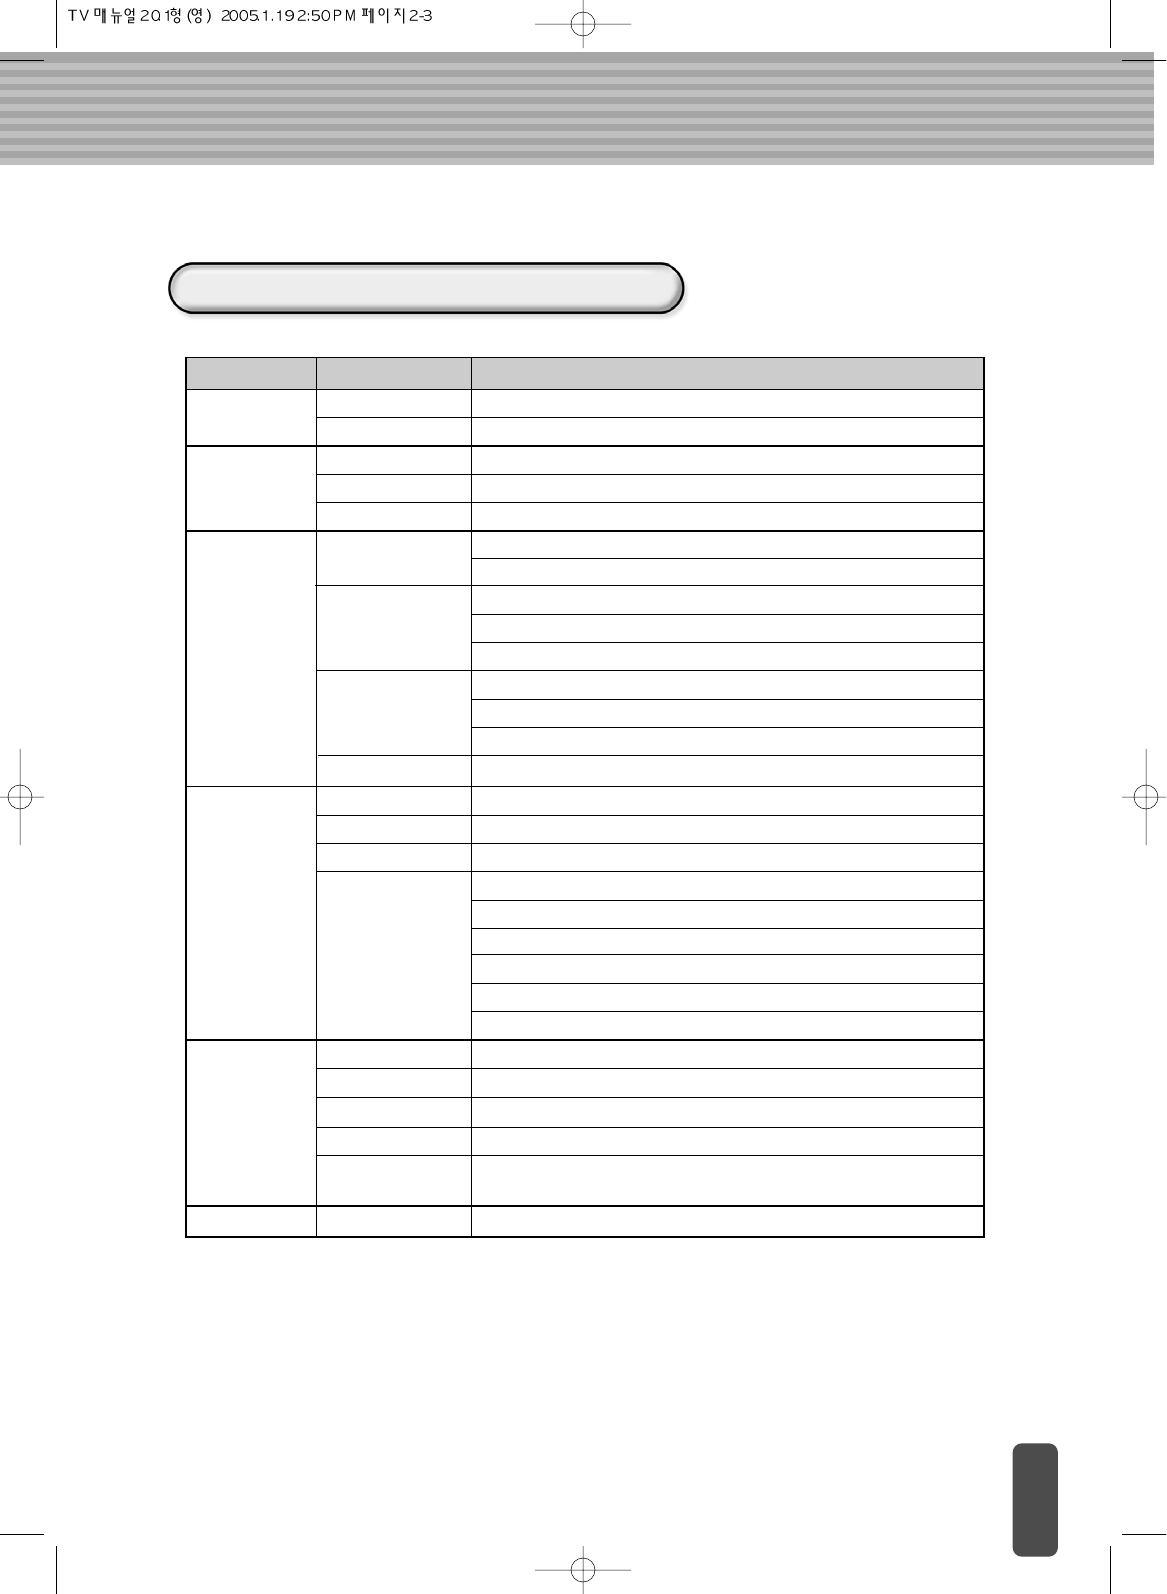
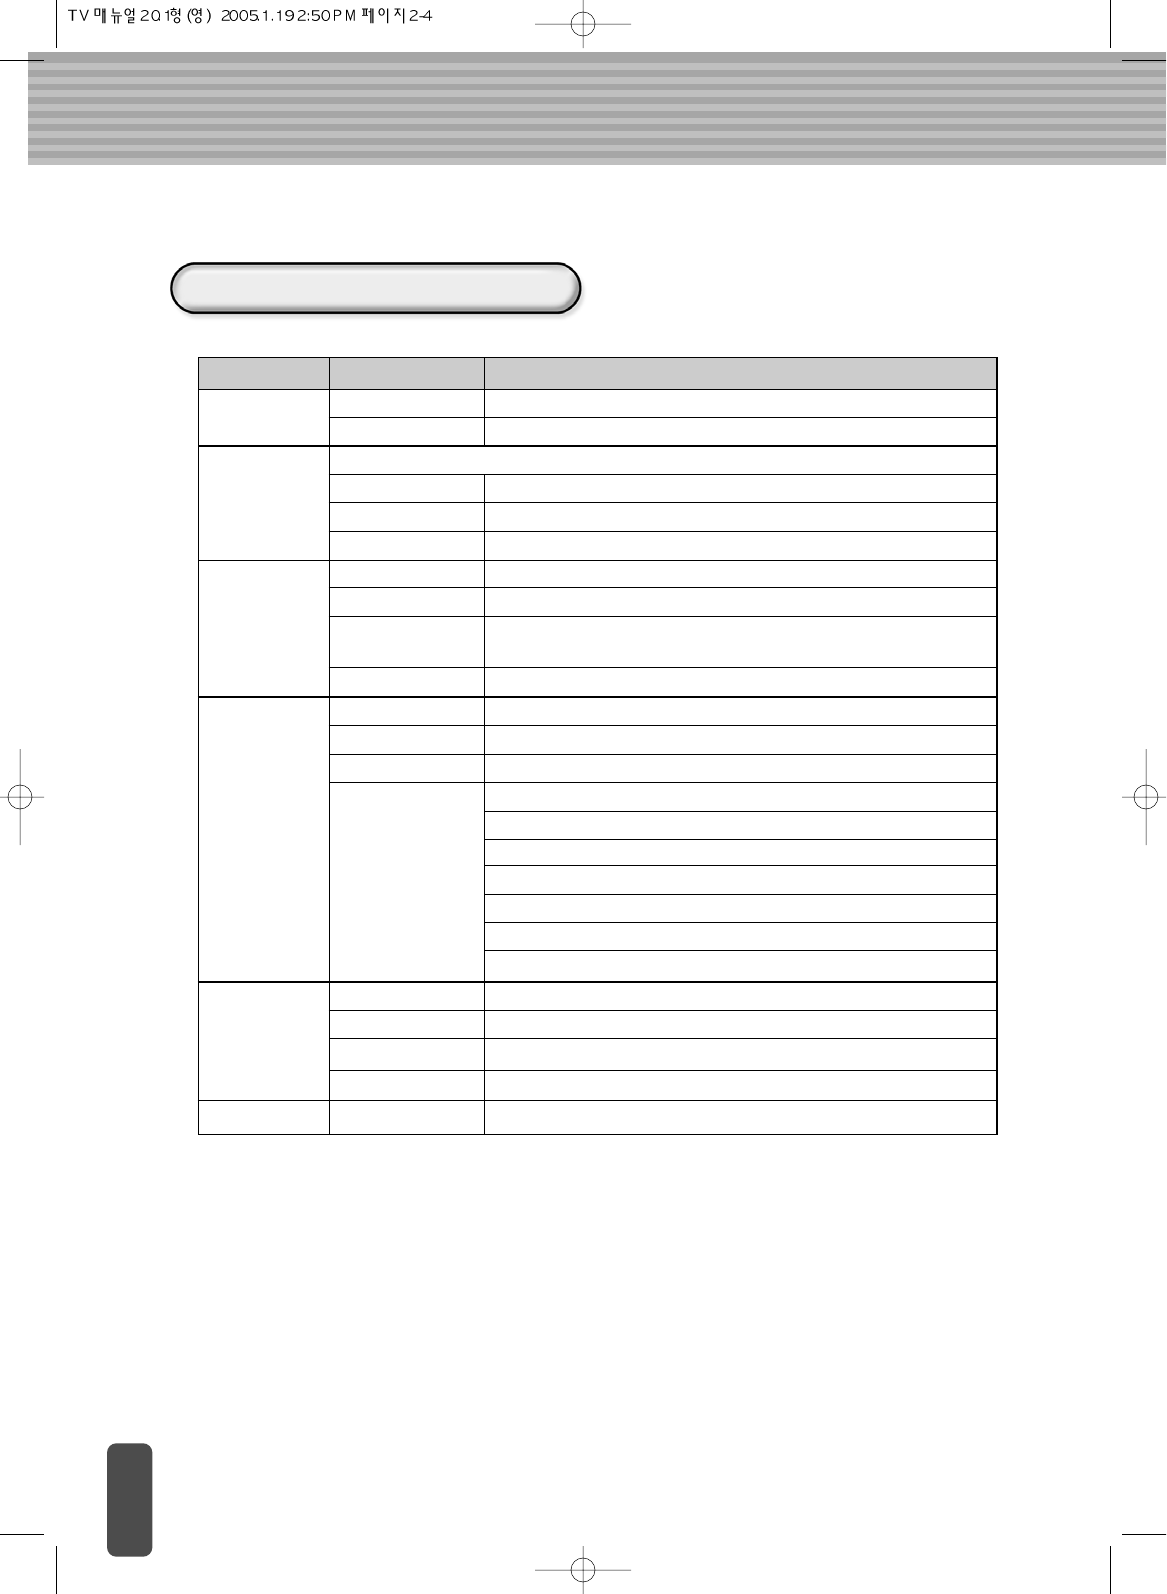
TV Menu Types and Items (NTSC)
Menu Items Items Description
BRIGHTNESS
/CONTRAST
COLOR
BRIGHTNESS
CONTRAST
SHARPNESS
COLOR
TINT
AIR/CATV
AUTO CHANNEL
AIR : Selects when watching the air TV.
MANUAL
CHANNEL
FINE
OSD POSITION
OSD TIME
Adjusts screen sharpness
START : Starts detecting the active channels.
STOP : STops detecting the active channels.
Adjusts screen brightness
Adjusts screen contrast
Adjusts color intensity (with reference to white)
Adjusts screen color saturation
CATV : Selects when watching the CATV.
Automatically memorize the active TV or CABLE channels.
ANALOG : When connected to a PC via an analog connector (D-sub).
Manually memorize or erase the TV or CABLE channel.
DEL : Delete channel number.
ADD : Add channel number.
Adjust when the display color is blur or unfocused.
Selects a position for the OSD screen
Adjusts the time taken for the OSD menu screen to disappear
Selects a language for the OSD menu LANGUAGE
Select an input source as appropriate for the following:
S-VIDEO : S-VHS signal input
CHANNEL
SETUP
BASS
TREBLE
Adjusts bass
Adjusts treble
Adjusts balance BALANCE
Selects the desired sound setting (Sports, Movie, Music) AUDIO MODE
Set status to SAP(Second Audio Program) to receive audio simul
casts in other lauguages.(ON/OFF)
SAP
AUDIO
Exits OSD Setup
EXIT
INPUT SOURCE
COMPONENT : COMPONENT (Y, Pb, Pr) input signal
COMPOSITE : COMPOSITE signal input
TUNER : When connected to a TV.
Menu Items Items Description
BRIGHTNESS
/CONTRAST
COLOR
BRIGHTNESS
CONTRAST
Controls color (Red, Green, Blue) of the display.
RED
GREEN
HORIZONTAL
OSD POSITION
OSD TIME
Adjusts screen brightness
Adjusts screen contrast
Changes the of red level.
Changes the of green level.
BLUE Changes the of blue level.
Adjusts the horizontal position of the display
VERTICAL Adjusts the vertical position of the display
CLOCK Increases or decreases the number of pixels to adjust the
horizontal size.
PHASE Adjusts the focus and sharpness of the display
ANALOG : When connected to a PC via an analog connector (D-sub).
Selects a position for the OSD screen
Adjusts the time taken for the OSD menu screen to disappear
Selects a language for the OSD menu LANGUAGE
Selects an input source as appropriate for the follows:
S-VIDEO : S-VHS signal input
POSITION
SETUP
BASS
TREBLE
Adjusts bass
Adjusts treble
Adjusts balance BALANCE
Selects the desired sound setting (Sport, Movie, Music) AUDIO MODE
AUDIO
Exits OSD Setup
EXIT
INPUT SOURCE
COMPONENT : COMPONENT (Y, Pb, Pr) input signal
SCART : SCART input signal
COMPOSITE : COMPOSITE signal input
TUNER : When connected to a TV.
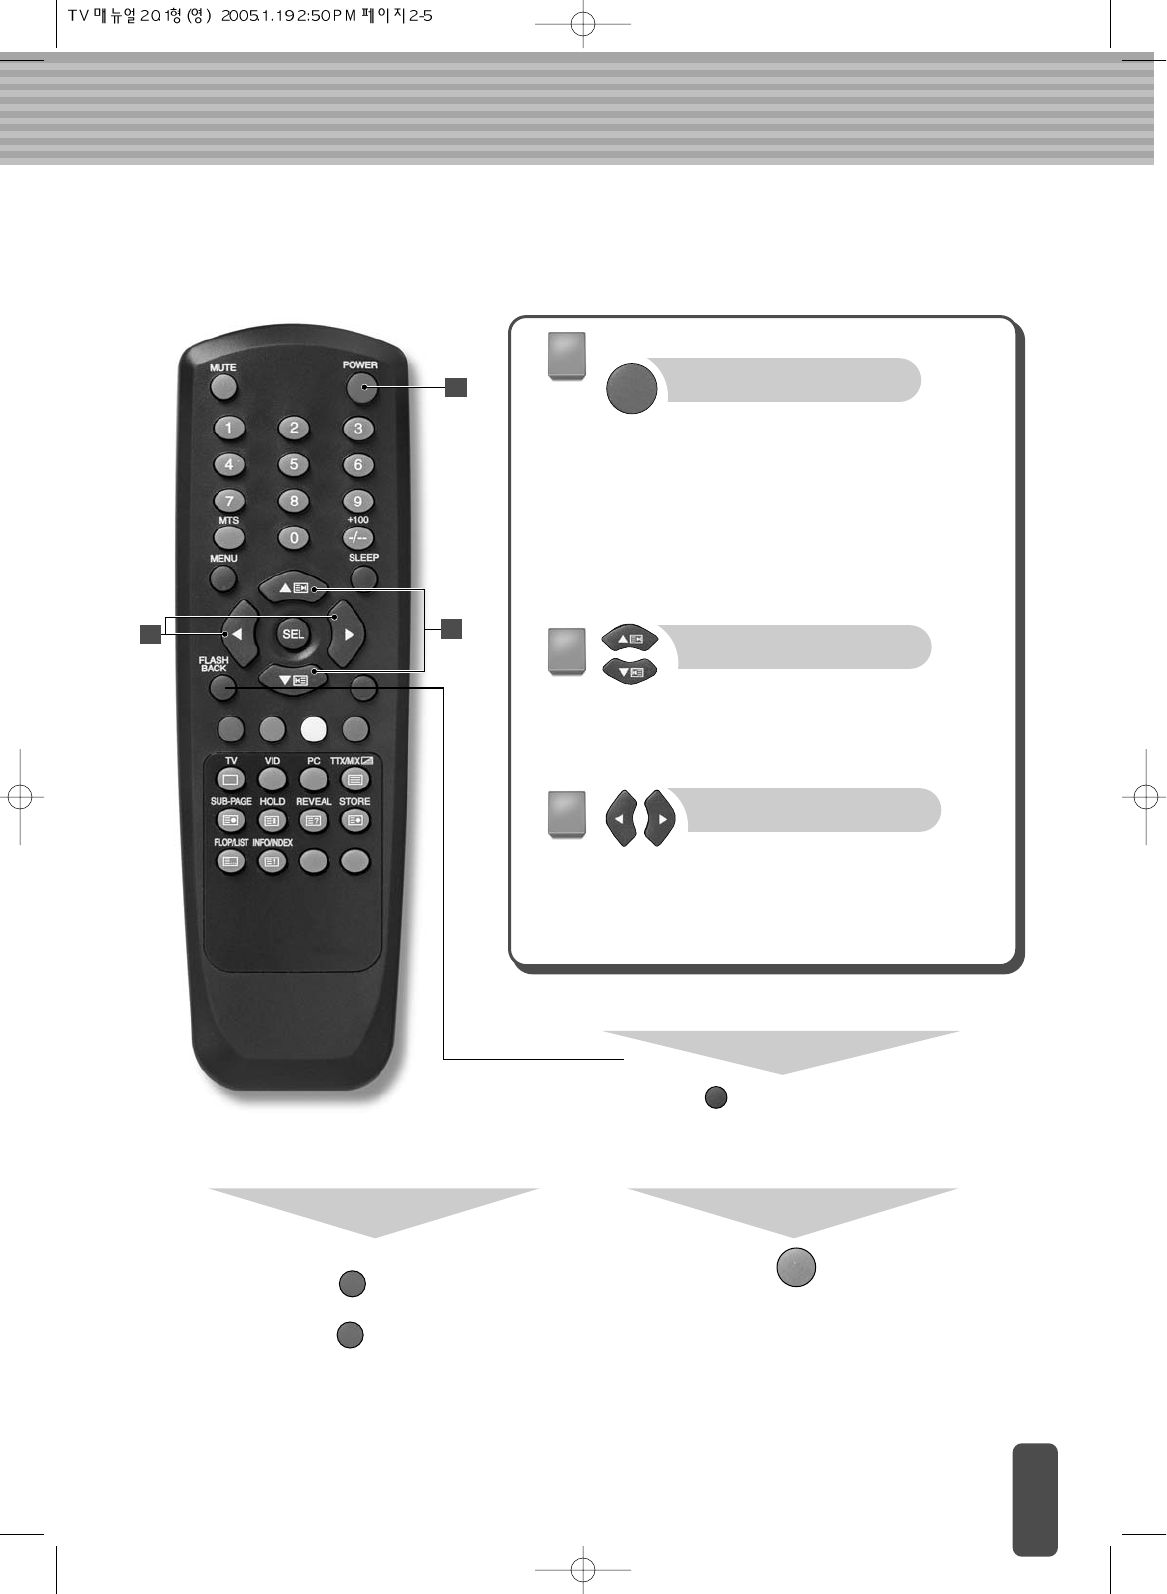
PC Menu Types and Items
Power supply to the TV may be either 110 V or 220 V.
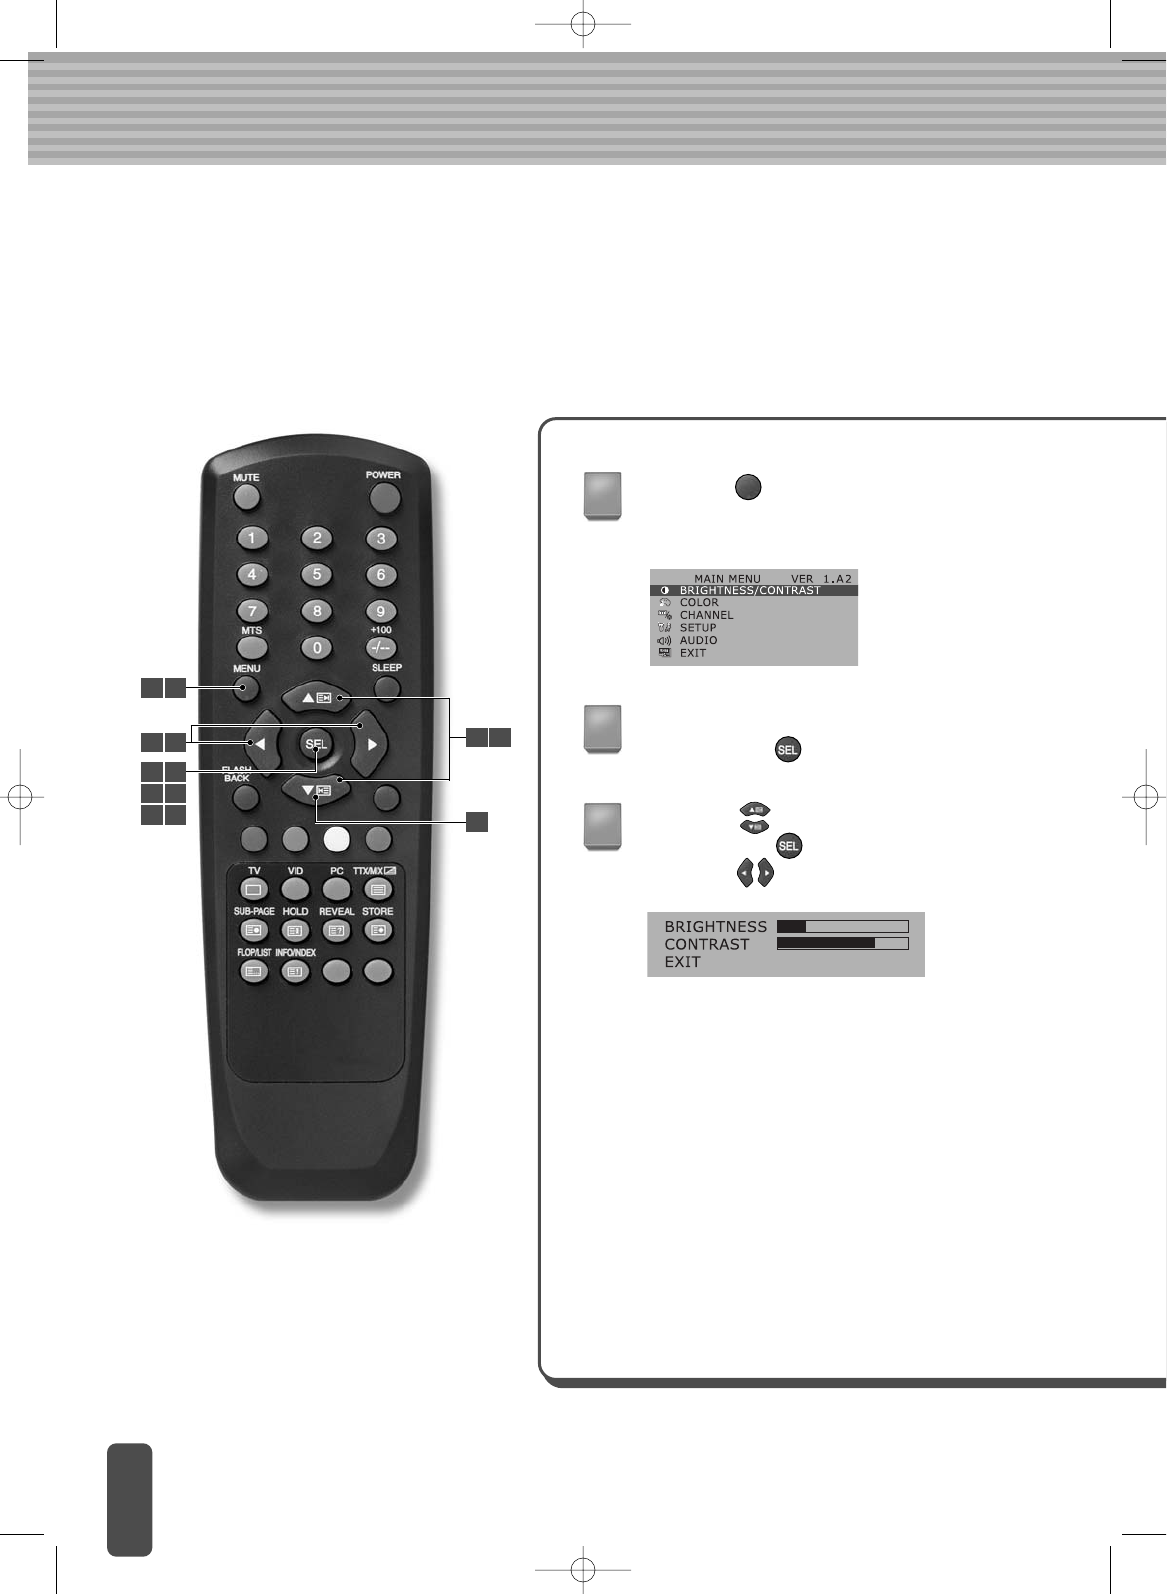
To watch TV
Turn the TV on or off.
(The power indicator turns
red when power is
connected to the LCD TV
and turns green when the
<POWER> button is
pressed.)
Volume Control Button /
Adjusts the volume level
while watching TV.
Also used to navigate in the
main menu
Channel Change Button /
Changes the channel.
Also used to select a
menu function.
1
23
1
2
3
To select the previous channel
Pressing the <FLASH BACK> button returns to
the channel that you were viewing previously.
To mute sound
Press the button once to
turn off the TV sound and
press again to turn on the
sound.
<MUTE> button
Pressing the <POWER> button on
your remote control
Pressing the <POWER> button
puts the TV in standby mode.
Pressing the <POWER> button
one more time turns on the channel
being viewed prior to switching to
standby mode. To turn off the power
completely, unplug the power cable
from the power outlet.
Adjusting the Picture Settings
Because display settings such as contrast, brightness, sharpness and color are set
automatically when the LCD TV is shipped, there is no need for additional adjustment by
the user. If you want re-set the display settings to your preference, please refer to the
following instructions.
BRIGHTNESS
Adjust brightness. (Brightness means the
brightness of the screen.)
CONTRAST
Adjust contrast. (Contrast means the
difference in brightness between an object
and its background.)
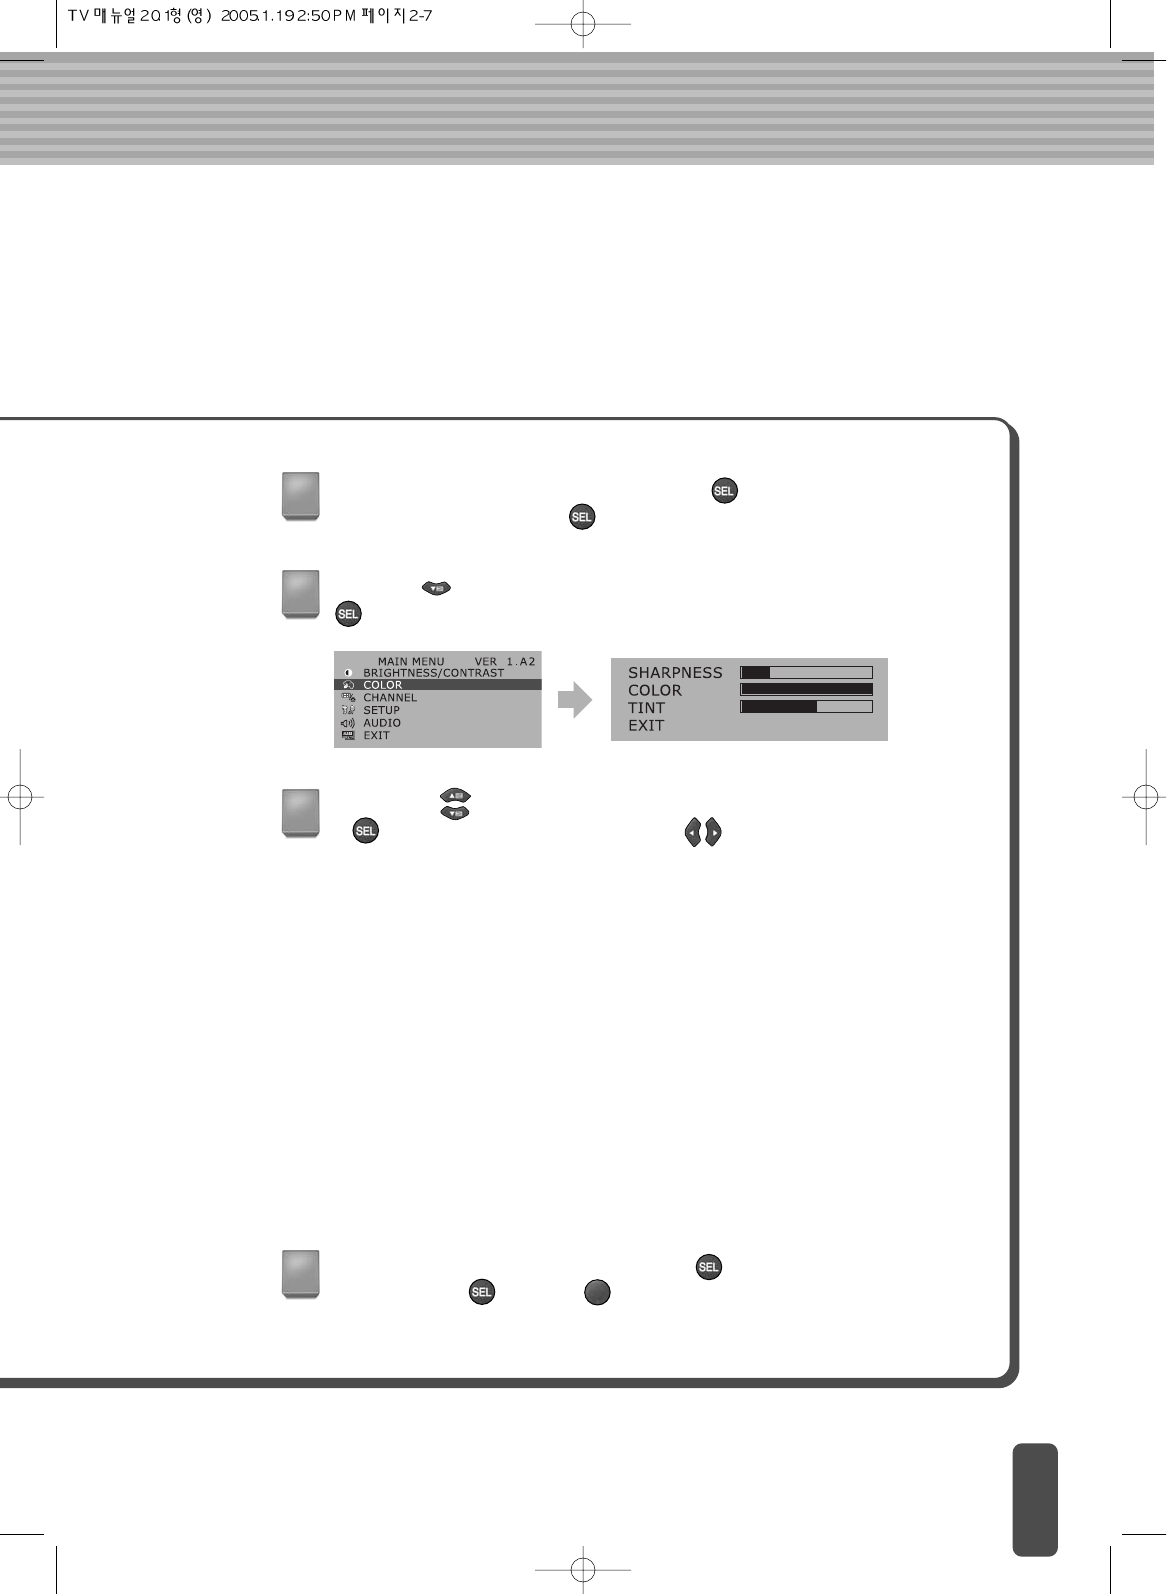
Press the <MENU> button on the remote
control. The main menu appears allowing you
to adjust the screen.
Go to the BRIGHTNESS/CONTRASTmenu
and press the <SEL> button.
1
2
Press the button to go to the item to change
and press the <SEL> button to select it.
Press the button to adjust the selected item.
Adjust the screen as described below:
3
1 7
3
5
6
2 3
4 5
6 7
3 6
SHARPNESS
Adjust sharpness.
(Sharpness means the sharpness of the object’s profile.)
TINT
Adjust color intensity.
(Color intensity indicates color depth.)
COLOR
Adjust color (RGB).
(Adjusting the color to make it look more natural.)
When the adjustment is complete, press the <SEL> button.
Go to ‘EXIT’ and press the <SEL> button.
Adjust the screen as described below:
4
When adjustment is complete, press the <SEL> button. Go to ‘EXIT’
and press the <SEL> or <MENU> button to exit the menu screen.
7
Press the button to go to the ‘COLOR’ menu and press the
<SEL> button.
5
Press the button to go to the item to change and press the
<SEL> button to select it. Press the button to adjust the
selected item.
6
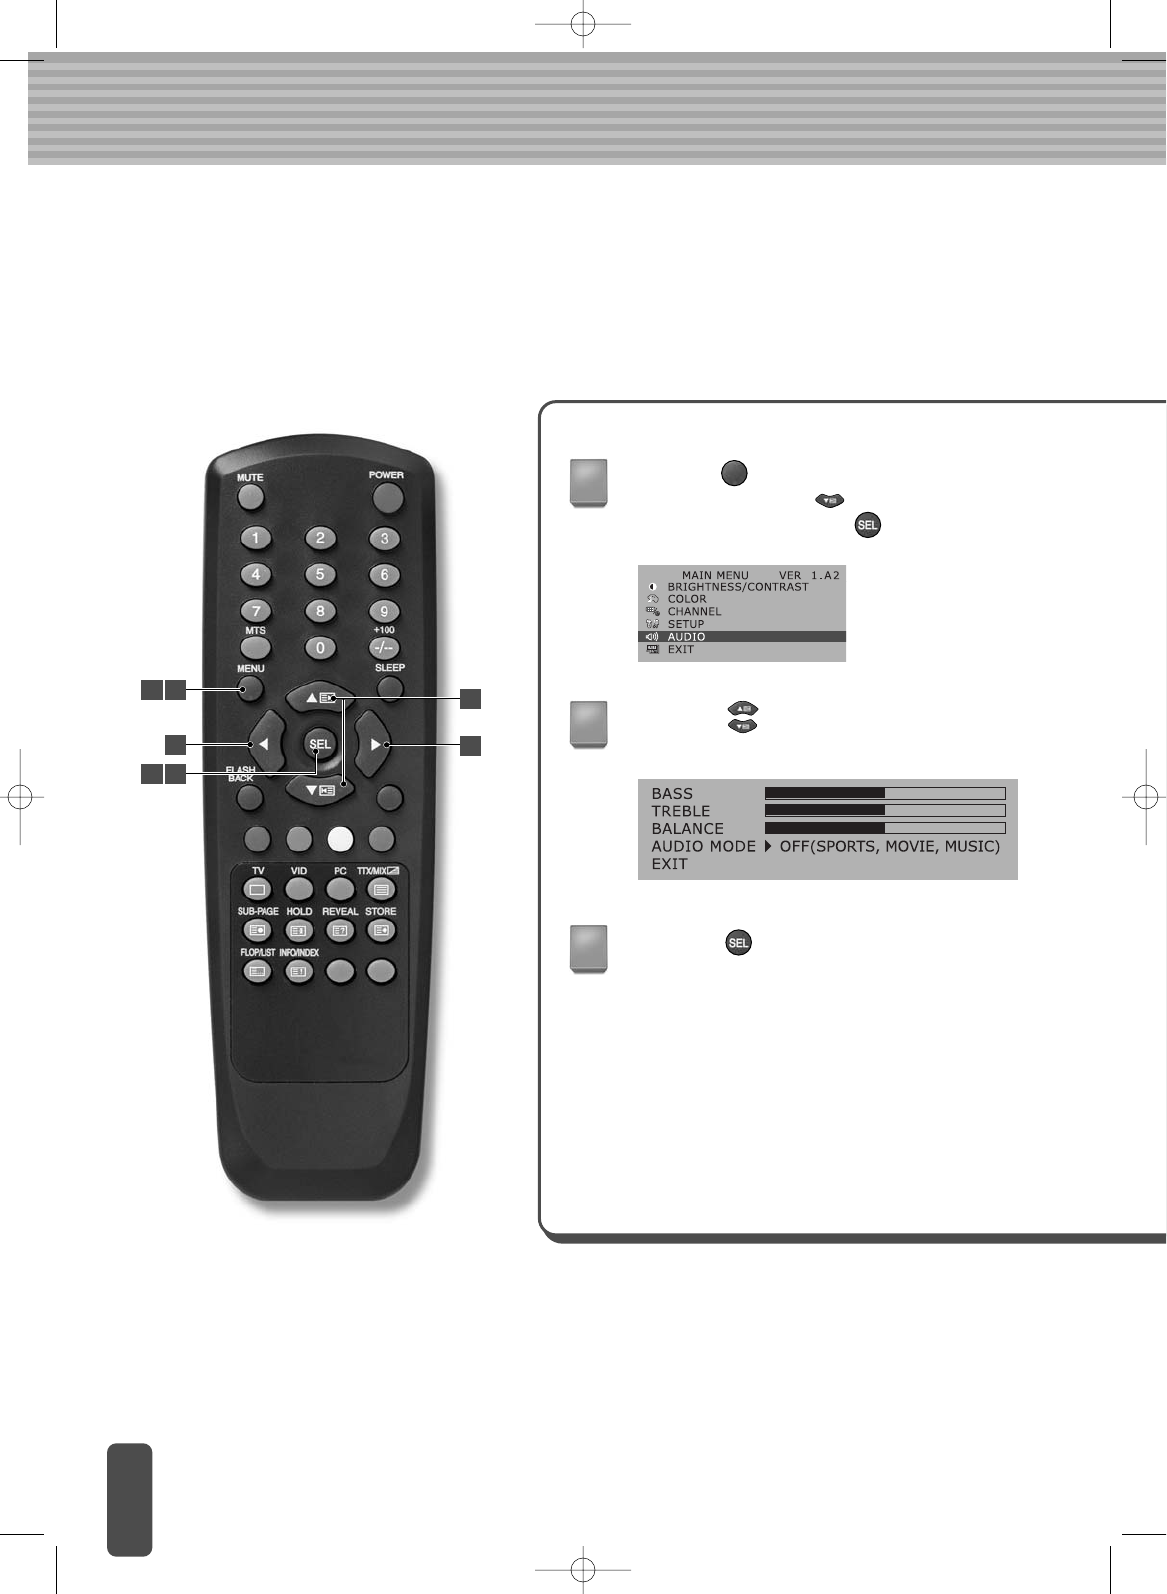
Adjusting Sound Settings
(PAL/SECOM)
TREBLE
Adjust treble.
BASS
Adjust bass.
Press the <MENU> button on the remote
control and press the button to go to the
‘AUDIO’ menu. Press the <SEL> button.
Press the button to go to the item to
change.
Press the <SEL> button on the item
to change.
1
2
3
Adjust the sound as described below:
1 5
4
2
4
1 3
BALANCE
Adjust balance between the left & right speakers.
AUDIO MODE
Select the desired sound setting.
When setting is complete, press the <MENU> button to exit the menu
screen.
Press the button to adjust setting.
4
5
Notes
If the sound is too harsh, reduce the Treble and Bass
Adjust the Treble/Bass for good sound.
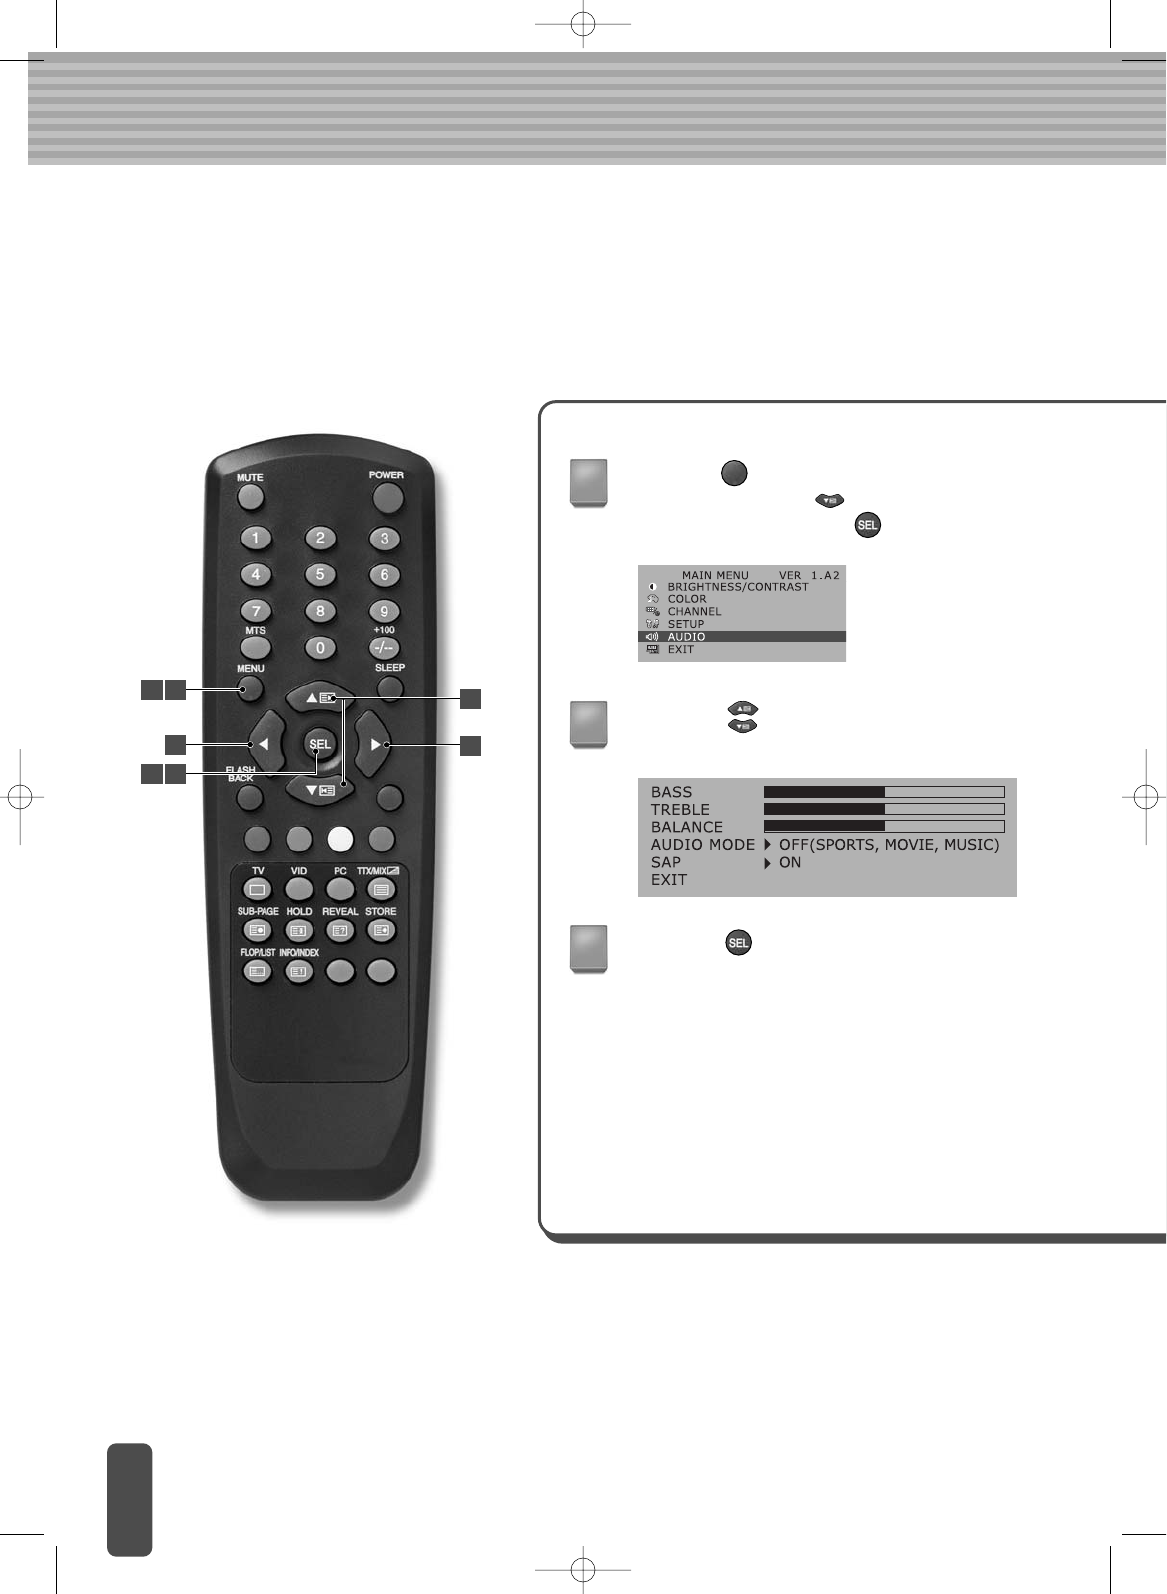
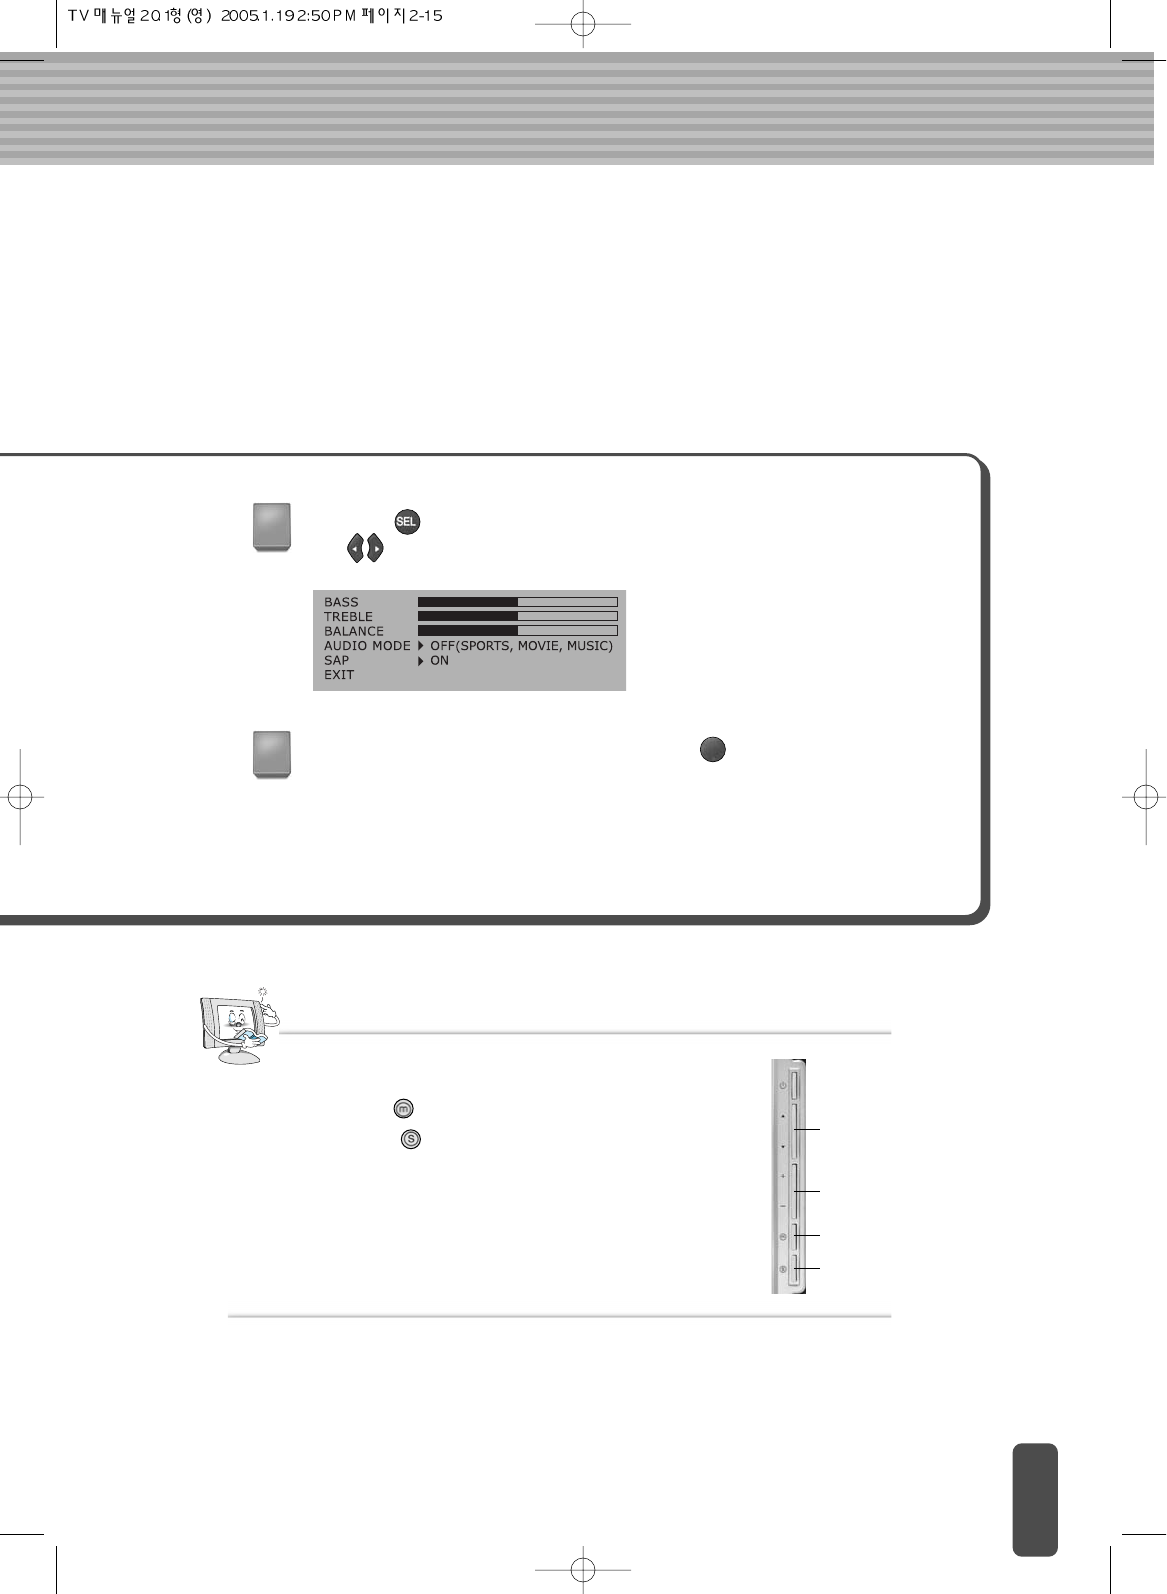
Adjusting Sound Settings(NTSC)
TREBLE
Adjust treble.
BASS
Adjust bass.
Press the <MENU> button on the remote
control and press the button to go to the
‘AUDIO’ menu. Press the <SEL> button.
Press the button to go to the item to
change.
Press the <SEL> button on the item
to change.
1
2
3
Adjust the sound as described below:
1 5
4
2
4
1 3
BALANCE
Adjust balance between the left & right speakers.
AUDIO MODE
Select the desired sound setting.
SAP
Set status to SAP(Second Audio Program) to receive audio simul
casts in other lauguages.(ON/OFF)
When setting is complete, press the <MENU> button to exit the menu
screen.
Press the button to adjust setting.
4
5
Notes
If the sound is too harsh, reduce the Treble and Bass
Adjust the Treble/Bass for good sound.

The ‘MTS’ button displays/controls the processing and output of the audio signal.
When power is switched ON, the mode is automatically preset to either MONO or
‘STEREO depending on the current transmission.
If receiving conditions deteriorate, listening will be easier if the mode is set to the
‘Mono’ position using the MTS button.
If the stereo signal is weak (or if intermittent Stereo-Mono) and automatic switching
occurs, then switch to ‘Mono’ mode.
Notes
Selecting the Sound Mode (Depending on PAL Model)
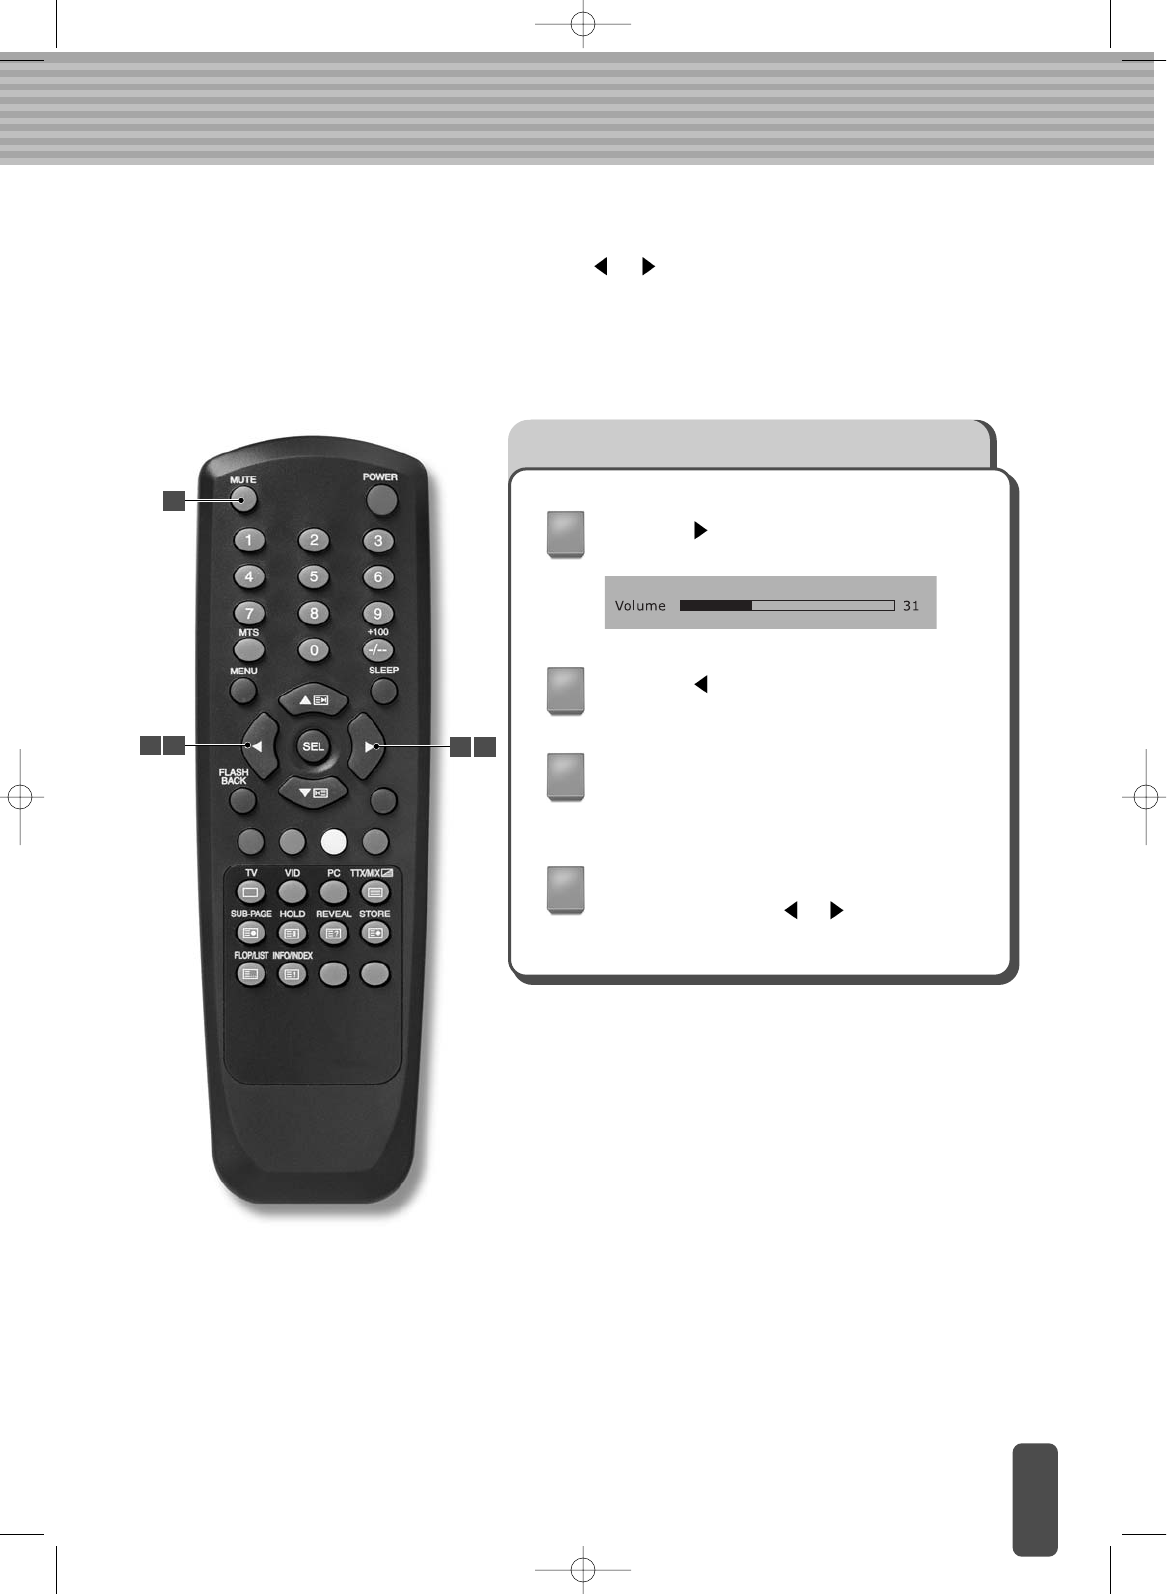
Adjusting the Volume/Temporarily Switching Off the Sound
You can adjust the volume by pressing the or buttons directly. You can switch
the sound off temporarily by pressing the MUTE button on the remote controller.
Press the button to increase the volume
(cursor moves to the right.).
Press the button to decrease the volume.
Press the MUTE button.
The sound is switched off and MUTE
character is displayed.
1
2
3
4
To resume the sound, press the MUTE
button again (or the or buttons).
3
42 1 4
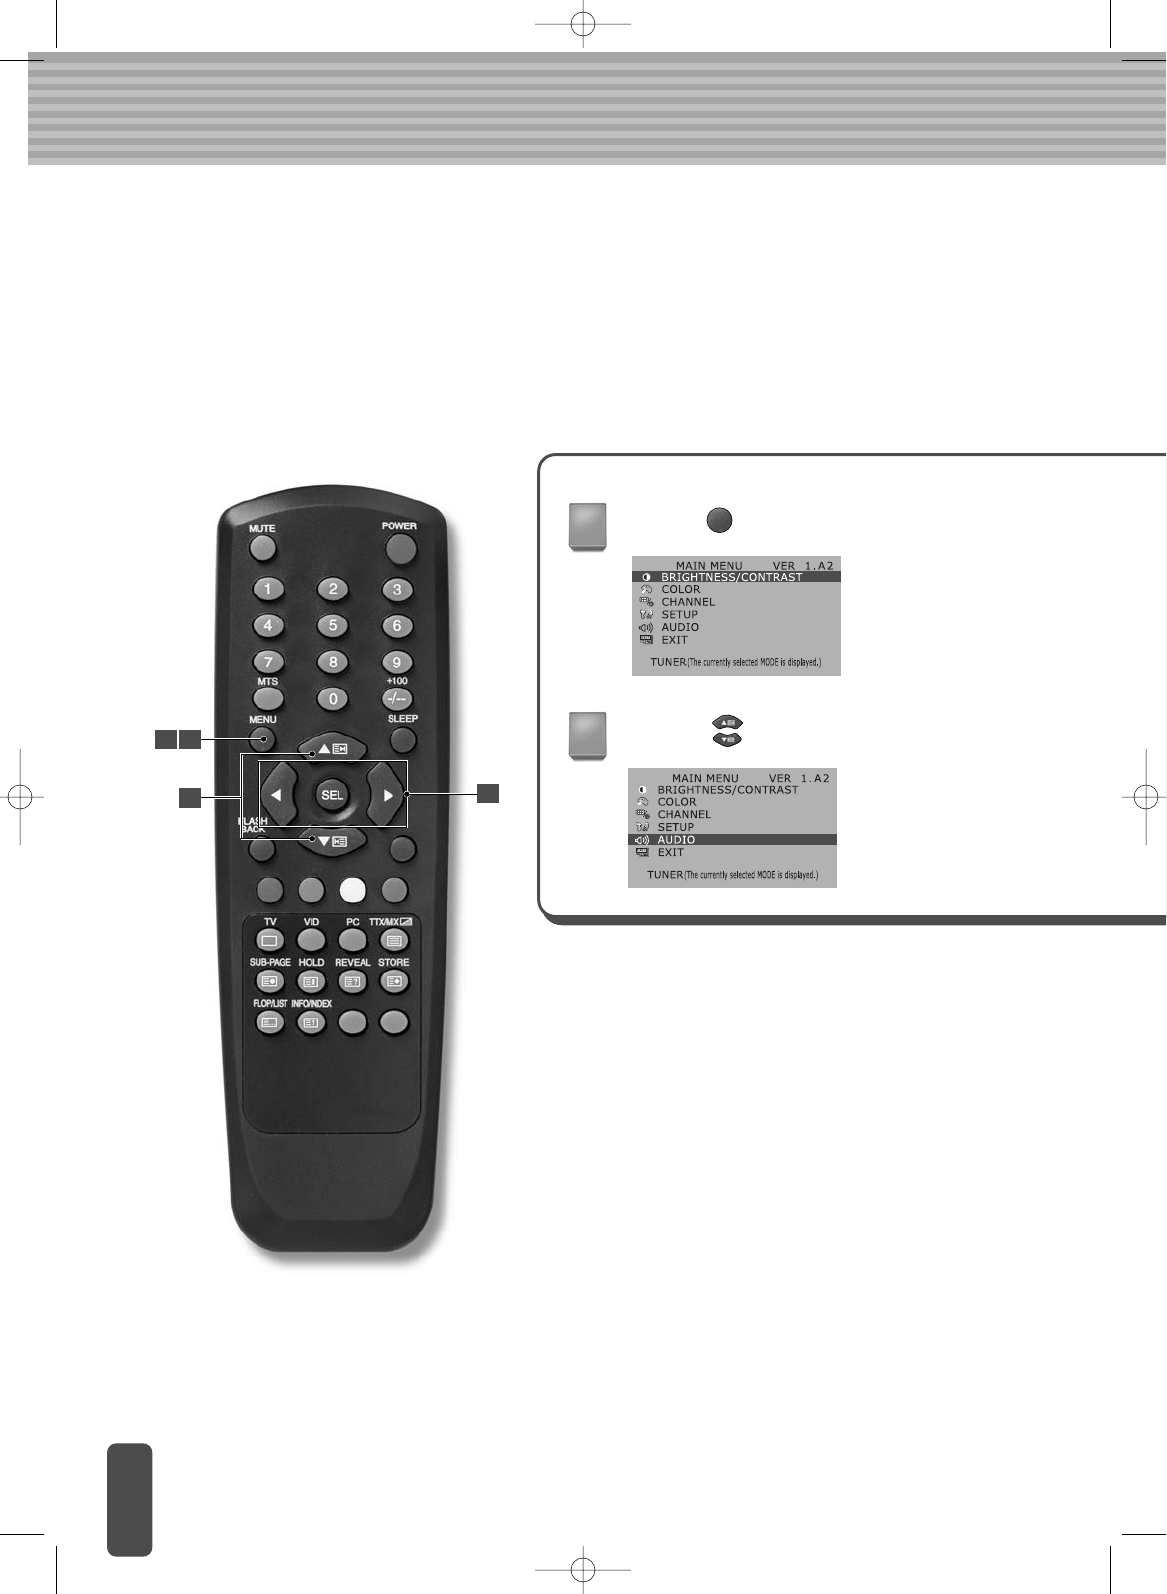
Adjusting the Menu Settings
To set a LCD TV function of, press the <MENU> button and set each function item in the
menu. As you become more familiar with setting menu items, using LCD TV will become
easier.
Press the <MENU> button.
Press the button to go to a menu.
1
2
1 4
23
Press the <Menu> button on the right side of LCD TV.
Press the < > button to activate the menu.
Pressing the <+/-> button changes the menu.
Pressing the </> button changes the item.
Press the <SEL> button to select a menu or an item.
And press the button to adjust or set an item.
(NTSC)
Note
To set the menu items without the remote control,
3
When finished with the adjustments, press the <MENU> button.
4
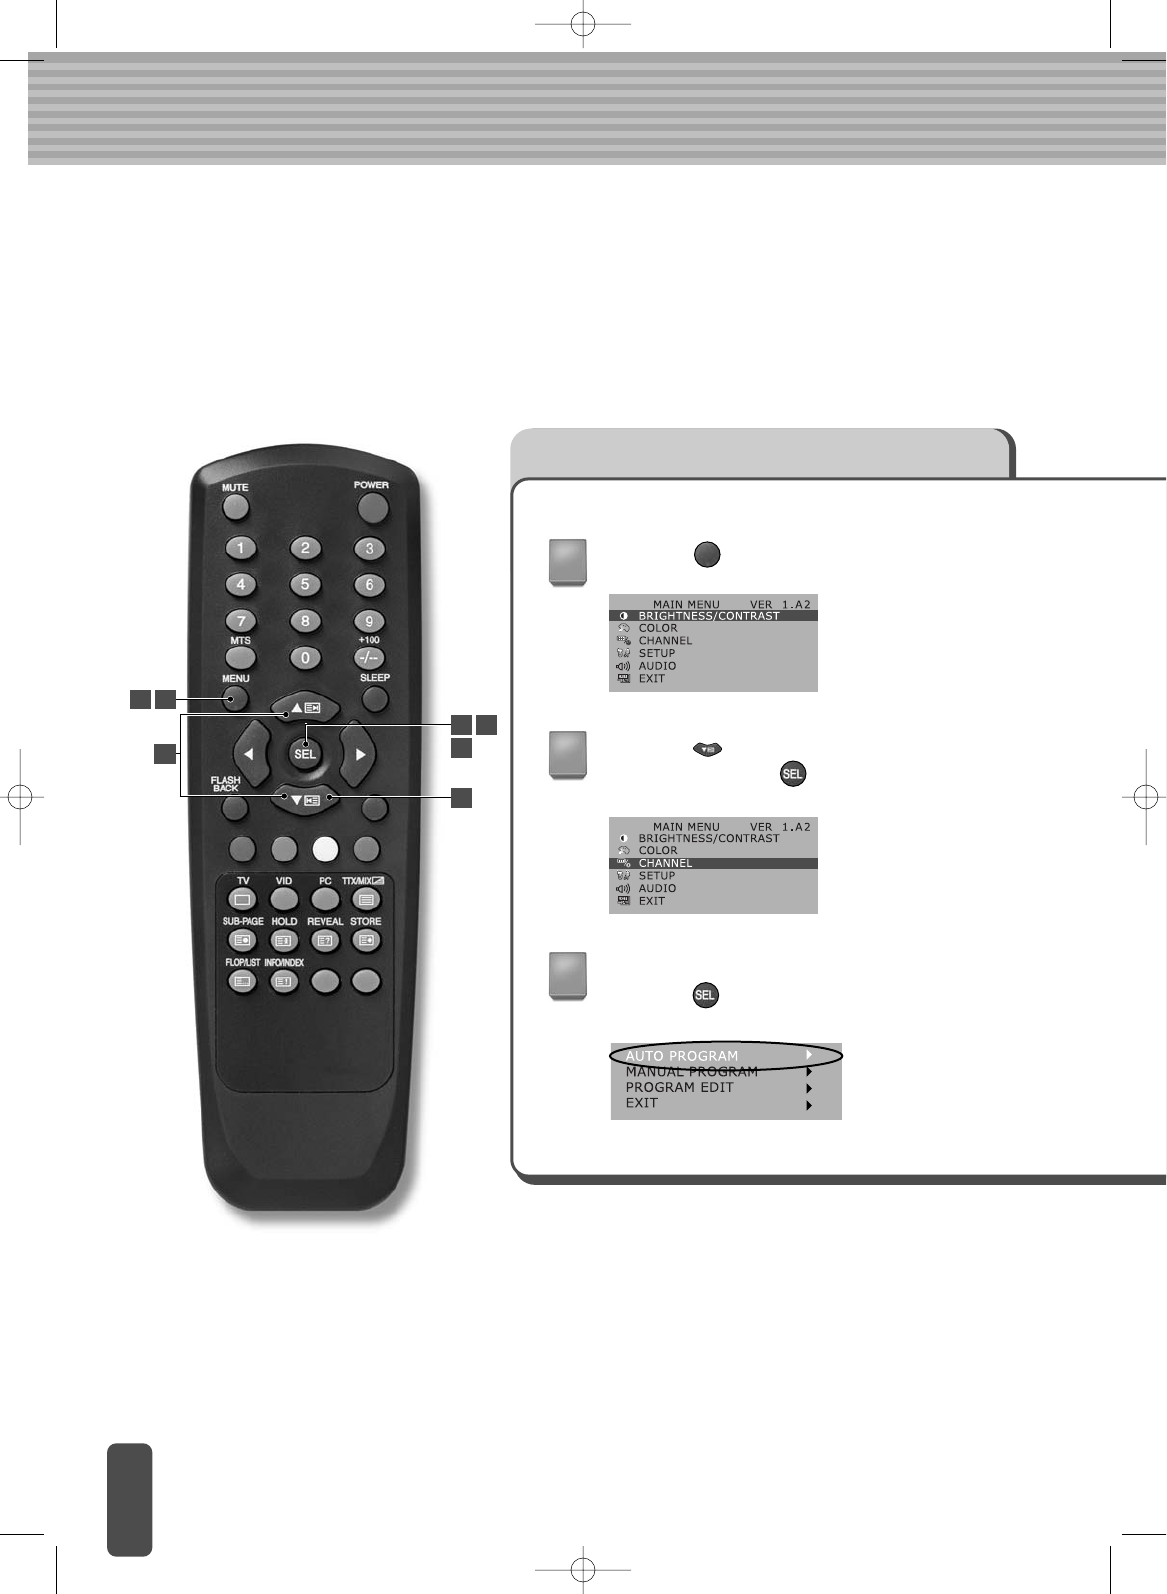
Setting TV channels(PAL/SECOM)
The TV can set its channels automatically.
Be sure that the TV is properly connected prior to using this function. Use this function
during regular air time only – the TV can detect only channels that are currently
broadcasting.
Setting channels automatically
Press the <MENU> button.
Press the button to go to the CHANNEL
menu and press the <SEL> button.
Go to the AUTO PROGRAMitem and
press the <SEL> button.
1
2
3
61
4
2
2 3
6
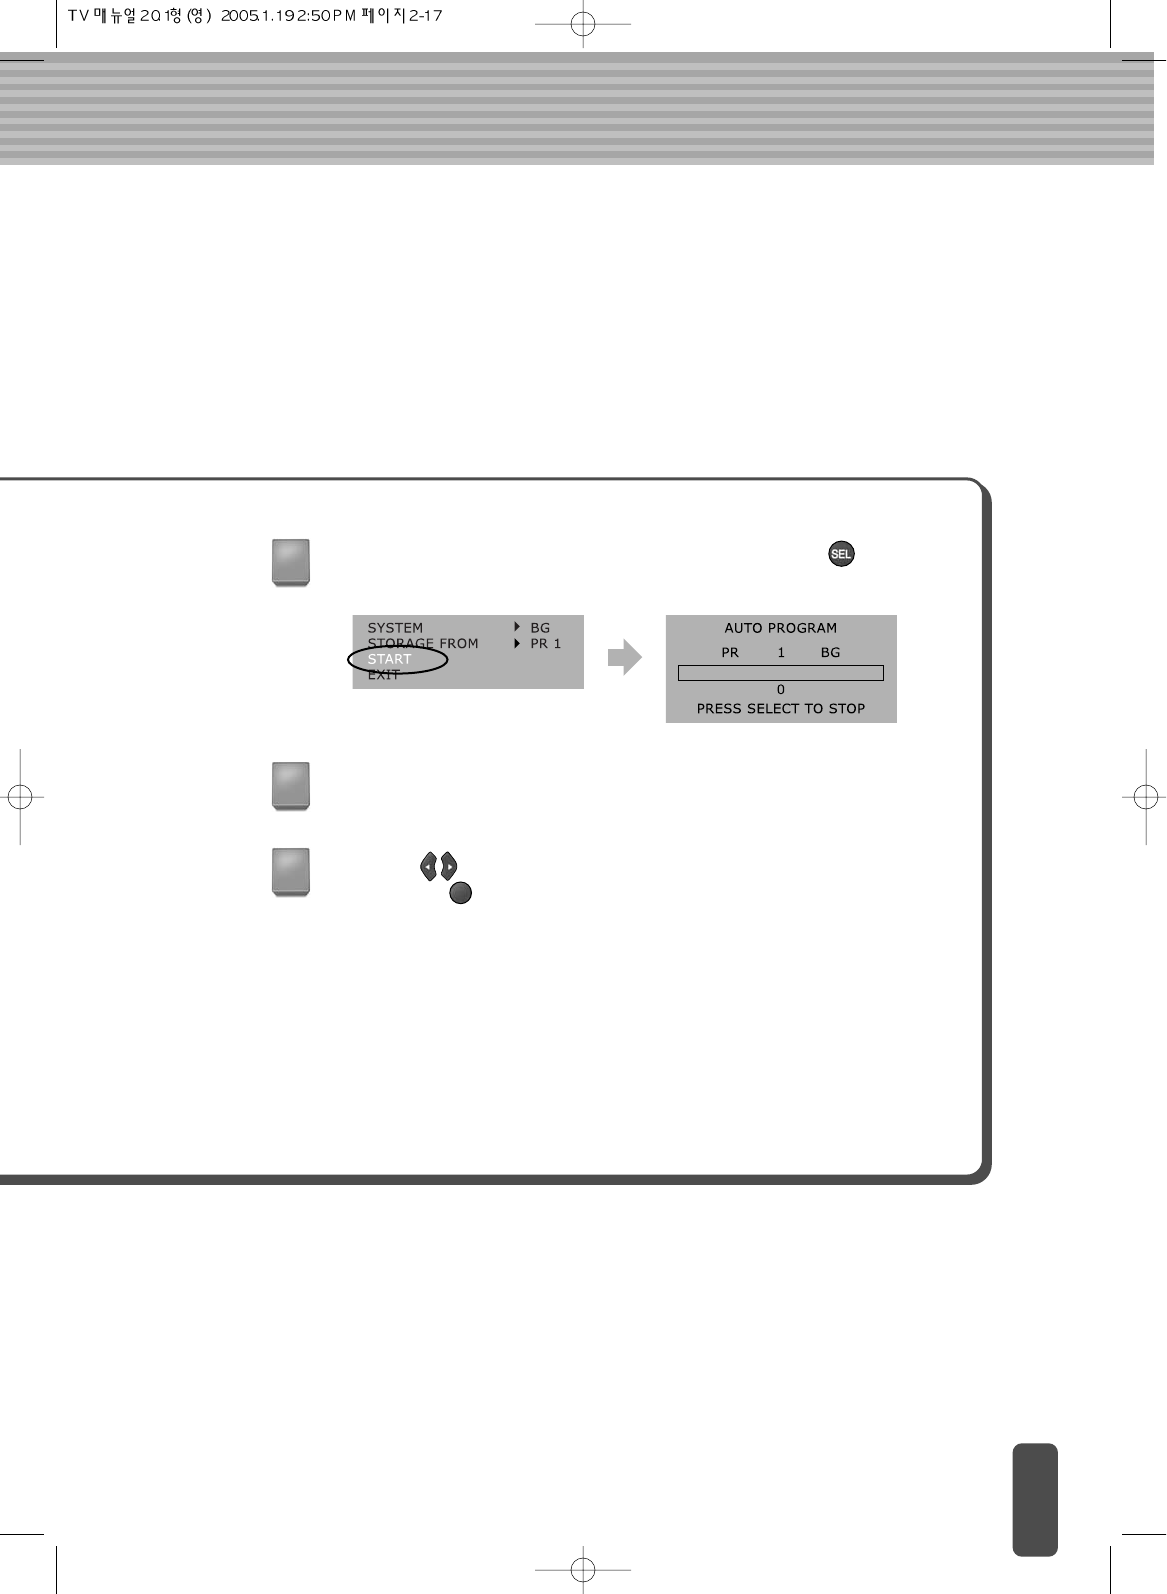
Go to ‘START’ item in ‘CHANNEL TUNING’ and press the <SEL>
button to seek and store channels automatically.
4
5
6
When automatic channel tuning is complete, the lowest channel number is
displayed on the screen.
Press the button to display stored channels.
(Or press the <MENU> button to exit the menu screen.)
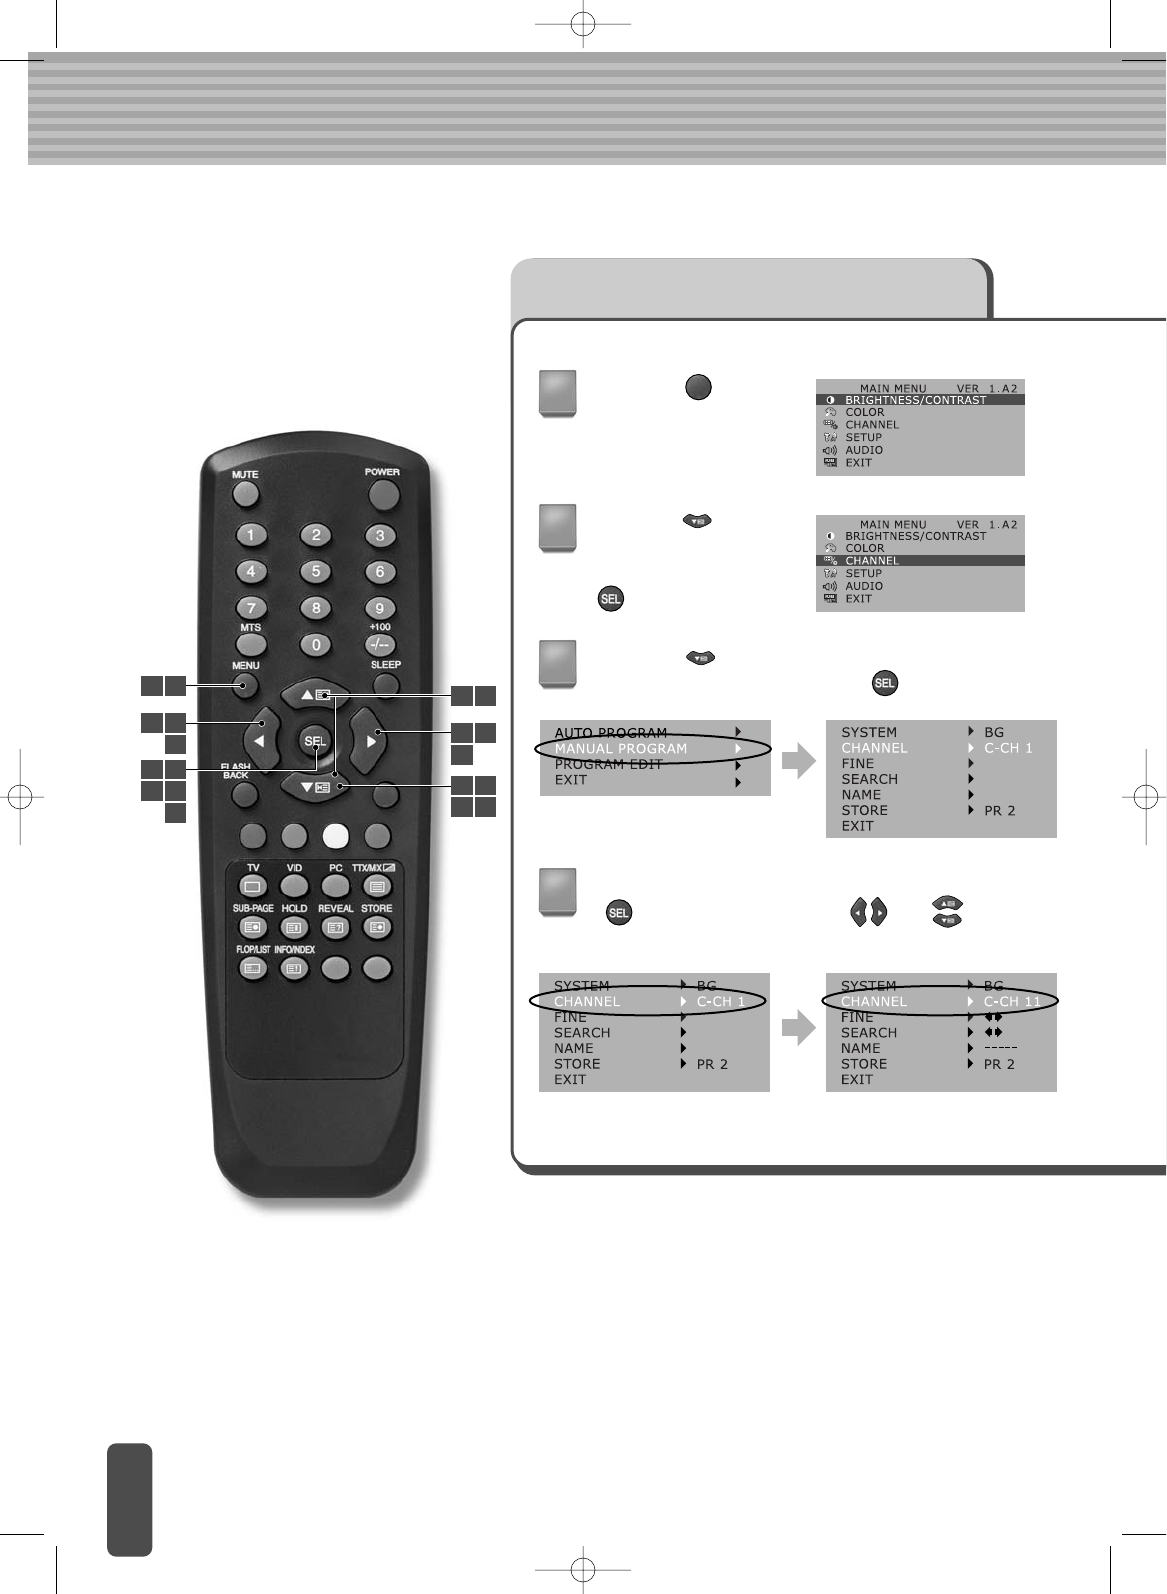
Storing the Channel Manually
Press the
<MENU> button.
Press the button to go to the 'MANUAL
PROGRAM' item and press the <SEL> button.
1
3
Go to the ‘CHANNEL’ item and press the
<SEL> button. Press the and buttons to
select the changed channel.
4
4
1 8
4
7
6
6
2 3
4 5 2 3
5 7
7
Press the button to
go to the CHANNEL
menu and press the
<SEL> button.
2
4 6
7
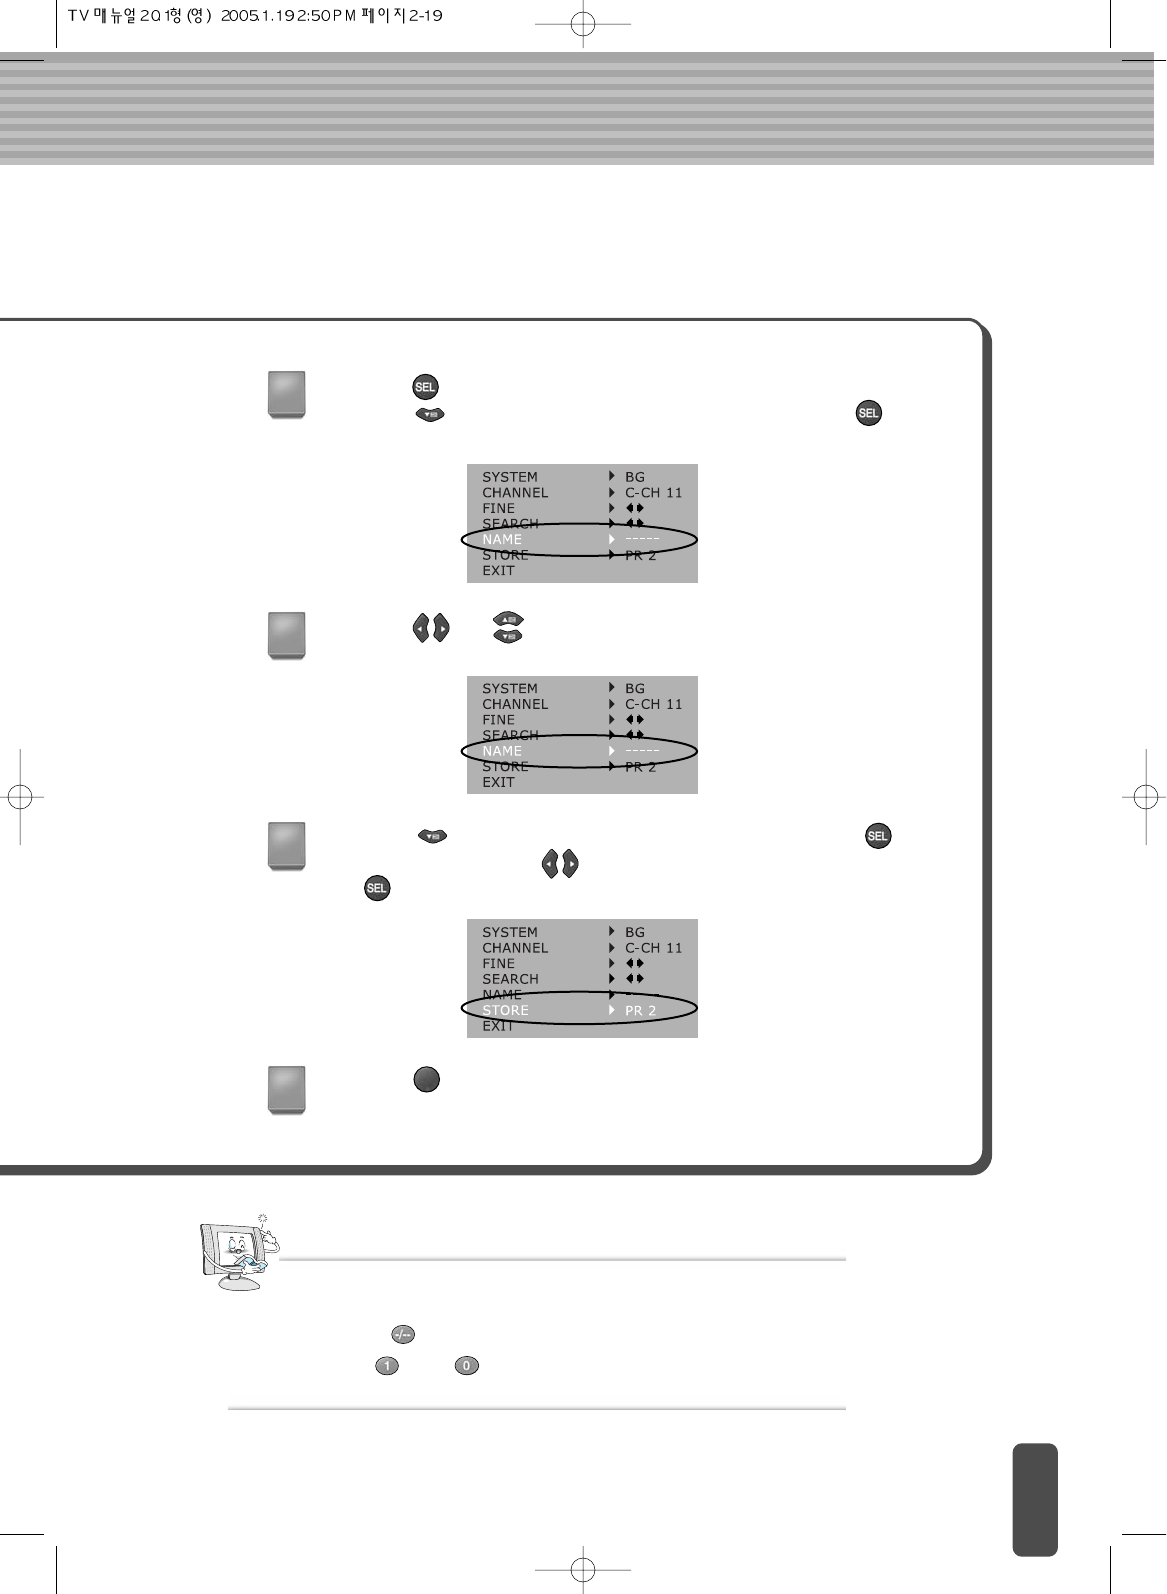
Press the <SEL> button to store the channel.
Press the button to go to the ‘NAME’ menu and press the <SEL>
button.
Press the button to go to the ‘STORE’ menu and press the
<SEL> button. Press the button to select a name to store and press
the <SEL> button.
Press the <MENU> button to exit the menu screen.
Note
Press the <+100> button on the remote control and then 1_ _ is displayed.
Press < > and < > on the remote control to select channel 110.
To select a channel above 100 (i.e.: Channel 110)
5
7
8
Press the and buttons to specify a name.
6
Setting TV channels(NTSC)
The TV can set its channels automatically.
Be sure that the TV is properly connected prior to using this function. Use this function
during regular air time only – the TV can detect only channels that are currently
broadcasting.
Setting channels automatically
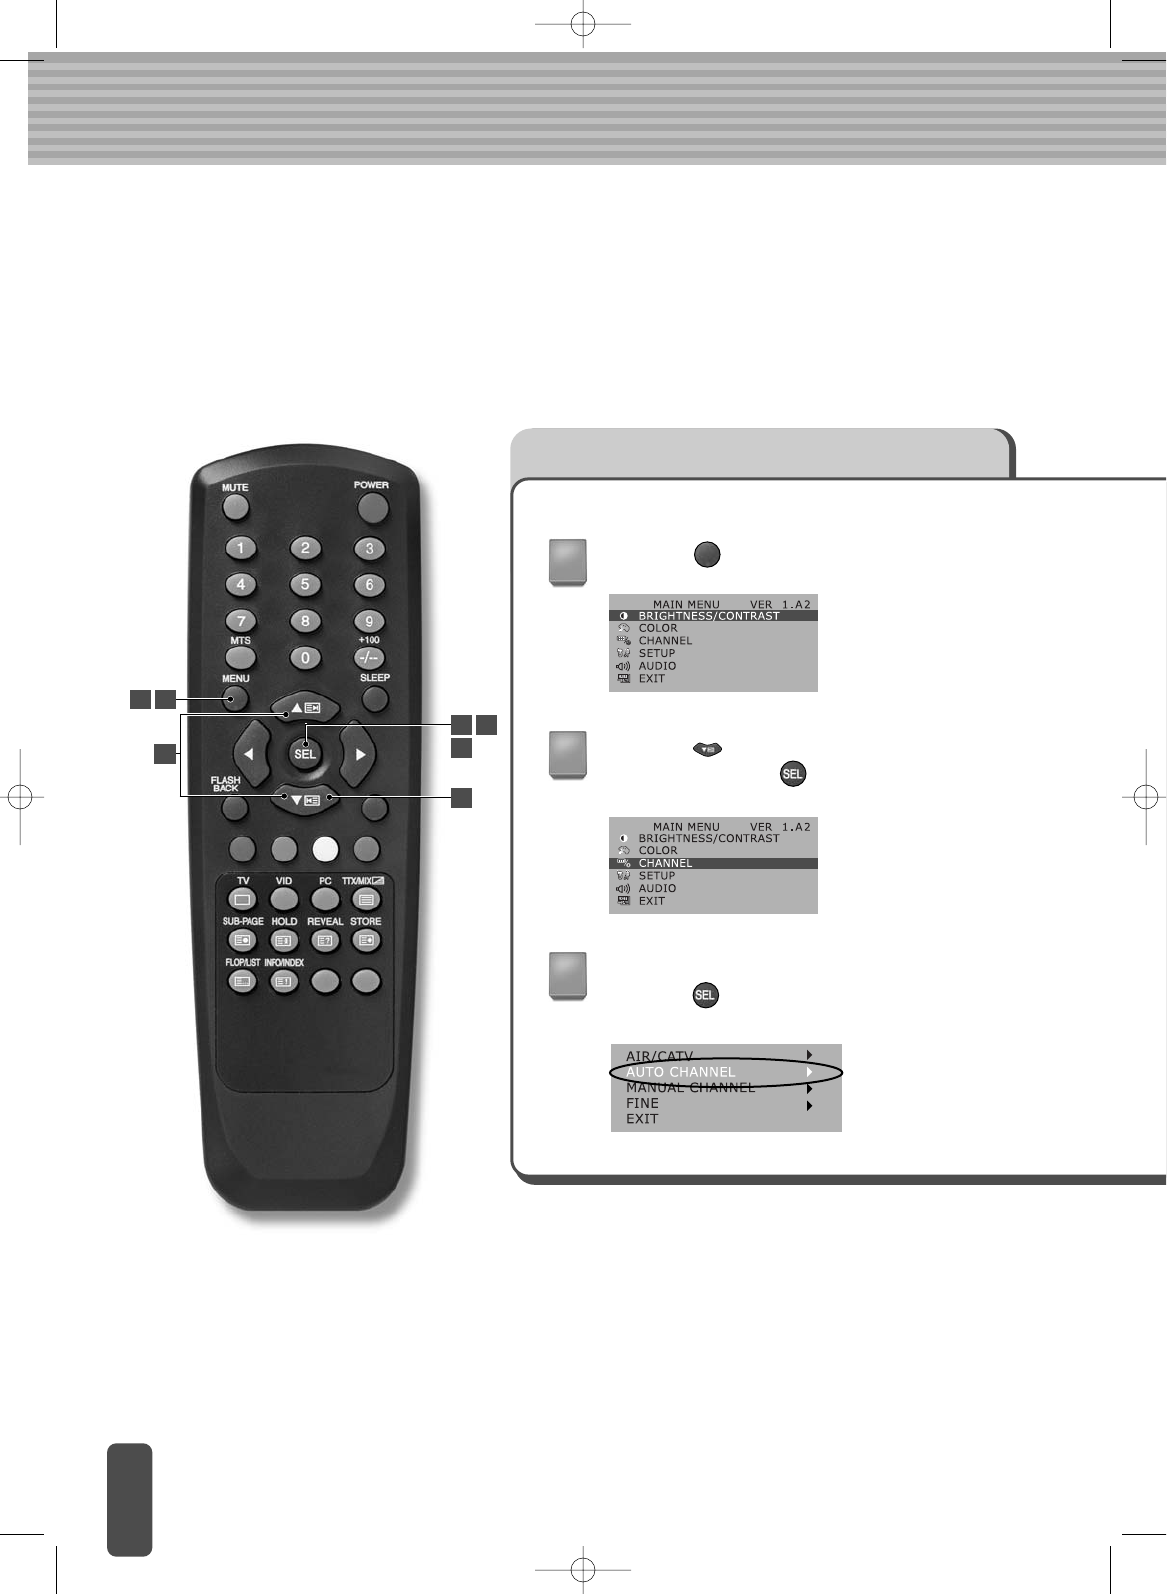
Press the <MENU> button.
Press the button to go to the CHANNEL
menu and press the <SEL> button.
Go to the AUTO CHANNELitem and
press the <SEL> button.
1
2
3
61
4
2
2 3
6
Press the button, select the STARTitem and press the <SEL>
button to seek and store channels automatically.
4
5
6
When automatic channel tuning is complete, the lowest channel number is
displayed on the screen.
Press the button to display stored channels.
(Or press the <MENU> button to exit the menu screen.)
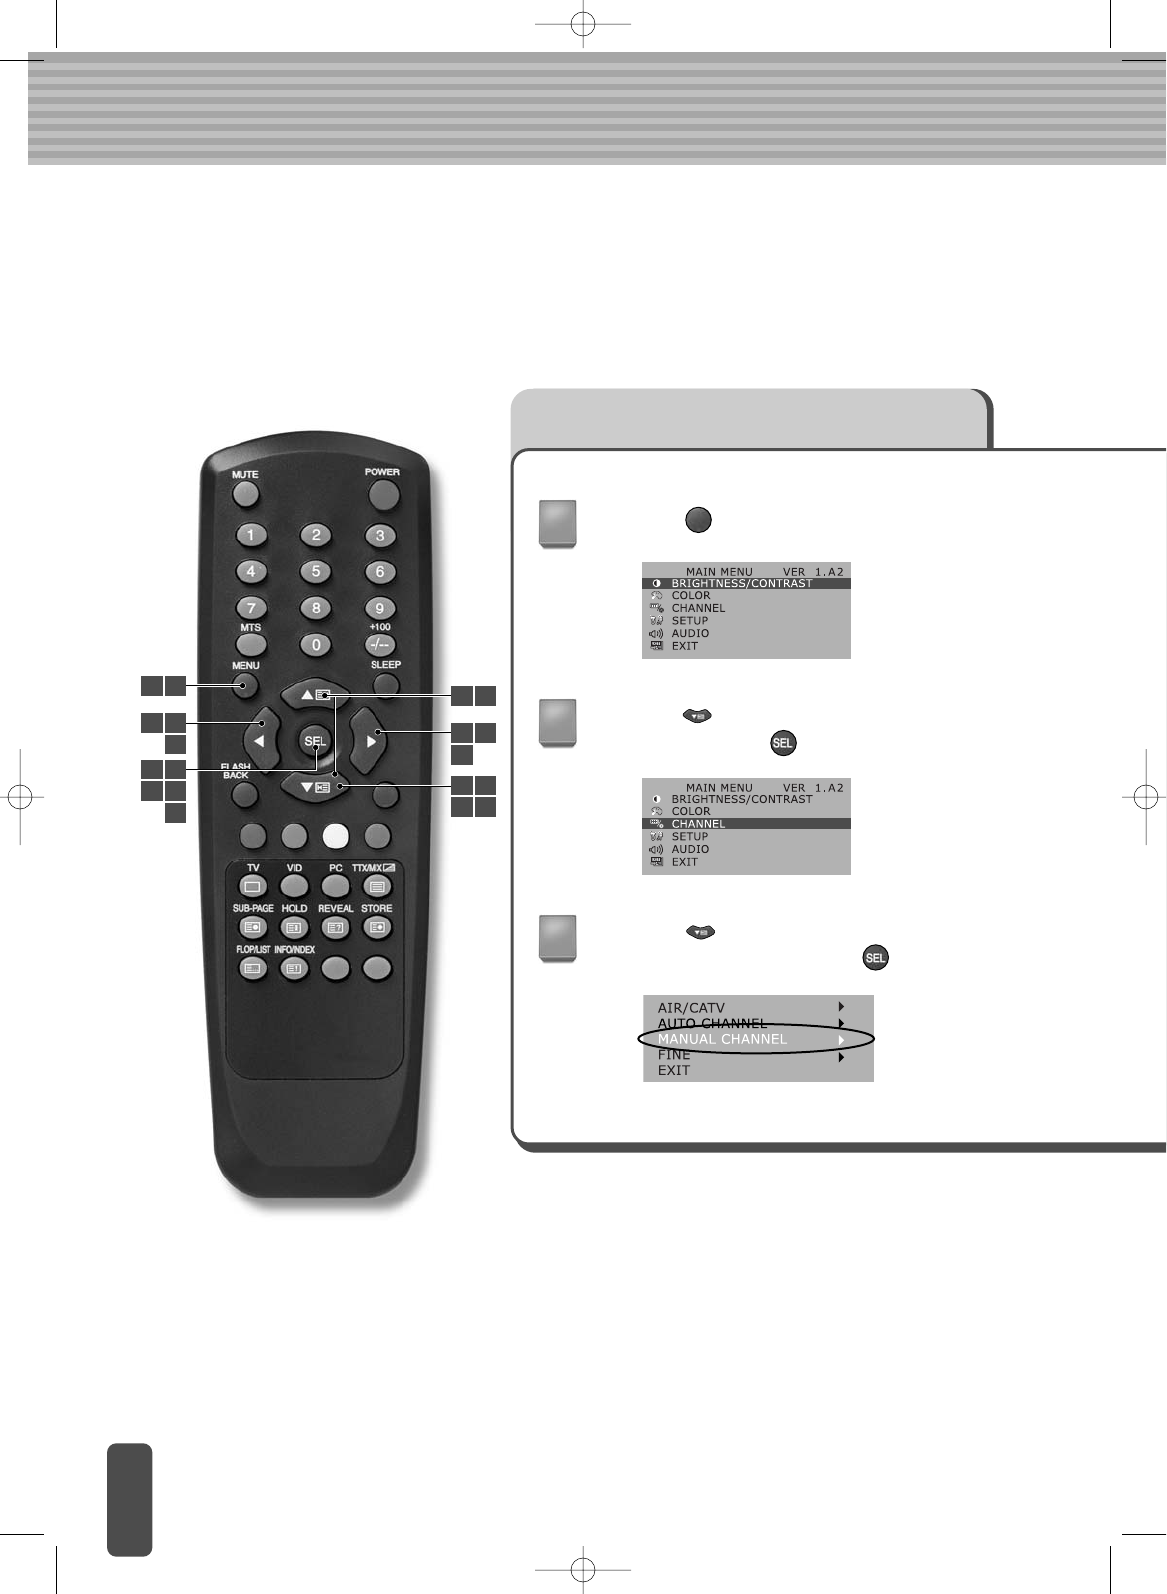
Storing the Channel Manually
Press the <MENU> button.
Press the button to go to the 'MANUAL
CHANNEL' item and press the <SEL> button.
1
3
4
1 8
4
7
6
6
2 3
4 5 2 3
5 7
7
Press the button to go to the CHANNEL
menu and press the <SEL> button.
2
4 6
7
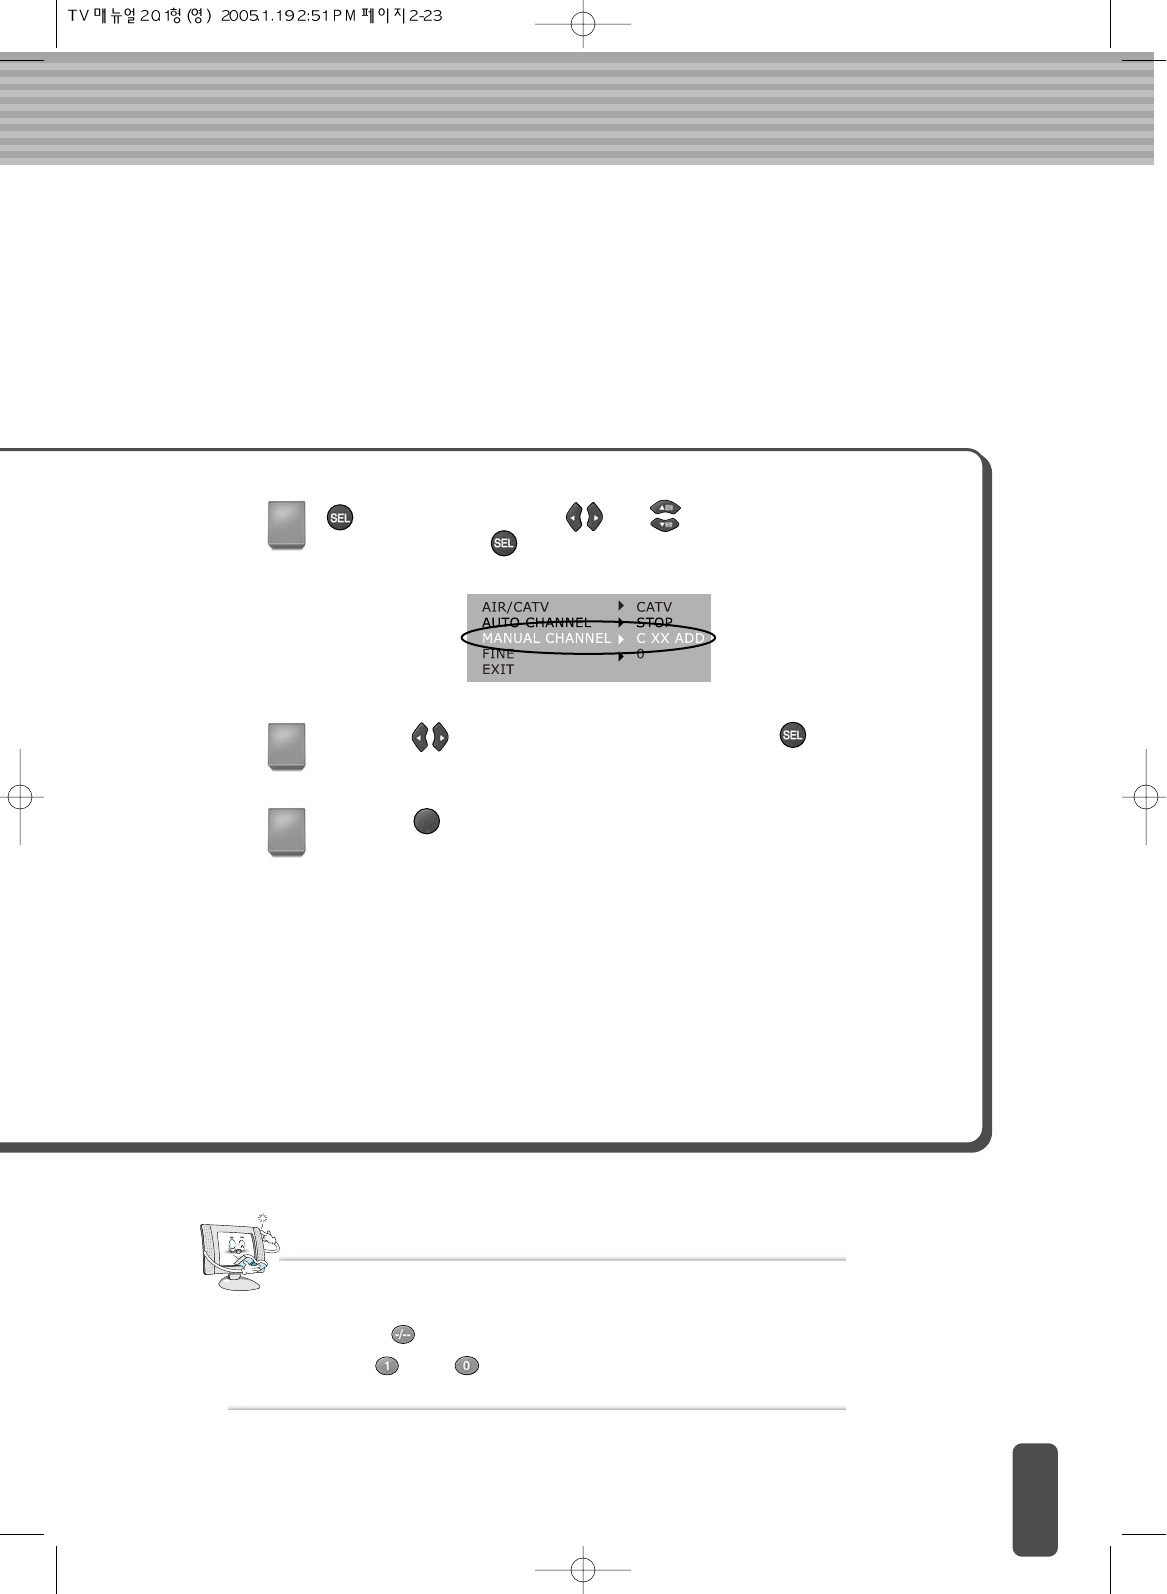
<SEL> button press the and buttons to select the changed
channel. Press the <SEL> button
Press the button to select a ‘ADD’ and press the <SEL> button.
Press the <MENU> button to exit the menu screen.
Note
Press the <+100> button on the remote control and then 1_ _ is displayed.
Press < > and < > on the remote control to select channel 110.
To select a channel above 100 (i.e.: Channel 110)
4
5
6
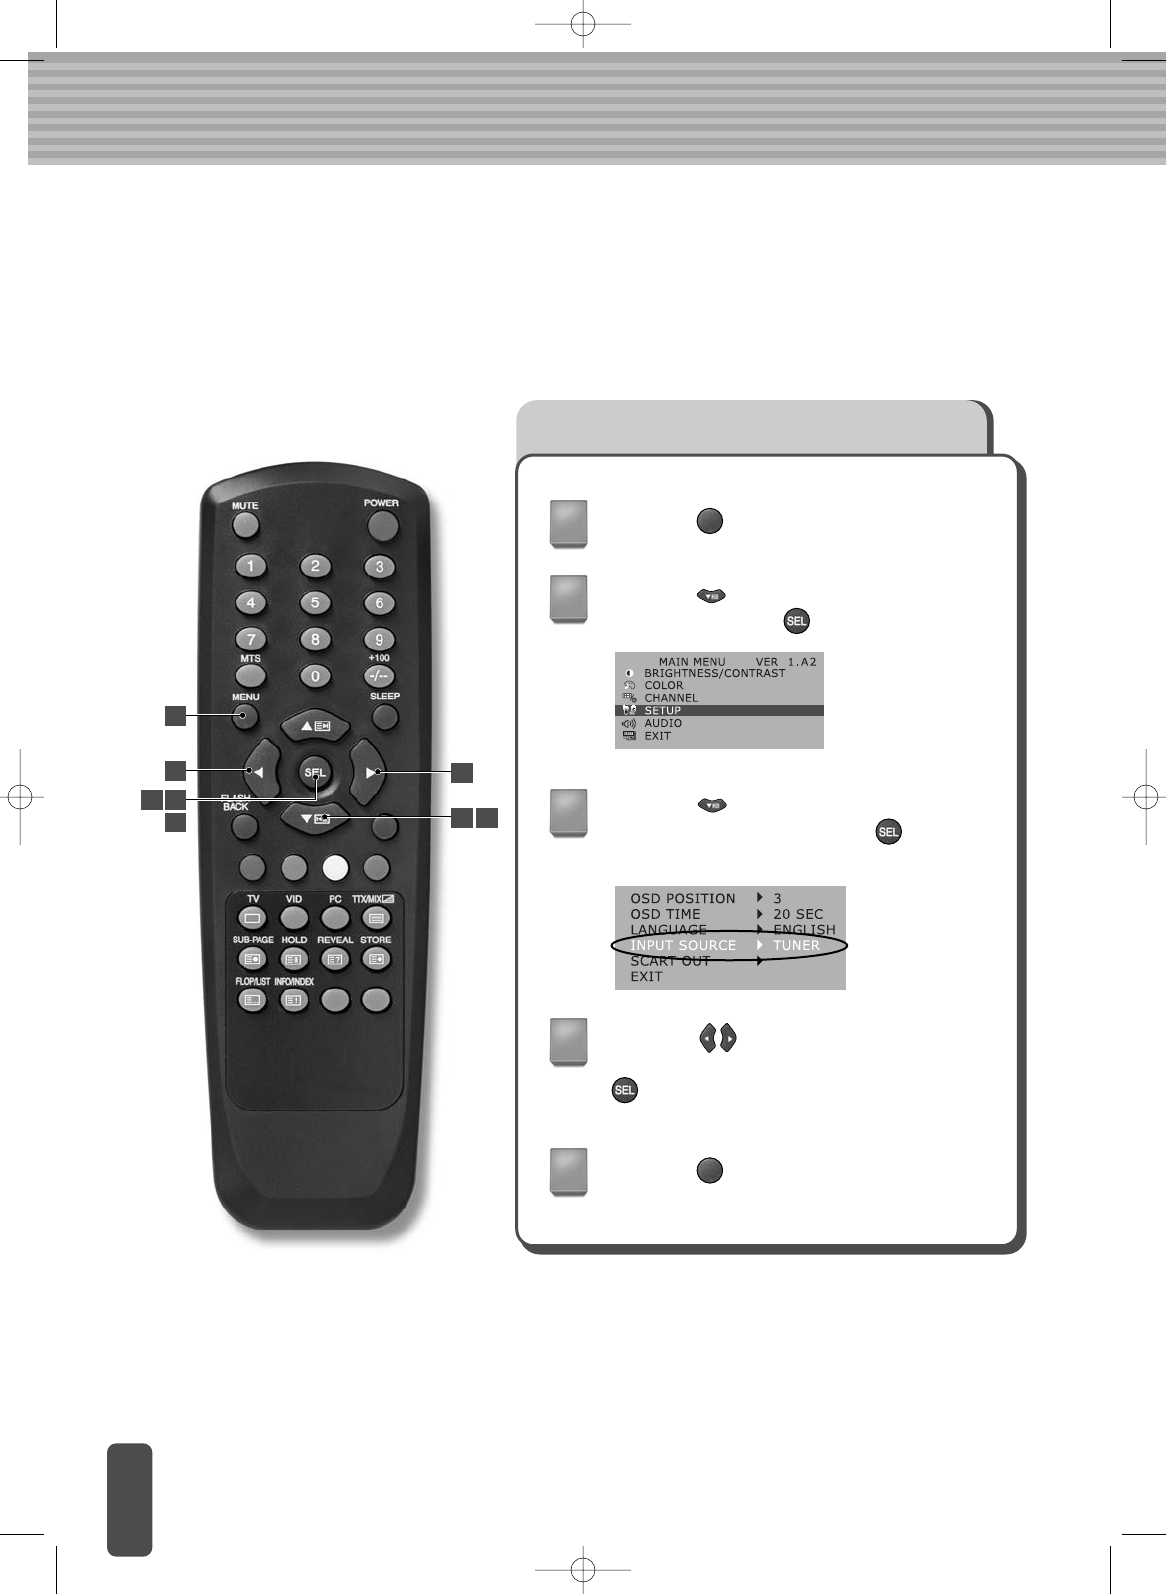
To select TV/external input(PAL/SECOM)
You can select signals from LCD TV or an external input that is connected to LCD TV.
(Ex: VCR, DVD, Camcorder, etc.)
When connected to cable input
Press the <MENU> button.
Press the <MENU> button to exit the
menu screen.
Press the button to go to the SETUP
menu and press the <SEL> button.
Press the button to go to the INPUT
SOURCEitem and press the <SEL>
button.
Press the button to select an external
input signal (TUNER) item and press the
<SEL> button.
1
2
3
4
5
2
1
4
4
4
3
2 3
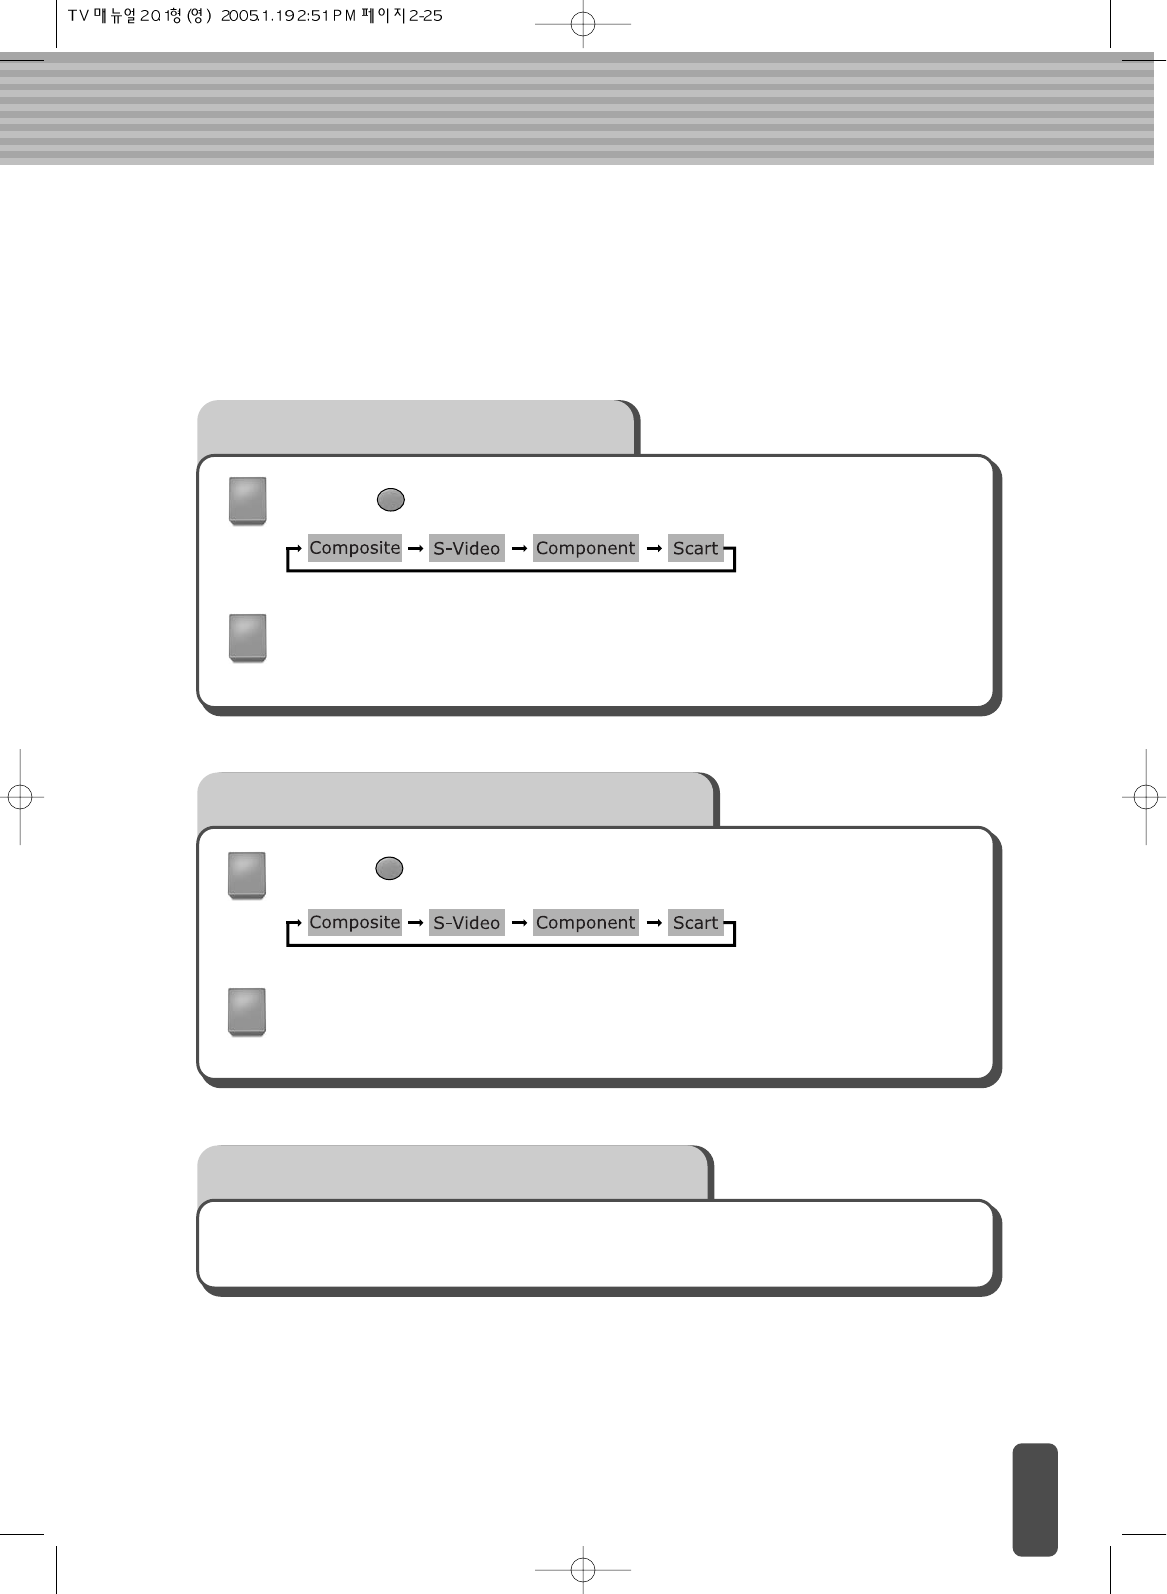
When connected to a VCR
Press the <VID> button on the remote control.
After checking whether the connecting cable to VCR is composite or S-video,
select an appropriate mode.
When connected to a DVD player
Press the <VID> button on the remote control.
When connected to a DVD player, select ‘Component’.
When connected to a camcorder
Please refer to the instructions for when connected to VCR.
1
2
1
2
To select TV/external input(NTSC)
You can select signals from LCD TV or an external input that is connected to LCD TV.
(Ex: VCR, DVD, Camcorder, etc.)
When connected to cable input
Press the <MENU> button.
Press the <MENU> button to exit the
menu screen.
Press the button to go to the SETUP
menu and press the <SEL> button.
Press the button to go to the INPUT
SOURCEitem and press the <SEL>
button.
Press the button to select an external
input signal (TUNER) item and press the
<SEL> button.
1
2
3
4
5
2
1
4
4
4
3
2 3
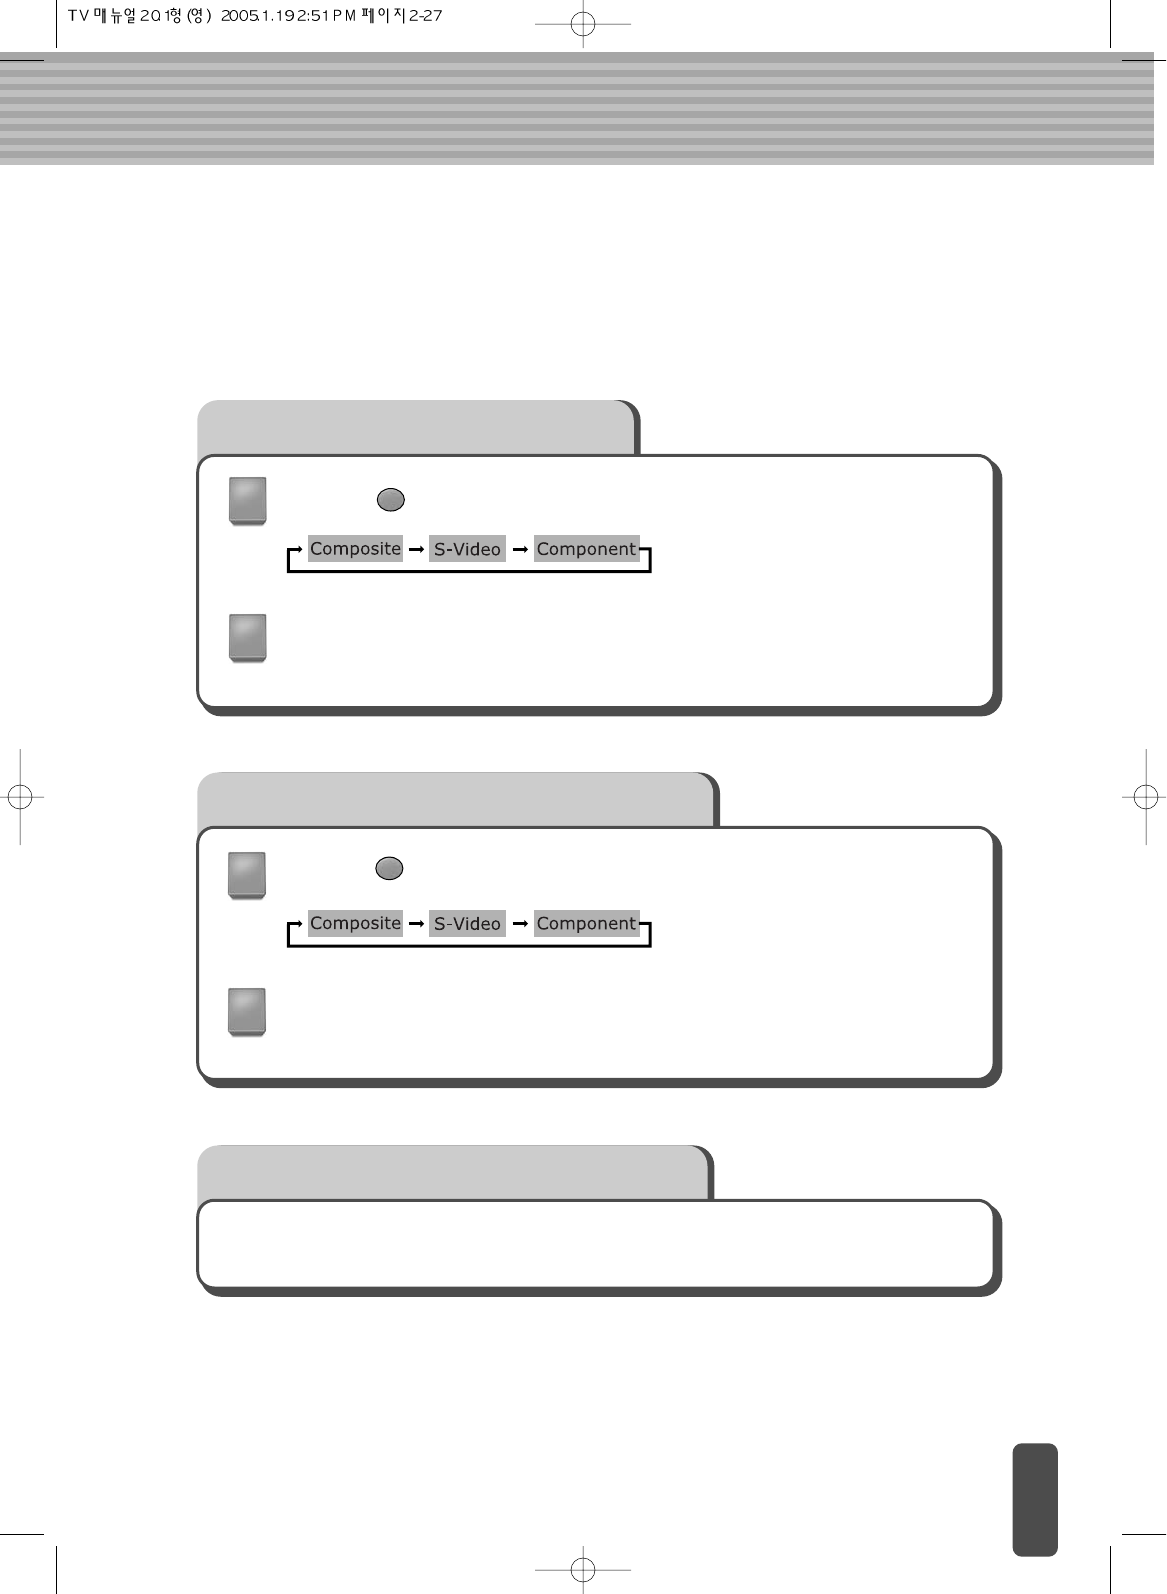
When connected to a VCR
Press the <VID> button on the remote control.
After checking whether the connecting cable to VCR is composite or S-video,
select an appropriate mode.
When connected to a DVD player
Press the <VID> button on the remote control.
When connected to a DVD player, select ‘Component’.
When connected to a camcorder
Please refer to the instructions for when connected to VCR.
1
2
1
2
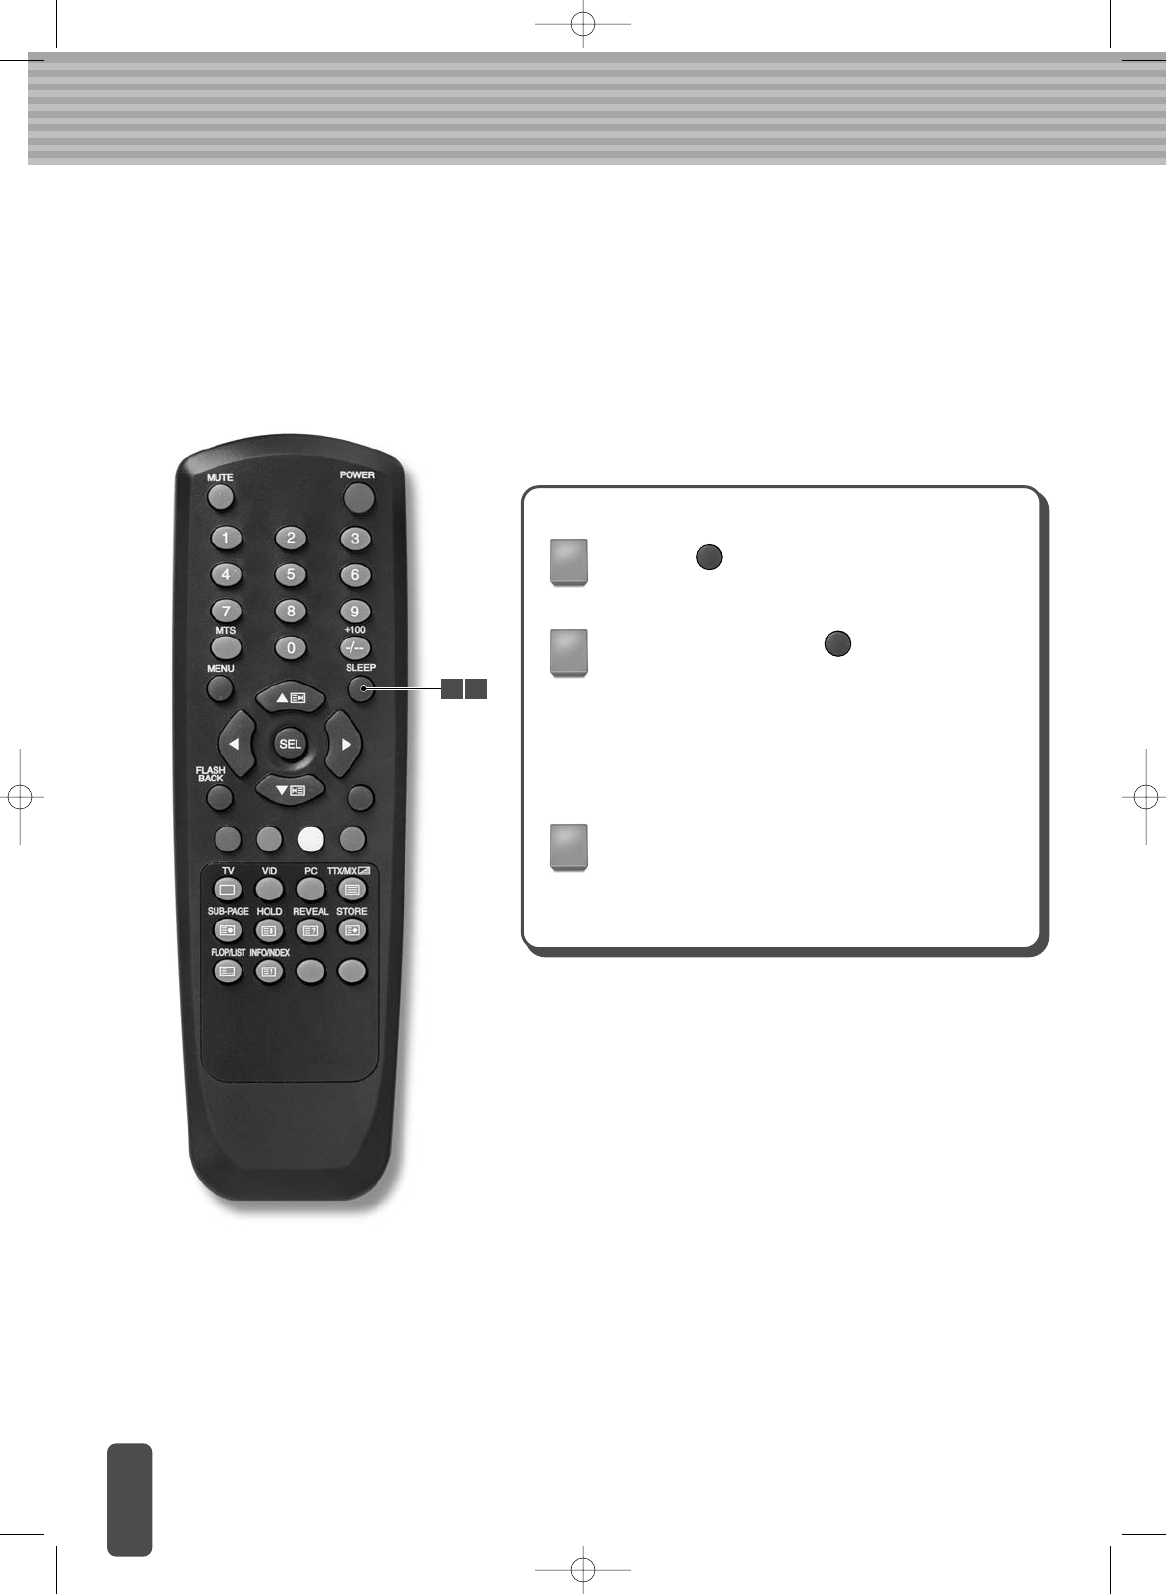
To schedule SLEEP TIME
If SLEEP TIME is scheduled, TV power goes into standby mode automatically after a
specified period of time.
Press the <SLEEP> button.
The ‘SLEEP TIMER’ setup screen appears.
Each time you press the <SLEEP> button a
different SLEEP TIME appears on the screen.
Select the SLEEP TIME that you want.
When the specified time (i.e.. 30 minutes) has
passed, the TV will go into standby mode
automatically
OFF: Select it to disable the SLEEP function.)
30, 60, 90, 120, 150, 180 : SLEEP TIME
1
2
3
1 2
Teletext Decoder(PAL/SECOM)
Most television channels carry ‘teletext’, pages of text that provide information such
as:
Television program schedules
News bulletins
Weather forecasts
Sports results
Subtitles for the hearing-impaired
The teletext pages are organised into six categories:
Note
The teletext feature does not work with PC signals.
Part Contents
A
B
C
D
E
F
Broadcasting station identity.
Current page number or search status.
Date and time.
Text.
Status information.
Selected page number.
Displaying Teletext Information
You can look at teletext information at any time, but signal reception must be good.
Otherwise:
- Information may be missing.
- Some pages may not be displayed.
Note
The teletext feature does not work with PC signals.
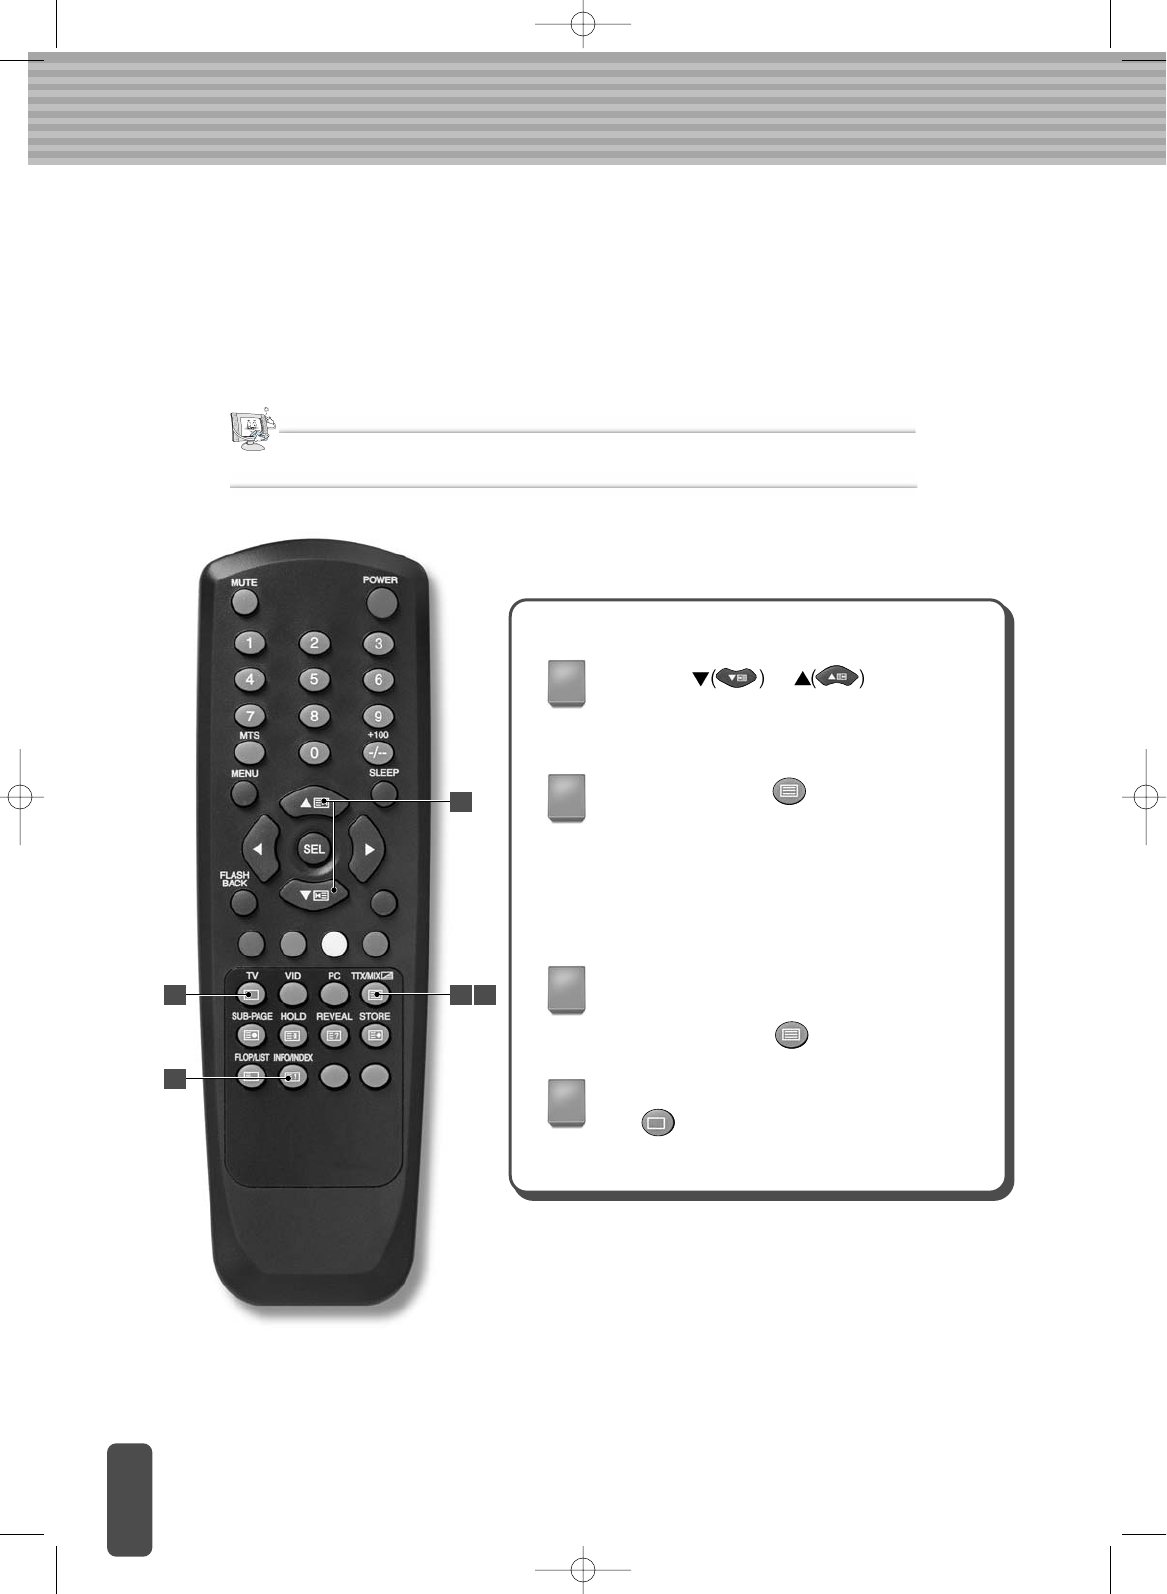
Using the or buttons,
select the channel providing the teletext
service.
Press the TTX/MIX( ) button to activate
the teletext mode.
(Result : The contents page is displayed. It
can be redisplayed at any time by pressing
the INDEX button.)
To display the actual broadcast
simultaneously with the teletext page,
press the TTX/MIX( ) button.
1
2
3
4
To return to normal viewing, press the
TV( ) button.
1
2
42 3
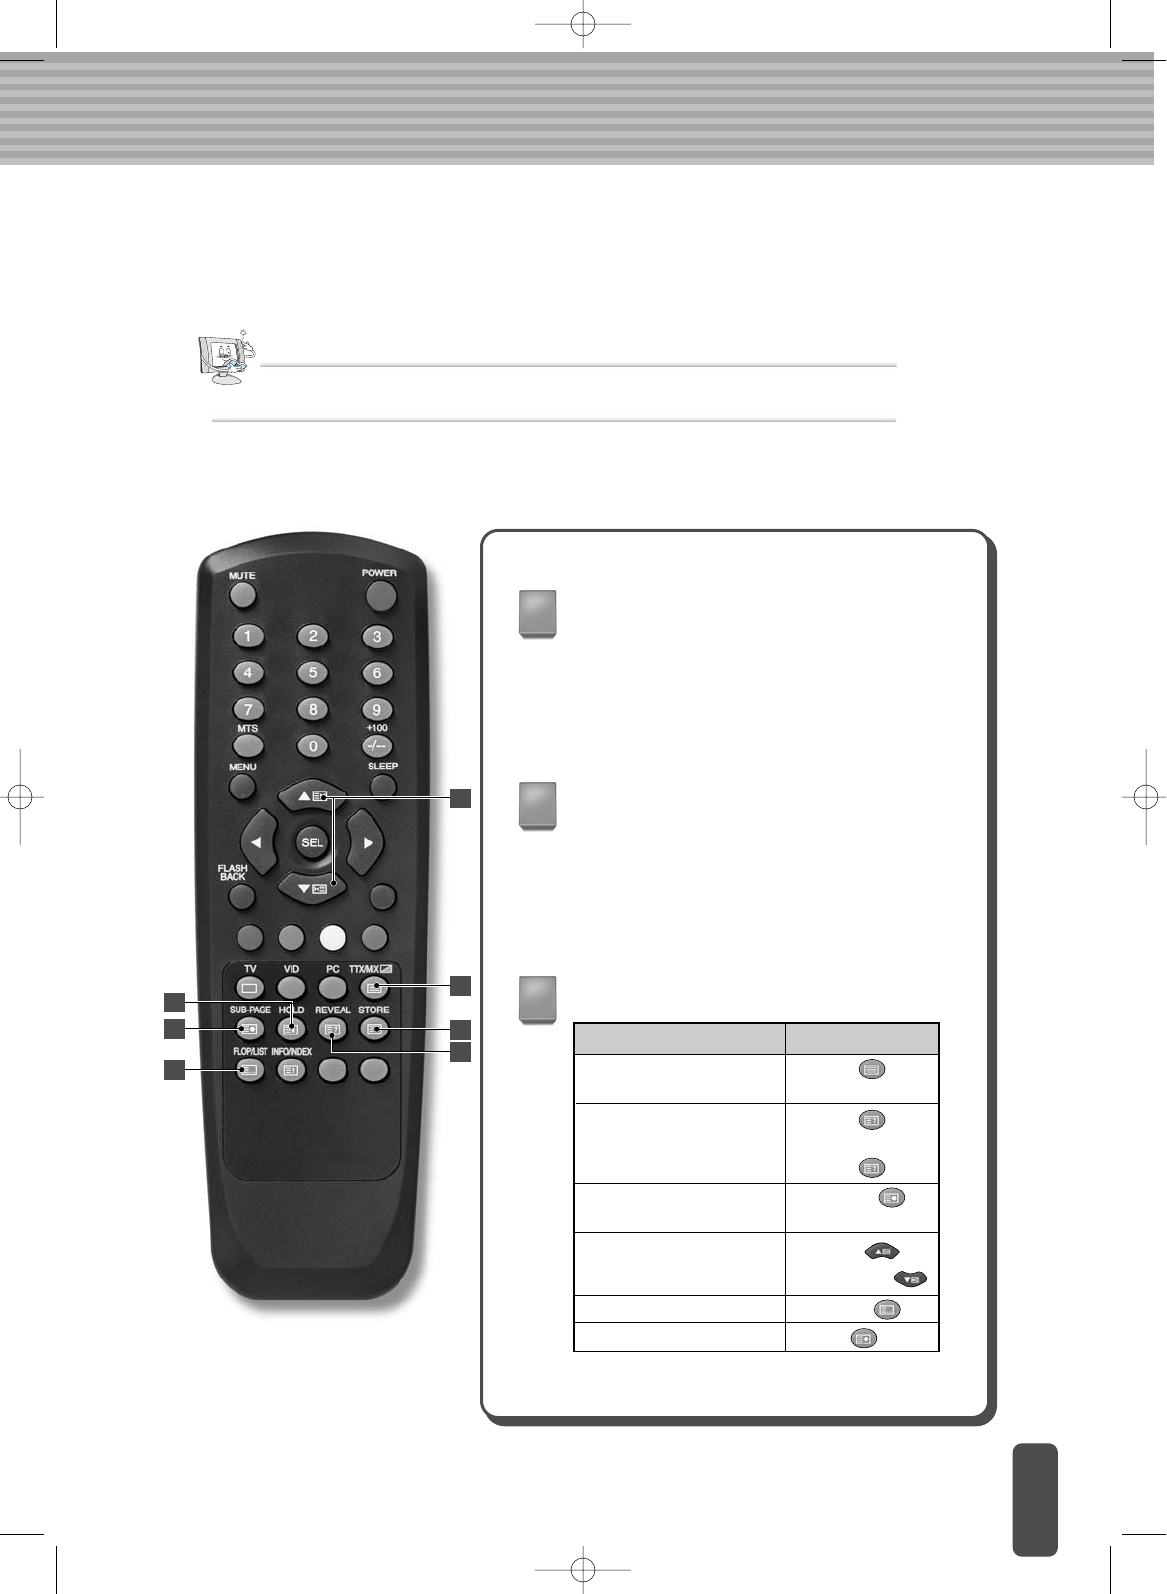
Press the numeric buttons on the remote control to enter the page number directly:
Selecting a Specific Teletext Page
Note
The Teletext feature does not work with PC signals.
Enter the three-digit page number listed in
the contents by pressing the corresponding
numeric buttons.
(Result : The current page counter is
incremented and the page is then displayed.)
If the selected page is linked to several
secondary pages, the secondary pages are
displayed in sequence.
To freeze the display at a given page, press
the HOLD button.
Press the HOLD button again to resume.
Using the various display options:
1
2
3
To display.... Press the...
Both teletext information
and the normal broadcast
Hidden text (answers to quiz
games, for example)
The normal screen
A secondary page, by
entering its 4-digit number
The next page
The previous page
FLOF/LIST select
Store
REVEAL( )
REVEAL( ) again
SUB-PAGE( )
PAGE UP( )
PAGE DOWN( )
FLOF/LIST( )
STORE( )
TTX/MIX( )
3
3
3
3
3
3
2
Using FLOF to select a Teletext Page (option)
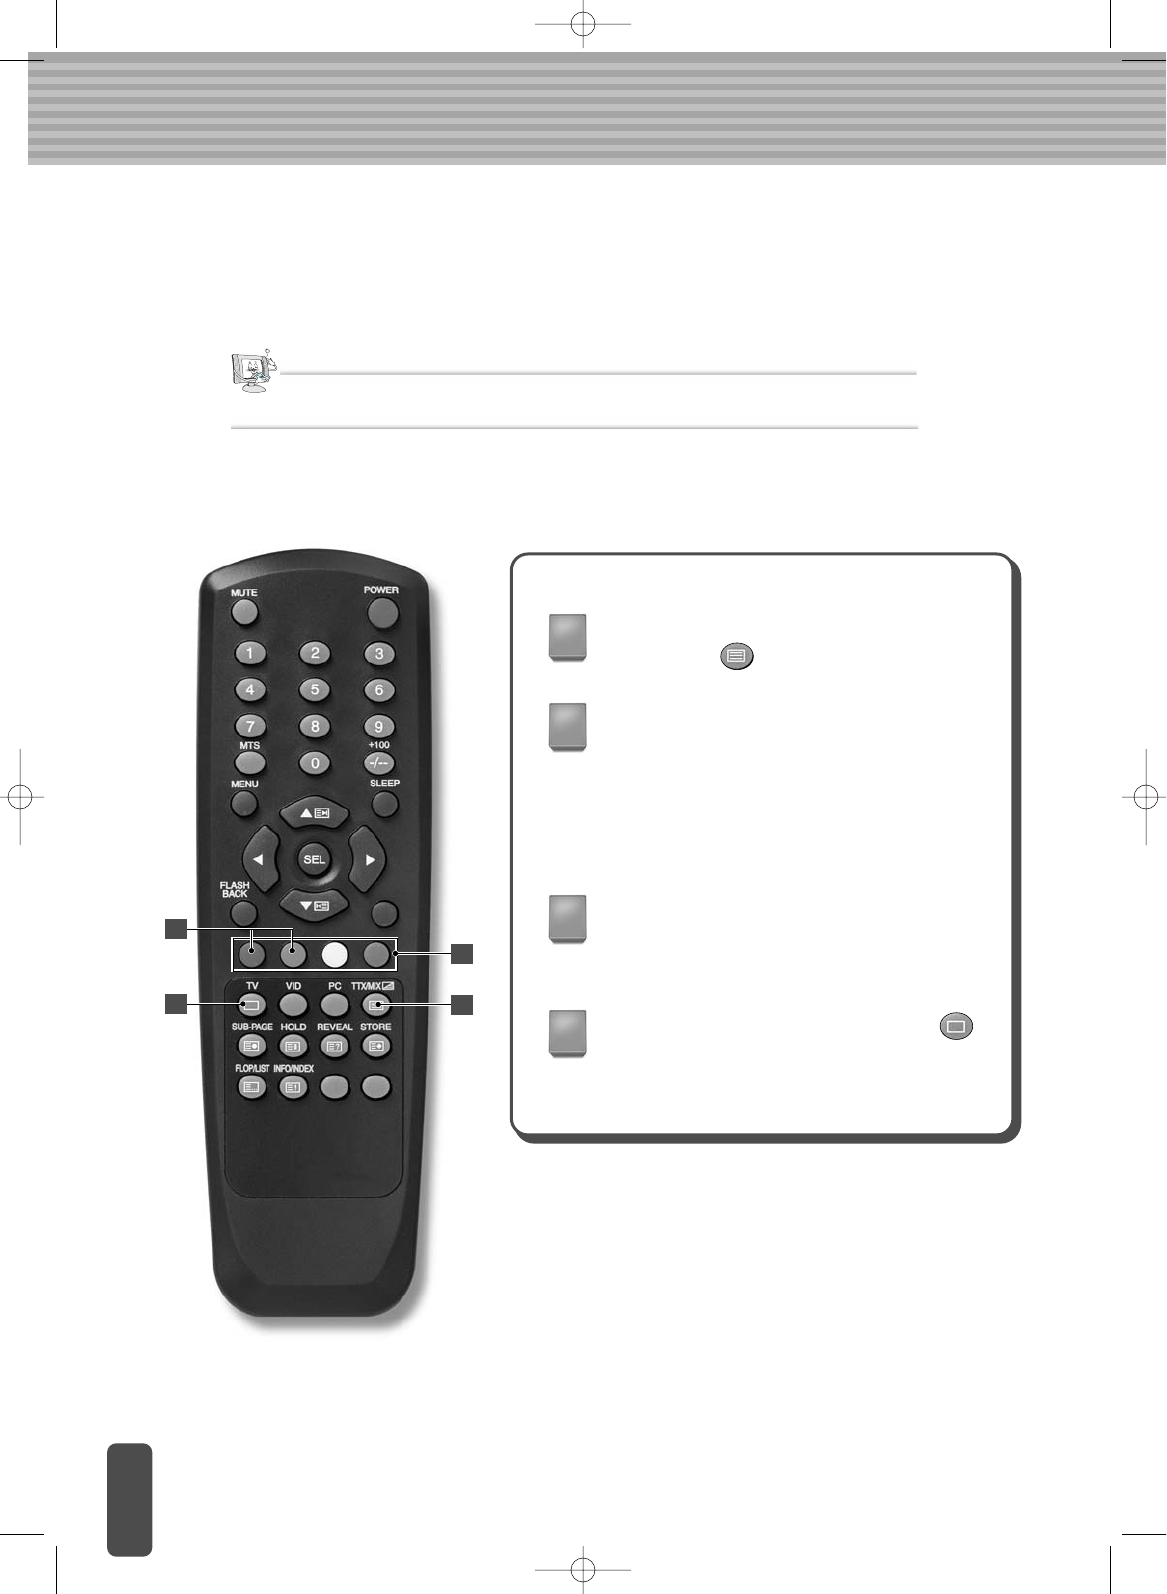
The topics included in the teletext pages are colour-coded, and can be selected by
pressing the coloured buttons on the remote control.
Display the teletext contents page by pressing
the TTX/MIX( ) button.
Press the coloured button corresponding to
the topic that you wish to select (The available
topics are listed on the status information line).
(Result : The page is displayed with additional
colour-coded information that can be selected
in the same way.)
To display the: Press the:
Previous page Red button
Next page Green button
1
2
3
When you have finished, press the TV( )
button to return to normal broadcasting.
4
Note
The Teletext feature dose not work with PC signals.
41
2
3
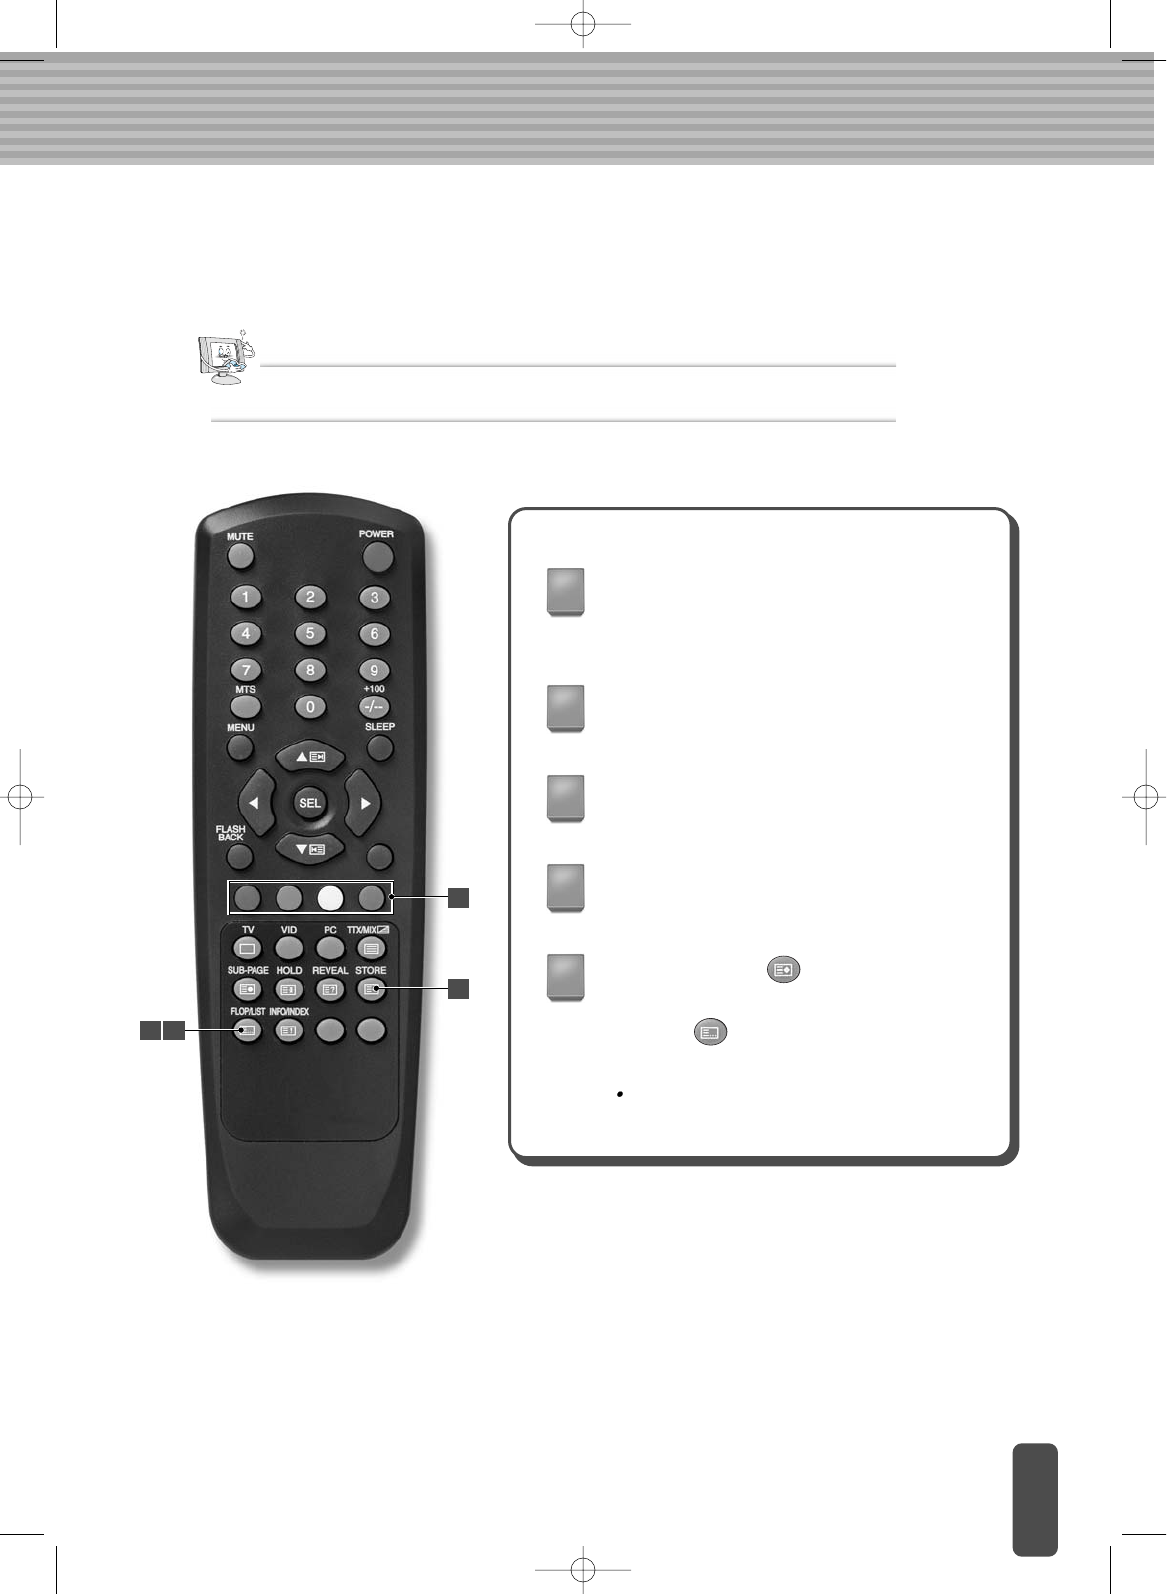
Up to four teletext pages can be stored.
Storing Teletext Pages
Select the LIST mode.
(Result : 3-digit numbers are displayed in
different colours at the bottom of the screen.)
Press the coloured button corresponding to
the page that will be replaced.
Enter the new page number using the
numeric buttons.
1
2
3
Repeat steps 2 and 3 for each page to be
stored, using a different coloured button each
time.
4
Press the STORE( ) button until the
corresponding blocks are displayed in white.
The LIST( ) button is used to switch
between:
LIST mode / FLOF mode
5
Note
The teletext feature dose not work with PC signals.
51
5
2
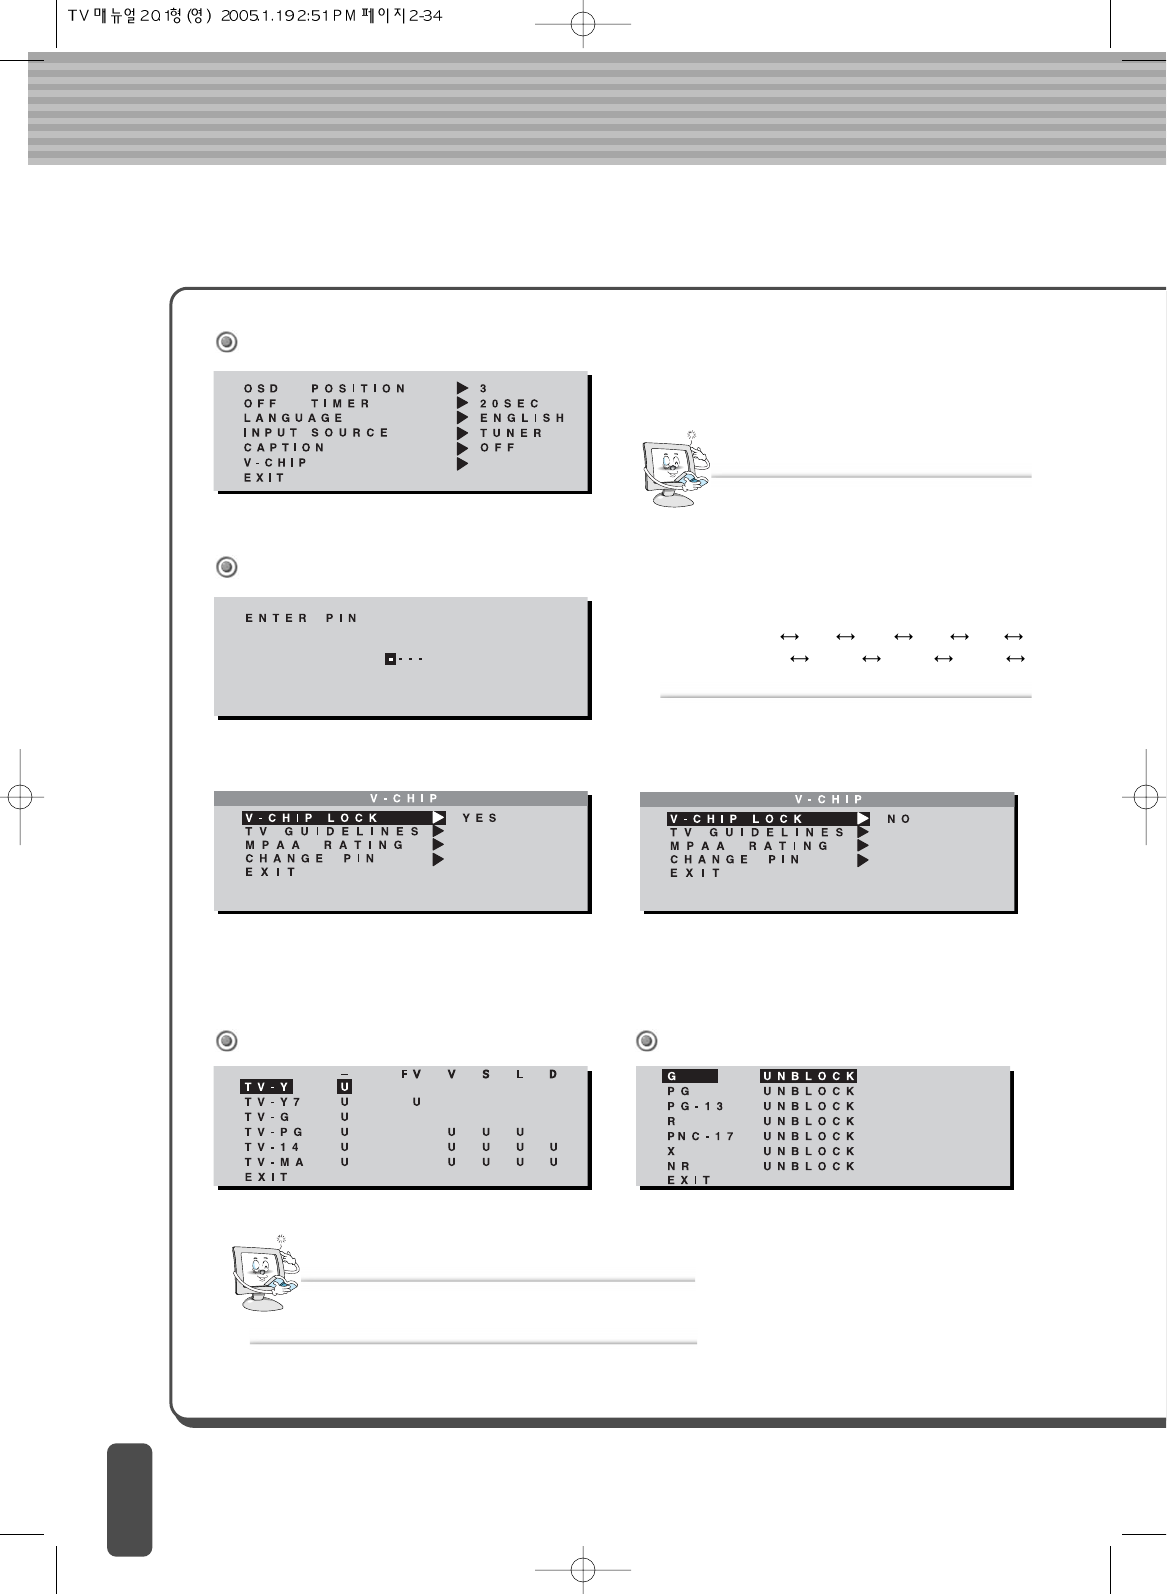
V-CHIP OSD(NTSC/Optional)
MAIN MENU
Enter ENTER PIN.
V-CHIP Selection
If you select Yes in the V-CHIP LOCK, the LOCK
function of the screen and voice is operated.
If you select No in the V-CHIP LOCK, the LOCK
function of the screen and voice is removed.
- The V-CHIP initial PIN is set at ‘0000.’
- If you press the MENU KEY for 5 seconds,
V-CHIP items are initialized.
Note
CAPTION
- OFF CC1 CC2 CC3 CC4
TEXT TEXT2 TEXT3 TEXT4
OFF
- U : UNBLOCK - B : BLOCK
Note
TV GUDELINES MPAA RATING
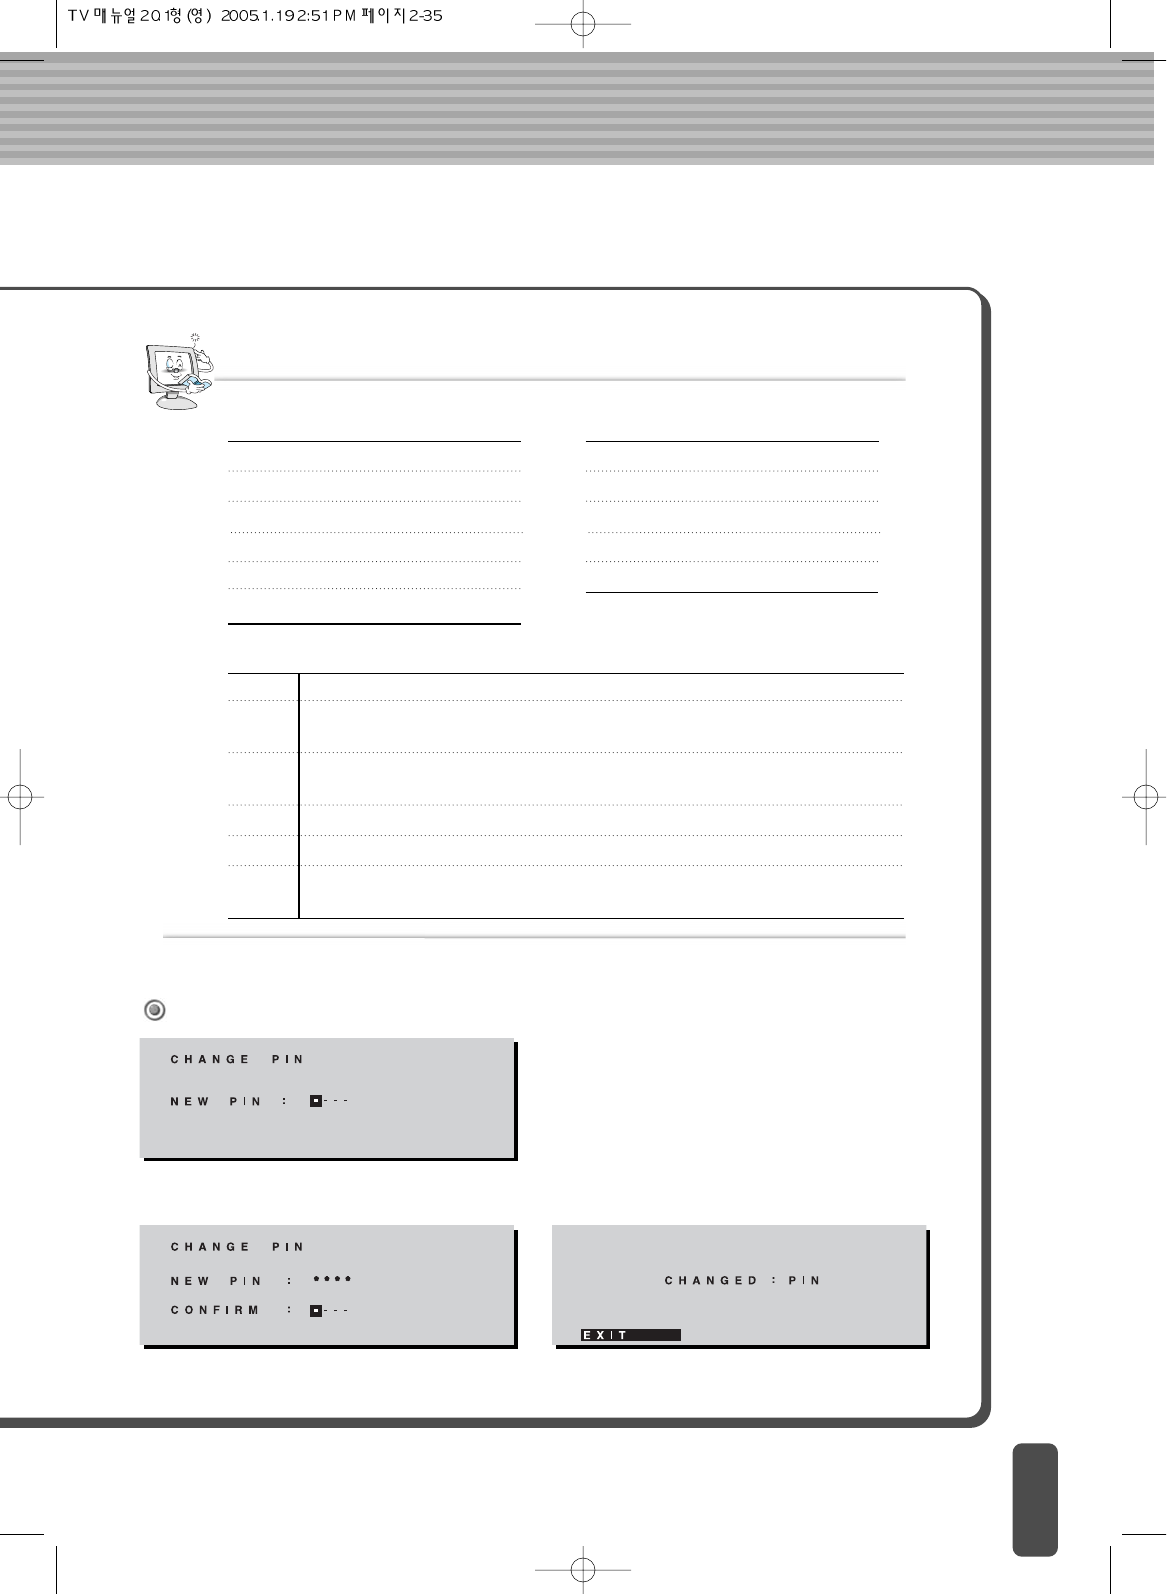
Note
TV-Y (All Children)
TV-Y7 (Direct to Older Children)
TV-G (General Audience)
TV-PG (Parental Guidance Suggested)
TV-14 (Parents Strongly Cautioned)
TV-MA (Mature Audience Only)
G
PG
PG-13
R
NC-17
X
GENERAL AUDIENCES All ages admitted
PARENTAL GUIDANCE SUGGESTED Some material may not be suitable for
children
PARENTAL STRONGLY CAUTIONED Some material may be inappropriate for
children under 13
RESTEICTED Under 17 requires accompanying parent or adult guardian
NO ONE 17 AND UNDER ADMITTED
X is an older rating that is unified with NC-17 but may be encoded in the data of
older movies
TV GUIDELINES
FV (Fantasy Violence)
V (Violence)
S (Sexual Situation)
L (Adult Language)
D (Sexually Suggestive Dialog)
CONTENT
MPAA RATING
To change the PIN number, select CHANGE PIN and enter NEW PIN.
CHANNEL PIN Selection
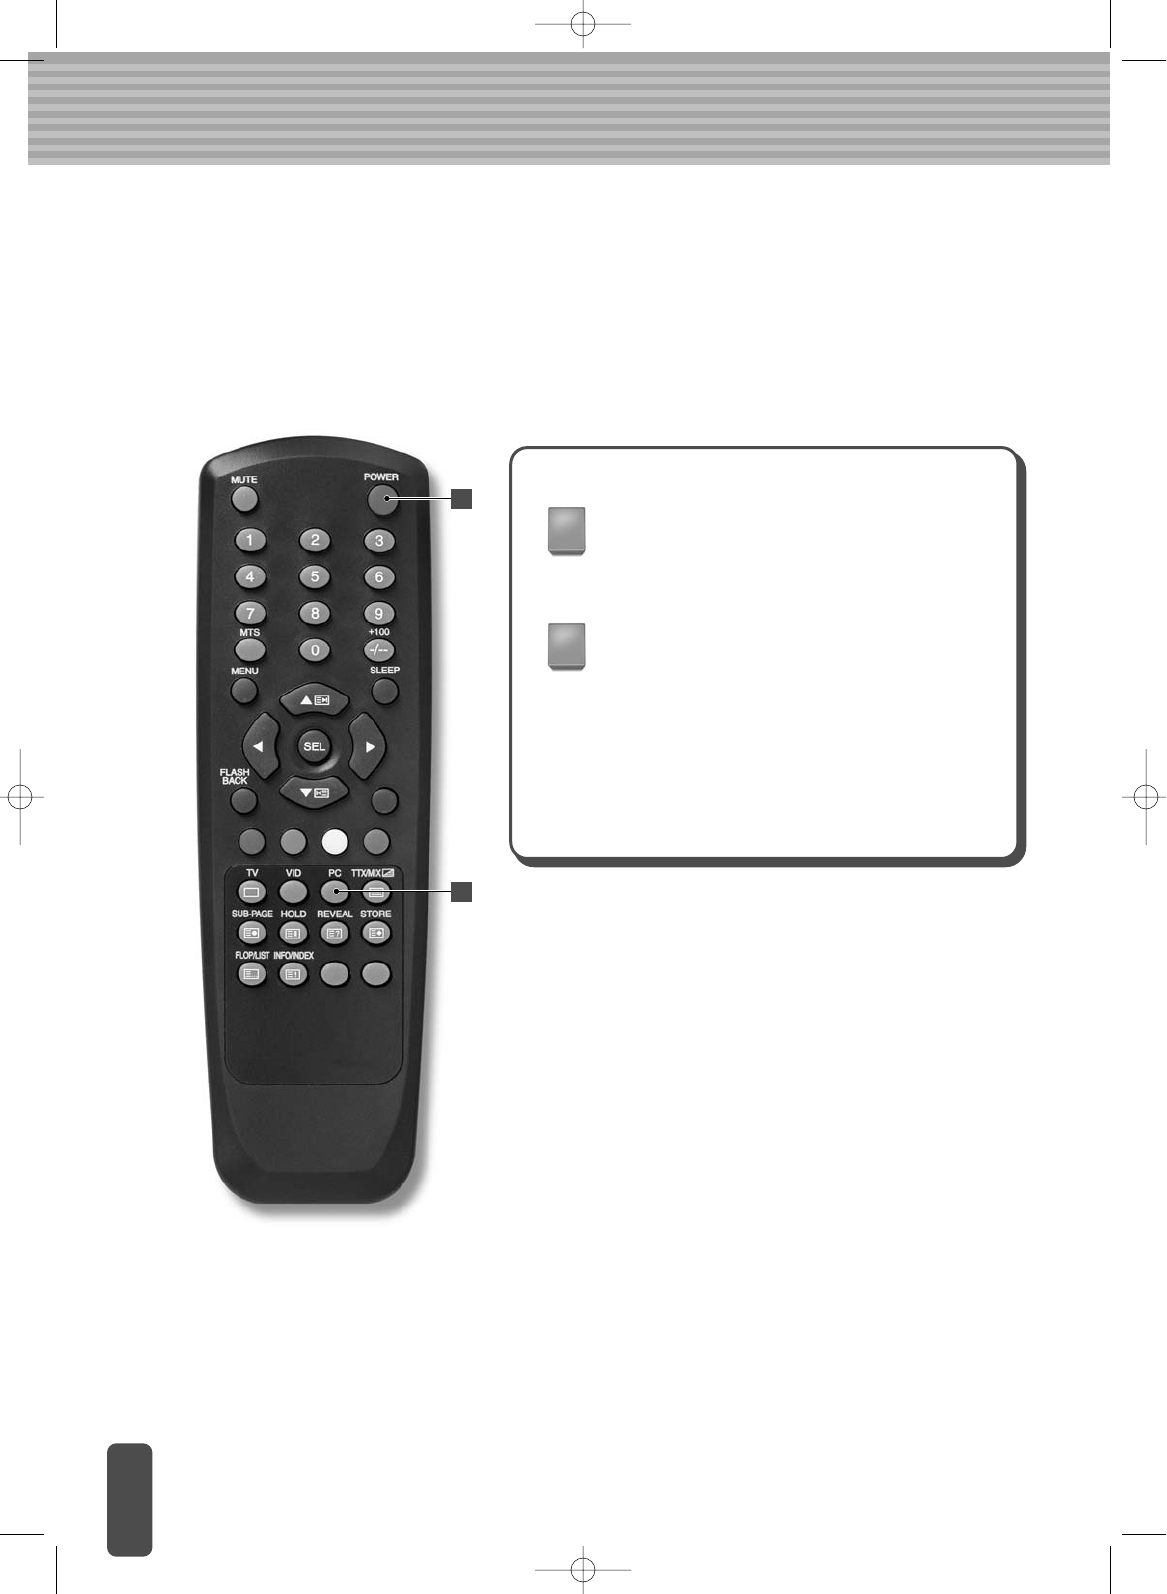
Initial set PC Mode
Power on your equipment by pressing the
POWER button on the main set or on the
remote control.
Press the PC button on the remote control to
switch to PC mode. The PC screen is then
automatically set.
When a CD-Title runs, the music is output from
the speakers.
(You can use an external speaker via the
Audio Output jack on the rear of the main set.)
1
2
2
1