ATEC AV370W 37" TFT LCD TV User Manual 3 of 3
ATEC Co., Ltd. 37" TFT LCD TV Users Manual 3 of 3
ATEC >
Contents
- 1. Users Manual 1 of 3
- 2. Users Manual 2 of 3
- 3. Users Manual 3 of 3
Users Manual 3 of 3
Initial PC Mode Settings
PC Menu Components
Main Menu Settings
3-2
Initial PC Mode Settings
To use the PC mode, set the resolution on the PC to 1280 x 768 @ 60Hz
/ 1360 x 768 @ 60Hz, and connect it to the LCD TV (supports up to 1600
x 1200 @ 60Hz/1280 x 1024 @ 85).
Connect the LCD TV and the PC, and press the <POWER> button.
1
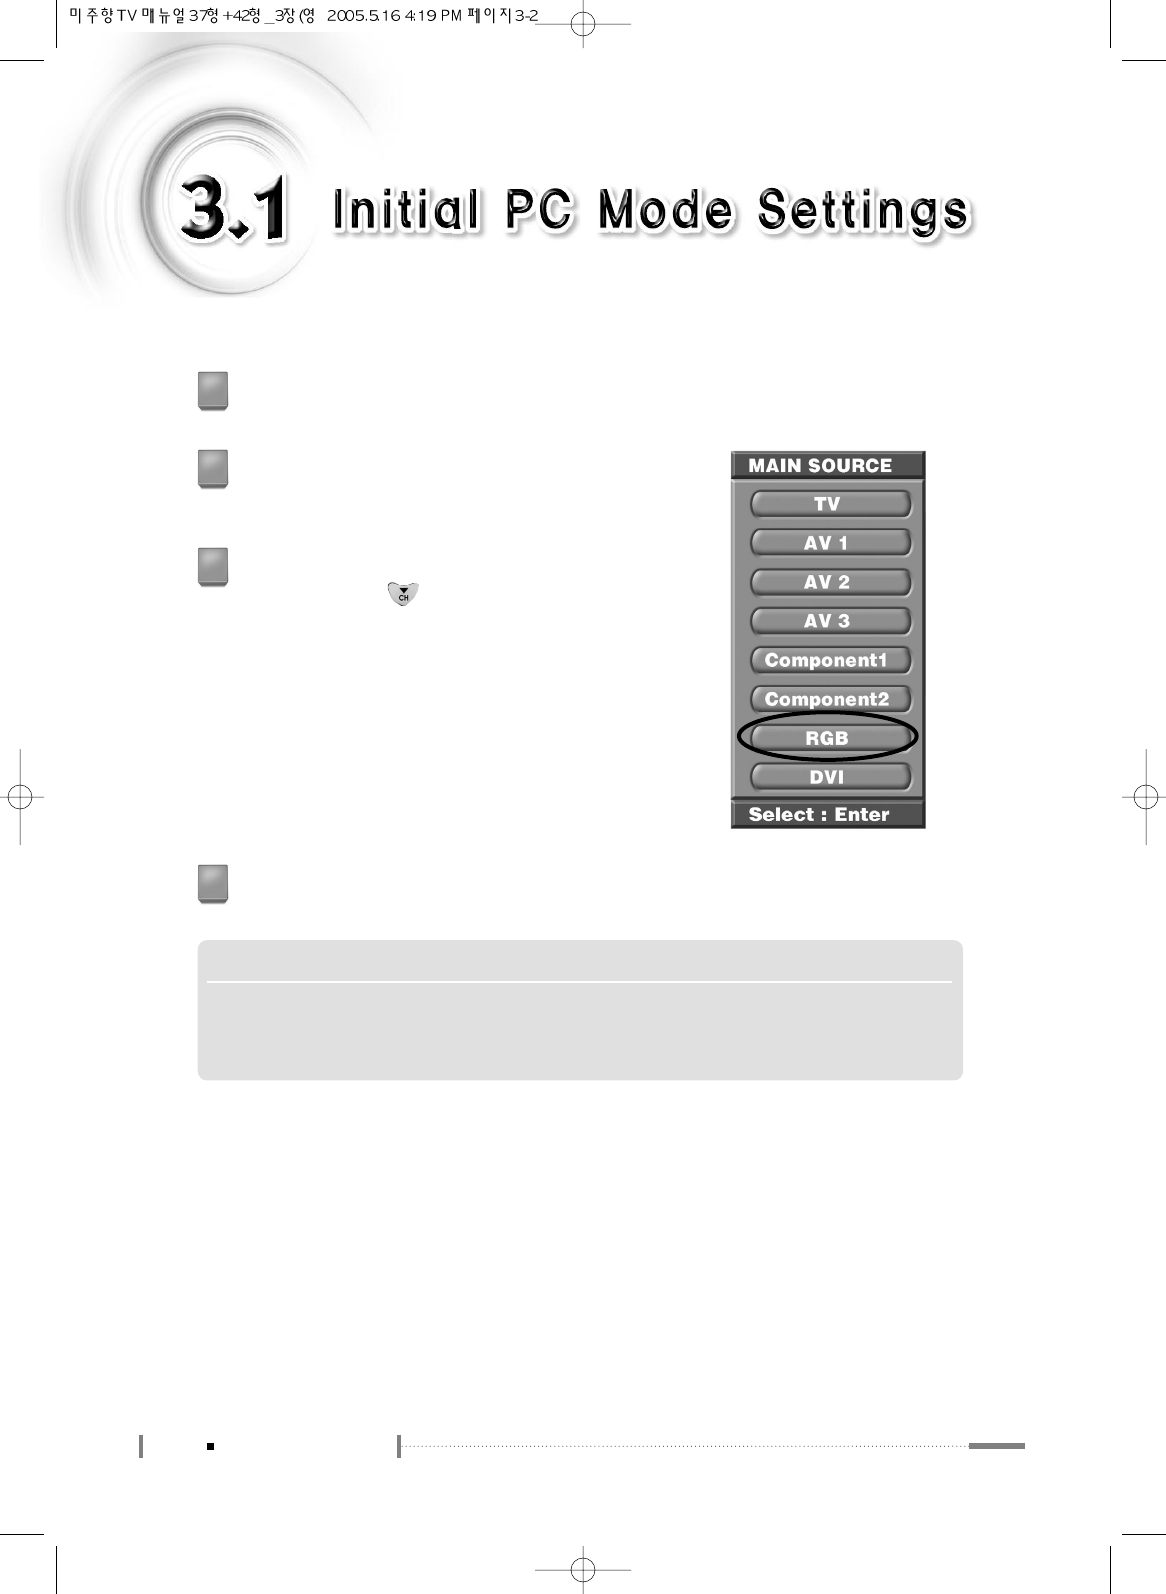
Press the <SOURCE> button on the remote control.
The ‘MAIN SOURCE’ screen will be displayed.
2
Check the type of cable that connects the LCD TV and
the PC. Press the < > button on the remote control
to navigate to RGB (or DVI), and press the <OK>
button. (or press the <PC> button on the remote
control.)
3
The ‘PC’ screen will be displayed.
4
NOTE
▶▶Highest resolution supported by the PC mode
Main screen : 1600x1200 @ 60Hz/1280x1024 @ 85Hz
Sub screen : 1280x768 @ 60Hz/1360x768 @ 60Hz

3-3
Initial PC Mode Settings
PC Mode Environment Settings
3-4
PC Menu Components
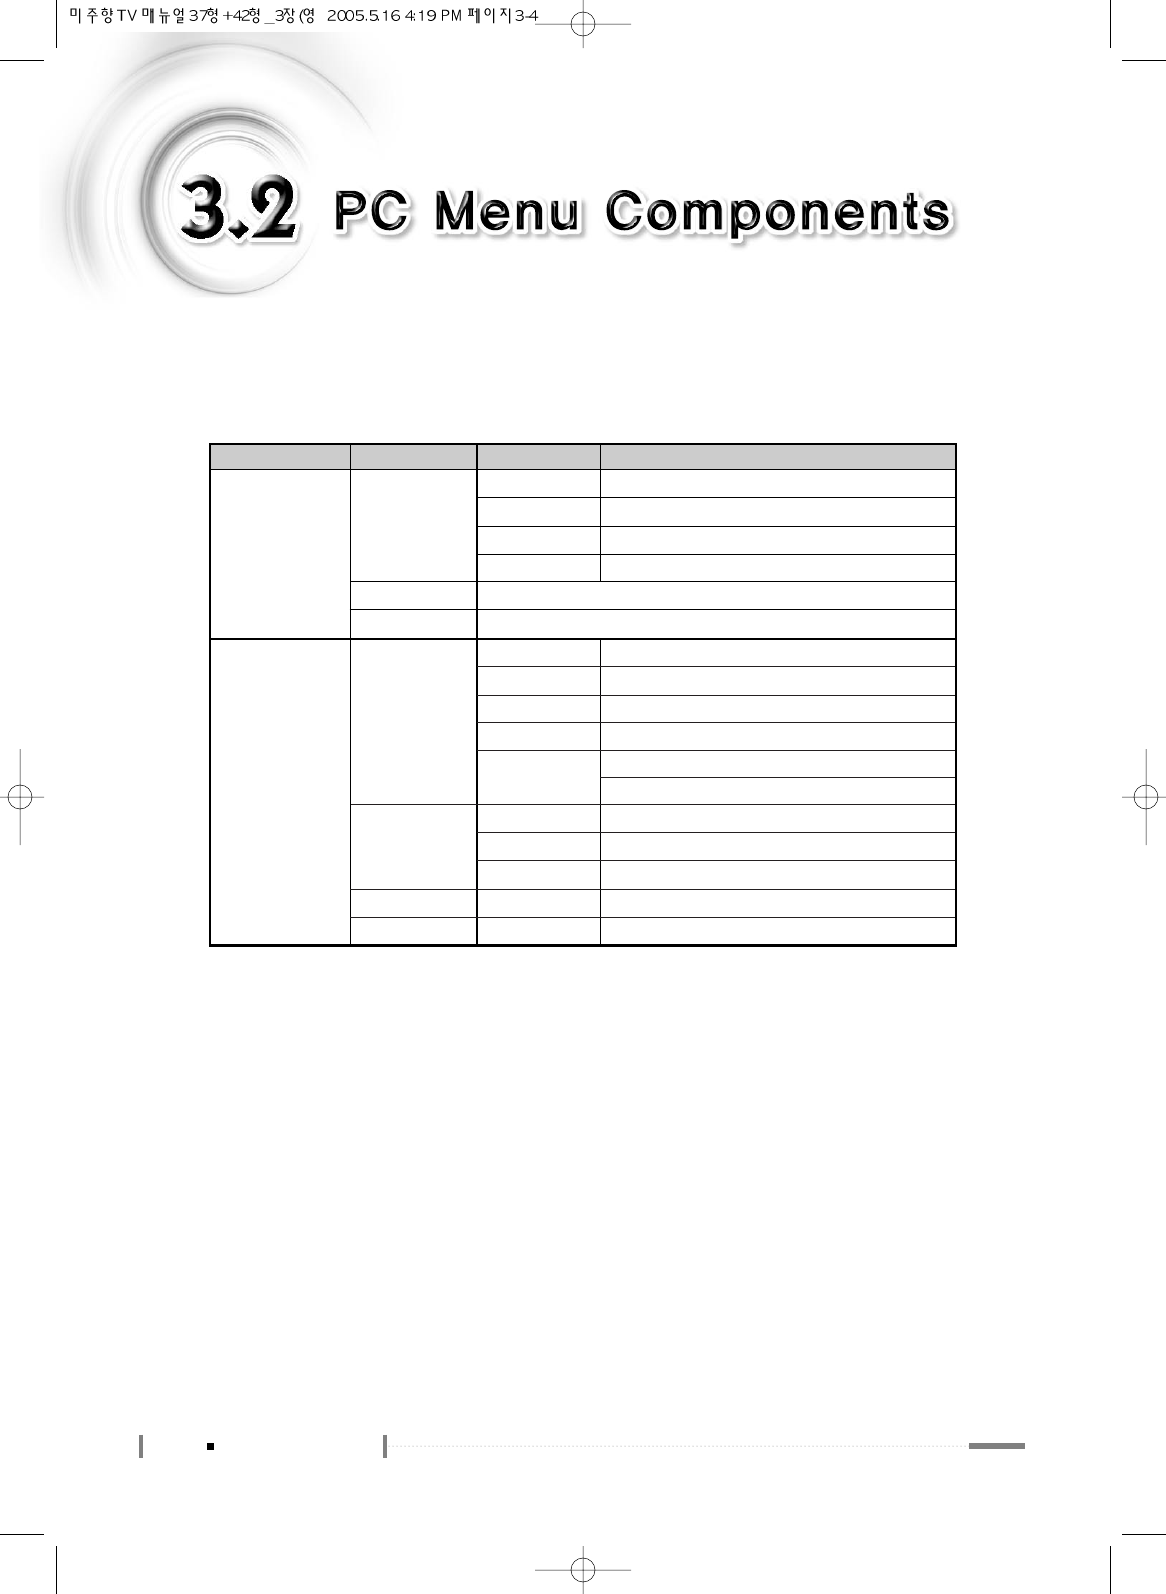
The Main menu has 5 categories, which contain submenus and option
items.
Main Menu
PICTURE CSM
Brightness
Contrast
Normal
Cool
Warm
User
Adjust the over-all brightness or darkness of the screen.
Adjust the brightness and darkness between objects and back-grounds.
Plain white.
Bluish white.
Reddish white.
Controls color (Red, Green, Blue) of the display.
SOUND Effect
Surround
AVL
Balance
Flat
Music
Movie
Speech
User
Off
Normal
Spatial
On/Off
-10 ~ 10
Standard factory settings.
When watching music video or concerts.
When watching movies.
When watching a show that is mostly dialogue.
Bass : Adjusts bass
Treble : Adjusts treble
Surround Output Off
Optimal Surround for Output Condition
Enhanced Surround
AVL Function On/Off
Adjust balance between the left & right speakers.
Sub Menu 1 Sub Menu 2 Sub Menu 3
Switch to the ‘PC’ mode and press the <MENU> button on the remote control.
The ‘MAIN MENU’ screen will be displayed.
3-5
PC Menu Components
PC Mode Environment Settings
Main Menu
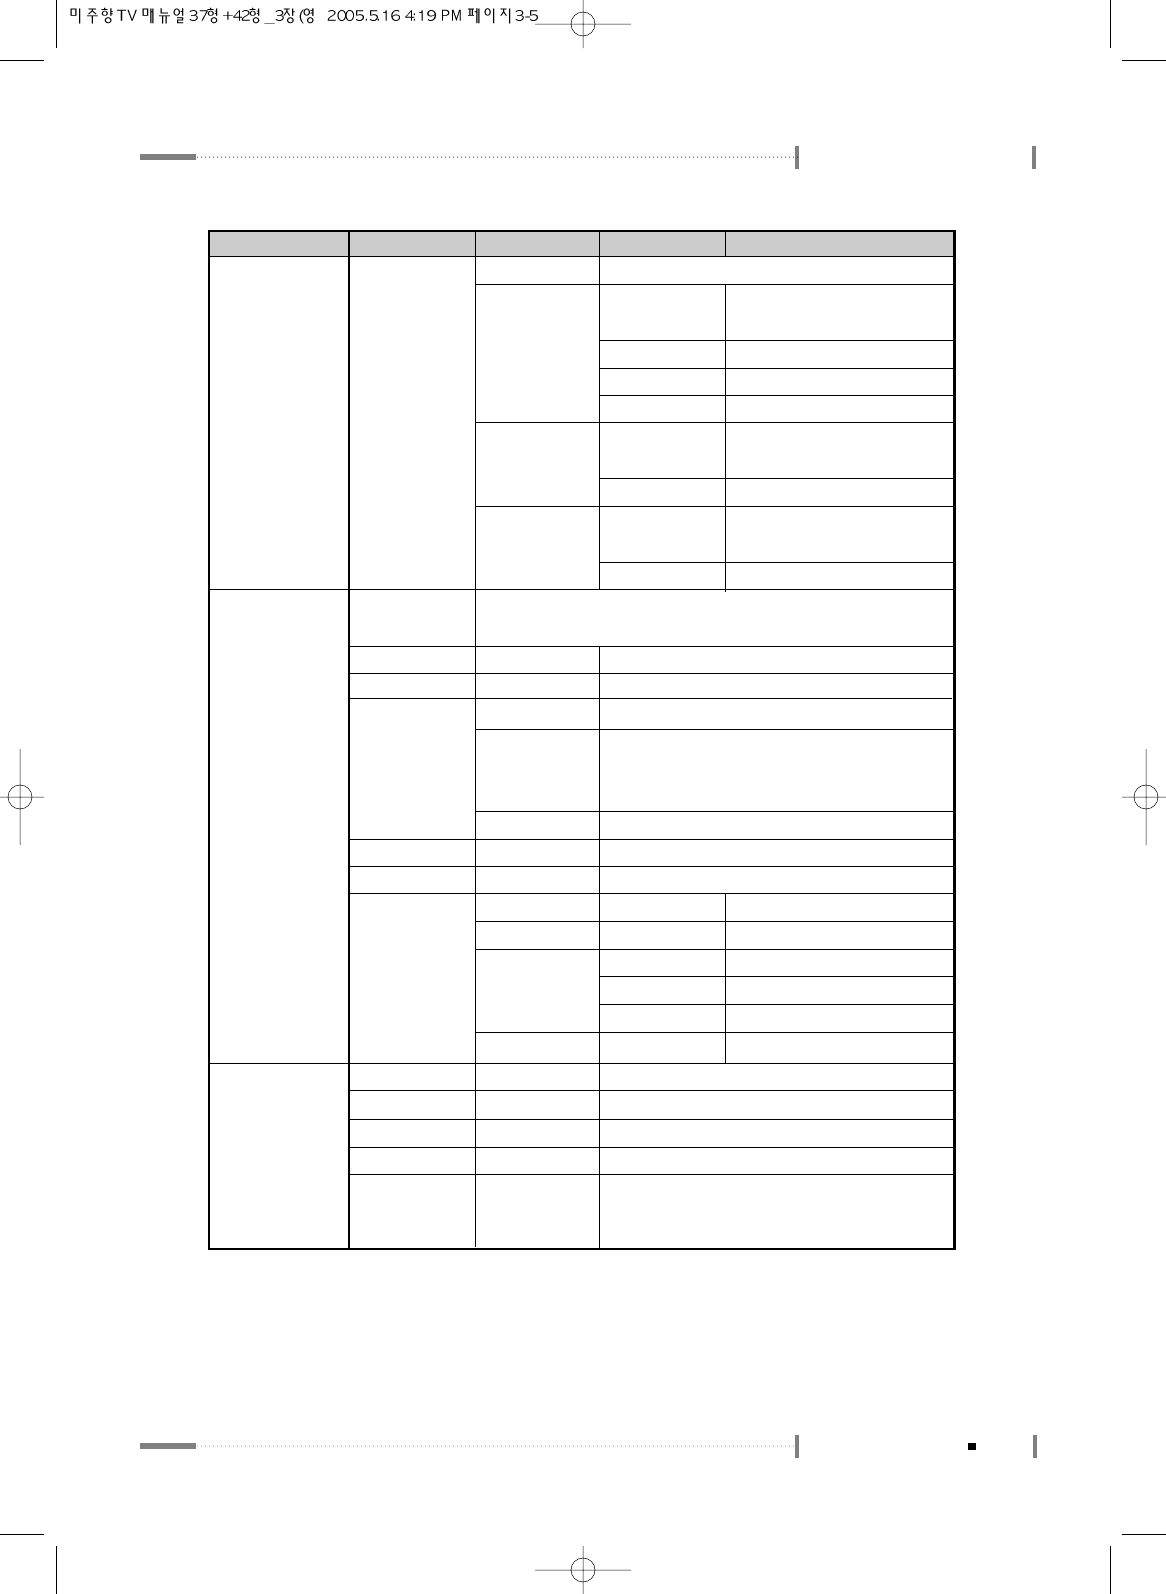
SCREEN Auto configure
H-Position
V-Position
Clock
Phase
To Start
0 ~ 100
0 ~ 100
0 ~ 100
0 ~ 255
Automatic adjustment of the screen/Auto in Progress
Horizontal screen position adjustment
Vertical screen position adjustment
Picture quality adjustment by fine-tuning
Screen phase adjustment (adjustment for
screen noise, focus when letters appear to
overlap each other, brightness, stability, etc.)
Sub Menu 1 Sub Menu 2 Sub Menu 3
Description
PIP/POP/PBP On/Off Off
PIP
POP
PBP1~2
PIP/POP/PBP Function Off
Source
Swap
PIP Size
PIP Position
Source
Swap
Source
Swap
TV, AV1~AV3,
Component1~2, RGB, DVI
To Set
Small, Large
PIP Screen Position Selection
TV, AV1~AV3,
Component1~2, RGB, DVI
To Set
TV, AV1~AV3,
Component1~2, RGB, DVI
To Set
SET UP
Language
Transparency
ARC
ISM Method
Set ID
Factory Reset
Timer
English, Deutsch, Français, Español, Italiano, Korean
(Menu Screen Display Language Selection)
0~10
16:9, 14:9, 4:3
Normal
Orbit
White
0~99
Off
Clock
Off Timer
On Timer
Auto Off
Adjusts the image transparency
Screen Aspect Selection
Normal screen
Moves the screen up, down, left and right in
small increments to prevent overheating of the
panel during prolonged use.
Sets the whole screen to white.
Set ID Selection
Selects the factory default.
AM, PM
AM, PM, On/Off
AM, PM, On/Off
CHANNEL
Volume
On/Off
Time Selection
TV Off Time Selection
TV On Time Selection
CATV/Air
0~100
TV Off Auto Function Selection
3-6
Main Menu Settings
PICTURE Menu Settings
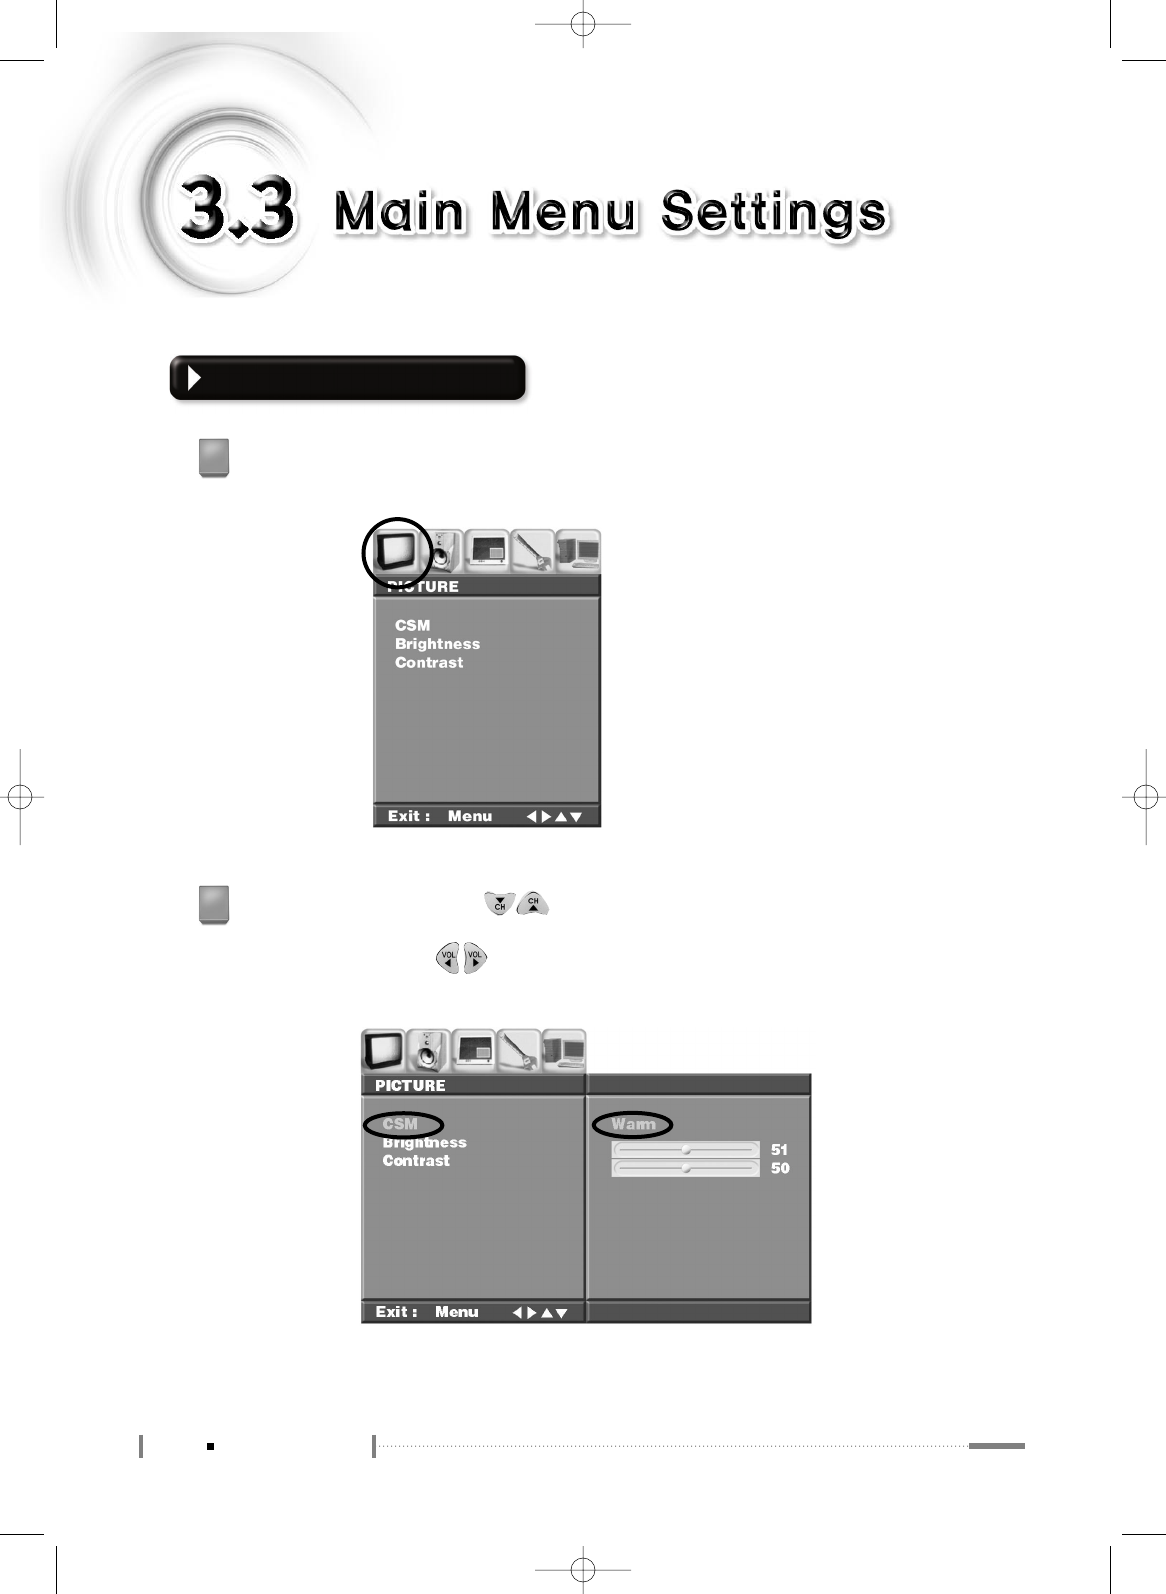
Switch to the ‘PC’ mode, press the <MENU> button on the remote control, and then
press the <OK> button on the remote control.
1
Press the <OK> button or the < > button on the remote control. The menu will be
selected, and the submenus can be navigated. Select the ‘CSM (Color Standard Mode)’
submenu and press the < > button on the remote control to select the option item
(select option items like ‘Normal, Cool, User, Warm’ and so on in the ‘CSM’ submenu).
2

3-7
Main Menu Settings
PC Mode Environment Settings
When selection is complete, press the <OK> button on the remote control.
3
Press the < > button on the remote control to navigate to the ‘Brightness, Contrast’
submenu in order to adjust brightness and contrast.
4
When adjustment is complete, press the <OK> button on the remote control, and press the
<MENU> button on the remote control once again to close the ‘Menu’ screen.
5
NOTE S
▶▶To configure the menu without the remote controller
❶
Press the <MENU> button located at the bottom of the LCD TV.
❷
Press the <CH
▲
/
▼
> buttons to navigate to submenus.
❸
Press the <VOL <
◀
/
▶
> buttons to adjust each item.
❹
If ‘Menu for Local Key’ is on, the <SOURCE> button is used as the <OK> button. When adjustments
are complete, press the <MENU> button to close the ‘Menu’ screen.
▶▶SOUND/PIP/POP/PBP/SET UP Menu Settings
For information on the SOUND/PIP/POP/PBP/SET UP menu settings, see ‘2.6 Adjusting the Sound’,
’2.7 Configuring the PIP/POP/PBP Functions’, and ‘2.8 To Configure the SET UP’.

PC Mode Environment Settings
3-8
Main Menu Settings
SCREEN Menu Settings
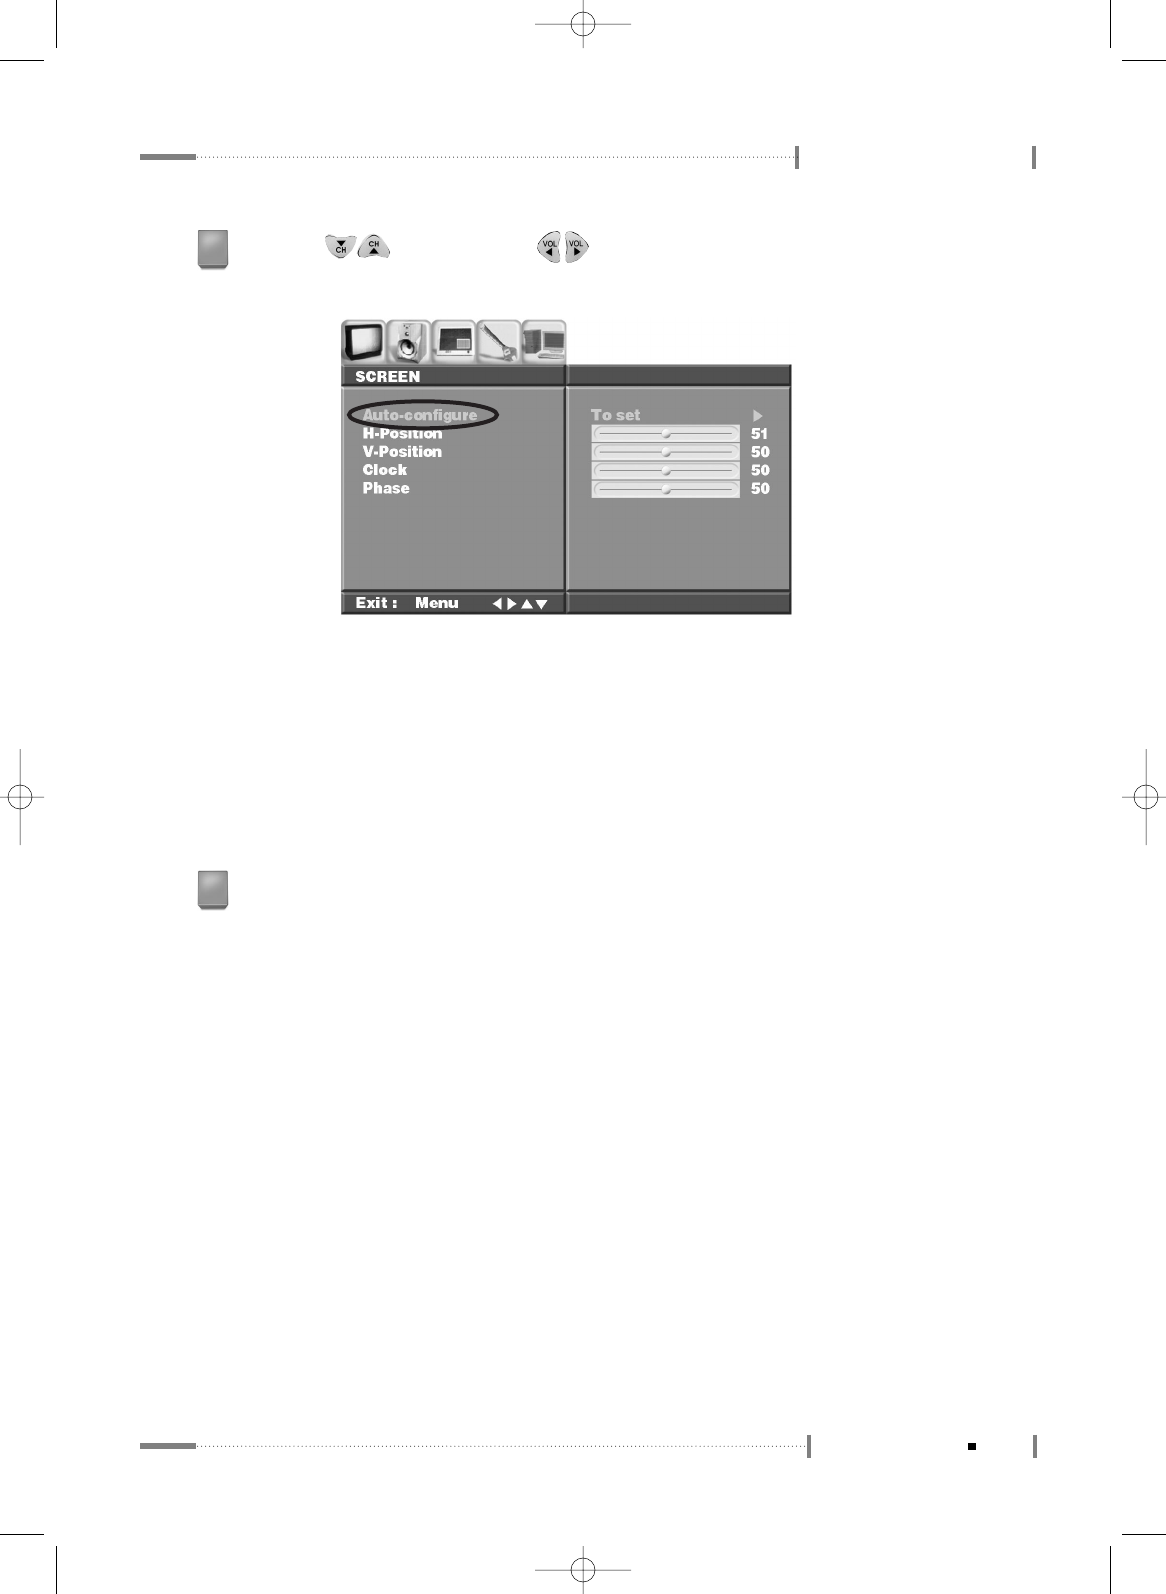
Switch to the ‘PC’ mode, press the <MENU> button on the remote control, and then press the
< > button on the remote control to navigate to the ‘Screen’ menu.
1
Press the < > button on the remote control to navigate to the ‘Auto Configure’
submenu, and press the < > button on the remote control. The ‘Auto in Progress’ screen
will be displayed, and the screen will be adjusted automatically.
2
3-9
Main Menu Settings
PC Mode Environment Settings
●H-Position : Adjusts horizontal screen position.
●V-Position : Adjusts vertical screen position.
●Clock : Adjusts the picture quality by fine tuning the screen.
●Phase : Adjusts the screen phase (adjustment for screen noise, focus when letters appear
to overlap each other, brightness, stability, etc.).
Press the < > button and the < > button on the remote control to adjust the
submenus ‘H-Position’, ‘V-Position’, ‘Clock’, ‘Phase’, etc.
3
When adjustment is complete, press the <OK> button on the remote control, and press the
<MENU> button on the remote control once again to close the ‘Menu’ screen.
4
Appendix
A-2
Appendix
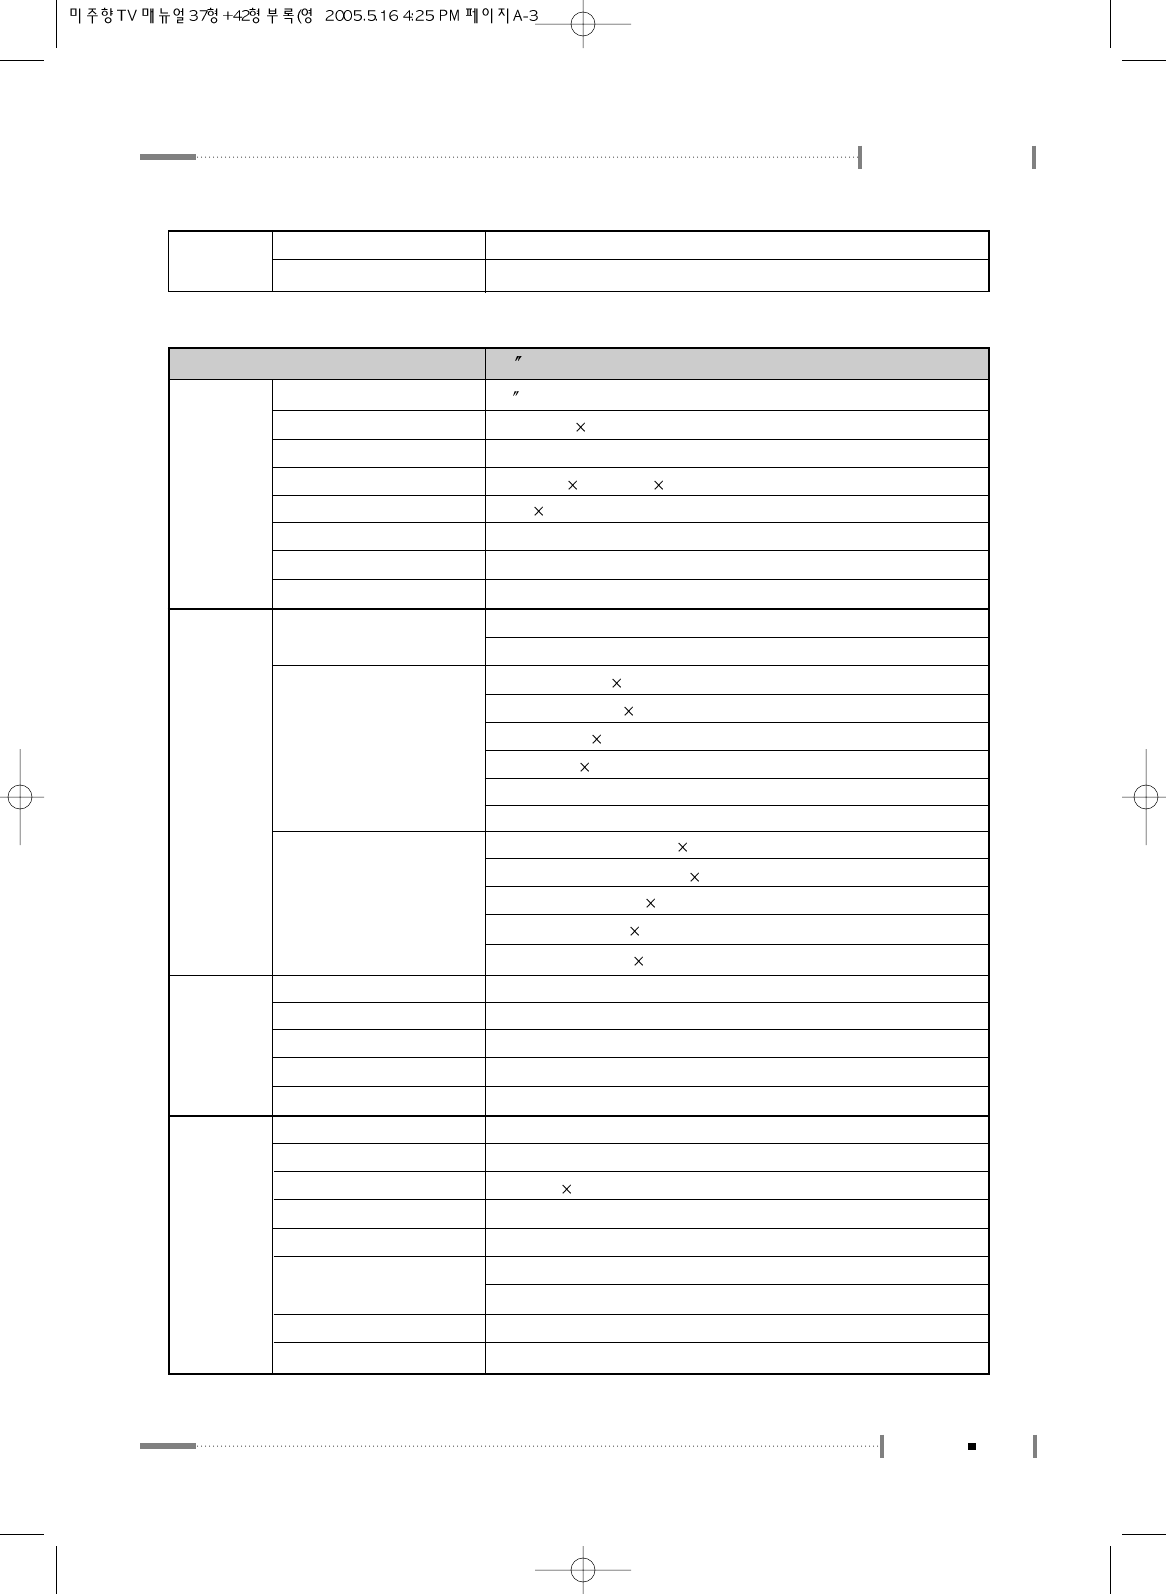
Specifications
Panel Panel Type
Display Area
Display Colour
Pixel Pitch
Recommended Resolution
Contrast Ratio
Brightness
Viewing Angle
In/Out PC
Video
Audio
RF Signal Antenna
Colour System
Sound System
Stereo Type
37
37 Wide TFT Colour LCD
819.6 mm 460.8 mm
(8bit) 16.7 million
0.2 mm 0.6 mm RGB
1366 768
500, 600(typical)
500 cd/m2
Free View Angle (R/L 176, U/D 176)
Analog RGB 15 pin D-Sub Input
DVI Input
Composite Input 3
Composite Output 1
S-Video Input 2
Component 2
PC (analog RGB) Input
DVI Input
Composite RCA L/R Input 3
Headphone Output 1
PC/DVI Audio Input 1
Composite RCA L/R Output 1
Component RCA L/R 2
75ΩCoaxial cable
NTSC
M
MTS/SAP
Text Close caption/V-chip
Others Power Consumption
Power Save Mode
Speaker
Plug & Play
Screen Control
Weight
221 watts
Less than 5 watts
10 watts×2
DDC 1/2 B
True Colour On Screen Display Menu, Bit Map
Net(Bady:23.5kg, Stand:4.3kg, Speaker:1.9kg)
Gross(Bady:28.5kg, Stand:5.9kg, Speaker:2.2kg)
A-3
Appendix
Appendix
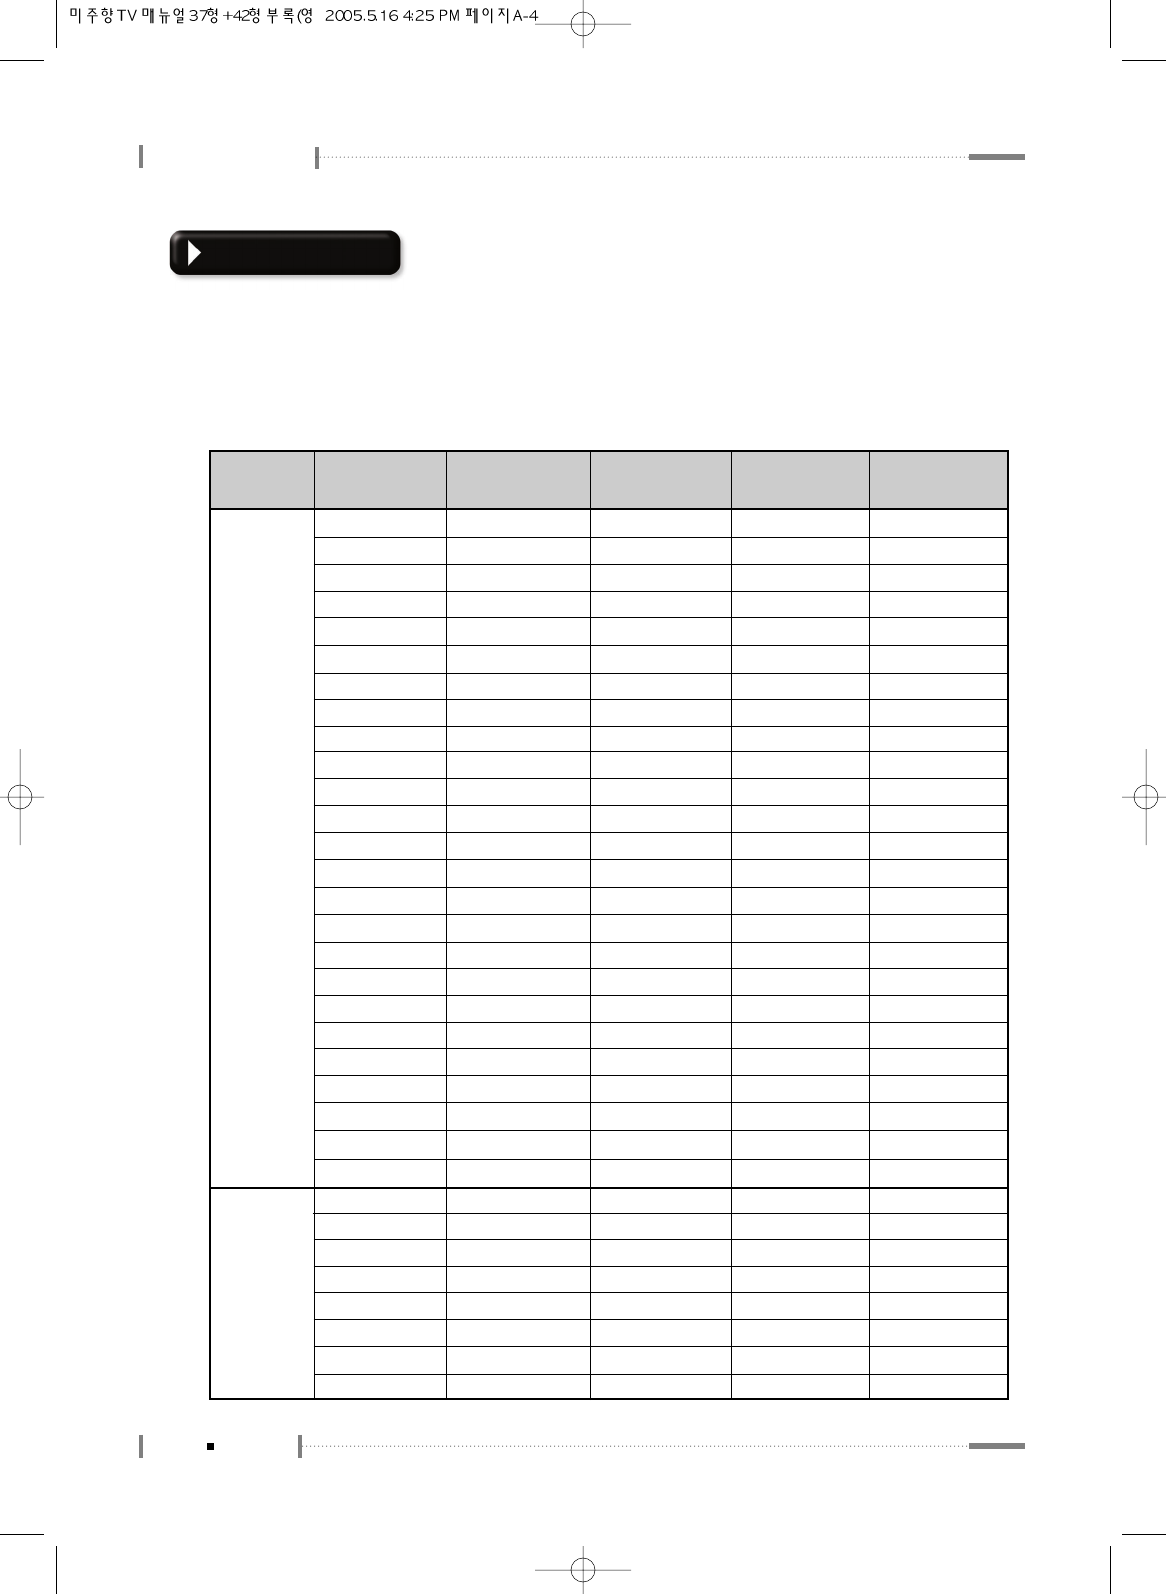
Panel Panel Type
Display Area
Display Colour
Pixel Pitch
Recommended Resolution
Contrast Ratio
Brightness
Viewing Angle
In/Out PC
Video
Audio
RF Signal Antenna
Colour System
Sound System
Stereo Type
42
42 Wide TFT Colour LCD
930.25 mm 523.01 mm
16.7 million, 8 bit
0.227 mm 0.681 mm RGB
1366 768
300(Min), 400(Typ.)
500 cd/m2
Free View Angle (R/L 176, U/D 176)
Analog RGB 15 pin D-Sub Input
DVI Input
Composite Input 3
Composite Output 1
S-Video Input 2
Component 2
PC (analog RGB) Input
DVI Input
Composite RCA L/R Input 3
Headphone Output 1
PC/DVI Audio Input 1
Composite RCA L/R Output 1
Component RCA L/R 2
75ΩCoaxial cable
NTSC
M
MTS/SAP
Text Close caption/V-chip
Others Power Consumption
Power Save Mode
Speaker
Plug & Play
Screen Control
Weight
Remote Controller
Dimension
253 watts
Less than 5 watts
10 watts 2
DDC 1/2 B
True Colour On Screen Display Menu, Bit Map
Net(Bady:26.6kg, Stand:4.3kg, Speaker:2.1kg)
Gross(Bady:33.1kg, Stand:5.9kg, Speaker:2.5kg)
Yes
1221(W) x 304(D) x 731(H) : Speaker (stand included)
Remote Controller
Dimension
Yes
1086(W) x 304(D) x 640(H) : Speaker (stand included)
Appendix
A-4
Appendix
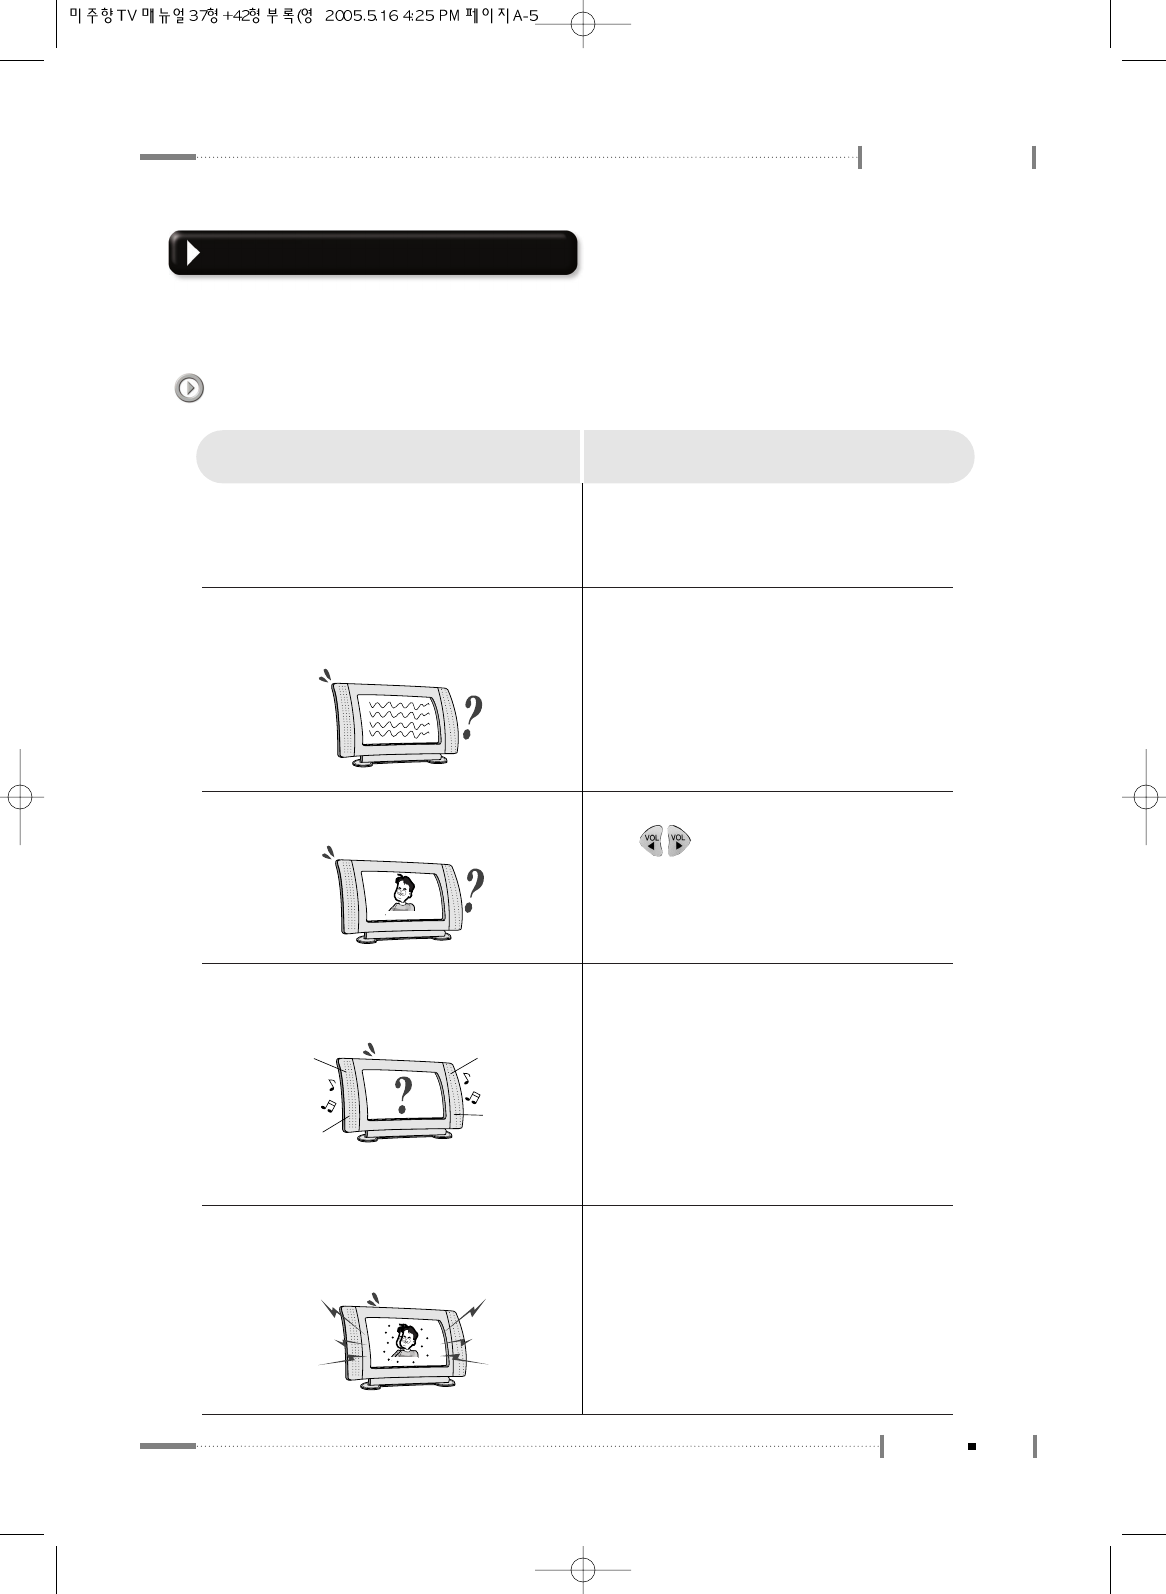
Display Modes
If the signal from the system is equal to the standard signal mode, the TV is adjusted
automatically. If the signal from the system does not equal the standard signal mode, adjust the
mode by referring to the Video card user guide, because the TV might not display or the power
LED only might be on. For the display modes listed below, the screen image has been optimized
initially.
Section Resolution H
Frequency (KHz)
V
Frequency (Hz)
Pixel
Frequency(MHz)
PC
Comment
640×400 37.861 85.08 31.5
640×350 31.469 70.087 25.175
640×350 37.861 85.08 31.5
640×480 31.469 59.94 25.175
640×480 35.000 66.667 30.24
640×480 37.861 72.809 29.765
640×480 37.500 75.0 31.5
640×480 43.269 85.008 36.0
720×400 31.469 70.087 28.332
720×400 37.927 85.039 35.5
800×600 35.156 56.25 36.0
800×600 37.879 60.317 40.0
800×600 48.077 72.188 50.0
800×600 46.875 75.0 49.5
800×600 53.674 85.061 56.25
DTV
1024×768 60.030 75.029 78.75
1152×864 67.500 75.0 104.993
1152×870 68.681 75.062 100.0
1280×768 47.700 60.0 80.136
1360×768 47.700 60.0 80.136
720×480 15.735 59.94 13.500 SDTV, DVD 480i
SDTV, DVD 576i
HDTV, 1080i
720×576 15.735 50.0 13.595
720×480 31.469 59.94 25.175 SDTV, 480p
SDTV, 576p
720×576 31.250 50.0 26.566
1280×720 44.964 59.94 74.176 HDTV, 720p
1280×720 37.500 50.0 60.466 HDTV, 720p
1920×1080 33.750 60.0 74.25
HDTV, 1080i
VESA
IBM
VESA
IBM
MAC
VESA
VESA
VESA
IBM
VESA
VESA
VESA
VESA
VESA
VESA
MAC
MAC
VESA
VESA
MAC
VESA
VESA
MAC
1920×1080 28.125 50.0 70.723
1024×768 48.780 60.001 64.11
1024×768 48.363 60.004 65.0
1024×768 56.476 70.069 75.0
1024×768 60.241 74.927 81.724
832×624 49.726 74.551 57.284
A-5
Appendix
Appendix
Check before calling for service
Please check the following before asking the service center about any problems with
your LCD TV.
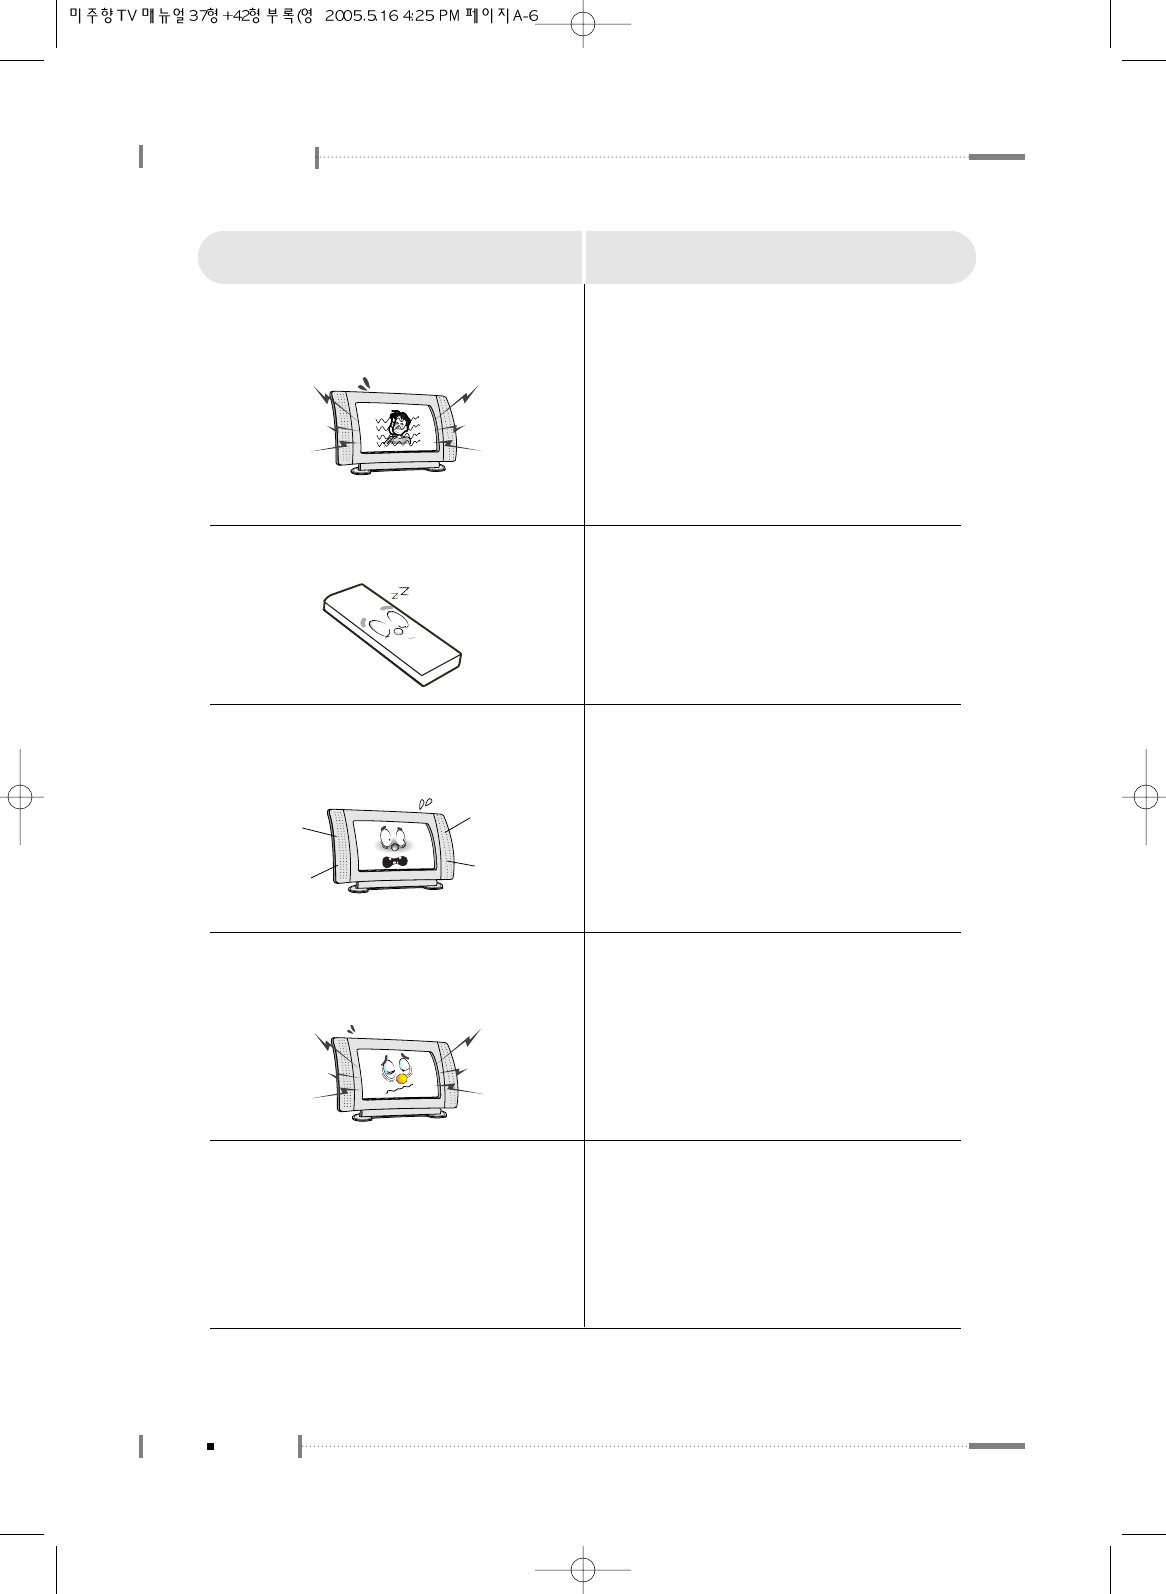
Something seems to be wrong with the TV
●The TV does not go on.
●The TV is making strange noises, but
there is no video or audio.
●There is video but no audio.
●There is audio but no video.
Check the power cable connection and
press the <POWER> button on the
remote controller.
The TV may be in external input mode.
Press the <TV/AV> button on the remote
controller.
Try pressing the volume adjustment
< > button.
Try pressing the <MUTE> button on the
remote controller.
Press the <MENU> button to adjust the
screen brightness (go to the screen
menu to adjust the settings. For more
information, see Pages 2-18~19.).
When you connect it to the external
devices, check the status of Video
terminal connection.
Symptoms What to do
●Images overlap , spots appear on the
screen, and audio is unstable.
Check the antenna cable connection.
Check whether the antenna cable is old
or damaged.
Check whether the external antenna
direction is correct. It may have been
altered by strong winds and so on.
Appendix
A-6
Appendix
●The picture shakes, lines appear, and
audio is unstable.
●The remote controller does not work.
Check whether the TV signal is receiving
interference from other radio waves or
devices.
Check whether the TV signal is receiving
interference from automobiles, high-
voltage cables, airplanes, neon
signboards and so on. Change the
antenna direction if necessary.
Check whether the batteries are dead or
installed incorrectly.
Check whether the receiver on the LCD
TV unit is masked. Ensure it is facing in
the correct direction.
Symptoms What to do
●Stereo audio is unclear or discontinuous. If the broadcasting station is too far away
or the TV is getting interference from other
radio waves, the stereo audio may not be
clear. In this case, press the <SSM>
button.
●The LCD TV is making cracking
sounds.
When the LCD TV is turned on or off,
cracking sounds may be heard. This
happens because the cabinet contracts
or expands due to environmental factors,
including humidity and temperature.
There are no adverse effects on the TV’s
performance.
●When playing VCR, there is no video. Check whether the VCR is set to a
dedicated VCR channel (3 or 4), and the
input mode for the TV is set to video
mode.
Check the video cable connection
between the VCR and TV.

A-7
Appendix
Appendix
Symptoms What to do
●When playing a DVD, there is no video. Check the video cable connection
between the DVD and TV.
Check whether there is a problem with
the DVD title.
Check whether the external input signal
matches the DVD output signal.
●When playing VCR, there is noise on the
screen.
Use the screen adjustment button on the
VCR to make adjustments.
Check whether the video tape is in good
condition.
●Some channels cannot be received.
●When playing VCR, there is no sound.
Ensure that your channel selection is
correct. For more information, see ‘2.3
To Configure TV Channels’.
Check the audio cable connection
between the TV and VCR.
●The DVD playback screen is not clear. Check whether the DVD title surface is
clean. Check for scratches and dust.
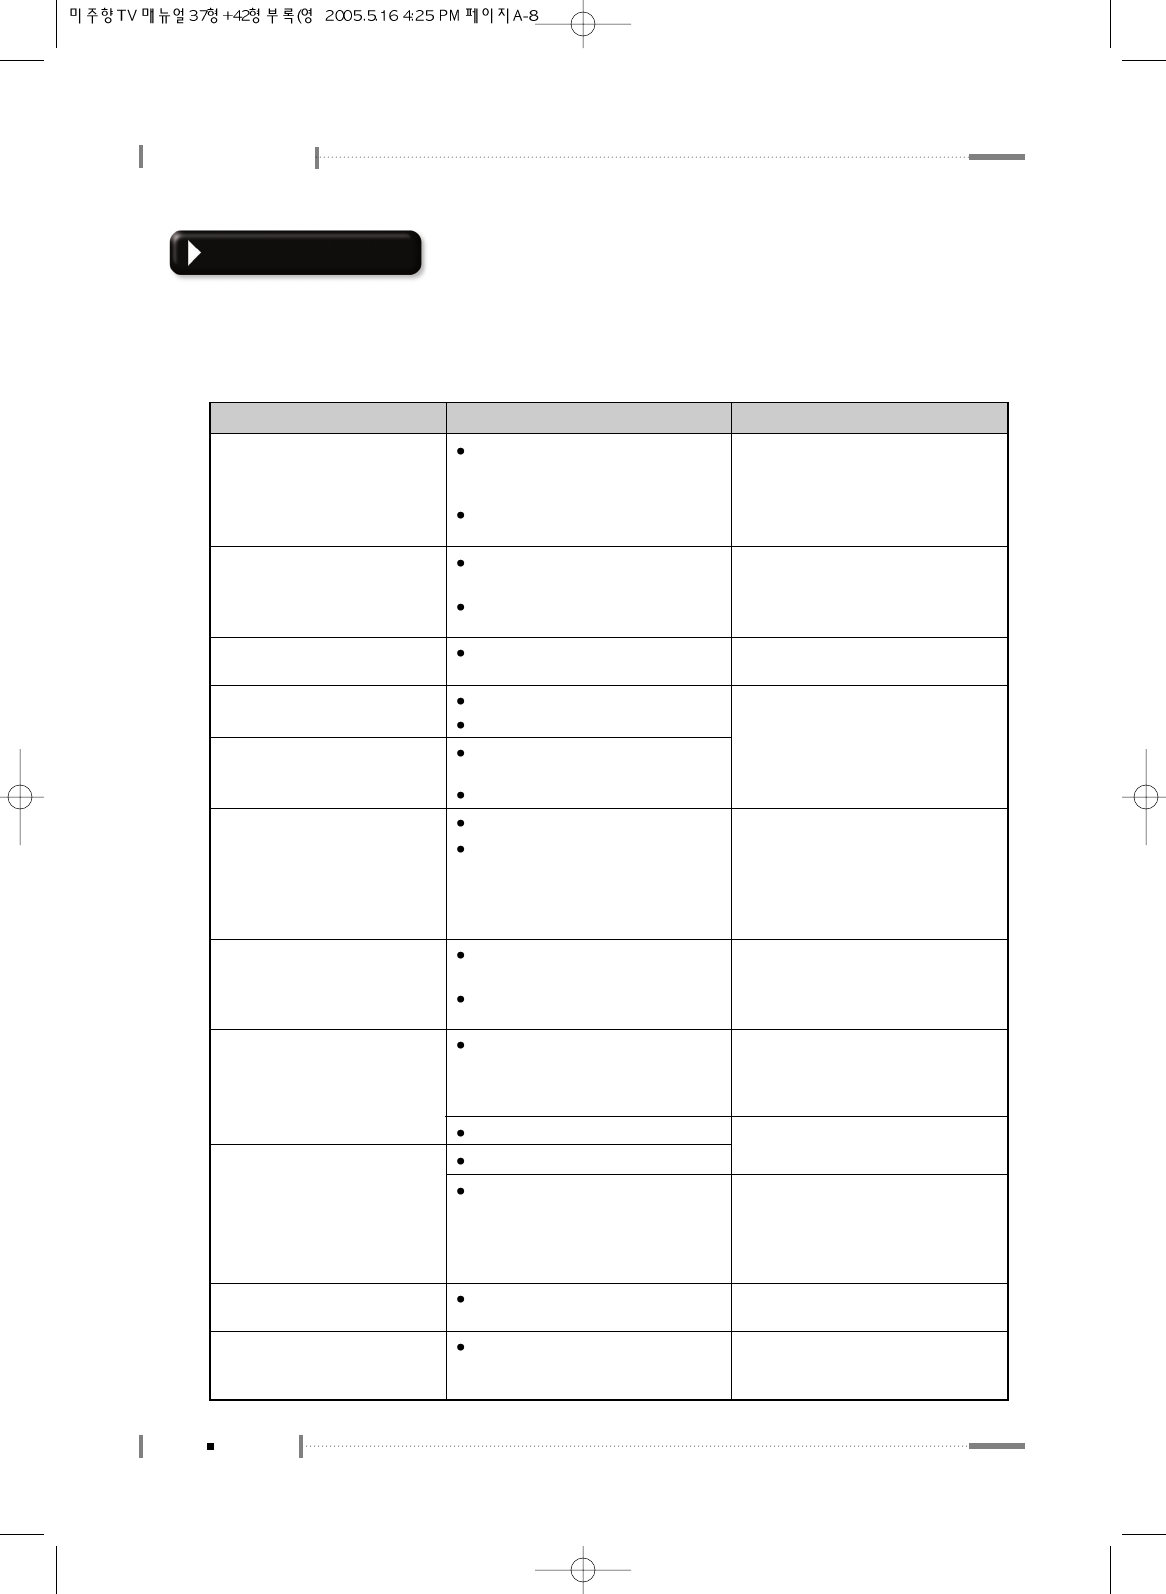
Appendix
A-8
Appendix
Troubleshooting
If you have a problem setting up or using your LCD TV, you may be able to solve it yourself.
Before contacting customer service, try the suggested actions that are appropriate to your
problem.
What you see... Suggested Actions Reference
‘No Signal’ message Ensure that the signal cable is firmly
connceted to the PC or video
sources.
Page 1-18 ~ 1-23
Ensure that the PC or video sources
are turned on.
‘Out of Range’ message Check the maximum resolution and
the frequency of the video adaptor.
Page A-4
Page A-5
Compare these values with the data
in the Display Modes Timing Chart.
Page 2-18 ~ 2-19
Page 3-6 ~ 3-9
The image is too light or too dark Adjust the Brightness and Contrast.
Auto in progress will clear it automatically.
Page 3-8Horizontal bars appear to flicker,
jitter or shimmer on the image.
Adjust the Clock function.
Vertical bars appear to flicker,
jitter or shimmer on the image.
Adjust the Phase function and then
adjust the Clock function.
Auto in progress will clear it automatically.
Page 3-8
Page 3-9
Image is not centered on the
screen.
Auto
in progress
will set the best
position automatically.
Adjust the horizontal and vertical
position.
Page 3-8
Page 3-9
Image is not stable and may
appear to vibrate
Auto in progress will clear it automatically.
Check that the display resolution and
frequency of your PC or video board
is an available mode for your TV.
On your computer check:
Control Panel, Display, Settings
No sound Ensure that the audio cable is firmly
connected to both the audio-in jack
on your TV and the audio-out jack
on your sound card.
Connecting a PC, TV or VCR, DVD
Page 1-18 ~ 1-26
Adjust the Sound settings
Page 2-20 ~ 2-22
Check the volume level
Check the volume levelSound level is too low
If the volume is still too low after
turning the conrol to its maximum,
check the volume control on the
computer sound card or software
program.
Refer to your computer, sound card or
software documentation.
Adjusting the Sound Settings,
Page 2-20 ~ 2-22
Sound is too high pitched or too
low pitched
Adjust the Treble and Bass to
appropriate level.
Connecting to watch TV or VCR, DVD
Page 1-18 ~ 1-26
TV signal is not received Ensure that the antenna cable is
firmly connected to the VHF/UHF
jack.