ATEN Technology IOGEAR GBU421 Bluetooth 2.0 USB Micro Adapter User Manual GBU421 M1204 indd
ATEN Technology, Inc., dba IOGEAR Bluetooth 2.0 USB Micro Adapter GBU421 M1204 indd
Users Manual

1
Installation
Installation Guide
Bluetooth® 2.0 USB Micro Adapter
GBU421
PART NO. M1204

2
3

2
3
Welcome
Thank you for purchasing one of the most feature-rich Bluetooth® to USB adapters available. IOGEAR’s
Bluetooth® to USB adapters are rst-rate wireless connectivity accessories designed to help reduce the
frustration of dealing with cable glut in your home or ofce. These adapters allow computers with USB
connections to become Bluetooth enabled computers. They comply to Bluetooth® 2.0 and USB 2.0
specications, and provide users with a 3 Mbps data rate. They also enable wireless Personal Area
Network (PAN) connectivity to Bluetooth enabled devices such as PDA’s, printers, cellular phones,
computers, etc.
We hope you enjoy using your IOGEAR Bluetooth® to 2.0 USB Micro Adapter, another connectivity
solution from IOGEAR.

4
5
Table of Contents
Package Contents 5
Overview 6
Features 8
Requirements 9
Introduction 10
Installation-Windows XP 11
Initial Bluetooth Conguration Wizard 14
Installation-Windows Vista 17
Uninstall Drivers 23
Installation-Mac OS X 24
Connect to a Cellular Phone 27
Connect to Network Access 33
Connect to a Printer 42
Connect to a PDA 45
Pairing 50
Installation - Windows XP Service Pack2 52
Specication 56
Technical Support 57
Federal Communications Commission
(FCC) Statement
58
CE Statement 60
Limited Warranty 61
Contact 62

4
5
Package Contents
This package contains:
GBU421
1 Bluetooth• ® 2.0 USB Micro Adapter
1 Driver CD•
1 Quick Start Guide•
1 Warranty Card / Registration Card•
The Bluetooth Installation CD contains the following:
Bluetooth drivers for Windows 2000/XP/Vista•
User Manual for IOGEAR Bluetooth• ® 2.0 USB Micro Adapter
* If any items are damaged or missing, please contact your dealer.

6
7
Overview
Bluetooth is a low-power wireless networking standard which uses short radio waves to allow electronic
devices to communicate with each other without using cables.
The following applications are supported by Bluetooth® technology:
Synchronize your Bluetooth PDA with your computer. •
Send your business card to anyone who has a Bluetooth device.•
Send or receive les to or from anyone who has a Bluetooth enabled device.•
Chat with anyone who has a Bluetooth enabled computer. •
Play a one-on-one serial game without a cable.•
Send an e-mail without being wired to the network.•
Dial up to the Internet on your computer over your Bluetooth cellular phone.•
Send a fax from your computer over your Bluetooth cellular phone.•
Transfer data between your cell phone and PC. •

6
7
Most Bluetooth-enabled devices have the capability to act as:
A Bluetooth server - these devices provide one or more services, such as access to the Internet, or •
to other Bluetooth devices.
A Bluetooth client - these devices use the service(s) provided by Bluetooth servers.•
Most Bluetooth devices that can act as both server and client, and can often do both at the same time.

8
9
Features
Eliminates cables between your computers•
Controls and communicates with Bluetooth enabled devices•
Enables wireless Personal Area Network (PAN) connectivity•
Bluetooth specication 2.0 compliant•
USB specication 2.0 compliant•
Up to 10 meter (30 feet) wireless working distance for Bluetooth• ® 2.0 USB Micro Adapter.
Up to 3 Mbps data rate•
Small form factor makes it easy to carry and place•
Crisp, easy, and fast installation and setup•
Built-in security to assure the privacy of your communication – Pairing, Encryption, and Authentication•
PC and Mac compatible•

8
9
Requirements
System Requirements
Hardware Requirements:
• Available USB port
Operation System:
For PCs: Windows 2000/XP/Vista
For Macs: OS X v10.3.9 or later

10
11
Introduction
IOGEAR®’s Bluetooth® 2.0 USB Micro Adapter is a Class 2 device with a wireless working distance of up
to 30 feet (10 meters). This device allows any computer with USB connections to become a
Bluetooth™ enabled computer. It complies with Bluetooth 2.0 and USB 2.0 specications, and provides
users with a 3 Mbps data transfer rate at ranges up to 30 feet. It also enables wireless Personal Area
Network (PAN) connectivity to Bluetooth™ enabled devices such as PDA’s, printers, cellular phones,
computers, etc. The Wireless Bluetooth™ to USB adapter is compatible with both PC and Mac. It is easy
to install and use, and very portable. Another great solution from IOGEAR® for home and mobile
networking needs.
Bluetooth® 2.0 USB Micro Adapter is a class 2 device with a wireless working distance of 30 feet (10
meters).
10
11
Installation-Windows XP
The Microsoft Bluetooth stack comes included with Service Pack 2 for Windows XP. If you already have
Service Pack 2 installed, you may choose not to install drivers from the installation CD and instead use
the Microsoft Bluetooth drivers. Please see Page 51 on the manual for more details.
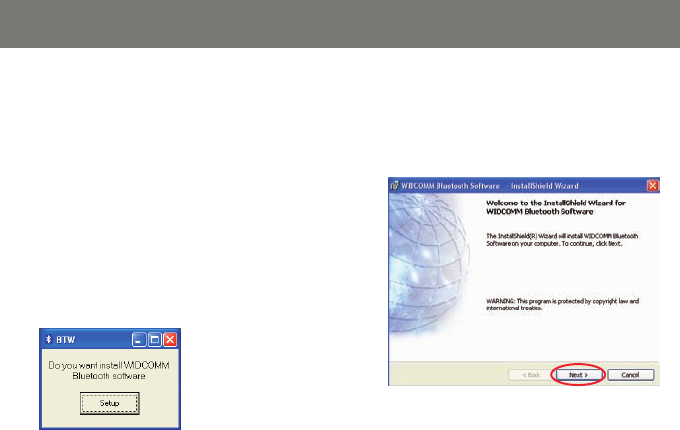
Click on 1. Setup to start the installation. Make
sure that the IOGEAR Bluetooth adapter is
NOT plugged into the computer at this
moment. Insert the IOGEAR installation CD
into your CD-ROM drive. The auto-start
feature will bring up the installation window
to begin the driver installation. If the
installation CD does not auto-start, simply
browse to your CD drive and run the setup
le. Please follow the on-screen instructions
to install the drivers.
Click 2. Next to continue.
12
13
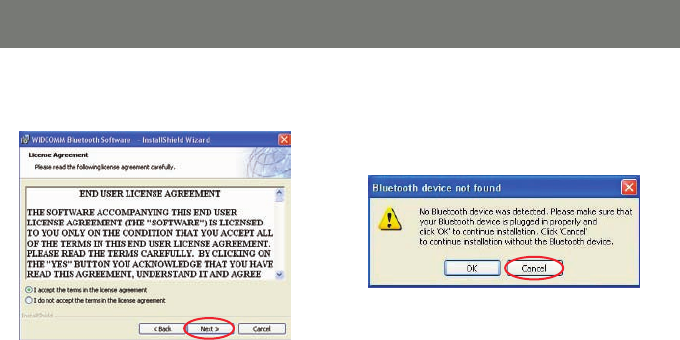
Select “I accept the terms in the license 3.
agreement” and click Next to continue
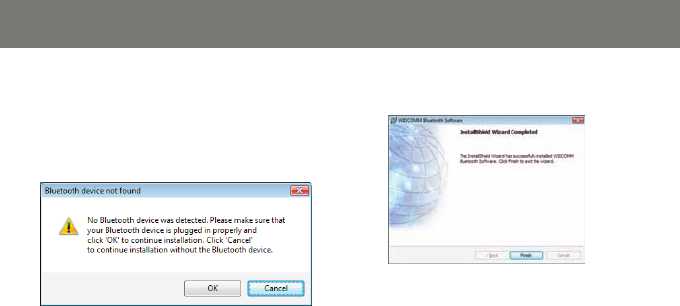
During the install, a “Bluetooth Device not 4.
Found” window will appear. Do Not plug
in the Bluetooth® adapter at this time and
click on Cancel to proceed with the driver
installation.
12
13
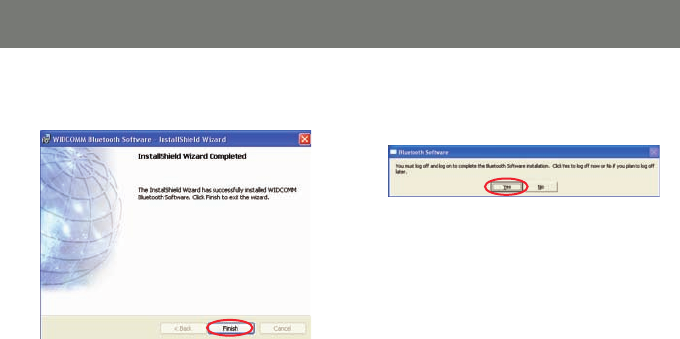
Once the driver installation has completed, 5.
click Finish.
In order to complete the Bluetooth instal-6.
lation software you will be asked to Log off
from your computer. Click Yes to log off.
14
15
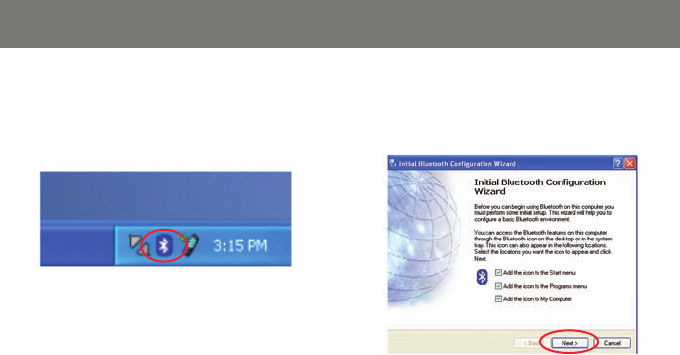
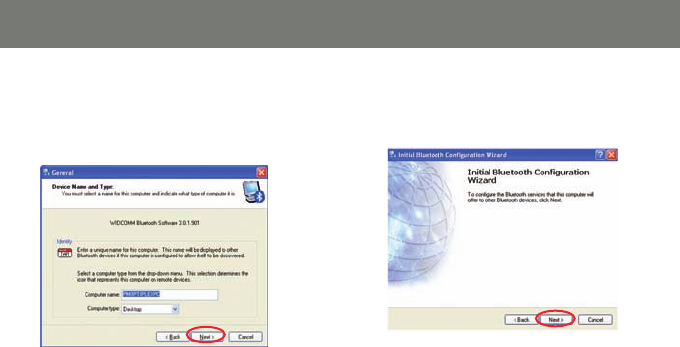
Initial Bluetooth Conguration Wizard
Once the Initial Bluetooth Conguration 2.
Wizard has started, click Next.
For Windows XP
Now double click the Bluetooth icon in the 1.
system tray. This will start the “Initial
Bluetooth Conguration Wizard.”
Note: We suggest leaving everything as
default to minimize mistaken conguration.
14
15
Next, enter a unique name for this computer. 3.
This name will be displayed to other
Bluetooth devices. Select a computer type
from the drop-down menu and click Next.
Click 4. Next to congure the services this
computer will offer to other Bluetooth
devices.
16
17
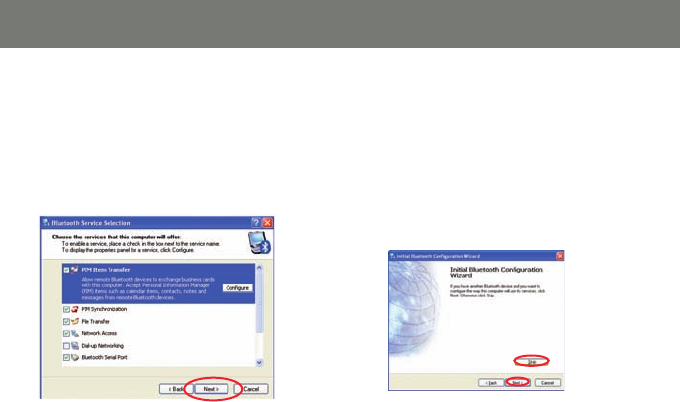
Choose the services that this computer will 5.
offer to the Bluetooth devices by placing a
check in the box. To display the properties,
click on the congure button. Click Next to
proceed.
At this point, Windows will install the software 6.
necessary for the services you selected.
Once Windows is nished installing the 7.
software, the following window will appear.
This window will allow you to congure your
computer to use the service of another
Bluetooth Device.
If you do not have any additional devices you
wish to connect to at this time, click Skip,
click Finish on the nal screen.
16
17
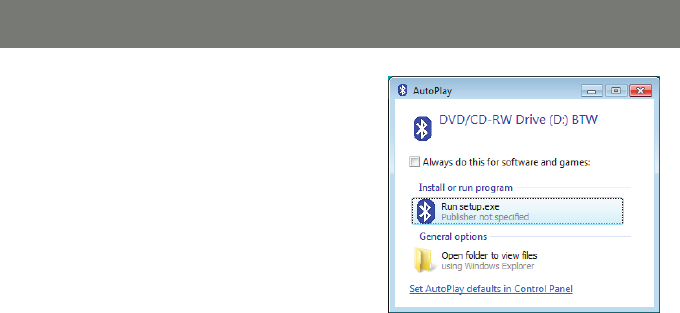
Installation-Windows Vista
Make sure the IOGEAR Bluetooth adapter 1.
is NOT plugged into the computer before
installing the software. Insert the IOGEAR
installation CD into your CD-ROM drive. The
auto-start feature will bring up the auto play
options for the installation CD. Simply click
on Run setup.exe to start the installation.
Insert the IOGEAR installation CD into your
CD-ROM drive. The auto-start feature will
bring up the auto play options for the instal-
lation CD. Simply click on Run setup.exe
view les to start the installation.

18
19
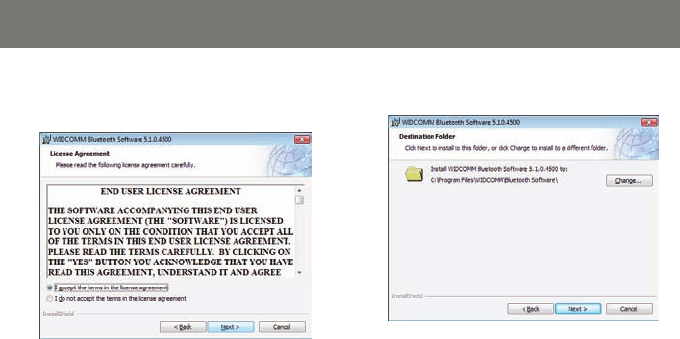
To start the Widcomm Bluetooth software 2.
installation simply click on the Setup button.
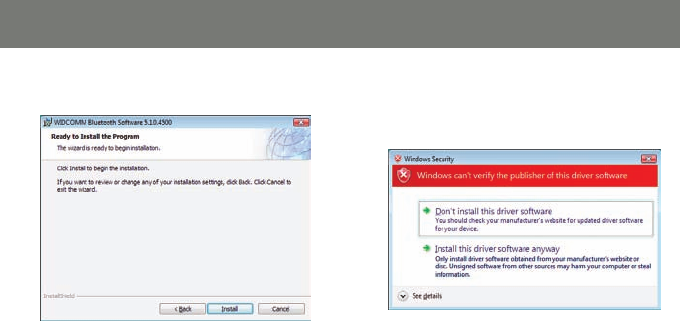
Click 3. Next to begin the driver installation.
18
19
Click 5. Next to continue.Select “I accept the terms in the license 4.
agreement” and click Next to continue.
20
21
Click 6. Install to being the installation. If you are prompted by the windows security 7.
message select “Install this driver software
anyway” to proceed with the installation.
20
21
Click 9. Finish to complete the installation.During the install, a “Bluetooth Device not 8.
Found” window will appear. DO NOT plug in
the Bluetooth adapter at this time, simply click
Cancel to proceed with the driver installation
without connecting the Bluetooth device.

22
23
In order to complete the Bluetooth installation 10.
software installation you will be asked to Log
off from your computer. Click Yes to log off.

22
23
Uninstall Drivers
Windows XP Service Pack 2
First, unplug the IOGEAR USB Bluetooth1. ®
2.0 USB Micro Adapter from your computer
Go to Control Panel (Start > Settings > 2.
Control Panel)
Click on 3. Add or Remove Programs
Click on Widcomm Bluetooth Software and 4.
click on [Remove]
When the uninstall is complete, restart your 5.
computer
Windows Vista
First, unplug the IOGEAR Bluetooth1. ® 2.0
USB Micro Adapter from your computer
Go to Control Panel (Start > Control Panel)2.
Click on Uninstall a program under Programs 3.
or Click on Programs and Features (Control
Panel Classic View)
Click on Widcomm Bluetooth Software and 4.
click on [Uninstall] on the top.
When the uninstall is complete, restart your 5.
computer
24
25
Installation-Mac OS X
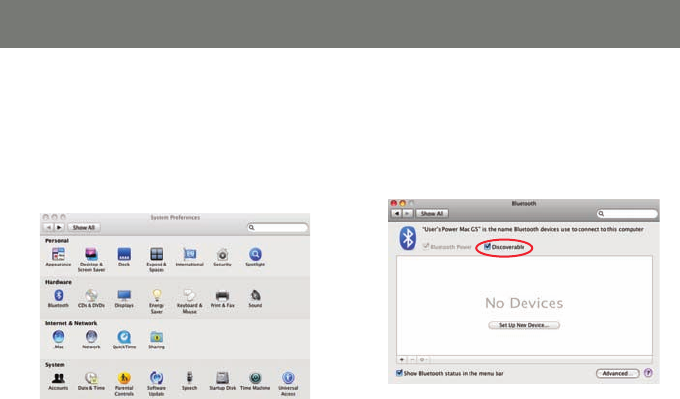
Use of the IOGEAR Bluetooth adapter 1.
requires MAC OS X v10.3.9 or later. There is
no need to install any additional software, as
Apple provides all required Bluetooth drivers.
Simply plug in your Bluetooth® adapter into
an available USB port on your computer, and
go to System Preferences.
Click on the Bluetooth icon and make sure 2.
the box next to Discoverable is checked (in
10.3 and 10.4 this will be on the Settings tab).
To connect and pair with a Bluetooth device,
click on Set Up New Device.(in 10.3 and 10.4
this will be on the Devices tab).
24
25
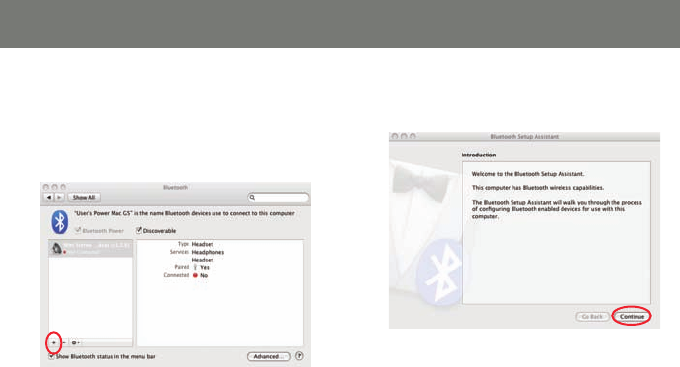
This will initiate the Bluetooth Setup Assistant; 4.
click Continue to proceed
If you have already connected a device 3.
under 10.5 the Bluetooth window will look
like this. Instead of clicking the Set Up New
Device button, click the button with a plus
(+) symbol below the device list.
26
27
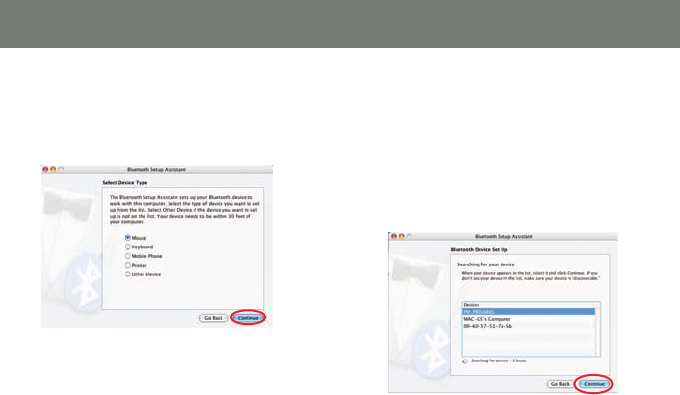
On this window, you can select what type of 5.
Bluetooth device you want to setup. Please
make your choice below and then click
Continue.
Your computer will search Bluetooth 6.
devices in your area and display them under
the window below. Select the device you
wish to communicate with and then click
Continue to pair/connect to your device.
Please refer to the Apple website for further 7.
information on Apple Bluetooth support at
www.apple.com.
26
27
Connect to a Cellular Phone
How to connect to a Cellular Phone (Bluetooth Enable)
For Windows XP
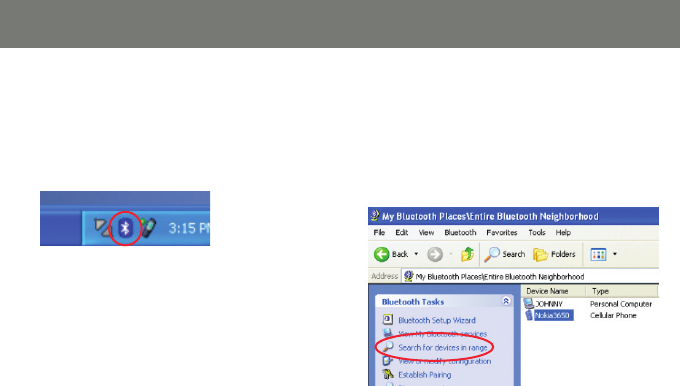
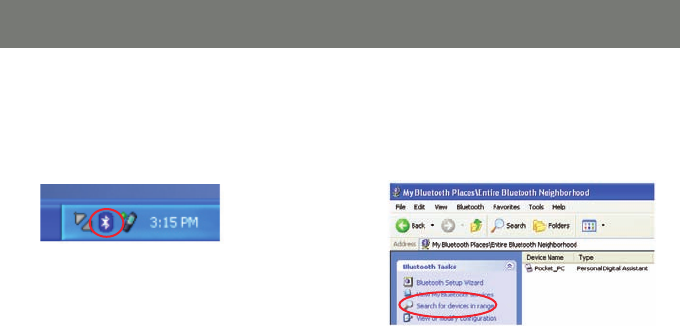
Double-click on the IOGEAR Bluetooth icon 1.
in the system tray.
Next, click on 2. Search for devices in range.
As illustrated below, the Bluetooth-enabled cell
phone is detected.
28
29
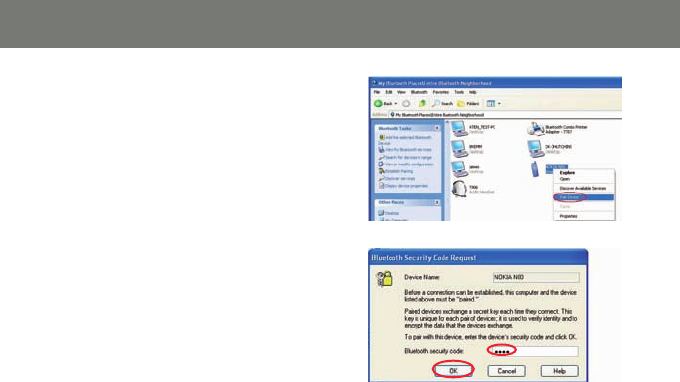
Right-click on the cell phone, and select 3. Pair
Device. When prompted for passkey, simply
type any four digits and click OK. On the
phone, you will also be prompted to enter
a passkey. Make sure you enter the same
passkey as on the computer. Your devices
should now be paired.

28
29
In our example, we used a Nokia 3650 cell 4.
phone. Double-click on the phone to see the
available services. The services offered by
your cell phone may depend on the features
supported by your specic model and may
or may not require additional software by the
phone manufacturer.
In the case of Nokia phones, you can take full
advantage of your Bluetooth phone by using the
Nokia PC Suite software. Please check
www.nokia.com to see the version of the software
supported by your Nokia phone. Once you have
the Nokia PC Suite software installed on your
system, please proceed with the instructions below.
30
31
For Windows Vista
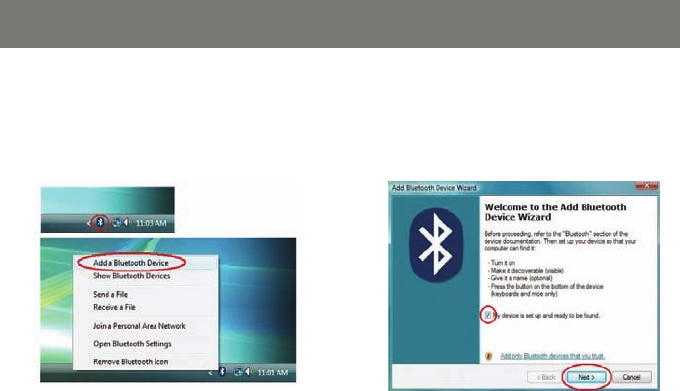
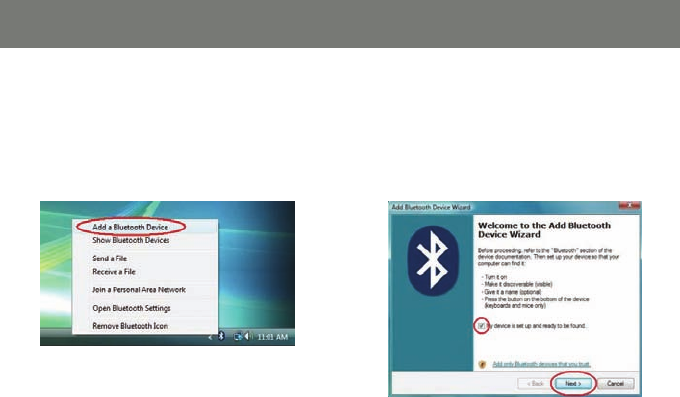
Right-click on the Bluetooth icon in the 1.
system tray and select Add a Bluetooth
Device.
Make sure to set your Bluetooth cellular 2.
phone in “discoverable” mode and check
the box as shown on the picture.
30
31
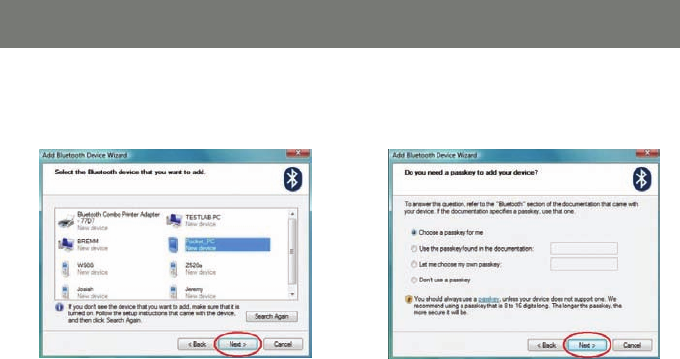
Your computer will search for all the 3.
Bluetooth devices in your area and list them.
Select the desired cellular phone, and click
Next.
Please consult the user manual for your 4.
cellular phone to see if you need a passkey
to pair/establish a connection.
32
33
Your Bluetooth cellular phone will then 5.
connect to the IOGEAR Bluetooth adapter.
To nish the process, simply click Finish.
32
33
Connect to Network Access
For Windows XP
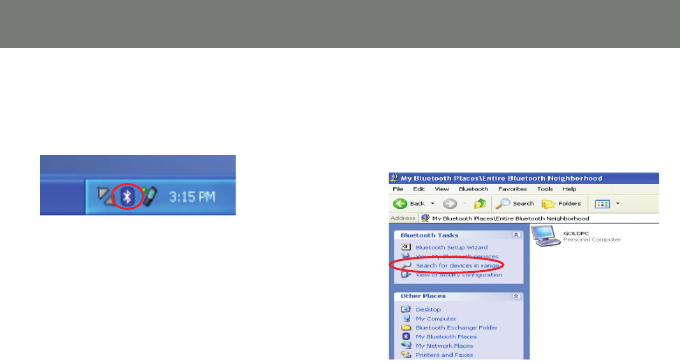
Double-click on the IOGEAR Bluetooth icon 1.
in the system tray.
Next, click on S2. earch for devices in range.
As illustrated below, the Bluetooth-enabled
computer is found.
34
35
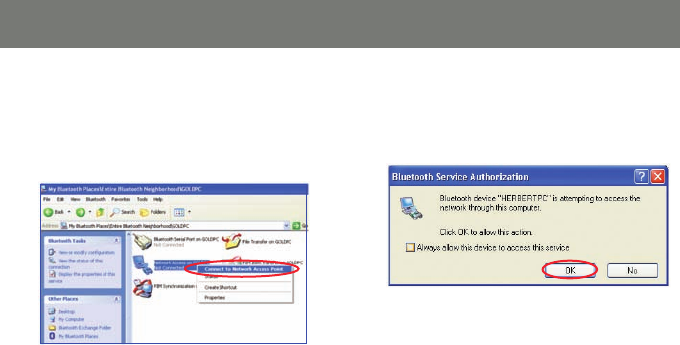
Double click on the device to display a list of 3.
its services. To establish a network
connection, right click on Network Access
and select Connect to Network Access
Point.
When the connection is being established, 4.
you will be prompted to accept/deny the
connection on your other computer. To
allow access, click OK.

34
35
Once you establish the connection, the 5.
Network Access icon will turn green and
say “Connected.” Your device will be able
to share its Internet connection (if the device
has Internet access) and les. If a passkey
has been set by either device, the passkey is
required to connect both Bluetooth enabled
devices.
At any time, when service requests are made 6.
from or to another Bluetooth device (e.g. File
Transfer, Network Access, Serial Port
Connection, etc.), a passkey is required to
connect the devices. This authentication is
not required once devices are paired (see
Chapter: What’s Pairing?).
36
37
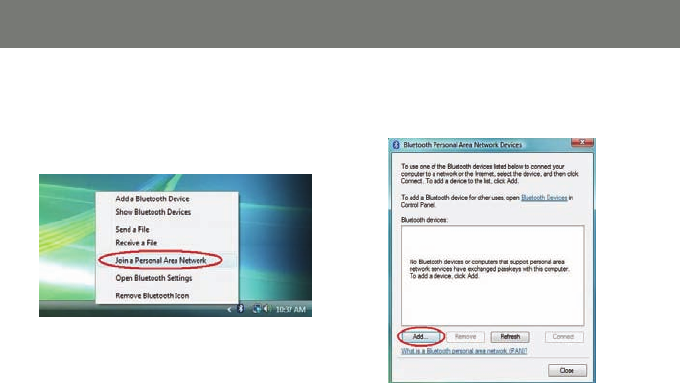
For Windows Vista
Right-click on the Bluetooth icon in the system 1.
tray and select Join Personal Area Network.
Click 2. Add to add a new network device.
36
37
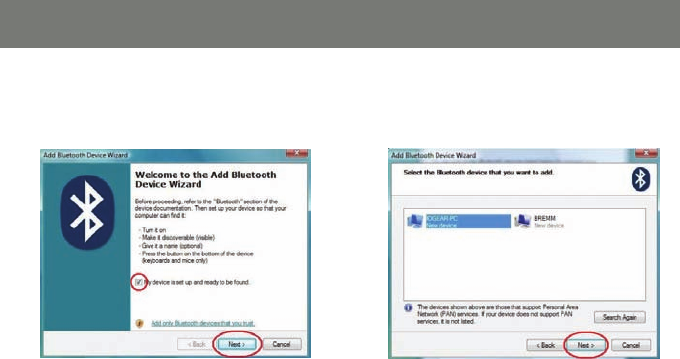
Make sure to set your Bluetooth enabled 3.
computer in “discoverable” mode and check
the box as shown on the picture.
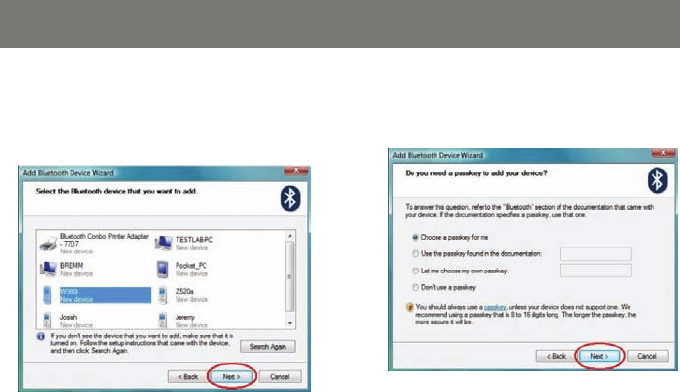
Your computer will search for all the Bluetooth 4.
devices in your area and list them. Select the
desired computer, and click Next.
38
39
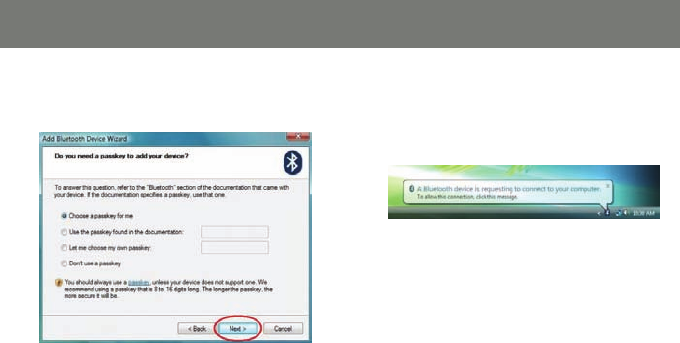
Decide if you use a passkey to add your 5.
device. Then click Next to proceed.
When the connection is being established, 6.
you will be prompted to accept/deny the
connection on your other computer. To allow
access, click on the message.
38
39
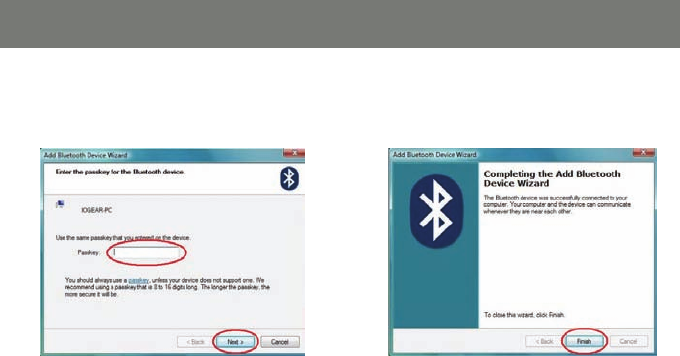
Enter the passkey that you have created or 7.
provided by the wizard to conrm the
connection.
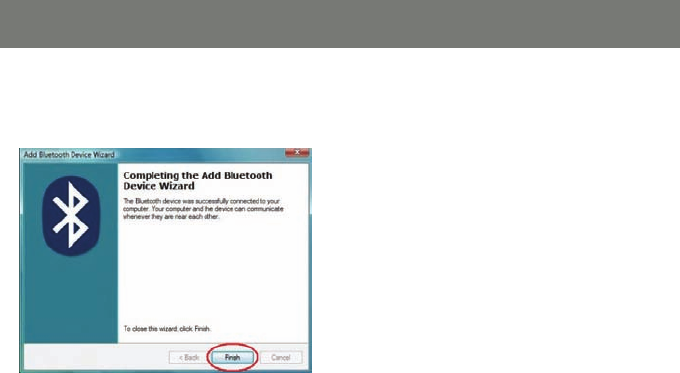
Your Bluetooth enabled computer will then 8.
connect to the IOGEAR Bluetooth adapter.
To nish the process, simply click Finish.
40
41
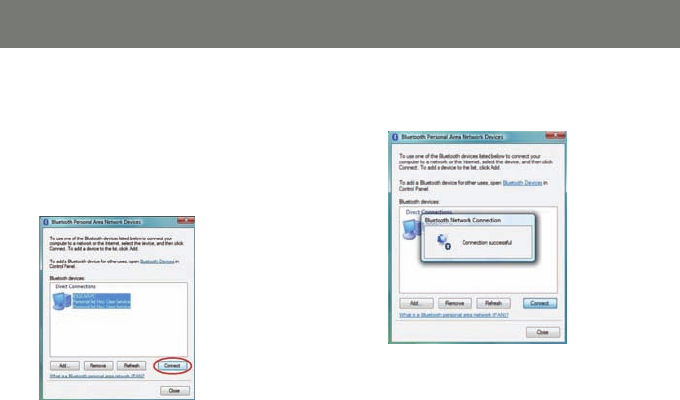
When you return to the Bluetooth Personal 9.
Area Network Device window by right-clicking
on the Bluetooth icon in the system tray and
select Join a Personal Area Network, now
you can see the connection that has been
established. Simply choose the desired con-
nection and click Connect.
Window will be closed automatically after the 10.
connection has successfully been connected.
40
41
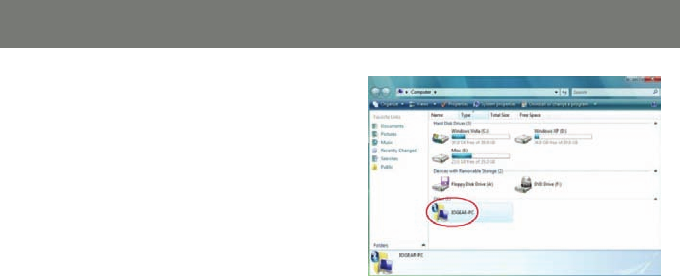
A Bluetooth connection is shown when you 11.
open Computer from the start menu. Now
your device will be able to share its internet
connection, printers, and les. (Make sure
the desired share options’ checkboxes are
checked under Bluetooth setting by
right-clicking on the Bluetooth icon in the
system tray.
42
43
Connect to a Printer
How to connect to a Bluetooth Enabled Printer
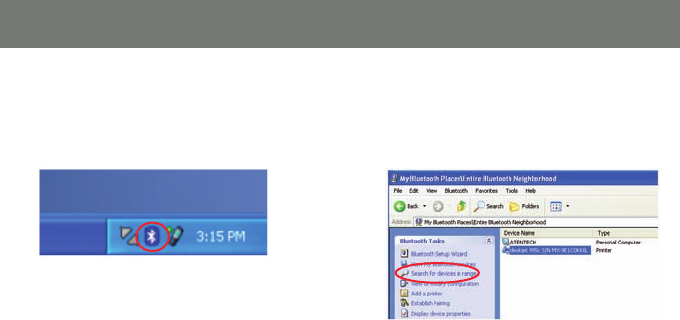
Double-click on the IOGEAR Bluetooth icon in 1.
the system tray.
Next, double click on “2. Search for devices
in range”.
42
43
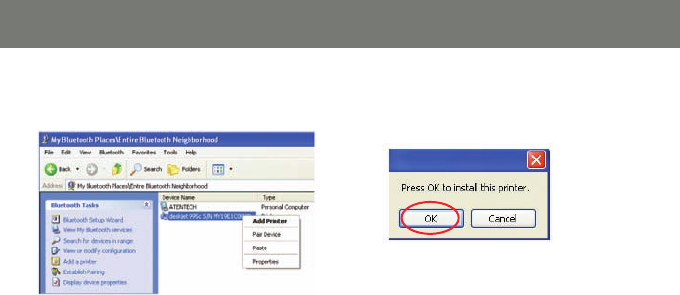
Right-click the printer you would like to add and 3.
select Add Printer.
Click 4. OK to install the printer. If your printer is
already installed, the printer properties window
will appear.
44
45
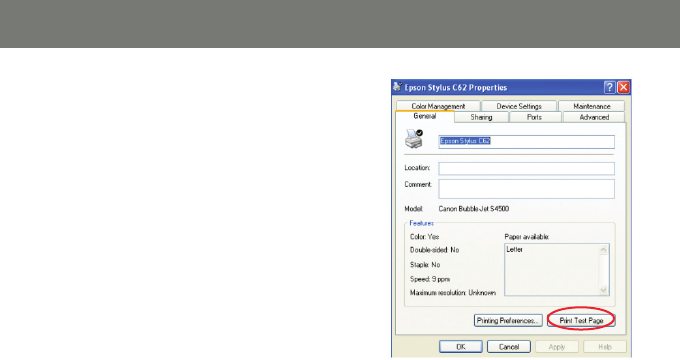
If your printer is already installed, the printer 5.
properties window will appear. Click on Print
Test Page to print a test page.
44
45
Connect to a PDA
How to connect to a Bluetooth Enabled PDA
For Windows XP
Double-click on the IOGEAR Bluetooth icon in 1.
the system tray.
Next, double click on “2. Search for devices
in range”.

46
47
Once the search is nished, double click on the 3.
PDA to view the series it offers.
At any time, when service requests are made 4.
from or to another Bluetooth device (e.g. File
Transfer, Network Access, Serial Port
Connection, etc.), a pass key is required to
connect the devices. This authentication is
not required once devices are paired (see
Chapter: What’s Pairing?).
46
47
How to connect to a Bluetooth Enabled PDA
For Windows Vista
Right-click on the Bluetooth icon in the 1.
system tray and select “Add a Bluetooth
Device”.
Make sure to set your Bluetooth enabled PDA 2.
in “discoverable” mode and check the box as
shown on the picture.
48
49
Your computer will search for all the Bluetooth 3.
devices in your area and list them. Select the
desired PDA, and click Next.
Please consult the user manual for your PDA to 4.
see if you need a passkey to pair/establish
a connection.
48
49
Our Bluetooth PDA will then connect to the 5.
IOGEAR Bluetooth adapter. To nish the
process, simply click Finish.

50
51
Pairing
What is “Pairing?”
Pairing is a Bluetooth function that enables Bluetooth devices to remain permanently linked to another.
What “Pairing” means in terms of security?
As mentioned, Pairing allows devices to permanently link with each other. The pass key authentication
will also be perpetuated in Pairing, meaning that devices will not ask for a pass key once they are paired.
Paired devices will remain linked, even if other paired devices are turned off. Once a paired device turns
back on, it is ready to be used and service requests will not ask for the pass key again. The built-in
128 bit security encryption of Bluetooth assures the privacy of your paired devices. Note: If devices are
unpaired, it is necessary to enter a pass key each time a service request is made from or to another
Bluetooth device.

50
51
Pairing Devices
Right-click on the Bluetooth device and select 1.
on “Pair device”.
Enter a Pass Key when asked. 2.
Note: The Pass Key on both devices must be
the same!
Example: If Device 1 tries to pair with Device
2, Device 1 will prompt for a Pass Key. Enter
any Pass Key. Device 2 will then ask for a
Pass Key. Enter the Pass Key, which has
been set for Device 1. Done!
The device is now paired with your computer.3.
Unpairing Devices
Right-click on the paired Bluetooth 1.
device in the list and select on “Unpair
Device”.
The device is now unpaired2.

52
53
Installation-Windows XP Service Pack 2
Windows XP Service Pack-Bluetooth Stack
If you are running Windows XP with Service
Pack 2, you may use the Bluetooth drivers
provided by Microsoft. Keep in mind, however,
that this Bluetooth stack has limited Bluetooth
proles support. For more information, please
visit the Microsoft website at www.microsoft.com.
To use the Microsoft Bluetooth stack, simply 1.
plug in your IOGEAR Bluetooth adapter into
an available USB port on your computer.
Windows will automatically detect the
Bluetooth device and install all necessary
drivers.
You will then see a Bluetooth icon on your 2.
tray bar that allows you to perform all
Bluetooth operations, as shown below:
52
53
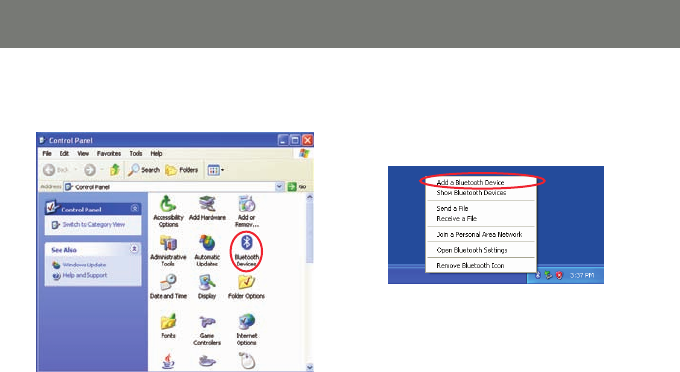
Optionally, you can nd this in 3. Control Panel
>Bluetooth Devices.
To connect with your Bluetooth devices, 4.
simply right-click on the Bluetooth icon on
the tray bar and select Add a Bluetooth
Device.
54
55
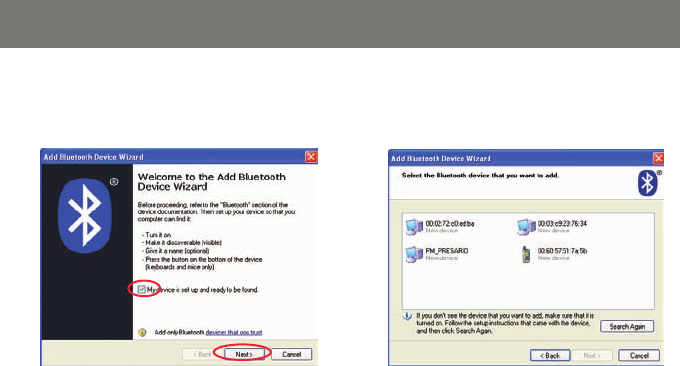
Make sure to set your Bluetooth device in 5.
“discoverable” mode and check the box as
shown on the picture.
Your computer will search for all theBluetooth 6.
devices in your area and list them. Select the
desired device, and click Next.
54
55
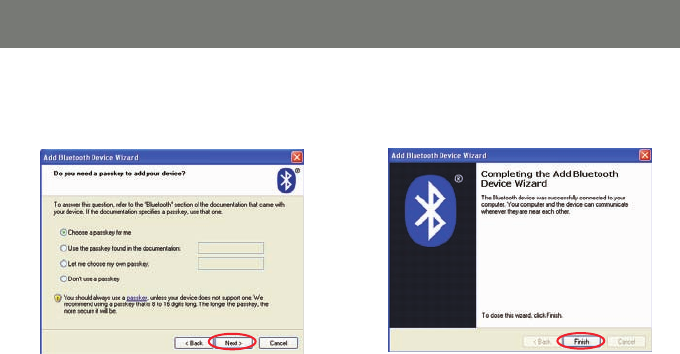
Please consult the user manual of your 7.
Bluetooth device to see if you need a
Passkey to pair/establish a connection.
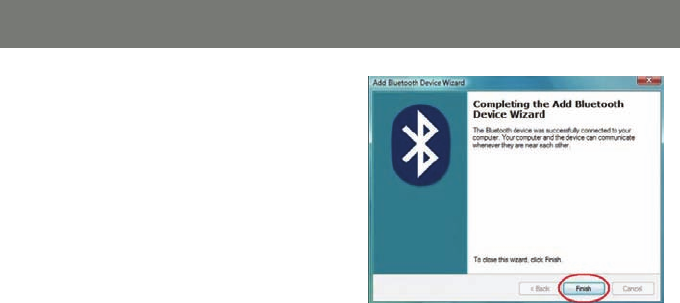
Your Bluetooth8. device will then connect to
the IOGEAR Bluetooth adapter. To nish the
process, simply click Finish.

56
57
Specications
Connectors USB Type A1
Data Rate 3 Mbps
Frenquency Band 2.400GHz - 2.4835GHz Unlicensed ISM band
Humidity 10% - 90% non-condensing
Interface USB
Modulation GFSK /π /4-DQPSK /8DPSK
Operating Temperature 0°C - 50°C
Security Pairing, Encrption, Authentication
Sensitivity Minimum - 76dB
Transmission Power 4.63dBm
Weight 0.4 oz.
GBU421

56
57
Technical Support
If you need technical support, please check out our IOGEAR Tech Info Library (T.I.L.) at www.iogear.
com/support for the latest tips, tricks, and troubleshooting. The IOGEAR T.I.L. was designed to provide
you with the latest technical information about our products. Most of the answers to your questions can
be found here, so please try it out before contacting technical support.
Technical support is available Monday through Friday from 8:00 am to 5:00 pm PST and can be reached
at (949) 453-8782 and (866) 946-4327 or by email support@iogear.com.

58
59
Federal Communications Commission (FCC) Statement
15.21
You are cautioned that changes or modications not expressly approved by the part responsible for com-
pliance could void the user’s authority to operate the equipment.
15.105(b)
This equipment has been tested and found to comply with the limits for a Class B digital device, pursuant
to part 15 of the FCC rules. These limits are designed to provide reasonable protection against harmful
interference in a residential installation. This equipment generates, uses and can radiate radio frequency
energy and, if not installed and used in accordance with the instructions, may cause harmful interference
to radio communications. However, there is no guarantee that interference will not occur in a particular
installation. If this equipment does cause harmful interference to radio or television reception, which can be
determined by turning the equipment off and on, the user is encouraged to try to correct the interference
by one or more of the following measures:
Reorient or relocate the receiving antenna.•
Increase the separation between the equipment and receiver.•
Connect the equipment into an outlet on a circuit different from that to which the receiver is connected.•
Consult the dealer or an experienced radio/TV technician for help.•

58
59
15.19
This device complies with Part 15 of the FCC Rules. Operation is subject to the following two conditions:
(1) This device may not cause harmful interference, and (2) this device must accept any interference
received, including interference that may cause undesired operation.
This transmitter must not be co-located or operating in conjunction with any other antenna or transmitter.

60
61
This device has been tested and found to comply with the requirements set up in the council directive on
the approximation of the law of member states relating to EMC Directive 89/336/EEC, Low Voltage Directive
73/23/EEC and R&TTE Directive 99/5/EC.
CE Statement

60
61
Limited Warranty
IN NO EVENT SHALL THE DIRECT VENDOR’S LIABILITY FOR DIRECT, INDIRECT, SPECIAL,
INCIDENTAL OR CONSEQUENTIAL DAMAGES RESULTING FROM THE USE OF THE PRODUCT,
DISK OR ITS DOCUMENTATION EXCEED THE PRICE PAID FOR THE PRODUCT.
The direct vendor makes no warranty or representation, expressed, implied, or statutory with respect to
the contents or use of this documentation, and especially disclaims its quality, performance,
merchantability, or tness for any particular purpose.
The direct vendor also reserves the right to revise or update the device or documentation without
obligation to notify any individual or entity of such revisions, or updates. For further inquires please
contact your direct vendor.

62
63
Contact
IOGEAR, INC.
23 Hubble
Irvine, CA 92618
P 949.453.8782
F 949.453.8785
Visit us at: www.iogear.com
©2008 IOGEAR. All Rights Reserved. PKG-M1204
IOGEAR and the IOGEAR logo are trademarks or registered trademarks of IOGEAR, Inc. Microsoft and Windows are registered trademarks of
Microsoft Corporation. IBM is a registered trademark of International Business Machines, Inc. IOGEAR makes no warranty of any kind with regards to
the information presented in this document. All information furnished here is for informational purposes only and is subject to change without notice.
IOGEAR, Inc. assumes no responsibility for any inaccuracies or errors that may appear in this document.

62
63

64

64 © 2007 IOGEAR, INC.
FUN
IOGEAR offers connectivity solutions that are innovative, fun, and stylish,
helping people enjoy daily life using our high technology products.
GREEN
IOGEAR is an environmentally conscious company that emphasizes the
importance of conserving natural resources. The use of our technology
solutions helps reduce electronic waste.
HEALTH
IOGEAR supports healthy and t lifestyles. By integrating products with
the latest scienti c developments, IOGEAR’s solutions enhance the life of
end-users.
About Us
About Us