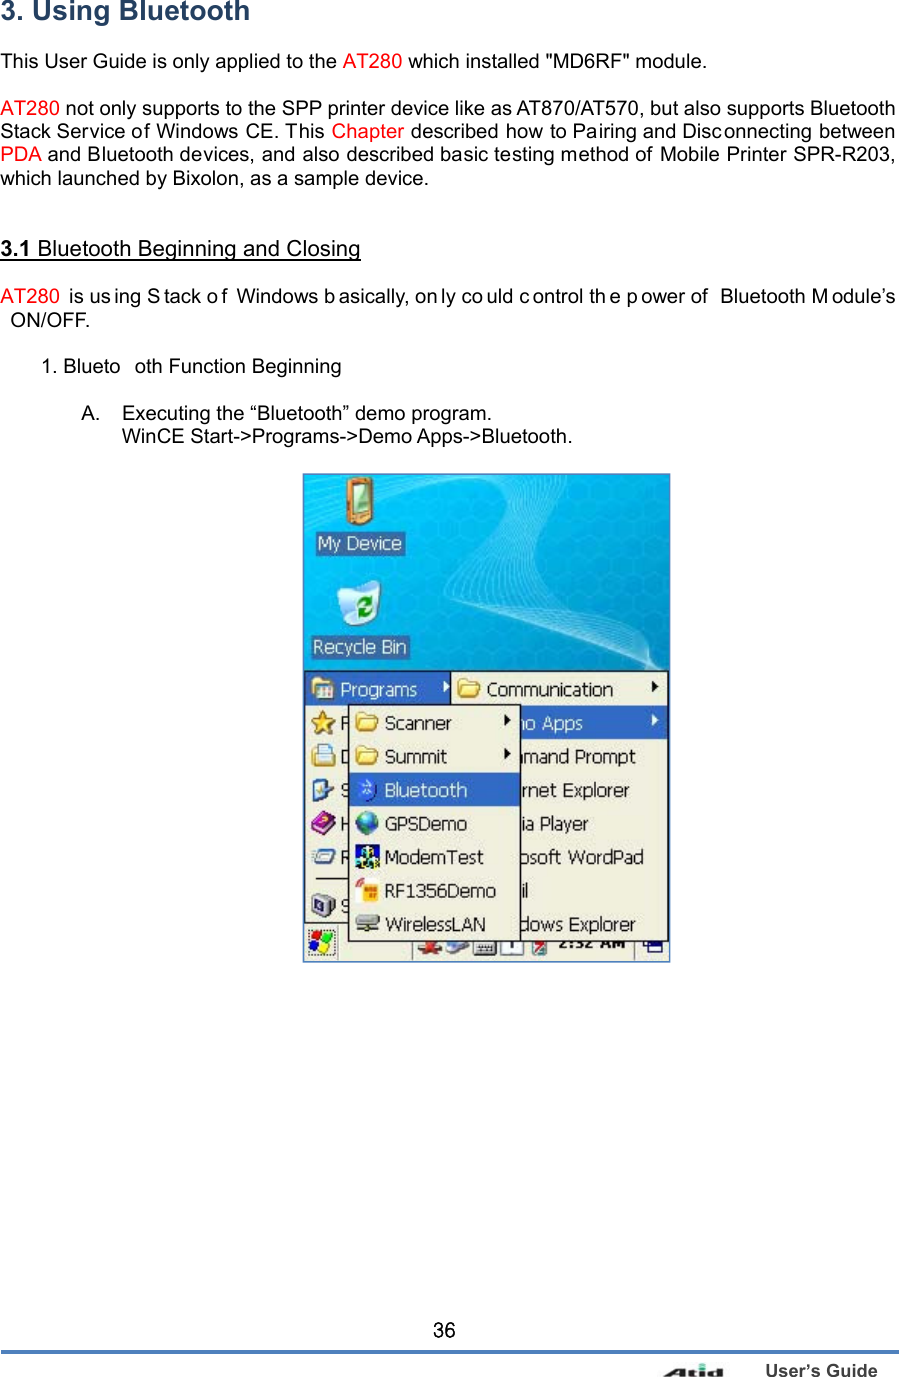
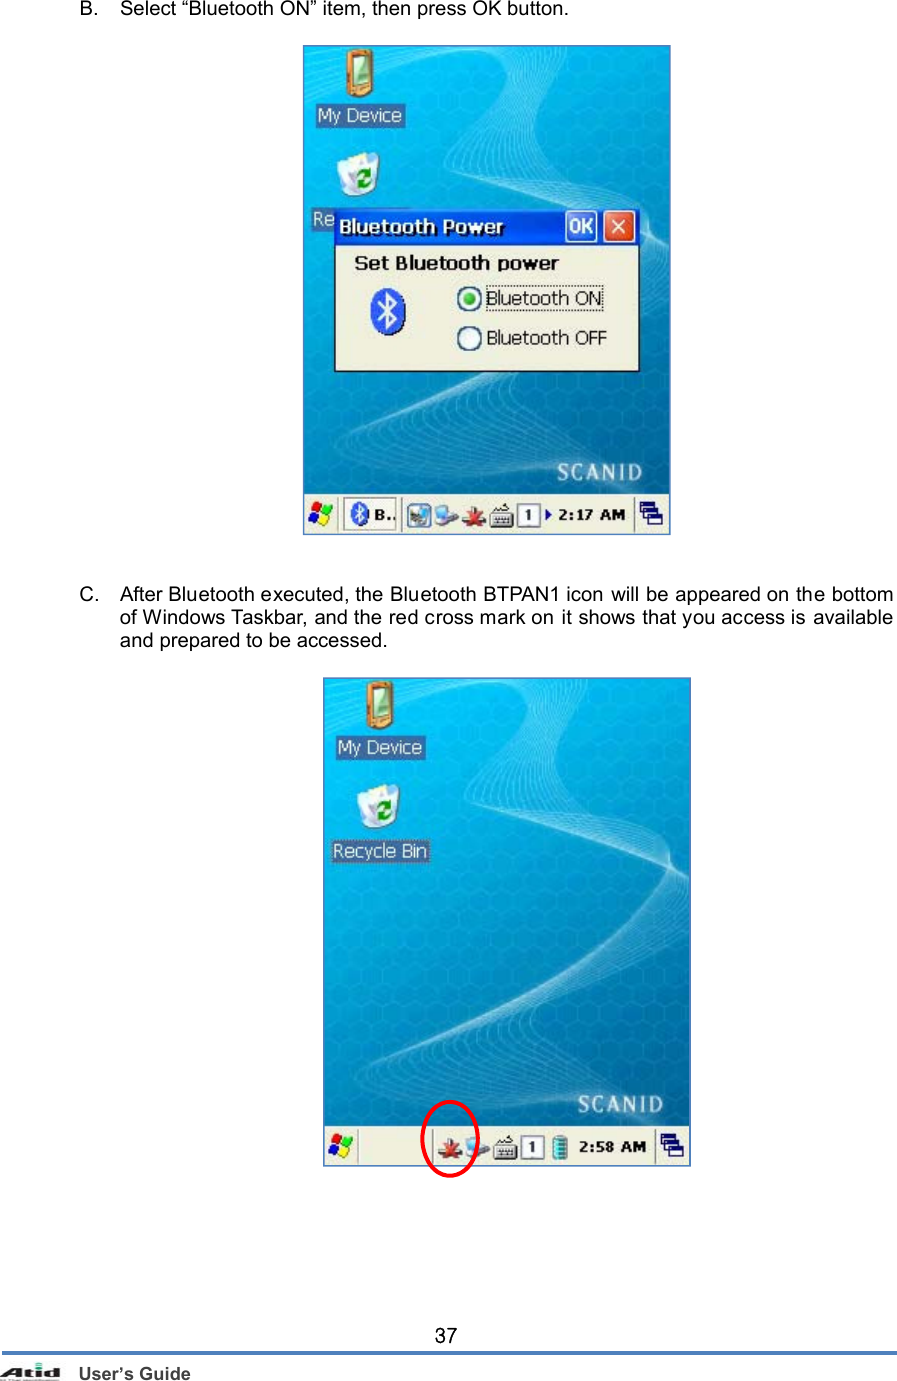
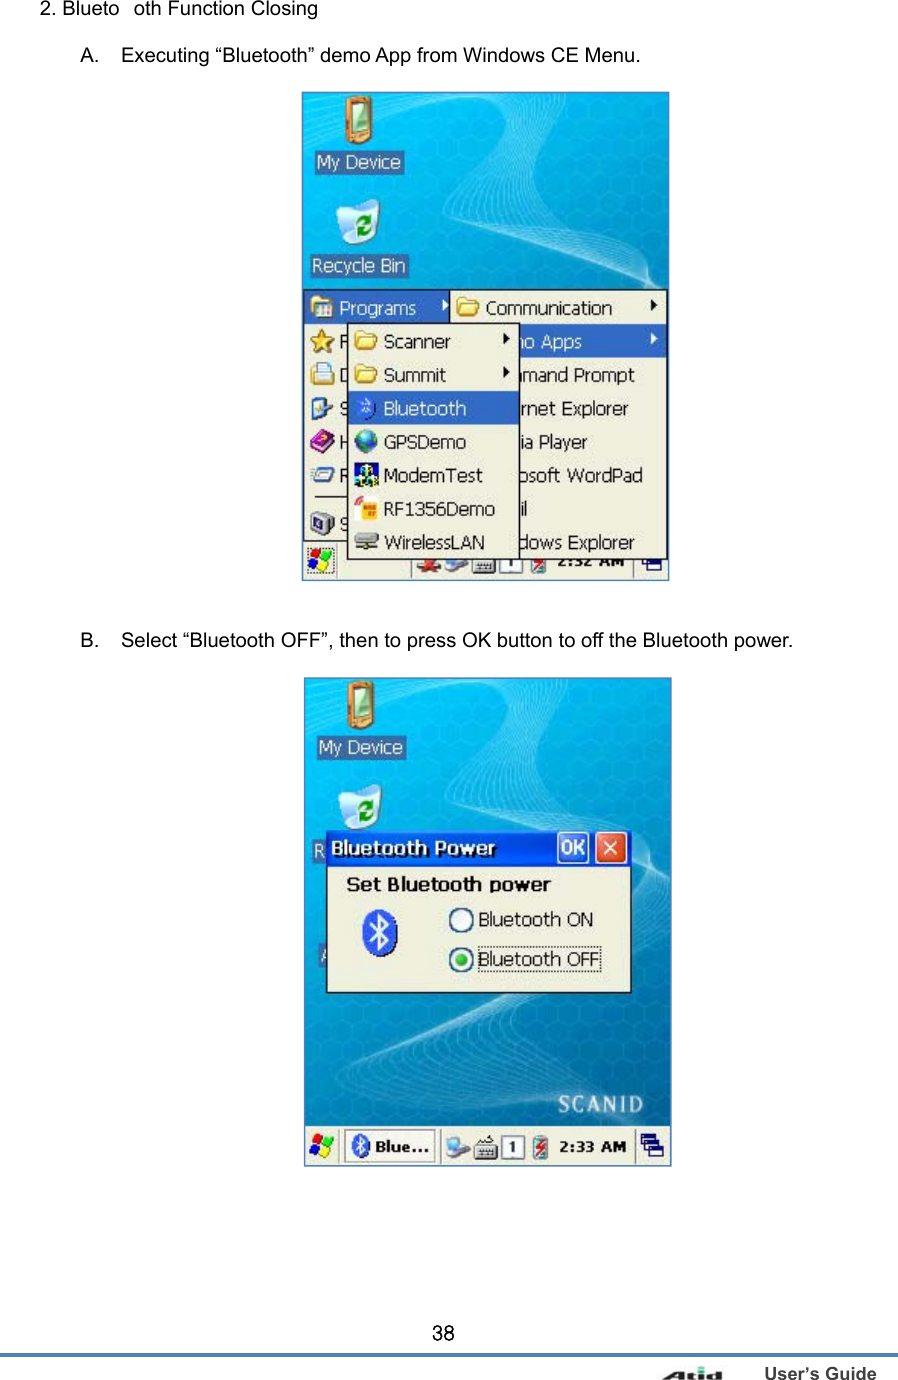
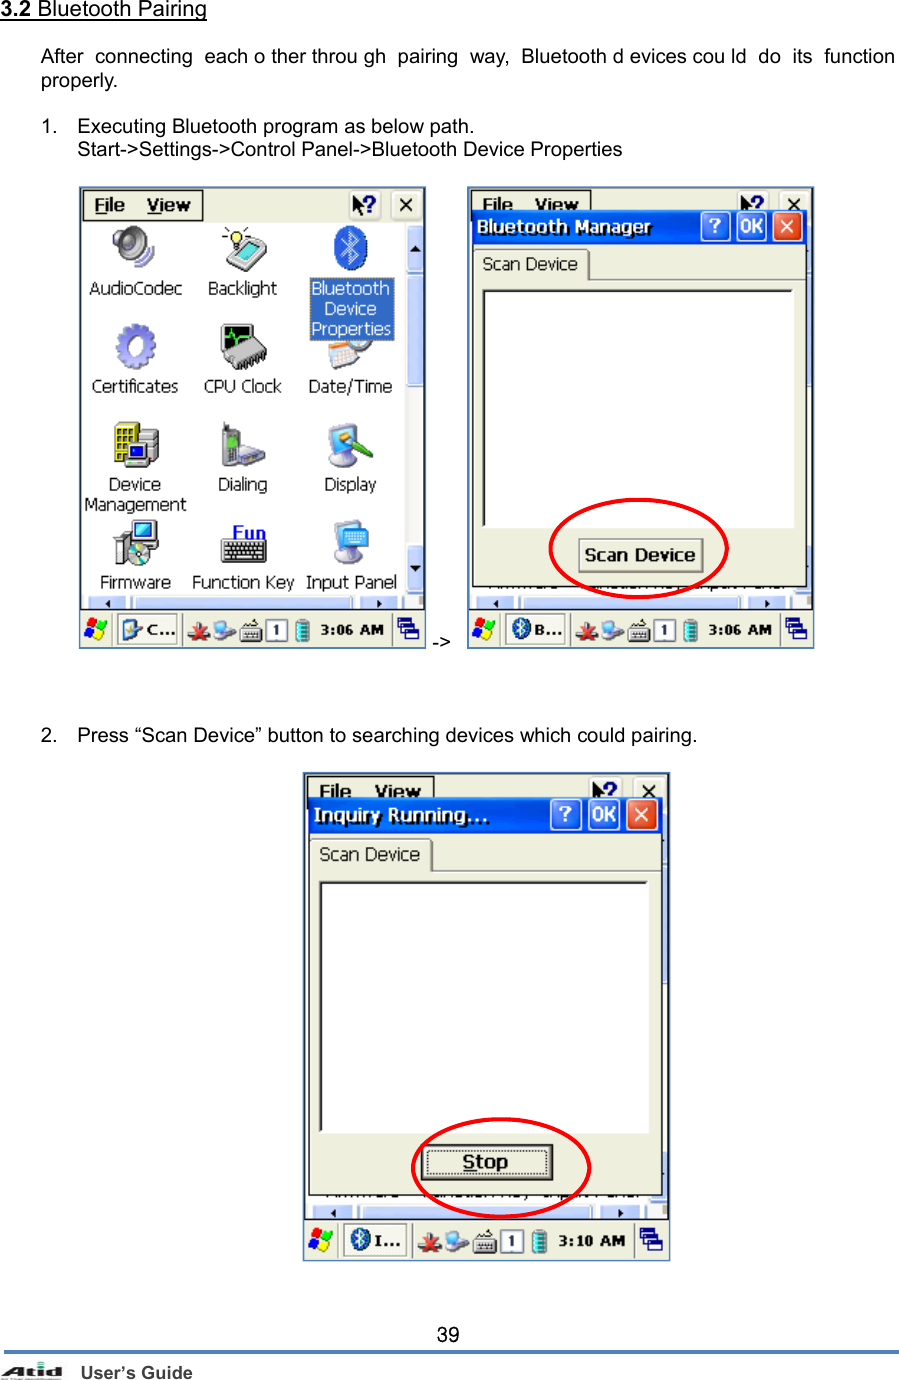
ATID AT280 INDUSTRIAL PDA User Manual USERS MANUAL
ATID Co., Ltd INDUSTRIAL PDA USERS MANUAL
UserManual.wiki
>
ATID
>
AT280 User Manual
USERS MANUAL
Navigation menu
Upload a User Manual
Namespaces
Wiki Guide
HTML
PDF
Info
Views
User Manual
Discussion / Help
Navigation

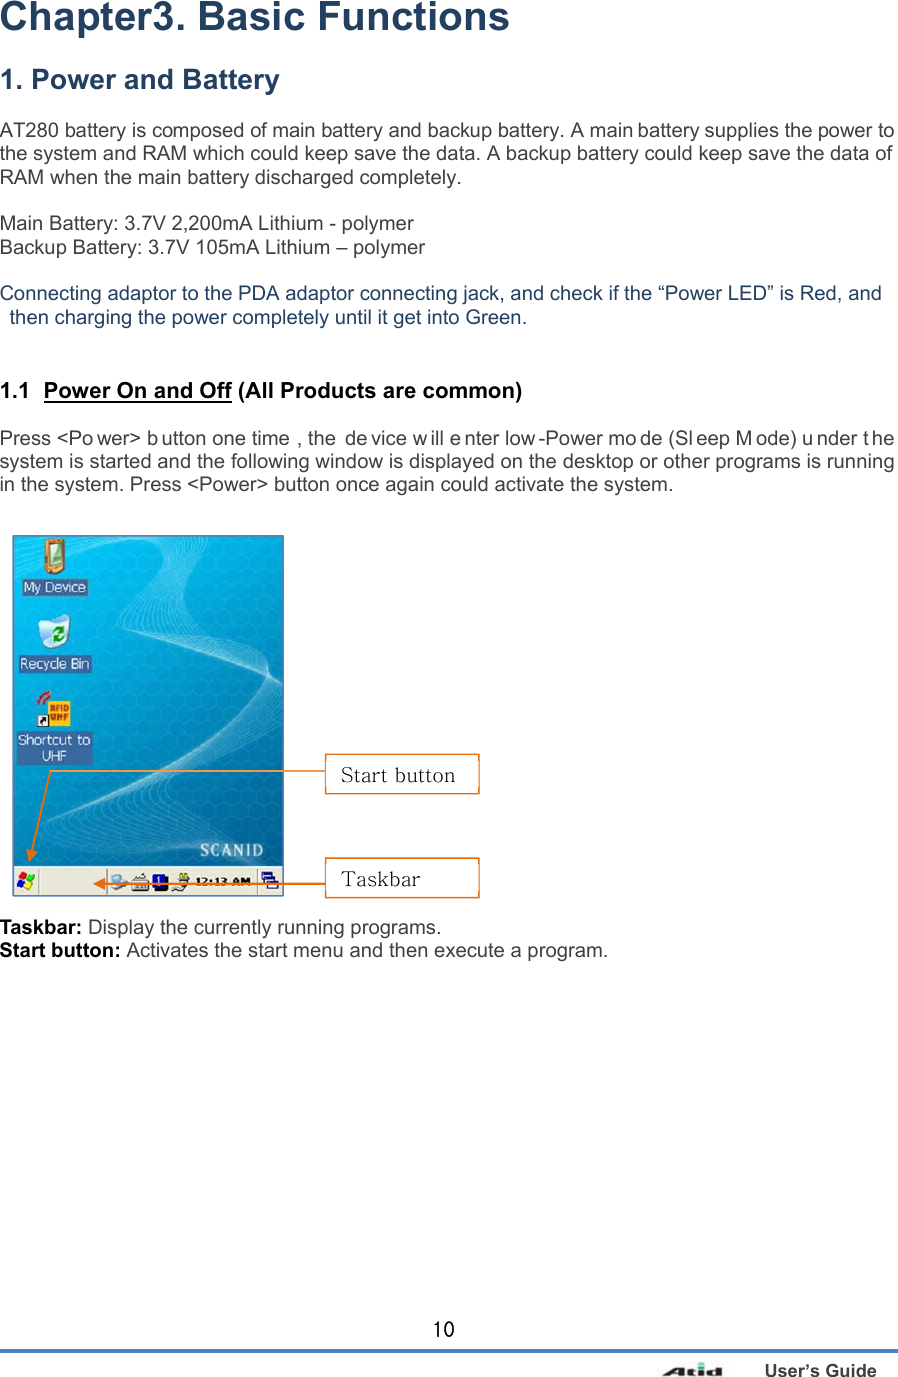
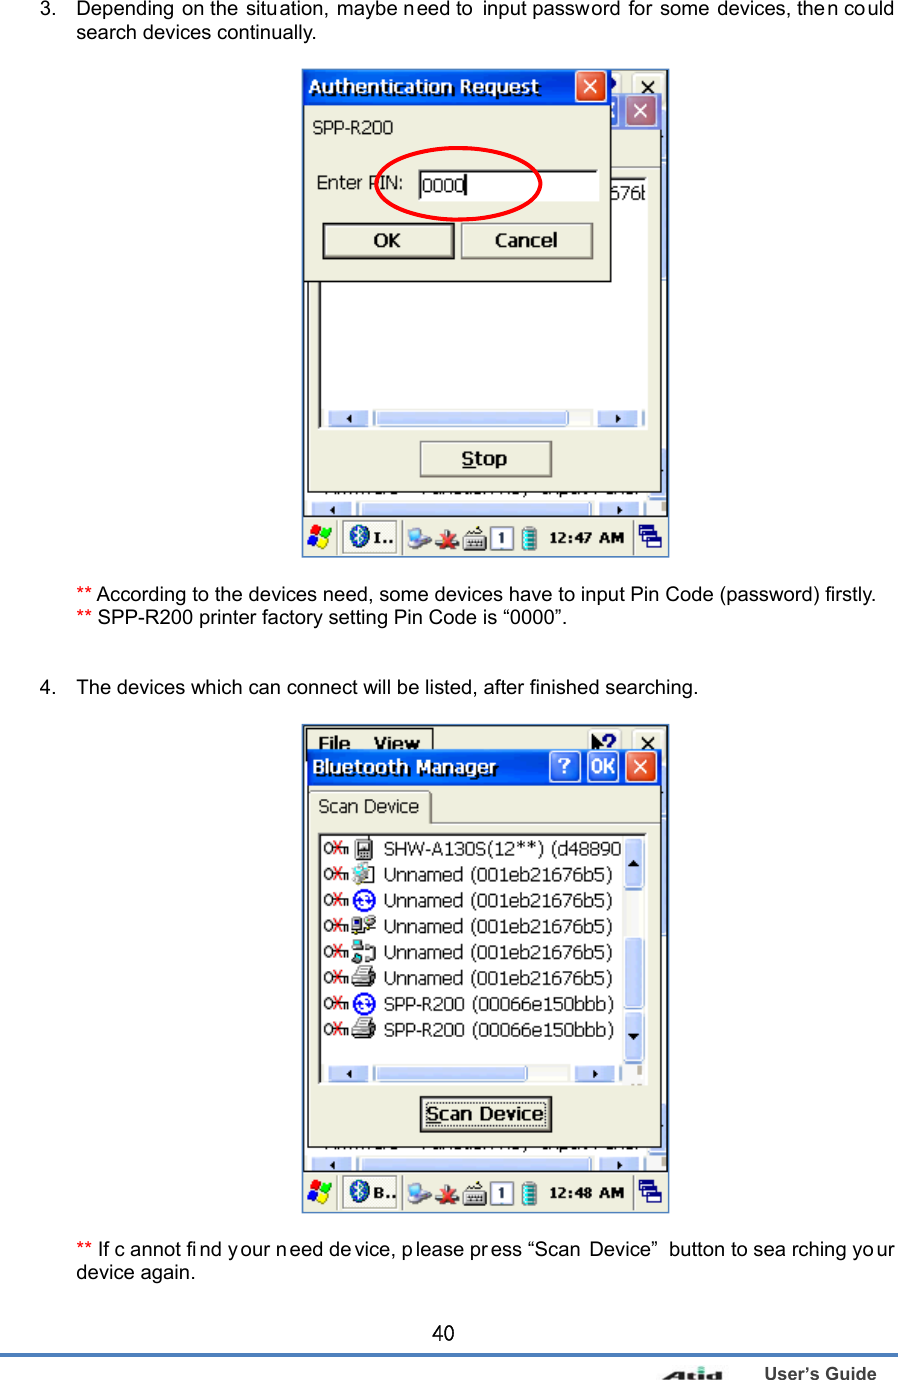
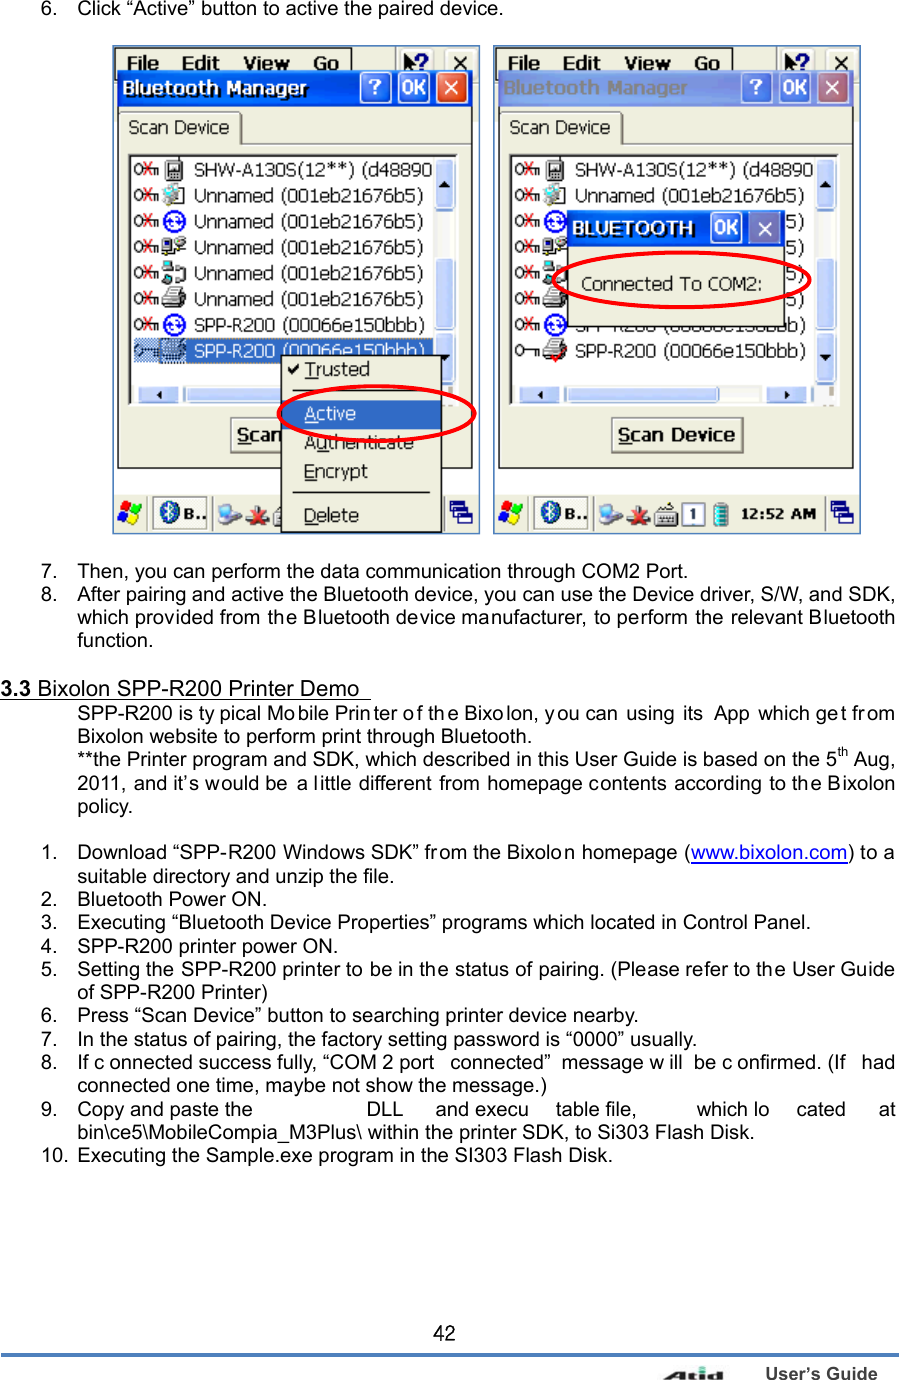
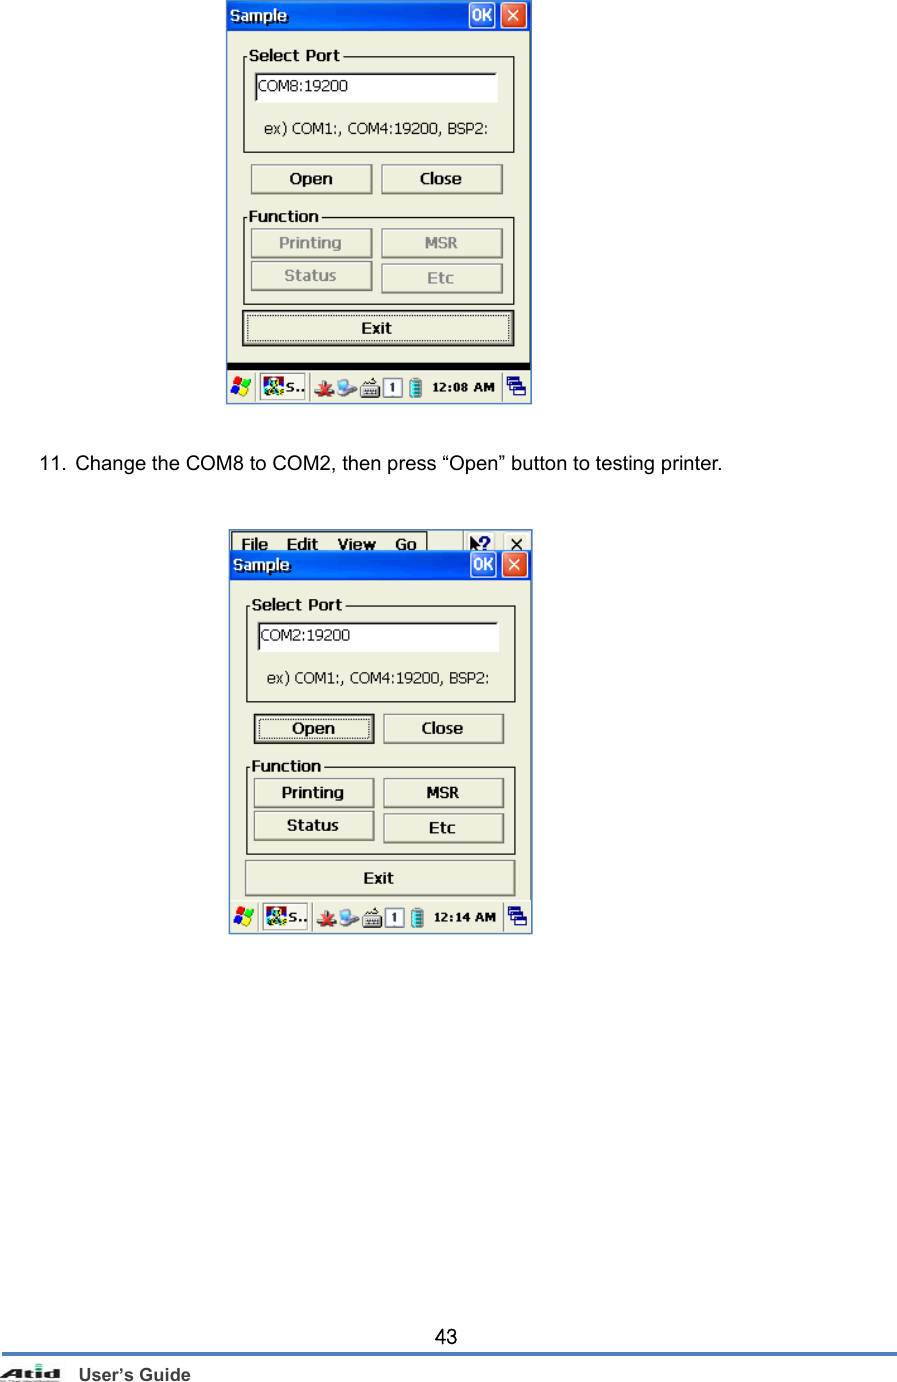
![User’s Guide 11 Power off automatically The device has been powered but has not been used for a period of time, then the system will enter low-power mode (sleep mode) automatically. You could set the sleep mode time at the power management so that could save power and prolog the battery life. [Start Button] -> [Setting] -> [Control Panel] -> [Power Management] -> [Power Off] Battery Discharging If the main battery discharge completely, the system will not turned on, the device will get into low-power mode (sleep mode) automatically, and even press the <Power> button, the system will not be turned on. In this case, you should charge the main battery or connect the adaptor to the adaptor connecting jack of main body, then press the <Power> button to turn on the system. Power Icon You can also double click <Power> Icon to enter this interface. You can also press the <Power> button to activate the system, when the device turned off cause get into the sleep mode.](https://usermanual.wiki/ATID/AT280/User-Guide-1741303-Page-11.png)
![User’s Guide 121.2 Check ing Battery Gauge Note: Battery life is largely affected from the user using method and surrounding environments. A 2200mA battery is usually needs 6 ~ 12 hours to get charged completely. Checking Battery Gauge [Start Button] -> [Setting] -> [Control Panel] -> [Power Management] -> [Battery] Low Power Warning If the remaining battery gauge cannot support the system running any more, a low power warning message window will be popped up on the screen. In this case, you need to press the <Power> button to turn off the power, and to charge the battery as soon as possible.](https://usermanual.wiki/ATID/AT280/User-Guide-1741303-Page-12.png)
![User’s Guide 142. System Reset If there is no response from the system or a n application is locked up an d stops responding, and when you want to upgrade the firmware, reset the system is maybe necessary. 2.1 Sof t Reset When do you need to perform Soft Reset? If there is no response for your command from the system, it calls (Hang-up). In this case, you need to perform a soft reset. Soft reset will end programs and the user memory region will be deleted, but installed programs and data, and so on, are not affected. [Soft Reset Procedure] Using the st ylus pe n to press < Reset> bu tton b riefly, th e sy stem will re starting ag ain, after the screen turns off shortly. [Soft Reset Result] System will be restarting. Operating System will be restarting (Windows CE). Desktop will appear in about ten seconds. User’s changed registry information, copied files and Installed programs will be restored. 2.2 Ha rd Reset When do you need to perform Hard Reset? Hard Reset, which is a lso called Cold Rese t, ena bles t o initiali ze har dware completely. User’s installed programs, copied files and registry values will keep remained even Si303 performed Hard Reset, but the real time a nd date will be initialized. So you need to r eset the time and date after performed Hard Reset. You need perform Hard Reset when the Soft Reset cannot restore the system. [Hard Reset Procedure] Using sty lus p en to Pre ss <Po wer> Button a nd < Reset> Button s imultaneously, the system will restarting again after the screen turns off shortly. [Hard Reset Result] System will be restarting. Operating System (Windows CE) will be loading and restarting. Desktop will appear in about ten seconds. Time and date window will be popped up and need to reset it. Reset Button Power Button](https://usermanual.wiki/ATID/AT280/User-Guide-1741303-Page-14.png)
![User’s Guide 152.3 In itializing System Enter [Boot Menu] and do what you want, when in the situations as below: 1. When you need to restore the original registry information, which has been changed. 2. When you need to initialize “My device” storage spaces. 3. When you need to initialize “Flash Disk” storage spaces. 4. When you need to initialize system to factory default settings. You can also p ress <Po wer> butto n an d <F un> butto n simu ltaneously, an d t hen pr ess <Reset> button to perform Hard Reset. [Boot Menu] window would appear in a couple of seconds. Warning! Except for [Clean System], please do not use other functions. The system might be work not properly if you use other functions on the [Boot Menu]. [Boot Menu] 0. Firmware Upgrade 1. Clean(Without Flash) 2. Clean(With Flash) 3. Exit Menu Select : Enter NO. [Boot Menu] **** WARNNING **** Your Information Will be erased! Back : <- BKS Erase : Enter Using<1>, <2> buttons to select Clean System, then press <Enter> button. 0. Firmware Upgrade – OS Update 1. Clean(Without Flash) – Initializing “Mydevice” region. 2. Clean(With Flash) – Initializing to factory default settings. 3. Exit](https://usermanual.wiki/ATID/AT280/User-Guide-1741303-Page-15.png)
![User’s Guide 174. System Settings 4.1 S etting Brightness Brightness is already set 80% at the factory, and brightness is the biggest consume part of the power, so you might need to adjust it to your actual need. [Setting Brightness] 1. [Start Button] -> [Setting] -> [Control Panel] -> [Brightness] 2. [MyDevice] -> [Control Panel] -> [Brightness] 밝기: Enable you to adjust brightness. 끄기: Enable you to adjust the timing of turning off brightness. 키램프: Enable you to adjust the timing of turning off key lamp. 4.2 Sc reen Calibration At first beginning of using the device after purchasing or need to use the device for a long period time, if you cannot select the place where you touched with stylus, you need to reset the coordinate calibration values. Touch screen calibration [Start Button] -> [Setting] -> [Control Panel] -> [Stylus] -> [Calibration] -> [Recalibration] Press and hold stylus pen briefly on the center of cross symbol, and repeat 5 times as it moves around the s creen. The screen counts 30 sec onds a fter ca librating, an d y ou can finish t he recalibration to t ouch s creen wherever you want, i f you d o n ot an y a ction, t he s creen will automatically finish the recalibration of itself.](https://usermanual.wiki/ATID/AT280/User-Guide-1741303-Page-17.png)
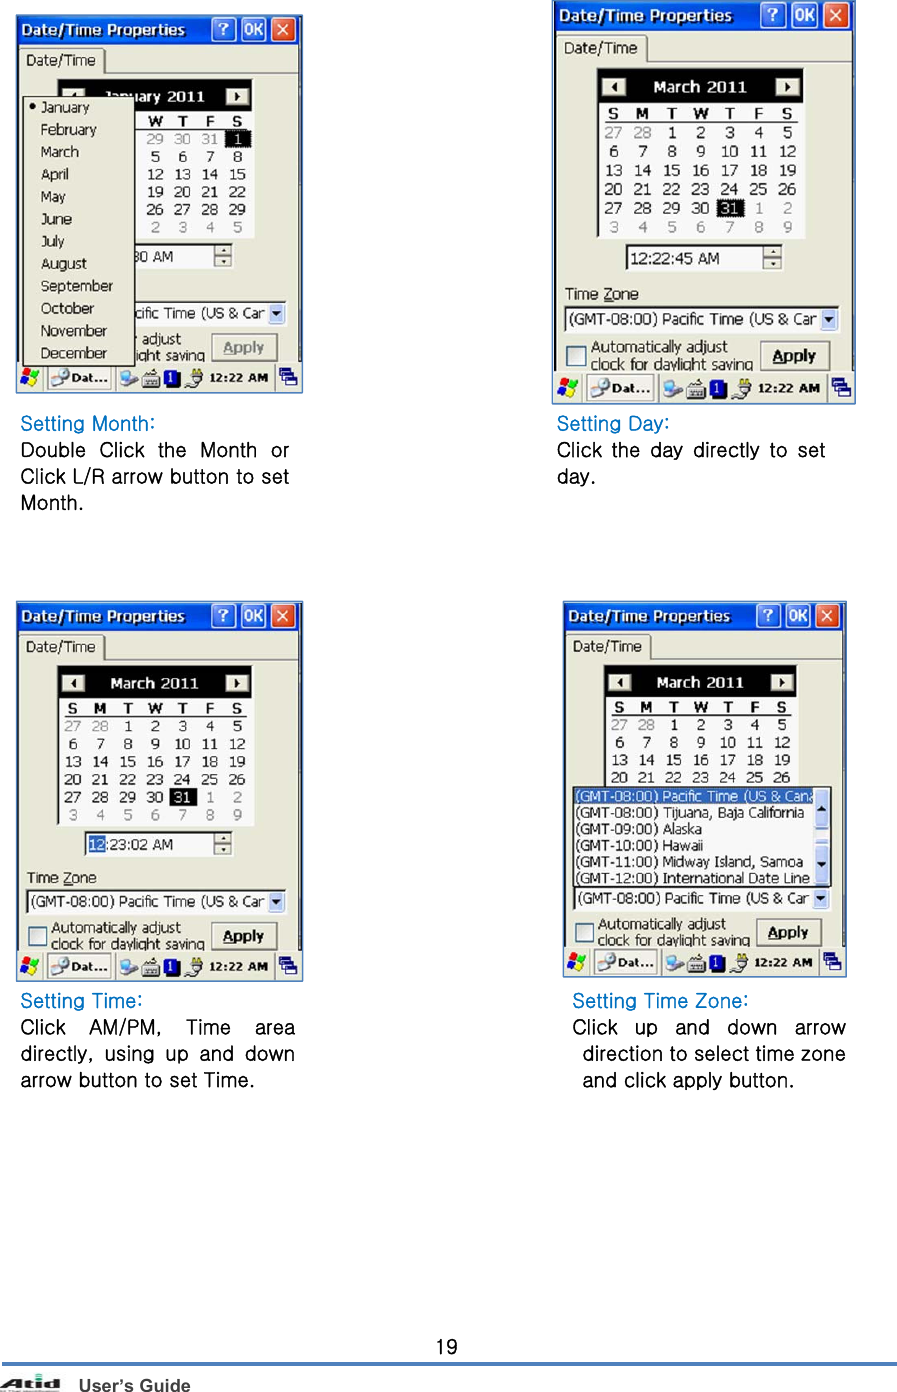
![User’s Guide 184.3 Setting Volume and Sounds Volumes is already set 80% at the factory, and you can readjust you need volume at control panel ->”Volume and Sounds” Setting Volume and Sounds [Start Button] –> [Setting] -> [Control Panel] -> [Volume and Sounds] 4.4 Setting Data and Time [Start Button] -> [Setting] -> [Control Panel] -> [Date and Time] Setting Year: Double Click the year, and click the up and down arrow button to set year.](https://usermanual.wiki/ATID/AT280/User-Guide-1741303-Page-18.png)
![User’s Guide 205. Using keypad Keypad enables you to input numbers, alphabets and special symbols. And can also execute other set function with <Fun> button. 5.1 Us ing keypad If you’d like to change the current input language, can press <ALP> button as below steps: [Numeric] -> [Lowercase] –> [Uppercase] 5.2 I nputting Data Numeric Keypad Mode: Press< ALP > button or keypad icon on the taskbar to change to the numeric mode and directly press number on the keypad. Alphabet Keypad Mode: Press <ALP > button or keypad icon on the taskbar to change to the Lowercase or Uppercase and directly press alphabets or special symbols on the keypad. Each button has 2 ~ 3 letters or symbols. Press the button once, the first letter or symbol will be inputted, press twice continuously, then the second letter or symbol will be inputted, and the third letter or symbol need to press button three times continuously. Click the input language icon on the taskbar is also can change the input language.](https://usermanual.wiki/ATID/AT280/User-Guide-1741303-Page-20.png)
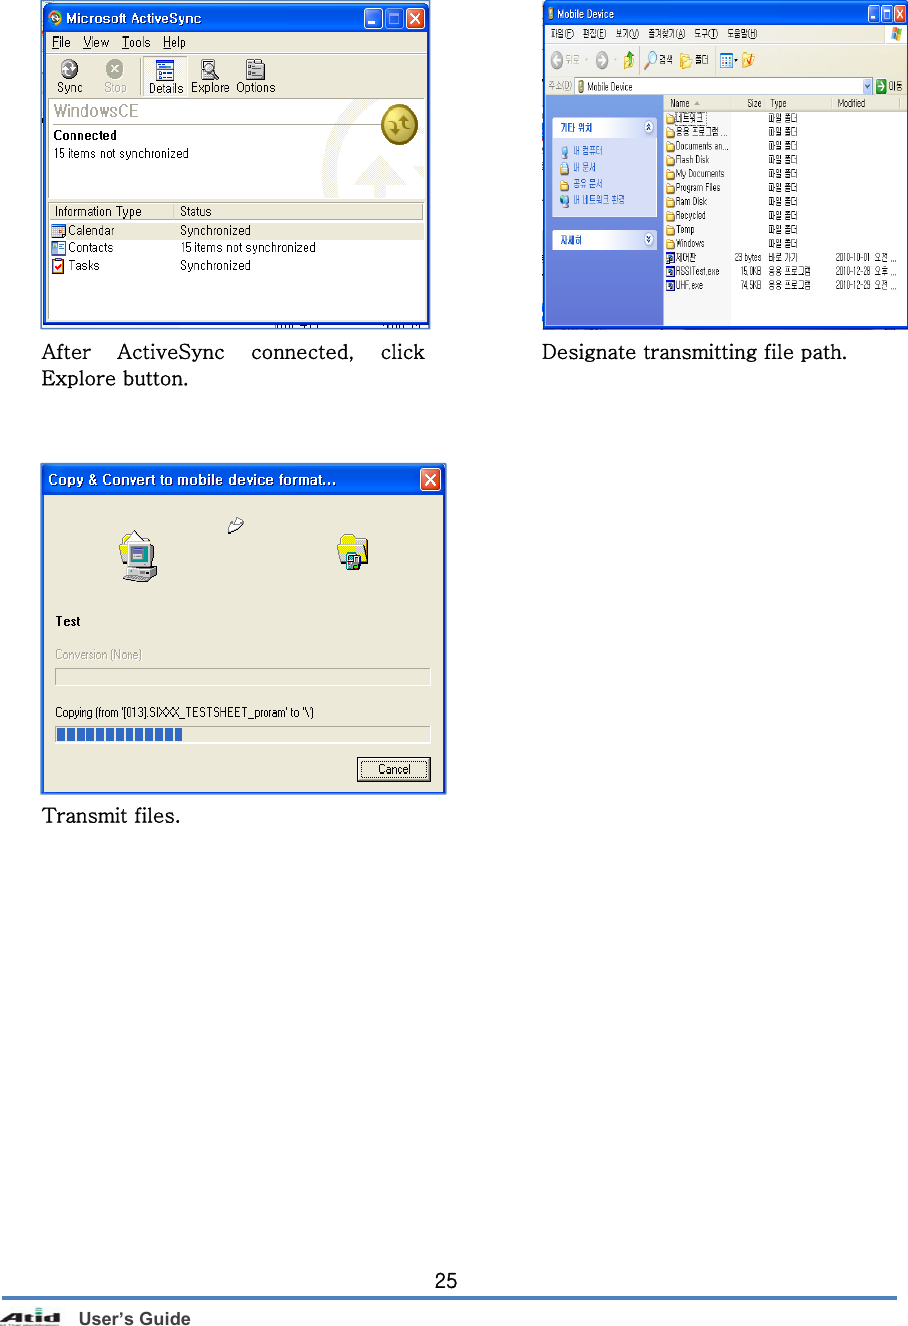
![User’s Guide 227. Using ActiveSync Program ActiveSync p rogram cou ld synchr onize be tween th e PC and PDA de vice, so tha t ena ble you to perform program installing, copy, transition, delete and so on operations. 7.1 Installing Microsoft ActiveSync Program Download the latest ver sion of Active Sync program from Microsoft Windows CE. Website, a nd install it to your PC. ActiveSync: Windows XP Download Address: http://www.microsoft.com/downloads/. Caution: You must use ActiveSync v3.7 version or above. Click [Next] Button. Designate installation folder, then click<Next> button. The installation was finished, and then usesthe USB cable to connect to the USB port onthe computer; ActiveSync will automaticallydetect the device connection.](https://usermanual.wiki/ATID/AT280/User-Guide-1741303-Page-22.png)
![User’s Guide 237.2 Connecting PC to PDA Setting PC [Start button] -> [Programs] -> [Microsoft ActiveSync] Executing Microsoft ActiveSync program Click [File], Click [Get Connected]. Select <Allow USB connection with this desktop computer>, press OK button. ActiveSync connected to PDA](https://usermanual.wiki/ATID/AT280/User-Guide-1741303-Page-23.png)
![User’s Guide 24 Setting AT280 PDA [Start Button] -> [Setting] -> [Control Panel] -> [PC Connection] 7.3 Transmi tting Data Connect USB cable to PC or Device. < Windows XP > Double click PC Connection icon To check if set to connected toUSB Sync cable You can check the ActiveSync connecting state on the taskbar. 현재이 이미지를 표시할 수 없습니다.현재 이 이미지를 표시할 수 없습니다. Connecting state Disconnecting state Start button/Programs/Microsoft ActiveSync](https://usermanual.wiki/ATID/AT280/User-Guide-1741303-Page-24.png)
![User’s Guide 268. Firmware Upgrade [Start Button] -> [Setting] -> [Control Panel] -> [Firmware Upgrade]](https://usermanual.wiki/ATID/AT280/User-Guide-1741303-Page-26.png)
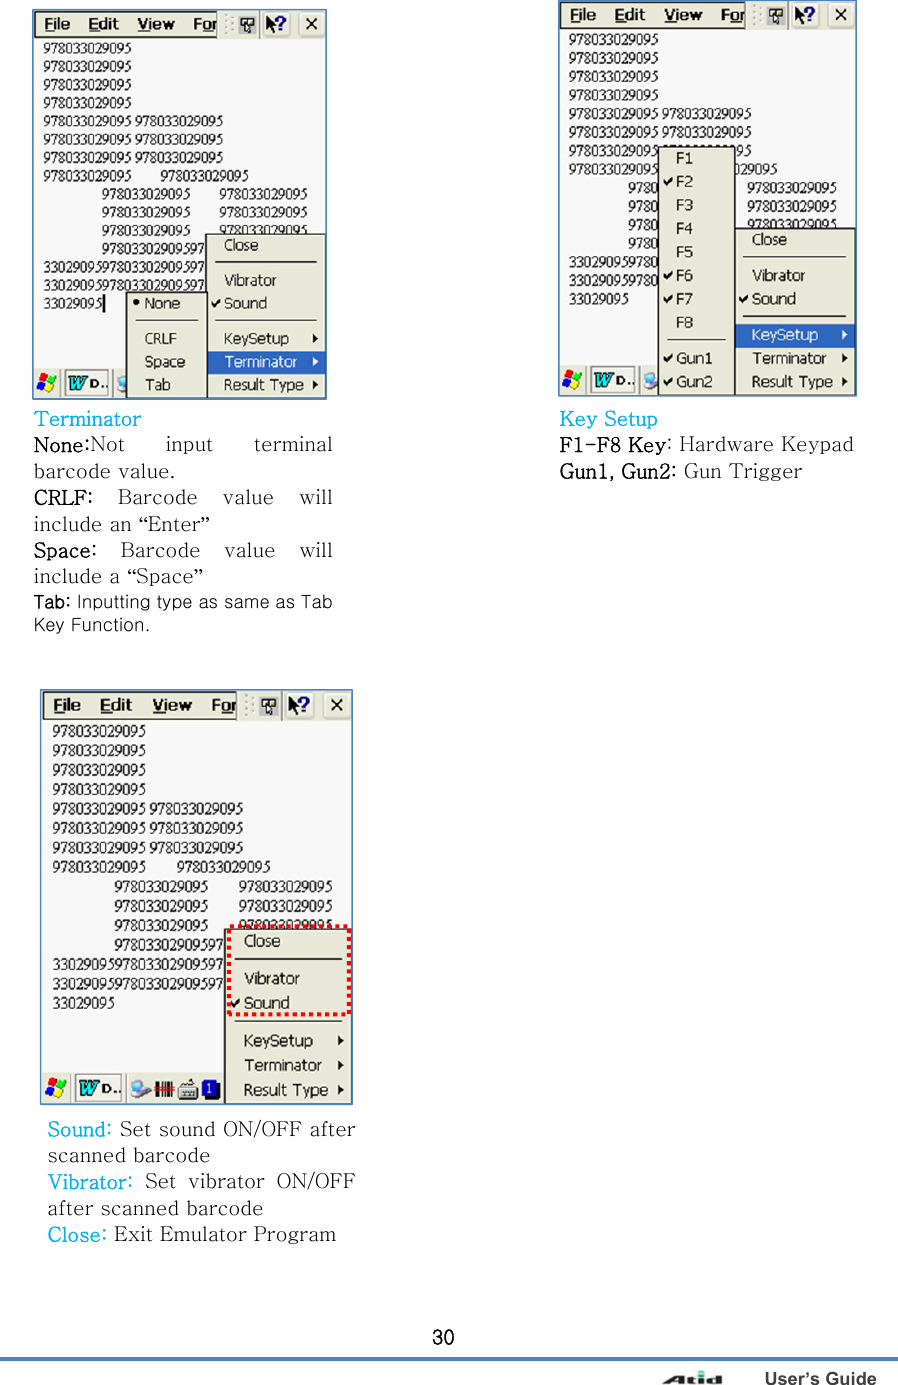
![User’s Guide 29Executing Barcode Emulator [Start Button] -> [Program] -> [Demo Apps] -> [Scanner] -> [BarcodeEmulator] Run Barcode Emulator Program Barcode Emulator Icon will beshowed on the taskbar. Run WordPad Program, thenclick the Emulator Icon Result Type Keyboard Event: Barcode inputted one by one. Copy Paste: Barcode will be stored be stored in clipboard and shown at paste way.](https://usermanual.wiki/ATID/AT280/User-Guide-1741303-Page-29.png)
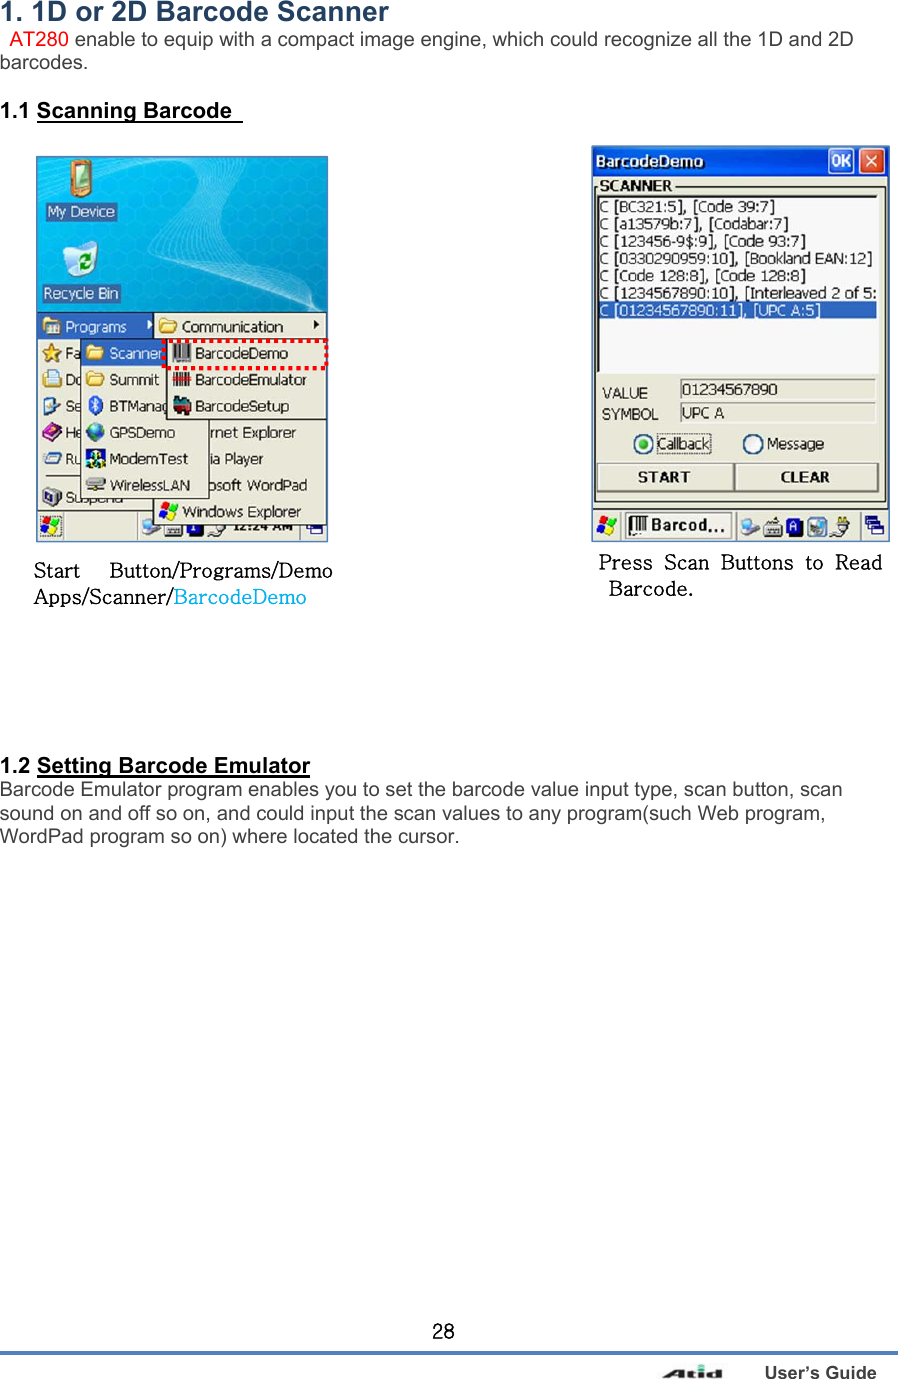
![User’s Guide 311.3 Setting Barcode Symbology AT280 enables you to set the various barcode by using barcode symbologies program. [Start Button] -> [Program] -> [Demo Apps] -> [Scanner] -> [BarcodeSetup] Click Set Enable Status button Make a check mark on thebarcode which you want touse, and then click <SET>button. Run BarcodeSetup Program. Set Barcode Type in detail.](https://usermanual.wiki/ATID/AT280/User-Guide-1741303-Page-31.png)
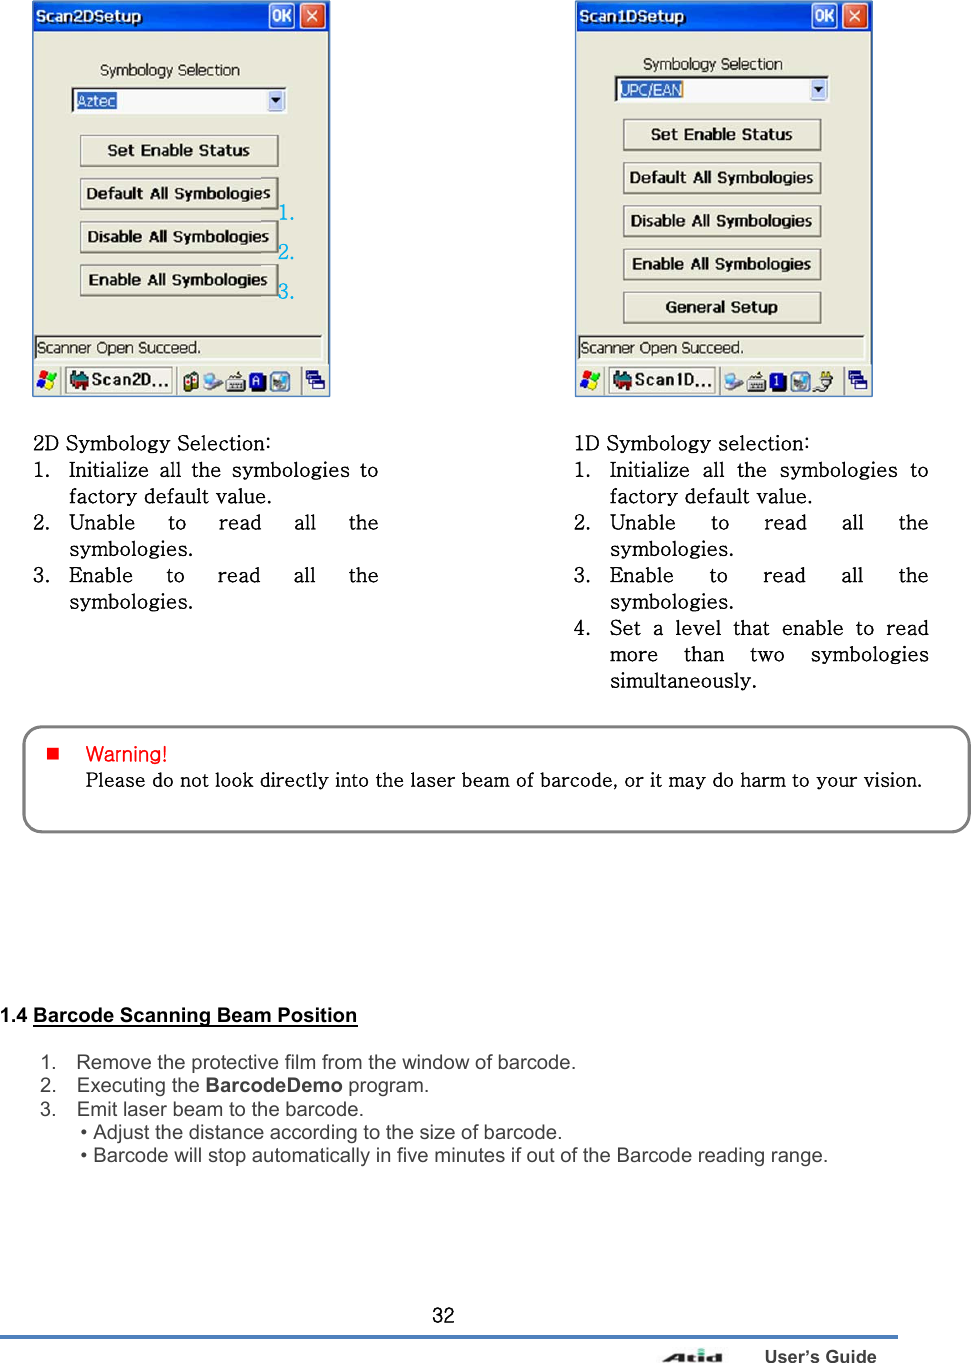
![User’s Guide 33[Correct Scanning Beam Position] 1. The more small size of barcode, AT280 needs the more close to barcode. The effective scanning rang of Si303 is from 40 ~ 300mm. if failed to scan barcode, please try to adjust scan angle and distance. 2. The laser beam is a red thick line, when scanning a barcode. [Incorrect Scanning Beam Position] 1. The laser beam must across the barcode. 2. It will couldn’t scan barcode if the laser beam across only a fraction of barcode. 1D 2D 1D 2D](https://usermanual.wiki/ATID/AT280/User-Guide-1741303-Page-33.png)
![User’s Guide 342. Using Wireless Lan AT280 enable to equip an internal 802.11 radio module to transfer data and do wireless communication. AT280 supports TCP/IP network protocol, and communicate with a host computer directly. 2.1 Connecting to Wlan [Start Button] -> [Program] -> [Demo Apps] -> [Wireless Lan] 2.2 Setting Wlan Manually Run the Wireless LAN program. Select <WLAN ON>, and thenclick Ok button. Double click a suitable devicefrom the list of AP. Input Key Password, and thenclick OK button.](https://usermanual.wiki/ATID/AT280/User-Guide-1741303-Page-34.png)