USERS MANUAL

ATID Co., Ltd
Product User’s Guide
Model : AT280
Ver. 2.0

User’s Guide
2
Disclaimer
ATID is registered trade mark of ATID Co., Ltd.
Si303, Si203, AT880, AT280 is registered trade mark of ATID Co., Ltd.
All other trademarks and trade names referred to herein are property of their respective
owners.
Microsoft Windows®, Windows® 2000, Windows® CE .NET, Windows® NT, Windows®
XP, Windows® and Embedded Handheld are registered trademarks of Microsoft
Corporation.
ATID Co., Ltd.
#1205, Byuksan/Gyungln Digital Valley II, #481-10,
Gasan-Dong, Gumchon-Gu, Seoul, Korea
Tel: +82-2-544-1436
Fax: +82-2-2113-0040
www.atid1.com
FCC Information to User
This equipment has been tested and found to comply with the limits for a Class B digital device,
pursuant to Part 15 of the FCC Rules. These limits are designed to provide reasonable
protection against harmful interference in a residential installation. This equipment generates,
uses and can radiate radio frequency energy and, if not installed and used in accordance with
the instructions, may cause harmful interference to radio communications. However, there is no
guarantee that interference will not occur in a particular installation. If this equipment does
cause harmful interference to radio or television reception, which can be determined by turning
the equipment off and on, the user is encouraged to try to correct the interference by one of the
following measures:
• Reorient or relocate the receiving antenna.
• Increase the separation between the equipment and receiver.
• Connect the equipment into an outlet on a circuit different from that to which the receiver is
con-nected.
• Consult the dealer or an experienced radio/TV technician for help.
Caution
Modifications not expressly approved by the party responsible for compliance could void the
user’s authority to operate the equipment.
FCC Comp liance Information : This device complies with Part 15 of the FCC Rules.
Operation is subject to the following two conditions: (1) This device may not cause harmful
interference, and (2) this device must accept any interference received, including interference
that may cause undesired operation
Body-worn Operation
This device has been tested for body-worn operation and meets FCC RF exposure guidelines.
Body-worn operation is restricted to accessories that maintain a minimum of 1.5cm separation
to the body and do not contain metallic components. Use of any other body-worn accessories
may not compliance with FCC RF exposure guidelines. For more information about RF
exposure, please visit the FCC website an www.fcc.gov

User’s Guide
3
Table of Contents
Copyright and Agreement ............................................................................................................... 5
Chapter1. Caution when using ATID PDA Product .......................................................................... 6
1. How to use the battery correctly ................................................................................................. 6
2. Caution when using ATID PDA Product ...................................................................................... 6
Chapter2. Products compositions ................................................................................................... 7
1. Package components ................................................................................................................. 7
2. Each Part Name & Function ....................................................................................................... 8
Chapter3. Basic Functions ........................................................................................................... 10
1. Power and Battery .................................................................................................................... 10
1.1 Power On and Off (All Products are common) ............................................................. 10
1.2 Checking Battery Gauge ............................................................................................. 12
1.3 Backup Battery ........................................................................................................... 13
1.4 Dispose of Battery ...................................................................................................... 13
2. System Reset........................................................................................................................... 14
2.1 Soft Reset .................................................................................................................. 14
2.2 Hard Reset ................................................................................................................. 14
2.3 Initializing System ....................................................................................................... 15
3. Using Micro SD Card................................................................................................................ 16
4. System Settings ....................................................................................................................... 17
4.1 Setting Brightness ...................................................................................................... 17
4.2 Screen Calibration ...................................................................................................... 17
4.3 Setting Volume and Sounds ........................................................................................ 18
4.4 Setting Data and Time ................................................................................................ 18
5. Using keypad ........................................................................................................................... 20
5.1 Using keypad .............................................................................................................. 20
5.2 Inputting Data ............................................................................................................. 20
5.3 Using <Fun> Button .................................................................................................... 21
6. Using stylus ............................................................................................................................. 2 1
7. Using ActiveSync Program ....................................................................................................... 22
7.1 Installing Microsoft ActiveSync Program ...................................................................... 22
7.2 Connecting PC to PDA ............................................................................................... 23
7.3 Transmitting Data ....................................................................................................... 24
8. Firmware Upgrade ................................................................................................................... 26
Chapter4. Optional Module .......................................................................................................... 27
1. 1D or 2D Barcode Scanner ...................................................................................................... 28
1.1 Scanning Barcode ........................................................................................................... 28
1.2 Setting Barcode Emulator ................................................................................................ 28
1.3 Setting Barcode Symbology ............................................................................................ 31
1.4 Barcode Scanning Beam Position.................................................................................... 32
2. Using Wireless Lan
.................................................................................................................. 34
2.1 Connecting to Wlan ......................................................................................................... 34
2.2 Setting Wlan Manually ..................................................................................................... 34
2.3 Checking WLAN Information ........................................................................................... 35
3. Using Bluetooth ........................................................................................................................ 36
3.1 Bluetooth Beginning and Closing ..................................................................................... 36
3.2 Bluetooth Pairing ............................................................................................................. 39

User’s Guide
4
3.3 Bixolon SPP-R200 Printer Demo ..................................................................................... 42
Chaptor5. Appendix ..................................................................................................................... 44
Specification with AT280 .............................................................................................................. 44

User’s Guide
5
Copyright and Agreement
- This manual is subject to copyright protection along with all relevant rights.
- No part of this document or the procedures described therein can b e copied, reproduced,
changed, tr anslated or tra nsmitted in a ny for m or by any means without prior written
permission of ATID Co., Ltd. or its wholly owned subsidiaries.
- ATID reserves the right to change any contents of this manual at anytime without prior
notice.
- There are maybe some differences between the contents of this manual and the actual
behavior of product.
This manual is written for the person who is responsible for installing, configuring, and maintaining
the Si303, Si203, AT880, AT280 PDA. Read and follow all warnings and cautions in this document
before you handle and operate ATID equipment
Safety Information
Read a nd fo llow all warnings an d c autions in t his m anual before y ou h andle a nd op erate ATID
equipment. If you do not follow the safety warnings and cautions, you might be seriously injured, and
the equipment and data are also might be damaged.
Warnings!
A warning req uires y ou m ust p ay attention t o th e operating proc edures, prac tices,
conditions, and statements strictly, or might be injured seriously.
Cautions
A c aution ale rts you th at y ou mu st b e observe str ictly when you oper ating procedure,
practicing, configuring, for preventing from damage and destruction of equipment, and loss
of data.
Note
A note provides you the information which you must needs while you using Si303

User’s Guide
6
Chapter1. Caution when using ATID PDA
Product
Before you handle and operate your AT280 and other ATID PDA Products, Please read through and
familiar with the contents of this manual.
1. How to use the battery correctly
When you dropped the main b ody or ba ttery in w ater, p lease d o no t p ut it on the stove or
heater for drying. Just keep it in natural temperature or contact with purchase place.
Please do not take the metal object to approach to the terminal of battery
If you do not use the battery for a long time after charging, please keep it at room temperature.
According to the life of battery and the processing time of its using, the buffering time can be
shortened. In this case, please contact your dealer.
You have to charging the device with the provided adaptor from factory.
2. Caution when using ATID PDA Product
User car eless or pr oducts r epair ma y w ould d amage th e store d d ata. Ma nufacture is n ot
responsible for this damage, so important data should be kept separately
If your AT280 has problem, do not try to repair or disassemble the p roduct arbitrarily, please
contact customer service center.
Do n ot use y our AT280 where ha ve ele ctromagnetic wave or th e r isk ma y o ccur such a s
hospital, plane so on.
A high temperature or high humidity environment will causes trouble, Please note that.
Please do not using other sharp object to touch the screen, otherwise it might be get damaged
or not working properly.
Please be careful not to touch the metal paper cutting saw tooth, so as not to get injured
If smell od ors, occurs s moke or noise during use product, immediately disconnect the
charger and off the power, then Please contact with customer service center
If you have any other questions during use, please contact the customer service center
User’s Guide
7
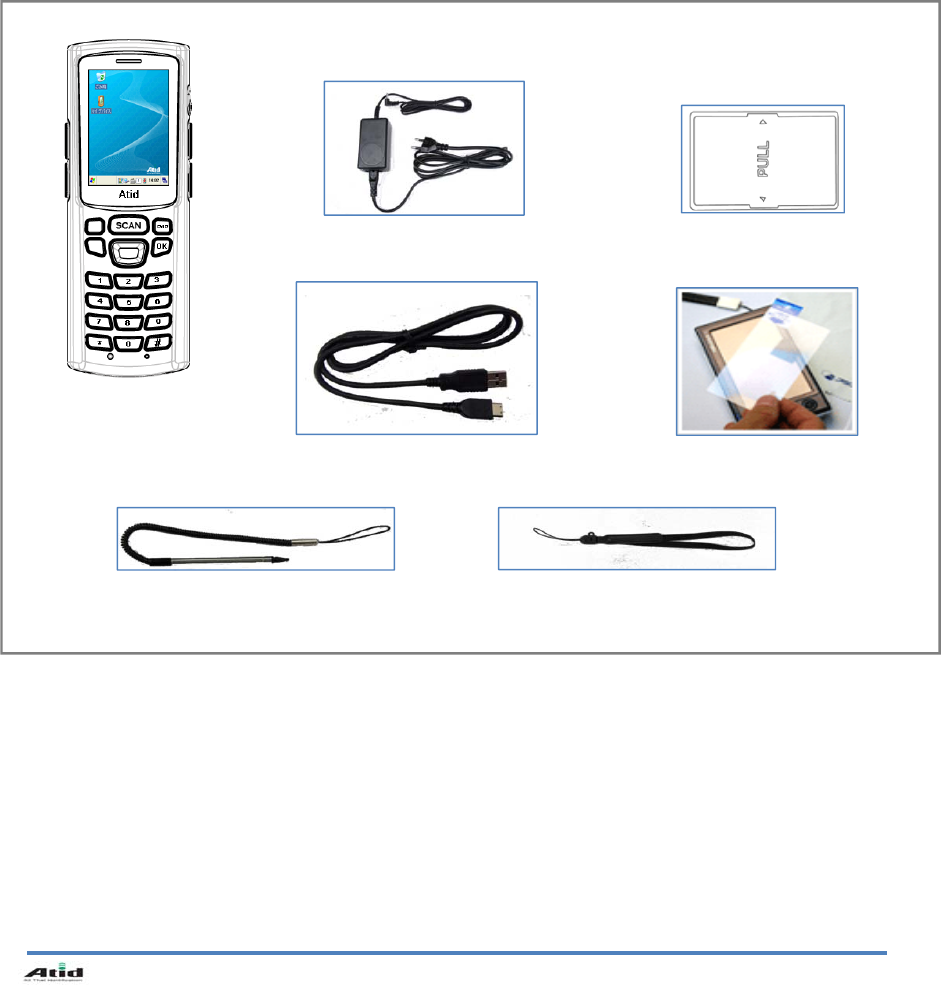
Chapter2. Products compositions
AT280 mobile computer is a small, ergonomically designed PDA, which built on the Microsoft
window CE 5.0 Operating System. The PDA could equip with Barcode Scanner and so on devices
as optional items. Its various function applied to Industry, Enterprise, Logistics and so on, can be
used extensively in many fields.
1. Package components
After opening the product packaging box, check the items listed as below:
M ODEL : AT280
*If there is missing or defective products on the above, please contact the customer support center or your place of purchase.
1. AT280 Body
2. Adaptor and AC Cable 3. Main Battery
4. USB Sync Cable
6. Stylus 7. Hand Strap
5. Protective Film
User’s Guide
8
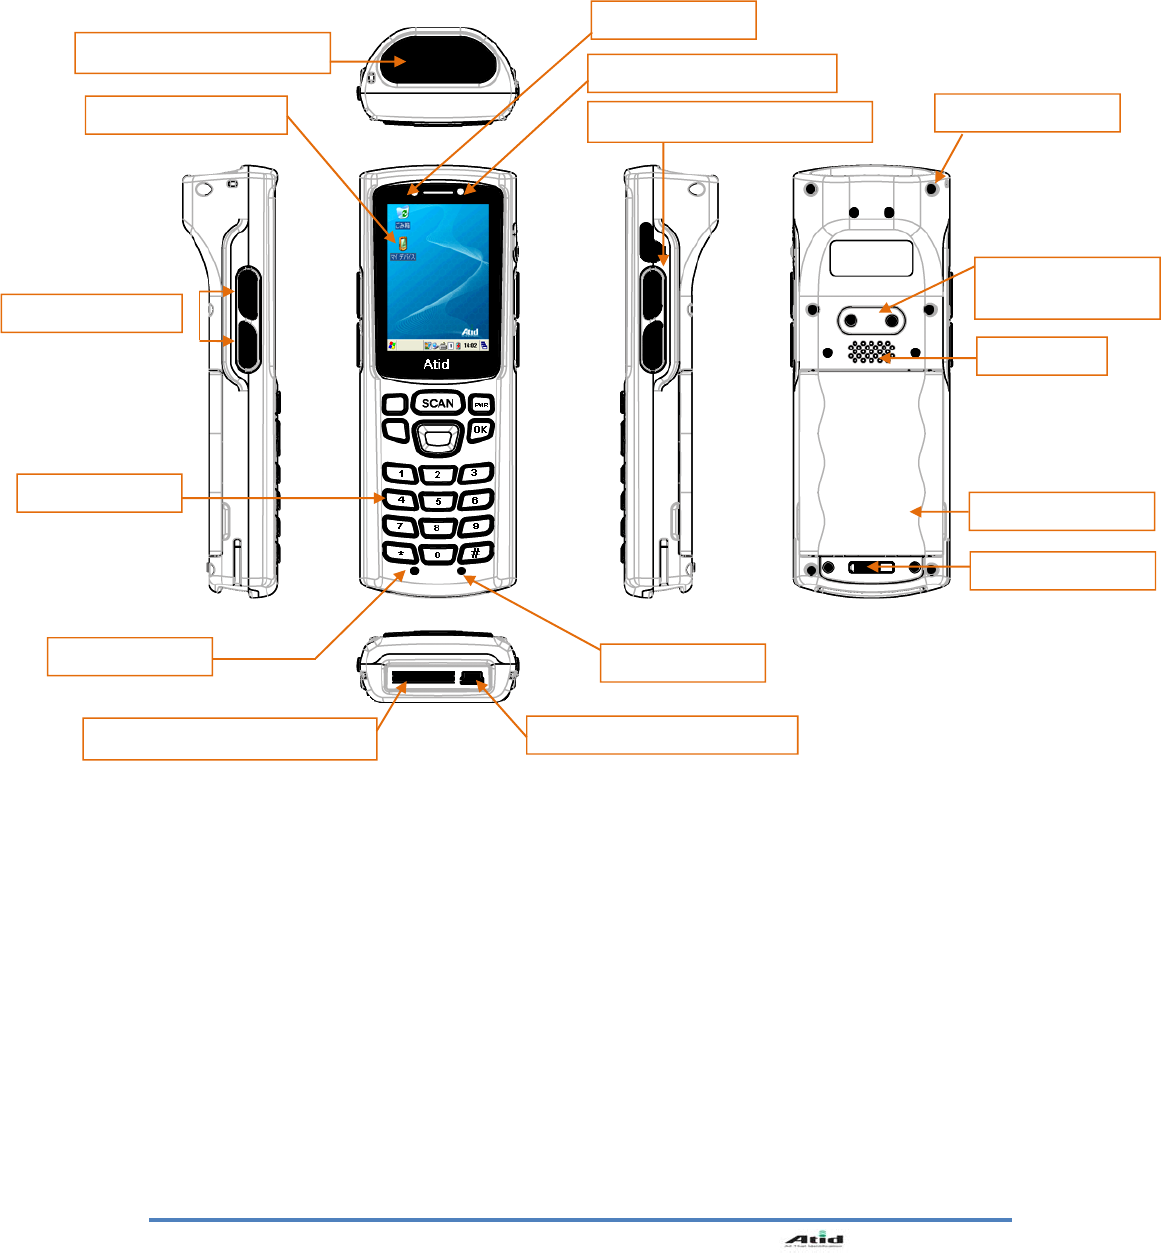
2. Each Part Name & Function
MODEL : AT280
1D/2D Scanner Window
Touch Screen
Volume Buttons
Battery Latch
Main Battery
Speaker
UHF Connecting
Port
Hand Strap Hole
Function Button & Ear Jack
Microphone
Sync & Cradle Connector Adaptor Connecting Jack
Reset Button
Keypad
Power LED
WLAN/BlueTooth LED

User’s Guide
9
Part Descriptions
1D/2D Scanner Window
(Option)
Laser beam emitted through this window. Please be careful the foreign substances and
preventing from the damage. Warning! Do not look at the laser beam directly.
UHF Connecting Port Enable you to install a UHF 900Mhz tag reader module.
Reset Button Enable you to perform a Warm Reset, Press <Power>button simultaneously, enable you to
perform a Hard Reset.
Microphone Enable you to conduct communication.
WLAN/Bluetooth LED Indicates WLAN & Bluetooth power on-off status.
Battery Latch Enable you to detaching and attaching the main battery.
Main Battery Enable to supply the power to the product.
Volume Buttons Enable you to press <Fun>button simultaneously to adjusting volume.
Function Buttons Enable you to scan Barcode and RFID Tag.
Speaker Build-in speaker, which could emit various sound effects.
Sync Cable Connector Enable you to connect and send data to PC via USB sync cable.
Ear Jack Enable you to connect to earphone.
Power LED Power LED will be Red when the battery is charging, or will be green when it is charged
completely.
Adaptor Connecting Jack Enable you to connect to adaptor which provided from factory.
Cradle Connector Enable you to connect to PC or charging the battery while using cradle.
Key Pad Enable you to input key value (number, alphabets, symbol), or executing assigned
programs.
Touch Screen Display running programs, and could execute, use, and exit programs via using stylus to
touch the screen.
Hand Strap Hole Enable you to attach a hand strap or a stylus for the convenience of using, while need to
use the device for a long period time.
User’s Guide
10
Chapter3. Basic Functions
1. Power and Battery
AT280 battery is composed of main battery and backup battery. A main battery supplies the power to
the system and RAM which could keep save the data. A backup battery could keep save the data of
RAM when the main battery discharged completely.
Main Battery: 3.7V 2,200mA Lithium - polymer
Backup Battery: 3.7V 105mA Lithium – polymer
Connecting adaptor to the PDA adaptor connecting jack, and check if the “Power LED” is Red, and
then charging the power completely until it get into Green.
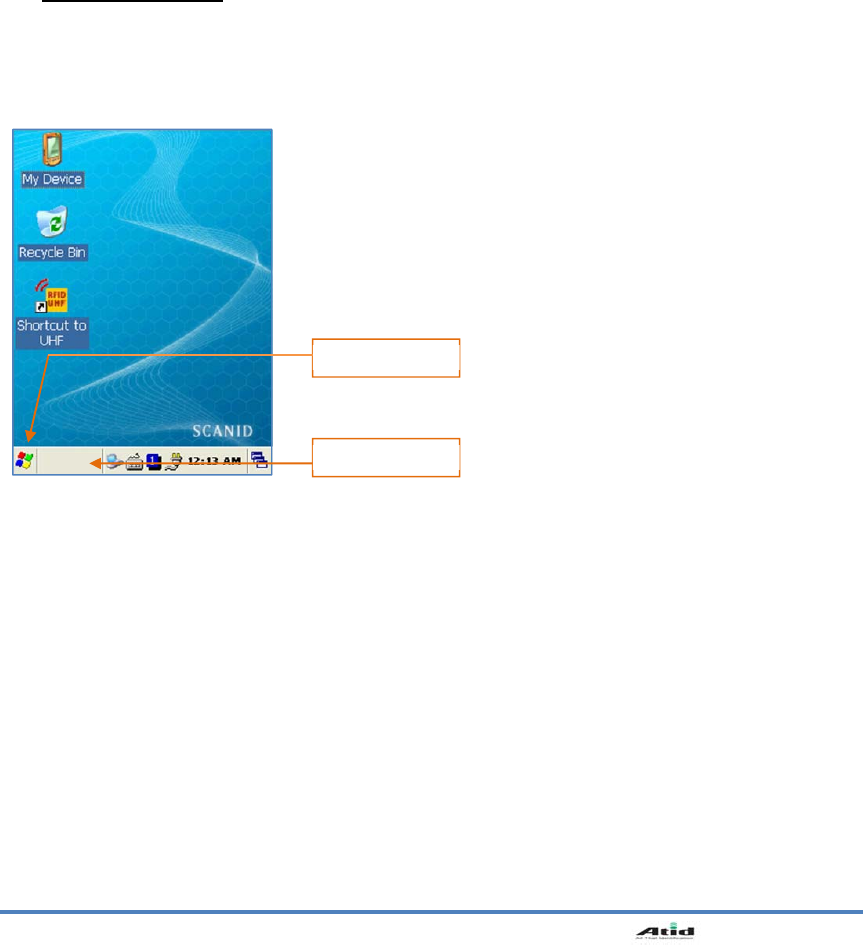
1.1 Power On and Off (All Products are common)
Press <Po wer> b utton one time , the de vice w ill e nter low -Power mo de (Sl eep M ode) u nder t he
system is started and the following window is displayed on the desktop or other programs is running
in the system. Press <Power> button once again could activate the system.
Taskbar: Display the currently running programs.
Start button: Activates the start menu and then execute a program.
Start button
Taskbar
User’s Guide
11
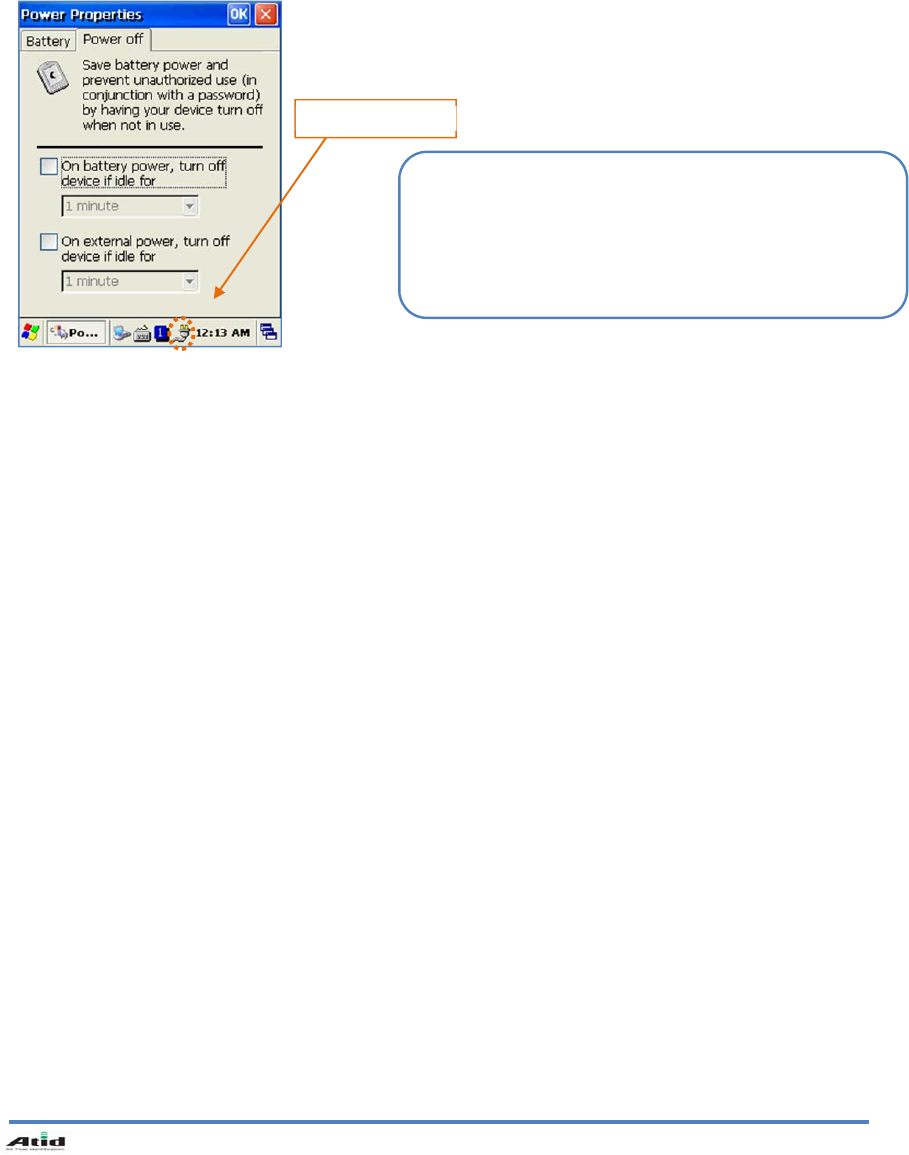
Power off automatically
The device has been powered but has not been used for a period of time, then the system will enter
low-power mode (sleep mode) automatically. You could set the sleep mode time at the power
management so that could save power and prolog the battery life.
[Start Button] -> [Setting] -> [Control Panel] -> [Power Management] -> [Power Off]
Battery Discharging
If the main battery discharge completely, the system will not turned on, the device will get into
low-power mode (sleep mode) automatically, and even press the <Power> button, the system will
not be turned on. In this case, you should charge the main battery or connect the adaptor to the
adaptor connecting jack of main body, then press the <Power> button to turn on the system.
Power Icon
You can also double click <Power> Icon to enter this
interface.
You can also press the <Power> button to
activate the system, when the device turned off
cause get into the sleep mode.
User’s Guide
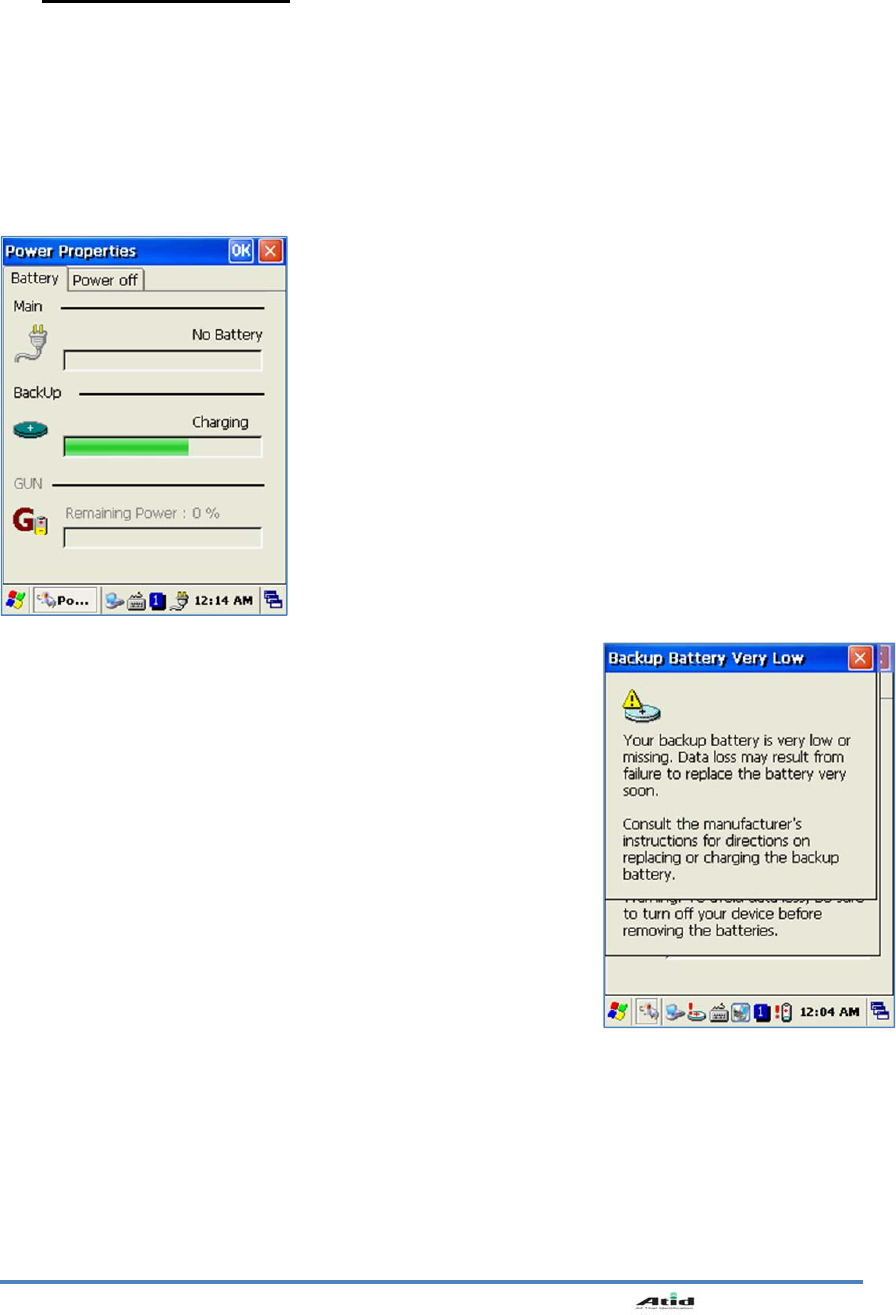
12
1.2 Check ing Battery Gauge
Note:
Battery life is largely affected from the user using method and surrounding environments.
A 2200mA battery is usually needs 6 ~ 12 hours to get charged completely.
Checking Battery Gauge
[Start Button] -> [Setting] -> [Control Panel] -> [Power Management] -> [Battery]
Low Power Warning
If the remaining battery gauge cannot support the system running
any more, a low power warning message window will be popped up
on the screen. In this case, you need to press the <Power> button to
turn off the power, and to charge the battery as soon as possible.

User’s Guide
13
1.3 Ba ckup Battery
A backup battery could safely keep the RAM data, even the main battery discharged completely.
1.4 Dispose of Battery
You need to purchase a new one if the battery damaged or reached its end of life.
Warning!
Please dispose the used batteries in a designated place.
Caution:
If the main battery and the backup battery are both discharged, the RAM date will disappear.
Among the running programs, the RAM data will disappear in which are using, and the system
will not be restore to previous state, but rebooting system after start charging.
User’s Guide
14
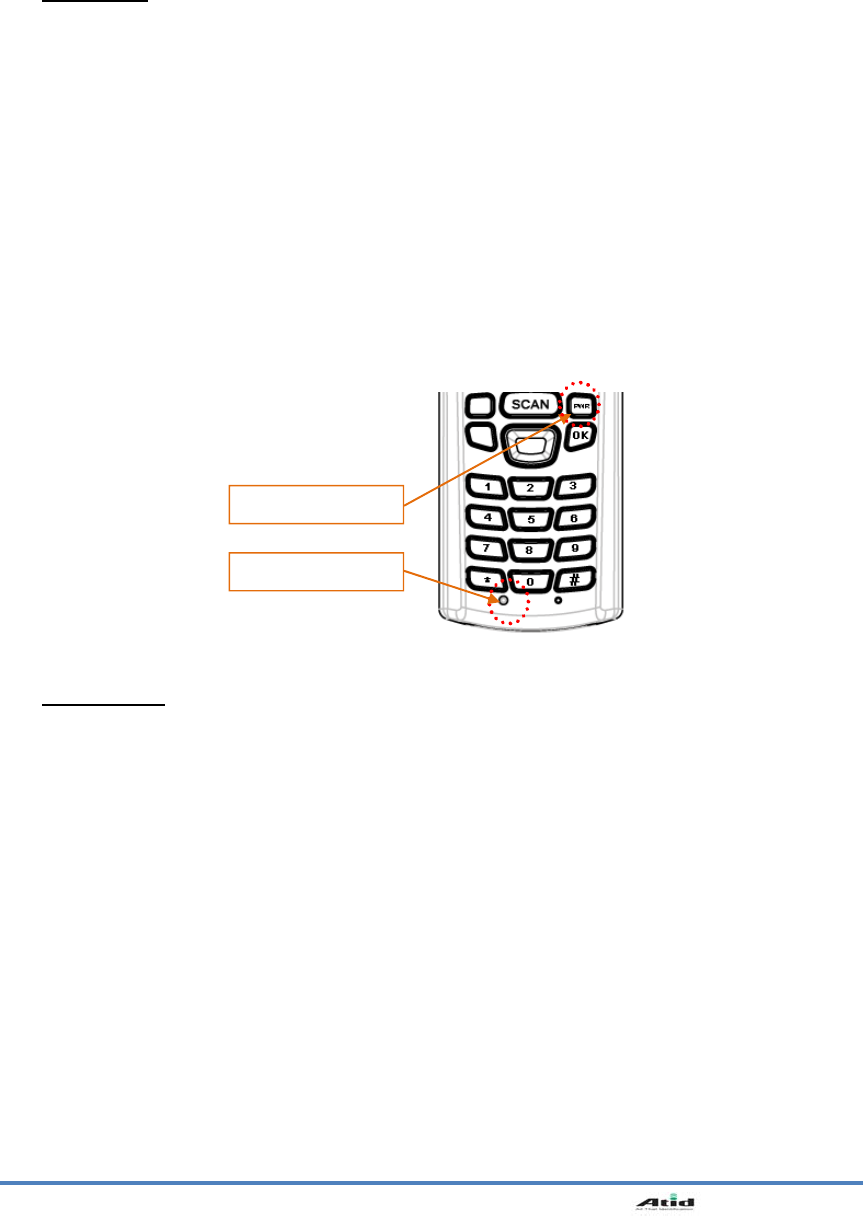
2. System Reset
If there is no response from the system or a n application is locked up an d stops responding, and
when you want to upgrade the firmware, reset the system is maybe necessary.
2.1 Sof t Reset
When do you need to perform Soft Reset?
If there is no response for your command from the system, it calls (Hang-up). In this case, you need
to perform a soft reset. Soft reset will end programs and the user memory region will be deleted,
but installed programs and data, and so on, are not affected.
[Soft Reset Procedure]
Using the st ylus pe n to press < Reset> bu tton b riefly, th e sy stem will re starting ag ain, after the
screen turns off shortly.
[Soft Reset Result]
System will be restarting.
Operating System will be restarting (Windows CE).
Desktop will appear in about ten seconds.
User’s changed registry information, copied files and
Installed programs will be restored.
2.2 Ha rd Reset
When do you need to perform Hard Reset?
Hard Reset, which is a lso called Cold Rese t, ena bles t o initiali ze har dware completely. User’s
installed programs, copied files and registry values will keep remained even Si303 performed Hard
Reset, but the real time a nd date will be initialized. So you need to r eset the time and date after
performed Hard Reset.
You need perform Hard Reset when the Soft Reset cannot restore the system.
[Hard Reset Procedure]
Using sty lus p en to Pre ss <Po wer> Button a nd < Reset> Button s imultaneously, the system will
restarting again after the screen turns off shortly.
[Hard Reset Result]
System will be restarting.
Operating System (Windows CE) will be loading and restarting.
Desktop will appear in about ten seconds.
Time and date window will be popped up and need to reset it.
Reset Button
Power Button

User’s Guide
15
2.3 In itializing System
Enter [Boot Menu] and do what you want, when in the situations as below:
1. When you need to restore the original registry information, which has been changed.
2. When you need to initialize “My device” storage spaces.
3. When you need to initialize “Flash Disk” storage spaces.
4. When you need to initialize system to factory default settings.
You can also p ress <Po wer> butto n an d <F un> butto n simu ltaneously, an d t hen pr ess <Reset>
button to perform Hard Reset.
[Boot Menu] window would appear in a couple of seconds.
Warning!
Except for [Clean System], please do not use other functions.
The system might be work not properly if you use other functions on the [Boot
Menu].
[Boot Menu]
0. Firmware Upgrade
1. Clean(Without Flash)
2. Clean(With Flash)
3. Exit
Menu Select : Enter NO.
[Boot Menu]
**** WARNNING ****
Your Information
Will be erased!
Back : <- BKS
Erase : Enter
Using<1>, <2> buttons to select Clean System, then press <Enter> button.
0. Firmware Upgrade – OS Update
1. Clean(Without Flash) – Initializing “Mydevice” region.
2. Clean(With Flash) – Initializing to factory default settings.
3. Exit
User’s Guide
16
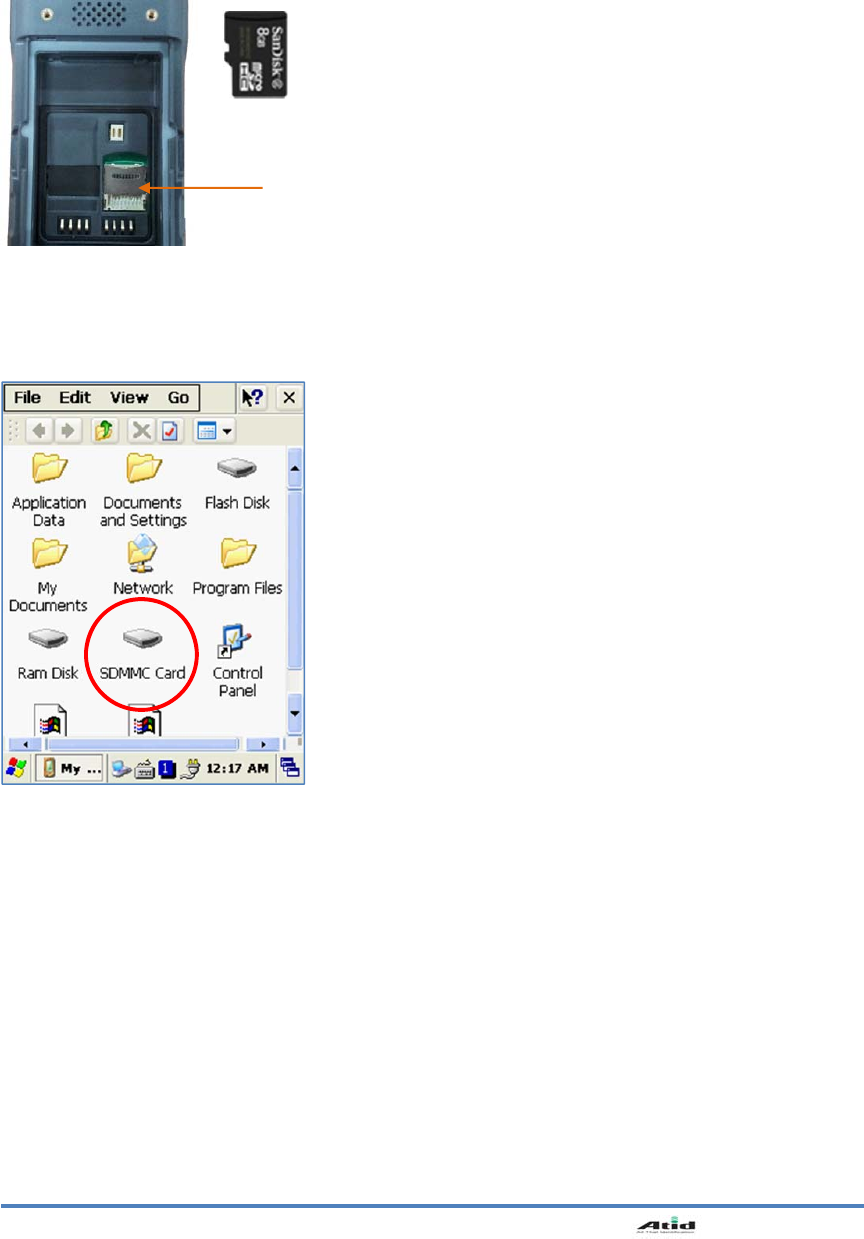
3. Using Micro SD Card
The image as below is battery compartment of AT280, and there are 1EA SIM Card Slot, 1EA SAM
Card Slot(Option) and 1EA Micro SD Card Slot.
You can find the Micro SD Memory Card icon when executing the file explorer, after the Micro
SD
1 Micro SD Card Slot
User’s Guide
17
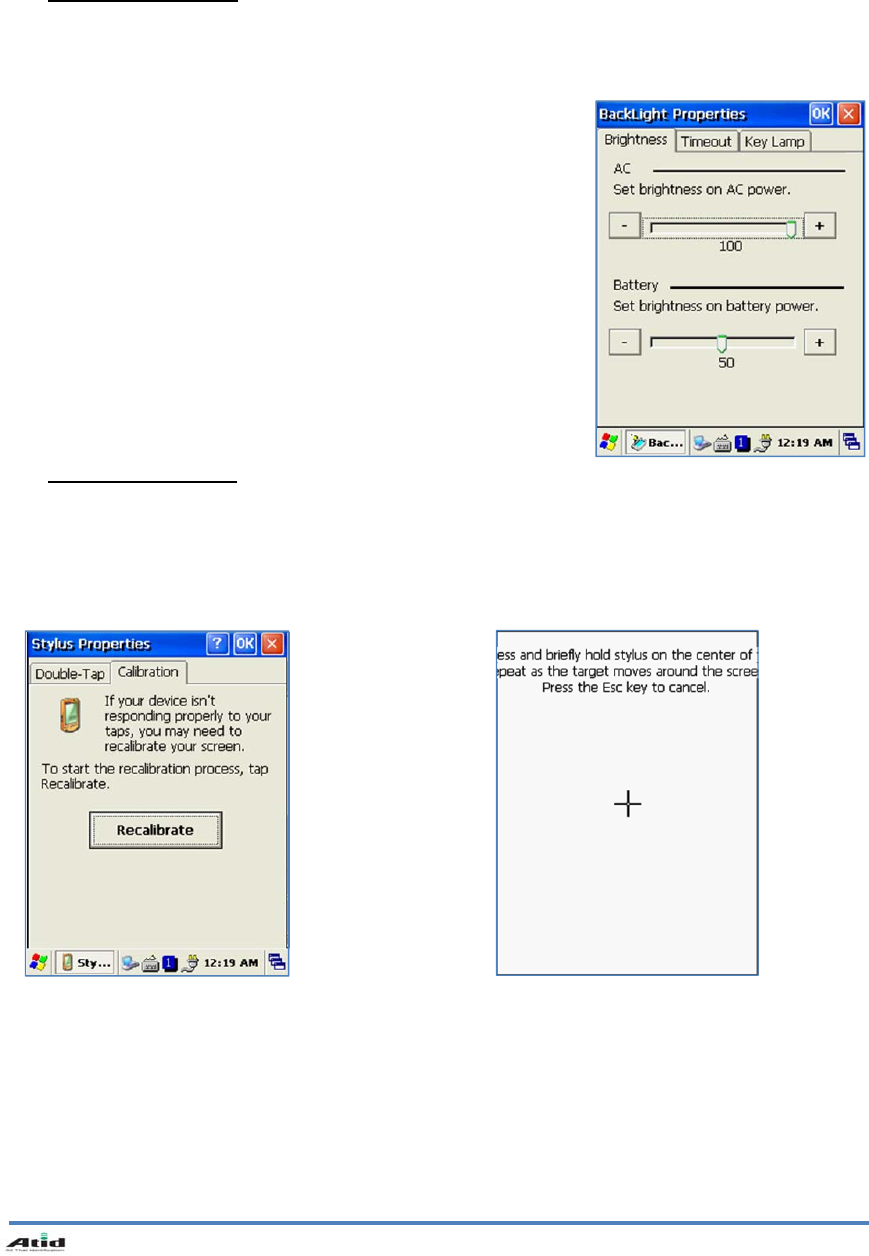
4. System Settings
4.1 S etting Brightness
Brightness is already set 80% at the factory, and brightness is the biggest consume part of the power,
so you might need to adjust it to your actual need.
[Setting Brightness]
1. [Start Button] -> [Setting] -> [Control Panel] -> [Brightness]
2. [MyDevice] -> [Control Panel] -> [Brightness]
밝기
: Enable you to adjust brightness.
끄기
: Enable you to adjust the timing of turning off brightness.
키램프
: Enable you to adjust the timing of turning off key lamp.
4.2 Sc reen Calibration
At first beginning of using the device after purchasing or need to use the device for a long period time,
if you cannot select the place where you touched with stylus, you need to reset the coordinate
calibration values.
Touch screen calibration
[Start Button] -> [Setting] -> [Control Panel] -> [Stylus] -> [Calibration] -> [Recalibration]
Press and hold stylus pen briefly on the center of cross symbol, and repeat 5 times as it moves
around the s creen. The screen counts 30 sec onds a fter ca librating, an d y ou can finish t he
recalibration to t ouch s creen wherever you want, i f you d o n ot an y a ction, t he s creen will
automatically finish the recalibration of itself.
User’s Guide
18
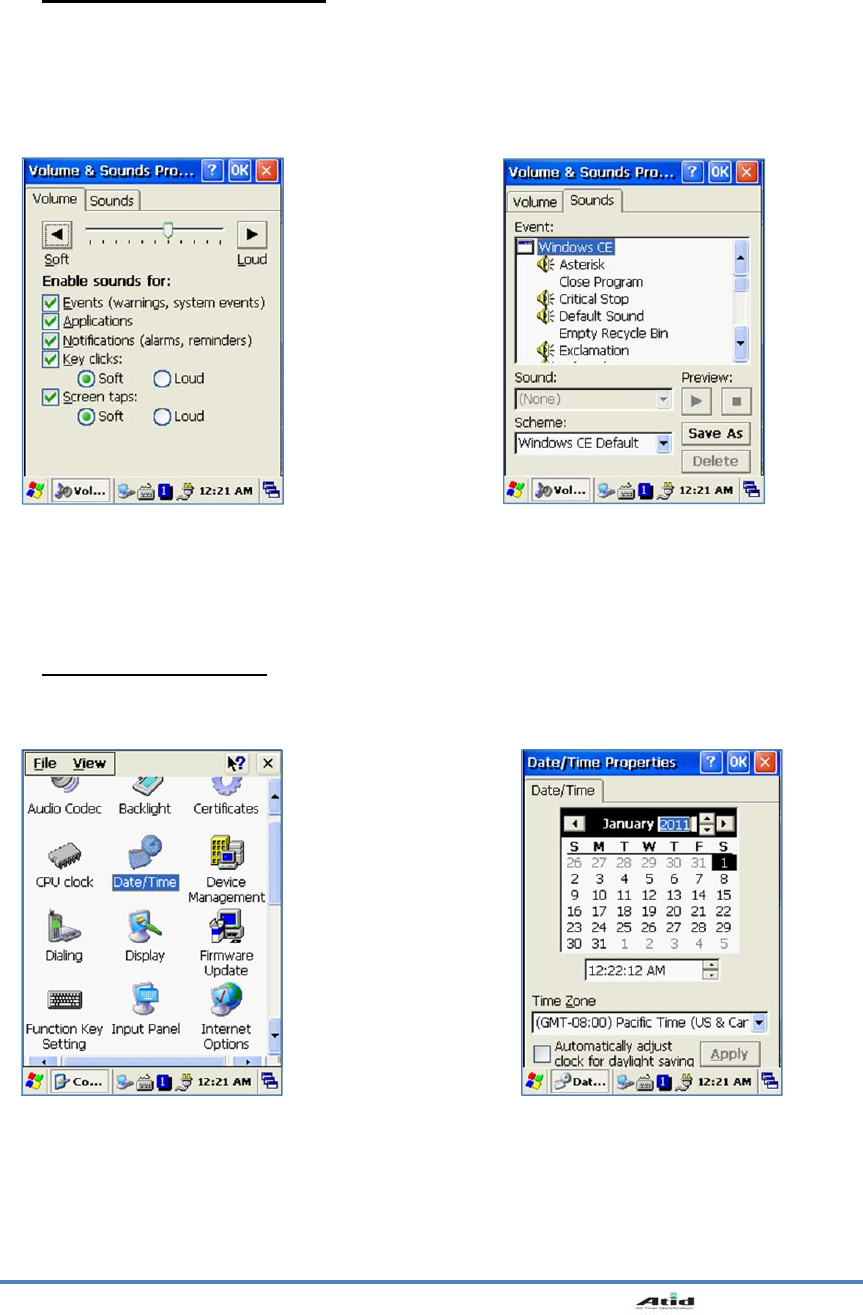
4.3 Setting Volume and Sounds
Volumes is already set 80% at the factory, and you can readjust you need volume at control panel
->”Volume and Sounds”
Setting Volume and Sounds
[Start Button] –> [Setting] -> [Control Panel] -> [Volume and Sounds]
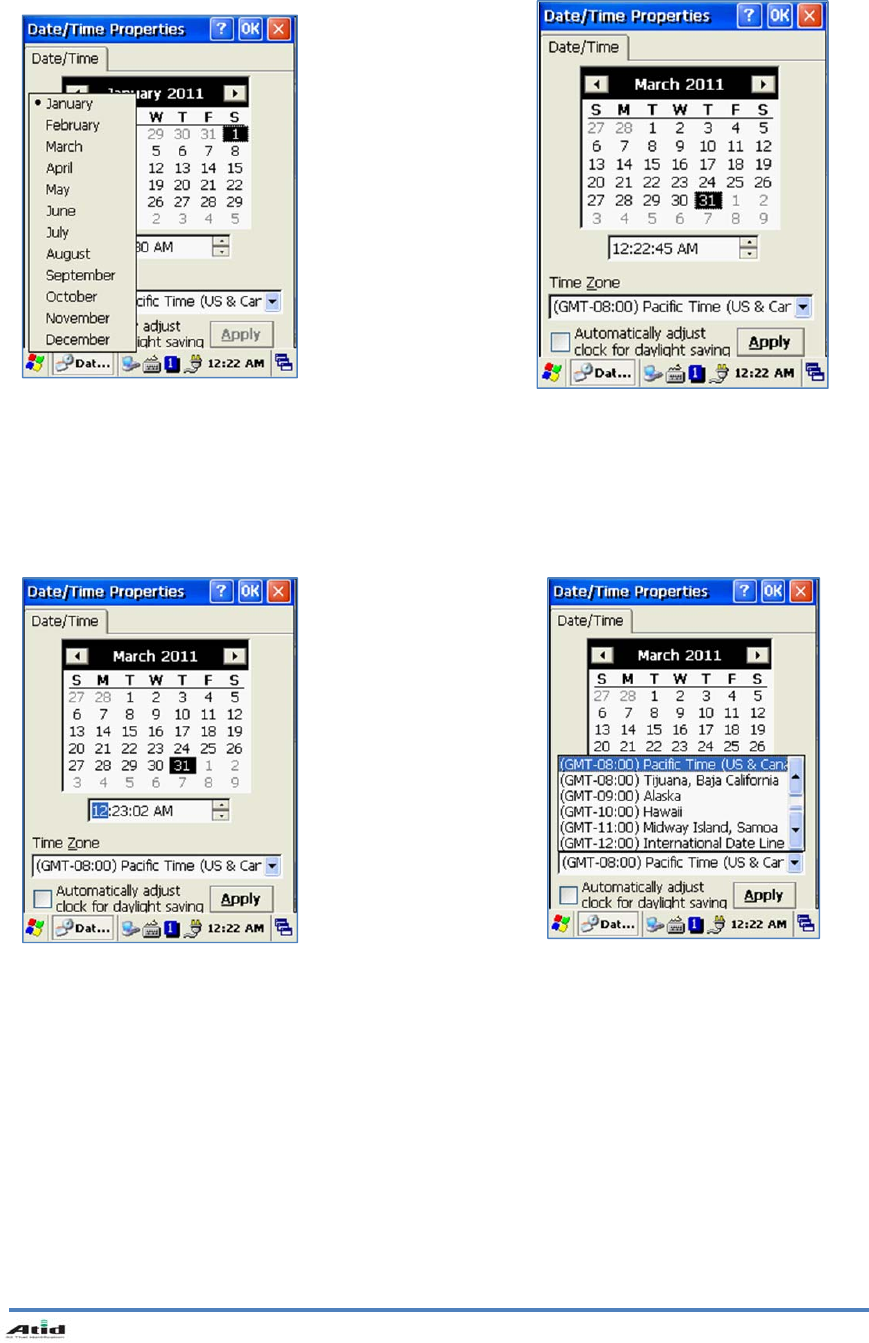
4.4 Setting Data and Time
[Start Button] -> [Setting] -> [Control Panel] -> [Date and Time]
Setting Year:
Double Click the year, and
click the up and down arrow
button to set year.
User’s Guide
19
Setting Month:
Double Click the Month or
Click L/R arrow button to set
Month.
Setting Day:
Click the day directly to set
day.
Setting Time:
Click AM/PM, Time area
directly, using u
p
and down
arrow button to set Time.
Setting Time Zone:
Click u
p
and down arrow
direction to select time zone
and click apply button.
User’s Guide
20
5. Using keypad
Keypad enables you to input numbers, alphabets and special symbols. And can also execute other
set function with <Fun> button.
5.1 Us ing keypad
If you’d like to change the current input language, can press <ALP> button as below steps:
[Numeric] -> [Lowercase] –> [Uppercase]
5.2 I nputting Data
Numeric Keypad Mode: Press< ALP > button or keypad icon on the taskbar to change to the
numeric mode and directly press number on the keypad.
Alphabet Keypad Mode: Press <ALP > button or keypad icon on the taskbar to change to the
Lowercase or Uppercase and directly press alphabets or special symbols on
the keypad. Each button has 2 ~ 3 letters or symbols. Press the button once,
the first letter or symbol will be inputted, press twice continuously, then the
second letter or symbol will be inputted, and the third letter or symbol need to
press button three times continuously.
Click the input language icon
on the taskbar is also can change
the input language.
User’s Guide
21
5.3 Usi ng <Fun> Button
Press <Fun> button and other buttons simultaneously can activate functions as below:
Fun + button Descriptions
<1> Enable you t o canc el th e se lected co mmand or th e pro grams operating or
state.(ESC)
<Up>, <Down> Enable you to increase or decrease the sound.
<3>,<5>, <4>, <9> Enable you to perform page Up or page Down and HOME
<6> Enable you to delete a letter which located after the cursor.(DEL)
<7>, <2> Enable it has Tab button function and Space button function.
<*>,<0>,<#>, <8> Enable you to input <+> <000> <–> symbols.
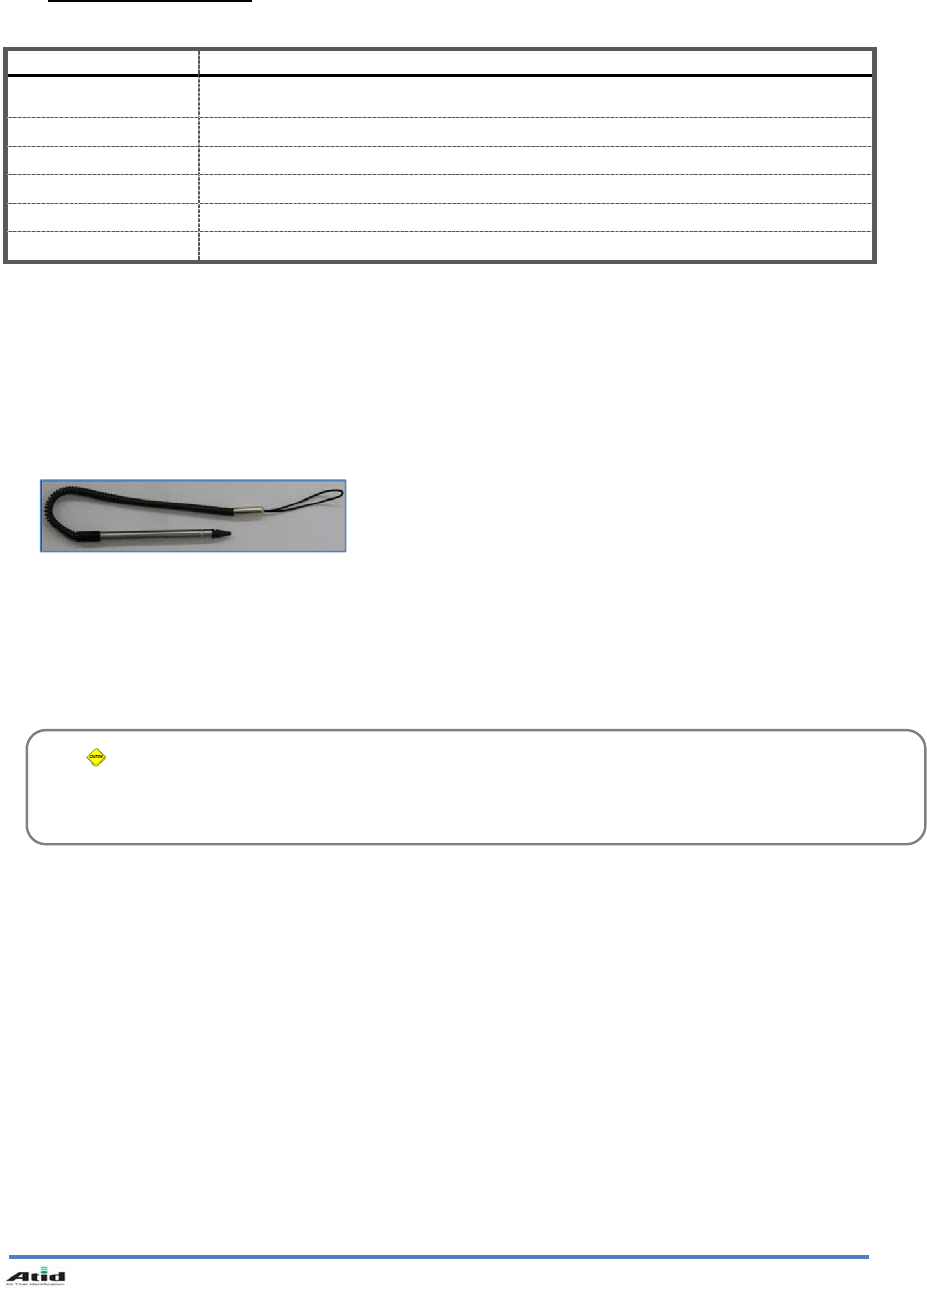
6. Using stylus
You can tie the stylus to the hand strap hole, so that enable you to use the stylus as like a mouse on
a PC
.
Caution:
Please do not use sharp objects on the touch screen. Use only supplied stylus, otherwise would
bring seriously damage to the touch screen.
Use Stylus to:
Select a letter on the soft keypad.
Select a program on the desktop or
taskbar.
Select button, zone or tab bar in a
window box or program.
User’s Guide
22
7. Using ActiveSync Program
ActiveSync p rogram cou ld synchr onize be tween th e PC and PDA de vice, so tha t ena ble you to
perform program installing, copy, transition, delete and so on operations.
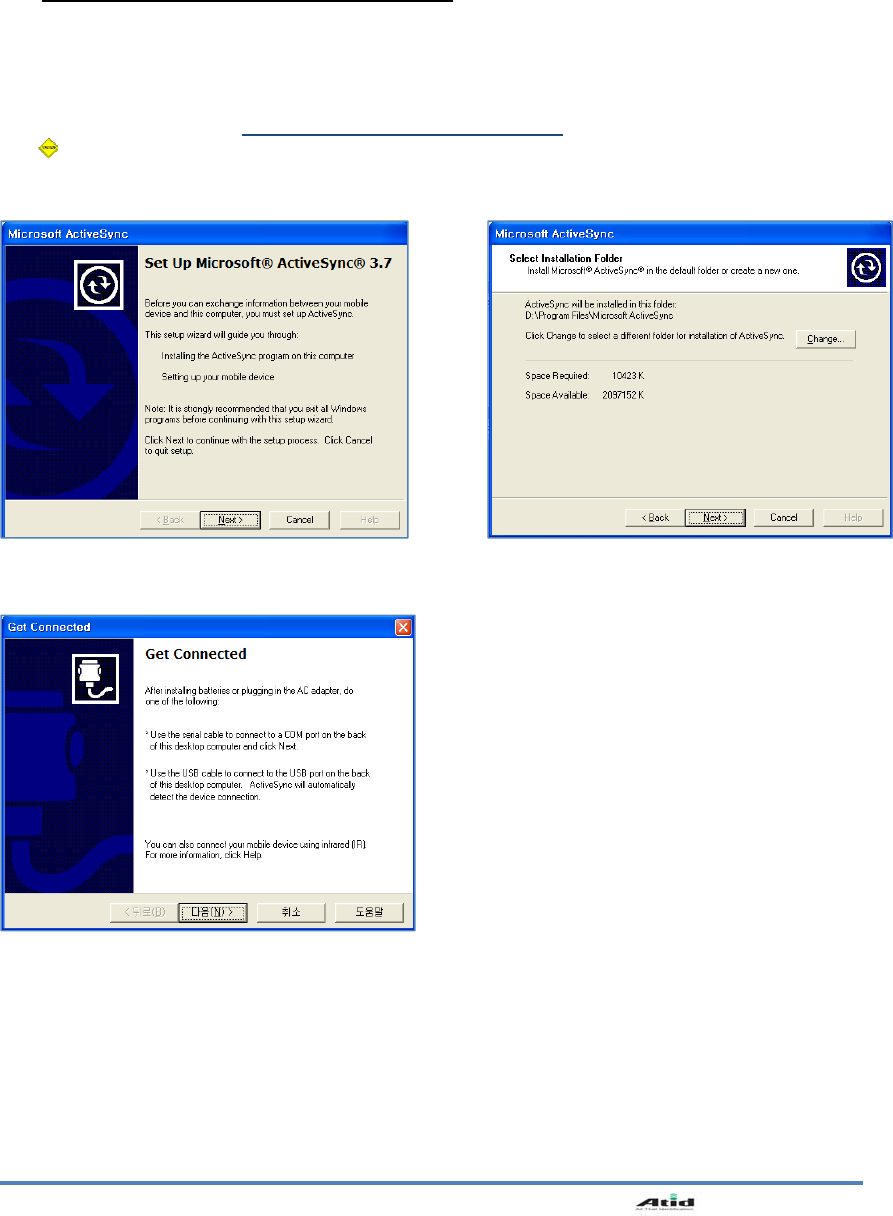
7.1 Installing Microsoft ActiveSync Program
Download the latest ver sion of Active Sync program from Microsoft Windows CE. Website, a nd
install it to your PC.
ActiveSync: Windows XP
Download Address: http://www.microsoft.com/downloads/.
Caution:
You must use ActiveSync v3.7 version or above.
Click [Next] Button. Designate installation folder, then click
<Next> button.
The installation was finished, and then uses
the USB cable to connect to the USB port on
the computer; ActiveSync will automatically
detect the device connection.
User’s Guide
23
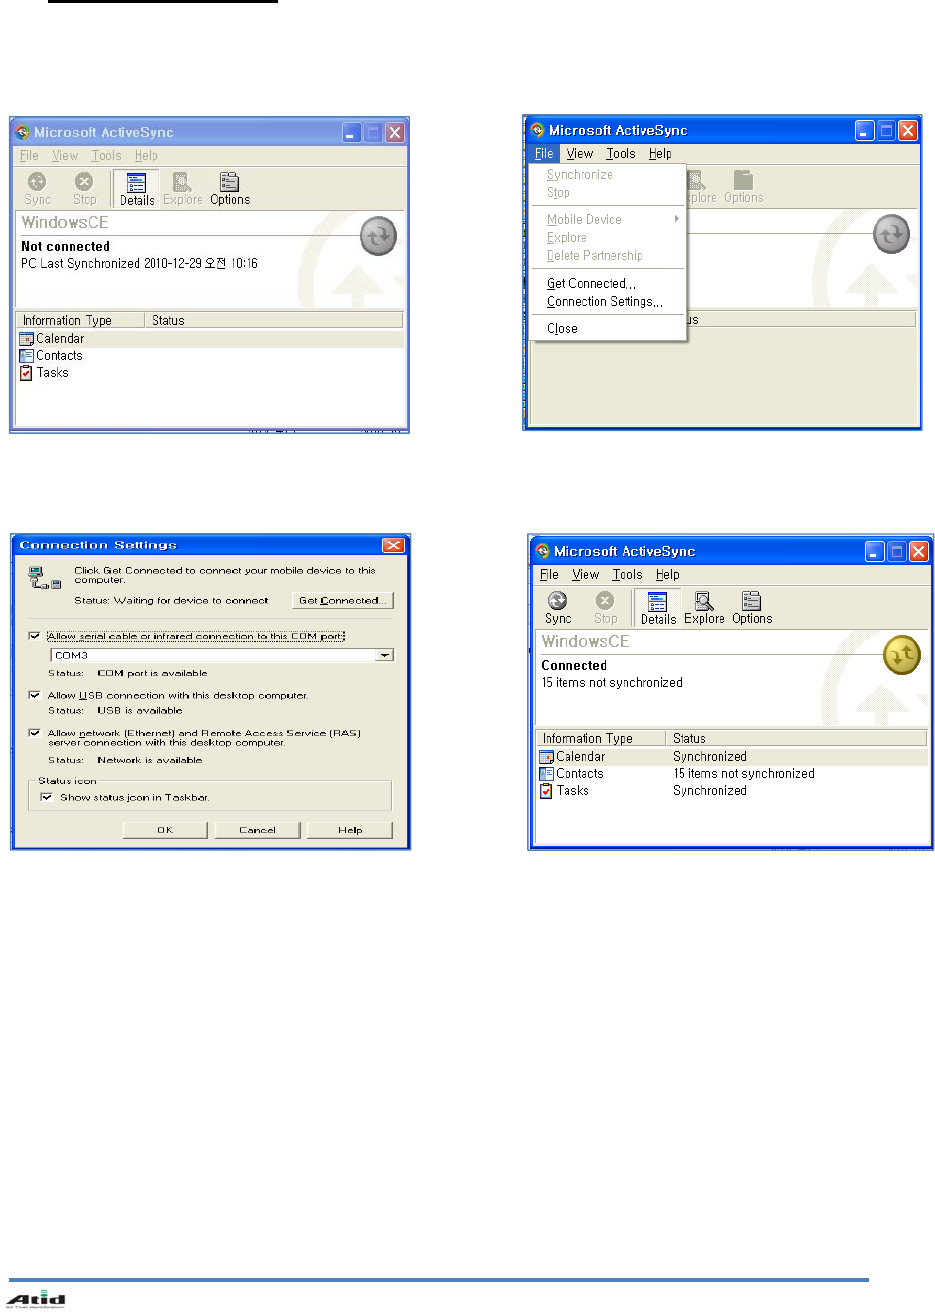
7.2 Connecting PC to PDA
Setting PC
[Start button] -> [Programs] -> [Microsoft ActiveSync]
Executing Microsoft ActiveSync program Click [File], Click [Get Connected].
Select <Allow USB connection with
this desktop computer>, press OK button.
ActiveSync connected to PDA
User’s Guide
24
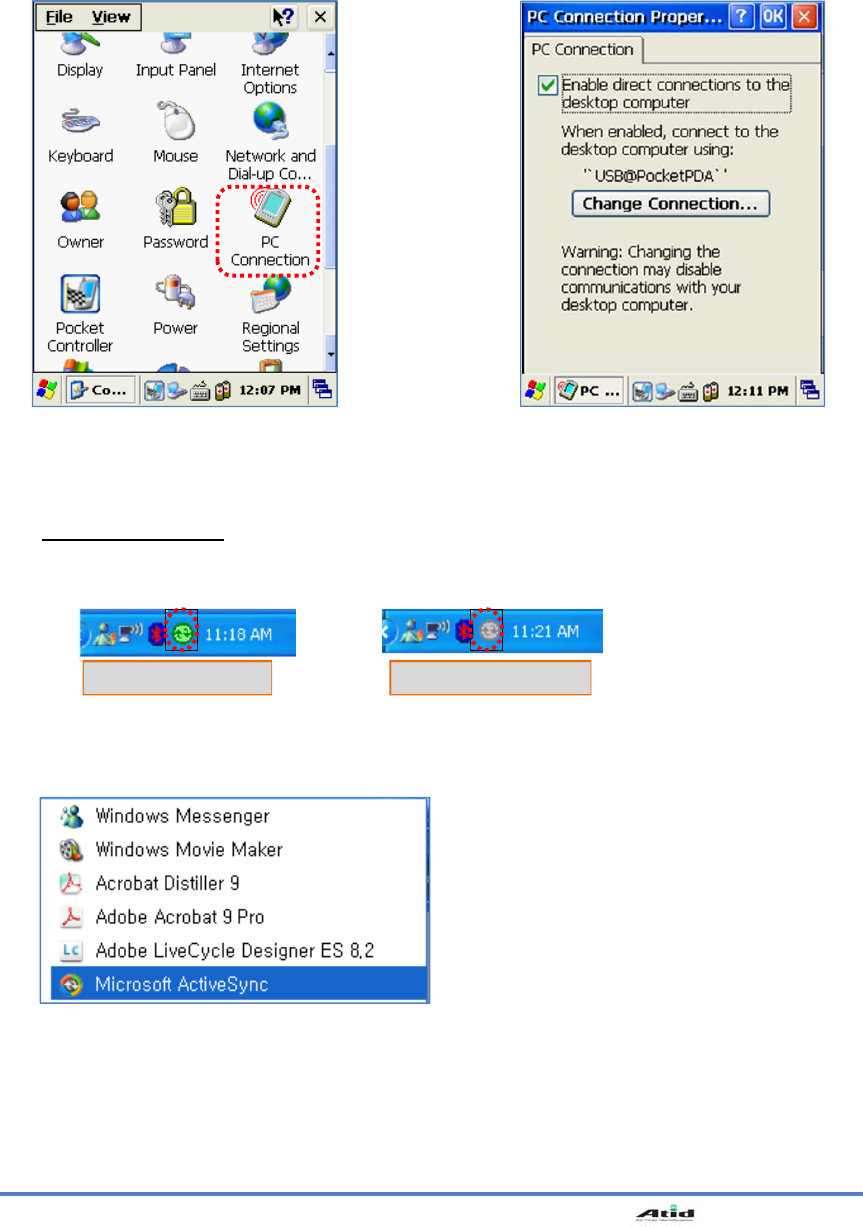
Setting AT280 PDA
[Start Button] -> [Setting] -> [Control Panel] -> [PC Connection]
7.3 Transmi tting Data
Connect USB cable to PC or Device.
< Windows XP >
Double click PC Connection icon To check if set to connected to
USB Sync cable
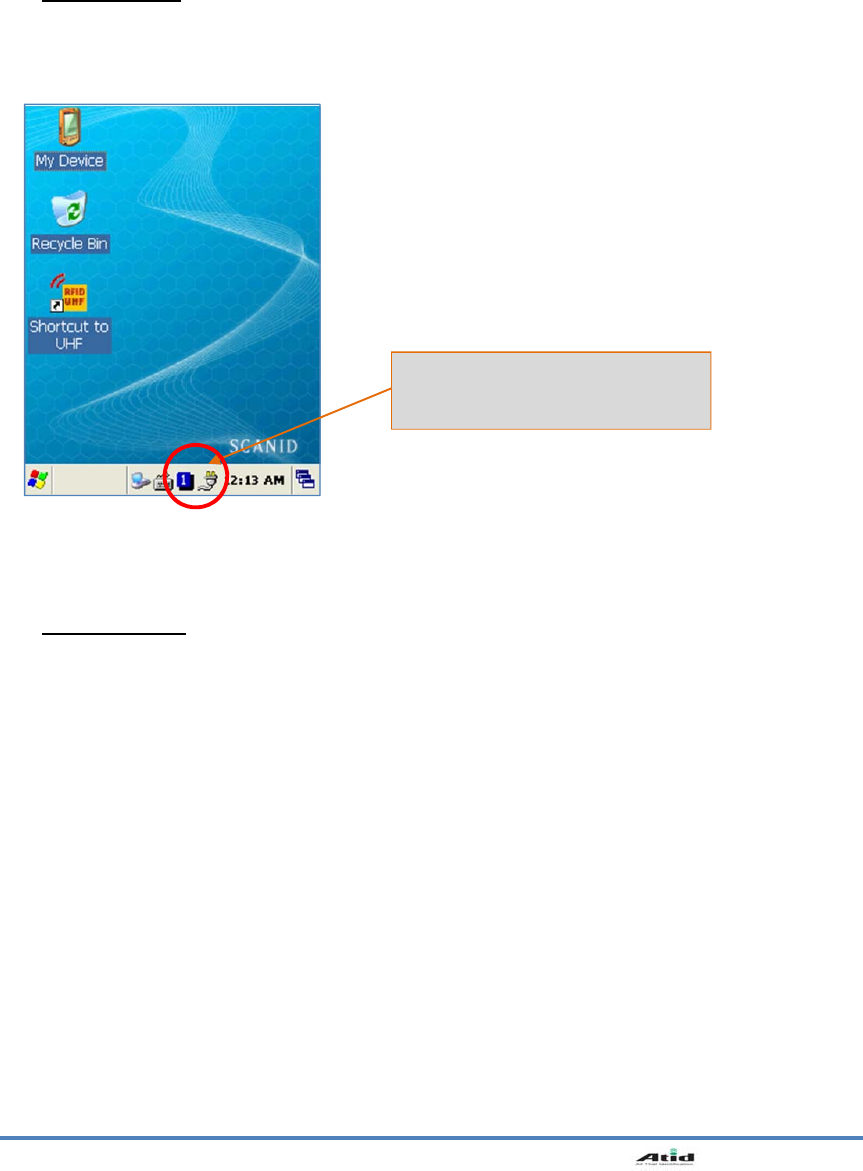
You can check the ActiveSync connecting state on the taskbar.
현재이 이미지를 표시할 수 없습니다.현재 이 이미지를 표시할 수 없습니다.
Connecting state Disconnecting state
Start button/Programs/Microsoft ActiveSync
User’s Guide
25
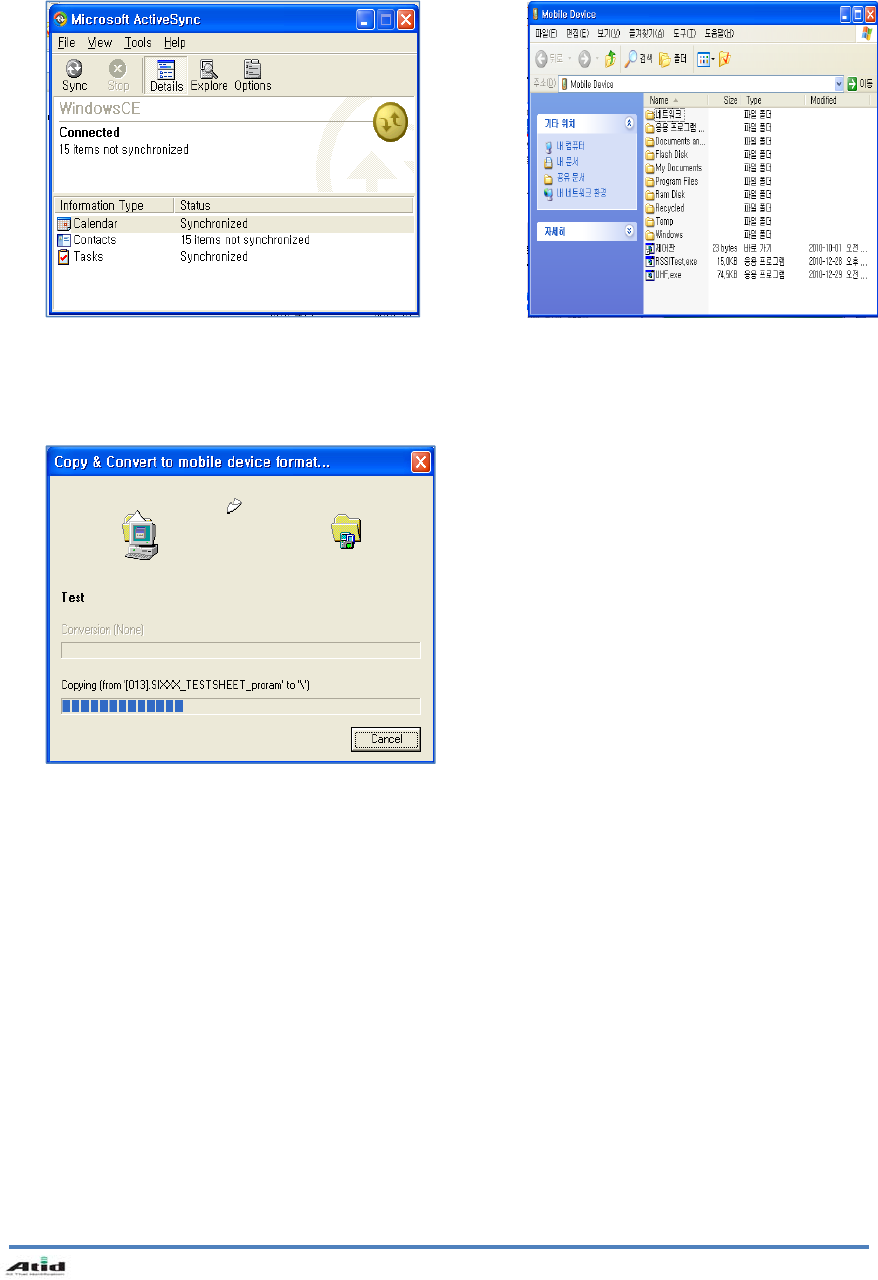
After ActiveSync connected, click
Explore button.
Designate transmitting file path.
Transmit files.
User’s Guide
26
8. Firmware Upgrade
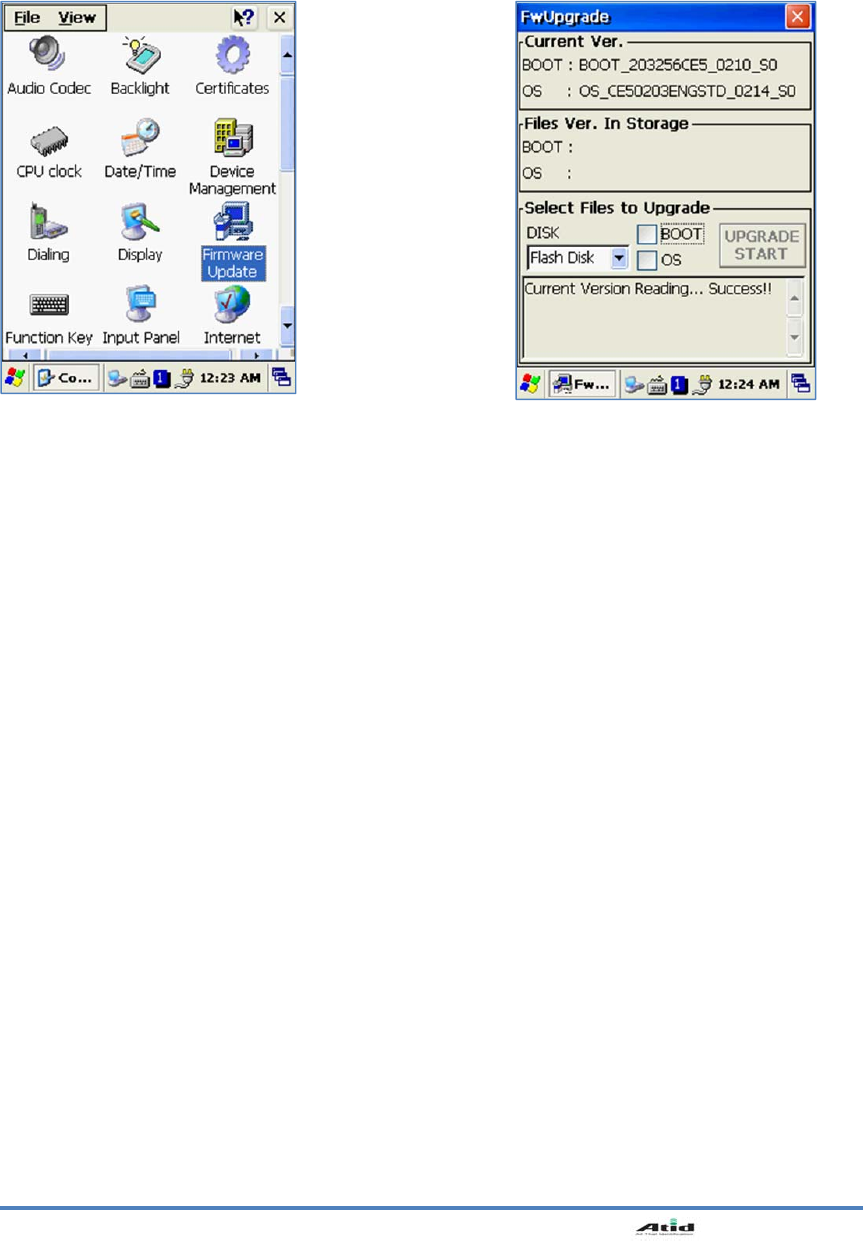
[Start Button] -> [Setting] -> [Control Panel] -> [Firmware Upgrade]

User’s Guide
27
Chapter4. Optional Module
AT280 provided variety of optional modules and in this chapter will provide you the information of
each module.
Optional modules as below:
1. B arcode Scanner
-. 1D Laser Barcode Scanner
-. 2D Imager Barcode Scanner
2. Wireless LAN – 802.11 b/g
3. B luetooth
User’s Guide
28
1. 1D or 2D Barcode Scanner
AT280 enable to equip with a compact image engine, which could recognize all the 1D and 2D
barcodes.
1.1 Scanning Barcode
1.2 Setting Barcode Emulator
Barcode Emulator program enables you to set the barcode value input type, scan button, scan
sound on and off so on, and could input the scan values to any program(such Web program,
WordPad program so on) where located the cursor.
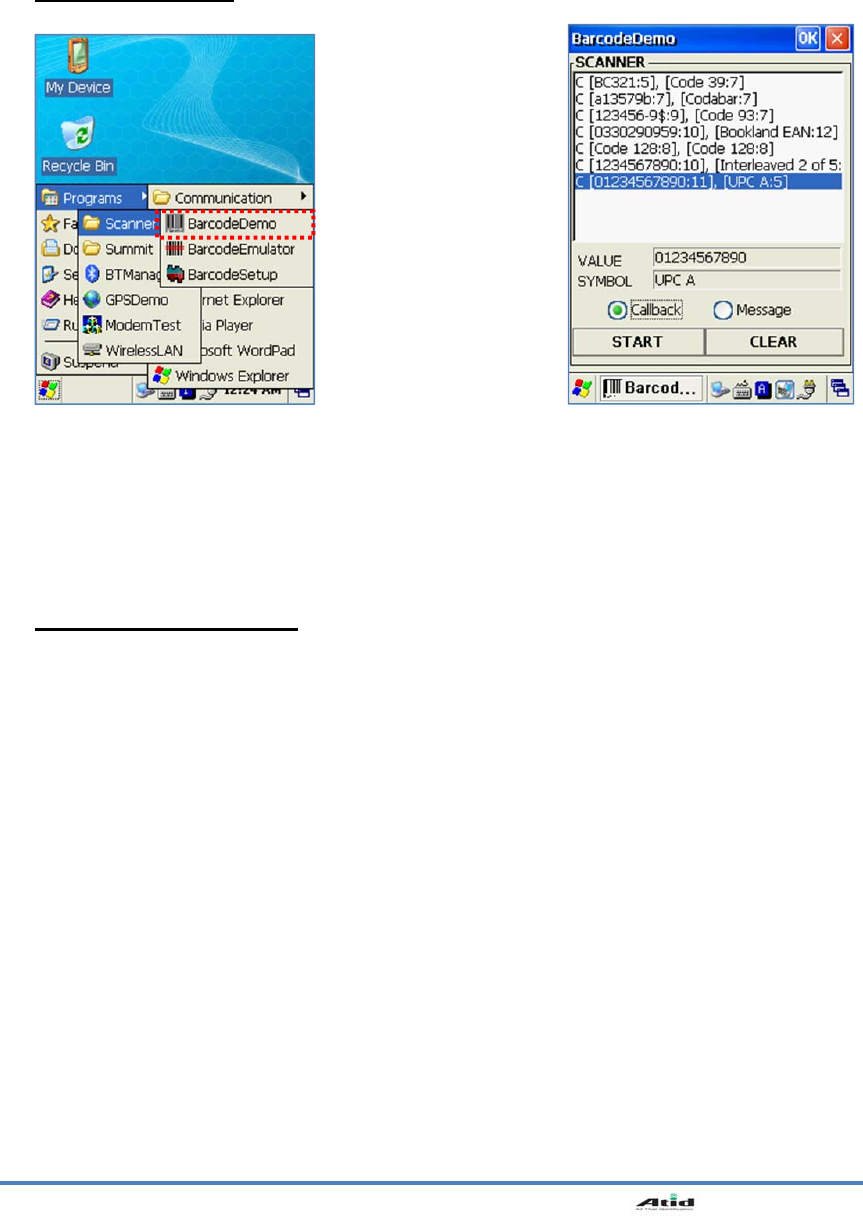
Start Button/Programs/Demo
Apps/Scanner/BarcodeDemo
Press Scan Buttons to Read
Barcode.
User’s Guide
29
Executing Barcode Emulator
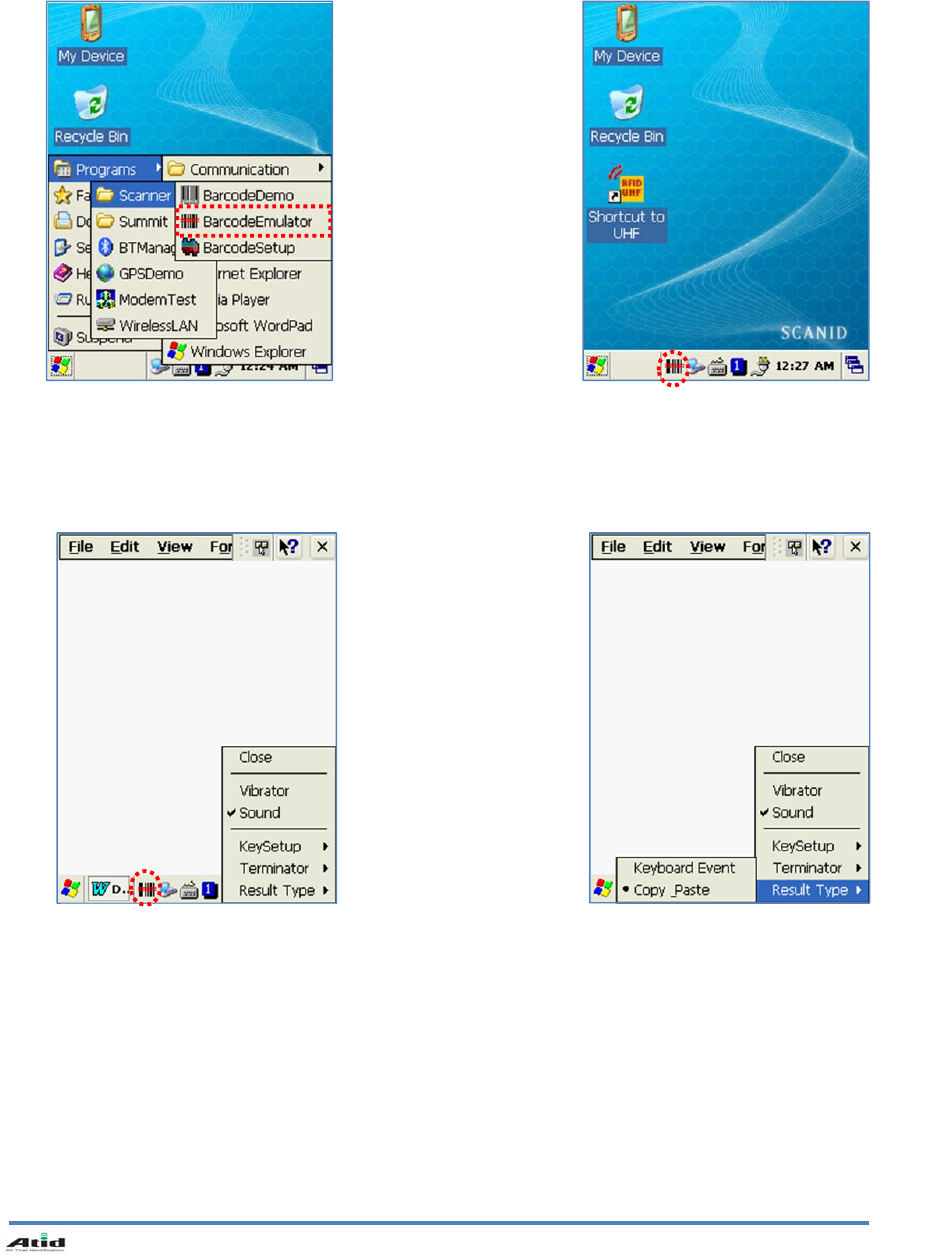
[Start Button] -> [Program] -> [Demo Apps] -> [Scanner] -> [BarcodeEmulator]
Run Barcode Emulator Program Barcode Emulator Icon will be
showed on the taskbar.
Run WordPad Program, then
click the Emulator Icon
Result Type
Keyboard Event: Barcode inputted
one by one.
Copy Paste: Barcode will be
stored be stored in clipboard and
shown at paste way.
User’s Guide
30
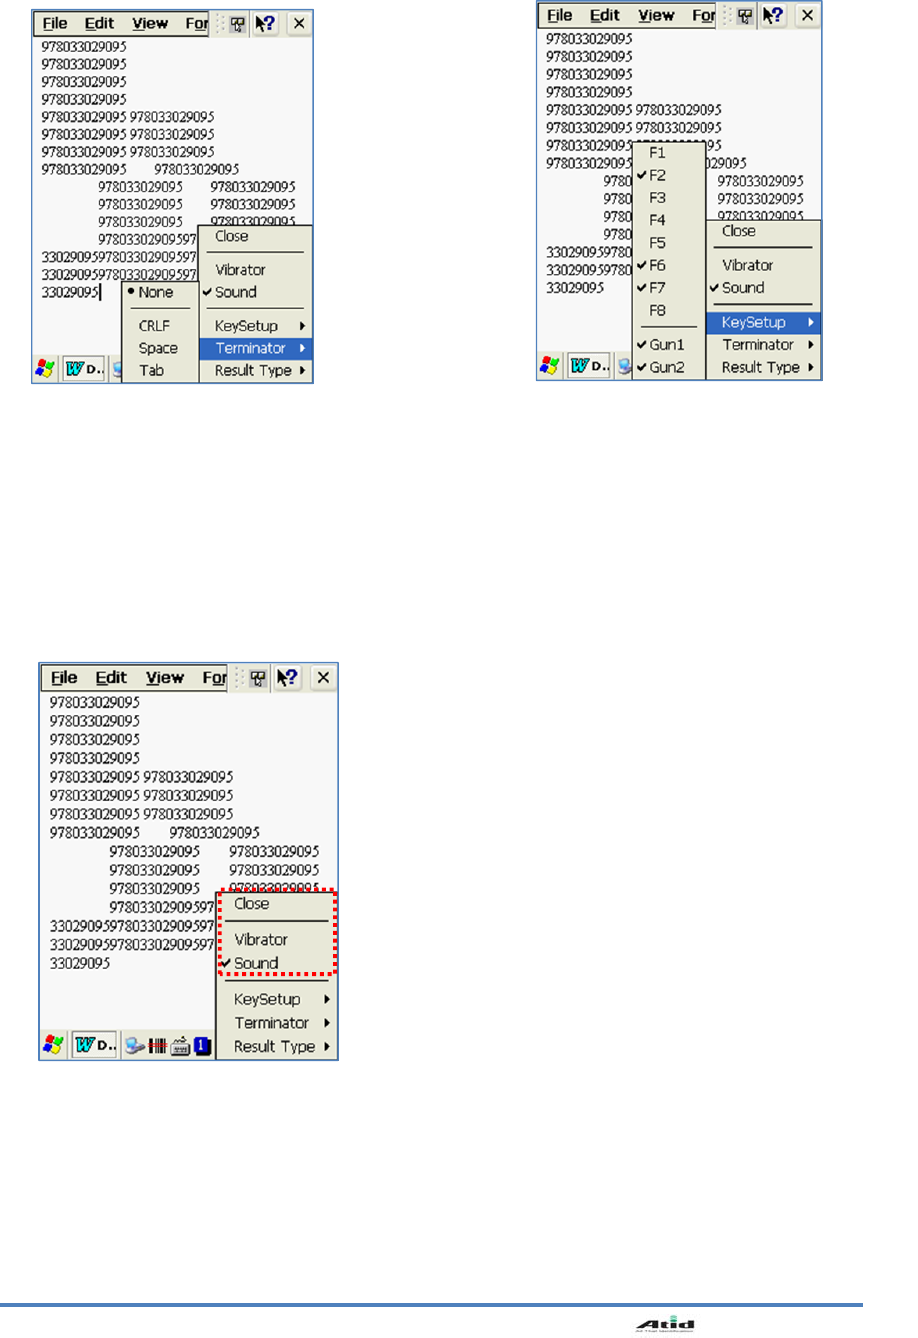
Terminator
None:Not input terminal
barcode value.
CRLF: Barcode value will
include an “Enter”
Space: Barcode value will
include a “Space”
Tab: Inputting type as same as Tab
Key Function.
Key Setup
F1-F8 Key: Hardware Keypad
Gun1, Gun2: Gun Trigger
Sound: Set sound ON/OFF after
scanned barcode
Vibrator: Set vibrator ON/OFF
after scanned barcode
Close: Exit Emulator Program
User’s Guide
31
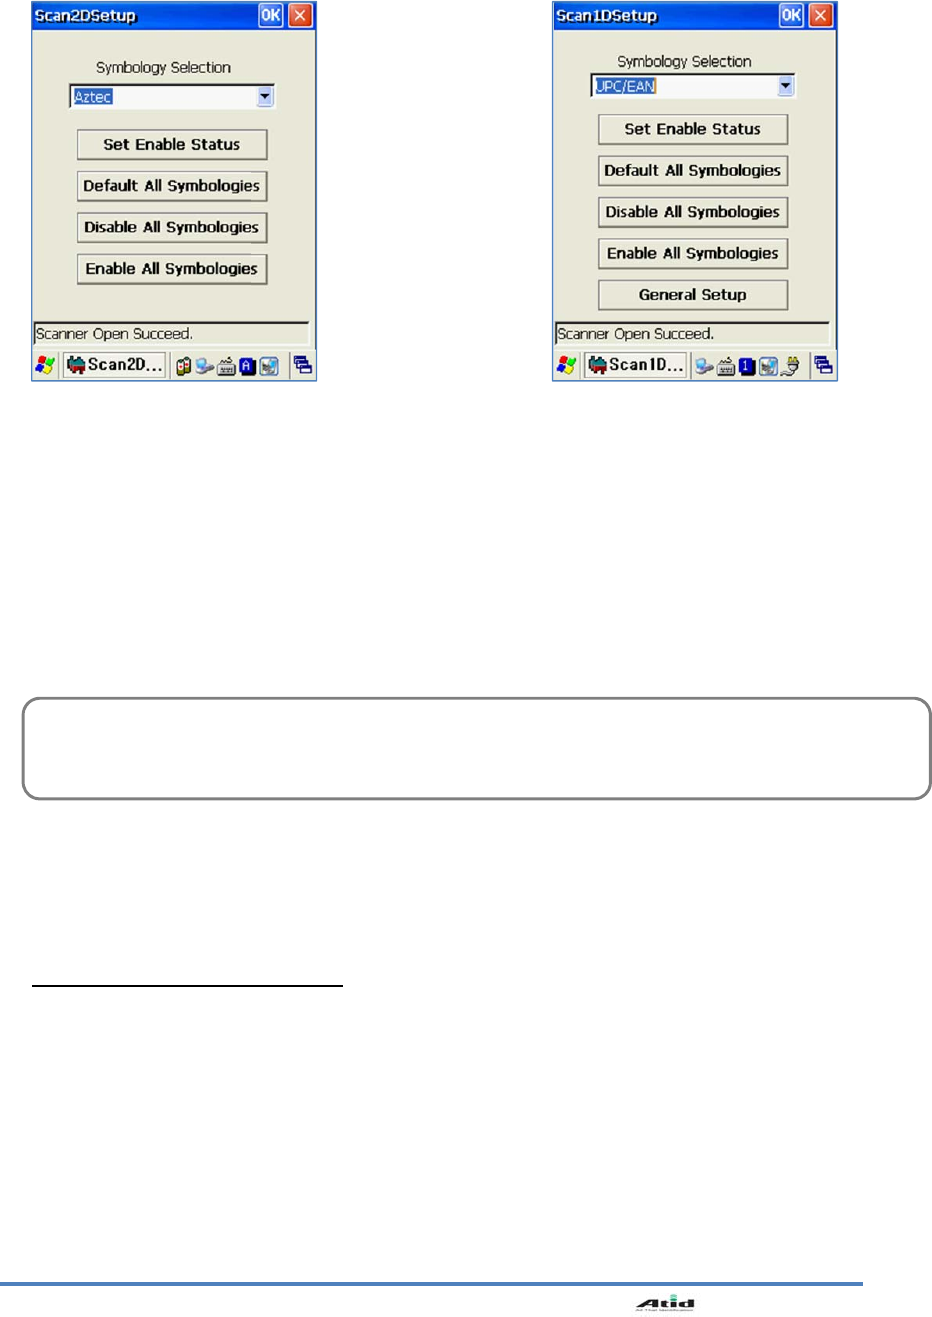
1.3 Setting Barcode Symbology
AT280 enables you to set the various barcode by using barcode symbologies program.
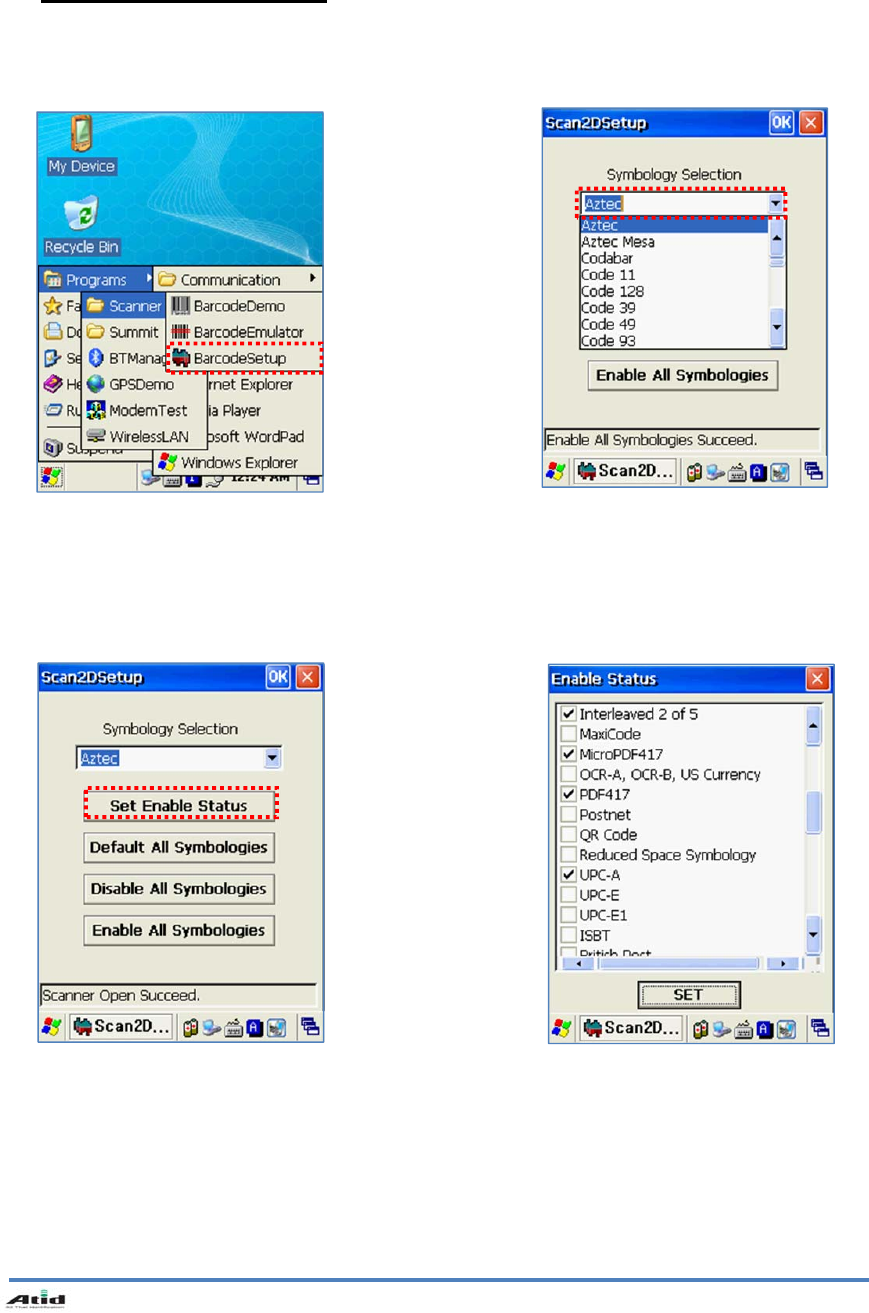
[Start Button] -> [Program] -> [Demo Apps] -> [Scanner] -> [BarcodeSetup]
Click Set Enable Status button Make a check mark on the
barcode which you want to
use, and then click <SET>
button.
Run BarcodeSetup Program. Set Barcode Type in detail.
User’s Guide
32
1.4 Barcode Scanning Beam Position
1. Remove the protective film from the window of barcode.
2. Executing the BarcodeDemo program.
3. Emit laser beam to the barcode.
• Adjust the distance according to the size of barcode.
• Barcode will stop automatically in five minutes if out of the Barcode reading range.
2D Symbology Selection:
1. Initialize all the symbologies to
factory default value.
2. Unable to read all the
symbologies.
3.Enable to read all the
symbologies.
1.
2.
3.
Warning!
Please do not look directly into the laser beam of barcode, or it may do harm to your vision.
1D Symbology selection:
1. Initialize all the symbologies to
factory default value.
2.Unable to read all the
symbologies.
3.Enable to read all the
symbologies.
4. Set a level that enable to read
more than two symbologies
simultaneously.
User’s Guide
33
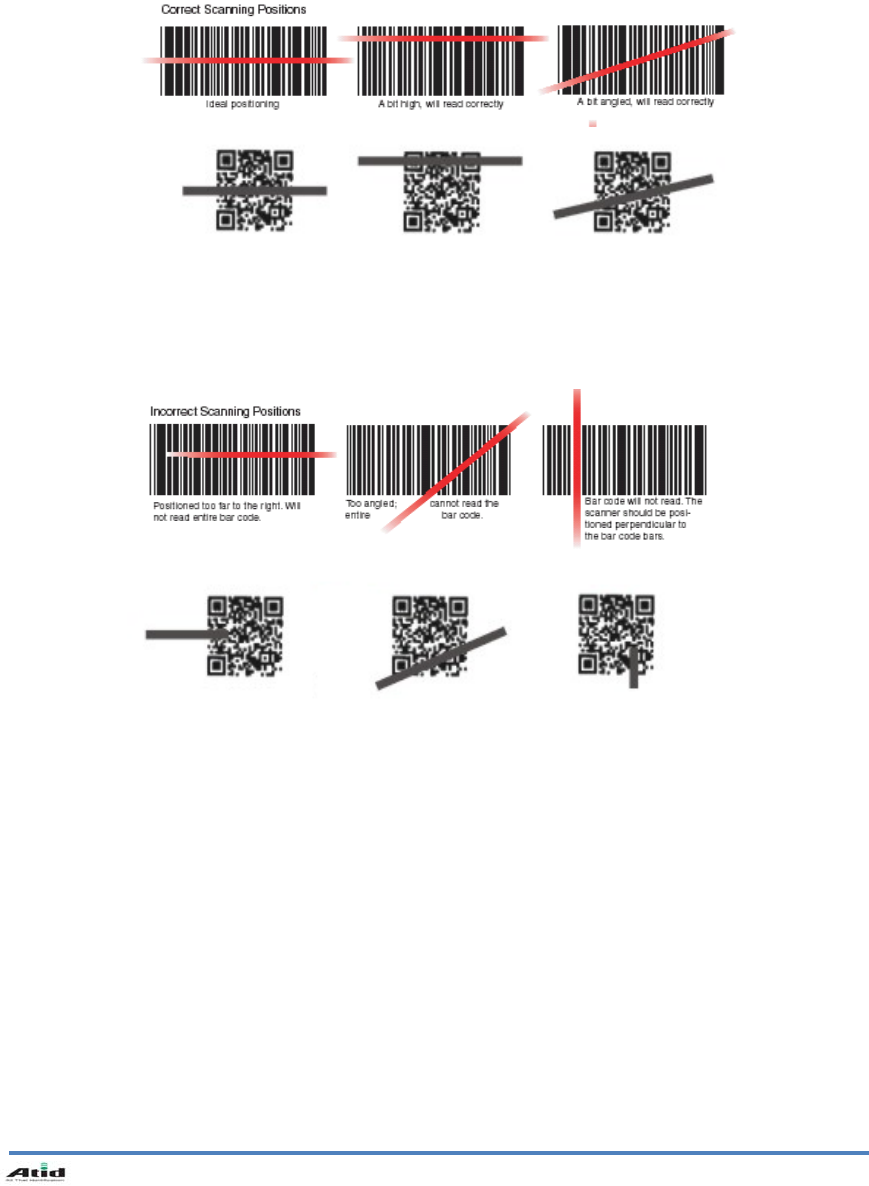
[Correct Scanning Beam Position]
1. The more small size of barcode, AT280 needs the more close to barcode. The effective
scanning rang of Si303 is from 40 ~ 300mm. if failed to scan barcode, please try to adjust scan
angle and distance.
2. The laser beam is a red thick line, when scanning a barcode.
[Incorrect Scanning Beam Position]
1. The laser beam must across the barcode.
2. It will couldn’t scan barcode if the laser beam across only a fraction of barcode.
1D
2D
1D
2D
User’s Guide
34
2. Using Wireless Lan
AT280 enable to equip an internal 802.11 radio module to transfer data and do wireless
communication. AT280 supports TCP/IP network protocol, and communicate with a host computer
directly.
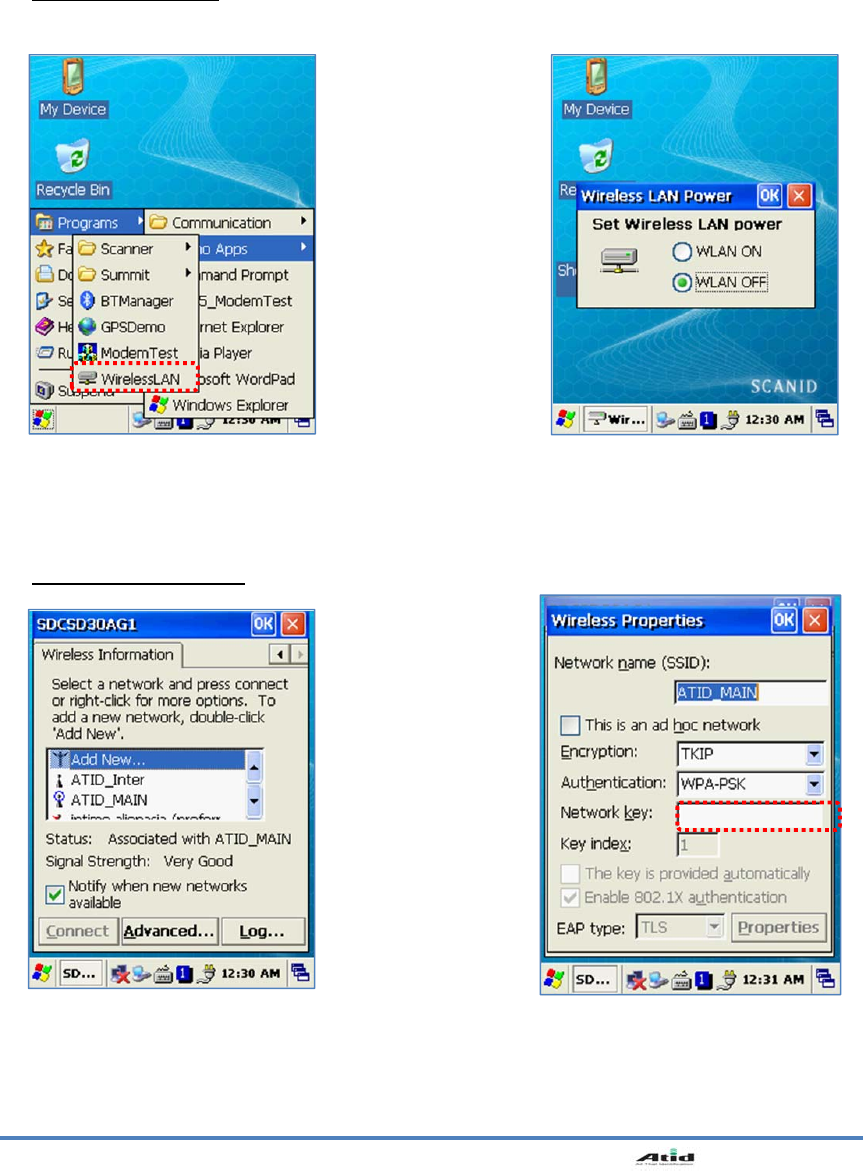
2.1 Connecting to Wlan
[Start Button] -> [Program] -> [Demo Apps] -> [Wireless Lan]
2.2 Setting Wlan Manually
Run the Wireless LAN program. Select <WLAN ON>, and then
click Ok button.
Double click a suitable device
from the list of AP.
Input Key Password, and then
click OK button.
User’s Guide
35
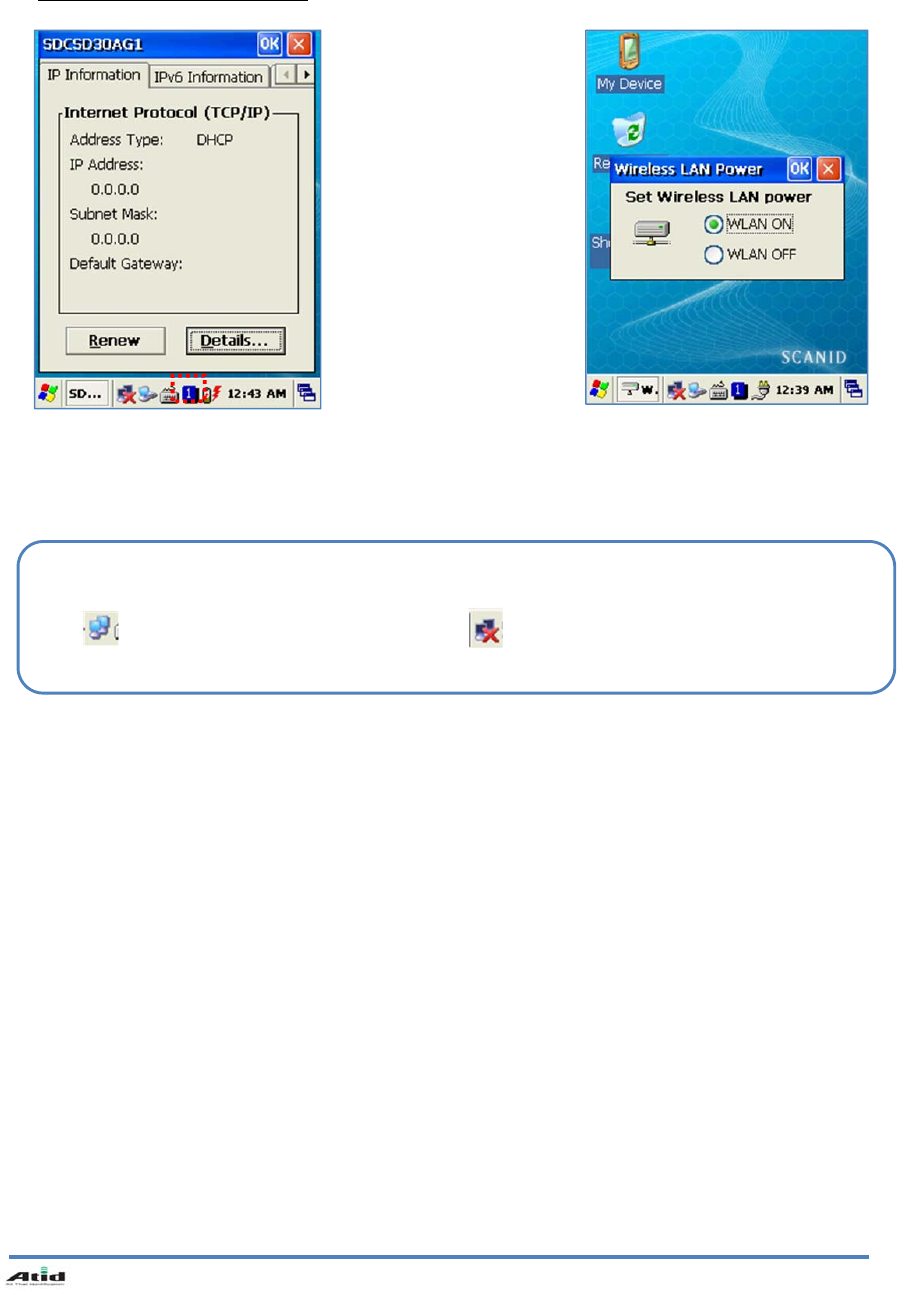
2.3
Checking WLAN Information
Double click WLAN icon on the taskbar
to check Wlan information.
Start Button/Programs/ATID
App/Wireless Lan, and then
select <WLAN OFF> to stop
Wlan communication.
Note:
The Wlan LED will changed to green and the Wlan icon on the taskbar will be lighted on
,if failed the Wlan icon will be light off
User’s Guide
36
3. Using Bluetooth
This User Guide is only applied to the AT280 which installed "MD6RF" module.
AT280 not only supports to the SPP printer device like as AT870/AT570, but also supports Bluetooth
Stack Service of Windows CE. This Chapter described how to Pairing and Disc onnecting between
PDA and Bluetooth devices, and also described basic testing method of Mobile Printer SPR-R203,
which launched by Bixolon, as a sample device.
3.1 Bluetooth Beginning and Closing
AT280 is us ing S tack o f Windows b asically, on ly co uld c ontrol th e p ower of Bluetooth M odule’s
ON/OFF.
1. Blueto oth Function Beginning
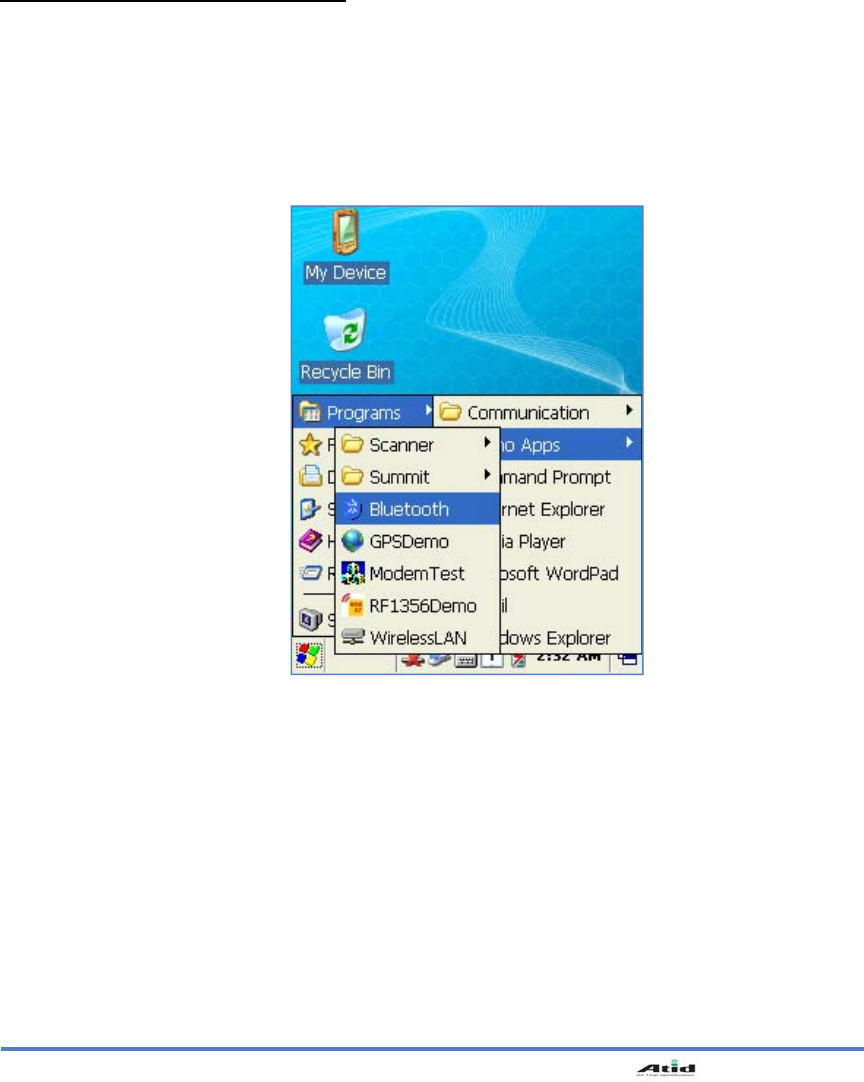
A. Executing the “Bluetooth” demo program.
WinCE Start->Programs->Demo Apps->Bluetooth.
User’s Guide
37
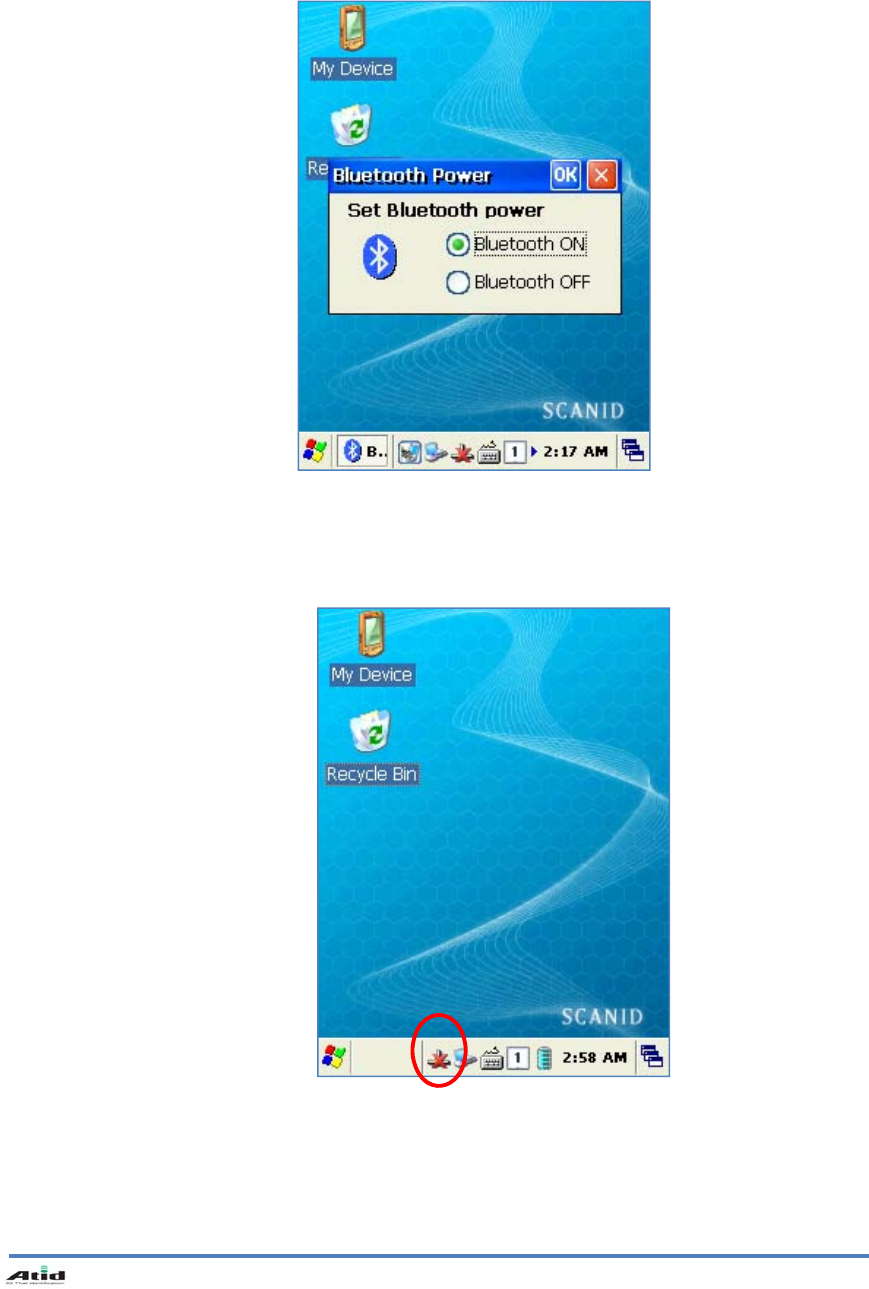
B. Select “Bluetooth ON” item, then press OK button.
C. After Bluetooth executed, the Bluetooth BTPAN1 icon will be appeared on the bottom
of Windows Taskbar, and the red cross mark on it shows that you access is available
and prepared to be accessed.
User’s Guide
38
2. Blueto oth Function Closing
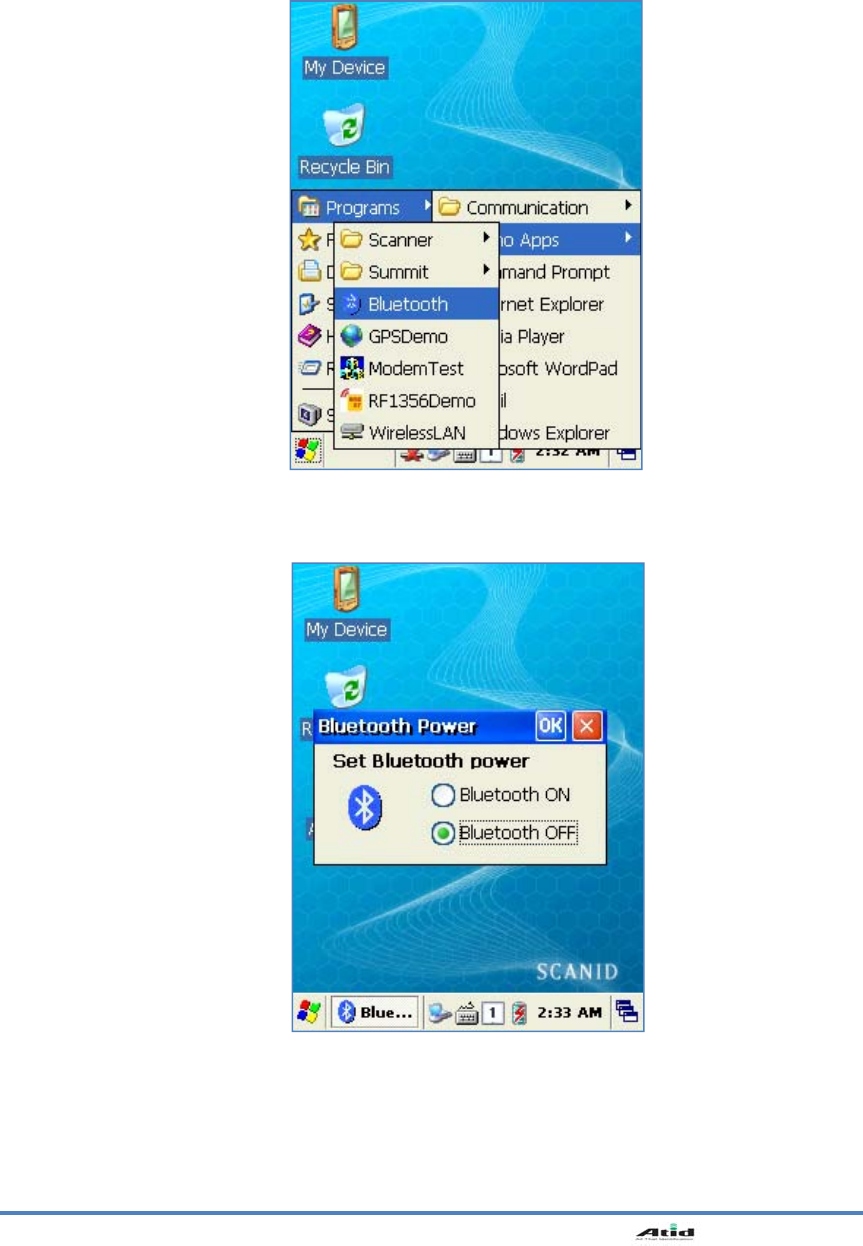
A. Executing “Bluetooth” demo App from Windows CE Menu.
B. Select “Bluetooth OFF”, then to press OK button to off the Bluetooth power.

User’s Guide
39
3.2 Bluetooth Pairing
After connecting each o ther throu gh pairing way, Bluetooth d evices cou ld do its function
properly.
1. Executing Bluetooth program as below path.
Start->Settings->Control Panel->Bluetooth Device Properties
->
2. Press “Scan Device” button to searching devices which could pairing.
User’s Guide
40
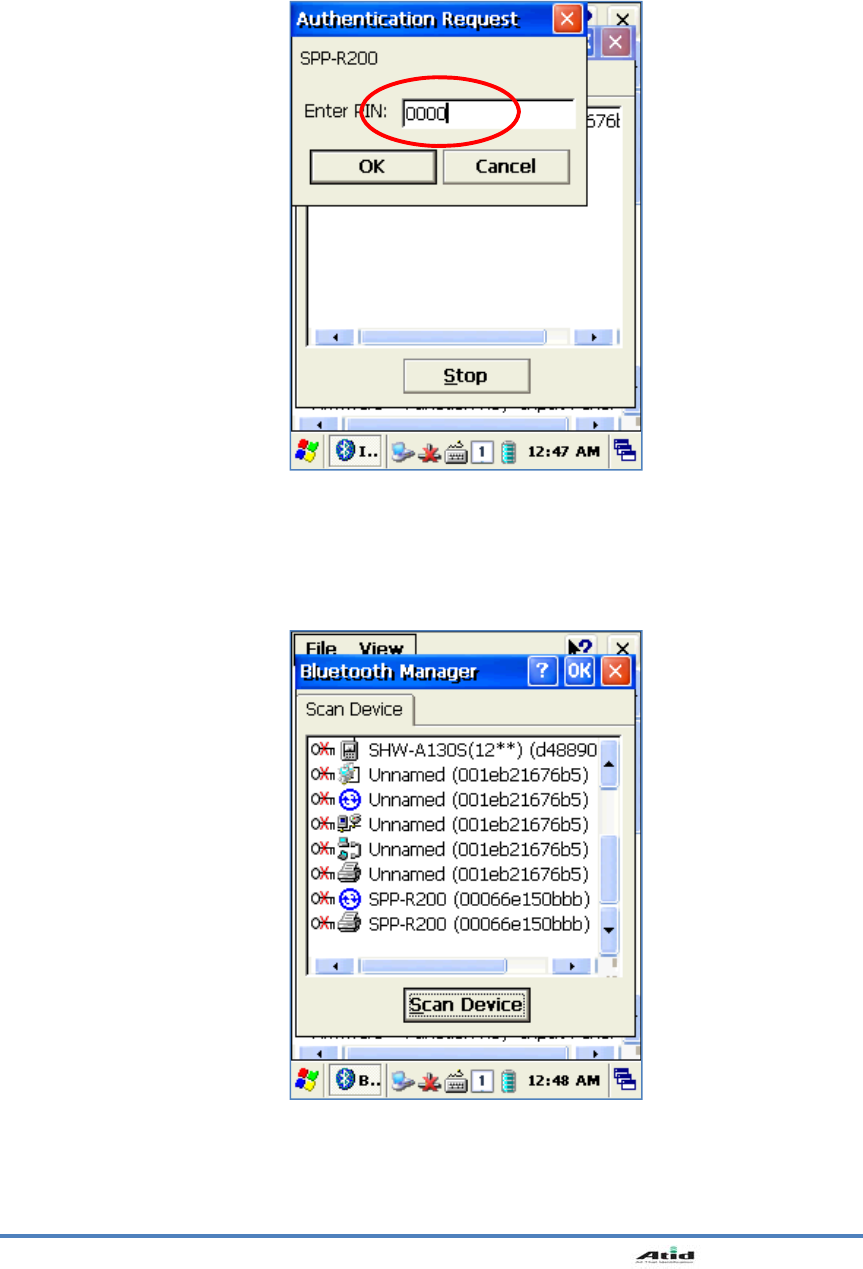
3. Depending on the situation, maybe n eed to input password for some devices, the n could
search devices continually.
** According to the devices need, some devices have to input Pin Code (password) firstly.
** SPP-R200 printer factory setting Pin Code is “0000”.
4. The devices which can connect will be listed, after finished searching.
** If c annot fi nd y our n eed de vice, p lease pr ess “Scan Device” button to sea rching yo ur
device again.

User’s Guide
41
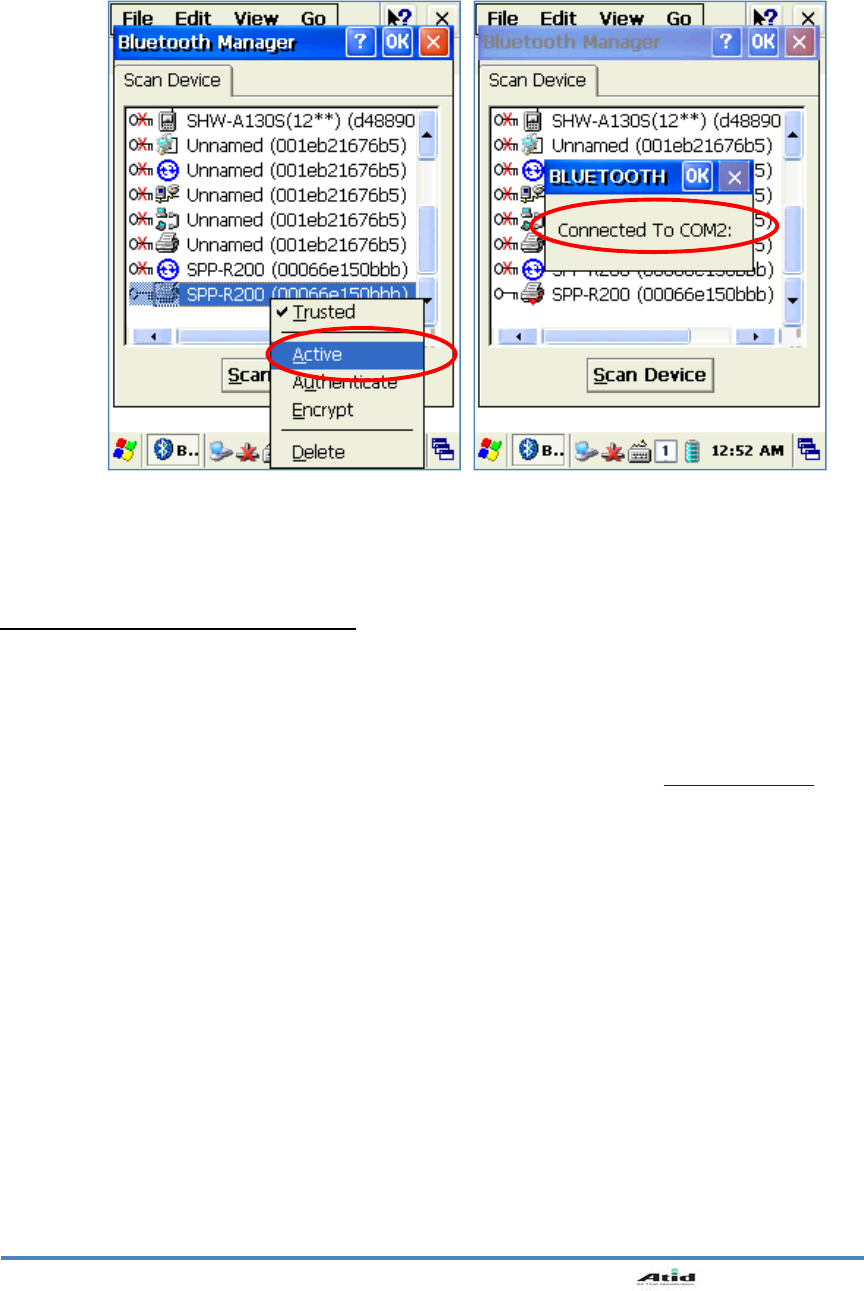
5. Double click you r device name, click “Trusted” Tab to ad d the device to the pairing items,
then click “Yes” button to ending the Bluetooth Manager.
->
->
* You can set the Password (Authentication code) according to the each device.
* The Red Cross mark(X) on the Key icon will disappear if finished to registration.
User’s Guide
42
6. Click “Active” button to active the paired device.
7. Then, you can perform the data communication through COM2 Port.
8. After pairing and active the Bluetooth device, you can use the Device driver, S/W, and SDK,
which provided from the Bluetooth device manufacturer, to perform the relevant Bluetooth
function.
3.3 Bixolon SPP-R200 Printer Demo
SPP-R200 is ty pical Mo bile Prin ter o f th e Bixo lon, you can using its App which ge t fr om
Bixolon website to perform print through Bluetooth.
**the Printer program and SDK, which described in this User Guide is based on the 5th Aug,
2011, and it’s would be a little different from homepage contents according to the Bixolon
policy.
1. Download “SPP-R200 Windows SDK” fr om the Bixolo n homepage (www.bixolon.com) to a
suitable directory and unzip the file.
2. Bluetooth Power ON.
3. Executing “Bluetooth Device Properties” programs which located in Control Panel.
4. SPP-R200 printer power ON.
5. Setting the SPP-R200 printer to be in the status of pairing. (Please refer to the User Guide
of SPP-R200 Printer)
6. Press “Scan Device” button to searching printer device nearby.
7. In the status of pairing, the factory setting password is “0000” usually.
8. If c onnected success fully, “COM 2 port connected” message w ill be c onfirmed. (If had
connected one time, maybe not show the message.)
9. Copy and paste the DLL and execu table file, which lo cated at
bin\ce5\MobileCompia_M3Plus\ within the printer SDK, to Si303 Flash Disk.
10. Executing the Sample.exe program in the SI303 Flash Disk.

User’s Guide
43
11. Change the COM8 to COM2, then press “Open” button to testing printer.

User’s Guide
44
Chaptor5. Appendix
Specification with AT280
Physical and Environmental Characteristics
Dimension 53.5mm(L) X 146.9mm(W) X 32.2mm(H)
Weight 320g
Operation Temperature -10℃ ~ 50℃
Storage Temperature -30℃ ~ 60℃
Humidity Non-condensing
Drop 1.5m drop to concrete
Performance Characteristics
Processor Marvell™ PXA320 806MHz
Operating System Windows CE 5.0
Memory ROM 256MB (Max. 512MB) / RAM 256MB
Display
2.4" QVGA with Backlight,
TFT LCD, 240*320 Pixels, 262,144 Color
Stylus Touch Screen Interface
Audio Phone Receiver,
Earphone Jack
Communication Port RS-232Serial Port, USB 1.1
Expansion Slot 1 Micro SD Slot (SDHC Support)
Keypad 25ke y
Notification Vibrator and LED
Power Supply
Main Battery Lithium ion 3.7V Above 3,000mAH(rechargeable)
Up to 4,400mAH(Option)
Backup Battery Lithium Polymer 3.7V, 100mAH(rechargeable)
Adaptor Input AC100V ~ 240V
Output DC5V 3A
Network Character
Wireless LAN WLAN(802.11 b/g compliant)
Bluetooth Class Ⅱ, v2.1 EDR
Antenna Internal LAN & WAN
Data Capture Devices
Barcode Engine 1D Laser Scanner, 2D Image Scanner