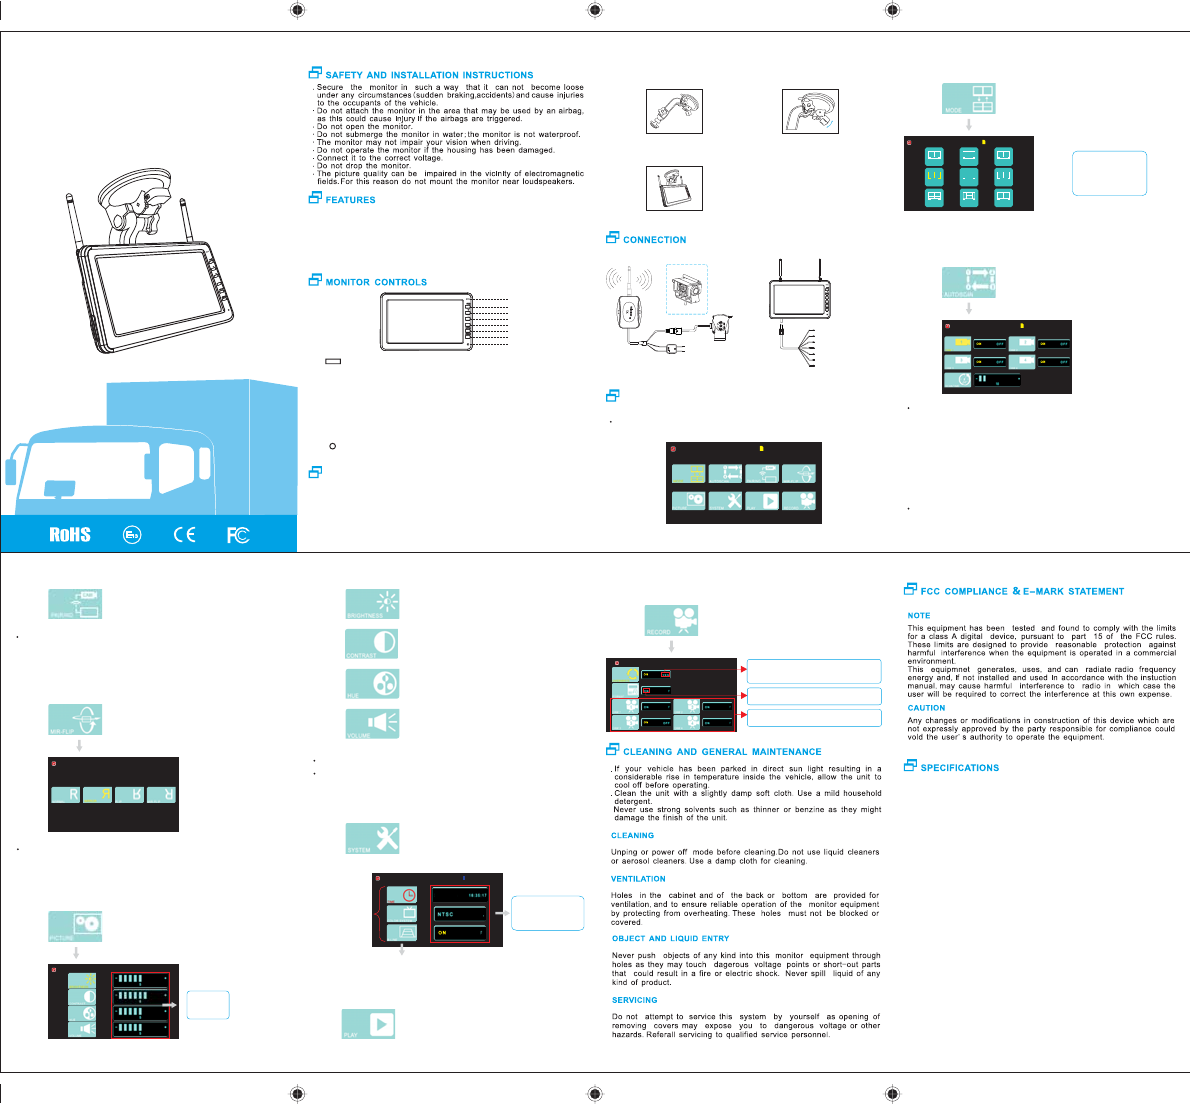
AUTOEQUIPS TECH CM11W Digital Wireless System User Manual
AUTOEQUIPS TECH CO., LTD. Digital Wireless System Users Manual
Users Manual
.Install the monitor on the windshield of the vehicle.
.Don't install the unit in an extremely hot or humid place (radiator,air
duct, ect.) or in a place subject to direct sunlight, excessive dust,
mechanical vibration or shock.
.The monitor is not designed for waterproof.
7 inch Digital TFT LCD monitor ..................................................16:9
Video input &Video output: ....................................................... 4CH
Wide view angle(CR>10):.............(up/ down): 50/70, (left/right):70/70
High brightness (cd/m2): ........................................................... 400
Contrast ratio:........................................................................... 500
Resolution :....................................................... 800*3(RGB)*480
Day/ night sensor for automatic adjustment
Build-in speaker
Frequency Range:.................................................. 2406 - 2476 MHz
Barrier-free Transmission Distance: ..................... ≤150M (free sight)
Memory mode:................................. high speed SD card Max.128GB
Start Up Time: ..................................................................... 1S Max
Latency: ........................................................................... < 120 ms
Video Code: ........................................................................ MPEG4
Audio Code: .............................................................WAV, 1 channel
Frame Rate:NTSC:................................................... 30f/s PAL:25f/s
Color system: ................................................................. PAL/NTSC
With soon respo nd (ms) (at 25℃) :................................................. 20
Power requirement: ...................................................... 12V/24V DC
Power consumption: ............................................................... ≤5W
Operating temperature:.............................................. -20℃ to +70℃
Dimension: ............................................... 192(L)*121(W)*28(D) mm
Weight:................................................................................... 476g
7” TFT WIRELESS
MONITOR WITH 4CH
USER MANUAL
. The 4TX VS 1RX digital wireless system is specially designed for
truck,trailer and farm cultivator.
. With significant long-distance and stable transmission capacity,
the transmission range can be as far as 150M.
. Applicable for DC 12V/24V vehicle.
. With re-pairing function.
. With record function.
-
1 : (power indicator): power on, indicator turns red.
2 REC : start up/stop recording.
3 + : select the item and increase the value of this item.
4 : select the item and decrease the value of this item.
5 SELECT : confirm the desired item and in work mode, press“SELECT” to switch
display mode as the following order:
AUTOSCAN-CAM1-CAM2-CAM3-CAM4-QUAD MODE-AUTOSCAN
6 MENU : menu is activated and exit the OSD menu.
7 POWER : power on/off.
8 : (Photosensitive resistance) enter day/night mode automatically. Power
on/off the system.
MONITOR INSTALLATION
Press “MENU” to enter main menu
OPERATION
1.Attach the supplied bracket on th e glass or flat area and make sure it
fix firmly.
First,find a best pos it io n an d angle Second,pull the pressure valve down
2.Mount monitor and tighten the knob,adjust the angle of the monitor.
Ground wire(Black)
Power inpout lead
(Red)(DC IN)
(CM111 )
OPTION 2
(CM11W*4)
OPTION 1
CB213+CAM)*4(
CAM2
DISPLAY MODE SETTING
Line1, line 2 is split mode, line 3 i s quad mode, OFF is canc el split and
quad mode.
SWITCHING CHANNEL AND ITS TIME SETTING
CAM2
Press “+” to “AUTOSCAN” option,then press
“SELECT” to enter the sub-menu.
Remark: The switch channel i s effected by the setting display mode,
eg: When y ou choose “ SPLIT 3-4 ”, the default setting is
“CAM3 ON ”, “CAM4 ON”,“CAM1 OFF”, “CAM2 OFF”.
Press “+ ”, “-” to choose which channel do you want to display,press
“SELECT”to confirm it, then press “+”, “-” to select “ON/OFF”,at last
press “SELECT”.
PAIRING SETTING
Press “SELECT” to choose the channel which do you want to pairing,
then press “MENU” to enter the main men u.
Press“+”to“PAIRING”option,then press“SELECT”to enter into pairing
mode, countdown to pair with 50 seconds, power on a transmitter, at
last ,the system do the pairing automatically.When paired for the first
time, it will not longer be interference.
MIRROR /NORMAL SETTING
CAM2
Press “+” to “MI R-F LIP ” opt ion ,th en press
“SELECT” to enter the sub-menu.
Press “+”, “-” to choose “NORMAL”, “MIRROR”, “FLIP” or “MIR-FLIP”,
then press “ SELECT ” to confirm it. After that the came ra view will
change according the setting and exit the sub-menu.
PICTURE'S PARAMETERS SETTING
Press “+” to “PICTURE” option, then press
“SELECT” to enter the sub-menu.
The value
choose
from 0~9.
CAM2
: adjust the brightness of view.
: adjust the contrast of view.
:adjust the hue o f view.
: adjust the volume of the loudspeaker.
Press “SELECT” to confirm the desired item.
Press “+” or “-” to adjust the value.
Press “+” to “SYSTEM” option,then press
“SELECT” to enter the sub-menu.
PLAYBACK
Press “+” to “PLAY” option,t hen press
“SELECT” to enter the sub-menu.
RECORD SETTING
Press “+” to “RECORD” option,then press
“SELECT” to enter the sub-menu.
CAM2
OF F
OF F
OF F
OF F
Press “ SELECT ” to confirm it, the n the
storage is nearly full,the oldest recording
file will be overlapped.
Press “SELECT” to confirm it, then all the
parameters retu rn to t he fa cto ry se tting.
Choose which camera do you want to
record.
12
SPLIT 1-2
13
SPLIT 1-3
14
SPLIT 1-4
24
SPLIT 2-4
23
SPLIT 2-3
34
SPLIT 3-4
OFF
H-SPLITQUAD
CAM2
Press “ SELECT” to en ter t he su b-menu.
Press “+”, “-” to move
the cursor.
Press “SELECT” to
confirm it.
Press“ MENU” to exit.
SELECT
1
2
3
4
5
6
7
8
S
E
L
E
C
T
SELECT
SYSTEM'S PARAMTER SETTING
Press“+”,“-”to adjust
the value of the item ,
then press“SELECT”
to confirm it.
Press “SELECT ” to
confirm the desired
item
Parking line
CAM2
PA L
2015/1 0 / 2 6
Y E S
SELECT
Power input lead (Red)
Ground wire (Black)
ACC for record (Yellow)
Trigger for cam1 (Green)
Trigger for cam2 (Blue)
Trigger for cam3 (Brown)
Trigger for cam4 (Gray)
FCC Radiation Exposure Statement:
This equipment complies with FCC radiation exposure limits set forth for an uncontrolled environment. This
equipment should be installed and operated with minimum distance 20cm between the radiator & your body.
FCC Warning
This device complies with Part 15 of the FCC Rules. Operation is subject to the following two conditions:
(1) This device may not cause harmful interference, and (2) this device must accept any interference received,
including interference that may cause undesired operation.
NOTE: Any changes or modifications to this unit not expressly approved by the party responsible for compliance
could void the user's authority to operate the equipment.