Abocom Systems MFJ25P21J1 10.4" Portable Wireless Thin Client User Manual user manual
Abocom Systems Inc 10.4" Portable Wireless Thin Client user manual
User Manual
REGULATORY NOTICES
Federal Communications
Commission Notice
This equipment has been tested and found to comply with the limits for a
Class B digital device, pursuant to Part 15 of the FCC Rules. These
limits are designed to provide reasonable protection against harmful
interference in a residential installation. This equipment generates, uses,
and radiates radio frequency energy and, if not installed and used in
accordance with the instructions, may cause harmful interference to
radio communications. However, there is no guarantee that interference
will not occur in a particular installation.
CAUTION!
CAUTION! Danger of explosion if an improper battery is
substituted. If a replacement is needed, only replace with a
manufacturer issued battery pack.
Do not dispose of the battery pack in a fire. They may explode.
Check with local authorities for proper disposal instructions.
T
ABLE OF CONTENTS
1. GETTING STARTED.............................................................1
1.1. WELCOME ..................................................................................1
1.2. SAFETY INSTRUCTIONS AND CARE OF YOUR WIRELESS THIN
CLIENT ..................................................................................................1
1.3. CHECKLIST .................................................................................3
2. GETTING TO KNOW YOUR WIRELESS THIN CLIENT
5
2.1. PARTS NAMES ............................................................................5
2.2. THE CRADLE (OPTIONAL)...........................................................8
2.3. THE BATTERY AND AC ADAPTER ..............................................9
2.4. THE STYLUS .............................................................................10
2.5. TOUCH-SCREEN DISPLAY..........................................................11
2.6. DISPLAY PROPERTIES ...............................................................11
2.7. THE CRADLE (OPTIONAL).........................................................11
3. MANAGING YOUR INFORMATION...............................12
3.1. DATA INPUT .............................................................................12
Software Keyboard ..................................................................12
3.2. DATA SYNCHRONIZATION ........................................................13
4. CONNECTING OTHER DEVICES ...................................22
5. GETTING ONLINE..............................................................23
6. TROUBLESHOOTING........................................................24

- 1 -
1. Getting Started
1.1. Welcome
Congratulations! With your new Wireless Thin Client you will be
able to create, manage and share information, send and receive email,
and carry out research from virtually anywhere! Your Wireless Thin
Client gives you freedom; easy access to the Internet, and the
800X600 SVGA screen offers high resolution for all your Tablet
uses.
This manual will guide you through the Tablet’s simple set-up,
introduce you to its range of features and help you source extra
information.
1.2. Safety Instructions and Care of your Wireless Thin
Client
CAUTION! Danger of explosion if an improper battery is
substituted. If a replacement is needed, only replace with a
manufacturer issued battery pack.
• During normal usage and charging, the battery pack heats up.
This is caused by energy that has been generated and a chemical
charge that has occurred inside the battery pack. This is not a
cause for concern.
• You should charge batteries at temperatures from 10°C to 30°C
(from 50 °F to 85 °F). Lower temperatures require a longer
charging time.

- 2 -
• Do not carry a battery in your pocket, purse, or other container
where metal objects could short-circuit the battery pack. The
resulted excessive current flow can cause extremely high
temperatures and may result in damage from burns.
• Do not use your Wireless Thin Client in a wet environment, for
instance, near a bathtub, sink, or any other place where there is
risk of moisture.
• To help prevent electric shock, plug the AC adapter into a three
prong, grounded power source. If a two-prong extension plug is
absolutely needed, use a 3-wire cable with properly grounded
plugs.
• If your Wireless Thin Client includes a modem PC Card,
disconnect the modem cable during electrical storms to avoid the
remote risk of electrical shock from lightening via the telephone
line.
• PC Cards may increase in temperature over an extended period
of use. Use care in handling these cards.
Do not dispose of the battery pack in a fire. They may explode.
Check with local authorities for-proper disposal instructions.
• When traveling, never check your Wireless Thin Client as
baggage. You can put your Wireless Thin Client through an Xx-
ray security machine, but never put your Wireless Thin Client
through a metal detector. Have a charged battery with you in case
you are asked to turn on the Tablet.
• When traveling, do not place the Wireless Thin Client in an
overhead compartment where it can slide around. Do not drop
your Wireless Thin Client or subject it to mechanical shocks.
• Protect your Wireless Thin Client from environmental hazards
such as dirt, dust, food, liquids, temperature extremes, and over
exposure to sunlight.
- 3 -
• When you change environments rapidly, in respect to
temperature and humidity, with your Wireless Thin Client,
condensation may form on or within the Tablet. To avoid
potential damage to your Wireless Thin Client, allow sufficient
time for the moisture to evaporate before using.
• When disconnecting cables from your Wireless Thin Client, be
sure to pull on the connector or the strain relief loop, not on the
cable itself. As you pull, keep it evenly aligned to avoid bending
the connector pins. Never force a connector into a port. Make
sure the connector and port are aligned correctly.
• Before you clean your Wireless Thin Client, turn it off, remove
the battery, and unplug the power source.
• Clean your computer with a soft cloth dampened with water
rather than with liquid or aerosol cleaners.
• Clean the screen with a soft, clean cloth and commercial window
cleaner that does not contain wax or abrasives. Always apply the
cleaner to the cloth, not the screen. If the display contains grease
or some other contaminant, use isopropyl alcohol instead of
commercial cleaner.
1.3. Checklist
Check to see that the package your Wireless Thin Client came in
includes these items:
• Wireless Thin Client
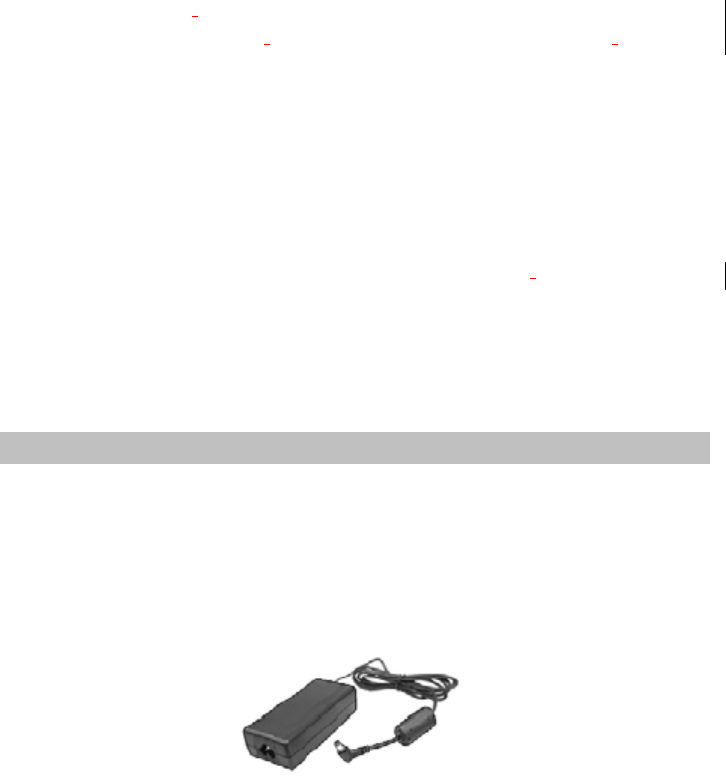
• AC Adapter
- 4 -
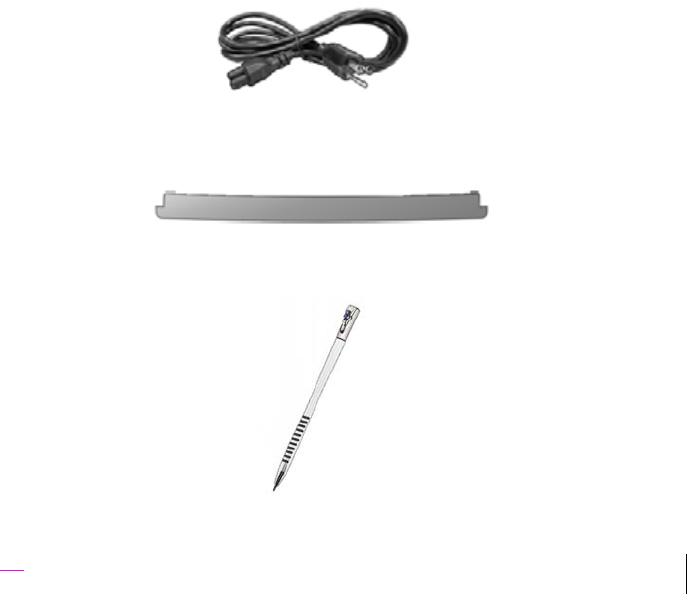
• Power Cord
• Battery Pack
• Stylus
• User Guide
- 5 -
2. Getting to Know Your Wireless
Thin Client
2.1. Parts Names
Your Wireless Thin Client features powerful functions and
connectivity for you to create, manage and transfer your information,
send and receive email and explore the World Wide Web. This
section outlines your Wireless Thin Client’s components.
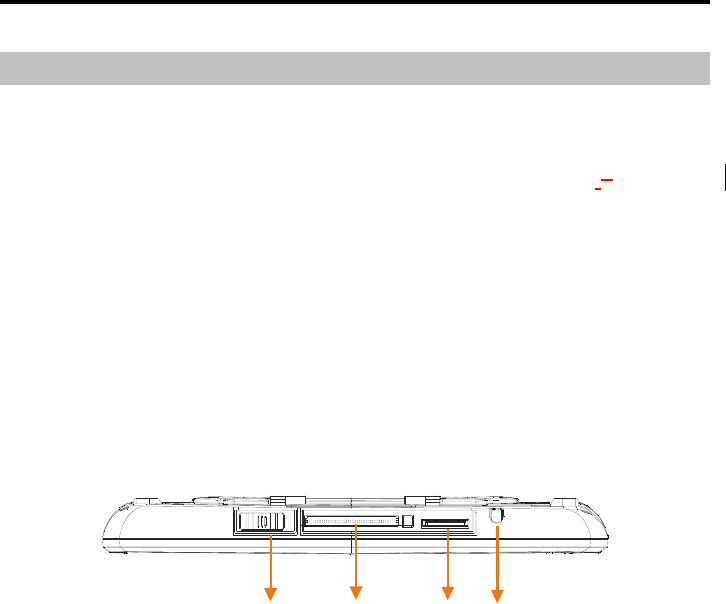
Top Side
1. On/Suspend Switch
2. PCMCIA Card Slot
3. SD Card Slot
4. Stylus Storage
12 3
4
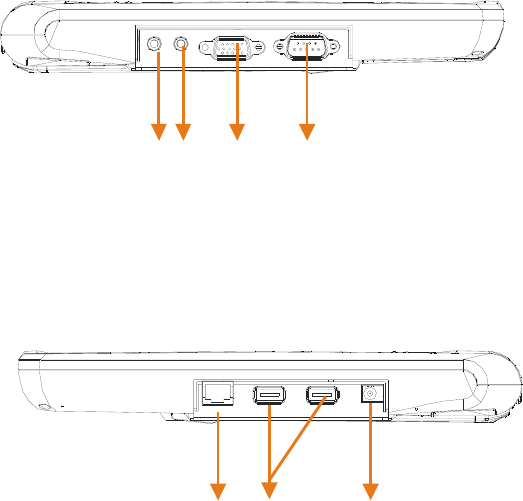
Right Side
5. Microphone
6. Headphone
7. VGA-Out Connector
8. RS-232 Connector
- 6 -
567 8
Left Side
9. RJ-45 Port
10. USB Type A Port x 2
11. DC IN Jack
910 11
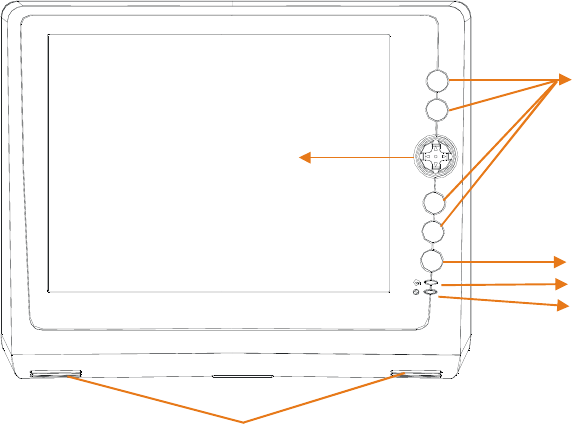
Front
12. Function Keys Button
13. 4-way Mover Button
14. Keyboard Button
15. Wireless LED Indicator
16. Battery LED Indicator
17. Internal Microphone
- 7 -
12
14
15
16
17
13
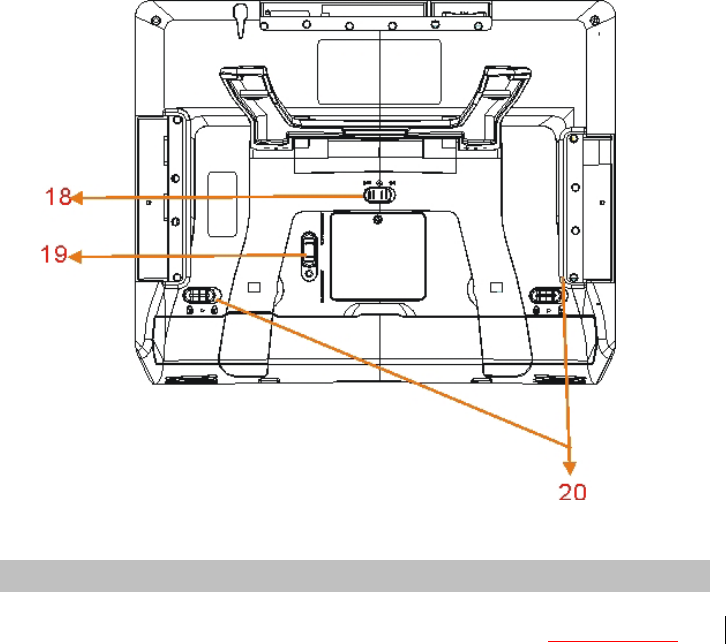
Back
18. RF On/Off Switch
19. Hardware/Software Reset Switch
20. Battery Latches
- 8 -
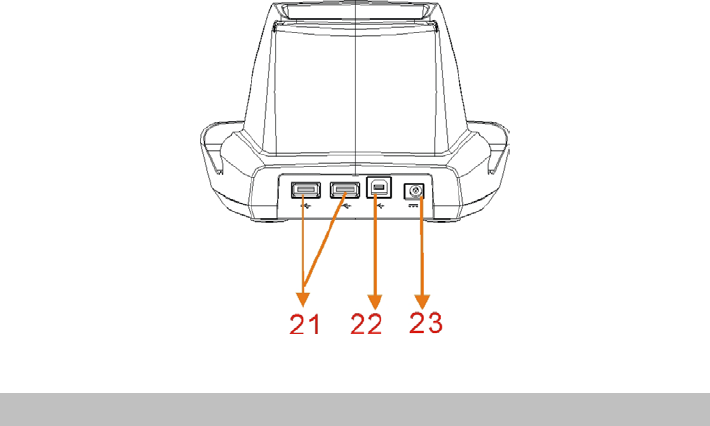
2.2. The Cradle (Optional)
The cradle lets you ‘dock’ your Wireless Thin Client on your desk,
making it easy to read information, add peripherals, or to
synchronize with your PC.
21. USB Type A Port x 2
22. USB Type B Port
23. DC IN jack
- 9 -
2.3. The Battery and AC Adapter
Your Wireless Thin Client has two power sources, battery and AC.
To run your Wireless Thin Client from the wall, use the supplied AC
adapter cable.
The battery charges when the Tablet is connected to the AC power.
The yellow indicator on the front of your Wireless Thin Client
indicates the battery is charging.
• Indicator orange: Battery is fully charged
• Indicator blinking: Battery is charging
• Indicator off: System is in the suspend mode
When fully charged and not in use, your Wireless Thin Client battery
has a two week life.
Note: When turning on your Wireless Thin Client but it goes to
suspend immediately, that means the battery volume is 0%. Please

- 10 -
charge your Tablet within one day, or you will lose all data in
memory.
To check your battery level, or to adjust the time before your battery
switches off (power schemes) after the Tablet is continuously idle,
go to Start→Settings→Control Panel→Power, or double-click on
the power icon in taskbar.
For further tips on optimizing your battery, go to
Start→Help→Settings→Power.
2.4. The Stylus
The Stylus has been specially designed for use with your Wireless
Thin Client.
IMPORTANT: It is strongly recommended that you use the
provided stylus at all times; fingers or other instruments may damage
your screen.
If you find that your Wireless Thin Client is not responding properly
to your taps, you may need to recalibrate your screen. To do this, go
to Start→Settings→Control Panel→Stylus. Once there, select the
Calibration tab and follow the instructions.
Your stylus can be conveniently stored in the side of your Wireless
Thin Client.

- 11 -
The ON/Suspend switch on the topside of your Wireless Thin Client,
when in the Suspend position, ensures that the Tablet isn’t
accidentally turned on. Sliding the switch to the ON position
resumes the Tablet.
2.5. Touch-screen Display
Your Wireless Thin Client is equipped with a touch screen. You can
use the stylus that works like a mouse to click or double-click a
selected icon, and open it. In addition, tap your Tablet’s desktop with
your stylus for over one (1) second,, it will act as ‘right-click”.
2.6. Display Properties
This function allows you to set the background on your desktop, and
the colors displayed on your interface. To access these functions, go
to Start→Settings→ Control Panel→Display→Background, or
tap the desktop with your stylus over one (1) second, and it will act
as ‘right-click’ to run the Display properties.
2.7. The Cradle (Optional)
The cradle lets you ‘dock’ your Wireless Thin Client, making it easy
to use your desk, to read information, or to add peripherals such as a
keyboard or a mouse.
In addition, the cradle increases your connectivity, with USB Type A
and B (for synchronization with your PC) ports [2 A-Type and 1 B-
Type]. By removing the insert in the cradle’s pocket (by sliding the
insert to the right and lifting it up), the cradle can accommodate
Wireless Thin Client with the battery.
- 12 -
3. Managing Your Information
3.1. Data Input
To input data into this Wireless Thin Client, you can choose to use
the Software Keyboard described below or an External USB
Keyboard via a USB 1.1 keyboard as stated above.
Software Keyboard
The icon appearing in the taskbar provides you a Software
Keyboard functions like a real keyboard. The ‘CAP’ key locks the
keys to uppercase; the ‘Shift’ key switches the keys to uppercase for
one click only.
Once finished with the handwriting and keyboard, click on the
icon in taskbar and select Hide Input Panel.
- 13 -
3.2. Data Synchronization
To share information between your Wireless Thin Client and your
PC/Laptop, you need to establish a direct PC Connection. There are
two ways to make direct connection.
A. Active sync via USB port of the Cradle Station.
Step 1. Cable Connection:
i. Plug the USB Type B Connector of USB cable to the USB
Type B Port at the rear side of the cradle.
ii. Plug the USB Type A Connector of USB cable to the USB
Type A Port in your PC/Laptop.
Step 2. PC Setup:
Prerequisite: To make the connection, you will need to install the
ActiveSync 3.7 (or higher) software to your PC/Laptop. To
download this freeware, go to:
http://www.microsoft.com/mobile/downloads/activesync.asp
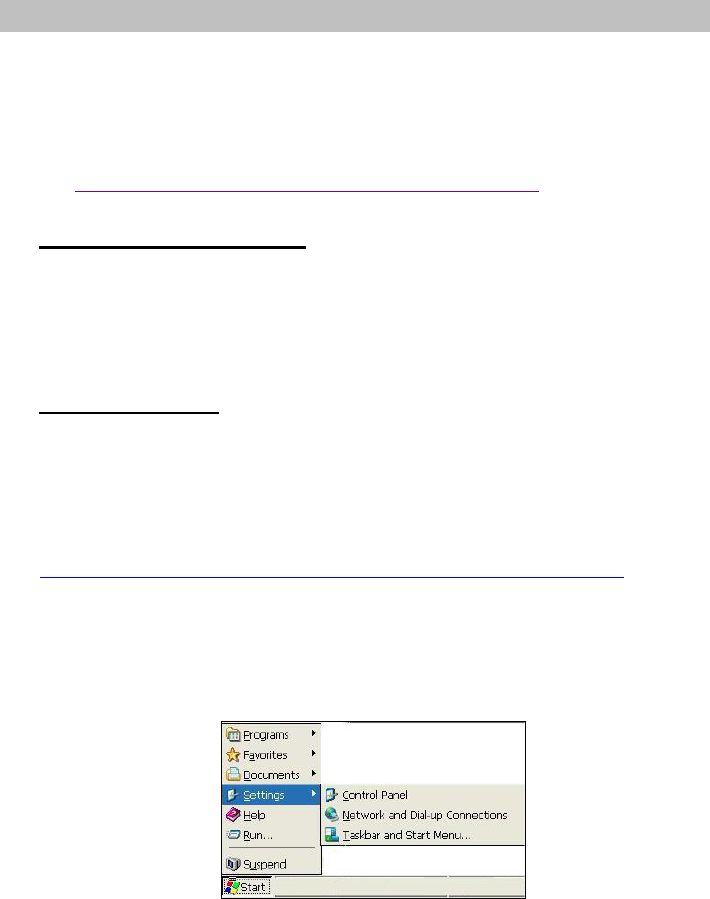
On your Tablet:
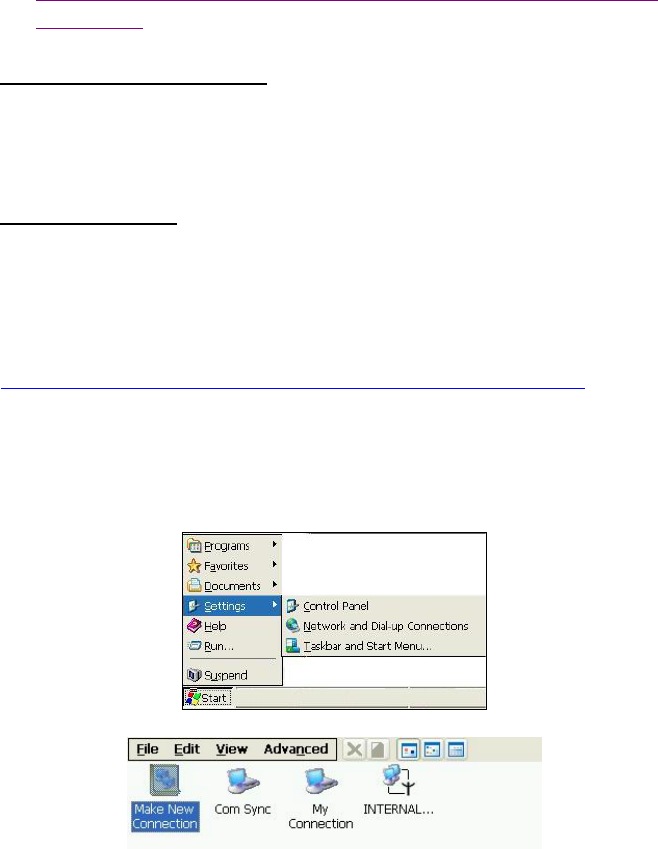
i. Go to Start →Settings→ Network and Dial-up
Connections.
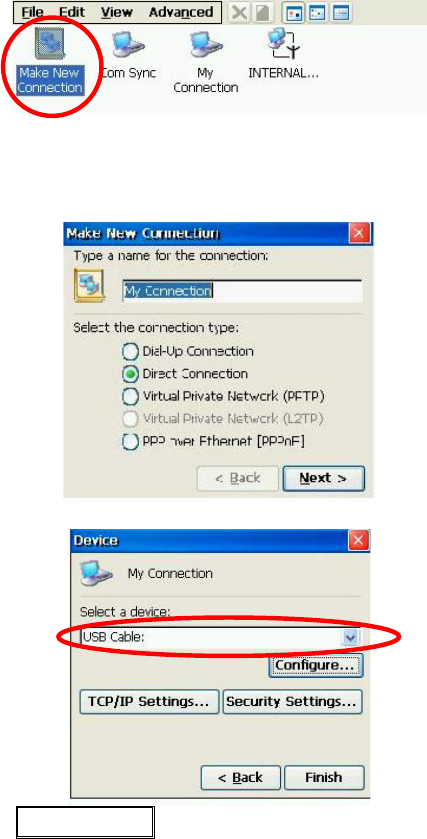
ii. Double click Make New Connection.
- 14 -
iii. When Windows prompts you to type a name for the
connection, name the connection appropriately. Select the
connection type to be Direct Connection. Click Next.
iv. Press the down arrow “∨” to select USB cable.
v. Click Configure… to set the Connection Preference. Set
the Baud Rate at 19200. Click OK.

- 15 -
vi. Click Finish.
vii. Go to Start→ Settings →Control Panel.
viii. Double click PC Connection.
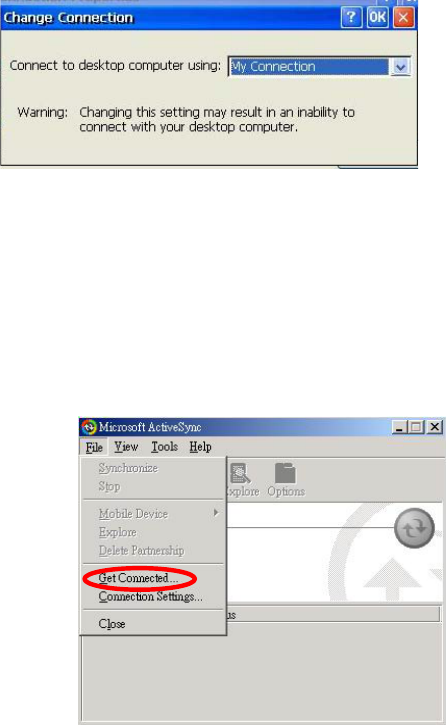
ix. Click on Change…
- 16 -
x. Press the down arrow “∨” to select the newly established
connection from the pull-down menu.
xi. Click OK to complete the setup.
On your PC/Laptop
i. Make sure Microsoft ActiveSync is well installed in your
PC/Laptop.
ii. Open Microsoft ActiveSync.
iii. Select File Get Connected. Both your PC/Laptop and the
Tablet will detect the connection and launch the counterpart
software to make the connection.
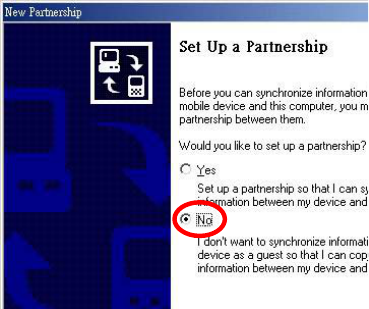
iv. When finishing the connection, there will be a pop-up
windows showing: ”Set Up a Partnership”. Please select
“No” and “Next”. Now you have established the connection
successfully.
- 17 -
- 18 -
B. Active Sync via a DB-9 RS-232 cable (two female connectors at
both ends).
Step 1. Cable Connection:
i. Plug one end to the RS-232 Connector (ΟΟ) at the right
side of the Tablet.
ii. Plug the other end to the RS-232 port in your PC/Laptop.
Step 2. PC setup:
Prerequisite: To make the connection, you will need to install the
ActiveSync 3.7 (or higher) software to your PC/Laptop. To
download this freeware, go to:
http://www.microsoft.com/mobile/downloads/activesync.asp
On your Tablet:
i. Go to Start →Settings→ Network and Dial-up
Connections.
ii. Double click Make New Connection.
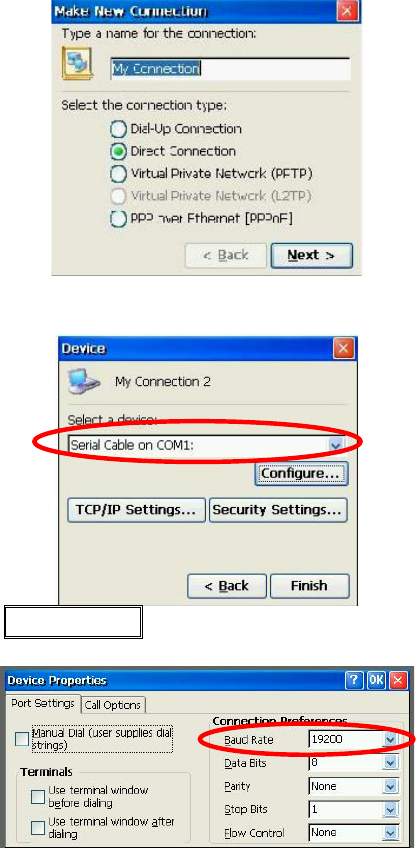
iii. When Windows prompts you to type a name for the
connection, name the connection appropriately. Select the
connection type to be Direct Connection. Click Next.
- 19 -
iv. Press the down arrow “∨” to select “Serial Cable on
COM1:”.
xii. Click Configure… to set the Connection Preference. Set
the Baud Rate at 19200. Click OK.
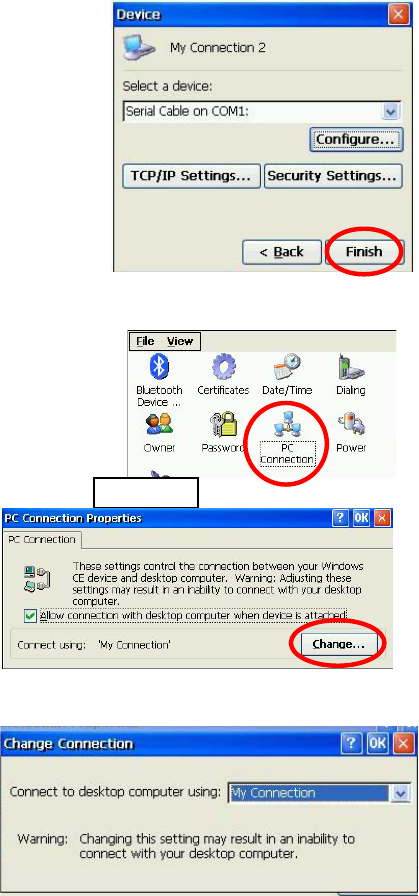
v. Click Finish.
- 20 -
vi. Go to Start→ Settings →Control Panel.
vii. Double click PC Connection.
xiii. Click on Change…
xiv. Press the down arrow “∨” to select the newly established
connection from the pull-down menu.
viii. Click OK to complete the setup.
On your PC/Laptop

- 21 -
i. Make sure Microsoft ActiveSync is well installed in your
PC/Laptop.
ii. Open Microsoft ActiveSync.
iii. Select File Get Connected. Both your PC/Laptop and the
Tablet will detect the connection and launch the counterpart
software to make the connection.
iv. When finishing the connection, there will be a pop-up
windows showing: ”Set Up a Partnership”. Please select
“No” and “Next”. Now you have established the connection
successfully.
- 22 -
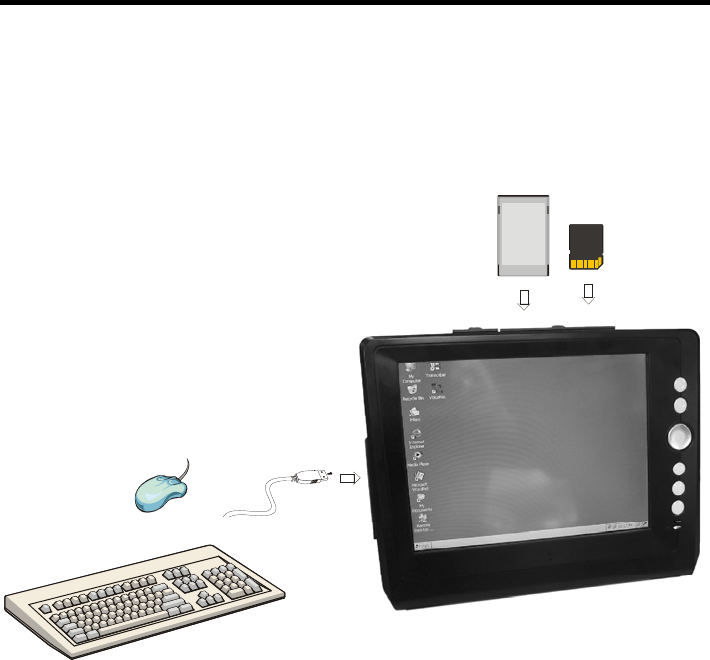
4. Connecting Other Devices
Your Wireless Thin Client is designed to support a number of external
devices. The two USB Type A ports on the left side let you add USB 1.1
keyboard, mouse or Flash disk. Whereas the built-in PCMCIA and SD
Card slots allow you to read/write these two kinds of memory cards
from/to this Wireless Thin Client.
TOSHI BA
SD - M32
III0514093B
MADE IN JAPAN
- 23 -
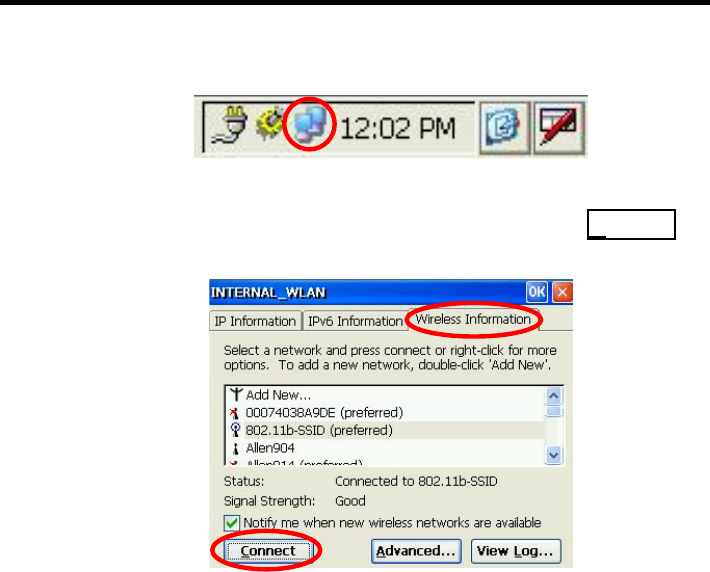
5. Getting Online
1. Double-click the Internal WLAN icon in your taskbar.
2. Select the “Wireless Information” tab.
3. Select your preferred network (AP) and click the Connect
button to associate.

- 24 -
6. Troubleshooting
For problems with your Wireless Thin Client, go to Start→Help.
This brings up a general user guide to reference. Most questions will
be able to be answered from this resource.
Common Problems / Frequently Asked Questions
The Wireless Thin Client will not turn on!
• Make sure the On/Suspend switch is set to ‘On’
• If device does not power on, use the AC Adapter to plug
the Tablet into the wall.
• If this does not turn the Tablet on, push the software reset
button located at the rear panel. (See the previous section
titled Parts Names.
I touch the screen with my stylus, and the mouse
arrow is in an entirely different place!
• This is a sure sign that you need to re-calibrate your touch
screen.
• Use the arrow keys and navigate the mouse arrow. If you
press the arrow buttons and the mouse does not move, press
button G. This will activate the arrow keys for mouse use.
• Go to Start→Settings→Control Panel→Stylus
• Click the calibration tab.
• Click “recalibrate” and follow the instructions.

- 25 -
How do I turn off my Wireless Thin Client?
• You can turn off your Wireless Thin Client by simply
going to the Start Menu and choosing ‘Suspend’. This will
put the device in standby mode. To resume your Wireless
Thin Client, switch the On/Suspend switch on the top of
your Tablet.
• Slide On/Suspend switch to the Suspend position, which
will turn off your Wireless Thin Client and ensure it isn’t
accidentally turned on by clicking on the buttons.
How do I restart my Wireless Thin Client? (If it
freezes / hangs up, or I just loaded new software)
• If you need to restart you Wireless Thin Client unscrew
your stylus, and hit the software-reset button on the side of
the Tablet. If your Wireless Thin Client is not responding to
any commands (that is, it freezes or hangs) you can use this
same reset button. The software-reset button will not affect
data on your Wireless Thin Client system.
• If your system freezes or hangs, and does not respond, even
after you hit the software reset button, first remove the
battery to restart the system. If this does not help the
situation, you will need to use the hardware reset button,
marked on the diagram below. Use a small Philips head
screw driver and remove the screws. Lift the cover and
press the reset button. Note that this will wipe all memory
from your Wireless Thin Client.
My screen is dirty, how can I clean it without
harm to the screen?
• Clean the screen with a soft, clean cloth and commercial
window cleaner that does not contain wax or abrasives.

- 26 -
Always apply the cleaner to the cloth, not the screen. If
the display contains grease or some other contaminant,
use isopropyl alcohol instead of commercial cleaner.
Note: paper toweling and other paper products are
abrasive. Be sure to use a clean cloth when wiping the
screen.
Can I protect my Wireless Thin Client with
password access?
• Yes, to protect your valuable information, you may want
to set up a password for your Wireless Thin Client. Go to
Start→Setting→Control Panel → Password.
Remember your password and keep it in safety. If you
lost your passport, the only way is to execute Hardware
Reset, but it will wipe out all the memory you saved.

- 27 -
Federal Communication Commission Interference Statement
This equipment has been tested and found to comply with the limits for a
Class B digital device, pursuant to Part 15 of the FCC Rules. These limits
are designed to provide reasonable protection against harmful interference
in a residential installation. This equipment generates, uses and can radiate
radio frequency energy and, if not installed and used in accordance with the
instructions, may cause harmful interference to radio communications.
However, there is no guarantee that interference will not occur in a
particular installation. If this equipment does cause harmful interference to
radio or television reception, which can be determined by turning the
equipment off and on, the user is encouraged to try to correct the
interference by one of the following measures:
- Reorient or relocate the receiving antenna.
- Increase the separation between the equipment and receiver.
- Connect the equipment into an outlet on a circuit different from that
to which the receiver is connected.
- Consult the dealer or an experienced radio/TV technician for help.
This device complies with Part 15 of the FCC Rules. Operation is subject
to the following two conditions: (1) This device may not cause harmful
interference, and (2) this device must accept any interference received,
including interference that may cause undesired operation.
FCC Caution: Any changes or modifications not expressly approved by the
party responsible for compliance could void the user's authority to operate
this equipment.
IMPORTANT NOTE:
FCC Radiation Exposure Statement:
This equipment complies with FCC radiation exposure limits set forth for
an uncontrolled environment. End users must follow the specific operating
instructions for satisfying RF exposure compliance.
This transmitter must not be co-located or operating in conjunction with
any other antenna or transmitter.
" AboCom Systems, Inc.” declare that 10.4” Portable Wireless Thin Client
with certified adapter (FJ25XXXXX) is limited in CH1~CH11 by
specified firmware controlled in USA."