Abocom Systems UHF1KB USB 1M HomePNA & 10/100M Fast Ethernet Adapter User Manual users manual
Abocom Systems Inc USB 1M HomePNA & 10/100M Fast Ethernet Adapter users manual
users manual
Doc. No.: 092001-01
USB
1M Home PNA
& 10/100
FAST ETHERNET
User Manual
1 -
REGULATORY STATEMENTS
Part15, Class B
This device complies with Part 15 of FCC rules.
Operation is subject to the following two conditions:
1. This device may not cause harmful interface, and
2. This device must accept any interface received,
including interface that may cause undesired
operation. This equipment has been tested and
found to comply with the limits for a Class B
digital device, pursuant to Part 15 of the FCC
Rules. These limits are designed to provide
reasonable protection against harmful
interference in a residential installation. This
equipment generates, uses and can radiate radio
frequency energy, and if not installed and used in
accordance with the instructions, may cause
harmful interference to radio communications.
However, there is no guarantee that interference
will not occur in a particular installation. If this
equipment does cause harmful interference to
radio or television reception, which can be
determined by turning off and on, the user is
encouraged to try to correct the interference by
one or more of the following measures:
• Reorient or relocate the receiving antenna.
• Increase the distance between the equipment and
receiver.
• Connect the equipment into an outlet on a circuit
different from that to which the receiver is
connected.
! Changes or modifications not expressly
approved by party responsible for compliance
could void the user the user authority to
operate the equipment.
2 -
FCC Part 68 Registration
This device complies with FCC Part 68 rules, and the use of
this device is subject to the following restrictions:
The FCC has established rules which permit this device to be
directly connected to the telephone network. Standardized
jacks are used for these connections. This equipment should
not be used on party lines or coin phones.
If this device is malfunctioning, it may also be causing harm
to the telephone network; this device should be
disconnected until the source of the problem can be
determined and until repair has been made. If this is not
done, the telephone company may temporarily disconnect
service.
The telephone company may make changes in it's facilities,
equipment, operation and procedures; if such changes affect
the compatibility or use of this device, the telephone
company is required to give adequate notice of the situation
with the FCC.
If the telephone company requests information on what
equipment is connected to their lines, inform them of:
a. The telephone number to which this unit is connected.
b. The Ringer Equivalence Number (REN).
c. The USOC jack required.
d. The FCC Registration number.
Items (b) and (d) are indicated on the label. The Ringer
Equivalence Number (REN) is used to determine how many
devices can be connected to your telephone line. In most
areas, the sum of the REN's of all the devices on any one line
should not exceed 5.0. If too many devices are attached, they
may not ring properly.

3 -
Table of Contents
Introductions...................................................... 1
Features.......................................................... 2
About Home Phone Networking Technology 2
Specifications................................................. 3
Parts Names and Functions............................ 4
Hardware Installation......................................... 6
Precaution...................................................... 6
Getting Hooked Up........................................ 7
Installing Ethernet Cabling............................ 8
Installing Telephone Cabling......................... 8
Software Installation.......................................... 9
Installation for Windows 98 .......................... 9
Installation for Windows 2000 .................... 11
Installation for Windows ME ...................... 14
Network Connection.................................... 16
Client Setup ................................................. 19
Using File and Printer Sharing..................... 21
1 -
INTRODUCTIONS
The USB 1M HomePNA & 10/100 Fast Ethernet
brings the latest technology of instant
connectivity to multiple PCs over a home's
existing telephone lines. You can network any
notebook computer by connecting it to any
standard phone line. No switches, hubs, or even
any additional cables is needed - the network
runs on standard home-grade telephone wires
just like the ones you use everyday.
This USB device is equipped with two standard
RJ-11 telephone ports and a 10/100 dual-speed
Fast Ethernet port. You can connect to any
1Mbps home phone network or any
10BaseT/100BaseTX network without swapping
devices or running multiple adapters at once. The
adapter connects to your Windows 98 computer
via USB (Universal Serial Bus), you can enjoy
the advantage of true plug-and-play connections
through a single interface.
You can share Internet access via a dial-up, cable
modem or DSL connection, as well as files,
printers, and CD-ROM drives at 1Mbps without
interrupting regular telephone service. The home
phone networking runs on regular telephone
cables, so there’s no extra hardware to buy. Just
plug it into any standard wall jack and you’re
networked!
The USB 1M HomePNA & 10/100 Fast Ethernet
complies the HomePNA specification which lets
your phone line carry computer data as well as
regular telephone voice service. Every standard
2 -
telephone jack in the home is capable of hosting
a PC - you can connect up to 25 computers, thus
transforming the home's telephone wiring into an
easily expandable network.
Features
• Connects to a network using your existing
telephone Line -- No additional hubs or
network cables needed
• Works with any PC with a USB port
• Supports Microsoft Windows 98/2000/ME
• 1Mbps transfer rate over telephone lines
• Dual-speed RJ-45 port automatically detects
Ethernet or Fast Ethernet cabling speed
• External USB network adapter with 2 RJ-11
modular telephone ports and 1 RJ-45 auto-
sensing 10BaseT/100BaseTX port
• USB cable included – true plug & play
• HomePNA compliant
• Connects up to 25 devices together on your
home phone network
About Home Phone Networking Technology
The USB 1M HomePNA & 10/100 Fast Ethernet
utilizes a technology known as Frequency
Division Multiplexing (FDM) which essentially
divides the data travelling over the phone lines
into separate frequencies - one for voice, one for
high-bandwidth net access such as DSL, and one
for the network data. These frequencies can

3 -
coexist on the same telephone line without
impacting one another.
The 1 Megabit-per-second (one million bits-per-
second) data rate is 18 times that of the fastest
analog modems available, which run at 56Kbps.
Even high-speed modem, DSL, and ISDN
connections will perform at full speed on a home
network.
Note: Because of the limitations of
standard telephone cables, Home
Phone Networking devices require that
your cabling does not exceed a total
length of 500 feet for your entire
network.
Specifications
Network Standard
" HomePNA specification 1.1
" IEEE 802.3 for 10BaseT
" IEEE 802.3u for 100BaseTX
" Standard phone wiring
" CAT 3/CAT 5 UTP, STP cable up to
328ft/100M
Data Transfer Rate
" Up to 1 Mbps of HomePNA data transfer
" 10/100 Mbps1 of LAN data transfer
1 CAT5 cable is required for 100M data transfer rate
4 -
" Doubled data transfer rate in Full duplex
mode
Supported Operating Systems
" Windows 98
" Windows 2000
" Windows ME
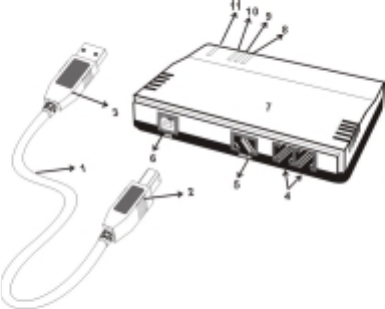
Parts Names and Functions
1. USB Connection Cable: connects the USB
1M HomePNA & 10/100 Fast Ethernet to
the USB host port of your computer.
2. USB B Type Connector
3. USB A Type Connector
4. RJ-11 telephone port:
" Phone port: connects to a telephone
setting.
5 -
" Line port: connects to the phone jack on
the wall.
5. RJ-45 Port
6. USB B Type Port
7. USB 1M HomePNA & 10/100 Fast
Ethernet
8. 100M LED indicator: glows green when
this adapter is linking to 100 Mbps Fast
Ethernet.
9. 10M LED indicator: glows green when this
adapter is linking to 10 Mbps Ethernet.
10. Home LED indicator: glows green when the
adapter is connecting to 1Mbps HomePNA
adapter.
11. ACT LED indicator: flashes orange when
the Fast Ethernet Adapter is
transmitting/receiving data via Ethernet or
Home PhoneLine Networking.
6 -
HARDWARE INSTALLATION
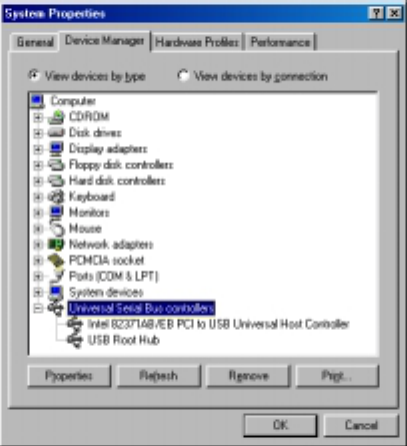
Precaution
Before the installation, make sure the USB port
exists in your computer and is enabled. To check
this, go to My Computer
#
Control Panel
#
System. Open the Device Manager tab. If the
Universal Serial Bus controller device is found,
it means your USB port is installed and enabled.
If not, it means no USB port is installed or the
USB bios is not properly enabled. In this case,
consult your computer dealer for USB support.
7 -
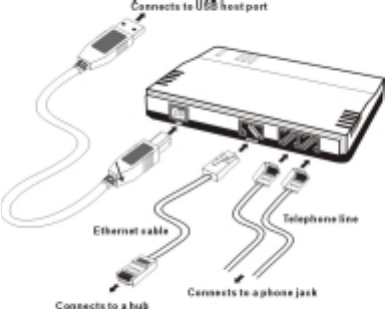
Getting Hooked Up
1. Locate the USB host port of your system.
Align the USB A-type connector toward the
USB host port, push evenly and steadily
until it is seated.
2. Connect the USB B-type connector to the
device port (USB B type port) of your USB
1M HOMEPNA & 10/100 FAST
ETHERNET until it clicks.

8 -
Installing Ethernet Cabling
1. Connect the UTP Ethernet cable to the
RJ-45 port of the USB 1M HomePNA &
10/100 Fast Ethernet.
2. Plug the other end of the cable into a
10BaseT or 10/100 switching hub2.
Installing Telephone Cabling
1. Attach one end of the RJ-11 telephone line
to the Line port. Connect the other end of
the cable into a telephone jack on the wall.
2. Attach one end of the RJ-11 telephone line
to the Phone port. Connect the other end of
the cable into a telephone setting.
The USB 1M HomePNA & 10/100 Fast Ethernet
is now connected to your PC. Perform the
following procedures to install the Telephone
cabling or Ethernet cabling.
Remember that if you choose to use the RJ-45
port on your USB 1M HOMEPNA & 10/100
FAST ETHERNET, the RJ-11 Phoneline
networking capabilities automatically become
disabled. The two cannot operate at the same
time.
2 If you plan to use both 10BaseT and 100Mbps network segments
on the same network, you'll need a dual-speed hub or switch that
allows segments of different speeds to communicate.
9 -
SOFTWARE INSTALLATION
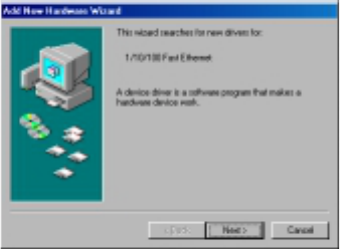
Installation for Windows 98
1. Once the USB 1M HomePNA & 10/100
Fast Ethernet is connected to your computer,
Windows will automatically detect the new
hardware device as shown below. Click
Next.
2. Insert the device driver diskette into your
floppy drive. When Windows prompts you
What do you want Windows to do? Select
Search for the best driver for your device.
(Recommended). Click Next.
3. Follow the on-screen instruction to proceed.
10 -
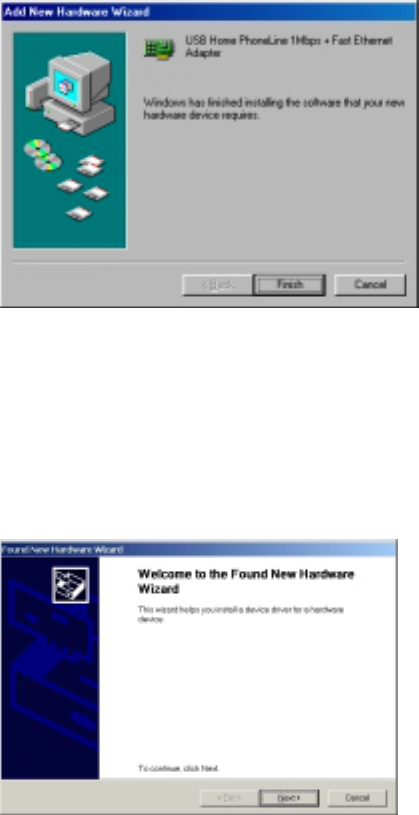
4. The installation program will proceed
automatically.
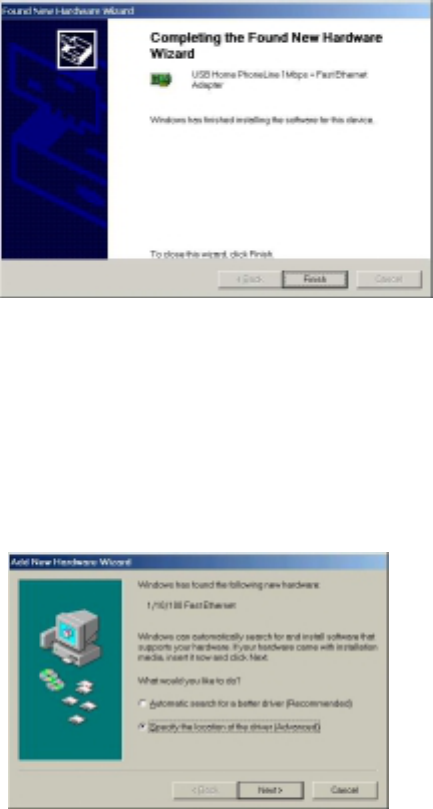
5. Windows will finish copying all the
necessary files to your system. When the
following window appears, click Finish.
11 -
6. When asked if you want to restart your
computer, click No
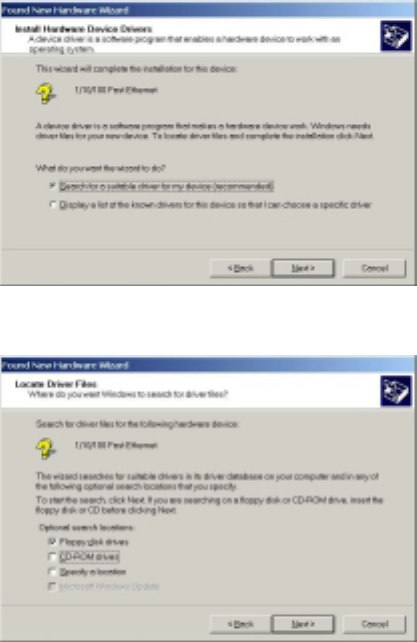
Installation for Windows 2000
1. Once the USB 1M HomePNA & 10/100
Fast Ethernet is well connected to your
computer as described in the previous
section, Windows will appear the
following picture. Click Next.
12 -
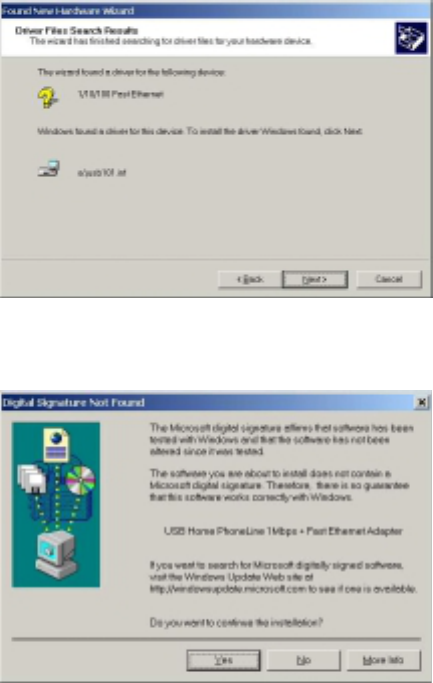
2. Load the device driver disk onto your disk
drive. Select Search for a suitable driver
for my device (recommended). Click
Next.
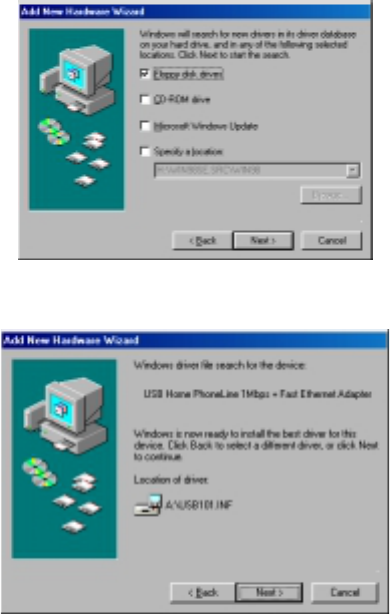
3. When the following window appears,
select Floppy disk drives. Click Next.
4. Click Next to continue the installation.
13 -
5. Windows will finish copying all the
necessary files to your system. When the
following window appears, click Yes.
6. Click Finish. Then the installation will be
fully completed.
14 -
7. When asked if you want to restart your
computer, click No
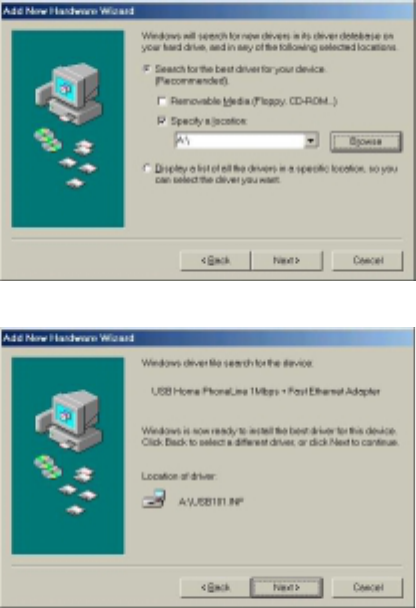
Installation for Windows ME
1. Once the USB 1M HomePNA & 10/100
Fast Ethernet is well connected to your
computer as described in the previous
section, Windows will appear the
following picture. Select Specify the
location of the driver (Advanced).
15 -
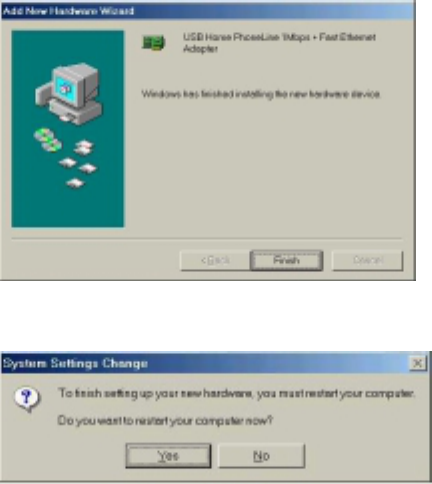
2. Click Next and load the device driver disk
onto your disk drive. Click Specify a
location when you see the following
picture. You may click the Browse button
to select the drive:\A. Click Next.
3. Click Next to continue.
4. The installation program will proceed
automatically.
16 -
5. Windows will finish copying all the
necessary files to your system. When the
following window appears, click Finish.
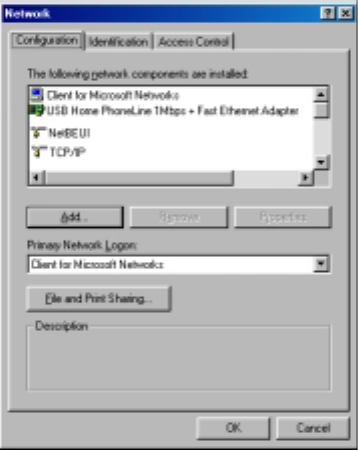
6. When asked if you want to restart your
computer, click No.
Network Connection
1. Once you are back at the Windows
desktop, go to Start#Settings#Control
Panel.
2. Double-click the Network icon. The
Network window will appear. Click the
Configuration tab.
3. Make sure that the following network
components are installed:
17 -
Client for Microsoft Networks
USB Home PhoneLine 1Mbps + Fast
Ethernet Adapter
NetBEUI
TCP/IP
4. If you are missing required components,
you'll need to install them manually. If you
need to install the TCP/IP Protocol, contact
your system administrator or refer to the
Windows 98 documentation.
5. In the Primary Network Logon box,
select Client for Microsoft Networks.
6. Click the Identification tab. Enter the
required information appropriately.
18 -
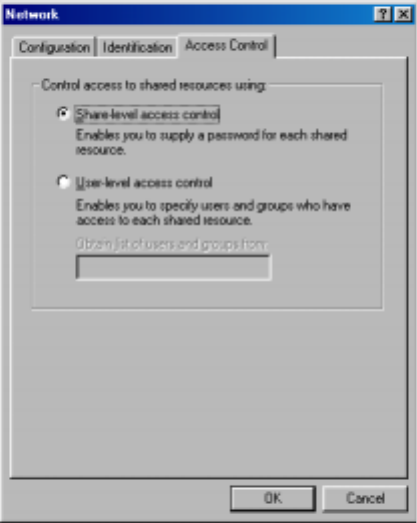
7. Click the Access Control tab. Make sure
that Shared-level access control is
selected.
8. When finished, remember to restart your
computer to activate the new device.
Once the computer has restarted and Windows
98 has booted up, the Link light will be on. And
a Logon window will appear requiring you to
enter a username and password. Make up a
username and password, enter them, and click
OK.
19 -
When you are at the Windows desktop, double-
click the Network Neighborhood icon. You
should see the name of the network, and/or the
names of the other PCs on the network.
Client Setup
If you are not using Windows operation system
with an NT or NetWare file server, skip the next
two paragraphs. Perform the following
procedures to prepare your computer to be used
with any file servers that may be on the network.
Connecting to a NetWare File Server
1. Click My Computer, Control Panel, and
Network.
2. Change the Network Logon to Client for
NetWare Network.
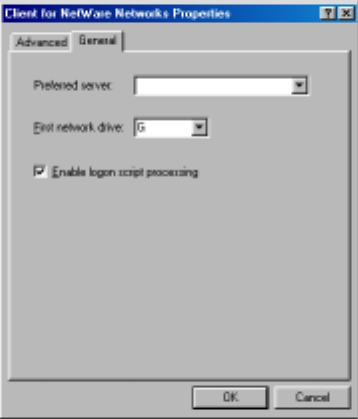
3. Double-click the Client for NetWare
networks. Put your server's name in the
Preferred Server box. Click in the Enable
Logon Script Processing box.
20 -
4. Click OK and restart your PC.
Connecting to a Windows NT Domain
1. Click My Computer, Control Panel, and
Network. Change the Primary Network
Logon to Client for Microsoft Network.
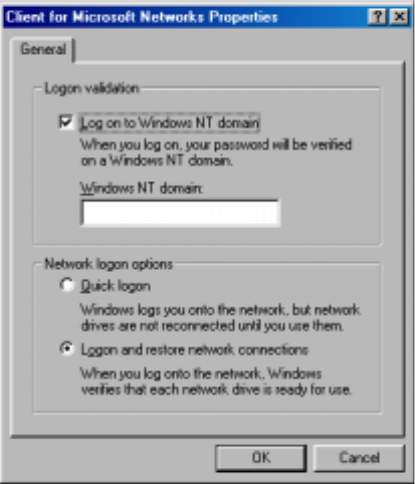
2. Double-click the Client for Microsoft
networks.
3. Select the Log on to Windows NT domain
box. Put your NT domain name in the
Windows NT domain area.
4. Click OK and restart your PC.
21 -
5. When finished, restart your computer.
Using File and Printer Sharing
1. Click Start, Settings, Control Panel.
Double-click Network.
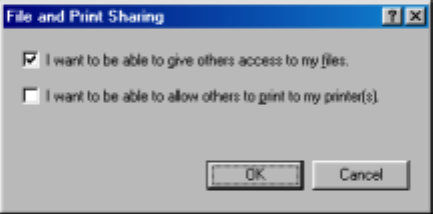
2. Click the Configuration tab, followed by
the File and Printer Sharing button. The
File and Printer Sharing window will
appear.
22 -
• If you'd like others to be able to access the files
on your PCs hard drive, select I want to be able
to give others access to my files.
• If you'd like to share your printer with other
users on the network, select I want to be able to
allow others to print to my printer.
3. Click the OK button. File and Printer
Sharing for Microsoft Networks should now
appear in the list of installed components.
Click OK. When asked to restart your PC,
choose to do so.
Enabling File Sharing
1. Double-click My Computer. A window of
available disk drives will appear.
2. Right-click once the drive or folder that you
want to make available to other users.
3. Click Sharing, followed by the Sharing tab.
Click Share As. In the Share Name box,
enter a name for the drive or folder you are
sharing, (e.g.: C-Drive, CD-ROM, Leela,
etc.).

23 -
Next, decide on the type of access that you want
to give other users.
• Read-Only access lets other users view the
files on your PC.
• Full access lets users create, change, or
delete files on your PC.
• Depends on Password lets users have Read-
Only and/or Full access, depending on the
password that you decide to give them.
24 -
Use your mouse to select the type of file sharing
access that you want other users to have. If you
want to assign access password(s), type them
into the Password box(es).
If you are sharing a cable modem or DSL
broadband connection that you will be using to
access the Internet, you should protect all of your
shared drives and printers with private
passwords.
When finished, click Apply, followed by OK.
Enabling Printers Sharing
Click Start#
##
#Setting#
##
# Printers. A window of
available printers will appear.
Right-click the printer that you want to share
with other users. Click Sharing, followed by the
Sharing tab. Click Share As. In the Share Name
box, give a name to the printer you're about to
share (Jack's HP4, for example). If you want to
assign a password to the printer so only certain
users can access it, type a password in the
Password box. When you're done, click Apply,
followed by OK. Your printer(s) are now shared.