Accton Technology WG3005BACC Wireless Cable/DSL Gateway 3CRWE51196 User Manual 3c51196 ug
Accton Technology Corp Wireless Cable/DSL Gateway 3CRWE51196 3c51196 ug
Contents
Users manual 3
46 CHAPTER 5: GATEWAY CONFIGURATION
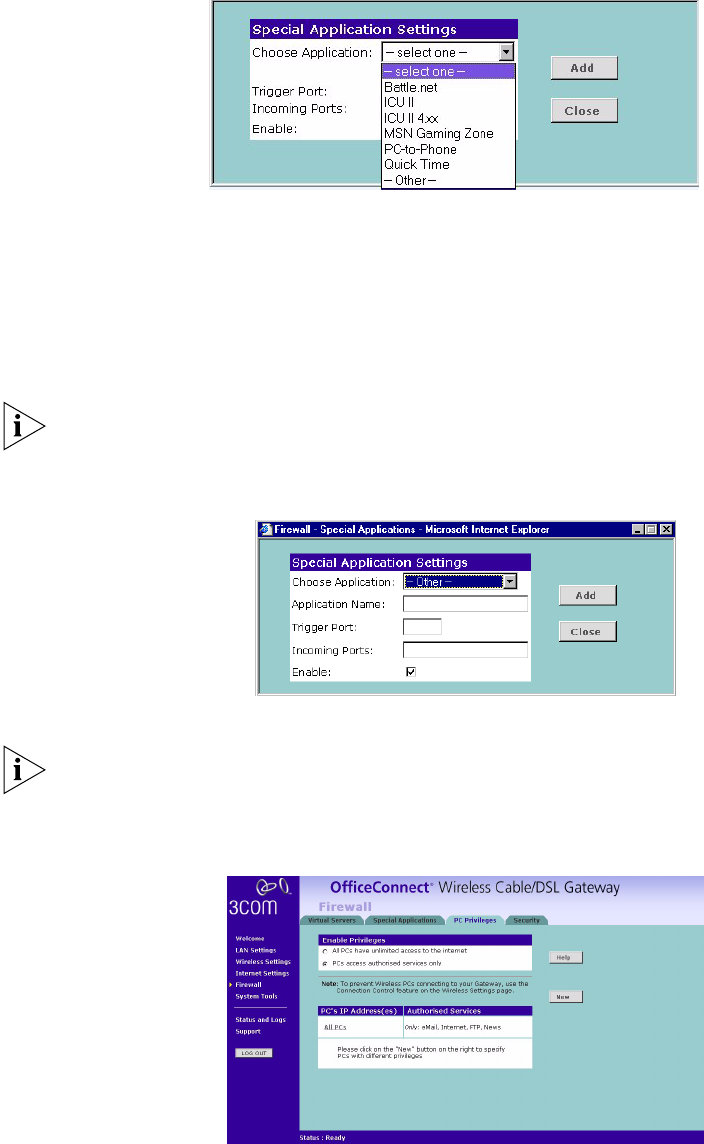
Figure 45 Special Application Settings Screen
Or select Other to specify a suitable name for the special application and then
enter a value in the Trigger and Incoming Ports text boxes (Figure 45). These values
correspond to the outbound port number issued by the application.
The port numbers are specified using a comma-separated list, with hyphens to
denote port number ranges. So for example, entering 2, 3, 5-7 would cause ports
2, 3, 5, 6, and 7 to be activated.
The Gateway will automatically allow FTP and NetMeeting sessions. You do not
need to configure these as Special Applications.
Figure 46
Other Applications Setup Screen
3Click Add to save your settings.
Only one computer on your network can be configured for special access at any
one time.
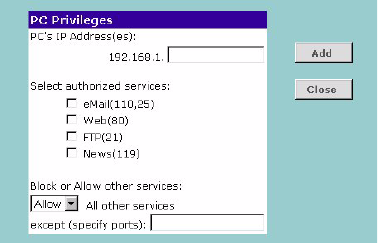
PCs Privileges Figure 47 PC Privileges Screen
Select PC Privileges to display the PCs Privileges setup screen (Figure 47).
Access from the local network to the Internet can be controlled on a
computer-by-computer basis. In the default configuration the Gateway will allow
all connected computers unlimited access to the Internet.
Firewall 47
PCs Privileges allows you to assign different access rights for different computers
on your network.
To use access control for all computers:
1Click in the PCs access authorized services only radio button.
2Select All PCs to setup the access rights for all computers connected to the
Gateway.
3Select authorized services by clicking in the appropriate check box(es) (Figure 48).
Figure 48 All PCs Setup Screen
4Access rights allow or deny users access to specified TCP and UDP ports. TCP and
UDP ports correspond to specific Internet services, such as browsing the Internet
or accessing news groups.
Activating Allow will give the particular users access to the service(s) you indicate
in step 5 (see below). Activating Block denies access to the services chosen in step
5.
5Select the service(s) to allow or block by clicking in the appropriate check box(es),
and then specify the port number for corresponding services. If you wish to deny
access to all services for all computers, click Block for All other services.
6Click Modify to save the settings.
To assign different access rights for different computers:
1Click in the PCs access authorized services only radio button.
2Click on the New button to display PC Privileges setting screen.
3Enter the last digit(s) of the IP address of the computer in the PC’s IP Address text
box.
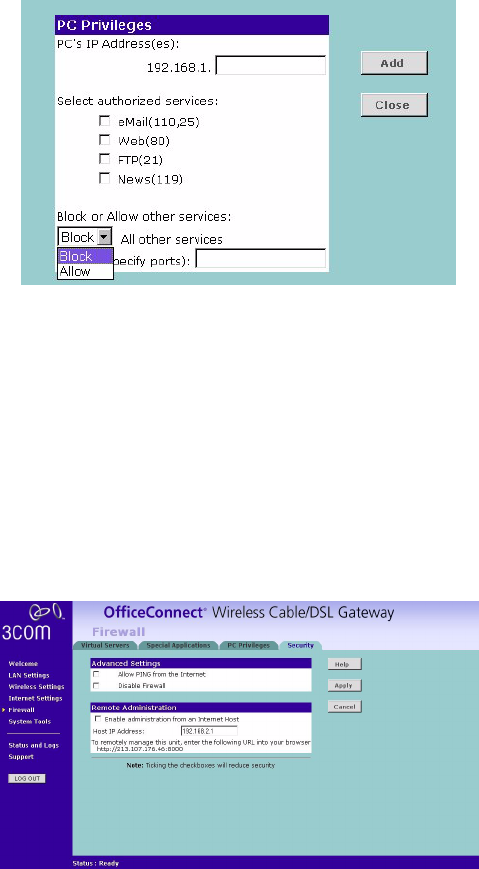
4Select authorized services by clicking in the appropriate check box(es) (Figure 49).
48 CHAPTER 5: GATEWAY CONFIGURATION
Figure 49 PC Privileges Setup Screen
5Activate the Allow or Block radio buttons.
Select the service(s) to allow or block by clicking in the appropriate check box(es),
and then specify the port number for corresponding services. If you wish to deny
access to all services for all PCs, click Block for All other services.
6Click Add to save the settings.
7Check all of your settings, and then click Apply.
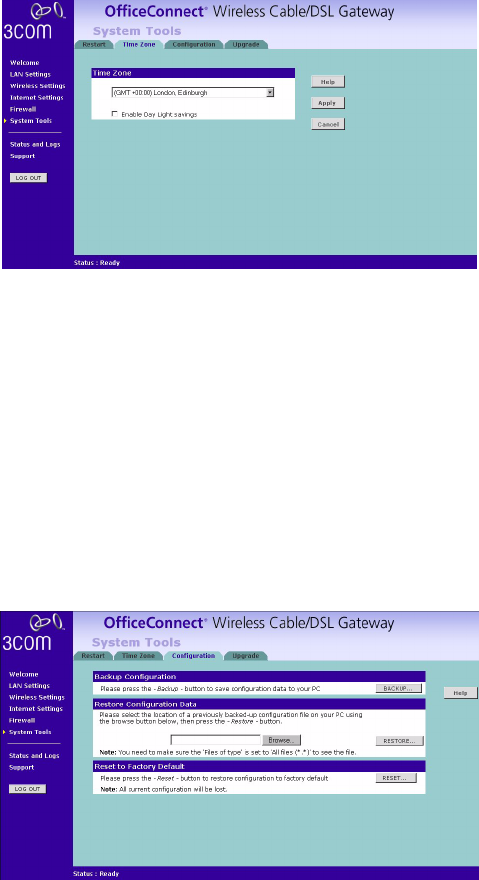
Security Select Security to display the Advanced Settings screen (Figure 50).
Figure 50 Security Screen
The Internet connects millions of computer users throughout the world. The vast
majority of the computer users on the Internet are friendly and have no intention
of breaking into, stealing from, or damaging your network. However, there are
hackers who may try to break into your network.
Allow PING from the Internet PING is a utility, which is used to determine
whether a device is active at the specified IP address. PING is normally used to test
the physical connection between two devices, to ensure that everything is working
correctly.
By default the Gateway has PING disabled in order to make the device more
difficult to find on the Internet and less prone to attack.
This feature is enabled by clicking on the check box so that a tick can be seen and
then pressing the Apply button.

System Tools 49
3Com recommends that you leave this disabled.
Disable Firewall The Gateway contains a firewall that detects attack patterns
used by hackers on the Internet and once detected will block their access to your
network. When an attack is detected a log entry will be generated and the Alert
LED will be lit for 2 seconds. The firewall will block Internet access to all unused
ports.
The Firewall is disabled by clicking on the check box so that a tick can be seen and
then pressing the Apply button.
3Com recommends that you leave this enabled.
Enabling Remote Administration It is possible to administer the Gateway
from the Internet. To do this:
1Check the Enable administration from an Internet Host box
2For added security, you may specify the IP address of the remote system. This will
prevent other remote hosts from accessing the administration pages. If you wish
to allow any remote host to administer the Gateway, type 0.0.0.0 in the Host IP
Address box.
3To remotely administer your Gateway, enter http://xxx.xxx.xxx.xxx:8000 in the
location bar of the browser running on the remote computer, where
xxx.xxx.xxx.xxx is the Internet IP address of the Gateway. You may then login using
the administration password.
System Tools After you have completed all basic setup procedures in the Welcome Wizard
section, you can go in later and change individual settings at any time by using the
System Tools.
The main frame of the System Tools screen includes four administration items:
Restart, Time Zone, Configuration, and Upgrade (Figure 51).
Restart Figure 51 Restart Screen
If your Gateway is not operating correctly, you can choose to restart the Gateway.
Pressing the Restart the Gateway button will cause the Gateway to restart,
simulating the effect of power cycling the unit. No configuration information will
be lost but the log files will be erased. This function may be of use if you are
experiencing problems and you wish to re-establish your Internet connection. Any
50 CHAPTER 5: GATEWAY CONFIGURATION
network users who are currently accessing the Internet will have their access
interrupted whilst the restart takes place, and they may need to reboot their
computers when the restart has completed and the Gateway is operational again.
Time Zone Figure 52 Time Zone Screen
Choose the time zone that is closest to your actual location. The time zone setting
is used by the system clock when displaying the correct time in the log files.
If you use Daylight saving tick the Enable Daylight savings box, and then click
Apply (Figure 52).
The Gateway reads the correct time from NTP servers on the Internet and sets its
system clock accordingly. The Daylight Savings option merely advances the system
clock by one hour. It does not cause the system clock to be updated for daylight
savings time automatically.
Configuration Figure 53 Configuration Screen
Select Configuration tab to display the Configuration screen (Figure 53).
Backup Configuration
Click the BACKUP button to save the current Gateway configuration. You will be
prompted to download and save a file to disk.
System Tools 51
Restore Configuration Data
If you want to reinstate the configuration settings previously saved to a file, press
the Browse button to locate the backup file on your computer, and then click the
RESTORE button to copy the data into the Gateway's memory.
Reset to Factory Default
If you want to reset the settings on your Gateway to those that were loaded at the
factory, click RESET. You will lose all your configuration changes. The Gateway LAN
IP address will revert to 192.168.1.1, and the DHCP server on the LAN will be
enabled. You may need to reconfigure and restart your computer to re-establish
communication with the Gateway.
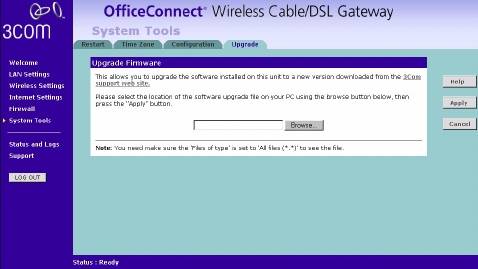
Upgrade Figure 54 Upgrade Screen
The Upgrade facility allows you to install on the Gateway any new releases of
system software that 3Com may make available. To install new software, you first
need to download the software from the 3Com support web site to a folder on
your computer. Once you have done this, use the Browse button to tell your web
browser where this file is on your computer, and then click on Apply. The file will
be copied to the Gateway, and once this has completed, the Gateway will restart.
Although the upgrade process has been designed to preserve your configuration
settings, it is recommended that you make a backup of the configuration
beforehand, in case the upgrade process fails for any reason (for example, the
connection between the computer and the Gateway is lost while the new
software is being copied to the Gateway).
The upgrade procedure can take up to two minutes, and is complete when the
Alert LED has stopped flashing and is permanently off. Make sure that you do not
interrupt power to the Gateway during the upgrade procedure; if you do, the
software may be corrupted and the Gateway may not start up properly
afterwards. If the Alert LED comes on continuously after a failed upgrade, refer to
Chapter 6, Troubleshooting.
52 CHAPTER 5: GATEWAY CONFIGURATION
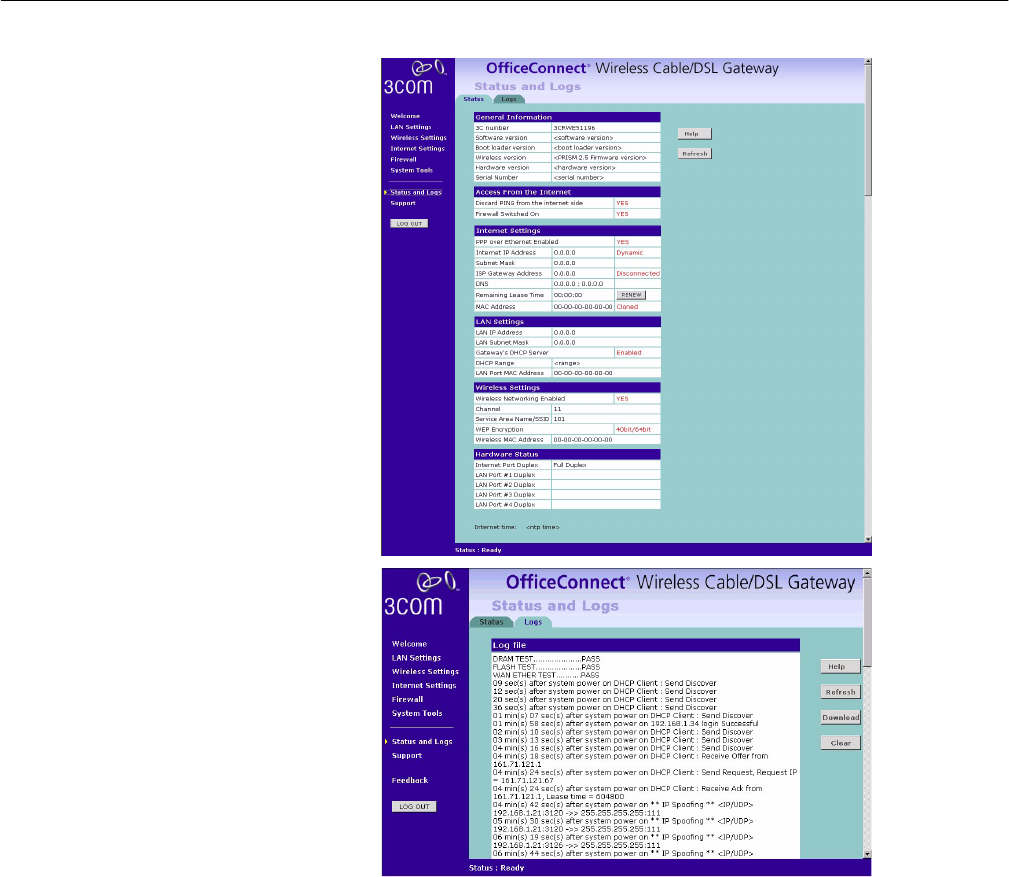
Status and Logs Figure 55 Status and Logs Screen
Selecting Status and Logs from the Main menu displays the Status and Logs
screens (Figure 55) in your Web browser window. The Status and Logs screen
display a tabular representation of your network and Internet connection.
Status Status will display the current unit status, including a summary of the
configuration
Logs Logs will allow you to view both the normal events, and security threats logged by
the Gateway
You may be asked to refer to the information on the Status and Logs screens if you
contact your supplier for technical support.
Status and Logs 53
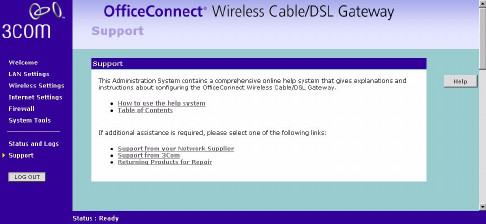
Support Figure 56 Support Screen
Selecting Support option on the main menu displays the support links screen,
which contains a list of Internet links that provide information and support
concerning the Gateway (Figure 56).
54 CHAPTER 5: GATEWAY CONFIGURATION

6TROUBLESHOOTING
Basic Connection
Checks
■Check that the Gateway is connected to your computers and to the cable/DSL
modem, and that all the equipment is powered on. Check that the LAN and
WAN port link status LEDs on the Gateway are illuminated, and that any
corresponding LEDs on the cable/DSL modem and the NIC are also illuminated.
■Ensure that the computers have completed their start-up procedure and are
ready for use. Some network interfaces may not be correctly initialised until the
start-up procedure has completed.
■If the link status LED does not illuminate for a port that is connected, check
that you do not have a faulty cable. Try a different cable.
Browsing to the
Gateway
Configuration Screens
If you have connected your Gateway and computers together but cannot browse
to the Gateway configuration screens, check the following:
■Confirm that the physical connection between your computer and the
Gateway is OK, and that the link status LEDs on the Gateway and NIC are
illuminated and indicating the same speed (10Mbps or 100Mbps). Some NICs
do not have status LEDs, in which case a diagnostic program may be available
that can give you this information.
■Ensure that you have configured your computer as described in Chapter 3,
Setting Up Your Computers. Restart your computer while it is connected to the
Gateway to ensure that your computer receives an IP address.
■When entering the address of the Gateway into your web browser, ensure that
you include the full URL including the http:// prefix (eg. http://192.168.1.1).
■If you cannot browse to the Gateway, use the winipcfg utility in Windows
95/98/ME to verify that your computer has received the correct address
information from the Gateway. From the Start menu, choose Run and then
enter winipcfg. Check that the computer has an IP address of the form
192.168.1.xxx (where xxx is in the range 2-254), the subnet mask is
255.255.255.0, and the default Gateway is 192.168.1.1 (the address of the
Gateway). If these are not correct, use the Release and Renew functions to
obtain a new IP address from the Gateway. Under Windows 2000, use the
ipconfig command-line utility to perform the same functions.
■If you still cannot browse to the Gateway, then use the Discovery program on
the accompanying CD-ROM as described in Appendix A.

56 CHAPTER 6: TROUBLESHOOTING
Connecting to the
Internet
If you can browse to the Gateway configuration screens but cannot access sites on
the Internet, check the following:
■Confirm that the physical connection between the Gateway and the cable/DSL
modem is OK, and that the link status LEDs on both Gateway and modem are
illuminated.
■Confirm that the connection between the modem and the cable/DSL interface
is OK.
■Ensure that you have entered the correct information into the Gateway
configuration screens as required by your Internet Service Provider. Use the
“Internet Settings” screen to verify this.
■For DSL users, check that the PPPoE user name, password and service name are
correct, if these are required. Only enter a PPPoE service name if your ISP
requires one.
■For cable users, check whether your ISP required a fixed MAC (Ethernet)
address. If so, use the Clone MAC Address feature in the Gateway to ensure
that the correct MAC address is presented, as described on page 43.
■Ensure that your computers are not configured to use a Web proxy. On
Windows computers, this can be found under Control Panel > Internet Options
> Connections.
Forgotten Password If you can browse to the Gateway configuration screen but cannot log on because
you do not know or have forgotten the password, follow the steps below to reset
the Gateway to it’s factory default configuration.
CAUTION: All your configuration changes will be lost, and you will need to run
the configuration wizard again before you can re-establish your Gateway
connection to the Internet. Also, other computer users will lose their network
connections whilst this process is taking place, so choose a time when this would
be convenient.
1Remove power from the Gateway.
2Disconnect all your computers and the cable/DSL modem from the Gateway.
3Using an Ethernet cable, connect the Ethernet Cable/DSL port on the rear of the
Gateway to any one of the LAN ports.
4Re-apply power to the Gateway. The Alert LED will flash as the Gateway starts up,
and after approximately 30 seconds will start to flash more slowly (typically 2
seconds on, 2 seconds off). Once the Alert LED has started to flash slowly, remove
power from the Gateway.
5Remove the cable connecting the Cable/DSL port to the LAN port, and reconnect
one of your computers to one of the Gateway LAN ports.
6Re-apply power to the Gateway, and when the start-up sequence has completed,
browse to http://192.168.1.1 and run the configuration wizard. You may need
to restart your computer before you attempt this.
7When the configuration wizard has completed, you may reconnect your network
as it was before.

Wireless Networking 57
Wireless Networking ■Ensure that you have a Wi-fi certified 802.11b wireless adapter for each
wireless computer, and that it is correctly installed and configured. Verify that
each Wireless computer has either Windows 95 or higher or MAC OS 8.5 or
higher.
■Verify that your wireless computers are configured to work in Infrastructure
mode and not Ad Hoc mode. The Gateway contains an Access Point that is
designed to operate in Infrastructure mode. Ad Hoc mode is not supported by
the Gateway.
■Check the status of the Gateway Wireless LED, it should be lit if wireless is
enabled and will flash when there is wireless activity. If not lit go to “Wireless
Configuration Screen” on page 35 and enable wireless networking.
■Ensure that the TCP/IP settings for all devices are correct.
■Ensure that the Wireless Clients are using the same ESSID or Service Area Name
as the Gateway. The ESSID is case-sensitive
■Ensure that you are using the same level of security on all of your wireless
computers (None, 40/64 or 128 bit) and that all devices are using the same
keys, and the same order of keys where appropriate.
■Ensure that you have the Wireless computer enabled in the list of allowed MAC
addresses if you are using Wireless Connection control on the Gateway.
■If you are having difficulty connecting or are operating at a low speed try
changing the antenna positions on the rear of the Gateway. For more effective
coverage you can try reorientating your antennae. Place one antenna vertically
and one horizontally to improve coverage. Additionally consider moving the
wireless computer closer to the Gateway to confirm that the building structure
or fittings are not adversely affecting the connectivity. If this resolves the
problem consider relocating the Wireless computer or the Gateway, or by
trying a different channel on the Gateway.
■Sources of interference: The 2.4Ghz ISM band is used for 802.11b. This is
generally a licence free band for low power applications, and you may have
other devices at your location that operate in this frequency band. You should
take care to ensure that there are no devices like microwave ovens for example
close to the Gateway or wireless computers as this could affect receiver
sensitivity and reduce the performance of your network. If you are unsure try
relocating both the wireless computers and the Gateway to establish whether
this problem exists.
■Most wireless computer Adapters will scan the channels for the wireless
Gateway. If a wireless computer has not located the Gateway then try initiating
a search manually if the client software supports this feature or manually set
the channel on your wireless computer to correspond to the Gateway channel
number. Please refer to your Wireless computer Card documentation and
vendor to do this.
■Speed of connection: The 802.11b standard will automatically choose the best
speed depending on the quality of your connection. As the signal quality
weakens then the speed falls back to a lower speed. The speeds are 11Mbps,
5.5Mbps, 2Mbps and 1Mbps. In general the closer you are to the Gateway the
better the speed. If you are not achieving the speed you had anticipated then
try moving the antenna on the Gateway or moving the Wireless computer
closer to the Gateway. In an ideal network the Gateway should be located in

58 CHAPTER 6: TROUBLESHOOTING
the centre of the network with Wireless computers distributed around it.
Applications are generally available with the computer wireless card to carry
out a site survey. Use this application to find the optimal siting for your wireless
computer. Consult your Computer Card documentation and vendor for more
details.
Alert LED The Alert LED will flash when the Gateway unit is first powered up while the
system software checks the hardware for proper operation. Once the Gateway has
started normal operation, the Alert LED will go out.
■If the Alert LED does not go out following start up, but illuminates
continuously, this indicates that the software has detected a possible fault with
the hardware. Remove power from the Gateway, wait 10 seconds and then
re-apply power. If the Alert LED comes on continuously again, then a fault has
been detected. Locate the copy of the Gateway software on the accompanying
CD-ROM and upload it to the Gateway to see if this clears the fault (refer to
“Recovering from Corrupted Software” below). If this does not fix the
problem, contact your supplier for further advice.
■During normal operation, you may notice the Alert LED lighting briefly from
time to time. This indicates that the Gateway has detected a hacker attack
from the Internet and has prevented it from harming your network. You need
take no specific action on this, unless you decide that these attacks are
happening frequently in which case you may wish to discuss this with your ISP.
The Gateway logs such attacks, and this information is available through the
Staus and Logs screens.
Recovering from
Corrupted Software
If the Alert LED remains permanently on following power-up, it is possible that the
system software has become corrupted. In this condition, the Gateway will enter a
“recovery” state; DHCP is disabled, and the LAN IP address is set to 192.168.1.1.
Follow the instructions below to upload a new copy of the system software to a
Gateway unit in this state.
Ensure that one of your computers has a copy of the new software image file
stored on its hard disk or available on CD-ROM.
1Remove power from the Gateway and disconnect the Cable/DSL modem and all
your computers, except for the one computer with the software image.
2You will need to reconfigure this computer with the following static IP address
information:
■IP address: 192.168.1.2
■Subnet mask: 255.255.255.0
■Default Gateway address: 192.168.1.1
3Restart the computer, and re-apply power to the Gateway.
4Using the Web browser on the computer, enter the following URL in the location
bar: http://192.168.1.1. This will connect you to the Microcode Recovery utility in
the Gateway.
5Follow the on-screen instructions. Enter the path and filename of the software
image file.

Frequently Asked Questions 59
6When the upload has completed, the Gateway will restart, run the self-test and, if
successful, resume normal operation. The Alert LED will go out.
7Refer to the Installation Guide to reconnect your Gateway to the Cable/DSL
modem and the computers in your network. Do not forget to reconfigure the
computer you used for the software upload.
If the Gateway does not resume normal operation following the upload, it may be
faulty. Contact your supplier for advice.
Frequently Asked
Questions
How many computers on the LAN does the Cable/DSL Gateway support?
A maximum of 253 computers on the LAN are supported.
How many wireless clients does the Cable/DSL Gateway support?
A maximum of 32 wireless clients are supported.
There are only 4 LAN ports on the Gateway. How are additional
computers connected?
You can expand the number of connections available on your LAN by using
hubs, switches and wireless access points connected to the Gateway. 3Com
wireless access points and OfficeConnect hubs and switches provide a
simple, reliable means of expanding your network; contact your supplier for
more information, or visit www.3com.com.
Does the Gateway support virtual private networks (VPNs)?
The Gateway supports VPN passthrough, which allows VPN clients on the
LAN to communicate with VPN hosts on the Internet. It is also possible to
set up VPN hosts on your LAN that clients elsewhere on the Internet can
connect to, but this is not a recommended configuration.
Where can I download software upgrades for the Gateway?
Upgrades to the Gateway software are posted on the 3Com support web
site, accessible by visiting www.3com.com. Upgrades are also available via
FTP from ftp.3com.com.
What other online resources are there?
The 3Com Knowledgebase at http://knowledgebase.3com.com is a
database of technical information covering all 3Com products. It is updated
daily with information from 3Com technical support services, and it is
available 24 hours a day, 7 days a week.
60 CHAPTER 6: TROUBLESHOOTING