Acer orporated DA221HQL Android All-in-One User Manual DA221HQL UM ENx
Acer Incorporated Android All-in-One DA221HQL UM ENx
User manual
Acer DA221HQL
User Guide

2
© 2014. All Rights Reserved.
Acer DA221HQL User Guide
Model: DA221HQL
This Revision: 03/2014
Acer DA221HQL
Model number: ______________________________
Serial number*: ______________________________
Date of purchase: ____________________________
Place of purchase: ___________________________
*Note: See the back of the DA221HQL

3
ENERGY STAR
Acer ENERGY STAR qualified products save your money by reducing energy cost and protecting
the environment without sacrificing features or performance. Acer is proud to offer our customers
products with the ENERGY STAR mark.
What is ENERGY STAR?
Products that are ENERGY STAR qualified use less energy and prevent greenhouse gas
emissions by meeting strict energy efficiency guidelines set by the U.S. Environmental Protection
Agency. Acer is committed to offering products and services worldwide that help customers save
money, conserve energy and improve the quality of our environment. The more energy we can
save through higher energy efficiency, the more we reduce greenhouse gases and the risks of
climate change. More information refers to www.energystar.gov or www.energystar.gov/
powermanagement.
- Note: Information in this section may not apply to your computer. Acer ENERGY STAR qualified
products:
- produce less heat and reduce cooling loads in warmer climates.
- automatically go into "display Sleep" and "computer Sleep" mode after 10 minutes of inactivity.
- wake from "Sleep" mode by pressing the power button.
- save more than 80% energy when in "Sleep" mode.
ENERGY STAR and the ENERGY STAR mark are registered U.S. marks.

4
Table of contents
ENERGY STAR
Getting to know your DA221HQL
Features and functions . . . . . . . . . . . . . . . . . . . . . . . . . . . . . . . . . . . . . . . . . . . . . . . . . . . 6
Product registration . . . . . . . . . . . . . . . . . . . . . . . . . . . . . . . . . . . . . . . . . . . . . . . . . . . . . . 6
Setting up
Unpacking your DA221HQL . . . . . . . . . . . . . . . . . . . . . . . . . . . . . . . . . . . . . . . . . . . . . . . . 7
Getting to know yourDA221HQL . . . . . . . . . . . . . . . . . . . . . . . . . . . . . . . . . . . . . . . . . . . . 8
Using your DA221HQL
Setting up your DA221HQL . . . . . . . . . . . . . . . . . . . . . . . . . . . . . . . . . . . . . . . . . . . . . . . 10
Turning on for the first time . . . . . . . . . . . . . . . . . . . . . .. . . . . . . . . . . . . . . . . . . . . . . . . . 10
Using the touchscreen . . . . . . . . . . . . . . .. . . . . . . . . . . . . . . . . . . . . . . . . . . . . . . . . . . . . 11
The Home screen . . . . . . . . . . . . . . . . . . . . . . . . . . . . . . . . . . .. . . . . . . . . . . . . . . . . . . . 12
The onscreen keyboard . . . . . . . . . . . . . . . . . . . . . . . . . . . . . . . . . . . . . . . . . . . . . . . . . . . 17
Editing text . . . . . . . . . . . . . . . . . . . . . . . . . . . . . . . . . . . . . . . . . . . . . . . . . . . . . . . . . . . . . 18
Locking your DA221HQL . . . . . . . . . . . . . . . .. . . . . . . . . . . . . . . . . . . . . . . . . . . . . . . . . . 20
Shutting down your DA221HQL . . . . . . . . . . . . . . . . . . . . . . . . . . . . . . . . . . . . . . . . . . . . . 20
Connecting devices to your DA221HQL
Connecting to AC power . . . . . . . . . . . . . . . . . . . . . . . . . . . . . . . . . . . . . . . . . . . . . . . . . . 21
Connecting to a PC as a monitor . . . . . . . . . . . . . . . . . . . . . . . . . . . . . . . . . . . . . . . . . . 21
Inserting a Micro SD card (optional) . . . . . . . . . . . . . . . . . . . . . . . . . . . . . . . . . . . . . . . . . . . . . . 21
Connecting a USB device to your DA221HQL . . . . . . . . . . . . . . . . . . . . . . . . . . . . . . . . 21
Transferring files between your DA221HQL and a PC . . . . . . . . . . . . . . . . . . . . . . . . . . 22
Connecting to a router or modem . . . . . . . . . . . . . . . . . . . . . . . . . . . . . . . . . . . . . . . . . . . 22
Connecting a Bluetooth device . . . . . . . . . . . . . . . . . . . . . . . . . . . . . . . . . . . . . . . . . . . . . 23
Using the webcam
Using the webcam as a camera . . . . . . . . . . . . . . . . . . . . . . . . . . . . . . . . . . . . . . . . . . . . 24
Using the webcam to record a video . . . . . . . . . . . . . . . . . . . . . . . . . . . . . . . . . . . . . . . 25
Viewing photos and videos . . . . . . . . . . . . . . . . . . . . . . . . . . . . . . . . . . . . . . . . . . . . . . . . . . . . . . 26
Advanced settings
Wireless & Networks . . . . . . . . . . . . . . . . . . . . . . . . . . . . . . . . . . . . . . . . . . . . . . . . . . . . 27
Device . . . . . . . . . . . . . . . . . . . . . . . . . . . . . . . . . . . . . . . . . . . . . . . . . . . . . . . . . . . . . . . 28
Personal . . . . . . . . . . . . . . . . . . . . . . . . . . . . . . . . . . . . . . . . . . . . . . . . . . . . . . . . . . . . 29
System . . . . . . . . . . . . . . . . . . . . . . . . . . . . . . . . . . . . . . . . . . . . . . . . . . . . . . . . . . . . . 30
Updating your DA221HQL’s operating system . . . . . . . . . . . . . . . . . . . . . . . . . . . . . . . 30

5
Resetting your DA221HQL . . . . . . . . . . . . . . . . . . . . . . . . . . . . . . . . . . . . . . . . . . . . . 31
FAQ and troubleshooting
Other sources of help . . . . . . . . . . . . . . . . . . . . . . . . . . . . . . . . . . . . . . . . . . . . . . . . . . 33

6
Getting to know your DA221HQL
Features and functions
Your new DA221HQL offers leading, easy-to-access multimedia and entertainment
features. You can:
• Connect to the Internet.
• Access your email.
• Play music and video.
• Keep in touch with your friends via your People and social networking apps.
• View content from an HDMI device.
• Use touch to control a PC.
Product registration
When using your product for the first time, it is recommended that you immediately
register it. This will give you access to useful benefits, such as:
• Faster service from our trained representatives.
• Membership in the Acer community: receive promotions and participate in
customer surveys.
• The latest news from Acer.
Hurry and register, as other advantages await you!
How to register
To register your Acer product, please visit www.acer.com. Tap Registration and
follow the simple instructions.
You can also register directly from your DA221HQL by tapping the Registration icon.
After we receive your product registration, you will be sent a confirmation email with
important data that you should keep in a safe place.

7
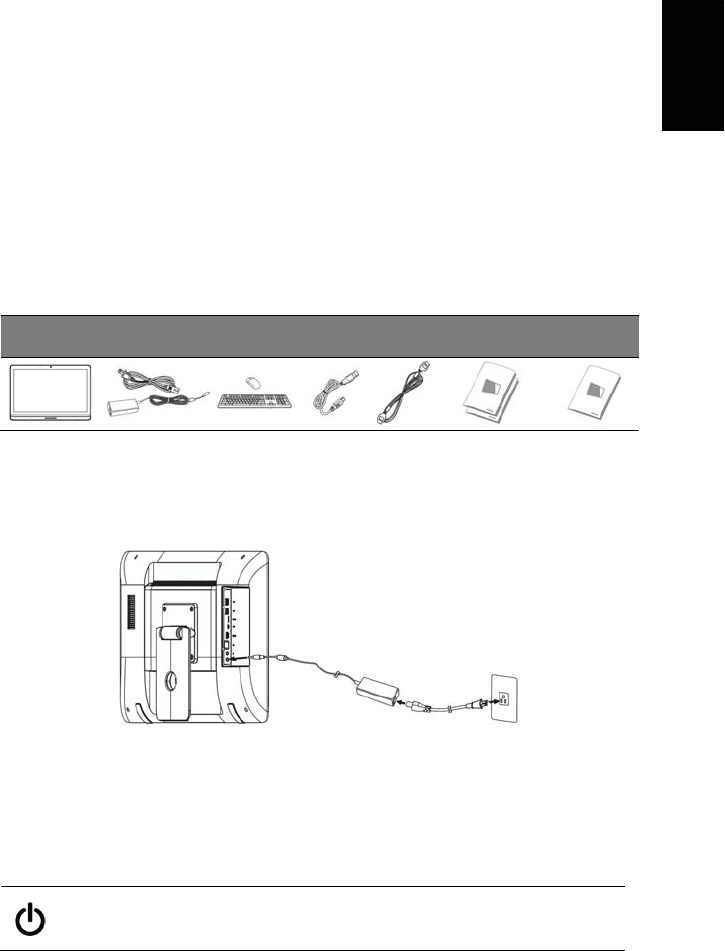
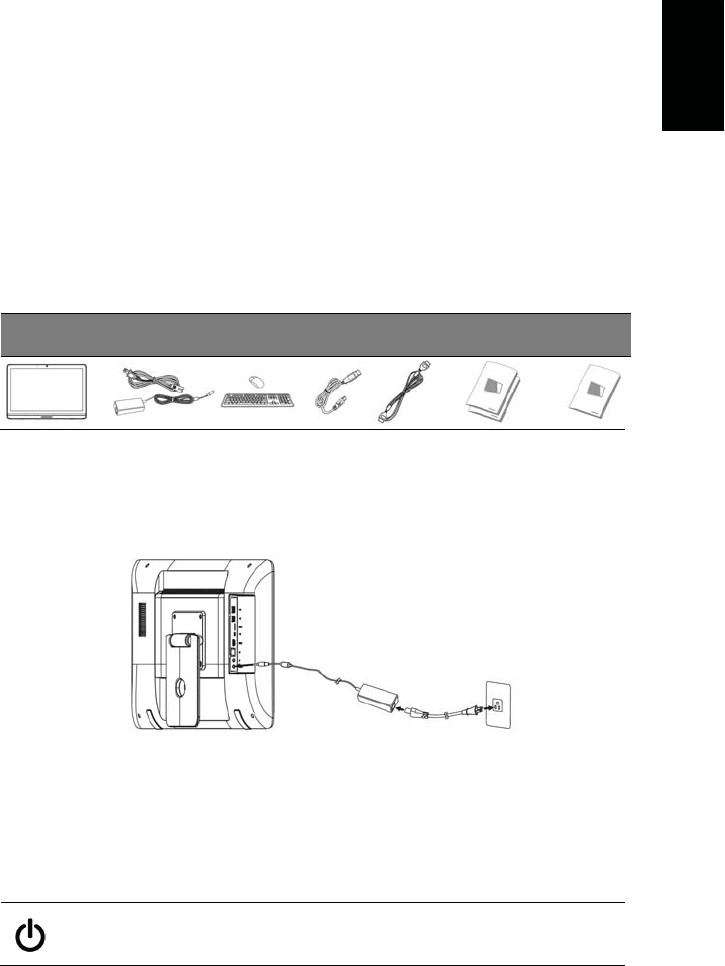
Setting up
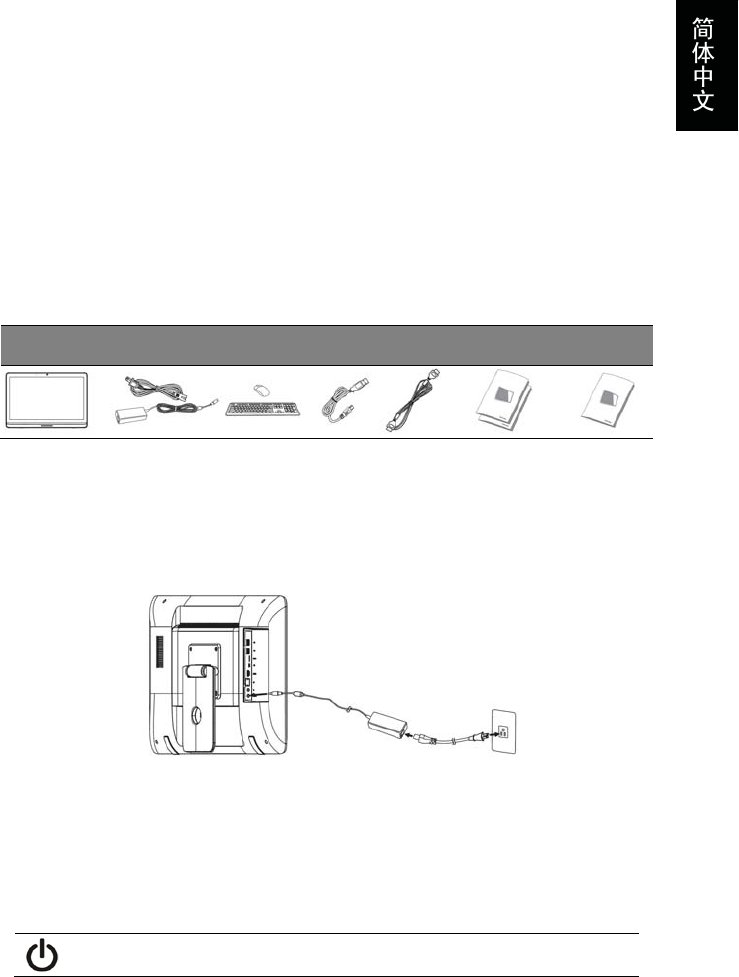
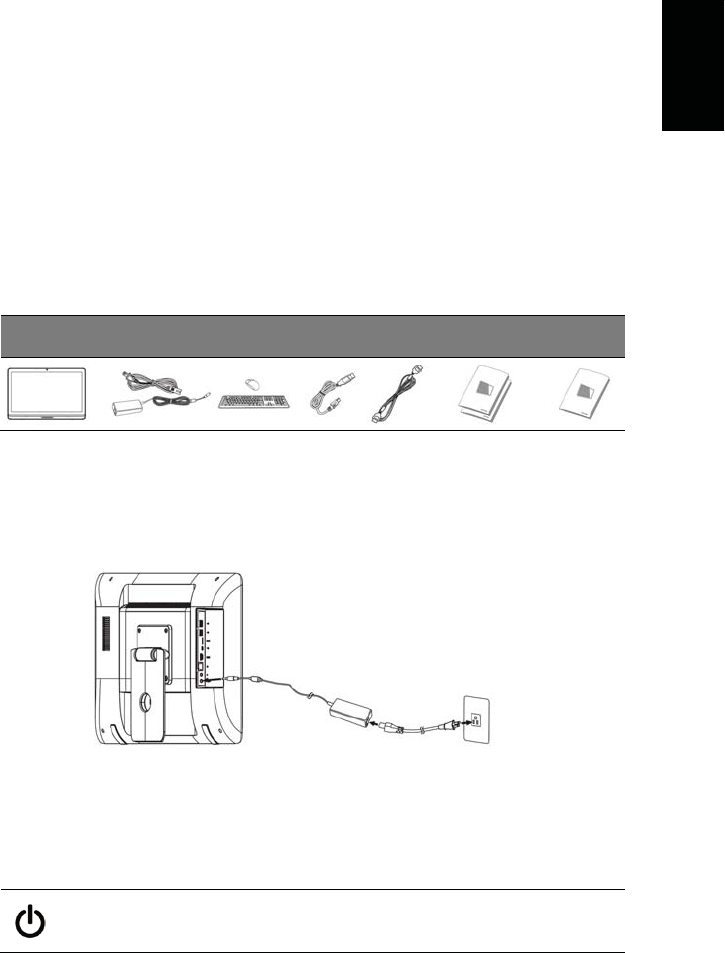
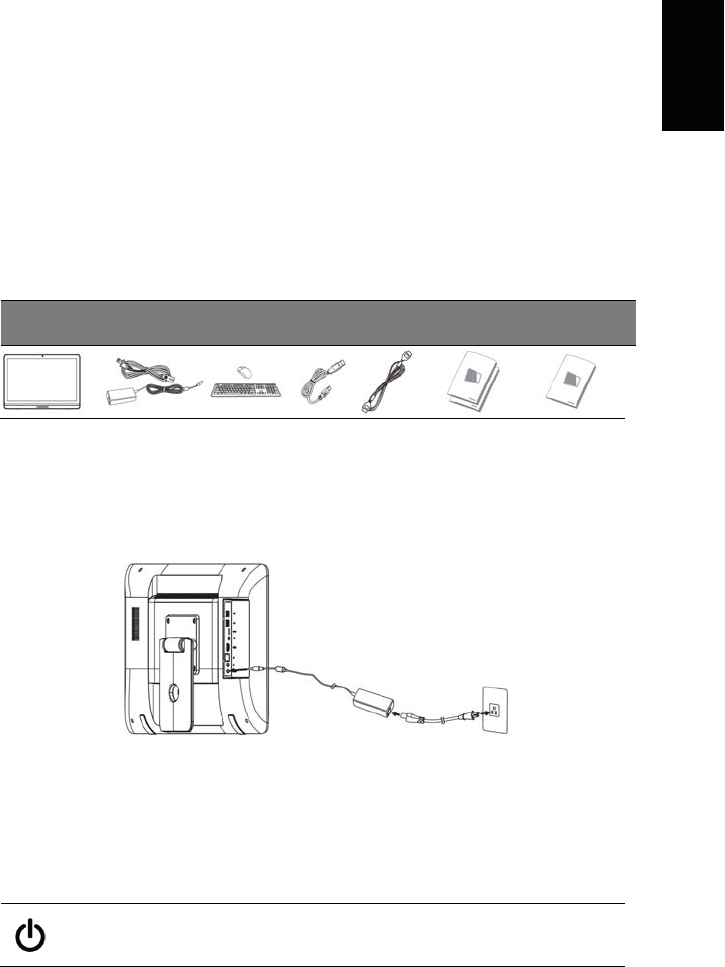
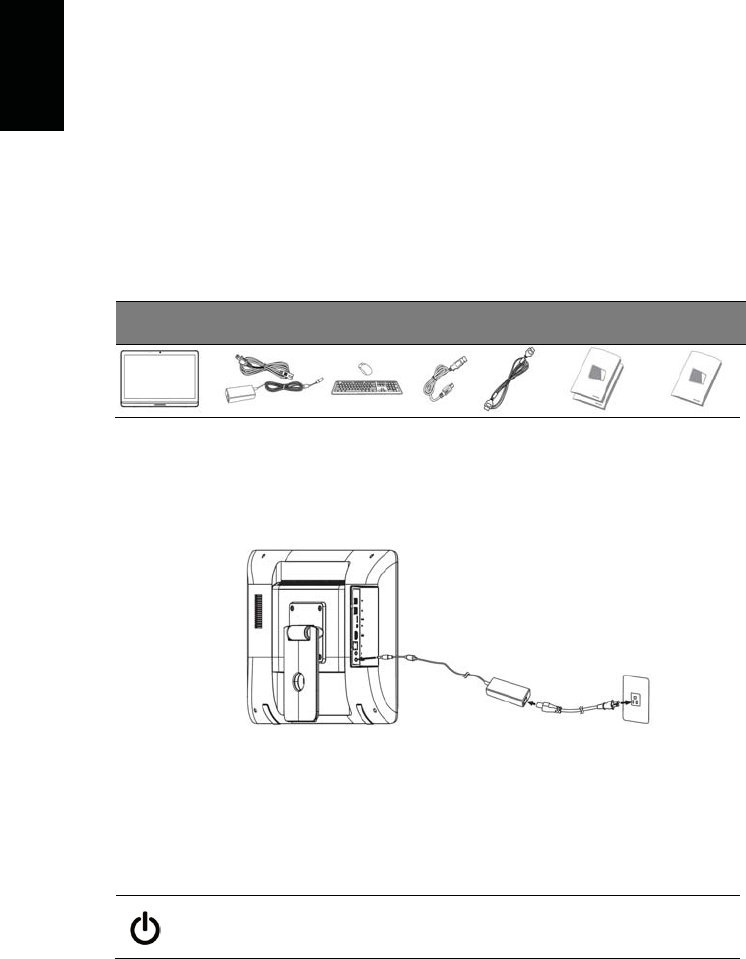
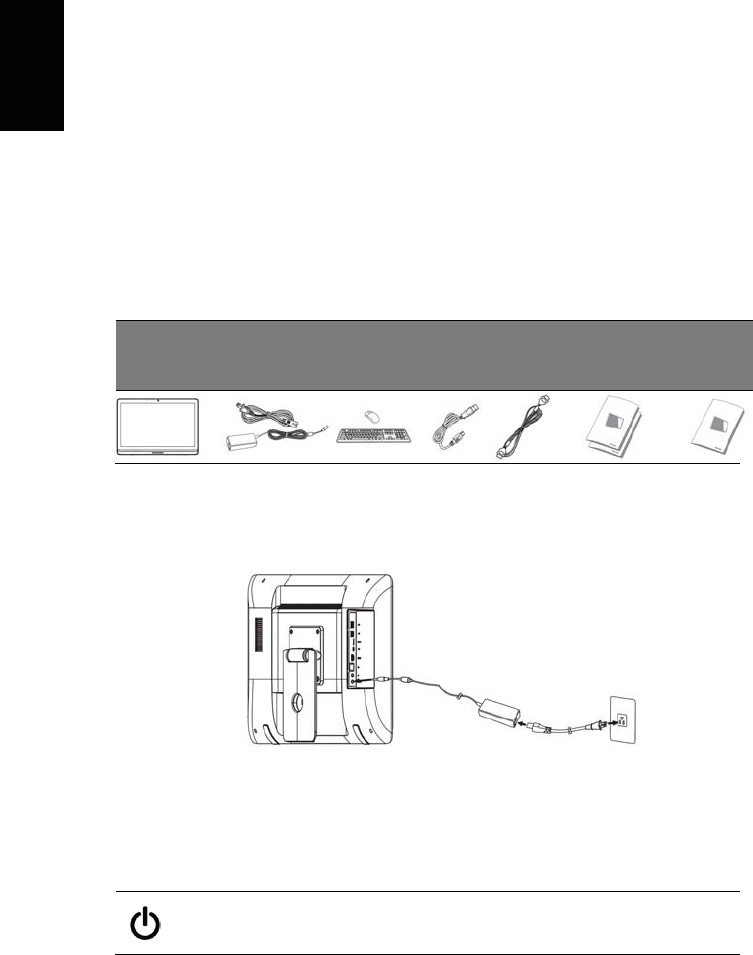
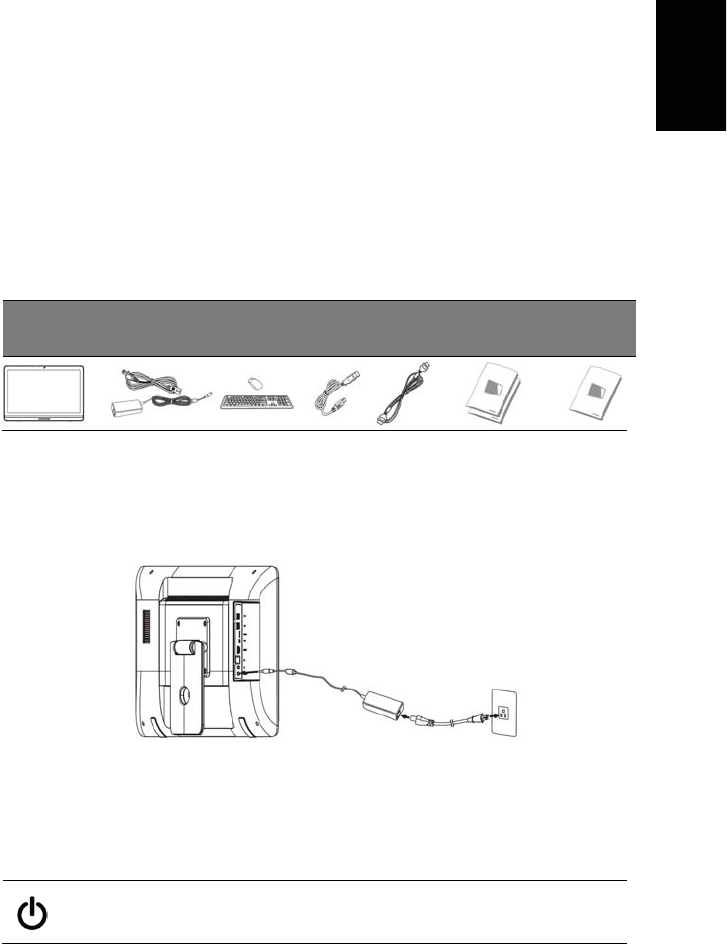
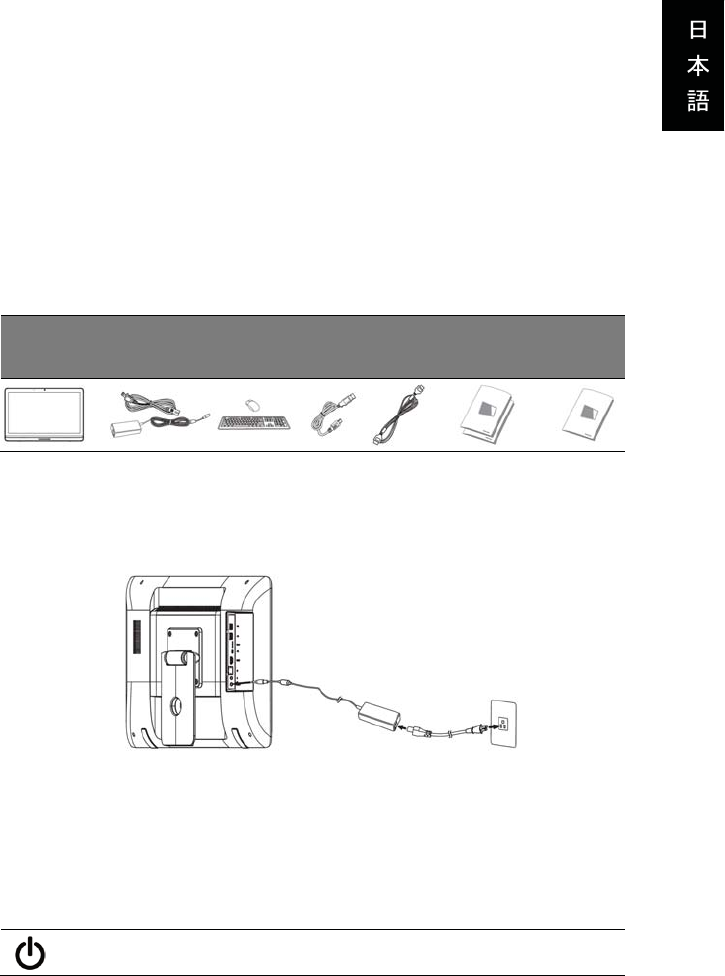
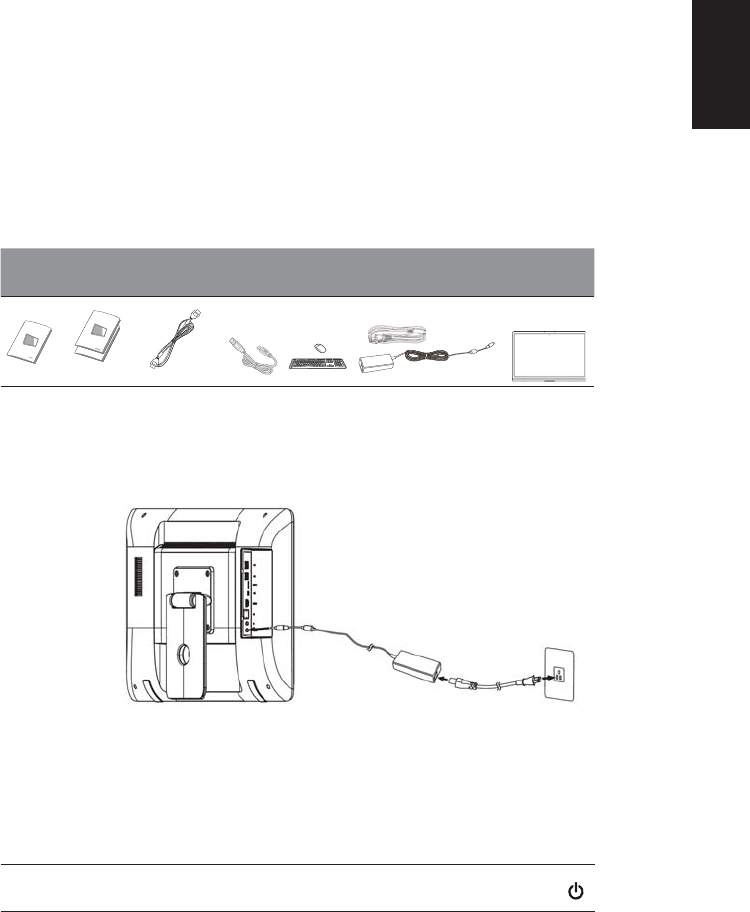
Unpacking your DA221HQL
Your new DA221HQL comes packed in a protective box. Carefully unpack the box
and remove the contents. If any of the following items is missing or damaged, contact
your dealer immediately:
• Acer DA221HQL
• Setup poster
• Keyboard and Mouse (optional)
• Micro USB cable (optional)
• HDMI cable (optional)
• AC adapter
• Warranty card
8
Getting to know your DA221HQL
Front view
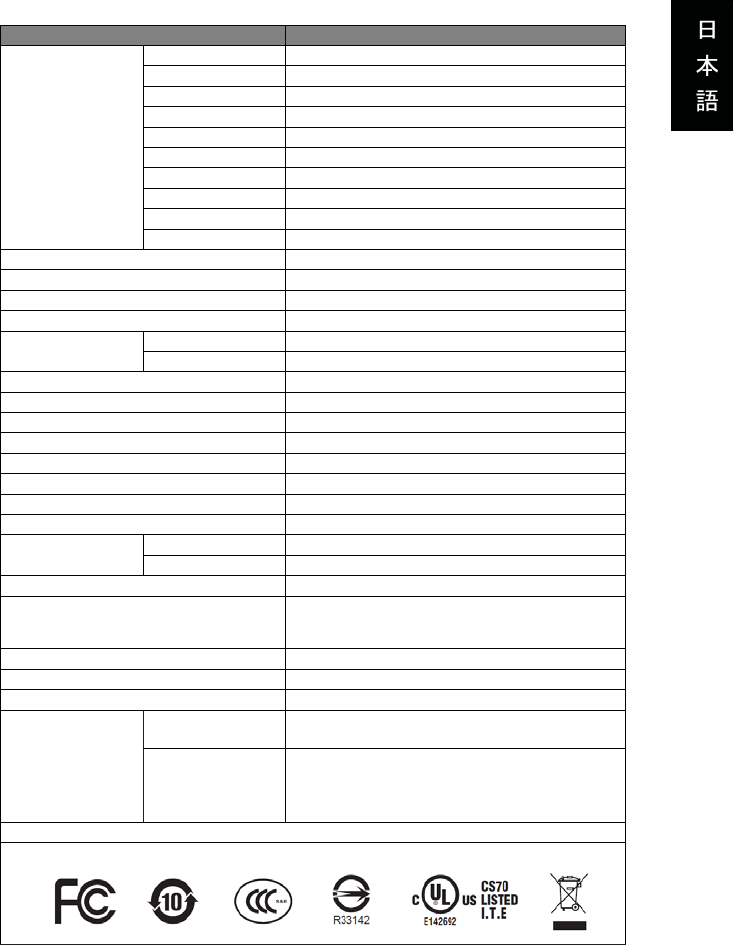
NO. Item Description
1 Front-facing camera A 1-megapixel camera for video chats and self-
portrait images.
2 Touchscreen 21.5” 1920 x 1080 optical touch screen.
3 Speakers Emit stereo audio.
4 Input switch key Press to switch input source.
5 Function key Press to open the main menu
6 Volume down key;
function key Volume down; function key (-)
7 Volume up key;
function key Volume up; function key (+)
8 Power indicator Indicates power status.
9 Power button
Press and hold to turn the DA221HQL on, press
briefly to turn the screen on/off or enter sleep
mode; press and hold to turn the DA221HQL off.
10 Microphone Receives audio for video chats and Internet calls
11 Camera indicator Indicates camera status.
9
Back view
NO. Item Description
1 USB ports Connects with external USB devices, such as a
keyboard, mouse or storage device.
2 Micro SD card slot Insert a micro SD card.
3 Micro USB port (Hub)
Connects to media devices (such as media
players or smartphones) that support Media
Transfer Protocol.
Note: If your system hangs, please unplug
the device.
4 HDMI port Supports high-definition digital video connections.
5 Ethernet (RJ-45) port Connects to an Ethernet network
6 3.5mm headphone
jack Connects to stereo headphones.
7 DC-in jack Connects to the DC power supply
10
Using your DA221HQL
Setting up your DA221HQL
Open the stand until it snaps in place. Then, tilt the display panel to an angle of
between 15 and 75 degrees from an upright position. Connect the DC-in jack to your
DA221HQL and plug the AC adapter into any AC outlet.
Warning: Only use the bundled power adapter to power your DA221HQL.
Turning on for the first time
To turn on your DA221HQL, press the power button until the screen turns on. Wait a
moment for your DA221HQL to get ready. You will then be asked some questions
before you can use your DA221HQL.
To start, tap to select your language and country, then tap Start. Follow the rest of
the instructions as they are displayed.

11
Note: If the DA221HQL’s screen turns off, it has entered sleep mode. Briefly
press the power button to wake it up. For more information, see "Waking your
DA221HQL" on page 20.
Sign in to or create a Google account
If you have Internet access, your DA221HQL allows you to synchronize information
with a Google account.
During the start-up process, you may create or sign in to an account, which will be
used to synchronize your contact list, email, calendar and other information. If you
do not yet have Internet access, or do not want to use this feature, then tap Skip.
Important: You must sign in to a Google Account to use Gmail, Google Talk,
Google Calendar, and other Google Apps; to download apps or media from
Google Play; to back up your settings to Google servers; and to take advantage
of other Google services on your DA221HQL.
If you want to restore existing settings from another device with Android 2.0 (or
later) installed, you must sign in to your Google account during setup. If you wait
until after setup is complete, your settings will not be restored.
Note: If you have multiple Google accounts, such as separate accounts for
personal and business contacts, you can access and synchonize them from the
Accounts settings section. See "Multiple Google accounts" on page 30.
Using the touchscreen
Your DA221HQL uses a touchscreen for selecting items and entering information.
Use your finger to tap the screen.
Tap: Touch the screen once to open items and select options.
Drag: Hold your finger on the screen and drag across the screen to select text and
images.
Tap and hold: Tap and hold an item to see a list of actions available for that item. On
the pop-up menu that appears, tap the action you want to perform.
Scroll: To scroll up or down the screen, simply drag your finger up or down the
screen in the direction that you want to scroll.
Note: The system will automatically calibrate touch coordinates during start-up.
Please do not touch the screen.
Note: Sudden change in ambient light source might result in misreading of the
touch coordinates. Please restart the device when this happens.
12
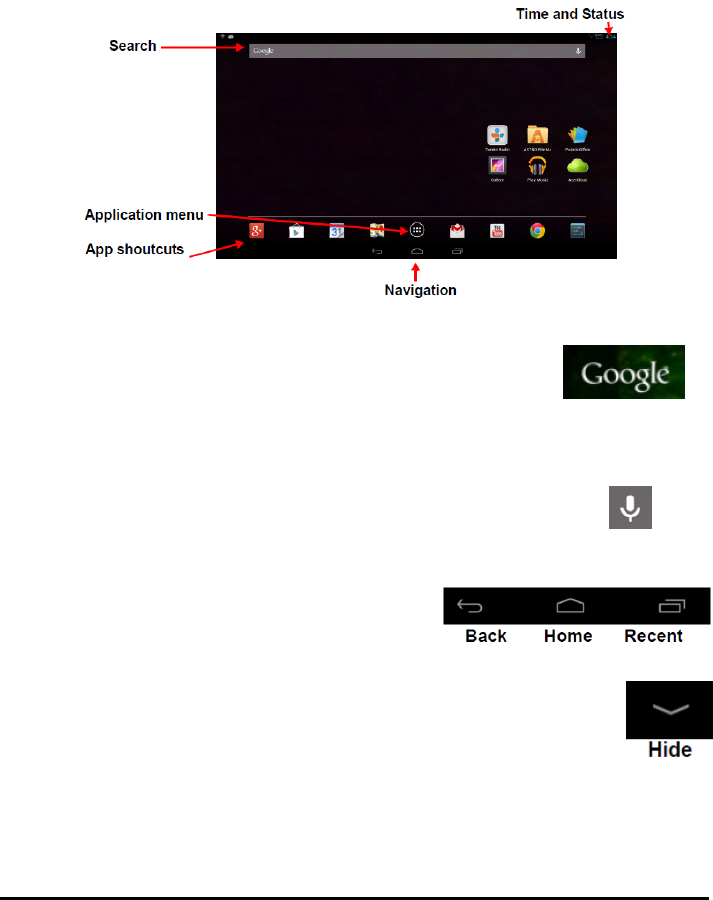
The Home screen
When you start your DA221HQL, or wake it from power saving, it will display the
Home screen. This screen gives you quick access to information and simple
controls with widgets or shortcuts. These display information such as the time and
weather, or provide additional controls and direct access to apps. Some have been
pre-installed on your DA221HQL, while others may be downloaded from Google
Play.
The Home screen already features some useful controls and information.
Search
To search for apps, files or for information on the Internet, tap the
Google icon in the top-left corner.
Simply enter the text you want to find. Tap the arrow or Enter key to search the
Internet, or tap one of the suggestions, apps or files shown in the list.
Voice search
If voice search is available, tap the microphone and speak your search
request.
Navigation
To navigate through menus and options, three (or
more) icons are shown at the bottom of the screen.
Back
Tap this icon to go to the previous page, or to go up one level in a menu.
This icon may be replaced with the hide icon in certain cases (such as if
the keyboard or list of recent apps is shown).
Home
Tap this icon to go directly to the Home screen.
13
Recent
Tap this icon to see recently opened apps. Tap an app to open it, or tap anywhere on
the screen to return to the Home screen.
The extended Home screen
The Home screen extends to either side of the initial Home screen, giving you more
room to add widgets or organize shortcuts. To view the extended Home screen,
swipe your finger to the left or right.
A total of five pages are available, two to the left and two to the right. To change or
add widgets on any of the screens see "Personalizing the Home screen" on page
15.
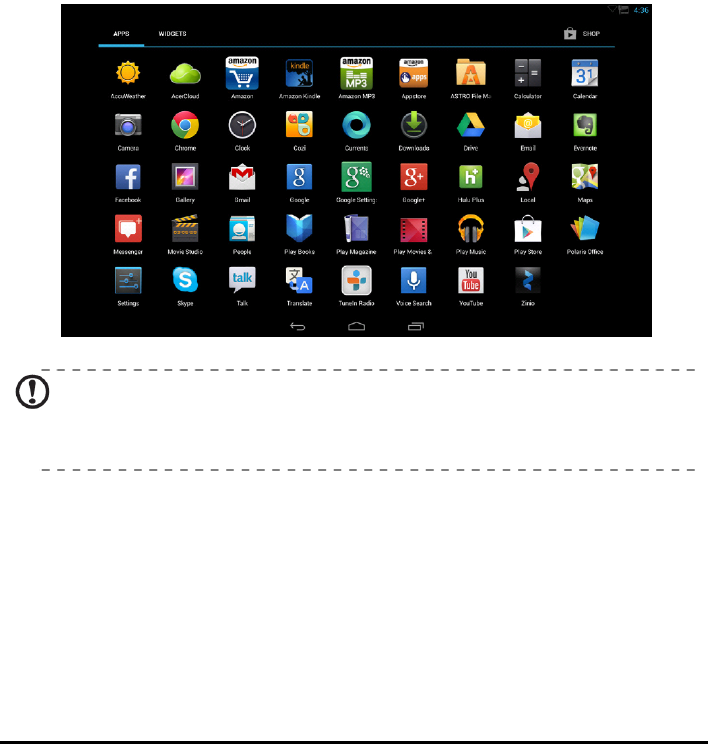
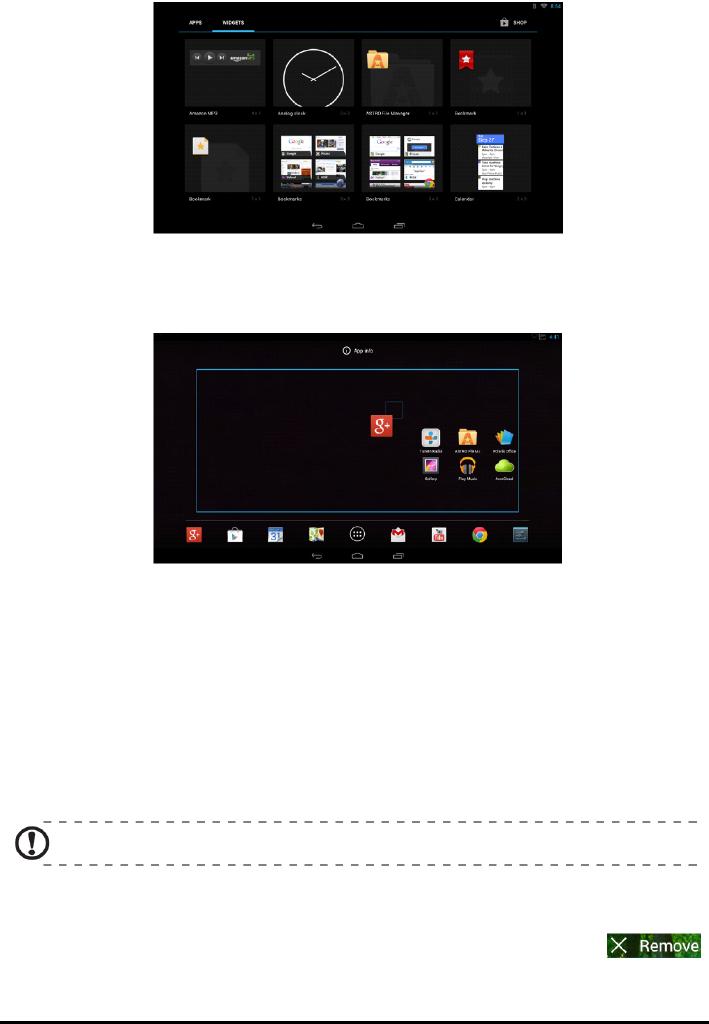
The App menu
The App menu displays applications and widgets available on your DA221HQL.
Note: All images are for reference only. The applications installed on your
DA221HQL can be different from the applications shown in illustrations. Some
applications might experience errors in location services because of abnormal
WiFi connections.
Apps are displayed in alphabetical order. If more apps are available, an outline of the
second page will be shown on the side of the screen. Swipe the outline towards the
center of the screen to switch pages.
Otherwise swipe to the left to see more Applications. When you are on the last page
of applications, swipe to the left to see widgets available on your DA221HQL. See
"Personalizing the Home screen" on page 15.
Tap the Shop icon to open Google Play.
14
Adding an application to a Home screen
Tap and hold an icon to add a shortcut to one of your Home screens. While a
shortcut is selected, thumbnails of the Home screens are shown below the list of
applications, simply drag the shortcut to a screen.
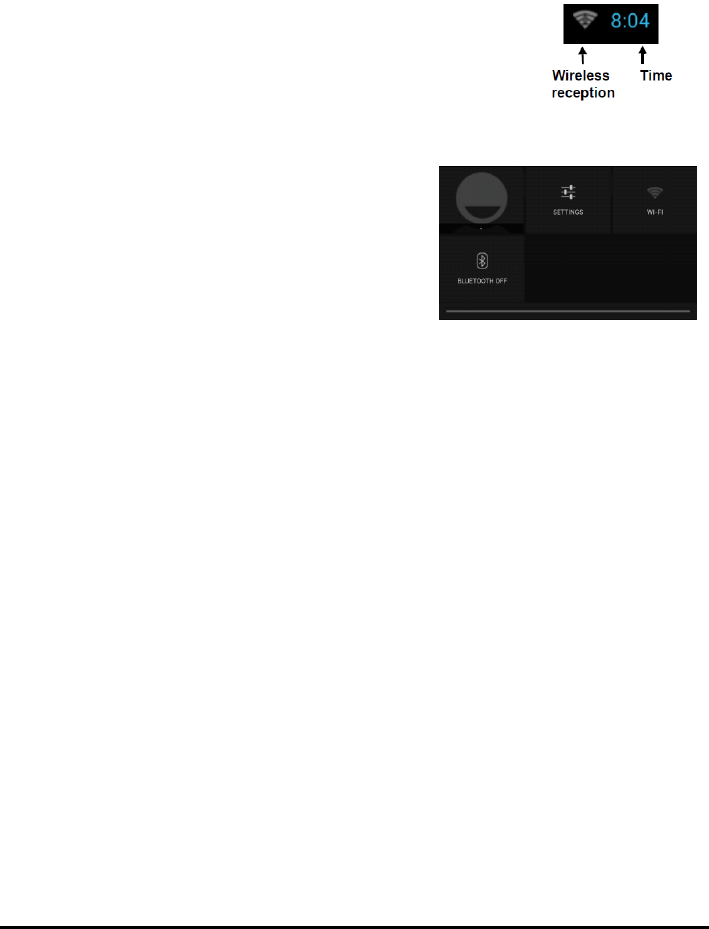
Status and notification area
Status and notification icons are shown in the bottom-right
corner of the screen.
This area contains a variety of icons to inform you of your
DA221HQL’s status. The icons on the right side of the clock
indicate connectivity status. The left side of the clock displays
the event notification icons.
Tap the notification area to view more status
information. Control buttons enable you to tap
features on (blue) or off (white).
Some event summaries include controls below
the main status area, such as media controls if
music is playing.
15
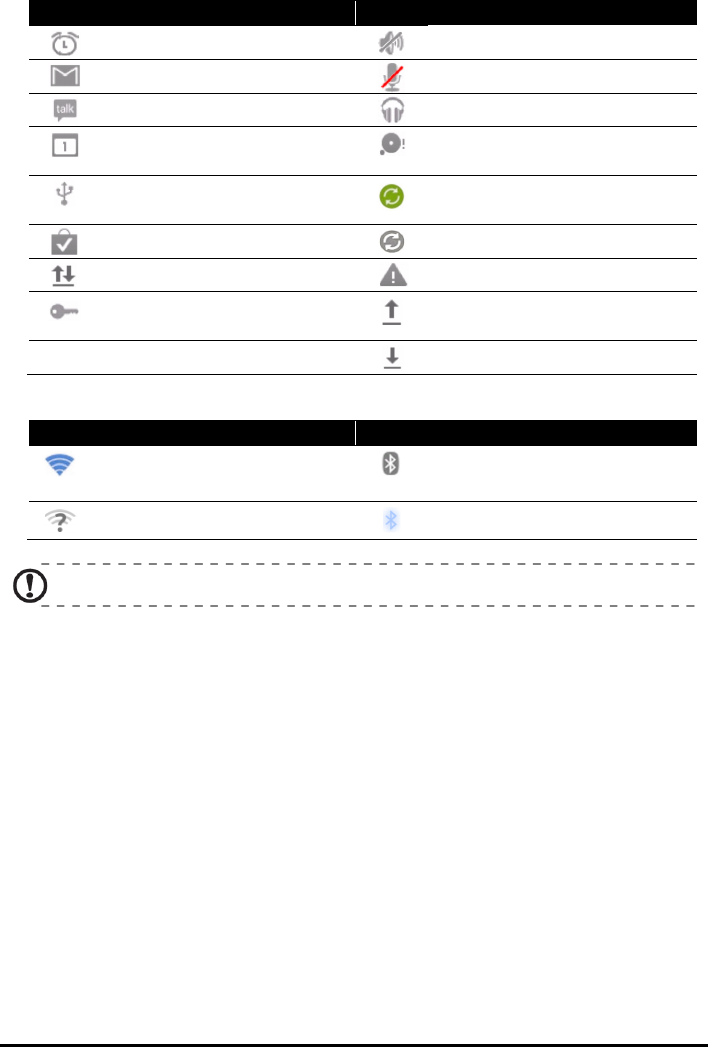
Status and notification icons
Notification icons
Icon Description Icon Description
Alarm is set Speaker is silenced
New Gmail message DA221HQL microphone is off
New Google Talk message Song is playing
Upcoming event Micro SD card or USB storage is
full
DA221HQL is connected to PC
via USB
Syncing data
Application update available Sync is on
System update available Problem with sign-in or sync
Virtual private network (VPN)
status
Uploading data
Downloading data
Connection icons
Icon Description Icon Description
Connected to a wireless network
(waves indicate connection
strength)
Bluetooth is on
An open wireless network is
available Connected to a Bluetooth device
Note: Network connection icons are blue if you have an active Google account.
Personalizing the Home screen
You may personalize your Home screen by adding or removing application shortcuts
or widgets, and by changing the wallpaper.
Adding or removing shortcuts or widgets
To add shortcuts or widgets tap the Apps icon in the top-right corner of the Home
screen.
The APPS menu contains a list of shortcuts to applications you can drag to a Home
screen.
Tap WIDGETS to see small applications and links (such as custom shortcuts,
contacts or bookmarks) that you can add to a Home screen. Widgets are small
16
applications that display constantly-updated information or quick shortcuts to
applications or special functions.
To move an App or Widget to the Home screen, tap and hold an item until it is
selected. The Home screen will open. Drag the item to any free area on the screen.
To move the item to a different Home screen, drag it to the side of the screen, the
Home screen will switch to the screen in that direction. Release the item when it is
positioned correctly.
Resizing a Widget
Most widgets can be made larger, so you can give more space to information that is
important to you. After placing a Widget on the Home screen, tap and hold to select
it. Four diamonds will appear on each side, tap and drag the diamond until the
Widget is the correct size. Tap Back to finish.
Note: Not all widgets can be resized.
Removing an item from the Home screen
To remove an item from the Home screen, tap and hold the item until
the Remove option appears at the top of the screen. Simply drag the
item to the Remove option.
17
Changing the Home screen image
Tap and hold any open space on the Home screen. You can choose from a set of
pre-formatted wallpapers, images stored in the Gallery, selected Wallpapers, or Live
wallpapers that feature animated or interactive backgrounds.
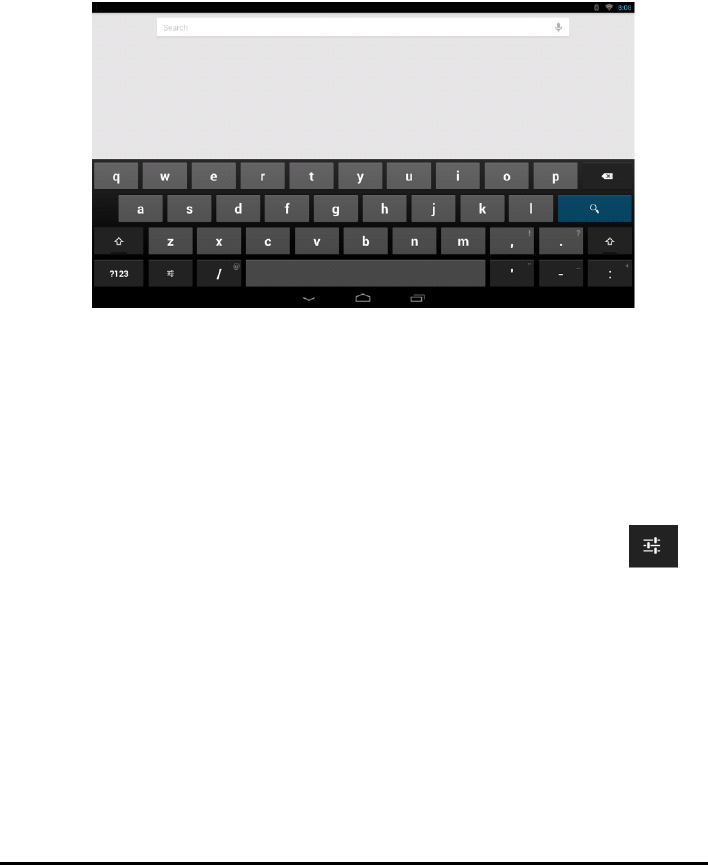
The onscreen keyboard
When you tap a text box to enter text, an onscreen keyboard will appear. Simply tap
on keys to enter text.
Tap the ?123 button to see numbers and special characters, and then tap the ~ \ {
key to see more options. Tap and hold a key to select alternative characters (if
available for that key), such as letters with accents or related symbols.
The layout of the keyboard varies slightly, depending on the application and
information that is required.
Changing Android keyboard settings
To use a different keyboard language or change settings, tap the Input
options key, then select either Input languages or Android keyboard
settings. These settings include Auto-correction and keyboard sounds.
Predictive text or auto correction
The Android keyboard can provide predictive text input. As you tap the letters of a
word, a selection of words are displayed that continue the sequence of letters
tapped, or are a close match allowing for errors. The word list changes after every
key press. If the word you need is displayed, you can tap on it to insert it into your
text.
18
To turn predictive text on or off with the Android keyboard, tap the Input options
key, and then Android keyboard settings. Tap Auto correction or Show
correction suggestions and select one of the options.
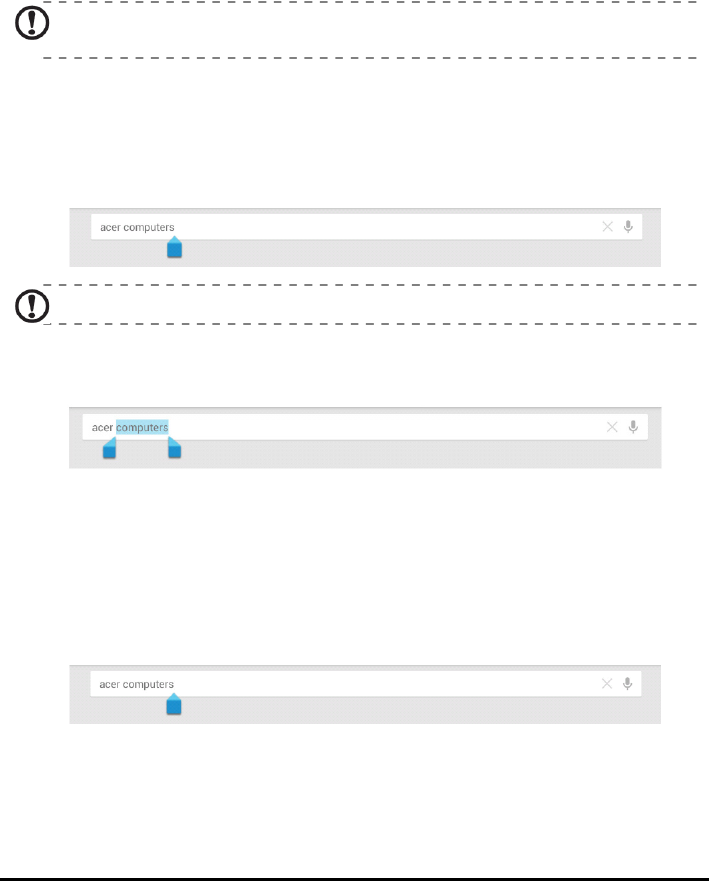
Editing text
You can select and edit text in certain applications, such as text you have entered in
a text field. Selected text can be cut or copied and later pasted within the same
application, or to a different application.
Note: Certain applications may not support text selection, or only support it in
certain areas.Other applications may offer specialized commands to select text.
Selecting text
To select text that you want to cut, copy, delete or replace:
1. Tap the text you want to select. If you can select this text, a cursor is inserted
below the text.
Note: The cursor indicates where text you type or paste will be inserted.
2. Tap and hold the text or word you want to select.
The selected text is highlighted, with a tab at each end of the selection.
3. Drag either tab to expand or reduce the amount of selected text, or tap Select all.
4. To cut or copy the text, tap the CUT or COPY button.
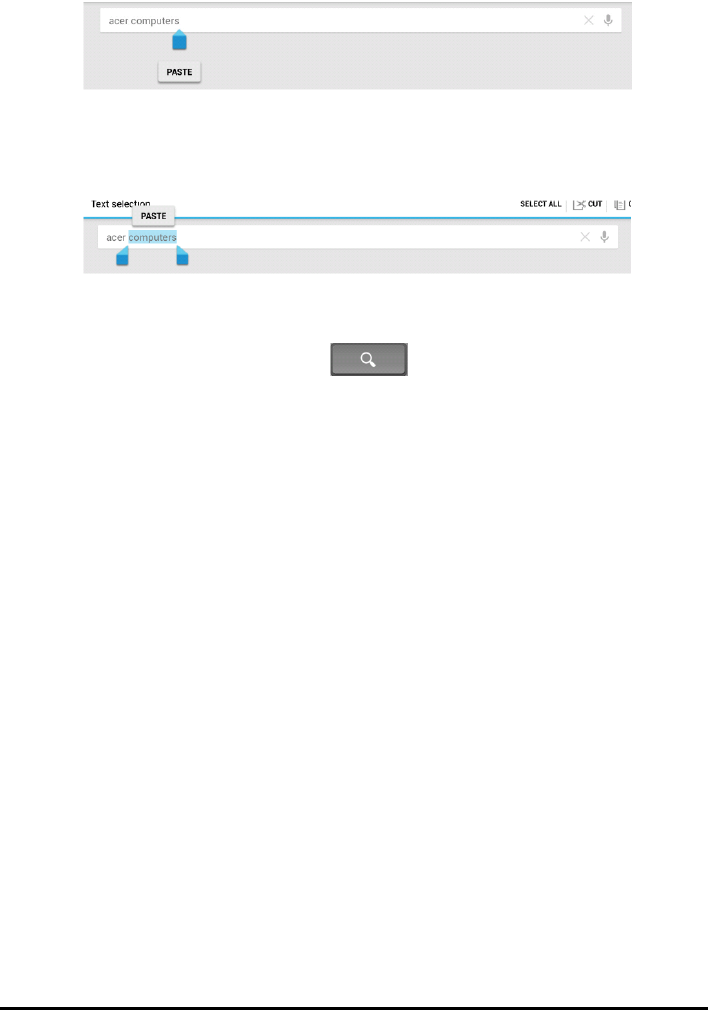
Inserting text
To type new text or add text that you have copied:
1. Tap the text you want to select. If you can select this text, a cursor is inserted
below the text.
19
2. If the cursor is not in the desired position, simply drag it to the correct position.
If you previously copied (see below) text, tap where you want to insert the text. A
PASTE button appears briefly below the cursor. Tap the button to paste the text.
To replace a word, double tap the word. A PASTE button appears above the
word. Tap the button to paste to replace the text.
3. Modify the text: Type, paste or delete text.
4. Tap Enter on the keyboard (or tap on the Acer Android keyboard).
20
Locking your DA221HQL
If you will not use your DA221HQL for a while, briefly press the power button to lock
access. This saves power and ensures your DA221HQL does not unintentionally use
any services. Your DA221HQL will lock automatically if it is not used after a while. To
change the delay, tap APPS > Settings > Display > Sleep.
Waking your DA221HQL
If the screen is off and the DA221HQL does not react to any taps on the screen, then
it has been locked and is in sleep mode.
Note: The default setting of Sleep Mode is enabled and the default setting of
“Stay Awake” is disabled, which could save more power consumption in Sleep
Mode (Suspense to RAM) .
Security options
For additional security, you may set a code or number that must be entered to
access the DA221HQL, such as an unlock pattern (a set of dots that must be tapped
in the correct order). Open the Home screen and tap APPS > Settings > Security >
Screen lock.
Note: If you forget an unlock pattern, please refer to "Unlock pattern" on page
32.
Shutting down your DA221HQL
If you won’t use your DA221HQL for an extended period of time, turn it off to save
power. To turn off your DA221HQL (even when locked), press and hold the power
button for one second. You will then be asked to confirm the shut down. To force a
shutdown, press and hold the power button for four seconds.
21
Connecting devices to your DA221HQL
Connecting to AC power
See "Setting up your DA221HQL" on page 10.
Connecting to a PC as a monitor
Your DA221HQL has an HDMI port, that can be used to connect it to a computer,
or video player.
Note: The USB 2.0 hub can switch between your PC's Windows operating
system and DA221HQL's Android operating system according to the Source
selection.
*If HDMI is selected, the USB hub is switched to PC Windows mode.
The internal touch function is also switched to PC Windows mode
(Windows 7 only).
*If in Android mode, the internal touch function, webcam, USB hub and Micro
SD card reader are also switched to Android mode.
Note: Only the first device could be read when multiple external storage devices
were connected via an external USB hub.
Inserting a Micro SD card (optional)
You may install a Micro SD card to expand your device's storage space.
Note: Your DA221HQL only supports Micro SD cards that use the NTFS, FAT
or FAT32 file system.
1. Locate the Micro SD card slot.
2. Align the card correctly and push it into the slot.
3. Ensure that the Micro SD card is inserted all the way into the card slot.
Check card capacity in the External Micro SD card section of APPS > Settings >
Storage.
Connecting a USB device to your DA221HQL
USB devices, such as a keyboard, mouse, game controller, digital camera, or
storage devices, are supported through the USB ports. See "Back view" on page 9.
22
As most USB keyboards, mice and game controllers are designed for desktop
computers and operating systems, some keys may not function.
Accessing files on a USB storage device
Note: Your DA221HQL supports USB storage devices that use the NTFS, FAT
or FAT32 file systems.
You can access media files (photos, music and video) on USB storage devices with
your DA221HQL's multimedia apps. For more flexible access, “file management”
apps are available in the Google Play store.
Caution: Before removing USB storage, make sure your device is not
using data on the USB storage device.
Note: Please check for updates to the DA221HQL's software that may add
support for additional USB devices. See "Updating your DA221HQL’s operating
system" on page 30.
Transferring files between your DA221HQL and a PC
Your DA221HQL and any connected storage devices can be accessed from a PC
with a USB connection.
Connecting to a PC as a USB storage device
This allows you to transfer your personal data to or from your PC, using your PC’s
file explorer.
Plug the micro USB connector into the micro USB port on the rear side of your
DA221HQL, and plug the other end of the USB cable into a USB port on your PC.
After a short delay, your DA221HQL's internal memory will be visible as a Portable
Device in your PC’s file explorer. Select the DA221HQL icon to see your
DA221HQL’s internal memory and any additional memory (Micro SD card or USB
devices) attached to your DA221HQL.
Connecting to a router or modem
Your DA221HQL has an Ethernet port, that can be used to connect it to a network.
Use an Ethernet cable to connect the display to a router or modem that provides
Internet access.
For Ethernet settings, tap APPS > Settings > Ethernet.
Ethernet only supports 10/100 Mbps.

23
Connecting a Bluetooth device
Only A2DP stereo headsets (playback only, no microphone) are supported. Please
check for updates to the DA221HQL's software which may add support for additional
Bluetooth devices.
For Bluetooth settings, tap APPS > Settings > Bluetooth.
Turn Bluetooth on and tap Search for devices to scan for nearby devices.
Note: Please check for updates to the DA221HQL's software that may add
support for additional Bluetooth devices. See "Updating your DA221HQL’s
operating system" on page 30.
24
Using the webcam
Note: Illustrations are for reference only. Actual product specifications may vary.
Your DA221HQL features a 1-megapixel digital webcam mounted on the front. Many
chat or instant messaging apps can use this webcam so you can be seen by your
family and friends. Use the settings in the app to control the webcam.
Using the webcam as a camera
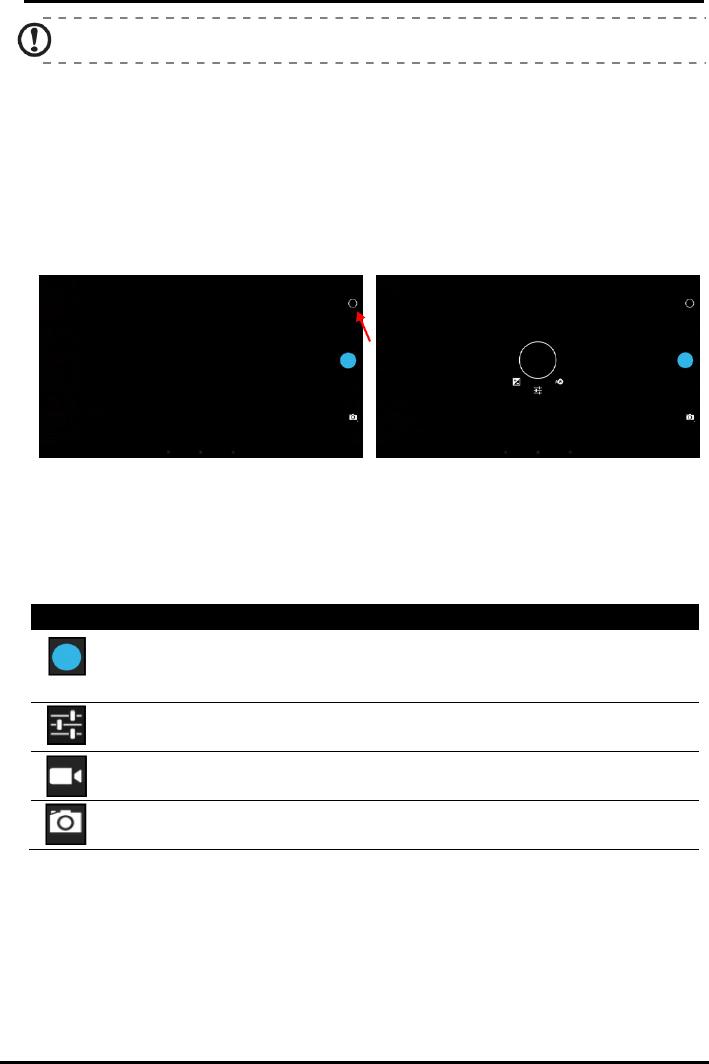
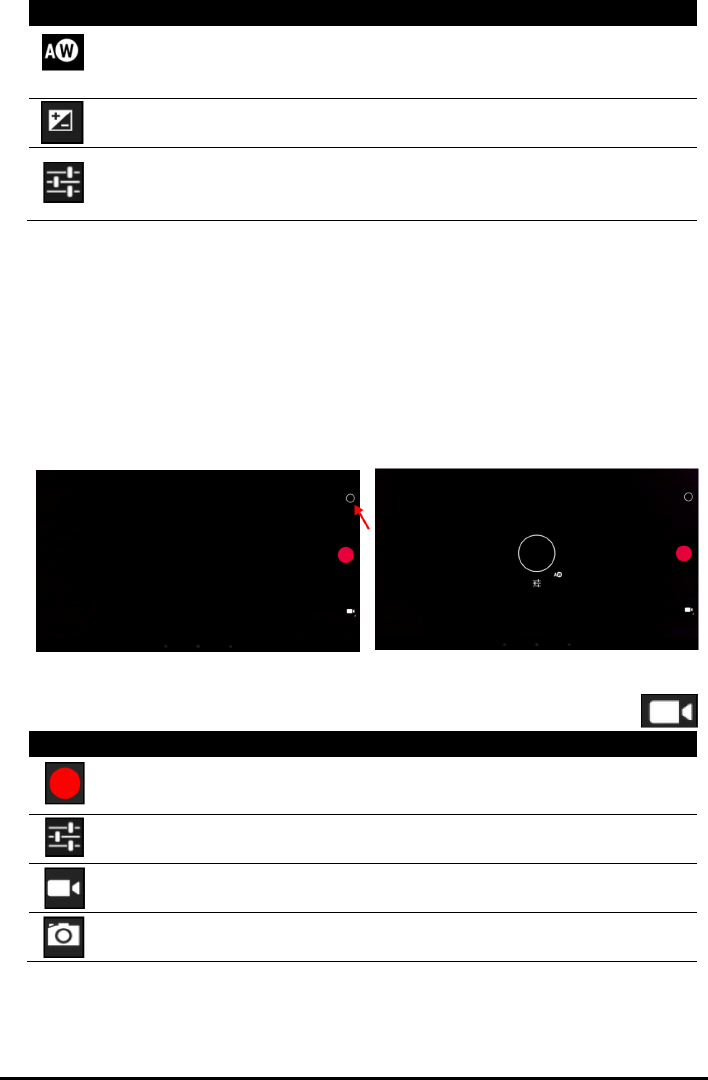
To activate the camera, open the application menu and tap Camera.
Camera icons and indicators
In the camera window, the controls on the right allow you to change settings or
select camera or camcorder.
After you have taken a photo, a thumbnail in the top-right allows you to view the
picture or video.
Icon Description
Take photo
After taking a photo, tap the thumbnail in the top-right corner to view and share
the photo.
Options
Tap to see camera options.
Camcorder mode
Switches to the camcorder (video recorder).
Camera mode
Switches to the camera.
25
Camera options
Icon Description
White balance
Change the color balance to match the lighting: Auto, Incandescent, Daylight,
Fluorescent or Cloudy.
Exposure
Increase or decrease image exposure.
Camera settings
Activate or change special settings: Picture size, Store Location
and Anti-flicker.
Taking a photo
1. Ensure the options described above are set to your preferences.
2. Frame your subject and steady your DA221HQL.
3. Tap the camera icon to take the photo.
Using the webcam to record a video
The Camera app can also record video.
Camcorder icons and indicators
Tap the camcorder icon to switch to camcorder mode.
Icon Description
Start / stop recording
Options
Tap to see camcorder options.
Camcorder mode
Switches to the camcorder (video recorder).
Camera mode
Switches to the camera.
26
Camcorder options
Adjust camcorder options to obtain the best image:
Icon Description
White balance
Change the color balance to match the lighting: Auto, Incandescent, Daylight,
Fluorescent or Cloudy.
Options
Tap to see camcorder options.
Shooting a video
1. Ensure the options described above are set to your preferences.
2. Frame your subject and steady your DA221HQL and zoom in or out as needed.
3. Tap the record icon to begin recording.
4. Tap the record icon again to stop recording.
Supported formats
Type Formats
Image JPEG
Video H.264 BP
Audio AAC-LC
Viewing photos and videos
After you have taken your photo or video, it is automatically saved.
Open the application menu and tap Gallery. Select the photo or video you want to
view (videos are marked with a small play symbol).
From the Gallery you can share the file using various services. Tap Menu and then
Share.
Note: Share options vary depending on the file type.
27
Advanced settings
Access Settings from the Application menu. Tap APPS, then Settings.
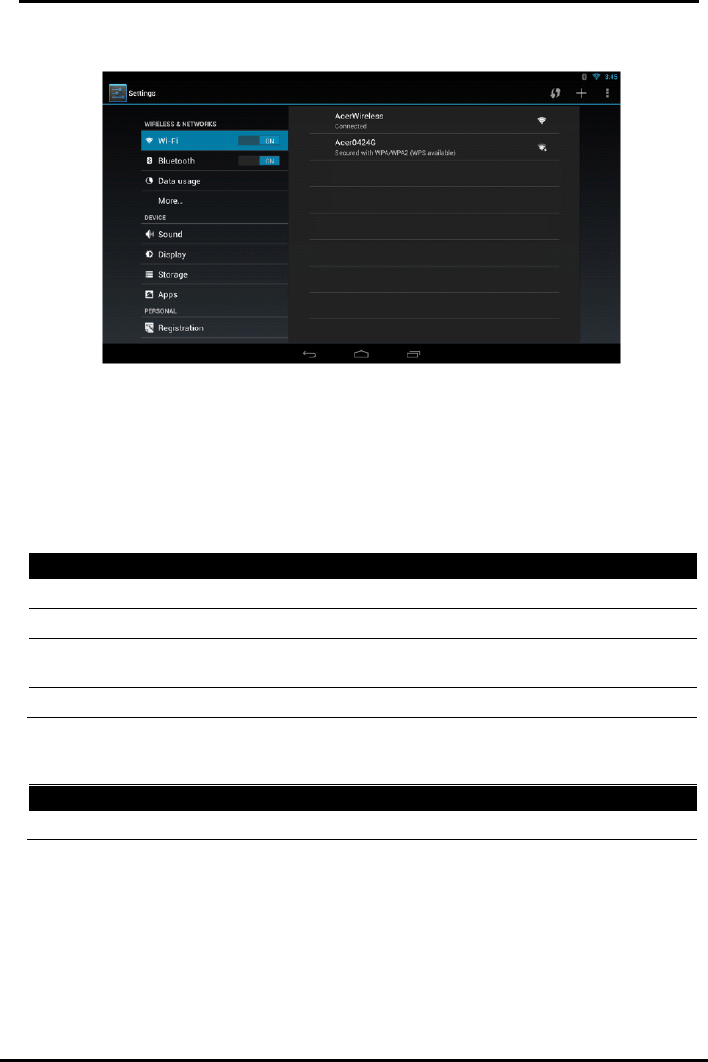
Wireless & Networks
Activating or deactivating connections
Open the Application menu and tap Settings. Under WIRELESS & NETWORKS
each connection has an ON/OFF switch that controls the connection. Tap an entry to
manage your connection settings.
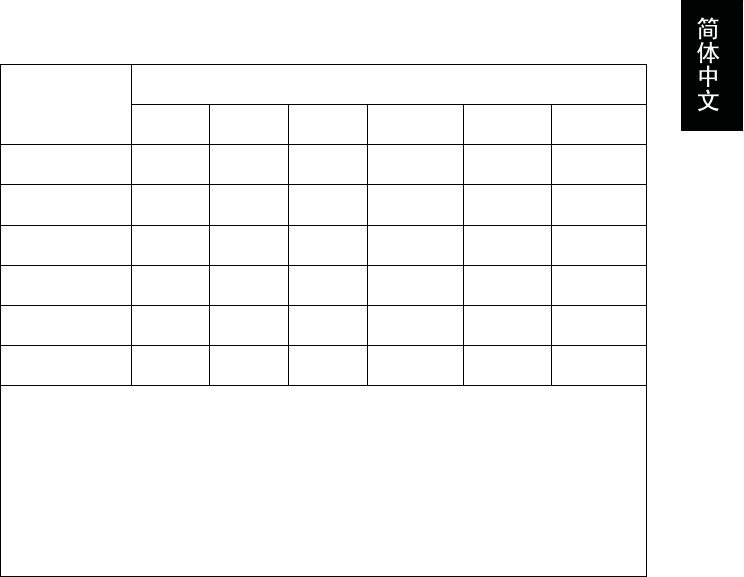
Item Description
Wi-Fi Turn the Wi-Fi function on or off.
Bluetooth Turn the Bluetooth function on or off.
Data usage Lets you monitor total usage by network type and application and then set
limits if needed.
More... Access additional connection settings.
Alternatively, use the right side of the status bar to manage connection settings.
Tap More... to access additional connection settings.
Item Description
VPN settings Set up and manage Virtual Private Networks.
Adjusting Bluetooth settings
You can use Bluetooth to exchange information between your DA221HQL and other
mobile devices.
Bluetooth connections
For Bluetooth settings, tap APPS > Settings, then under WIRELESS &
NETWORKS tap Bluetooth. Here you can switch Bluetooth on or off, set the
28
DA221HQL name and discoverability. Tap SEARCH FOR DEVICES to scan for
nearby devices.
To connect to a device, tap the device in the list of available devices. You may be
asked to enter a PIN on both devices to establish the connection.
Note: Only A2DP stereo headsets (playback only, no microphone) are
supported. Please check for updates to the DA221HQL's software which may
add support for additional Bluetooth devices.
Ethernet connections
For Ethernet settings, tap APPS > Settings, then under WIRELESS & NETWORKS
tap Ethernet. Here you can switch Ethernet on or off, and check the MAC address
and IP address used by your DA221HQL.
Data Usage
The Data Usage section shows how much data has been transmitted to your
DA221HQL, either in total or for each App. This information is useful if you are using
a metered service.
Virtual Private Network (VPN)
This option enables you to connect to a private network, such as a secure work or
office environment.
Add a VPN by tapping APPS > Settings, then under WIRELESS & NETWORKS
tap More... > VPN > Add VPN network.
Device
Sound
Adjust the volume of your DA221HQL using the volume buttons on the side of the
DA221HQL. Alternatively, you can adjust your DA221HQL sound settings by tapping
APPS > Settings > Sound.
Item Description
Default notification Sets a ringtone for Notifications.
Touch sounds Plays a sound whenever a screen selection is made.
Screen lock sound Plays a sound when locking and unlocking the screen.
You can adjust volume from the OSD.
Display
You can adjust your DA221HQL screen settings by tapping APPS > Settings >
Display.
Item Description
Wallpaper Set the Home screen background image.
29
Item Description
Sleep Sets a delay before the screen will be turned off.
Font size Sets the font size so either more text is visible or the text is easier
to read.
You can adjust screen brightness and contrast from the OSD.
Storage
You can check how much of your DA221HQL’s storage (Internal, SD or USB) has
been used, and what type of files are using storage.
Apps
Closing an application
To close an active application, go to APPS > Settings > Apps. Tap the RUNNING
tab, then tap the program you wish to close. Select Stop to close the program.
Uninstalling an application
You can remove programs installed on your DA221HQL to free up extra storage
memory. Tap and hold a program icon from the application menu and drag it into the
Uninstall area in the top-left corner.
Note: You cannot uninstall applications that were pre-loaded on your DA221HQL.
Alternatively, you can go to APPS > Settings and select Apps. Tap the application
you wish to uninstall, tap Uninstall and confirm the uninstall.
Warning! You should only remove programs if you are familiar with the
Android operating system.
Personal
Synchronization
You can configure synchronization options for many applications on your
DA221HQL.
You can also configure what types of data you synchronize for each account.
Some applications, such as Contacts, Gmail, and Calendar, can sync data from
multiple accounts. Others sync data only from the first Google Account you sign in to
on your DA221HQL, or from an account associated specifically with that application.
For some applications, such as Contacts or Calendar, all changes that you make on
your DA221HQL are made to the synchronised copy on the Internet. Other
applications only copy information from account on the Internet; the information on
your DA221HQL cannot be changed directly, you must change the information stored
in the Internet account.
Tap APPS > Settings > Accounts & sync to access the synchronization settings.
30
To manage synchronization of individual accounts, tap an account name.
Some applications, such as Gmail and Calendar, have additional
synchronization settings. Open the application and tap the Menu button (three
dots) and then tap Settings.
Multiple Google accounts
If you have multiple Google accounts, such as separate accounts for personal and
business contacts, you can access and synchonize them from the Accounts settings
section. Tap APPS > Settings > Accounts & sync. Tap ADD ACCOUNT in the top-
right corner and select Google.
Changing language and text options
Set your location and language input preferences by opening the application menu
and going to APPS > Settings > Language & input.
System
Setting the date and time
To set the date and time, tap APPS > Settings > Date & time.
Tip: If you travel frequently or live in an area that uses daylight saving time, and
have mobile network access, activate Automatic date & time from this menu.
Your DA221HQL will set the date and time based on information it receives from
the network.
Setting alarms
There are two predefined alarms on your DA221HQL by default. To add or edit alarm
settings, tap Clock in the application menu and tap Set alarm.
Tap Add alarm to create a new alarm, or tap the check box next to a preset alarm to
turn it on or off.
Tap a preset alarm to edit it. You can:
• Turn the alarm on or off.
• Set the alarm time.
• Set which days to repeat the alarm.
• Set a ringtone.
• Give it a label (i.e., a name).
Updating your DA221HQL’s operating system
Your DA221HQL can download and install system updates, adding support for new
devices or expanding software options.
To check for updates, tap APPS > Settings > About > System updates > Update.
Note: Downloading new firmware can take up to 40 minutes, depending on your
network speed.

31
Resetting your DA221HQL
You may have to perform a reset if your DA221HQL fails to respond when buttons
are pressed or the screen is tapped.
To reset your DA221HQL disconnect the main power supply for ten seconds, then
reconnect.
Clean boot
A clean boot will restore your DA221HQL to the factory settings.
Warning! This will erase all your personal information, any contacts stored
on your DA221HQL and any programs you installed.
Open Settings from the application menu, then tap Backup & reset > Factory data
reset; click Reset DA221HQL and then Erase everything to format your DA221HQL.
If your DA221HQL still does not respond, refer to "FAQ and troubleshooting" on page
32.
32
FAQ and troubleshooting
This section lists frequently asked questions that may arise during the use of your
DA221HQL, and gives easy answers and solutions to these questions.
Aspect Question Answer
Audio Why is there no
sound coming from
the device?
If a headset is plugged into the device, the
speaker is automatically shut off. Disconnect
the headset.
Check that the device volume setting is not
muted. Check that the volume control is not
at its lowest setting.
Multimedia files Why can’t I view my
picture files?
You may be trying to view an image that is
not supported. Refer to "Supported
formats" on page 26 for more
information.
Why can’t I view my
video files?
You may be trying to view a video that is not
supported.
Why can’t I play my
music files?
You may be trying to play a file that is not
supported.
System
information and
performance
How do I check the
OS version of my
device?
Tap APPS > Settings > About to check
the OS version (Kernel/build number)
and other hardware and software
information.
Storage How do I check
memory status?
To check storage status, go to
Settings >Storage.
Unlock pattern I forgot my unlock
pattern.
After five wrong entries, you can reset
your unlock pattern. Tap Forgotten
pattern? and enter your Google
account username and password.
Note: You must have an active Google
account on the DA221HQL and an
Internet connection.
If this option is not available please
contact you local service center.

33
Other sources of help
For information on: Refer to:
Up-to-date information regarding your
DA221HQL
www.acer.com
Service enquiries support.acer.com

ㅔԧЁ᭛. . . . . . . . . . . . . . . . . . . . . . . . . . . . . . . . 1
English . . . . . . . . . . . . . . . . . . . . . . . . . . . . . . . . . 5
ENERGY STAR . . . . . . . . . . . . . . . . . . . . . . . . . . . . . . . . . . . . . 8
CE Declaration of Conformity . . . . . . . . . . . . . . . . . . . . . . . . . . . 9
FCC Declaration of Conformity . . . . . . . . . . . . . . . . . . . . . . . . . . 10
Deutsch . . . . . . . . . . . . . . . . . . . . . . . . . . . . . . . . 11
Español . . . . . . . . . . . . . . . . . . . . . . . . . . . . . . . . 14
Français . . . . . . . . . . . . . . . . . . . . . . . . . . . . . . . . 17
Italiano . . . . . . . . . . . . . . . . . . . . . . . . . . . . . . . . 20
. . . . . . . . . . . . . . . . . . . . . . . . . . . . . . . . 23
Português . . . . . . . . . . . . . . . . . . . . . . . . . . . . . . . .26
CE Declaration of Conformity . . . . . . . . . . . . . . . . . . . . . . . . . . . 29
esky . . . . . . . . . . . . . . . . . . . . . . . . . . . . . . . . . . . 30
Bahasa Indonesia . . . . . . . . . . . . . . . . . . . . . . . . 33
. . . . . . . . . . . . . . . . . . . . . . . . . . . . . . . . . . . . 36
᮹ᴀ䁲. . . . . . . . . . . . . . . . . . . . . . . . . . . . . . . . . . .39
㐕储Ё᭛. . . . . . . . . . . . . . . . . . . . . . . . . . . . . . . . . 42
45. . . . . . . . . . . . . . . . . . . . . . . . . . . . . . . . . . . . . . .
ᖿ䗳ܹ䮼ᣛफ
䞡㽕ᅝܼ⊼ᛣџ乍
䇋Ҩ㒚䯙䇏ҹϟ⊼ᛣџ乍DŽ
⏙⋕ ሣᐩ˖
݇䯁 ᑊᢨϟ⬉⑤㒓DŽ
ᇚ䴲⒊ࠖᗻ⏙⋕⎆ࠄᢍᏗϞᑊ䕏䕏⏙⋕ሣᐩDŽ
ߛ࣓ᇚ 㕂Ѣ䴴䖥にষⱘԡ㕂DŽᰒ⼎఼⎟ࠄ䲼ǃফ╂䰇Ⳉᇘ
ӮফࠄϹ䞡ᤳണDŽ
䇋࣓ᇍ ሣᐩᮑࡴय़DŽ䖛ᑺⱘय़ৃ㛑䗴៤ᰒ⼎఼ⱘ∌ЙᗻᤳണDŽ
䇋࣓ौϟᇱ䆩㞾㸠㓈ׂᴀ䆒DŽӏԩᗻ䋼ⱘ㓈ׂᑨ⬅㒣ᥜᴗⱘᡔᴃҎ
ਬᅲᮑDŽ
ᇚ 㕂Ѣ 㟇 ˄ 㟇 ˅ⱘᅸݙ⏽ᑺ⦃๗ϟDŽ
ᇚ 㕂Ѣ䍙ߎℸ㣗ೈⱘ⦃๗ϟৃ㛑Ӯ䗴៤∌ЙᗻᤳണDŽ
བᵰথ⫳ӏԩҹϟᚙމˈ䇋ゟेᢨϟᰒ⼎఼⬉⑤ᑊ㟈⬉ᥜᴗⱘᡔᴃҎਬDŽ
ᰒ⼎఼㟇ֵো㒓⺼ᤳᤳണDŽ
⎆ԧ⌕ࠄ Ϟᰒ⼎఼⎟䲼DŽ
ᴎㆅᤳണDŽ
༫㺙ࣙ
⬉⑤㒓䗖䜡఼
䬂Ⲭ
哴ᷛ
㒓
㒓
ᖿ䗳ܹ䮼ᣛफ
ᅝ㺙ᣛफ
䇈ᯢк
ৃ䗝
ᇚᰒ⼎఼䖲ࠄ⬉㛥
݇䯁⬉㛥ᑊᢨߎ⬉㛥ⱘ⬉⑤㒓DŽ
ᇚ 㒓䖲ࠄᰒ⼎఼ⱘ䕧ܹᦦᄨˈҹঞ⬉㛥ᰒवⱘ 䕧
ߎᦦᄨDŽ
ৃ䗝˖⫼ 㒓䖲ⱘ ッষ⬉㛥Ϟⱘ
䕧ߎッষDŽ
ᇚ ⱘ⬉⑤䗖䜡఼ᦦܹᰒ⼎఼㚠ৢⱘ⬉⑤ッষDŽ
ᇚ⬉㛥ᰒ⼎఼ⱘ⬉⑤㒓ᦦܹ䰘䖥ⱘ⬉⑤ᦦᑻDŽ
ᣝϟ⬉⑤ᣝ䪂ˈ ᇚᓔਃDŽ
㽕ߛᤶࠄ ᰒ⼎ˈᣝࡳ㛑䬂ৃ䗝ᢽ䇗ᭈ䗝乍DŽ
䇋খ㾕⫼᠋ᣛफҹњ㾷᳝݇䆒㕂 ⱘֵᙃDŽ
佪ᓔᴎ
ᇚᰒ⼎఼⫼ Пࠡᇚ䆶䯂ᙼϔѯ䯂乬DŽ
㽕䆒㕂䆓䯂 Ꮴ᠋ˈᇚ 䖲ࠄҹ㔥ܹ⚍DŽ
䚼ӊ
⬉⑤ᣝ䪂ᠧᓔ݇䯁ᰒ⼎఼DŽ㪱㡆ᣛ⼎♃㸼⼎⬉⑤ᠧᓔDŽ
Փ⫼ 䕧ܹᯊˈᣝᎺࡳ㛑䬂ৃ䗝ᢽ䇗ᭈ䗝乍DŽ
㽕ᬍ䷇䞣ˈᣝেࡳ㛑ᣝ䪂ৃᶹⳟDŽᎺে⒥ࡼ䷇䞣ᴵDŽ

㾘ᅮᅝܼ⊼ᛣџ乍
⊼ᛣџ乍
ᴀ䆒㒣⌟䆩䆕ᯢˈヺড় 㾘ゴ䚼ߚ᳝݇㑻᭄ᄫ䆒ⱘ䰤ࠊ㾘ᅮDŽ
᠔㾘ᅮⱘ䖭ѯ䰤ࠊᰃЎњᇍԣᅙ䆒ᮑᦤկড়⧚ⱘֱᡸˈ䰆ℶᇍԣᅙ䆒ᮑ䗴᳝ᆇᑆ
ᡄDŽᴀ䆒Ӯѻ⫳ǃՓ⫼থߎ᮴㒓⬉⊶DŽབᵰϡᣝ✻ᣛ⼎䖯㸠ᅝ㺙Փ⫼ˈৃ
㛑Ӯᇍ᮴㒓䗮ֵѻ⫳᳝ᆇᑆᡄDŽԚᰃˈᴀ݀ৌϡᢙֱ⡍ᅮᅝ㺙ᚙމϟϡѻ⫳ᑆ
ᡄDŽབᵰᴀ䆒ᇍ᮴㒓䗮ֵ⬉㾚ᬊ䗴៤᳝ᆇᑆᡄ˄ৃ䗮䖛ᓔ݇ℸ䆒ᴹ⹂
ᅮ˅ˈᓎ䆂⫼᠋ᇱ䆩䞛ҹϟϔ乍乍ᮑ
ᴹᥦ䰸ℸᑆᡄ˖
䞡ᮄ䇗ᭈᬊ㒓ⱘᮍԡ㕂DŽ
ࡴ䆒ᬊ఼П䯈ⱘ䯈䎱DŽ
ᇍ䆹䆒ⱘ⬉⑤Ϣᬊ఼ⱘ⬉⑤Փ⫼ϡৠⱘಲ䏃DŽ
䆶㒣䫔ଚ᳝㒣偠ⱘ᮴㒓䗮ֵ⬉㾚ᡔᴃҎਬҹ㦋পᐂࡽDŽ
ヺড়ᗻໄᯢ
ℸໄᯢˈᴀヺড় ǃ
ǃ
ҹঞЎ㛑⑤Ⳍ݇ѻકⱘϔ㋏߫⦃
ֱ䆒䅵ࠊᅮⱘᴀ㽕∖݊ᅗⳌ݇㾘ᅮDŽ
⊼ᛣ˖ሣ㬑㒓㓚
Ў⹂ֱ䙉ᅜ㾘ᅮˈϢ݊ᅗ䅵ㅫ䆒ⱘ䖲ᖙ乏ܼ䚼Փ⫼ሣ㬑㒓㓚DŽ
⊼ᛣ˖ೈ䆒
া᳝㒣䅸䆕ヺড়㑻䰤ࠊ㾘ᅮⱘೈ䆒˄བ䕧ܹ䕧ߎ䆒ǃ㒜ッ䆒ǃ
ᠧॄᴎㄝ˅ˈᠡ㛑䖲䰘ᴀ䆒ϞՓ⫼DŽՓ⫼㒣䅸䆕ⱘೈ䆒ᕜৃ㛑ᑆᡄ
᮴㒓䗮ֵ⬉㾚ᬊDŽ
⊼ᛣ
㒣ড়㾘䋷ӏᮍᯢ⹂䆌ৃ㗠ׂᬍব䆒ˈৃ㛑Ӯᇐ㟈⫼᠋ϻ༅Փ⫼ᴀѻક
ⱘᴗ߽˄ℸᴗ߽⬅ ᥜќ˅DŽ
᪡ᴵӊ
ᴀ䆒ヺড় 㾘߭П䚼ߚDŽՓ⫼ᴀ䆒ᑨヺড়ҹϟϸϾᴵӊ˖
˄˅ᴀ䆒ϡӮ䗴៤᳝ᆇᑆᡄ˗
˄˅ᴀ䆒ৃҹᡓফ᠔ᬊࠄⱘӏԩᑆᡄˈࣙᣀᇐ㟈ℷᐌ䖤㸠ⱘᑆᡄDŽ
⊼ᛣ˖ࡴᣓ⫼᠋
Փ⫼ᴀ䆒ᑨヺড়ҹϟϸϾᴵӊ˖˄˅ᴀ䆒ϡӮ䗴៤ᑆᡄ˗
˄˅ᴀ䆒ৃҹᡓফ᠔ᬊࠄⱘӏԩᑆᡄˈࣙᣀৃ㛑ᇐ㟈䆒ϡℷᐌ䖤㸠ⱘᑆᡄDŽ
ᇘ乥䕤ᇘ䄺ਞ
ᴀ䆒ᖙ乏ḍᦤկⱘ䇈ᯢ䖯㸠ᅝ㺙᪡ˈℸথᇘ఼᠔⫼ⱘ㒓ᖙ乏䎱⾏ӏԩ
Ҏ㟇ᇥ६㉇ⱘ䎱⾏ˈᑊϨϡᕫϢӏԩ݊ᅗ㒓থᇘ఼݅ৠՓ⫼䖲DŽᖙ
乏᳔㒜⫼᠋ᅝ㺙Ҏਬᦤկ㒓ᅝ㺙䇈ᯢҹঞথᇘ఼᪡ᴵӊˈҹヺড়ᇘ乥䕤
ᇘⱘ㾘ᅮDŽ
ⲳᆊ⾕Ҏᆊᒁ⫼᠋ᇍᑳᓗ䆒ⱘ໘⧚
ᴀѻક݊ࣙ㺙ㆅϞⱘℸᷛᖫ㸼⼎ᴀѻકϡᕫᔧ⫳⌏ൗഒ໘⧚DŽᙼᑨ
䋳䋷໘㕂ᑳᓗ䆒ˈᇚ݊Ѹࠄᣛᅮⱘᬊ䲚⚍䖯㸠ᑳᓗ⬉఼⬉ᄤ䆒ⱘ
ಲᬊDŽ໘㕂ᯊߚᓔᬊ䲚ಲᬊᑳᓗ䆒ᇚ᳝ࡽѢֱᡸ㞾✊䌘⑤ˈ⹂ֱҹ
ֱᡸҎ㉏عᒋ⦃๗ⱘᮍᓣࡴҹಲᬊ߽⫼DŽ㽕њ㾷᳝݇ᙼৃᬒ㕂ᑳ
ᓗ䆒䖯㸠ᬊⱘഄᮍˈ䇋Ϣᔧഄⱘࡲџ໘ᑳ⠽໘⧚᳡ࡵЁᖗ䌁фᴀѻ
કⱘଚᑫ㘨㋏DŽ
Ё⬉ᄤֵᙃѻક∵ᶧࠊᷛ䆚㽕∖
ᴀѻક᳝↦᳝ᆇ⠽䋼ܗ㋴ⱘৡ⿄ঞ䞣ᷛ䆚བϟ㸼˖
Ё㛑ᬜᷛ䆚
ᴀѻક㛑ᬜㄝ㑻ヺড়ᆊᷛޚ П㑻ᷛޚˈѻક㉏ൟЎ㉏ˈ
ൟ㛑⑤⍜㗫乱ᅮؐЎDŽ
䳊䚼ӊৡ⿄
᳝↦᳝ᆇ⠽䋼ܗ㋴
䪙˄˅∲˄˅䬝˄˅݁Ӌ䫀
˄˅
⒈㘨㣃
˄˅
⒈Ѡ㣃
䝮˄ ˅
⬉䏃ᵓ㒘ӊ
⬉⑤㒓
䗖䜡఼
䚼ֵো䖲
㒓
⎆䴶ᵓ
γ˖⬉䏃ᵓ㒘ӊࣙᣀॄࠋ⬉䏃ᵓঞ݊ᵘ៤䳊䚼ӊˈབ⬉䰏ǃ⬉ᆍǃ䲚៤⬉䏃ǃ䖲
఼ㄝDŽ
˖㸼⼎䆹᳝↦᳝ᆇ⠽䋼䆹䚼ӊ᠔᳝ഛ䋼ᴤ᭭Ёⱘ䞣ഛlj⬉ᄤֵᙃѻકЁ᳝
↦᳝ᆇ⠽䋼ⱘ䰤䞣㽕∖ᷛޚNJ㾘ᅮⱘ䰤䞣㽕∖ҹϟDŽ
˖㸼⼎䆹᳝↦᳝ᆇ⠽䋼㟇ᇥᄬѢ䆹䚼ӊⱘᶤϔഛ䋼ᴤЁˈᰃЎⳂࠡϮ⬠䖬
≵᳝៤❳ⱘৃ᳓ҷᡔᴃˈҹ㟈㱑✊䍙ߎlj⬉ᄤֵᙃѻકЁ᳝↦᳝ᆇ⠽䋼ⱘ䰤䞣㽕
∖ᷛޚNJ㾘ᅮⱘ䰤䞣㽕∖˗Ԛҡ✊ヺড়ⲳᣛҸ᠔ᆍ䆌ⱘ䈕ᴵℒঞ⬉∴
ᣛҸⱘ㽕∖DŽ
㾘Ḑ
乍ⳂDA221HQL
䴶ᵓ
偅ࡼ㉏ൟᔽ㡆
ሎᇌ ᆑ
ڣ㋴䯈䎱 ˄∈ᑇ˅˄ൖⳈ˅
҂ᑺ ˄ൟ˅
ᇍ↨ᑺ ᳔˄˅
ৃ㾚㾦ᑺ ˄∈ᑇ˅˄ൖⳈ˅˄᳔˅
ડᑨᯊ䯈˄♄䰊ডᑨᯊ䯈˅
䴶ᵓ㉏ൟ
㸠ৠℹ乥⥛
എৠℹ乥⥛
ᰒ⼎买㡆 ϛ买㡆ᐩ
㾺ᩌ⬠䴶ܝᄺঠ⚍㾺ᩌሣ
ࠋᮄ⥛
᳔ߚ䕼⥛
ࡳ㗫
˄ ሐ⡍˅
ᓔ
᳔
݇˄ᕙᴎ˅ൟ
ᡀໄ఼
䕧ܹ༈˄ҙ䕧ܹൟো˅
䕧ܹ㾚乥ֵো ֵো˄ҙ 䕧ܹൟো˅
㋏㒳ݙᄬ
᪡㋏㒳
䖲
ᨘڣ༈
ሣᐩሎᇌ∈ᑇ
ൖⳈ
⬉⑤ 㟇ˈ˄Ѹ⌕⬉⑤䗖䜡఼˅
⦃๗㽕∖
Ꮉ⏽ᑺ˖ 㟇
ټᄬ⦃๗⏽ᑺ˖ 㟇
Ꮉ⦃๗ᑺ˖ 㟇
ሎᇌ˄ᆑ催⏅˅
䞡䞣˄ޔ䞡˅ ˄ޔ䞡˅
ᴎẄ㾘Ḑؒ᭰˖ 㟇 ˈ
䚼ࠊ
ᣝ䪂⬉⑤ᣝ䪂ǃࡴ䷇䞣˄˅ǃ䰡Ԣ䷇䞣˄˅ǃ㦰
ऩǃ䕧ܹ
ࡳ㛑
҂ᑺǃᇍ↨ᑺǃ∈ᑇԡ㕂ǃൖⳈԡ㕂ǃ⛺䎱ǃ
ᯊ䩳ǃ㡆⏽ǃሣᰒ䍙ᯊǃᆑሣᓣǃ ᓔ
݇ǃ ᓔ݇ǃ䕧ֵܹো䗝ᢽ˄ҙঠ䕧ܹ
䕧ܹᓣ˅䇁㿔ǃ䞡䆒ᰒ⼎ֵᙃǃ䗔ߎ
᠔᳝㾘Ḑབ᳝ᬍˈᘩϡ㸠䗮ⶹDŽ
ড়㾘ᗻ

ItemsDA221HQL

ENERGY STAR
Acer’s ENERGY STAR qualified products save your money by reducing energy cost
and protecting the environment without sacrificing features or performance. Acer is
proud to offer our customers products with the ENERGY STAR mark.
What is ENERGY STAR?
Products that are ENERGY STAR qualified use less energy and prevent greenhouse
gas emissions by meeting strict energy efficiency guidelines set by the U.S.
Environmental Protection Agency. Acer is committed to offering products and services
worldwide that help customers save money, conserve energy and improve the quality
of our environment. The more energy we can save through higher energy efficiency,
the more we reduce greenhouse gases and the risks of climate change. More
information refers to www.energystar.gov or
www.energystar.gov/powermanagement.
- Note: Information in this section may not apply to your computer.
Acer ENERGY STAR qualified products:
- produce less heat and reduce cooling loads in warmer climates.
- automatically go into "display Sleep" and "computer Sleep" mode after 10 minutes of
inactivity.
- wake from "Sleep" mode by pressing the power button.
- save more than 80% energy when in "Sleep" mode.
ENERGY STAR and the ENERGY STAR mark are registered U.S. marks.
To Enable the Wake on LAN (WOL) Function
Click settings icon on the screen.
Check Ethernet is ON
Choose More… under Data usage row
Enable Wakeup on Lan on the right-hand side of screen.
System Update
Please link the product to an Internet when you turn on the product at the first time.
The image of the system will be updated to the newest. This is for ENERGY STAR
compliance.

Acer Incorporated
8F, 88, Sec. 1, Xintai 5th Rd., Xizhi
New Taipei City 221, Taiwan
Declaration of Conformity
We,
Acer Incorporated
8F, 88, Sec. 1, Xintai 5th Rd., Xizhi, New Taipei City 221, Taiwan
Contact Person: Mr. RU Jan, e-mail:ru.jan@acer.com
And,
Acer Italy s.r.l
Via Lepetit, 40, 20020 Lainate (MI) Italy
Tel: +39-02-939-921 ,Fax: +39-02 9399-2913
www.acer.it
Declare under our own responsibility that the product:
Product: Android All-in-One
Trade Name: Acer
Model Number: DA221HQL
SKU Number: DA221HQL xxxxxx (“x” = 0~9, a ~ z, or A ~ Z)
To which this declaration refers conforms to the relevant standard or other standardizing
documents:
x EN55022:2010 Class B; EN55024:2010
x EN301 489-1 V1.9.2; EN301 489-17 V2.1.1
x EN300 328 V1.8.1
x EN61000-3-2:2006+A1:2009+A2:2009, Class D
x EN61000-3-3:2008
x EN60950-1:2006/A11:2009/A1:2010 +A12:2011
x Regulation (EU) No. 617/ 2013
x Regulation (EC) No. 278/2009; EN 50563:2011
x EN50581:2012
We hereby declare above product is in compliance with the essential requirements and other
relevant provisions of EMC Directive 2004/108/EC, Low Voltage Directive 2006/95/EC, R&TTE
Directive 1999/5/EC and RoHS Directive 2011/65/EU and Directive 2009/125/EC with regard to
establishing a framework for the setting of ecodesign requirements for energy-related product.
Year to begin affixing CE marking 2014.
_______________________________ Mar. 27, 2014
RU Jan / Sr. Manager Date
Regulation, Acer Inc.

Acer America Corporation
333 West San Carlos St., Suite 1500
San Jose, CA 95110, U. S. A.
Tel : 254-298-4000
Fax : 254-298-4147
www.acer.com
Federal Communications Commission
Declaration of Conformity
This device complies with Part 15 of the FCC Rules. Operation is subject to the following
two conditions: (1) this device may not cause harmful interference, and (2) this device
must accept any interference received, including interference that may cause undesired
operation.
The following local Manufacturer /Importer is responsible for this declaration:
Product: Android All-in-One
Model Number: DA221HQL
SKU Number: DA221HQL xxxxxx
(“x” = 0~9, a ~ z, or A ~ Z)
Name of Responsible Party: Acer America Corporation
Address of Responsible Party: 333 West San Carlos St.
Suite 1500
San Jose, CA 95110
U. S. A.
Contact Person: Acer Representative
Phone No.: 254-298-4000
Fax No.: 254-298-4147

ObjekteDA221HQL


Éléments DA221HQL


Elementi DA221HQL


Itens DA221HQL
Acer Incorporated
8F, 88, Sec. 1, Xintai 5th Rd., Xizhi
New Taipei City 221, Taiwan
Declaration of Conformity
A,
Acer Incorporated
8F, 88, Sec. 1, Xintai 5th Rd., Xizhi, New Taipei City 221, Taiwan
Contact Person: Mr. RU Jan, e-mail:ru.jan@acer.com
E a,
Acer Italy s.r.l
Via Lepetit, 40, 20020 Lainate (MI) Italy
Tel: +39-02-939-921 ,Fax: +39-02 9399-2913
www.acer.it
Declara que sob a sua responsabilidade que o produto:
Product: Android All-in-One
Trade Name: Acer
Model Number: DA221HQL
SKU Number: DA221HQL xxxxxx (“x” = 0~9, a ~ z, or A ~ Z)
Ao que se refere esta declaração está em conformidade com a norma pertinente ou outros
documentos de padronização:
x EN55022:2010 Class B; EN55024:2010
x EN 61000-3-2:2006+A1:2009+A2:2009, Class D
x EN61000-3-3:2008
x EN60950-1:2006/A11:2009/A1:2010+A12:2011
x Regulation (EC) No. 1275/ 2008; EN 50564:2011; IEC 62301:2011
x EN50581:2012
Aqui declaramos que o produto acima está em conformidade com os requisitos essenciais e
outras disposições relevantes da Directiva EMC 2004/108/EC, Directiva de Baixa Voltagem
2006/95/EC, a Directiva RoHS 2011/65/EU e a Directiva 2009/125/EC que diz respeito à criação
de um quadro para definir os requisitos de concepção ecológica dos produtos relacionados com a
energia.
Ano para inicio da fixação da marca CE 2014.
_______________________________ Mar. 27, 2014
RU Jan / Sr. Manager Date
Regulation, Acer Inc.


PoložkyDA221HQL

Item DA221HQL

DA221HQL
1 DA221HQL:
• DA221HQL
•
2 DA221HQL
3
4
5 DA221HQL -20° 60°C (-4° 140°F) DA221HQL
6
:
•
• DA221HQL
• DA221HQL
DA221HQL
*
*
Micro USB *
HDMI
*
*:
1
2 HDMI HDMI HDMI
3 : DA221HQL USB
USB
4 DA221HQL
5
6 DA221HQL
7 HDMI
DA221HQL
DA221HQL
Google DA221HQL Ethernet Wi-Fi
HDMI
OSD

FCC
B 15
FCC
:
•
•
•
• /
CE
Acer Inc. LCD
Directive 2004/108/EC, Low Voltage Directive 2006/95/EC, R&TTE Directive 1999/5/EC
65/EU
:
EMC
:
(/, ,
B
15 :
(1) (2)
:
CAN ICES-3 (B) / NMB-3 (B)
: (1)
(2)
Le present appareil est conforme aux CNR d'Industrie Canada applicables aux appareils radio exempts de
licence. L'exploitation est autorisee aux deux conditions suivantes: (1) l'appareil ne doit pas produire de
brouillage, et (2) l'utilisateur de l'appareil doit accepter tout brouillage radioelectrique subi, meme si le brouillage
est susceptible d'en.
20
іѥѕдѥі DA221HQL
LCD Panel
TFT LCD
21.5”
0.248 () x 0.248 ()
250 cd/m2()
100,000,000:1 (ACM)
178° (, 178° () ()
8 (G G)
VA
30kHz-80kHz
55Hz-75Hz
16.7
173MHz
1920 x 1080
(250 )
40W( )
0.5W( )
2W x 2
HDMI (HDMI)
HDMI (HDMI)
CPU Rockchip RK3188A (Quad- Core 1.6GHz)
1 GB RAM 8 GB
Android 4.2.2
Bluetooth 3.0, WiFi IEEE 802.11b/g/n
1
476.6
268.1
100 240 VAC, 50-
: 0 oC 35 oC
: -20 oC 60 oC
: 20% 85%
530.4x357.1x75.2
() 5.0 ()
: 15° 75°, ± 3°
(+) (-)
, , , ,
, , , OSD, ,
DDCCI /, ACM /,
(HDMI), ,
*
ࠢࠗ࠶ࠢࠟࠗ࠼
ోߦ߅ߚߛߊߚߦ
ᰴߩᵈᗧࠍᦨᓟ߹ߢࠃߊ߅⺒ߺߊߛߐޕ
ࠬࠢࡦߩ߅ᚻࠇ㧦
ߩ㔚Ḯࠍಾࠅޔ㔚Ḯࠦ࠼ࠍᛮ߈߹ߔޕ
Ꮣߦ㕖ṁߩࠢ࠾ࡦࠣࠬࡊࠍ็߈߆ߌߡޔ߿ߐߒߊ߅ᚻࠇࠍߒߡߊߛߐޕ
ߪ⓹ߩㄭߊߦ⸳⟎ߒߥߢߊߛߐޕ㔎ߦỨࠄߒߚࠅޔḨ᳇ߩᄙ႐ᚲߦ⸳⟎ߒߚࠅޔ⋥
ᣣశߦᒰߡߚࠅߔࠆߣޔ㓚ߩේ࿃ߣߥࠅ߹ߔޕ
ࠬࠢࡦࠍᒝߊߐߥߢߊߛߐޕᒝജࠍട߃ࠆߣޔ࠺ࠖࠬࡊࠗ߇⎕៊ߔࠆ႐ว߇ࠅ
߹ߔޕ
߅ቴ᭽ߏ⥄りߢࠞࡃࠍᄖߒߚࠅޔୃߒߚࠅߒߥߢߊߛߐޕୃߪၮᧄ⊛ߦኾ㐷ߩᛛⴚ⠪߇ⴕ
߹ߔޕ
ߪቶౝ᷷ᐲ߇ ߆ࠄ ߆ࠄ ߩ႐ᚲߦ▤ߒߡߊߛߐޕߎߩ▸࿐ࠃࠅ߽
᷷ᐲ߇㜞߆ߞߚࠅޔૐ߆ߞߚࠅߔࠆߣޔ ߇㓚ߔࠆ႐ว߇ࠅ߹ߔޕ
ᰴߩࠃ߁ߥ⇣Ᏹ߇⊒↢ߒߚ႐วߪޔ⋥ߜߦࡕ࠾࠲ߩ㔚Ḯࠍᛮ߈ޔኾ㐷ߩᛛⴚ⠪ߦ߅วࠊߖߊߛߐޕ
ࡕ࠾࠲ାภࠤࡉ࡞߇⠻ޔ߹ߚߪ⎕៊ߒߡࠆ႐วޕ
ߦᶧࠍߎ߷ߒߚޔ߹ߚߪࡕ࠾࠲߇㔎ߦỨࠇߚ႐วޕ
߹ߚߪࠤࠬ߇⎕៊ߒߡࠆ႐วޕ
ࡄ࠶ࠤࠫౝኈ
㔚Ḯࠦ࠼ߣࠕ
࠳ࡊ࠲
ࠠࡏ
࠼ߣࡑ࠙ࠬ
ࠤࡉ࡞
ࠤࡉ࡞
ࠢࠗ࠶ࠢࠬ࠲
࠻ࠟࠗ࠼
ߣ࠶࠻ࠕ࠶
ࡊࠟࠗ࠼
࡙ࠩ
ࡑ࠾
ࡘࠕ࡞
છᗧ
ࠦࡦࡇࡘ࠲ߦࡕ࠾࠲ࠍធ⛯ߔࠆ
ࠦࡦࡇࡘ࠲ߩ㔚Ḯࠍಾࠅޔࠦࡦࡇࡘ࠲ߩ㔚Ḯࠦ࠼ࠍᛮ߈߹ߔޕ
ࡕ࠾࠲ߩ ജ┵ሶߦࠤࡉ࡞ࠍ❬߉ޔߘߩᓟߢࠦࡦࡇࡘ࠲ߩࠣࡈࠖ࠶ࠢࠞ࠼ߩ
ജ┵ሶߦ߽❬߉߹ߔޕ
છᗧ㧦 ߩ ࡐ࠻ߣࠦࡦࡇࡘ࠲ߩ ࡐ࠻ࠍ ࠤࡉ࡞ߢ❬߉߹ߔޕ
ߩ㔚Ḯࠕ࠳ࡊ࠲ࠍࡕ࠾࠲⢛㕙ߦࠆ㔚Ḯࡐ࠻ߦ❬߉߹ߔޕ
ࠦࡦࡇࡘ࠲ߣࡕ࠾࠲ߩ㔚Ḯࠦ࠼ࠍㄭߊߩࠦࡦࡦ࠻ߦ❬߉߹ߔޕ
㔚Ḯࡏ࠲ࡦࠍߒߡ ࠍࠝࡦߦߒ߹ߔޕ
࠺ࠖࠬࡊࠗߦಾࠅ឵߃ࠆߦߪޔᯏ⢻ࠠࠍߒߡࠝࡊ࡚ࠪࡦࠍㆬᛯޔ߹ߚߪ⺞ᢛߒ߹ߔޕ
ߩ⸳ቯߦߟߡߪޔ࡙ࠩࠟࠗ࠼ࠍ߅⺒ߺߊߛߐޕ
ೋߡ㔚Ḯࠍࠇࠆߣ߈
ࠍࡕ࠾࠲ߣߒߡ↪ߔࠆ೨ߦޔߊߟ߆ߩ⾰ࠍߐࠇ߹ߔޕ
ࠕࠞ࠙ࡦ࠻ࠍ⸳ቯ߹ߚߪࠕࠢࠬߔࠆߦߪޔ ࠍ ߹ߚߪࠕࠢࠬࡐࠗࡦ࠻ߦ❬
߉߹ߔޕ
ᄖㇱᓮ
㔚Ḯࡏ࠲ࡦ࠺ࠖࠬࡊࠗࠍࠝࡦࠝࡈߦߒ߹ߔޕ㕍ߪޔ㔚Ḯ߇ࠝࡦߦߥߞߡࠆߎߣࠍ␜ߒ߹ߔޕ
ജࠍ↪ߔࠆ႐วߪޔᏀߩᯏ⢻ࡏ࠲ࡦࠍߒߡࠝࡊ࡚ࠪࡦࠍㆬᛯ߹ߚ
ߪ⺞ᢛߒ߹ߔޕ
㖸㊂ࠍ⺞ᢛߔࠆߦߪޔฝߩᯏ⢻ࡏ࠲ࡦࠍߒߡࠍ㐿߈߹ߔޕ㖸㊂ࡃࠍߞߡ⺞ᢛߒߡߊߛߐޕ

ⷙቯߣోߩߚߩᵈᗧ
ⷙቯ
ߎߩⵝ⟎ߪޔ ⷙቯߩ╙ ᧦ߦḰߓޔ ࠺ࠫ࠲࡞ᯏེߩ㒢ߦᓥߞߡ߹ߔޕߎߩ㒢ߪቛߦ⸳
⟎ߒߚ႐วߦኂߥᐓᷤ߇߈ߥࠃ߁ߦߔࠆߚߩ߽ߩߢߔޕᧄⵝ⟎ߪࠫࠝᵄࠛࡀ࡞ࠡࠍ⊒↢ޔ↪
ߒޔߐࠄߦߔࠆน⢻ᕈ߇ࠅޔᜰ␜ߦߒߚ߇ߞߡࠗࡦࠬ࠻࡞߅ࠃ߮↪ߐࠇߥ႐วޔࠫࠝㅢାߦ
ኂߥ㓚ኂࠍਈ߃ࠆ႐ว߇ࠅ߹ߔޕ
ߒ߆ߒޔ߆ߥࠆ․ቯߩ⸳⟎᧦ઙߢ߽ᐓᷤ߇߈ߥߎߣࠍ⸽ߔࠆ߽ߩߢߪࠅ߹ߖࠎޕߎߩⵝ⟎ߦࠃߞߡ
ࠫࠝ߿࠹ࡆߩฃାߦኂߥᐓᷤ߇⊒↢ߔࠆ႐วߪⵝ⟎ߩ㔚Ḯࠍࠝࡦࠝࡈߔࠆߣಽ߆ࠅ߹ߔޔᰴߩߟ
એߩᣇᴺߢᐓᷤࠍߥߊߔࠃ߁ߦߒߡߊߛߐޕ
ฃାࠕࡦ࠹࠽ߩᣇะࠍᄌ߃ࠆ߆ޔ⸳⟎႐ᚲࠍᄌ߃ࠆޕ
ⵝ⟎ߣฃାⵝ⟎ߩ〒㔌ࠍᐢߍࠆޕ
ߎߩⵝ⟎ߩฃାⵝ⟎ߣߪߩࠦࡦࡦ࠻ߦធ⛯ߔࠆޕ
⽼ᄁᐫ߹ߚߪࠫࠝ߿࠹ࡆߩኾ㐷ᛛⴚ⠪ߦวࠊߖࠆޕ
߳ߩḰ
ߪޔߎߩ ࠛࡀ࡞ࠡ㑐ㅪຠߩࠛࠦ⸳⸘᧦ઙߦၮߠߚ᭴ㅧࠍ߃ߡࠆߎߣߦߟ
ߡޔᔅⷐߥⷙቯޔ߅ࠃ߮ᜰ ޔૐ㔚ᜰ ޔ ᜰ ޔ
ᜰ ޔᜰ ߩ㑐ㅪ᧦㗄ߦḰߒߡࠆߎߣࠍߎߎߦት⸒ߒ߹ߔޕ
ᵈᗧ㧦ࠪ࡞࠼ઃ߈ࠤࡉ࡞
ⷙቯߦࠃࠅޔࠦࡦࡇࡘ࠲ᯏེߣߩធ⛯ߦߪࠪ࡞࠼ઃ߈ࠤࡉ࡞ࠍ↪ߔࠆߎߣ߇⟵ോઃߌࠄࠇߡ߹ߔޕ
ᵈᗧ㧦ㄝᯏེ
ߎߩຠߦߪޔࠢࠬߩ㒢ߦḰߔࠆㄝᯏེജⵝ⟎ޔ┵ᧃޔࡊࡦ࠲ߥߤߩߺߏ↪ߚߛߌ
߹ߔޕ⸽ߐࠇߥㄝᯏེࠍߏ↪ߦߥࠆߣޔࠫࠝ߿࠹ࡆߩฃା⁁ᘒߦᓇ㗀ࠍ߷ߔ႐ว߇ࠅ߹ߔޕ
ᵈᗧ
ㅧర߇ߥᄌᦝ߿ᡷㅧࠍⴕ߁ߣޔ ߇ߚߎߩຠࠍ↪ߔࠆᮭ߇ᄬࠊࠇ߹ߔޕ
ᠲ᧦ઙ
ߎߩ࠺ࡃࠗࠬߪ ⷙቯߩ╙ ᧦ߦḰߒߡ߹ߔޕᰴߩߟߩ᧦ઙߦߒߚ߇ߞߡᠲࠍⴕ߁ߎߣ߇ߢ߈߹
ߔޕ ߎߩ࠺ࡃࠗࠬ߇ኂߥ㓚ኂࠍ⊒↢ߒߥߎߣਇౕวࠍ↢ߓᓧࠆࠃ߁ߥ㓚ኂߦኻᔕߒᓧࠆߎߣޕ
ᵈᗧ㧦ࠞ࠽࠳ߦ߅ߌࠆ↪
ߎߩ࠺ࡃࠗࠬߪޔࠞ࠽࠳↥ᬺ⋭ߩ⸵㒰 ⷙᩰߦㆡวߒߡ߹ߔޕᰴߩߟߩ᧦ઙߦߒߚ߇ߞߡᠲࠍ
ⴕ߁ߎߣ߇ߢ߈߹ߔޕ ߎߩ࠺ࡃࠗࠬ߇ኂߥ㓚ኂࠍ⊒↢ߒߥߎߣਇౕวࠍ↢ߓᓧࠆࠃ߁ߥ㓚ኂߦኻᔕ
ߒᓧࠆߎߣޕ
ή✢ᵄⵍߦ㑐ߔࠆ⼊๔
ߎߩຠߪޔᜰቯߐࠇߚᜰ␜ߦᓥߞߡ⸳⟎ޔᠲߒߥߌࠇ߫ߥࠅ߹ߖࠎޕ߹ߚޔߎߩㅢାᯏེߢ↪ߐࠇࠆࠕ
ࡦ࠹࠽ߪޔੱ߆ࠄ એ㔌ߒߡ⸳⟎ߔࠆᔅⷐ߇ࠅޔઁߩࠕࡦ࠹࠽߿ㅢାᯏེߣ৻✜ߦ⸳⟎ߔࠆߎߣߪߢ
߈߹ߖࠎޕᵄⵍⷙቯߦḰߔࠆߚߦޔ↪⠪߅ࠃ߮⸳⟎⠪ߪޔࠕࡦ࠹࠽ߩ⸳⟎ߣㅢାᯏེߩᠲ᧦ઙߦ
ߟߡචಽߥ⺑ࠍฃߌߡߥߌࠇ߫ߥࠅ߹ߖࠎޕ
࡛ࡠ࠶ࡄߦ߅ߌࠆ৻⥸࡙ࠩߦࠃࠆ↪ᷣߺᯏེߩᑄ᫈ߦߟߡ
ຠ߹ߚߪᪿ൮ߦߎߩ⸥ภ߇⸥ߐࠇߡࠆ႐วߪޔߎߩຠࠍઁߩኅᐸߏߺߣ৻✜ߦᑄ
᫈ߔࠆߎߣߪߢ߈߹ߖࠎޕ↪ᷣߺߩ㔚ሶ㔚᳇ᯏེߪޔ߅ቴ᭽ߏ⥄りߢᜰቯߐࠇߚ࿁
႐ᚲ߳ᜬߜㄟࠎߢߊߛߐޕ↪ᷣߺᯏེߩಽߣౣ↪ߪޔᄤὼ⾗Ḯߩሽߪ߽ߣࠃࠅޔ
ੱ߿ⅣႺࠍ⼔ߔࠆߢ߽ᓎߦ┙ߜ߹ߔޕ↪ᷣߺᯏེߩ࿁႐ᚲޔᣇᴺߦߟߡߪޔ
߅߹ၞߩⴕᯏ㑐ޔኅᐸ↪ࠧࡒߩ࿁ࠨࡆࠬ⓹ญޔຠߩ⽼ᄁᐫ߳߅ߨߊߛߐ
ޕ
᭽
ࠕࠗ࠹ࡓDA221HQL
ࡄࡀ࡞
㚟േ࠲ࠗࡊ ࠞ
ࠨࠗ࠭
ࡇࠢ࡞ࡇ࠶࠴ 㧔㧕㧔㧕
ᐲ ˄ ˅
ࠦࡦ࠻ࠬ࠻ 㧔㧕
␜ⷺᐲ 㧔㧕㧔㧕㧔㧕
ᔕ╵ᤨ㑆
ࡄࡀ࡞࠲ࠗࡊ
᳓ᐔᵄᢙ
ု⋥ᵄᢙ
␜⦡ ਁ⦡
࠲࠶࠴ࠗࡦ࠲ࡈࠚࠗࠬశቇ࠺ࡘࠕ࡞࠲࠶࠴ࠬࠢࡦ
ࡈ࠶ࠪࡘ࠻
ᦨ㜞⸃ᐲ
㔚ജᶖ⾌㊂
࠾࠶࠻ᤨ
ࠝࡦ
ࠝࡈ
ࠬ࠲ࡦࡃࠗ
ࠬࡇࠞ
ജࡆ࠺ࠝାภ ࡕ࠺࡞ߩߺ
ജࡆ࠺ࠝାภ ାภ ࡕ࠺࡞ߩߺ
ࠪࠬ࠹ࡓࡔࡕ㧦ޔࡈ࠶ࠪࡘࡔࡕ㧦
ࠝࡍ࠹ࠖࡦࠣࠪࠬ࠹ࡓ
ធ⛯
ࠞࡔ
ࠬࠢࡦࠨࠗ࠭᳓ᐔ
ု⋥
㔚Ḯ ޔ ࠕ࠳ࡊ࠲
ⅣႺ᧦ઙ
ᠲ᷷ᐲ㧦 ߆ࠄ
▤႐ᚲߩ᷷ᐲ㧦 ߆ࠄ
Ḩᐲ㧦 ߆ࠄ
ኸᴺ
㊀㊂ ⚐㊂
ࡔࠞ࠾࠭ࡓ᭽߈㧦 ߆ࠄ 㧘
ᄖㇱᓮ
ࡏ࠲ࡦ㔚Ḯࡏ࠲ࡦޔ㖸㊂ࠍߍࠆޔ㖸㊂ࠍਅߍࠆ ޔࡔ࠾ࡘޔ
ജ
ᯏ⢻
ᐲޔノᐲޔ᳓ᐔ⟎ޔု⋥⟎ޔࡈࠜࠞࠬޔᤨ⸘ޔ⦡
᷷ᐲޔ ࠲ࠗࡓࠕ࠙࠻ޔࡢࠗ࠼ࡕ࠼ޔ ࠝࡦ
ࠝࡈޔ ࠝࡦࠝࡈޔജାภㆬᛯ࠺ࡘࠕ࡞߹ߚߪ
ജࡕ࠺࡞ߩߺޔ⸒⺆ޔ࠺ࠖࠬࡊࠗᖱႎࠍ࠶
࠻ޔ⚳ੌ
ຠ᭽ߪ᧪੍๔ߥߊᄌᦝߐࠇࠆ႐ว߇ࠅ߹ߔޕ
Ḱⷙ

ᖿ䗳ܹ䭔ᣛफ
䞡㽕ᅝܼᣛ⼎
䂟Ҩ㌄䮅䅔ϟ߫ᣛ⼎DŽ
⏙┨ ⱘ㵶ᐩ˖
䮰䭝 ⱘ䳏⑤ˈϺᢨᥝ䳏⑤㎮DŽ
ᇛ䴲⒊ࡥ⏙┨⫶કై☥ᇣพᏗϞˈϺҨ㌄⏙┨㵶ᐩDŽ
䂟࣓ᇛ ᬒ㕂䴴䖥に᠊ⱘഄᮍDŽ䅧乃⼎఼㿌ࠄ䲼∈ǃ▩⇷᮹ܝⳈᇘৃ㛑᳗ᇢ㟈ಈ䞡ফ᧡DŽ
䂟࣓䞡ວ 㵶ᐩDŽ䘢ᑺᮑວ᳗ᇢ㟈乃⼎఼∌Й᧡າDŽ
䂟࣓⿏䰸㪟௫䀺㞾㸠㎁ׂᴀ㺱㕂DŽឝ⬅ড়Ḑᥜ⃞㎁ׂҎવ䘆㸠ӏԩ㎁ׂᎹDŽ
䂟ᇛ ᄬᬒ⑿ᑺҟᮐ 㟇˄ 㟇 ˅ⱘᅸܻDŽབᵰᇛᄬᬒᮐℸ
㆘ೡⱘഄᮍˈৃ㛑᳗䗴៤∌Йᗻ᧡າDŽ
㢹ⱐ⫳ϟ߫ӏϔ⢔⊕ˈ䂟ゟेᢨϟ乃⼎఼䳏⑤Ϻ㟈䳏ড়Ḑᥜ⃞ᡔ˖
䗷乃⼎఼㟛䳏㜺ⱘ㿞㰳㎮⺼᧡᧡າDŽ
⎆储┥☥ Ϟ乃⼎఼ফࠄ䲼⎟DŽ
ֱ䅋←Ꮖফ᧡DŽ
ࣙ㺱ܻᆍ
䳏⑤㎮㟛䅞ວ఼䥉Ⲹ
⒥哴
㎮ ㎮ᖿ䗳ܹ䭔ᣛफ
䀁ᅮᣛफ
Փ⫼
ݞ
˖䙌䋐
ᇛ乃⼎఼䗷㟇䳏㜺
䂟䮰䭝䳏㜺Ϻᢨ䰸䳏㜺ⱘ䳏⑤㎮DŽ
ᇛ 䗷㎮䗷㟇乃⼎఼ⱘ䔌ߎᦦῑˈҹঞ䳏㜺乃⼎वⱘ 䔌ߎᦦῑDŽ
䙌䋐˖Փ⫼ ڇ䔌㎮䗷 ⱘ 䗷පˈҹঞ䳏㜺ⱘ 䗷පDŽ
ᇛ ⱘ䳏⑤䅞ວ఼ᦦܹ乃⼎఼㚠䴶ⱘ䳏⑤ڇ䔌පDŽ
ᇛ䳏㜺㟛乃⼎఼ⱘ䳏⑤㎮ᦦ㟇䰘䖥ⱘ䳏⑤ᦦᑻDŽ
ᣝϟ䳏⑤ᣝ䟩ˈ֓㛑ଳࢩ DŽ
㢹㽕ߛ㟇 乃⼎ˈ䂟ᣝϟࡳ㛑䥉ҹ䙌প䂓ᭈ䙌䷙DŽ
བ䳔᳝䮰䀁ᅮ ⱘ䊛㿞ˈ䂟গ䮅 NjՓ⫼ݞnjDŽ
佪䭟″
᳗ܜ䀶ଣᙼ䚼ߚଣ丠ˈ✊ᕠᠡ㛑䭟ྟՓ⫼DŽ
㢹㽕䀁ᅮᄬপ ᐇ㰳ˈ䂟ᇛᙼⱘ 䗷㟇Э㎆䏃ᄬপ咲DŽ
䚼ࠊ
䳏⑤䥉ၲඔᣂຨ᧩قᕴΖ៴ۥ।قሽᄭբၲඔΖ
Փ⫼ 䕧ܹᯊˈ䇋ᣝϟᎺջࡳ㛑ᣝ䪂ҹ䗝প䇗ᭈ䗝乍DŽ
㢹㽕䅞䷇䞣ˈ䂟ᣝϟেوࡳ㛑ᣝ䟩ҹ⁶㽪DŽᎺে⒥ࢩ䷇䞣߫DŽ

㽣㆘ᅝܼ⊼ᛣџ䷙
FCC ⊼ᛣџ䷙
ᴀ⫶ક㍧䘢␀䀺Ϻ߸ᅮヺড় B㋮ᭌԡ䀁٭䰤ࠊˈϨ䙉✻ FCC ṱ՟ 15 ㆔DŽ䁆䰤ࠊᰃ⚎њᦤկড়⧚ֱ䅋ˈ䙓ܡ
ԣᅙܻՓ⫼ᰖᓩ䍋᳝ᆇᑆ㗠䀁㿜ⱘՓ⫼ṱӊDŽᴀ⫶ક᳗⫶⫳ǃՓ⫼Ϻⱐᇘ⛵㎮䳏丏⥛㛑䞣ˈ㢹ᙼᣝᣛ⼎՚ᅝ
㺱㟛Փ⫼ˈৃ㛑᳗ᇡ⛵㎮䳏䗮㿞䗴៤᳝ᆇᑆDŽ
✊㗠ˈ៥ץ⛵⊩ֱ䄝ϔѯ⡍ᅮⱘᅝ㺱ᮍᓣϡ᳗ⱐ⫳ᑆDŽབᵰᴀ⫶કᇡᬊ䷇″䳏㽪ᬊ䗴៤᳝ᆇᑆ ˄ৃ㍧⬅
ᠧ䭟䮰䭝ᴀ⫶ક㗠⺎䁡˅ˈࠛՓ⫼㗙ৃ௫䀺߽⫼ϟ߫ᮍᓣ䘆㸠䂓ᭈ˖
• ⿏ࢩᬊ㎮ⱘ㾦ᑺԡ㕂DŽ
• ࡴ㺱㕂㟛ᬊ఼П䭧ⱘ䎱䲶DŽ
• ϡ㽕݅⫼㺱㕂㟛ᬊ఼ⱘ䳏⑤ᦦᑻDŽ
• བ䳔नࡽˈ䂟⌑䀶㍧䢋ଚᇜὁⱘᬊ䷇″ /䳏㽪ᡔ㸧ҎવDŽ
CE ヺড়㙆ᯢ
⡍ℸˈAcer Inc. ᅷਞℸ DA221HQL ヺড় EMC ᣛҸ 2004/108/ECǃԢ䳏ວᣛҸ 2006/95/ECǃR&TTE ᣛҸ
1999/5/EC 㟛RoHS ᣛҸ 2011/65/EC ঞ2009/125/EC ᣛҸˈ⚎ᓎゟ㛑⑤Ⳍ䮰⫶ક⫳ᜟ࣪䀁㿜㽕∖ПᶊᾟDŽ
⊼ᛣ˖䙂㬑ൟ䳏㎮
ᴀ⫶ક㟛݊ᅗ䳏㜺㺱㕂П䭧ⱘ䗷ˈᖙ䷜Փ⫼䙂㬑ൟ䳏㎮ҹヺড় EMC 㽣ᅮDŽ
⊼ᛣ˖਼䙞㺱㕂
ڙ䗮䘢䁡䄝Ϩヺড় Class B 䰤ࠊⱘ਼䙞㺱㕂 ˄䔌ܹ /䔌ߎ㺱㕂ǃ㌖ッ″ǃॄ㸼″ㄝ˅ᮍ㛑㟛ᴀ⫶કᨁଂDŽ㢹㟛݊
Ҫ㍧䁡䄝ⱘ䘅䙞㺱㕂݅ৠՓ⫼ᰖˈৃ㛑᳗ᑆᬊ䷇″㟛䳏㽪ⱘᬊDŽ
䄺ਞ
㍧㻑䗴ᒴଚ䀅ৃⱘ䅞ׂᬍৃ㛑ᇢ㟈Փ⫼㗙༅᪡ᴀ⫶કⱘ⃞߽ˈℸᥜ⃞֖⬅㙃䙺䗮㿞ྨવ᳗ ˄Federal
Communications Commission˅᠔䊺ќDŽ
Փ⫼ṱӊ
ᴀ⫶કヺড় FCC ṱ՟ 15 ㆔䰤ࠊDŽ᪡ᰖˈ䂟䙉ᕾϟ߫ܽ䷙ṱӊ˖(1) ᴀ⫶કϡᕫ⫶⫳ڋᆇᗻᑆˈϨ (2) ᴀ⫶
કᖙ䷜ফӏԩᬊࠄⱘᑆ㿞㰳ˈࣙᣀৃ㛑ᇢ㟈䴲䷤ᳳ᪡ⱘᑆDŽ
⊼ᛣ˖Canadian users
CAN ICES-3 (B) / NMB-3 (B)
᪡ᰖˈ䂟䙉ᕾϟ߫ܽ䷙ṱӊ˖(1) ᴀ㺱㕂ϡᕫ⫶⫳ᑆˈϨ (2) ᴀ㺱㕂ᖙ䷜ফӏԩᑆ㿞㰳ˈࣙᣀৃ㛑ᇢ㟈㺱
㕂ߎ⧒䴲䷤ᳳ᪡ⱘᑆDŽ
Le present appareil est conforme aux CNR d'Industrie Canada applicables aux appareils radio exempts de
licence. L'exploitation est autorisee aux deux conditions suivantes: (1) l'appareil ne doit pas produire de
brouillage, et (2) l'utilisateur de l'appareil doit accepter tout brouillage radioelectrique subi, meme si le brouillage
est susceptible d'en.
RF ᲈ䴆䄺ਞ
ᖙ䷜䙉ᕾᦤկⱘᣛ⼎՚ᅝ㺱᪡ᴀ䀁٭ˈϨᖙ䷜ᅝ㺱䘽⫼ᮐᴀⱐᇘ఼П䘽⫼㎮ˈҹ⺎ֱ݊㟛᠔᳝ҎП䭧ⱚֱ
ᣕ㟇ᇥ 20 ݀ߚⱘ䭧䱨䎱䲶ˈϨϡᕫ㟛݊Ҫⱘ㎮ⱐᇘ఼ᬒⳌৠԡ㕂݅ৠ䘟DŽՓ⫼㗙㟛ᅝ㺱Ҏવᖙ䷜ⶁ
㾷㎮ᅝ㺱ᣛ⼎㟛ⱐᇘ఼᪡⢔⊕ˈҹヺড় RF ᲈ䴆䀁٭䳔∖DŽ
⊼ᛣ˖䂟࣓ӏᛣᢚ㺱䀁٭DŽӏԩ㍧ᥜ⃞䁡䄝ҎવП䀁٭ᢚ㺱ৃ㛑䗴៤ಈ䞡ⱘᅝܼଣ丠DŽ
ӏԩଣ丠ˈ䂟⌑ᙼⱘ䢋ଂҎવ㍧䢋ଚᇟ∖नࡽDŽ
䄺ਞ
བᵰϡℷ⺎П䳏∴ൟᓣ᳗᳝⟚⚌ⱘ乼䱾ˈ䂟ձ㻑䗴ଚ䁾ᯢ㰩⧚⫼䘢П䳏∴DŽ
ḍℤⲳ㽣ᅮˈՓ⫼㗙ᖙ䷜ҹ⾕Ҏᒶẘ⠽ᮍᓣ՚ẘ㕂ฅᒶ䀁٭
㢹⫶ક݊ࣙ㺱Ϟߎ⧒ℸヺ㰳ˈҷ㸼ᴀ⫶કϡৃ㟛݊Ҫᆊᒁᒶẘ⠽ϔՉẘ㕂DŽᙼᖙ䷜㸠ᇛ
ฅᒶ䀁٭Ѹ⬅ᣛᅮಲᬊキ㰩⧚ˈҹಲᬊᒶ䳏″䳏ᄤ䀁٭DŽẘ㕂ฅᒶ䀁٭ᰖخད䊛⑤ߚ串㟛ಲ
ᬊᎹˈ᳝ࡽᮐֱ䅋㞾✊䊛⑤ˈϺ⺎ֱ䊛⑤ಲᬊᎹ⚎Ҏ串عᒋ㟛⪄๗ᐊ՚ֱ䅋DŽབ䳔䮰ᮐ
ฅᒶ䀁٭ẘ㕂ಲᬊキⱘ䁇㌄䊛㿞ˈ䂟⌑䀶ᙼ⭊ഄⱘᏖ݀᠔ǃ⏙┨䱞䋐䊋⫶કП᠔ଚᑫDŽ

㽣Ḑ
䷙ⳂDA221HQL
䴶ᵓ
候ࢩ串ൟ ᔽ㡆
ᇣ
ڣ㋴䭧䎱 ˄∈ᑇ˅˄ൖⳈ˅
҂ᑺ
ᇡ↨⥛ ᳔˄˅
㾦ᑺ ˄∈ᑇ˅˄ൖⳈ˅˄᳔˅
ডឝᰖ䭧˄˅
䴶ᵓ串ൟ
∈ᑇ丏⥛
ൖⳈ丏⥛
乃⼎఼㡆ᔽ ⱒ㨀㡆
㿌ᩌҟ䴶ܝᅌ䲭咲㿌ᓣ㵶ᐩ
ᮄ丏⥛
᳔㾷ᵤᑺ
㗫䳏䞣˄ᮐ ˅䭟ଳ᳔
䮰䭝˄ᕙ
″
˅
ু
䔌ܹ丁˄䰤䔌ܹൟ㰳˅
䔌ܹ㽪㿞㿞㰳 㿞㰳˄䰤䔌ܹൟ㰳˅
㋏㍅㿬ដ储
ὁ㋏㍅
䗷㎮㛑ǃ
㎆䏃ᕅ″ 㨀ڣ㋴
㵶ᐩᇣ∈ᑇ
ൖⳈ
䳏⑤ ǃ˄ 䅞ວ఼˅
⪄๗㗗䞣џ䷙
᪡⑿ᑺ˖ 㟇
܆ᄬ⑿ᑺ˖ 㟇
᪡⒐ᑺ˖ 㟇
ሎᇌ˄ᇀ催⏅˅
䞡䞣˄⎼䞡˅ ˄⎼䞡˅
″ᾟ㽣Ḑڒ᭰˖ 㟇 ˈ
䚼ࠊ
ᣝ䟩䳏⑤ᣝ䟩ǃ䂓催䷇䞣˄˅ǃ䂓催䷇䞣˄˅ǃࡳ㛑㸼ǃ䔌ܹ
ࡳ㛑
҂ᑺǃᇡ↨ ⥛ǃ∈ᑇԡ㕂ǃൖⳈԡ㕂ǃ⛺䎱ǃᰖ䧬ǃ㡆⑿ǃ
䘒ᰖǃᇀ㵶ᐩᓣǃ 䭟ଳ䮰䭝ǃ 䭟ଳ䮰䭝ǃ
䔌ֵܹ㰳䙌˄䰤䲭 䔌ܹൟ㰳˅䁲㿔ǃ䞡䀁乃⼎䊛
㿞ǃ䗔ߎ
᠔᳝㽣Ḑ䅞ⱚϡ㸠䗮ⶹDŽ
ヺড়⊩㽣
DA221HQL
1
:DA221HQL
DA221HQL
2
DA221HQL
3
LCD
4
5
140-460-20DA221QHL
DA221HQL
6
DA221HQL
DA221HQL
DA221HQL
USB
HDMI
1
2
HDMIHDMIHDMI
3
.USBUSBDA221HQLUSB
4
DA221HQL
5
6
.DA221HQL
7
HDMI
.DA221HQL
.DA221HQL
.Wi-FiEthernetDA221HQLGoogle
HDMI
OSD

FCC15
CE
LCDAcer
ECECEC
.EMC
2115
1RSS
2)
Le present appareil est conforme aux CNR d'Industrie Canada applicables aux appareils radio exempts de
est susceptible d'en.
20
DA221HQL
LCDTFTLCD
5521.5
2 250
ACM) 100,000,000:1
oo)
GG
- 30
75 - 55
16.7
173
250
40
0.5
2 x2
HDMI) HDMI
HDMI) HDMI
CPU1.6
RAM1
AndroidTM 4.2.2
1
476.6
100
35oC0o
60oC-20o
530.4 x 357.1 x 75.2
5.0
+-3 ,75o15o
DDCCIOSD
ACM
HDMI