Acrowave Systems AVP-2000B IP Phone System (Handset) User Manual
Acrowave Systems Co., Ltd IP Phone System (Handset)
users manual

W
Wi
iF
Fi
i
V
Vo
oI
IP
P
P
Ph
ho
on
ne
e
WiFi SIP VoIP Phone
AVP-2000B
Users Manual
Copyright® 2005-2006 Acrowave Systems Co,Ltd. All rights reserved
1

W
Wi
iF
Fi
i
V
Vo
oI
IP
P
P
Ph
ho
on
ne
e
-- INDEX --
1. OVERVIEWS 5
1.1 LCD DISPLAY 5
1.1.1 Pictograms on LCD 5
1.1.2 Key Buttons 5
2. AVP-2000B MENU TREES 6
2.1 BASIC MENU TREE 6
2.2 PHONEBOOK MENU TREE 8
2.3 MESSAGE MENU TREE 8
2.4 INCALL SOFT MENU TREE 8
3. OPERATIONS 9
3.1 POWER ON / OFF 9
3.1.1 Power On 9
3.1.2 Power Off 9
3.2 SIP REGISTRATION / UNREGISTRATION 9
3.2.1 Registration 9
3.2.1 Unregistration 11
3.3 CALL MAKING / ANSWERING / HANGUP / DND 12
3.3.1 Making Call 12
3.3.2 Answering Call 12
3.3.3 Hangup Call 12
3.3.4 DND Call 12
4. PHONE FUNCTIONS 13
4.1 MENU DESCRIPTIONS 13
4.1.1 RING / BELL 13
4.1.1.1 Ringing Type 13
4.1.1.2 Ring Color 13
4.1.1.3 Ring Volume 13
4.1.2 PHONE DIARY 14
4.1.2.1 Alarm 14
4.1.2.2 Calculator 14
4.1.3 USER SETUP 14
4.1.3.1 Standby Display Mode 14
4.1.3.2 LCD Contrast 15
2

W
Wi
iF
Fi
i
V
Vo
oI
IP
P
P
Ph
ho
on
ne
e
3
4.1.3.3 LCD Backlight 15
4.1.3.4 Auto Answering 15
4.1.3.5 Localization 15
4.1.3.6 Call Prefix 16
4.1.3.7 Call Forward 16
4.1.3.8 Call Waiting 16
4.1.3.9 Password Change 17
4.1.3.10 Ring-Back Tone Mode 17
4.1.3.11 DTMF Mode 17
4.1.4 ADMIN SETUP 17
4.1.4.1 Networks 18
4.1.4.2 SIP 18
4.1.4.3 Wireless LAN 18
4.1.4.4 NAT 20
4.1.4.5 CODEC 21
4.1.4.6 Initializaionz 22
4.1.4.7 Ping Test 22
4.2 INPUT CHARACTERS 23
4.3 PHONEBOOK 24
4.3.1 OUTBOUND CALL 24
4.3.2 INBOUND CALL 24
4.3.3 SEARCH PHONEBOOK 25
4.3.4 ADD NEW ENTRY 25
4.4 MESSAGE 26
4.4.1 RECEIVED MESSAGE 26
4.4.2 SEND MESSAGE 26
4.5 SOFT MENUS 28
4.5.1 PHONEBOOK 28
4.5.2 CALL MUTE 28
4.5.3 CALL TRANSFER 28
4.5.4 CALL HOLD 29
4.5.5 CALL WAIT 29

W
Wi
iF
Fi
i
V
Vo
oI
IP
P
P
Ph
ho
on
ne
e
This page is blank area.
4
W
Wi
iF
Fi
i
V
Vo
oI
IP
P
P
Ph
ho
on
ne
e
1. OVERVIEWS
1.1 LCD DISPLAYS
1.1.1 Pictograms on LCD
아이콘 설 명
WiFi Signal Strength. : Weak : Strong
Out of Service area.
Indicates in call state
Indicates alarm is on.
Indicates that there is/are new message(s) that has/have not been read.
Indicates vibration mode or manner mode is on
Indicate key-lock state is on
Battery life gauge
: Full : Sufficient : Shortage : Empty
1.1.2 Key buttons
버튼 이름 기 능
[ ] Send or Receive
[ M ] Menu
[ ] Upper direction
[ ] Down direction
[ ] Right direction / Message Menu
[ ] Left direction / Phonebook Menu
[ S] OK / Selection
[ CLR ] Cancel Key
[0]~[9] Number / Character input Keys
[ * ] Symbol Key / Manner Mode
[ # ] Symbol Key / Keylock Mode
[ ] Power On / Off / Cancel
5
W
Wi
iF
Fi
i
V
Vo
oI
IP
P
P
Ph
ho
on
ne
e
2. AVP-2000B MENU TREES
This chapter shows the menu trees of AVP-2000B
2.1 BASIC MENU TREES
MENU 1.SOUND 1.RING TYPE 1.RING
2.VIBRATOR
3.RING AFTER VIBRATOR
4.RING WITH VOBRATOR
2.RING COLOR 1.RING COLOR 1
2.RING COLOR 2
3.RING COLOR 3
4.RING COLOR 4
5.RING COLOR 5
3.RING VOLUME
2.DIARY 1.ALARM SETTING 1.SET ON/OFF 1.ALARM ON
2.ALARM OFF
2.SET TIME
3.SET BELL TYPE 1.RING COLOR 1
2.RING COLOR 2
3.RING COLOR 3
4.RING COLOR 4
5.RING COLOR 5
2.CALCULATOR
3.USER SETUP 1.DISPLAY TYPE 1.NUMBER MODE
2.LOGO MODE
2.LCD CONTRAST
3.LCD BACKLIGHT 1.ALWAYS OFF
2.10 SEC ON
3.20 SEC ON
4.ALWAYS ON
4.AUTO ANSWER 1.DISABLE
2.AFTER 1 BELL
3.AFTER 3 BELL
5.LOCALIZATION 1.LANGUAGE 1.ENGLISH
2.KOREAN
2.TIME SERVER
3.TIME ZONE
4.DST SETUP 1.DST ENABLE
2.DST DISABLE
6.CALL PREFIX
7.CALL FORWARD 1.CALL FWD OFF
2.CALL FWD ON 1.FORWARD NUMBER
2.CONDITION
8.CALL WAITING 1.DISABLE
2.ENABLE
9.PASSWORD CHG
0.DTMF 1.SIP INFO
2.INBAND
*.RINGBACK TONE 1.ENABLE
2.DISABLE
6
W
Wi
iF
Fi
i
V
Vo
oI
IP
P
P
Ph
ho
on
ne
e
4.ADMIN SETUP 1.NETWORK 1.DHCP
2.STATIC IP PHONE ADDRESS NET MASK GATEWAY
IP
2.SIP SETUP
2.WLAN 1.AP SELECT 1.SCAN AP
2.INPUT DIRECT
2.SECURITY 1.DISABLE
2.ENABLE 1.64 BITS 1.ASCII
2.HEXA
2.128 BITS 1.ASCII
2.HEXA
3.802.1X 1.DISABLE
2.ENABLE USER ID PASSWORD
4.ROAMING 1.ENABLE
2.DISABLE
5.CONNECTION 1.INFRA STRUCT
2.AD-HOC
4.NAT 1.NAT DISABLE
2.NAT ENABLE 1.STUN SETUP STUN
SERVER STUN PORT
2.STATIC NAT
5.CODEC 1.G.711
2.G.711+G.723
3.G.711+G.729
4.G.711+G.726
6.INITIALIZE 1.SOFT RESET
2.RESET PARAM 1.YES
2.NO
3.FACTORY
RESET 1.YES
2.NO
7.TEST MODE 1.PING TEST
2.RF TEST 1.RF Tx TEST
2.RF Rx TEST
5.INFORMATION 1.VERSIONS
2.NETWORK
3.SIP
4.CODEC
5.WLAN
6.MAC
ADDRESS
7
W
Wi
iF
Fi
i
V
Vo
oI
IP
P
P
Ph
ho
on
ne
e
2.2 PHONEBOOK MENU TREE
PHONEBOOK 1:OUTBOUND Î MENU 1:DEL
2:DEL ALL
Î OK Î MENU 1:DEL
2:INBOUND CALL Î MENU 1:DEL
2:DEL ALL
3:SEARCH Î MENU 1:EDIT
2:DELETE
Î OK Î MENU Î EDIT
4:NET ENTRY Î NAME Î PHONE NUMBER Î SHORT NUMBER
2.3 MESSAGE MENU TREE
MESSAGE 1:SHOW MESSAGE
2:SEND MESSAGE 1:WRITE MSG
2:SHOW SENT MSG Î MENU 1:DEL
2:DEL ALL
Î CONTENTS Î MENU 1:RESENT
2:DEL
2,4 INCALL SOFT MENU TREE
MENU Î 1: PHONEBOOK 1:OUTBOUND CALL
2:INBOUND CALL
3:SEARCH
2:CALL MUTE
3:CALL TRANSFER Î XFER NUMBER
4:CALL HOLD
8

W
Wi
iF
Fi
i
V
Vo
oI
IP
P
P
Ph
ho
on
ne
e
3. OPERATIONS
This chaper describes how to operate and configure the AVP-2000B WiFi Phone.
3.1 POWER ON / OFF
3.1.1 Power On
Press [ ] button during 2 or 3 seconds to power on the AVP-2000B, then AVP-2000B
turn on the power with short beep sound.
3.1.2 Power Off
Press [ ] button during 2 or 3 seconds to power off the AVP-2000B, then AVP-2000B
turn off with “Good-Bye” message on LCD windows.
3.2 SIP REGISTRATION / UNREGISTRATION
3.2.1 REGISTRATION
AVP-2000B can use after SIP registration operation on SIP REGISTRAR SERVER.
The operations of SIP registration are as below ;
1) Press [M] button in standby state.
2) Select “4.Admin Setup” menu.
3) Default password is “0000”.
4) First, select “1. Setup Network” menu and configure the network informations.
AVP-2000B supports two kind of IP address mode which are DHCP mode and Static IP
address mode. When used as Static IP address mode, SubNet Mask value and Default
Gateway Address are also needed.
(Refer to clause 4.2 how to input IP address)
5) Select “2. Setup SIP” menu and configure the SIP informations.
AVP-2000B need some SIP informations to make / receive call.
- SIP Phone Number - Administrator will be supported
- SIP Registrar Server IP Address - Administrator will be supported
- SIP Domain Name – Administrator will be supported.
(SIP Registrar Server IP Address will be used as default value if not supported.)
- SIP Authenticate Name – Administrator will be supported
9

W
Wi
iF
Fi
i
V
Vo
oI
IP
P
P
Ph
ho
on
ne
e
(Press [S] button to skip this value)
- SIP Authenticate Password – Administrator will be supported
(Press [S] button to skip this value)
- SIP Registration Expire Time – Administrator will be supported
(Default value is 3600 seconds)
6) Select “3.Setup WLAN” menu and configure the WLAN informations
Input the SSID of AP(Access Point), Encryption mode of WiFi, Security configure,
Roaming mode and Connection mode of WLAN in this mode.
- SSID of AP : Scanning Mode and Direct input mode
- Encryption Mode : Configure Static WEP key value of AP when using Encryption mode.
- 802.1x Security : Configure security informations when using Security mode.
- Roaming mode : Select Roaming state of AVP-2000B (Default is disable)
- Connection mode : Select WiFi Connection mode (Default is Infra-structure mode)
7) Select “4.Setup NAT” menu and configure the NAT informations when needed.
(AVP-2000B supports two kind of NAT mode, one is STUN protocol and the other is Static
NAT. Administrator will be support for about this operation.)
- STUN Mode
Administrator can supports STUN server IP address and port value.
Default value of STUN server IP address is same as SIP Registrar Server IP address
and value of STUN port is 3478.
- Static NAT
Some kind of Route Server can not support dynamic allocation of port number. In this
case, select “Static NAT” mode to operate normally.
8) Select “5.Setup CODEC” menu if need to change.
AVP-2000B supports G.711 a/mu – law and G.729ab mode CODEC as default.
9) Press [ ] button to save and reboot AVP-2000B
AVP-2000B will reboot and register on SIP Registrar Server.
10

W
Wi
iF
Fi
i
V
Vo
oI
IP
P
P
Ph
ho
on
ne
e
3.2.2 UNREGISTRATION
The unregistration of AVP-2000B Phone means that administrator or user is to remove
registration for AVP-2000B on purpose using already registered on SIP registration server.
Following both the means provide removing information in phone registered on SIP
registration server.
3.2.2.1 Phone Power Off
AVP-2000B Power Off is to remove registered information in AVP-2000B registered on SIP
registration server.
3.2.2.2 Phone Factory Initialization
Initializing phone setup figures is to remove registered information from SIP registration
server and initialize all figures of AVP-2000B.
[Using Method]
[Menu] Î [4.Administrator setup] Î [6.Initialization setup] Î [3.Factory Initialization]
3.3 Call Making / Answering / Hangup / DND
3.3.1 Making Call
There is 3 ways to make a call with AVP-2000B Phone.
1) At registered state of AVP-2000B on SIP server,
(If registered, LCD window shows registered phone number) press the phone number you
want to make a call and press button[ ] and then the phone is called.
2) In case that there is the shortened number registered in the phone book, press the number
a long while and then automatically you can make a call to the stored number in shortened
number.
3) In standby state, press button [ ] and then there appears previous calling list.
After you choose number in the list you want with the use of direction key [ ] [ ] , press
Button [ ] and then you can make a call to the relevant number.
11

W
Wi
iF
Fi
i
V
Vo
oI
IP
P
P
Ph
ho
on
ne
e
3.3.2 Answering Call
AVP-2000B phone is ringing and its LCD window shows sender’s phone number.
At this time, press some button except button [CLR] [Power/Off] and then the phone is
connected with the sender’s.
3.3.3 Hangup Call
To finish calling in AVP-2000B, press button [Power/Off] once and then call is finished.
For 3 seconds, call time is indicated.
3.3.4 DND Call
If you do not want to answer the phone after checking sender’s phone number when
AVP-2000B rings, press button [Power/Off] and then the phone is disconnected.
At the same time, “Denied Call” message is transmitted to the sender.
12

W
Wi
iF
Fi
i
V
Vo
oI
IP
P
P
Ph
ho
on
ne
e
4. Phone Functions
4.1 Menu Descriptions
AVP-2000B provides each menu for setup of each function.
The composition of whole menu is <1.Menu Tree>
Each function is described as follows :
4.1.1 Ring/ Bell
Ring/ Bell menu of AVP-2000B provides 3 kinds of function listed below :
1. Ringing Type 2. Ring Color 3. Ring Volume
4.1.1.1 Ringing Type
This mode is for setup about how AVP-2000B operates when phone is called.
- Phone Bell, Vibration, Bell after Vibration, Vibration + Bell
By using direction key or figure key [ ] [ ], they can be selected.
[Using Method]
[Menu] Î [1:Ring/Bell] Î [1:Ringing Type] Î [1:Phone Bell]
4.1.1.2 Ring Color
This menu is for setup about Ring Color when phone is called, AVP-2000B have 5 kinds of
Ring Color to be selected.
By using direction key or figure key [ ] [ ], they can be selected.
[Using Method]
[Menu] Î [1:Ring/Bell] Î [2:Ring Color] Î [1:Ring Color 1]
4.1.1.3 Ring Volume
This is for setup about Ring Volume when phone is called
By using direction key or figure key [ ] [ ], they can be selected.
[Using Method]
[Menu] Î [1:Ring/Bell] Î [1:Ring Volume Type] Î [3:Ring Volume]
13

W
Wi
iF
Fi
i
V
Vo
oI
IP
P
P
Ph
ho
on
ne
e
4.1.2 Phone Diary
AVP-2000B provides functions of alarm and calculator for user’s convenience.
4.1.2.1 Alarm
This is to provide user with sound of bell by AVP-2000B at setting time with alarm setup.
By using direction key or figure key [ ] [ ], they can be selected.
[Using Method]
[Menu] Î [2:Phone Diary] Î [1:Alarm] Î [1:Alarm] Î [2:Time setting] Î [3:Bell setting]
4.1.2.2 Calculator
AVP-2000B provides function of calculator for user’s convenience.
[Using Method]
[Menu] Î [2:Phone Diary] Î [2:Calculator]
The using method is that first of all, after input of initial figure by using direction key, do
select calculation symbol corresponding to the direction indicated in LCD window and then
select the calculation method required. After selection of calculation symbol, do input
second figure by using figure key and press button [OK], and then the calculation results are
indicated in below line of LCD window.
At this state, if direction key button [ ] is pressed, previous calculation results are moved
to figure window to calculate first and are waiting for selection input of next calculation symbol.
The next methods are just like the description mentioned above.
4.1.3 User Setup
This user setup menu provides setup made by user of AVP-2000B.
4.1.3.1 Standby Display Mode
AVP-2000B, at standby state, provides dual ways to indicate LCD window.
There is mode showing your telephone number and present time with date. And also there is
other mode showing logo of Acrowave Systems with phone number time and date.
Basic mode of AVP-2000B is to show logo of Acrowave Systems. By using direction key or
figure key [ ] [ ], they can be selected.
[Using Method]
[Menu] Î [3:User Setup ] Î [1:Standgby Display Mode]
14

W
Wi
iF
Fi
i
V
Vo
oI
IP
P
P
Ph
ho
on
ne
e
4.1.3.2 LCD Contrast
This menu is adjusting contrast of LCD window.
There are total 11 steps for adjusting contrast. After selecting menu, by using direction key
[ ] [ ], contrast can be adjusted.
[Using Method]
[Menu] Î [3:User Setup] Î [2:LCD Contrast]
4.1.3.3 LCD Backlight
In case that key button of AVP-2000B is pressed or when phone is called, this menu is
adjusting time to light up.
There are total 4 steps to be selected.
By using direction key or figure key [ ] [ ], they can be selected.
- Always not lighting, 10 seconds lighting, 20 seconds lighting, always lighting.
[Using Method]
[Menu] Î [3:User Setup] Î [3:LCD Backlight] Î [2:10 seconds lighting]
4.1.3.4 Auto Answering
This menu is for user to answer the phone automatically without pressing button [ ] with
setting conditions when AVP-2000B is called.
There is mode for user to answer the phone by using button [ ] when phone is called and
also there is other mode for user to answer the phone automatically after bell rings once or
three times.
- 1. No Use 2. Bell Once 3. Bell three times
By using direction key or figure key [ ] [ ] , they can be selected.
[Using Method]
[Menu] Î [3:User Setup] Î [4:Auto Answering] Î [3:Bell three times]
4.1.3.5 Localization
This menu is setup using language, standard time server, time zone and sunlight saving time
when AVP-2000B is used.
For getting standard time with Internet, standard time server must be designated.
IP address of basic server is 203.254.163.74.
- 1 : using language 2 : time server setup 3 : time zone setup 4: sunlight saving setup
By using direction key or figure key [ ] [ ] , they can be selected.
15

W
Wi
iF
Fi
i
V
Vo
oI
IP
P
P
Ph
ho
on
ne
e
[Using Method]
[Menu] Î [3:User Setup] Î [5:Localization] Î [1:Using Language] Î [2:Korean]
4.1.3.6 Call Prefix
AVP-2000B can be used through PSTN network using connection equipment (example:
AVG-5400G) with PSTN network in Wireless Lan circumstances.
In this case, for using PSTN network , it is needed to press country line selected number
in advance to differentiate from VolP phone generally.
This menu provides automatic function for those procedures.
By using this menu, if PSTN country line selection number is input in advance, user can call
by pressing phone number regardless of VoIP telephone number or PSTN telephone
number.
AVP-2000B provides country line selection number with one digit.
If this menu is not needed, press button [CONFIRM] without inputting any figures after
selecting this menu and then this function is removed.
[Using Method]
[Menu] Î [3:User Setup] Î [6:Call Prefix]
Î [Country Line Selected number input]
4.1.3.7 Call Forward
AVP-2000B have function for Call Forward when phone is called.
This menu is setup for “Call Forward” function.
[Using Method]
[Menu] Î [3:User Setup] Î [7:Call Forward] Î [2:Call Forward] Î
[Call Forward Phone number input]
4.1.3.8 Call Waiting
AVP-2000B have function for Call Waiting when phone is called.
This menu is setting for “Call Waiting” function.
[Using Method]
[Menu] Î [3:User Setup] Î [8:Call Waiting] Î [2:Call Waiting]
16

W
Wi
iF
Fi
i
V
Vo
oI
IP
P
P
Ph
ho
on
ne
e
4.1.3.9 Password Change
AVP-2000B is using password to remove phone lock function for phone setup change.
At this time, user can change password to use.
Initial password of AVP-2000B is “0000”.
[Using Method]
[Menu] Î [3:User Setup] Î [9:Password Change] Î[New Password] Î
[Password Confirmation]
4.1.3.10 RingBack Tone Mode
When you are phoning with AVP-2000B, you can select sending sound to people answering
the phone.
[Using Method]
[Menu] Î [3:User Setup] Î [10:RingBack Tong Change] Î[1.RingBack Tone On] Î [Yes]
4.1.3.11 DTMF Mode
While phoning with AVP-2000B, you can transmit DTMF.
This mode is menu for DTMF transmitting methods.
AVP-2000B supports following 3 modes.
1. SIP INFO (RFC2976) 2. RFC2833 OOB 3. Inband Mode
Basic mode is setup for SIP INFO to be supported.
[Using Method]
[Menu] Î [3:User Setup] Î [0:Call DTMF] Î[1.SIP INFO] Î [Example]
4.1.4 Administrator Setup
This menu provides setup for registration of AVP-2000B phone.
This menu can be used after user does input password decided in advance.
4.1.4.1 Network Setup
This menu can do setup and change of AVP-2000B network environment.
- 1:DHCP 2:Fix IP
By direction key or figure key [ ] [ ], they can be selected.
17

W
Wi
iF
Fi
i
V
Vo
oI
IP
P
P
Ph
ho
on
ne
e
1) DHCP
This menu is to be used with IP allotted automatically.
[Using Method]
[Menu] Î [4:Administrator Setup] Î [Password input] Î [1:Network Setup] Î [1:DHCP]
Selection
2) Fix IP
This menu is for Fix IP.
[Using Method]
[Menu] Î [4:Administrator Setup] Î [Password input] Î [1:Network setup] Î [1:Fix IP]
selectionÎ [Phone IP address] Î [Net Mask Figures] Î [Gateway Address] Input
4.1.4.2 SIP Setup
This menu is for setup and change of AVP-2000B registration.
[Using Method]
[Menu] Î [4:Administrator Setup] Î [Password input] Î [1:SIP Setup] selection
Î [SIP Phone number] Î [SIP Server Address] Î [Domain Name] Î [SIP License Name]
Î [SIP License Password ] Input
4.1.4.3 Wireless Lan
AVP-2000B is phone used with connection of network by WiFi Wireless Land, IEEE802.11b.
This menu is for setup and change relevant to IEEE802.11b Wireless Lan.
- 1:SSID setup, 2:passwordization setup, 3:802.1X License,
- 4:Roaming setup, 5:contact mode setup
By direction key of figure key [ ] [ ], they can be selected.
1) SSID Setup
This menu is for selection of AP to be contacted or to change AP already contacted with
AVP-2000B.
- 1:AP Scan, 2:direct Input
[Using Method]
[Menu] Î [4:Administrator Setup] Î [4:Wireless Lan Setup] Î [1:SSID Change]
Î [1:AP Scan] or [2:Direct Input] selection
18

W
Wi
iF
Fi
i
V
Vo
oI
IP
P
P
Ph
ho
on
ne
e
3) Passwordization Setup
This is setup menu relevant to safety to be setup with use of wireless lan.
Fixed Web key, supplied from IEEE802.11b standard, and be used by this menu.
Fixed Web key, provided by AVP-2000B, supports 64 beat, 128 beat, ASKI Word mode and
16 digit mode.
[Using Method]
[Menu] Î [4:Administrator Setup] Î [4:Wireless Lan Setup] Î [2:Passwordization
Setup] Î [2:Setup] Î [1:64 beat mode] Î [1:Character line Mode] Î [Fix Web key] Î
[WEP key Number ] Input
4) 802.1X License
This menu is relevant to license required by Wireless Lan Internet operators for use of
wireless lan.
This menu makes it possible to input user’s ID and password provided by the relevant
operator when applied wireless Lan.
For use of 802.1X license with AVP-2000B, first with this menu, do input user’s ID and
password provided by the operator and then make contact with Wireless Lan AP so that it
can be used by Wireless Lan License.
Basic setup of AVP-2000B is mode not using 802.1X license function.
[Using Method]
[Menu] Î [4:Administrator Setup] Î [4:Wireless Lan Setup] Î [3:802.1X License] Î
[1:Mode Setup] Î [User ID input] Î [User password input]
4) Roaming Setup
This menu provides AVP-2000B with roaming or hand-over function under the circumstances
of lots of AP setup. Basic setup of AVP-2000B is made to permit roaming movement.
[Using Method]
[Menu] Î [4:Administrator Setup] Î [4:Wireles Lan Setup] Î [4:Roaming Setup] Î
[1:Roaming Setup]
5) Contact Mode
. This menu is to setup contact mode of wireless lan mode.
This menu can do setup following 2 modes.
*Infra-Structure mode, that is general AP mode stipulated in IEEE802.11b standard.
*AdHoc mode that is only card contact mode without AP.
19

W
Wi
iF
Fi
i
V
Vo
oI
IP
P
P
Ph
ho
on
ne
e
With use of this menu, after selecting Wireless Lan Contact mode, AP connection have to
be tried .
For registration of phone, first check state of wireless lan to contact and select contact
mode and complete phone registration procedures so that the relevant contact mode works.
After contact completed, with the use of function <1.SSID change>, contact the relevant AP
or card.
[Using Method]
[Menu] Î [4:Administrator setup] Î [4:Wireless Land setup] Î [5:contact mode] Î
[1:general mode]
4.1.4.4 NAT
This menu is for using to do setup or change the relevant circumstances to NAT with
AVP-2000B.
AVP-2000B provides functions passing NAT by two ways. One way is using STUN server
for private network use. The other is to do port forwarding function in NAT server.
- 1:NAT removal, 2:NAT setup
1) NAT removal
This menu is to remove STUN and NAT port forwarding functions in AVP-2000B.
[Using Method]
[Menu] Î [4:Administrator setup] Î [3:NAT setup] Î [1:NAT Removal] selection
1) NAT setup
This menu is to do setup STUN server and NAT port forwarding functions for private
network use.
Following are for NAT setup.
- 1:STUN setup, 2:Fix NAT setup
[Using Method]
[Menu] Î [4:Administrator setup] Î [3:NAT setup] Î [1:NAT setup] selection
1. STUN setup
This menu is for setup of STUN server and STUN port.
[Using Method]
[Menu] Î [4:Administrator setup] Î [3:NAT setup] Î [1:NAT setup] Î
[1:STUN setup]Î [STUN server address] Î [STUN port] Input
20

W
Wi
iF
Fi
i
V
Vo
oI
IP
P
P
Ph
ho
on
ne
e
2. Fix NAT setup
This is menu for setup of NAT Port Forwarding Function. NAT server address, NAT SIP
Port, and NAT RTP Port can be setup.
[Using Method]
[Menu] Î [4:Administrator setup] Î [3:NAT setup] Î [1:NAT setup Î [1:Fix NAT
setup]Î [NAT server address] Î [NAT SIP Port] Î [NAT RTP Port] Input
4.1.4.5 CODEC
Following are voice CODEC which can be used with AVP-2000B.
- G.711 a/u law, G.723.1, G.726, G.729a
Among the above, AVP-2000B can support another CODEC except G.711 a/u law.
At the same time, two kinds of CODEC can be supported.
So, user can do setup the kinds of CODEC to use. This menu has following selections.
- G.711 a/u law
- G.711 a/u law + G.723.1
- G.711 a/u law + G.729
- G.711 a/u law + G.726
[Using Method]
[Menu] Î [4:Administrator setup] Î [2:CODEC setup] Î [3:G.711 + G.729]
4.1.4.6 Initialization
This menu is to initialize the variables which are setup in AVP-2000B or to remove the
registration of SIP registration server normally.
1) Rebooting
This menu is enabling user to start AVP-2000B again.
[Using Method]
[Menu] Î [4:Administrator setup] Î [6:Initialization setup] Î [1:Rebooting]
2) Variables Initialization
This menu is enabling user to change all setup figures in AVP-2000B to initial setup
figures.
If initialization is carried out by this menu, all figures, such as bell sound, contrast, backlight
setup, password and etc, which were setup in AVP-2000B, are initialized.
21

W
Wi
iF
Fi
i
V
Vo
oI
IP
P
P
Ph
ho
on
ne
e
[Using Method]
[Menu] Î [4:Administrator setup] Î [6:Initialization setup] Î [2:Variables Initialization]
Î [1:Yes]
3) Factory Initialization
This menu is to return all of AVP-2000B phone state to initial factory setup.
[Using Method]
[Menu] Î [4:Administrator setup] Î [6:Initialization setup] Î [3:Factory Initialization]
Î [Yes]
4.1.3.7 Ping Test
This menu is to carry out Ping Test to confirm simply network state and etc.
with AVP-2000B.
[Using Method]
[Menu] Î [4:Administrator setup] Î [7:Test Mode]Î[1.Ping Test] Î
[Address input]Î[Test rounds input]
22
W
Wi
iF
Fi
i
V
Vo
oI
IP
P
P
Ph
ho
on
ne
e
4.2 Input Characters
In case of transmitting short text message or making phonebook, AVP-2000B phone is
converted to Input Characters Mode and waiting for characters input.
Input characters methods are as follows:
If AVP-2000B is converted to characters input mode, pictogram, showing characters input mode,
is indicated at upper right side of LCD window.
At this state, the wanted characters can be input by figure key and “*” “#”key of AVP-2000B.
On input of characters, stipulated characters are supposed to show the corresponding
characters to characters indicated on figure key.
Input characters setup is as follows:
Input character Input charecter
Digit
Button Korean Alphabet
Digit
Button Korean Alphabet
1 ㄱ ㅋ ㄲ @ _ + - = 7 ㅁ P Q R S
2 ㄴ ㄹ A B C 8 T U V
3 ㄷ ㅌ ㄸ D E F 9 ㅇ W X Y Z
4 ㅂ ㅍ ㅃ G H I 0 . (vowel) Space ^ ! ~ %
5 ㅅ ㅎ ㅆ J K L * l (vowel) . * $ & ?
6 ㅈ ㅊ ㅉ M N O # ㅡ (vowel) # < > ( )
The kinds of indicating characters input are Korean, alphabet, capital/small character and digit.
The pictogram at upper right side of LCD window shows pictures corresponding to each
character input mode. That is, pictures show like [가] in korean [A] in English capital,
[a] in English small character and [1] in digit.
If it is needed to change kind of character during character input, it can be made by using sound
adjustment button [ ] in left side of AVP-2000B.
If present character input mode of Korean is to be changed English capital, press once sound
adjustment button [ ]. Pictogram at upper right side of LCD window changes [가] to [A].
After that, if characters are input by figure key, English capital is input in LCD window.
Change of kinds of character is made according to following sequence.
Korean Î English Capital Î English small character Î Digit Î Korean
23

W
Wi
iF
Fi
i
V
Vo
oI
IP
P
P
Ph
ho
on
ne
e
4.3 Phone book
AVP-2000B provides function of phone book so that user can easily control phone numbers.
AVP-2000B can keep memory of 100 phone numbers in shortened numbers.
If direction key button [ ] of AVP-2000B is pressed, it enters menu of phonebook.
Phone book menu is consisted of following 4 items.
1: Recent sent number, 2:Recent received number,
3:Phone number scan , 4:Phone number registration
4.3.1 OUTBOUND CALL
AVP-2000B can store up to 32 phone numbers sent.
With stored phone numbers, user can make a call.
In case that the sent number is registered in phone book, it is shown as registered name in
phone book. Otherwise, it is shown as the number sent.
After selection of the relevant number in recent sent number menu, if button [call] is pressed,
User can make a call again with the selected number,
After selection of the relevant number, if button [confirm] is pressed, details on sent time and
etc. are indicated.
At this time, if menu button is pressed, <1.store> <2.removal>menu is indicated.
If <1.store> is selected, it is moved to screen for registration of phone book. If <2.removal> is
selected, the relevant number is removed in recent sent number list.
4.3.2 INBOUND CALL
AVP-2000B can store up to 32 phone numbers received and using stored numbers, it can
make a call.
In case that the received number is registered in phone book, it is shown as registered name
in phone book. Otherwise, it is shown as the number received.
If user presses button [call] after selecting the relevant number among recent received
number, the user can make a call again with the selected number.
After selecting the relevant number, if button [confirm] is pressed, details on received time and
etc. are indicated.
At this time, if button [menu] is pressed, <1.store> <2.removal>menu is indicated.
If <1.store> is selected, it is moved to screen for registration of phone book.
If <2.removal>is selected, the relevant number is removed in recent received number list.
24
W
Wi
iF
Fi
i
V
Vo
oI
IP
P
P
Ph
ho
on
ne
e
4.3.3. SEARCH PHONEBOOK
Using function of “phone number registration” of AVP-2000B, it shows all the stored phone
numbers and the registered numbers can be found.
If “Search phonebook” menu is selected, LCD window shows 3 phone numbers registered in
one screen. At this time, user can make it move to next screen for finding required phone
numbers by direction key [ ] [ ].
After having the cursor positioned to the required phone list, press button [menu].
Then, it shows menu <1.compilation> <2.removal>for the relevant phone number.
If menu <1.compilation>is selected by number key, it is converted to the screen to revise
information of the relevant phone number.
If menu <2.removal>is selected, the relevant phone number is removed in phone book.
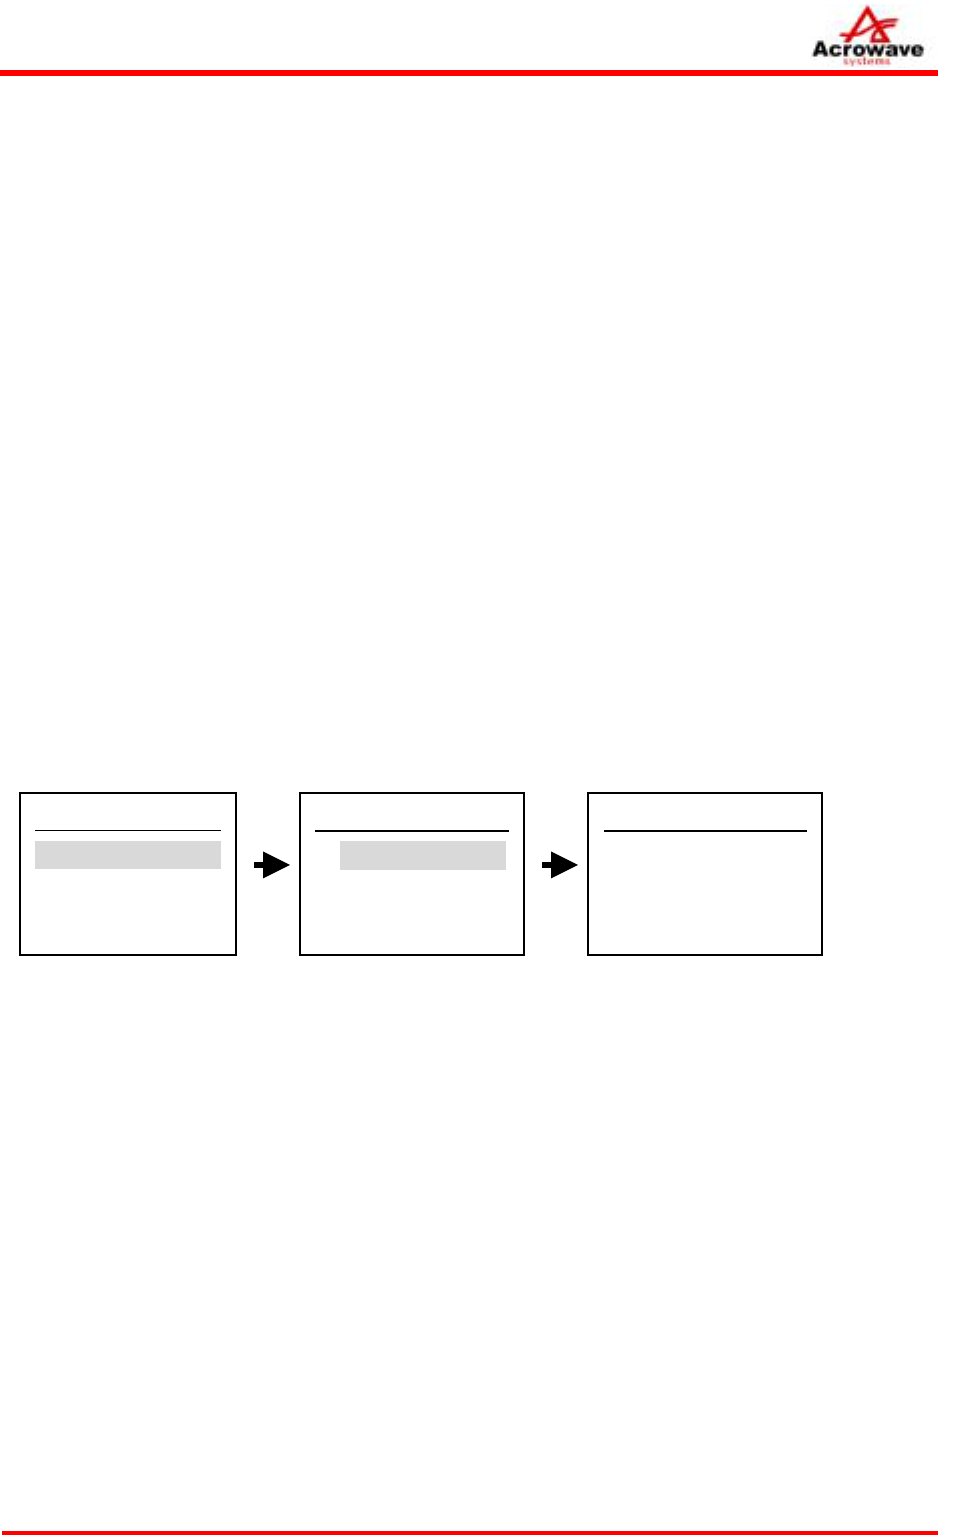
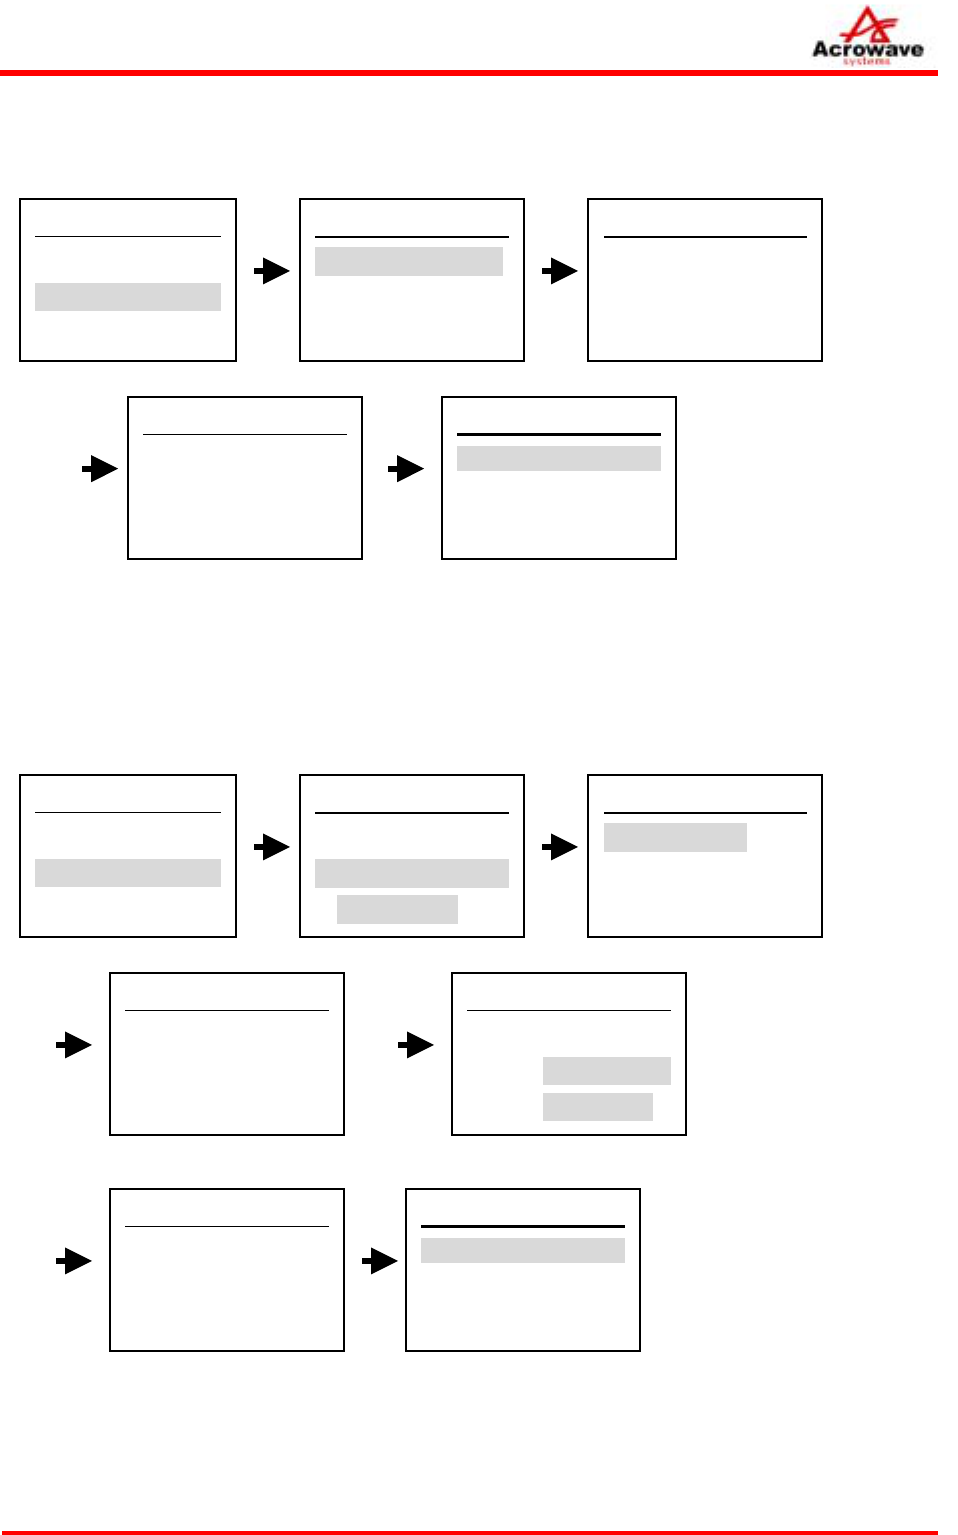
4.3.4 ADD NEW ENTRY
For user’s convenience, AVP-2000B can register up to 100 phone numbers that user wants.
In order to register new phone number, first select phone number new registration menu.
If it is selected, LCD window is waiting for name input to be given to new phone number.
If user presses direction key [ ] after name input, input cursor moves to window for phone
number input.
After registration of phone number, press button [confirm]. Then, you can make a call by the
shortened number indicated on right side of phone number input window.
4.3.
Phonebook
4:Phone number
registration
Name
가
PhoneNumber
[01]
홍길동
가
Phone Number
[01]
홍길동
가
1234567
[01]
Store
proceeding…
Store
Completion
25
W
Wi
iF
Fi
i
V
Vo
oI
IP
P
P
Ph
ho
on
ne
e
4.4 MESSAGE (SIP Instance Message)
AVP-2000B provides short text message transmitting and receiving function between
equipments using SIP protocol.
This message transmitting technique is subject to IEEE RFC-3428 standard.
This function of AVP-2000B can be worked by using direction key [ ]. This function
provides<1:Text Confirm> and <2:Text letter Writing>.
Details are as follows:
4.4.1 Received Message
This is menu for confirming text message transmitted between AVP-2000B phone or through
equipments using SIP protocol.
If AVP-2000B receives text message in standby state, it shows “new message arrived” in LCD
window and message icon is lighted up.
At this state, if you press direction key [ ] and select [1:message receiving], some of front
parts of the arrived text message are showing.
In case that there are lots of message arrived, by using direction key [ ] or [ ], you have to
have cursor positioned at the message you want to confirm and then if you press button
[confirm], its arrival time and contents are showing.
[05/02 02:57pm]
Tel : 1234
This is test text MSG..
Textmsg Confirm
01:TestMSG
02:Questions
MailTest
Textmessage
1:TextmsgConfirm
2:Textmsgsending
AVP-2000B can store up to 32 text messages arrived.
4.4.2 SEND MESSAGE
This is menu for transmitting text message with terminal observing IEEE-RFC3284 standard
byAVP-2000B phone or between equipments using SIP protocol.
AVP-2000B can transmit up to 80 text message to the required terminal.
26
W
Wi
iF
Fi
i
V
Vo
oI
IP
P
P
Ph
ho
on
ne
e
4.4.2.1 New Message transmitting
This is menu for transmitting newly made message.
Text MSG Sending
1:Contentswriting
2:Transmitted Txt
MSG
TextMessage
1:TxtMSGConfirm
2:TxtMSGSending
ContentsWriting
This is test
message.
Message store
1:Yes
2:No
ContentsWriting
Theotherparty’ s
phonenumber
:1234_
AVP-2000B is able to store up to 32 transmitted message.
4.4.2.2 Send Stored Message
This is menu for transmitting again the stored message sent before.
TextMessage
1:TxtMSGConfirm
2:TxtMSGsending
Text MSG Sending
1:ContentsWriting
2:Transmitted Txt
Message
TextMSGSending
1:Testmail
2:ShortMSGtrans
3:Howareyou.
<2.Send>
TextMSGSending
Thisistestmail.
1.Revision
2.Sending
[Con-
firm ]
ContentsWriting
Theotherparty’ s
phonenumber
:1234_
Message Store
1:Yes
2:No
[Me-
nu]
TextMSGSending
Thisistestmail.
27

W
Wi
iF
Fi
i
V
Vo
oI
IP
P
P
Ph
ho
on
ne
e
4.5 Soft Menus
For user’s convenience, AVP-2000B provides following functions at call state.
1.Phone Book, 2:Call Mute, 3:Call Transfer, 4:Call Hold
At call state, if you press button [Menu], LCD screen appears to be transferred.
At this state, if you press button [cancel], it returns to call state.
4.5.1 Phonebook
Please refer to <4.3 phonebook>.
4.5.2 Call Mute
At call state in AVP-2000B, call mute function is to prevent user’s own voice from being
transmitted to the other party’s phone.
If this function is setup by using button [Menu], any sound does not be transmitted to the other
party’s phone.
“>>Call mute<<” Message blinks in LCD window of user’s AVP-2000B phone.
[Using Method]
[Call]
Î
[Menu] Î [2:Call mute]
At call mute state, if you want to remove this function, press button [menu] again and select
<2:Call sound connection>, or you can press volume adjusting button [ ] or button [ ] for
automatic call sound connection.
[Using Method]
[Call]
Î
[Menu] Î [2:Call sound connection]
4.5.3 Blind Call Transfer
At call state, AVP-2000B provides function transferring to other phone number you want.
If you do input the number you want to transfer, your present call is connected with the newly
inputted number and your present call stops.
[Using Method]
[Call]
Î
[Menu] Î [3:Blind Call Transfer] Î [Phone number input] Î [Confirm]
28

W
Wi
iF
Fi
i
V
Vo
oI
IP
P
P
Ph
ho
on
ne
e
4.5.4 Call Hold
At call state, AVP-2000B provides function for temporary call hold.
[Using Method]
[Call]
Î
[Menu] Î [4:Call Hold] Î [Phone Number input] Î [Confirm]
If call hold function is worked, message “>>call hold<<” blinks at down part of LCD window.
In order to remove call hold state of AVP-2000B, do the call hold procedures described above
again.
Then, call hold is removed and phone is connected again.
4.5.5 Call Waiting
At call state, if other phone is called, AVP-2000B provides information of such phone number
during call.
AVP-2000B informs it by short warning sound. Warning sound rings once every 3 seconds.
With warning sound, message “>>call standby<<” blinks.
At this state, if you want to transfer to the phone arrived later, do press button [call].
Then, you are connected with that phone.
And your present call changes to call hold state and vice versa. It can be confirmed by the
number connected in LCD window.
At state connected with phone called later, when you finish call, you are connected again with
previous phone.
29
-Acrowave Systems –CradleAP
RF Exposure Statement
The device should be used beyond 20cm from the body.