Actiontec Electronics SBT100U ScreenBeam USB Transmitter User Manual
Actiontec Electronics Inc ScreenBeam USB Transmitter
User Manual
AWDTestEnvironmentSetupGuide
HardwareRequirement
TVormonitorwithHDMIinterface
Laptop:
CPU:intelCPUatleastCore2duo1.8gorAMDCPU
Ram:atleast2g
Wirelesscard:Realtek8192DUUSBdongle
OS:Win764bit
Softwarepackage(FilesincludedinthezipfileAWD_WIN7_TEST.zip)
Folder“Driver_Installation”–driverofRealtek8192DU
AWD.msi–AWDinstallationfile(version:2.0.18)
install.img–firmwareimageofRx(version:0.5.7)
vcredist_x64.exe–MicrosoftVisualC++2010Redistributablex64
vcredist_x86.exe–MicrosoftVisualC++2010Redistributablex86
Testenvironmentsetupprocedure
ConnectRx
1 UpgradeRxto0.5.7
1.1 PrepareaUSBstick,copyinstall.imgintorootandstickintoRx’sUSBport
1.2 ConnectRxtoaTVorMonitorviaHDMIinterface
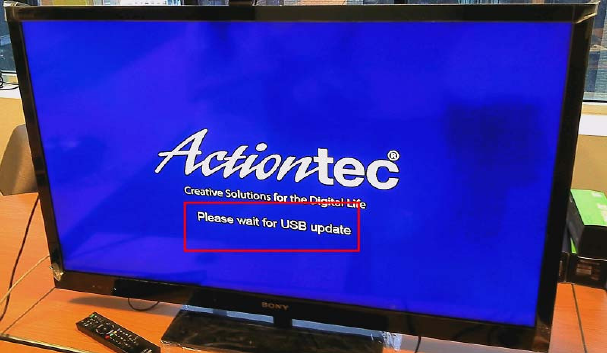
1.3 Holdresetbuttonandthenpoweron,checktheScreentobelikethis,thenreleasereset
button
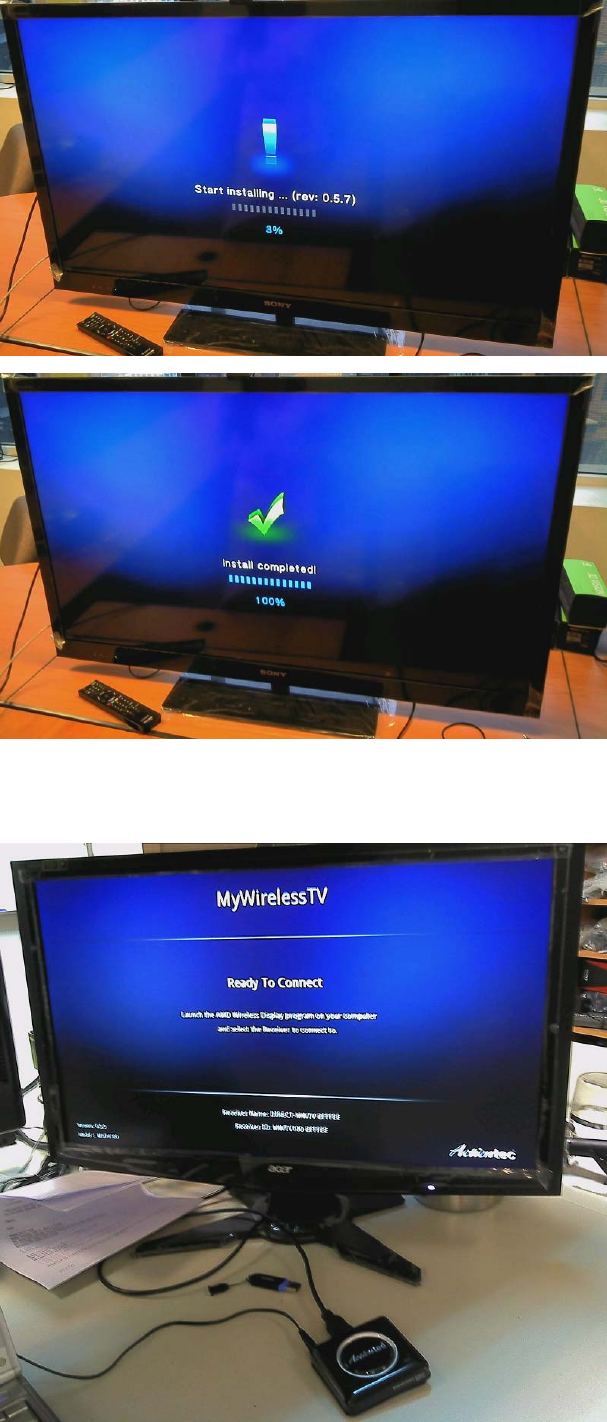
1.4 Waituntilupgradeprocessfinish(DONOTPOWEROFFWHILEUPGRADING)
1.5 Rxwillrebootautomatically,waituntilReadytoConnectscreen.Checkversiononleft‐bottom
corner,shouldbe0.5.7

ConnectAWD
1 ChangeAudioSetting
1.1 RightClickthespeakericonintheright‐leftcorner,thenchoosePlaybackdevices
1.2 InPlaybacktab,findSpeakersandHeadphone,thenclickProperties
1.3 SwitchtoAdvancedtab,fromthedropdownlistchangethedefaultformatto16
bit,44100Hz(CDQuality)
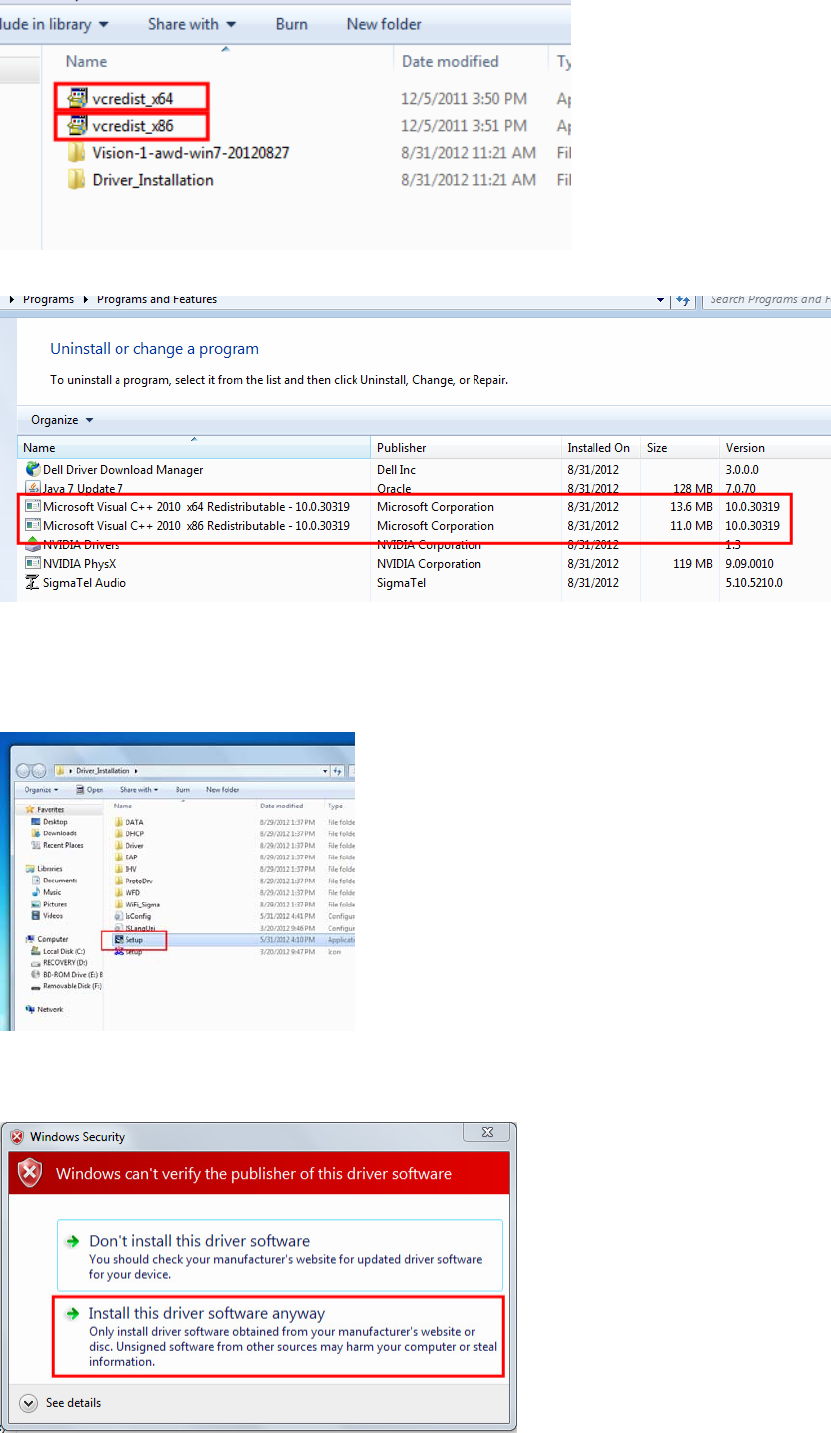
2 InstallMicrosoftVisualC++2010Redistributable
2.1 InstallMicrosoftVisualC++2010Redistributablex86andx64version
2.2 Afterfinish,gotoprogramsandfeatures,checkifitisinstalledcorrectly.
3 InstallWirelessUSBdongledriver
3.1 DoubleclickonSetup,thenfollowtheinstructions
3.2 Duringtheprocess,thiswindowmayappearseveraltimes,chooseInstallthisdriversoftware
anyway
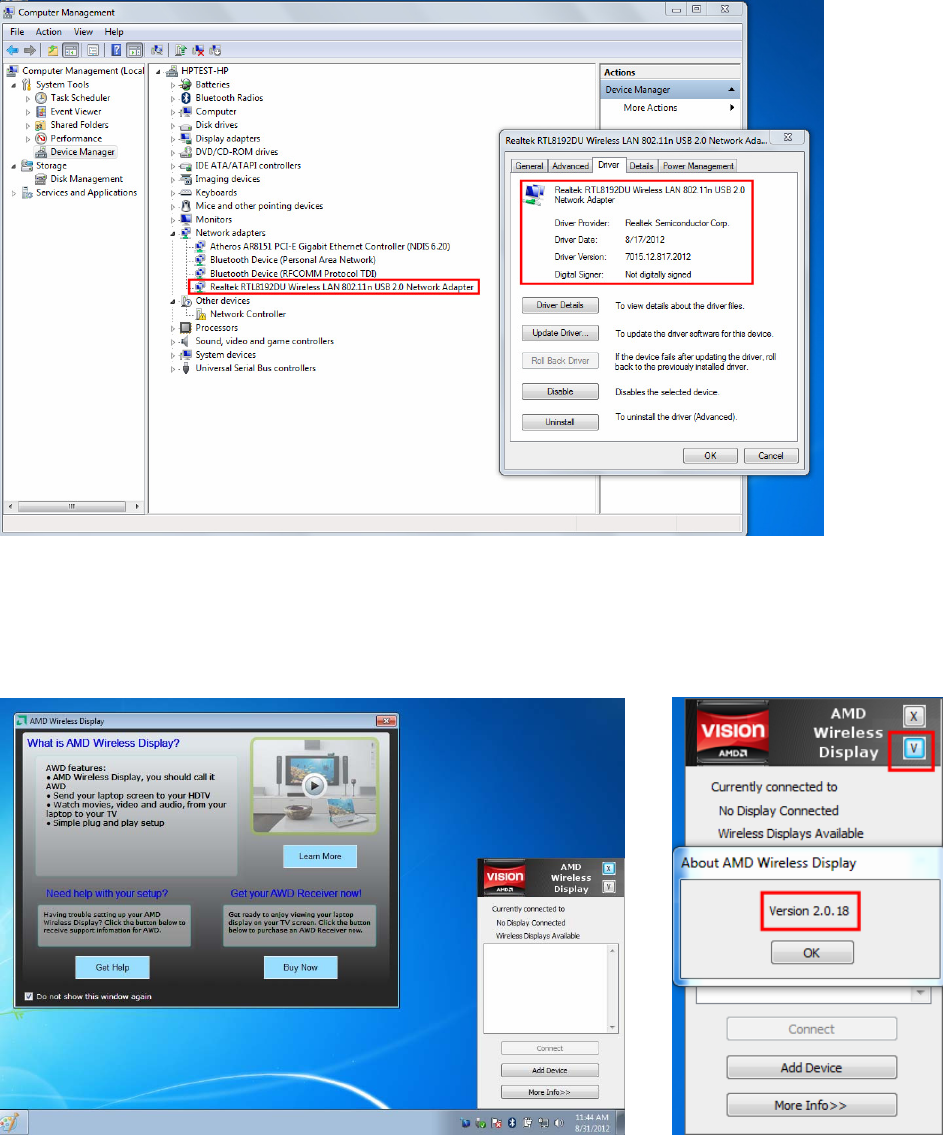
3.3 Afterreboot,plug‐inthewirelessUSBdongle,andwaittillitisreadytouse.Tocheckifitis
installedcorrectly,gotoDevicemanager,thereshouldbeadeviceRealtekRTL8192DU
WirelessLAN802.11nUSB2.0NetworkAdapterinNetworkadapters,doubleclicktoopen
properties,checktheDrivertab,theversionshouldbe7015.12.817.2012
4 InstallAWD
4.1 InstallAWD,afterfinished,clickontheicon,AWDMainwindowandInformationwindowwill
appear(markthecheckboxininformationwindow,thencloseit).Checkversiontobe2.0.18
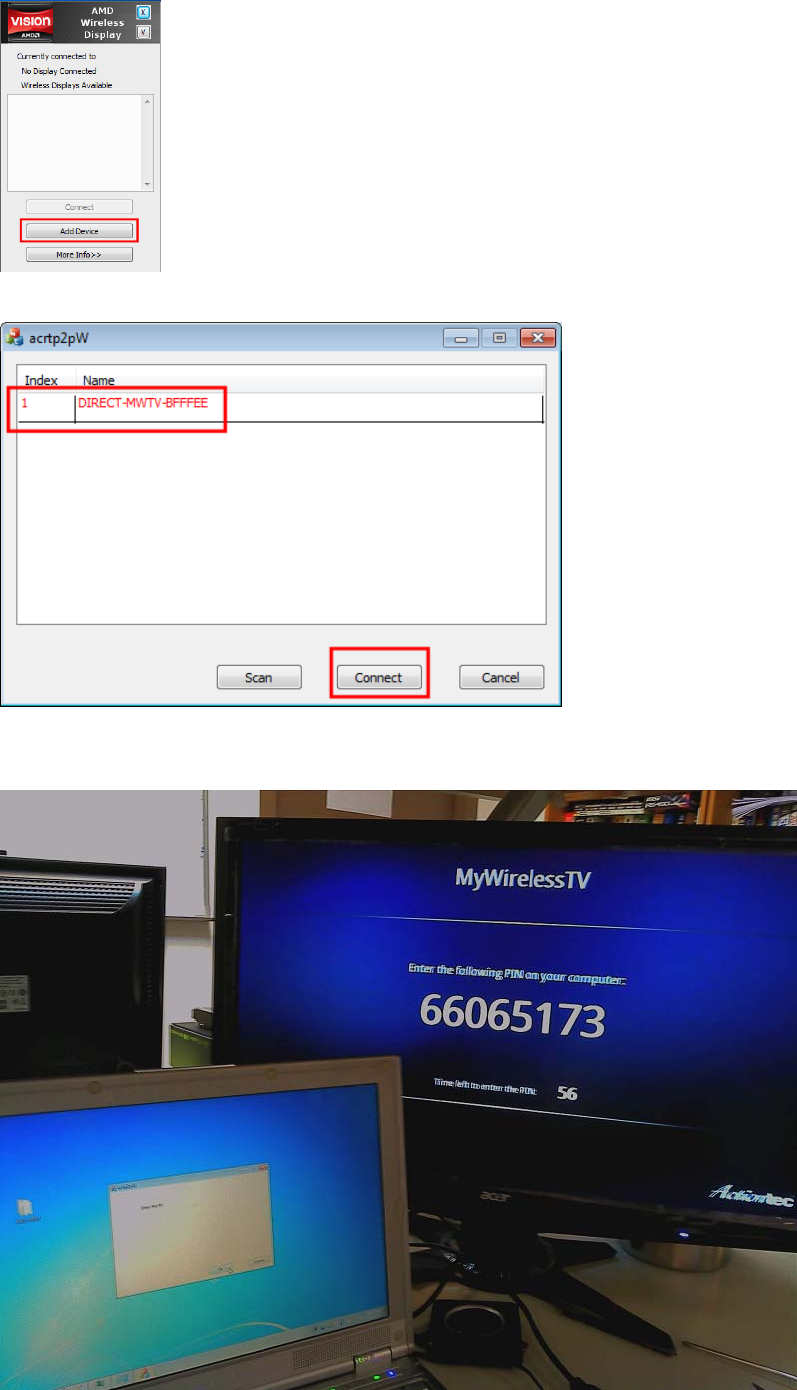
5 ConnectAWD
5.1 PINmethod(Firsttime)
5.1.1 ClickAddDevicebutton
5.1.2 Pairwindowwillappear,scanandlistRx.ClickonRxnameandthenclickConnect
5.1.3 PINnumberwillshownonTVandainputwindowwillshownonlaptop,inputthePIN
numberandthenclickOK
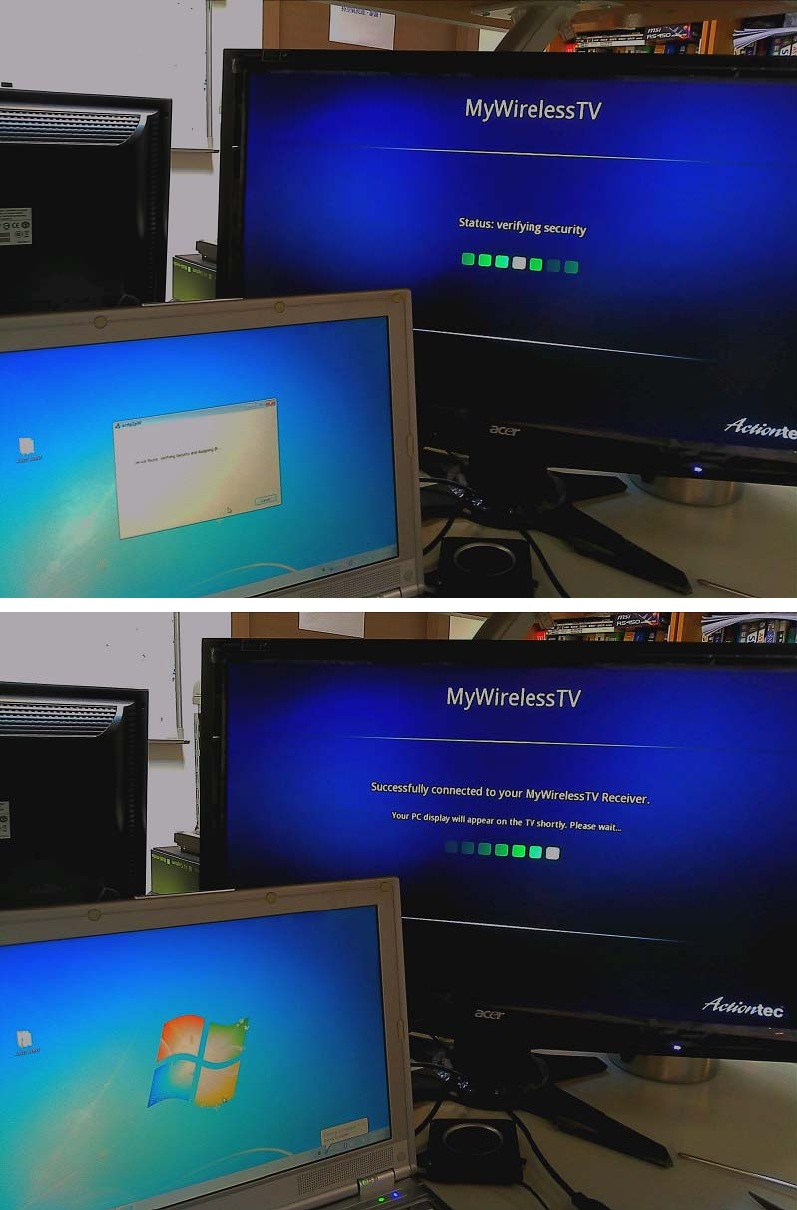
5.1.4 Waitfortheconnectionprocess
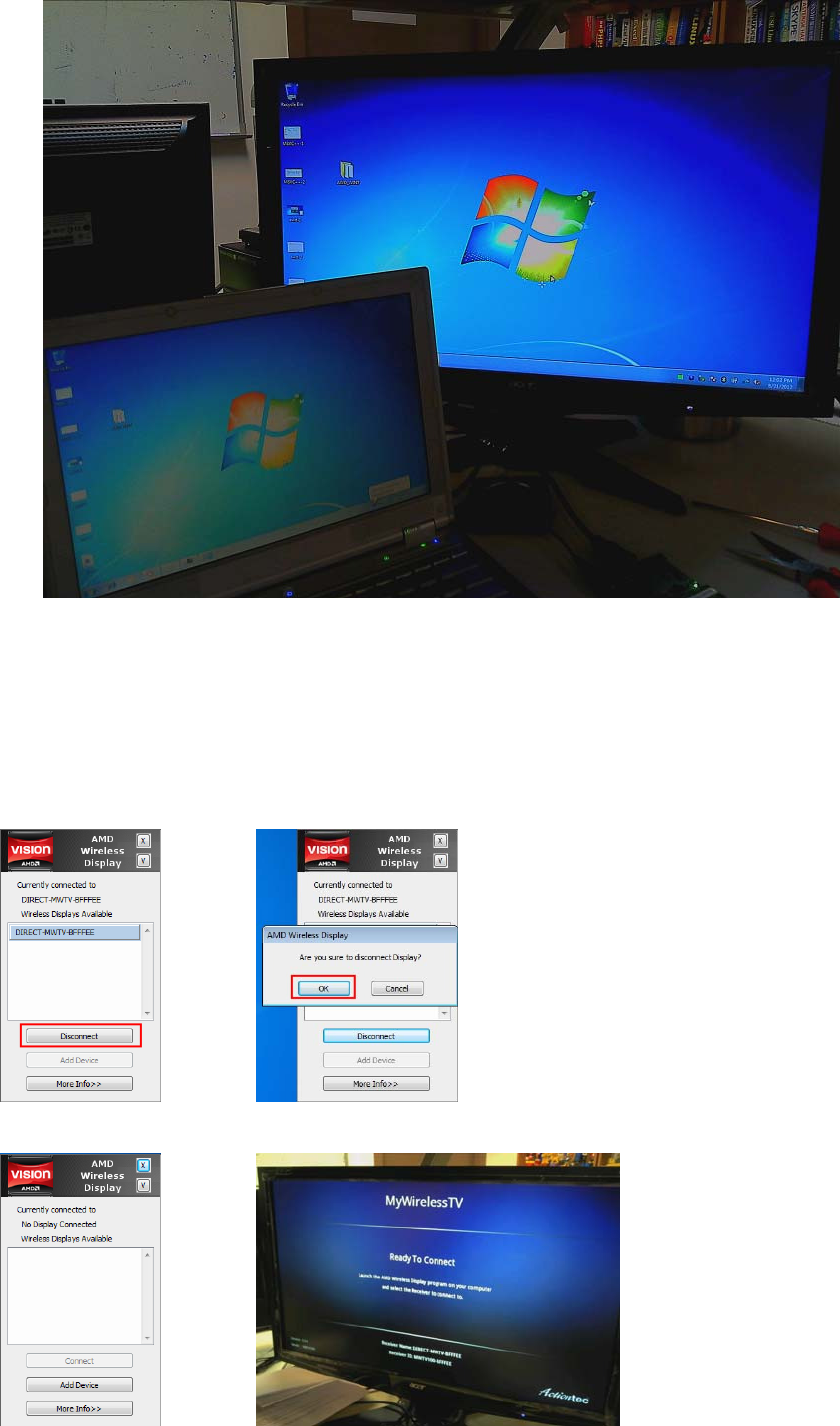
5.1.5 Afterfinish,laptopscreenwillbedisplayedonTV
5.2 Persistentmethod
SameasPINmethodexceptenteringPIN.ThereisnoneedtoenterPIN
6 Playavideocliprepeatedly
7 DisconnectAWD
7.1 ClickonAWDicon,AWDmainwindowwillappear.ClickDisconnectbutton.ClickOKwhen
prompted
7.2 AWDandRxwillreturntothestatus,readyfornextconnection.
FCC Statement:
Federal Communication Commission Interference Statement
This equipment has been tested and found to comply with the limits for a Class B digital device,
pursuant to Part 15 of the FCC Rules. These limits are designed to provide reasonable
protection against harmful interference in a residential installation. This equipment generates,
uses and can radiate radio frequency energy and, if not installed and used in accordance with
the instructions, may cause harmful interference to radio communications. However, there is no
guarantee that interference will not occur in a particular installation. If this equipment does cause
harmful interference to radio or television reception, which can be determined by turning the
equipment off and on, the user is encouraged to try to correct the interference by one of the
following measures:
● Reorient or relocate the receiving antenna.
● Increase the separation between the equipment and receiver.
● Connect the equipment into an outlet on a circuit different from that to which the receiver is
connected.
● Consult the dealer or an experienced radio/TV technician for help.
FCC Caution: Any changes or modifications not expressly approved by the party
responsible for compliance could void the user’s authority to operate this equipment.
This device complies with Part 15 of the FCC Rules. Operation is subject to the following two
conditions: (1) This device may not cause harmful interference, and (2) this device must accept
any interference received, including interference that may cause undesired operation.
For product available in the USA/Canada market, only channel 1~11 can be operated. Selection
of other channels is not possible.
This device and its antenna(s) must not be co-located or operation in conjunction with any other
antenna or transmitter.
This device is going to be operated in 5.15~5.25GHz frequency range, it is restricted in indoor
environment only.
IMPORTANT NOTE:
Federal Communication Commission (FCC) Radiation Exposure Statement
This EUT is compliance with SAR for general population/uncontrolled exposure limits in
ANSI/IEEE C95.1-1999 and had been tested in accordance with the measurement methods and
procedures specified in OET Bulletin 65 Supplement C. This equipment should be installed and
operated with minimum distance 0.5 cm between the radiator & your body.