Active Innovations AI01B Robotic Toy User Manual GUIDE SIDE 1 FINAL
Active Innovations Robotic Toy GUIDE SIDE 1 FINAL
Contents
- 1. Users Manual Part 1
- 2. Users Manual Part 2
Users Manual Part 1
Setup How to use the Remote Control How to Throw a Pass
Setting Up the Robot to be
a Receiver / Lineman
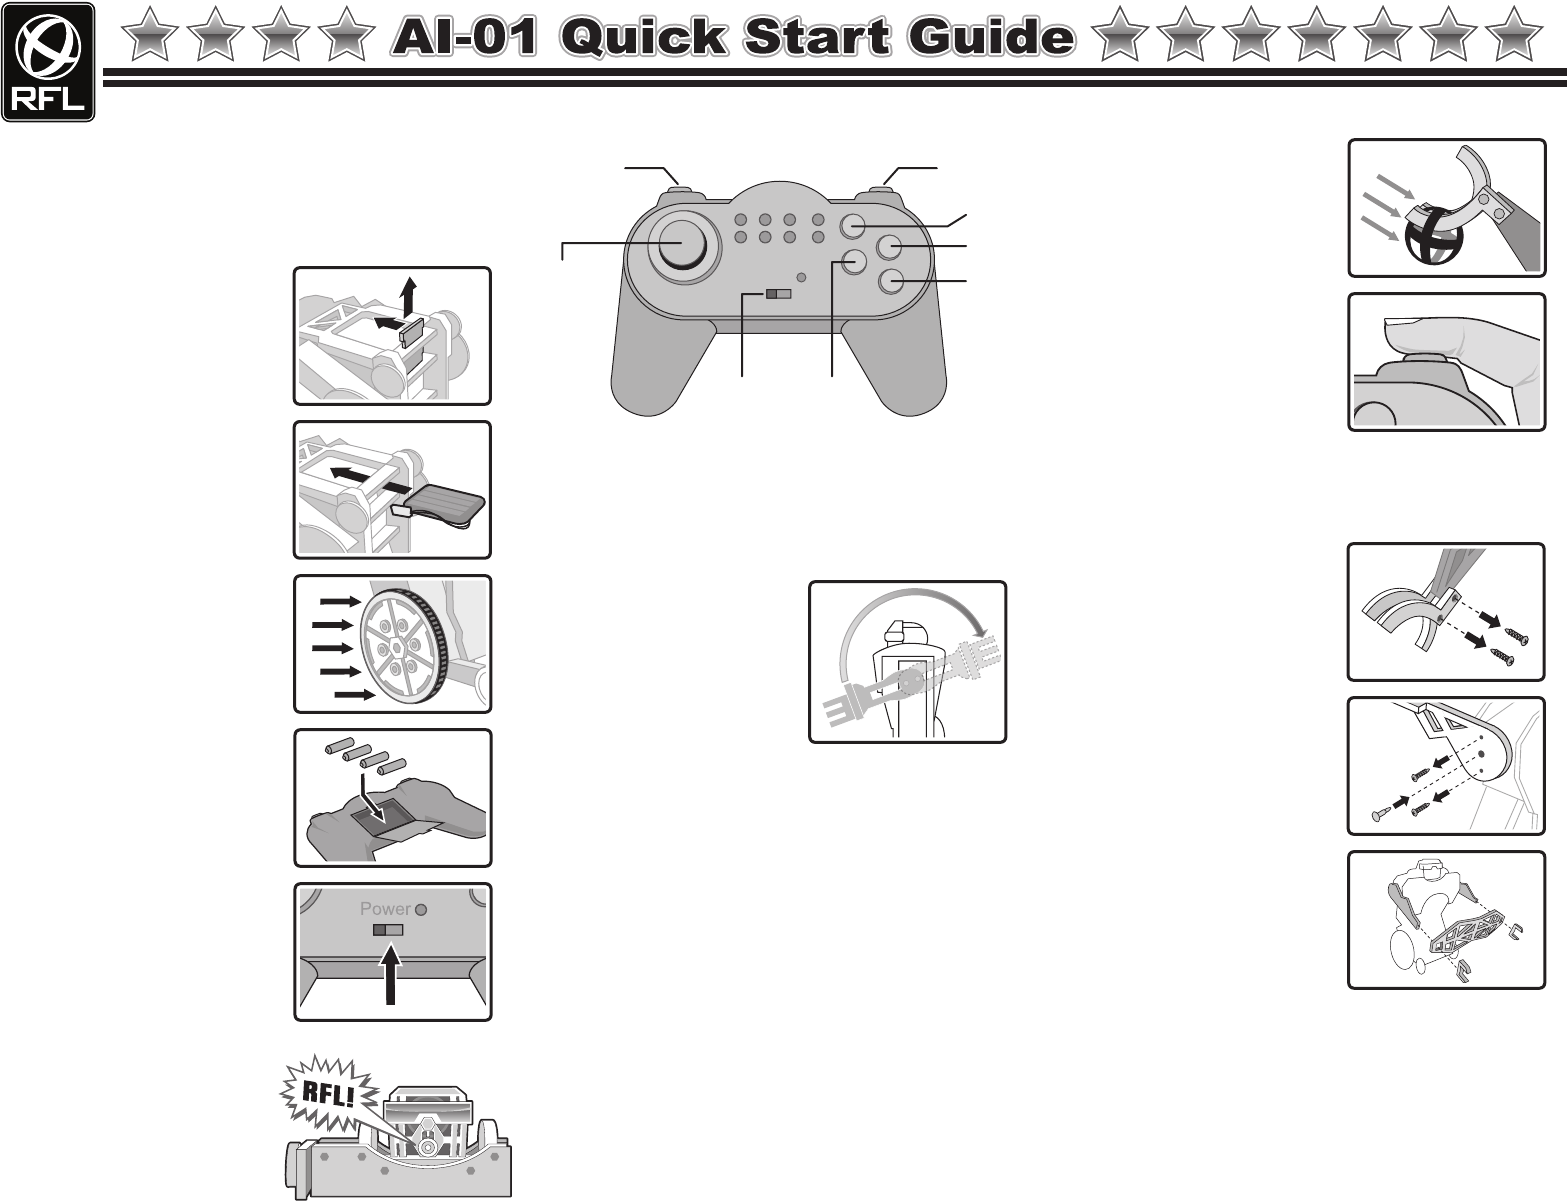
Switch on the remote
control’s power button. Don’t
touch the joystick while
turning on the remote. This
will cause the remote (and
robot) to malfunction until you
turn off/turn on again.
Turn on the robot using the
power switch on the robot’s
back panel. You will see
lights come on and the robot
will say “RFL”.
Remote battery insertion:
place 4 AAA batteries into the
remote compartment on back
of remote.
Place the included traction
bands onto wheels com-
pletely as shown.
Insert battery with cable
arranged to side as shown.
Connect battery cable to
robot’s power cable.
To insert battery: lay robot
face-down and remove
battery key by pushing it
toward the robot’s head and
then pulling it out.
JOYSTICK - drives the robot forward, backward, and
turns. Joystick control is PROPORTIONAL. This means
the further you push the joystick in one direction, the
FASTER it goes. Small motions on the joystick get
small controlled motions on the robot.
BURST button - when you hold down this button, the
robot drives at BURST speed (about 2x normal speed).
HIKE - used to start a play when using two or more
robots (see Advanced Operation section).
THROW - press this key to use the throwing arm.
Press, hold, then release to throw. The longer you hold
the button down, the longer the throw. A brief touch of
the button makes a short throw. Press and hold for 2
seconds and it throws automatically at longest range.
As you hold down the THROW button, LEDs light up on
the remote. This shows the power of the throw. The
more LEDs that light up, the more powerful the throw.
SWITCH - press this button to change remote control
between multiple robots (see Advanced Operation section).
Load the ball onto the throwing
hand as shown. Note that the
ball fits between the two
fingers.
Then just press the THROW
button on the remote.
Remember to hold down the
throw button longer before
releasing to throw farther.
Slide the claw hands and the
receiver plate onto the arms
and fasten with screws.
Install the shoulder bolt into the
center hole of the robot's right
arm, then remove the 2 outside
screws. You cannot use the
receiver hands if the 2 outside
screws are left in.
Remove the screws from the
QB hand pieces. Remove the
hand pieces and store them.
UP and DOWN arm
buttons - raises and lowers
the non-throwing arm (left
side arm). The non-
throwing arm will rotate
through about 180 degrees.
The robot comes with a 9.6V rechargable battery pack.
This should be fully charged before use. The robot will
run best on a level surface like a wood floor or short
carpet. The four casters allow the robot to drive over
cracks easily.
Joystick
Switch Throw
Hike
Burst
Power
Switch
Up
Down
Do not operate the robot if the battery is hot. Allow
battery to cool down before operating.
For notifications about upgrades and accessories for the
robot and remote control, go to:
www.Active-Innovations.com
www.RoboticFootballLeague.com