Adco LUX™ MC Manual Revn.GUIDE
User Manual: Adco Product Manuals
Open the PDF directly: View PDF ![]() .
.
Page Count: 92
Scan here to download a free
recipe book with more than 100
delicious recipes to use in your
Fagor LUX™ Multi-Cooker.
User’s Manual
Manual del Usuario
Manuel d’utilisation
LUX™
MULTI-COOKER
OLLA ELÉCTRICA MULTIFUNCIONAL
MULTI-CUISEUR ÉLECTRIQUE

1
ENGLISH
Contents
Introduction .............................................................................................................. 2
Important Safeguards .............................................................................................. 3
Features and Functions ............................................................................................ 5
Getting Started.......................................................................................................... 7
Operating Functions ................................................................................................. 8
Pressure Cooking Program .................................................................................... 10
Pressure Cooking Charts ....................................................................................... 12
Rice Cooking Programs .......................................................................................... 16
Slow Cooking Program ........................................................................................... 18
Yogurt Program ....................................................................................................... 19
Greek Yogurt ........................................................................................................... 22
Brown Function ...................................................................................................... 22
Sauté Function ........................................................................................................ 23
Simmer Function .................................................................................................... 23
Steam Function ....................................................................................................... 24
Keep Warm Function .............................................................................................. 24
Time Delay Function ............................................................................................... 25
Cleaning and Maintenance .................................................................................... 26
Troubleshooting ...................................................................................................... 28
Español.................................................................................................................... 29
Français .................................................................................................................. 57
Limited Warranty .................................................................................................... 86
ENGLISH

2
ENGLISH
Introduction
Thank you for purchasing this state of the art Fagor LUX™ Multi-
Cooker! The Fagor LUX™ can be used to steam, simmer, brown,
sauté, cook white rice, brown rice, risotto, yogurt, pressure cook
and slow cook foods to perfection. The user friendly electronic
controls are simple and straightforward, allowing you to set recipe
times with ease. Plus, the convenient TIME DELAY and KEEP WARM
settings provide you with cooking flexibility that meets your busy
schedule.
This Fagor LUX™ Multi-Cooker user’s manual contains information
on the use and care of this product. Please read this manual
carefully before operating the Fagor LUX™ Multi-Cooker to ensure
proper usage and maintenance of the unit. Carefully following the
directions in this manual will enable you to optimize the performance
and lifespan of the cooker.
Note: This manual applies to all colors and sizes of the LUX™ Multi-
Cooker.

3
ENGLISH
IMPORTANT SAFEGUARDS
The product you have purchased is a state of the art appliance. It adheres to
all of the latest safety and technology standards; however, as with any electric
appliance, there are some potential risks. Only operate this cooker in accordance
with the instructions provided and only for its intended household use.
PLEASE READ THE INSTRUCTIONS BELOW BEFORE USING THE
APPLIANCE FOR THE FIRST TIME.
• Readalloftheinstructionscontainedinthismanualbeforeusingtheappliance.
• This product is not intended for commercial or outdoor use; it is only for
household and indoor use.
• Donotoperatetheunitiftheelectriccordorplugisdamaged.Iftheappliance
is not working properly, has been dropped or damaged, left outdoors or
submergedinwater,discontinueuseimmediatelyandcontactourcustomer
service department at 1-800-207-0806.
• TheMulti-cookerhasaNEMA5-15P,3pinspluganda47.24inchpowercord.
• AttachplugtotheMulti-cookerbasefirst,theninsertthepower plug into a
poweroutlet.Alwaysensurethatthepowercordiscompletelydry.
• Donotlettheelectriccordhangovertheedgeofthetableorcounter.
• Donotlettheelectriccordtouchhotsurfaces.
• If using an extension cord to connect the Multi-cooker, please note that a
damagedextension cordcan cause the unitto malfunction.Always check
yourextensioncordfordamageandbesureitiscompliantwiththerequired
voltage.Forsafety,besuretoarrangethecordsothatitcan’tbepulledonby
children or tripped over unintentionally.
• DonotplacetheMulti-cookernearheat-emittingdevicessuchasheaters,gas
cooktopsorelectricburners.Donotplacethecookerinaheatedoven.
• AlwaysusetheMulti-cookerinawell-ventilatedarea.
• Usingaccessoriesorreplacementpartsthatarenotrecommendedorsoldby
themanufacturermaycausedamagetotheMulti-cookerorpersonalinjury.
• Childrenneedcloseadultsupervisionatalltimeswhentheyareinoraround
the kitchen. Keep this appliance out of the reach of children.
• Thisapplianceis not intended foruse bypersons (includingchildren)with
reducedphysical, sensoryor mentalcapabilities, orlack ofexperienceand
knowledge,unlesstheyhavebeengivensupervisionorinstructionconcerning
useoftheappliancebyapersonresponsiblefortheirsafety.
• Whilein operation,donotcover theapplianceor positionitnearflammable
materialsincludingcurtains,draperies,walls,andfabricupholsteredfurniture.
•Do not open thepressure cookeruntil theunit hascooledand all internal

4
ENGLISH
pressure has been released. If the handles are difficult to push apart, this
indicatesthatthecookerisstillpressurized–donotforceitopen.Anypressure
inthecookercanbehazardous.
• AlwayscookintheremovablecookingpotoftheMulti-cooker.Cookingwithout
theremovablecookingpotmaycauseanelectricshockordamagetotheunit.
• Neverdeepfryorpressurefryinthecooker.Itisdangerousandmaycausea
fire and serious damage.
• Nevercoverorblockthepressurevalvewithanything.Thismaycauseover
pressurizing and lead to serious accidents.
• Whileyou’recooking,thelidandtheouterstainlesssteelsurfaceofthecooker
might get hot. Handle with care and carry or move the cooker using only the
side handles. Be very cautious when moving any appliance containing hot food
orliquids.
• Keep hands and face away from pressure regulator knob when releasing
pressurefromthecookertoavoidbeingscaldedbyhotsteam.
• Aftercooking,useextremecautionwhenremovingthelid.Seriousburnscan
result from residual steam escaping from inside the unit. Lift the lid facing
awayfromyouandallowthedropsofwatertotricklebackfromthelidintothe
cooker.
• Alwaysunplugandletcoolbeforecleaningandremovingparts.Neverattempt
tounplugtheunitbypullingonthepowercable.Keepunpluggedwhennotin
use.
• Toreducetheriskofanelectricshock,neverimmersetheplug,powercable
orhousinginwateroranyotherliquid.Onlytheremovablecookingpotcanbe
placed in the dishwasher.
• Onlyqualifiedexpertsmayrepairandperformmaintenanceworkontheelectric
Multi-cookerusingauthenticFAGORreplacementandaccessoryparts.Never
attempttodissembleandrepairtheMulti-cookeryourself.
• This appliance cooks under pressure. Improper use may result in scalding
injury. Make certain unit is properly closed before operating. See “Pressure
CookerProgram”.
• Donotfilltheunitover2/3full.Whencookingwithfoodsthatexpandsuchas
riceordriedvegetables,donotfilltheremovablecookingpotmorethan1/2
full. Over filling may cause a risk of clogging the vent pipe and you will not have
enoughroomforproperbuildingofpressure.See“OperatingFunctions”.
• Thefollowingfoodstendtofoam,frothand/orsputter:applesauce,cranberries,
pearlbarley,oatmeal,splitpeas,noodles/pastaorrhubarb.Theseitemsmay
blockthepressurevalveiffilledtoohighintheremovablecookingpot.Please
besurewhenpressurecookingtheseitemstonotfilltheremovablecooking
pot more than half way.
• Alwayscheckthepressurereleasedevicesforcloggingbeforeuse.
SAVE THESE INSTRUCTIONS

5
ENGLISH
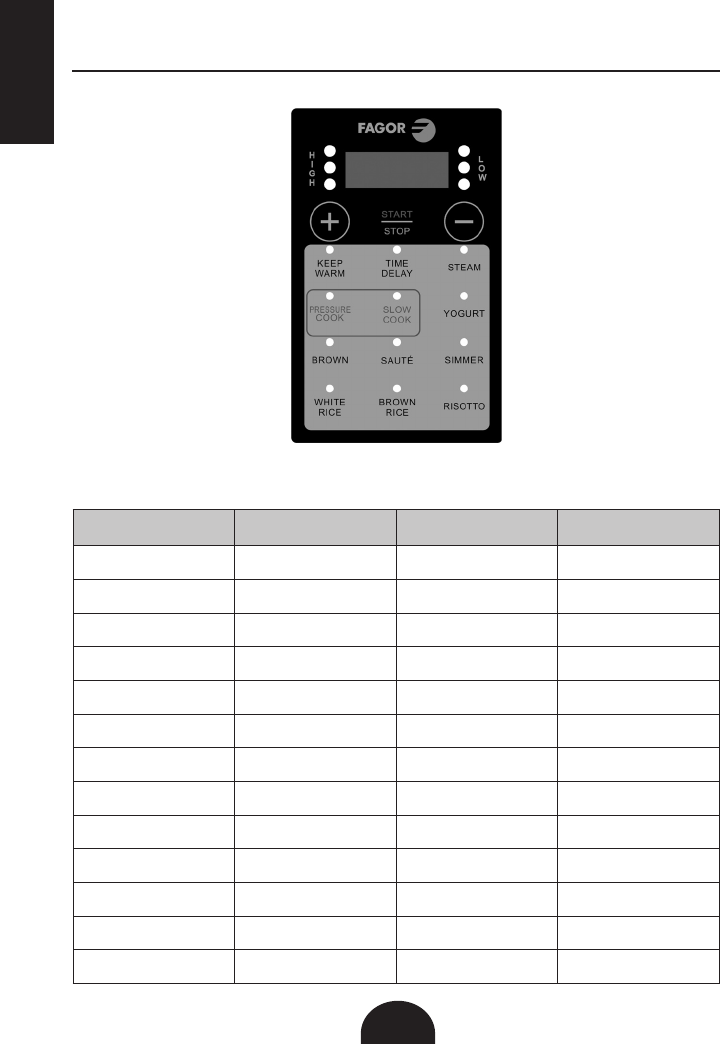
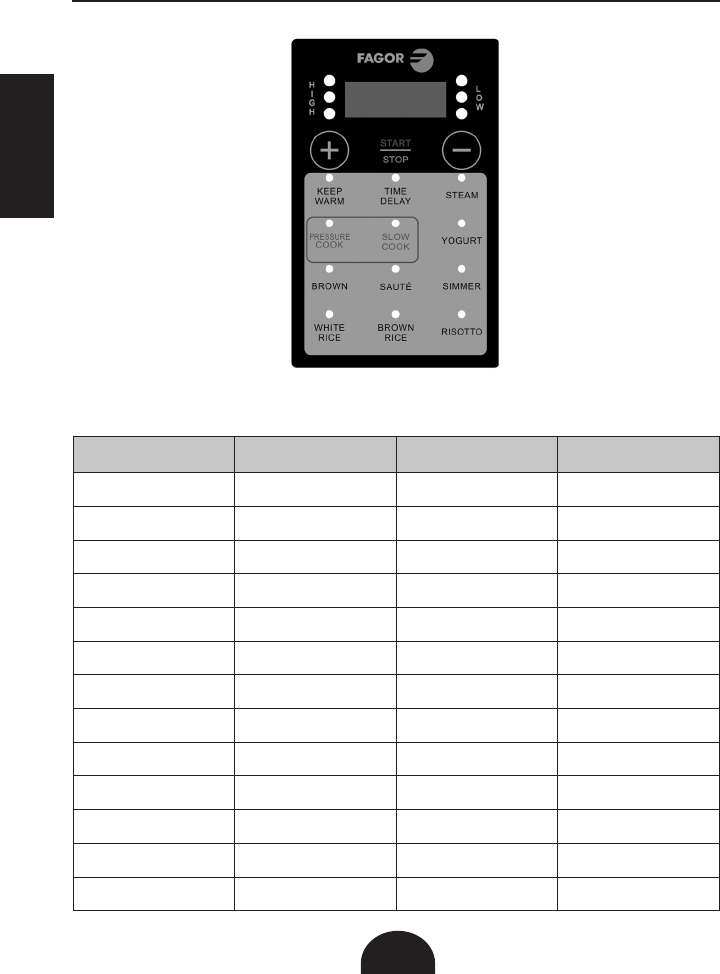
Features and Functions
Pressure regulating knob (1)
Cool-touch handle (3)
(5) Silicone gasket
(6) Safety Pressure Valve
(7) Anti-blocking case
(pull up to remove)
Stationary pot (11)
(cannot be removed)
Control panel (12)
Condensation reservoir (8)
(can be removed)
(3) Cool-touch handle
(9) Temperature sensor
(9) Heating element
(10) Removable cooking pot
(4) Floating valve
(2) Self- Locking pin
Top of the lid
Bottom of the lid
Body of Multi-cooker

6
ENGLISH
1. Pressure Regulating Knob: Turn the regulating knob to the “Pressure”
position when cooking under pressure or when using any of the rice cooking
functions.Turntheknobtothe“Steam”positiontoreleasethepressureafter
pressurecookingorricecookingandwhenusingtheSTEAMfunction.When
usingthe SLOW COOKER orKEEP WARM functions, besure to turn the
pressureregulatingknobtothe“Steam”positionandnottothe“Pressure”
position.
2. Self-Locking Pin: The lid will lock automatically when it is properly aligned
andclosed.Whilecookingunderpressureyouwillnotbeabletoopenthelid
until all of the pressure is released.
3. Cool-Touch Handles: The cool to the touchhandles ofthe Multi-cooker
allows for easy handling and opening of the lid.
4. Floating Valve: The floating valve controls the amount of pressure inside the
cookerbyallowingexcesspressuretobereleased.
5. Silicone Gasket: Creates an airtight seal needed for the cooker to build
pressure.Checkthesiliconegasketforanytearsorcracksbeforeusingthe
Multi-Cooker.Toorderanewgasket,pleasecontactaFagorRepresentative
at 1-800-207-0806 or purchase it directly on the Fagor website at
www.fagoramerica.com.
6. Safety Pressure Valve: Thesafetypressurevalveallowsexcesspressureto
escapefromthecookerwhenitisbeingusedforpressurecooking.Itworks
independently of the floating valve.
7. Anti-Blocking Case: Pullittowardsyourselftoreleasethepressureregulator
knobforcleaning.
8. Condensation Reservoir: Collectsexcess condensation during cooking. If
thereissomeliquidinthereservoiraftercooking,simplyemptyit.
9. Heating Element and Temperature Sensor: Both elements regulate the
cooking temperature inside the pot.
10. Removable Cooking Pot: Stainlesssteelpotisdishwashersafe,buthand
washing is always recommended.
11. Stationary Pot: Thispotcannotberemovedfromtheelectricmulti-cooker
andshouldNEVERbeusedforcooking.Beforecooking,makesuretoplace
theremovablecookingpotintothestationarypotfirst.Allingredientsshould
beplacedintotheremovablecookingpotONLY.
12. Control Panel: The easy to use controls allow you to select the different
programsavailablewithatouchofafinger.Availableforselectionare:two
pressurecookingsettings,twoslowcookingsettings,whiterice,brownrice,
risotto,brown,sauté,simmer,steam,yogurt,keepwarm,timedelay, start/
stopandaplusandminusbuttontoadjustcookingtimeandtimedelay.Also,
onthecontrolpanelyouwillfindtheHIGHandLOWindicatorlightswhichwill
blinkwhilepressureortemperatureisbuilding.Thesethreelightswillgosolid
once the unit has reached proper pressure or temperature.

7
ENGLISH
Getting Started: BeforeFirstUse
Readthesafetyinstructionsfoundinthismanualbeforeplugginginandoperating
theunit.BeforeusingtheMulti-cookerforthefirsttime,followthesesteps:
1. Remove all packing materials and literature from within the Fagor LUX™
Multi-Cooker.Liftouttheremovablecookingpotandremoveanypiecesof
paperfromunderit.Removetheplasticprotectionfromthecontrolpaneland
any stickers from the lid or stainless steel housing.
2. Wash all removable parts in warm soapy water. Rinse and dry all parts
thoroughly.Wipethestainlesssteelouterhousingwithacleandampcloth.
NEVER submerge the stainless steel outer housing in water or any other
liquid.Onlytheremovablecookingpotisdishwashersafe.
3. Tocleanthepressureregulatorknob,gentlypushthepressureregulatorknob
downandatthesametimeturnthepressureregulatorknobcounterclockwise
pastSTEAMtoCLEANsetting.OncethewhitedotonCLEANisalignedwith
thewhitedotonthebaseofthepressureregulator,youcanliftthepressure
regulator up and off the lid. Look through the holes of the pressure regulator to
makesurethereisnothingobstructing,andthencleanthepressureregulator
knobwithwarmsoapywater,allowingthewatertorunthroughthepressure
regulator to remove all particles.
4. Toputthepressureregulatorbackontothelid,simplyaligntheCLEANsetting
withthewhitedotonthebase,gentlypushdownonthepressureregulator
andturntheknobclockwiseuntilitslidesbackintoplace.
5. Make sure the silicone gasket is seated properly inside the lid or else the
cooker will not function properly.
6. Afterthoroughdrying,placetheremovablecookingpotbackintotheMulti-
cookerbeforecooking.
8
ENGLISH
Operating Functions:
PanelProgramsandFunctions
Temperature/Timer Chart
Cooking Function: Temperature: Preset Time: Timer:
Keep Warm 165°F 30 minutes Up to 12 hours,
30 minute increments
Steam 212°F 5 minutes 1-99 minutes,
1 minute increments
Brown 356°F 30 minutes 1-30 minutes,
1 minute increments
Sauté 284°F 30 minutes 1-30 minutes,
1 minute increments
Simmer 200°F 30 minutes 1-120 minutes,
1 minute increments
High Pressure 240°F-248°F 1 minute 1-99 minutes,
1 minute increments
Low Pressure 226°F-230°F 1 minute 1-99 minutes,
1 minute increments
High Slow Cooker 212°F 2 hours 30 minutes - 10 hours,
30 minute increments
Low Slow Cooker 190°F 2 hours 30 minutes - 10 hours,
30 minute increments
Yogurt 104°F-109°F 8 hours Up to 24 hours,
30 minute increments
White Rice 226°F-230°F 10 minutes 1-99 minutes,
1 minute increments
Brown Rice 240°F-248°F 20 minutes 1-99 minutes,
1 minute increments
Risotto 240°F-248°F 6 minutes 1-99 minutes,
1 minute increments

9
ENGLISH
1. Keep Warm: Usedtoreheatorkeepcookedfoodwarmuntilreadytoserve.
2. Steam: This function isusedtosteammeals such as vegetablesandfish.
Simplyaddatleastahalfacupofwaterintothebottomofyourremovable
cookingpotandinserttheFagorStainlessSteelSteamerBasketandTrivet.
Makesurethatthesteamerbasketispositionedabovethewater.TheFagor
StainlessSteelSteamerBasket andTrivetcanbepurchasedseparatelyon
theFagorwebsiteatwww.fagoramerica.com.
3. Brown: Thisfunctionisusedtosealinflavorandjuicebygivingthefooda
goldenbrownexterior.
4. Sauté: Thisfunctionisusedwhencookingsmallpiecesoffoodbypreparing
themwithverylittleoilatahighheatbeforeusingthepressurecookingor
slow cooking function.
5. Simmer: This function is used to make soup, stew, sauce or other entrees
thatneedtobecookedatalowerheatsetting.Thisfunctionismuchgentler
thantheboilingpointofwaterandwillmakemeatandvegetablesverytender.
6. Pressure Cooking: HIGH-Usethisfunctiontocookathighpressure,10-13
PSI(poundspersquareinch).Thispressuresettingismoresuitabletocook
toughermeatsandvegetablesorotherfoodsthatarenotsodelicate.LOW-
Usethisfunctiontocookatalowpressure,4-7PSI.Thispressuresettingis
moresuitabletocookdelicatefoodssuchastendervegetablesandcertain
types of fish.
7. Slow Cooking: This program cooks food slowly for up to 10 hours at
temperaturesof190°F(LOW)or212°F(HIGH).Slowcookinghelpsfoodretain
maximumflavorandtenderness.
8. Yogurt: This function is perfect for making traditional homemade yogurt and
Greekyogurt.
9. White Rice: This function uses low pressure and gives you a preset time of 10
minutes to cook different types of white rice.
10. Brown Rice: This function uses high pressure and gives you a preset time of
20 minutes to cook a variety of different rices.
11. Risotto: This function uses high pressure and gives you a preset time of 6
minutes to create a gourmet risotto dish.
12. Start/Stop: Tobeusedafteracookingselectionhasbeenmadetobeginthe
cooking process or if you would like to cancel the cooking function.
13.Time Delay: Allowsyoutodelaycookingtimeupto6hours.Simplypushthe
timedelaybutton,whichwillincreaseby30minuteincrementsuntilyoureach
the6hourmaximumtime.

10
ENGLISH
Pressure Cooking Program
Thisprogramwillallowfoodtocookfasterunderpressurebyreducingcooking
timeupto70%comparedtotraditionalcookingmethods.Pressurecookingis
fast, easy, safe and healthy!
1. Before every use, make sure the silicone gasket and the pressure regulating
valves are clean and are properly placed within the cooker.
2. Plugthecordintoawalloutlet.
3. Placethe removablecooking pot into thecooker, andaddthe ingredients
followingtherecipe.Whencookingfoodsunderpressure,aminimumof1cup
(8oz.)ofliquidisrequired.
NOTE: Donotfillthepotmorethan2/3fullwithfoodandliquid.Donotfillthe
unitmorethan½fullwhencookingfoodsthatexpandduringcooking.
NOTE: Thefollowingfoodstendtofoam,frothand/orsputter:applesauce,
cranberries, pearl barley, oatmeal, split peas, noodles/pasta or rhubarb.
Theseitemsmayblockthepressurevalveiffilledtoohighintheremovable
cookingpot.Pleasebesurewhenpressurecookingtheseitemstonotfillthe
removablecookingpotmorethanhalfway.
4. Placethelidonthecooker;aligningtheprotrudingpinonthehandlewiththe
unlockedsymbol,andturnyourlidcounterclockwiseuntilitlocksintoplace.
Youwillknowwhenthisunithasbeenlockedonceyouhearthepinclickinto
place.
5. TurnthepressureregulatorknobtoPRESSURE.
6. ChoosethedesiredcookingmodebypressingthePRESSURECOOKbutton
onceforHIGHpressureandtwiceforLOWpressure.
7. Setthedesiredcookingtimebypressingthe+ or-buttonsoncefor each
additionalminuteortofastadvance,holdthebuttondownuntilyoureachthe
desiredtime.Themaximumpressurecookingtimeis99minutes.
8. To set the delay timer, select the TIME DELAY button and use the + or –
buttonstoadjustwhencookingshouldbegin.Thedelaytimegoesupin1/2
hour increments.
9. PresstheSTART/STOPbuttontobegincooking. Theindicatorlighton the
PRESSURECOOKbuttonwillflashwhentheunithasbeguntobuildpressure.
IfyouforgettoselectadesiredcookingtimeorforgettopresstheSTART/
STOPbutton,theunitwillbeep twice and the digital display will read--:--
after30seconds.
10.Asthe pressureis building, thethree circlesnext to the chosenpressure
settingwilllightuponeatatime.ThePRESSURECOOKbuttonwillalsoflash
untilithasreachedfullpressure.Oncepressurehasbeenreached,allthree
circleswillturnsolidred,thepressurecookerbuttonindicatorlightwillalso
turnsolidredandthentheunitwillbeep.Thisiswhenyourcooktimebegins.
11.The unit will then begin to count down in minutes once the appropriate
pressurehasbeenreached.Thefloatingvalvewhichislocatedinthelidwill
alsorisewhenpressurehasbeenreached.

11
ENGLISH
WARNING: NEVER TRY TO FORCE THE LID OPEN WHILE YOU ARE
COOKING UNDER PRESSURE. THIS CAN RESULT IN A SERIOUS ACCIDENT.
WARNING: NEVER DEEP FRY OR PRESSURE FRY IN THE MULTI-COOKER.
IT IS DANGEROUS AND MAY CAUSE A FIRE AND SERIOUS DAMAGE.
12.Thecookerwillbeeponcethecookingtimeends.Itwillturntheautomatic
KEEPWARMfunctiononandthisfunctionwillblinkuntilyoupresstheSTART/
STOPbuttontocanceltheprogram.AfterpressingtheSTART/STOPbutton,
releasethepressure.Youhavetwooptionsforreleasingthepressure:
a. Quick Release Method: Releasethepressureimmediatelybyturningthe
pressureregulatorknobtoSTEAM.
CAUTION:THESTEAMCOMINGOUTOFTHECOOKERWILLBEHOT,
ANDMIGHTCONTAINDROPLETSOFHOTLIQUID.ALWAYSTURNTHE
JETOFSTEAMAWAYFROMYOURFACEANDHANDS.BESURETOUSE
POTHOLDERSWHENRELEASINGPRESSURE.
b.Natural Release Method: Allowsthe pressure to drop naturally without
turning the pressure regulator knob to STEAM. This will take several
minutes,duringwhichthefoodinsidewillcontinuecooking.Somerecipes
(suchasrisotto)benefitfromthisextracookingtime.Youwillknowwhen
thepressurehasbeenreleasedbecausethefloatingvalvewilldropandyou
willbeabletoopenthelid.
NOTE:If you donotpresstheSTART/STOPbuttonattheendof the cooking
time,theMulti-cookerwillswitchtoKEEPWARMandwillbeepperiodicallyto
remind you that cooking has ended.
13.Once all the pressure is released, removethelid by turning it clockwise,
liftingitupandtiltingthelidawayfromyoutoavoidbeingscaldedbysome
remaining steam or hot water condensation dripping from the inner portion of
the lid.
WARNING: AFTER COOKING, THE REMOVABLE COOKING POT WILL BE
HOT. USE POTHOLDERS TO HANDLE IT OR LET IT COOL DOWN BEFORE
REMOVING.
12
ENGLISH
Pressure Cooking Charts
Pressure cookingtimes are approximatetimes. Use these cookingtimes asa
generalguideline.Sizeandvarietywillaltercookingtimes.
Pressure Cooking Vegetables (Fresh & Frozen): Toachievebestresultswhen
pressurecookingfreshorfrozenvegetables,pleaserefertothebelowtipsand
hints:
1. UsetheSTEAMfunctionwhenmakingsteamedvegetabledishes.
2. Usethequickreleasemethodwhenpressurecookingvegetablessotheydo
not overcook.
3. Useaminimumof1cupofliquidwhencookingvegetables.
4. Whensteamingvegetables,usetheFagorStainlessSteelSteamerBasketand
Trivet,whichcanbepurchasedattheFagorwebsiteatwww.fagoramerica.
comorbycallingaFagorRepresentativeat1-800-207-0806.
Vegetable Pressure Cooking Chart:
Vegetable Pressure Setting Fresh
(Cooking Time) Frozen
(Cooking Time)
Acorn Squash, chunks High 6-7 minutes 8-9 minutes
Artichoke, 4 medium – large High 8-10 minutes 10-12 minutes
Asparagus High 1-2 minutes 2-3 minutes
Whole Beets, medium – large High 20-25 minutes 25-30 minutes
Broccoli, Florets High 2-3 minutes 3-4 minutes
Brussel Sprouts High 3-4 minutes 4-5 minutes
Butternut Squash, chunks High 8-10 minutes 10-13 minutes
Cabbage, Quartered High 3-4 minutes 4-5 minutes
Carrots, whole or chunk High 2-3 minutes 3-4 minutes
Cauliflower, florets High 2-4 minutes 3-5 minutes
Celery, chunks High 2 minutes 3 minutes
Collard Greens High 4-5 minutes 5-6 minutes
Corn on the Cob High 3-5 minutes 4-6 minutes
Edamame, in pod High 4-5 minutes 5-6 minutes
Eggplant High 2 minutes 3 minutes
Endive High 1-2 minutes 2-3 minutes
Kale, coarsely chopped High 1-2 minutes 2-3 minutes
Leeks High 2-4 minutes 3-5 minutes
Onions, sliced High 2 minutes 3 minutes
Potatoes, whole, small High 5-8 minutes 6-9 minutes
Potatoes, whole, large High 10-12 minutes 11-13 minutes
Potatoes, sliced or cubed High 5-8 minutes 6-9 minutes
Pumpkin, chunks High 4-8 minutes 6-12 minutes
Spinach High 1-2 minutes 3-5 minutes
13
ENGLISH
Sweet Potatoes, cubed High 7-9 minutes 9-11 minutes
Sweet Potatoes, whole High 10-15 minutes 12-19 minutes
Tomatoes, quartered High 2 minutes 4 minutes
Zucchini High 2 minutes 3 minutes
Pressure Cooking Fresh or Dried Fruits:Toachievebestresultswhenpressure
cookingdriedorfreshfruit,pleaserefertothebelowtipsandhints:
1. Quickreleasemethodisrecommendedwhenpressurecookingfruittoprevent
from overcooking.
2. Onehalfcupofwaterissufficientforcookinganyquantityoffruitbecausethe
cooking time is very short.
3. Addsugartofruitonlyafteritiscooked,notbefore.
Fruit Pressure Cooking Chart:
Fruit Pressure Setting Fresh
(Cooking Time) Dried
(Cooking Time)
Apples (Slices or Chunks) High 2 minutes 3 minutes
Apples (Whole) High 3 minutes 4 minutes
Apricots, whole or halved High 2-3 minutes 3-4 minutes
Peaches High 2-3 minutes 4-5 minutes
Pears High 2-4 minutes 3-5 minutes
Plums/Prunes High 2-4 minutes 3-5 minutes
Grapes/Raisins High 1-2 minutes 4-5 minutes
Pressure Cooking Beans/Legumes (Dry & Soaked): To achieve best results
whencookingwithdriedorsoakedbeans/legumes,pleaserefertothebelowtips
andhints:
1. Rinsedriedbeans/legumesundercoldwateranddrain;discardanypebbles
orotherdebrisinbatch.
2. Donotfillcookermorethanhalffulltoallowforbeans/legumestoexpandin
size.
3. Useenoughliquidtocoverthebeans/legumes
4. Donotsaltbeans/legumes.Usingsaltwhilecookingthebeans/legumeswill
prevent them from cooking properly.
5. Add1-2tablespoonsofoiltobeans/legumestominimizefrothing.
6. Releasepressure whencooking driedbeans/legumes byusing thenatural
releasemethodforbestresults.
14
ENGLISH
Beans/Legumes Pressure Cooking Chart:
Beans/Legumes Pressure Setting Cooking Time
(Dried 180ml Cups) Cooking Time
(Soaked Overnight)
Adzuki Beans High 20-25 minutes 10-15 minutes
Black Beans High 20-25 minutes 10-15 minutes
Black-Eyed Peas High 20-25 minutes 10-15 minutes
Cannellini Beans High 35-40 minutes 20-25 minutes
Chestnuts, pierced High 7-10 minutes 5-7 minutes
Chickpeas (Garbanzo Beans) High 34-40 minutes 20-25 minutes
Great Northern Beans High 28-30 minutes 23-25 minutes
Kidney Beans High 25-30 minutes 20-25 minutes
Lentils (Brown) High 15-20 minutes N/A
Lentils (Green) High 15-20 minutes N/A
Lentils (Red) High 15-17 minutes N/A
Lima Beans High 20-24 minutes 10-15 minutes
Navy Beans High 25-30 minutes 20-25 minutes
Pinto Beans High 25-30 minutes 20-25 minutes
Red Beans High 25-30 minutes 20-25 minutes
Soybeans High 25-30 minutes 20-25 minutes
Split Peas (Green) High 15-20 minutes 10-15 minutes
Split Peas (Yellow) High 15-20 minutes 10-15 minutes
Pressure Cooking Rice/Grains:Toachievebestresultswhenpressurecooking
rice/grains,pleaserefertothebelowtipsandhints:
1. Add1-2tablespoonsofoiltothedriedgrainstominimizefrothing.
2. Donotfillremovablecookingpot morethanhalfwaytoallowrice/grainto
expandinsize.
3. Donot use the quick releasemethod to release pressure;Use thenatural
release method instead to release pressure from the cooker.
4. PearlBarleytendstofroth,foamandsputterwhichmayblockthepressure
valveiffilledtoohighintheremovablecookingpot.Pleasebesuretonotfill
theremovablecookingpotmorethanhalfway.
Rice/Grain Pressure Cooking Chart:
Rice/Grain Grain : Water Ratio
(180ml Cups) Cooking Function & Cooking Times
Arborio 1:3 Risotto, 6 minutes
Barley 1:3 – 1:4 Brown Rice, 25-30 minutes
Basmati 1:1½ White Rice, 6-9 minutes
Brown 1:1¼ Brown Rice, 25-30 minutes
Couscous 1:2 Brown Rice, 5-8 minutes
Jasmine 1:1 White Rice, 8-9 minutes

15
ENGLISH
Long Grain 1:1½ White Rice, 10 minutes
Millet 2:3 Brown Rice, 10-12 minutes
Pearl Barley 1:4 Risotto, 25-30 minutes
Quick Cooking Oats 1:1 2⁄3Risotto, 5-6 minutes
Quinoa 1:2 Brown Rice, 8-10 minutes
Short Grain Rice 1:1½ White Rice, 8-9 minutes
Steel Cut Oats 1:1 2⁄3 Risotto, 10 minutes
Sushi Rice 1:1½ White Rice, 9 minutes
Wheat Berries 1:3 Brown Rice, 25-30 minutes
Wild Rice 1:3 Brown Rice, 25-30 minutes
Pressure Cooking Meat/Poultry: Toachievebestresultswhencookingmeat/
poultry,pleaserefertothebelowtipsandhints:
1. Cutmeat/poultryintopiecesofuniformsizeforevencooking.
2. Whenmixingmeats,cutthosethatcookmorequicklyintolargerpiecesand
those that cook more slowly into smaller pieces.
3. Brownmeat in smallbatches –overcrowding thecooker canresult in the
meatbecomingtoughandflavorless.
Meat/Poultry Pressure Cooking Chart:
Meat/Poultry Pressure Setting Cooking Time
Beef Brisket, whole High 40-50 minutes
Oxtail High 40-50 minutes
Beef Short Ribs High 35-40 minutes
Boneless Chicken Strips High 10-12 minutes
Chicken Breast High 8-10 minutes
Chicken Legs High 10-12 minutes
Chicken Wings High 10-12 minutes
Chicken (Whole) High 20-25 minutes
Cornish Hen High 10-15 minutes
Duck (Whole) High 25-30 minutes
Ham (Uncooked) High 26-30 minutes
Lamb, Cubes High 10-13 minutes
Pork Spareribs High 20-25 minutes
Pork Chops High 8-10 minuets
Pork (Baby Back Ribs) High 19-24 minutes
Pork Loin High 45-50 minutes
Pork Shoulder High 45-50 minutes
Turkey (Drumsticks) High 15-20 minutes
Veal Chops High 5-8 minutes
Beef Cubes High 18-23 minutes
Chicken Cubes High 10-12 minutes

16
ENGLISH
Pressure Cooking Seafood: To achieve best results when cooking seafood,
pleaserefertothebelowtipsandhints:
1. Alwaysleaveatleast2inchesfromthetoprimtopreventoverflowing.
2. Smaller types of seafood, such as clams and shrimp, do not take long to
cook,therefore,it’sbesttoaddthesetypesofseafoodtoadishduringthe
last few minutes of cooking.
Seafood Pressure Cooking Chart:
Fish/ShellFish Pressure Setting Cooking Time
(Fresh) Cooking Time
(Frozen)
Fish, whole Low 5-6 minutes 7-10 minutes
Fish Filet Low 2-3 minutes 3-4 minutes
Fish Steak Low 3-4 minutes 4-6 minutes
Crab Legs Low 3-4 minutes 5-6 minutes
Lobster Tail Low 2-3 minutes 3-4 minutes
Lobster (Whole) Low 3-4 minutes 4-6 minutes
Mussels Low 2-3 minutes 4-5 minutes
Scallops (Small) Low 1 minute 2 minutes
Scallops (Large) Low 2 minutes 3 minutes
Shrimp, shell Low 2-3 minutes 3-4 minutes
Shrimp (Med/Large) Low 1-2 minutes 2-3 minutes
Shrimp (Jumbo) Low 2-3 minutes 3-4 minutes
Rice Cooking Programs
White Rice:CookricetoperfectioneverytimewiththeWHITERICEfunction.
Thisfunctionisprogrammabletoensurericeissoftandcomposedofjustthe
rightcookingtemperatures.Ricewillbefluffyanddeliciouswhileeliminatingany
cooking hassle.
1. PlacetheremovablecookingpotintotheMulti-cooker.
2. Placeabout1-2tablespoonsofoilintotheremovablecookingpot.
3. Addthewaterandriceratiosneededandanyotherdesiredingredientsinto
theremovablecookingpot.
4. CloseandlockthelidoftheMulti-cookerbyproperlyaligningthehandlesand
turningthelidcounterclockwise.SetpressureregulatorknobtoPRESSURE.
5. PresstheWHITERICEfunctionwhichwillshowapresettimeof10minutes.If
youneedtoadjustthetime,pressthe+or–buttonstoadjusttimingandthen
presstheSTART/STOPbuttononcetobegincooking.
6. Asthepressureisbuilding,theWHITERICEfunctionwillblink.Oncepressure
hasbeenreached,thelightwillturnsolidredandtheunitwillbeep.Thisis
whenyourcooktimebeginsandtheMulti-cookerwillstartcountingdownby
minutes on the cookers digital screen.

17
ENGLISH
7. Oncecooktimeisover,theMulti-cookerwillautomaticallygotoKEEPWARM
functionuntilyoupresstheSTART/STOPbuttontocanceltheprogram.
Brown Rice: The BROWN RICE function ensures your rice is cooked entirely
while maintaining all of its richness and nutrients. This function transforms your
riceflawlesslybyutilizingaspecializedcookingcycle.
1. PlacetheremovablecookingpotintotheMulti-cooker.
2. Placeabout1-2tablespoonsofoilintotheremovablecookingpot.
3. Addthewaterandriceratiosneededandanyotherdesiredingredientsinto
theremovablecookingpot.
4. CloseandlockthelidoftheMulti-cookerbyproperlyaligningthehandlesand
turningthelidcounterclockwise.SetpressureregulatorknobtoPRESSURE.
5. PresstheBROWNRICEfunction,whichwillshowapresettimeof20minutes.
Ifyouneedtoadjustthetime,pressthe+or–buttonstoadjusttimingand
thenpresstheSTART/STOPbuttononcetobeginbuildingpressure.
6. As the pressure is building, the BROWN RICE function will blink. Once
pressurehasbeenreached,theindicatorlightwillturnsolidredandtheunit
willbeep.ThisiswhenyourcooktimebeginsandtheMulti-cookerwillstart
countingdownbyminutesontheMulti-cookersdigitalscreen.
7. Oncecooktimeisover,theMulti-cookerwillautomaticallygotoKEEPWARM
functionuntilyoupresstheSTART/STOPbuttontocanceltheprogram.
Risotto: The RISOTTO function ensures the temperature is perfectly precise.
CreateRisottothathastheperfectblendoftiming,temperatureandtaste!
1. PlacetheremovablecookingpotintotheMulti-cooker.
2. Placeabout1tablespoonofvegetableoroliveoilintotheremovablecooking
potandchooseSAUTÉfunctiontosautétheArborioriceandotheringredients
withthelidofffirstforabout1-2minutes.
3. Addwaterorstockandanyseasoningoringredientsneeded.Oncetheliquid
comestoarapidboil,properlycloseandlockthepressurecookerlid.
4. ChoosetheRISOTTOfunction,whichwillbepresetto6minutes.Ifyouneed
toadjustthetimefortherecipe,pressthe+or–buttonstodoso.
5. PresstheSTART/STOPbuttononcetobeginbuildingpressure.TheRISOTTO
functionwillblinkasitsbuildingpressure.
6. Oncepressurehasbeenbuilt,theredblinkinglightontheRISOTTOfunction
willgosolidred,theunitwillbeepandthat’swhenyourcooktimewillbegin
andtheunitwillcountdownbyminutes.
7. Afteryourcookingtimeover,theMulti-cookerwillautomaticallyswitchtothe
KEEPWARMfunction.

18
ENGLISH
Slow Cooking Program
Prepareslowcookerclassicssuchaspotroasts,soupsandstewsinupto10
hourswiththisfunction.Loadyouringredientsinthemorninganddinnerwillbe
waiting for you in the evening.
1. PlacetheremovablecookingpotintotheMulti-cooker.
2. Placeallingredientsasneededintotheremovablecookingpot.
3. Placethelidonthecooker;aligntheprotrudingpinonthehandlewiththe
condensationcollector(openlocksymbol),andturnitcounterclockwiseuntil
thelockingpinclicksintoplace.TurnthepressureregulatorknobtoSTEAM
when using the slow cooking program.
4. ChoosethedesiredcookingmodebypressingtheSLOWCOOKbuttonon
thecontrolpanelonceforHIGHslowcookingortwiceforLOWslowcooking.
5. Setthedesiredcookingtimebypressingthe+or–buttonsortofastadvance,
holdthe + or -button downtill youreach the desired cooking time. The
longestcookingtime,whenslowcooking,is10hoursateither190°F(LOW)
or212°F(HIGH).
6. To set the delay timer, select the TIME DELAY button and use the + or –
buttonstoadjustwhenitshouldbegincooking.
7. PresstheSTART/STOPbuttontosettheMulti-cooker.Thecirclesoneither
theHIGHorLOWoption,whicheverhasbeenchosenonthepanel,willbegin
tolightuponeatatime,indicatingthatheatisbeginningtoform.Whenthe
indicatorlightontheslowcookbuttongoessolidredandallthreecirclesgo
solidred,this meanspropertemperaturehasbeenreachedandcooktime
begins.Ifyouforgettoselectadesiredcookingtimeorforgettopressthe
START/STOPbutton,theunitwillbeeptwiceandthedigitaldisplaywillread
--:--after30seconds.
8. The unit will begin to count down in one minute increments after the
temperaturereacheseither190°F(LOW)or212°F(HIGH).
9. Whenthe cooking time is up,the unitwill beepand automaticallygo into
KEEP WARM mode until you press the START/STOP button to cancel the
program.

19
ENGLISH
Yogurt Program
Youonlyneedtwoingredientstomakeyogurtathome:anytypeofmilkandplain
store-boughtyogurt(withliveactivecultures)orstarteryogurt.
Choosing the Milk:
Thefollowingtypesofmilkmaybeused:
1. Pasteurizedmilkofanyfatcontent(full,2%,1%orskimmilk)
2. Powderedmilk
3. Long-lifeUHTsterilizedmilk
4. SoyMilk.BesuretouseUHTsoymilk,whichcontainsoneofthefollowing
ingredients: fructose, honey or malt. These ingredients are necessary for
fermentationandyouwillnotsucceedifnoneareavailableinthemilk.
Live Active Cultures-Unflavored Yogurt:
Allyouneedisasmallamountofplain,unflavoredyogurtwithliveactivecultures,
oftencalledprobiotics.Theplainyogurtcaneitherbepurchasedfromastoreor
usedfromapreviousbatchofhomemadeyogurt.Homemadeyogurtcanonlybe
usedamaximumof2timesasstarteryogurt.Ifyouusethestoreboughtyogurt
andpreferaparticularbrand,tryusingthatoneasastarter.
TheLive&ActiveCultureseal,fromtheNationalYogurtAssociation(NYA),helps
you recognize those products containing significant amounts of live and active
cultures. The seal is a voluntary identification available to all manufacturers of
yogurt whose products contain at least 100 million cultures per gram at the time
ofmanufacture.Sincethesealprogramisvoluntary,someyogurtproductsmay
havesomeliveculturesbutnotcarrytheseal.
NOTE: For 5 cups of milk use ½ cup of plain yogurt or 1 packet starter
culture. For 1 cup of milk use about one tablespoon of plain yogurt.
NOTE:Youcanmakeyogurteitherdirectlyintheremovablecookingpotorusing
glassjarsintheremovablecookingpotbyplacingthemonasteamer.

20
ENGLISH
Yogurt Making Process:
1. Take the starter yogurt from the refrigerator so that it has time to get closer to
room temperature while you heat the milk.
2. Placetheamountofmilkdesiredin the removablecookingpot.Leavethe
lid off and heat the milk to 180-185°F by pressing the SLOW COOK LOW
function.Useathermometertomakesurethatpropertemperaturehasbeen
reached.
3. Removetheremovablecookingpotfromheatandallowthemilktocoolto
anywherebetween(100°F-110°F).To acceleratethecoolingdownprocess,
placetheremovablecookingpotincoldwater.Donotletitcoolbelow90°F.
4. Stirintheplainyogurtorstarterculturepacketanduseasiliconewhiskto
mixitwiththemilkuntiltheconsistencyissmoothwithnolumpsremaining.
DoNOT use a metalwhisk asit willscratch thenon-stick surface ofthe
removablecookingpot.
5. PlacethelidontheMulti-Cooker;alignthehandlewiththeopenlocksymbol,
and turn it counterclockwise until the locking pin clicks into place. Turn the
pressureregulatorknobtoSTEAMwhenusingtheyogurtprogram.Pressthe
YOGURTbutton.Thepresetcookingtimeis8hours.Dependingontheflavor
ofyogurtyoulikebest,youcanchoosehowlongtocooktheyogurtforby
pressingthe+or-buttononceforeachadditionalhalfhourortodecrease
by a half hour. To fast advance, hold the button down until you reach the
desiredcookingtime.Thelongestcookingtimeis24hours.Thepreparation
timeimpactstheyogurttaste.Withlongercookingtime,theyogurtwillhavea
moretartflavor.Withshortertime,theyogurtwillhaveamilderflavor.
6. PresstheSTART/STOPbuttontobegintheyogurtfunction.Theunitwillbegin
tocountdownin1minuteincrementsoncethecorrecttemperaturehasbeen
reached.
7. When the yogurt is ready, remove the lid. There may be some yellowish
liquid,whey,ontopoftheyogurt.Thisisnormal,wheycontainsnutrientsand
protein.Mixitbackintotheyogurt.
8. Ifyoupreferregularyogurt,coverandplaceintherefrigeratorfor2to3hours
beforeserving,oruntilyogurtcoolsdown.IfyouprefermakingGreekyogurt,
please refer to page 22.
NOTE: THE MULTI-COOKER SHOULD REMAIN PERFECTLY STILL DURING
THECOOKINGPROCESS.DONOTMOVETHEAPPLIANCE;DONOTREMOVE
THE REMOVABLE COOKING POT OR THE LID AS THIS WILL AFFECT THE
FIRMNESS OF THE YOGURT. DO NOT ADD ANY FLAVORING BEFORE
COMPLETINGTHEYOGURTMAKINGPROCESS.
Yogurt Making in Glass Jars:
1. Take the starter yogurt from the refrigerator so that it has time to get closer to
room temperature while you heat the milk.

21
ENGLISH
2. Whenyouheatthemilkinglassjars,add1cupofwaterintotheremovable
cookingpot,theninsertayogurtmakingrackandplaceyourglassjarson
top of the rack. Place the lid on the Multi-cooker; align the protruding pin
onthehandlewiththecondensationcollector(openlocksymbol),andturn
it counterclockwise until the locking pin clicks into place. Turn the pressure
regulatorknobtoSTEAM.SelecttheSLOWCOOKfunctiontoheatthemilk
to180-185°F.Oncetheprocessisover,usetheNaturalReleaseMethodto
release the steam.
3. Thesecondstepafterheatingthemilkisallowingthemilktocooltolukewarm
(100-110°F).Toacceleratethecoolingdownprocess,takeoutthejarswith
thehelpofajarlifter.Donotletitcoolbelow90°F.
4. Stirintheplainyogurtwithliveactivecultureanduseaspoontomixitwith
the milk until the consistency is smooth with no lumps remaining.
5. PlacethelidontheMulti-Cooker;aligntheprotrudingpinonthehandlewith
thecondensationcollector(openlocksymbol),andturnitcounterclockwise
until the locking pinclicks into place. Turn the pressureregulatorknob to
STEAM. Press the YOGURT function. The preset cooking time is 8 hours.
Dependingontheflavorofyogurtyoulikebest,youcanchoosehowlongto
cooktheyogurtforbypressingthe+or–buttononceforeachadditionalhalf
hourortodecreasebyahalfhour.Tofastadvance,holdthebuttondownuntil
youreachthe desiredcookingtime.Thelongestcookingtimeis24hours.
Thepreparationtimeimpactstheyogurttaste.Withlongercookingtime,the
yogurtwillhaveamoretartflavor.Withshortertime,theyogurtwillhavea
milder flavor.
6. PresstheSTART/STOPbuttontobegintheyogurtfunction.Theunitwillbegin
tocountdowninminutesoncethecorrecttemperaturehasbeenreached.
7. When the yogurt is ready, remove the lid. There may be some yellowish
liquid,whey,ontopoftheyogurt.Thisisnormal,wheycontainsnutrientsand
protein.Mixitbackintotheyogurt.
8. Ifyoupreferregularyogurt,coverandplaceintherefrigeratorfor2to3hours
beforeserving,oruntilyogurtcools.IfyouprefermakingGreekyogurt,please
refer to page 22.
Helpful Hints and Tips:
• Theprobioticsandliveactiveculturesarestrongestwhentheyogurtisfresh.
Forthebestresults,onlyrepeatthesamestarteryogurt2timesmax.Aftera
fewdays,theprobioticsinthepreviousbatchcanweakenandtheyogurtmay
containaliquidconsistency.
• You may chooseto makeflavoredyogurt and addsugar,honey, flavorings,
fruit,orotheringredientstotastejustpriortoeating.
• Forbestresultsandeaseofpreparation,usewholeorsemi-skimmedUHTmilk
orreconstitutedmilkpowder.Theydon’tneedtobeheatedorcooleddown.
• Thebestbefore-datefornaturalyogurtswillbethedatetheyogurtsweremade
plus7days,dependingonthefreshnessofthemilk.Whenindoubt,usethe
expirationdateonyourmilkasaguideline.

22
ENGLISH
Greek Yogurt
1. Placethestraineroracheeseclothinsideacontainersothestrainerdoesn’t
touchthebottomofthecontainertoallowforbetterdrainage.
2. Pourthehomemadeyogurtintothethestraineror cheeseclothandcover
withthelid.Putitintherefrigeratortostrainandchillforatleast2hours.The
longerthetime,thethickertheyogurtbecomes.
3. Gentlyremoveyogurtfromstrainerorcheeseclothbyturningthestraineror
cheese cloth upside down on a plate or container.
4. Putitbackintherefrigeratortochillforanotherfewhoursbeforeserving.
Brown Function
Thisprogramallowsyoutobrownfoodsuchasmeat orpoultry,tohelpbring
forththebestflavorandtexturebeforecooking.
Patfooddrywithapapertowelbeforebrowning.Forbestresults,makesurethe
oilishotbeforeaddingyourmeatorpoultry.Brownthefoodinbatchestokeep
thecorrectoiltemperatureforevenbrowning.
1. PlacetheremovablecookingpotintotheMulti-Cooker.
2. Addtheappropriateamountofoilintotheremovablecookingpotasindicated
in the recipe.
3. PresstheBROWNbutton.ThelightontheBROWNbuttonwillflashandthe
displaywillread00:30.Adjusttimingwith+or-buttons.Thelidshouldremain
offwhenbrowning.
4. Press the START/STOP button. When the BROWN button light goes solid,
that means that the cooker has reached proper temperature and the cooker
willbeginheatingtheoil.
5. Afteraboutone minute of heating the oil,addfoodandbeginbrowningin
batches.
6. Onceyouaredonebrowning,pressthe START/STOPbuttontocancelthe
BROWNfunction.Youcannowuseanyofthecookingprogramstocontinue
preparing the recipe. Follow the instructions for each program.
NOTE:WhenusingtheBROWNfunctiondonotplacethelidonthemulti-cooker.
Themulti-cookerwillbeepevery10secondsifthelidisontoalertyouthatit
shouldberemovedwhenusingtheBROWNfunction.

23
ENGLISH
Sauté Function
Thisprogramallowsyoutosautéfoodbeforecooking.Sautésmallamountsof
foodonhighheatwithverylittleoilbeforecooking.
Patfooddrywithapapertowelbeforesautéing.Forbestresults,makesurethe
oilishotbeforeaddingyourfood.Brownthefoodinbatchestokeepthecorrect
oiltemperatureforevensautéing.
1. PlacetheremovablecookingpotintotheMulti-Cooker.
2. Addtheappropriateamountofoilintotheremovablecookingpotasindicated
in the recipe.
3. PresstheSAUTÉfunction.ThelightontheSAUTÉbuttonwillflashandthe
displaywillread00:30.Adjusttimingwith+or-buttons.Thelidshouldremain
offwhenusingthesautéfunction.
4. Press the START/STOP button. Once the cooker reaches the appropriate
temperature, the indicator light will stop flashing and the cooker will start
heating the oil.
5. Afteraboutoneminuteofheatingtheoil,addfoodandbeginsautéing.
6. Onceyou are done sautéing, press the START/STOP button tocancel the
SAUTÉfunction.Youcannowuseanyofthecookingprogramstocontinue
preparing the recipe. Follow the instructions for each program.
Simmer Function
Prepare your foods with this fantastic technique used to make soups, stocks,
saucesandotherwonderfulcreations.TheSIMMERfunctionensuresyourfood
staysjustbelowtheboilingpointwhilestillbeingheated.
1. Place the removable cooking pot into the Multi-Cooker and add the
ingredients.
2. Withthelidoff,presstheSIMMERfunctiononceandthenpressthe+or–
buttonstoadjustthecookingtime.PresstheSTART/STOPbuttontobegin
cooking.
3. Whendonesimmering,presstheSTART/STOPbuttontocanceltheprogram.

24
ENGLISH
Steam Function
Thisprogramallowsyoutosteamdelicatefoodssuchasfishandvegetables.
1. PlacetheremovablecookingpotintotheMulti-cooker.
2. Placeabout1-2cupsofwaterintothebottomoftheremovablecookingpot.
Thenaddthesteamerbasket*makingsurethatthewatersitsalittlebitbelow
thesteamerbasket.
3. Placeingredientsintothesteamerbasketandclosethelidofthecooker.
4. TurnthepressureregulatingknobtoSTEAM.
5. PresstheSTEAMfunction andthenpressthe+ or–buttonsto adjustthe
cookingtime.PresstheSTART/STOPbuttontobegincooking.
6. Whendonesteaming,presstheSTART/STOPbuttontocanceltheprogram.
*PleasenotethattheFagorStainlessSteelSteamerBasketandTrivetcanbe
purchasedseparately.Topurchasethisitem,pleasegototheFagorwebsite
atwww.fagoramerica.comorcontactaFagorRepresentativeat1-800-207-
0806.
NOTE: If the STEAM function is selected, but the regulator valve is turned to
PRESSUREtheunitwillbeepevery10secondstoalertyouthatyouareeither
usingthewrongfunctionortheregulatorknobisnotturnedtothecorrectposition.
WhenusingtheSTEAMfunctiontheregulatorknobmustbeturnedtoSTEAM.
NOTE:IfusingtheSTEAMfunctionbutthereisn’tenoughliquidintheremovable
cookingpot,themulti-cookerwillbeepevery5secondstoalertyouthatmore
liquidneedstobeadded.
Keep Warm Function
TheKEEPWARMprogramallowsforreheatingoffoodorcankeepcookedfood
warm for up to 12 hours.
1. PlacetheremovablecookingpotintotheMulti-cooker.Thenplacethefood
intotheremovablecookingpottoreheat.
2. Place the lid on the Multi-cooker; align the pin on the handle with the
condensation collector, and turn it counterclockwise until it locks into place.
Thelockingpinwillclickwhenit’sinplace.
3. TurnthepressureregulatorknobtoSTEAM.
4. PresstheKEEPWARMbutton.Thelightonthekeepwarmbuttonwillflash
andthedigitaldisplaywillread00:30.
5. PresstheSTART/STOPbuttontobegintheprogram.Theindicatorlightwill
stopflashingoncethepropertemperaturehasbeenreached.

25
ENGLISH
6. Sincepressureisnotbeingbuiltwhenwarmingfood,youcanopenthelid
to check on your food as needed. To turn the program off, simply press the
START/STOPbuttononce.
NOTE:Whenusingthepressurecooking,ricecookingorslowcookingprograms,
theKEEPWARMsettingwillautomaticallystartafterthecookingtimeends.The
selectedprogram’slightwillturnoff,andtheKEEPWARMfunctionlightwillturn
on.ThefoodwillstaywarmuntilyoupresstheSTART/STOPbuttontocancelthe
program.
Time Delay Function
Thisfunction allowsyoutodelay the cookingprocessupto6 hours. Youcan
use the delay time setting after choosing a cooking program: Pressure Cook
HIGHandLOW,SlowCookHIGHandLOW,WhiteRice,BrownRiceandRisotto
functions.
CAUTION:DO NOT LEAVE PERISHABLE FOODSSUCHASMEAT,POULTRY,
FISH,CHEESEANDDAIRYPRODUCTSATROOMTEMPERATUREFORMORE
THAN2HOURS(ORMORETHAN1HOURWHENTHEROOMTEMPERATURE
IS ABOVE 90°F). WHEN COOKING WITH THESE FOODS, DO NOT SET THE
DELAYFUNCTIONFORMORETHAN1-2HOURS.
1. Selectthedesiredcookingprogrambychoosingthecorrectprogrambutton
(Pressure Cook, Slow Cook, White Rice, Brown Rice, and Risotto) and
adjustingthetimeasneeded.
2. PresstheTIMEDELAYbutton.Thebuttonwillblinkandthepanelwillread
“00:30”meaninghalfanhourofdelay.Pressthe+or–buttonstoadjustthe
desired delay time needed.
3. PresstheSTART/STOPbutton.TheMulti-cookerwillbegincookingafterthe
delay time has elapsed.
FOR EXAMPLE:Itis11:30a.m.andyouwantyourdinnertobereadyby6p.m.
Yourrecipecallsfor12minutesofhighpressurecooking.Youcanprogramyour
delaytimefor6hoursandthenthepressurecookingprogramfor12minutes.You
dothisbypressingthepressurecookfunctiononceandthenadjustingthetime
withthe+or–buttonsuntilitreads00:12minutesandthenpressingtheTIME
DELAYbuttononceandthenthe+or–buttonsuntilthepanelreads06:00hours.
Next,youpresstheSTART/STOPbutton,andyou’reallset!Thecookerwillstart
cookingat5:30p.m.andyourdinnerwillbereadyat5:42p.m.Theautomatic
warmfunctionwillensurethatitdoesn’tgetcold.

26
ENGLISH
Cleaning and Maintenance
Donot wash any partsof theMulti-cooker inthe dishwasherexcept for the
removablecookingpot.Alwayswashtheremovablecookingpotthoroughlyafter
everyuse,orifithasnotbeenusedforanextendedperiodoftime.
1. UnplugtheMulti-Cookerandlettheunitcoolbeforecleaning.
2. Remove the removable cooking pot and wash with warm soapy water or
in the dishwasher. Hand washing is always recommended. Rinse and dry
thoroughly.
3. Wipetheouterhousingwithacleandampclothandrinsethelidwithwarm
waterandsoap.DonotsubmergetheMulti-cookerorthelidinwater.
NOTE:Toremoveanodorfromtheinsidepartofthelid,cleanitwithwater
andvinegar(1:1ratio).
4. Remove the condensation reservoir by pulling it down. Wash with warm,
soapywater.Rinseanddrythoroughly.Replacebypushingitbackintoplace.
5. Turn the lidupsidedown; grip the siliconegasket andpullup to remove.
Cleanthesiliconegasketwithwarmsoapywater.Rinseanddrythoroughly.
Replacethegasketbypositioningitinsidetheedgeofthelidandpushingit
down.Makesurethegrooveinthecenterofthegasketispositionedaround
the metal ring on the inside edge of the lid.
NOTE:Thesiliconegasketmustalwaysbeproperlypositionedontheunderside
ofthelid;otherwisetheunitwillnotwork.Checkperiodicallytomakesurethat
itisclean,flexible,andnotcrackedortorn.(See“GettingStarted”sectioninthis
manual.)
6. If the silicone gasket appears damaged, cracked or torn, do not use the unit
andcontactFagorCustomerServiceDepartmentat1-800-207-0806orvisit
theFagorwebsitetopurchaseanewsiliconegasketatwww.fagoramerica.
com.
7. For optimal performance, the bottom of the cooker, in the area under the
removablecooking potwherethe temperaturesensorandheatingpad are
locatedmustbecleanedaftereachuse.Wipewithasoftdampclothandbe
sure to dry thoroughly.
8. Neveruseabrasivecleanersorscouringpadstocleananyoftheparts.
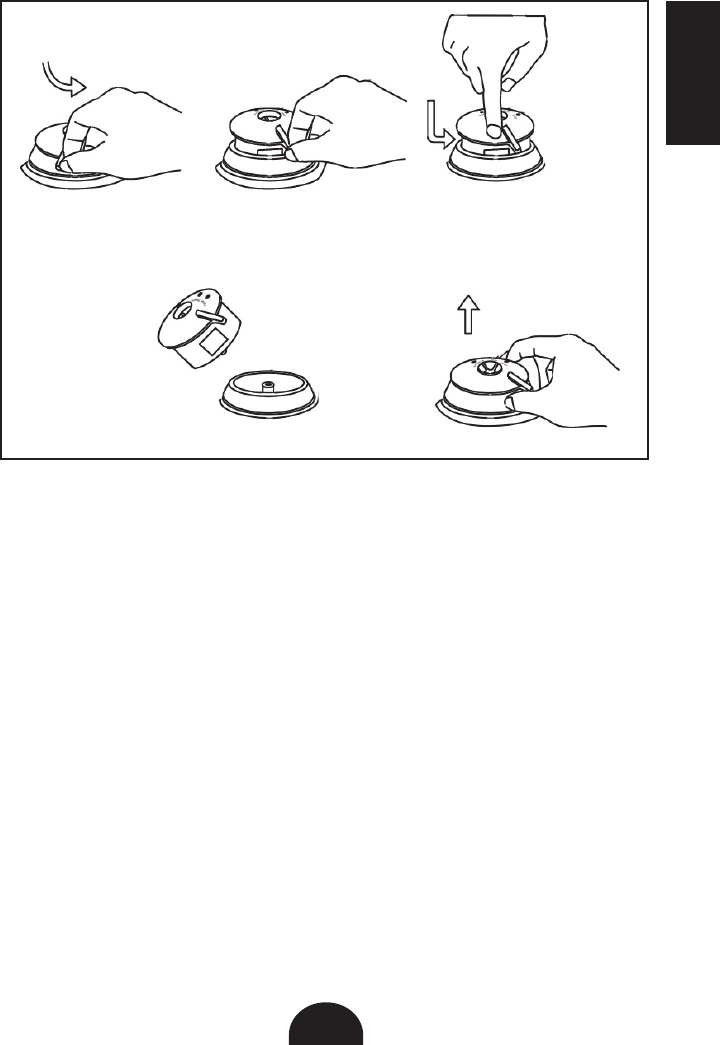
Cleaning the Pressure Regular Knob
ALWAYScheckthatthepressureregulatorknobandthepressuresafetyvalves
areingoodworkingorderbeforeeachuse.
1. Aftertheunithascooled,removethelidfromtheMulti-cooker.
2. Press down and at the same time turn the pressure regulator knob
counterclockwisepastSTEAMtoCLEANsettingandcarefullylifttoremove.
Lookthroughtheholestomakesurethereisnoparticlebuild-up,andputit
under running water to clean.
27
ENGLISH
3. Turnthelidoverandplaceitonatabletop.Pullouttheanti-lockingcase.
Usingabrushortoothpick,checkandremoveanyfoodorforeignparticles
that may be lodged in the floating valve. Replace the anti-locking case by
pressing down.
4. ReplacethepressureregulatorknobbyliningtheCLEANdotwiththedoton
the lid of the unit and turning clockwise until it goes into place. The white dot
onthebaseofthepressureregulatorshouldlineupwiththePRESSUREor
STEAMsettingonthepressureregulatorknob.Ifitdoesn’t,removetheknob
again and try realigning the dots the other way around.
(1) (2) (3)
(4)(5)

28
ENGLISH
28
Troubleshooting
IftheLUX™detectsaninternalerrororawrongconnection,itwilldisplayanerror
message with a code on the display panel and will stop functioning. These codes
will allow you to identify the cause of the error and help you find the solution to
theproblem.Iftheerrorpersists,pleasecallourcustomerservicedepartmentfor
assistance at 1-800-207-0806.
E1: Internal circuits have disconnected.
Self-help: Callourcustomersservicedepartmentforassistance.
E2: The internal sensor has short-circuited and the current is
insufficient or the unit is overheating.
Self-help: Trytocooltheunitbyturningitoffandunpluggingaswellas
removing the cooking pot.
E3: Unitisoverheating.
Self-help: Try to cool the unit by turning it off and unplugging as well
asremovingthecookingpot.IftheE3 message persists, the
cookingpotorheatingplatemaybedeformed.Youwillneedto
contact our customer service department.
E4: Pressureswitchhasmalfunctioned.
Self-help: Checkthecookingpotforwarping.Chechtheheatingplatefor
any food residue.

ESPAÑOL
29
Contenidos
Introducción ............................................................................................................ 30
Precauciones Importantes ..................................................................................... 31
Características y Funciones ................................................................................... 33
Antes del Primer Uso .............................................................................................. 35
Funciones de Operación ......................................................................................... 36
Programa de Cocinado a Presión .......................................................................... 38
Tablas de Cocinado a Presión ................................................................................ 40
Programas de Arroz ............................................................................................... 44
Función de Cocción Lenta ...................................................................................... 46
Función de Yogur .................................................................................................... 47
Yogur Griego ........................................................................................................... 50
Función de Dorar .................................................................................................... 50
Función de Saltear ................................................................................................. 51
Función de Hervir a Fuego Lento .......................................................................... 51
Función de Vapor .................................................................................................... 52
Programa para Mantener Caliente ....................................................................... 52
Función de Aplazamiento de la Cocción ............................................................... 53
Limpieza y Mantenimiento ..................................................................................... 54
Solución de Problemas .......................................................................................... 56

ESPAÑOL
30
Introducción
¡Gracias por comprar esta Olla Eléctrica LUX™ Multifuncional de
Fagor!
La Olla Eléctrica LUX™ Multifuncional de Fagor puede usarse
para cocinar a presión, al vapor, para dorar, hacer arroz blanco,
hacer arroz integral, hacer risotto, hacer yogur y cocinar lento
comidas a la perfección. Sus mandos, fáciles de usar, son simples y
sencillos, permitiéndole seleccionar los tiempos de cada receta con
facilidad. Además, las prácticas funciones de “aplazar la cocción”
y “mantener caliente” le proporcionan una flexibilidad para cocinar
acorde a su apretada agenda.
Este manual de uso contiene información vital para la utilización y
cuidado de este producto. Lea por favor este manual detenidamente
antes de poner en funcionamiento la Olla Eléctrica Multifuncional
LUX™ de Fagor para asegurar un uso y mantenimiento adecuado.
Siga cuidadosamente las siguientes instrucciones de este
folleto para optimizar el resultado y el período de vida útil de su
electrodoméstico.
Nota: este manual es valido para todos los tamaños y colores de la
olla LUX™ Multifuncional.

ESPAÑOL
31
PRECAUCIONES IMPORTANTES
Elproductoqueustedhacompradoesunelectrodomésticodetecnologíapunta.
Cumpletodaslasúltimasmedidasdeseguridadyestándarestecnológicos;sin
embargo, al igual que con cualquier electrodoméstico, existen algunos riesgos
potenciales.SóloopereestaOllaEléctricaMultifuncionalLUX™deacuerdocon
lasinstruccionesfacilitadasysóloparasuusoprevistoenelhogar.
LEA POR FAVOR LAS SIGUIENTES INSTRUCCIONES ANTES DE PONER EN
FUNCIONAMIENTO EL ELECTRODOMÉSTICO POR PRIMERA VEZ.
• Lea todas las instrucciones contenidas en este manual antes de usar el
electrodoméstico.
• Esteproductonoestáconcebidoparausoindustrialoalairelibre;essólopara
uso interior y en el hogar.
• No ponga a funcionar esta unidad si el cable o el enchufe están dañados.
Sielelectrodomésticonoestáfuncionandocorrectamente,sehacaídoose
hadañado, se ha dejadoal aire libreo sumergidoen agua,deje deusarlo
inmediatamente y contacte con nuestro servicio de asistencia al cliente en el
númerodeteléfono(800)2070806.
• LaOllaEléctricaMultifuncionaltieneunNEMA5-15P,3clavijasdeenchufey
uncablede47.24pulgadas.
• EnprimerlugarconecteelcablealabasedelaOllaEléctricaMultifuncional.A
continuación,inserteelenchufeenunatomadecorriente.Asegúresesiempre
dequeelcableestécompletamenteseco.
• Nodejeelcablesueltocolgandosobreelbordedelamesaoencimera.
• Nodejequeelcabletoquesuperficiescalientes.
• Si usa una alargadera para conectar la Olla Eléctrica Multifuncional, tenga
en cuenta por favor que una alargadera dañada puede causar un mal
funcionamiento del producto. Compruebe siempre su alargadera para
asegurarsequenoestádañadayqueesdelvoltajequelaunidadrequiere.Por
razonesdeseguridad,asegúresedecolocarelcabledemaneraquenopuede
serjaladoporniñosocausartropiezosaccidentales
• NocoloquelaOllaEléctricaMultifuncionalcercadeningúnaparatoqueemita
calorcomopodríanserestufas,cocinasdegasoquemadoreseléctricos.
• UsesiemprelaOllaEléctricaMultifuncionalenunazonabienventilada.
• Usaraccesorioso repuestosquenosonlos recomendadosovendidospor
elfabricante puede causar dañoa laOllaEléctrica Multifuncional o daños
personales.
• Losniñosrequierenvigilanciadeunadultoentodomomentomientrasestén
enlacocinaoalrededor.Mantengaesteelectrodomésticofueradelalcancede
losniños.
• Este producto no debe ser utilizado por personas (niños incluidos) con
capacidadesfísicas,sensorialesomentalesreducidas,asícomoporpersonas
confaltadeexperienciaoconocimiento,anoserquelapersonaresponsable
desuseguridadsuperviseodélasinstruccionesnecesariassobreelusodel
producto.
• Mientrasestéenfuncionamiento,nocubraelelectrodomésticonilocoloque
cercadematerialesinflamablescomocortinas,visillos,paredes,omobiliario
tapizado con tela.

ESPAÑOL
32
• CocinesiempreenelcazoextraíbledelaOllaEléctricaMultifuncional.Cocinar
sinelcazoextraíblepuedecausarunadescargaeléctrica.
• Noabralaollaapresiónhastaquelaunidadsehayaenfriadoytodalapresión
internahasidoliberada.Silasasassondifícilesdeabrir,estoindicaquelaolla
estátodavíabajopresión-¡nolofuerce.Cualquierpresiónenlaollapuedeser
peligrosa.
• Nuncafría o fríaapresiónenlaOllaEléctrica Multifuncional. Espeligrosoy
podríacausarunincendioydañosseveros.
• Nunca cubra o bloqueela válvulade presióncon nada. Esto puedecausar
sobre-presurizaciónyllevaraaccidentesgraves.
• Mientrasestácocinando,latapaylasuperficiedeaceroinoxidabledelaOlla
EléctricaMultifuncional pueden calentarse. Manéjelacon cuidadoy lleveo
muevala Olla Eléctrica Multifuncionalusando sólo lasasas laterales.Tenga
mucho cuidado cuando mueva cualquier aparato que contenga comida o
líquidoscalientes.
• Mantengalasmanosylacaraalejadasdelbotónreguladordepresióncuando
liberelapresióndelaOllaEléctricaMultifuncionalparaevitarquemarsecon
vapor caliente.
• Después de cocinar, emplee cuidado extremo cuando quite la tapa. Puede
resultargravementequemadoacausadelvaporresidualescapandodedentro
delaunidad.Elevelatapadetalformaqueelvaporescapeporelladomás
alejadodeustedydejequelasgotasdeaguaescurrandesdeelinteriordela
tapaadentrodelaOllaEléctricaMultifuncional.
• Asegúrese de que la Olla Eléctrica Multifuncional esté apagada antes de
desenchufarladelatomadecorriente.Desenchufesiempreydejequeseenfríe
antesdelimpiarodequitaralgúncomponente.Nointentenuncadesenchufar
launidadtirandodelcable.Manténgaladesenchufadacuandonoestéenuso.
• Parareducirelriesgodedescargaeléctrica,nuncametaelenchufe,elcableo
elcuerpoenaguauotrolíquido.Sóloelcazoextraíblepuedecolocarseenel
lavavajillas.
• Sólo expertos cualificados deben reparar y llevar a cabo trabajos de
mantenimiento en la Olla Eléctrica Multifuncional usando repuestos y
accesoriosauténticosdeFAGOR.NointentenuncadesarmaryrepararlaOlla
EléctricaMultifuncionalustedmismo.
• Este aparato cocina bajo presión. El uso inadecuado puede provocar
quemadurasuotraslesiones.Asegúresedequelaunidadestábiencerrada
antesdeoperar.Consulte<<Programa de Cocinado a Presión>>.
• No llene la Olla Eléctrica Multifuncional mas de 2 tercios de su capacidad.
Cuandococinealimentosqueseexpandencomoelarrozoverdurassecasno
lleneelcazoextraíblemasdelamitaddesucapacidad.Silollenaenexcesose
puedebloquearlavalvulaycrearexcesodepresión.Consulte<<Funciones
de Operación>>.
• Tengaencuentaqueciertosalimentos,comoelpurédemanzana,arándanos,
cebadaperlada, harina de avenau otros cereales,guisantes secos, fideos,
macarrones,ruibarbooespaguetispuedenformarespumaychisporrotear,y
obstruireldispositivodeliberacióndepresión.Estosalimentosnosedeben
cocinarenunaollaapresión.
• Compruebesiempreantesdelusoqueeldispositivodeliberacióndepresión
noesteobstruido.
GUARDE ESTAS INSTRUCCIONES

ESPAÑOL
33
Características y Funciones
Parte superior de la tapa
(14) Pieza de sujección de la cobertura interior
(5) Junta de Silicona
(6) Válvula de Seguridad
(7) Funda anti-bloqueo
(puede sacarse tirando
hacia arriba)
Cazuela Estática (11)
(no se puede quitar)
Panel de Control (12)
Colector de Agua (8)
(puede sacarse)
(3) Mangos fríos al tacto
(9) Sensor de Temperatura
(9) Fuente de Calor
(10) Olla para Cocinar Extraíble
Botón Regulador de Presión (1)
Mangos fríos al tacto (3)
Válvula Flotante (4)
(2) Indicador de Auto-cierre
Parte inferior de la tapa
Cuerpo de la olla eléctrica

ESPAÑOL
34
1. Botón Regulador de Presión:Gireelbotónhacialaposiciónde“Pressure”
(Presión)cuandococineapresiónouselafuncióndearrocera.Gireelbotón
ala posición de “STEAM”(Vapor) paraliberar lapresión cuando cocine a
presiónocuandouselasfuncionesdecocinadolentoodemantenercaliente.
2. Indicador de Auto-cierre: Latapa secerrará automáticamentecuando la
girehastasutope.Mientrasestécocinandoapresiónnopodráabrirlatapa
mientrashayapresióndentro.
3. Mangos fríos al tacto: losmangoslepermitiránabrir,cerrarymoverlaOlla
EléctricaLUX™confacilidad.
4. Válvula Flotante: La válvula de seguridad-válvula flotante controla la
cantidaddepresióndentrodelaOllaEléctricaMultifuncionalpermitiendoque
elexcesodepresiónselibere.
5. Junta de Silicona: Crea un selladoherméticopara que su OllaEléctrica
Multifuncionalpuedaacumularlapresiónnecesaria.Compruebequelajunta
noestérajadaniagrietadaantesdecocinarapresión.Sinecesitacomprar
unanuevajuntadesiliconavisitela paginaweb:www.fagoramerica.com o
llamealnumerodeServicioalCliente:1-800-207-0806.
6. Válvula de Seguridad: La válvula de seguridad permite que el exceso de
presiónescapedelaOllaEléctricaMultifuncionalcuandoestásiendousada
comoollaapresión.Funcionaindependientementedelaválvulaflotante.
7. Funda anti-bloqueo: tire hacia usted para sacar el botón regulador de
presiónparasulimpiado.
8. Colector de Agua: Recogeelexcesodevaporcondensadoenaguadurante
elprocesodecocinado. Si hay algodelíquido en el colectordespués de
cocinar,simplementevacíelo.
9. Sensor de Temperatura y Fuente de Calor: estos dos elementos regulan la
temperaturadecocción.
10. Olla para Cocinar Extraíble: La olla de acero inoxidable es apta para
lavavajillas,perosiempreserecomiendaellavadoamano.
11. Cazuela Estática: Estapartenosepuedesacardelaolla.NUNCAsedebe
cocinardirectamenteenestacazuelaestática.Antesdecocinar,asegúresede
colocarlaollaextraíbleenelboteestacionarioprimero.Todoslosingredientes
sedebencolocarenlaolladecocciónextraíbleSOLAMENTE.
12. Panel de Control: Loscontroles fáciles de usarpermiten seleccionarlos
programasdisponiblesconuntoque.Disponibleparalaselecciónson:dos
ajustes de cocción a presión, dos configuraciones de cocción lenta, arroz
blanco,arrozintegral,risotto,dorar,saltear,hervirafuegolento,vapor,yogur,
mantener el calor, aplazamiento de la cocción,Start/Stopyunbotóndemás
omenosparaajustartiempodecocciónyaplazamientodetiempo.Además,
enelpaneldecontrolencontrarálaslucesindicadorasHIGHyLOWcuales
parpadeanmientras que la presión o la temperaturaesta creciendo. Estas
treslucesseiluminaranunavezqueelequipohayaalcanzadolapresiónola
temperatura adecuada.

ESPAÑOL
35
Antes del Primer Uso
Lea las instrucciones de seguridad que encontrará en este manual antes de
enchufaryponerenfuncionamientosuOllaEléctricaLUX™Multifuncional.Antes
deusarlaOllaEléctricaMultifuncionalporprimeravez,sigaestospasos:
1. Quitetodoslos materiales de empaquetado ylos folletosde dentro dela
OllaEléctricaMultifuncional.Levanteelcazoextraíbleyretirecualquiertrozo
depapelde debajo. Quite el plástico deproteccióndel panel de controly
cualquierpegatinadelatapaodelcuerpodeaceroinoxidable.
2. Lavetodos los componentesdesmontablesyextraíblescon agua yjabón.
Enjuaguey seque todos los componentescuidadosamente. Pase unpaño
húmedoporelexteriordelcuerpodeaceroinoxidable.NUNCAsumerjael
cuerpo de acero inoxidable en agua o cualquier otro líquido. Sólo la olla
extraíbleesaptoparalavarenlavavajillas.
3. Para limpiar el botón regulador de presión, empújelo suavemente hacia
abajoyalmismotiempogíreloensentidocontrarioalasagujasdelrelojala
posiciónCLEAN.UnavezqueelpuntoblancoenCLEANestáalineadocon
elpuntoblancodelabasedelreguladordepresión,puedelevantarysacarel
reguladordepresióndelatapa.Mireatravésdelosorificiosdelreguladorde
presiónparaasegurarsedequenohaynadaqueobstruye,yluegolímpielo
conaguatibiayjabón,permitiendoqueelaguacorraatravésdelregulador
depresiónparaeliminartodaslaspartículas.
4. Paraponerelreguladordepresióndenuevoenlatapa,simplementealiñeel
puntoblancodeCLEANconelpuntoblancoenlabase,empujeelregulador
depresiónsuavementehaciaabajoygíreloensentidodelasagujasdelreloj
hastaquesedesliceensulugar.
5. Asegúresequelajuntadesiliconaestácolocadaadecuadamenteenlatapa,
sino,laollaeléctricanofuncionara
6. Despuésdesecarcompletamente,coloquelaollaextraíbledenuevoenla
ollaeléctricaantesdecocinar.
ESPAÑOL
36
Funciones de Operación:
ProgramasyFuncionesdelPaneldeControl
Tabla de Temperatura / Tiempo
Función de Cocina: Temperatura: Tiempo Pre-Ajustado: Temporizador:
Mantener Caliente 165°F 30 minutos Hasta 24 horas, en
incrementos de 30 minutos
Vapor 212°F 5 minutos 1-99 minutos, incrementos
de 1 minuto
Dorar 356°F 30 minutos 1-30 minutos, incrementos
de 1 minuto
Saltear 284°F 30 minutos 1-30 minutos, incrementos
de 1 minuto
Hervir a Fuego Lento 200°F 30 minutos 1-120 minutos, incrementos
de 1 minuto
Alta Presión 240°F-248°F 1 minuto 1-99 minutos, incrementos
de 1 minuto
Baja Presión 226°F-230°F 1 minuto 1-99 minutos, incrementos
de 1 minuto
Cocción Lenta Alta 212°F 2 horas 30 minutos - 10 horas,
incrementos de 30 minutos
Cocción Lenta Baja 190°F 2 horas 30 minutos - 10 horas,
incrementos de 30 minutos
Yogur 104°F-109°F 8 horas Hasta 24 horas, en
incrementos de 30 minutos
Arroz Blanco 226°F-230°F 10 minutos 1-99 minutos, incrementos
de 1 minuto
Arroz Integral 240°F-248°F 20 minutos 1-99 minutos, incrementos
de 1 minuto
Risotto 240°F-248°F 6 minutos 1-99 minutos, incrementos
de 1 minuto

ESPAÑOL
37
1. Mantener Caliente (KEEP WARM): Se utiliza para calentar o mantener
calienteslosalimentoshastaqueestélistoparaservir.
2 Vapor (STEAM): Esta función se utiliza para cocinar al vapor las comidas
comoverdurasypescado.Agreguealmenoslamitaddeunatazadeagua
en el fondo de la olla de cocción extraíble e inserte la cesta de vapor de
aceroinoxidableyelsoportedeFagor.Coloquelacestadevaporporencima
del agua. La cesta de vapor y el soporte de Fagor se pueden comprar por
separadoenelsitiowebdeFagorenwww.fagoramerica.com.
3. Dorar (BROWN): Estafunciónseutilizaparaconservarelsaboryeljugode
losalimentosyparadorarelexterior.
4. Saltee (SAUTE): Estafunciónseutilizacuandosecocinapequeñostrozos
dealimentospreparándolosconmuypocoaceiteaunaltocalorantesdela
cocciónapresiónococciónlenta.
5. Cocine a Fuego Lento (SIMMER): Estafunciónseutilizaparahacersopa,
guiso,salsauotrosplatosquenecesitansercocinadosenunajustedecalor
bajo.Estafunciónesmuchomássuavequeelpuntodeebullicióndelaguay
ablandaralascarnesylasverduras.
6. Cocinar a Presión (PRESSURE COOK): Alto-Useestafunciónparacocinar
a alta presión, 10-13 PSI. Este ajuste de presión es más adecuado para
cocinarcarnes másduras yotrosalimentosque no son delicados.Bajo-
Useestafunciónparacocinarabajapresión,4-7PSI.Esteajustedepresión
es más adecuado para cocinar comidas delicadas como son las verduras
blandasociertostiposdepescado.
7. Cocción Lenta (SLOW COOK): Este programa cocina los alimentos
lentamente durante un máximo de 10 horas a una temperatura de 190°F
(BAJO) o 212°F (ALTO). La cocción lenta ayuda a la comida a retener el
máximosaboryternura.
8. Yogur (YOGURT): Esta función es perfecta para hacer yogur casero
tradicional y yogur griego.
9. Arroz Blanco (WHITE RICE): Estafunciónutilizabajapresiónydauntiempo
preestablecidode10minutosparacocinardiferentestiposdearrozblanco.
10. Arroz Integral (BROWN RICE): Esta función utiliza alta presión y da un
tiempopreestablecidode20minutosparacocinarunavariedaddediferentes
arroces.
11. Risotto: Estafunciónutilizaaltapresiónydauntiempopreestablecidode6
minutos para crear un risotto gourmet.
12. Inicio/Parar (START/STOP): Paraserutilizadodespuésdequeunaselección
decocinasehahechoparacomenzarelprocesodecocción,osideseapara
cancelarlafuncióndecocción.
13. Aplazar la Cocción (TIME DELAY): Lepermiteretrasareltiempodecocción
hasta6horas.SimplementepresioneelbotónTIMEDELAY,loqueaumentará
porincrementosde30minutoshastallegaraltiempomáximode6horas.

ESPAÑOL
38
Programa de Cocinado a Presión
Este programa le permitirá cocinar alimentos bajo presión en menos tiempo,
yaqueeltiempodecocciónsereducehastaun70%comparadoconmétodos
tradicionales.¡CocinarapresiónesRápido,FácilySano!
1. Antes de cada uso, asegúrese de que la junta de silicona y las válvulas
reguladorasdepresiónesténlimpiasybiencolocadas.
2. Conecteelcableenunenchufedepared.
3. Coloquela olla extraíble en la ollaMultifuncional, y añadalos ingredientes
siguiendolareceta.Cuandococinecomidasapresión,esnecesarioañadiral
menos1taza(8oz.)delíquido.
NOTA: No llene la olla extraíble más 2/3 de su capacidad con líquido. No
llenelaunidadmásde½desucapacidadcuandococinecomidasquese
expandencuandoestáncocinándose.
NOTA:Lassiguientescomidasnodebensercocinadasapresión:salsade
manzana,arándanos,cebadaperla,harinadeavena,arvejaspartidas,fideos,
pastaoruibarbo.Estascomidastiendena producirespumaybarbotear, y
puedenbloquearlaválvuladepresión.
4. Coloque la tapa de la Olla Eléctrica Multifuncional alineando la parte
protuberantedelmangoconlaimagendelcandadoabierto,ygírelahaciael
candadocerrado.Oiráelclicdelcierreautomático.
5. GireelbotónreguladordepresiónaPRESSURE.
6. Elijael mododecocinado deseado presionando el botón dePRESSURE
COOKunavezparaaltapresiónydosvecesparabajapresión.
7. Ajuste el tiempo de cocción deseado pulsando los botones + o - una vez
porcadaminuto adicional o paraavanzarrápidamente,mantengapulsado
elbotónhastaquelleguealahoradeseada.Eltiempomáximodecoccióna
presiónes99minutos.
8. Paraestablecereltiempodeaplazamiento,seleccioneelbotónTIMEDELAY
y utilice los botones + o - para ajustar cuando la hora de cocinar debe
comenzar. El tiempo de aplazamiento sube en incrementos de ½ hora (30
minutos).
9. Pulseel botón START/STOPparaempezar a cocinar. La luzindicadora en
elbotónPRESSURECOOKparpadearácuandolaunidadhacomenzadoa
acumularpresión.Siseolvidaseleccionaruntiempodecoccióndeseadoo
presionarel botón START/STOP, la unidad emitirá dos pitidos y lapantalla
digitalleerá--:--despuésde30segundos.
10.Amedidaquelapresiónestáaumentando,lostrescírculospróximosalajuste
depresiónseleccionadoseencenderánunoalavez.ElbotónPRESSURE
COOKtambiénparpadearáhastaquesehayaalcanzadolamáximapresión.
Una vez que se ha alcanzado la presión, los tres círculos se mantendrán
rojos, la luz indicadora del botón también se iluminará en color rojo y la
unidademitiráunpitido.Aquíescuandocomienzaeltiempodecocción.

ESPAÑOL
39
11.Launidadempezaráacontarhaciaatráslosminutosunavezquesehaya
alcanzadolapresiónadecuada.Laválvulaflotanteseelevarácuandosehaya
alcanzadolapresión.
ATENCIÓN: NUNCA FUERCE LA TAPA PARA INTENTAR ABRIRLA CUANDO
ESTÉ COCINANDO A PRESIÓN. ESTO PUEDE DAR LUGAR A UN ACCIDENTE
GRAVE.
ATENCIÓN: NUNCA FRÍA O FRÍA A PRESIÓN EN LA OLLA ELÉCTRICA
MULTIFUNCIONAL. ES PELIGROSO Y PUEDE CAUSAR UN INCENDIO Y
DAÑOS SEVEROS.
12.LaOllaEléctricaMultifuncionalpitaráunavezcuandoeltiempodecocinado
acabe. Empezará a funcionar automáticamente bajo la función de KEEP
WARM hasta que pulse el botón START/STOP para cancelar el programa.
Después de presionar el botón START/STOP, libere la presión. Tiene dos
opcionesparaliberarlapresión:
a. Método Rápido: Libere la presión inmediatamente girando el botón
reguladordepresiónaSTEAM.Todalapresiónseráliberadaensegundos.
PRECAUCIÓN: ELVAPORQUESALEDELAOLLAESTARÁCALIENTE,Y
PUEDELANZARGOTASDELÍQUIDOCALIENTE.NOACERQUESUCARA
OMANOSALCHORRODEVAPORYGIRELAOLLADETALMODOQUE
ELCHORROSEALEJEDEUSTED.
b.Método Natural: Dejequelapresiónbajenaturalmentesingirarelbotón
reguladordepresiónaSTEAM.Estolellevarávariosminutos,durantelos
cualeslacomidacontinuarácocinándose.Algunasrecetas(porejemploun
risotto)sebeneficiandeestetiempoextradecocción.Sabrácuandoseha
liberadolapresiónporquelaválvulaflotantebajaráyustedpodrágirarla
tapaparaabrirla.
NOTA: SinopulsaelbotónSTART/STOPalfinaldeltiempodecocción,laOlla
EléctricaMultifuncionalpitaráperiódicamentepararecordarlequeelcocinadoha
acabado.
13.Unavezquelapresiónhasidoliberada,quitelatapagirándolaenelsentido
de las agujas del reloj, y levántela inclinándola hacia el lado más alejado
de usted para evitar quemarse con los restos de vapor y el agua caliente
condensadaquegoteadesdelaparteinteriordelatapa.
ATENCIÓN: DESPUÉS DE COCINAR, LA OLLA EXTRAÍBLE INTERIOR
ESTARÁ MUY CALIENTE. USE AGARRADORES PARA MOVERLA O DEJE
QUE SE ENFRÍE ANTES DE SACARLA.

ESPAÑOL
40
Tablas de Cocinado a Presión
Los tiempos de cocción de presión son tiempos aproximados. Utilice estos
tiemposdecoccióncomounaguíageneral.Eltamañoylavariedadalteraránlos
tiemposdecocción.
Cocinando Verduras a Presión (Frescas y Congeladas): Paralograrmejores
resultadosalcocinarverdurasfrescasocongeladasapresión,porfavorconsulte
lossiguientesconsejosysugerencias:
1. UtilicelafunciónSTEAMalhacerplatosdeverdurasalvapor.
2. Useelmétodorápidodeliberaciónalcocinarverdurasapresiónparaqueno
se cocinen de mas.
3. Useunmínimode1tazadelíquidoalcocinarverduras.
4. Alcocerlasverdurasalvapor,utiliceelcestodevapordeaceroinoxidable
quesepuedecomprarenelsitiowebdeFagorenwww.fagoramerica.como
llamando a un representante de Fagor al 1-800-207-0806.
Tabla de Cocinar Verduras a Presión:
Vegetal Ajuste de Presión Fresco
(Tiempo de Cocción) Congelado
(Tiempo de Cocción)
Bellota Calabaza Alta 6-7 minutos 8-9 minutos
Alcachofa, 4 mediana – grande Alta 8-10 minutos 10-12 minutos
Espárragos Alta 1-2 minutos 2-3 minutos
Remolachas Enteras, medianas–
grandes Alta 20-25 minutos 25-30 minutos
Brócoli, Floretes Alta 2-3 minutos 3-4 minutos
Coles de Bruselas Alta 3-4 minutos 4-5 minutos
Calabaza Butternut, trozos Alta 8-10 minutos 10-13 minutos
Repollo, cuarteado Alta 3-4 minutos 4-5 minutos
Zanahorias, entero o trozos Alta 2-3 minutos 3-4 minutos
Coliflor, floretes Alta 2-4 minutos 3-5 minutos
Apio, trozos Alta 2 minutos 3 minutos
Berza Alta 4-5 minutos 5-6 minutos
Maíz en la Mazorca Alta 3-5 minutos 4-6 minutos
Edamame, en la vaina Alta 4-5 minutos 5-6 minutos
Berenjena Alta 2 minutos 3 minutos
Endibia Alta 1-2 minutos 2-3 minutos
Col Rizada, en trozos grandes Alta 1-2 minutos 2-3 minutos
Puerros Alta 2-4 minutos 3-5 minutos
Cebollas, en rodajas Alta 2 minutos 3 minutos
Patatas, entera, pequeña Alta 5-8 minutos 6-9 minutos
Patatas, entera, grande Alta 10-12 minutos 11-13 minutos
Patatas, en rodajas o en cubos Alta 5-8 minutos 6-9 minutos
Calabaza, trozos Alta 4-8 minutos 6-12 minutos
ESPAÑOL
41
Espinacas Alta 1-2 minutos 3-5 minutos
Camotes, en cubos Alta 7-9 minutos 9-11 minutos
Camotes, enteros Alta 10-15 minutos 12-19 minutos
Tomates, cuarteado Alta 2 minutos 4 minutos
Calabacín Alta 2 minutos 3 minutos
Cocinando Frutas a Presión (Frescas y Congeladas): Para lograr mejores
resultadosalcocinarfrutasfrescasocongeladasapresión,porfavorconsultelos
siguientesconsejosysugerencias:
1. Useelmétodorápidodeliberaciónalcocinarverdurasapresiónparaqueno
se cocinen de mas.
2. Unamediatazadeaguaessuficienteparacocinarcualquiercantidaddefruta
debidoaqueeltiempodecocciónesmuycorto.
3. Agregueazúcaralafrutasólodespuésdequesecocina,noantes.
Gráfico de Cocinar Fruta a Presión:
Fruta Ajuste de Presión Fresca Seca
Manzanas (Rodajas o Trozos) Alta 2 minutos 3 minutos
Manzanas (Entera) Alta 3 minutos 4 minutos
Albaricoques, entero o cortado por la
mitad Alta 2-3 minutos 3-4 minutos
Duraznos Alta 2-3 minutos 4-5 minutos
Peras Alta 2-4 minutos 3-5 minutos
Ciruelas/Ciruelas Pasas Alta 2-4 minutos 3-5 minutos
Uvas/Pasas Alta 1-2 minutos 4-5 minutos
Cocinando Frijoles/Legumbres a Presión (Secos y Empapados): Paralograr
mejoresresultadosalcocinarconfrijoles/legumbressecasoempapadas,por
favorconsultelossiguientesconsejosysugerencias:
1. Enjuaguelosfrijolessecos/legumbresconaguafríaydesagüe;descartarlos
guijarrosuotrosdesechos.
2. Nollenelaollaamásdelamitadparapermitirquelosfrijoles/legumbresse
expandan.
3. Usesuficientelíquidoparacubrirlosfrijoles/legumbres.
4. Noagreguesalalosfrijoles/legumbres.Elusodelasaldurantelacocción
delosgranos/legumbreslesimpedirácocinarcorrectamente.
5. Agregue1-2cucharadasdeaceitealosfrijoles/legumbresparaminimizarla
formacióndeespuma.
6. Liberelapresiónalcocinarfrijolessecos/leguminosasutilizandoelmétodo
naturaldeliberaciónparaobtenermejoresresultados.
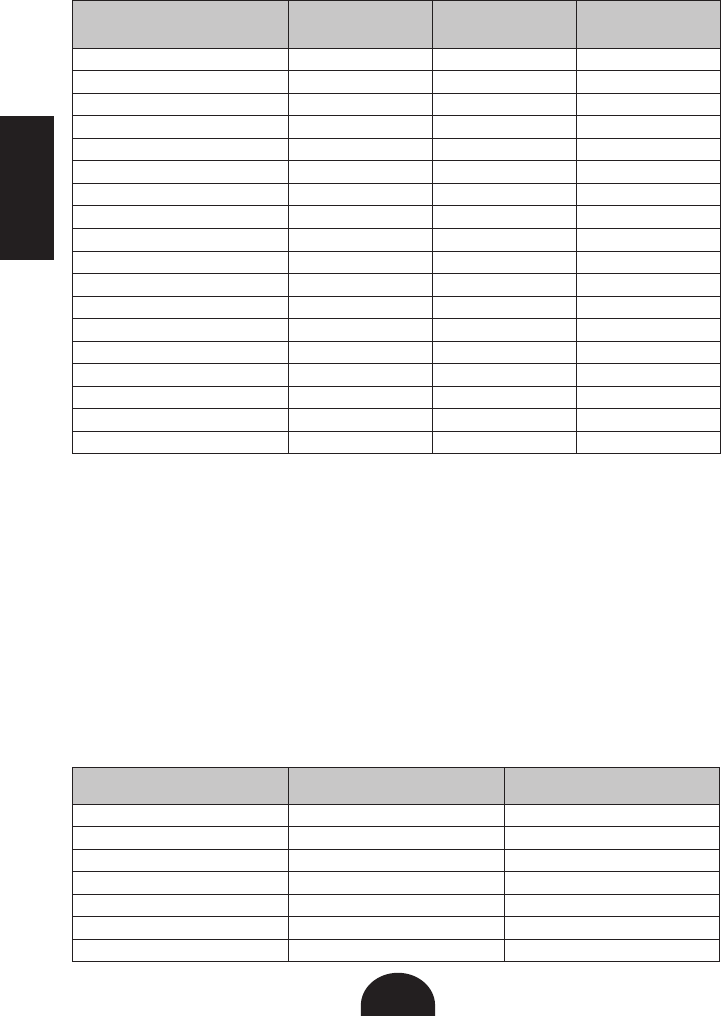
ESPAÑOL
42
Tabla de Cocinar Frijoles/Legumbres a Presión:
Frijoles/Legumbres Ajuste de Presión Tiempo de Cocción
(1 taza seca)
Tiempo de Cocción
(Remojadas durante
la Noche)
Azuki Alta 20-25 minutos 10-15 minutos
Frijoles Negros Alta 20-25 minutos 10-15 minutos
Black-Eyed Peas Alta 20-25 minutos 10-15 minutos
Frijoles Cannellini Alta 35-40 minutos 20-25 minutos
Castañas, perforadas Alta 7-10 minutos 5-7 minutos
Garbanzos Alta 34-40 minutos 20-25 minutos
Frijoles Grandes del Norte Alta 28-30 minutos 23-25 minutos
Frijoles Alta 25-30 minutos 20-25 minutos
Lentejas (Marrónes) Alta 15-20 minutos N/A
Lentejas (Verdes) Alta 15-20 minutos N/A
Lentejas (Rojas) Alta 15-17 minutos N/A
Habas Alta 20-24 minutos 10-15 minutos
Frijoles de la Armada Alta 25-30 minutos 20-25 minutos
Frijoles Pintos Alta 25-30 minutos 20-25 minutos
Frijoles Rojos Alta 25-30 minutos 20-25 minutos
Soya Alta 25-30 minutos 20-25 minutos
Arvejas (Verdes) Alta 15-20 minutos 10-15 minutos
Arvejas (Amarillas) Alta 15-20 minutos 10-15 minutos
Cocinando Arroz / Granos a Presión: Paralograrmejoresresultadosalcocinar
arroz/granosapresión,porfavorconsultelossiguientesconsejosysugerencias:
1. Agregue1-2cucharadasdeaceiteagranossecosparaminimizarlaformación
de espuma.
2. No llene la olla a más de la mitad para permitir que el arroz/granos se
expandan.
3. Noutiliceelmétodorápidoparaliberarlapresión,utiliceelmétodonatural
paraliberarlapresióndelaolla.
4. Nota: La cebada perla tiende a formar espuma y chisporrotear, y puede
bloquearlaválvuladepresiónsisellenademasiadolaolladecocción.Por
favor,asegúresedenollenarlaollaextraíblemásdelamitaddesucapacidad.
Tabla de Cocinar Arroz/Granos a Presión:
Arroz/Grano Grano : Relación Agua
(Tazas) Función y Tiempo de Cocción
Arborio 1:3 Risotto, 6 minutos
Cebada 1:3-1:4 Brown Rice, 25-30 minutos
Basmati 1: 1 ½ White Rice, 6-9 minutos
Integral 1: 1 ¼ Brown Rice, 25-30 minutos
Cuscús 1:2 Brown Rice, 5-/8 minutos
Jazmín 1:1 White Rice, 8-9 minutos
Arroz de Grano Largo 1: 1 ½ White Rice, 10 minutos
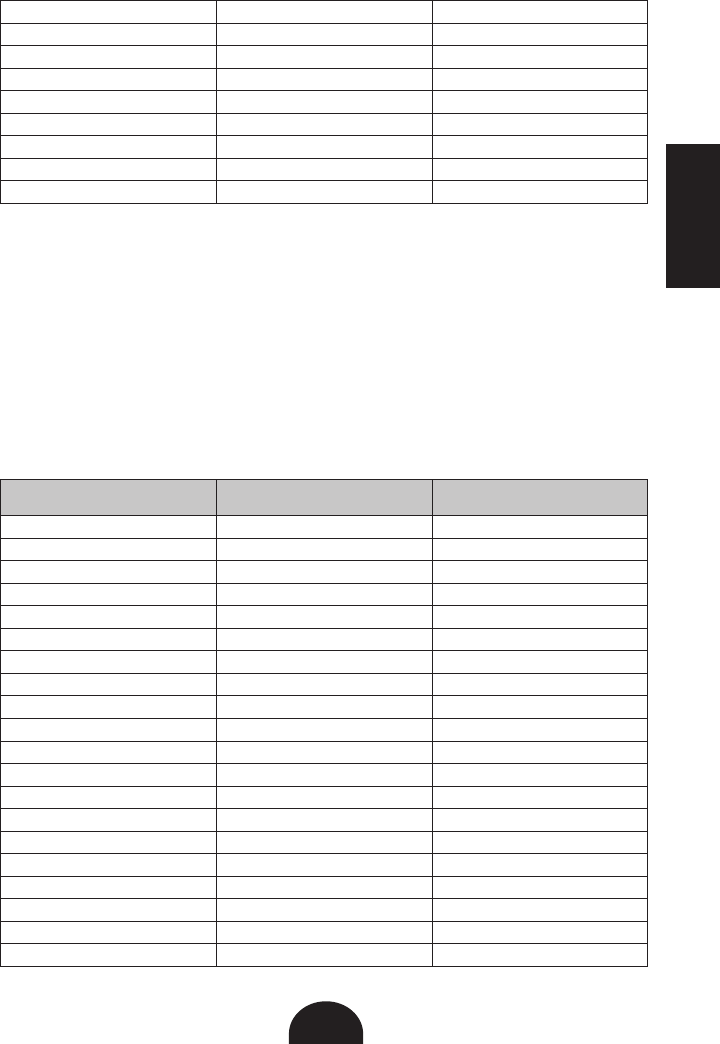
ESPAÑOL
43
Mijo 2:3 Brown Rice, 10-12 minutos
Cebada Perlada 1:4 Risotto, 25-30 minutos
Avena de Cocción Rápida 1: 1 2/3 Risotto, 5-6 minutos
Quinoa 1: 2 Brown Rice, 8-10 minutos
Arroz de Grano Corto 1: 1 ½ White Rice, 8-9 minutos
Avena Cortada en Máquina 1: 1 2/3 Risotto, 10 minutos
Arroz de Sushi 1: 1 ½ White Rice, 9 minutos
Granos de Trigo 1:3 Brown Rice, 25-30 minutos
Arroz Silvestre 1:3 Brown Rice, 25-30 minutos
Cocinando Carne / Aves de Corral a Presión:Paralograrmejoresresultados
alcocinarlacarne/avesdecorral,porfavorconsultelossiguientesconsejosy
sugerencias:
1. Cortelacarne/avesdecorralentrozosdetamañouniformeparaunacocción
uniforme.
2. Almezclarlascarnes,cortelasquesecocinanmásrápidamenteenpiezas
másgrandesylasquesecocinanmáslentamenteenpedazosmáspequeños.
3. Dorelacarneenpequeñoslotes-demasiadacomidaenlaollapuederesultar
encarneduraysinsabor.
Meat/Poultry Pressure Cooking Chart:
Carne/ Aves de Corral Ajuste de Presión Tiempo de Cocción
Pecho de Res, entero Alta 40-50 minutos
Rabo de Buey Alta 40-50 minutos
Costillas de Ternera Alta 35-40 minutos
Tiras de Pollo Deshuesado Alta 10-12 minutos
Pechuga de Pollo Alta 8-10 minutos
Piernas de Pollo Alta 10-12 minutos
Alas de Pollo Alta 10-12 minutos
Pollo (Entero) Alta 20-25 minutos
Gallina de Cornualles Alta 10-12 minutos
Pato (Entero) Alta 25-30 minutos
Jamón (Sin Cocinar) Alta 26-30 minutos
Cordero, Cubos Alta 10-13 minutos
Costillas de Cerdo Alta 20-25 minutos
Chuletas de Cerdo Alta 8-10 minutos
Lomo de Cerdo Alta 45-50 minutos
Hombro de Cerdo Alta 45-50 minutos
Pavo (Pata) Alta 15-20 minutos
Chuletas de Ternera Alta 5-8 minutos
Cubos de Carne Alta 18-23 minutos
Cubos de Pollo Alta 10-12 minutos

ESPAÑOL
44
Cocinando Mariscos a Presión:Paralograrmejoresresultadosalcocinarlos
mariscos,porfavorconsultelossiguientesconsejosysugerencias:
1. Siempredeje por lo menos 2 pulgadas de espacio entreelbordesuperior
paraevitardesbordamiento.
2. Mariscosmáspequeños,comolasalmejasycamarones,notomanmucho
tiempoparacocinar,porlotanto,lomejoresañadirestostiposdemariscos
asurecetadurantelosúltimosminutosdecocción.
Tabla de Cocinar Mariscos a Presión:
Pescados / Mariscos Ajuste de Presión Tiempo de Cocción
(Fresco) Tiempo de Cocción
(Congelado)
Pescado, entero Baja 5-6 minutos 7-10 minutos
Filete de Pescado Baja 2-3 minutos 3-4 minutos
Patas de Cangrejo Baja 3-4 minutos 5-6 minutos
Cola de Langosta Baja 2-3 minutos 3-4 minutos
Langosta (Entera) Baja 3-4 minutos 4-6 minutos
Mejillones Baja 2-3 minutos 4-5 minutos
Vieiras (Pequenas) Baja 1 minuto 2 minutos
Vieiras (Grandes) Baja 2 minutos 3 minutos
Camarón, con cáscara Baja 2-3 minutos 3-4 minutos
Camarón (Med/Grande) Baja 1-2 minutos 2-3 minutos
Camarón (Jumbo) Baja 2-3 minutos 3-4 minutos
Programas de Arroz
Arroz Blanco: Cocineelarroza laperfeccióncadavezcon lafunciónWHITE
RICE.Estafunciónsepuedeprogramarparagarantizarqueelarrozestésuave
yse compone de sólolastemperaturas de cocción correctas. Elarroz estará
esponjosoydeliciosoynolecostaraningunamolestia.
1. ColoquelaollaextraíbleenlaOllaEléctricaMultifuncionalLUX™
2. Coloque1-2cucharadasdeaceiteenlaolladecocción.
3. Agregue las proporciones de agua y arroz necesarias y cualesquiera otros
ingredientes deseados en la olla.
4. Cierre y asegure la tapa de la Olla Eléctrica Multifuncional alineando
correctamentelasasasygirandolatapaensentidocontrarioaldelasagujas
delreloj.FijeelbotónreguladordepresiónalaposiciónPRESSURE.
5. Pulsela función WHITERICE quemostrará untiempopreestablecidode
10minutos.Sinecesitaajustarlahora,pulselosbotones+o-paraajustar
eltiempo y luegopresioneel botónSTART/STOPunavezparaempezara
cocinar.
6. Amedidaquelapresiónestáaumentando,lafunciónWHITERICEparpadeará.
Unavezquesehaalcanzadolapresión,laluzseencenderáenrojoyquedara

ESPAÑOL
45
fijaylaunidademitiráunpitido.Enestemomentoescuandoeltiempode
cocciónseiniciaylaOllaEléctricaMultifuncionalempezarálacuentaatrás
por minuto en la pantalla digital.
7. Una vez que el tiempo de cocción haya terminado, la Olla Eléctrica
MultifuncionalpasaráautomáticamentealafunciónKEEPWARMhastaque
sepulseelbotónSTART/STOPparacancelarelprograma.
Arroz Integral:LafunciónBROWNRICEaseguraquesuarrozestécocidopor
completo,manteniendotodasuriquezaynutrientes.Estafuncióntransformasu
arrozutilizandounciclodecocciónespecializada.
1. ColoquelaollaextraíbleenlaOllaEléctricaMultifuncional.
2. Coloque1-2cucharadasdeaceiteenlaolladecocción.
3. Agregue las proporciones de agua y arroz necesarias y cualesquiera otros
ingredientes deseados en la olla.
4. Cierre y asegure la tapa de la Olla Eléctrica Multifuncional alineando
correctamentelasasasygirandolatapaensentidocontrarioaldelasagujas
delreloj.FijeelbotónreguladordepresiónalaposiciónPRESSURE.
5. Pulsela función BROWN RICE quemostrará untiempo preestablecido de
20minutos.Sinecesitaajustarlahora,pulselosbotones+o-paraajustar
eltiempo y luegopresioneel botónSTART/STOPunavezparaempezara
cocinar.
6. A medida que la presión está aumentando, la función BROWN RICE
parpadeará.Unavezquesehaalcanzadolapresión,laluzseencenderáen
rojoyquedarafijaylaunidademitiráunpitido.Enestemomentoescuando
eltiempodecocciónseiniciaylaOllaEléctricaMultifuncionalempezarála
cuentaatrásporminutoenlapantalladigital.
7. Una vez que el tiempo de cocción haya terminado, la Olla Eléctrica
MultifuncionalpasaráautomáticamentealafunciónKEEPWARMhastaque
sepulseelbotónSTART/STOPparacancelarelprograma.
Risotto: La función RISOTTO garantiza la temperatura perfecta y precisa.
¡Prepareunrisottoquetienelamezclaperfectadetiempo,temperaturaysabor!
1. ColoquelaollaextraíbleenlaOllaEléctricaMultifuncional.
2. Coloqueaproximadamente1cucharadadeaceitevegetalodeolivaenlaolla
extraíbleyseleccionelafunciónSAUTÉparasaltearelarrozArborioyotros
ingredientes sin la tapa por unos 1-2 minutos.
3. Agregueagua o caldoy cualquieraderezo o ingredientesnecesarios. Una
vezqueellíquidoempieceahervir,cierrecompletamentelatapadelaollade
presión.
4. Pulse la función RISOTTO que mostrará un tiempo preestablecido de 6
minutos.Sinecesitaajustarlahora,pulselosbotones+o-paraajustarel
tiempo.
5. PresioneelbotónSTART/STOPunavezparaempezaracocinar.Amedida
quelapresiónestáaumentando,lafunciónRISOTTOparpadeará.
6. Unavezquesehaalcanzadolapresión,laluzseencenderáenrojoyquedara
fijaylaunidademitiráunpitido.Enestemomentoescuandoeltiempode
cocciónseiniciaylaOllaEléctricaMultifuncionalempezarálacuentaatrás
por minuto en la pantalla digital.
7. Una vez que el tiempo de cocción haya terminado, la Olla Eléctrica
MultifuncionalpasaráautomáticamentealafunciónKEEPWARM.

ESPAÑOL
46
Función de Cocción Lenta
Preparerecetasclásicascomoestofados,sopasyguisosenhasta10horascon
estafunción.Pongasusingredientesenlaollaporlamañanaylacenaestará
esperando en la tarde.
1. ColoquelaollaextraíbleenlaOllaEléctricaMultifuncional.
2. Coloquelacomidaquevayaacocinarlentamenteenlaollaextraíble.
3. Coloquelatapaenlaolla,alineeelmandoconelcandadoabiertoygireal
candado cerrado. El indicador de auto-cierre hará clic cuando esté en su
lugar.GireelbotónreguladordepresiónhaciaSTEAM.
4. Eligeel modo de coccióndeseado pulsandoel botónSLOW COOKen el
paneldecontrolunavezparacocciónlentaaltaodosvecesparacocción
lentabaja.
5. Ajusteeltiempodecoccióndeseadopulsandolosbotones+o–o,paraun
avancerápido,mantengaelbotón+o-pulsadohastaquelleguealtiempode
coccióndeseado.Eltiempodecocciónmáslargo,paralacocciónlenta,es
de10horas,a190°F(LOW)o212°F(HIGH).
6. Paraconfigurareltiempodeaplazamiento,seleccioneelbotónTIMEDELAY
yutilicelosbotones+o-paraajustarcuandodeberíaempezaracocinar.
7. PulseelbotónSTART/STOPparaajustarlaollaeléctrica.Laslucesindicadoras
HIGHyLOW,segúncualsehayaelegidoenelpanel,comenzaránailuminarse
unaalavez,loqueindicaqueelcalorseempiezaaformar.Cuandolaluz
indicadoraen el botónSLOWCOOKy laslucesindicadorassemantienen
rojas,estosignificaquesehaalcanzadolatemperaturaadecuadayeltiempo
decoccióncomenzara.Siseolvidadeseleccionaruntiempodecocciónosi
seolvidedepresionarelbotónSTART/STOP,launidademitirádospitidosyla
pantalladigitalleerá--:--despuésde30segundos.
8. Launidadcomenzarálacuentaatrásenincrementosdeunminutodespués
dequelatemperaturaalcanza190°F(LOW)o212°F(HIGH).
9. Una vez que el tiempo de cocción haya terminado, la Olla Eléctrica
MultifuncionalpasaráautomáticamentealafunciónKEEPWARM.

ESPAÑOL
47
Función de Yogur
Sólonecesitadosingredientesparahaceryogurencasa:cualquiertipodeleche
yyogur sin sabor comprado en tienda(con cultivos activosvivos) o yogurde
inicio.
Eligiendo la Leche:
Lossiguientestiposdelechesepuedenutilizar:
1. Lalechepasteurizadadecualquiercontenidodegrasa(completa,2%,1%o
lechedescremada)
2. Leche en polvo.
3. Lechedelargaduraciónesterilizadacontemperaturaultra-alta.
4. LechedeSoya.Asegúresedeusarlalechedesojaesterilizadacontemperatura
ultra-alta,quecontieneunodelossiguientesingredientes:fructosa, mielo
malta. Estos ingredientes son necesarios para la fermentación, no tendrá
éxitosinohayningunodisponibleenlaleche.
Yogur sin Sabor con Cultivos Vivos y Activos:
Todoloquenecesitasesunpocodeyogurnatural,sinsaborconcultivosvivos
yactivos,amenudollamadosprobióticos.Elyogurnaturalsepuedecompraren
unatiendaousadodeunloteanteriordeyogurcasero.Elyogurcaserosólose
puedeutilizarunmáximode2vecescomoelyogurdeinicio.Siutilizaelyogur
comprado y prefiere una marca en particular, trate de usarlo como el yogur de
inicio.
Elsello Cultura Vivoy Activo, de la AsociaciónNacional de Yogur, le ayuda a
reconocer los productos que contienen cantidades significativas de cultivos
vivosy activos. El selloes unaidentificación voluntaria disponiblepara todos
losfabricantesdeyogurcuyosproductoscontienenalmenos100millonesde
cultivosporgramoenelmomentodelafabricación.Dadoqueelprogramade
sello es voluntario, algunos yogures pueden tener algunos cultivos vivos pero no
llevan el sello.
NOTA: Para 5 tazas de leche, use ½ taza de yogur natural o 1 paquete de
yogur de inicio. Para 1 taza de leche, use una cucharada de yogur natural.
NOTA: Puedehaceryogurdirectamenteenlaollade cocción extraíble ousar
frascosdevidrioenlaolladecocciónextraíble.

ESPAÑOL
48
Proceso de Hacer Yogur:
1. Retireelyogurdeiniciodelaneveraparaquetengatiempoparaacercarsea
latemperaturaambientemientrassecalientalaleche.
2. Coloque la cantidad de leche deseada en la olla de cocción extraíble.
Calientelalechea180°F-185°FusandolafunciónSLOW COOKbaja.Use
un termómetro para asegurarse de que se ha alcanzado la temperatura
adecuada.
3. Retirela olla de cocción extraíbledel calor y deje quela leche se enfríe a
tibia(100°F-110°F).Paraacelerarelprocesodeenfriamiento,coloquelaolla
extraíbleenaguafría.Nodejequeseenfríemenosde90°F.
4. Agregueelyogurnaturaloelpaquetedecultivoiniciadoryuseunbatidorde
siliconaparamezclarloconlalechehastaquelaconsistenciaestésuavey
singrumos.NOutiliceunbatidordemetal,yaquepuedenrayarlasuperficie
antiadherentedelaolladecocciónextraíble.
5. Coloquelatapa en la olla,alinee el mandocon elcandado abiertoy gire
alcandado cerrado. El indicador deauto-cierrehará clic cuando estéen
sulugar. Gire el botón regulador de presión hacia STEAM. Pulseel botón
YOGURT.Eltiempodecocciónpreestablecidoesde8horas.Dependiendo
delsabor de yogur que más teguste, puede elegircuánto tiempo cocinar
elyogurpulsandoelbotón+o-unavezporcadamediahoraadicionalo
disminuyaenunamediahora.Paraavanzarrápidamente,mantengapulsado
elbotónhastaquelleguealtiempodecoccióndeseado.Eltiempodecocción
máslargoesde24horas.Eltiempodepreparaciónafectadelsaboryogur.
Con más tiempo de cocción, el yogur tendrá un sabor más agrio. Con el
tiempomáscorto,elyogurtendráunsabormássuave.
6. Pulse el botón START/STOP para iniciar la función de yogur. La unidad
comenzarálacuentaatrásenincrementosde1minutounavezqueseha
alcanzado la temperatura correcta.
7. Cuando el yogur está listo, quite la tapa. Puede haber algo de líquido
amarillento(suerodeleche)enla partesuperiordelyogur.Estoesnormal,
elsuerode lechecontienenutrientes yproteínas.Mézclelodenuevoenel
yogur.
8. Siprefiereelyogurregular,cúbraloycolóqueloenelrefrigeradorpor2a3
horasantesdeservir,ohastaqueelyogurseenfríe.Siprefierehaceryogur
griego,porfavorconsultelapágina50.
NOTA: LA UNIDAD DEBE PERMANECER COMPLETAMENTE INMOVIL
DURANTE LA COCCION. NO MUEVA EL APARATO; NO QUITE LA OLLA
EXTRAIBLENILATAPAYAQUEESTAAFECTARALAFIRMEZADELYOGUR.NO
AGREGUENINGUNALIMENTOPARADARLESABORANTESDECOMPLETAR
ELPROCESODEHACERYOGUR.
Hacer Yogur en Frascos de Vidrio:
1. Retireelyogurdeiniciodelaneveraparaquetengatiempoparaacercarsea
latemperaturaambientemientrassecalientalaleche.
2. Cuandosecalientalalecheenfrascosdevidrio,agregar1tazadeaguaen

ESPAÑOL
49
laolladecocciónextraíble,luegoinserteunestanteosoporteycoloquelos
frascosdevidrioenla parte superior del soporte. Coloque la tapa encima
delaolla,alineeelmandoconelcandadoabiertoygirealcandadocerrado.
Elindicadordeauto-cierreharácliccuandoestéensulugar.Gireelbotón
reguladordepresiónhaciaSTEAM.SeleccionelafunciónSLOWCOOKpara
calentarlalechea180°F-185°F.Unavezqueelprocesohaterminado,utilice
elmétodonaturalparaliberarelvapor.
3. Elsegundo paso después decalentar lalechees permitir que laleche se
enfríeatibia(100°F-110°F).Paraacelerarelprocesodeenfriamiento,coloque
laollaextraíbleenaguafría.Nodejequeseenfríemenosde90°F.
4. Agregueelyogurnaturalconlaculturavivayactivayuseunacucharapara
mezclarloconlalechehastaquelaconsistenciaestésuaveysingrumos.
5. Coloquelatapa en la olla,alinee el mandocon elcandado abiertoy gire
alcandado cerrado. El indicador deauto-cierrehará clic cuando estéen
sulugar. Gire el botón regulador de presión hacia STEAM. Pulseel botón
YOGURT.Eltiempodecocciónpreestablecidoesde8horas.Dependiendo
delsabor de yogur que más teguste, puede elegircuánto tiempo cocinar
elyogurpulsandoelbotón+o-unavezporcadamediahoraadicionalo
disminuyaenunamediahora.Paraavanzarrápidamente,mantengapulsado
elbotónhastaquelleguealtiempodecoccióndeseado.Eltiempodecocción
máslargoesde24horas.Eltiempodepreparaciónafectaalsabordelyogur.
Con más tiempo de cocción, el yogur tendrá un sabor más agrio. Con el
tiempomáscorto,elyogurtendráunsabormássuave.
6. Pulse el botón START/STOP para iniciar la función de yogur. La unidad
comenzarálacuentaatrásenincrementosde1minutounavezqueseha
alcanzado la temperatura correcta.
7. Cuando el yogur está listo, quite la tapa. Puede haber algo de líquido
amarillento(suerodeleche)enla partesuperiordelyogur.Estoesnormal,
suerodelechecontienenutrientesyproteínas.Mézclelodenuevoenelyogur.
8. Si prefiere el yogur regular, cubra y colóquelo en el refrigerador por 2 a 3
horasantesdeservir,ohastaqueelyogurseenfríe.Siprefierehaceryogur
griego,porfavorconsultelapágina22.
Sugerencias y Consejos Útiles:
• Losprobióticosylaculturavivayactivasonmásfuertescuandoelyogures
fresco. Para obtener los mejores resultados, sólo repita el mismo yogur de
inicio 2 veces como máximo. Después de unos días, los probióticos en el
loteanteriorsepuededebilitaryelyogurpuedencontenerunaconsistencia
líquida.
• Ustedpuedeelegirhaceryogurconsaboryañadirelazúcar,lamiel,aromas,
frutas u otros ingredientes al gusto antes de comer.
• Paraobtenerlosmejoresresultadosyparafacilidaddepreparación,useleche
entera o semi-desnatada esterilizada con temperatura ultra-alta o leche en
polvo reconstituida.
• Esmejorconsumirlosyoguresnaturalesdentrode7dias,dependiendode
lafrescuradelaleche.Encasodeduda,utilicelafechadevencimientodesu
lechecomounaguía.

ESPAÑOL
50
Yogur Griego
1. Coloqueelcoladorounpañodequesodentrodeunrecipienteparaqueel
filtronotoqueelfondodelrecipienteparapermitirunmejordrenaje.
2. Viertaelyogurcaseroenelcoladoropañodequesoycubraconlatapa.
Colóqueloen el refrigeradory refrigerepor lo menos 2horas. Mástiempo
resultaráenyogurmásgrueso.
3. Retireconcuidadoelyogurdelcoladoropañodequesogirandoelcoladoro
pañodequesodebocaabajosobreunplatoorecipiente.
4. Pongalodenuevoenelrefrigeradorparaenfriardurantealgunashorasantes
de servir.
Función de Dorar
Esteprogramalepermitedorarlacomidaantesdecocinar.Dorecarneopollo
paraobtenerelmayorsaborytextura,amenosqueseindiqueotracosaenla
receta.
Delepalmaditasconpapeldecocinaalosalimentosquevaadorarparasecarlos.
Paraobtenerelmejorresultado,asegúresedequeelaceiteestécalienteantes
deañadircarneopollo.Dorelacomidaentandasparamantenerlatemperatura
correcta del aceite para un dorado uniforme.
1. Coloquelaollaextraíbleensusitio.
2. Añadalacantidadapropiadadeaceiteindicadaenlareceta.
3. PulseelbotónBROWN.LaluzdelbotónBROWNparpadearáyenlapantalla
aparecerá00:30.Ajusteeltiempopulsandolosbotones+o-.Latapadebe
permanecerretiradacuandoestádorando.
4. PulseelbotónSTART/STOP.CuandolaluzdelbotónBROWNestefija,eso
significaquelaollahaalcanzadolatemperaturaadecuadaylaunidadiniciará
el calentamiento del aceite.
5. Después de aproximadamente un minuto de calentar el aceite, agregue la
comida y empiece a dorar.
6. Unavezqueterminededorar,pulseelbotónSTART/STOPparacancelarla
funciónBROWN.Ahorapuedeutilizarcualquieradelosprogramasdecocina
paracontinuar la preparación de la receta. Siga las instruccionesde cada
programa.

ESPAÑOL
51
Función de Saltear
Esteprogramalepermitesaltearlacomidaantesdecocinar.Salteepequeños
trozos de comida a fuego alto con muy poco aceite antes de cocinar.
Dele palmaditas con papel de cocina a los alimentos que va a saltear para
secarlos. Para obtener el mejor resultado, asegúrese de que el aceite esté
calienteantesdeañadircarneopollo.Salteelacomidaentandasparamantener
la temperatura correcta del aceite para un dorado uniforme.
1. Coloquelaollaextraíbleensusitio.
2. Añadalacantidadapropiadadeaceiteindicadaenlareceta.
3. PulseelbotónSAUTÉ.LaluzdelbotónSAUTÉparpadearáyenlapantalla
aparecerá00:30.Ajusteeltiempopulsandolosbotones+o-.Latapadebe
permanecerretiradacuandoestásalteando.
4. PulseelbotónSTART/STOP.CuandolaluzdelbotónSAUTÉestefija,eso
significaquelaollahaalcanzadolatemperaturaadecuadaylaunidadiniciará
el calentamiento del aceite.
5. Después de aproximadamente un minuto de calentar el aceite, agregue la
comida y empiece a saltear.
6. Unavezqueterminedesaltear,pulseelbotónSTART/STOPparacancelarla
funciónSAUTÉ.Ahorapuedeutilizarcualquieradelosprogramasdecocina
paracontinuar la preparación de la receta. Siga las instruccionesde cada
programa.
Función de Hervir a Fuego Lento
Preparesusalimentosconestafantásticatécnicautilizadaparahacercremas,
caldos,salsasyotrascreacionesmaravillosas.ConlafuncióndeSIMMER,se
asegura que su comida se mantiene justo por debajo del punto de ebullición
mientrassiguecalentándose.
1. Coloquelaollaextraíbleensusitioconlosingredientesnecesarios.
2. Sinla tapa, pulse la funciónSIMMER yuna veza continuación,pulse los
botones+o-paraajustareltiempodecocción.PulseelbotónSTART/STOP
para empezar a cocinar.
3. Cuandoterminedecocerafuegolento,pulseelbotónSTART/STOPpara
cancelar el programa.

ESPAÑOL
52
Función de Vapor
Esteprogramalepermite cocinaralvaporlos alimentosdelicadostalescomo
pescado y verduras.
1. Coloquelaollaextraíbleensusitio.
2. Coloque1-2 tazas de aguaen elfondo dela olladecocción extraíble. A
continuación, agregue el cestillo para cocinara al vapor con el soporte
asegurándosedequeelaguaseencuentraunpocopordebajodelcestillo.
Este cestillo y el soporte se pueden comprar en la pagina web: www.
fagoramerica.comollamandoalteléfono:1-800-2070806
3. Coloquelosingredientesenelcestilloycierrelatapadelaolla.
4. GireelbotónreguladordepresiónhaciaSTEAM.
5. PresionelafunciónSTEAMyluegopulselosbotones+o-paraajustarel
tiempodecocción.PulseelbotónSTART/STOPparaempezaracocinar.
6. Cuandotermine,pulseelbotónSTART/STOPparacancelarelprograma.
Programa para Mantener Caliente
Esteprogramarecalientaomantienelacomidareciéncocinadacalientepor12
horas.
1. Coloquelaollaextraíbleensusitio.Luegocoloquelacomidaenlaollade
cocciónextraíblepararecalentar.
2. Coloquelatapaenlaolla,alineeelmandoconelcandadoabiertoygireal
candado cerrado. El indicador de auto-cierre hará clic cuando esté en su
lugar.
3. GireelbotónreguladordepresiónhaciaSTEAM.
4. PulseelbotónKEEPWARM.LaluzdelbotónKEEPWARMparpadearáyen
lapantallaaparecerá00:30.
5. Pulse el botón START / STOP para empezar el programa. Cuando la luz
indicadoraenelbotónKEEPWARMysemantieneroja,estosignificaquese
ha alcanzado la temperatura adecuada.
6. Dadoquelapresiónnoseestáconstruyendoalcalentarlosalimentos,puede
abrirlatapaparacomprobarsucomidasegúnseanecesario.Paraactivarel
programade apagado,simplemente presione el botón START / STOP una
vez.
NOTA: Alutilizarlosprogramasdecocciónapresión,paracocinararrozode
cocciónlenta, el ajusteKEEPWARMseiniciaráautomáticamente después de
quetermineeltiempodecocción.Laluzdelprogramaseleccionadoseapagará,
ylaluzdelafunciónMantenerCalienteseencenderá.Lacomidasemantendrá
calientehastaquesepulsaelbotónSTART/STOPparacancelarelprograma.

ESPAÑOL
53
Función de Aplazamiento de la Cocción
Estafunciónlepermiteposponerelprocesodecocinadohasta6horas.Puede
usarelaplazamientodecocciónjuntoconlossiguientesprogramas:cocinado
lentoaltaybaja,cocinadoapresiónaltaybaja,arrozblanco, arrozintegraly
risotto.
ATENCIÓN: NODEJECOMIDASPERECEDERASTALYCOMOCARNE,POLLO,
PESCADO,QUESOYPRODUCTOSDELDÍAATEMPERATURAAMBIENTEPOR
MÁSDE2HORAS(OMÁSDE1HORACUANDOLATEMPERATURAAMBIENTE
ESTÉPORENCIMADE90ºF).CUANDOCOCINECONESTASCOMIDAS,NO
PONGALAFUNCIÓNDERETRASOPORMÁSDE1O2HORAS.
1. Seleccioneelprogramadecoccióndeseadoseleccionandoelbotóncorrecto
yajustandoeltiempocomoseanecesario.
2. PulseelbotónTIMEDELAY.Elbotónparpadearáyelpanelseleerá“00:30”,
esdecirlamitaddeunahoraderetraso.Pulselosbotones+o-paraajustar
el tiempo de retraso deseado.
3. PulseelbotónSTART/STOP. La unidad empezará acocinar después del
tiempo de aplazamiento.
EJEMPLO DE USO: Sisonlas11:30delamañana,ustedquierequelacenaesté
listaparalas6delatardeysurecetarequiereuntiempodecocciónaaltapresión
por12minutos,puedeprogramarlaollaparaquesepongaacocinardentrode
seishorasyluegococineapresióndurante12minutos.(paraello,tendráque
pulsarelbotóndeaplazamientodelacocciónhastaqueaparezca“6.0”yluego
pulsarelbotóndealtapresióndoceveces.)Así,laollamultifuncionalempezar
acocinaralas 5.30 pm y su cena estará lista faltando18 minutos para las 6
pm– tiempoduranteel cualelprogramaautomáticodeMantenerCalientese
encargarádequenoseleenfríe.

ESPAÑOL
54
Limpieza y Mantenimiento
No lave ningún componente de la olla Electrica LUX™ Multifuncional en el
lavavajillas,conlaexcepcióndelaollaextraíble.Lavesiempreestaollaextraíble
complementedespuésdecadauso,osinohasidousadaporunperiodolargo
de tiempo.
1. DesenchufelaollaMultifuncionalydejequeseenfrieantesdelimpiarla.
2. Saque la olla extraíble y lavela con agua y jabon, o en el lavavajillas.
Recomendamoslavarloamano.Aclareloyséquelomuybien.
3. PaseunpañohúmedoporelexteriordelcuerpodelaollaMultifuncional.NO
lasumerjaenagua.
NOTA:Paraeliminarelolordelaparteinteriordelatapa,límpielaconaguay
vinagre(proporción1:1).
4. Quite el colector de agua tirando hacia abajo. Lávelo con agua con jabón
templada.Enjuagueysequecuidadosamente.Póngalodenuevoensusitio.
5. Delelavueltaalatapa,cojalajuntadesiliconaytireparasacarla.Limpie
la junta de silicona con agua templada con jabón. Enjuague y seque
completamente.Pongadenuevolajuntaensusitiocolocándoladentrodel
bordedelatapayempujandohaciaabajo.Asegúresedequeelsurcoenel
centrode lajunta estácolocado alrededor del anillo demetal enel borde
interior de la tapa.
NOTA: a junta de silicona debe colocarse siempre adecuadamente en el
lado inferior de la tapa; de otro modo la unidad no funcionará. Compruebe
periódicamenteparaasegurarsedequeestálimpia,flexible,ynoestárajadao
agrietada(Versecciónde“Antesdelprimeruso”enestemanual).
6. Silajuntadesiliconaparecedañada,rajadaodesgastada,nouselaunidad
ycontacteconnuestrodepartamentodeatenciónalclienteenelnúmerode
teléfono(800)207-0806.
7. Paraunfuncionamientoóptimo,lafuentedecaloryelsensordetemperatura
deben limpiarse después de cada uso. Limpie con un paño húmedo y
asegúresedesecarlocompletamente.
8. Nuncauselimpiadoresabrasivosoestropajosparafrotarparalimpiarninguno
de los components.
Limpieza del Botón Regulador de Presión
CompruebeSIEMPREqueelbotónreguladordepresiónylaválvuladeseguridad
funcionan correctamente antes de cada uso.
1. Despuésdequelaunidadsehayaenfriado,quitelatapa.
2. Presionehaciaabajoalavezquegiraelbotónreguladordepresiónenel
sentidocontrariodelasagujasdelrelojhastapasadoelindicadordeVAPOR
(STEAM)hastallegaraLIMPIAR(CLEAN).Retireconcuidado.Mireatravés
delosagujerosdelbotónpara asegurarsedequenoestábloqueado.Deje
correrunpocodeaguaatravésdelamisma.
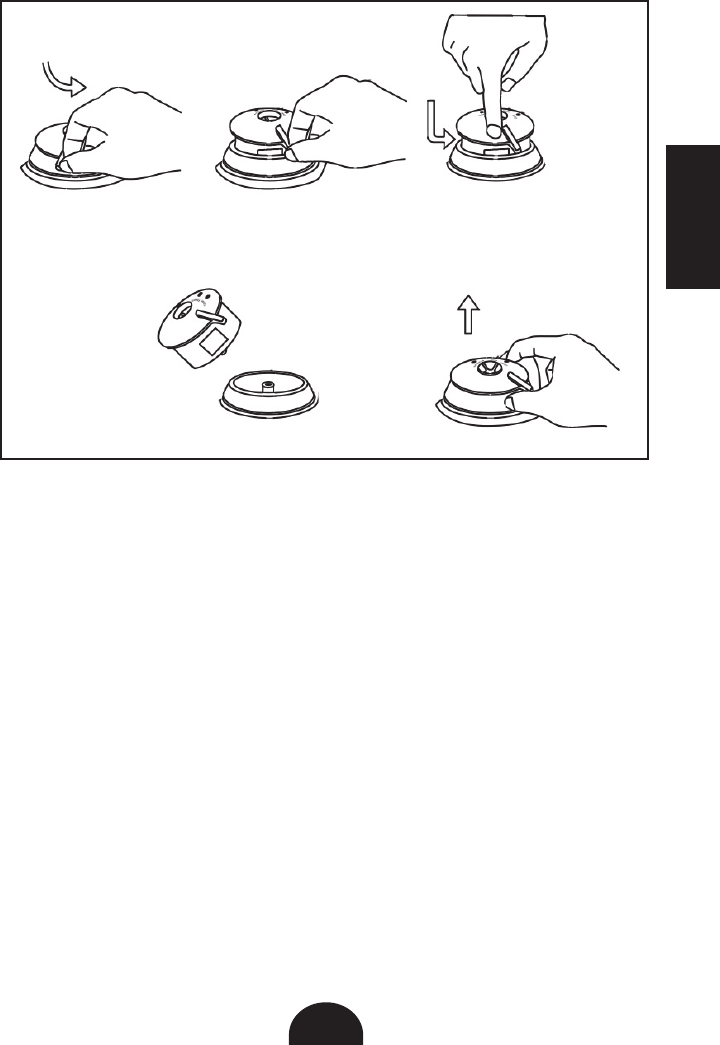
ESPAÑOL
55
3. Délela vuelta a la tapay colóquelaencima deuna mesa. Saquela funda
anti-bloqueo tirando hacia arriba. Usando un cepillo, compruebe y elimine
cualquierrestodecomidaodepartículasextrañasquepuedanestardentro
delaválvulaflotante.Vuelvaaponerlafundaanti-bloqueoempujandohacia
abajohastaquesesujeteensuposición.
4. Vuelva a colocar el botón regulador alineando las muescas del botón
reguladorconlasmuescasenelhuecodelbotónenlaposiciondeLIMPIAR
(CLEAN),ygirandoenelsentidodelasagujasdelrelojhastaquesevuelvaa
colocarensuposición.Lospuntosblancossobreelbotóndeberíancoincidir
conelpuntoblancoenelcuerpodelaolla.Sinocoinciden,vuelvaaquitarel
botónygírelo180gradosparavolveraalinearlasmuescas.
(1) (2) (3)
(4)(5)

ESPAÑOL
56
Solución de Problemas
SielLUX™detectaunerrorinternoounaconexiónincorrecta,mostraráuncódigo
deerrorenelpanelydejarádefuncionar.Estoscódigoslepermitiránidenticar
la causa del error y le ayudan a encontrar la solución al problema. Si el error
persiste, llame a nuestro departamento de servicio al cliente al 1-800-207-0806.
E1: Los circuitos internos se han desconectado.
Autoayuda: Llame a nuestro departamento de servicio al cliente para
obtenerayuda.
E2: Elsensorinternosehacortocircuitadoolaunidadestá
sobrecalentándose.
Autoayuda: Trate de enfriar la unidad apagándola y desconectándola,
tambiénquitelaolla.
E3: Launidadestásobrecalentándose.
Autoayuda: Intente enfriar la olla apagándola y desconectándola de la
corriente. Quite la olla extraíble. Si el mismo error persiste
contacte con nuestro departamento de servicio al cliente:
1-800-207-0806.
E4: Elinterruptordepresiónhafallado.
Autoayuda: Trate de enfriar la unidad apagándola y desconectándola,
tambiénquitelaolla.SipersisteelmensajeE3,laollaolaplaca
calefactora podría estar deformada. Tendrá que ponerse en
contacto con nuestro departamento de servicio al cliente.

FRANÇAIS
57
Table des Matières
Introduction ............................................................................................................ 58
Importantes Mesures de Protection ...................................................................... 59
Caractéristiques et Fonctions ................................................................................ 61
Préparation ............................................................................................................. 63
Fonctions de Fonctionnement ................................................................................ 64
Programme de Cuisson à la Pression ................................................................... 66
Tableaux de Cuisson à la Pression ........................................................................ 68
Programme de Cuisson du Riz .............................................................................. 72
Programme de Cuisson Lente ................................................................................ 74
Programme de Yogourt .......................................................................................... 75
Yogourt Grec ........................................................................................................... 78
Fonction pour Dorer ............................................................................................... 78
Fonction pour Sauté ............................................................................................... 79
Fonction pour Faire Mijoter ................................................................................... 79
Fonction pour Cuire à la Vapeur ............................................................................ 80
Fonction pour Garder au Chaud ............................................................................ 80
Fonction de Temporisation ..................................................................................... 81
Nettoyage et Entretien ............................................................................................ 82
Dépannage .............................................................................................................. 84

FRANÇAIS
58
Introduction
Merci d’avoir acheté ce cuiseur multifonction perfectionné Fagor
LUX™! Le Fagor LUX™ peut cuire à la vapeur, faire mijoter, dorer,
sauter, cuire du riz blanc, du riz brun, le risotto, le yogourt, cuire
à la pression et cuire lentement les aliments à la perfection. Les
commandes électroniques conviviales sont simples et directes,
vous permettant de facilement régler les temps de cuisson
des recettes. De plus, les paramètres pratiques de TIME DELAY
(temporisation) et KEEP WARM (garder au chaud) vous fournissent
une souplesse de cuisson qui répond à votre horaire chargé.
Ce manuel de l’utilisateur du cuiseur multifonction de Fagor
contient tous les renseignements sur l’utilisation et l’entretien de
ce produit. Veuillez lire attentivement ce manuel avant d’utiliser le
cuiseur multifonction de Fagor LUX™ afin d’en assurer un usage et
un entretien adéquat. Les instructions contenues dans ce manuel
vous permettront d’optimiser la performance et la durée de vie de
l’autocuiseur.
Remarque: Ce manuel est valable pour toutes les couleurs et les
tailles du LUX™ Multi-Cooker.

FRANÇAIS
59
IMPORTANTES MESURES DE
PROTECTION
Leproduitquevousavezachetéestunappareilàlapointeduprogrès.Iladhère
àtouslesstandardsdesécuritéetdetechnologielesplusrécents;cependant,
commeavectoutappareilélectrique,ilcomportedesrisquespotentiels.N’opérez
cetautocuiseurqueconformémentauxinstructionsfourniesetuniquementselon
sonutilisationménagèreprévue.
VEUILLEZ LIRE LES INSTRUCTIONS CI-DESSOUS AVANT D’UTILISER
L’APPAREIL POUR LA PREMIÈRE FOIS.
• Liretouteslesinstructionscontenuesdanscemanuelavantd’utiliserl’appareil.
• Ceproduitn’estpasprévupouruneutilisationcommercialeouenpleinair;il
estuniquementprévupouruneutilisationdomestiqueetàl’intérieur.
• Ne pas faire fonctionner l’appareil si le cordon électrique ou la fiche est
endommagé. Si l’appareil ne fonctionne pas correctement, est tombé, ou
a été endommagé, laissé à l’extérieur ou immergé dans l’eau, cessez-en
immédiatementl’utilisationetcontacteznotreserviceclientèleau1-800-207-
0806.
• Lecuiseurmultifonctionpossèded’unNEMA5-15P,ficheà3brochesetun
câblede47.24pouces.
• Tout d’abordconnecter le câble àlabaseducuiseur multifonction. Ensuite,
insérezlafichedansuneprisedecourant.Assurez-voustoujoursquelecâble
estcomplètementsec.
• Nelaissezpas le cordon électrique pendredu rebordd’une table oud’un
comptoir.
• Nemettezpaslecordonélectriqueaucontactdesurfaceschaudes.
• Sivousutilisezunerallongepourbrancherl’appareil,sachezqu’uncordonde
rallongeendommagépeutcauserdesdysfonctionnements.Examineztoujours
votrerallongepourvousassurerqu’ellen’estpasendommagéeetqu’elleest
compatibleaveclatensionrequise.Pourdesraisonsdesécurité,assurez-vous
deplacerlecâbleafinqu’ilpuisseêtretirépardesenfantsouprovoquerun
déclenchementaccidentel.
• Neplacez pas l’appareilprès de dispositifs émettant dela chaleurtels que
desradiateurs, des tables decuisson électriquesouà gaz. Ne placezpas
l’autocuiseurdansunfourchaud.
• Utiliseztoujourslecuiseurmultifonctiondansunendroitbienventilé.
• L’utilisation d’accessoires ou de pièces de rechange qui ne sont pas
recommandés ou vendus par le fabricant peut endommager l’appareil ou
occasionnerdesblessurescorporelles.
• Les enfants doivent en tout temps être sous la surveillance d’un adulte à
proximitélorsqu’ilssontdansouprèsdelacuisine.Gardezcetappareilhors
deportéedesenfants.
• Cetappareiln’estpasprévupouruneutilisationpardespersonnes(ycompris
desenfants)ayantdescapacitésréduitesphysiques,sensoriellesoumentales,
ou qui manquent d’expérience et de connaissances, à moins qu’elles ne
soientsurveilléesouinstruitessurl’utilisationdel’appareilparunepersonne
responsablepourleursécurité.
• Pendant le fonctionnement, ne pas couvrir l’appareil, ni le positionner à
proximité, de matériaux inflammables comme rideaux, tentures, murs et
meublesrecouvertsdetissu.

FRANÇAIS
60
• N’ouvrezpasl’autocuiseurtantqu’ilestchaudetsouspression.S’ilestdifficile
deséparerlespoignées,c’estqu’ilestencoresouspression:N’enforcezpas
l’ouverture.Toutepressioncontenuedansl’autocuiseurprésenteundanger.
• Faitestoujourscuiredanslepotdecuissonamovibleducuiseurmultifonction.
Unecuissonsanslepotdecuissonamoviblepeutprovoquerunchocélectrique
ouendommagerl’appareil.
• Nejamaisfairefrireoufrireàlapressiondanslecuiseur.Ceciestdangereuxet
peutprovoquerunincendieetdesdégâtsgraves.
• Nejamaiscouvriroubloquerlasoupapedepressionparquoiquecesoit.Cela
peutprovoquerunesurpressionetdesaccidentsgraves.
• Pendant que vous cuisinez, le couvercle et la surface externe en acier
inoxydabledu cuiseur peuvent devenirbrûlants. Manipulez lecuiseur avec
soinetportez-leoudéplacez-leenutilisantuniquementlespoignéeslatérales.
Soyeztrèsprudentsendéplaçantunappareilcontenantdesalimentsoudes
liquideschauds.
• Gardezvosmainsetvotrevisageàbonnedistanceduboutonderégulateurde
pressionlorsqu’onrelâchelapressionducuiseurafind’éviterd’êtreéchaudé
par la vapeur.
• Aprèslacuisson,soyezextrêmementprudentlorsquevousretirezlecouvercle.
Lavapeurrésiduellequis’échappedel’intérieurdel’appareilpeutcauserdes
brûluresgraves.Soulevezlecouvercleendétournantvotrefigureetlaissezles
gouttesd’eaus’écoulerducouvercledanslecuiseur.
• Toujours débrancher etlaisserrefroidir avant de nettoyeret d’enretirerdes
pièces.
• Ne tentez jamais de débrancher l’appareil en tirant sur son cordon
d’alimentation.Ilfautledébrancherlorsqu’iln’estpasutilisé.
•Pourréduirelerisquedechocélectrique,nejamaisplongerlafiche,lecâble
d’alimentation ou le boîtier dans l’eau ou tout autre liquide. Seul le pot de
cuissonamoviblepeutêtreplacédanslelave-vaisselle.
• Seuls des experts qualifiés peuvent réparer et effectuer des travaux de
maintenance sur le cuiseur multifonction électrique en utilisant des pièces
derechangeetdes accessoiresauthentiques FAGOR. Netentez jamaisde
démonterouderéparerlecuiseurmultifonctionvous-même!
•Cetappareilcuitsouspression.Sonutilisationinappropriéepeutcauserdes
blessuresparbrûlures.Assurez-vousquel’appareilestbienferméavantdele
fairefonctionner.Voir«Programmedel’autocuiseur»
•Nepasremplirl’appareilàplusdes2/3.Lorsquevouscuisinezavecdesaliments
quisedilatentcommedurizoudeslégumessecs,neremplissezpaslepotde
cuissonamovibleàplusla1/2.Sil’appareilesttroprempli,lasoupapepeutse
boucheretcauserunesurpression.Voir«Programmedel’autocuiseur»
•Rappel:certainsalimentstelsquelacompotedepommes,lesairelles,l’orge
perlée,l’avoineetd’autrescéréales,lespoiscassés,lesnouilles,lesmacaroni,
larhubarbeoulesspaghettisontsourced’écumeetdeprojectionsquipeuvent
bloquerledispositifdelibérationdelapression(soupapevapeur).Cesaliments
nedoiventpasêtrepréparésdansl’autocuiseur.
• Vérifieztoujourslesdispositifsdelibérationdelapressionavantdecuisiner.
GARDEZ CES INSTRUCTIONS
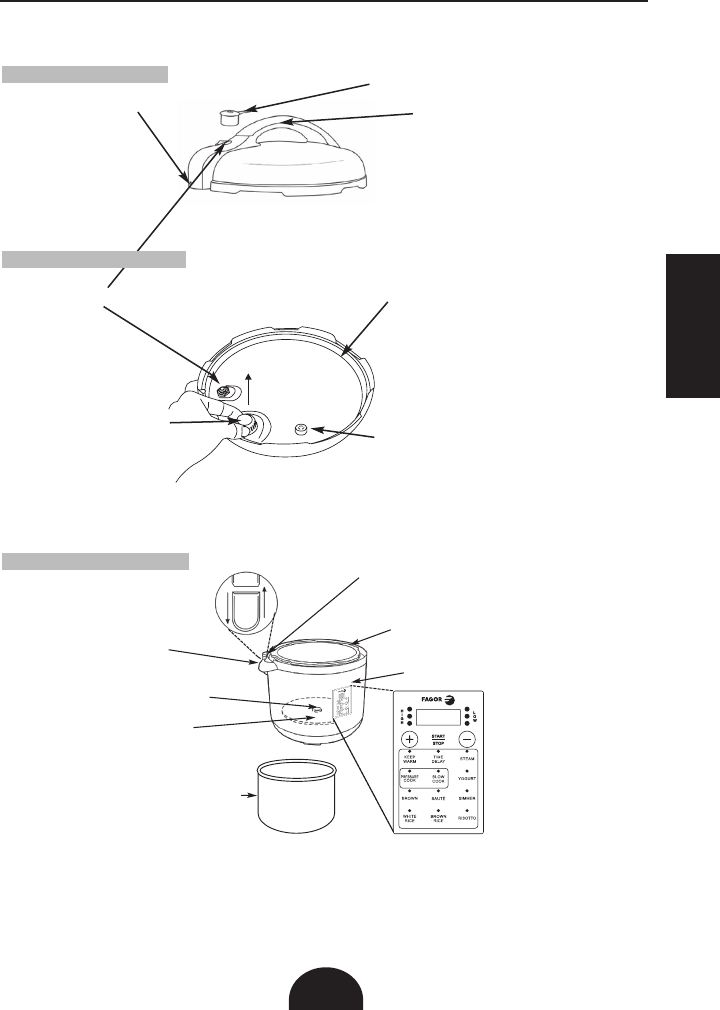
FRANÇAIS
61
Caractéristiques et Fonctions
(5) Joint en silicone
(6) Soupape de surpression
de sécurité
(7) Boîtier antiblocage
(se soulève et se détache)
Pot fixe (11)
(non amovible)
Panneau de réglages (12)
Réservoir de condensation (8)
(amovible)
(3) Poignées froidesau
toucher
(9) Capteur de température
(9) Élément de chauffage
(10) Le pot de cuisson amovible
Bouton régulateur de pression (1)
Poignées froides au toucher (3)
(4) Soupape
flottante
(2) Ergot d’auto-
verrouillage
Dessus du couvercle
Dessous du couvercle
Boîtier de l'autocuiseur

FRANÇAIS
62
1. Bouton régulateur de pression: Tournez le bouton régulateur en position «
Pressure»lorsdecuissonàlapressionoulorsquevousutilisezl’unedesfonctions
decuissonderiz.Tournezleboutonenposition«Steam»pourfaireretomberla
pression après une cuisson à la pression ou de riz, et lorsque vous utilisez la
fonction STEAM (vapeur). Lorsque vous utilisez les fonctions SLOW COOKER
(mijoteuse)ouKEEPWARM(garderauchaud),assurez-vousdetournerlebouton
régulateurdepressionenposition«Steam»(vapeur)etnonenposition«Pressure
»(pression).
2. Ergot d’auto-verrouillage:Lecouvercleseverrouilleautomatiquementlorsqu’il
est correctement aligné et fermé. Pendant la cuisson à la pression, vous ne
pourrezpasouvrirlecouvercleavantquetoutelapressionsoitretombée.
3. Poignées froides au toucher: Les poignées froides au toucher du cuiseur
multifonctionpermettentdemanipuleretd’ouvrirlecouverclefacilement.
4. Soupape flottante: La soupape flottante de sécurité contrôle la pression à
l’intérieurducuiseur,etpermetdelibérerunexcèsdepression.
5. Joint en silicone: Crée un joint étanche à l’air nécessaire pour faire monter la
pressionducuiseur.Vérifiezquelejointensiliconeneprésentepasdedéchirures
oufissuresavantd’utiliserlesfonctionsdecuissonàlapression,cuissonlenteou
l’unedescuissonsderiz.Pourcommanderunnouveaujoint,veuillezcontacterun
représentantFagorau1-800-207-0806oul’acheterdirectementsurlesiteFagor
www.fagoramerica.com.
6. Soupape de surpression de sécurité: Lasoupapedesurpressionde sécurité
permetàunexcèsdepressiondes’échapperdel’appareildecuissonlorsqu’ilest
utiliséencuissonàlapression.Ellefonctionneindépendammentdelasoupape
flottante.
7. Boîtier antiblocage: Tirezle bouton régulateur de pressionversvous pour le
libéreretlenettoyer.
8. Réservoir de condensation: Recueill’excèsdecondensationpendantlacuisson.
S’ilresteunpeudeliquidedansleréservoiraprèslacuisson,ilsuffitdelevider.
9. Élément de chauffage et capteur de température: Cesdeuxélémentsrégulent
latempératuredecuissonàl’intérieurdupot.
10. Le pot de cuisson amovible: Le pot en acier inoxydable peut aller au lave-
vaisselle,maisunlavageàlamainesttoujoursrecommandé.
11. Pot fixe: Cepotnepeutpasêtreretiréducuiseurmultifonctionélectriqueetne
doitjamaisêtreutilisépourlacuisson.Avantlacuisson,assurez-vousdeplacer
d’abordlepotdecuissonamovibledanslepotfixe.Touslesingrédientsdoivent
êtreplacésUNIQUEMENTdanslepotdecuissonamovible.
12. Panneau de réglages: Les commandes faciles d’utilisation vous permettent
desélectionner du bout du doigt les différentsprogrammesdisponibles. Deux
réglages de cuisson à la pression, deux réglages de cuisson lente, riz blanc,
riz brun, risotto, dorer, faire sauter, mijoter, vapeur, yogourt, garder au chaud,
temporisation,marche/arrêtetunboutonplus/moinspourajusterletempsde
cuissonetlatemporisation.Enoutre,surlepanneaudecommande,voustrouverez
lesvoyantsindicateursHIGH(haute)etLOW(basse)quiclignotentpendantque
lapressionoulatempératureaugmente.Cestroisvoyantsserontcontinuellement
alluméslorsquel’appareilauraatteintlapressionoulatempératureappropriée.

FRANÇAIS
63
Préparation: Avantlapremièreutilisation
Lirelesinstructionsdesécuritécontenuesdanscemanuelavantl’emploi.Avant
d’utilisercetappareilpourlapremièrefois,suivezlesétapessuivantes:
1. Retireztouslesemballages et lalittératureducuiseurmulti-fonctionFagor
LUX™.Soulevezlepotdecuissonamovibleetretirezlesmorceauxdepapier
quise trouventsous lui. Retirez la protectionen plastique du panneaude
commandeetlesautocollantsducouvercleouboîtierenacierinoxydable.
2. Lavez toutes les pièces amovibles à l’eau chaude savonneuse. Rincer et
séchersoigneusementtouteslespièces.Essuyezleboîtierexterneenacier
inoxydableavecunchiffonpropreethumide.Nejamaissubmergerleboîtier
externe en acier inoxydable dans l’eau ou tout autre liquide. L’autocuiseur
peut aller au lave-vaisselle.
3. Pournettoyer le boutonrégulateur de pression, enfoncez-le doucementet
faites-letournerenmêmetempsdanslesensantihoraireau-delàduréglage
STEAM to CLEAN (vapeur pour nettoyer). Une fois que le point blanc de
CLEANestaligné avec le pointblancàlabasedu régulateur de pression,
vouspouvezsouleverlerégulateurdepressionetleretirerducouvercle.Mirez
lestrousdurégulateurdepressionpourvousassurerqueriennelesobstrue,
puisnettoyezleboutonrégulateurdepressionàl’eauchaudesavonneuse,
enlaissantl’eaus’écoulerautraversdurégulateurdepressionpourenretirer
toutes les particules.
4. Pourreplacerlerégulateurdepressionsurlecouvercle,alignezsimplement
leréglageCLEANaveclepointblancdelabase,appuyezdoucementsurle
régulateurdepressionetfaitestournerleboutondanslesenshorairejusqu’à
cequ’ilglisseenplace.
5. Assurez-vousque le joint ensilicone estcorrectementpositionné dans le
couvercle sinon le cuiseur ne fonctionnera pas correctement.
6. Après un séchage complet, replacez le pot de cuisson amovible dans le
cuiseur multifonction avant la cuisson.
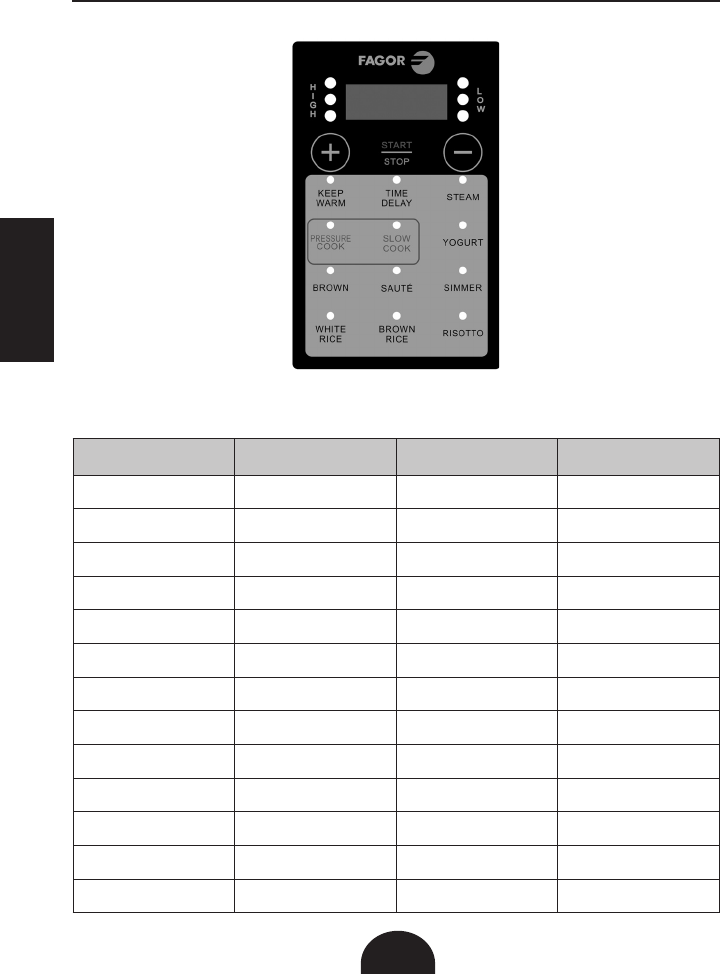
FRANÇAIS
64
Fonctions de Fonctionnement:
Programmesetfonctionsdupanneau
Tableau de température/minuterie
Fonction de cuisson: Température: Temps préréglé: Minuterie:
Garder au chaud 165°F 30 minutes Jusqu’à 12 heures, par
paliers de 30 min
Vapeur 212°F 5 minutes 1-99 minutes, par paliers de
1 minute
Dorer 356°F 30 minutes 1-30 minutes, par paliers de
1 minute
Sauter 284°F 30 minutes 1-30 minutes, par paliers de
1 minute
Faire mijoter 200°F 30 minutes 1-120 minutes, par paliers
de 1 minute
Haute pression 240°F-248°F 1 minutes 1-99 minutes, par paliers de
1 minute
Basse pression 226°F-230°F 1 minutes 1-99 minutes, par paliers de
1 minute
Autocuiseur lent haute
température 212°F 2 heures 30 minutes - 10 heures, en
30 min d’intervalle
Autocuiseur lent basse
température 190°F 2 heures 30 minutes - 10 heures, en
30 min d’intervalle
Yaourt 104°F-109°F 8 heures Jusqu’à 24 heures, par
paliers de 30 min
Riz blanc 226°F-230°F 10 minutes 1-99 minutes, par paliers de
1 minute
Riz brun 240°F-248°F 20 minutes 1-99 minutes, par paliers de
1 minute
Risotto 240°F-248°F 6 minutes 1-99 minutes, par paliers de
1 minute

FRANÇAIS
65
1. Garder au chaud: Utiliséepour réchauffer ou garder les aliments cuitsau
chaudjusqu’aumomentdeservir.
2. Vapeur: Cettefonctionestutiliséepourlesrepascuitsàlavapeurtelsque
les légumes et les poissons. Il suffit d’ajouter au moins une demi-tasse
d’eaudanslefonddevotrepotdecuissonamovibleetd’insérerlepanierà
vapeuretletrépiedenacierinoxydableFagor.Veillezàpositionnerlepanier
àvapeurau-dessusduniveaudel’eau.LepanieràvapeuretletrépiedFagor
en acier inoxydable peuvent s’acheter séparément sur le site Fagor www.
fagoramerica.com.
3. Dorer: Cettefonctionestutiliséepourconserverlasaveuretlejusendonnant
àlanourritureunaspectbrundoré.
4. Sauté: Cette fonction est utilisée pour préparer de petits morceaux de
nourrituredanstrèspeud’huileàfeuvif,avantd’utiliserlafonctiondecuisson
àlapressionoudecuissonlente.
5. Mijoteuse: Cettefonctionestutiliséepourfairedelasoupe,duragoût,des
saucesouautresplatsquidoiventêtrecuitsàunréglagemoinschaud.Cette
fonctionestbeaucoupplusdoucequel’ébullitiondel’eauetrendralaviande
etleslégumestrèstendres.
6. Cuisson à la vapeur: HIGH(haute)-utilisercettefonctionpourcuireàhaute
pression,10à13psi(livresparpoucecarré).Ceréglagedelapressionest
préférépourcuiredesviandesetlégumesoud’autresalimentsmoinstendres
quinesontpassidélicats.LOW–(basse)utilisercettefonctionpourcuire
àbassepression,de4 à7psi.Ceréglagedela pressionestpréférépour
cuiredesalimentsdélicatstelsqueleslégumestendresetcertainstypesde
poissons.
7. Cuisson lente: Ceprogrammecuitlesalimentslentementjusqu’à10heures
desuiteàdestempératuresde190°F(LOW)ou212°F(HIGH).Lacuisson
lente permet aux aliments de conserver un maximum de saveur et de
tendresse.
8. Yogourt: Cettefonctionestparfaitepourfaireduyogourttraditionnelmaison
et du yogourt grec.
9. Riz blanc: Cette fonction utilise une pression basse et vous permet de
prédéterminer un temps de 10 minutes pour cuire différents types de riz
blancs.
10. Riz brun: Cette fonction utilise une pression haute et vous permet de
prédétermineruntempsde20minutespourcuiredifférentesvariétésderiz.
11. Risotto: Cette fonction utilise une pression haute et avec un temps
prédéterminéde6minutespourcréerunplatderisottogastronomique.
12. Start/Stop (Marche/Arrêt):Àutiliseraprèslasélectiond’unecuissonpour
commencer le processus de cuisson ou si vous souhaitez annuler la fonction
de cuisson.
13. Temporisation: Vous permet de retarder le début de la cuisson jusqu’à 6
heures.Ilsuffitdepousserleboutondetemporisation,cequil’augmentera
parpaliersde30minutesjusqu’àatteindreletempsmaximumde6heures.

FRANÇAIS
66
Programme de Cuisson à la Pression
Ceprogrammepermetdecuirelesalimentssouspressionenréduisantjusqu’à
70%letempsdecuissonparrapportauxméthodestraditionnelles.Lacuissonà
lapressionestrapide,facile,sûreetsaine!
1. Avantchaqueutilisation,assurez-vousquelejointensiliconeetlessoupapes
derégulationdepressionsontpropresetbienplacéesdanslecuiseur.
2. Branchezlecordond’alimentationdansunepriseélectrique.
3. Placezlepotdecuissonamovibledanslecuiseur,etajoutez-ylesingrédients
selonlarecette.Pourcuiredesalimentssouspression,ilfautauminimum1
tasse(8oz)deliquide
REMARQUE : Neremplissezlepotpasdenourritureetdeliquideau-delà
des2/3.Neremplissezpasl’unitéau-delàdela½avecdesalimentsquise
dilatent pendant la cuisson.
REMARQUE : Lesalimentssuivantsnedoiventpasêtrecuitssouspression:
compotedepommes,canneberges,orgeperlé,avoine,poiscassés,nouilles,
pâtesourhubarbe.Cesalimentsonttendanceàmousser,àfairedel’écume
etàéclabousser,cequipeutbloquerlasoupapedesurpression.
4. Placezlecouverclesurl’appareildecuissonenalignantl’ergotdelapoignée
surlacupuledecondensationquimontrele symbole de déverrouillage,et
tournezlecouvercledanslesensantihorairejusqu’àcequ’ilseverrouilleen
place.Voussaurezquel’appareilestverrouillélorsquevousentendrezleclic
del’ergotquisemetenplace.
5. TournezleboutonrégulateurdepressionsurPRESSURE.
6. ChoisissezlemodedecuissonsouhaitéenappuyantsurleboutonPRESSURE
COOK(cuissonàlapression)unefoispourHIGH(haute)pressionetdeuxfois
pourLOW(basse)pression.
7. Réglezletempsdecuissonsouhaitéenappuyantsurboutons+et–unefois
pourchaqueminutesupplémentaire,oumaintenezleboutonenfoncé pour
uneavancerapidejusqu’àatteindreletempssouhaité.Letempsmaximum
decuissonàlapressionestde99minutes.
8. Pourréglerlaminuteriedetemporisation,sélectionnezleboutonTIMEDELAY
(temporisation)et utiliser les touches+ et- pourajuster lemoment oùla
cuissondoitcommencer.Latemporisations’accroîtparpaliersde½heure.
9. AppuyezsurleboutonSTART/STOP(marche/arrêt)pourlancerlacuisson.Le
voyantduboutonPRESSURECOOKclignotelorsquel’appareilacommencé
àmonterlapression.Sivousoubliezdesélectionneruntempsdecuisson
désiréoud’appuyersurleboutonSTART/STOP,l’appareilémettradeuxbips
sonoresetl’écrannumériqueaffichera--:--après30secondes.
10.Lorsque la pressionmonte, les troiscerclesà côté duréglagedepression
choisis’allumentunàun.LeboutonPRESSURECOOKclignoteégalement
jusqu’àcequ’ilaitatteintlapressionfinale.Unefoislapressionatteinte,les
trois cercles s’illuminent en rouge continu, le voyant témoin du bouton de
l’autocuiseurs’allumeégalementenrougecontinu,puisl’appareilémetunbip
sonore.C’estalorsquecommencevotretempsdecuisson.

FRANÇAIS
67
11.L’appareilcommenceàdécompterlesminutesunefoislapressionappropriée
estatteinte.Lasoupapeflottantequisesituedanslecouverclesesoulève
égalementlorsquelapressionestatteinte.
AVERTISSEMENT : NE TENTEZ JAMAIS D’OUVRIR LE COUVERCLE PAR
LA FORCE PENDANT QUE VOUS CUISINEZ SOUS PRESSION. CELA PEUT
CAUSER UN ACCIDENT GRAVE.
AVERTISSEMENT : NE JAMAIS FAIRE FRIRE OU FRIRE À LA PRESSION
DANS LE CUISEUR MULTI-FONCTION. C’est dangereux et peut provoquer
un incendie et causer de sérieux dégâts.
12.Le cuiseur émet un bip une fois le temps de cuisson terminé. Il passe
automatiquement à la fonction KEEP WARM (garder au chaud) et cette
fonctionclignotejusqu’àcequevousappuyiezsurleboutonSTART/STOP
pourannulerleprogramme.AprèsavoirappuyésurleboutonSTART/STOP,
faitesretomberla pression. Vous avez deuxoptions pour faire retomber la
pression:
a. Méthode de retombée rapide:faitesretomberlapressionimmédiatement
entournantleboutonrégulateurdepressionsurSTEAM.
MISE EN GARDE:Lavapeurquisortdelasoupapedepressionseratrès
chaude,etpeutcontenirdesgouttelettesdeliquidechaude.TOUJOURS
DIRIGERLEJETDEVAPEURLOINDEVOTREVISAGEETDEVOSMAINS.
VEILLEZÀUTILISERDESPOIGNÉESQUANDVOUSFAITESRETOMBER
LAPRESSION.
b. Méthode de retombée naturelle: faites retomber à la pression
naturellementsanstournerleboutonrégulateur depressionsurSTEAM.
Celaprendraplusieursminutesaucoursdesquelleslanourriturecontinue
àcuire.Certainesrecettes(tellesquelerisotto)bénéficientdecetempsde
cuissonsupplémentaire.Voussaurezquandlapressionestretombéeparce
quelasoupapeflottantevas’abaisseretvouspourrezouvrirlecouvercle.
REMARQUE: Si vous n’appuyez pas sur le bouton START/STOP en fin de
cuisson, le cuiseur multifonction émet un bip à intervalles réguliers pour vous
rappelerquelacuissonestterminée.
13.Unefoisquetoutelapressionestretombée,retirerlecouvercleenletournant
danslesenshoraire,puissoulevez-leenl’inclinantloindevouspouréviter
d’êtreéchaudéparlavapeurrestanteoul’eauchaudedecondensationqui
dégoulinedel’intérieurducouvercle.
AVERTISSEMENT : APRÈS LA CUISSON, LE POT AMOVIBLE SERA CHAUD.
Utilisez des poignées pour le manipuler ou laissez-le refroidir avant de le
retirer.
FRANÇAIS
68
Tableaux de Cuisson à la Pression
Lestempsdecuissonà la pressionsontapproximatifs.Utilisez ces temps de
cuissoncommerèglegénérale.Latailleetlavariétévontmodifierlestempsde
cuisson.
Cuisson de légumes à la pression (frais et surgelés): Pourobtenirlesmeilleurs
résultats de cuisson à la pression de légumes frais ou congelés, suivez les
conseilsetastucesci-dessous:
1. Utilisezla fonctionSTEAM pourpréparerdes plats de légumescuits à la
vapeur.
2. Utilisezlaméthoderapidepourfaireretomberlapressionlorsdecuissonde
légumesafindenepastroplescuire.
3. Utilisezauminimumde1tassedeliquidelorsdelacuissondeslégumes.
4. Lorsde cuisson delégumesà la vapeur, utilisezle panierà vapeuret le
trépiedFagor en acier inoxydablequi peuvents’achetersur le site Fagor
www.fagoramerica.comouenappelantunreprésentantFagorau1-800-207-
0806.
Tableaux de cuisson des légumes à la pression:
Légumes Réglage de la pression Frais
(Temps de cuisson) Surgelés
(Temps de cuisson)
Courge poivrée, en morceaux Haute 6-7 minutes 8-9 minutes
Artichaut, 4 moyens à gros Haute 8-10 minutes 10-12 minutes
Asperges Haute 1-2 minutes 2-3 minutes
Betteraves entières, moyenne à grosse Haute 20-25 minutes 25-30 minutes
Brocoli, en fleurons Haute 2-3 minutes 3-4 minutes
Choux de Bruxelles Haute 3-4 minutes 4-5 minutes
Courge musquée, en morceaux Haute 8-10 minutes 10-13 minutes
Chou, en quartiers Haute 3-4 minutes 4-5 minutes
Carottes, entières ou en rondelles Haute 2-3 minutes 3-4 minutes
Choux-fleurs, en bouquets Haute 2-4 minutes 3-5 minutes
Céleri, en morceaux Haute 2 minutes 3 minutes
Légumes à feuilles vertes Haute 4-5 minutes 5-6 minutes
Épis de maïs Haute 3-5 minutes 4-6 minutes
Edamame, en gousses Haute 4-5 minutes 5-6 minutes
Aubergine Haute 2 minutes 3 minutes
Endive Haute 1-2 minutes 2-3 minutes
Chou vert, haché grossièrement Haute 1-2 minutes 2-3 minutes
Poireaux Haute 2-4 minutes 3-5 minutes
Oignons, en tranches Haute 2 minutes 3 minutes
Pommes de terre, entières, petites Haute 5-8 minutes 6-9 minutes
Pommes de terre, entières, grosses Haute 10-12 minutes 11-13 minutes
Pommes de terre, en tranches ou en
cubes Haute 5-8 minutes 6-9 minutes
FRANÇAIS
69
Citrouille, en morceaux Haute 4-8 minutes 6-12 minutes
Épinards Haute 1-2 minutes 3-5 minutes
Patates douces, en cubes Haute 7-9 minutes 9-11 minutes
Patates douces, entières Haute 10-15 minutes 12-19 minutes
Tomates, en quartiers Haute 2 minutes 4 minutes
Courgettes Haute 2 minutes 3 minutes
Cuisson à la pression de fruits frais ou secs:Pourobtenirlesmeilleursrésultats
lorsdecuissonàlapressiondefruitsséchésoufrais,veuillezsuivrelesconseils
etastucesci-dessous:
1. Laméthoderapidepourfaireretomberlapressionestrecommandéelorsde
lacuissondefruitssouspressionpouréviterdetroplescuire.
2. Unedemi-tassed’eauserasuffisantepourcuireunequantitédefruitsparce
queletempsdecuissonesttrèscourt.
3. Ajouterdusucreauxfruitsaprèsqu’ilssontcuits,pasavant.
Tableaux de cuisson des fruits à la pression:
Fruit : Réglage de la pression Frais Secs
Pommes (en tranches ou en morceaux) Haute 2 minutes 3 minutes
Pommes (entières) Haute 3 minutes 4 minutes
Abricots, entiers ou en moitiés Haute 2-3 minutes 3-4 minutes
Pêches Haute 2-3 minutes 4-5 minutes
Poires Haute 2-4 minutes 3-5 minutes
Prunes/Pruneaux Haute 2-4 minutes 3-5 minutes
Raisins frais/secs Haute 1-2 minutes 4-5 minutes
Cuisson à la pression de haricots/légumes (secs & trempés):Pourobtenirles
meilleursrésultatsdecuissondeharicots/légumesséchésoutrempés,veuillez
suivrelesconseilsetastucesci-dessous:
1. Rincezlesharicots/légumessecsàl’eaufroideetégouttez-les;éliminezles
caillouxouautresdébrisdulot.
2. Ne remplissez pas cuiseur plus qu’à moitié pour permettre aux haricots/
légumesdegonfler.
3. Utilisezsuffisammentdeliquidepourcouvrirlesharicots/légumes
4. Nesalezpaslesharicots/légumes.Leselpendantlacuissondesharicots/
légumesempêcheradebienlescuire.
5. Ajouter1à2cuillèresàsouped’huileauxharicots/légumespourréduireau
minimumlaproductiond’écume.
6. Pour de meilleurs résultats, faites retomber la pression par la méthode
naturellelorsquelesharicots/légumessecssontcuits.
FRANÇAIS
70
Tableau de cuisson à la pression des haricots/légumes:
Haricots/légumes Réglage de la pression Temps de cuisson
(séchés, 1 tasse) Temps de cuisson
(à tremper la nuit)
Haricots azuki Haute 20-25 minutes 10-15 minutes
Haricots noirs Haute 20-25 minutes 10-15 minutes
Haricots à oeil noir Haute 20-25 minutes 10-15 minutes
Haricots Cannellini Haute 35-40 minutes 20-25 minutes
Châtaignes, percées Haute 7-10 minutes 5-7 minutes
Pois chiches (haricots Garbanzo) Haute 34-40 minutes 20-25 minutes
Haricots blancs Great Northern Haute 28-30 minutes 23-25 minutes
Haricots communs Haute 25-30 minutes 20-25 minutes
Lentilles (brunes) Haute 15-20 minutes N/A
Lentilles (vertes) Haute 15-20 minutes N/A
Lentilles (rouges) Haute 15-17 minutes N/A
Haricots de Lima Haute 20-24 minutes 10-15 minutes
Haricots blancs Haute 25-30 minutes 20-25 minutes
Haricots Pinto Haute 25-30 minutes 20-25 minutes
Haricots rouges Haute 25-30 minutes 20-25 minutes
Soja Haute 25-30 minutes 20-25 minutes
Pois cassés (verts) Haute 15-20 minutes 10-15 minutes
Pois cassés (jaunes) Haute 15-20 minutes 10-15 minutes
Cuisson à la pression des riz/grains: Pour obtenir les meilleurs résultats
de cuisson à la pression des riz/grains, veuillez suivre les conseils et astuces
ci-dessous:
1. Ajouter1à2cuillèresàsouped’huileauxgrainssecsafindeminimiserla
productiond’écume.
2. Neremplissezpaslepotamovibleplusqu’àmoitiédefaçonàpermettreaux
riz/céréalesdegonfler.
3. N’utilisez pas la méthode rapide, mais laissez la pression retomber
naturellement.
Tableau de cuisson à la pression des riz/grains:
Riz/Grains Grains : Proportion d'eau
(tasses) Fonction & temps de cuisson
Riz Arborio 1:3 Risotto, 6 minutes
Orge 1:3 – 1:4 Brown Rice, 25-30 minutes
Riz basmati 1:1½ White Rice, 6-9 minutes
Dorer 1:1¼ Brown Rice, 25-30 minutes
Couscous 1:2 Brown Rice, 5-8 minutes
Riz au jasmin 1:1 White Rice, 8-9 minutes
Riz longs grains 1:1½ White Rice, 10 minutes
Millet 2:3 Brown Rice, 10-12 minutes
FRANÇAIS
71
Orge perlée 1:4 Risotto, 25-30 minutes
Avoine à cuisson rapide 1:1 2⁄3Risotto, 5-6 minutes
Quinoa 1:2 Brown Rice, 8-10 minutes
Riz à grains courts 1:1½ White Rice, 8-9 minutes
Avoine épointée 1:1 2⁄3 Risotto, 10 minutes
Riz à sushi 1:1½ White Rice, 9 minutes
Blé entier 1:3 Brown Rice, 25-30 minutes
Riz sauvage 1:3 Brown Rice, 25-30 minutes
Cuisson à la pression des viandes/volailles:Pourobtenirlesmeilleursrésultats
lors de la cuisson de viandes/volailles, veuillez suivre les conseils et astuces
ci-dessous:
1. Couperla viande/volaille en morceaux detaille uniformepour unecuisson
uniforme.
2. Lorsdemélangedeviandes,coupezenplusgrosmorceauxcellesquicuisent
plusrapidementetcellesquicuisentpluslentementenmorceauxpluspetits.
3. Faitesdorerla viandeen petitslots -surpeupler lecuiseur peutrendre la
viande coriace et fade.
Tableau de cuisson à la pression des viandes/volailles:
Viandes/Volailles Réglage de la pression Temps de cuisson
Poitrine de bœuf, entière Haute 40-50 minutes
Queue de boeuf Haute 40-50 minutes
Petites côtes de boeuf Haute 35-40 minutes
Bandettes de poulet désossées Haute 10-12 minutes
Blancs de poulet Haute 8-10 minutes
Cuisses de poulet Haute 10-12 minutes
Ailes de poulet Haute 10-12 minutes
Poulet (entier) Haute 20-25 minutes
Poule Cornish Haute 10-15 minutes
Canard (entier) Haute 25-30 minutes
Jambon (non cuit) Haute 26-30 minutes
Agneau, en cubes Haute 10-13 minutes
Côtelettes de porc Haute 20-25 minutes
Côtes de porc Haute 8-10 minuets
Porc (côtes levées) Haute 19-24 minutes
Longe de porc Haute 45-50 minutes
Épaule de porc Haute 45-50 minutes
Dinde (pilon) Haute 15-20 minutes
Côtes de veau Haute 5-8 minutes
Cubes de boeuf Haute 18-23 minutes
Cubes de poulet Haute 10-12 minutes

FRANÇAIS
72
Temps de cuisson à la pression: Pour obtenir les meilleurs résultats pour la
cuissondesfruitsdemer,veuillezsuivrelesconseilsetastucesci-dessous:
1. Toujourslaisseraumoinsdeuxpoucesded’espacedanslehautpourprévenir
lesdébordements.
2. Les petits fruits de mer, comme les palourdes et crevettes, ne prennent pas
longtempspourcuire,parconséquent,ilestpréférabledelesajouteràunplat
danslesdernièresminutesdecuisson.
Tableaux de cuisson à la pression des fruits de mer:
Poissons/Crustacés Réglage de la pression Temps de cuisson
(Frais) Temps de cuisson
(Surgelés)
Poissons entiers Basse 5-6 minutes 7-10 minutes
Filet de poisson Basse 2-3 minutes 3-4 minutes
Steaks de poisson Basse 3-4 minutes 4-6 minutes
Pattes de crabe Basse 3-4 minutes 5-6 minutes
Queues de homard Basse 2-3 minutes 3-4 minutes
Homard (entier) Basse 3-4 minutes 4-6 minutes
Moules Basse 2-3 minutes 4-5 minutes
Coquilles Saint-Jacques
(Petites) Basse 1 minute 2 minutes
Coquilles Saint-Jacques
(Grandes) Basse 2 minutes 3 minutes
Crevettes, non épluchées Basse 2-3 minutes 3-4 minutes
Crevettes (Moy./Grandes) Basse 1-2 minutes 2-3 minutes
Crevettes (Jumbo) Basse 2-3 minutes 3-4 minutes
Programme de Cuisson du Riz
Riz blanc:DurizcuitchaquefoisàlaperfectionaveclafonctionWHITERICE
(rizblanc).Cettefonctionestprogrammableafind’assurerunriztendreetellen’a
quelestempératuresdecuissonappropriées.Rizseramoelleuxetdélicieuxtout
enéliminantlestracasdecuisson.
1. Placezlepotdecuissonamovibledanslecuiseurmultifonction.
2. Ajoutez1à2cuillèresàsouped’huiledanslepotdecuissonamovible.
3. Ajoutez les proportions d’eau et de riz nécessaires et tous les autres
ingrédientssouhaitésdanslepotdecuissonamovible.
4. Fermez et verrouillez le couvercle du cuiseur multifonction en alignant
correctementlespoignéesetentournantlecouvercledanslesensantihoraire.
RéglezleboutonrégulateurdepressionsurPRESSURE.
5. AppuyezsurlafonctionWHITERICEquiindiquerauntempsprédéfinide10
minutes.Sivousdevezajusterletemps,appuyezsurlestouches+et-,puis
appuyezunefoissurleboutonSTART/STOPpourdémarrerlacuisson.

FRANÇAIS
73
6. Pendantquelapressionmonte,lafonctionWHITERICEclignote.Unefoisla
pressionatteinte,levoyants’allumeenrougecontinuetl’appareilémetunbip
sonore.C’estalorsquevotretempsdecuissoncommenceetquelecuiseur
multifonctiondécomptelesminutessursonécrannumérique.
7. Une fois le temps de cuisson écoulé, le cuiseur multifonction passe
automatiquementàlafonctionKEEPWARM(garderauchaud)jusqu’àceque
vousappuyiezsurleboutonSTART/STOPpourannulerleprogramme.
Riz brun: La fonction BROWN RICE (riz brun) assure que votre riz est
complètement cuit touten conservant toutesarichesse et tousses éléments
nutritifs.Cettefonctiontransformevotrerizparfaitementenutilisantuncyclede
cuissonspécial.
1. Placezlepotdecuissonamovibledanslecuiseurmultifonction.
2. Ajoutez1à2cuillèresàsouped’huiledanslepotdecuissonamovible.
3. Ajoutez les proportions d’eau et de riz nécessaires et tous les autres
ingrédientssouhaitésdanslepotdecuissonamovible.
4. Fermez et verrouillez le couvercle du cuiseur multifonction en alignant
correctementlespoignéesetentournantlecouvercledanslesensantihoraire.
RéglezleboutonrégulateurdepressionsurPRESSURE.
5. AppuyezsurlafonctionBROWNRICEquiindiquerauntempsprédéfinide20
minutes.Sivousdevezajusterletemps,appuyezsurlestouches+et-,puis
appuyezunefoissurleboutonSTART/STOPpourcommenceràfairemonter
la pression.
6. Pendantquelapressionmonte,lafonctionBROWNRICEclignote.Unefoisla
pressionatteinte,levoyants’allumeenrougecontinuetl’appareilémetunbip
sonore.C’estalorsquevotretempsdecuissoncommenceetquelecuiseur
multifonctiondécomptelesminutessursonécrannumérique.
7. Une fois le temps de cuisson écoulé, le cuiseur multifonction passe
automatiquementàlafonctionKEEPWARM(garderauchaud)jusqu’àceque
vousappuyiezsurleboutonSTART/STOPpourannulerleprogramme.
Risotto:LafonctionRISOTTOassureunetempératureparfaiteetprécise.Créer
unrisottoavecunmélangeparfaitdetemps,detempératureetdegoût!
1. Placezlepotdecuissonamovibledanslecuiseurmultifonction.
2. Ajoutez environ 1 cuillère à soupe d’huile végétale ou d’olive dans le pot
de cuisson amovible et choisissez la fonction SAUTÉ pour faire sauter du
rizArborioetd’autresingrédientsd’abordsanslecouverclependant1à2
minutes.
3. Ajouter l’eau ou le bouillon et tous les assaisonnements ou ingrédients
nécessaires.Unefoisqueleliquidearriveàuneébullitionrapide,refermezet
verrouillezbienlecouvercledel’autocuiseur.
4. Choisissezla fonction RISOTTO, quisera prérégléesur 6 minutes.Si vous
avezbesoind’ajusterdutempspourlarecette,appuyezsurlestouches+et-.
5. AppuyezsurleboutonSTART/STOP(marche/arrêt)pourlancerlacuisson.La
fonctiondeRISOTTOclignotependantquesapressionmonte.
6. Unefoislapressiondésirée atteinte, le voyantde la fonction de RISOTTO
passe au rouge continu, l’appareil émet un bip sonore et c’est alors votre
tempsdecuissoncommenceetquel’appareildécomptelesminutes.
7. Une fois votre temps de cuisson écoulé, le cuiseur multifonction passe
automatiquementàlafonctionKEEPWARM(garderauchaud).

FRANÇAIS
74
Programme de Cuisson Lente
Préparezdesplatsmijotésclassiques, tels querôtis,soupesetragoûts en 10
heuresmaximumaveccettefonction.Ajoutezvosingrédientslematinetledîner
vousattendradanslasoirée.
1. Placezlepotdecuissonamovibledanslecuiseurmultifonction.
2. Placeztouslesingrédientsnécessairesdanslepotdecuissonamovible.
3. Placez le couvercle sur le cuiseur, alignez l’ergot de la poignée sur le
collecteurde condensation (symbole dedéverrouillage), et tournez-le dans
lesensantihorairejusqu’àcequel’ergotdeverrouillages’enclencheavecun
clic.TournezleboutonrégulateurdepressionsurSTEAMlorsdel’utilisation
du programme de cuisson lente.
4. Choisissezle mode decuissonsouhaitéen appuyantsurleboutonSLOW
COOK(cuissonlente)surlepanneaudecontrôle,unefoispourunecuisson
lenteHIGH(haute)oudeuxfoispourunecuissonlenteLOW(basse).
5. Réglezletempsdecuissonsouhaitéenappuyantsurboutons+et–ou,pour
uneavance rapide, maintenez boutons+ et–enfoncé jusqu’à atteindre le
tempsdecuissondésiré.Letempsdecuissonlepluslong,lorsdecuisson
lente,estde10heuresà190°F(LOW)ouà212°F(HIGH).
6. Pourréglerlaminuteriedetemporisation,sélectionnezleboutonTIMEDELAY
etutiliserlesboutons+et–pourajusterquanddoitcommencerlacuisson.
7. Appuyez sur le bouton START/STOP (marche/arrêt) pour lancer le cuiseur
multifonction.Lescerclesdel’optionHIGHouLOWchoisiesurlepanneau,
vonts’allumerunàun,cequiindiquequelachaleurcommenceàmonter.
Lorsque le voyant sur le bouton de cuisson lente passe au rouge continu
etquelestroiscerclespassentaurougecontinu,celasignifiequelabonne
température est atteinte et que le temps de cuisson commence. Si vous
oubliezde sélectionner un tempsdecuisson ou d’appuyer surle bouton
START/STOP,l’appareilémettradeuxbipsetl’écrannumériqueaffichera--:--
après30secondes.
8. L’appareilcommenceraàdécompter les minutes après que la température
atteint190°F(LOW)ou212°F(HIGH).
9. Lorsqueletempsdecuissonestécoulé,l’unitéémetunbipsonoreetpasse
automatiquementen modeKEEPWARM(garderau chaud)jusqu’àce que
vousappuyiezsurleboutonSTART/STOPpourannulerleprogramme.

FRANÇAIS
75
Programme de Yogourt
Vousn’avezbesoinquededeuxingrédientspourfaireduyogourtàlamaison:un
typedelaitquelconqueetduyogourtachetéenmagasin(avecculturesvivantes
actives)ouundémarreurdeyogourt.
Choisir le lait:
Lestypesdelaitssuivantspeuventêtreutilisés:
1. Dulaitpasteuriséd’uneteneurquelconqueenmatièresgrasses(entier,2%,
1%ouécrémé)
2. Dulaitenpoudre
3. DulaitstériliséUHTlonguedurée
4. Du lait de soja. Il faut utiliser du lait de soja UHT qui contient l’un des
ingrédientssuivants:fructose,mieloumalt.Cesingrédientsdanslelaitsont
nécessairespourlafermentation,sansquoivousneréussirezpas.
Cultures vivantes actives – Yogourt non parfumé:
Toutcedontvousavezbesoinestunepetitequantitédeyogourtentiernature
avecdesculturesvivantesactives,souventappeléesprobiotiques.Leyogourt
naturepeutsoits’achetéenmagasinsoitêtreréutiliséàpartird’unlotprécédent
deyogourtfaitmaison.Leyogourtfaitmaisonnepeutêtreutiliséquedeuxfois
aumaximumcommedémarreur.Sivousutilisezduyogourtachetéenmagasin
etsipréférezunemarqueparticulière,essayezdel’utilisercommeundémarreur.
LesceauCulturevivanteetactive,del’Associationnationaleduyogourt(NYA),
vousaide à reconnaîtrelesproduitscontenantdes quantités significatives de
culturesvivantesetactives.Lesceauestuneidentificationvolontairedisponible
pouttouslesfabricantsdeyogourtdontlesproduitscontiennentaumoins100
millionsdeculturespargrammeaumomentdelafabrication.Étantdonnéque
le sceau est volontaire, certains yogourts peuvent contenir des cultures vivantes
sans porter le sceau.
REMARQUE: Pour 5 tasses de lait, utilisez ½ tasse de yogourt nature ou 1
paquet de culture de démarrage. Pour 1 tasse de lait, utilisez environ une
cuillère à café de yogourt nature.
REMARQUE: Vouspouvezfaireduyogourtdanslepotdecuissonamovibleou
utiliserdesbocauxenverre.

FRANÇAIS
76
Fabrication du yogourt:
1. Sortezleyogourtdedémarrageduréfrigérateurpourl’ameneràlatempérature
ambiantependantquevouschauffezlelait.
2. Placez la quantité de lait souhaitée dans le pot de cuisson amovible.
Placezle couverclesurle cuiseur multifonction, alignez lapoignée avec le
collecteurde condensation (symbole dedéverrouillage), et tournez-le dans
lesens antihorairejusqu’à ce que l’ergot de verrouillage s’enclenche avec
unclic.TournezleboutonrégulateurdepressionsurSTEAM.Chauffezlelait
à180-185 °F en appuyantsur lafonction SIMMER(mijoteuse). Utilisezun
thermomètrepourêtresûrd’atteindrelabonnetempérature.
3. Retirezlacasseroledecuissonamovibledufeuetlaissezlelaittiédir(100
°F-110 °F). Pour accélérer le refroidissement, placez le pot de cuisson
amovibledansl’eaufroide.Nepaslelaisserrefroidirendessousde90°F.
4. Incorporerleyogourtnatureoulepaquetdeculturededémarrage,etutilisez
unfouetpourlemélangeraveclelaitjusqu’àobteniruneconsistancelisse
etsansgrumeaux.NEPASutiliserdefouetmétalliquecarilrayeralasurface
antiadhésivedupotdecuissonamovible.
5. Placezle couverclesurle cuiseur multifonction, alignez lapoignée avec le
collecteurde condensation (symbole dedéverrouillage), et tournez-le dans
lesensantihorairejusqu’àcequel’ergotdeverrouillages’enclencheavecun
clic.TournezleboutonrégulateurdepressionsurSTEAMlorsdel’utilisation
duprogrammede yogourt.Appuyez surle boutonYOGURT. Ladurée de
cuissonprérégléeestde8heures.Selonvotresaveurpréféréedeyogourt,
vous pouvez choisir le temps de cuisson du yogourt avec boutons + et –
parpaliersd’unedemi-heure.Pouruneavancerapide,maintenezlebouton
enfoncéjusqu’àatteindreletempsdecuissondésiré.Letempsdecuisson
lepluslongestde24heures.Letempsdepréparationsinfluencelegoûtdu
yogourt.Avecplusdetempsdecuisson,leyogourtauraungoûtplusacidulé.
Avecuntempspluscourt,leyogourtauraunesaveurplusdouce.
6. Appuyezsurle bouton START/STOP(marche/arrêt)pour lancerla fonction
yogourt.L’appareilcommenceraàdécompterlesminutesunefoislabonne
températureatteinte.
7. Lorsqueleyogourtestprêt,retirezlecouvercle.Unpeudeliquidejaunâtre,
dulactosérum, peut surnager à lasurface duyogourt. Ceciest normal,le
lactosérumcontientdesnutrimentsetdesprotéines.Mélangez-leauyogourt.
8. Si vous préférez un yogourt habituel, couvrez et mettez au réfrigérateur
pendant2à3heuresavantdeservir,oujusqu’àcequeleyogourtsoitrefroidi.
Sivouspréférezfaireduyogourtgrec,consultezlapage22.
REMARQUE: LECUISEURMULTI-FONCTIONDOITRESTERPARFAITEMENT
IMMOBILE PENDANT LE PROCESSUS DE CUISSON. NE DÉPLACEZ PAS
L’APPAREIL; NE RETIREZ PAS LE POT DE CUISSON AMOVIBLE OU LE
COUVERCLECARCELAAFFECTERAITLAFERMETÉDUYOGOURT.N’AJOUTEZ
PAS D’AROMATISANTS AVANT QUE LE PROCESSUS DE FABRICATION DE
YOGOURTSOITTERMINÉ.
Faire du yogourt dans des bocaux en verre:
1. Sortezleyogourtdedémarrageduréfrigérateurpourl’ameneràlatempérature
ambiantependantquevouschauffezlelait.
2. Lorsquevous chauffezlelaitdans des bocaux en verre, ajouter une tasse
d’eaudanslepotdecuissonamovible,puisinsérezunegrilleàyogourtet

FRANÇAIS
77
placez-y vos bocaux en verre. Placez le couvercle sur le cuiseur, alignez
l’ergot sur la poignée avec le collecteur de condensation (symbole de
déverrouillage),ettournez-ledanslesensantihorairejusqu’àcequel’ergot
de verrouillage s’enclenche avec un clic. Tournez le bouton régulateur de
pressionsurSTEAM.SélectionnezlafonctionSLOWCOOKpourchaufferle
laità180-185°F.Unefoisleprocessusterminé,utiliserlaméthodenaturelle
pourfaireretomberlavapeur.
3. Ladeuxièmeétape,aprèslechauffagedulait,estdetiédirlelait(100-110
°F).Pouraccélérerleprocessusderefroidissement,sortezlesbocauxàl’aide
d’unlève-bocaux.Nepaslelaisserrefroidirendessousde90°F.
4. Incorporer leyogourt nature avec la culture vivanteactive, et utilisezune
cuillère pour la mélanger au lait jusqu’à une consistance lisse et sans
grumeaux.
5. Placez le couvercle sur le cuiseur, alignez l’ergot sur la poignée avec le
collecteurde condensation (symbole dedéverrouillage), et tournez-le dans
lesens antihorairejusqu’à ce que l’ergot de verrouillage s’enclenche avec
unclic.TournezleboutonrégulateurdepressionsurSTEAM.Appuyezsur
lafonctionYOGOURT.Laduréedecuissonprérégléeestde8heures.Selon
votresaveurdeyogourtpréférée,vouspouvezchoisirletempsdecuisson
duyogourtaveclesboutons+et–parpalierdedemi-heuresupplémentaire
ouenmoins.Pouruneavancerapide,maintenezleboutonenfoncéjusqu’à
atteindreletempsdecuissondésiré.Letempsdecuissonlepluslongestde
24heures.Letempsdepréparationsinfluencelegoûtduyogourt.Avecplus
detempsdecuisson,leyogourtauraungoûtplusacidulé.Avecuntemps
plus court, le yogourt aura une saveur plus douce.
6. Appuyezsurle bouton START/STOP(marche/arrêt)pour lancerla fonction
yogourt.L’appareilcommenceraàdécompterlesminutesunefoislabonne
températureatteinte.
7. Lorsqueleyogourtestprêt,retirezlecouvercle.Unpeudeliquidejaunâtre,
dulactosérum, peut surnager à lasurface duyogourt. Ceciest normal,le
lactosérumcontientdesnutrimentsetdesprotéines.Mélangez-leauyogourt.
8. Si vous préférez un yogourt habituel, couvrez et mettez au réfrigérateur
pendant2à3heuresavantdeservir,oujusqu’àcequeleyogourtrefroidisse.
Sivouspréférezfaireduyogourtgrec,consultezlapage22.
Trucs et astuces:
• Lesprobiotiqueset lescultures vivantes actives sont lesplus fortslorsque
le yogourt est frais. Pour de meilleurs résultats, n’utilisez le même yogourt
démarreurque2foisaumaximum.Aprèsquelquesjours,lesprobiotiquesdu
lotprécédent peuvent s’affaiblir et le yogourtpeut prendre une consistance
liquide.
• Vous pouvez choisir de faire du yogourt aromatisé et ajouter du sucre, du
miel,desarômes,desfruitsoud’autresingrédientsauchoixjusteavantdele
manger.
• Pour de meilleurs résultats et en faciliter la préparation, utiliser du lait UHT
entierou demi-écrémé ou dela poudre delait reconstitué.Il ne doit être ni
chauffénirefroidi.
• Lameilleuredatedepéremptionpourleyogourtnaturelseracelleàlaquelle
leyogourtaétéfaitplus7jours,enfonctiondelafraîcheurdulait.Encasde
doute,utilisezladated’expirationdevotrelaitcommeguide.

FRANÇAIS
78
Yogourt Grec
1. Placezletamisoul’étamineàfromageàl’intérieurd’unconteneursansquele
tamisnetouchelefonddurécipientpourpermettreunmeilleurdrainage.
2. Verser le yogourt fait maison dans le tamis ou l’étamine et le recouvrir du
couvercle.Mettez-leàpasserauréfrigérateuretàréfrigérerpendantaumoins
2heures.Plusletempspasse,plusleyogourtdevientépais.
3. Retirez délicatement le yogourt dutamis oude l’étamineen retournant le
tamisoul’étaminesuruneplaqueouunrécipient.
4. Remettez-leauréfrigérateurpourlerefroidirpendantquelquesheuresavant
de servir.
Fonction pour Dorer
Ceprogrammevouspermetdedorerdesalimentstelsquedesviandesoudes
volailles,pouryapporteruneplusbellesaveurettextureavantunecuissonàla
pression ou une cuisson lente.
Séchezlesalimentsenlestapotantavecuneservietteenpapieravantdeles
dorer.Pourdemeilleursrésultats,assurez-vousquel’huileestchaudeavantd’y
ajouterlaviandeoulavolaille.Faitesdorerenlotspourgarderunetempérature
d’huilecorrectepourdorer.
1. Placezlepotdecuissonamovibledanslecuiseurmultifonction.
2. Ajouterlaquantitéappropriéed’huiledanslepotdecuissonamoviblecomme
indiquédanslarecette.
3. AppuyezsurleboutonBROWN(dorer).LevoyantduboutonBROWNclignote
etl’écranaffiche00:30.Réglezletempsaveclesboutons+et–.Lecouvercle
doitêtreretirépourfairedorer.
4. AppuyezsurleboutonSTART/STOP.LorsquelevoyantduboutonBROWN
resteallumécontinuellement,celasignifie quelecuiseuraatteintlabonne
températureetcommenceàchaufferl’huile.
5. Environ après une minute que l’huile a chauffé, ajoutez les aliments et
commencezàdorerparlots.
6. Une fois que vous avez terminé de dorer, appuyez sur le bouton START/
STOPpourannulerlafonctionBROWN.Vouspouvezmaintenantutiliserl’un
desprogrammesdecuissonpourcontinueràpréparerlarecette.Suivezles
instructionsdechaqueprogramme.

FRANÇAIS
79
Fonction pour Sauté
Ceprogrammevouspermetdefairesauterdesalimentsavantlacuisson.Faire
revenirdespetitsmorceauxàfeuvif avectrèspeud’huile avant d’utiliserdes
fonctionsdecuissonàlapressionoudecuissonlente.
Séchezlesalimentsenlestapotantavecuneservietteenpapieravantdeles
sauter.Pour de meilleurs résultats,assurez-vous que l’huile est chaudeavant
d’ajouter la viande, la volaille, etc. Faites dorer en lots afin de garder une
températurecorrectedel’huilepourfairesauter.
1. Placezlepotdecuissonamovibledanslecuiseurmultifonction.
2. Ajouterlaquantitéappropriéed’huiledanslepotdecuissonamoviblecomme
indiquédanslarecette.
3. AppuyezsurlafonctionSAUTÉ.LevoyantsurleboutonSAUTÉclignoteet
l’écranaffiche00:30.Réglezletempsaveclesboutons+et–.Nepasmettre
lecouverclelorsquevousutilisezlafonctionSAUTÉ.
4. Appuyez sur le bouton START/STOP. Une fois que le cuiseur a atteint la
températureappropriée,levoyants’arrêtedeclignoteretl’huilecommenceà
chauffer.
5. Environ une minute après que l’huile a chauffé, ajoutez des aliments et
commencezàlesfairesauter.
6. Unefoisquevousavezterminédefairesauter,appuyezsurleboutonSTART/
STOPpourannulerlafonctionSAUTÉ.Vouspouvezmaintenantutiliserl’un
desprogrammesdecuissonpourcontinueràpréparerlarecette.Suivezles
instructionsdechaqueprogramme.
Fonction pour Faire Mijoter
Préparezvos aliments aveccette technique fantastique pourdes soupes, des
sauces,desbouillonsetd’autresmerveilleusescréations.LafonctionSIMMER
(mijoteuse)garantitquelanourriturerestejusteendessousdupointd’ébullition
toutenétantchauffée.
1. Placezlepotdecuissonamovibledanslecuiseurmultifonctionetajoutezles
ingrédientsàfairemijoter.
2. Sanslecouvercle,appuyezunefoissurlafonctionSIMMER(mijoteuse).puis
appuyezsurlesboutons+et–pourajusterletempsdecuisson.Appuyezsur
leboutonSTART/STOP(marche/arrêt)pourlancerlacuisson.
3. Unefoislafonctionmijoteuseterminée,appuyezsurleboutonSTART/STOP
pour annuler le programme.

FRANÇAIS
80
Fonction pour Cuire à la Vapeur
Ceprogrammevouspermetdecuiredesalimentsdélicatsàlavapeurtelsque
poissonsetlégumes.
1. Placezlepotdecuissonamovibledanslecuiseurmultifonction.
2. Placerenviron1à2tassesd’eaudanslefonddupotdecuissonamovible.
Puisajouter le panieràvapeur*en faisantensortequele niveaud’eause
trouveunpeuendessousdupanieràvapeur.
3. Placez les ingrédients dans le panier à vapeur, puis alignez et fermez le
couvercle du cuiseur.
4. TournerleboutonrégulateurdepressionsurSTEAM.
5. AppuyezsurlafonctionSTEAM,puisappuyezsurlesboutons+et–pour
ajusterletempsdecuisson.AppuyezsurleboutonSTART/STOP(marche/
arrêt)pourlancerlacuisson.
6. Lorsque vous avez terminé la cuisson à la vapeur, appuyez sur le bouton
START/STOPpourannulerleprogramme.
*NotezquelepanieràvapeuretletrépiedFagorenacierinoxydablepeuvent
s’acheterséparément.Pourachetercesarticles,veuillezvisiterlesiteWeb
Fagor www.fagoramerica.com ou contacter un représentant Fagor au
1-800-207-0806.
Fonction pour Garder au Chaud
LeprogrammeKEEPWARM(garderauchaud)permetderéchaufferdesaliments
oudelesgarderauchaudpendant12heuresmaximum.
1. Placezle potdecuisson amovible dans lecuiseur multifonction.Ensuite,
placezlanourritureàréchaufferdanslepotdecuissonamovible.
2. Placezlecouverclesurlecuiseurmultifonction,alignezl’ergotdelapoignée
avec le collecteur de condensation et tournez-le dans le sens antihoraire
jusqu’àcequel’ergotdeverrouillages’enclenche.L’ergotdeverrouillageva
cliquerquandilestenplace.
3. TournezleboutonrégulateurdepressionsurSTEAM.
4. AppuyezsurleboutonKEEPWARM(garderauchaud).Levoyantdubouton
KEEPWARMsemetàclignoteretl’écrannumériqueaffiche00h30.
5. AppuyezsurleboutonSTART/STOP(marche/arrêt)pourlancerleprogramme.
Levoyants’arrêtedeclignoterunefoislabonnetempératureatteinte.
6. Commeiln’yapasdepressionlorsduchauffagedesaliments,vouspouvez
ouvrirlecouverclepourexaminerlanourriture,sinécessaire.Pourdésactiver
leprogramme,simplementappuyezunefoissurleboutonSTART/STOP.

FRANÇAIS
81
REMARQUE: Lorsque vous utilisez lesprogrammes de cuisson àla pression,
de cuisson de riz ou de cuisson lente, le réglage KEEP WARM démarre
automatiquement à la fin du temps de cuisson. Le voyant du programme
sélectionnés’éteintetlevoyantdelafonctionKEEPWARMs’allume.Lanourriture
resteauchaudjusqu’àcequevousappuyiezsurleboutonSTART/STOPpour
annuler le programme.
Fonction de Temporisation
Cette fonction vous permet de temporiser le processus de cuisson jusqu’à 6
heures.Vous pouvezutiliser leparamètre de temporisation aprèsavoir choisi
unprogrammede cuisson : fonctions de cuisson à la pressionHIGHetLOW,
cuissonlenteHIGHetLOW,rizblanc,rizbrunetrisotto.
MISE EN GARDE: NELAISSEZPASD’ALIMENTSPÉRISSABLESCOMMEDE
LAVIANDE,DELAVOLAILLE,DUPOISSON,DUFROMAGEOUDESPRODUITS
LAITIERS À TEMPÉRATURE AMBIANTE PENDANT PLUS DE 2 HEURES (OU
PLUSDE1HEURELORSQUELATEMPÉRATUREAMBIANTEESTSUPÉRIEURE
À 90 °F). LORSQUE VOUS CUISINEZ CES ALIMENTS, NE RÉGLEZ PAS LA
FONCTIONDETEMPORISATIONSURPLUSDE1À2HEURES.
1. Sélectionnezleprogrammedecuissonsouhaitéavecleboutondeprogramme
correct(cuissonàlapression,cuissonlente,rizblanc,rizbrunetrisotto)eten
ajustantletempsnécessaire.
2. Appuyez sur le bouton TIME DELAY (temporisation). Le bouton clignote et
lepanneauindique00:30,cequisignifieunedemi-heuredetemporisation.
Appuyez sur les touches + et - pour régler le temps de temporisation
nécessaire.
3. AppuyezsurleboutonSTART/STOP.Lecuiseurmultifonctioncommencerla
cuissonunefoisletempsdetemporisationécoulé.
PAR EXEMPLE:Ilest11h30etvousvoulezquevotredînersoitprêtà18heures
Votrerecette demande 12 minutesde cuissonà hautepression. Vous pouvez
programmer le temps de temporisation sur 6 heures et ensuite le programme
decuissonàlapressionsur12minutes.Pourcefaire,appuyezunefoissurla
fonctionPRESSURECOOK(cuissonàlapression),puisajustezletempsavec
lesboutons+et–jusqu’àobtenir0h12minutes;ensuite,appuyezunefoissurle
boutonTIMEDELAY(temporisation),puissurlesboutons+et–jusqu’àceque
lepanneauindique06h00heures.Enfin,appuyezsurleboutonSTART/STOP,et
toutestprêt!Lecuiseurvacommencerlacuissonà17:30etvotredînersera
prêtà17:42.LafonctionKEEPWARMdémarreautomatiquementpourqu’ilne
refroidisse pas.

FRANÇAIS
82
Nettoyage et Entretien
Ne lavez pas de parties du cuiseur multifonction au lave-vaisselle, sauf le pot
decuissonamovible.Toujoursselaverlepotdecuissonamovibleàfondaprès
chaqueutilisation,ous’iln’apasétéutiliséependantlongtemps.
1. Débranchezlecuiseurmultifonctionetlaissez-lerefroidiravantdelenettoyer.
2. Retirezlepotdecuissonamovibleetlavez-leàl’eauchaudesavonneuseou
danslelave-vaisselle.Unlavageàlamainesttoujoursrecommandé.Rincez-
leetséchez-lecomplètement.
3. Essuyez-leconvenablementavecunchiffonhumidepropre.Neplongezpas
lecuiseurmultifonctiondansl’eau.
REMARQUE:Pour éliminer l’odeur del’intérieur ducouvercle,nettoyez-le
avecdel’eauetdevinaigre(1:1).
4. Retirezleréservoirdecondensationenletirantverslebas.Lavez-leàl’eau
chaudesavonneuse.Rincez-leetséchez-lecomplètement.Remplacez-leen
le poussant en place.
5. Retournezlecouvercle;saisissezlejointensiliconeetretirez-leentirantvers
lehaut.Nettoyezlejointdesiliconeàl’eauchaudesavonneuse.Rincez-leet
séchez-lecomplètement.Remplacezlejointenlepositionnantàl’intérieurdu
bordducouvercleetenlepoussantverslebas.Assurez-vousquelarainure
aucentredujointsetrouveautourdelabaguemétalliquesurlebordintérieur
du couvercle.
REMARQUE: Lejointensiliconedoittoujoursêtrecorrectementpositionnésur
lafaceinférieureducouvercle;sinonl’appareilnefonctionnerapas.Examinez-le
périodiquementpourvousassurerqu’ilestpropre,souple,etnifissurénidéchiré.
(VoirlaSection«Démarrage»danscemanuel)
6. Silejointensiliconesembleendommagé,craqueléoudéchiré,n’utilisezpas
l’appareiletcontactezleServiceàlaclientèledeFagorau1-800-207-0806
ouvisitezlesiteFagorwww.fagoramerica.compouracheterunnouveaujoint
en silicone.
7. Pouruneperformanceoptimale,lefondducuiseur,correspondantàlazone
où se trouvent le capteur de température et un coussin chauffant situés
souslepotdecuissonamovible,doitêtrenettoyéaprèschaqueutilisation.
Essuyez-leavecunchiffonhumideetséchez-lecomplètement.
8. N’utilisezjamaisdenettoyantsabrasifsoudetamponsàrécurerpournettoyer
lespièces.
Nettoyage du bouton régulateur de pression
Toujours vérifier que le bouton régulateur de pression et les soupapes de
surpressionsontenbonétatdefonctionnementavantchaqueutilisation.
1. Lorsquel’appareilestrefroidi,retirezlecouvercleducuiseurmultifonction.
2. Enfoncezleboutonrégulateurdepressionetenmêmetempstournez-ledans
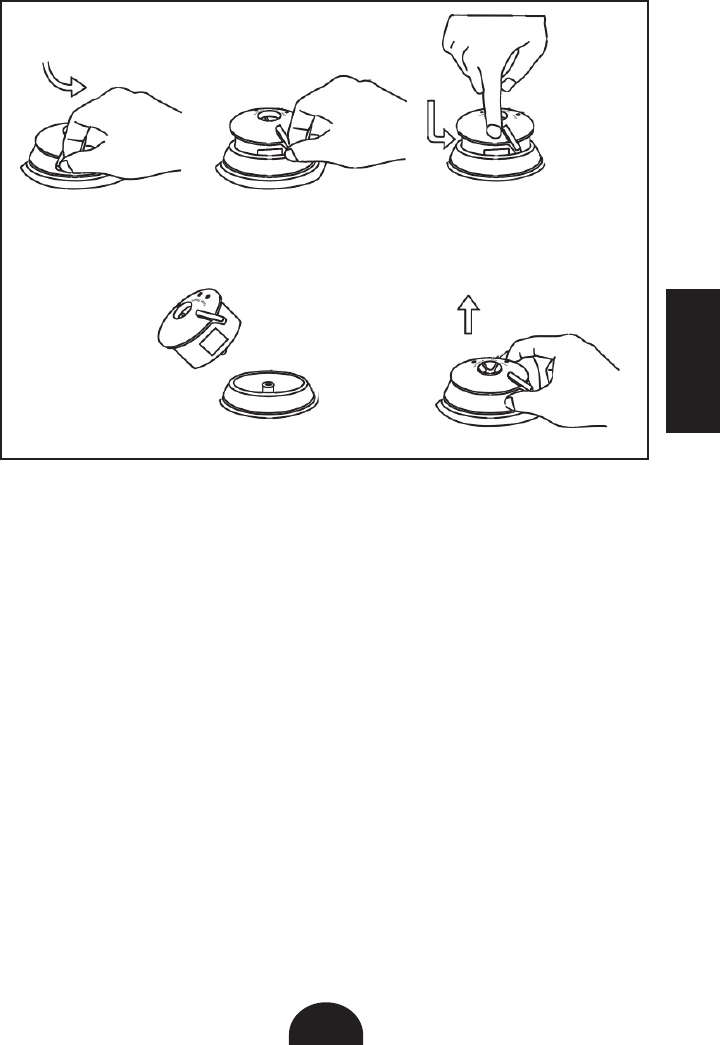
FRANÇAIS
83
lesens antihoraireau-delà du réglage STEAMtoCLEAN, puis soulevez-le
doucementpourl’enlever.Mirezlestrousdurégulateurdepressionpourvous
assurerqueriennelesobstrue,puisnettoyez-leàl’eaucourante.
3. Retournezlecouvercleetplacez-lesurunetable.Retirezleboîtierantiblocage.
Avecunebrosseou un cure-dent,examinez et élimez toutes particules de
nourritureouétrangèresquipeuventêtrelogéesdanslasoupapeflottante.
Remplacezleboîtierantiblocageenl’enfonçant.
4. ReplacezleboutonrégulateurdepressionenalignantlepointCLEANavec
le point sur le couvercle de l’appareil et en tournant vers la droite jusqu’à
qu’ilsoit enplace.Lepoint blancàla basedurégulateurde pressiondoit
êtrealigné surle réglagePRESSURE ou STEAMdu boutonrégulateur de
pression.Sicen’estpaslecas,retirezleboutonetessayezderéalignerles
pointsdansl’autresens.
(1) (2) (3)
(4)(5)
FRANÇAIS
84
Dépannage
SileLUX™détecteuneerreurinterneouunemauvaiseconnexion,ilafcheun
coded’erreursurlepanneaud’afchageetcessedefonctionner.Cescodesvous
permettentd’identierlacausedel’erreuretvousaidentàtrouverlasolutionau
problème.Sil’erreurpersiste,veuillezcontacternotreserviceclientèlepourune
assistance au 1-800-207-0806.
E1: Circuitsinternesdéconnectés.
S’assister
soi-même:
Appeleznotreserviceclientèlepouruneassistance.
E2: Lecapteurinterneestcourt-circuitéetlecourantest
insufsant,oul’appareilestensurchauffe.
S’assister
soi-même:
Essayezderefroidirl’appareilenl’éteignantetenledébranchant
ainsiqu’enretirantlacasserole.
E3: L’appareilestensurchauffe.
S’assister
soi-même:
Essayezderefroidirl’appareilenl’éteignantetenledébranchant
ainsiqu’enretirantlacasserole.SilemessageE3persiste,la
casserole ou la plaque chauffante peuvent se déformer. Vous
devrezcontacternotreserviceclientèle.
E4: L’interrupteurdepressionn’apasfonctionnécorrectement.
S’assister
soi-même:
Vériez que la casserole n’est pas déformée. Vériez que la
plaquechauffantenecomportepasderésidusalimentaires.

Limited Warranty
Thismanufacturer’sproductwarrantyextendstotheoriginalconsumerpurchaser
oftheproduct.Neithertheretailernoranyothercompanyinvolvedinthesaleor
promotion of this product is a co-warrantor of this manufacturer warranty.
WARRANTYDURATION: All materialsand workmanshiparewarranted to the
originalconsumerpurchaserforaperiodofone(1)yearfromtheoriginalpurchase
date.
WARRANTYCOVERAGE:Thisproductiswarrantedagainstdefectivematerials
or workmanship. This warranty is void if the product has been damaged by
accident, in shipment, unreasonable use, misuse, neglect, improper service,
commercialuse,repairsbyunauthorizedpersonnelorothercausesnotarising
out of defects in materials or workmanship. This warranty is effective only if
theproductispurchasedandoperated in the USA,and doesnotextend to
anyunitswhichhavebeenusedinviolationofwritteninstructionsfurnishedby
manufacturerortounitswhichhavebeenalteredormodifiedortodamageto
productsor parts thereof whichhave hadthe serial numberremoved,altered,
defacedorrenderedillegible.
WARRANTYDISCLAIMERS:Thiswarrantyisinlieuofallwarrantiesexpressedor
implied and no representative or person is authorized to assume for manufacturer
anyotherliabilityinconnectionwiththesaleofourproducts.Thereshallbeno
claims for defects or failure under any theory of tort, contractor commercial law
including,butnotlimitedto,negligence,grossnegligence,strictliability,breach
ofwarrantyandbreachofcontract.
WARRANTY PERFORMANCE: During the above one-year warranty period, a
productwith adefect willbeeither repairedor replaced witha reconditioned
comparable model (at manufacturer’s option). The repaired or replacement
product will be in warranty for the balance of the one year warranty period
andanadditionalone-monthperiod.Nochargewillbemadeforsuchrepairor
replacement.
SERVICEANDREPAIR:If serviceisrequiredforan appliance,youshouldfirst
calltollfree1-800-207-0806betweenthehoursof8:30amand5:30pmEastern
StandardTimeandaskforCUSTOMERSERVICE.
NOTE:Manufacturercannot assumeresponsibility for loss ordamage during
incoming shipment. For your protection, carefully package the product for
shipment, and insure it with the carrier. Be sure to enclose the following items
withyourappliance:yourfullname,returnaddressanddaytimephonenumber;
anotedescribingtheproblemyouexperienced;acopyofyoursalesreceiptor
otherproofofpurchasetodeterminewarrantystatus.C.O.D.shipmentscannot
beaccepted.

FAGOR LUX™ MULTI-COOKER
WARRANTY REGISTRATION CARD
MR./MRS./MS.: ________________________________________________________
TELEPHONE: __________________________________________________________
ADDRESS: ___________________________________________________________
ITEM NUMBER (On the rating label): _________________________________________
DATE OF PURCHASE: ___________________________________________________
NAME OF STORE WHERE PURCHASED: _______________________________________
EMAIL: ______________________________________________________________
NOTE: Please complete and mail this warranty registration card immediately to protect your warranty service or register
your product online at http://www.fagoramerica.com/my_fagor/product_registration.
FAGOR WARRANTY REGISTRATION
PO BOX 94, LYNDHURST, NJ 07071
✃

The manufacturer reserves the right to modify the
termsdescribedinthismanual.
Elfabricante sereserva elderechode modicar
los modelos descritos en el presente libro de
instrucciones.
Le fabricant se reserve le droit de modier les
modèlesdécritsdanslabrochure.
POBOX94
Lyndhurst,NJ07071
www.fagoramerica.com
1-800-207-0806
VersionII
