Ademco 8DL5800PIR-OD Security Transmitter User Manual 5890 OD Wireless Outdoor Motion Sensor
Honeywell International Inc. Security Transmitter 5890 OD Wireless Outdoor Motion Sensor
UserManual.wiki
>
Ademco
>
8DL5800PIR OD User Manual
User manual
Navigation menu
Upload a User Manual
Namespaces
Wiki Guide
HTML
PDF
Info
Views
User Manual
Discussion / Help
Navigation
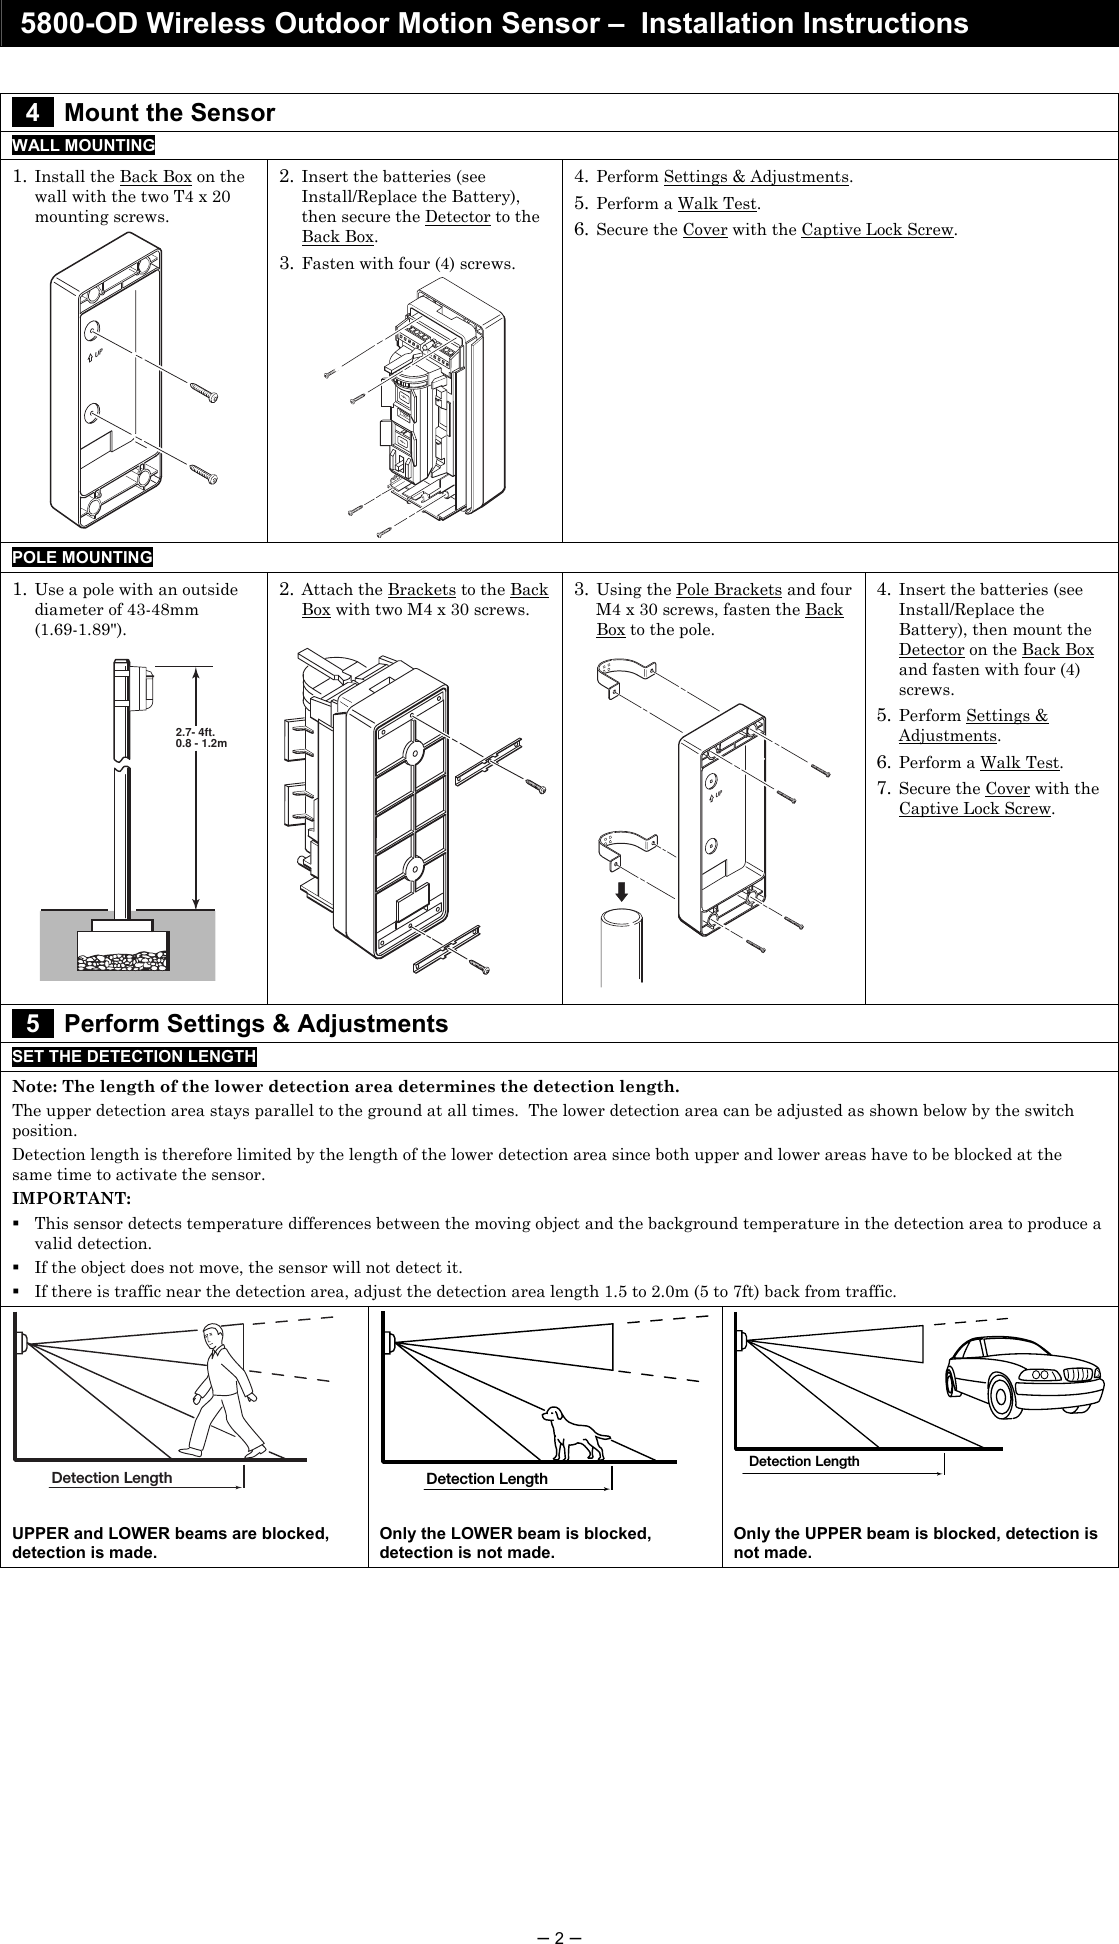
![5800-OD Wireless Outdoor Motion Sensor – Installation Instructions – 4 – SET THE SENSITIVITY SET THE DIP SWITCHES 1. Set the Sensitivity Select Switch to the desired sensitivity. SensitivitySelect Switch(L,M,H) Notes: When greater sensitivity is desired, select "H". When conditions are poor select "L". 1. Set switch 2 for the desired Battery Saving Timer period. Note: The alarm output activations are limited by the timer selection (5 or 120 seconds). Even if there are continuous alarm events, the alarm output operates only once in the selected timer period. This can be 5 or 120 seconds. 120s – Default Setting 5s – Used when frequent alarm transmission is re-quired. Battery life will be shortened when using this setting. 2. Set switch 3 for the desired Pulse Count (selectable for 2 or 4). Pulse Count of 2 = detection can be made with as little as two steps. Pulse Count of 4 = detection can be made with as little as four steps. 3. Set switch 1 to enable the Walk Test, see the instructions below. ON 1. Walk Test5s 2. Battery Saving Timer2 3. Pulse CountON123OFF120s4 6 Perform a Walk Test NOTE: With the Walk Test switch set to ON the LED will light when the detector is tripped, and the alarm is generated instantly. 1. Set the walk test switch (DIP switch 1) to ON. Replace the cover. 2. Perform a walk test through the detection area, and verify satisfactory results. 3. Allow the detection area to remain static and check for false or unwanted detections. 4. If necessary, adjust the detection area (see Perform Settings & Adjustments). 5. Repeat the walk test through the detection area, and verify satisfactory results. 6. Set the walk test switch to OFF, and secure the Cover with the Captive Lock Screw. Notes: If normal car or people traffic pass close to the detection area, adjust the detection area 1.5 to 2.0m (5 to 7ft) shorter to reduce false detections. This also allows for changes due to environmental thermal conditions. If the detection length is adjusted to position "A" [12m (40ft)], the detection area may increase when there is a big temperature difference between the moving object and the background. If this causes a problem, adjust the detection length to position "B". Then walk test to verify satisfactory results. Approx.8m (27ft)position BApprox.12m (40ft) WALK TEST This sensor has a multi-level detection pattern (from side view). A heat source beyond the detection area may cause the detector to issue a false alarm by reflecting off the ground. Examples include puddles, wet surfaces, very smooth asphalt or concrete surfaces. If this causes a problem, adjust the detection length to position "B". Then perform a walk test to verify satisfactory results. 7 Program the Control Panel Prior to use in the system, you must “enroll” the transmitter's serial number in the control panel. Refer to the control panel’s instructions for further details. During programming, the transmitter shall be treated as RF supervised . (Mandatory for UL installations.) TROUBLESHOOTING SYMPTOM CAUSE REMEDY Batteries are incorrectly installed or dead. Check for correct battery installation, or replace dead batteries. No detection, when walking through the detection area. Wiring is faulty or loose. Check all connectors and wiring. Water in unit. Check for cracks in the housing that would allow water infiltration. Replace unit. Transmitter or PIR sensor is faulty. Replace unit. No detection occasionally, or poor detection. Sensitivity is set too low. Try a higher sensitivity setting. Detection area is not set correctly. Perform a Settings & Adjustments procedure. Low battery fault indicated on system keypad display. Batteries are very low or dead. Replace batteries.](https://usermanual.wiki/Ademco/8DL5800PIR-OD/User-Guide-997586-Page-4.png)