Ademco RPWL4045A Doorbell push (Transmitter Only) User Manual 33 00195EFS 01 Wireless Doorbell Adapter

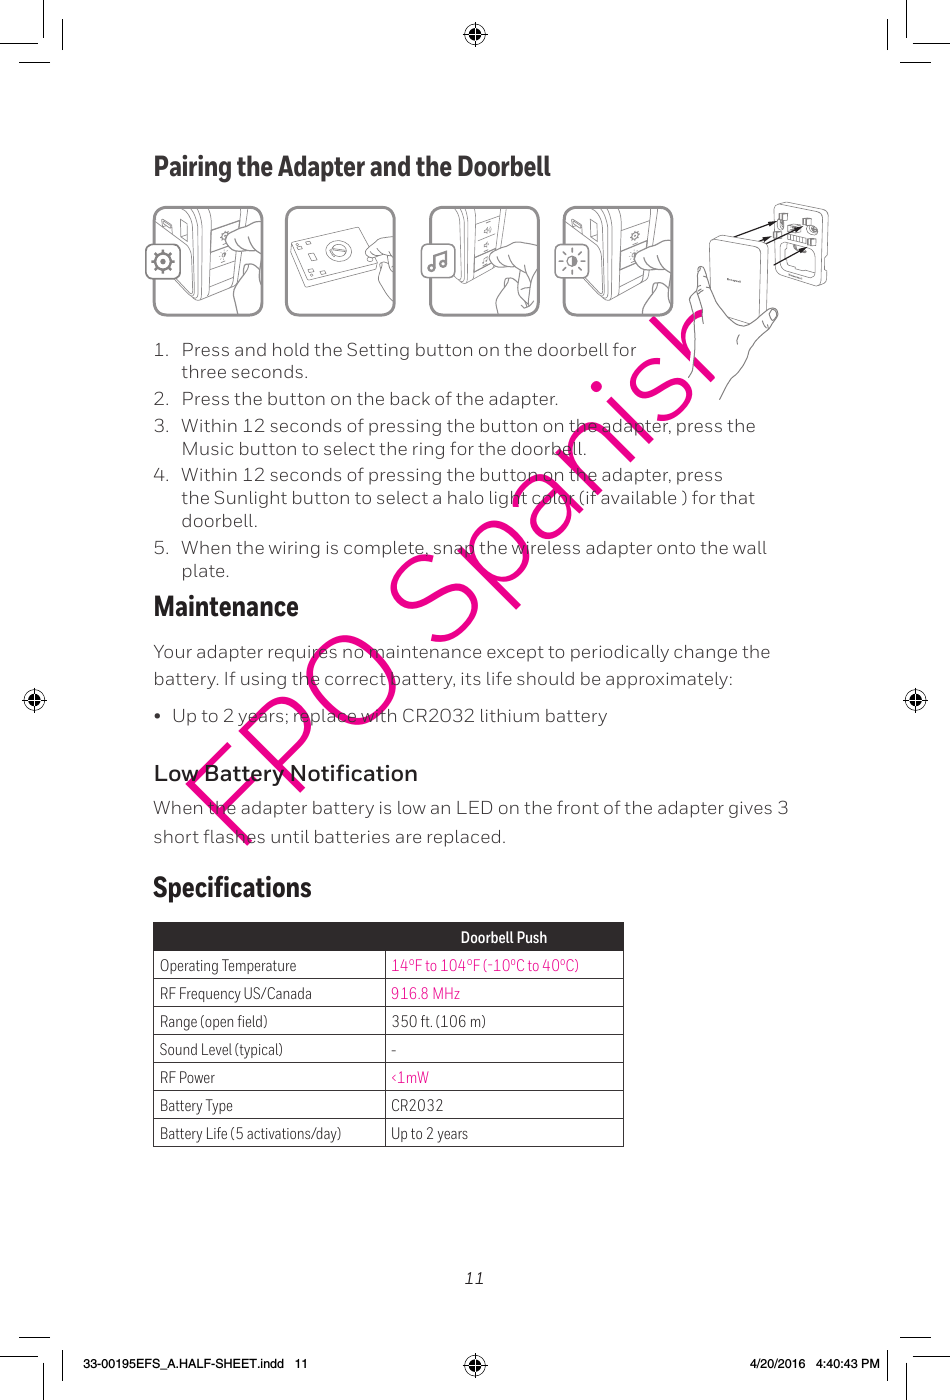
Honeywell International Inc Doorbell push (Transmitter Only) 33 00195EFS 01 Wireless Doorbell Adapter

User Manual

1HomeInstallation InstructionsWireless Doorbell AdapterRPWL4045A2000FPOPreparationAdapterWall  AnchorsRound Head  Screws Phillips ScrewdriverStandard ScrewdriverDrill and 1/4 in. (6 mm) drill bitTo install you will needIn the box you will findCR2032 BatteryWall PlateSafetyTurn Power OFFTo protect yourself and your equipment, turn off the power at the breaker box or switch that controls your heating/cooling system.Before proceeding with the installation, please note the following safety warnings:•  Always follow the manufacturer’s advice when using power tools and wear suitable protective equipment (e.g. safety goggles) when drilling holes, etc.•  Before drilling holes in walls, check for hidden electricity cables and water pipes. The use of a cable/pipe locator is advisable if in doubt.33-00195EFS_A.HALF-SHEET.indd   1 4/20/2016   4:40:41 PM
2Wiring1.  Make sure at least 1/3-inch of each wire is exposed for easy insertion into the wire terminals. Insert the wires into the appropriate terminals. Refer to the wiring diagrams below. 3.  Connect the wires to the adapter terminals. You can connect one or two doorbell pushes and transformers. Connect to one push button Connect to a second push button (if used)AC1 Connect to one line voltage transformer (if used) Not used When the wiring is complete, turn the power back on.1/3 in.ABABWiring 1 (A only) or 2 (A and B) Pushes Wiring 1 (A o/nly) or 2 (A and B) Pushes with 1 TransformerInstall Adapter1.  Separate the adapter from the wall plate. Open the battery cover in the wireless adapter 3.  Remove the existing doorbell chime from the wall. Screw the wall plate to the wall using the included screws and anchors (if necessary). Choose a LocationChoose a location that is not near a heat source or on somthing that moves (like a door). 33-00195EFS_A.HALF-SHEET.indd   2 4/20/2016   4:40:42 PM
3Pairing the Adapter and the Doorbell1.  Press and hold the Setting button on the doorbell for three seconds. Press the button on the back of the adapter.3.  Music button to select the ring for the doorbell. the Sunlight button to select a halo light color (if available ) for that doorbell. When the wiring is complete, snap the wireless adapter onto the wall plate.MaintenanceYour adapter requires no maintenance except to periodically change the battery. If using the correct battery, its life should be approximately:•  Low Battery NotificationWhen the adapter battery is low an LED on the front of the adapter gives 3 SpecicationsDoorbell PushOperating Temperature 14°F to 104°F (-10ºC to 40ºC)RF Frequency US/Canada 916.8 MHzRange (open eld) 350 ft. (106 m)Sound Level (typical) -RF Power <1mWBattery Type CR2032Battery Life (5 activations/day) Up to 2 years33-00195EFS_A.HALF-SHEET.indd   3 4/20/2016   4:40:42 PM
4Automation and Control Solutions Honeywell International Inc. 1985 Douglas Drive North Golden Valley, MN  55422 yourhome.honeywell.com® U.S. Registered Trademark.© 2016 Honeywell International Inc.33-00195EFS—01  M.S.  02-16Printed in U.S.A.33-00195EFS-01FCC Regulationsundesired operation.Rules. These limits are designed to provide reasonable protection against harmful interference in a residential installation. This equipment generates, uses and can radiate radio frequency energy and, if not installed and used in accordance with the instructions, may cause harmful interference to radio communications. However, there is no guarantee that interference will not occur in a particular installation. If this equipment does cause harmful interference to radio or television reception, which can be determined by turning the equipment off and on, the user is encouraged to try to correct the interference by one or more of the following measures:•  Reorient or relocate the receiving antenna.•  Increase the separation between the equipment and receiver.•  Connect the equipment into an outlet on a circuit different from that to which the receiver is connected.•  Consult the dealer or an experienced radio/TV technician for help.IC RegulationsCAN ICES-3(B)/ NMB-3(B)undesired operation of the device.exposure, users can obtain Canadian information on RF exposure and compliance. Warranty1-year limited warrantyHoneywell warrants this product, excluding battery, to be free from defects in workmanship or materials, under normal use and the product is determined to be defective due to workmanship or materials, Honeywell shall repair or replace it (at Honeywell’s option). If the product is defective,    returned to the following address:  can be sent to you. This warranty does not cover removal or reinstallation costs. This warranty shall not apply if it is shown by Honeywell that the defect was caused by damage which occurred while the product was in the possession of a consumer. Honeywell’s sole responsibility shall be to repair or replace the product within the terms stated above. HONEYWELL SHALL NOT BE LIABLE FOR ANY LOSS OR DAMAGE OF ANY KIND, INCLUDING ANY INCIDENTAL OR CONSEQUENTIAL DAMAGES RESULTING, DIRECTLY OR INDIRECTLY, FROM ANY BREACH OF ANY WARRANTY, EXPRESS OR IMPLIED, OR ANY OTHER FAILURE OF THIS PRODUCT. Some states do not allow the exclusion or limitation of incidental or consequential damages, so this limitation may not apply to you. THIS WARRANTY IS THE ONLY EXPRESS WARRANTY HONEYWELL MAKES ON THIS PRODUCT. THE DURATION OF ANY IMPLIED WARRANTIES, INCLUDING THE WARRANTIES OF MERCHANTABILITY AND FITNESS FOR A PARTICULAR PURPOSE, IS HEREBY LIMITED TO THE ONEYEAR DURATION OF THIS WARRANTY. Some states do not allow limitations on how long an implied warranty lasts, so the above limitation may not apply to you.  33-00195EFS_A.HALF-SHEET.indd   4 4/20/2016   4:40:43 PM
5HomeInstallation InstructionsWireless Doorbell AdapterRPWL4045A2000FPOPreparationAdapterWall  AnchorsRound Head  Screws Phillips ScrewdriverStandard ScrewdriverDrill and 1/4 in. (6 mm) drill bitTo install you will needIn the box you will findCR2032 BatteryWall PlateSafetyTurn Power OFFTo protect yourself and your equipment, turn off the power at the breaker box or switch that controls your heating/cooling system.Before proceeding with the installation, please note the following safety warnings:•  Always follow the manufacturer’s advice when using power tools and wear suitable protective equipment (e.g. safety goggles) when drilling holes, etc.•  Before drilling holes in walls, check for hidden electricity cables and water pipes. The use of a cable/pipe locator is advisable if in doubt.FPO French33-00195EFS_A.HALF-SHEET.indd   5 4/20/2016   4:40:43 PM
6FPO FrenchWiring1.  Make sure at least 1/3-inch of each wire is exposed for easy insertion into the wire terminals. Insert the wires into the appropriate terminals. Refer to the wiring diagrams below. 3.  Connect the wires to the adapter terminals. You can connect one or two doorbell pushes and transformers. Connect to one push button Connect to a second push button (if used)AC1 Connect to one line voltage transformer (if used) Not used When the wiring is complete, turn the power back on.1/3 in.ABABWiring 1 (A only) or 2 (A and B) Pushes Wiring 1 (A o/nly) or 2 (A and B) Pushes with 1 TransformerInstall Adapter1.  Separate the adapter from the wall plate. Open the battery cover in the wireless adapter 3.  Remove the existing doorbell chime from the wall. Screw the wall plate to the wall using the included screws and anchors (if necessary). Choose a LocationChoose a location that is not near a heat source or on somthing that moves (like a door). 33-00195EFS_A.HALF-SHEET.indd   6 4/20/2016   4:40:43 PM
7FPO FrenchPairing the Adapter and the Doorbell1.  Press and hold the Setting button on the doorbell for three seconds. Press the button on the back of the adapter.3.  Music button to select the ring for the doorbell. the Sunlight button to select a halo light color (if available ) for that doorbell. When the wiring is complete, snap the wireless adapter onto the wall plate.MaintenanceYour adapter requires no maintenance except to periodically change the battery. If using the correct battery, its life should be approximately:•  Low Battery NotificationWhen the adapter battery is low an LED on the front of the adapter gives 3 SpecicationsDoorbell PushOperating Temperature 14°F to 104°F (-10ºC to 40ºC)RF Frequency US/Canada 916.8 MHzRange (open eld) 350 ft. (106 m)Sound Level (typical) -RF Power <1mWBattery Type CR2032Battery Life (5 activations/day) Up to 2 years33-00195EFS_A.HALF-SHEET.indd   7 4/20/2016   4:40:43 PM
8Automation and Control Solutions Honeywell International Inc. 1985 Douglas Drive North Golden Valley, MN  55422 yourhome.honeywell.com® U.S. Registered Trademark.© 2016 Honeywell International Inc.33-00195EFS—01  M.S.  02-16Printed in U.S.A.33-00195EFS-01Règlement de la FCCcelles pouvant causer un fonctionnement non souhaité.utilisé conformément aux instructions, peut causer des interférences nuisibles aux communications radio. Il n’y a toutefois aucune nuisibles à la réception radio et télévision, ce qui peut être déterminé en éteignant le dispositif et en le remettant en marche, il est recommandé à l’utilisateur de tenter de corriger l’interférence par l’une des mesures suivantes :•  Réorientez ou déplacez l’antenne réceptrice.•  Augmentez la séparation entre l’équipement et le récepteur.•  Branchez l’équipement dans la prise d’un circuit différent de celui auquel le récepteur est connecté.•  Consultez le distributeur ou un technicien radio/TV compétent pour obtenir de l’aide.Cet émetteur ne doit pas être Co-placé ou ne fonctionnant en même temps qu’aucune autre antenne ou émetteur. Cet équipement Réglementation ICCAN ICES-3(B)/ NMB-3(B)Le présent appareil est conforme aux CNR d’Industrie Canada applicables aux appareils radio exempts de licence. L’exploitation dispositif.Cet émetteur ne doit pas être Co-placé ou ne fonctionnant en même temps qu’aucune autre antenne ou émetteur. Cet équipement GarantieGarantie limitée d’un anan à partir de la date d’achat initiale par le consommateur d’origine si le produit est utilisé et entretenu convenablement. En cas de de remplacement peut vous être expédié.La présente garantie ne couvre pas les frais de retrait ou de réinstallation. La présente garantie ne s’appliquera pas s’il est démontré par Honeywell que la défaillance est due à un endommagement du produit qui s’est produit lorsque le consommateur l’avait en sa possession. La responsabilité exclusive de Honeywell se limite à réparer ou à remplacer le produit conformément aux modalités susmentionnées. HONEYWELL N’EST EN AUCUN CAS RESPONSABLE DES PERTES OU DOMMAGES, Y COMPRIS LES DOMMAGES INDIRECTS OU ACCESSOIRES DÉCOULANT DIRECTEMENT OU INDIRECTEMENT D’UNE VIOLATION QUELCONQUE D’UNE GARANTIE, EXPRESSE OU TACITE, APPLICABLE AU PRÉSENT PRODUIT, OU TOUTE AUTRE DÉFAILLANCE DU PRÉSENT PRODUIT. Certaines provinces ne permettent pas l’exclusion ou la restriction des dommages indirects ou accessoires et, par conséquent, la présente restriction peut ne pas s’appliquer.CETTE GARANTIE EST LA SEULE GARANTIE EXPRESSE FAITE PAR HONEYWELL POUR CE PRODUIT. LA DURÉE DE TOUTE GARANTIE IMPLICITE, INCLUANT LES GARANTIES DE QUALITÉ MARCHANDE OU D’ADAPTATION À UNE UTILISATION PARTICULIÈRE, EST LIMITÉE PAR LES PRÉSENTES À LA PÉRIODE D’UNE ANNÉE DE LA PRÉSENTE GARANTIE. Certaines provinces ne permettent pas de limiter la durée des garanties tacites et, par conséquent, la présente limitation peut ne pas s’appliquer.l’autre.   FPO French33-00195EFS_A.HALF-SHEET.indd   8 4/20/2016   4:40:43 PM
9HomeInstallation InstructionsWireless Doorbell AdapterRPWL4045A2000FPOPreparationAdapterWall  AnchorsRound Head  Screws Phillips ScrewdriverStandard ScrewdriverDrill and 1/4 in. (6 mm) drill bitTo install you will needIn the box you will findCR2032 BatteryWall PlateSafetyTurn Power OFFTo protect yourself and your equipment, turn off the power at the breaker box or switch that controls your heating/cooling system.Before proceeding with the installation, please note the following safety warnings:•  Always follow the manufacturer’s advice when using power tools and wear suitable protective equipment (e.g. safety goggles) when drilling holes, etc.•  Before drilling holes in walls, check for hidden electricity cables and water pipes. The use of a cable/pipe locator is advisable if in doubt.FPO Spanish33-00195EFS_A.HALF-SHEET.indd   9 4/20/2016   4:40:43 PM
10FPO SpanishWiring1.  Make sure at least 1/3-inch of each wire is exposed for easy insertion into the wire terminals. Insert the wires into the appropriate terminals. Refer to the wiring diagrams below. 3.  Connect the wires to the adapter terminals. You can connect one or two doorbell pushes and transformers. Connect to one push button Connect to a second push button (if used)AC1 Connect to one line voltage transformer (if used) Not used When the wiring is complete, turn the power back on.1/3 in.ABABWiring 1 (A only) or 2 (A and B) Pushes Wiring 1 (A o/nly) or 2 (A and B) Pushes with 1 TransformerInstall Adapter1.  Separate the adapter from the wall plate. Open the battery cover in the wireless adapter 3.  Remove the existing doorbell chime from the wall. Screw the wall plate to the wall using the included screws and anchors (if necessary). Choose a LocationChoose a location that is not near a heat source or on somthing that moves (like a door). 33-00195EFS_A.HALF-SHEET.indd   10 4/20/2016   4:40:43 PM
11FPO SpanishPairing the Adapter and the Doorbell1.  Press and hold the Setting button on the doorbell for three seconds. Press the button on the back of the adapter.3.  Music button to select the ring for the doorbell. the Sunlight button to select a halo light color (if available ) for that doorbell. When the wiring is complete, snap the wireless adapter onto the wall plate.MaintenanceYour adapter requires no maintenance except to periodically change the battery. If using the correct battery, its life should be approximately:•  Low Battery NotificationWhen the adapter battery is low an LED on the front of the adapter gives 3 SpecicationsDoorbell PushOperating Temperature 14°F to 104°F (-10ºC to 40ºC)RF Frequency US/Canada 916.8 MHzRange (open eld) 350 ft. (106 m)Sound Level (typical) -RF Power <1mWBattery Type CR2032Battery Life (5 activations/day) Up to 2 years33-00195EFS_A.HALF-SHEET.indd   11 4/20/2016   4:40:43 PM
12Automation and Control Solutions Honeywell International Inc. 1985 Douglas Drive North Golden Valley, MN  55422 yourhome.honeywell.com® U.S. Registered Trademark.© 2016 Honeywell International Inc.33-00195EFS—01  M.S.  02-16Printed in U.S.A.33-00195EFS-01Regulaciones FCCque se reciba, incluyendo la interferencia que pudiese causar el funcionamiento no deseado.o radial, lo cual puede determinarse al apagar y encender el equipo, se recomienda que el usuario intente corregir la interferencia •  Vuelva a orientar o ubicar la antena receptora.•  Aumente la distancia entre el equipo y el receptor.•  •  Consulte con su distribuidor o con un técnico experto en radio/televisión para recibir ayuda.Regulaciones ICCAN ICES-3(B)/ NMB-3(B)interferencia recibida, incluso la que puede producir un funcionamiento no deseado del dispositivo.de RF. Garantíaanteriormente. HONEYWELL NO SERÁ RESPONSABLE POR LA PÉRDIDA O EL DAÑO DE NINGÚN TIPO, INCLUYENDO LOS DAÑOS ACCIDENTALES O RESULTANTES DERIVADOS DIRECTA O INDIRECTAMENTE DEL INCUMPLIMIENTO DE LAS GARANTÍAS, EXPRESAS O IMPLÍCITAS, O DE OTRAS FALLAS DE ESTE PRODUCTO. Algunos estados no permiten la exclusión o ESTA GARANTÍA ES LA ÚNICA GARANTÍA EXPRESA QUE HONEYWELL OTORGA SOBRE ESTE PRODUCTO. LA DURACIÓN DE CUALQUIERA DE LAS GARANTÍAS IMPLÍCITAS, INCLUIDAS LAS GARANTÍAS DE COMERCIABILIDAD E IDONEIDAD PARA UN FIN DETERMINADO, QUEDA, POR EL PRESENTE, LIMITADA A LA DURACIÓN DE UN AÑO DE ESTA GARANTÍA. Algunos estados no en su caso.otro.  FPO Spanish33-00195EFS_A.HALF-SHEET.indd   12 4/20/2016   4:40:43 PM

Navigation menu