Advance Multimedia Internet Technology WIQ318 Wireless Broadband Router User Manual III
Advance Multimedia Internet Technology Inc. Wireless Broadband Router Users Manual III
Contents
- 1. Users Manual I
- 2. Users Manual II
- 3. Users Manual III
Users Manual III

4.7.1 System Time
Get Date and Time by NTP Protocol
Selected if you want to Get Date and Time by NTP Protocol.
Time Server
Select a NTP time server to consult UTC time
Time Zone
Select a time zone where this device locates.
Set Date and Time manually
Selected if you want to Set Date and Time manually.
Set Date and Time manually
Selected if you want to Set Date and Time manually.
Function of Buttons
Sync Now: Synchronize system time with network time server
Daylight Saving:Set up where the location is.
51
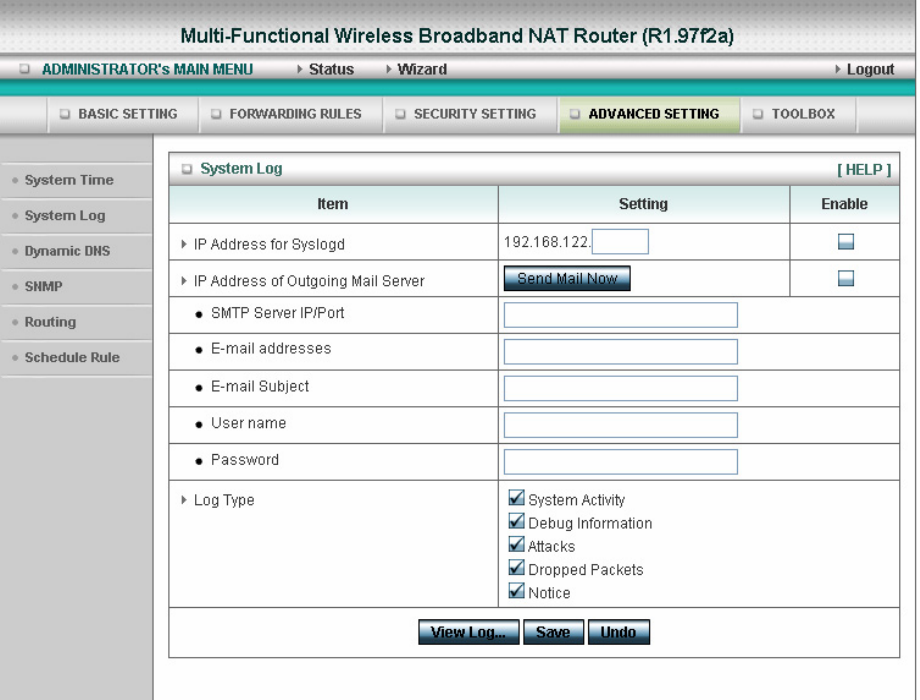
4.7.2 System Log
This page support two methods to export system logs to specific destination by means of syslog(UDP)
and SMTP(TCP). The items you have to setup including:
IP Address for Syslog
Host IP of destination where syslogs will be sent to.
Check Enable to enable this function.
E-mail Alert Enable
Check if you want to enable Email alert (send syslog via email).
SMTP Server IP and Port
Input the SMTP server IP and port, which are concated with ':'. If you do not specify port number, the
default value is 25.
For example, "mail.your_url.com" or "192.168.1.100:26".
Send E-mail alert to
The recipients who will receive these logs. You can assign more than 1 recipient,
using ';' or ',' to separate these email addresses.
52
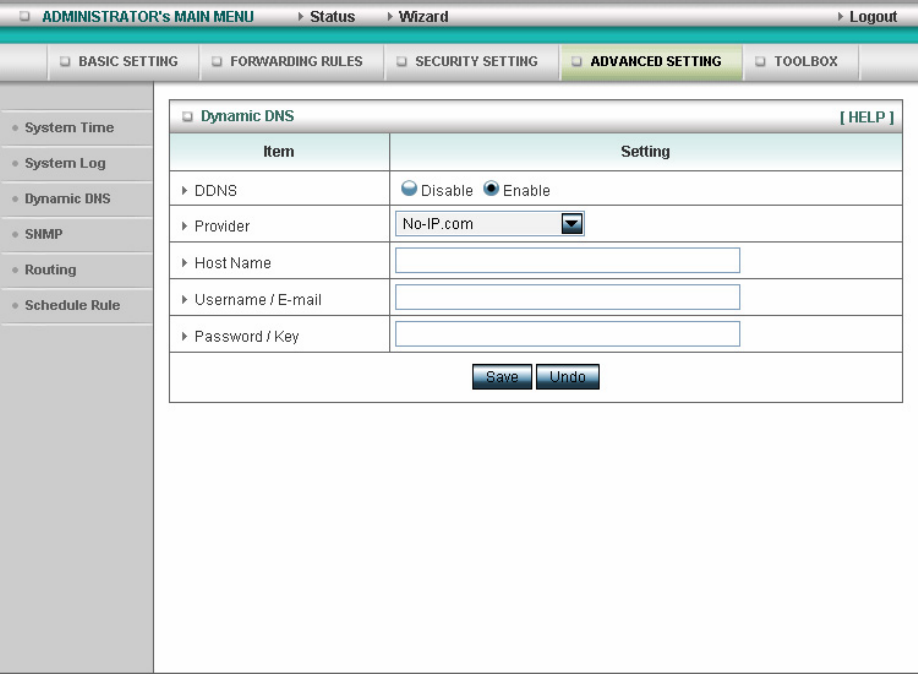
4.7.3 Dynamic DNS
To host your server on a changing IP address, you have to use dynamic domain name service (DDNS).
So that anyone wishing to reach your host only needs to know the name of it. Dynamic DNS will map
the name of your host to your current IP address, which changes each time you connect your Internet
service provider.
Before you enable Dynamic DNS, you need to register an account on one of these Dynamic DNS
servers that we list in provider field.
To enable Dynamic DNS click the check box next to Enable in the DDNS field.
Next you can enter the appropriate information about your Dynamic DNS Server.
You have to define:
Provider
Host Name
53
Username/E-mail
Password/Key
You will get this information when you register an account on a Dynamic DNS server.
Example:
After Dynamic DNS setting is configured, click the save button.
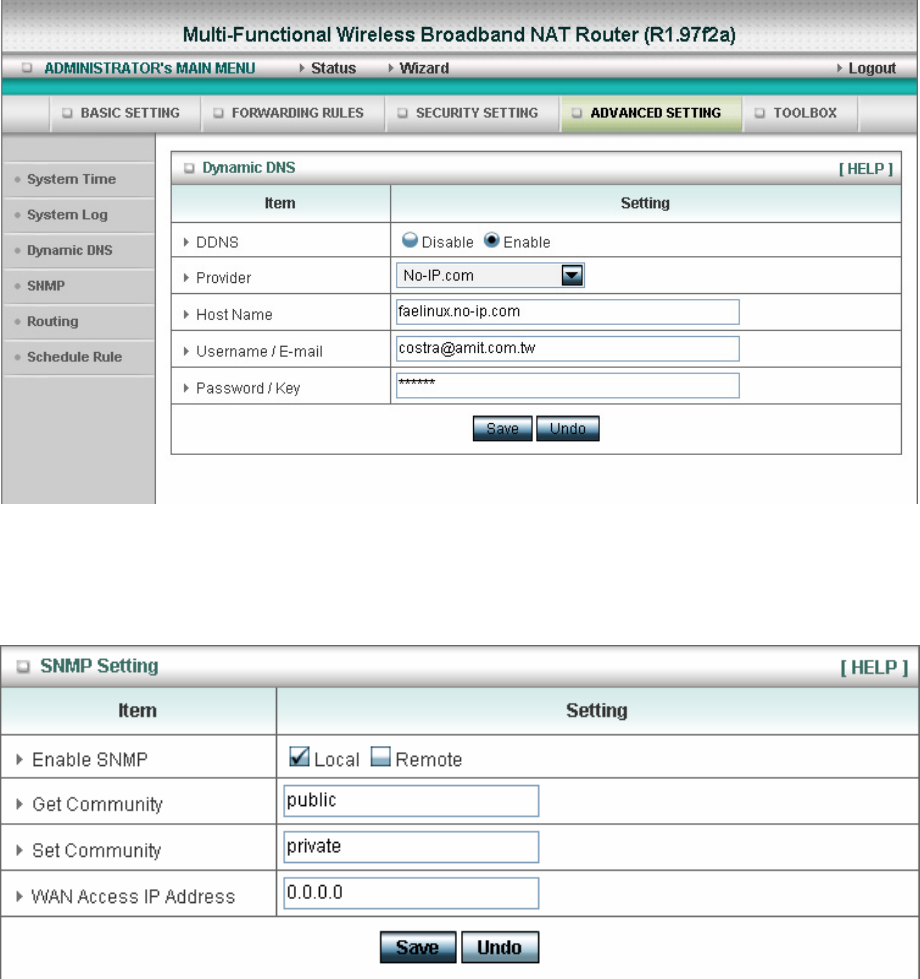
4.7.4 SNMP Setting
In brief, SNMP, the Simple Network Management Protocol, is a protocol designed to give a user the
capability to remotely manage a computer network by polling and setting terminal values and
monitoring network events.
Enable SNMP
54
You must check either Local or Remote or both to enable SNMP function. If Local is checked, this
device will response request from LAN. If Remote is checked, this device will response request from
WAN.
Get Community
Setting the community of GetRequest your device will response.
Set Community
Setting the community of SetRequest your device will accept.
WAN Access IP Address
IF the user wants to limit to specific the ip address to access,please input in the item.The default
0.0.0.0 and means every ip of Internet can get some information of device with snmp protocol.
55
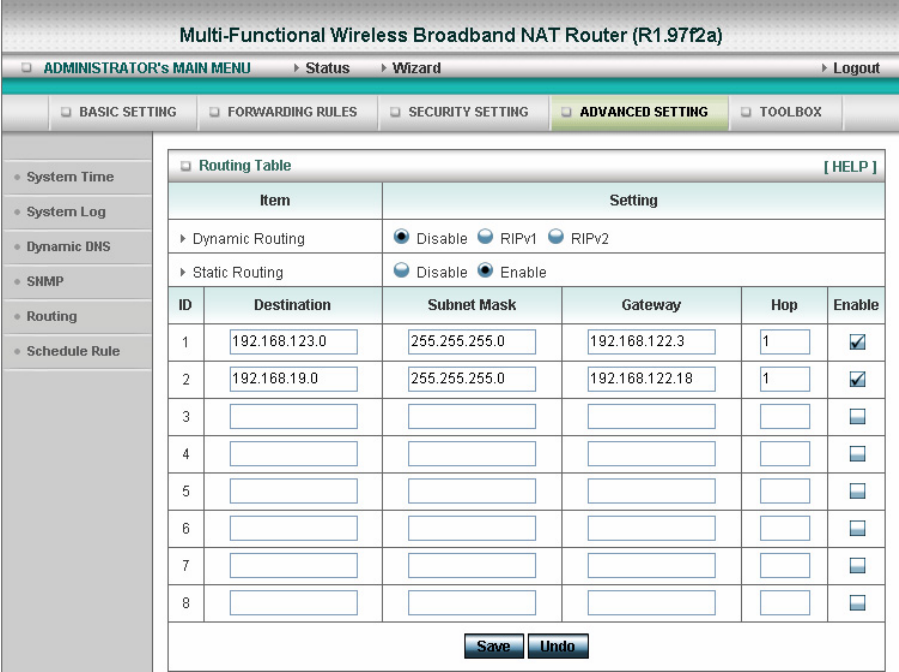
4.7.5 Routing
Routing Tables allow you to determine which physical interface address to use for outgoing IP data
grams. If you have more than one routers and subnets, you will need to enable routing table to allow
packets to find proper routing path and allow different subnets to communicate with each other.
Routing Table settings are settings used to setup the functions of static.
Dynamic Routing
Routing Information Protocol (RIP) will exchange information about destinations for computing routes
throughout the network. Please select RIPv2 only if you have different subnet in your network.
Otherwise, please select RIPv1 if you need this protocol.
Static Routing: For static routing, you can specify up to 8 routing rules. You can enter the destination
IP address, subnet mask, gateway, hop for each routing rule, and then enable or disable the rule by
checking or unchecking the Enable checkbox.
56
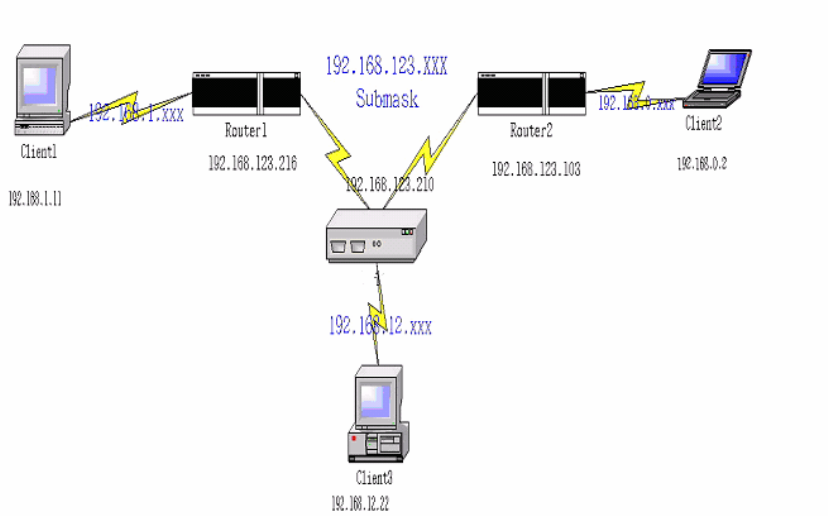
Example:
Configuration on NAT Router
Destination SubnetMask Gateway Hop Enabled
192.168.1.0 255.255.255.0 192.168.123.216 1 ˇ
192.168.0.0 255.255.255.0 192.168.123.103 1 ˇ
So if, for example, the client3 wanted to send an IP data gram to 192.168.0.2, it would use the above
table to determine that it had to go via 192.168.123.103 (a gateway),
And if it sends Packets to 192.168.1.11 will go via 192.168.123.216
Each rule can be enabled or disabled individually.
After routing table setting is configured, click the save button.
57
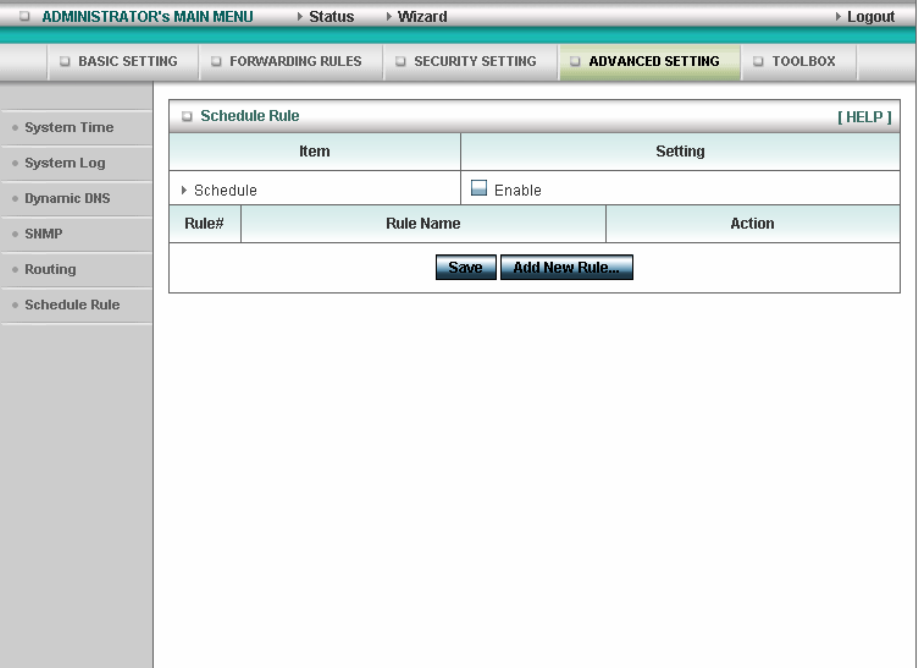
4.7.6 Schedule Rule
You can set the schedule time to decide which service will be turned on or off. Select the “enable”
item.
Press “Add New Rule”
58
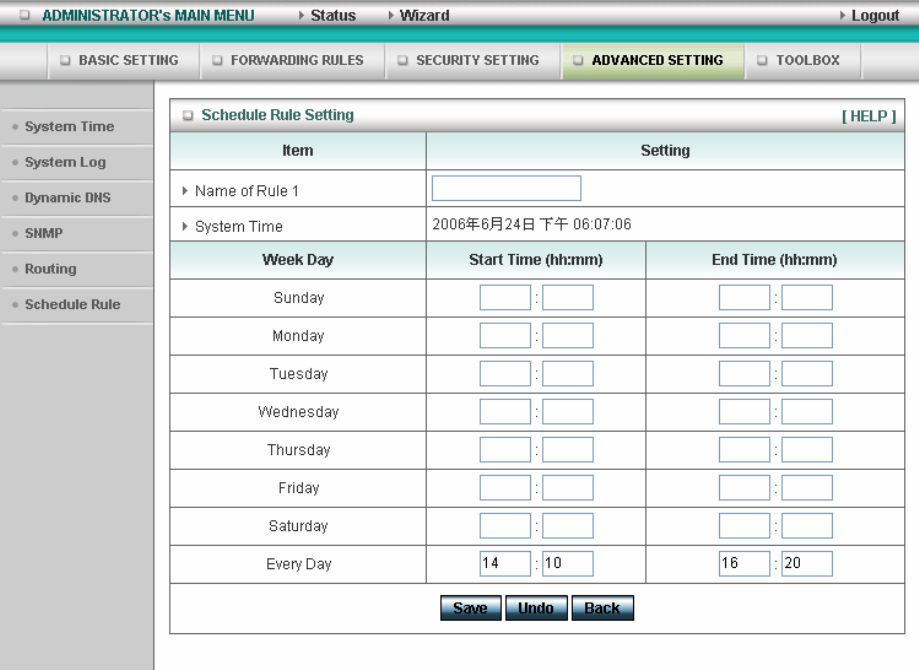
You can write a rule name and set which day and what time to schedule from “Start Time” to “End
Time”. The following example configure “ftp time” as everyday 14:10 to 16:20
59
Schedule Enable
Selected if you want to Enable the Scheduler.
Edit
To edit the schedule rule.
Delete
To delete the schedule rule, and the rule# of the rules behind the deleted one will decrease one
automatically.
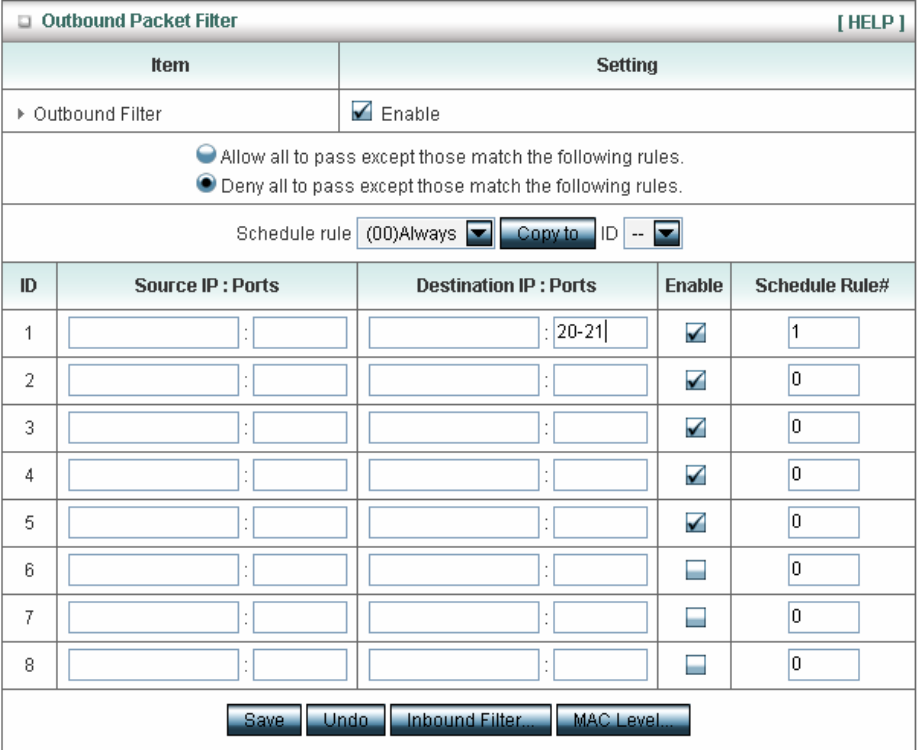
Schedule Rule can be apply to Virtual server and Packet Filter, for example:
60
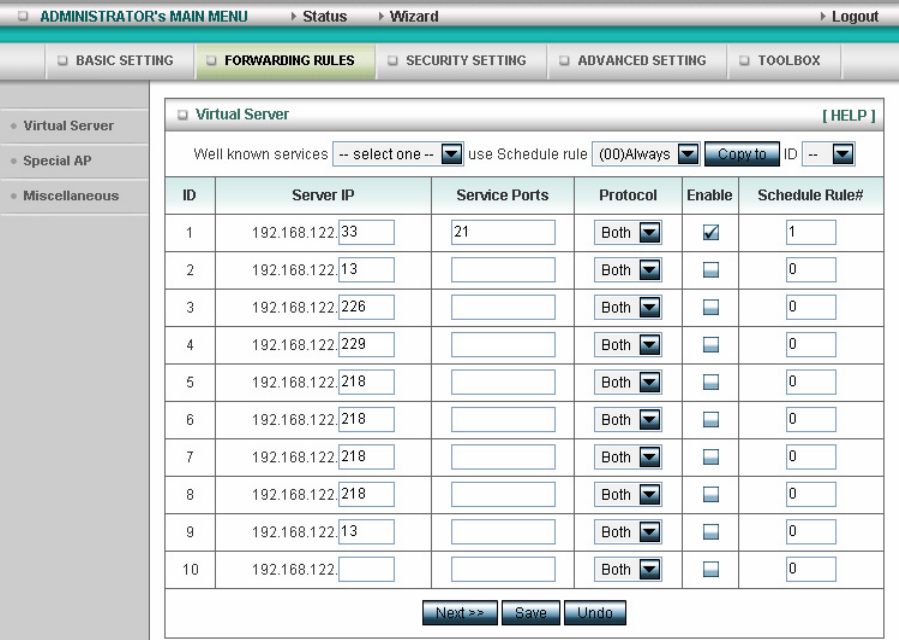
Exanple1: Virtual Server – Apply Rule#1 (ftp time: everyday 14:10 to 16:20)
Exanple2: Packet Filter – Apply Rule#1 (ftp time: everyday 14:10 to 16:20).
61
62
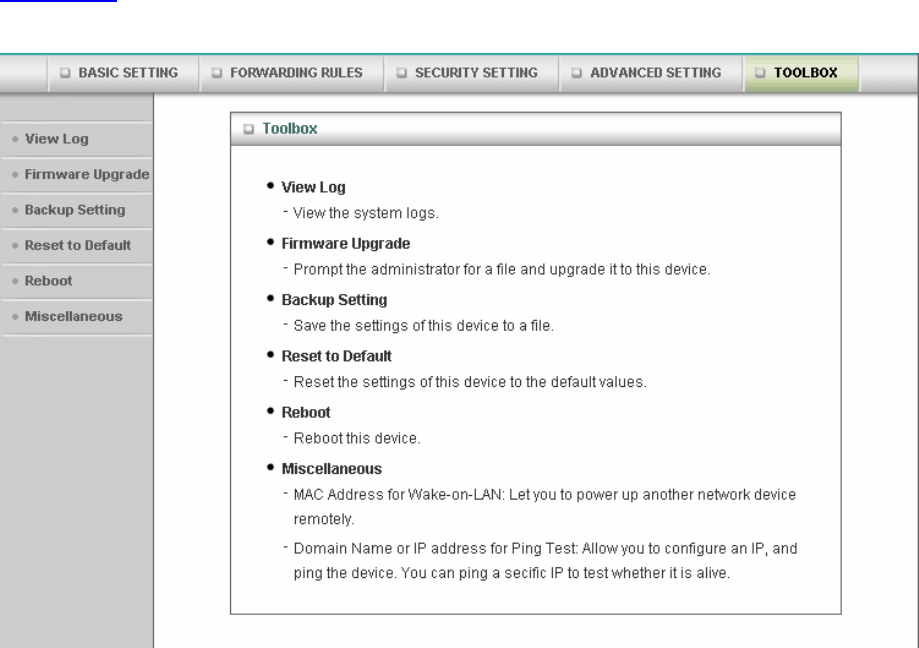
4.8 Toolbox
4.8.1 System Log
63
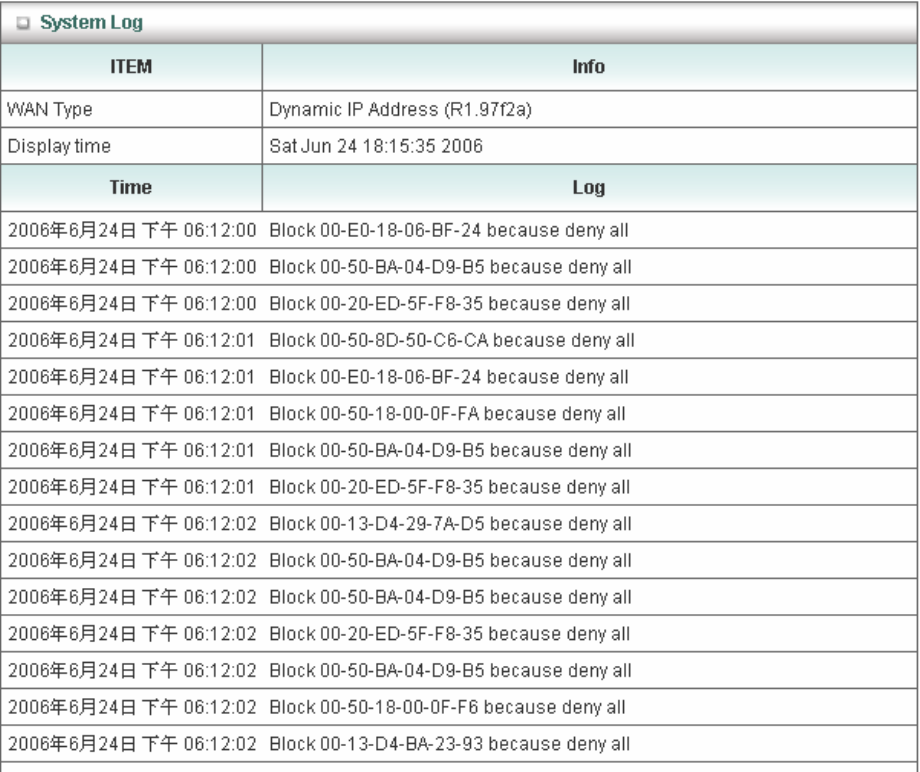
You can View system log by clicking the View Log button
64
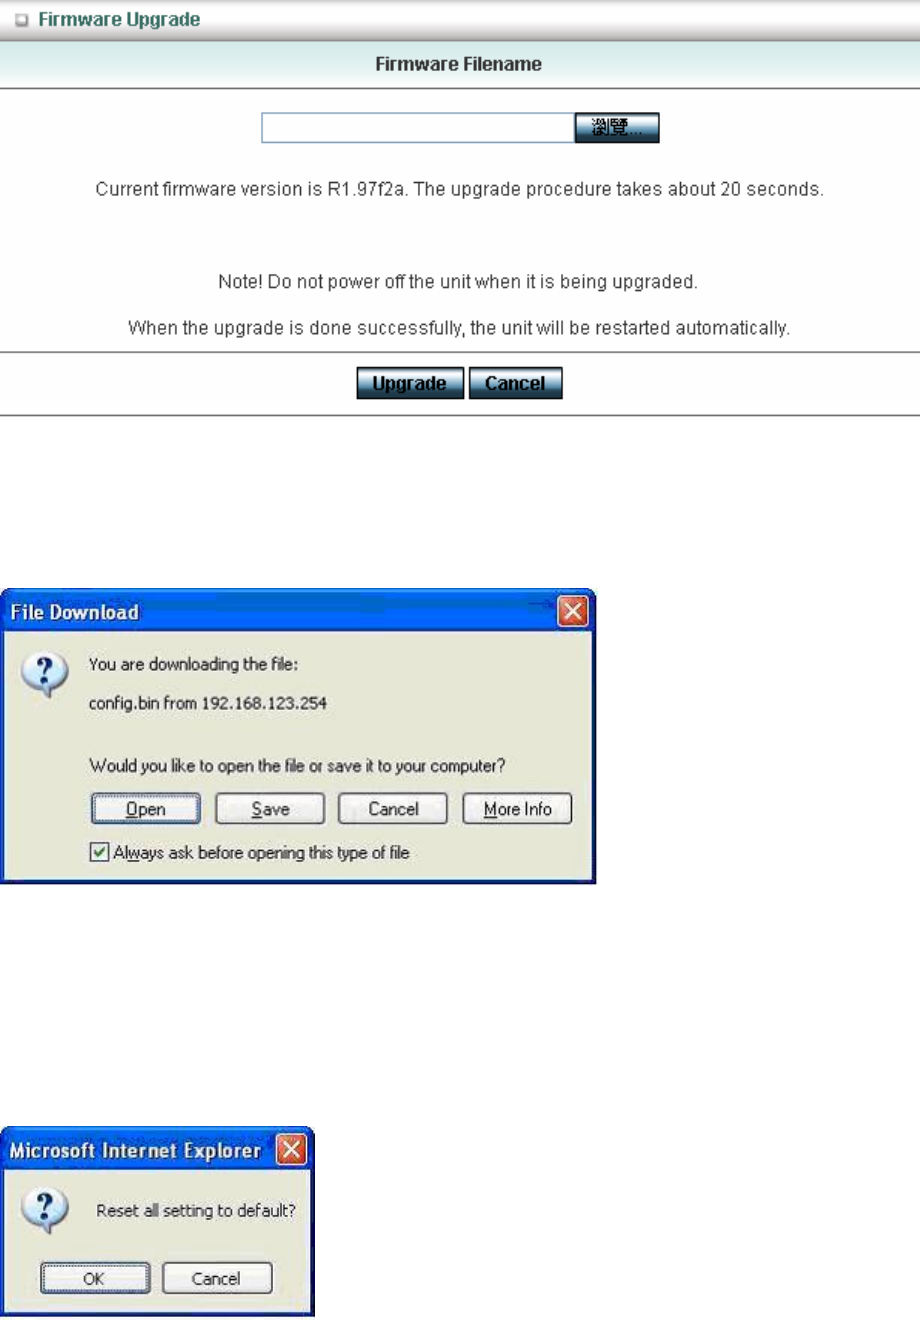
4.8.2 Firmware Upgrade
You can upgrade firmware by clicking Firmware Upgrade button.
4.8.3 Backup Setting
You can backup your settings by clicking the Backup Setting button and save it as a bin file. Once you
want to restore these settings, please click Firmware Upgrade button and use the bin file you saved.
4.8.4 Reset to default
65

You can also reset this product to factory default by clicking the Reset to default button.
4.8.5 Reboot
You can also reboot this product by clicking the Reboot button.
4.8.6 Miscellaneous Items
MAC Address for Wake-on-LAN
Wake-on-LAN is a technology that enables you to power up a networked device remotely. In order to
enjoy this feature, the target device must be Wake-on-LAN enabled and you have to know the MAC
address of this device, say 00-11-22-33-44-55. Clicking "Wake up" button will make the router to send
the wake-up frame to the target device immediately.
Domain Name or IP Address for Test
Allow you to configure an IP, and ping the device. You can ping a secific IP to test whether it is alive.
66
67
A
A
Ap
p
pp
p
pe
e
en
n
nd
d
di
i
ix
x
x
A
A
A
T
T
TC
C
CP
P
P/
/
/I
I
IP
P
P
C
C
Co
o
on
n
nf
f
fi
i
ig
g
gu
u
ur
r
ra
a
at
t
ti
i
io
o
on
n
n
f
f
fo
o
or
r
r
W
W
Wi
i
in
n
nd
d
do
o
ow
w
ws
s
s
9
9
95
5
5/
/
/9
9
98
8
8
This section introduces you how to install TCP/IP protocol into your personal computer. And suppose
you have been successfully installed one network card on your personal computer. If not, please refer
to your network card manual. Moreover, the Section B.2 tells you how to set TCP/IP values for
working with this NAT Router correctly.
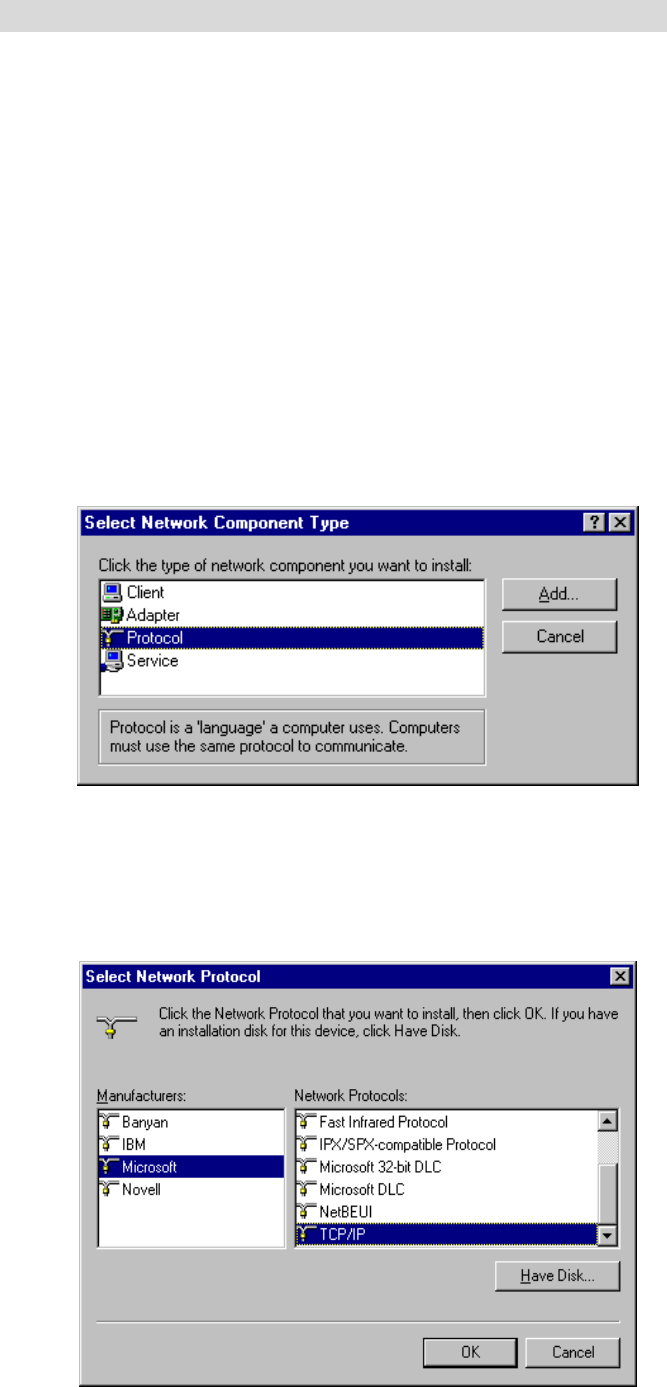
A.1 Install TCP/IP Protocol into Your PC
1. Click Start button and choose Settings, then click Control Panel.
2. Double click Network icon and select Configuration tab in the Network window.
3. Click Add button to add network component into your PC.
4. Double click Protocol to add TCP/IP protocol.
5. Select Microsoft item in the manufactures list. And choose TCP/IP in the Network Protocols.
Click OK button to return to Network window.
68
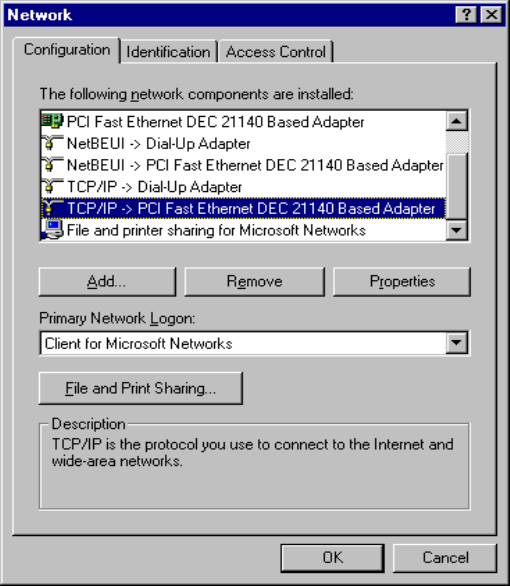
6. The TCP/IP protocol shall be listed in the Network window. Click OK to complete the install
procedure and restart your PC to enable the TCP/IP protocol.
A.2 Set TCP/IP Protocol for Working with NAT Router
1. Click Start button and choose Settings, then click Control Panel.
2. Double click Network icon. Select the TCP/IP line that has been associated to your network card
in the Configuration tab of the Network window.
3. Click Properties button to set the TCP/IP protocol for this NAT Router.
4. Now, you have two setting methods:
69
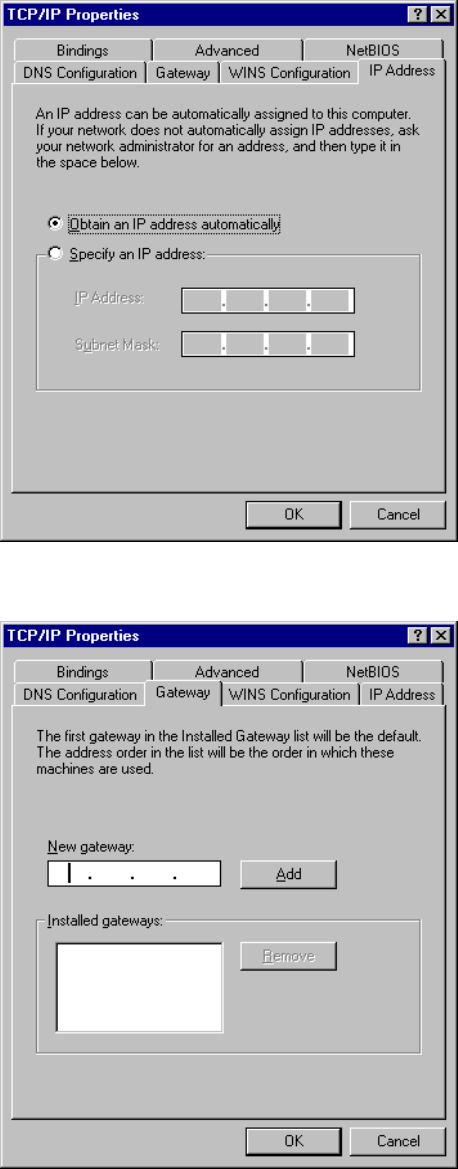
a. Select Obtain an IP address automatically in the IP Address tab.
b. Don’t input any value in the Gateway tab.
70
c. Choose Disable DNS in the DNS Configuration tab.
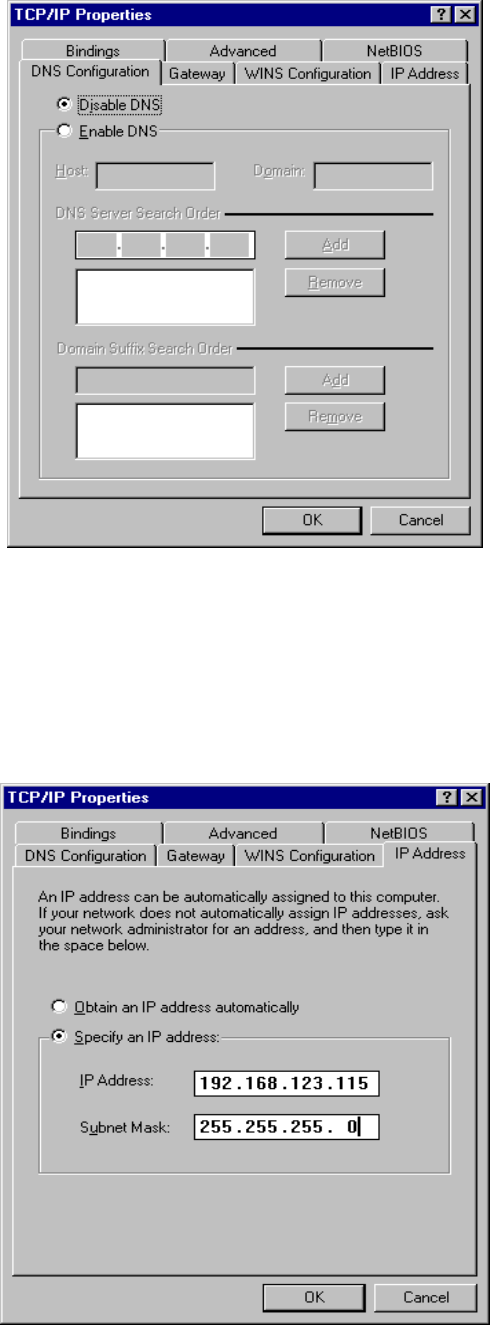
B. Configure IP manually
a. Select Specify an IP address in the IP Address tab. The default IP address of this
product is 192.168.123.254. So please use 192.168.123.xxx (xxx is between 1 and 253)
for IP Address field and 255.255.255.0 for Subnet Mask field.
71
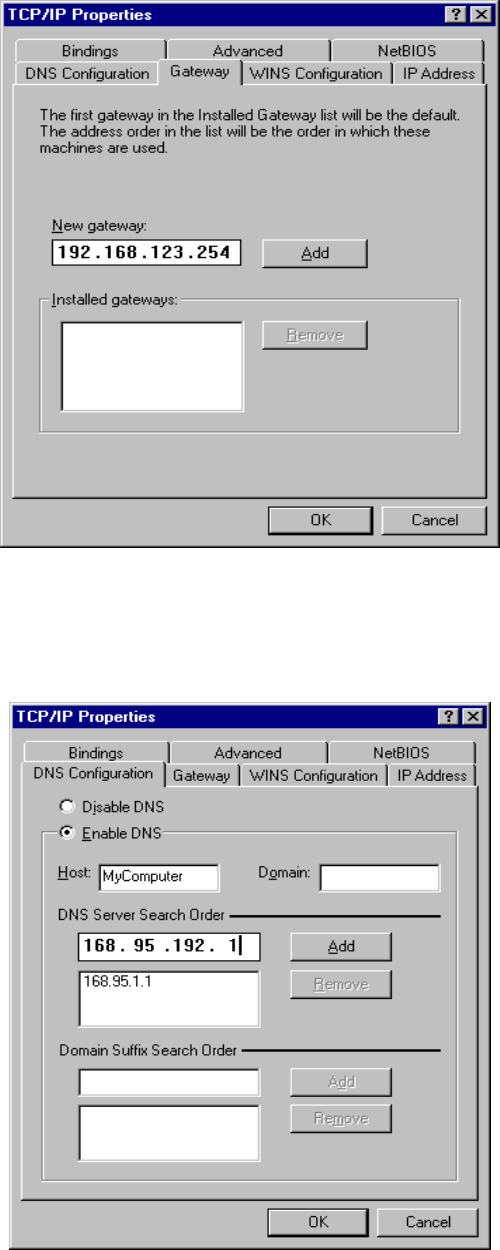
b. In the Gateway tab, add the IP address of this product (default IP is 192.168.123.254)
in the New gateway field and click Add button.
c. In the DNS Configuration tab, add the DNS values which are provided by the ISP into
DNS Server Search Order field and click Add button.
72
A
A
Ap
p
pp
p
pe
e
en
n
nd
d
di
i
ix
x
x
B
B
B
8
8
80
0
02
2
2.
.
.1
1
1x
x
x
S
S
Se
e
et
t
tt
t
ti
i
in
n
ng
g
g
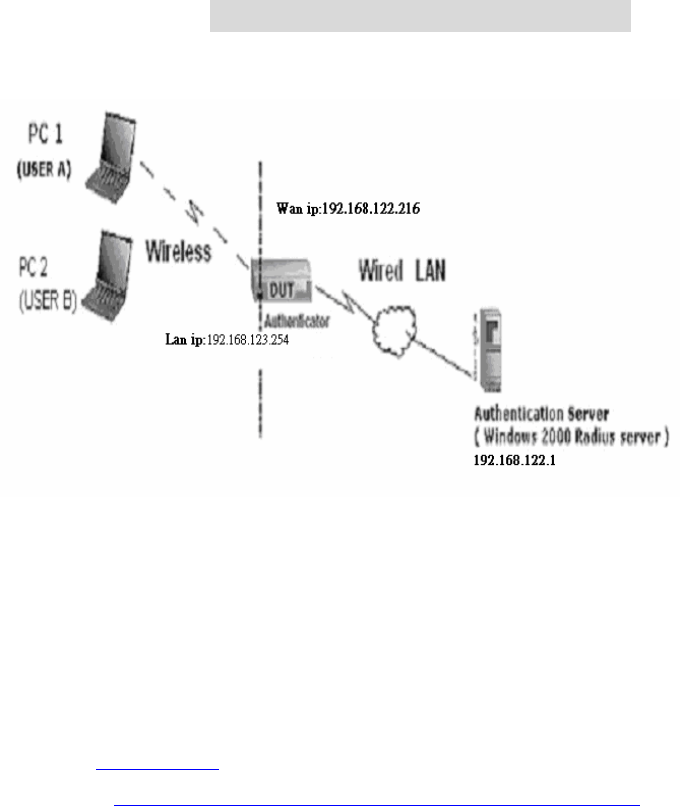
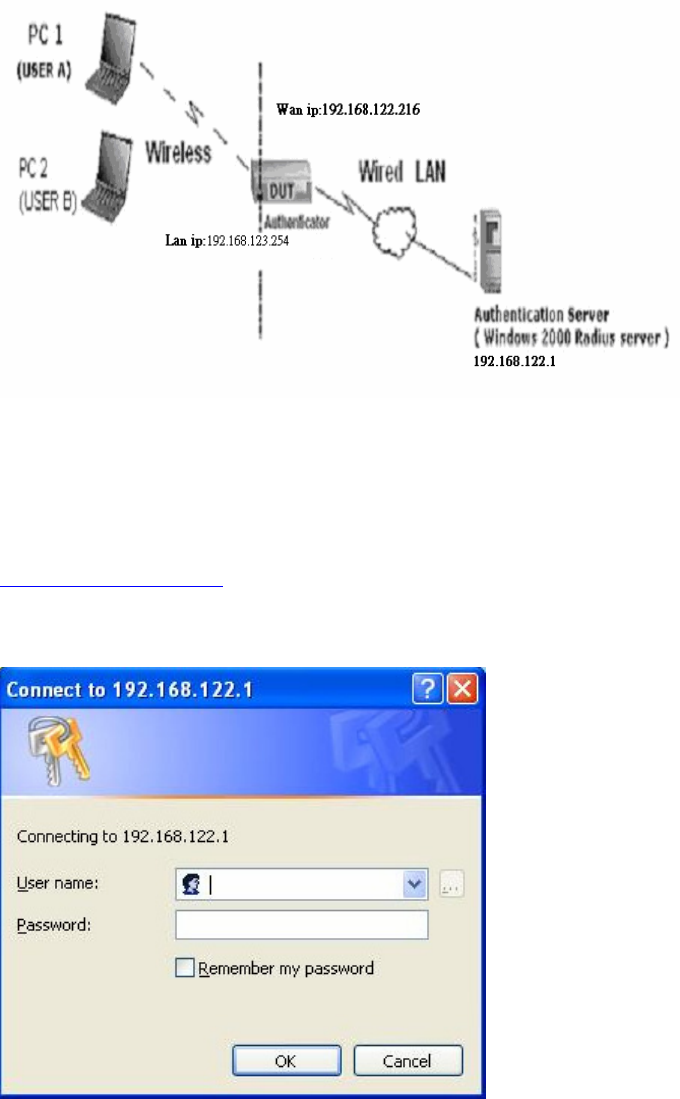
Figure 1: Testing Environment (Use Windows 2000 Radius Server)
1 Equipment Details
PC1:
Microsoft Windows XP Professional without Service Pack 1.
AMIT 531C Wireless Cardbus:3.0.3.0
Driver version:
PC2:
Microsoft Windows XP Professional with Service Pack 1a or latter.
AMIT 561C Wireless Cardbus:1.0.1.0
Driver version: 1.7.29.0 (Driver date: 10.20.2001)
Authentication Server: Windows 2000 RADIUS server with Service Pack 3 and HotFix
Q313664.
Note. Windows 2000 RADIUS server only supports PEAP after upgrade to service pack 3 and
HotFix Q313664 (You can get more information from
http://support.microsoft.com/default.aspx?scid=kb; en-us;313664)
2 DUT
Configuration:
73
1.Enable DHCP server.
2.WAN setting: static IP address.
3.LAN IP address: 192.168.123.254/24.
4.Set RADIUS server IP.
5.Set RADIUS server shared key.
6.Configure WEP key and 802.1X setting.
The following test will use the inbuilt 802.1X authentication method such as ,EAP_TLS,
PEAP_CHAPv2(Windows XP with SP1 only), and PEAP_TLS(Windows XP with SP1 only)
using the Smart Card or other Certificate of the Windows XP Professional.
3. DUT and Windows 2000 Radius Server Setup
3-1-1. Setup Windows 2000 RADIUS Server
We have to change authentication method to MD5_Challenge or using smart
card or other certificate on RADIUS server according to the test condition.
3-1-2. Setup DUT
1.Enable the 802.1X (check the “Enable checkbox“).
2.Enter the RADIUS server IP.
3.Enter the shared key. (The key shared by the RADIUS server and DUT).
4.We will change 802.1X encryption key length to fit the variable test
condition.
3-1-3. Setup Network adapter on PC
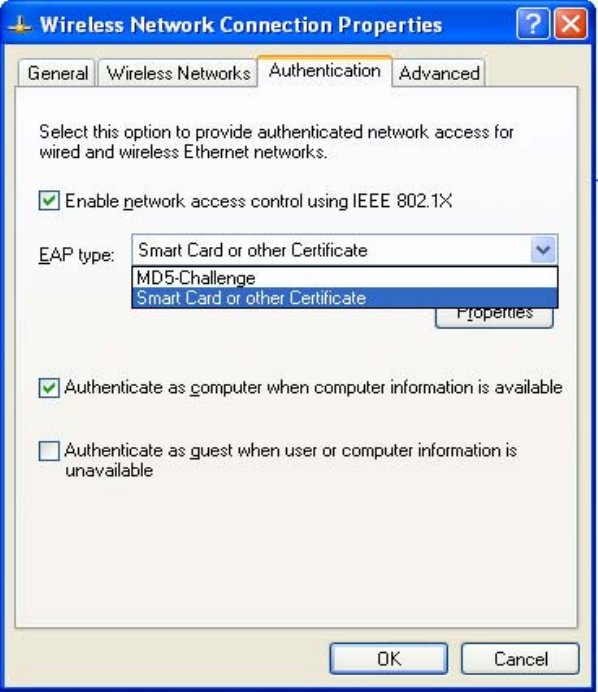
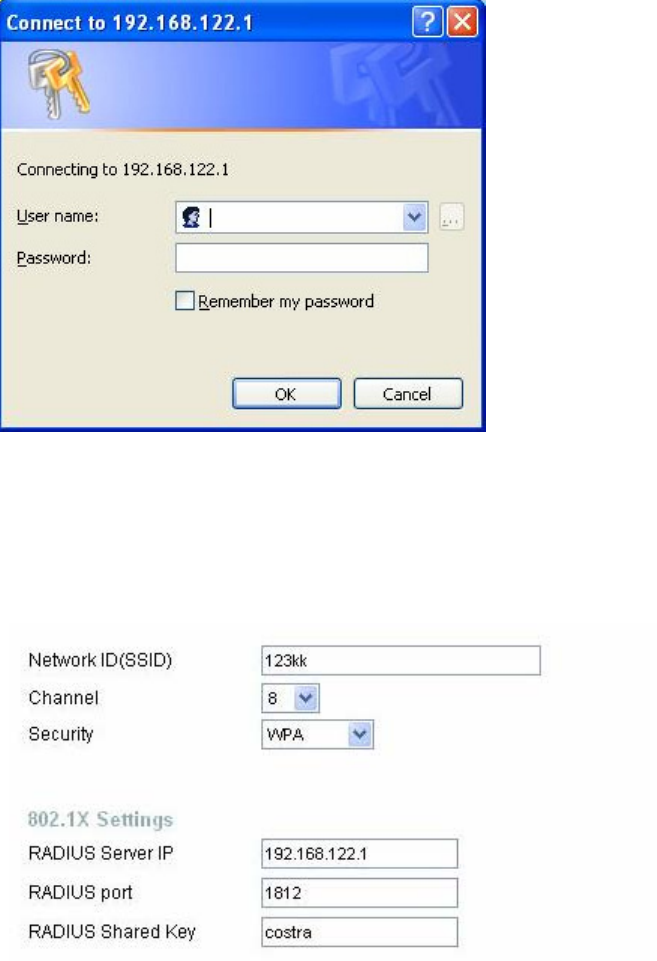
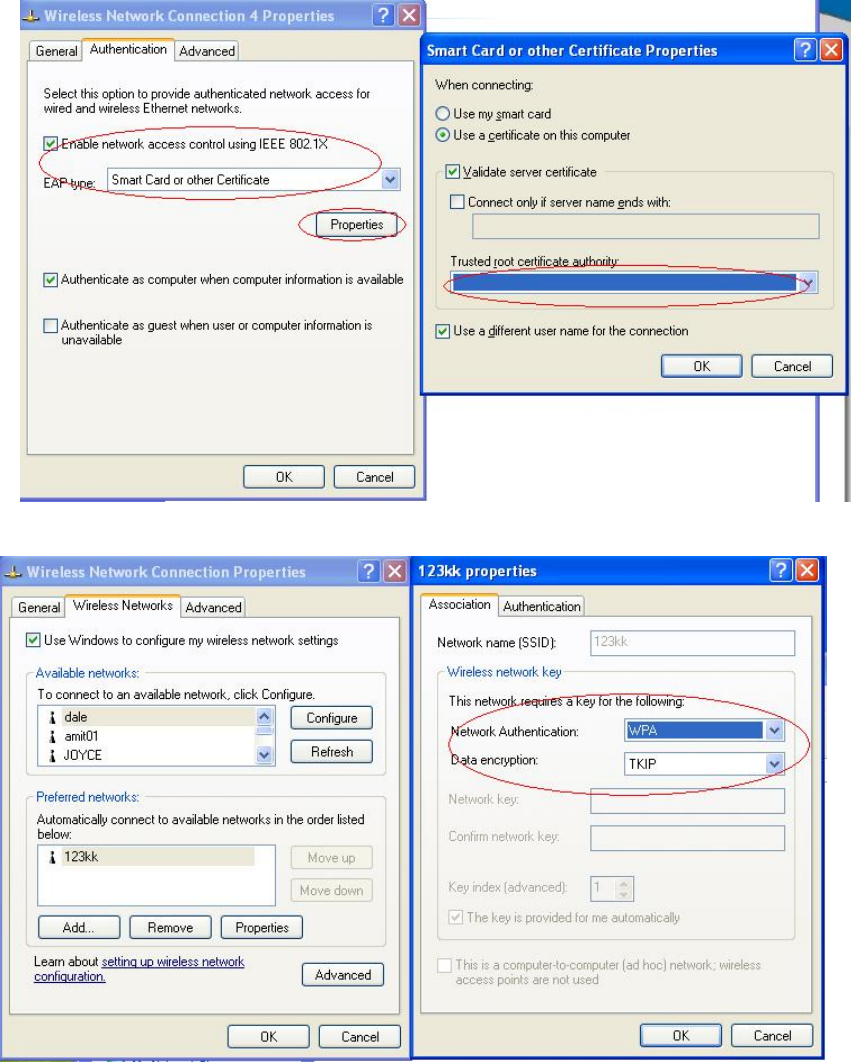
1.Choose the IEEE802.1X as the authentication method. (Fig 2)
Note.
Figure 2 is a setting picture of Windows XP without service pack 1. If users
upgrade to service pack 1, then they can’t see MD5-Challenge from EAP
type list any more, but they will get a new Protected EAP (PEAP) option.
2.Choose MD5-Challenge or Smart Card or other Certificate as the EAP
type.
3.If choosing use smart card or the certificate as the EAP type, we select to
use a certificate on this computer. (Fig 3)
74
4. We will change EAP type to fit the variable test condition.
Figure 2: Enable IEEE 802.1X access control
75
Figure 3: Smart card or certificate properties
4. Windows 2000 RADIUS server Authentication testing:
4.1DUT authenticate PC1 using certificate. (PC2 follows the same test procedures.)
1. Download and install the certificate on PC1. (Fig 4)
2. PC1 choose the SSID of DUT as the Access Point.
3. Set authentication type of wireless client and RADIUS server both to
EAP_TLS.
4. Disable the wireless connection and enable again.
5. The DUT will send the user's certificate to the RADIUS server, and then
send the message of authentication result to PC1. (Fig 5)
6. Windows XP will prompt that the authentication process is success or fail
and end the authentication procedure. ( Fig 6)
7. Terminate the test steps when PC1 get dynamic IP and PING remote host
successfully.
76
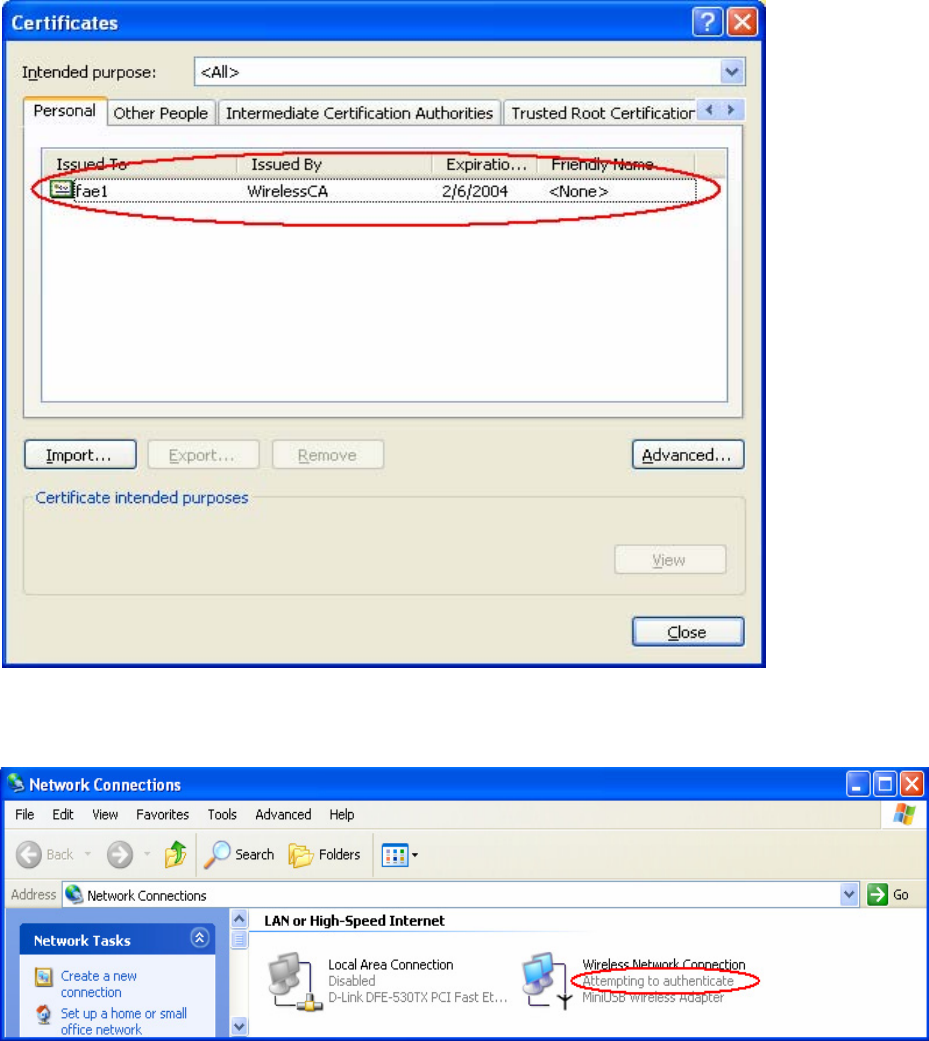
Figure 4: Certificate information on PC1
Figure 5: Authenticating
77
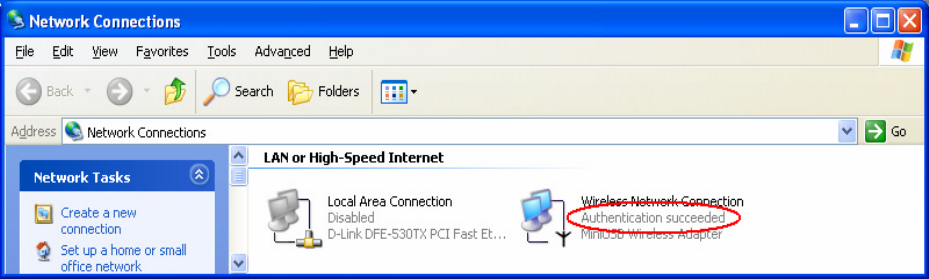
Figure 6: Authentication success
4.2DUT authenticate PC2 using PEAP-TLS.
1. PC2 choose the SSID of DUT as the Access Point.
2. Set authentication type of wireless client and RADIUS server both to
PEAP_TLS.
3. Disable the wireless connection and enable again.
4.The DUT will send the user's certificate to the RADIUS server, and then
send the message of authentication result to PC2.
5. Windows XP will prompt that the authentication process is success or fail
and end the authentication procedure.
6. Terminate the test steps when PC2 get dynamic IP and PING remote host
successfully.
Support Type: The router supports the types of 802.1x Authentication:
PEAP-CHAPv2 and PEAP-TLS.
Note.
1.PC1 is on Windows XP platform without Service Pack 1.
2.PC2 is on Windows XP platform with Service Pack 1a.
3.PEAP is supported on Windows XP with Service Pack 1 only.
4.Windows XP with Service Pack 1 allows 802.1x authentication only when data encryption
function is enable.
78
A
A
Ap
p
pp
p
pe
e
en
n
nd
d
di
i
ix
x
x
C
C
C
W
W
WP
P
PA
A
A-
-
-P
P
PS
S
SK
K
K
a
a
an
n
nd
d
d
W
W
WP
P
PA
A
A
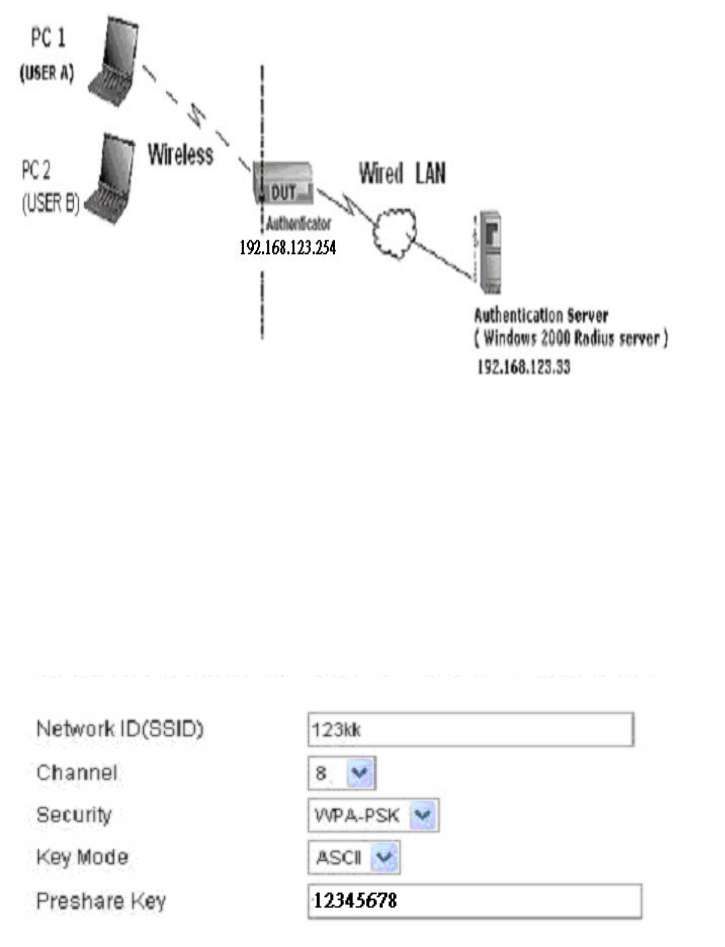
Wireless Router: LAN IP: 192.168.123.254
WAN IP: 192.168.122.216
Radius Server: 192.168.122.1
UserA : XP Wireless Card:Ti-11g
Tool: Odyssey Client Manager
Refer to: www.funk.com
Download: http://www.funk.com/News&Events/ody_c_wpa_preview_pn.asp
79
Or Another Configuration:
WPA-PSK
In fact, it is not necessary for this function to authenticate by Radius Server, the client and wireless
Router authenticate by themselves.
Method1:
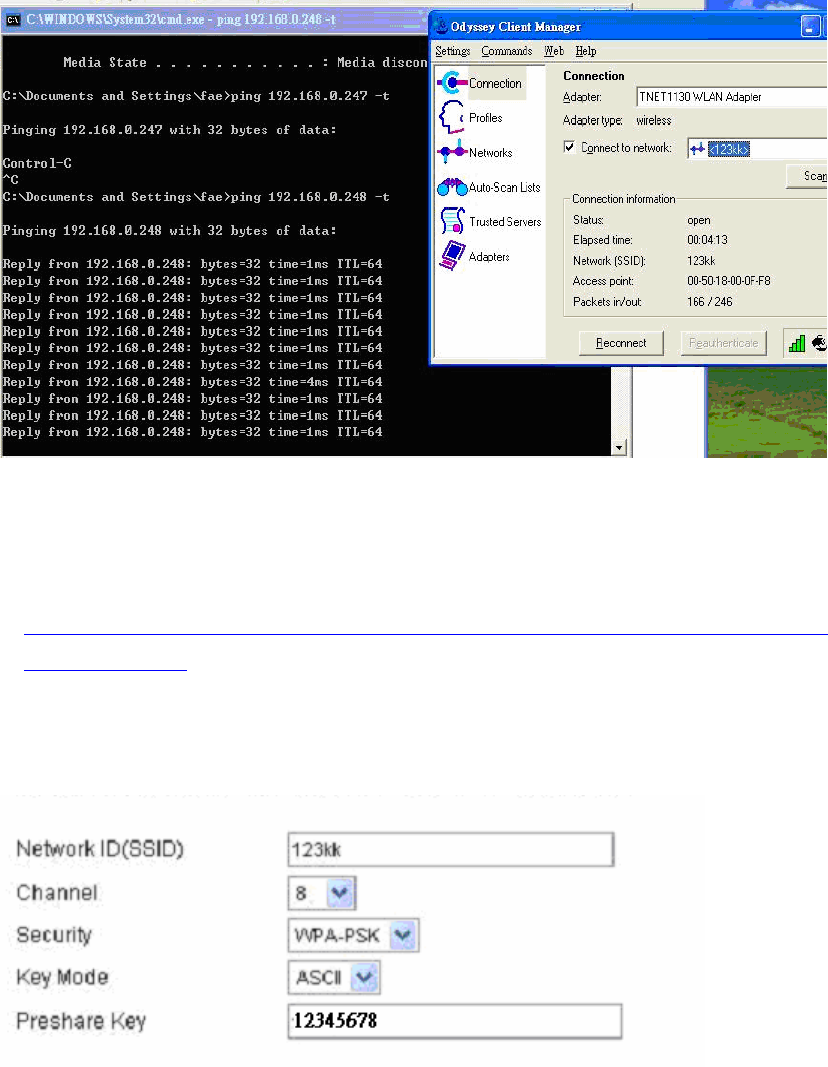
1. Go to the Web manager of Wireless Router to configure, like below:
2. Go to Odyssey Client Manager, first choose “Network”
Before doing that, you should verify if the software can show the wireless card.
Open “Adapters”
80
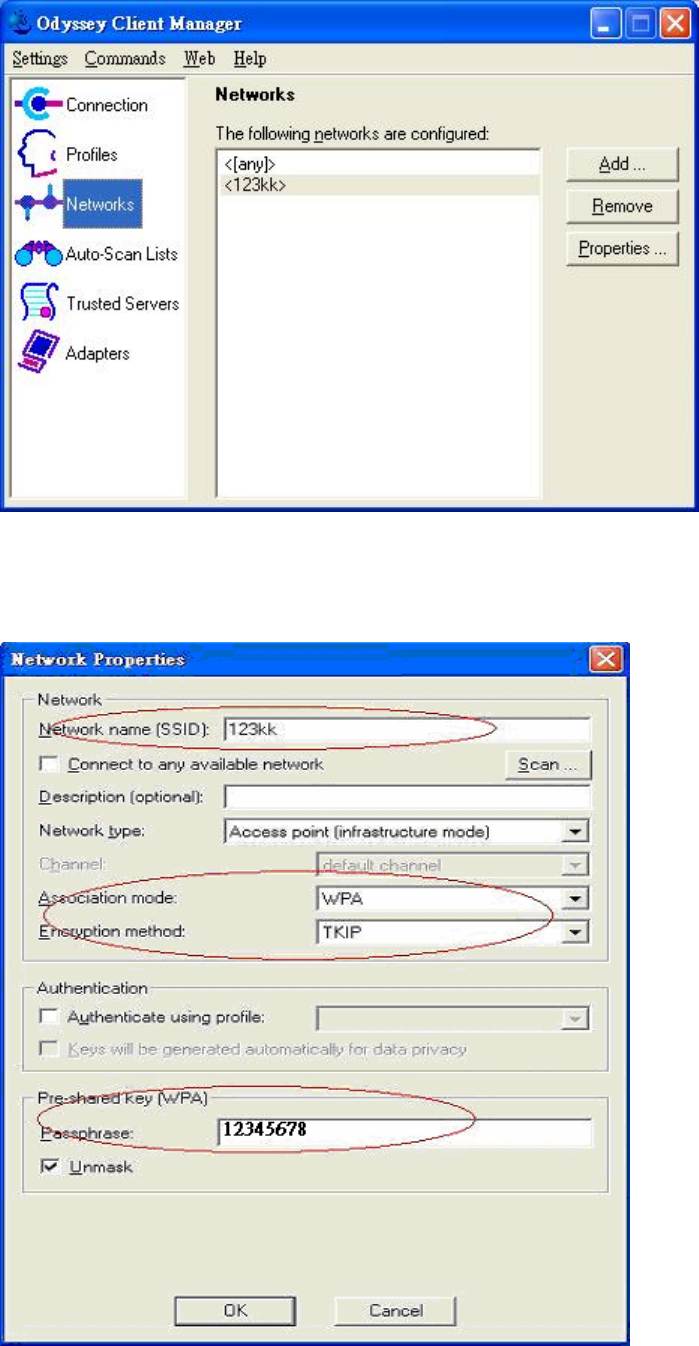
3. Add and edit some settings:
81
4. Back to Connection:
Then Select “Connect to network” You will see:
Method2:
1. First, patch windows XP and have to install “Service package 1”
Patch:
http://www.microsoft.com/downloads/details.aspx?displaylang=en&FamilyID=5039ef4a-61e0-4c44
-94f0-c25c9de0ace9
2. Then reboot.
3. Setting on the router and client:
Router:
Client:
Go to “Network Connection” and select wireless adapter.
82
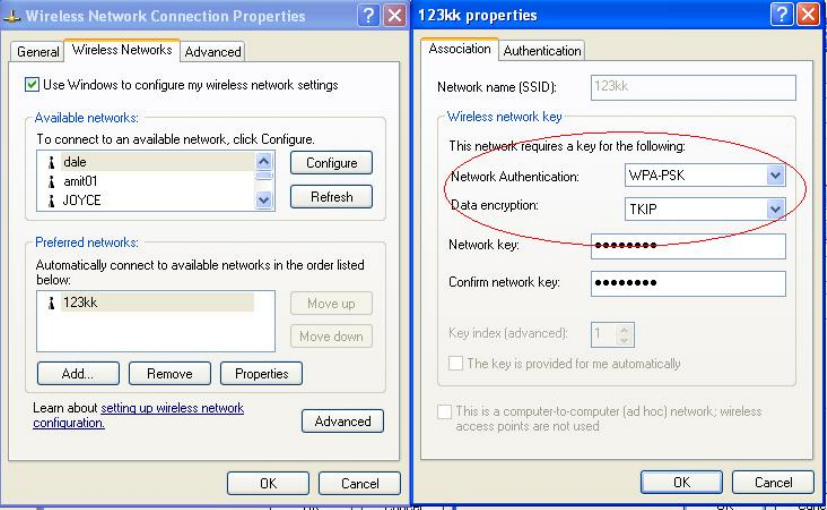
Choose “View available Wireless Networks” like below:
AdvancedÆ choose “123kk”
83
WPA:
For this function, we need the server to authenticate. This function is like 802.1x.
The above is our environment:
Method 1:
1. The UserA or UserB have to get certificate from Radius, first.
http://192.168.122.1/certsrv
account : fae1
passwd : fae1
2. Then, Install this certificate and finish.
3. Go to the Web manager of Wireless Router to configure, like below:
84
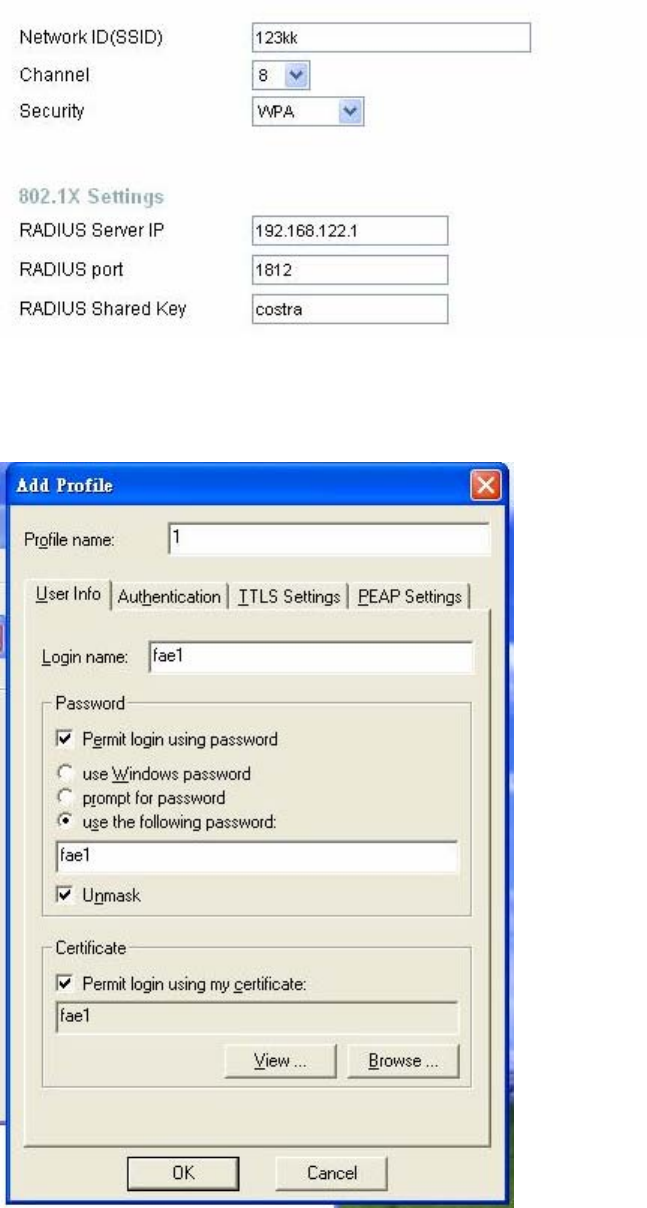
4. Go to Odyssey Client Manager, choose “Profiles” and Setup Profile name as “1”
Login name and passwd are fae1 and fae1.
Remember that you get certificate from Radius in Step1.
85
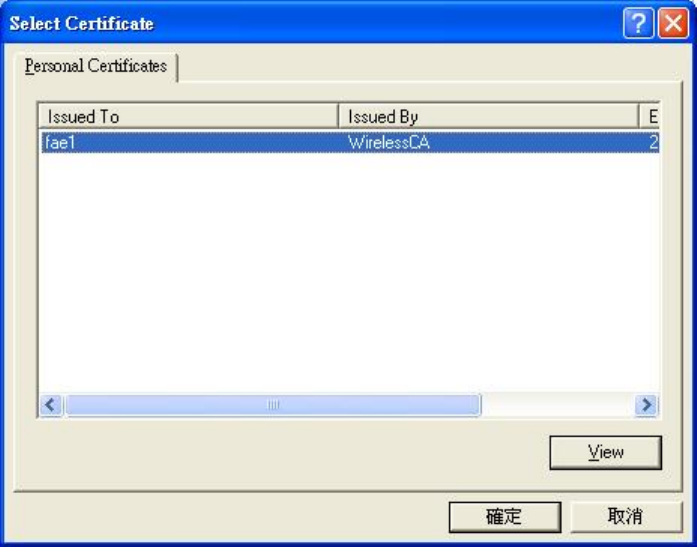
5. Then Choose “certificate” like above.
86
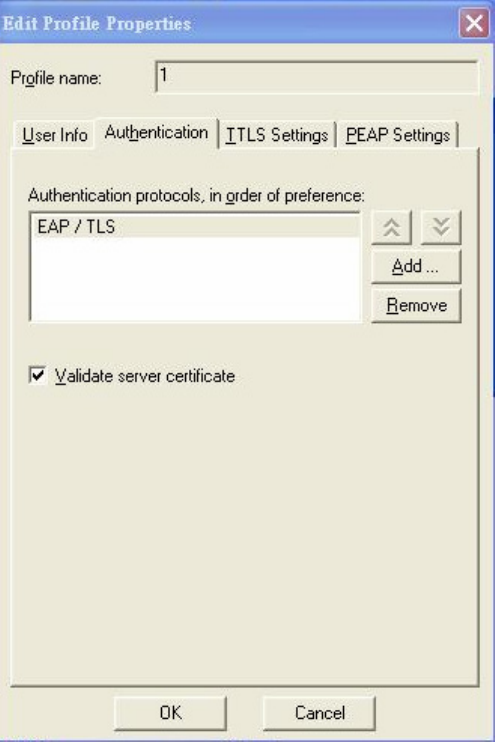
6. Then go to Authentication and first Remove EAP/ TLS and Add EAP/TLS again.
87
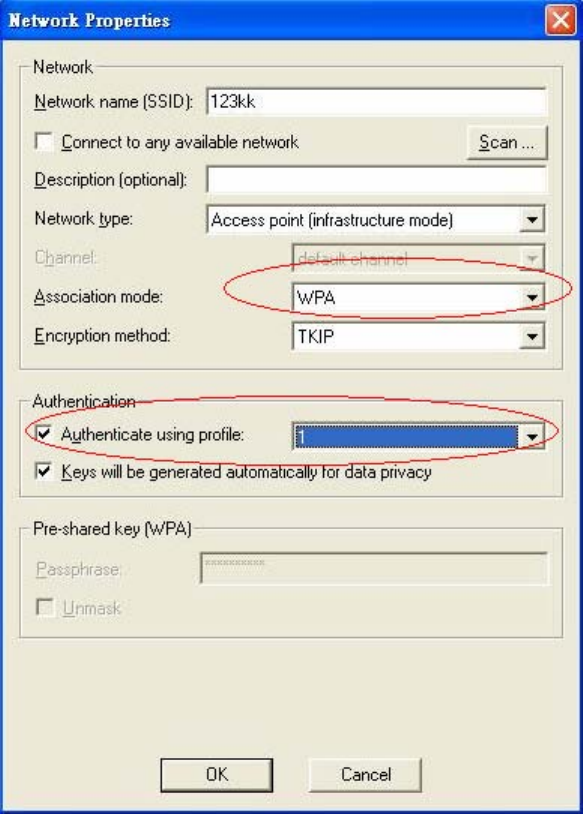
7. Go “Network” and Select “1” and ok
88
2. Then Install this certificate and finish.
3. Setting on the router and client:
Router:
90
Client:
Go to “Network Connection” and select wireless adapter.
Choose “View available Wireless Networks” like below:
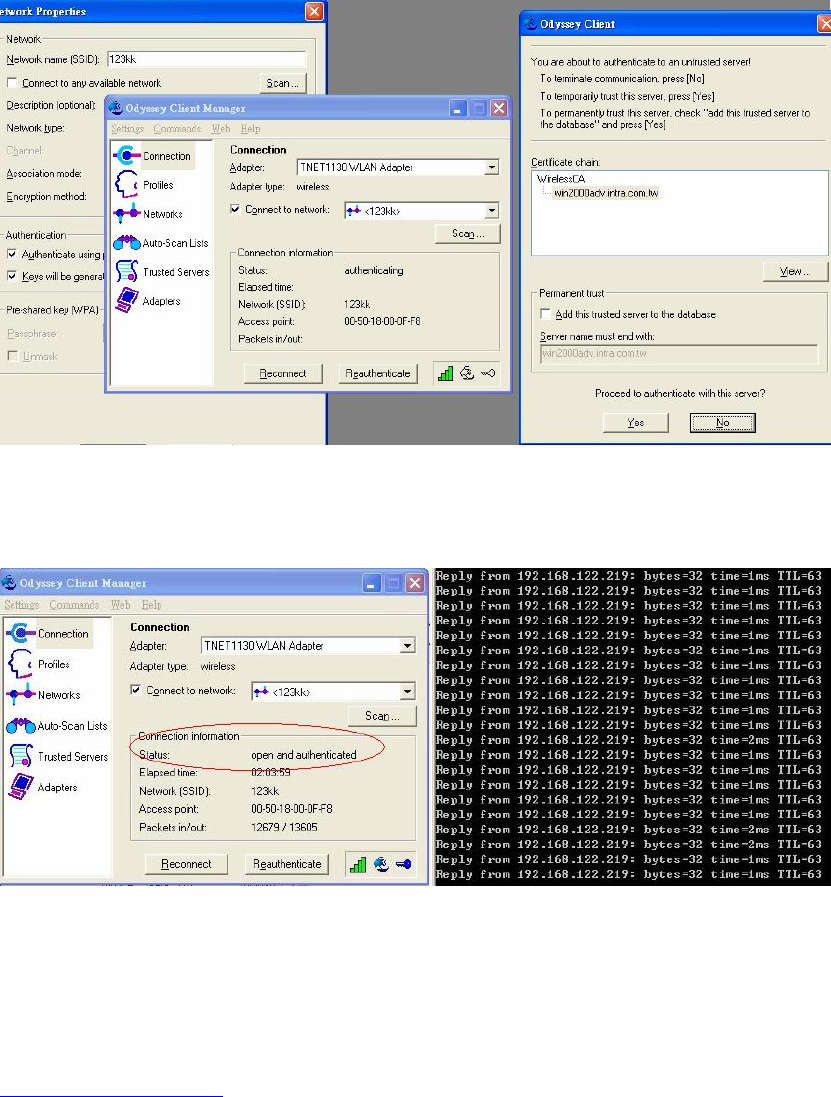
AdvancedÆ choose “123kk”
Select “WirelessCA and Enable” in Trusted root certificate authority:
Then, if the wireless client wants to associate, it has to request to authenticate.
91
A
A
Ap
p
pp
p
pe
e
en
n
nd
d
di
i
ix
x
x
D
D
D
F
F
FA
A
AQ
Q
Q
a
a
an
n
nd
d
d
T
T
Tr
r
ro
o
ou
u
ub
b
bl
l
le
e
es
s
sh
h
ho
o
oo
o
ot
t
tii
in
n
ng
g
g
What can I do when I have some trouble at the first time?
1. Why can I not configure the router even if the cable is plugged in the ports of
Router and the led is also light?
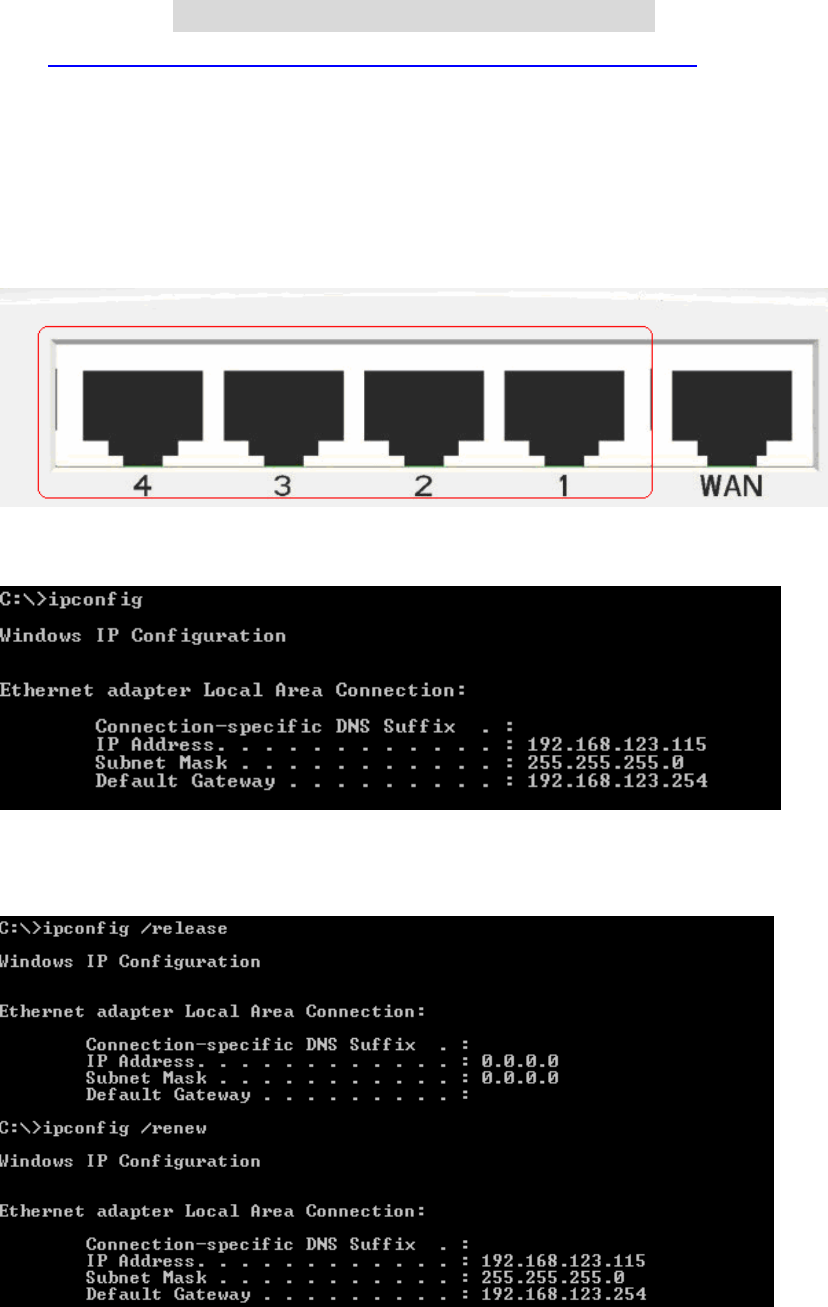
A: First, make sure that which port is plugged. If the cable is in the Wan port, please change
to plug in Lan port 1 or Lan port 4:
Then, please check if the Pc gets ip address from Router. Use command mode as below:
If yes, please execute Browser, like Mozilla and key 192.168.123.254 in address.
If not, please ipconfig /release, then ipconfig /renew.
Whatever I setup, the pc can not get ip. Please check Status Led and refer to the Q2:
2.Why can I not connect the router even if the cable is plugged in Lan port and
92
the led is light?
A: First, please check Status Led. If the device is normal, the led will blink per second.
If not, please check How blinking Status led shows.
There are many abnormal symptoms as below:
Status Led is bright or dark in work: The system hanged up .Suggest powering off and on
the router. But this symptom often occurs, please reset to default or upgrade latest fw to try
again.
Status led flashes irregularly: Maybe the root cause is Flash rom and please press reset
Button to reset to default or try to use Recovery mode.(Refer to Q3 and Q4)
Status flashes very fast while powering on: Maybe the router is the recovery mode and
please refer to Q4.
3.How to reset to factory default?
A: There are 2 methods to reset to default.
1. Restore with RESET button
First, turn off the router and press the RESET button in. And then, power on the router and push the
RESET button down until the M1 and or M2 LED (or Status LED) start flashing, then remove the
finger. If LED flashes about 8 times, the RESTORE process is completed. However, if LED flashes 2
times, repeat.
2. Restore directly when the router power on
First, push the RESET button about 5 seconds (Status will start flashing about 5 times), remove the
finger. The RESTORE process is completed.
4.How to do recovery mode when the router is abnormal ?
A: Allocate a Static IP Address on your computer as below:
Step1:First, press the reset button and power on the router until Status blinks very ffast.
Step2:Find the Inter Protocol(TCP/IP) Properties from My Network Places and check Properties
of Local Area Network Connection. And click the “General” icon and assign one IP address
which can be from 192.168.123.1 to 192.168.123.253. Here we use the 192.168.123.88 as
the IP address. The Subnet mask must be 255.255.255.0, and the Default gateway must
be 192.168.123.254. Then click “OK” button to complete TCP/IP setup.
93
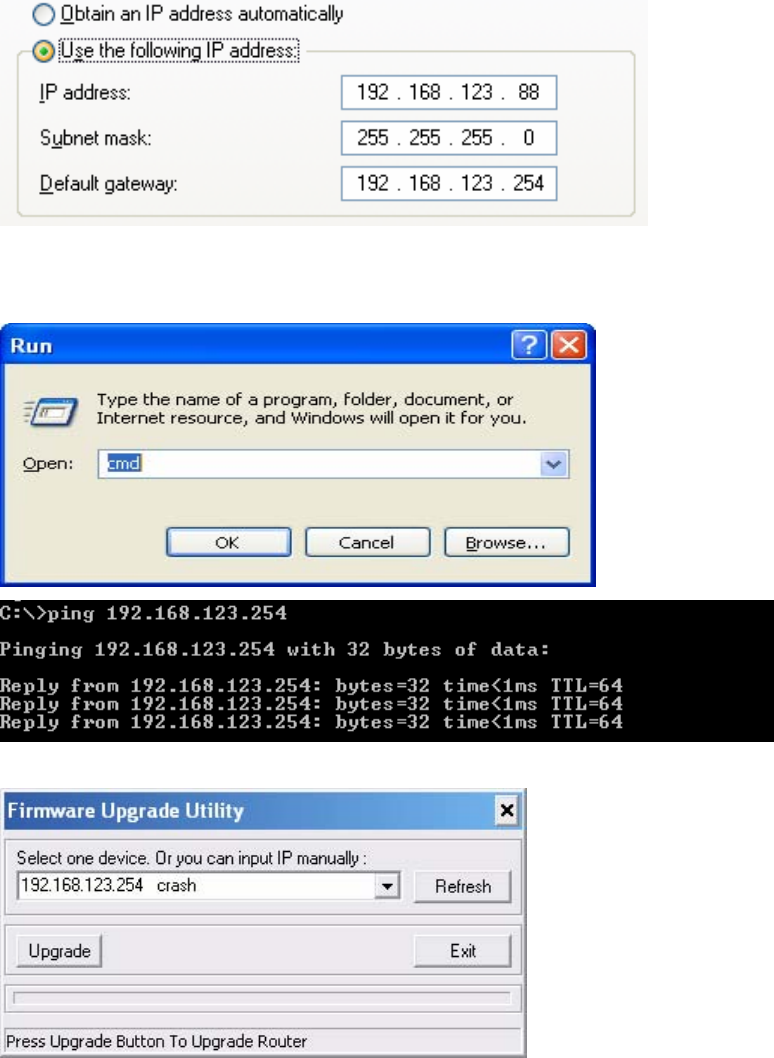
Step2: Open the command mode and input “cmd” then check if the router replies to ping
192.168.123.254
Step3:Please use the exe-file of fw and click as below:
Then click” Upgrade” if necessary, please input password ”admin” .Then reset to default and refer to
Q1 How to connect Router.
However, if those methods can not make the router normal, please send the unit to the seller to check,
thanks.
5.Why can I not connect Internet even though the cables are plugged in Wan
port and Lan port and the leds are blink. In addition, Status led is also normal
and I can configure web management?
94
A: Make sure that the network cable from DSL or Cable modem is plugged in Wan port of Router and
that the network cable from Lan port of router is plugged in Ethernet adapter. Then, please check
which wan type you use. If you are not sure, please call the isp. Then please go to this page to input the
information isp is assigned.
6.When I use Static IP Address to roam Internet, I can access or ping global IP
202.93.91.218, But I can not access the site that inputs domain name, for example
http://espn.com ?
A: Please check the dns configuration of Static IP Address. Please refer to the
information of ISP and assign one or two in dns item.
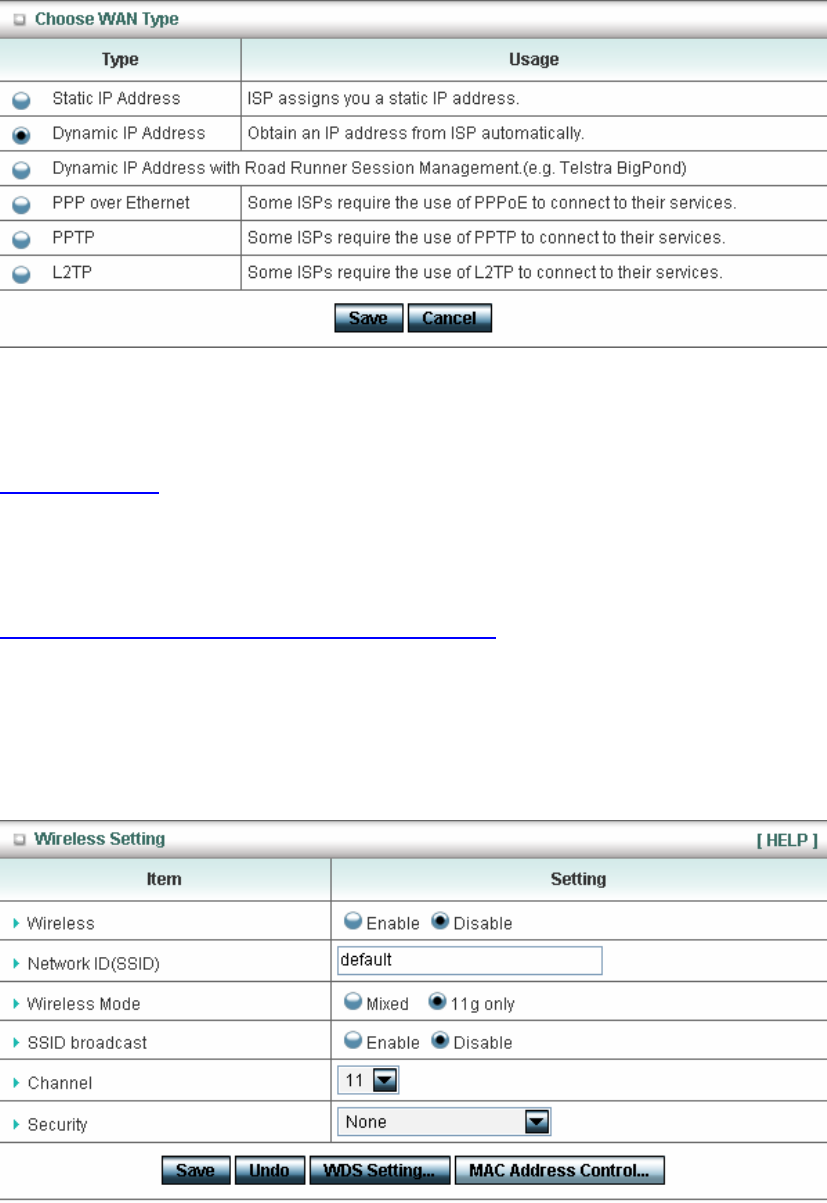
How do I connect router by using wireless?
1.How to start to use wireless?
A: First, make sure that you already installed wireless client device in your computer. Then check the
Configuration of wireless router. The default is as below:
95
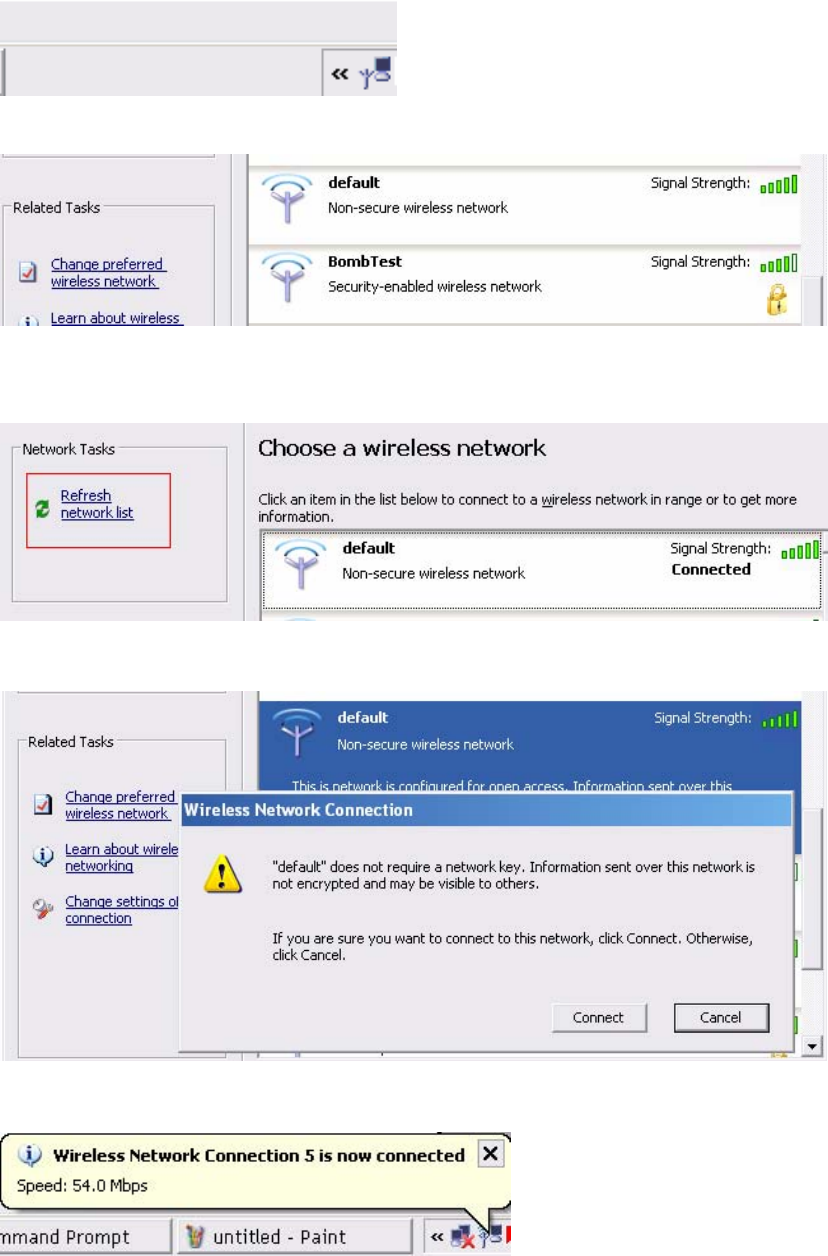
About wireless client, you will see wireless icon:
Then click and will see the ap list that wireless client can be accessed:
If the client can not access your wireless router, please refresh network list again. However, I still can
not fine the device which ssid is “default”, please refer to Q3.
Choose the one that you will want to connect and Connect:
If successfully, the computer will show
and get ip from router:
96
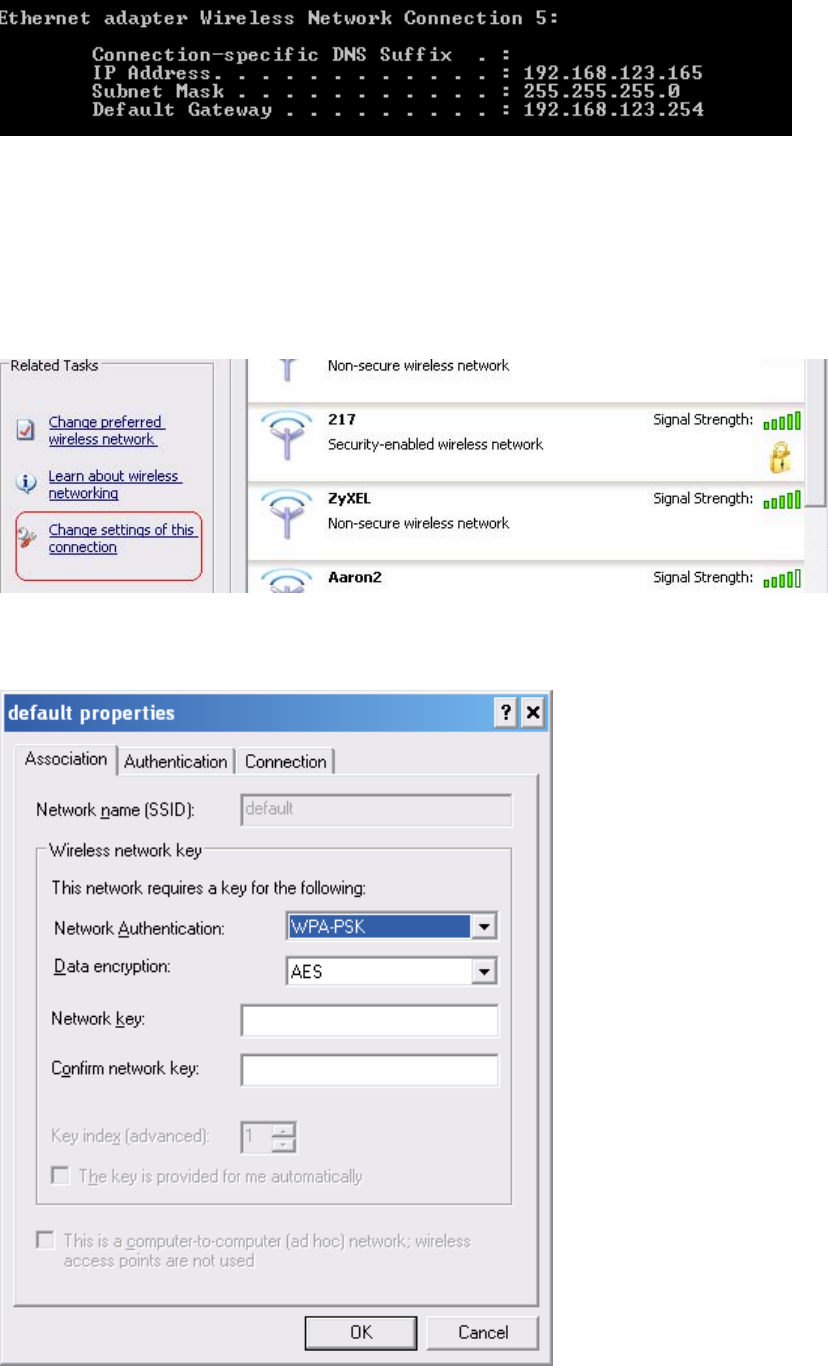
2.When I use AES encryption of WPA-PSK to connect even if I input the correct
pre-share key?
A: First, you must check if the driver of wireless client supports AES encryption. Please refer to the
below:
If SSID is default and click “Properties” to check if the driver of wireless client supports AES
encryption.
97
3.When I use wireless to connect the router, but I find the signal is very low even
if I am close to the router?
A: Please check if the wireless client is normal, first. If yes, please send the unit to the seller and verify
What the problem is.
Attention :
1.Changes or modifications not expressly approved by the party responsible for compliance could
void the user's authority to operate the equipment.
2.This device and its antenna must not be co-located or operating in conjunction with any other
antenna or transmitter. A minimum separation distance of 20 cm between the antenna and from all
persons must be maintained to satisfy the RF exposure requirements.
98