Advance Multimedia Internet Technology WL541M Router with Wireless Card User Manual Pages 101 to 133
Advance Multimedia Internet Technology Inc. Router with Wireless Card Users Manual Pages 101 to 133
Contents
- 1. Users Manual Pages 1 to 60
- 2. Users Manual Pages 60 to 100
- 3. Users Manual Pages 101 to 133
Users Manual Pages 101 to 133
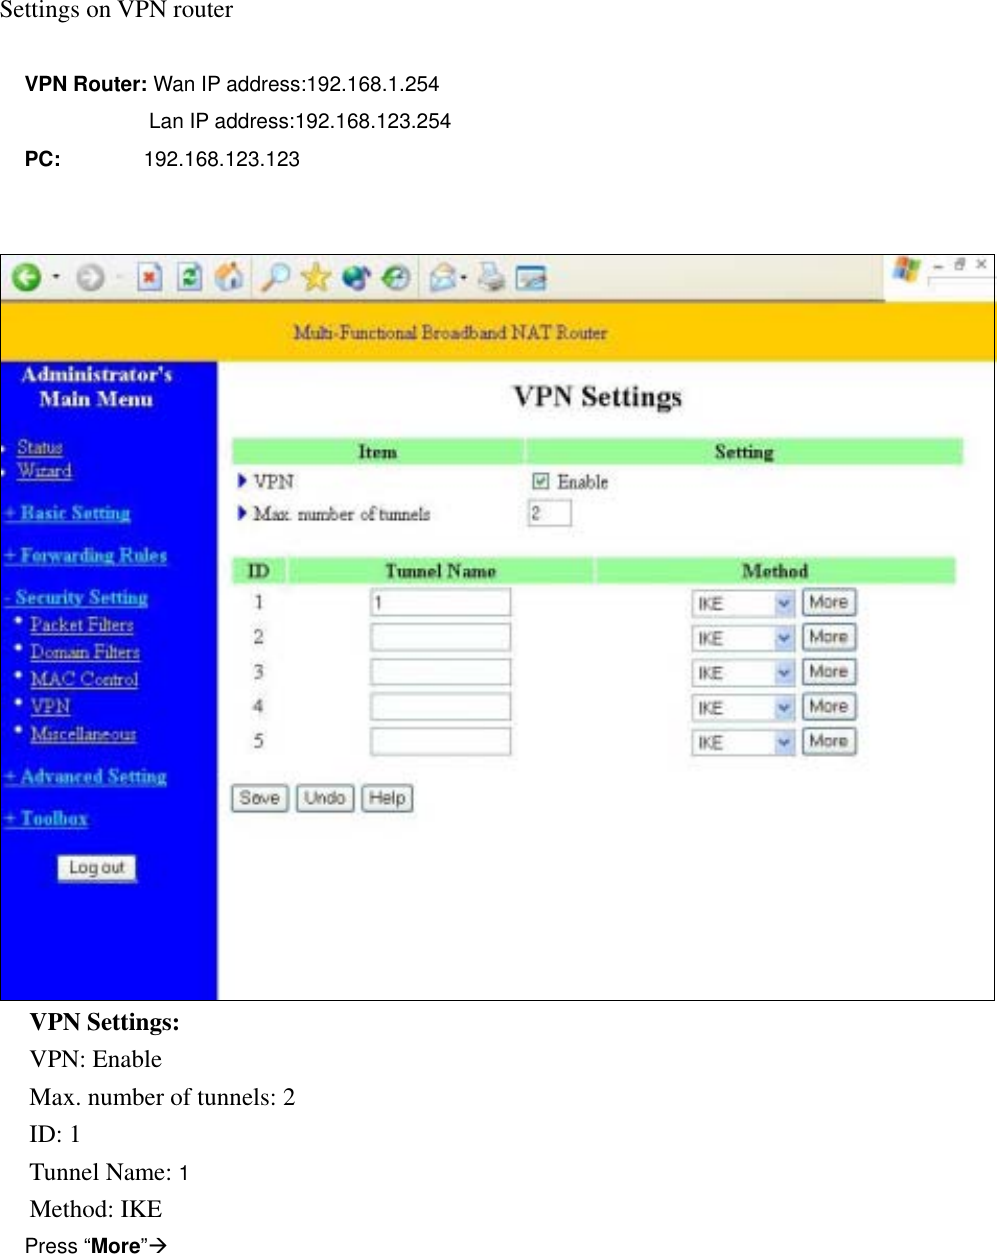
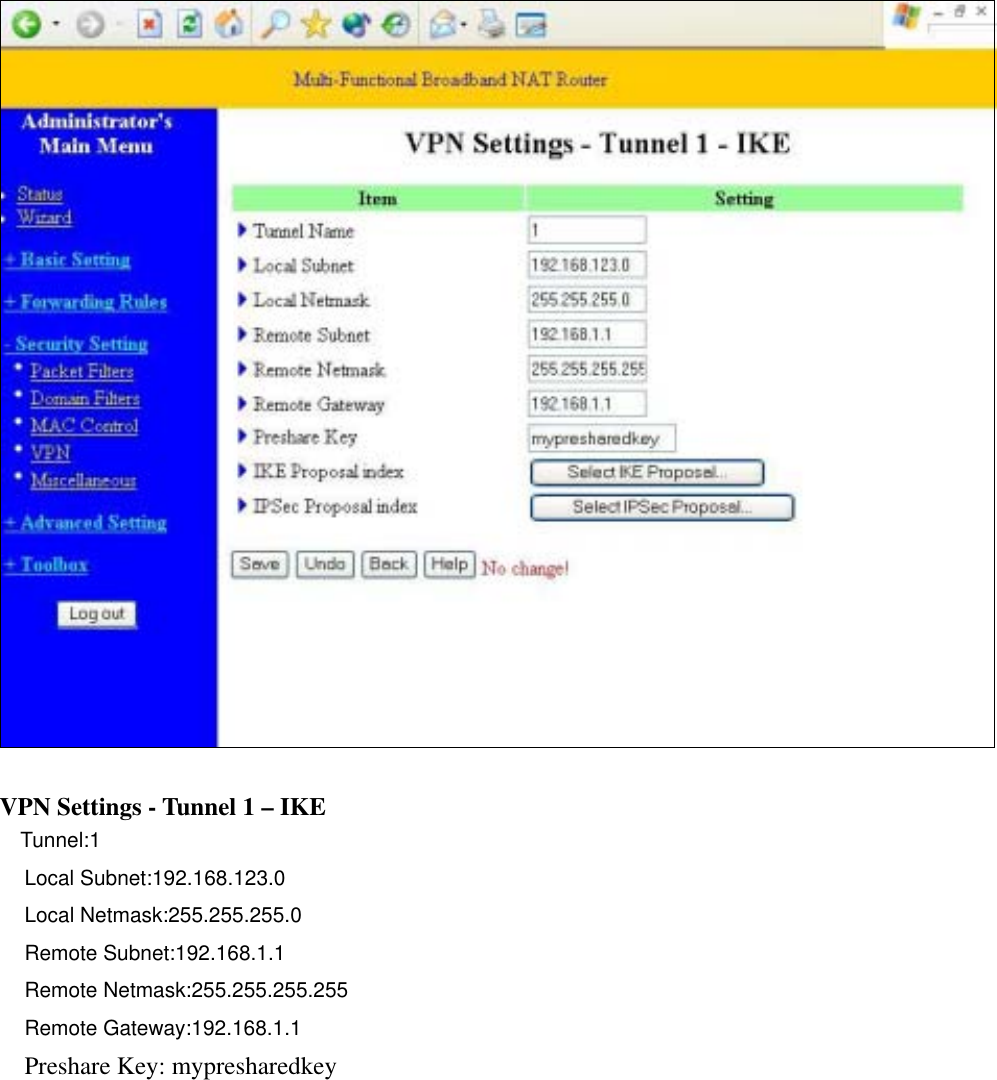
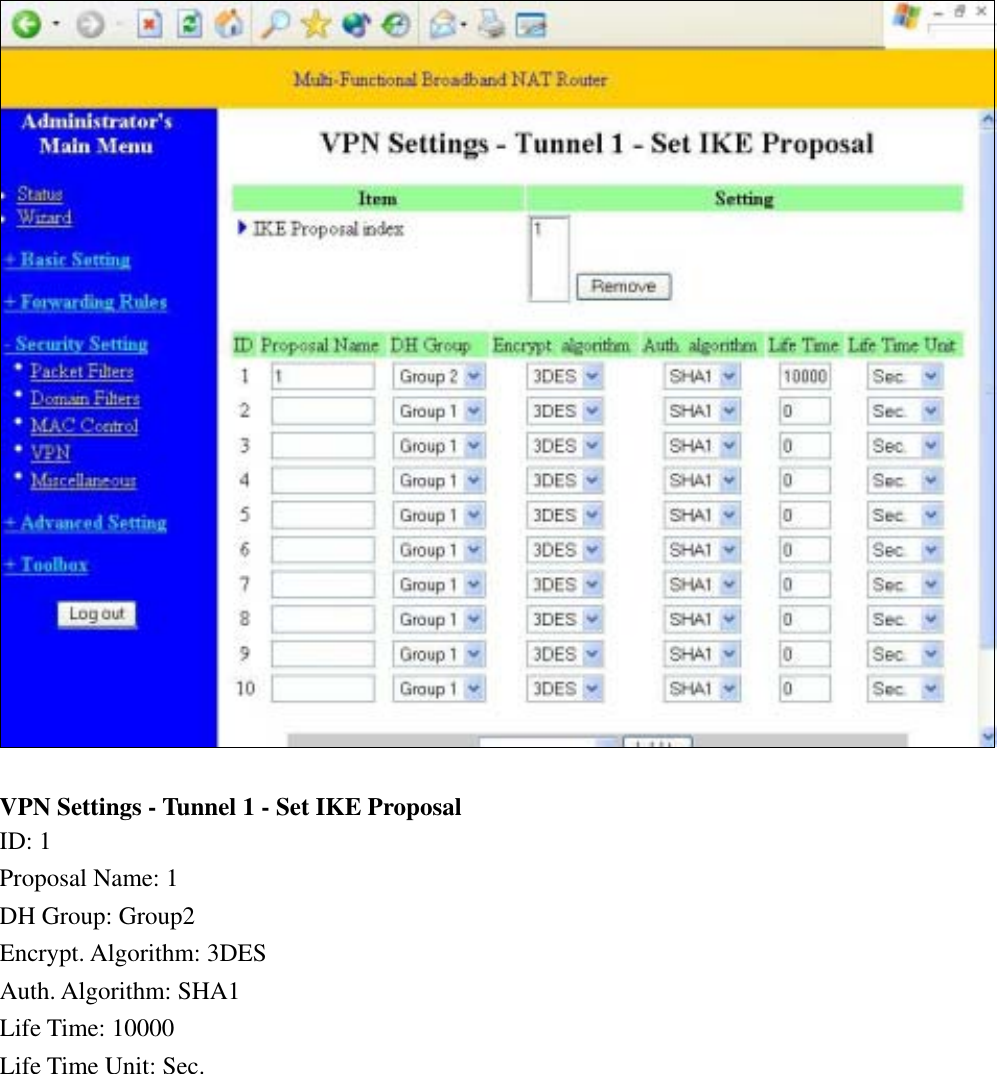
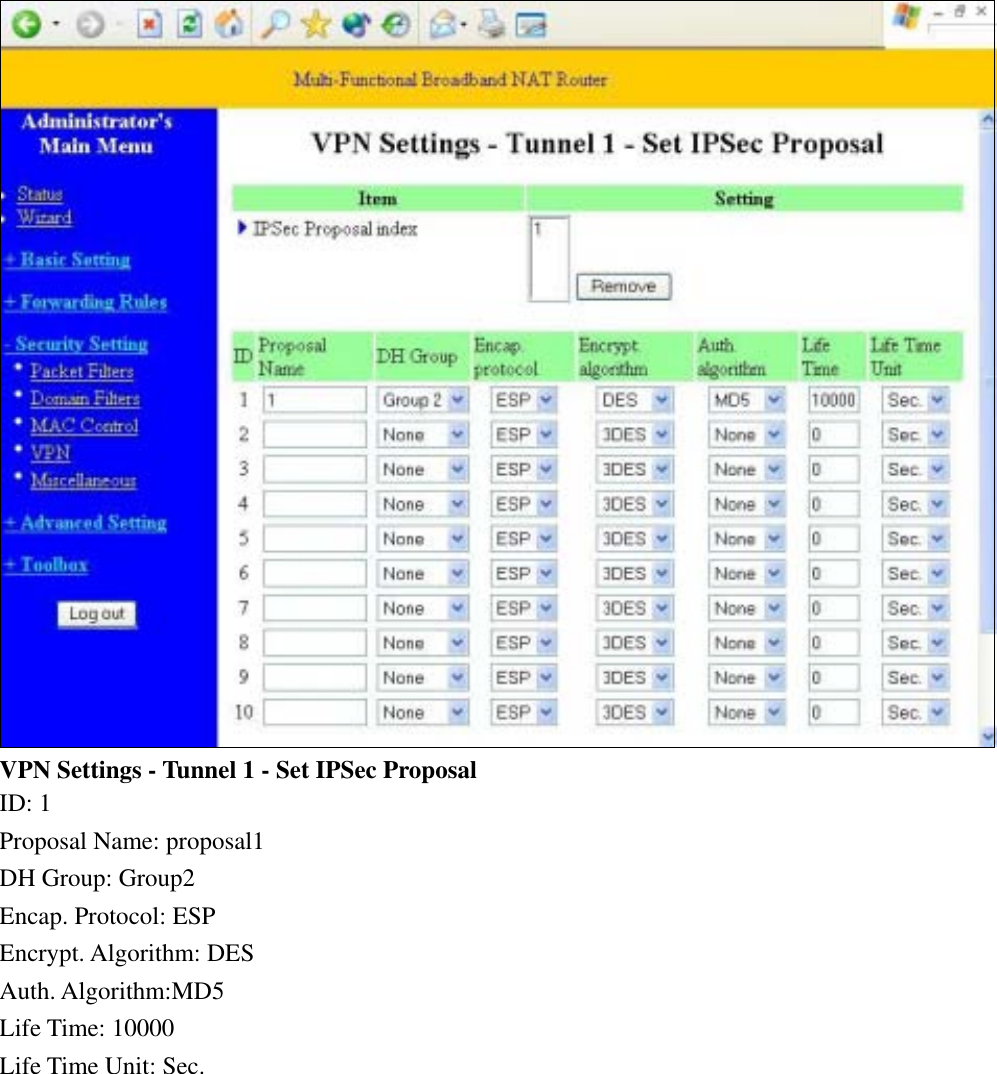
![Charlie 20030401 Appendix B Win 2000/XP IPSEC Setting guide Example: Win XP/2000 VPN Router (Configuration on WIN 2000 is similar to XP) 1. On Win 2000/XP, click [Start] button, select [Run], type secpol.msc in the field, then click [Run] Goto **Local Security Policy Settings** page 2. Or in Win XP, Click [Control Pannel] Double-click [Performance and Maintenance]](https://usermanual.wiki/Advance-Multimedia-Internet-Technology/WL541M.Users-Manual-Pages-101-to-133/User-Guide-386849-Page-1.png)
![Double-click [Administrative Tools]](https://usermanual.wiki/Advance-Multimedia-Internet-Technology/WL541M.Users-Manual-Pages-101-to-133/User-Guide-386849-Page-2.png)
![Local Security Policy Settings Double-click [Local Security Policy]](https://usermanual.wiki/Advance-Multimedia-Internet-Technology/WL541M.Users-Manual-Pages-101-to-133/User-Guide-386849-Page-3.png)
![Right-click [IP Security Policies on Local Computer], and click [Create IP Security Policy]. Click the [Next] button, enter your policy’s name (Here it is to_vpn_router). Then, click [Next]. Introduction Dis-select the [Activate the default response rule] check box, and click [Next] button. Click [Finish] button, make sure [Edit] check box is checked.](https://usermanual.wiki/Advance-Multimedia-Internet-Technology/WL541M.Users-Manual-Pages-101-to-133/User-Guide-386849-Page-4.png)
![Build 2 Filter Lists: “xp->router” and “router->xp” Filter List 1: xp-> router In the “new policy’s properties” screen, disselect [Use Add Wizard] check box, and then click [Add] button to create a new rule.](https://usermanual.wiki/Advance-Multimedia-Internet-Technology/WL541M.Users-Manual-Pages-101-to-133/User-Guide-386849-Page-5.png)
![click [Add] button](https://usermanual.wiki/Advance-Multimedia-Internet-Technology/WL541M.Users-Manual-Pages-101-to-133/User-Guide-386849-Page-6.png)
![Enter a name, for example: xp->router and dis-select [Use Add Wizard] check box. Click [Add] button. In the Source address field, select [A specific IP Address]. and fill in IP Address: 192.168.1.1 In the Destination address field, select [A specific IP Subnet], fill in IP Address: 192.168.123.0 and Subnet mask: 255.255.255.0. If you want to select a protocol for your filter, click [Protocol] page.](https://usermanual.wiki/Advance-Multimedia-Internet-Technology/WL541M.Users-Manual-Pages-101-to-133/User-Guide-386849-Page-7.png)
![Click [OK] button. Then click [OK] button on the “IP Filter List” page.](https://usermanual.wiki/Advance-Multimedia-Internet-Technology/WL541M.Users-Manual-Pages-101-to-133/User-Guide-386849-Page-8.png)
![select [Filter Action], select [Require Security], then click [Edit] button.](https://usermanual.wiki/Advance-Multimedia-Internet-Technology/WL541M.Users-Manual-Pages-101-to-133/User-Guide-386849-Page-9.png)
![select [Negotiate security], Select [Session key Perfect Forward Secrecy (PFS)] click [Edit] button.](https://usermanual.wiki/Advance-Multimedia-Internet-Technology/WL541M.Users-Manual-Pages-101-to-133/User-Guide-386849-Page-10.png)
![select [Custom] button](https://usermanual.wiki/Advance-Multimedia-Internet-Technology/WL541M.Users-Manual-Pages-101-to-133/User-Guide-386849-Page-11.png)
![Select [Data integrity and encryption (ESP)] Configure “Integrity algorithm”: [MD5] Configure “Encryption algorithm”: [DES] Configure “Generate a new key every [10000] seconds” Click [OK] button select [Authentication Methods] page, click [Add] button.](https://usermanual.wiki/Advance-Multimedia-Internet-Technology/WL541M.Users-Manual-Pages-101-to-133/User-Guide-386849-Page-12.png)
![select [Use this string to protect the key exchange (preshared key)], and enter your preshared key string, such as mypresharedkey. Click [OK] button. Click [OK] button on [Authentication Methods] page. Select [Tunnel Setting]](https://usermanual.wiki/Advance-Multimedia-Internet-Technology/WL541M.Users-Manual-Pages-101-to-133/User-Guide-386849-Page-13.png)
![configure [The tunnel endpoint is specified by this IP address]: 192.168.1.254 Select [Connection Type]](https://usermanual.wiki/Advance-Multimedia-Internet-Technology/WL541M.Users-Manual-Pages-101-to-133/User-Guide-386849-Page-14.png)
![select [All network connections] Tunnel 2: router->xp In the “new policy’s properties” page, dis-select [Use Add Wizard] check box, and then click [Add] button to create a new rule.](https://usermanual.wiki/Advance-Multimedia-Internet-Technology/WL541M.Users-Manual-Pages-101-to-133/User-Guide-386849-Page-15.png)
![click [Add] button](https://usermanual.wiki/Advance-Multimedia-Internet-Technology/WL541M.Users-Manual-Pages-101-to-133/User-Guide-386849-Page-16.png)
![Enter a name, such as router->xp and dis-select [Use Add Wizard] check box. Click [Add] button. In the Source address field, select [A specific IP Subnet]. fill in IP Address: 192.168.123.0 and Subnet mask: 255.255.255.0. In the Destination address field, select [A specific IP Address], and fill in IP Address: 192.168.1.1 If you want to select a protocol for your filter, click [Protocol] page.](https://usermanual.wiki/Advance-Multimedia-Internet-Technology/WL541M.Users-Manual-Pages-101-to-133/User-Guide-386849-Page-17.png)
![Click [OK] button. Then click [OK] button on [IP Filter List] window.](https://usermanual.wiki/Advance-Multimedia-Internet-Technology/WL541M.Users-Manual-Pages-101-to-133/User-Guide-386849-Page-18.png)
![select [Filter Action tab], select [Require Security], then click [Edit] button.](https://usermanual.wiki/Advance-Multimedia-Internet-Technology/WL541M.Users-Manual-Pages-101-to-133/User-Guide-386849-Page-19.png)
![select [Negotiate security], Select [Session key Perfect Forward Secrecy (PFS)] click [Edit] button.](https://usermanual.wiki/Advance-Multimedia-Internet-Technology/WL541M.Users-Manual-Pages-101-to-133/User-Guide-386849-Page-20.png)
![select [Custom] button](https://usermanual.wiki/Advance-Multimedia-Internet-Technology/WL541M.Users-Manual-Pages-101-to-133/User-Guide-386849-Page-21.png)
![Select [Data integrity and encryption (ESP)] Configure “Integrity algorithm”: [MD5] Configure “Encryption algorithm”: [DES] Configure “Generate a new key every [10000] seconds” Click [OK] button select [Authentication Methods] page, click [Add] button.](https://usermanual.wiki/Advance-Multimedia-Internet-Technology/WL541M.Users-Manual-Pages-101-to-133/User-Guide-386849-Page-22.png)
![select [Use this string to protect the key exchange (preshared key)], and enter the preshared key string, such as mypresharedkey. Click [OK] button. Click [OK] button on [Authentication Methods] page. Select [Tunnel Setting]](https://usermanual.wiki/Advance-Multimedia-Internet-Technology/WL541M.Users-Manual-Pages-101-to-133/User-Guide-386849-Page-23.png)
![Configure [The tunnel endpoint is specified by this IP address]: 192.168.1.1 Select [Connection Type]](https://usermanual.wiki/Advance-Multimedia-Internet-Technology/WL541M.Users-Manual-Pages-101-to-133/User-Guide-386849-Page-24.png)
![select [All network connections]](https://usermanual.wiki/Advance-Multimedia-Internet-Technology/WL541M.Users-Manual-Pages-101-to-133/User-Guide-386849-Page-25.png)
![Configure IKE properties Select [General] Click [Advanced…]](https://usermanual.wiki/Advance-Multimedia-Internet-Technology/WL541M.Users-Manual-Pages-101-to-133/User-Guide-386849-Page-26.png)
![enable “Master key perfect forward security (PFS)” configure “Authenticate and generate a new key after every [10000] seconds” click [Methods…] click [Add] button Configure “Integrity algorithm”: [SHA1] Configure “Encryption algorithm”: [3DES] Configure “Diffie-Helman group”: [Medium (2)]](https://usermanual.wiki/Advance-Multimedia-Internet-Technology/WL541M.Users-Manual-Pages-101-to-133/User-Guide-386849-Page-27.png)