Advance Security R30 Auto Alarm System Receiver User Manual
Advance Security Inc Auto Alarm System Receiver Users Manual
Users Manual

00/04/21
MODEL 6974
REMOTE CONTROL AUTO ALARM SYSTEM
INSTALLATION & OPERATION INSTRUCTIONS
Override Plug
L.E.D. Plug
4 pin shock sensor
11 Pin Plug
Antenna Plug
1. Blue/yellow (N/O)--unlock.
2. Blue/red (N/C)--unlock.
3. Blue/white (Com)--unlock.
4. Green/white (Com)--lock.
5. Green/yellow (N/O)--lock.
6. Green/red (N/C)--lock.
Negative door lock.
Green/white
Blue/white
Green/yellow
Blue/yellow
Positive door lock.
Green/white
Blue/white
Green/yellow
Blue/yellow
Door lock Door unlock
Master
locking
switch
locking
Master
switch
+12V
Door lock Door unlock
+12V
10 Pin main harness
2 wires start cut
3 A Fuse
Red Wire: +12V To Fuse Box
Brown Wire: To Siren
Black Wire: To Ground
Gray Wire:Channel 2 (Trunk release) power
Red / White Wire: Parking light power
Parking light
Yellow Wire: To I
g
nition Switch
+12
White wire :Parkin
g
Li
g
ht Out
p
u
t
Light green wire :Dome Light Output
Light green wire :Dome Light power
10A Fuse
Entry illumination
Connect to +12V for + switch
or to ground for - switch
Existing door pin switch
Dome Light
Trunk release
Connect to +12V for + switch
or to ground for - switch
Gra
y
Wire:Channel 2
(
Trunk release
)
out
p
ut Connect to active
trunk release button
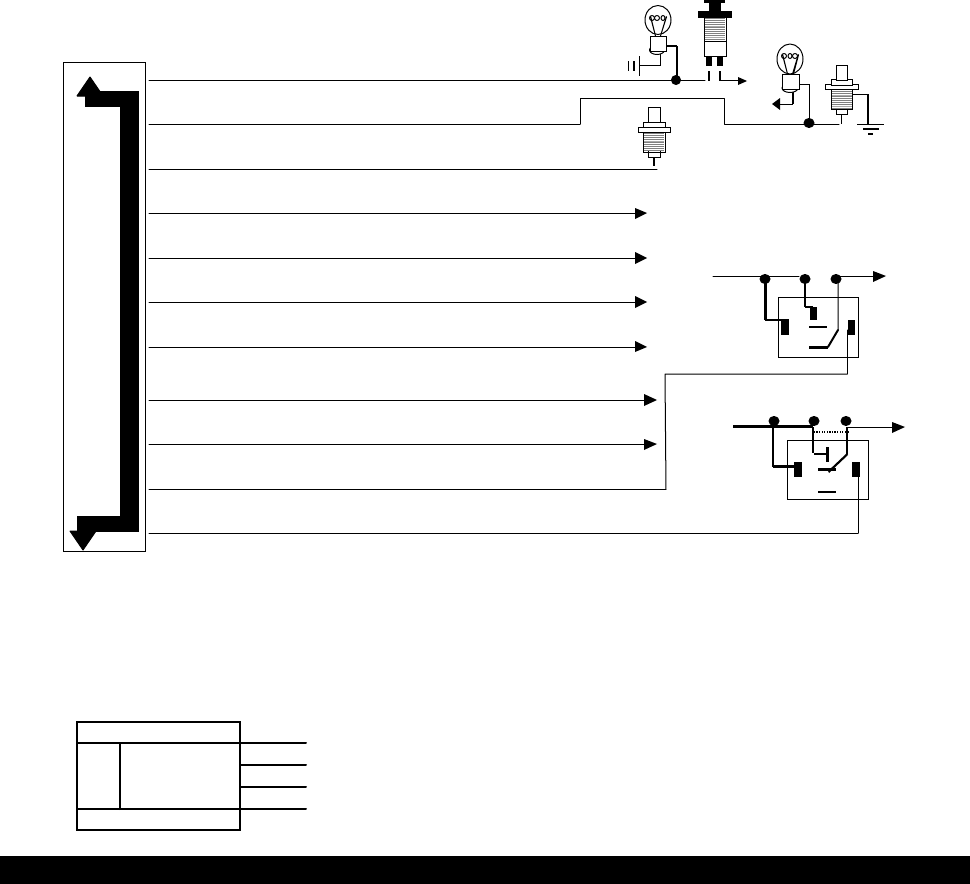
2
Green Wire Negative Door Pin Switch:
Blue Wire: Instant Trigger Ground Input
Violet Wire: Positive Door Pin Switch
Oran
g
e Wire: 500mA Grounded when armed
+12V
N.O. circuit block
85 8630
87a
87
Cut
Black Wire: 500mA Grounded when disarmed
Red Wire:
(
-
)
200mA channel 4 out
p
ut
Gray Wire: (-) 200mA two step door unlock output
White Wire:
(
-
)
200mA horn out
p
ut
Pink Wire: (-) 200mA headlight output
Yellow Wire: (-) 200mA channel 3 output
Brown Wire:
(
-
)
200mA
p
a
g
er out
p
ut
+12V
85 8630
87a
87
Cut
N.C. circuit block
B. 2 PIN STARTER DISABLE PLUG:
This output can control starter disable, when an intrusion is detected and the system is triggered, the
vehicle is prevented from any unauthorized starting. Starter wires with 30 A relay built-in
C 4-PIN WHITE PLUG FOR ACCESSORY DETECTION DEVICES
4. + 12V
3. Negative
2. Ground Trig
g
1. Warn Away I
n
PROGRAMMING & ADJUSTMENT
A. PROGRAMMING TRANSMITTER:
Maximum is 4 transmitters. Two modes of programming, one is designated channel, (Button 1 is arm/disarm)
the other is auto channel setting. (Button 1 is arm, button 2 is disarm.)
1. Ent er:
Turn ignition to 'on' position. Within 15 seconds.
Push valet switch 3 times to enter designated channel; if push 6 times it will be auto channel.
1 long chirp to enter each channel's programming.
2. In designated channel:
In program 1st transmitter the LED will with one flash…pause sequence.
Press button 1 to program channel 1, 1 short chirp and LED on to confirm programmed and ready program
channel 2.
Press button 2 to program channel 2, 2 short chirps and LED on to confirm programmed and ready
program channel 3.
Press button 3 to program channel 3, 3 short chirps and LED on to confirm programmed and ready
program channel 4.
Press button 4 to program channel 4, 4 short chirps and LED on to confirm programmed
Program 2nd transmitter, push valet switch one time, the LED will with two flashes…pause sequence.
Press button 1 to program channel 1, 1 short chirp and LED on to confirm programmed and ready program
channel 2.
Press button 2 to program channel 2, 2 short chirps and LED on to confirm programmed and ready
program channel 3.
3
Press button 3 to program channel 3, 3 short chirps and LED on to confirm programmed and ready
program channel 4.
Press button 4 to program channel 4, 4 short chirps and LED on to confirm programmed
Program 3rd transmitter, push valet switch one time again, the LED will with three flashes…pause
sequence.
Use above steps to program each channel.
Program 4th transmitter, push valet switch one time again, the LED will with four flashes…pause sequence.
Use above steps to program each channel.
3. In auto channel:
In program 1st transmitter the LED will with one flash…pause sequence.
Press any button on 1st TX, 1 short chirp confirm programmed and ready program 2nd TX.
The LED will with two flashes…pause sequence.
Press any button on 2nd TX. 1 short chirp confirm programmed and ready program 3rd TX.
The LED will with three flashes…pause sequence.
Apply the same procedure to program 3rd and 4th, after the 4th transmitter programmed the system will auto
exit.
4. Exit:
Turn ignition to 'off' position, or leave it for 15 seconds. A 3 long chirps to confirm exit.
Note: If more than 4 transmitters programmed, the system only kept the last 4 transmitters.
!!! The designated channel & auto channel transmitters can exist independently.
• This system has an unique optional passive/active transmitter design, it’s
programming is the same as above. (To see how it works, please see operation
part.)
B. PROGRAMMING OPTIONAL SENSOR (PIR OR DOOR/WINDOW SENSOR)
This system has a very unique interfacing with optional sensor, to extend more protection, such as PIR (IR-70)
sensor or Door/Window sensor. (DS-70)
For example, in your garage you can put a PIR for protection. (A device to detect person's movement in a
protected area.) If system armed, a person walk through the detect area, the siren inside the car will alarming
to raise the attention to the owner.
So the same thing applies in door/window sensor, (A device to detect door/window open.) you may put the
sensor to the garage door or window. If system armed, a person opens the door or window, the siren will
alarm.
Maximum program 4 different sensor codes.
The programming procedure is the same as above A. PROGRAMMING TRANSMITTER of auto channel, The
difference is only upon enter you push the valet switch 9 times. (1 long chirp to confirm enters).
During programming, you will need to activate the sensor to let the system program it's code.
C. PROGRAMMING FEATURES:
There are 2 stages of totally 15 programming features to select. (Factory preset all features to "ON" position)
1. Enter:
Turn the ignition 'on' then 'off'. Within 15 seconds push the valet switch 6 times. (A long chirp.) It is on first
stage programming features.
2. First stage programming features:
Push the valet switch times that equal the feature number you want. Example: Push valet switch 2 times,
it's on chirp on/off selection. The siren will chirp 2 times, LED flash 2 times to confirm enter this feature.
Select chirp on, turn ignition from 'off' to ‘on’. 1 chirp for confirmation.
Select chirp off, turn ignition from 'on' to ‘off’. 2 chirps for confirmation.
If you want to program transmitter car-jacking when the system is on chirp on/off, push valet switch 4 times
again. (Siren chirp 6 times, LED flash 6 times) The system will add on the previous valet switch pushing.
Note: Totally push valet switch 8 times, the siren chirp 8 times, and LED with 8 flashes… pause sequence.
If push the valet switch again, system will return to feature 1. (Siren chirp 1 time, and LED with 1
flash…pause sequence. It's cycling.)
3. Second stage programming features:
Enter: Again push & hold the valet switch for over 2 seconds, with 1 long chirp confirmation.
By using first stage programming features method to program second stage's features.
4. Exit:

4
During programming, if you don’t respond to previous step in 15 seconds, or any time press transmitter’s
button 1, it will exit features programming, which indicates by 3 long chirps.
FIRST STAGE:
Push valet
switch times: Chirp, parking
light flash times Turn ignition from
'OFF' to 'ON' Turn ignition from
'ON' to 'OFF'
Show 1 short chirp 2 short chirps
Select Feature " ON " Feature " OFF "
1 1 Current sensor ON Current sensor OFF
2 2 Chirp ON Chirp OFF
3 3 Active arming Passive arming
4 4 Rearm ON Rearm OFF
5 5 When door close dome light on
(Vehicle equip interior light delay)
No defective chirp reminder.
When door close dome light off
(Vehicle no interior light delay)
With defective chirp reminder.
6 6 Transmitter car-jacking OFF Transmitter car-Jacking ON
7 7 Ignition car-jacking OFF Ignition car-jacking ON
8 8 Door car-jacking OFF Door car-jacking ON
SECOND STAGE:
Push valet
switch times: Chirp parking
light flash times Turn ignition from
'OFF' to 'ON' Turn ignition from
'ON' to 'OFF'
Show One short chirp Two short chirps
Select Feature " ON " Feature " OFF "
1 1 Lock/unlock 0.8 sec. Lock/unlock 3.5 sec.
2 2 2-pulse unlock OFF. 2-pulse unlock ON.
3 3 Passive door lock ON Passive door lock OFF.
4 4 Ignition on door lock ON Ignition on door lock OFF
5 5 Ignition off door unlock ON Ignition off door unlock OFF
6 6 Disarm parking light OFF. Disarm parking light on 30"
7 7 Password OFF. Password ON.
NOTE:
For system programming features all returns to presetting "ON", turn the ignition 'on' then 'off'. Within 15
seconds push the valet switch 3 times. (A long chirp.) Then press button 1 and 2 together for 5 seconds, there
will be a confirmation long chirp.
D. Testing sensors:
In this test mode, this system can test shock sensor sensitivity and other sensor. The installer can save time
to test the shock sensor sensitivity and sensor without using the traditional arming/disarming procedures to
test the sensors.
ENTER:
1. System under disarm or valet condition.
2. Turn ignition switch on then off.
3. Within 15 seconds, push valet switch 3 times.
4. There will be a long chirp confirmation to enter the test mode.
Trigger sensor Siren chirps
Negative pin switch 2
Voltage sensor 3
Optional wireless PIR or door switch 5

5
TEST shock sensor:
1. Use channel 2 to enter. (press button 2)
2. There will be a long chirp confirmation for you to test shock sensor.
3. Activate the warn away (first stage shock sensor), system will emit a short chirp.
4. Activate the full alarm (second stage shock sensor), system will emit a long chirp.
5. Continue to test the shock sensor until reach the proper sensitivity.
TEST current sensor:
1. Use channel 3 to enter. ( press button 3)
2. There will be a long chirp confirmation.
3. Activate the current sensor, system will emit a short chirp.
Note: In this test mode you may test both shock sensor and current sensor.
EXIT the test mode:
1. Turn ignition switch to on position or
2. Use channel 1 to exit. (Press button 1)
3. There will be three long chirps confirm exit.
E. Password setup: (MANUAL OVERRIDE RE-ARM FEATURE ON / OFF)
What is override re-arm:
An override re-arm feature designs as the system automatically re-arm in override condition, if the legal user
do not take correct procedures to cancel the override re-arm.
Programming your personal override re-arm number:
In order to cancel override re-arm, you must program your personal number into the system. The number is
from 1 through 10, (by counting the LED flashing times) or you may use factory pre-set number 9 to cancel
override re-arm.
1. Program feature of password to ‘ON’.
2. Enter system valet: Turn ignition key on then within 10 seconds push and hold override/valet switch for 2
seconds, the LED will turns on.
3. Turn ignition key 'off-on' three times in 4 seconds. A confirmation long chirp from siren.
4. LED will flash from 1 through 10 for 3 cycles. Wait until LED flash to your selected number.
5. As soon as LED turns on your selected number, quickly turn ignition key off.
6. A long chirp from siren, the number is programmed.
7. LED will flash the programmed number for 2 cycles.
Example: To program override re-arm number 5, you would;
1. Enter valet.
1. Turn ignition key 'off-on' three times in 3 seconds. A long chip from siren.
2. Wait until LED flash 5 times, then quickly turn ignition key off. A long chirp from siren.
3. LED will flash 5 times to indicate your override re-arm number is 5.
OPERATION
A. TRANSMITTER OPERATION :
For designated channel setting:
Transmitter Button System Function Remark
Button 1 Arm/disarm & door lock/unlock
Button 1 Panic function Press 3 sec
Button 1 - 1 Arm and delete optional sensor In disarm, press twice.
Button 1 - 1 Two step door unlock In arm, press twice.
Button 2 Channel 2 (trunk) control Press 2 sec.
Button 2 - 2 Passive arming by-pass Under passive arming press twice.
Button 2 - 2 Car locator Press twice.
Button 3 Channel 3 control
Button 4 Panic Press 1 second.

6
Button 1 + 2 both Silent arm/disarm Ignition in "off" position.
Button 1 + 2 both 1 sec Activate car-jacking Ignition in 'on' position and
Programmed transmitter car-
jacking "ON"
Button 2 + 3 both Channel 4 control
Side button Switching code system
For auto channel setting:
Transmitter Button System Function Remark
Button 1 Arm & door lock
Button 1 Panic function Press 3 sec.
Button 1 - 1 Arm and delete optional sensor Press twice.
Button 2 Disarm & door unlock
Button 2 -2 Two steps door unlock Press twice.
Button 3 Channel 2 (trunk) control Press 2 sec.
Button 3 - 3 Passive arming by-pass Under passive arming press twice.
Button 3 - 3 Car locator Press twice
Button 1 + 3 both Channel 3 control
Button 4 Panic Press 1 seconds.
Button 1 + 2 both Silent arm/disarm Ignition in "off" position.
Button 1 + 2 both 1 sec. Activate car-jacking Ignition in 'on' position and
Programmed transmitter car-
jacking "ON"
Button 2 + 3 both Channel 4 control
Side button Switching code system
B. UNIQUE OPTIONAL PASSIVE/ACTIVE TRANSMITTER :
This system has a passive/active transmitter (PT) design that allows you to arm/lock and disarm/unlock the
system passively or actively. The active usage is the same as above operation. Below is the passive
operation:
1. Slide the passive switch to ‘ON’ position on the front case.
2. When you move toward your vehicle around 10 meters, system will automatically disarm and unlock the
doors.
3. When you leave your vehicle over 10 meters, and after 10 seconds system will automatically arm and
lock the doors.
4. In case the system armed and lock all doors, while you leave your ignition key and this transmitter inside
the vehicle. Rock the vehicle the transmitter will disarm and unlock the doors.
Note:
1. Time delay:
Upon you are active pressing the button on the transmitter, the system will set a 60 seconds time delay
for the passive feature. For example you press any button on the transmitter, the passive feature will not
works in 60 seconds.
2. Turning the Passive System Off
You can disable the passive feature by moving the transmitter's slider switch to OFF. It will turn into
normal active transmitter.
C. LED DISPLAY :
LED Function LED Function
Off Disarmed 2 flashes... pause Trigger on trunk/hood
Slow flash Armed 3 flashes... pause Trigger on door switch
Fast flash Passive arming 4 flashes... pause Trigger on sensor
On (solid) Valet mode 5 flashes... pause Trigger on PIR Door / window sensor

7
D. CHIRP INDICATORS :
Chirp Function
1 chirp Arm
2 chirps Disarm
3 chirps Defective reminder
4 chirps Disarm / Triggered
6 chirps Car locator
E. PARKING LIGHT :
Parking light Function
1 flash Arm
2 flashes Disarm
3 flashes Disarm / Triggered
5 flashes Transmitter low battery.
(suitable for random code only)
12 flashes Car locator
F. OVERRIDE/VALET SWITCH :
1. OVERRIDE FUNCTION: (System in arm condition)
Use in emergency, like lost or malfunctions of transmitter. Turn ignition on, within 10 seconds push the
override/valet switch, the siren will stop and the system disarmed.
2. VALET MODE: (System in disarm condition)
Vehicle in for maintenance or valet parking, the system will not arm.
a. Turn ignition on then within 10 seconds push and hold override/valet switch for 2 seconds, the LED will
turns on indicates the system is in 'valet mode'.
b. System stay in 'valet mode', transmitter still can remote operating lock or unlock the doors, parking
light, pop trunk release and panic function. But no alarm function.
c. Return to normal operation, turn ignition 'on', then within 10 seconds, push and hold override/valet
switch for 2 seconds, it will exit the valet.
G. PASSIVE ARMING :
It operate as below:
1. Turn 'off' the ignition.
2. Leave vehicle and close all doors.
3. LED fast flashing.
4 After 30 sec. System auto arming
Note: during the 30 sec. If open the door the time will stop counting down, until all doors closed then again
re-start count down for 30 sec.
Passive arming by-pass: Press button 2 twice (designated channel setting), to temporally by-pass
passive arming. That's for prevent locking yourself out of the vehicle (For example fill up the gas).
A short chirp will confirm this by-pass.
Re-open the door will not start the passive arming again.
Note: It’s only temporally by-pass. When turn ignition ‘on - off ‘ or use transmitter to arm or disarm, this by-
pass will cancel.
H. ACTIVE ARMING :
1. Press arm button on transmitter.
2. The siren will chirp once after 3 seconds the system will be fully arm.
NOTE: Defective sensor reminder: 3 chirp indicate defective sensor occurred.
Special Note: If the system is interfacing with optional sensor, such as PIR or door/window sensor, upon
system armed, if the PIR or door sensor triggered, the system will full alarming.
8
I. ACTIVE DISARMING :
1. Press disarm button on the transmitter.
2. The siren will chirp twice to indicate that system disarmed.
NOTE: 1. Tamper disarming: If alarm triggered, upon disarm the system, siren chirp 4 times,parking light
flash 3 times.
NOTE: 2. Automatic re-arm: No doors open and no ignition on after disarm; after 60 seconds system auto
rearm.
J. PANIC FUNCTION :
The transmitter can be used as a remote panic switch to manually trigger the alarm in case emergency. To
do so, hold button 4 for 1 second, and the system will full alarming. To stop panic, press button 4 again or
press disarm button.
K. TRIGGER THE SYSTEM :
While system in armed condition, open the doors, hood, trunk or trigger the optional sensors, siren and
parking light will turn on to alerting of an intrusion for 30 or 60 seconds. Then it will stop and automatic
reset and re-arm. If the one of sensors or detectors still active, the alarm system will sound a maximum of
3 times of 30 or 60 seconds cycles.
L. DOME LIGHT CONVENIENCE DELAY & SUPERVISION :
Upon disarming, the dome lights will remain on for 30 seconds.
If the vehicle triggered, the dome light will flashing as the same duration as siren.
Note: Turn on the ignition switch or arm the alarm will turn off the dome light.
M. ANTI CAR-JACKING :
Warning: If you don't want to have car jacking in this alarm system, be sure to set car-jacking off.
This system is default setting all car-jacking OFF.
In this system totally there are 3 features of entering car-jacking.
First: Use transmitter to enter car-jacking. (Program transmitter car-jacking ON, see programming
features)
This feature provides user to remote activates car-jacking. When programmed this feature ON,
upon the ignition switch is 'on', user can press button 1 + 2 together for 1 second to enter car-
jacking.
Second: Use ignition switch turn to 'on' position to enter car-jacking. (Program ignition car-jacking ON, see
programming features). This feature provides user to use ignition switch to activate car-jacking.
When programmed this feature ON, upon turn the ignition switch to 'on' position, the system enter
car-jacking.
Third: Use Door open close to enter car-jacking. (Program door car-jacking ON, see programming
features)
This feature provides user to use door open close to activates car-jacking. When programmed this
feature ON, upon the ignition switch is 'on', if someone open door and close door the system enter
car-jacking.
2-timer circuits will function as follows:
First timer:
50 seconds after activates car-jacking. The siren will start chirping. Within 10 seconds, you will be alert
to turn the ignition switch from off to on, and push valet switch to turn off the car jacking feature. If not, it
will enter second timer car jacking.
Second timer:
Totally after 60 seconds from beginning, siren still alarming and parking light flashing, and the starter
disable will activate to prevent the vehicle from starting. Override the system to turn off car jacking.
(Ignition from off to on, and within 10 seconds push valet switch)
9
Note: If you use password (see below Password Security) to double protect the vehicle security, you will
need to use it to completely disarm the system.
N. PASSWORD SECURITY :
In carry this feature you need to set features programming of password 'ON' first. Then program your
password number. Please see above PROGRAMMING section.
Using password to protect system. Below is an example of how to use password to completely
disarm system.
System in arm condition.
1. Open the door, siren will sound.
2. Turn ignition key on.
3. Push valet switch.
Note: When finished above procedures, system's siren stop alarming, parking light stop flashing, other
sensor stop trigger, but the vehicle can not be start and drive away.
Use password to cancel the system re-arm: ( Re-arm timer 30 seconds)
When system disarmed, the LED start flashing, indicate system entered password procedures.
Cancel system re-arm itself:
Wait until LED flash to your password number, then turn the ignition key 'on-off', to cancel re-arm.
You must make sure to turn the ignition key off at the correct number within 30 seconds. If not, the system
will automatically re-arm.
Example: To cancel re-arm using password number 5 of above, you would;
1. Open the door. Siren sound.
2. Turn ignition key on.
3. Push valet switch.
4. Wait LED flash 5 times, then quickly turn ignition key off.
Note 1: The number is form 1 through 10, by counting LED flash. Legal user can program the number.
Note 2: If some one turn the ignition key off at wrong override number, the system allows him to make 2
mistakes, if third time still wrong, it will automatically shut down for 3 minutes. During the period the system
will not accept any correct number, and when time is up it will re-armed again; which with siren one chirp
and parking light one flash, LED flashing, door locked and activate sensors to guard the vehicle.
O. IGNITION CONTROL POWER DOOR LOCK SAFETY SYSTEM :
The vehicle's doors will automatically lock after the ignition key turn 'on' (if all doors are closed.) And when
the ignition key turn 'Off', the doors will automatically unlock.
P. TRUNK RELEASE :
Press and hold button 2 on transmitter for two seconds to remote control the trunk release or other electric
devices.
Q. CHANNEL 3 CONTROL :
Press button 3 (designated channel setting), or button 1+3 together (auto channel setting) to remote control
the optional electrical device. The device will 'on' when the button(s) press continuously, and 'off' when the
button(s) released.
R. CAR LOCATOR :
Press button 2 twice (designated channel setting), or button 3 twice (auto channel setting) to active car
locator function. The siren will chirp 6 times. The parking light will flash 12 times, for you to easily locate
your car.
S. TRANSMITTER LOW BATTERY : (Random code transmitter only)
When the transmitter is in low battery condition, the system will show up by parking light flash 5 times, to
remind the user to change the low battery.
T. TWO STEPS DOOR UNLOCK :

10
Upon first disarming, the system only unlock the driver's side door. Then press the disarm button again, the
system will unlock all the doors.
U. ALARM OPERATING CONDITION:
Siren, horn Parking Light LED Doors Starter
disable
1. Arming 1 Chirp 1 Flash Slow flash Locking On
2. Disarming 2 or 4 Chirps 2 or 3 Flashes Fast flash (in passive arming) or
OFF. Unlocking Off
3. Trigger Alarming Flashes Slow flash On
4. Panic Alarming Flashes Slow flash Locking
5. Car-Jacking Alarming Flashes Slow flash On
6. Car locator 6 chirps 12 flashes
This device complies with part 15 of the FCC rules. Operation is subject to the following two conditions.
(1) This device may not cause harmful interference, and
(2) This device must accept any interference received, including interference that may cause undesired
operation.