Advance Security TR26 Remote Control User Manual MODEL 6876
Advance Security Inc Remote Control MODEL 6876
UserManual.wiki
>
Advance Security
>
TR26 User Manual
Users Manual
Navigation menu
Upload a User Manual
Namespaces
Wiki Guide
HTML
PDF
Info
Views
User Manual
Discussion / Help
Navigation
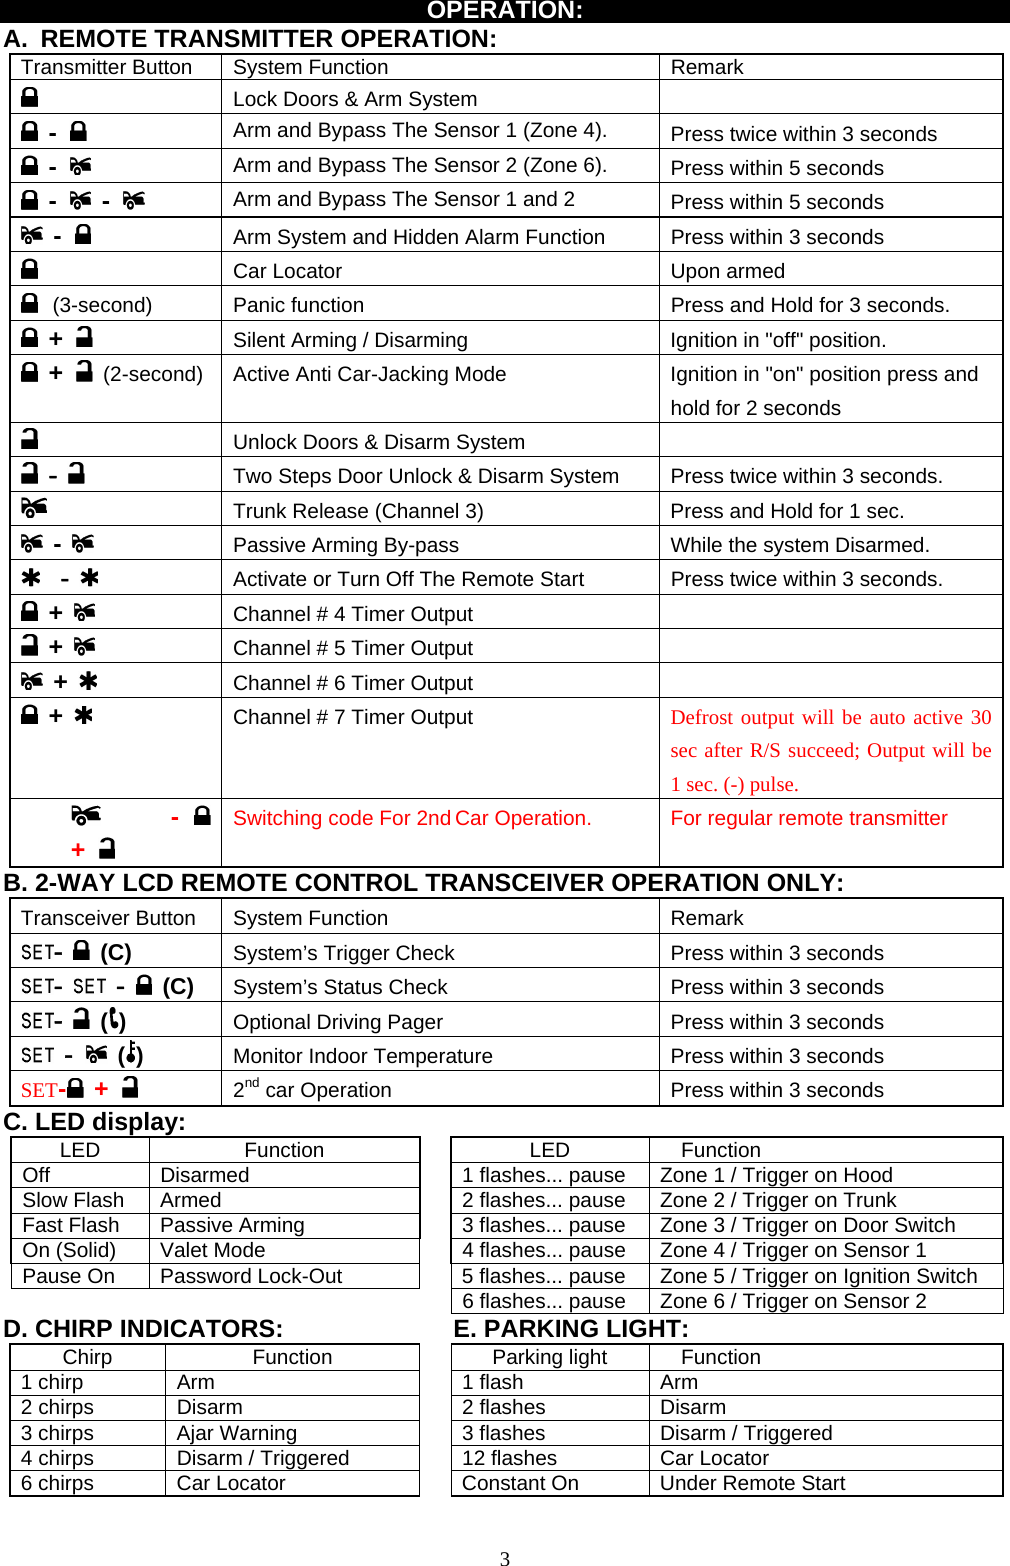
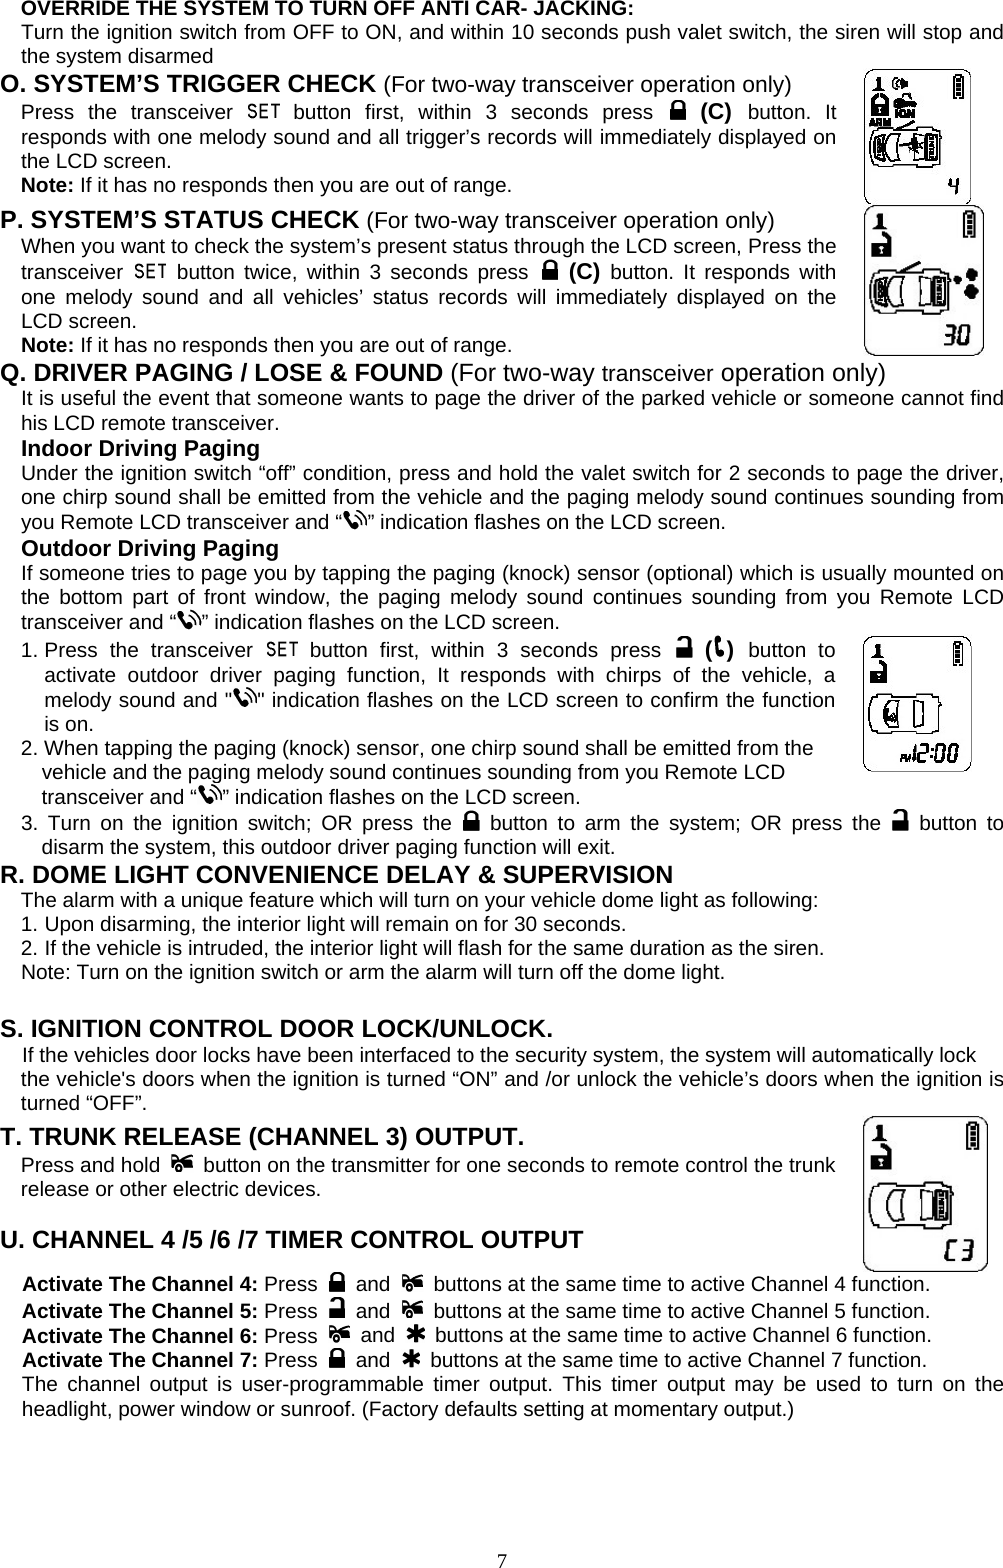
![F. ACTIVE ARMING – LOCK & ARM: 1. Press button on the transmitter. 2. The siren will chirp once and parking light will flash once indicating that the system is now armed. The vehicle door will lock upon arming when interfaced with the security system. System Arm Hood Ajar Trunk Ajar Door Ajar . Clear The Flash Icon: Press the button 3times within 3 secondswill clear the flash icon on the LCD screen transmitter AJAR WARNING: If the siren sounds 3 chirps, then you have left a door, trunk, or hood lid ajar. SILENT ARMING / DISARMING: Press the transmitter and buttons at the same time will arm or disarm your security system, No chirp sound will be heard, arm / disarm confirmation will be through the vehicles parking lights only. SENSOR BY-PASS: Bypass The Sensor 1 (Zone 4): Press the button on the transmitter two times within 3 seconds will arm the security system and by-pass the sensor 1 (zone 4 shock sensor). Bypass The Sensor 2 (Zone 6): Press the button first, with 3 seconds press the button will arm the security system and by-pass the zone 6 optional sensor 2. Bypass The Sensor 1 (Zone 4) and Sensor 2 (Zone 6): Press the button first, with 3 seconds press the button twice will arm the security system and by-pass the sensor 1 (zone 4 shock sensor) and zone 6 optional sensor 2. The system will chirp one additional time to confirm the sensor bypass mode was activated. The sensor bypass feature is programmed to activate for one arming cycle only. The security system will return to normal operation during the next arming cycle. HIDDEN ALARM FUNCTION: Press the button first; within 3 seconds press the button to activate the hidden alarm function. The security system will arm and with “Hidden Alarm Function” The siren / horn will be silenced even if the sensor is triggered in the armed status. (A melody sounding from your Remote LCD transceiver and “ ” icon will display on the LCD screen to confirm the hidden alarm was activated.) G. PASSIVE ARMING Active arming / disarming is controlling your security system via the remote transmitter. This security system is equipped with an optional Passive Arming feature, which allows the security system to arm 30 seconds after the last door is closed. Operation is as follows. 1. Turn the ignition to the “OFF” position and exit the vehicle. 2. After all entrances are closed, the security system LED will flash fast for 30 seconds. If you reopen any door / hood / trunk, the security system LED will stop flashing. It will begin flashing again once the vehicle all entrances are closed. 3. After 30-second timer has elapsed, the security system will automatically “ARM”. The siren will chirp [1] time and the parking lights will flash [1] time. PASSIVE ARMING WITH PASSIVE DOOR LOCKING: The vehicle doors will automatically lock after passive arming cycle has been completed. PASSIVE ARMING BY-PASS: While the system disarmed, Press the button twice, the security will respond with [1] chirp and LED will turn “ON”. The security system will remain in this temporally state for as long as you wish. To exit passive by-pass, press the transmitter or button and the system will return to normal status. H. ACTIVE DISARMING – UNLOCK & DISARM: 1. Press button on the transmitter. 2. The siren will chirp twice and parking light flash twice to indicating that the security system is now disarmed. The vehicle’s door will unlock and dome light turns on for 30 seconds upon disarming when interfaced with the security system. 4](https://usermanual.wiki/Advance-Security/TR26/User-Guide-897758-Page-4.png)
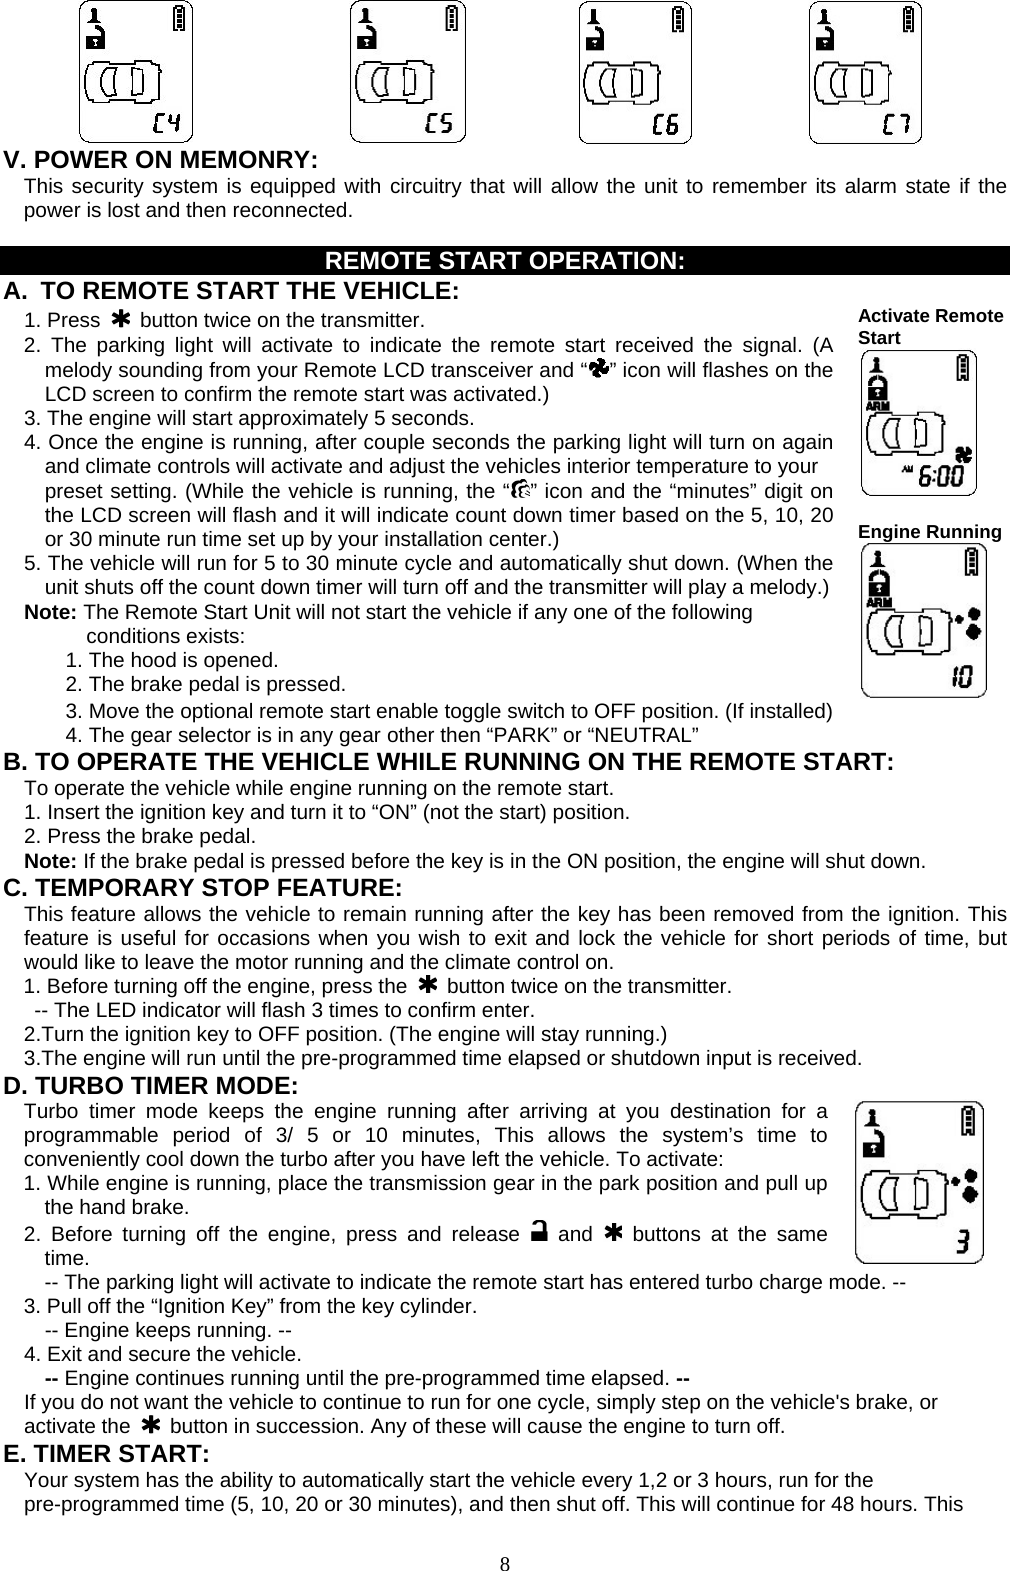

![Note: Maximum is 19 hours. 4. Time Set-Up For “Daily Timer Start”: Example to AM 6:30 1. Press & hold the button for 3 seconds, with two-melody sound and the “Hours” digit flashes for adjusting. 2. Press & hold the button for 2 seconds, the LCD screen will flash / icon and “Hours” digit for Hour set-up. 3. Press the or button to decrease or increase the hour digit until AM 6:00 4. Press the button once again then the minute digit flashes. 5. Press the or button to decrease or increase the minutes digit until AM 6:30 6. Press the button for 2 seconds with one-melody sound to confirm exit the timer program mode. A. PROGRAMMING THE REMOTE TRANSMITTER: Note: This mode will only retain the last 4 remote transmitters programmed. If the transmitter memory is exceeded, the security system will start deleting transmitters from memory in chronological order. 1. Turn the Ignition 'switch ‘OFF/ON’ 3 TIMES and stay in ON position. Within 15 seconds. 2. Push the Valet switch 3 times and holding in on 3rd push until a long chirp is hearing then release the valet switch. You are now in the Transmitter programming mode. 3. Press and hold any button of the transmitter until the siren responds with a confirming chirp, indicating the signal has been stored into memory. 4. If you have additional transmitters (up to 4) that need to be programmed, repeat step 3 for each transmitter. Exit: Turn Ignition to 'OFF' position, or leave it for 15 seconds to exit the program mode and the siren will chirp three long chirps. B. FEATURES PROGRAMMING: ALARM FEATURE “I” PRORAMMING: 1. Turn the Ignition switch ‘ON/OFF’ 3 TIMES and stay in OFF position. 2. Push the Valet switch 2 times and holding in on 2nd push until one chirp with a long chirp is hearing then release the valet switch. You are now in the Alarm feature ‘I’ programming mode. 3. Press and release the transmitter button ‘A’ corresponding to the feature ‘A’ you want to program. a. The siren chirps and LED pause will indicate previously setting. b. The factory default settings is always [1] LED flash, [1] chirp. 4 Depress the transmitter button ‘A’ again to change the feature. Simple keep re-depressing the transmitter button ‘A’ again until the module advances to your desired setting. a. In this case, Press button ‘A’ again, the module would advance to [2] LED flash, [2] chirps. b. Press button ‘A’ again, the module would advance to [3] LED flash, [3] chirps etc. 5. Depress the transmitter button ‘B’ corresponding to the feature ‘B’ you wants to program. Press Transmitter Button One Chirp / LED one pulse Factory Default Setting Two Chirps / LED two pulses Three Chirps / LED three pulses Four Chirps / LED four pulses 1 All Siren/Horn arming, disarming and tamper indicator chirps on Siren/Horn arming Chirps OFF w/second TX button push confirmation, Disarm chirp OFF. All tamper indicator chirps ON All Siren/Horn arming, disarming and tamper indicator chirps off Siren/Horn arming and disarming chirps off with all tamper indicator chirps on 2 Active arming Passive arming without passive door locking Passive arming with passive door locking. 3 Automatic Rearm off Automatic Rearm on 4 Instantly Door Ajar Warning 45 seconds delay Door Ajar Warning. 5 + Without Car-jack mode Active Car-jack mode Passive Car-jack mode 6 + Panic with Ignition off Panic with Ignition on & off Panic with Ignition on & off. Panic with No time limit. Without Panic function. 14](https://usermanual.wiki/Advance-Security/TR26/User-Guide-897758-Page-14.png)