Advantech Co ARK-1382 Ultra-compact System User Manual ARK 1382 user manual ed 1
Advantech Co Ltd Ultra-compact System ARK 1382 user manual ed 1
User manual
User Manual
ARK-1382

ARK-1382 User Manual ii
Copyright
The documentation and the software included with this product are copyrighted 2008
by Advantech Co., Ltd. All rights are reserved. Advantech Co., Ltd. reserves the right
to make improvements in the products described in this manual at any time without
notice. No part of this manual may be reproduced, copied, translated or transmitted
in any form or by any means without the prior written permission of Advantech Co.,
Ltd. Information provided in this manual is intended to be accurate and reliable. How-
ever, Advantech Co., Ltd. assumes no responsibility for its use, nor for any infringe-
ments of the rights of third parties, which may result from its use.
Acknowledgements
Intel and Pentium are trademarks of Intel Corporation.
Microsoft Windows and MS-DOS are registered trademarks of Microsoft Corp.
All other product names or trademarks are properties of their respective owners.
Product Warranty (2 years)
Advantech warrants to you, the original purchaser, that each of its products will be
free from defects in materials and workmanship for two years from the date of pur-
chase.
This warranty does not apply to any products which have been repaired or altered by
persons other than repair personnel authorized by Advantech, or which have been
subject to misuse, abuse, accident or improper installation. Advantech assumes no
liability under the terms of this warranty as a consequence of such events.
Because of Advantech’s high quality-control standards and rigorous testing, most of
our customers never need to use our repair service. If an Advantech product is defec-
tive, it will be repaired or replaced at no charge during the warranty period. For out-
of-warranty repairs, you will be billed according to the cost of replacement materials,
service time and freight. Please consult your dealer for more details.
If you think you have a defective product, follow these steps:
1. Collect all the information about the problem encountered. (For example, CPU
speed, Advantech products used, other hardware and software used, etc.) Note
anything abnormal and list any onscreen messages you get when the problem
occurs.
2. Call your dealer and describe the problem. Please have your manual, product,
and any helpful information readily available.
3. If your product is diagnosed as defective, obtain an RMA (return merchandize
authorization) number from your dealer. This allows us to process your return
more quickly.
4. Carefully pack the defective product, a fully-completed Repair and Replacement
Order Card and a photocopy proof of purchase date (such as your sales receipt)
in a shippable container. A product returned without proof of the purchase date
is not eligible for warranty service.
5. Write the RMA number visibly on the outside of the package and ship it prepaid
to your dealer.
Part No. 2006138200 Edition 1
May 2008

iii ARK-1382 User Manual
Technical Support and Assistance
1. Visit the Advantech web site at www.advantech.com/support where you can find
the latest information about the product.
2. Contact your distributor, sales representative, or Advantech's customer service
center for technical support if you need additional assistance. Please have the
following information ready before you call:
–Product name and serial number
–Description of your peripheral attachments
–Description of your software (operating system, version, application software,
etc.)
–A complete description of the problem
–The exact wording of any error messages
Packing List
Before installation, please ensure the following items have been shipped:
Item Part Number
–1 ARK-1382 unit
–1 Utility CD
–1 Registration and 1 year Warranty card Rev. A
–1 2-Pole Phoenix to DC-Jack Power Cable 1700001394
–1 DVI-I to VGA connector
–1 WLAN antenna ( ARK-1382W version)
Ordering information
Model Number Description
ARK-1382-S0A1E
Intel ULV Celeron 1.06GHz, 2 x Serial ports,1 x Giga LAN, 4 x USB 2.0, 2 x
DVI-I ,Ultra Compact, Fanless Embedded Box Computer
ARK-1382W-S0A1E
Optional accessories
1757000222 AC-to-DC Adapter DC19 V/3.42 A 65 W, with Phoenix
Power Plug, 0 ~ 40° C for Home and Office Use
1750003222 802.11b/g 5dBi Dipole Antenna
1700001947 Power Cable 2-pin 180 cm, USA type
1700001948 Power Cable 2-pin 180 cm, Europe Type
1700001949 Power Cable 2-pin 180 cm, UK Type
9666K10000E DIN-Rail mounting kit for ARK-1000 series models
9666K10001E VESA mounting kit for ARK-1000 series models

ARK-1382 User Manual iv

v ARK-1382 User Manual
Contents
Chapter 1 General Introduction ...........................1
1.1 Introduction ............................................................................................... 2
1.2 Product Feature ........................................................................................ 3
1.2.1 General ......................................................................................... 3
1.2.2 Display .......................................................................................... 3
1.3 Chipset ...................................................................................................... 4
1.3.1 Functional Specification................................................................ 4
1.3.2 Mechanical Specification .............................................................. 7
Figure 1.1 ARK-1382 Dimensions ............................................... 7
1.3.3 Electrical Specification.................................................................. 8
1.3.4 Environmental Specification.......................................................... 8
Chapter 2 H/W Installation....................................9
2.1 Jumpers .................................................................................................. 10
2.1.1 Jumper Description..................................................................... 10
2.1.2 Jumper Setting............................................................................ 11
2.1.3 Locating Jumpers on the Board.................................................. 13
2.2 Connectors.............................................................................................. 14
Figure 2.1 ARK-1382 Front Side External I/O Connectors........ 14
Figure 2.2 ARK-1382 Rear Side External I/O Connectors......... 14
2.2.1 ARK-1382 Front Side External I/O Connectors .......................... 15
Figure 2.3 COM Connector........................................................ 15
Table 2.1: COM Standard Serial Port Pin Assignments............ 15
Figure 2.4 USB Connector......................................................... 15
Table 2.2: USB Connector......................................................... 16
Figure 2.5 Ethernet Connector .................................................. 16
Table 2.3: RJ-45 Connector Pin Assignments........................... 16
2.2.2 ARK-1382 Rear Side External I/O Connectors........................... 17
Figure 2.6 DVI-I Connector........................................................ 17
Table 2.4: DVI-I Connector Pin Assignment.............................. 17
Figure 2.7 eSATA/USB Connector ............................................ 18
Table 2.5: eSATA/USB Connector Pin Assignment .................. 18
Figure 2.8 Power Input Connector............................................. 18
Table 2.6: Power Connector Pin Assignments .......................... 18
Chapter 3 BIOS Operation..................................19
3.1 BIOS Introduction.................................................................................... 20
3.2 BIOS Setup ............................................................................................. 20
3.2.1 Main Menu .................................................................................. 21
3.2.2 Standard CMOS Features .......................................................... 22
3.2.3 Advanced BIOS Features ........................................................... 23
3.2.4 Advanced Chipset Features........................................................ 25
3.2.5 Integrated Peripherals................................................................. 26
3.2.6 Power Management Setup ......................................................... 27
3.2.7 PnP/PCI Configurations.............................................................. 29
3.2.8 PC Health Status ........................................................................ 29
3.2.9 Frequency/Voltage Control ......................................................... 30
3.2.10 Load Optimized Defaults............................................................. 30
3.2.11 Set Password.............................................................................. 31
3.2.12 Save & Exit Setup....................................................................... 32
3.2.13 Exit Without Saving..................................................................... 32

ARK-1382 User Manual vi
Chapter 4 Full Disassembly Procedure............ 33
4.1 Introduction ............................................................................................. 34
Figure 4.1 Unscrew the 4 screws on the bottom side................ 34
Figure 4.2 Unscrew the 6 screws on the front side frame ......... 35
Figure 4.3 Unscrew the 1 screws on the front face plate .......... 35
Figure 4.4 Unscrew the 4 Hex-bolt on the front face plate ........ 36
Figure 4.5 Unscrew the 6 screws on the rear side frame .......... 36
Figure 4.6 Unscrew the 4 Hex-bolt on the rear face plate ......... 37
Figure 4.7 Unscrew the antenna mounting screw ..................... 37
Figure 4.8 Pull out the carrier board from the Aluminum case on
bottom side, and be careful for the thermal pad....... 38
Figure 4.9 Memory Socket ........................................................ 38
Figure 4.10MiniPCI Socket......................................................... 39
Figure 4.11Jumper Setting ......................................................... 39
Figure 4.12Install the board on the bottom side and be careful for
thermal pad .............................................................. 40
Appendix A Realtek RTL8111B/8111C Gigabit Boot
Agent Configuration Menu41
A.1 Realtek RTL8111B/8111C Gigabit Boot Agent Configuration Menu ...... 42

Chapter 1
1General Introduction

ARK-1382 User Manual 2
1.1 Introduction
ARK-1382 is a fanless and ultra compact system designed for a wide range of appli-
cations, such as Point of information system, flight information display system, and
vehicle video player system.
ARK-1382 designed with Intel Celeron M 423 @ 1.06 GHz, which provides the excel-
lent computing and multimedia performance. The system Equipped with 802.11b/g
WLAN card and supports wide range of input voltages from 9 VDC to 35VDC. More-
over, to fitting in the different application, ARK-1382 supports dual DVI-I independent
display or dual VGA with clone mode. With the smallest size, ARK-1382 still support
4 x USB 2.0, 1 x Giga LAN and 2 x COM ports, user can install or take the CF card by
the external CF socket easily.
The ARK-1382 Compact Embedded Computer is equipped with a solid state onboard
CF card of up to 8 GB, so it easily passes 50 and 5 Grms shock and vibration tests.
ARK-1000 can be standalone, wall-mounted, DIN-rail mounted or VESA mounted.
The series accepts a wide range of power supplies (DC power in) and comes in a
footprint of only 189 x 41 x 130.6 mm (7.44" x 1.61" x 5.14"). The rugged cast alumi-
num case not only provides great protection from EMI, shock/vibration, cold and
heat, but also passive cooling for quiet fanless operation.

3 ARK-1382 User Manual
Chapter 1 General Introduction
1.2 Product Feature
1.2.1 General
CPU Intel/Celeron M ULV 423 at 1.06 GHz
System Chipset: 945GM chipset 533 MHz FSB
BIOS: AWARD® 4 Mbit Flash BIOS
System Memory: 200-pin SODIMM socket, support ECC Double Data Rate
(DDR2) 128 MB to 1 GB, DDR2 400/533 MHz
Power Management: APM1.2, ACPI 2.0 support
SSD: Supports CompactFlash® Card TYPE I/II (shared 1st IDE Channel) USB
memory
Watchdog Timer: Single chip Watchdog 255-level interval timer, setup by soft-
ware
Expansion Interface: 1 x miniPCI ( Equipped with miniPCI WLAN card for
ARK-1382W version)
Battery: 3V/210 mAh
I/O Interface: 2 x RS232/422/485 (default is RS-232, RS-422/485 by jumper
setting)
USB: 4 x USB 2.0 compliant Ports
Audio: ALC203 AC97 surround stereo sound and dual output 2.2 W amplifier.
Supports Line-out ( Left and Right)
IrDA: N/A
GPIO: N/A
LAN Chipset: Realtek 8111B PCI-E 10/100/1000 Base-T
Speed: 10/100/1000 Mbps
Interface: 1 x RJ45
Standard: IEEE 802.3u 100Base-T
1.2.2 Display
Chipset: Intel 945GM integrated 2D/3D graphic controller
Memory Size: Supports Intel DVMT (Dynamic Video Memory Technology) 3.0 1
MB or 8 MB under system BIOS
Resolution: CRT Display mode: pixel resolution up to 1600 x 1200 at 85-Hz
and 1600 x 1200 at 75-Hz LCD Display mode:
Display Interface: 2 x DVI-I, (VGA interface can be extended by connector)
Dual Independent: DVI + DVI; DVI + VGA; (VGA +VGA only supports clone
mode)

ARK-1382 User Manual 4
1.3 Chipset
1.3.1 Functional Specification
1.3.1.1 Processor
For ARK-1382W-S0A1E, ARK-1382-S0A1E.
1.3.1.2 Chipset
Processor
CPU supports:
Support 533 MHz Source-Synchronous Processor System Bus
Support Intel Celeron ULV423 at 1.06 GHZ CPU
35 mm *35 mm Micro-FCBGA Package.
Memory
NB: Intel 945GM GMCH chip supports:
Supports for 400/533 MHz DDR2 SDRAM devices with max
Supports maximum 1GB DDR SDRAM.
SO-DIMM Socket on board: 200 pin SO-DIMM socket type x 1
It may have compatibility issue for 2 GB memory, please check with Advantech
support team.
Graphic
and Video
Controllers
NB: Intel 945GM GMCH chip supports:
Internal Graphics Features
Dual display choose on board: Dual DVI, Dual VGA or DVI + VGA through
OS Driver
–DVI-I ( CRT )
Integrated 400-MHz, Three 8-bit DACs provide the R,G and B signal to
the monitor
Supports pixel resolution up to QXGA
Supports for Display Hot Plug
Supports Dual VGA Display via Video Separate Amplifier
–DVI-I ( DVI )
Supports DVI 1.0 for External Digital Monitor
Supports for Display Hot Plug
DVI Transmitter Support Digital Visual Interface (DVI) Transmitter up to
165M pixels/second
Supports Dual DVI Display Independently
WinXP Extended desktop support for Dual DVI and DVI + VGA
DVI-I Connector on board: DVI-I Combined Conn. 29P 90D(F) x 2
IDE
Interface
SB: Intel NH82801GHM chip supports:
Supports PIO IDE transfers up to 16 Mbytes/sec
Supports Ultra ATA transfers to 100/66/33 Mbytes/sec
The IDE interface integrates 16x32-bit buffers for optimal transfers
Supports Compact Flash Card Type II Socket
CF Socket on board: CF Type II 50P 90D(M) external connector x 1

5 ARK-1382 User Manual
Chapter 1 General Introduction
Audio
Link
SB: Intel NH82801GHM chip supports:
Supports Audio Codec’97, Revision 2.3 specification
Supports Link for Audio and Telephony CODECS
Supports Dual 2.2W Audio Amplifier Plus Stereo
RCA Jack on Board: 3P 90D(F) Red x 1 ( Right Channel )
RCA Jack on Board: 3P 90D(F) White x 1 ( Left Channel )
USB
Interface
SB: Intel NH82801GHM chip supports:
USB host interface with support for 5 USB 2.0 ports ( 1 combined with
eSATA )
All ports are High-Speed, Full-Speed, and Low-Speed capable
Supports legacy keyboard/mouse software
USB dual connecter on board: USB conn 8P 90D(M) DIP x 2
USB + eSATA connecter on board : E-SATA+USB 11P 90D(M) DIP x 1
eSATA
Interface
SB: Intel NH82801GHM chip supports:
Supports the Serial ATA specification Revision 1.0a
Supports several optional sections of Serial ATA II: Extensions to Serial
ATA 1.0 Specification, Revision 1.0
USB + eSATA connecter on board : E-SATA+USB 11P 90D(M) DIP x 1
Note: eSATA do not support PnP function.
Mini PCI
Interface
SB: Intel NH82801GHM chip supports:
Supports Mini PCI Interface 1.0
Supports Mini PCI WLAN extension card use only
Supports 802.11A/B/G when use 9680005627
Mini PCI socket: MINI PCI 124P 180D(F) SMD x 1
(ARK-1382W version, miniPCI is equipped with WLAN miniPCI card)
Power
Manage-
ment
SB: Intel NH82801GHM chip supports:
Supports ACPI 3.0
ACPI Power Management Logic Support
Power connecter: Plug-In block 2P DIP x 1
BIOS
SB: Intel NH82801GHM chip supports:
Low Pin Count (LPC) interface support
Firmware Hub (FWH) interface support
Phoenix 4M bit Flash BIOS, supports Plug & Play, APM 1.2/ACPI 1.1.
Socket: 32 pin PLCC socket x 1

ARK-1382 User Manual 6
1.3.1.3 Others (chipset)
Serial
Ports
Super I/O: Winbond W83627HG supports:
2 full function serial ports by Winbond W83627
Support IRQ Sharing among serial ports on XPE
COM1: Supports to RS-232/422/485 and setting by Jumper
COM2: Supports to RS-232/422/485 and setting by Jumper
COM connecter: D-SUB CON. 9P 90D(M)DIP x 2
Note:RS-485 does not support Auto flow control. Please refer to CH2 for jumper
setting.
Thermal
sensor
Super I/O: Winbond W83627HG supports:
Monitor the current CPU temperature
Monitor the main power voltage
LAN
LAN Chip: Realtek RTL8111B-GR supports:
Supports PCI Express 1.0a
Integrated 10/100/1000 transceiver
Fully compliant with IEEE 802.3 compliant
Supports Wake on LAN and remote wake-up
Giga LAN Phone Jack on board: Phone Jack conn 8P 90D DIP x 1
Audio
Audio Codec: Realtek ALC203
Amplifier: National LM4863
Compliant with AC’97 2.3 specifications
Supports to 20-bit DAC and 18-bit ADC resolution
Supports Dual 2.2W Audio Amplifier Plus Stereo
RCA Jack on Board: 3P 90D(F) Red x 1 ( Right Channel )
RCA Jack on Board: 3P 90D(F) White x 1 ( Left Channel )
DVI
DVI Transmitter: Chrontel CH7307C x 2
Digital Visual Interface (DVI) Transmitter up to 165M pixels/second
High-speed SDVO (1G~2Gbps) AC-coupled serial differential RGB
inputs
Complete Windows and DOS driver support
DVI hot plug detection
DVI-I Connector on board: DVI-I Combined Conn. 29P 90D(F) x 2
VGA
Video Amplifier: Linear LT6557 x 2
Supports Dual VGA Display via Video Separate Amplifier
Share with DVI-I Connector on board: DVI-I Combined Conn. 29P
90D(F) x 2
7 ARK-1382 User Manual
Chapter 1 General Introduction
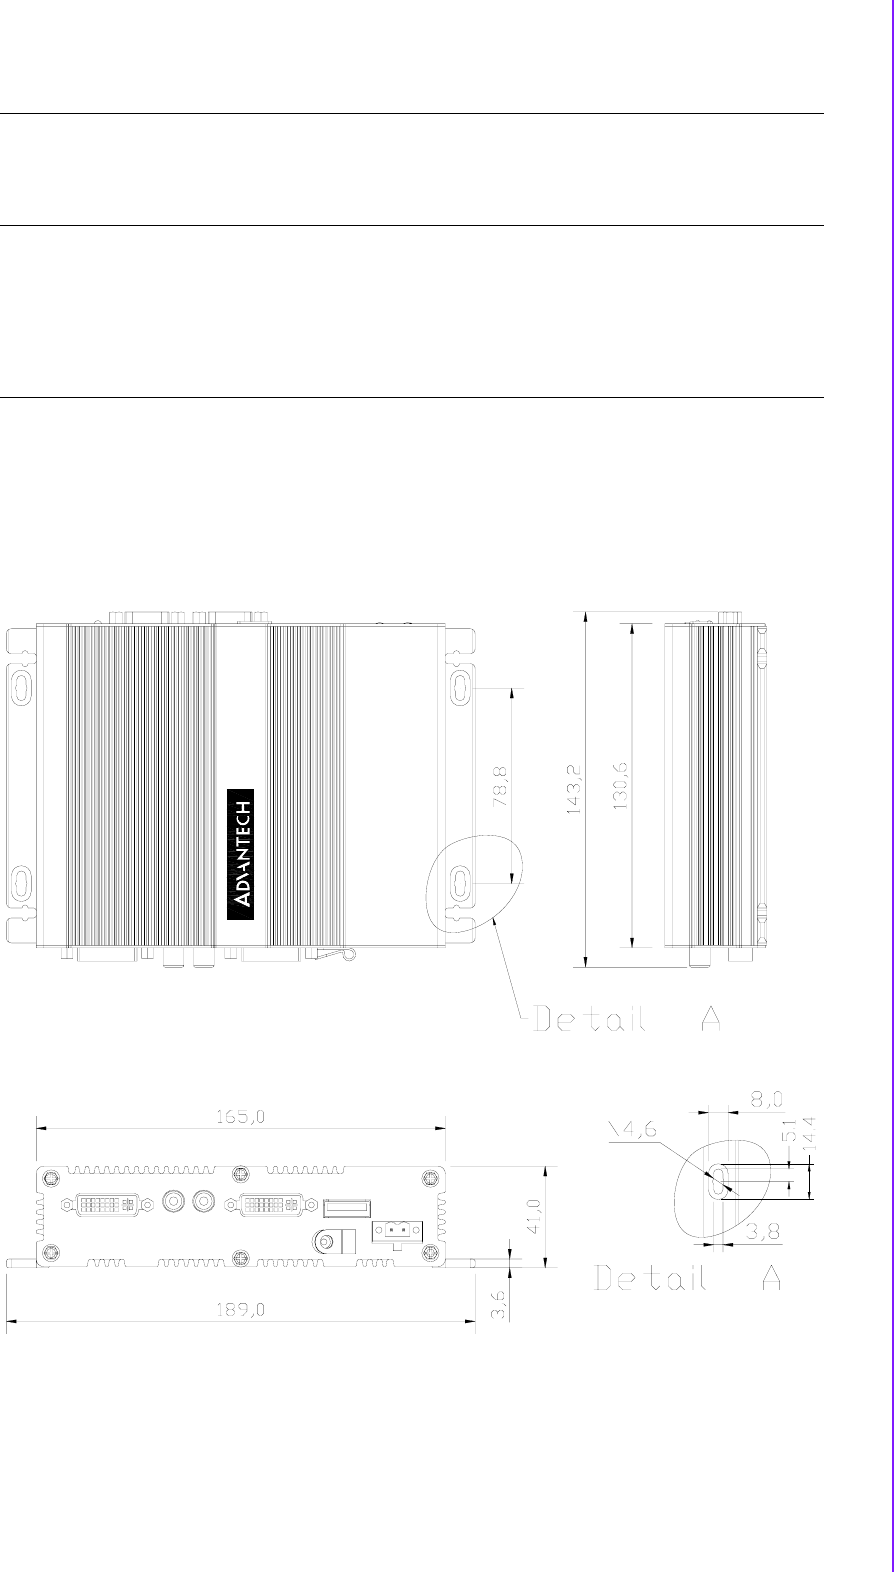
1.3.2 Mechanical Specification
1.3.2.1 Dimension (mm)
189 x 41 x 130.6mm
(7.44” x 1.61” x 5.14”)
Figure 1.1 ARK-1382 Dimensions
Battery
backup
Battery support: CR2032
BATTERY 3V/210 mAh with WIRE x 1
WLAN
(Optional)
Wireless LAN Module Card: WM3210
Supports Mini PCI Interface 1.0
Supports 802.11 b/g
Mini PCI socket: MINI PCI 124P 180D(F) SMD x 1
Unit: mm

ARK-1382 User Manual 8
1.3.2.2 Weight (g)
1.15 kg
1.3.3 Electrical Specification
1.3.3.1 Power Supply Voltage
Voltage requirement with Adaptor:
9 V-3.8 A ~ 35 V-1 A Adaptor
1.3.3.2 Power Supply Current
Supply Current (Maximum)
CPU : Intel Celeron ULV423 1.06 , RAM:533MHz 512GB DDR2 SDRAM
1.3.3.3 RTC Battery
Norminal Voltage: 3.0 V
Nominal discharge capacity: 210 mAh
1.3.4 Environmental Specification
1.3.4.1 Operating Temperature
The Intel® Celeron® is specified for proper operation when the junction temperature
is within the specified range of 0° C to 100° C.
The Intel® 945GM chipset temperature runs at a maximum of 100° C. The Intel®
ICH7 I/O Controller Hub 7 ( 82801GHM) case temperature runs at a maximum of
110° C.
The processor protects itself from catastrophic overheating by use of an internal ther-
mal sensor at a temperature level of approximately 135° C.
Operating temperature: 0 ~ 60° C (32 ~ 140° F)
1.3.4.2 Operating Humidity
Operating Humidity: 0% ~ 90% Relative Humidity, non-condensing
1.3.4.3 Storage Temperature
Standard products (0 ~ 60° C)
Storage temperature: -20 ~ 70° C
1.3.4.4 Storage Humidity
Standard products (0 ~ 60° C)
Relative humidity: 95% @ 60° C
Adaptor 19 V
Dos 0.86 A
BIOS NC
WINXP Idle 0.88 A
WINXP HCT11.0 NC
WINXP 3DMARK2001SE NC
WINXP
BURN IN TEST 1.16 A
Suspend 0.66 A

Chapter 2
2H/W Installation
ARK-1382 User Manual 10
2.1 Jumpers
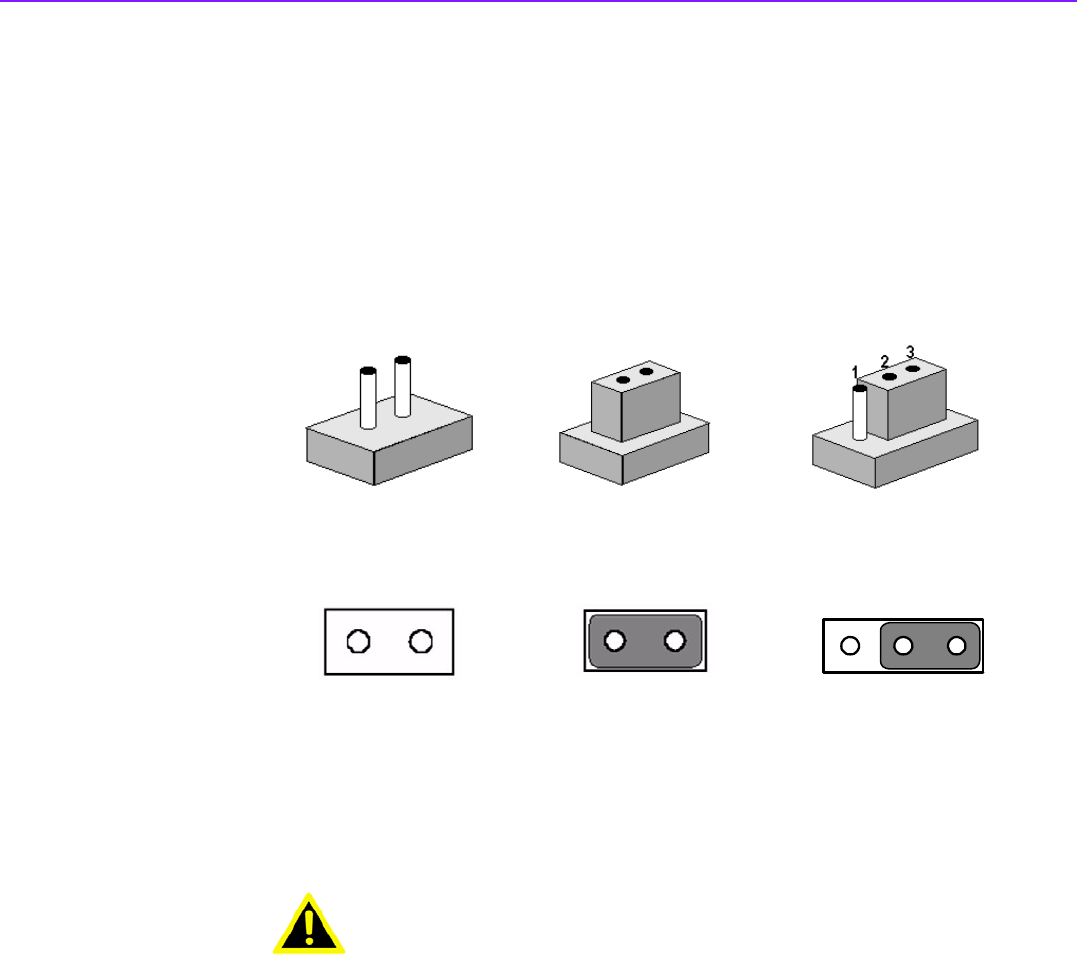
2.1.1 Jumper Description
Cards can be configured by setting jumpers. A jumper is a metal bridge used to close
an electric circuit. It consists of two metal pins and a small metal clip (often protected
by a plastic cover) that slides over the pins to connect them. To close a jumper, you
connect the pins with the clip. To open a jumper, you remove the clip. Sometimes a
jumper will have three pins, labeled 1, 2 and 3. In this case you would connect either
pins 1 and 2, or 2 and 3.
The jumper settings are schematically depicted in this manual as follows.
A pair of needle-nose pliers may be helpful when working with jumpers. If you have
any doubts about the best hardware configuration for your application, contact your
local distributor or sales representative before you make any changes.
Warning! To avoid damaging the computer, always turn off the power supply
before setting jumpers. Clear CMOS. Before turning on the power sup-
ply, set the jumper back to 3.0 V Battery On.
123

11 ARK-1382 User Manual
Chapter 2 H/W Installation
2.1.2 Jumper Setting
2.1.2.1 COM1 Jumper
ARK-1382 series of embedded box computer provide a jumper - JP1 ~ JP3 located
on the internal carrier board for COM1 selecting the RS-232, RS422 and RS485.
2.1.2.2 COM2 Jumper
ARK-1382 series of embedded box computer provide a jumper - JP1 ~ JP3 located
on the internal carrier board for COM2 selecting the RS-232, RS422 and RS485.]
JP1
Close pins Function
1-3 RS-232*
2-4 RS-232*
3-5 RS-422/RS-485
4-6 RS422/RS-485
(*): means default setting of the jumper/function.
JP2
Close pins Function
1-3 RS-232*
2-4 RS-232*
3-5 RS-422/RS-485
4-6 RS-422/RS-485
(*): means default setting of the jumper/function.
JP3
Close pins Function
1-2 RS-485
3-4 RS-422
5-6 RS-232*
(*): means default setting of the jumper/function.
JP4
Close pins Function
1-3 RS-232*
2-4 RS-232*
3-5 RS-422/RS-485
4-6 RS422/RS-485
(*): means default setting of the jumper/function.
JP5
Close pins Function
1-3 RS-232*
2-4 RS-232*

ARK-1382 User Manual 12
2.1.2.3 CMOS Jumper (JP8)
ARK-1382 series of embedded box computer provide a jumper - JP8 located on the
internal carrier board for selecting the CMOS of Clear or Normal status.
3-5 RS-422/RS-485
4-6 RS-422/RS-485
(*): means default setting of the jumper/function.
JP6
Close pins Function
1-2 RS-485
3-4 RS-422
5-6 RS-232*
(*): means default setting of the jumper/function.
Close pins Function
1-2 Clear CMOS
2-3 Normal*
(*): means default setting of the jumper/function.
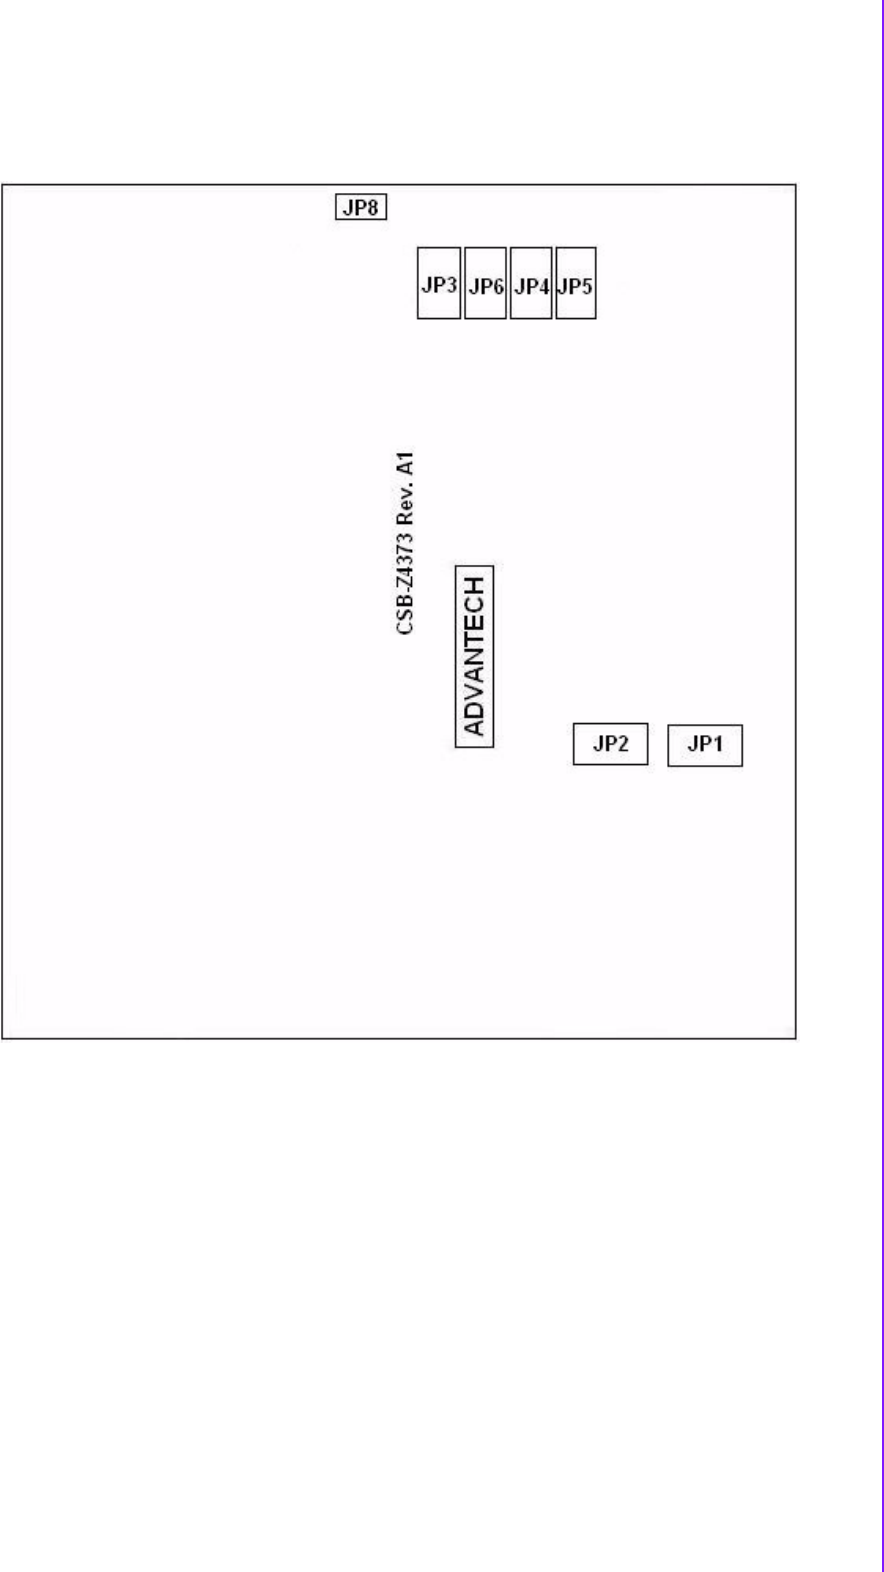
13 ARK-1382 User Manual
Chapter 2 H/W Installation
2.1.3 Locating Jumpers on the Board
ARK-1382 User Manual 14
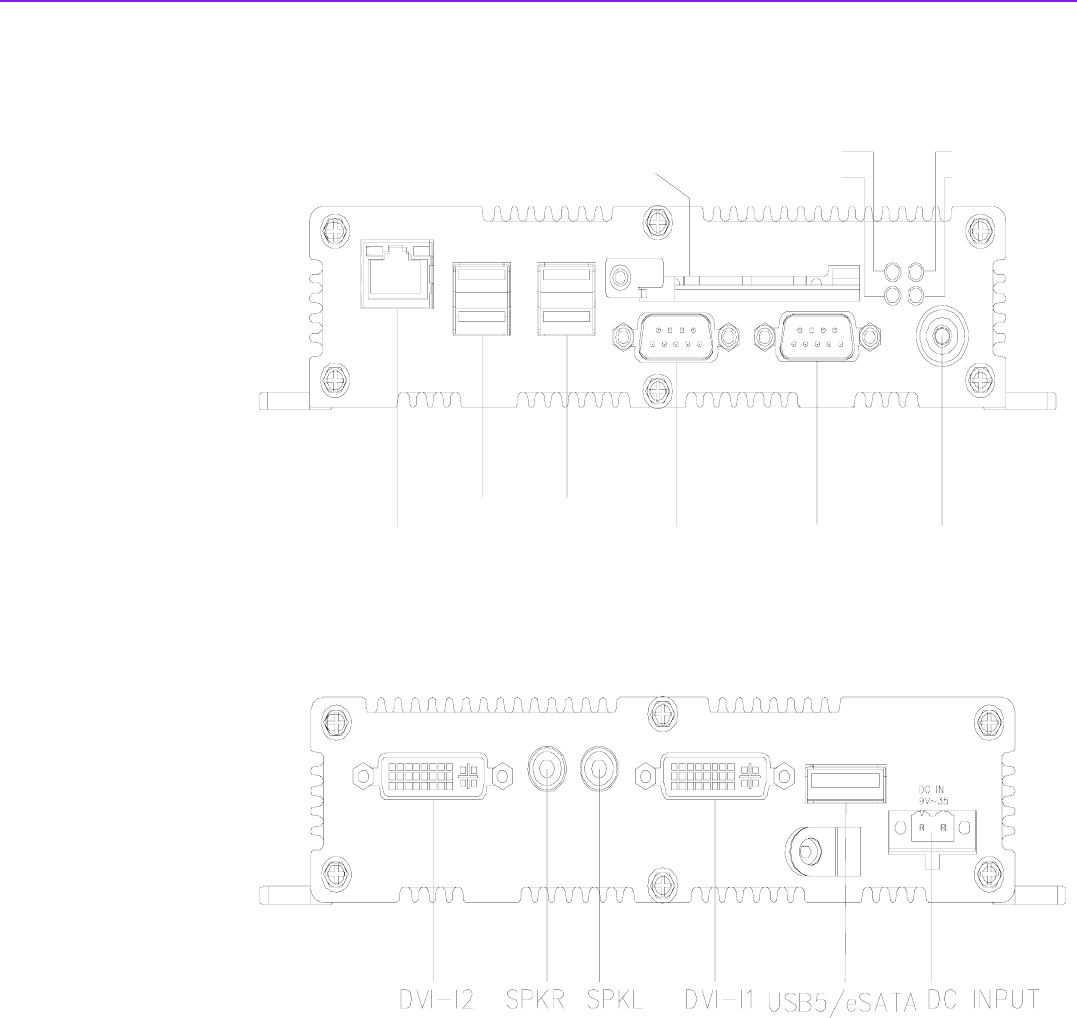
2.2 Connectors
Figure 2.1 ARK-1382 Front Side External I/O Connectors
Figure 2.2 ARK-1382 Rear Side External I/O Connectors
COM1 COM2 ON/OFF
USB4 USB2
USB3 USB1
LAN
Alarm LED
Normal LED
Compact Flash HDD LED
PWR LED
GN DVCC

15 ARK-1382 User Manual
Chapter 2 H/W Installation
2.2.1 ARK-1382 Front Side External I/O Connectors
2.2.1.1 COM Connector
ARK-1382 provides two D-sub 9-pin connectors, which offers RS-232/422/485 serial
communication interface ports. Default setting is RS-232, if you want to use RS-422/
485, you can find the jumper installation in Appendix and jumper setting in 2.12.
Figure 2.3 COM Connector
Note: NC represents “No Connection”.
2.2.1.2 USB Connector
ARK-1382 provides four connectors of USB interface, which give complete Plug &
Play and hot swapping for up to 127 external devices. The USB interface complies
with USB UHCI, Rev. 2.0 compliant. The USB interface can be disabled in the system
BIOS setup. Please refer to Table. 2.2 for its pin assignments.
The USB connectors are used for connecting any device that conforms to the USB
interface. Many recent digital devices conform to this standard. The USB interface
supports Plug and Play, which enables you to connect or disconnect a device when-
ever you want, without turning off the computer.
Figure 2.4 USB Connector
Table 2.1: COM Standard Serial Port Pin Assignments
RS-232 RS-422 RS-485
Pin Signal Name Signal Name Signal Name
1DCD Tx- DATA-
2RxD Tx+ DATA+
3 TxD Rx+ NC
4DTR Rx- NC
5 GND GND GND
6DSR NC NC
7RTS NC NC
8CTS NC NC
9RI NC NC
1 2 3 4 5
6 7 8 9
ARK-1382 User Manual 16
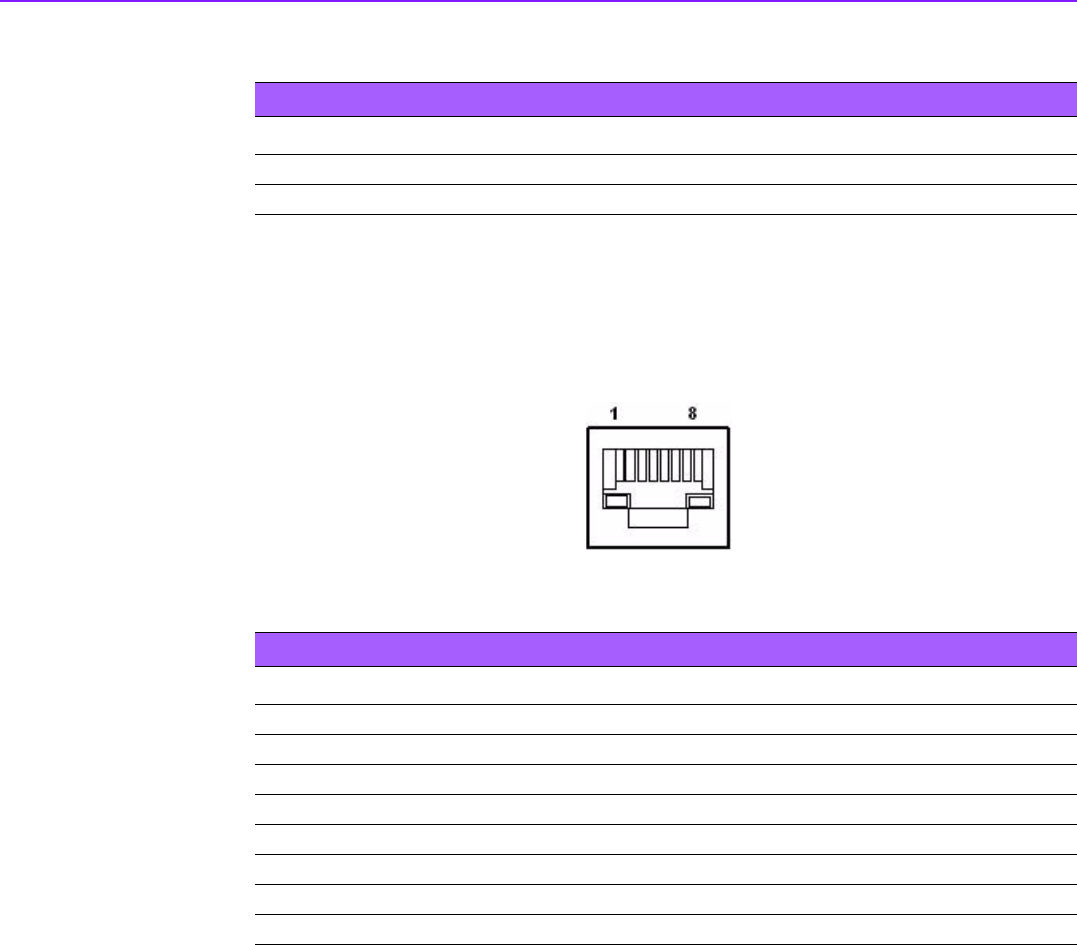
2.2.1.3 Ethernet Connector (LAN)
ARK-1382 is equipped with an Realtek RTL8111B-GR Ethernet controller that is fully
compliant with IEEE 802.3u 10/100/1000Base-T CSMA/CD standards. The Ethernet
port provides a standard RJ-45 jack connector with LED indicators on the front side
to show its Active/Link status (Green LED) and Speed status (Yellow LED).
Figure 2.5 Ethernet Connector
2.2.1.4 Compact Flash Card
ARK-1382 is equipped with an external CF card. You can find the installation in
Appendix.
2.2.1.5 Power ON/OFF Button
ARK-1382 comes with a Power On/Off button, that support dual function of Soft
Power -On/Off (Instant off or Delay 4 Second), and Suspend.
2.2.1.6 LED Indicators
There are four LEDs on ARK-1382 front metal face plate for indicating system status:
PWR LED is for power status and Flash in green color; and HDD LED is for compact
flash disk status, which Flash in red color; Normal LED is to detect the internal tem-
perature which is under 75° C, which flash in blue color; When the internal tempera-
ture is over 75° C, normal LED will not flash and alarm LED will Flash in orange color,
which means end user have better to enhance air flow condition to dissipate heat.
Advantech QA testing profile is to make sure system is stable under 60° C environ-
ment temperature, chamber air flow rate: 0.7 m/s; To reflect customer’s installation
site sometimes will be non air flow condition, over heat LED is to alarm customer that
environment temp is too high, suggest to enhance the air flow rate.
Table 2.2: USB Connector
Pin Signal name Pin Signal name
1 VCC 2 USB_data-
3 USB_data+ 4 GND
Table 2.3: RJ-45 Connector Pin Assignments
Pin 10/100/1000BaseT Signal Name
1TX+
2TX-
3RX+
4NC
5NC
6RX-
7NC
8NC

17 ARK-1382 User Manual
Chapter 2 H/W Installation
2.2.2 ARK-1382 Rear Side External I/O Connectors
2.2.2.1 DVI-I Connector
ARK-1382 provides dual DVI-I interface, you can link your DVI monitor and ARK-
1382 support dual independent display. For VGA monitor, you can use the DVI-I to
VGA connector in the package (Advantech P/N: 1654000446), support dual indepen-
dent display for DVI + VGA; if need to use dual VGA display, please order DVI-I to
VGA connector (Advantech P/N: 1654000446), and dual VGA display support with
clone model.
It supports CRT mode: 1600 x 1200 @ 32 bpp @ 85 Hz and up to 32 MB shared
memory.
Figure 2.6 DVI-I Connector
2.2.2.2 Line out
ARK-1382 support left and right channel line out.
Table 2.4: DVI-I Connector Pin Assignment
Pin Signal Name Pin Signal name
1 TMDS-C2# 16 HP_DET
2 TMDS-C2 17 TMDS_C0#
3GND 18TMDS_C0
4 CRT_DDC_CLK 19 GND
5 CRT_DDC_DATA 20 -
6 MDVI_CLK 21 -
7 MDVI_DATA 22 GND
8VGAVSY 23TMDS_CK#
9 TMDS_C1# 24 TMDS_CK
10 TMDS_C1 C1 VGAR
11 GND C2 VGAG
12 - C3 VGAB
13 - C4 VGAHSY
14 VCC_DVI C5 GND
15 GND
ARK-1382 User Manual 18
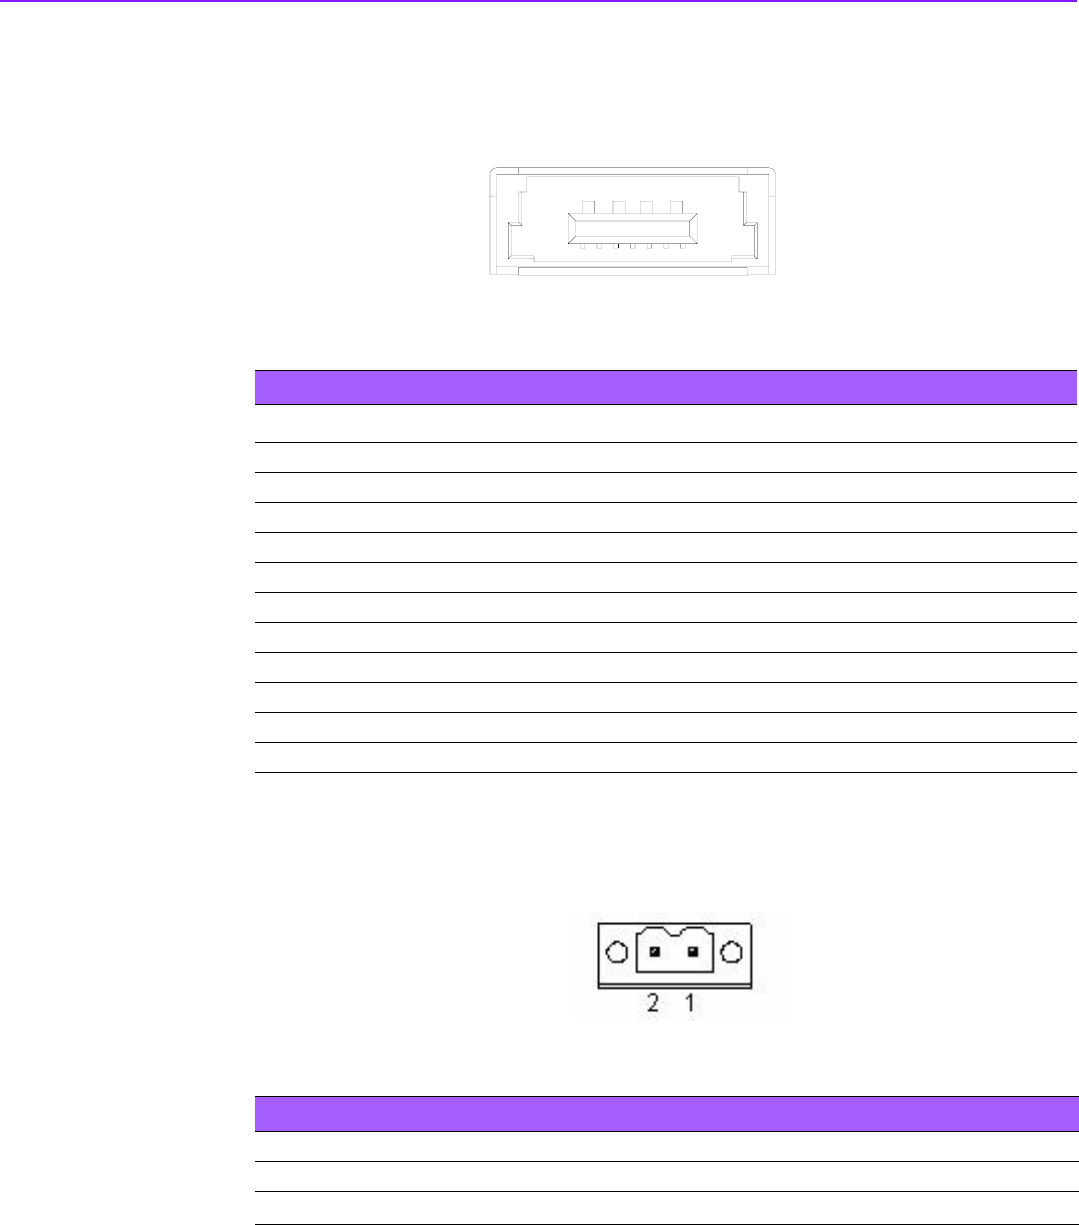
2.2.2.3 USB5/eSATA
ARK-1382 provides external SATA connector for external storage; if you do not need
to use eSATA, the connector can be used as USB port.
Figure 2.7 eSATA/USB Connector
2.2.2.4 Power Input Connector
ARK-1382 comes with a two pins header that carries 9 ~ 35 VDC external power
input.
Figure 2.8 Power Input Connector
Table 2.5: eSATA/USB Connector Pin Assignment
Pin Signal name
1 VBUS
2D-
3D+
4 GND
5 GND
6SATA_TX+
7SATA_TX-
8GND
9SATA_RX-
10 SATA_RX+
11 GND
1234
11
10897
65
Table 2.6: Power Connector Pin Assignments
Pin Signal Name
1 GND
2 +9 ~ 35 VDC

Chapter 3
3BIOS Operation
Sections include:
BIOS Introduction
BIOS Setup

ARK-1382 User Manual 20
3.1 BIOS Introduction
Advantech provides a full-featured AwardBIOS 6.0 which delivers the superior perfor-
mance, compatibility, and functionality that manufacturers of Industrial PC and
Embedded boards demand; its many options and extensions let you customize your
products to a wide range of applications and target markets.
The modular, adaptable AwardBIOS 6.0 supports the broadest range of processors,
third-party peripherals and popular chipsets including: Intel CPUs from 386 through
to Pentium, and AMD Geode to K7 and K8; as well as nVidia and VIA processors.
Advantech also provides utilities to easily select and install features that suit the cus-
tomers’ own designs.
3.2 BIOS Setup
The ARK-1382 series has a built-in AwardBIOS with a CMOS SETUP utility which
allows the user to configure their required settings or to activate certain system fea-
tures.
The CMOS SETUP saves the configuration in the CMOS RAM on the motherboard.
When the power is turned off, the onboard battery supplies the necessary power to
the CMOS RAM for configuration settings to be retained.
When the power is turned on, press the <Del> button during the BIOS POST (Power-
On Self Test) boot up stage; this will take you to CMOS SETUP.
CONTROL KEYS
<↑>< ↓>< ←>< →>Move item selection
<Enter> Select Item - View submenu or options
<Esc> Main Menu - Quit and do not save changes into CMOS
Sub Menu - Exit current page and return to higher menu
<Page Up/+> Increase the numeric value or make changes
<Page Down/-> Decrease the numeric value or make changes
<F1> General help - for Setup Sub Menu
<F2> Item Help
<F5> Load Previous Values
<F7> Load Optimized Default
<F10> Save all CMOS changes

21 ARK-1382 User Manual
Chapter 3 BIOS Operation
3.2.1 Main Menu
Early in bootup, press <Del> to enter the AwardBIOS CMOS Setup Utility; the Main
Menu will appear on the screen. Use arrow keys to select among the items and press
<Enter> to accept or enter a sub-menu.
Standard CMOS Features
This setup page includes all the items in the standard compatible BIOS.
Advanced BIOS Features
This setup page includes all the Award BIOS enhanced features.
Advanced Chipset Features
This setup page includes all the chipset configuration features.
Integrated Peripherals
This setup page includes all onboard peripheral devices.
Power Management Setup
This setup page includes all the Power Management features.
PnP/PCI Configurations
This setup page includes PnP OS and PCI device configuration.
PC Health Status
This page includes CPU overheat protection setting, and reports system tem-
perature, CPU temperature, fan speeds, and system voltages.
Frequency/Voltage Control
This setup page includes settings for PCI clock signal, spread spectrum, and
CPU host/SRC/PCI clock speeds.
Load Optimized Defaults
This option loads values that are optimized for stable, average performance.
Set Password
Establish, change, or disable passwords.
Save & Exit Setup
Save CMOS value settings to CMOS and exit BIOS setup.
Exit Without Saving
Abandon all CMOS value changes and exit BIOS setup.

ARK-1382 User Manual 22
3.2.2 Standard CMOS Features
Date
The date format is <Weekday>, <Month>, <Day>, <Year>.
Time
The time format is in <hours> : <minutes> : <seconds>, based on 24-hour time
IDE Channel 0 Master/Slave
–IDE HDD Auto-Detection. Press "Enter" for automatic device detection.
IDE Channel 1 Master/Slave
–IDE HDD Auto-Detection. Press "Enter" for automatic device detection.
Video
The item determines that VGA display support type.
Halt on
This item determines whether the computer bootup process will stop if an error
is detected during power up.
Base Memory
The BIOS POST displays the amount of base (or conventional) memory
installed in the system.
Extended Memory
The BIOS POST displays the amount of extended memory (above 1 MB in the
CPU's memory address map) installed in the system.
Total Memory
This item displays the total system memory size.
–Weekday From Sun to Sat, determined and displayed by the BIOS only
–Month From Jan to Dec
–Day From 1 to 31
–Year From 1999 through 2098
–EGA/VGA Support VGA color mode
–CGA 40 Support VGA color mode
–CGA 80 Support VGA color mode
–MONO Support VGA mono mode
–No Errors The system boot sequence will not stop for any error.
–All Errors Whenever the BIOS detects a non-fatal error the system
will stop.
–All, but Keyboard The system boot sequence will not stop for a keyboard
error, but it will stop for all other errors. (Default value)
–All, but Diskette The system boot sequence will not stop for a disk error,
but it will stop for all other errors.
–All, but Disk/Key The system boot sequence will not stop for a keyboard or
disk error, but it will stop for all other errors.

23 ARK-1382 User Manual
Chapter 3 BIOS Operation
3.2.3 Advanced BIOS Features
Blank Boot [Disabled] (* Advantech feature enhancement)
When enabled, the system displays a blank screen during the BIOS POST
stage.
POST Beep [Enabled] (* Advantech feature enhancement)
When enabled, the system emits beep sounds during the BIOS POST stage.
CPU Feature
This item allows users to adjust CPU features, CPU ratio, VID. Thermal and
special features like XD flag.
Hard Disk Boot Priority
This item allows users to select the boot sequence for system hard drive
devices - HDD, SCSI, RAID.
USB Boot Priority
This item allows user to select boot sequence for USB device Boot.
Virus Warning [Disabled]
This item allows users to choose or disable the virus warning feature for IDE
Hard Disk boot sector protection.
Quick Power On Self Test [Enabled]
This field speeds up the Power-On Self Test (POST) routine by skipping the
second, third, and forth re-tests. Default setting is enabled.
First / Second / Third / Other Boot Drive
Boot Up NumLock Status [On]
When enabled, the keyboard keypad boots up in number mode. When dis-
abled, the keypad boots up in cursor control mode (arrow mode).
Gate A20 Optio [Fast]
This item enables the user to switch A20 control by port 92 or not.
Typematic Rate Setting
This item enables users to enable or disable typematic action. When enabled,
they can set the two typematic controls items.
These fields control the speeds of:
–Typematic Rate (Chars/Sec)
This item controls the speed at which the system registers repeated key-
strokes.
The eight settings are 6, 8, 10, 12, 15, 20, 24 and 30.
–First [USB Device]
–Second [USB-CDROM]
–Third [Hard Disk]
–Other [Enabled]
Hard Disk Select boot device priority by CF.
USB Device Select boot device priority by USB Device.
USB-FDD Select boot device priority by USB-FDD.
USB-CDROM Select boot device priority by USB-CDROM.
LAN Select boot device priority by LAN.
Disabled Disable this boot function.

ARK-1382 User Manual 24
–Typematic Delay (Msec)
This item sets the keypress delay before typematic repetition kicks in. The
four delay options are 250, 500, 750 and 1000.
Security Option [Setup]
APIC Mode[Enabled]
This item allows user to enabled of disabled “Advanced Programmable Inter-
rupt Controller”. APIC is implemented in the motherboard and must be sup-
ported by the operating system, and it extends the number of IRQ's available.
MPS Version Control for OS [1.4]
This item sets the system multiprocessor specification version.
OS Select For DRAM > 64 M [Non-OS2]
Select OS2 only if the system is running OS/2 with greater than 64 MB of RAM
on the system.
Full Screen Logo Show [Enabled]
Shows full screen logo during POST stage; logo image can be customized.
Small Logo (EPA) Show [Disable]
Shows EPA logo during system POST stage.
Summary Screen Show [Enabled]
Shows system status on summary screen page.
Note! These typematic settings apply to systems that communicate with the
keyboard via BIOS. For Windows systems, typematic settings are con-
trolled by keyboard driver settings in Windows Control Panel.
–System System requires password both for bootup and for access to
the Setup page.
–Setup System requires password only for access to the Setup
page, not for bootup. (Default value)

25 ARK-1382 User Manual
Chapter 3 BIOS Operation
3.2.4 Advanced Chipset Features
DRAM Timing Selectable [By SPD]
This item enables users to set optimal timings for items 2 through to 5. The sys-
tem default setting of “By SPD” ensures the system runs with stable and opti-
mal performance.
CAS Latency Time [Auto]
This item enables users to set the timing delay in clock cycles before the
SDRAM starts a read command after receiving it.
DRAM RAS# to CAS# Delay [Auto]
This item enables users to set the timing of the transition from RAS (Row
Address Strobe) to CAS (Column Address Strobe) as both rows and columns
are separately addressed shortly after DRAM is refreshed.
DRAM RAS# Precharge [Auto]
This item enables users to set the DRAM RAS# precharge timing. System
default is set to “Auto” to reference the data from SPD ROM.
Prechage delay (tRAS) [Auto]
This item allows user to adjust memory precharge time.
System Memory Frequency [Auto]
This item allows user to adjust memory frequency to improvement perfor-
mance.
SLP_S4# Assertion Width [1 to 2 sec.]
This item allows user to adjust SLP_S4# signal.This field indicates the mini-
mum assertion width of the SLP_S4# signal to ensure that the DRAMs have
been safely power-cycled.
System BIOS Cacheable [Enabled]
This item allows the system BIOS to be cached to allow faster execution and
better performance.
Video BIOS Cacheable [Disabled]
This item allows the video BIOS to be cached to allow faster execution and bet-
ter performance.
Memory Hole At 15 M-16 M [Disabled]
This item reserves 15 MB-16 MB memory address space to ISA expansion
cards that specifically require the setting. Memory from 15 MB-16 MB will be
unavailable to the system because only expansion cards can access memory in
this area.
PEG/Onboard VGA Control [Auto]
This item allows the user to select whether onboard graphics processor or the
PCI Express card.
On-Chip Frame Buffer Size [8 MB]
This item allows the user to choose Frame Buffer Size. BIOS default value is
set to 8 MB.
Note! This “Advanced Chipset Features” screen controls the configuration of
the board’s chipset; this page is developed to be chipset independent for
fine-tuning system performance. It is strongly recommended that only
technical users make changes to the default settings.

ARK-1382 User Manual 26
DVMT Mode [ DVMT]
This item allows the user to adjust Intel's Dynamic Video Memory Technology
(DVMT).Bios provide three option to choose (DVMT, FIXED and Both).
DVMT/FIXED Memory Size [128MB]
This item allows the user to adjust DVMT/FIXED graphics memory size.
Boot Display [VBIOS Default]
This item allows the user to decide that display mode.
3.2.5 Integrated Peripherals
OnChip IDE Device
This item enables users to set the OnChip IDE device status, including enabling
IDE devices and setting PIO and DMA access mode, plus some new chipset
support for SATA devices (Serial-ATA).
–IDE HDD Block Mode [Enabled]
This item allows the users to enable for automatic detection of optimal num-
ber of block read/writes per sector the drive can support if IDE Hard Driver
supports block mode
–IDE DMA transfer access Mode [Enabled]
This item allows the user to enable the DMA transfer access.
–On-Chip Primary / Secondary PCI IDE [Enabled]
This item allows the user to select the PIO or UDMA mode.
–SATA Mode [IDE]
The item allows the users to support IDE mode.
–SATA Port Speed Settings [Disabled]
This item allows the users to select SATA port speed.
Onboard Device
This item enables users to set the Onboard device status, including enabling
USB, AC97, MC97 and LAN devices.
Super IO Device
This item enables users to set the Super IO device status, including enabling
Floppy, COM, LPT, IR and control for GPIO and Power Fail status.
–Onboard Serial Port 1 [3F8/IRQ4]
This item allows the user to change the COM 1 address and IRQ. BIOS
default value suggest to .3F8/IRQ4.
–Onboard Serial Port 2 [2F8/IRQ3]
This item allows the user to chang13 the COM 2 address and IRQ. BIOS
default value suggest to .2F8/IRQ3.
–UART Mode Select [Normal]
This item allows the selection for the mode of operation of the serial port.
–Onboard Parallel Port [378/IRQ7]
This item allows the user to change the parallel port address. BIOS default
value is set to .378/IRQ7..
Note! This “Integrated Peripherals” screen controls the configuration of the
board’s chipset, including controls for: IDE, ATA, SATA, USB, AC97,
MC97 and Super IO and sensor devices; this page is developed to be
chipset independent.

27 ARK-1382 User Manual
Chapter 3 BIOS Operation
–Parallel Port Mode [SPP]
This item allows the user to change the parallel port mode. The user can
choose .SPP., .EPP., .±ECP. and .ECP+EPP.; SPP (Standard Parallel Port );
ECP (Extended Capabilities Port); and EPP (Enhanced Parallel Port). The
BIOS default value is set to .Normal..
–EPP Mode Select [EPP1.7]
This item allows the user to change the EPP Mode for the parallel port. The
BIOS default value is set to .EPP1.7..
–ECP Mode Use DMA [3]
This item allows the user to change the DMA channel for the parallel port.
The BIOS default value is set to 3.
PWRON After PWR-Fail [Off]
This item allows user to select system power status after power loss.
3.2.6 Power Management Setup
ACPI Function [Enabled]
This item defines the ACPI (Advanced Configuration and Power Interface) fea-
ture that makes hardware status information available to the operating system,
and communicates PC and system device information for improving power
management.
ACPI Suspend Type [S1 (POS)]
This item allows users to select sleep state when the system is in suspend
mode.
–S1(POS) Suspend mode is equivalent to a software power down.
–S3(STR) The system shuts down with the exception of a refresh
current to the system memory.
–S1 & S3 This item is support two mode be selection by software.
Run VGA BIOS if S3 Resume [Auto]
This item allows the system to reinitialize the VGA BIOS after the system has
resumed from ACPI S3 mode.
Power Management Option [User Define]
This item allows user to select system power saving mode.
–Min Saving Minimum power management. Suspend Mode=1 hr.
–Max Saving Maximum power management. Suspend Mode=1 min.
–User Define Allows user to set each mode individually. Suspend Mode=
Disabled or 1 min ~1 hr.
Video Off Method [DPMS]
This item allows users to determine the manner in which the monitor is blanked.
–V/H SYNC+Blank This option will cause the system to turn off vertical and
horizontal synchronization ports and write blanks to the
video buffer.
–Blank Screen This option only writes blanks to the video buffer.
–DPMS Initial displays power management signaling.
Note! This “Power Management Setup” screen configures the system to most
effectively save energy while operating in a manner consistent with your
computer use.

ARK-1382 User Manual 28
Video Off In Suspend [Yes]
This item allows users to turn off video when entering suspend mode.
Suspend Type [Stop Grant]
This item allows users to determine the suspend type.
Modem use IRQ [3]
This item allows users to determine which IRQ the MODEM can use.
Suspend Mode [Disabled]
Shows the time of system inactivity before all devices except the CPU will be
shut off.
HDD Power Down Mode [Disabled]
Shows the time of system inactivity before the hard disk drive will be powered
down.
Soft-Off by PWR-BTTN [Instant-Off]
This item allows users to define power button functions.
–Instant-Off Press power button to power-off instantly.
–Delay 4 Sec Press power button for 4 seconds to power-off.
Energy Lake Function[Disabled]
Wake-Up by PCI card [Enabled]
This item allows users to permit PCI cards to wake up the system from suspend
mode.
Power On by Ring [Enabled]
This item allows users to permit the system to power-on from a modem ring.
USB KB Wake-Up From S3 [Disabled]
This item allows users to use a USB keyboard to wake up the system from
power saving mode.
Resume by Alarm [Disabled]
This item allows users to power on the system at a specified date and/or time.
–Disabled Disable this function.
–Enabled Enable alarm function to power on system
–Data (of month) Alarm1-31
–Time (HH:MM:SS) Alarm(0-23) : (0-59) : 0-59)

29 ARK-1382 User Manual
Chapter 3 BIOS Operation
3.2.7 PnP/PCI Configurations
Init Display First [Onboard]
This item allow user to select initial display mode, optional item include PCI slot
and Onboard.
Reset Configuration Data [Disabled]
This item allows users to clear any PnP configuration data stored in the BIOS.
Resources Controlled By [Auto (ESCD)]
–IRQ Resources
This item allows you respectively assign an interruptive type for IRQ-3, 4, 5,
7, 9, 10, 11, 12, 14, and 15.
PCI VGA Palette Snoop [Disabled]
The item is designed to solve problems caused by some non-standard VGA
cards. A built-in VGA system does not need this function.
INT Pin 1~8 Assignment [Auto]
The interrupt request (IRQ) line assigned to a device connected to the PCI
interface on your system.
Maximum payload Size [128]
The item allows user to adjust maximum TLP (Transaction Layer Packet) pay-
load size.
3.2.8 PC Health Status
Shutdown Temperature [Disabled]
This item allow user to set the temperature to notify the ACPI OS to shutdown
the system.
Current System/CPU Temp [Show Only]
This item displays current system and CPU temperature.
2.5 V / 3.3 V / 5 V / 12 V and VCore [Show Only]
This item displays current CPU and system Voltage.
Note! This “PnP/PCI Configurations” screen is setting up the IRQ and DMA
(both PnP and PCI bus assignments.)
Note! This “PC Health Status” screen reports the Thermal, FAN and Voltage
status of the board. This page is developed to be chipset independent.

ARK-1382 User Manual 30
3.2.9 Frequency/Voltage Control
Auto Detect PCI Clk [Enabled]
This item enables users to set the PCI Clock by system automatic detection or
by manual.
Spread Spectrum [Enabled]
This item enables users to set the spread spectrum modulation.
3.2.10 Load Optimized Defaults
Note! NOTE: This “Frequency/Voltage Control” option controls the CPU Host
and PCI frequency, this page is developed by CPU and Chipset inde-
pendent, some items will show up when you install a processor which
supports this function.
Note! Load Optimized Defaults loads the default system values directly from
ROM. If the stored record created by the Setup program should ever
become corrupted (and therefore unusable). These defaults will load
automatically when you turn the ARK-1382 Series system on.

31 ARK-1382 User Manual
Chapter 3 BIOS Operation
3.2.11 Set Password
To Establish Password
1. Choose Set Password from the CMOS Setup Utility main menu and press
<Enter>.
2. When you see “Enter Password”, enter the desired password and press
<Enter>.
3. At the “Confirm Password” prompt, retype the desired password, then press
<Enter>.
4. Select Save to CMOS and EXIT, type <Y>, then <Enter>.
To Change Password
1. Choose Set Password from the CMOS Setup Utility main menu and press
<Enter>.
2. When you see “Enter Password”, enter the existing password and press
<Enter>.
3. You will see “Confirm Password”. Type it again, and press <Enter>.
4. Select Set Password again, and at the ”Enter Password” prompt, enter the new
password and press <Enter>.
5. At the ”Confirm Password” prompt, retype the new password, and press
<Enter>.
6. Select Save to CMOS and EXIT, type <Y>, then <Enter>.
To Disable Password
1. Choose Set Password from the CMOS Setup Utility main menu and press
<Enter>.
2. When you see “Enter Password”, enter the existing password and press
<Enter>.
3. You will see “Confirm Password”. Type it again, and press <Enter>.
4. Select Set Password again, and at the “Enter Password” prompt, don’t enter
anything; just press <Enter>.
5. At the “Confirm Password” prompt, again, don’t type in anything; just press
<Enter>.
6. Select Save to CMOS and EXIT, type <Y>, then <Enter>.
Note! To enable this feature, you should first go to the Advanced BIOS Fea-
tures menu, choose the Security Option, and select either Setup or Sys-
tem, depending on what you want password protected. Setup requires
the password only to enter Setup. System requires the password every
time the system boots, and to enter Setup. A password may be at most
8 characters long.

ARK-1382 User Manual 32
3.2.12 Save & Exit Setup
3.2.13 Exit Without Saving
Note! Type “Y” will quit the BIOS Setup Utility and save user setup value to
CMOS.
Type “N” will return to BIOS Setup Utility.
Note! Type “Y” will quit the BIOS Setup Utility without saving to CMOS.
Type “N” will return to BIOS Setup Utility.

Chapter 4
4Full Disassembly
Procedure
ARK-1382 User Manual 34
4.1 Introduction
If you want to completely disassemble ARK-1382, follow the step-by-step procedures
below. Users should be aware that Advantech Co., Ltd. takes no responsibility what-
soever for any problems or damage caused by the user disassembly of ARK-1382.
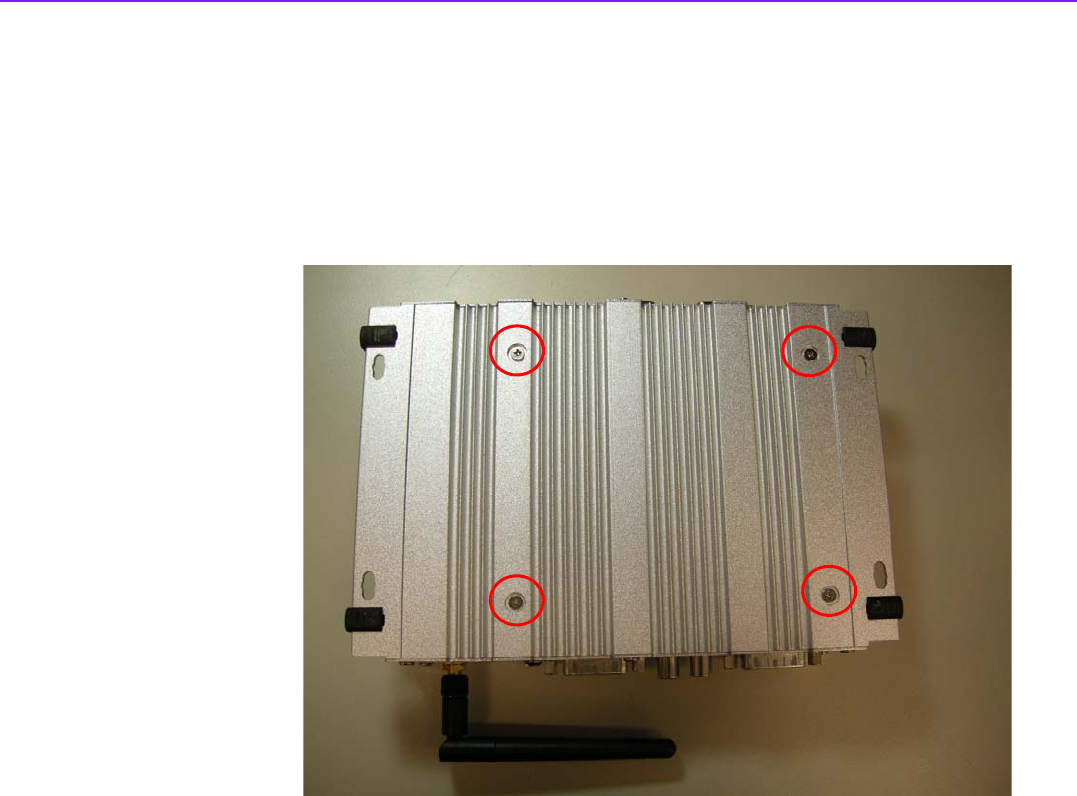
Make sure the power cord of ARK-1382 is unplugged before you start disassembly.
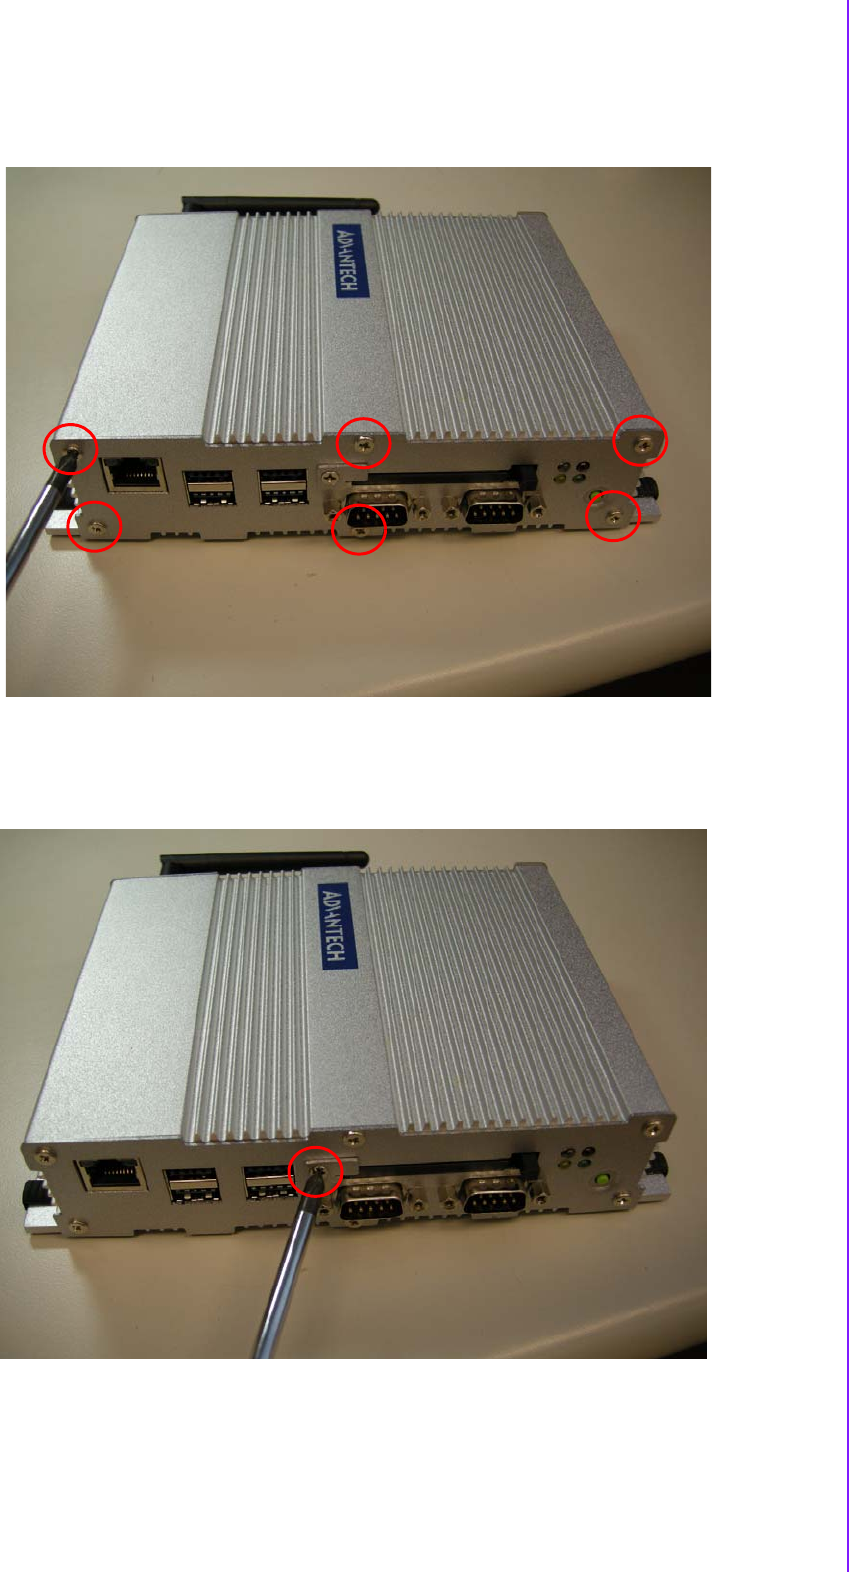
1. Unscrew the 4 screws on the bottom side.
Figure 4.1 Unscrew the 4 screws on the bottom side
35 ARK-1382 User Manual
Chapter 4 Full Disassembly Procedure
2. Unscrew the 6 screws on the front side frame.
Figure 4.2 Unscrew the 6 screws on the front side frame
3. Unscrew the 1 screws on the front face plate.
Figure 4.3 Unscrew the 1 screws on the front face plate

ARK-1382 User Manual 36
4. Unscrew the 4 Hex-bolt on the front face plate.
Figure 4.4 Unscrew the 4 Hex-bolt on the front face plate
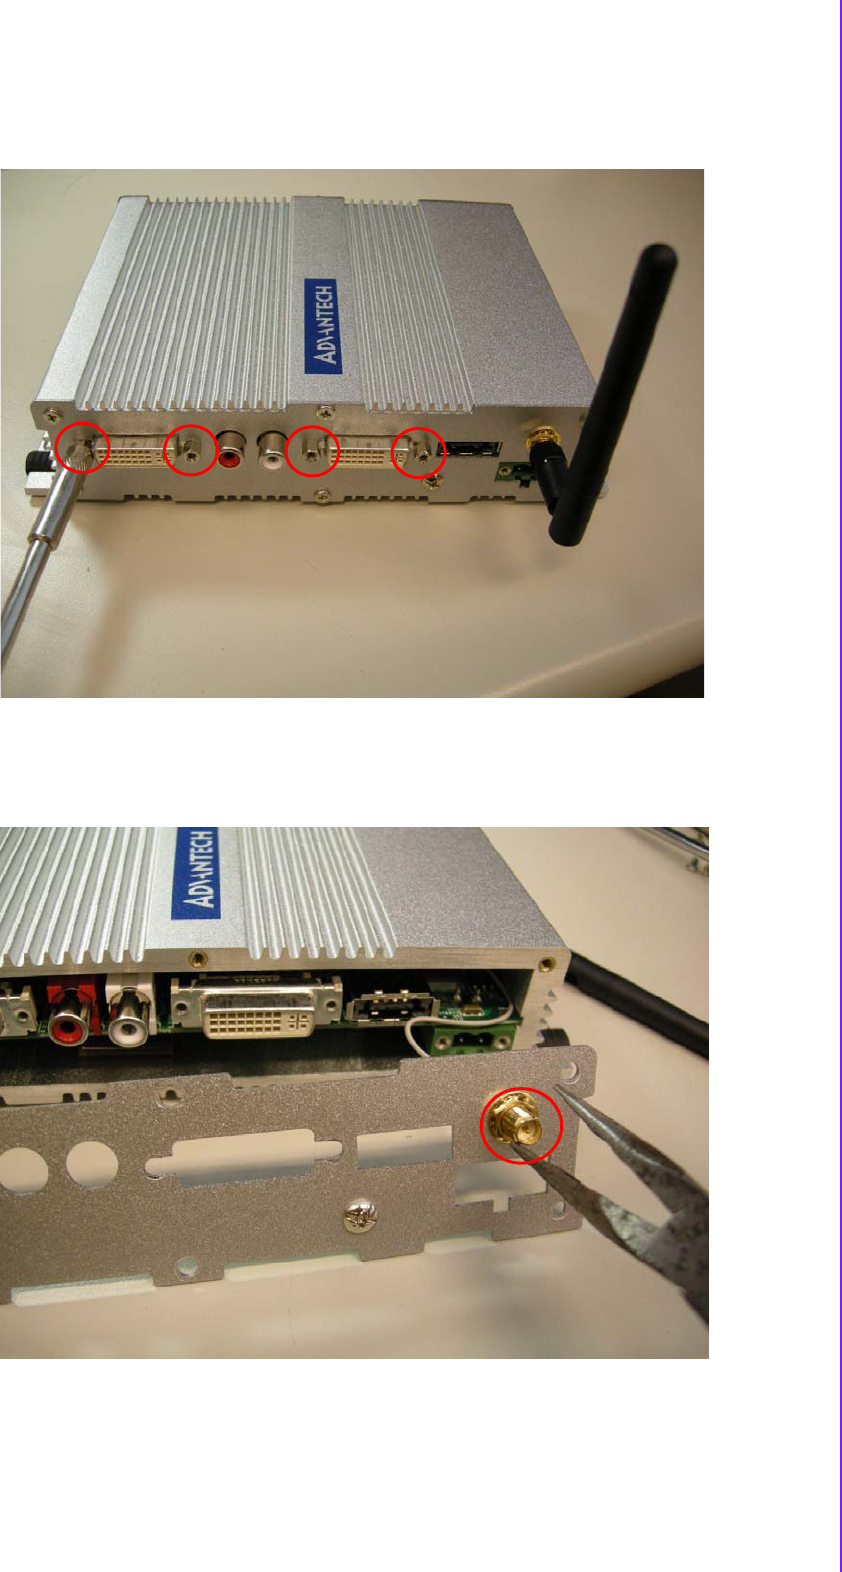
5. Unscrew the 6 screws on the rear side frame.
Figure 4.5 Unscrew the 6 screws on the rear side frame
37 ARK-1382 User Manual
Chapter 4 Full Disassembly Procedure
6. Unscrew the 4 Hex-bolt on the rear face plate.
Figure 4.6 Unscrew the 4 Hex-bolt on the rear face plate
7. Unscrew the antenna mounting screw.
Figure 4.7 Unscrew the antenna mounting screw
ARK-1382 User Manual 38
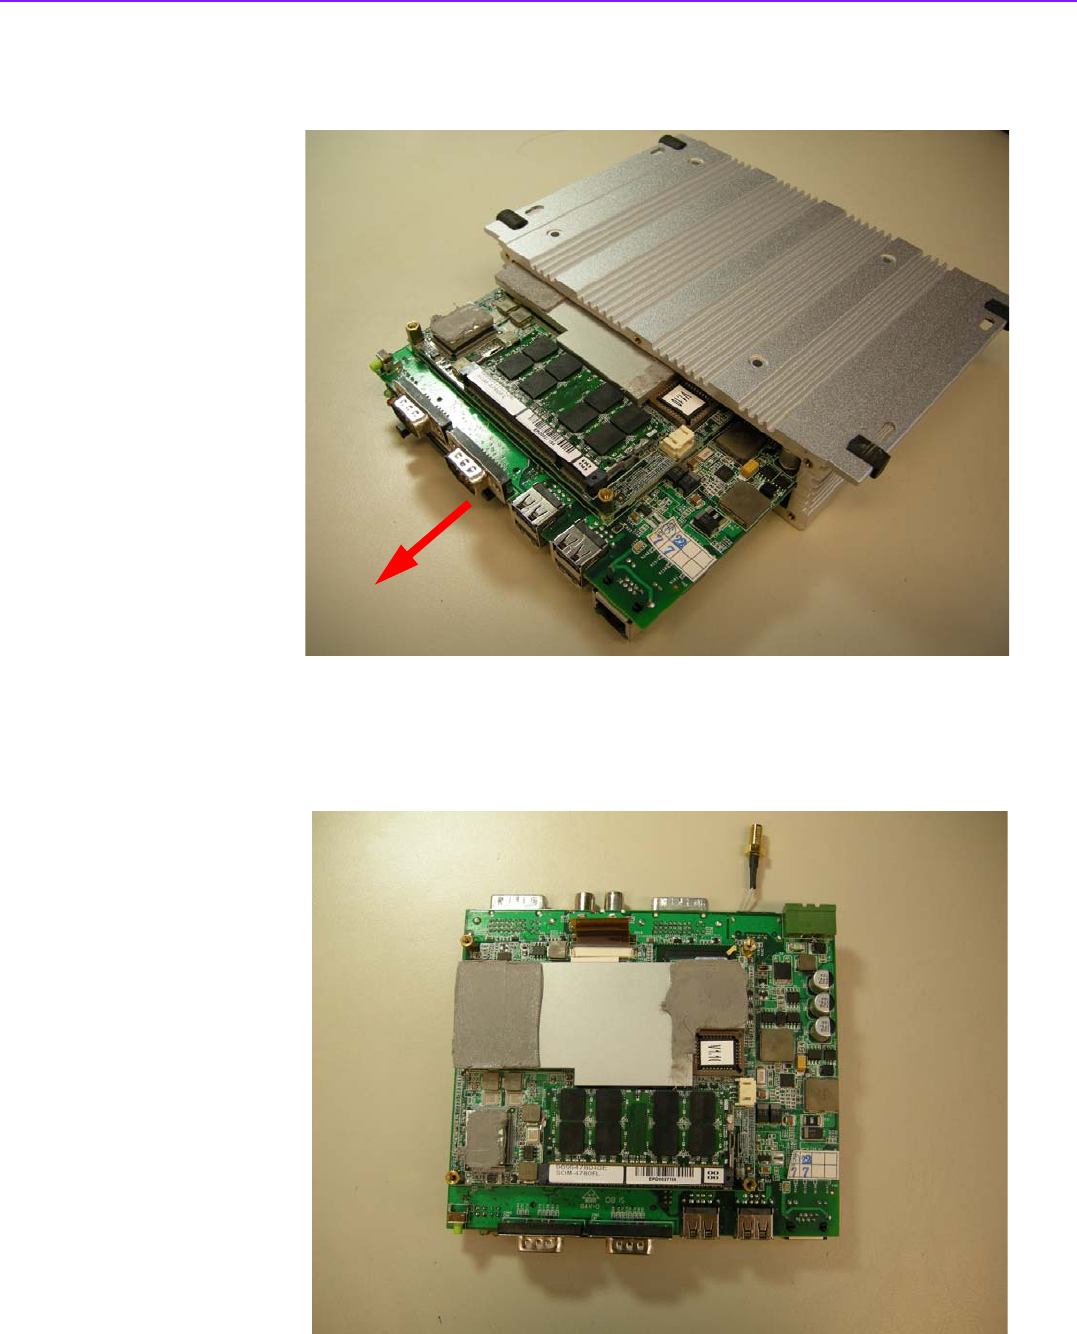
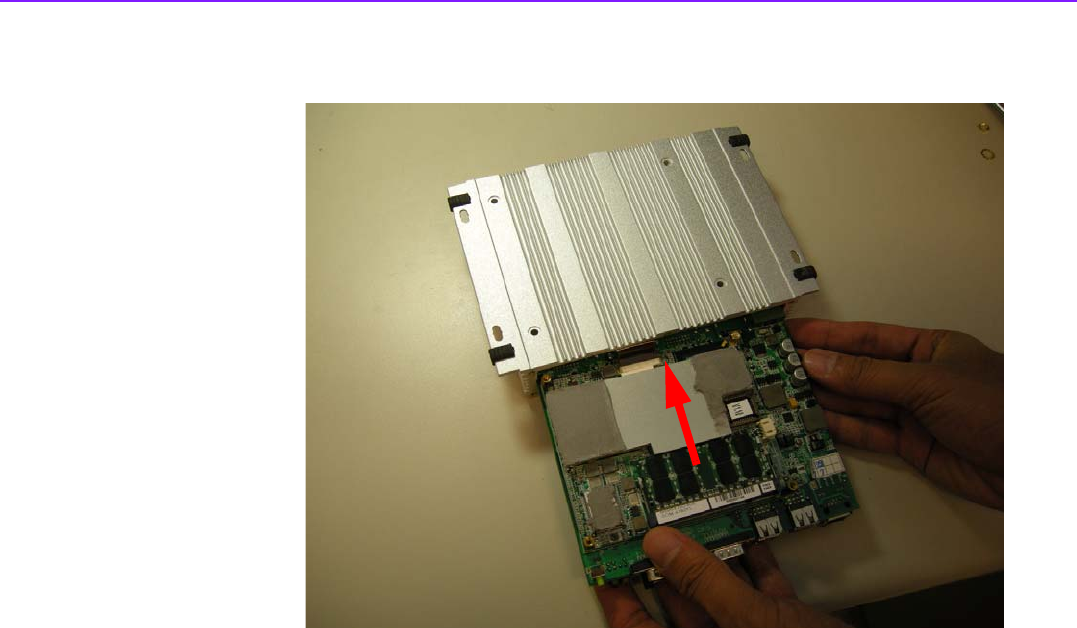
8. Pull out the carrier board from the Aluminum case on bottom side, and be care-
ful for the thermal pad.
Figure 4.8 Pull out the carrier board from the Aluminum case on bottom side,
and be careful for the thermal pad
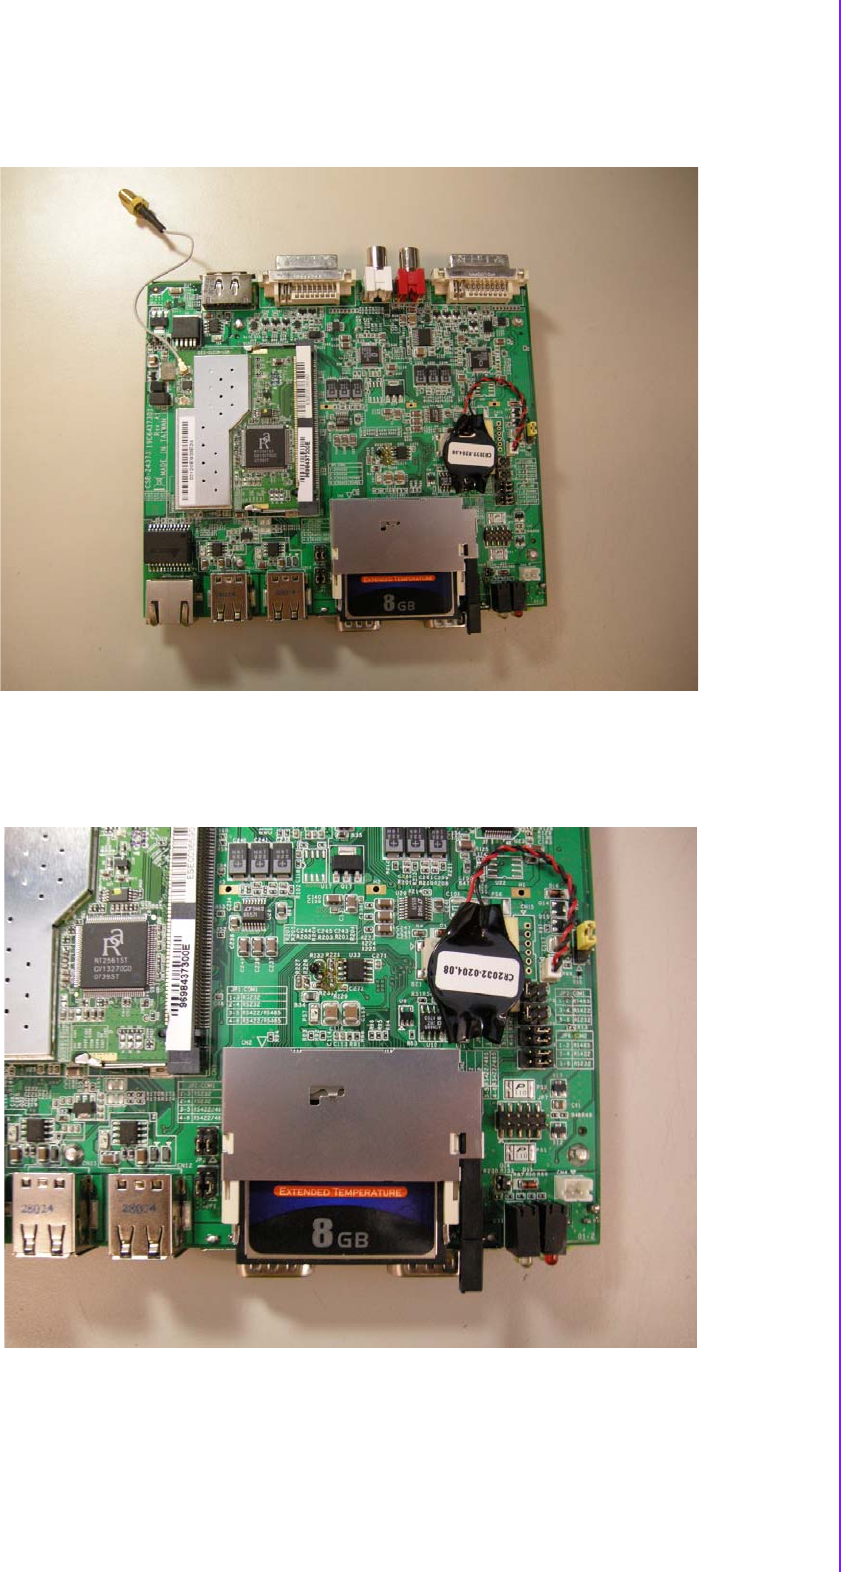
9. Memory socket.
Figure 4.9 Memory Socket
39 ARK-1382 User Manual
Chapter 4 Full Disassembly Procedure
10. MiniPCI socket.
Figure 4.10 MiniPCI Socket
11. Jumper setting.
Figure 4.11 Jumper Setting
ARK-1382 User Manual 40
12. Install the board on the bottom side and be careful for thermal pad.
Figure 4.12 Install the board on the bottom side and be careful for thermal pad

Appendix A
ARealtek RTL8111B/
8111C Gigabit Boot
Agent Configuration
Menu

ARK-1382 User Manual 42
A.1 Realtek RTL8111B/8111C Gigabit Boot Agent
Configuration Menu
This appendix allows the user to control the Boot Agent Setup Menu
1. When user need for the boot from LAN application, you can press the Shift +
F10 to enter Boot Agent Setup Menu to setting during the system initialization.
2. The Intel Boot Agent Provide the two of Network Boot protocols (PXE and RPL),
user can choose it on Network Boot Protocol item.

43 ARK-1382 User Manual
Appendix A Realtek RTL8111B
/
8111C Gigabit Boot Agent Configuration
Menu
This equipment has been tested and found to comply with the limits for a Class B digital device, pursuant to part 15 of the FCC
rules. These limits are designed to provide reasonable protection against harmful interference in a residential installation. This
equipment generates, uses and can radiate radio frequency energy and, if not installed and used in accordance with the
instructions, may cause harmful interference to radio communications. However, there is no guarantee that interference will not
occur in a particular installation. If this equipment does cause harmful interference to radio or television reception, which can be
determined by turning the equipment off and on, the user is encouraged to try to correct the interference by one or more of the
following measures:
-Reorient or relocate the receiving antenna.
-Increase the separation between the equipment and receiver.
-Connect the equipment into an outlet on a circuit different from that to which the receiver is connected.
-Consult the dealer or an experienced radio/TV technician for help.
You are cautioned that changes or modifications not expressly approved by the party responsible for compliance could void your
authority to operate the equipment.
FCC RF Radiation Exposure Statement:
1. This Transmitter must not be co-located or operating in conjunction with any other antenna or transmitter.
2. This equipment complies with FCC RF radiation exposure limits set forth for an uncontrolled environment. This equipment
should be installed and operated with a minimum distance of 20 centimeters between the radiator and your body.
FCC Warning statement

www.advantech.com
Please verify specifications before quoting. This guide is intended for reference
purposes only.
All product specifications are subject to change without notice.
No part of this publication may be reproduced in any form or by any means,
electronic, photocopying, recording or otherwise, without prior written permis-
sion of the publisher.
All brand and product names are trademarks or registered trademarks of their
respective companies.
© Advantech Co., Ltd. 2008