Advantech Co FWA1012VC Network Security Platform User Manual FWA 1012VC v1 1
Advantech Co Ltd Network Security Platform FWA 1012VC v1 1
User Manual

Copyright2014AdvantechCo.Ltd.Allrightsreserved.
USERMANUAL
REVISION1.1 DATE2018/10/16
FWA‐1012VC
NETWORKSECURITYPLATFORM

Copyright2017AdvantechCo.Ltd.Allrightsreserved. Page2
Content
PREFACE.................................................................................................................................4
REVISIONHISTORY ............................................................................................................................................................ 4
COPYRIGHT ......................................................................................................................................................................... 4
WARNINGS,CAUTIONSANDNOTES ................................................................................................................................. 5
SAFETYINSTRUCTIONS ..................................................................................................................................................... 6
DECLARATIONOFCONFORMITY ....................................................................................................................................... 8
FCC Class B ..................................................................................................................................................................................................... 8
BSMI .................................................................................................................................................................................................................. 8
CCC ..................................................................................................................................................................................................................... 9
CE Mark ........................................................................................................................................................................................................ 10
TECHNICALSUPPORTANDASSISTANCE ....................................................................................................................... 10
WARRANTYANDRMA ................................................................................................................................................... 11
1.INTRODUCTION.......................................................................................................12
1.1OVERVIEW ........................................................................................................................................................ 12
1.2SYSTEM OUTLOOK ........................................................................................................................................... 13
1.2.1Front View .............................................................................................................................................................................. 13
1.2.2Rear View ................................................................................................................................................................................ 13
1.3SYSTEM LAYOUT .............................................................................................................................................. 14
1.4BLOCK DIAGRAM ............................................................................................................................................. 15
1.5COMPONENT INSTALLATION ......................................................................................................................... 16
1.5.1Memory/2.5” SSD_HDD/ POE Module/ M.2 SSD/ LTE Module/WiFi Module ......................................... 16
1.5.2Rack mount Kits ................................................................................................................................................................... 18
1.5.3Antenna installation ........................................................................................................................................................... 20
1.6OPTIMUM MOUNTING ENVIRONMENT ......................................................................................................... 21
1.6.1Space Requirement ............................................................................................................................................................. 21
1.6.2Temperature Requirement ............................................................................................................................................. 21
2.OPERATION...............................................................................................................22
2.1POWERING UP/DOWN THE PLATFORM ........................................................................................................ 22
2.2BOOTING FROM NETWORK VIA PXE ............................................................................................................. 23
2.3LED BEHAVIOUR ............................................................................................................................................ 27
2.3.1For the description of Lan port LEDs ......................................................................................................................... 27
2.3.2SFP LED indicator function in front: ........................................................................................................................... 27
2.3.3RJ45 LED indicator function in front: ......................................................................................................................... 27
2.3.4RJ45 LED indicator function w/ POE in front: ........................................................................................................ 28
2.4MAIN BOARD CONNECTOR PLACEMENT ...................................................................................................... 29
3.BIOS..............................................................................................................................31
3.1BIOS DEFAULTS .............................................................................................................................................. 31
3.2BIOS SETUP MENU ........................................................................................................................................ 31
3.2.1Main Setup Menu ................................................................................................................................................................. 32
3.2.2Platform Setup Menu ......................................................................................................................................................... 35
3.2.3Hardware setup menu ....................................................................................................................................................... 43
3.2.4Setup POST & Boot Menu ................................................................................................................................................. 50

Copyright2017AdvantechCo.Ltd.Allrightsreserved. Page3
3.2.5Save & Exit Menu ................................................................................................................................................................. 55
APPENDIXA:ACKNOWLEDGEMENTS..........................................................................57
APPENDIXB:GLOSSARY..................................................................................................58

Copyright2017AdvantechCo.Ltd.Allrightsreserved. Page4
PREFACE
RevisionHistory
Date Revision Modifications
6/August/2018 0.1 Initialversion
16/August/2018 0.2 UpdateOperationandBIOSsection
17/August/2018 1.0 Officialrelease
25/September/2018 1.1 Updatechapter1.5
Copyright
ThedocumentationandthesoftwareincludedwiththisproductarecopyrightedbyAdvantechCo.,Ltd.
AdvantechCo.,Ltd.reservestherighttomakeimprovementsintheproductsdescribedinthismanualatany
timewithoutnotice.
Nopartofthismanualmaybereproduced,copied,translatedortransmittedinanyformorbyanymeans
withoutthepriorwrittenpermissionofAdvantechCo.,Ltd.Informationprovidedinthismanualisintended
tobeaccurateandreliable.
FormoreinformationaboutthisandotherAdvantechproducts,pleasevisitourwebsiteat:
http://www.advantech.com/
http://www.advantech.com/ePlatform/
Fortechnicalsupportandservice,pleasevisitoursupportwebsiteat:
http://support.advantech.com.tw/support/

Copyright2017AdvantechCo.Ltd.Allrightsreserved. Page5
Warnings,CautionsandNotes
Warning!Warningsindicateconditions,which,ifnotobserved,cancausepersonalinjury.
AVERTISSEMENT! Les avertissements indiquent des conditions qui, si elles ne sont pas observées,
peuventprovoquerdesblessures.
Caution!Cautionsareincludedtohelpyouavoiddamaginghardwareorlosingdata.
ATTENTION! Des précautions sont incluses pour vous aider à éviter d'endommager le matériel ou de
perdredesdonnées.
Note!Notesprovideadditionalinformation.
Remarque!Lesnotesfournissentdesinformationssupplémentaires.

Copyright2017AdvantechCo.Ltd.Allrightsreserved. Page6
SafetyInstructions
1.Readthesesafetyinstructionscarefully.
2.KeepthisUserManualforlaterreference.
3. Disconnect this equipment from any AC outlet before cleaning.Useadampcloth.Donotuseliquidor
spraydetergentsforcleaning.
4.Forplug‐inequipment,thepoweroutletsocketmustbelocatedneartheequipmentandmustbeeasily
accessible.
5.Keepthisequipmentawayfromhumidity.
6.Putthisequipmentonareliablesurfaceduringinstallation.Droppingitorlettingitfallmaycausedamage.
7.Theopeningsontheenclosureareforairconvection.Protecttheequipmentfromoverheating.DONOT
COVERTHEOPENINGS.
8.Makesurethevoltageofthepowersourceiscorrectbeforeconnecting the equipment to the power
outlet.
9.Positionthepowercordsothatpeoplecannotsteponit.Donotplaceanythingoverthepowercord.
10.Allcautionsandwarningsontheequipmentshouldbenoted.
11.Iftheequipmentisnotusedforalongtime,disconnectitfromthepowersourcetoavoiddamageby
transientovervoltage.
12.Neverpouranyliquidintoanopening.Thismaycausefireorelectricalshock.
13. Never open the equipment. For safety reasons, the equipment should be opened only by qualified
servicepersonnel.
14.Ifoneofthefollowingsituationsarises,gettheequipmentcheckedbyservicepersonnel:
• Thepowercordorplugisdamaged.
• Liquidhaspenetratedintotheequipment.
• Theequipmenthasbeenexposedtomoisture.
• Theequipmentdoesnotworkwell,oryoucannotgetittoworkaccordingtotheuser'smanual.
• Theequipmenthasbeendroppedanddamaged.
• Theequipmenthasobvioussignsofbreakage.
15.Donotleavethisequipmentinanenvironmentwherethestoragetemperaturemaygobelow‐40°C(‐
40°F)orabove85°C(185°F).Thiscoulddamagetheequipment.Theequipmentshouldbeinacontrolled
environment.
16.Caution:Dangerofexplosionifbatteryisincorrectlyreplaced.Replaceonlywiththesameorequivalent
typerecommendedbythemanufacturer,discardusedbatteriesaccordingtothemanufacturer's
instructions.
17.Thesoundpressurelevelattheoperator'spositionaccordingtoIEC704‐1:1982isnomorethan70dB
(A).
18.RESTRICTEDACCESSAREA:TheequipmentshouldonlybeinstalledinaRestrictedAccessArea.
19.DISCLAIMER:ThissetofinstructionsisgivenaccordingtoIEC704‐1.Advantechdisclaimsallresponsibility
fortheaccuracyofanystatementscontainedherein.
French:
1.Lisezcesinstructionsdesécuritéattentivement.
2.Conservezcemanueld'utilisationpourréférenceultérieure.

Copyright2017AdvantechCo.Ltd.Allrightsreserved. Page7
3.Débranchezcetéquipementdetouteprisesecteuravantdelenettoyer.Utilisezunchiffonhumide.
N'utilisezpasdedétergentliquideoupulvérisépourlenettoyage.
4.Pourleséquipementsenfichables,laprisedecourantdoitêtresituéeprèsdel'équipementetdoitêtre
facilementaccessible.
5.Gardezcetéquipementàl'abridel'humidité.
6.Placezcetéquipementsurunesurfacefiablependantl'installation.Lelaissertomberoulelaissertomber
peutcauserdesdommages.
7.Lesouverturessurl'enceinteserventàlaconvectiondel'air.Protégezl'équipementcontrelasurchauffe.
NECOUVREZPASLESOUVERTURES.
8.Assurez‐vousquelatensiondelasourced'alimentationestcorrecteavantdeconnecterl'équipementàla
prisedecourant.
9.Placezlecordond'alimentationdemanièreàcequepersonnenepuissemarcherdessus.Neplacezrien
surlecordond'alimentation.
10.Touteslesmisesengardeetlesavertissementssurl'équipementdoiventêtrenotés.
11.Sil'équipementn'estpasutilisépendantunelonguepériode,débranchez‐ledelasourced'alimentation
pourévitertoutdommagedûàunesurtensiontransitoire.
12.Neversezjamaisdeliquidedansuneouverture.Celapourraitprovoquerunincendieouunchoc
électrique.
13.N'ouvrezjamaisl'équipement.Pourdesraisonsdesécurité,l'équipementdoitêtreouvertuniquement
pardupersonnelqualifié.
14.Sil'unedessituationssuivantesseprésente,faitesvérifierl'équipementparlepersonneldeservice:
•Lecordond'alimentationoulapriseestendommagé.
•Leliquideapénétrédansl'équipement.
•L'équipementaétéexposéàl'humidité.
•L'équipementnefonctionnepasbien,ouvousnepouvezpaslefairefonctionnerselonlemanuelde
l'utilisateur.
•L'équipementaétééchappéetendommagé.
•L'équipementprésentedessignesévidentsderupture.
15.Nelaissezpascetappareildansunenvironnementoùlatempératuredestockagepeutêtreinférieureà‐
40°Cousupérieureà85°C.Celapourraitendommagerl'équipement.L'équipementdevraitêtredansun
environnementcontrôlé.
16.Attention:Dangerd'explosionsilabatterieestincorrectementremplacée.Remplacezuniquementparle
mêmetypeouuntypeéquivalentrecommandéparlefabricant,jetezlespilesusagéesconformémentaux
instructionsdufabricant.
17.Leniveaudepressionacoustiqueàlapositiondel'opérateur,conformémentàlanormeCEI704‐1:1982,
nedépassepas70dB(A).
18.ZONED'ACCESRESTREINTE:L'équipementnedoitêtreinstalléquedansunezoned'accèsrestreint.
19.AVERTISSEMENT:Cetensembled'instructionsestdonnéconformémentàlaCEI704‐1.Advantech
déclinetouteresponsabilitéquantàl'exactitudedesdéclarationscontenuesdanscedocument.

Copyright2017AdvantechCo.Ltd.Allrightsreserved. Page8
DeclarationofConformity
FCCCLASSB
FederalCommunicationsCommission(FCC)Statement
ThisdevicecomplieswithPart15oftheFCCRules.Operationissubjecttothefollowingtwoconditions:
1)thisdevicemaynotcauseharmfulinterferenceand
2)thisdevicemustacceptanyinterferencereceived,includinginterferencethatmaycauseundesired
operationofthedevice
15.105(b)
ThisequipmenthasbeentestedandfoundtocomplywiththelimitsforaClassBdigitaldevice,pursuantto
part15oftheFCCrules.Theselimitsaredesignedtoprovidereasonableprotectionagainstharmful
interferenceinaresidentialinstallation.
Thisequipmentgeneratesusesandcanradiateradiofrequencyenergyand,ifnotinstalledandusedin
accordancewiththeinstructions,maycauseharmfulinterferencetoradiocommunications.However,there
isnoguaranteethatinterferencewillnotoccurinaparticularinstallation.Ifthisequipmentdoescause
harmfulinterferencetoradioortelevisionreception,whichcanbedeterminedbyturningtheequipmentoff
andon,theuserisencouragedtotrytocorrecttheinterferencebyoneormoreofthefollowingmeasures:
‐Reorientorrelocatethereceivingantenna.
‐Increasetheseparationbetweentheequipmentandreceiver.
‐Connecttheequipmentintoanoutletonacircuitdifferentfromthattowhichthereceiverisconnected.
‐Consultthedealeroranexperiencedradio/TVtechnicianforhelp.
FCCRFRadiationExposureStatement:
1.ThisTransmittermustnotbeco‐locatedoroperatinginconjunctionwithanyotherantennaor
transmitter.
2.ThisequipmentcomplieswithFCCRFradiationexposurelimitssetforthforanuncontrolled
environment.Thisequipmentshouldbeinstalledandoperatedwithaminimumdistanceof20centimeters
betweentheradiatorandyourbody.
FCCCaution:Anychangesormodificationsnotexpresslyapprovedbythepartyresponsibleforcompliance
couldvoidtheuser'sauthoritytooperatethisequipment.
BSMI
警告使用者:這是甲類資訊產品,在居住的環境中使用時,可能會造成射頻干擾,在這種情況下,使
用者會被要求採取某些適當對策。
安全指示
1.請仔細閱讀此安全操作說明。
2.請妥善保存此用戶手冊供日後參考。
3.用濕抹布清洗設備前,請確認拔除電源線。請勿使用液體或去污噴霧劑清洗設備。

Copyright2017AdvantechCo.Ltd.Allrightsreserved. Page9
4.對於使用電源線的設備,設備周圍必須有容易接觸到的電源插座。
5.請勿在潮濕環境中試用設備。
6.請在安裝前確保設備放置在可靠的平面上,意外摔落可能會導致設備損壞。
7.設備機殼的開孔適用於空氣對,從而防止設備過熱。請勿覆蓋開孔。
8.當您連接設備到電源插座前,請確認電源插座的電壓符合要求。
9.請將電源線佈置在人們不易絆倒的位置,請勿在電源線上覆蓋任何雜物。
10.請注意設備上所有的警告標示。
11.如果長時間不使用設備,請拔除與電源插座的連結,避免設備被超標的電壓波動損壞。
12.請勿讓任何液體流入通風口,以免引起火灾或短路。
13.請勿自行打開設備。為了確保您的安全,請透過經認證的工程師來打開設備。
14.如遇下列情况,請由專業人員維修:
電源線或插頭損壞;
設備內部有液體流入;
設備曾暴露在過度潮濕環境中使用;
設備無法正常工作,或您無法透過用戶手冊來正常工作;
設備摔落或損壞;
設備有明顯外觀損;
15.請勿將設備放置在超出建議溫度範圍的環境,即不要低於0°C(‐20°C;‐4°F)或高於40°C(60°C;140°F),
否則可能會造成設備損壞。
16.注意:若電池更換不正確,將有爆炸危險。因此,只可以使用製造商推薦的同一種或者同等型號
的電池進行替換。請按照製造商的指示處理舊電池。
17.根據IEC704‐1:1982規定,設備產生的音量不高於70分貝。
18.免責聲明:請安全訓示符合IEC704‐1要求。研華公司對其內容之準確性不承擔任何法律責任。
CCC
警告使用者:这是甲类资讯产品,在居住的环境中使用,可能会造成射频干扰,在这种情况下,使用
者会被要求采取某些适当的对抗。
声明:此为A级产品,在生活环境中,可能会造成无线干扰,在这种情况下,可能需要用户对其干扰
采取切实可行的措施。
安全指令
1.请仔细阅读此安全操作说明。
2.请妥善保存此用户手册供日后参考。
3.用湿抹布清洗设备前,请从插座拔下电源线。请不要使用液体或去污喷雾剂清洗设备。
4.对于使用电源线的设备,设备周围必须有容易连接到的电源插座。
5.请让设备远离潮湿环境。
6.请在安装前确保设备放置在可靠的平面上,意外跌落可能会导致设备损坏。
7.设备外壳的开口是用于空气对流,从而防止设备过热。请不要覆盖这些开口。

Copyright2017AdvantechCo.Ltd.Allrightsreserved. Page10
8.当您连接设备到电源插座上前,请确认电源插座的电压是否符合要求。
9.请将电源线安置在人们不易绊到的位置,并不要在电源在线覆盖任何杂物。
10.请注意设备上的所有警告和注意标语。
11.如果长时间不使用设备,请将设备与电源插座间的电线断开,避免设备被超目标电压波动损坏。
12.请不要让任何液体流入通风口,以免引起火灾或者电路短路。
13.请不要自行打开设备。为了确保您的安全,请由经过认证的工程师来打开设备。
14.如遇下列情况,请由专业人员来维修:
电源线或者插头损坏;
设备内部有液体流入;
设备曾暴露在于于潮湿的环境中使用;
设备无法正常工作,或您无法通过用户手册来使其正常工作;
设备跌落或者损坏;
设备有明显的外观破损。
15.请不要把设备放置在超出我们建议的温度范围的环境,即不要低于0°C(‐20°C;‐4°F)或高于
40°C(60°C;140°F),否则可能会损坏设备。
16.注意:如果电池放置不正确,将有爆炸的危险,因此,只可以使用制造商推荐的同一种或者同等
型号的电池进行替换。请按照制造商的指示处理已使用过的电池。
17.根据IEC704‐1:1982规定,设备产生的音量不高于70分贝。
18.免责声明:请安全训示符合IEC704‐1要求。研华公司对其内容之准确性不承担任何法律责任。
CE
M
ARK
TheCEmarkingonthisproductindicatesthatitisincompliancewiththeEuropeanUnionEMCDirective
2014/30/EU,SafetyDirective2014/35/EU.
LemarquageCEsurceproduitindiquequ'ilestconformeàlaDirectiveeuropéennesurlacompatibilité
électromagnétique2014/30/UE,Directivesurlasécurité2014/35/UE.
Note!Theequipmentisoperatedandmaintainedonlybyprofessionals
Remarque!L'équipementestexploitéetentretenuuniquementpardesprofessionnels
TechnicalSupportandAssistance
1.VisittheAdvantechwebsiteatwww.advantech.com/supportwhereyoucanfindthelatestinformation
abouttheproduct.
2. Contact your distributor, sales representative, or Advantech's customer service centre for technical
support if you need additional assistance. Worldwide contact information can be found on
www.advantech.com.Pleasehavethefollowinginformationreadybeforeyoucall:
• Productnameandserialnumber
• Descriptionofyourperipheralattachments
• Descriptionoffirmwareandsoftwareversionsinstalledontheproduct
• Acompletedescriptionoftheproblem

Copyright2017AdvantechCo.Ltd.Allrightsreserved. Page11
• Theexactwordingofanyerrormessages
3.Formoreinformationpleasecontactncg@advantech.comorvisitwww.advantech.com/nc.
WarrantyandRMA
ProductWarranty(2years)
Advantech warrants to you, the original purchaser, that each of its products will be free from defects in
materialsandworkmanshipfortwoyearsfromthedateofpurchase.
Thiswarrantydoesnotapplytoanyproductswhichhavebeenrepairedor altered bypersonsotherthan
repair personnel authorized by Advantech, or which have been subject to misuse, abuse, accident or
improperinstallation.Advantechassumesnoliabilityunderthetermsofthiswarrantyasaconsequenceof
suchevents.
Because of Advantech’s high quality‐control standards and rigorous testing, most of our customers never
need to use our repair service. If an Advantech product is defective, it will be repaired or replaced at no
chargeduringthewarrantyperiod.Foroutof‐warrantyrepairs,youwillbebilledaccordingto the costof
replacementmaterials,servicetimeandfreight.Pleaseconsultyourdealerformoredetails.
Ifyouthinkyouhaveadefectiveproduct,followthesesteps:
1.Collectalltheinformationabouttheproblemencountered.(Forexample,CPUspeed,Advantechproducts
used,otherhardwareandsoftwareused,etc.)Noteanythingabnormalandlistanyonscreenmessagesyou
getwhentheproblemoccurs.
2.Callyourdealeranddescribetheproblem.Pleasehaveyourmanual,product,andanyhelpfulinformation
readilyavailable.
3.Ifyourproductisdiagnosedasdefective,obtainanRMA(returnmerchandiseauthorization)numberfrom
yourdealer.Thisallowsustoprocessyourreturnmorequickly.
4. Carefully pack the defective product, a fully‐completed Repair and Replacement Order Card and a
photocopyproofofpurchasedate(suchasyoursalesreceipt)inashippablecontainer.Aproductreturned
withoutproofofthepurchasedateisnoteligibleforwarrantyservice.
5.WritetheRMAnumbervisiblyontheoutsideofthepackageandshipitprepaidtoyourdealer.

Copyright2017AdvantechCo.Ltd.Allrightsreserved. Page12
1. INTRODUCTION
1.1 Overview
FWA‐1012VCisdesktopnetworkplatformwhichispoweredbyIntel®Atom®C3000ProcessorFamily.The
Intel®Atom®C3000ProcessorisintegratedwithIntelQuickAssistTechnologytoincreasesencryptedpacket
throughput.
FWA‐1012VCplatformalsointegratestwo1GbEFPSportsandsix1GbERJ45ports.TwoofsixRJ45portsare
supportedIEEE®802.3afPOEwhichcanpoweruptotwo25.5WPDdevice.StorageoptionsincludeoneM.2
2280andone2.5”SATAdevice.
FWA‐1012VCtotalcansupport1x2.4G/5Gwirelessmoduleand1x2G/4GLTEmodulewithdualSIMslots.
Moreover,FWA‐1012VCreservesdesignfor2nd2.4G/5Gwirelessmoduleand1x2G/4GLTEmodule.
FormoreinformationrelatedtoFWA‐1012VC,pleasecheckbelowlink:
http://www.advantech.com/products/6e5d3cbf‐5420‐4e95‐9a4a‐9a51d929623b/fwa‐
1012vc/mod_f0dba999‐ef8c‐45d4‐be05‐fe29cd7662a2
Copyright2014AdvantechCo.Ltd.Allrightsreserved.
1.2 SystemOutlook
1.2.1 FRONTVIEW
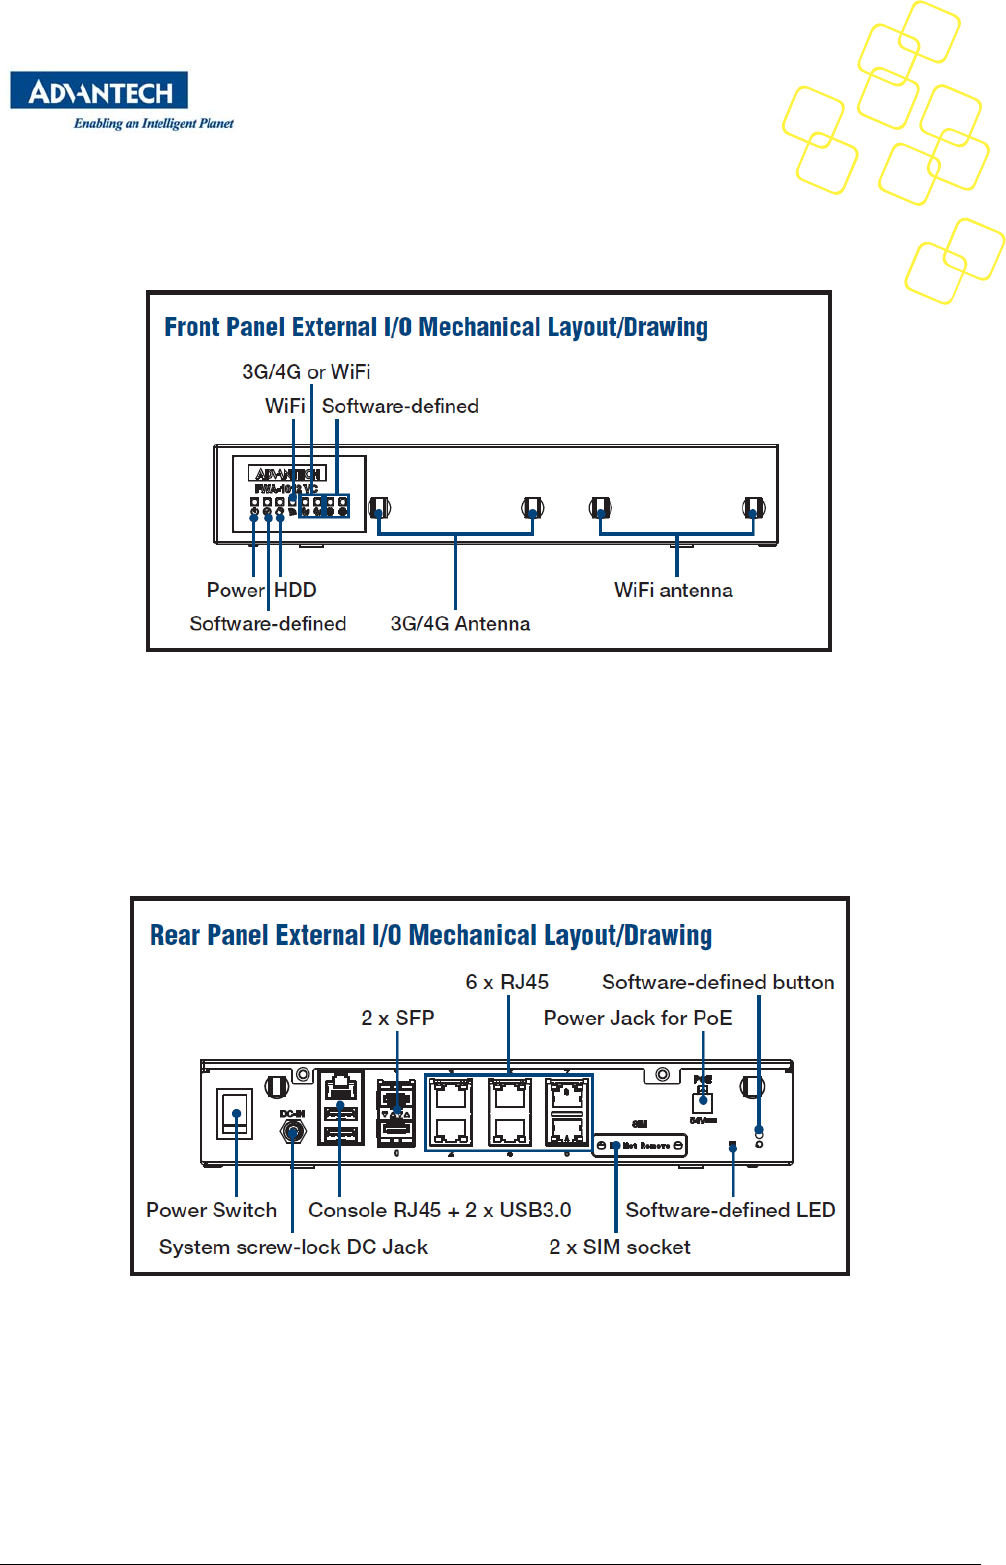
Thereare8LEDindicatorsand4antennaholdsinfrontofthesystem:
Figure1:SystemFrontView
1.2.2 REARVIEW
Therearepowerswitchlocatesonbackofchassis,lockableDC‐Injack,oneconsoleport,twoUSB3.0
ports,two1GbESFPports,sixRJ45ports,twoSIMslots,POEconnectorandSWdefileLED/button
therearside.
Figure2:SystemRearView
Copyright2014AdvantechCo.Ltd.Allrightsreserved.
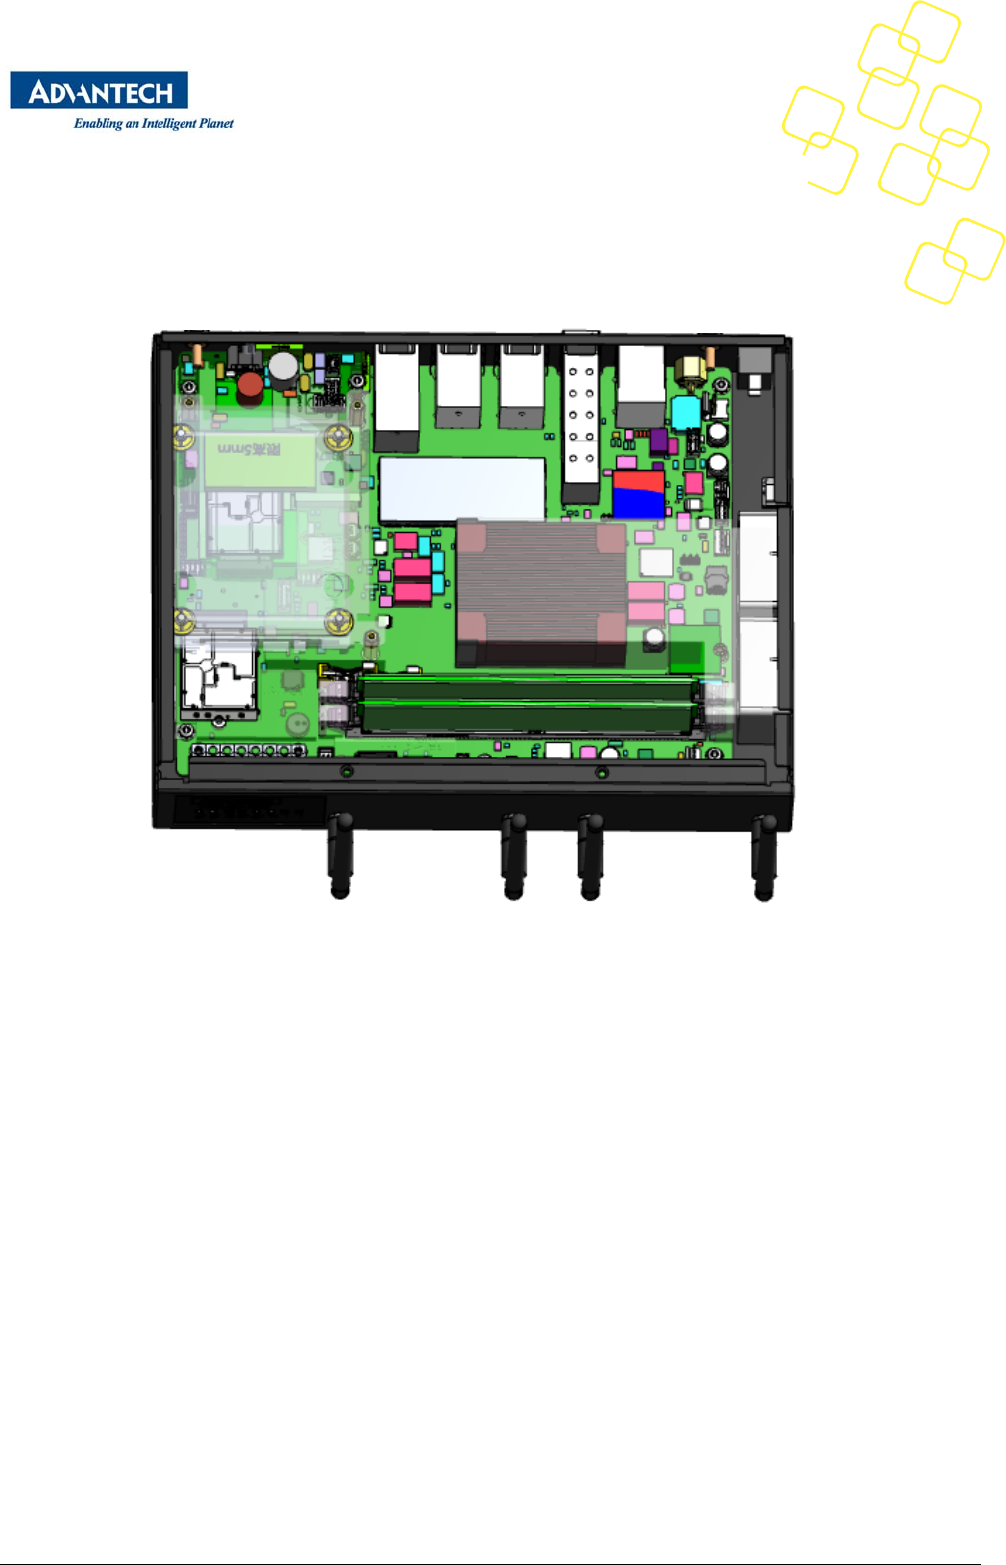
1.3 Systemlayout
Systemlayoutasbelowpicture:
Figure3:SystemArchitecture
Copyright2014AdvantechCo.Ltd.Allrightsreserved.
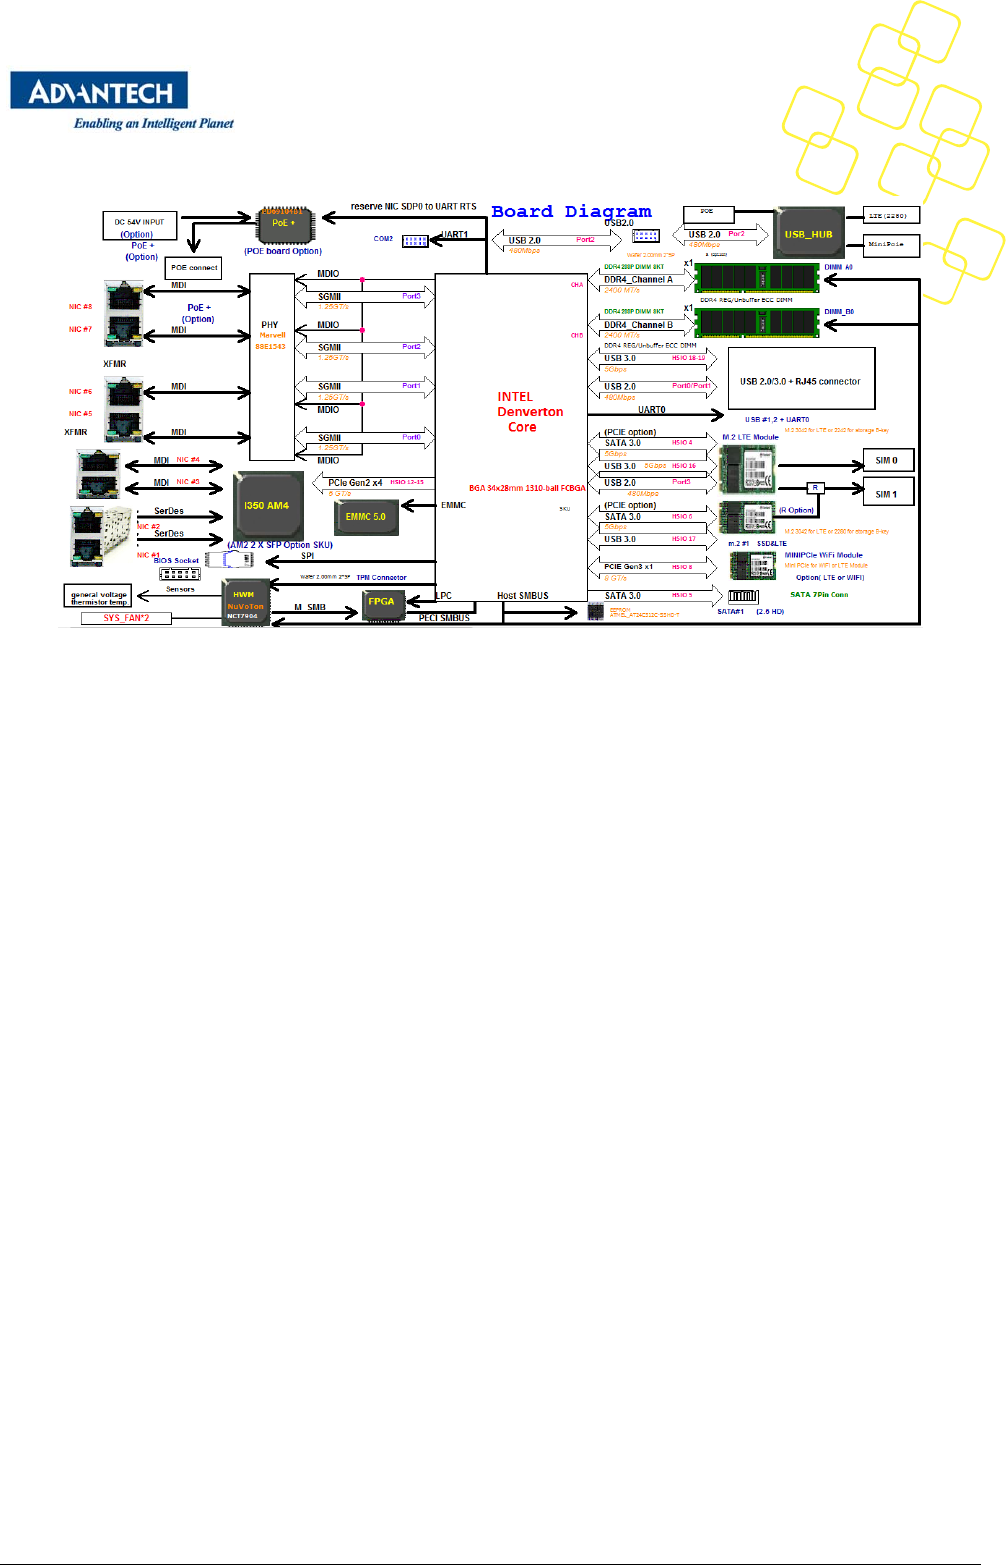
1.4 BlockDiagram
Figure4:SystemBlockdiagram
Copyright2017AdvantechCo.Ltd.Allrightsreserved. Page16
1.5 ComponentInstallation
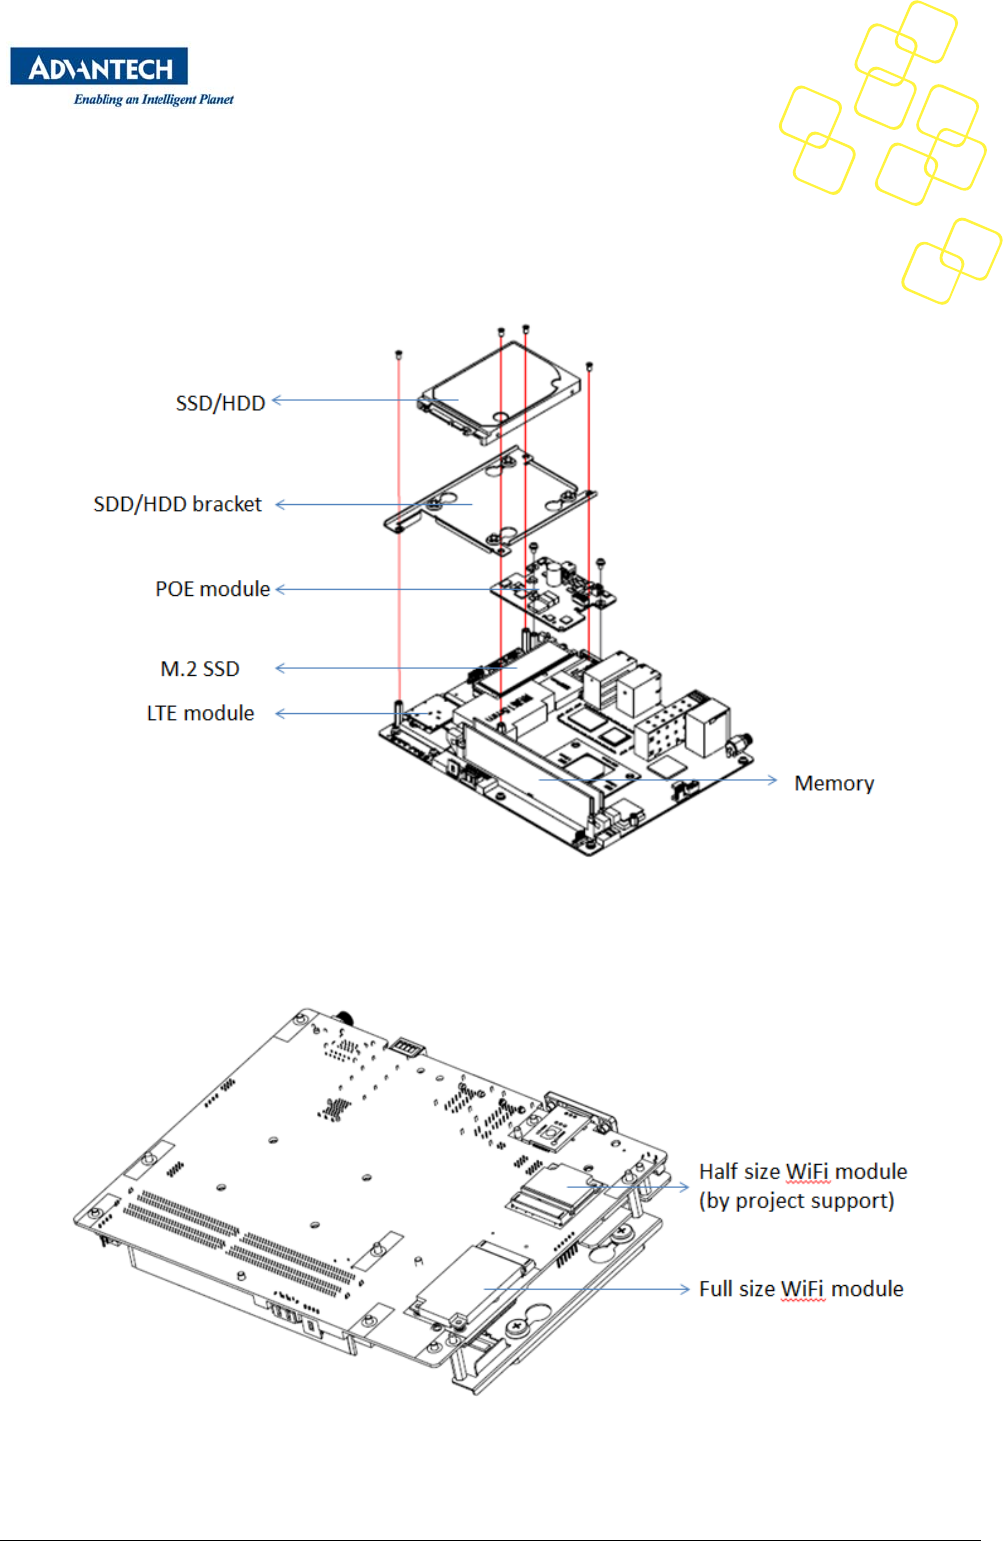
1.5.1 MEMORY/2.5”SSD_HDD/POEMODULE/M.2SSD/LTEMODULE/WIFIMODULE
ThisisthedrawingofmemorylocationandthestackingofLTE,M.2,POEmodule,HDDbracketand
SSD/HDDintoFWA‐1012VCunit.
Figure5:maincomponentsonthetopside
TightenscrewbytheinstructiononWifimoduleinbottomsideasbelow:
Figure6:wifimodulelocationonthebottomside

Copyright2017AdvantechCo.Ltd.Allrightsreserved. Page17
1.5.1.1 TPM/M.2SSD/LTEmoduleinstallation
Figure7:TPM/M.2SSD/LTEmodulelocation
1.5.1.2 2.5”HDD/SSDinstallation
Figure8:2.5”HDD/SSDlocation
Copyright2017AdvantechCo.Ltd.Allrightsreserved. Page18
1.5.1.3 POEmoduleinstallation
Figure9:POEmodulelocation
1.5.2 RACKMOUNTKITS
1.5.2.1 2coreSKUrackmountkitinstallation
Figure10:Rackmountfor2coreSKU
Copyright2017AdvantechCo.Ltd.Allrightsreserved. Page19
1.5.2.2 4/8coreSKUrackmountkitinstallation
Figure11:Rackmountfor4/8coreSKU
1.5.2.3 8coreSKUwithPOErackmountkitinstallation
Figure12:Rackmountfor8coreSKUwithPOE
Copyright2017AdvantechCo.Ltd.Allrightsreserved. Page20
1.5.3 ANTENNAINSTALLATION
Figure13:Antennalocationinstruction

Copyright2014AdvantechCo.Ltd.Allrightsreserved.
1.6 OptimumMountingEnvironment
1.6.1 SPACEREQUIREMENT
Pleasealwayskeep20cmspacearoundplatformforbetterthermaldissipationifnotrunningFWA‐1012VC
onrack.
1.6.2 TEMPERATUREREQUIREMENT
Pleasemakesureenvironmentconditionbeforepoweronthissystem:
Operatingtemperature0~35°C(32~104°F)withairflowspeed0.7m/sec
Non‐operatingTemperature‐20~80°C(‐4~167°F)
Relativehumidity95%@40°C(non‐condensing)
Storagetemperature‐40~85°C(‐40~185°F)

Copyright2014AdvantechCo.Ltd.Allrightsreserved.
2. OPERATION
2.1 Poweringup/downtheplatform
TopoweruptheFWA‐1012VC,pleasepressthepowerswitchbutton.
BeforepoweringdowntheFWA‐1012VCforanyupgradeormaintenanceprocedures,performabackupof
criticaldataandprograms.
PressthePowerSwitch
1. FWA‐1012isusingPowerSwitchtopowerON/OFFsystem,whenuserpresspowerswitchasON(|),
systemwillautopowerup,,whenuserpresspowerswitchasOFF(O),systemwillforcepowerOFF.
2. Pleasedon’tdirectplugorunplugDCJackwhenPowerSwitchsetsasON
Copyright2014AdvantechCo.Ltd.Allrightsreserved.
2.2 BootingfromnetworkviaPXE
TobootanOSvianetwork,pleasemakesurethefollowingBIOSoptionsIntheAdvanced:NetworkStack
ConfigurationMenuisconfiguredproperly:
BIOSitem
CSMParameters‐>Network
BIOSitem
NetworkStack PXEsetting
Donotlaunch
Disabled DisabledPXE
Enabled DisabledPXE
UEFI
Disabled DisabledPXE
Enabled EnabledUEFIIPV4PXE
Legacy
Disabled EnabledlegacyIPV4PXE
Enabled EnabledlegacyIPV4PXE
Table1:PXEBIOSOptions
BelowarethestepstoenablePXEboot.
1.Whenusersets“BIOS/Advanced‐>CSMParameters‐>Network”asLegacytoenablePXEROMfunction,
setitas“Legacy”(IPV4PXE)function.
Copyright2017AdvantechCo.Ltd.Allrightsreserved. Page24
2.WhenusersetsBIOS/Advanced‐>NetworkStackConfiguration‐>NetworkStackasenabled(default
settingisdisabled),ItwillopenUEFIIPV4PXEsupportfunction.
3.SaveBIOSandrebootsystem.TheBIOSwillshow“CheckingMediaPresence......”,ifsystemisnot
connectedPXEserver,itwillshow“NoMediaPresent......”
Copyright2017AdvantechCo.Ltd.Allrightsreserved. Page25
4.Usermayre‐logininBIOS,chooseBIOS/bootitem,itwillhas“NetworkDeviceBBSPriorities”itemandset
LegacyIPV4PXELANbootsequencepriority.
AndpleasechoosePXEBootpriorityas“IBAGESlot0A00v1570”itisonboardMgmtGbEport.
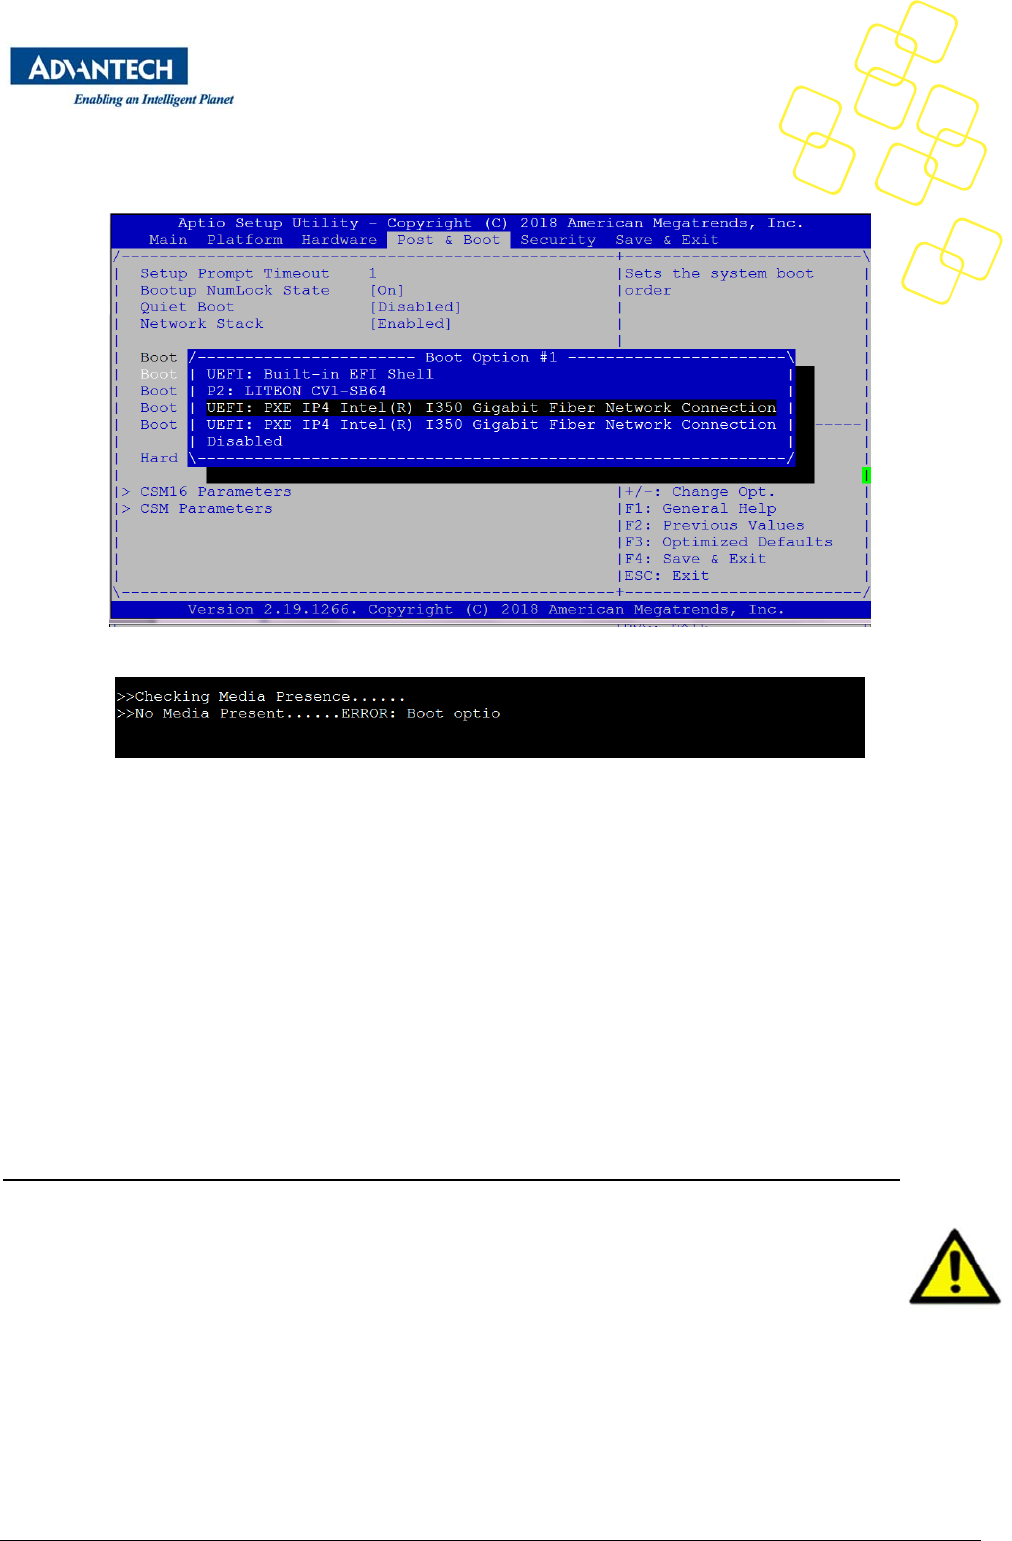
Copyright2017AdvantechCo.Ltd.Allrightsreserved. Page26
WhenUsersets“CSMParameters‐>Network”asUEFIand“NetworkStack”asEnabled,thePXEchoosing
itemislistin“BootOptionPriorities”,pleasechooseBootOptiontosetsequencepriorityofUEFIIPV4PXE
LANport
WhenUEFIIPV4PXEdoesn’tdetectUEFIPXEserver,itwillreturntoBIOSmanual.
PXEbootusuallydoesnotallowforOSinstallationovernetworkasthePXEclientwillonlyloadasinglefile
fromthebootserver.Similarly,bootingLinuxovernetworkisusuallyatwostageprocess.Inthefirststep,a
bootloadersuchagruborminiOSsuchasSysLinuxareloadedviaPXEfromthebootserver.Thebootloader
orminiOSthenloadtheactualtargetOSwhichusuallyconsistsofmultiplefileswhichdecompressedand
installedintoaRAMdisk.Thedetailedprocessandrequiredconfigurationofsuchnetworkinstallwillheavily
dependonthetargetOSandbootloader/miniOSused.Pleaserefertotherelateddocumentation
available.
PXEbootrequiresaDHCPserverandaTFTPserverinthenetworktocomplete.DHCPServerandTFTPserver
arecommonlyrunonthesamemachineandcollectivelyreferredtoas“bootserver”.Settingupsuchaboot
serverimpliesacoupleofsteps.How‐toguidesforsettingupLinuxasPXEbootserverareavailableonthe
internet,e.g.
https://www.debianadministration.org/article/478/Setting_up_a_server_for_PXE_network_booting.
Pleasenotethatitisrecommendedtosetupaseparatenetwork/subnetfornetworkbootingas
theDHCPrequiredforPXEbootingmayconflictwithexistingDHCPserversinyournetwork.
Copyright2014AdvantechCo.Ltd.Allrightsreserved.
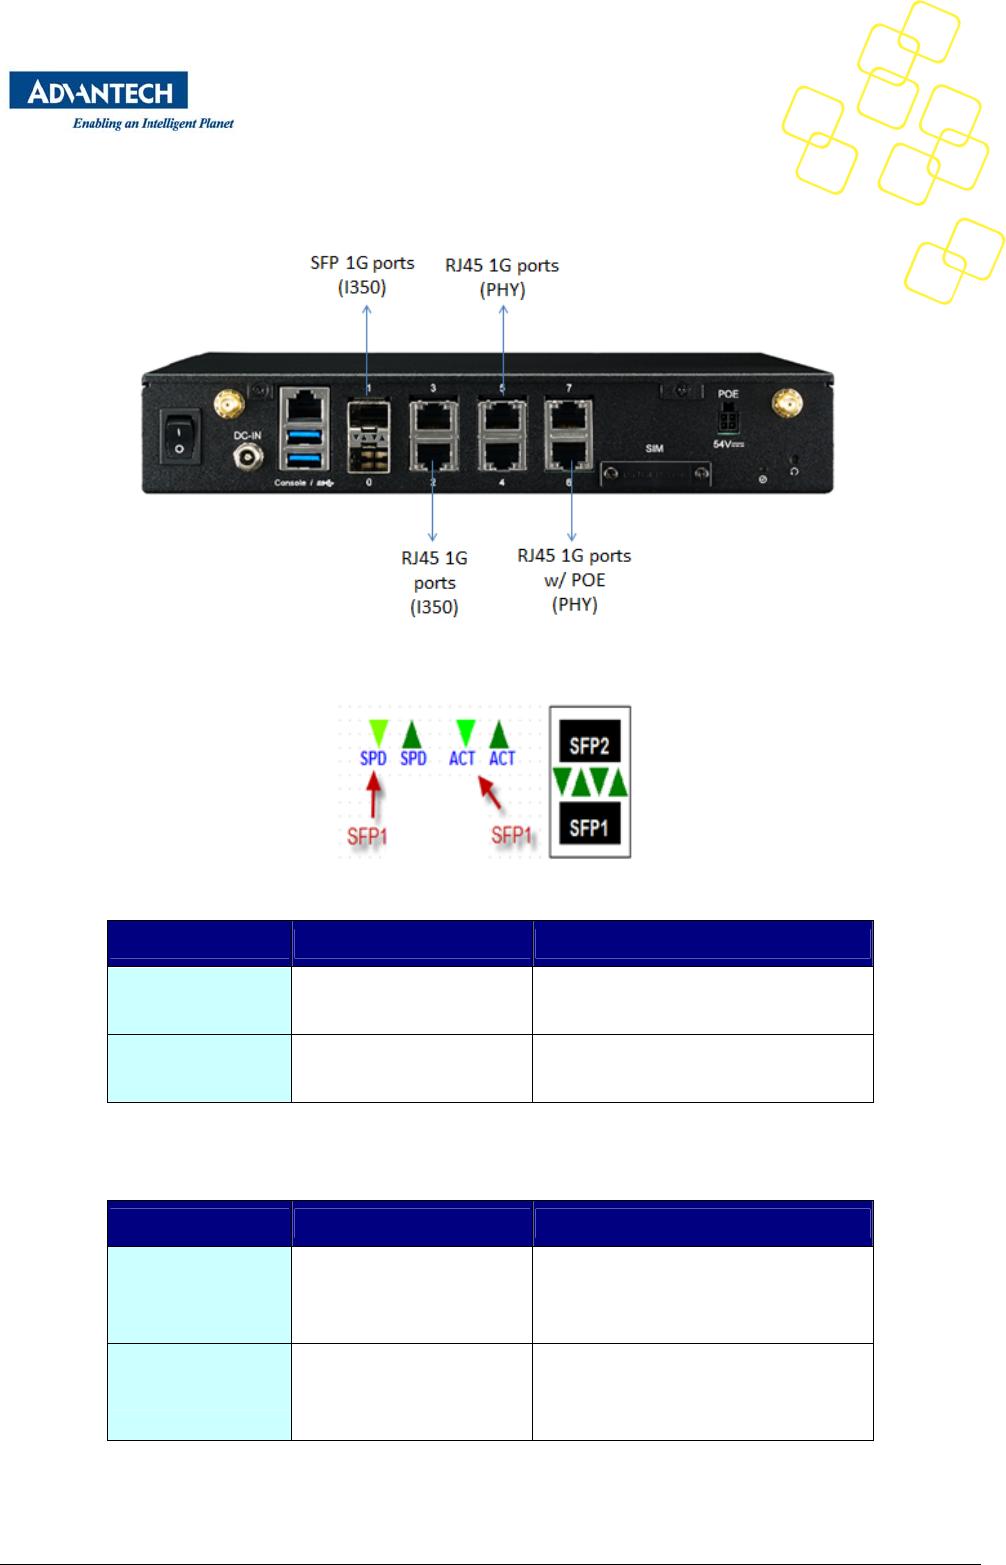
2.3 LEDBehaviour
2.3.1 FORTHEDESCRIPTIONOFLANPORTLEDS
2.3.2 SFPLEDINDICATORFUNCTIONINFRONT:
Figure:SFPconnectordrawing
SFPLED LEFT RIGHT
SFP1 SPEED:1GGreen LINK/ACKLINK:GreenACK:
GreenBlinking
SFP2 SPEED:1GGreen LINK/ACKLINK:GreenACK:
GreenBlinking
Table2:SFPconnectorLEDindication
2.3.3 RJ45LEDINDICATORFUNCTIONINFRONT:
RJ45LED LEFT RIGHT
1
SPEED:10MLEDOFF
100MAmber,1G
Green
LINK/ACKLINK:GreenACK:
GreenBlinking
2
SPEED:10MLEDOFF
100MAmber,1G
Green
LINK/ACKLINK:GreenACK:
GreenBlinking
Table3:RJ45connectorLEDindication(MarvellPHY)

Copyright2017AdvantechCo.Ltd.Allrightsreserved. Page28
2.3.4 RJ45LEDINDICATORFUNCTIONW/POEINFRONT:
RJ45LED LEFT RIGHT
1
SPEED:10MLEDOFF
100MAmber,1G
Green
LINK/ACK/SPEEDLINK:
1G/Green,100M/AmberACK:
Blinking
2
SPEED:10MLEDOFF
100MAmber,1G
Green
LINK/ACKLINK:GreenACK:
GreenBlinking
Table4:RJ45connectorLEDindication(MarvellPHY)withoutPOE
RJ45LED LEFT RIGHT
1 POELEDON:GREEN
LINK/ACK/SPEEDLINK:
1G/Green,100M/AmberACK:
Blinking
2 POELEDON:GREEN
LINK/ACK/SPEEDLINK:
1G/Green,100M/AmberACK:
Blinking
Table5:RJ45connectorLEDindication(MarvellPHY)withPOE
Copyright2017AdvantechCo.Ltd.Allrightsreserved. Page29
2.4 MainBoardConnectorplacement
Topside:
Figure14:NAMB‐1012VCMBConnectorplacement(Topside)
BottomSide:
Figure15:NAMB‐1012VCMBConnectorplacement(Bottomside)

Copyright2017AdvantechCo.Ltd.Allrightsreserved. Page30
FWA‐1012VCMBJumperSettingandConnectorList
Location Description Comment
CN89 12VSWITCHCONN
CN91 12VPowerConnector
BH1 Batteryholderforcoinbattery
CLS_CMOS1 ClearCMOSpinheader
CLS_CMOS2 ClearRTCpinheader
CN5 LPCConnector
CN8 4‐PINSATAPOWERConnector
CN11 RJ45+USBx2Connector
CN12 USBHEADER.10‐PinwaferconnectorforUSB
2.0
CN95 COM2UARTCONN
CN30 6‐PinpinheaderforFPGAJTAG
CN13 UARTCOM2Connector. 10‐Pinwaferconnector
forCOM2
FAN1,FAN2 4‐Pinfanconnector
SATA1 SATAIOconnectorsfromDenverton
SPI1 SPIsocketforSPIflash(BIOS)
SW2 SWButton
CN77 SFPCONN
CN78,CN80 RJ45CONN
CN84 RJ45(POE)CONN
CN85 POEPOWERCONN
CN1CN88 SIMCARDCONN
CN37CN38 BSCNCONN
CN86 POECONN
CN_MINI1CN_MINI2 MINIPICECONN
CN87 M.2CONN(B+MKEY3042&2280)
CN71 M.2CONN(B+MKEY3042&2242)
SW3 FPGAswitch
SW1 BSCNswitch
CN96 BSCNjumper
Table6:FWA‐1012VCMBJumperSettingandConnectorList
Copyright2017AdvantechCo.Ltd.Allrightsreserved. Page31
3. BIOS
FWA‐1012VCBIOSisbasedonAMI’sAPTIOBIOSandcomplianttotheUEFI,SMBIOSandACPIspecifications.
TheBIOSperformsprobing,initializationandconfigurationoftheFWA‐1012VCandinitializestheOSboot
processattheendofPOST(Power‐On‐Self‐Test).
RegularBIOSoutputaswellasthesetupmenuaredisplayedviaconsoleportandpleasenotethattheFWA‐
1012VCdoesnothaveanyon‐boardPOSTCodeLEDs.AspecialPOSTcodeadapterisrequiredtoretrieve
BIOSerrorcodes.
AllBIOSconfigurationparametersbarestoredinNVRAM,adedicatedsectionoftheBIOSflashchip.
ParametersarenolongerstoredinlegacyCMOSRAMbytheplatformBIOS.I.e.BIOSconfiguration
parameterswillnotbelostduetoanemptybattery.
3.1 BIOSDefaults
TheBIOScomeswithasetofconfigurationparameterswhenshippedbyAdvantechreferredtoas
“OptimizedDefaults”or“factorydefaults”.TheusercanchangeBIOSsettingsviathesetupmenueither
temporarilyorpermanentlybysavingthechangesas“Userdefaults”.
TheBIOSloadsOptimizedDefaultsbytheoption“RestoreDefaults;andloadsUserdefaultsbytheoption
“RestoreUserDefaults”.IfnoUserdefaultshavebeendefined,theBIOSwilldonothing.
3.2 BIOSSetupMenu
ThissectiondescribestheFWA‐1012VC’sUEFIBIOSbasedonAMI’sAPTIOBIOS.
UserscanmodifyBIOSsettingsandcontrolthespecialfeaturesoftheFWA‐1012VCusingtheBIOSsetup
menu.
PleasenotethatAdvantechsupportsshippingtheFWA‐1012VCwithcustomBIOSdefaultstosimplifythe
deploymentandintegrationforourcustomers.PleasecontactyourAdvantechrepresentativeifyouwantto
receivemoreinformationregardingthisservice.
TheBIOSSetupMenucanbeenteredviatheBIOSPOSTscreendisplayedontheconsoleinterface:
Figure15:BIOSPOSTscreen(example)
BIOSSetupcanbeenteredbyhitting<DEL>or<F2>keysduringPOST.
The BIOS setup menu screens have a few main elements as shown below. The menu bar displays the
selectable menu pages as tabs. The parameter window displays and allows configuration of the settings
available in a given menu page or a submenu thereof. Auxiliary text providing information about the
selectedsetupitemisdisplayedinthetoprightcorner.
Copyright2017AdvantechCo.Ltd.Allrightsreserved. Page32
Figure16:BIOSSetupScreenOrganization
3.2.1 MAINSETUPMENU
If security protection has been enabled previously (see chapter錯誤! 找不到參照來源。), you will be
prompted for the BIOS password upon entering the BIOS Setup. After a successful check or if password
protection has not been enabled, users will see the Main Setup screen shown below. Users can always
returntotheMainsetupscreenbyselectingtheMaintab.
Copyright2017AdvantechCo.Ltd.Allrightsreserved. Page33
Figure17:BIOSSetupMainscreen
ThemainsetuppagedisplayssystemasummaryofsystemandBIOSconfigurationandstatusinformation.
Thefieldsonthispageareread‐onlyexceptfortheSystemDateandTimesetting.
Group Setupitem Access/Options Description
BIOS
Information
BIOSVendor Displayonly AmericanMegatrends
CoreVersion Displayonly CurrentAMIBIOScoreversioninuse
Compliancy Displayonly UEFISpecrevisionthattheBIOScompliesto
ProjectVersion Displayonly
AdvantechBIOSVersioninfo
EX:mmmmVx.yz
mmmm:modelname
X:majorversion
Yz:minorversion
BuildDate&Time Displayonly ShowsBIOSbuilddateandtime
System
Language
Displayonly SelectstheSetupMenuLanguage.OnlyEnglish
issupportedontheFWA‐1012VC.

Copyright2017AdvantechCo.Ltd.Allrightsreserved. Page34
SystemDate MM/DD/YY Displaysandsetsthesystemdateasusedby
theBIOS
SystemTime HH:MM:SS Displaysandsetsthesystemtimeasusedby
theBIOS
AccessLevel
Displayonly Showstheuserprivilegelevelaccordingtothe
securitysettings.Ifpasswordprotectionhas
notbeenenabled,thiswilldefaultto
“Administrator”
Table76:BIOSSetup:MainMenu
3.2.1.1 SettingSystemTimeandDate
Use this option to change the system time and date. Highlight System Time or System Date using the
<Arrow>keys.Enternewvaluesthroughthe keyboard.Pressthe<Tab>keyorthe <Arrow> keys to move
betweenfields.ThedatemustbeenteredinMM/DD/YYformat.ThetimeisenteredinHH:MM:SSformat.
Pleasenotthatsystemtimeanddatearesetduringmanufacturingprocessaccordingtofactory’slocaltime
zone.Youmayneedtoupdatesystemtimetoreflectthedesiredtimezonewhenyoureceivetheunit.
Copyright2017AdvantechCo.Ltd.Allrightsreserved. Page35
3.2.2 PLATFORMSETUPMENU
SelectthePlatformtabfromtheFWA‐1012VCsetupscreentoenterthePlatformSetupscreen.Userscan
selectanyoftheitemsintheleftframeofthescreen,suchastheTrustedComputingConfiguration,togoto
the sub menu for that item. Users can display a Platform BIOS Setup option by highlighting it using the
<Arrow>keys.ThePlatformBIOSSetupscreenisshownbelow.The sub menus are described on the
followingpages.Note:IfBMCisPresentinthesystemandHardwareMonitorpagewillbehidden.
Figure18:PlatformSetupMainscreen
3.2.2.1 SerialConsole
Thissubmenuallowsyoutochangethesettingsusedfortheserialconsole.
NotethattheserialconsoleisalwaysusingCOM1whichisconnectedtothefrontpanel.
Copyright2017AdvantechCo.Ltd.Allrightsreserved. Page36
Figure19:PlatformSetup:ConsoleRedirectionMenu
ThesettingsforCOM0consolecanbeaccessedinthismenu.
Thissubmenuallowsyoutochangethesettingsusedfortheserialconsole.Forexample,userscandefine
theterminaltype,bitspersecond,databits,parity,stopbitsandothers.
Setupitem Access/Options Description
ConsoleRedirection Disabled/
Enabled Disabled/EnabledConsoleRedirection
SerialConsolePort COM0 SerialConsolePort
SerialConsole
Speed
9600/19200/
38400/57600/
115200
Definesthebaudrate.
DataBits 7/8 Definesnumberofdatabitsinacharacter.
StopBits 1/2 Definesnumberofstopbitsinacharacter.
Parity None/Even/Odd
/Mark/Space Definestheparityschemeused.
FlowControl None/Xon/Xoff Definestheflowcontrolscheme.
TerminalType ANSI/VT100/
VT100+/
Selectthetargetterminalemulationtype:‐ANSItousethe
ExtendedASCIICharacterSet.

Copyright2017AdvantechCo.Ltd.Allrightsreserved. Page37
VT‐UTF8 ‐VT100tousetheASCIICharacterset.
‐VT100+toaddcolorandfunctionkeysupport.
‐VT‐UTF8touseUTF8encodingtomapUnicode
charactersintooneormorebytes.
VT‐UF8ComboKey Disabled/
Enabled
Enables VT‐UTF8 Combination Key Support for ANSI / VT100
terminals
RecorderMode Disabled/
Enabled
WhenEnabledthedatadisplayedonaterminalwillbecaptured
andsentastextmessagestoaremoteserver.
Resolution100x31 Disabled/
Enabled Enablesordisablesextendedterminalresolution
Resolution 80x24/
80x25
WhenusingLegacyOS,thisitemspecifiestheNumberofRows
andColumnssupported
PuTTYKeypad
VT100/.LINUX/
XTERMR6/SCO/
ESCN/VT400
SelectFunctionKeyandKeyPadEmulationonPuTTY.
Redirectionafter
POST
AlwaysEnable/
BootLoader
Thisdefineshowlongconsoleredirectionwillbeactive:
“BootLoader”meansthatlegacyconsoleredirectionisdisabled
beforebootingintoaLegacyOS.“AlwaysEnable”meansLegacy
consoleRedirectionisenabledpermanently.
Emergency
Management
Services(EMS)
ConsoleRedirection
Disabled/
Enabled
Disabled/Enabledserialconsoleinterfacetothebootloader
menuonmodernversionsofMicrosoftWindows
Table8:PlatformSetup:COM0ConsoleRedirectionMenuItems
Copyright2017AdvantechCo.Ltd.Allrightsreserved. Page38
3.2.2.2 USBConfiguration
ThissubmenuallowsyoutochangethesettingsusedforUSBandtogetanoverviewoftheUSBdevices
detectedbytheBIOS.
Figure20:PlatformSetup:USBConfigurationMenu
Setupitem Access/Options Description
USBSupport Enabled
Disabled
Enables or disables the support for USB. If
disabled, the USB EHCI controller will not be
initializedbytheBIOS.
LegacyUSBSupport Auto
Enabled
Disabled
Enables legacy support over USB to support
KeyboardandMouse
EHCIHand‐Off Enabled
Disabled
ControlsthehandoffofXHCIownershipfrom
BIOStoOSatboottime.
Port60/64
Emulation
Enabled
Disabled
EnablesI/Oport60h/64hemulation
support
Table9:USBConfigurationMenu
Copyright2017AdvantechCo.Ltd.Allrightsreserved. Page39
3.2.2.3 TrustedComputing
PleasenotethatTrustedComputingsupportisdisabledbydefaultinthefactorydefaultstosavesystem
boottime.Ifdisabled,theTrustedComputingMenuwillnotdisplayanystatusinformation.
Figure21:PlatformSetup:TrustedComputing
Group Setupitem Access/Options Description
Configuration
SecurityDeviceSup Enable
Disable
Enables or Disables BIOS support for security
device.O.S.willnotshowSecurityDevice.TCG
EFI protocol and INT1A interfacewillnotbe
available.
Table10:TrustedComputingMenu
Copyright2017AdvantechCo.Ltd.Allrightsreserved. Page40
3.2.2.4 NCT7904DHWMonitor
ThesystemwithNCT7904DHWMonitor,andtheBIOSwilldetectvoltagesandtemperaturesandthe
relatedinformationwillbeshownintheBIOSsetupmenuasbelow.
Figure22:PlatformSetup:TrustedComputingwithTPM2.0
3.2.2.5 Virtualization
ThissubmenuallowsyoutochangethesettingsusedforVirtualizationfunction.
Intel®VirtualizationTechnologyforDirectedI/O(VT‐d).Thus,BIOShandlevirtualfunctionsexposedbyPCIe
devicesincaseSR‐IOVissupported,otherwisePCIedeviceswillbeassignedtovirtualmachinesinpass‐
throughmode.ThisappliesforallPCIedevices.
Copyright2017AdvantechCo.Ltd.Allrightsreserved. Page41
Figure23:PlatformSetup:Virtualization
Setupitem Access/Options Description
IntelVirtualization Enable
Disable
Enable/DisableIntelVirtualizationTechnology,
takeeffectafterreboot
VT‐d Enable
Disable
Enable/disableIntelVirtualizationTechnology
forDirectedI/O(VT‐d)byreportingtheI/O
device
SR‐IOVSupport Enable
Disable
IfsystemhasSR‐IOVcapablePCIeDevices,this
optionEnablesorDisablesSingleRootIO
VirtualizationSupport
Table11:VirtualizationMenu
3.2.2.6 PlatformManagement
ThissubmenuallowsyoutochangethesettingsusedforrelatedCPUutilizationsetting.
ThedefaultconfigurationforCPUwasoptimizedsettingforgettingbetterperformancefornetworking,soit
isnotrecommendtochangeit.
Copyright2017AdvantechCo.Ltd.Allrightsreserved. Page42
Figure24:PlatformSetup:PlatformManagement
Setupitem Access/Options Description
EIST
Enable
Disable
EnableordisableBIOSsupportforEnhanced
IntelSpeedStepTechnology,Whenenabled,OS
setsCPUfrequencyaccordingload.When
disabled,CPUfrequencyissetatmaxnon‐
turbo.
MaxCoreC‐State C1,C6 Enable/DisableCPUC6(ACPIC2)reporttoOS
Recommendedtobeenabled.
PackageCState
limit NoPkgC‐State,No
S0Ix,Nolimit
PackageCStatelimit.The"waking‐uptime"
willbelongerifPackageCstatelimitsettingis
deepCstatesupport.
Table12:PlatformManagementMenu
Copyright2017AdvantechCo.Ltd.Allrightsreserved. Page43
3.2.3 HARDWARESETUPMENU
ThissubmenuallowsyoutochangethesettingsoftheIntelchipset.Pleasenotethat“chipset”isalegacy
termandtherelatedfunctionalityissplitovertheCPUandPCHportionsoftheSoC.Similarly,theterms
“SouthBridge”and“NorthBridge”arelegacytermsanddonotrepresentthesiliconimplementationany
more.However,thosetermsarekeptconsistentwithpreviousproductstoallowuserstonavigatemore
easily.
Thesubmenusaredescribedonthefollowingpages.
Figure25:HardwareConfigurationMenu
3.2.3.1 HardwareSetup:CPUConfiguration
ThismenuuseexampleofAtomC3000CPUconfiguration.
Copyright2017AdvantechCo.Ltd.Allrightsreserved. Page44
Figure26:Chipset:ProcessorConfigurationMenu

Copyright2017AdvantechCo.Ltd.Allrightsreserved. Page45
Group Setupitem Access/Options Description
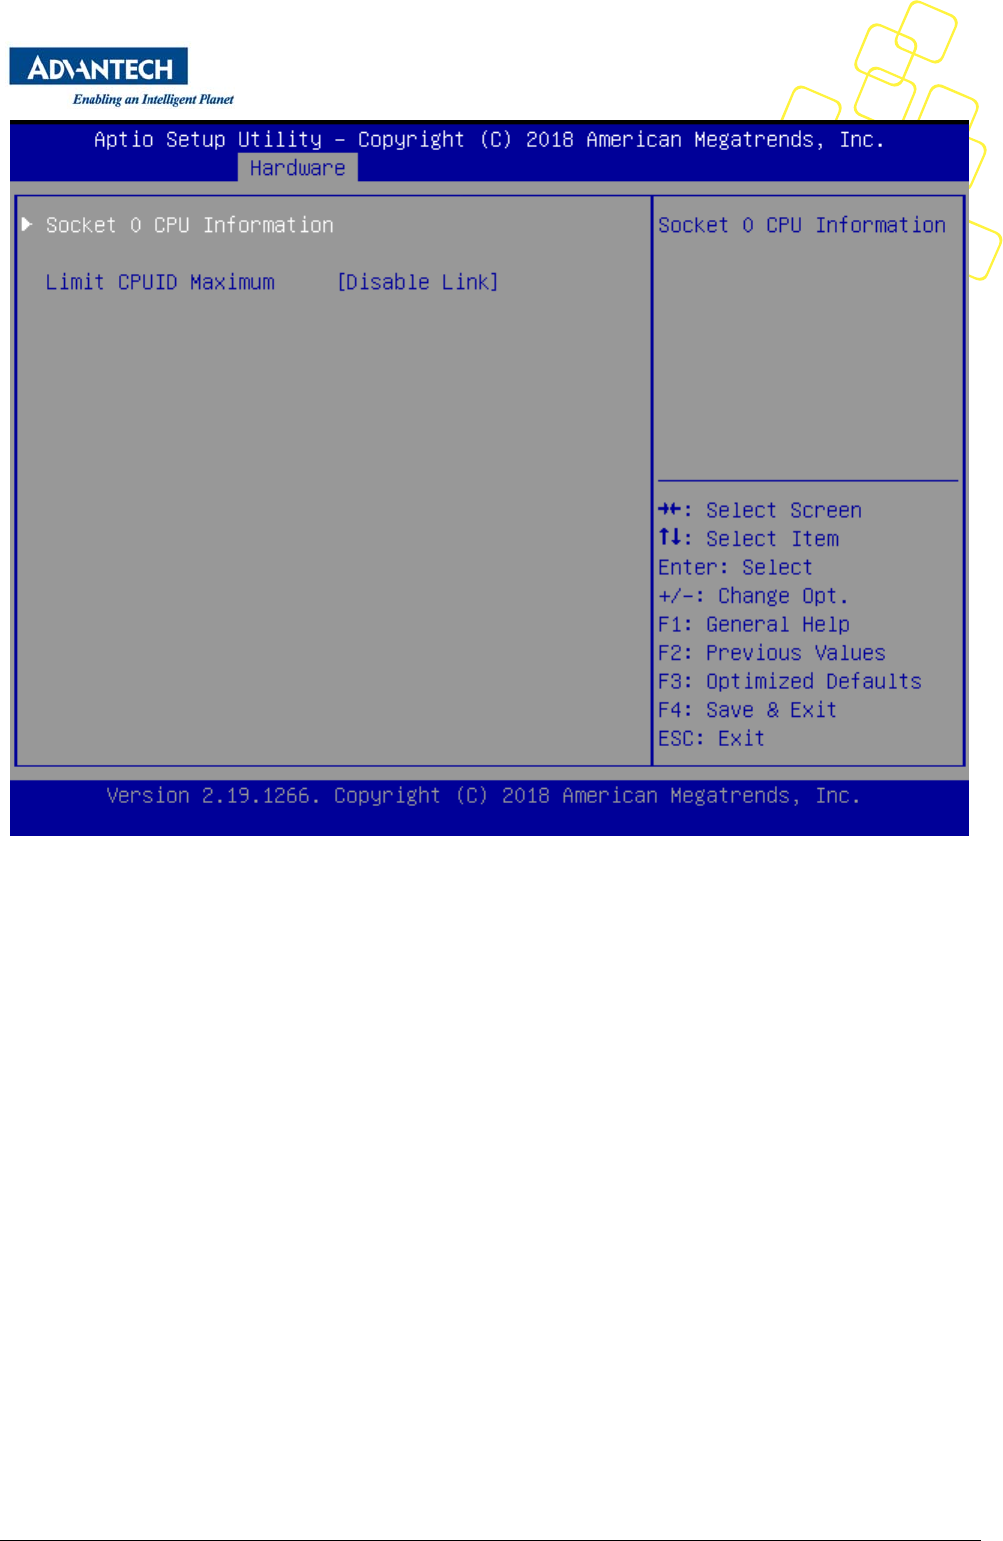
Socket0 CPU
information
CPUsignature
Displayonly Displaysinformationontheprocessorinstalled
MicrocodePatch
CPUFrequency
ProcessorCores
IntelVT‐x
Technology
L1codeCache
L2Cache
None LimitCPUID
Maximum
Enabled,Disabled
Link
Somelegacyoperatingsystemsareunableto
properlydealwiththeCPUIDx86opcodewhen
calledusingoperandsgreaterthan3,Setthis
toEnabledifyouexperiencejustsucha
problem,otherwiseleavethisDisabled.
Table13:ProcessorConfigurationMenu
Copyright2017AdvantechCo.Ltd.Allrightsreserved. Page46
3.2.3.2 HardwareSetup:NorthBridgeConfiguration
ThismenuallowstheconfigurationofthememorycontrollerandrelatedfeaturesoftheSoC.
Figure27:NorthBridgeConfigurationMenu
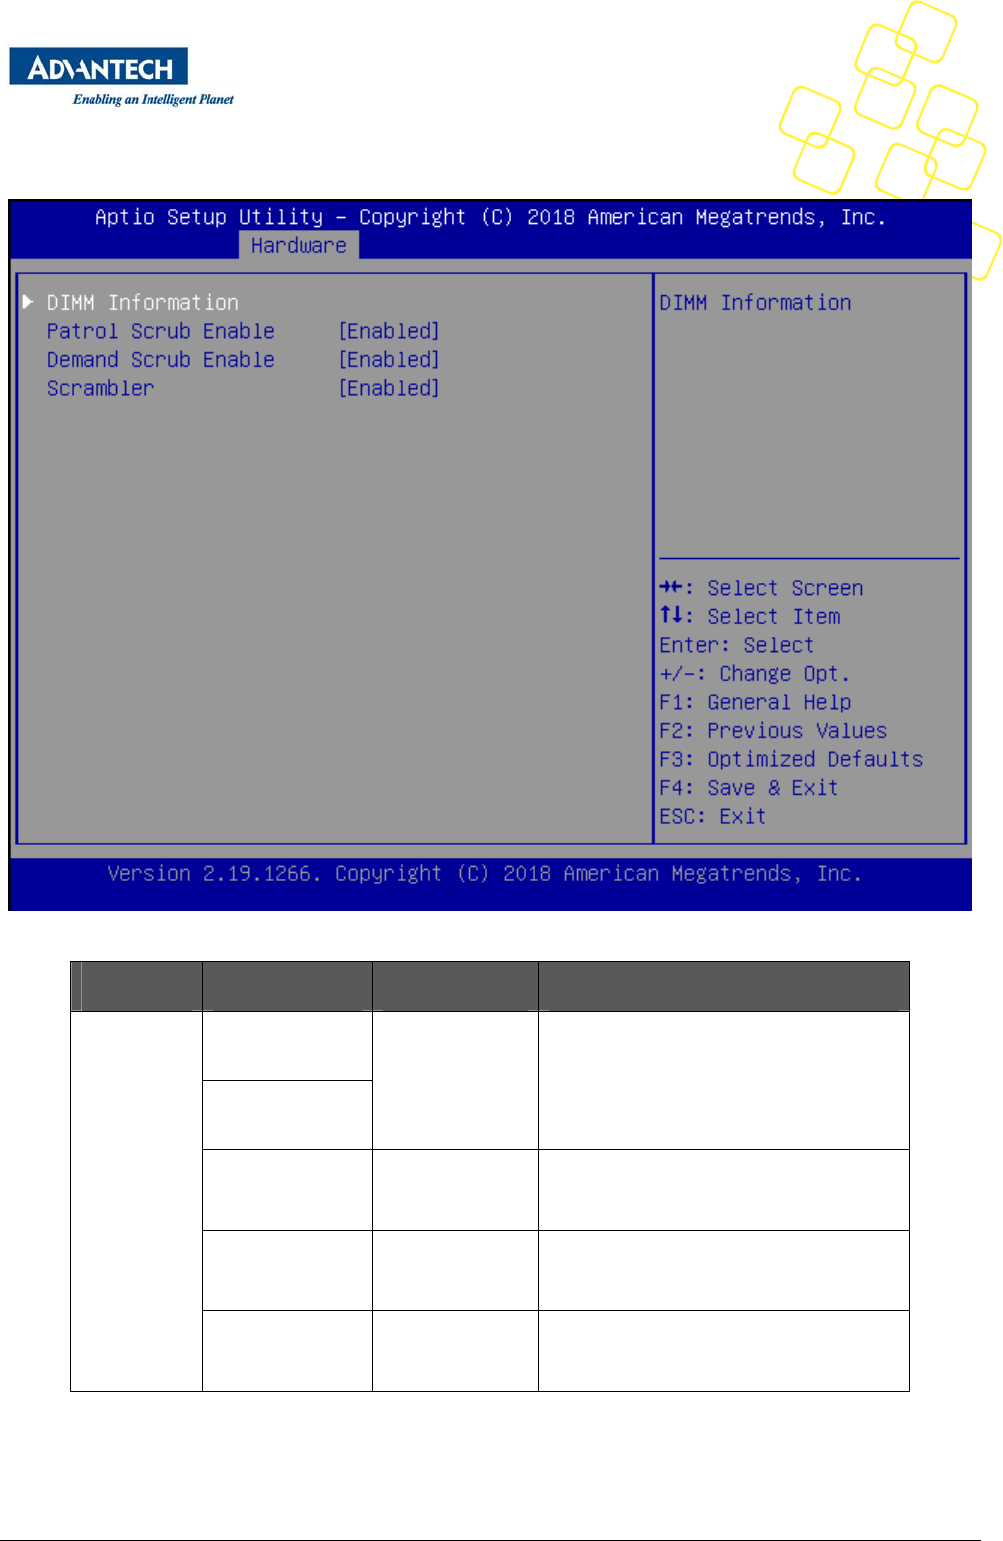
Group Setupitem Access/Options Description
DIMM
Information
Node0Ch0Dimm
0
Displayonly DisplaysinformationontheDIMMinstalled
Node0Ch1Dimm
0
PatrolScrubEnable
Enable
Disable
Selecttoenable/disablePatrolScrubSupport
DemandScrub
Enable
Enable
Disable
Select to enable / disable Demand Scrub
Support
Scrambling
Enable
Disable
Selecttoenable/disabletheScrambler
Table14:NorthbridgeConfigurationMenu
Copyright2017AdvantechCo.Ltd.Allrightsreserved. Page47
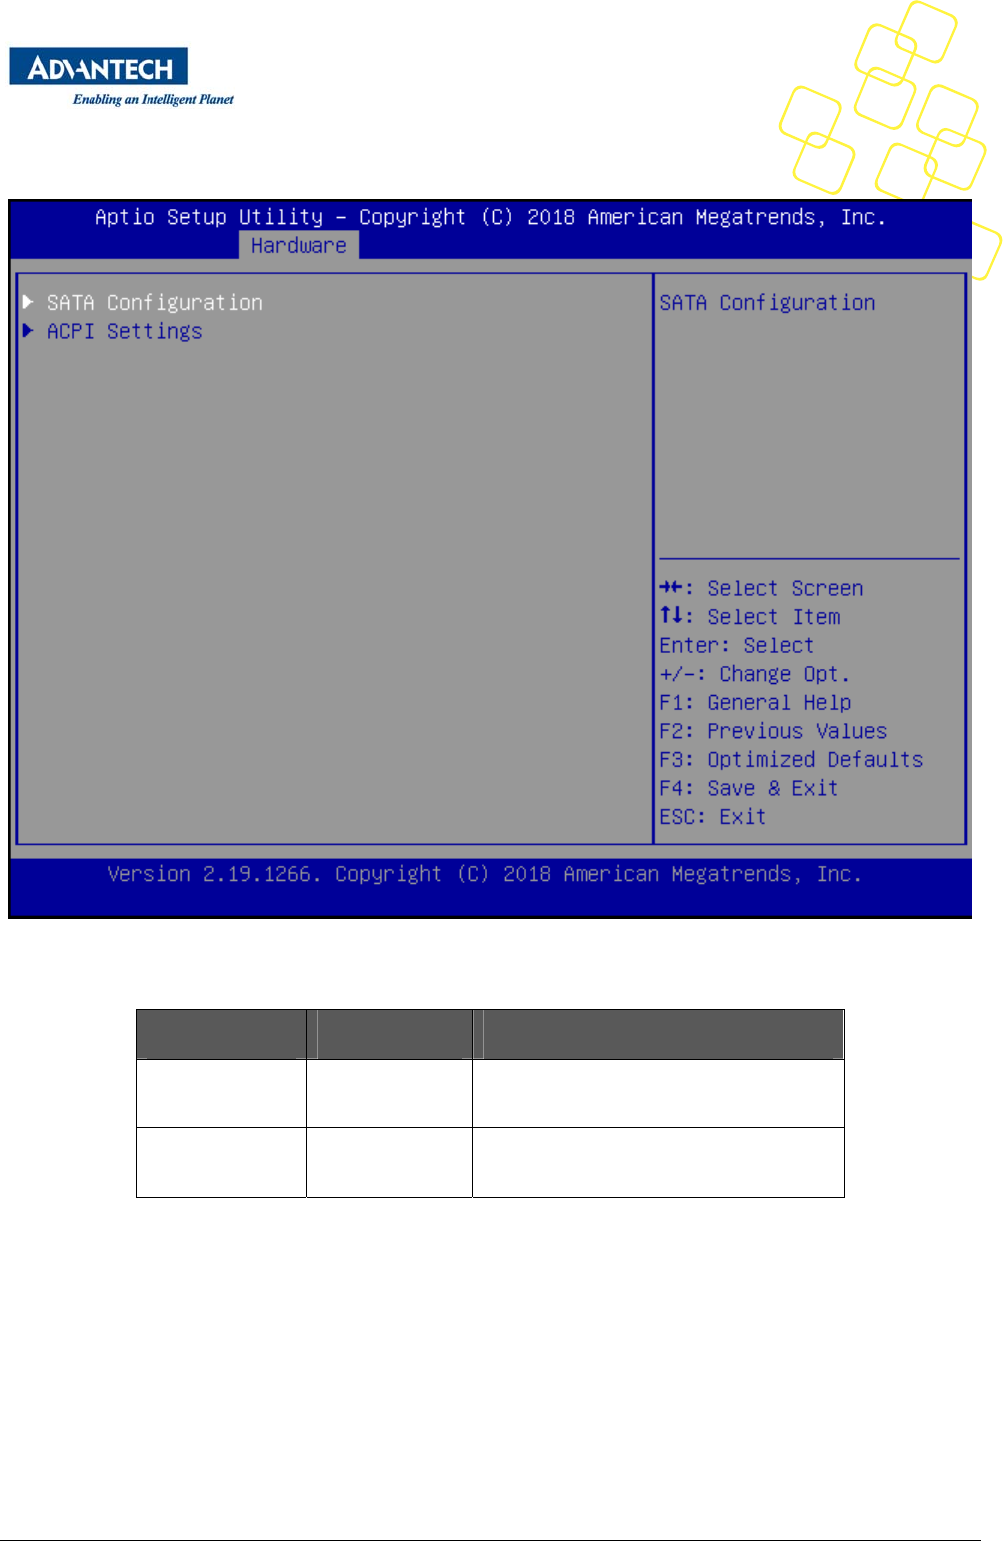
3.2.3.3 HardwareSetup:SouthBridgeConfiguration
ThismenucontainssettingsfortheSouthBridgeforrelatedSATAandUSBandACPIsettingetc.
Figure28:HardwareSetup:SouthBridgeconfiguration
Setupitem Access/Options Description
SATAConfiguration N/A Selectsub‐menu.
ACPISettings N/A Selectsub‐menu.
Table15:HardwareSetup:SouthBridgeconfigurationMenuItems
Copyright2017AdvantechCo.Ltd.Allrightsreserved. Page48
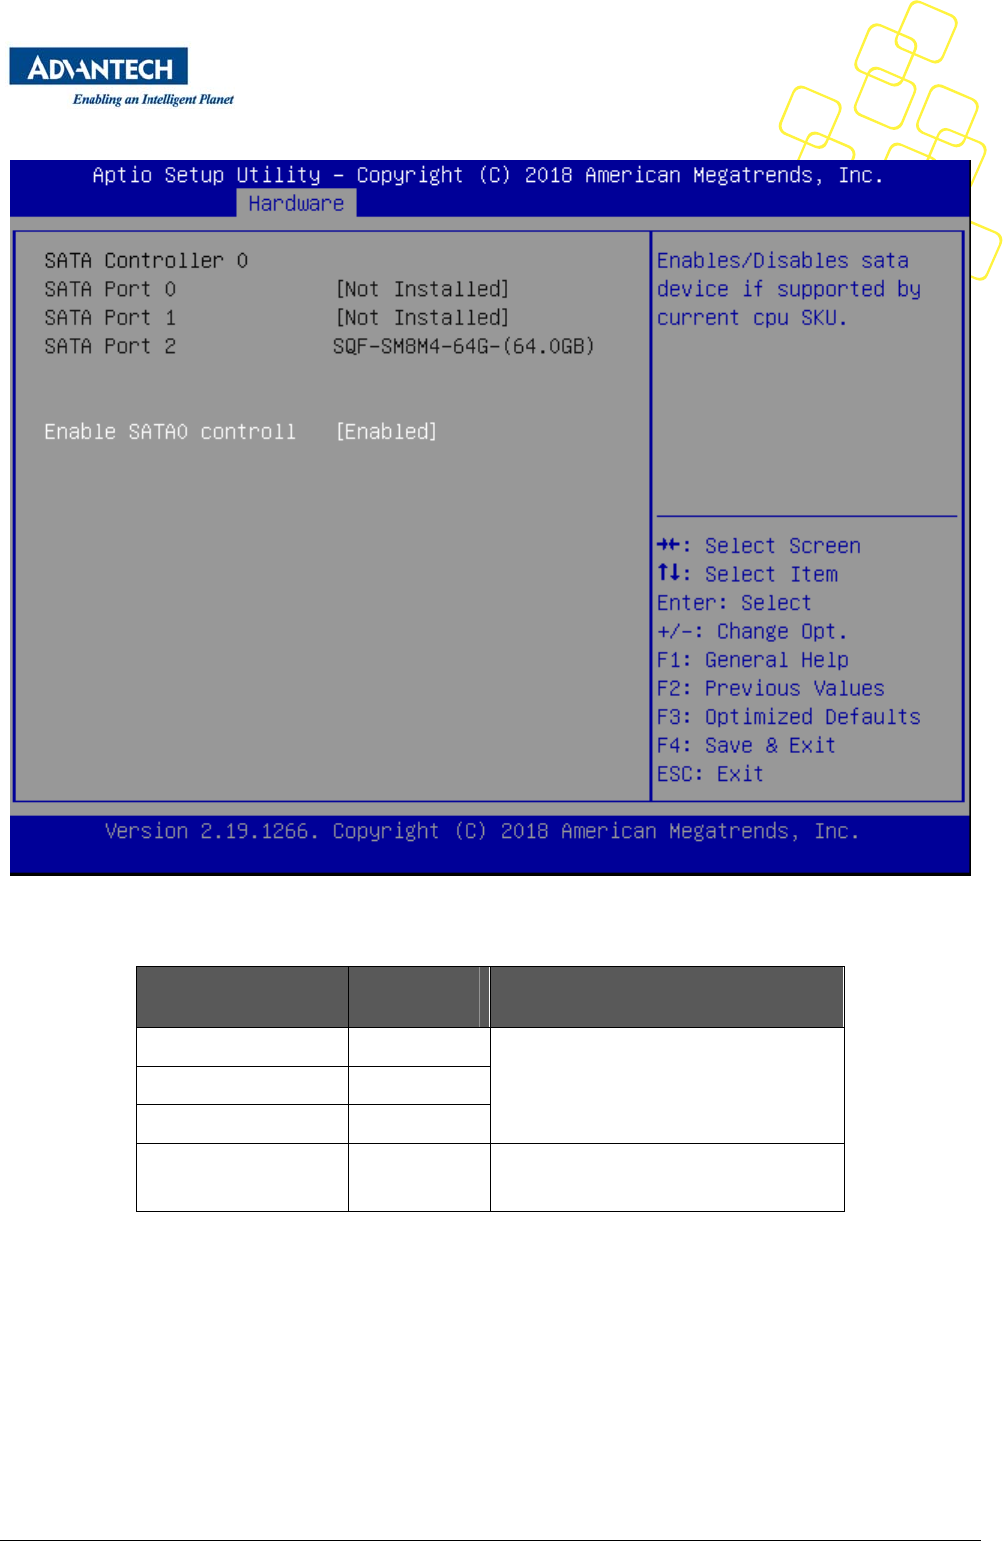
3.2.3.3.1 SouthBridgeConfiguration:SATAConfiguration
Figure29:HardwareSetup:SATAconfiguration
Setupitem Access/
Options Description
SATAPort0 Displayonly
ShowcurrentSATAdevicesinuseonthe
FWA‐1012VC
SATAPort1 Displayonly
SATAPort2 Displayonly
SATAController Enabled
Disabled ToenabletheSATAcontroller
Table16:HardwareSetup:SATAconfigurationMenuItems
Copyright2017AdvantechCo.Ltd.Allrightsreserved. Page49
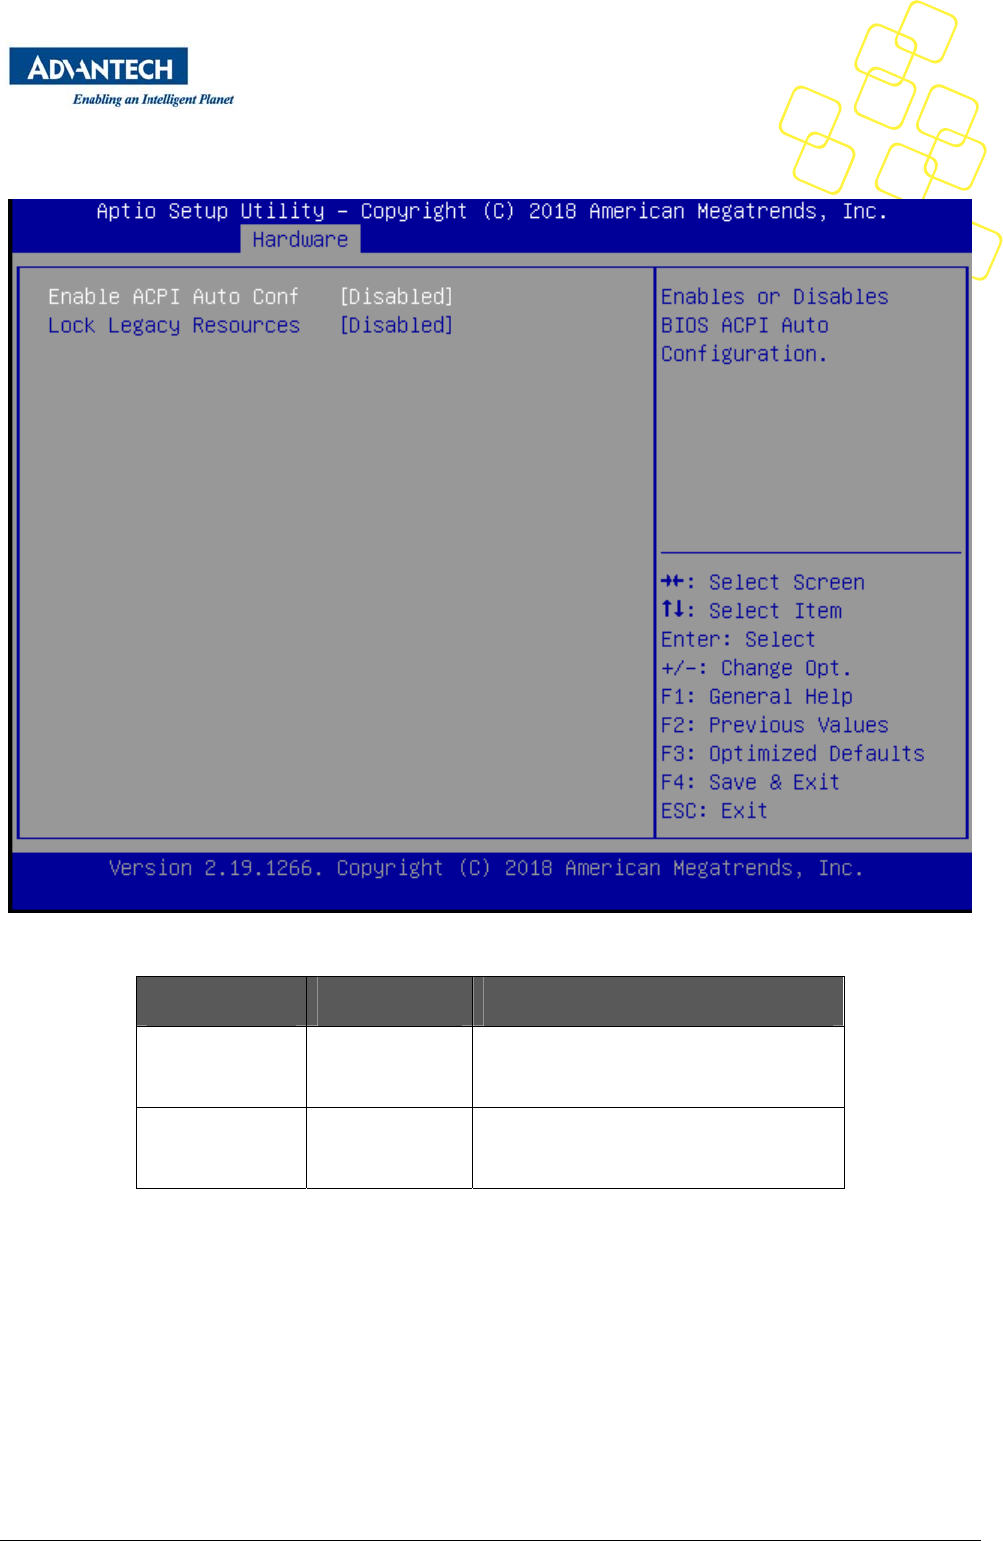
3.2.3.4 ACPISetting
ThismenucontainssettingsfortheACPIconfiguration.
Figure30:HardwareSetup:ACPIconfiguration
Setupitem Access/Options Description
EnableACPIAuto
Configuration
Enabled
Disabled
EnableordisableBIOSACPIautoconfiguration
LockLegacy
Resources
Enabled
Disabled
Enablelockoflegacyresources
Table17:HardwareSetup:ACPIconfigurationMenuItems
Copyright2017AdvantechCo.Ltd.Allrightsreserved. Page50
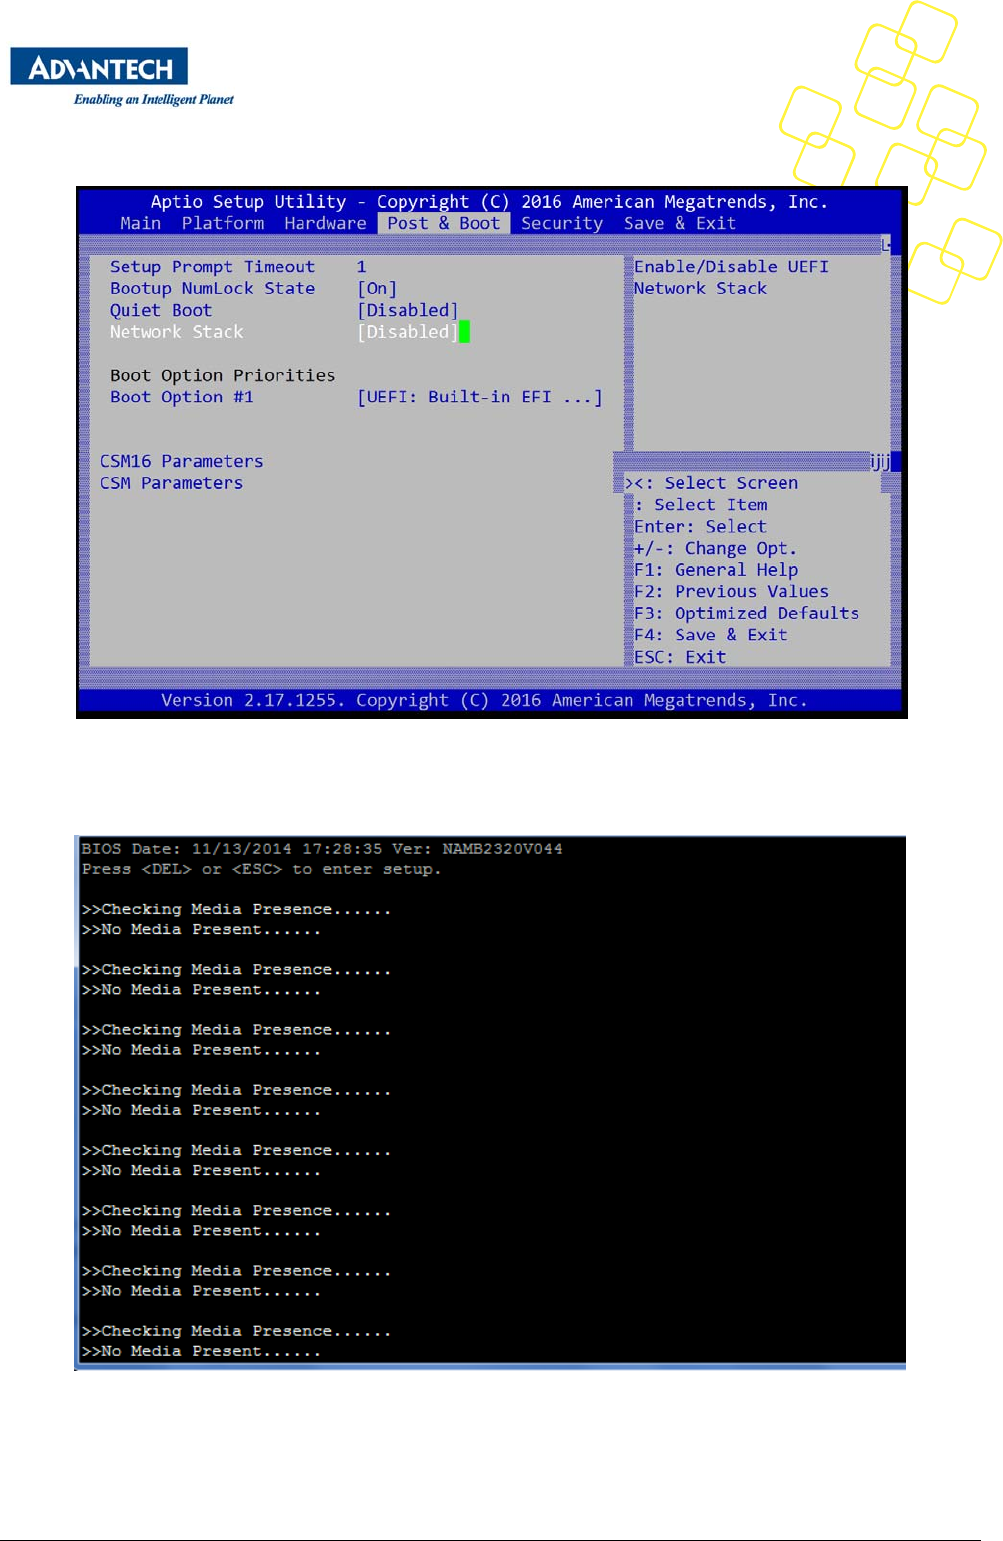
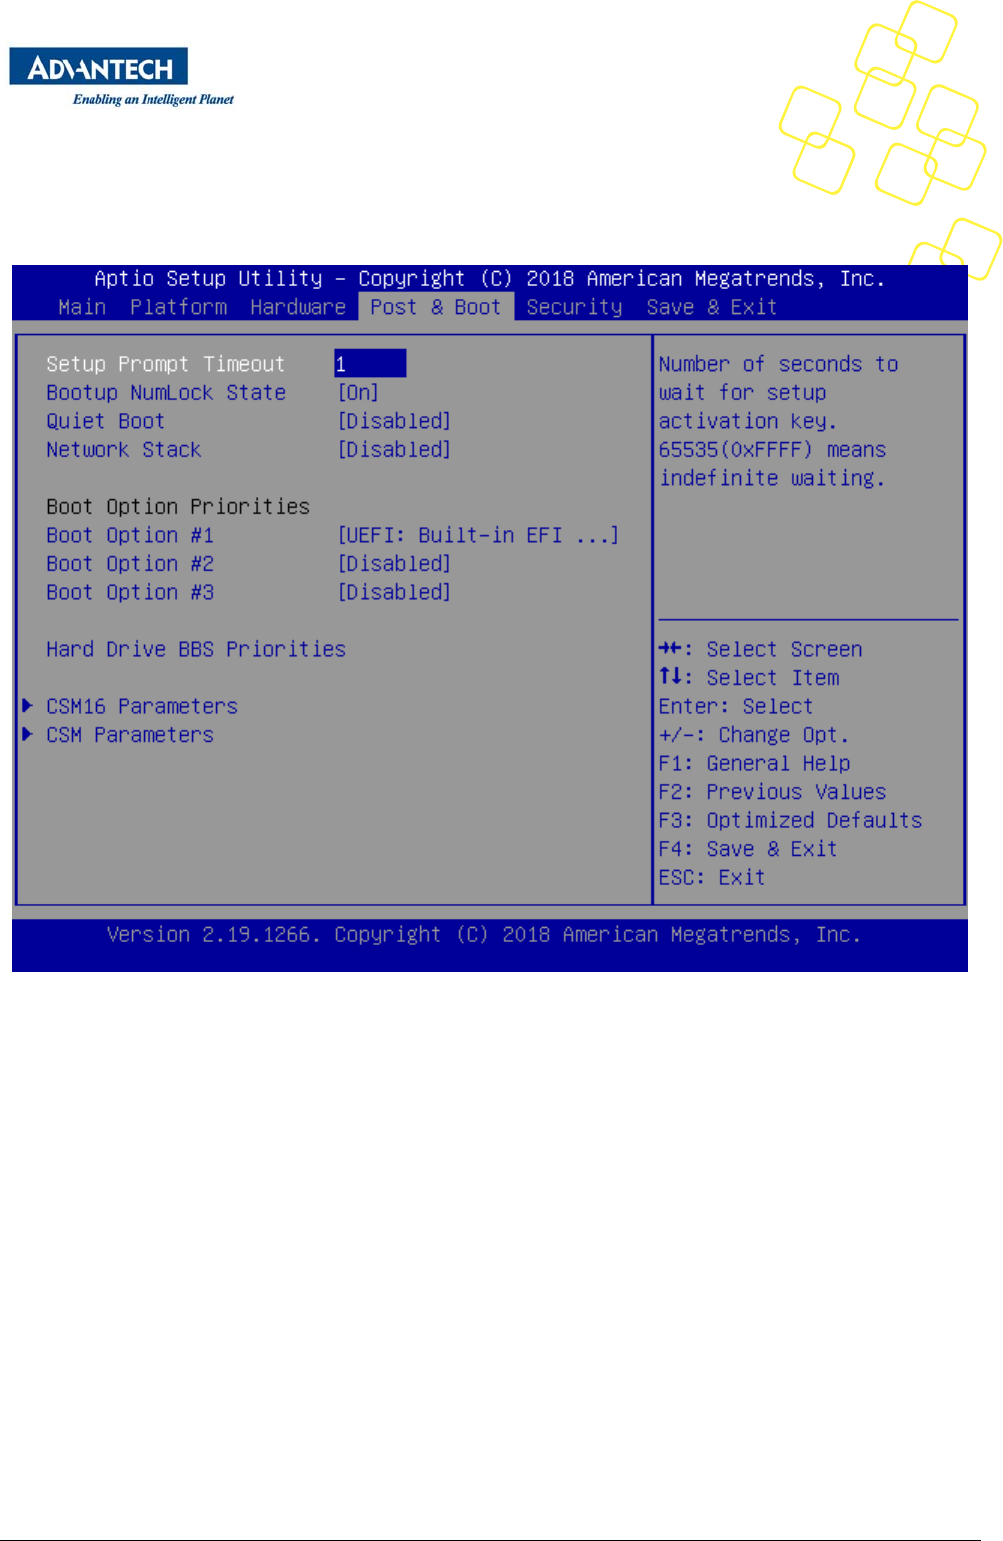
3.2.4 SETUPPOST&BOOTMENU
Userscanconfigurethesystembootprioritysettingsviathebootpage.Thedefaultsettingofbootpriority
ofbootoption#1is“UEFI:Built‐inEFIShell”;Userscandefinethebootprioritiesbasedontheapplication.
Figure31:BootConfiguration
Copyright2017AdvantechCo.Ltd.Allrightsreserved. Page51
Table18:BootConfiguration
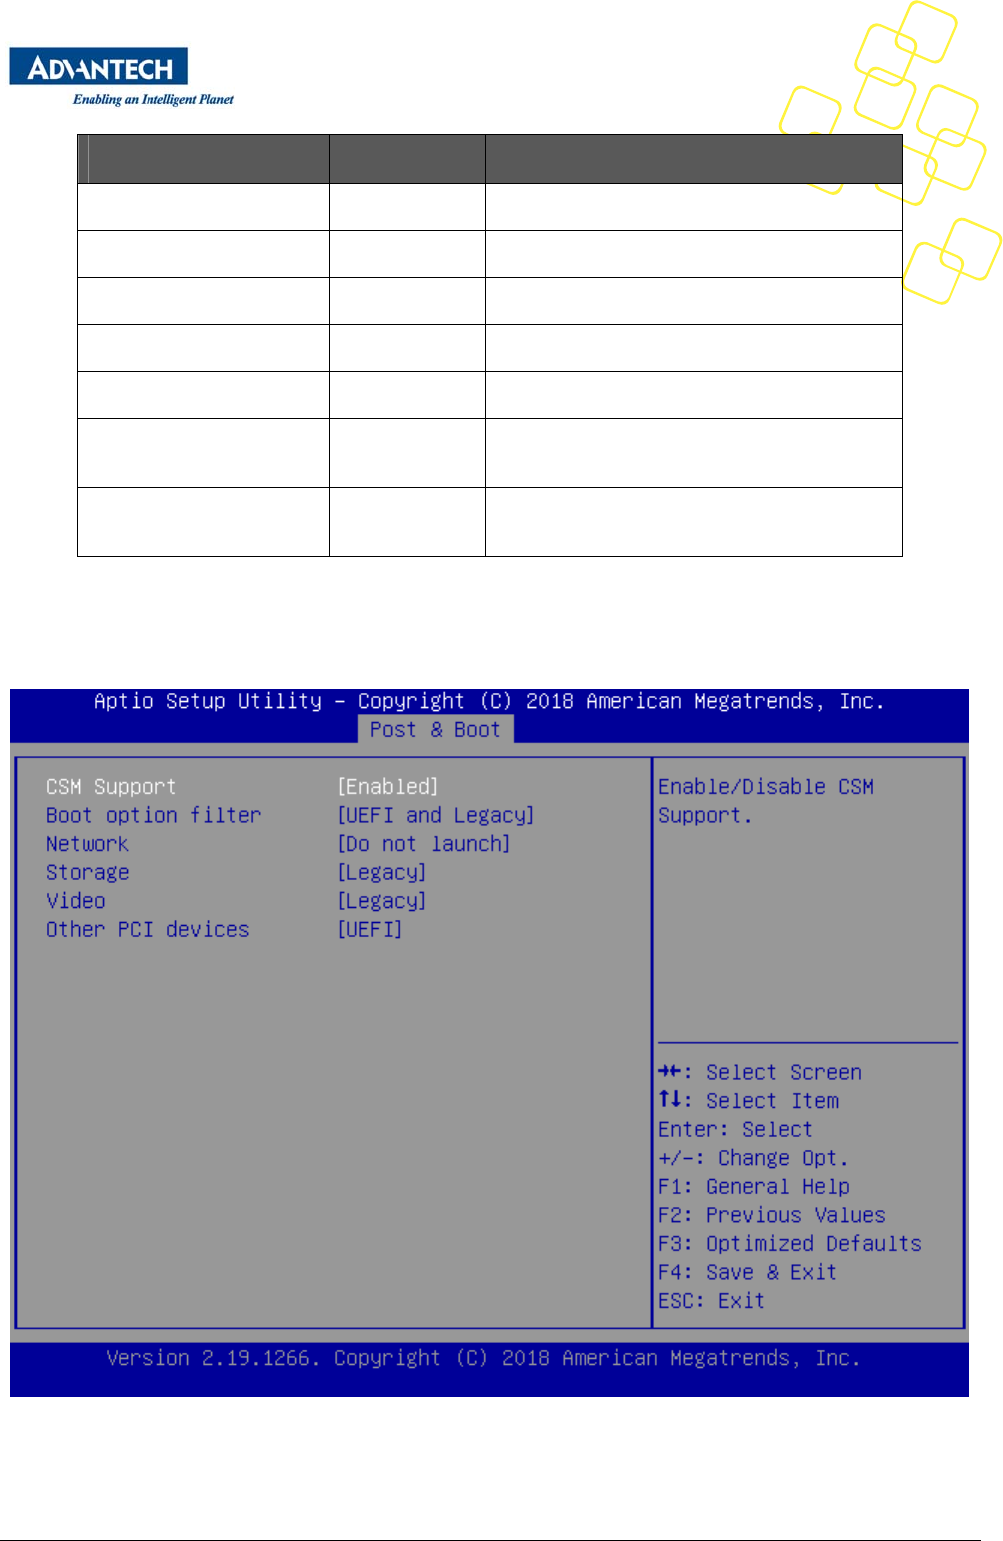
3.2.4.1 CompatibilitySupportModule(CSM)Configuration
ThissubmenuallowsuserstoconfigurethesupportforlegacyBIOSmechanismsandoptionROMs.
Figure32:Post&BootSetup:CSMConfigurationMenu
Feature Default Description
SetupPromptTimeout 1 Numberofsecondstowaitforsetupactivationkey.
BootupNumLockState On SelectthekeyboardNumLockstate.
QuietBoot Disabled EnablesordisablesQuietBootoption.
NetworkStack Disabled EnablesordisablesbootviaNetwork(PXE)
BootOptionPriority UserDefined Setsthesystembootorder.
CSM16Parameters N/A Selectsub‐menu.
CSMParameters N/A Selectsub‐menu.
Copyright2017AdvantechCo.Ltd.Allrightsreserved. Page52
Setupitem Access/Options Description
CSMSupport Enabled
Disabled
Enables or disables the Compatibility Support
Module.
Bootoptionfilter UEFIandLegacy
LegacyOnly
UEFIOnly
Thisitemallowstocontroltheexecutionof
legacyandUEFIcompliantOptionROMs
Network
Donotlaunch
UEFI
Legacy
Thisitemallowsamoregranularcontrolof
OptionROMexecutiondependingofthetypeof
extensiondevice.
Storage
Video
OtherPCIdevice
ROM
Table19:CSMConfigurationMenu
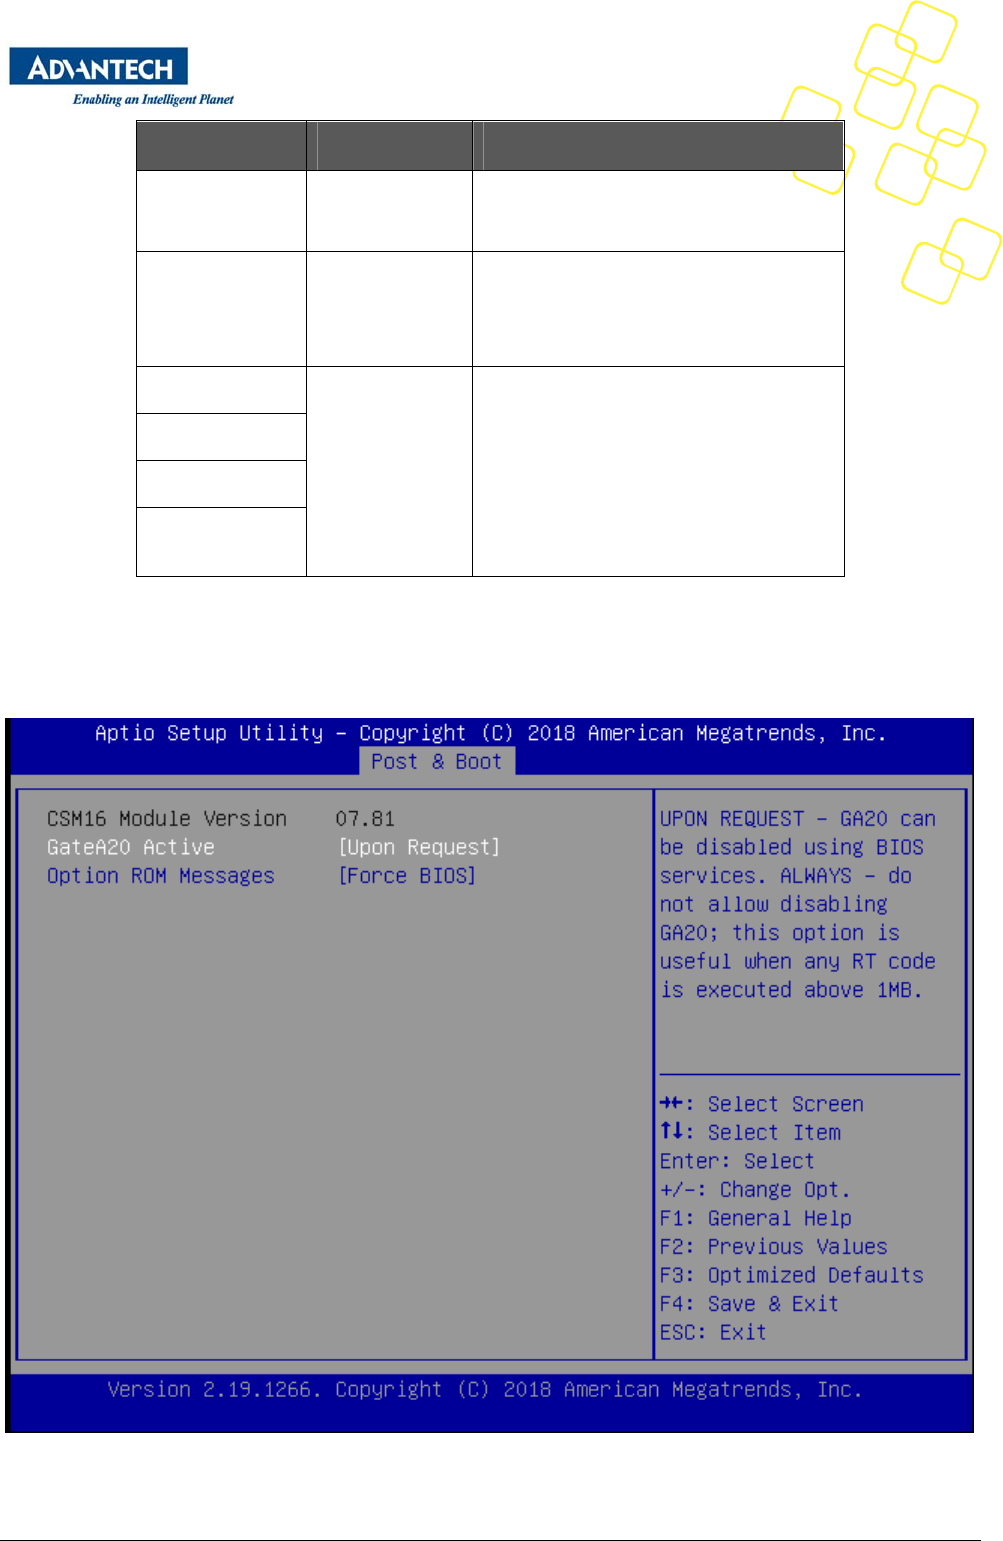
3.2.4.2 CSM16Configuration
ThissubmenuallowsuserstoconfigurethesupportforlegacyBIOSCSM16
Figure33:CSM16Configuration
Copyright2017AdvantechCo.Ltd.Allrightsreserved. Page53
Setupitem Access/Options Description
GateA20Active UponRequest
Always
UPONREQUEST‐GA20canbedisabledusing
BIOSservices.ALWAYS‐donotallowdisabling
GA20;thisoptionisusefulwhenanyRTcodeis
executedabove1MB
OptionROM
Messages
ForceBIOS
KeepCurrent
SetdisplaymodeforOptionROM
Table20:CSM16ConfigurationMenu
3.2.4.3 SecuritySetup
“AdministratorPassword”allowsuserstoconfigurethesystemsothatapasswordafter beinginstalledis
requiredeachtimethesystemboots,and/oranattemptismadetoentertheSetupprogram.
Figure34:AdministratorSetup
Note:
Ifsetthe“PasswordCheck”is[Setup],thenthisonlylimitsaccesstoSetupandisonlyaskedforwhenentering
Setup.

Copyright2017AdvantechCo.Ltd.Allrightsreserved. Page54
Ifsetthe“PasswordCheck”is[Always],thenthisisapoweronpasswordandmustbeenteredtobootorenter
Setup.InSetuptheUserwillhaveAdministratorrights.
Thepasswordlengthmustbeinthefollowingrange:
Minimumlength:3
Maximumlength:20
Copyright2014AdvantechCo.Ltd.Allrightsreserved.
3.2.5 SAVE&EXITMENU
TheFWA‐1012VCBIOSallowsuserstostoreBIOSconfigurationresultsas“UserDefaults.”Userscanselect
“SaveasUserDefaults”torecordallchangeswhichhadbeenmadeinpreviouspagesasthedefaultsetting
forfurtheruse.
Figure35:Save&ExitMenu
Group Setupitem Description
None
SaveChangesand
Exit
Exit setup after saving the changes. Does not update User
defaults.
DiscardChangesand
Exit
Exitsetupwithoutsavinganychanges.
SaveChangesand
Reset
Reset system after saving the changes. Does not update User
Defaults.
DiscardChangesand
Reset Resetsystemwithoutsavingthechanges.
SaveOptions
SaveChanges SaveChangesmadesofartoanyofthesetupoptions.
DiscardChanges DiscardChangesmadesofartoanyofthesetupoptions.
RestoreDefaults RestorestheBIOSfactorydefaultstoallthesetupoptions.

Copyright2017AdvantechCo.Ltd.Allrightsreserved. Page56
SaveasUserDefaults SavestheCurrentBIOSSettingsasUserDefaults.
RestoreUserDefaults RestorestheUserdefaultstoallthesetupoptions.
BootOverride UEFI:<bootdevice> Thisoption allows youto override thespecified bootorder and
useadifferentbootdeviceforthenextboot.
Table21:Save&ExitMenuOptions

Copyright2017AdvantechCo.Ltd.Allrightsreserved. Page57
APPENDIXA:ACKNOWLEDGEMENTS
AwardisatrademarkofAwardSoftwareInternational,Inc.
IBM,PC/AT,PS/2andVGAaretrademarksofInternationalBusinessMachinesCorporation.Intel®and
Pentium®aretrademarksofIntelCorporation.
MicrosoftWindows®isaregisteredtrademarkofMicrosoftCorp.
Allotherproductnamesortrademarksarepropertiesoftheirrespectiveowners.

Copyright2017AdvantechCo.Ltd.Allrightsreserved. Page58
APPENDIXB:GLOSSARY
Terminology Description
ACPI AdvancedConfigurationandPowerInterfacespecification
AHCI AdvancedHostControllerInterface.
APIC AdvancedProgrammableInterruptController.
ASF AlertStandardFormat.
BGA BallGridArray
BIST Built‐inselftest
BMC BaseBoardManagementController
BSCAN BoundaryScanConnector
BSP BootStrapProcessor
DDR3 ThirdgenerationDoubleDataRateSDRAMmemorytechnology.
DMA DirectMemoryAccess.
DMI DirectMediaInterface.
DMTF Theinternationalorganizationresponsibleformanagingandmaintainingthe
ASFspecification.
DTS DigitalThermalSensor
ECC ErrorCorrectingCode
EEPROM ElectricallyErasableProgrammableMemory.Anon‐volatilememorylocatedon
theLANcontrollerthatisdirectlyaccessiblefromthehost
EHCI EnhancedHostControllerInterface.
EMI ElectromagneticInterface
ESD ElectrostaticDischarge
GB/s Gigabytespersecond(1000Mbytespersecond)
Gb/s Gigabitspersecond(1000Mbitspersecond)
GT/s Giga‐transferspersecond
I2C Inter‐integratedcircuit
IEEE InstituteofElectricalandElectronicsEngineers.
IIO IntegratedI/OController.
ILM IndependentLoadingMechanism.
IMC IntegratedMemoryController.
IOV I/Ovirtualization.
IPMB IntelligentPlatformManagementBus
IPMI IntelligentPlatformManagementInterface

Copyright2017AdvantechCo.Ltd.Allrightsreserved. Page59
JTAG JointTestActionGroup
LAN LocalAreaNetwork
LPC LowPinCount
MAC MediaAccessControl
MDIO ManagementDataInput/OutputInterfaceoverMDC/MDIOlines
MTBF MeanTimeBetweenFailure
NC‐SI NetworkControllerSidebandInterface
NMC NetworkMezzanineCard
PCI PeripheralComponentInterconnectLocalBus
PCIe PCIExpress.
PCH PlatformControllerHub
PECI PlatformEnvironmentControlInterface.
PET PlatformEventTrap.
PHY PhysicalLayerDevice
PICMG PCIIndustrialComputerManufacturersGroup
QPI QuickPathInterconnect.Acache‐coherent,link‐basedinterconnect
specificationforIntelProcessors,chipsets,andI/Obridge.
RAID RedundantArrayofInexpensiveDisksorRedundantArrayofIndependentDisks
RANK AunitofDRAMcorrespondstofourtoeightdevicesinparallel,ignoringECC.
Thesedevicesareusually,butnotalways,mountedonasinglesideofaDDR3
DIMM.
RDIMM RegistereddualIn‐lineMemoryModule.
RGMII Reducedgigabitmediaindependentinterface
RTC RealTimeClock
SandyBridge‐EP
Processor
Intel’s32‐nmprocessordesign,follow‐ontothe32‐nmSandyBridgeprocessor
design.
SATA SerialATA.
SAS SerialAttachedSCSI
SCI SystemControlInterrupt.UsedinACPIprotocol.
SDRAM SynchronousDynamicRandomAccessMemory
SerDes SerializerandDe‐SerializerCircuit
SGMII SerializedGigabitMediaIndependentInterface
SIU SerialI/OUnit
SIW SerialI/OandWatchdogTimer
SKU StockKeepingUnit

Copyright2017AdvantechCo.Ltd.Allrightsreserved. Page60
SMBus SystemManagementBus.Atwo‐wireinterfacethroughwhichvarioussystem
componentsmaycommunicate.
SPD SerialPresenceDetect
SPI SerialPeripheralInterface.
TAC ThermalAveragingConstant
TBD ToBeDefined.
TDP ThermalDesignPower
TPM TrustedPlatformModule
TurboBoost
Technology
IntelTurboBoostTechnologyisawaytoruntheprocessorcorefasterthanthe
markedfrequency.
UART UniversalAsynchronousReceiver/Transmitter
UHCI UniversalHostControllerInterface
USB UniversalSerialBus
USBDOM USBdisk‐on‐module
QAT Intel®QuickAssistTechnology