Advantech Co TREK-510 COMPUTER User Manual
Advantech Co Ltd COMPUTER
Users Manual

TREK‐510Usermanual1
UserManual
TREK‐510
In‐VehicleComputingBox
SmartDisplay
Usermanual

TREK‐510Usermanual2
Copyright
Thedocumentationandthesoftware
includedwiththis
product
are
copyrighted
2010by
AdvantechCo.,Ltd.Allrights
arereserved.AdvantechCo.,
Ltd.reservesthe
righttomake
improvements
intheproductsdescribed
inthis
manualat
anytimewithoutnotice.No
part
ofthismanualmay
be
reproduced,copied,translated
or
transmittedinanyform
orby
any
meanswithoutthe
priorwrittenpermissionofAdvantechCo.,Ltd.Informationprovided
in
this
manualisintendedtobeaccurateand
reliable.How‐ever,AdvantechCo.,Ltd.assumesno
responsibilityforitsuse,norforanyinfringementsoftherightsofthirdparties,whichmay
resultfromitsuse.
Acknowledgements
IntelandAtomaretrademarksofIntelCorporation.MicrosoftWindows
andMS‐DOSare
registeredtrademarksofMicrosoftCorp.Allotherproductnamesortrademarksare
propertiesoftheirrespectiveowners.
ProductWarranty(2years)
Advantechwarrantstoyou,theoriginalpurchaser,thateachofits
productswillbefreefrom
defectsinmaterialsandworkmanshipfortwoyearsfromthedateofpurchase.
This
warrantydoesnotapplyto
any
products
which
havebeenrepaired
oralteredbypersons
otherthanrepair
personnelauthorizedbyAdvantech,orwhich
havebeensubject
tomisuse,
abuse,
accidentor
improperinstallation.Advantechassumesnoliabilityunderthetermsof
thiswarrantyasaconsequenceofsuchevents.
Becauseof
Advantech’s
highquality‐controlstandardsandrigoroustesting,mostofour
customersneverneedtouse
ourrepairservice.If
anAdvantech
productisdefective,itwillbe
repairedorreplacedatnochargeduringthewarrantyperiod.Forout‐ of‐warranty
repairs,
youwill
bebilledaccording
tothecost
ofreplacementmaterials,servicetime
andfreight.
Pleaseconsultyourdealerformoredetails.
Ifyouthinkyouhaveadefectiveproduct,followthesesteps:
1.
Collectallthe
informationabouttheproblemencountered.(Forexample,CPUspeed,
Advantechproductsused,otherhardwareandsoftwareused,
etc.)Noteanything
abnormalandlistanyonscreenmessagesyougetwhentheproblemoccurs.
2.
Callyourdealeranddescribethe
problem.Please
have
yourmanual,product,andany
helpfulinformationreadily
available.
3.
Ifyourproductisdiagnosedasdefective,obtainanRMA(returnmerchandise
authorization)numberfrom
yourdealer.Thisallowsusto
process
your
returnmore
quickly.
4.
Carefullypack
thedefectiveproduct,afully‐completedRepairand
ReplacementOrder
Card
and
a
photocopyproofof
purchasedate(such
as
yoursalesreceipt)inashippable
container.Aproductreturned
without
proofofthepurchasedateisnoteligiblefor
warrantyservice.
5.
Write
theRMA
number
visiblyontheoutsideofthe
package
andshipitprepaidtoyour
dealer.
PartNo.2010051001
Edition1
Printedin
Ta i w a n
Jan2011

TREK‐510Usermanual3
DeclarationofConformity
Thisproduct
has
passedtheCEtestfor
environmentalspecifications.Te s t conditionsfor
passingincluded
the
equipmentbeing
operatedwithinanindustrialenclosure.
Inorderto
protecttheproductfrombeingdamagedbyESD
(ElectrostaticDischarge)andEMIleakage,
westrongly
recommend
theuseofCE‐compliantindustrialenclosureproducts.
FCCClassB
Note:This
equipmenthasbeentestedandfoundtocomplywiththelimitsforaClassB
digital
device,pursuanttopart15of
theFCCRules.Theselimitsaredesignedtoprovidereasonable
protectionagainstharmfulinterferenceinaresidentialinstallation.Thisequipment
generatesuses
andcanradiateradiofrequencyenergyand,ifnotinstalled
andused
in
accordancewiththeinstructions,may
causeharmfulinterferencetoradio
communications.
However,thereisnoguaranteethatinterferencewillnotoccurina
particular
installation.If
thisequipment
doescauseharmfulinterferencetoradioortelevisionreception,whichcanbe
determinedbyturningtheequipmentoff
andon,theuserisencouragedtotrytocorrect
theinterferencebyoneormoreofthe
followingmeasures:
z
Reorientorrelocatethereceivingantenna.
z
Increasetheseparationbetweenthe
equipmentandreceiver.
z
Connect
the
equipmentintoan
outletona
circuitdifferentfromthattowhichthe
receiverisconnected.
z
Consultthedealeroranexperienced
radio/TVtechnicianforhelp.
TechnicalSupportandAssistance
1.
VisittheAdvantechwebsiteat
www.advantech.com/support
forthelatest
informationabouttheproduct.
2.
Contactthedistributor,
salesrepresentative,orAdvantech'scustomerservicecenter
for
technicalsupport
ifyouneed
additionalassistance.Pleasehavethefollowing
informationreadybeforeyoucall:
–
Productnameandserialnumber
–
Descriptionofyour
peripheral
attachments
–
Descriptionofyoursoftware(operating
system,version,applicationsoftware,etc.)
–
Acompletedescriptionoftheproblem
–
Theexactwordingofanyerrormessages

TREK‐510Usermanual4
Warnings,CautionsandNotes
Warning!
Warningsindicateconditions,which
if
not
observed,cancausepersonal
Caution!
Cautionsareincludedtohelpyouavoiddamaginghardwareorlosingdata.
e.g.
Note!
Notesprovideoptionaladditional
information.
DocumentFeedback
To
assistusinmaking
improvements
tothis
manual,
wewouldwelcomecommentsand
constructivecriticism.Sendall
suchinwritingto:support@advantech.com
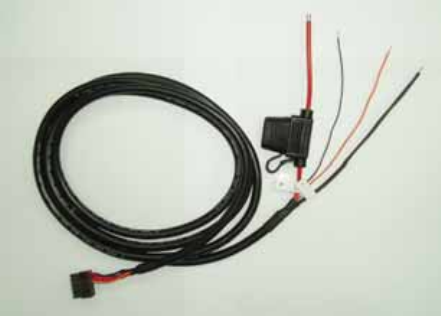
PackingList
Beforesettingup,checkthattheitems
listed
belowareincluded,in
goodcondition.Ifanyitem
doesnotaccord
withthetable,pleasecontactyourdealer
immediately.
z
TREK‐510series
In‐VehicleComputingBox
z
USB/AudioCableclip
z
Warrantycard
z
Powercord:DCpowerinletcable
(180cm‐forTREK‐510only)
z “
Drivers,UtilitiesandUserManual"CD‐ROM
z
EndUserLicenseAgreement(WinCEmodel),pleasedownloaddriverandrelated
documentfromwww.advantech.com/support
Orderinginformation
P/NDescription
TREK‐510‐GCEA0EST2062333Mhz,GPS,GPRSmodulebuiltin,WinCE5.0
TREK‐303R‐LA0E7"vehicledisplaysystem,480x234resolution,with4wireresistivetouch
screen,2‐wattsspeaker.
17000183422‐metercable(pairedwithTREK‐510)
Packinglist
Item
Powercablex1Screwx4
GPSantennax1CableclipforMICin,lineout,USBhost,USBclientx4
WWANantennax1StartupmanualCDx1

TREK‐510Usermanual5
SafetyInstructions
1. Readthesesafetyinstructionscarefully.
2. Keepthisusermanualforlaterreference.
3. DisconnectthisequipmentfromACoutletbeforecleaning.Donotuseliquidorspraydetergents
forcleaning.
4. Forpluggableequipment,thepoweroutletshallbeinstalledneartheequipmentandshallbe
easilyaccessible.
5. Keepthisequipmentawayfromhumidity.
6. Putthisequipmentonareliablesurfaceduringinstallation.Droppingitorlettingitfallcould
causedamage.
7. Donotleavethisequipmentinanenvironmentunconditionedwherethestoragetemperature
under‐30°C(‐22°F)orabove70°C(158°F),itmaydamagetheequipment.
Operatingtemperature:50°C.SafetyCertificateTemperature:50°C
8. Theopeningsontheenclosureareforairconvectionhenceprotectstheequipmentfrom
overheating.DONOTCOVERTHEOPENINGS.
9. Makesurethevoltageofthepowersourceiscorrectbeforeconnectingtheequipmenttothe
poweroutlet.
10. Placethepowercordsuchawaythatpeoplecannotsteponit.Donotplaceanythingoverthe
powercord.Thevoltageandcurrentratingofthecordshouldbegreaterthanthevoltageand
currentratingmarkedontheproduct.
11. Allcautionsandwarningsontheequipmentshouldbenoted.
12. Iftheequipmentisnotusedforlongtime,disconnectitfromthepowersourcetoavoidbeing
damagedbytransientover‐voltage.
13. Neverpouranyliquidintoventilationopenings.Thiscouldcausefireorelectricalshock.
14. Neveropentheequipment.Forsafetyreasons,theequipmentshouldbeopenedonlyby
qualifiedservicepersonnel.
15. Ifanyofthefollowingsituationsarises,gettheequipmentcheckedbyservicepersonnel:
a. Thepowercordorplugisdamaged.
b. Liquidhaspenetratedintotheequipment.
c. Theequipmenthasbeenexposedtomoisture.
d. Theequipmentdoesnotworkwelloryoucannotgetittoworkaccordingtousermanual.
e. Theequipmenthasbeendroppedanddamaged.
f. Theequipmenthasobvioussignsofbreakage.
16. CAUTION:Thecomputerisprovidedwithabattery‐poweredreal‐timeclockcircuit.Thereisa
dangerofexplosionifbatteryisincorrectlyreplaced.Replaceonlywithsameorequivalenttype
recommendedbythemanufacture.Discardusedbatteriesaccordingtothemanufacturer’s
instructions.
17. THECOMPUTERISPROVIDEDWITHCDDRIVESCOMPLYWITHAPPROPRIATESAFETYSTANDARDS
INCLUDINGIEC60825.
CLASS 1 LASER PRODUCT
KLASSE 1 LASER PRODUKT

TREK‐510Usermanual6
18.ThisdevicecomplieswithPart15oftheFCCrules.Operationissubjecttothefollowingtwo
conditions:
(1)thisdevicemaynotcauseharmfulinterference,and
(2)thisdevicemustacceptanyinterferencereceived,includinginterferencethatmaycause
undesiredoperation.
19.CAUTION:Alwayscompletelydisconnectthepowercordfromyourchassiswheneveryouwork
withthehardware.Donotmakeconnectionswhilethepowerison.Sensitiveelectronic
componentscanbedamagedbysuddenpowersurges.
20.CAUTION:Alwaysgroundyourselftoremoveanystaticchargebeforetouchingthemotherboard,
backplane,oradd‐oncards.Modernelectronicdevicesareverysensitivetostaticelectric
charges.Asasafetyprecaution,useagroundingwriststrapatalltimes.Placeallelectronic
componentsonastatic‐dissipativesurfaceorinastatic‐shieldedbagwhentheyarenotinthe
chassis.
21.CAUTION:Anyunverifiedcomponentcouldcauseunexpecteddamage.Toensurethecorrect
installation,pleasealwaysusethecomponents(ex.screws)providedwiththeaccessorybox.
22.Cautiontextconcerninglithiumbatteries:
23"RackMountInstructions‐Thefollowingorsimilarrack‐mountinstructionsareincludedwiththe
installationinstructions:
A) ElevatedOperatingAmbient‐Ifinstalledinaclosedormulti‐unitrackassembly,theoperating
ambienttemperatureoftherackenvironmentmaybegreaterthanroomambient.Therefore,
considerationshouldbegiventoinstallingtheequipmentinanenvironmentcompatiblewiththe
maximumambienttemperature(Tma)specifiedbythemanufacturer.
B) ReducedAirFlow‐Installationoftheequipmentinarackshouldbesuchthattheamountofair
flowrequiredforsafeoperationoftheequipmentisnotcompromised.
C) MechanicalLoading‐Mountingoftheequipmentintherackshouldbesuchthatahazardous
conditionisnotachievedduetounevenmechanicalloading.
D) CircuitOverloading‐Considerationshouldbegiventotheconnectionoftheequipmenttothe
supplycircuitandtheeffectthatoverloadingofthecircuitsmighthaveonovercurrentprotection
andsupplywiring.Appropriateconsiderationofequipmentnameplateratingsshouldbeused
whenaddressingthisconcern.
E) ReliableEarthing‐Reliableearthingofrack‐mountedequipmentshouldbemaintained.Particular
attentionshouldbegiventosupplyconnectionsotherthandirectconnectionstothebranch
circuit(e.g.useofpowerstrips)."
24.CAUTION:
1.Thisproductisconnectedtoafuseboxinthepassengercompartmentbeforeitconnectedto
thevehiclebattery,andthefuseinafuseboxisULlistedandautomotivefuse.
2.UsetheappropriateflexibleandSAEwiringtoconnecttoafusebox.
*Thisproductisinstalledinthepassengercompartment.
3.Thisproductmustbeinstalledandmaintainedbyqualifiedservicepersonnel.
4.ThisdevicecomplieswithPart15oftheFCCrules.Operationissubjecttothefollowingtwo
conditions:(1)Thisdevicemaynotcauseharmfulinterference,and
(2)Thisdevicemustacceptanyinterferencereceived,including
interferencethatmaycauseundesiredoperation.
ADVARSEL!
Lithiumbatteri - Eksplosionsfare ved fejlagtig
håndtering.
Udskiftning må kun ske med batteri af samme

TREK‐510Usermanual7
WichtigeSicherheishinweise
1.
BittelesensieSichdieseHinweise
sorgfältigdurch.
2.
HebenSiedieseAnleitungfürdenspäterenGebrauch
auf.
3.
VorjedemReinigenistdasGerätvomStromnetzzutrennen.Ve r w en d en SieKeine
Flüssig‐oderAerosolreiniger.AmbestendienteinangefeuchtetesTuc hzurReinigung.
4.
DieNetzanschluBsteckdosesollnahedemGerätangebrachtundleicht
zugänglichsein.
5.
DasGerätistvorFeuchtigkeitzu
schützen.
6.
BeiderAufstellungdesGerätesistaufsicherenStandzuachten.EinKippenoder
FallenkönnteVe rletzu nge n hervorrufen.
7.
DieBelüftungsöffnungendienen
zurLuftzirkulationdiedasGerätvorüberhit‐zung
schützt.SorgenSiedafür,daBdieseÖffnungennichtabgedecktwerden.
8.
BeachtenSiebeim.AnschluBan
dasStromnetzdieAnschluBwerte.
9.
VerlegenSiedieNetzanschluBleitungso,daBniemanddarüberfallenkann.Essollteauch
nichtsaufderLeitungabgestelltwerden.
10.
AlleHinweiseundWarnungendie
sichamGerätenbefindensindzubeachten.
11.
WirddasGerätübereinenlängerenZeitraum
nichtbenutzt,solltenSieesvom
Stromnetztrennen.SomitwirdimFalleeinerÜberspannungeineBeschädigung
vermieden.
12.
Durchdie
Lüftungsöffnungendürfenniemals
GegenständeoderFlüssigkeiten
indasGerät
gelangen.DieskönnteeinenBrandbzw.elektrischenSchlagaus‐lösen.
13.
ÖffnenSieniemalsdasGerät.DasGerätdarfausGründenderelektrischen
SicherheitnurvonauthorisiertemServicepersonalgeöffnetwerden.
14.
WennfolgendeSituationenauftretenistdasGerätvomStromnetzzu
trennenundvon
einerqualifiziertenServicestellezuüberprüfen:
15.
NetzkabeloderNetzsteckersindbeschädigt.
16.
FlüssigkeitistindasGeräteingedrungen.
17.
DasGerätwarFeuchtigkeitausgesetzt.
18.
Wenndas
Gerätnichtder
Bedienungsanleitung
entsprechendfunktioniertoder
SiemitHilfedieserAnleitungkeine
Verbesserungerzielen.
19.
DasGerätistgefallenund/oderdasGehäuseistbeschädigt.
20.
Wenndas
GerätdeutlicheAnzeicheneines
Defektesaufweist.
21.
VOSICHT:Explisionsgefahrbei
unsachgemaben
AustauschderBatterie.Ersatznurdurch
densellbenordereinemvom
Herstellerempfohlene‐mahnlichenTyp.Entsorgung
gebrauchterBatteriennavhAngabendesHerstellers.
22.
ACHTUNG:EsbestehtdieExplosionsgefahr,fallsdieBatterieaufnichtfach‐männische
Weisegewechseltwird.
Ve r f a n ge n SiedieBatterie
nurgleicher
oderentsprechender
Typ e,wie
vomHerstellerempfohlen.EntsorgenSieBatteriennachAnweisungdes

TREK‐510Usermanual8
Herstellers.
23.
DerarbeitsplatzbezogeneSchalldruckpegelnachDIN
45635Te i l 1000beträgt
70dB(A)oderweiger.
Haftungsausschluss:
DieBedienungsanleitungen
wurdenentsprechend
der
IEC‐704‐1
erstellt.
Advantech
lehnt
jegliche
Verantwo r tun g
für
die
Richtigkeit
der
in
diesemZusammenhanggetätigtenAussagenab.
SafetyPrecaution‐StaticElectricity
Followthesesimpleprecautionstoprotect
yourself
fromharmandtheproductsfrom
damage.
z
To avoidelectricalshock,alwaysdisconnectthepowerfrom
yourPCchassisbefore
youworkonit.Don'ttouchany
componentsontheCPUcardorothercardswhilethe
PCison.
z
Disconnectpowerbeforemakinganyconfigurationchanges.Thesuddenrushofpower
asyouconnectajumperorinstall
acardmaydamagesensitiveelectroniccomponents.
Warning!
1.
Inputvoltagerated:6‐36Vdc
.
2.
Tra n s p o r t : carry
theunitwith
bothhandsandhandlewithcare
.
3.
Maintenance:
to
properlymaintainandclean
the
surfaces,useonly
approvedproductsor
cleanwith
adryapplicator
.
4.
CompactFlash:
Tu r n offthepowerbeforeinsertingorremoving
CompactFlashstoragecards
.
EuropeanContactinformation:
AdvantechEuropeGmbHKolberger
Straße7
D‐40599Düsseldorf,Germany
Te l : 49‐211‐97477350
Fax:49‐211‐97477300
TREK‐510Usermanual9
Contents
Chapter1GeneralInformation............................12
1.1
Introduction
...............................................................................................
12
1.2
GeneralSpecifications
...............................................................................
13
1.3
Dimensions
................................................................................................
14
Figure1.1
TREK‐510dimensions............................................
1
4
Chapter2SystemSetup.......................................15
2.1
AQuickTouroftheVehicle
Mounted
............................................................
1
6
Figure2.1
Frontview
ofthe
TREK‐510
.......................................
1
6
Figure2.2
RearsideoftheTREK‐510
..........................................
1
6
Figure2.3
SideviewoftheTREK‐510
..........................................
1
6
Figure2.4
Bottom
viewoftheTREK‐510
...................................
1
7
Figure2.5
Top
viewoftheTREK‐510
..........................................
1
7
2.2
InstallationProcedures....................................................................................
1
7
2.2.1
Connecting
thePowerCord
..............................................................
1
7
Table
2.2.1:
PinDefinition
ofPowerCord
...................................
1
7
2.2.2
Powerc
onnector…………………..
...........................................................18
Figure2.6
Powerconnectoroutlook
...................................
1
8
Table
2.2.2:
PinDefinition
ofPowerconnector..........................
1
8
Figure2.7
Powerconnectorphoto
......................................
1
9
2.3
RunningtheBIOS
SetupProgram
...............................................................
……..
19
2.4
InstallingSystemSoftware
...............................................................................
19
2.5
InstallingtheDrivers.....................................................................................
19
2.6
ProgrammingFunction
Keys
andGPIO/CANBUS
.......................................
19
Chapter3Hardware&PeripheralInstallation……20
3.1
OverviewofHardware
Installation
&Upgrading
.....................................
21
3.2
InstallingtheStorageDeviceandMemory
.............................................
21
3.3
InstallingOptionalAccessories
..................................................................
21
3.3.1
InstallingTREK‐510peripheralmodules.......................................
21
Figure3.1
Installperipheralinthesystem...............................
…
21
3.3.2
InstallingtheMiniPCI
typeWWAN,SIMcard&coinbattery......
22
Figure3.2
MiniPCI
typeWWAN,SIMcard&coinbatteryfrombottom
view…………………………………………………………....
………………………………22
3.3.4
InstallingCFcard……………..........................................................
22
Figure3.4
InstallingCFcard…..
.................................................
23
Figure
3.5
Installingcablelock…..
.............................................
23
3.3.5
GPSmoduleisunabletobeinstalledbycustomer.......................
23
3.4
PairedwithTREK‐303specification…......................................................
23
TREK‐510Usermanual10

TREK‐510Usermanual11
Chapter4JumperSettingsandConnectors.....24
4.1
SettingJumpersandSwitches................................................................
….
25
4.1.1LocationsoftheJumpersandconnector..................................
….
26
Figure4.1Locationsofjumpersandconnectorsontopsidethe
motherboard………………………………………………………………………….…26
Figure4.2Locationsofjumpersandconnectorsonbottomsideofthe
motherboard……………………………………………………...……………………26
Figure4.3Locationsofjumpersandconnectorsonbottomsideofthe
daughterboard……………………………………………………27
4.1.2
Jumpers………………………………………………………………27
Ta b l e 4.1.2.1:Jumpersonmotherboard
...................................
…
27
Ta b l e 4.1.2.2:Jumpersondaughterboard
................................
..
27
4.1.3
Connectors....................................................................................
28
Ta b l e 4.1.3.1:Connectorsonmotherboard
.................................
28
Ta b l e 4.1.3.2:Connectorsondaughterboard
..............................
28
4.2JumperSettings……………………………………………………………….29
4.2.1
CMOSClearforExternalRTC(JP2)………………………………29
Ta b l e 4.2.1:ClearCMOS/ExternalRTC(JP1)…………………..29
4.2.2
PowerInputVoltageSetting(JP1)…………………………………29
Ta b l e 4.2.2:PowerInputVoltageSelection(JP1)………………..29
4.2.3Pin9ofCOM3FunctionSelection(JP3)…………………………29
Table4.2.3:Pin9ofCOM3FunctionSelection(JP3)……………29
4.2.4
Pin9ofCOM8FunctionSelection(J3)……………………………29
Table4.2.4:Pin9ofCOM8FunctionSelection(J3)……………..29
4.2.5
DI/GPSFunctionSelection(SW2)………………………………..30
Table4.2.5:Pin9o22fCOM8FunctionSelection(J3)…………30
4.3 COMPortInterface………………………………………………………………30
Table4.7:SerialPortFunction…………………………………….30
Ta b l e 4.7:SerialPortSettings…………………………………….30
Chapter5PinAssignments...............................31
5.1 FrontSideconnectors…………………………………………………………..32
5.2 RearSideConnectors………………………………………………………….32
5.3 PowerConnector(12/24V;6~36V)…………………………………………..32
Ta b l e 5.3:Powerconnector………………………………………..32
5.4 SmartDisplayConnector…………………………………………………………33
Ta b l e 5.4:Smartdisplayconnector………………………………..33
5.5 RS‐232Connector(COM3,COM8)……………………………………………..34
Ta b l e 5.5:RS232/485/J1708connector……………………………34
5.6 RS‐232(COM9)/RS‐485(COM5)/J1708(COM6)Connector………34
Ta b l e 5.6:RS232/485/J1708connector……………………….…..34
5.7 DI/DOConnector…………………………………………………………………35
Ta b l e 5.7:DI/DOconnector………………………………………….35
5.8 CAN/VideoinConnector…………………………………………………………35
Ta b l e 5.8:CAN/Videoinconnector………………………………...35
5.9LEDConnector………………………………………………………
……………
36
Ta b l e 5.9:LEDconnector…………………………………………….36
Chapter6SWfunctionality...............37
6.1 Introduction
…………………………………………………………………………38
TREK‐510Usermanual12
6.1.1
ExecuteJ1939demoutility……………………………………………………………………….….38
Figure6.1IMCdemoutility
……………………………………………..………38
Figure6.2J1939trucksimulator
………………………………38
Figure6.3J1939test
………………………………………………………….…39
Figure6.4J1939test
……………………………………………………..……39
6.1.2
CANTest…………………………………………………………………………..…………………………39
Figure6.9CANtest‐2
………………………………………………………………39
6.2
RTCtest………………………………………………………………….……………………………………40
Figure6.10RTCtest‐1
………………………………………………………………40
Figure6.11RTCtest‐2
…………………………………………………..……………40
Figure6.12RTCtest‐3
………………………………………………………………40
Figure6.13RTCtest‐4
…………………………………………………….…………40
Figure6.14RTCtest‐5
…………………………………………………………….…41
6.3
PowerManagement………………………………………………………………………………….…..41
6.3.1PowermanagementMechanism………………………………….……………..42
6.3.2 PowerManagementutilityprogram…………………………………………….43
6.3.3
PowerManagementParametersettings………………………..…………….43
Figure6.15Powermanagementtestutility
…………………………………43
6.3.4TREK‐510powerconsumption……………………………………………………….43
6.4
GPIOTest…………………………………………………………………………………….…44
Figure6.16DI/Otest
…………………………………………………………………….44
Figure6.17Digitalin
……………………………………………………………………..…44
Figure6.18Digitalout
……………………………………………………………………45
6.7
G‐sensor………………………………………………….………………………………………..46
Chapter7SWdemoutilitysetUp...............37
6.1 Introduction
…………………………………………………………………………38
6.1.1
ExecuteJ1939demoutility……………………………………………………………………….….38
Figure6.1IMCdemoutility
……………………………………………..………38
Figure6.2J1939trucksimulator
………………………………38
Figure6.3J1939test
………………………………………………………….…39
Figure6.4J1939test
……………………………………………………..……39
6.1.2
CANTest…………………………………………………………………………..…………………………39
Figure6.9CANtest‐2
………………………………………………………………39
6.2
RTCtest………………………………………………………………….……………………………………40
Figure6.10RTCtest‐1
………………………………………………………………40
Figure6.11RTCtest‐2
…………………………………………………..……………40
Figure6.12RTCtest‐3
………………………………………………………………40
Figure6.13RTCtest‐4
…………………………………………………….…………40
Figure6.14RTCtest‐5
…………………………………………………………….…41
6.3
PowerManagement………………………………………………………………………………….…..41
6.3.1PowermanagementMechanism………………………………….……………..42
6.3.2 PowerManagementutilityprogram…………………………………………….43
6.3.3
PowerManagementParametersettings………………………..…………….43
Figure6.15Powermanagementtestutility
…………………………………43
6.3.4TREK‐510powerconsumption……………………………………………………….43
6.4
GPIOTest…………………………………………………………………………………….…44
Figure6.16DI/Otest
…………………………………………………………………….44
Figure6.17Digitalin
……………………………………………………………………..…44
Figure6.18Digitalout
……………………………………………………………………45
6.7
G‐sensor………………………………………………….………………………………………..46
TREK‐510Usermanual13
AppendixAPairedwithTREK‐303............................47
A.1
TableA.1:TREK‐303spec
..............................................................................
48
A.2
Ta b l e A.2SmartDisplayconnectorpinout
....................................................
49
FigureA.1Hotkeyutility………………………………………………………….…..51
AppendixBWinCE5.0compatiblelist......................47
A.1
TableA.1:WinCE5.0compatiblelist.............................................................
48

TREK‐510Usermanual14
Chapter
1
1
GeneralInformation
Thischaptergivesbackground
informationontheTREK‐510
In‐VehicleComputingBox.
Sectionsinclude:
z Introduction
z GeneralSpecifications
z Dimensions
TREK‐510Usermanual12
1.1Introduction
TheTREK‐510TheTREK‐510isadedicatedboxcomputerforindustrialvehiclefleets,transporttrucks,
busesandtaxis.TREK‐510combinedwithavarietyofI/Oconnectorscanbeconnectedtodeviceslike
OBD‐IIorTPMS(TirePressureMonitoringSystem).Built‐inwirelesscommunications‐WWANenables
TREK‐510tosendimportantdriver/vehicle/location/carinformationbacktothecontrolcenter.
TREK‐510canalsooperateinextremeenvironmentswithfeatureslikeawideworkingtemperature
range(‐30to70degrees)andanti‐shock/vibrationdesign.TREK‐510alsousesaspecialdesignto
handlethecriticalissueofin‐vehiclepower.Specialpowerprotection(ISO7637‐2/SAEJ1455ClassA/
SAEJ1113)andcarpowermanagementsoftware(Ignitionon/off,delayon/off,lowbatterymonitor)
preventelectricalnoiseandsurgesfromimpactingthesystem,guardingagainstdamagefrom
transientcarpower.
I/OConnectors
1.2GeneralSpecifications
Keyfeatures
z STARMbasedSTA2062333MHzCPUwithWinCE5.0
z Automotivegradeworkingtemperaturerange(‐30°Cto70°C)
z RichI/OincludingCAN,multi‐COMs,isolation4DI/4DO,Lineout,Micin,USBandSD.
z Built‐inRFcommunicationmodules,includingGSM/GPRS/HSDPA/CDMA
z GPSwithAGPS
z Certifications:CE/FCC/e‐mark,MIL‐SD810F,ISO7637‐2,SAEJ1455,SAEJ1113regulations
z Ignitionon/offdelay;SWcontrollableforcarpowermanagement
z BuiltinGsensorforactivesecuritysystem
ƒ
Specifications
z
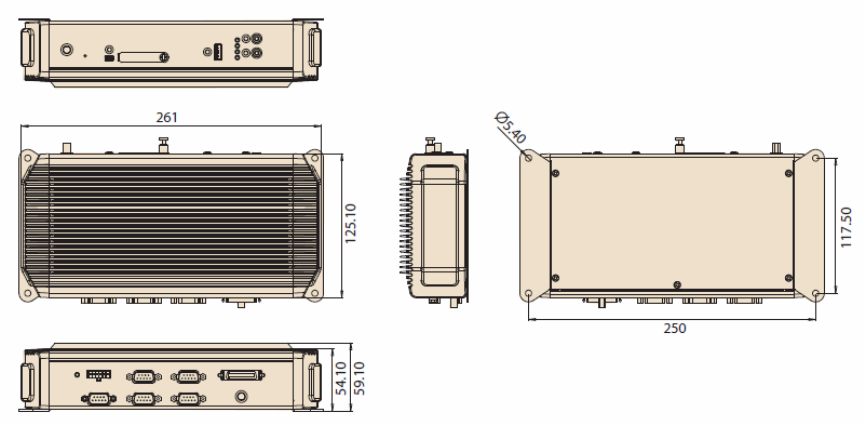
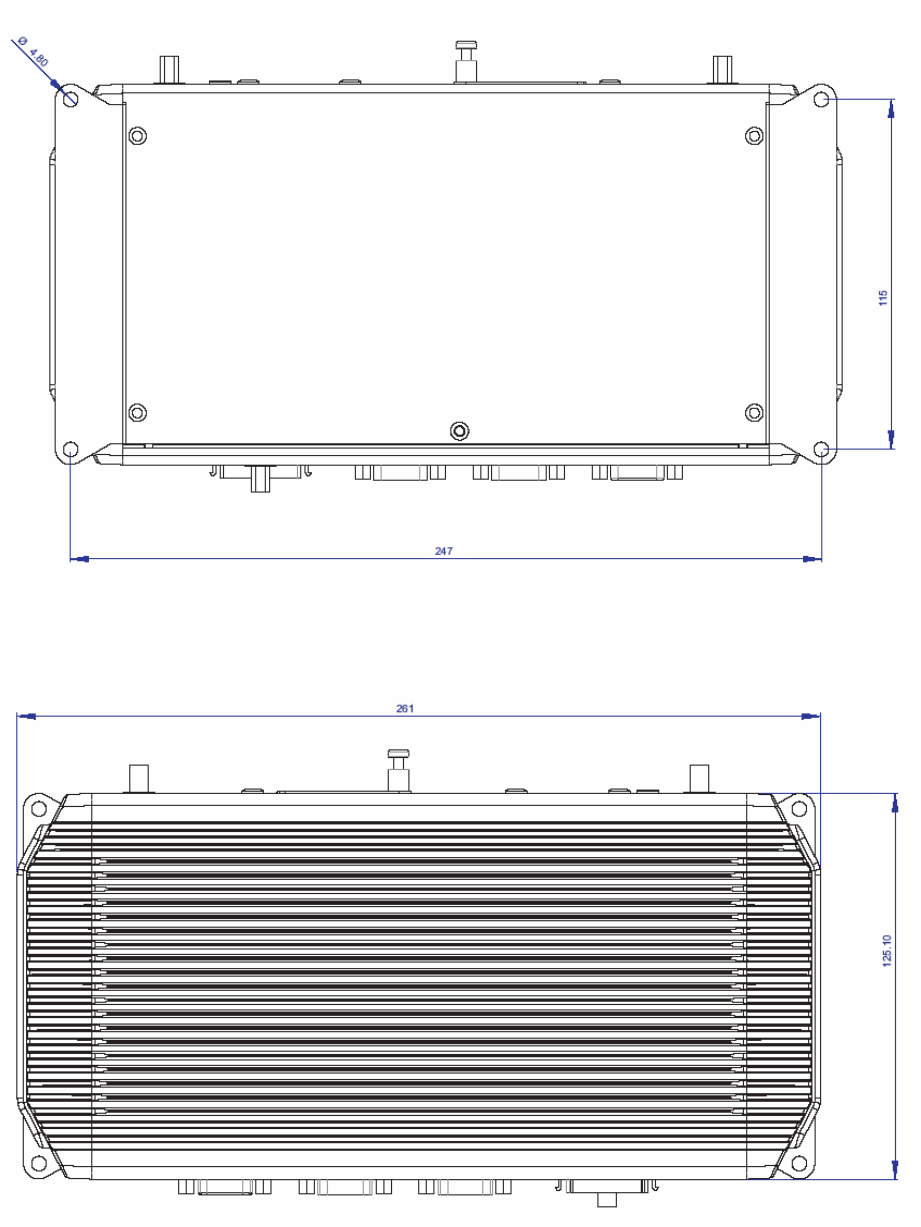
Dimensions
:(WxHxD):
261x125x59.1mm
z
Weight
:1.5kg.
z
Vehiclepowerfeature:
–
Inputvoltage
:6
~36Vdc,supportignitioncoldcrank
–
SupportIgnitionon/off
–
Supportlowbatteryshut‐downprotectionthreshold
(optional)
–
Supportpoweroffeventdelay

TREK‐510Usermanual13
–
Supportpowerondelay
–
Supportpowerlowdelay
–
Supportpowerlowharddelay
–
Supporthardoff
delay
Note!
Formoredetailoffunctionplease
referto
Chapter7,Section6.3ofthismanual.
z
Enclosure
:Ruggedizedaluminumwithoutventilation
holes.
z
CPU
:
STA2062333MHz
z
Systemmemory
:
2GBonboardflashforbootloader,image&Customer'sAP
z
Storage
:
SD
:
1x(externalaccessible)
z
Serialports
:
COM1&2:2xFullFunctionRS‐232,5V/12V@0.5A,ping9,byjumperselected
COM3:1x4‐wireRS‐232/485(controlbySW,5V/12V@0.5A,ping9,byjumper
selected
z
USBHostport
:SupportsuptotwoUSB1.1xbyTypeA.Onefromsmartdisplayport.
z
USBClientport:
1xbyminiTypeAB
z
Watchdogtimer
:Supports0‐255secstimeintervals,SWprogrammableandSW
enable/disabled.
z
RTCBattery
:3.0V@
200mAHlithiumbattery.
z
Powermanagement
:Supportspowersaving
modesincludingNormalmode.
z
DigitalI/O
:
4xIsolateddrycontactdigitalinputsfromDB9connector(2500Vrms
protection),4xrelaydriverfromDB9connector
z
CANbus
:SupportCANV2.0Bupto500kb/s.
z
Audio:
2audiocodecs,oneisforsmartdisplay,oneisforTREK‐510lineoutandmicin
phonejack.
z
Optionalmodules
:
GPS
z
LEA‐5S:50
channelsGPS
RF
:
z
Quad‐band
GSM/GPRS,HSDPA,CDMA
z
Operatingtemperature
:‐30~70°C
z
Relativehumidity
:
10~95%@40°C(non‐condensing)
z
Shock
:30Gpeakacceleration(11msecduration)
z
Certifications
:CE,FCC,CCC,Emark
z
Vibration
:5~500HzSAEJ14554.9.4.2,MIL‐STD‐810F514.5
TREK‐510Usermanual14
1.3Dimensions
Figure1.1
TREK‐510dimensions

TREK‐510Usermanual15
Chapter
2ShThis
Thischapterdetailssystemsetup
Sectionsinclude:
z AQuickTourofthecomputerbox
z InstallationProcedures
z RunningtheSetupProgram
TREK‐510Usermanual16
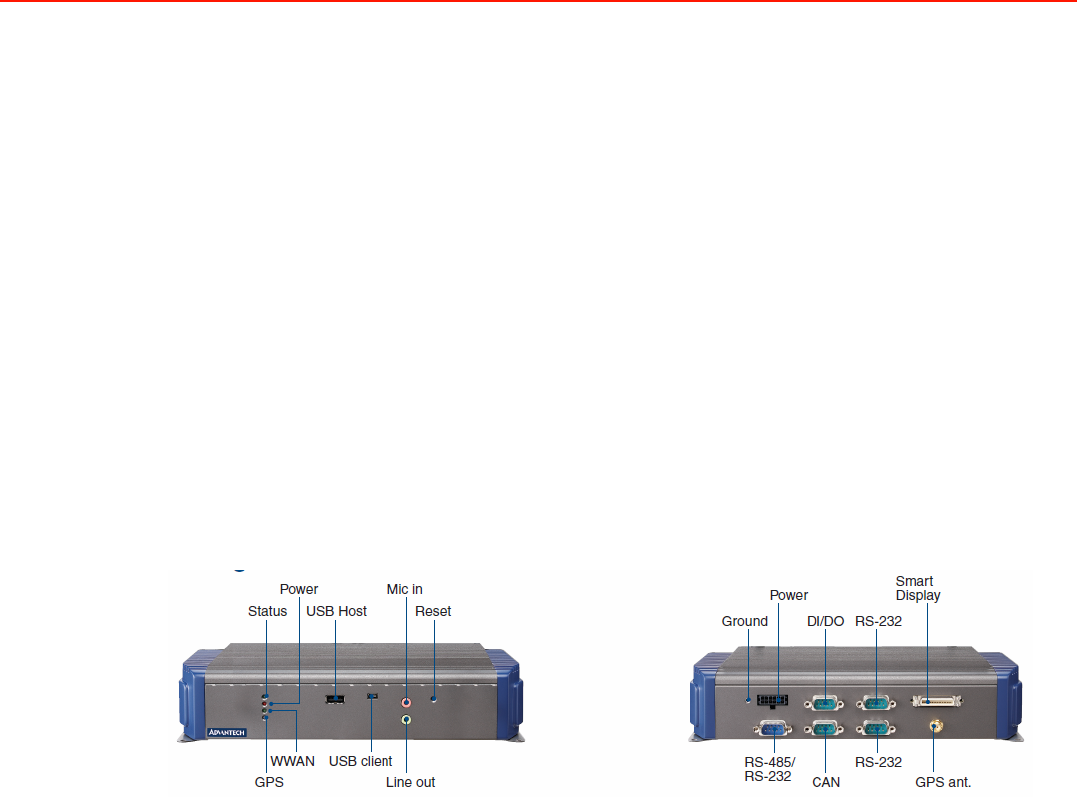
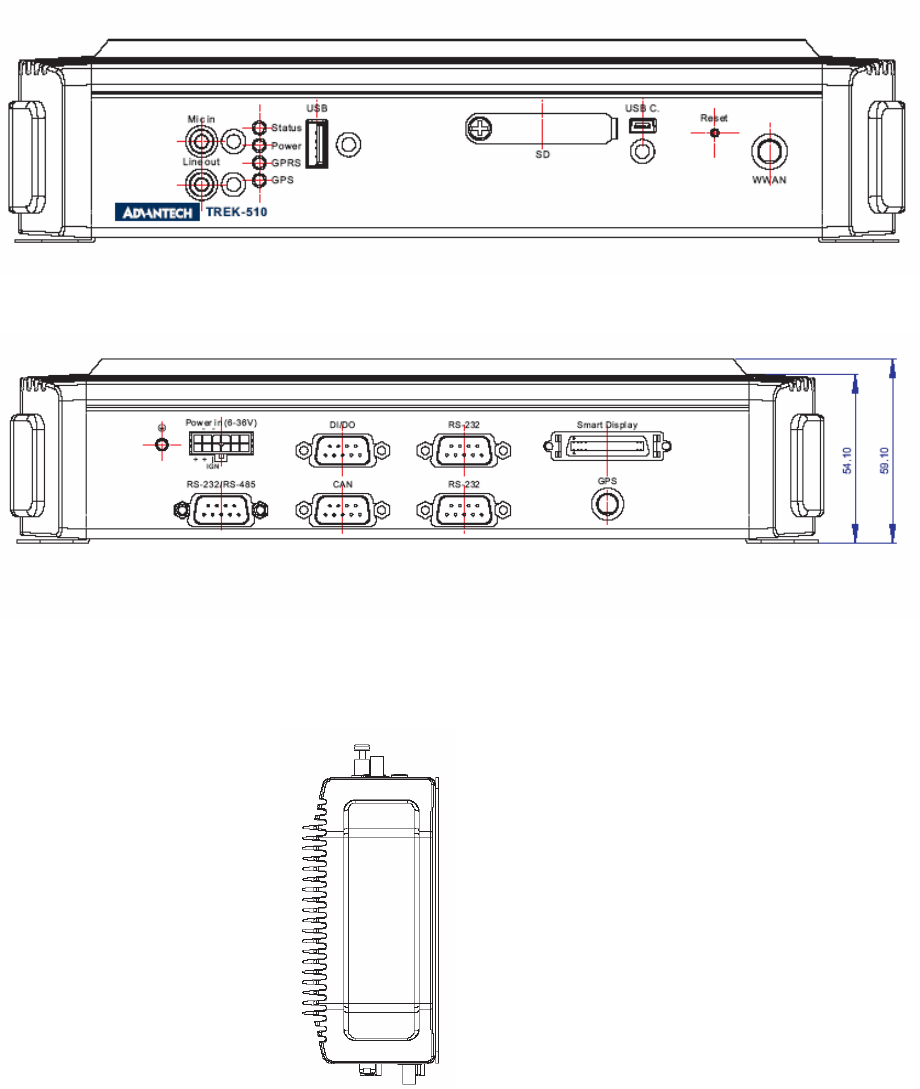
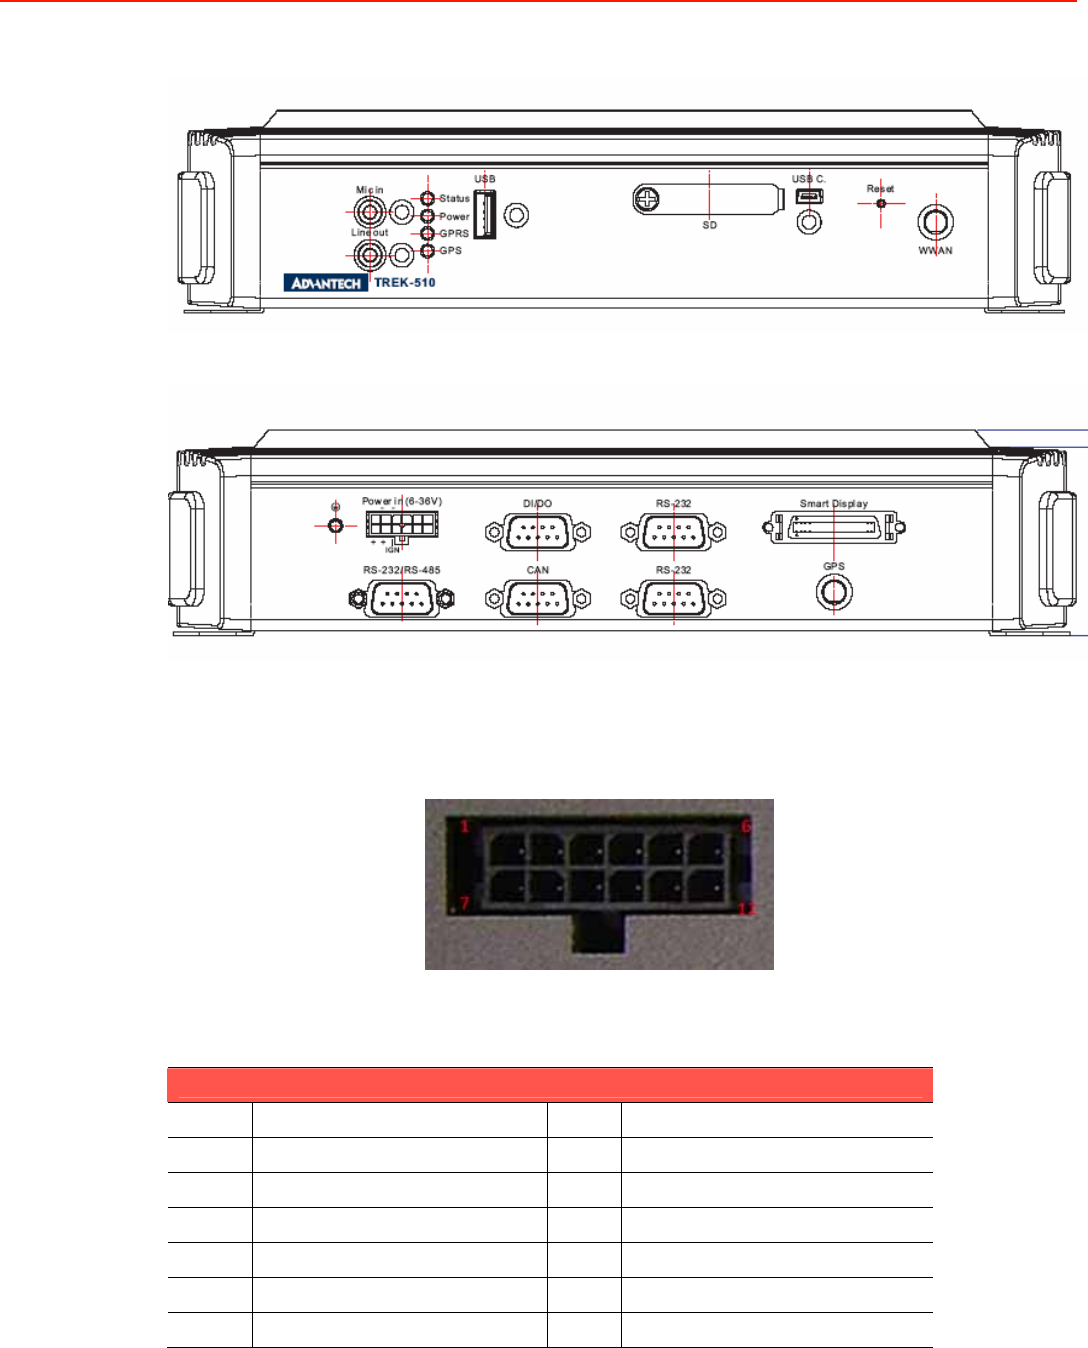
2.1AQuickTo u r oftheTREK‐510Computingbox.
Before
startingtosetuptheIn‐VehicleComputingBox,
take
a
moment
tobecomefamiliarwiththe
locationsand
purposesofthecontrols,
drives,connectorsandports,whichareillustrated
in
thefigures
below.Whenthe
Computer
box
isplacedinsidetruckglovecabinetorunderthepassenger’sseatnextto
thedriver,itsfrontappearsasshown
in
Figure2.1.
Figure2.1.FrontviewofTREK‐510
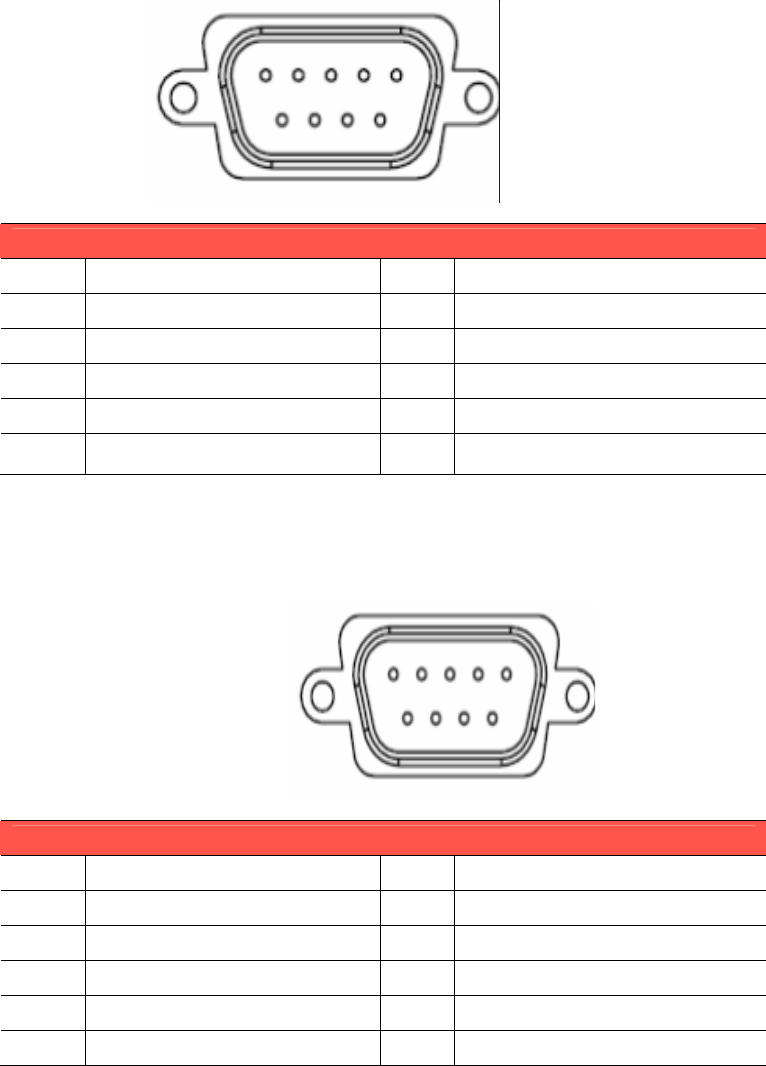
Figure2.2.RearviewofTREK‐510
Unit:mm
TREK‐510Usermanual17
Figure2.3.SideviewofTREK‐510
Unit:mm
Figure2.4.BottomviewofTREK‐510
Unit:mm
Figure2.5.TopviewofTREK‐510

TREK‐510Usermanual18
2.2InstallationProcedures
2.2.1
ConnectingthePowerCord
Connectthe
threepinwaterproofpowercordtotheDC
inlet
of
theIn‐VehicleComputing
Box.Onthe
open‐wireend,onepinisreservedforpositivevoltageandismarked,
"+";
onepinis
reserved
forground
and
is
marked,
"‐";and,onepinisreservedforthe
ignitionsignalwithan“ignition”mark.
Note!
Ignition
on/off
setting:TheTREK‐510supportsanignitionon/off
functionsothatyoucanpoweron/offtheTREK‐510viatheignition
signal/voltageandconnecttheTREK‐510vehicleignitionswitch.
Ta b l e 2.2.1PinDefinitionofPowerCord
Pin
Definition
Color
1
+
Red
3
‐
Black
4
Ignition
Orange
2.2.2
PowerConnector
Figure2.6.Powerconnectoroutlook
Table2.2.2PindefinitionofPowerConnector(M o le xManufacturerpartno.0430451200)
Pin
Signal
Pin
Signal
1ChassisGround2Ground
3Ground4(Reserved)
5(Reserved)6(Reserved)
7PowerInput(6~36VDC)8PowerInput(6~36VDC)
9AccIgnitionInput10Ground
11(Reserved)12PowerbuttonInput
Connector:Molex430451200
Matingconnector:Molex0430251200
TREK‐510Usermanual19
Figure2.7.Powerconnectorphoto
Note!
Fuseholder:Thefuseholderonthepowercableiswater/dustproof;youmaychangethefuse
(5Amp)easilybyyourself.

TREK‐510Usermanual23
Chapter
4
4
JumperSettingsand
Connectors
Thischapterexplainshowtosetupthe
In‐VehicleComputingBoxhardware,
includinginstructionsonsetting
jumpersandconnectingperipherals,
andhowtosetswitchesandread
indicators.
Besuretoreadallthesafetypre‐
cautionsbeforebeginningthe
installationprocedure.
Sectionsinclude:
JumpersSetting
TREK‐510Usermanual24
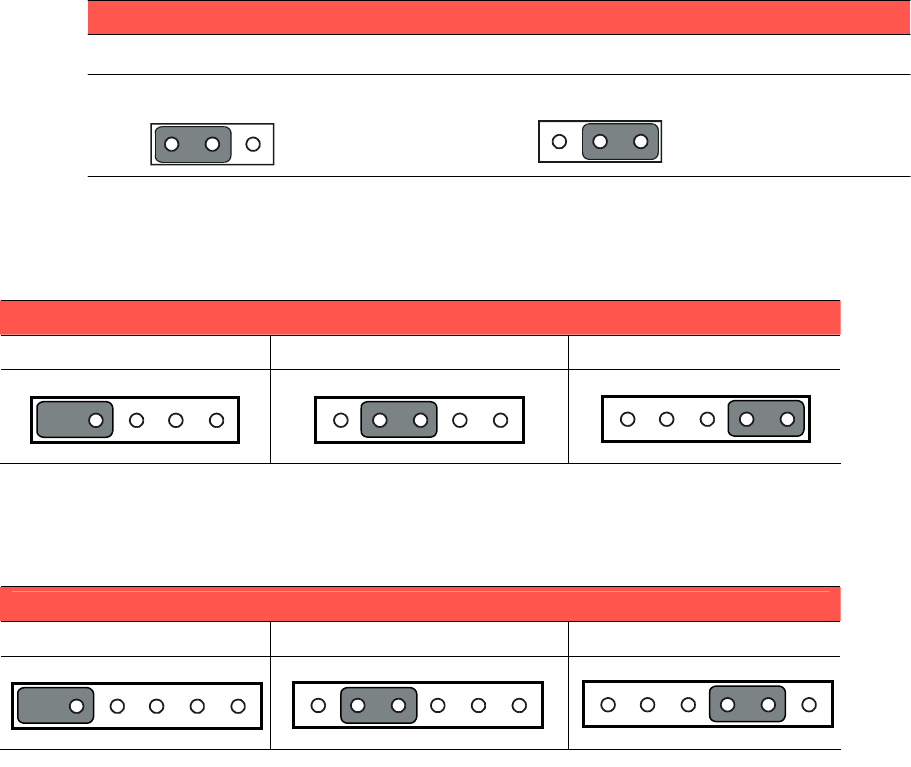
4.1SettingJumpersandSwitches
It
ispossibletoconfiguretheIn‐VehicleComputingBoxtomatchtheneeds
oftheapplication
byresettingthejumpers.Ajumper
isthesimplest
kind
ofelectricalswitch.Itconsistsoftwo
metal
pins
andasmallmetalclip,oftenprotectedbya
plasticcoverthatslides
overthepins
to
connectthem.
To
“close”a
jumper,
connectthepinswiththeclip.To “open”ajumper,
removethe
clip.Sometimesajumper
hasthreepins,labeled1,2,and3.Inthiscase,
connect
eitherpins1and2,or
pins2and3.
open
closed
closed2‐3
open
closed
closed2‐3
Apairofneedle‐nose
pliers
maybehelpful
whenworkingwithjumpers.Ifthereareany
doubtsaboutthebesthardwareconfigurationfortheapplication,contactthelocal
distributororsalesrepresentativebeforemakinganychanges.
Anarrowis
usedonthemotherboardtoindicatethefirstpinofeachjumper.
TREK‐510Usermanual25
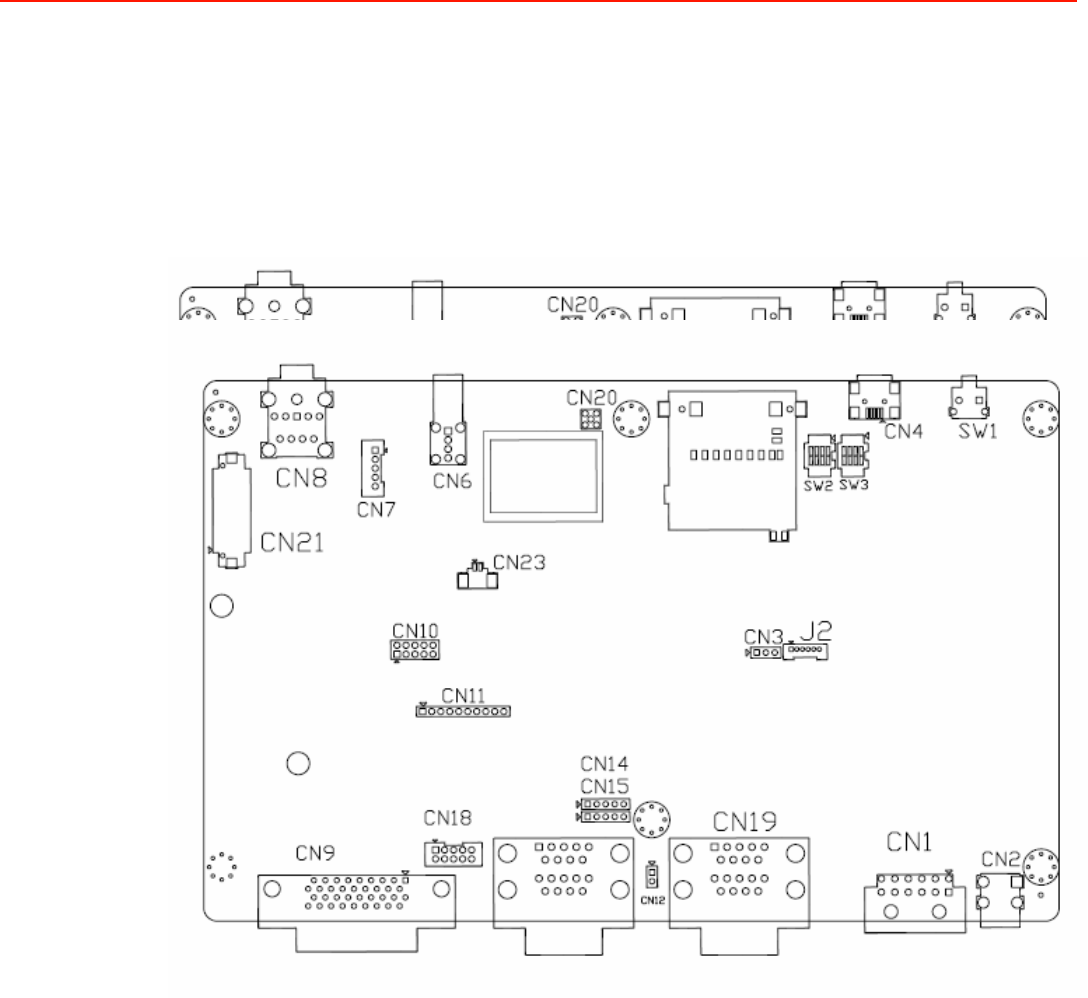
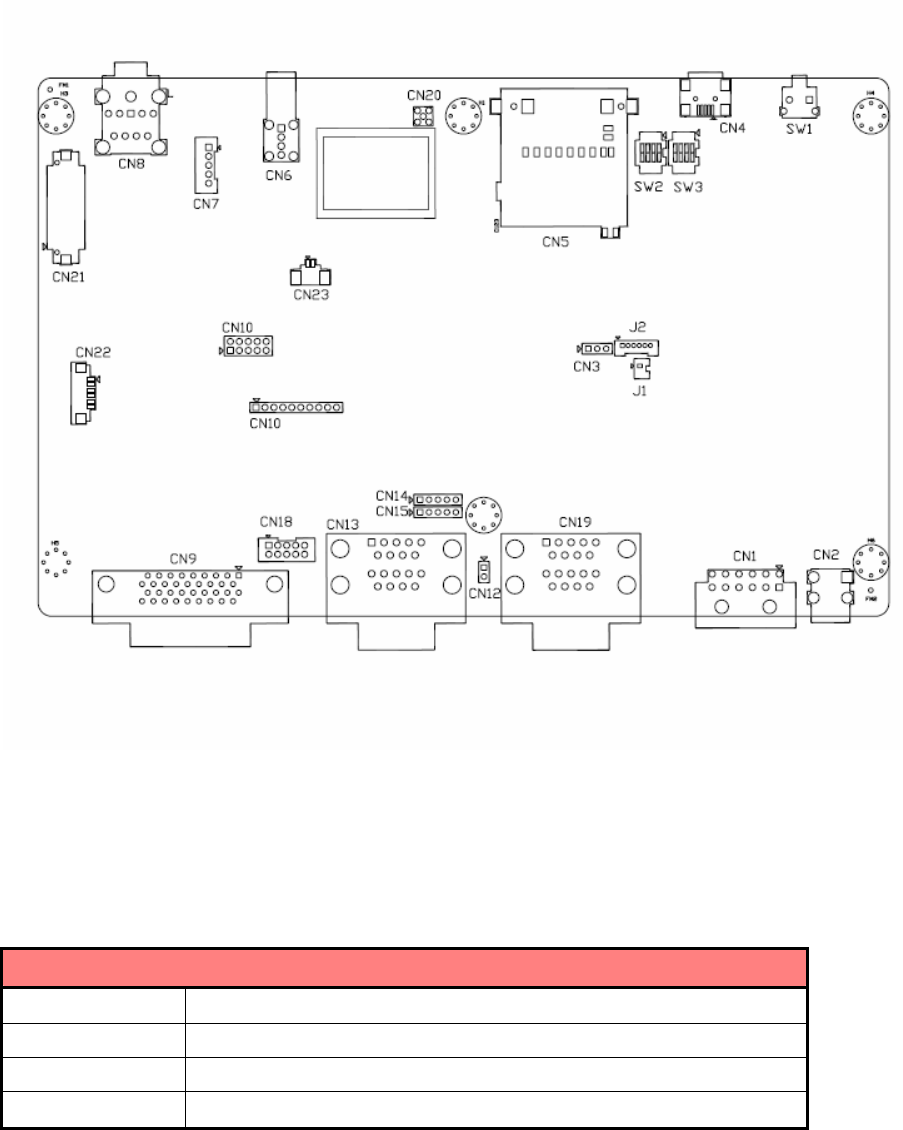
4.1.1
LocationsoftheJumpersandConnector
Figure4.1Locationsofjumpersandconnectorsontopsidethemotherboard.
4.1.2
Jumpers
Table4.1.2.1:Jumpersonmotherboard
LocationFunction
CN3Vehicleinputvoltageselection
CN14Pin9ofCOM6RS232RIor5Vor12Vselectjumperconnector
CN15Pin9ofCOM7RS232RIor5Vor12Vselectjumperconnector

TREK‐510Usermanual26
4.1.3
Connectors
.Thetablebelowliststhefunctionofeach
connector.
Table4.1.3.1:Connectorsonmotherboard
LocationFunction
CN1Powerinputconnector
CN2VehicleGroundingconnector
SW1Resetconnector
SW2,SW3Systemsettingswitch
CN4USBClientconnector
CN5SDCardconnector
CN6USBHOSTTYPE‐Aconnector
CN7USBHOSTTYPE‐Acableconnector(reserve)
CN8AudioandSpeakerJackconnector
CN9VGAconnector
CN10RS232connector(debugonlyandreserve)
CN11JTAGconnector(debugonlyandreserve)
CN12CANBUSterminationconnector
CN13Fullfunction8‐wireRS232connector
CN19IsolatedDI/DOandCANbusconnector
CN20onboardGPSantennaconnector
CN21RFModuleboardcableconnector
CN22UBLOXGPSmoduleboardcableconnector
CN23RTCbatteryconnector
J1uPRS232connector(debugonlyandreserve)
J2upburningimageconnector
TREK‐510Usermanual27
4.2JumperSettings
4.2.1
PowerInputVoltageSetting(CN3)
TREK‐510mustbeconfiguredproperlyaccordingthevehiclepowerinputrange.
Ta b l e 4.2.1:PowerInputVoltageSelection(CN3)
12V
Input(Default)
24VInput
1
23123
4.2.2Pin9ofCOM6FunctionSelection(CN14)
Pin9onCOM3portcanbeconfiguredasRI,5Vor12Voutput.
Table4.2.2:Pin9ofCOM3FunctionSelection(CN14)
RI+5VDC(max.500mA)+12VDC(max.250mA)
151515
4.2.4
Pin9ofCOM7FunctionSelection(CN15)
Pin9onCOM8portcanbeconfiguredasRI,5Vor12Voutput.
Table4.2.4:Pin9ofCOM8FunctionSelection(J3)
RI+5VDC(max.500mA)+12VDC(max.250mA)
161616

TREK‐510Usermanual28
4.3COMPortInterface
Thecomputerprovides
totallyeightserial
portsfordifferenceuses.SixRS232and3UART.
Ports,
respectively.BelowtabledescribeeachCOMportfunction.
Table4.3.1:SerialPortFunction
PortFunction
COM02‐wireRS‐232(TXD/RXD)forTREK‐303
COM14‐wireRS‐232forSysteminternaldebug
COM24‐wireUARTforUBLOXGPSmodule
COM34‐wireUARTforsysteminternalGPS
COM42‐wireRS‐232(TXD/RXD)forinternaluP
COM58‐wireUARTforRFmodule
COM68‐wireFullfunctionalRS‐232
COM78‐wireFullfunctionalRS‐232
COM84‐wireRS‐232and2‐wireRS‐485withsoftwareselect

TREK‐510Usermanual29
Chapter
5
A
PinAssignments
Thischapterexplainspin
assignmentsontheTREK‐510.
Sectionsinclude:
z Front/sideConnector
z Powerconnector
z Smartdisplayconnector
z RS232Connectors
z DI/DOconnectors
TREK‐510Usermanual30
5.1FrontSideConnectors
5.2RearSideConnectors
5.3PowerConnector(12/24V;6~36V)
MolexManufacturerpartno.0430451200
Table5.3:PowerConnector
Pin
Signal
Pin
Signal
1ChassisGround2Ground
3Ground4(Reserved)
5(Reserved)6(Reserved)
7PowerInput(6~36VDC)8PowerInput(6~36VDC)
9AccIgnitionInput10Ground
11(Reserved)12PowerButtonInput

TREK‐510Usermanual31
5.4SmartDisplayConnector
Table5.4:SmartDisplayConnector
Pin
Signal
Pin
Signal
1BacklightEnableoutput#2PanelPowerEnableoutput#
3LVDSGround4ResetButtonInput#
5LVDSClock+6LVDSClock‐
7Ground8Ground
9LVDSData2+10LVDSData2‐
11RS232TXD1#12RS232RXD1#
13LVDSData1+14LVDSData1‐
15Ground16Ground
17LVDSData0+18LVDSData0‐
19USBD‐ 20USBD+
21Ground22Ground
23+12VDCoutput(+/‐5%,max1A)24+12VDCoutput(+/‐5%,max1A)
25+12VDCoutput(+/‐5%,max1A)26+12VDCoutput(+/‐5%,max1A)
27PowerGround28PowerGround
29PowerGround30PowerGround
31NC32NC
33NC34PowerButtonInput#
35Ground36Mono.Line‐out
TREK‐510Usermanual32
5.5RS‐232(COM6,COM7)Connector
Table5.5:RS‐232Connector
Pin
Signal
Pin
Signal
1RS‐232DCD2RS‐232RXD
3RS‐232TXD4RS‐232DTR
5RS‐232Ground6RS‐232DSR
7RS‐232RTS8RS‐232CTS
9RS‐232RI/+5V(max.500mA)/
+V12(max.250mA)
5.6RS‐232(COM8)/RS‐485(COM8)Connector
Table5.6:RS‐232/RS‐485Connector
Pin
Signal
Pin
Signal
1RS‐485D‐ 2RS‐232RXD#
3RS‐232TXD4RS‐485D+
5Ground6Ground
7RS‐232RTS8RS‐232CTS
9NC
1
5
6
9
1
5
6
9
TREK‐510Usermanual33
5.7DI/DOConnector
Table:5.7:DI/DOConnector
Pin
Signal
Pin
Signal
1IsolatedDryContactInput12IsolatedDryContactInput2
3IsolatedDryContactInput3
/SpeedsignalinputforDR*4IsolatedDryContactInput4
/ForwardsignalinputforDR*
5IsolationGround6IsolatedRelayDriverOutput1
7IsolatedRelayDriverOutput28IsolatedRelayDriverOutput3
9IsolatedRelayDriverOutput4
*Note.RegardingthesettingofPin3/4,pleasereferparagraph4.2.5(DI/GPSFunctionSelection).
5.8CANBUSConnector
Table:5.8:CANBUSConnector
Pin
Signal
Pin
Signal
1CAN_H2CAN_L
3IsolationGround4IsolationGround
5IsolationGround6NC
7NC8NC
9IsolationGround
1
5
6
9
1
5
6
9

TREK‐510Usermanual34
5.9LEDindicator
Status
indicator
ThisUSERDefinedindicatorGREENLEDisusedforcustomization
ThisLEDiscontrolledbysoftware.
SystemPower
indicator
ThissystempowerindicatorisaREDLED,controlledbyHardware.
Whensystemisinnormalmode,thisLEDwillbeliton.
Inothermodes,thisLEDwillbelitoff.
WWANActivity
indicator
ThisGPSActivityindicatorisaBLUELED,controlledbyWWANmodule
WhenWWANisactivity,thisLEDwillbeliton.
GPSActivity
indicator
ThisGPSActivityindicatorisaBLUELED,controlledbyGPSChip
WhenGPSisactivity,thisLEDwillbeliton.
GPS
GPRS
Power
Status

TREK‐510Usermanual35
Chapter
6
C
Softwarefunctionality
ThischapterincludestheWindows
5.0operatingsystemonTREK‐510
platform.
Sectionsinclude:
z Introduction
z WindowsCEstartupProcedure
z UpgradeProcedure
z Utilities
z Network
z ApplicationProgramDevelopment
z WindowsCE5.0Require
components.

TREK‐510Usermanual36
6.1Introduction
TheTREK510platformisoneembeddedsystemwithWindows®EmbeddedCE5.0.The
Windows®EmbeddedCE5.0isacompactOSthatoccupieslessstoragespaceorsystem
resourcescomparedwithotheroperatingsystemssuchasWindows®XP.Byitsmodular
nature,itispossibletochoosethosefunctionsthatareusefulforspecificapplication.Not
onlyreducingthesystemresourcesrequired,butalsoreducesstart‐uptime.Inthefieldof
embeddedapplications,thisisanappealingfeaturebecausetheimpactofdowntimewould
beminimized.
Furthermore, the small storage space it needs makes OS on solid-state disk possible, which implies higher robustness to harsh environments.
Figure6.1Windows®EmbeddedCE5.0ontheTREK510platform
6.2WindowsCEStartupProcedure
WindowsCEimagecanbeloadedbytwomethods,firstwayisbySD/MMCstoragecard,and
secondwayisbysystemon‐boardchip.Storagecardishigherbootprioritythanon‐board
systemflashchip.InBOOTLOADERcriteria,itwillfirstreadtheWindowsCEimagefrom
externalstoragecard.Afterdownloadimagedone,booloaderwillburnimagetoon‐board
flashchipautomatically.IfexternalstoragecardisunavailableornoWindowsCEimageinside,
BOOTLOADERwillloadtheWindowsCEimagefromon‐boardsystemflashchip.BOOTLOADER
copyWindowsCEimagetoDRAMandlaunchWinCEfromDRAM,wheneverloadedby
externalstoragecardorsystemon‐boardflashchip.

TREK‐510Usermanual37
6.3UpgradeProcedure
AdvantechreleasetwoimagesforTREK510platform.EBOOT.NB0isbootloaderandNK.BINis
WinCE5.0image.
Youcanupgradeimagebyfollowingtwoways:
a)Upgradeimageviabootloader.
6.3.1Upgradeimageviabootloader
Bootloaderimagewillbeabletosupportimagedownloadthenburnittoon‐boardflash
chipautomatically.YoujustcopyEBOOT.NB0orNK.BINimagetostoragecardseparatelythen
rebootplatform.Platformwillautomaticallyloadimagefromstoragecardnextboottime.
1)Bootloaderimagedownload
Step1,CopyEBOOT.NB0filetoSD/MMCstoragecard.
Step2,Poweronplatform.
Step3,ItwillautomaticallyreadEBOOT.NB0fromstoragecardandthenburnittoon‐board
bootROM.
2)NKimagedownload
Step1,CopyNK.BINfiletoCF/SD/MMCstoragecard.YouneedstomakesureEBOOT.NB0
doesn’texistinstoragecardinadvance.
Step2,Poweronplatform.
Step3,ItwillautomaticallyreadNK.BINfromstoragecardandthenburnittoon‐boardflash
chip.
6.4Utilities
ThereareseveralusefulutilitiesaddedinthestandardWindows®EmbeddedCE5.0:
6.4.1TestUtility
Theutility“AdvDiag.exe”isoneintegratedtesttool,whichincludesthefunctionvalidationfor
peripheral.Youcanusethistooltoverifywhethertheperipheralfunctionworkornot.You
justcopythisutilitytostoragecardandthenlaunchfromWinCEbydoubleclickit.
MainFunction:
ItemFunctionDescription
COMx(LOOPBACK)LookbacktestforCOM1~COM3
COMx<=>COMyTwoCOMportsRS232transmission
TOUCHSCREENTouchScreenfunctionvalidation
AudioPlayAudioplayfunctionvalidation
AudioRecordAudiorecordfunctionvalidation
USBKeyboardUSBKeyboardfunctionvalidation
USBMouseUSBMousefunctionvalidation
WATCHDOGTimerWatchdogtimervalidation
BacklightTestBacklightfunctionvalidation
TREK‐510Usermanual38
DIOControlDIOfunctionvalidation
PAUSEPausetestprocess
REPEATTESTRepeattestprocess
Etc……
6.4.2TestProcedure
Youshouldseealotoftestitemsinleftzoneafterlaunchthisutility.Youcaninsertenough
testitemsyouwanttorightzonebypressing“Add”button.Thetestitemsinrightzonewill
beexecuted.Also,youcanremovetestitemsfromrightzonebypressing“Remove”button.
Afteryouaddtestitemsdone,youcangofunctiontestbypressing“EXEALL”button.Topress
“ViewRpt”button,youwillseethetestresult.
Figure6.4TestUtility
6.4.3Startupexecution
TheTREK510platformhasausefulfunctioncall"Startupexecution".Afterthesystembootup,
thestartupexecutionfunctionwouldautomaticallyperform.Thisfunctionisusefulforcontrol
systemtodotheinitializationprocessesorsomeotherprocedures.InTREK510platform,
therearetwowaystoperform"Starup"function.
Method1:
Step1:Create"startup"directoryinSD/MMCstoragecard,USBdisk.

TREK‐510Usermanual39
Step2:Copyexecutablefilesto"startup"directorythatiscreatedbyStep1.
Example:
Wecopytwoexecutablefiles"softreset.exe"and"Notepad.exe"in"Startup",andthen
rebootthesystem.Afterthesystembootup,thetwoexecutablefilewouldautomatically
execute.
Method2:
Step1:Create"startup"directoryinSD/MMCstoragecard,USBdisk(HardDisk).
Step2:Createafilecalled"startup.ini"in"startup"directory.Typeinthecommandsyouwant
toexecuteafterbootupinthatfile.
Example:
Create"Startup.ini"in"\DiskOnChip\Startup"directoryandrebootthesystem.Thecontentof
startup.iniwaslistedbelow:
\windows\tty.exe
\windows\registry.exe
Afterthesystemreboot,"\windows\tty.exe"and"\windows\registry.exe"would
automaticallyexecute.Besurethatthetwomethodsareindependent.Itmeanstheycanbe
usedsimultaneously.
6.4.4PlatformSetting
PlatformSettingutilityisanoutstandingutilitydesignedbyAdvantechWindows®CEsoftware
team.Itisanintegratedenvironmentwhereusercangetusefulsysteminformationaswellas
configurefavoritesystemsettingsandapplysystemcontrolfunctionondemand.Doubleclick
theiconofPlatformSettingonthedesktop.PlatformSettingisalsoputonControlPanel.
FollowingsectionsillustratethefunctionsofPlatformSetting.
6.4.4.1General
ItshowsthememoryinformationincludingDRAMandonboardMMC.Platformnameand
versioncontrolarealsoputhere.
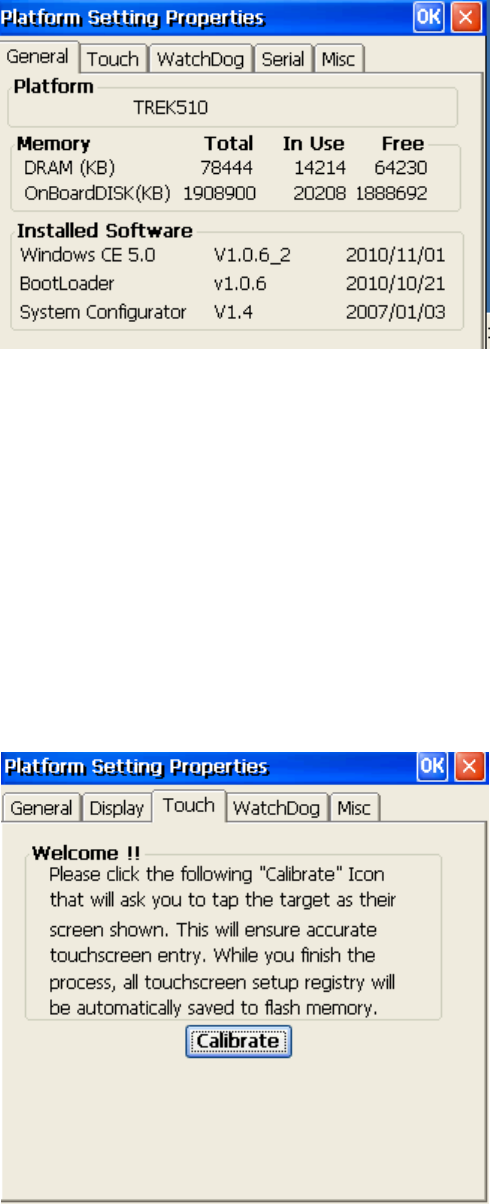
TREK‐510Usermanual40
Figure6.5Generalinformation
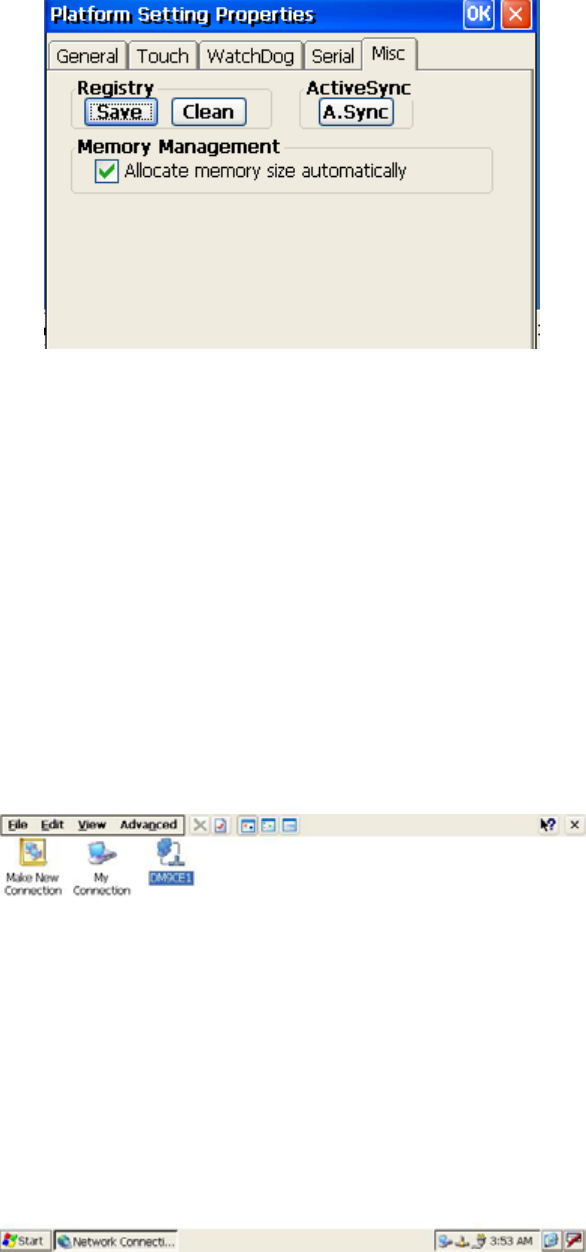
6.4.4.2Touch‐screen
TheTouch‐screenpageprovidesthecalibrationfunction.Clickthe"calibration"button,the
"StylusProperties"windowswouldappear.Thenclick"calibrate"buttonintheStylus
Propertieswindowtoentercalibrationprocess.Inthecalibrationprocess,usertapsonthe
centerofthetargetonthescreenthenthetargetwillmovetothenextposition.After
calibration,press"OK"toleaveStylusPropertieswindow,andthenitwillsavecalibration
settingtoregistrypersistently.
Figure6.6TouchCalibration

TREK‐510Usermanual41
6.4.4.3WatchDogtimer
Itisimportantinindustrialapplicationsthatthecontrolsystemsarerarelycrashed,orare
capableofself‐resetiftheyarehaltedsomehow.Watchdogfunctionofautomaticresetting
systemisthereforeprovidedinTREK510.Thereisatimerinsidethewatchdogfunction.User’s
APcouldinvoketheassociatedAPIsinWatchdogfunctiontostartthetimer,thenWatchdog
functionwouldrepeatthecountdownofthespecifiedperiodoftimetorebootthesystemif
theuser’sAPdoesnotclearthetimerintimeperiodically.TheWatchdogfunctioninthe
TREK510provideseightdifferenttimeintervals:2seconds,5seconds,10seconds,30seconds,
60seconds,2minutes,5minutesand10minutes.The“Enable"buttonisusedtostartthe
Watchdogfunction.Pressthe"SoftReset"buttonwillcausesystemwarmboot,reloadsall
driversandrefreshthenewestregistrysettings.Pressthe“REBOOT”buttonwillcausethe
systemcoldboot.PressRTCTIMEstartbutton,itwillgetrealRTCvaluefromRTCchip.
Figure6.7Watchdogtimer
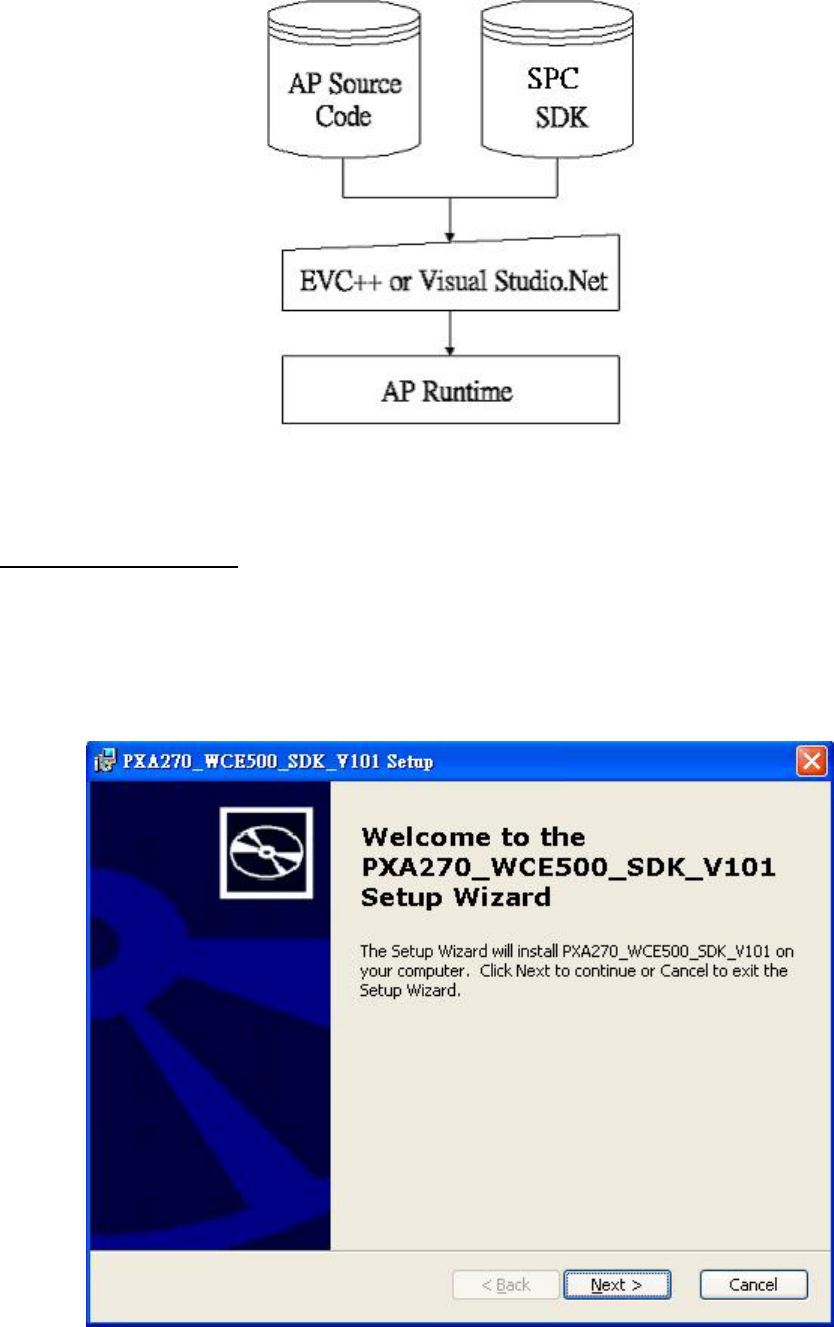
6.4.4.4Miscellaneous
TheMiscpageprovidesseveralfunctionsasdescribedbelow.The"Registry"blockprovides
registrysaveandregistrycleanfunction.Pressing“Save”button,theregistrysettingswillbe
savedtopersistentstorageasDISKONCHIP.Pressing“Clean”button,theregistrysettingwill
returntodefaultsettings.The“A.Sync”buttoninvokesActiveSynctothehostcomputer.The
MemoryManagementblockwillcheckifmemorysizeneedstobeallocatedautomatically
duringboot.Oncethisischecked,programmemorywillbeallocatedhalfsizeofmemory,and
storagememorywilloccupytherest.
TREK‐510Usermanual42
Figure6.8Miscellaneoussettings
6.5Network
TREK510buildinone3Gcontroller.Itappearsat“ControlPanel/NetworkandDial‐up
Connections”via“DM9CE1”.Usercanconfigureits3Gsupportasfollows:
1.Click"Start/Settings/ControlPanel"
2.Doubleclick"NetworkandDial‐upConnections"
3.IftheTREK510isanodeoftheLANwith3Gservers,itisnowavailable.
4.SupportModulehaveMC55i/MC5728V/MV8790V
Figure6.103GviaEthernet

TREK‐510Usermanual43
6.6ApplicationProgramDevelopment
TheTREK510isbundledwithbuilt‐inWindows®EmbeddedCE5.0operatingsystem.Inreal
applicationsusersneedtoexecutevariousapplicationprogramsonit.However,unlikeits
otherfamily,theWindows®EmbeddedCE5.0isahardware‐dependentoperatingsystem.
Thatistosay,Windows®EmbeddedCE5.0applicationprogramsareonlyportableinthe
sourcecodelevel.UsersmustrebuildtheruntimefileforadifferentWindows®EmbeddedCE
5.0platformeventhoughthesourcecodemaynotbechangedatall.
6.6.1PCSystemrequirements
•Intel®Pentium‐90CPUormoreadvanced
•Microsoft®Windows®2000ProfessionalorWindows®XP
•Microsoft®eMbeddedVisualC++4.0orVirtualStudio2005
•PlatformSDKforTREK510
•64MBDRAM
•CD‐ROMdrive
•MonitorwithVGAresolutionatleast
•Mouse
•200MBfreeharddiskspaceatleast
•TREK510platform
•LetthehostPCandTREK510connectonthesameUSB1.1todokerneldebuggingif
necessary
•USBcable(bundledinthestandardTREK510)
6.6.2BuildingWindowsCEprogram
BytheplatformSDKbundledwiththestandardTREK510,userscanbuildtheWindowsCE
runtimeapplicationprogrambytheeMbeddedVisualTools.
TREK‐510Usermanual44
Figure6.11Flow‐chartofBuildingWindows®EmbeddedCE5.0runtime
6.6.3HowtoinstallSDK
ForexamplecopyPlatformSDKfile“**.msi”toyourPC,andlaunchit.YoucaninstallSDKby
steps.
Step1,LaunchPlatformSDKfile,andthentapNextbutton.
Figure6.12
TREK‐510Usermanual45
Step2,AcceptLicenseAgreementandgonext.
Figure6.13
Step3,Keyinyourinformationandgonext.
TREK‐510Usermanual46
Figure6.14
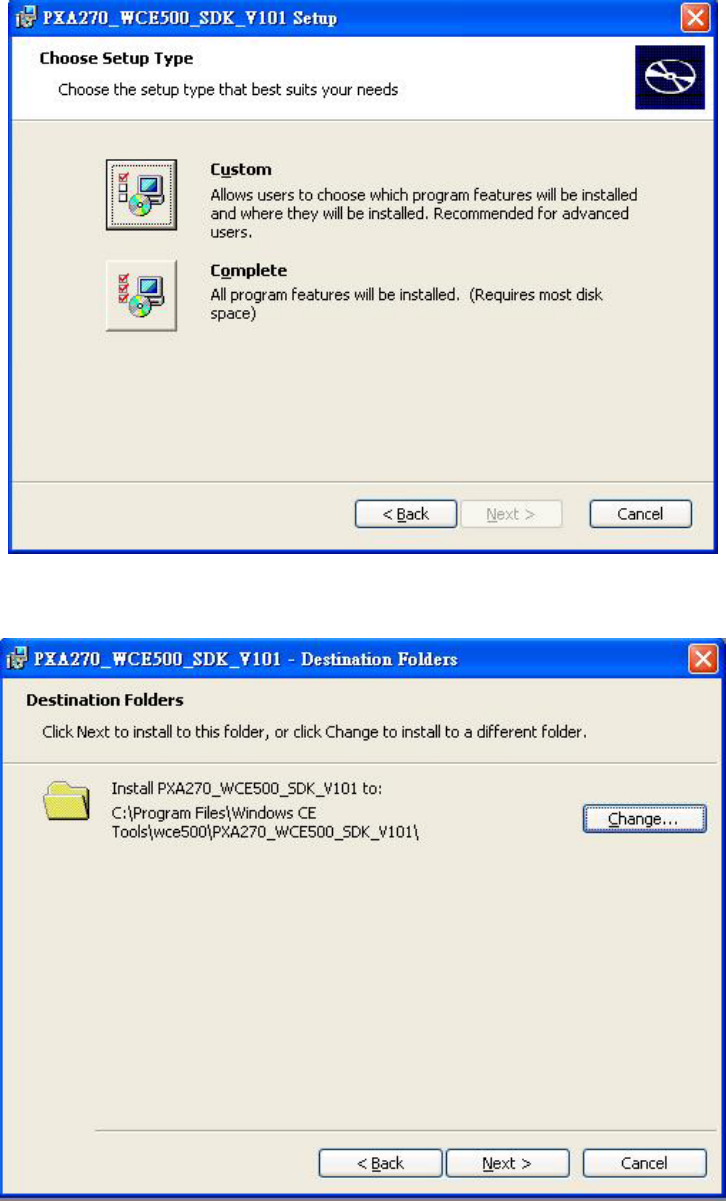
Step4,Choosesetuptype.
Figure6.15
Figure6.16
TREK‐510Usermanual47
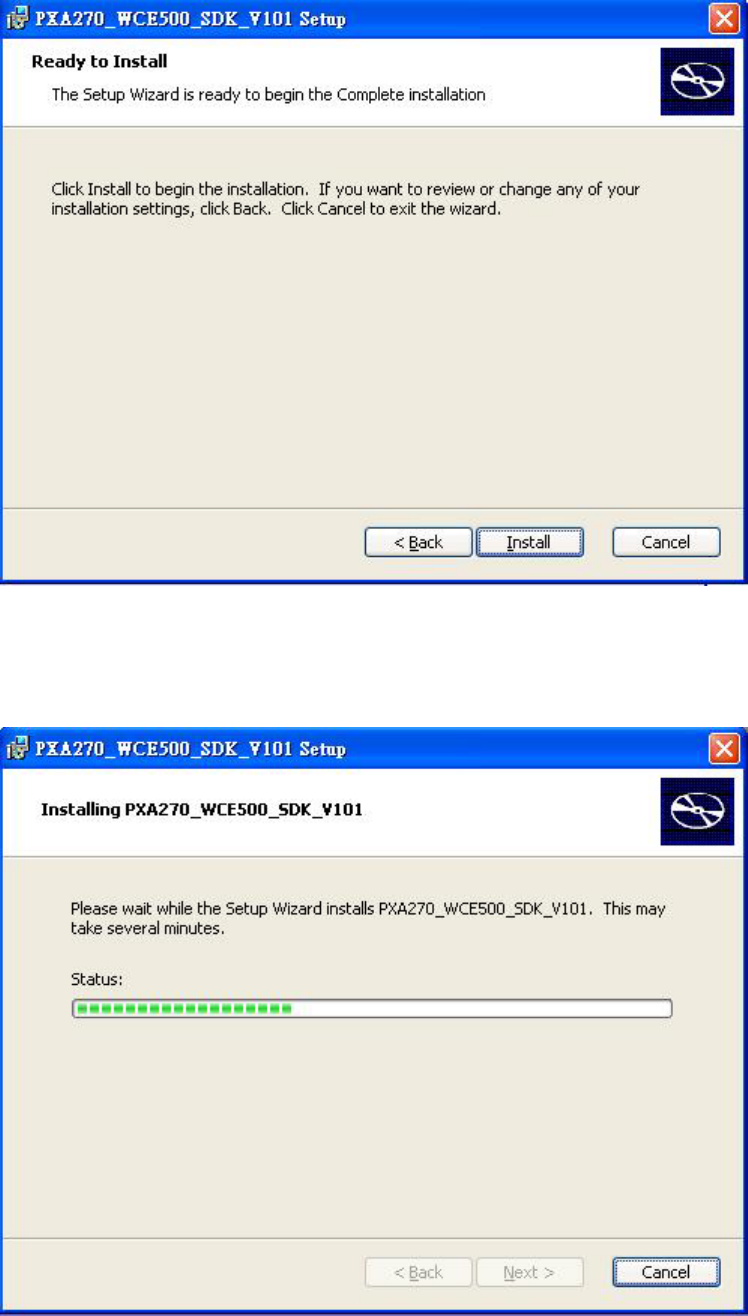
Step5,Tap“Install”buttontoinstallSDK.
Figure6.17
InstallSDK…….
TREK‐510Usermanual48
Figure6.18
Step6,Finishinstalling.
Figure6.19
6.6.4Runningyourapplicationprograms
Afteryouimplementapplicationcode,youshouldchooseAdvantechSDKtocompile.
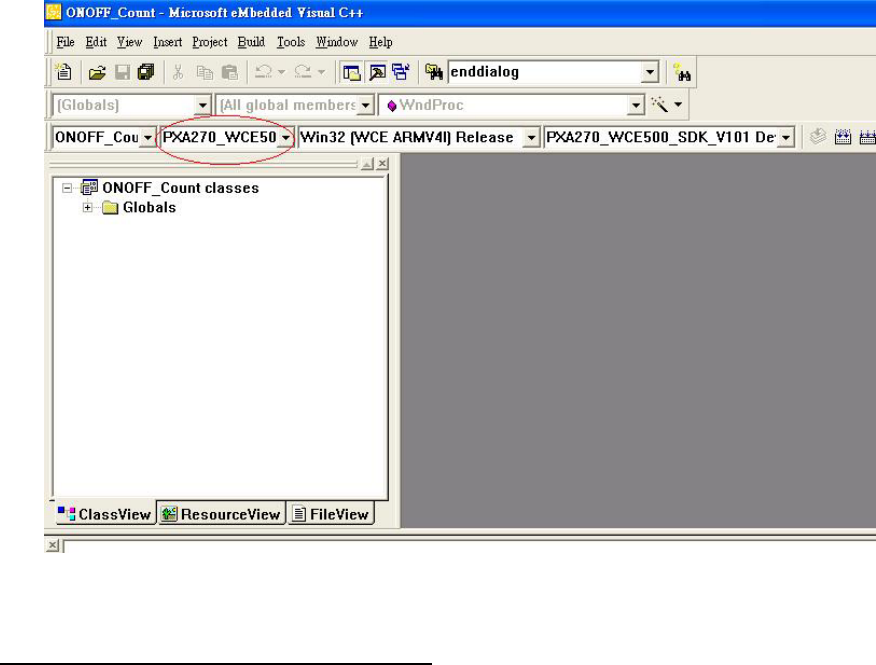
TREK‐510Usermanual49
Figure6.20
6.6.5SUSIlibraryforapplicationprogram
TREK510istargetedtobetheembeddeddeviceforsystemintegrator.Systemintegrator
usuallyaccessplatformrelativeIO,likebacklightcontrol,brightnesscontrol,etc.Advantech
especiallyprovideoneSUSIstaticlibrarytosystemintegrator.SUSIlibraryincludessome
usefulAPIs.Systemintegratorjustaddsittotheirapplicationproject,andthentheycanuse
SUSIlibraryfunctions.
Note:aboutSUSIlibrarydetailwasshowedin[SUSIV3.0RISCUserManual(Hotkey2GPIO).doc]
SUSIlibrarypackageincludefollowingcontent:
1,SUSI.lib
2,SUSI.h
3,SUSIuserguide
ThefunctionsinSUSIinclude:
1,Screenon/off
2,Brightnessset/get
3,Watchdogtimerset/get/refresh
TREK‐510Usermanual50
4,Software/Hardwarereset
5,Getbootloaderversion
6,DigitalI/Oaccess

TREK‐510Usermanual51
Chapter
7
C
Softwaredemoutility
setup
Thisappendixexplainsthesoftware
demoutilityforTREK‐510.
Sectionsinclude:
z Introduction
z Howtosetupdemoutility

TREK‐510Usermanual52
7.1Introduction
To
makethehardwareeasier
to
access
forprogrammers,Advantechhas
developedademoutilityinordertoletcustomertestthefunctionsonTREK‐510.
ThisdocumentdescribesdetailedinformationforeachAdvantechdemoutilityso
that
applicationdeveloperscanbecome
more
familiarwithusingthem.
Fortechnicalsupport,contactAdvantechapplicationengineers
worldwide.Fornewsupdates,visitourwebsite:
www.advantech.com
7.1.1
ExecuteJ1939demoutility
This
sectionexplains
howtoinstallthe
AdvantechdemoutilityinWindowsXPPro
/Embedded.
1. Executethetestprogramcalled“IMC_Demo”
Figure7.1IMCdemoutility
2. ClickJ1939:customermayconnectdirectlytothetruck;weuseacar
simulatorboardbelowtoexplainhowJ1939protocolcanbeexecuted.
First,connecttothesimulatorboardtoTREK‐510CANportandconsolePC,
oncethesimulatorispoweredon(connecttothetruck),youcanstartgetting
thedata,justclick[Read],youmaygetthedatayouneedfromthecar
simulator,click[Read],youmaytransferthedatatoConsole

TREK‐510Usermanual53
Figure7.3J1939test‐1Figure7.4J1939test‐2
7.1.2
ExecuteCANdemoutility
Figure7.9CANtest
TREK‐510Usermanual54
1. Resetthemodule
2. TransmitCANmessage
3. SetthepollingrateofCANmessagereception
4. ReceivedCANmessage.
5. SetupthefilterofCANmessage(onlyshowthemessageID)
7.2
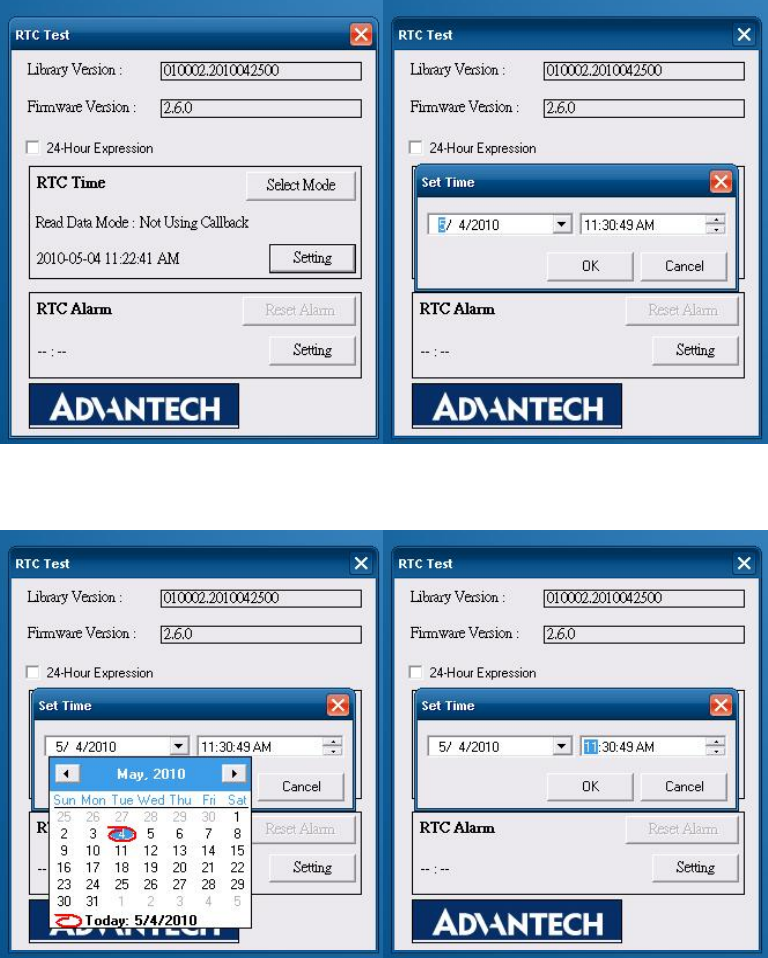
RTCtest
Execute“RTCtest”
1. ForRTCTimesetting:Youmaysetyear,month,date,andtimeshowas
below.
Figure7.10RTCtest‐1Figure7.11RTCtest‐2
Figure7.12RTCtest‐3 Figure7.13RTCtest‐4
TREK‐510Usermanual55
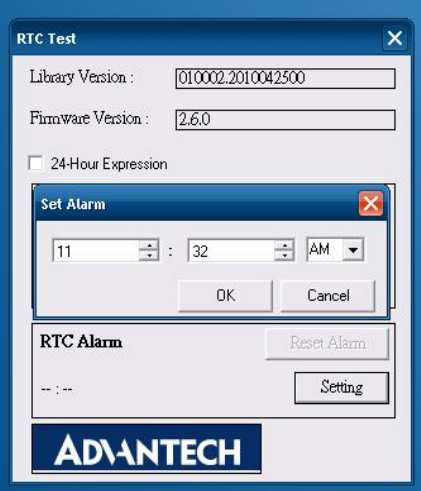
2. RTCAlarmSetting:YoumayalsosetAlarmtime;youmaywakeupthe
systembythetimeyouhaveset.Pleaserefertobelowfigure6.
Figure7.14RTCtest‐5
7.3
Vehicle
PowerManagement
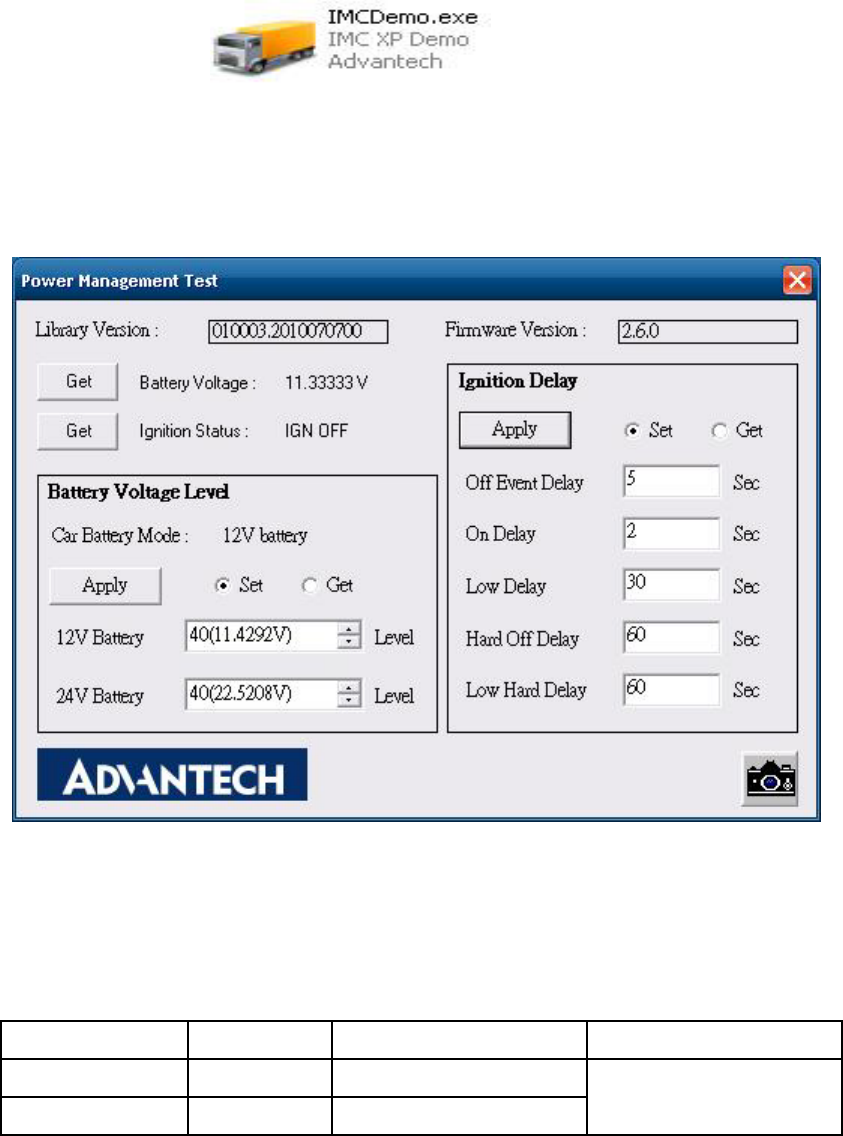
7.3.1PowermanagementMechanism
ThefeatureofVehiclePowerManagement(VPM)isprovidedforusersto
fulfillthespecialrequirementsonin‐vehicleapplications.
z
Ignitionon/off
Turnonthesystembyignition
Forthecasesofin‐vehicleapplications,ignitionsignalisoftenusedtoturnonor
shutdownsystem.WhenthesystemisinOFFstateandignitionisturnON,theVPM
controllerwillcountdownON_DELAY;onceitcountstozero,thesystemwillbeturnon.
Shutdownthesystembyignition
Whenthesystemispoweredonandignitionisturnoff,theOFF_EVENT_DELAYwillstart
tocountdown.Duringthisstage,iftheignitionisbacktoON,VPMcontrollerwillstop
countdownandresettheOFF_EVENT_DELAYvalue.IfOFF_EVENT_DELAYiskeeping
countingtozero,VPMcontrollerwillsendaevent(powerbuttonpress)tothesystem
andstarttocountHARD_OFF_DELAY.Theapplicationprogramscouldwatchthiseventto
dopre‐definedtasks,likestoringthedataandpreparingtoturnoffsystem.
OncegoingintoHARD_OFF_DELAYstage,thisprocesswillbeirreversible.Andif
HARD_OFF_DELAYcountstozero,thesystempowerwillbecutoffabruptly.
z
Lowbatteryprotection
Toavoiddrainingoutthecarbattery,low‐batteryprotectionisinvolvedtoensurethe
carbatteryiscapabletostartthevehicle.WhenthesystemisON,VPMcontrollerwill
monitorthecarbatteryvoltage.Ifthebatteryvoltageislowerthanaprogrammable
threshold(LOW_THRESHOLD),VPMcontrollerwillgointoLOW_DELAYstageandstart
tocountdown.
DuringthestageofLOW_DELAYcountdown,ifbatteryvoltageisback
TREK‐510Usermanual56
aboveLOW_THRESHOLD,VPMcontrollerwillstopcountdownandleavethisstage.If
LOW_DELAYcountstozero,VPMcontrollerwillsendanevent(powerbuttonpress)to
notifythesystem,gointoLOW_HARD_DELAYstageandstarttocountdown.Once
LOW_HARD_DELAYcountstozero,VPMcontrollerwillcutoffthesystempower
abruptlytoavoiddrainingoutthecatbattery.
ThetablebelowliststheuserprogrammableparametersforVPMfeatures:
DefaultvalueAcceptablerange
ON_DELAY
2second1~18000second
OFF_EVENT_DELAY
5second1~18000second
HARD_OFF_DELAY
60second1~18000second
LOW_THRESHOLD(12Vmode)
11.42V10.09~12.25V
LOW_THRESHOLD(24Vmode)
22.44V21.11~23.28V
LOW_DELAY
30second1~3600second
LOW_HARD_DELAY
60second1~3600second
7.3.2
PowerManagementutilityprogram
TREK‐510Usermanual57
ExecuteIMCDemo.exefile,seetheiconbelow.
7.3.3
PowerManagementParametersettings
TheparametersforpowermanagementonTREK‐510couldbereadormodifiedbyDemo
utility(seetheimagebelow)orSDK/API.
Figure7.15Powermanagementtestutility
7.3.4
TREK‐510powerconsumption
OS:WindowsEmbeddedStandard
Burn‐intestV6.0
IdleMode100%Burn‐inTestMode Offmode(S5)
w/oTREK‐303H12V/1.04A12V/1.20A
w/TREK‐303H12V/1.51A12V/1.94A
12V/1.75mA
*Doesn’tsupportS1,S3,S4
7.4
GPIOTest
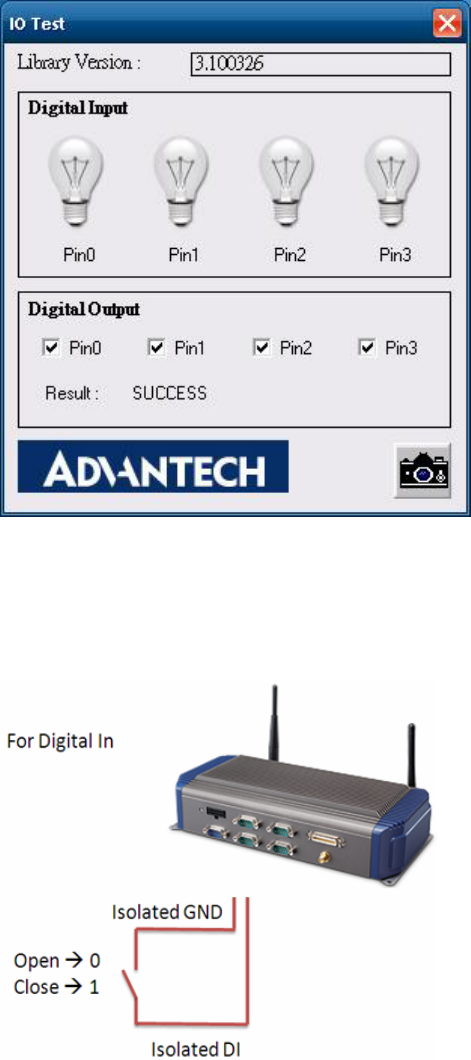
TREK‐510Usermanual58
1. ExecuteI/OTest,connectGPIOloopback,clickPin0→Set,theendwhichRead
thesignal,thebulbwillbelightup,likewisetoPin1~Pin3.NextpickDigital
outputtoexecutethesameprocedure.Seefigure6.
Figure7.16DI/Otest
a. DigitalOutputÎisolatedrelaydriveroutput
b. DigitalInputÎisolateddrycontactinput
Figure7.17Digitalin
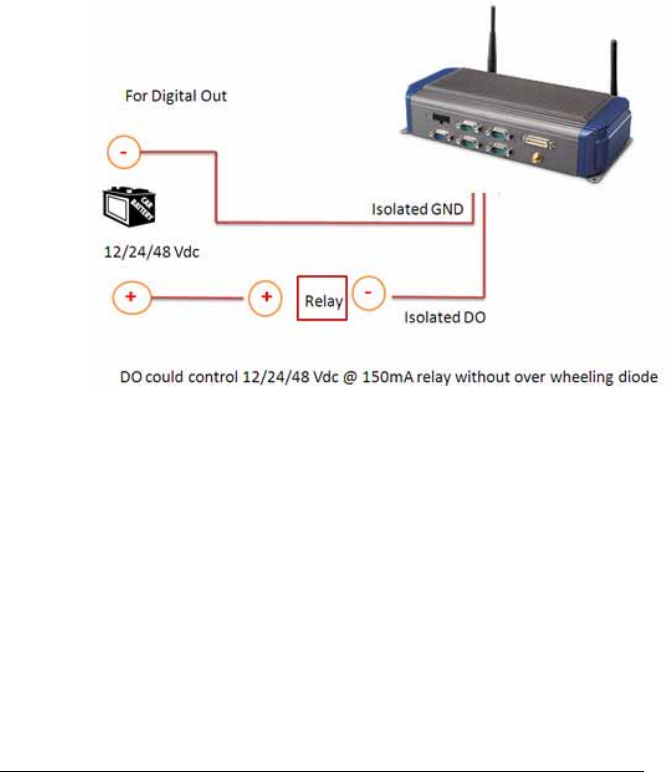
TREK‐510Usermanual59
Figure7.18Digitalout
7.7
G‐sensor(3‐axisaccelerometer)
A3‐axisaccelerometerisintegratedinTREK‐510.Thiscouldbeusedto
characterizedriverbehaviorsuchashardaccelerations,braking,and
cornering.Thisalsocantellusersothersignificantinformationthatcanbeusedin
accidentreconstructionandetc.Acodeexampleisprovidedforcustomer
referenceregardinghowtoaccessandconfigureG‐sensor.G‐sensorislocatedon
themotherboardinsidetheTREK‐510.Pleasereferthelink
(http://www.analog.com/static/imported‐files/data_sheets/ADXL345.pdf)forthe
G‐sensordatasheet.

TREK‐510Usermanual60
Appendix
A
C
TREK‐303
This
Thisappendixexplainsthe
TREK‐303detailedinformation

TREK‐510Usermanual61
AppendixAPairedwithTREK‐303Specifications
.
TREK‐303Specification
Note!
1.
TheBrightnesscontrolisadjustedbytheautolightsensor
inthefrontpanelasdefault;itisalsodefinedbybutton
on
the
frontpanel
bymanual.
2.
ThecolorLCDdisplay

TREK‐510Usermanual62
PinoutforTREK‐303LVDSconnector
TableA.2:SmartDisplayConnector
Pin
Signal
Pin
Signal
1BacklightEnableinput#2PanelPowerEnableinput#
3LVDSGround4ResetButtonInput#
5LVDSClock+6LVDSClock‐
7LVDSGround8LVDSGround
9LVDSData2+10LVDSData2‐
11RS232RXD1#12RS232TXD1#
13LVDSData1+14LVDSData1‐
15LVDSGround16LVDSGround
17LVDSData0+18LVDSData0‐
19USBD‐ 20USBD+
21USBGround22USBGround
23+12VDCinput(+/‐5%,max1A)24+12VDCinput(+/‐5%,max1A)
25+12VDCinput(+/‐5%,max1A)26+12VDCinput(+/‐5%,max1A)
27PowerGround28PowerGround
29PowerGround30PowerGround
31RS232RXD2#32RS232TXD2#
33RS232RTS234PowerButtonInput#(connect
withsystembox)
35AudioGround36Mono.Line‐in
TREK‐510Usermanual63
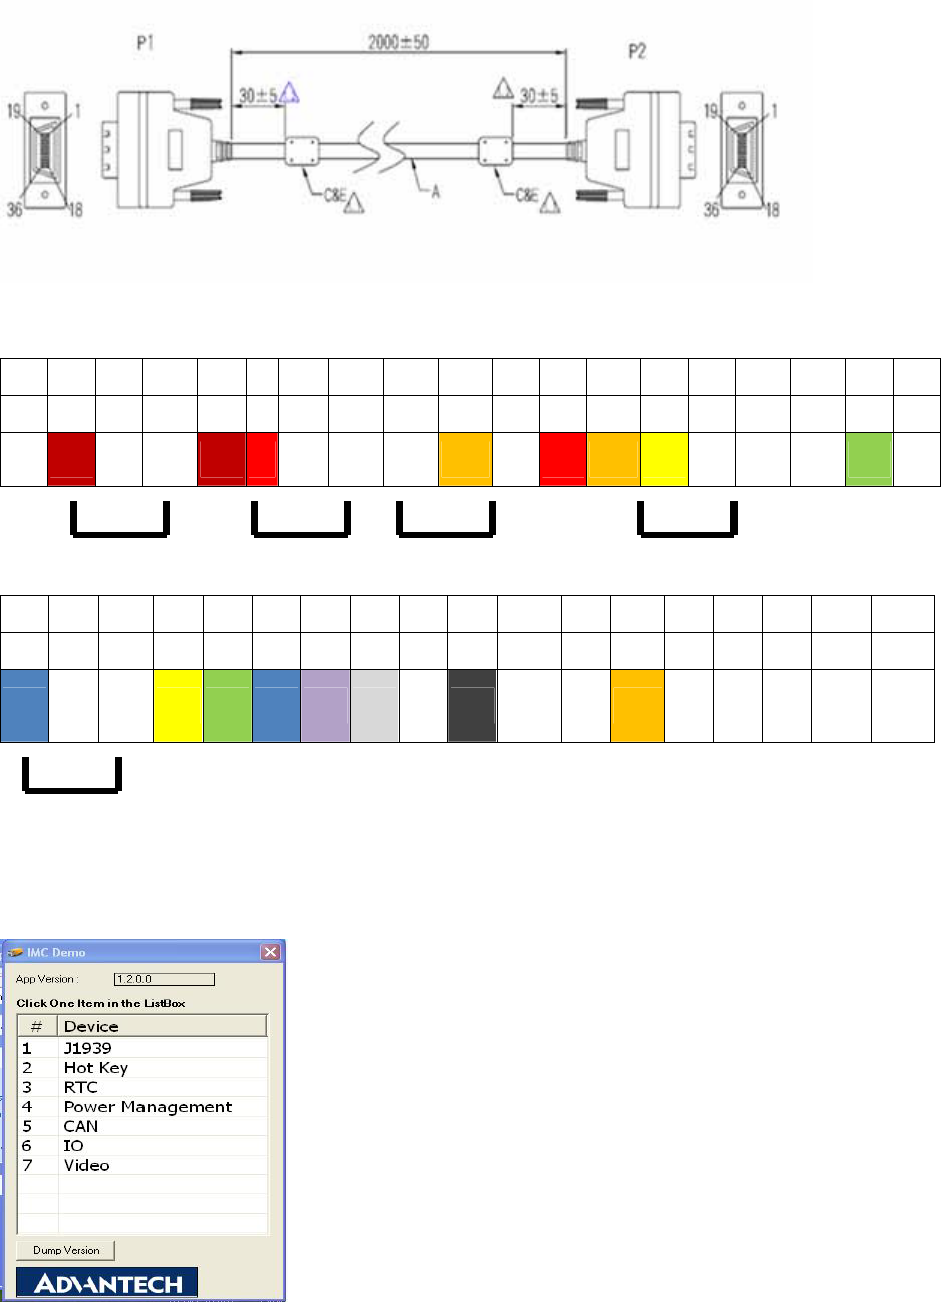
Pinassignment
P112345678910 11 12 13141516 17 18
P212345678910 11 12 13141516 17 18
ColorBrownWhiteGroundBrownredwhite Ground Ground Orange white red Orange yellowwhiteGroundGround Green white
19202122232425 26 27 28 2930 31 32333435 36
19202122232425 26 27 28 2930 31 32333435 36
BluewhiteGroundyellowGreenBluePurple Grey white Black
Black
Brown
black
red
Orange
Black
Yellow
Black
green
Black
blue
Black
purple
Black
grey
TREK‐303HotkeyUtility
ExecuteIMCdemoutility
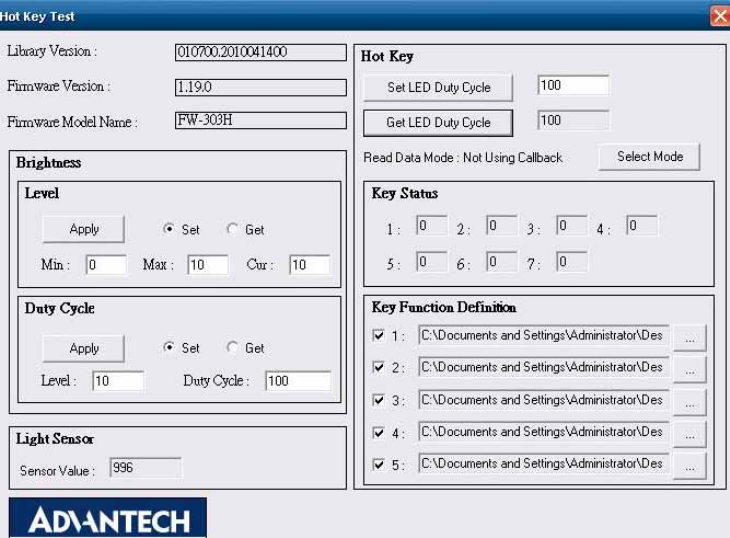
TREK‐510Usermanual64
FigureA.1Hotkeyutility
1. Execute“HotKeytest”programÎ
2. Brightnesslevel:Youmaysetpanel’sbrightnessfromlevel0~10,total10
levels,whenyoufinishsettingthebrightnesslevelyouwant,pleaseclick
“Apply”.IfyouwanttocheckthecurrentbrightnesslevelofTREK‐303,
pleaseclick“Get”.
3. Dutycycle:Youmayseteverylevel’sbrightnessstrength,total10levels,
whenyoufinishsettingthebrightnessstrengthforeachlevel,pleaseclick
“Apply”.Ifyouwanttocheckthecurrentbrightnessstrengthoncertain
levelofTREK‐303,pleaseclick“Get”.
4. Lightsensor:Whenthesensorhasdetectedthechangeofthebrightness
intheenvironment,thevaluewillchange.Thelowestlevelofbrightness,
thelowestvalueitispresented.Onthecontrary,thehighestlevelof
brightness,thehighestvalueitispresented.
5. Hotkey:thebacklightbrightnessofhotkeyscouldbeadjustedbysetting
thevaluefrom0~100.
6. KeyStatus:WhenyoupressHotkey,thestatuswillchangefrom0to1.
7. KeyfunctionDefinition:Youmaysettheparametertoconnectthe
applicationprogramofthehotkey.

TREK‐510Usermanual65
Appendix
B
C
WindowsEmbedded
CE5.0Component
List
This

TREK‐510Usermanual66
AppendixB
Windows®EmbeddedCE5.0ComponentList
APPLICATIONS AND SERVICES DEVELOPMENT Core
Advantech
Core Pro.
Advantech
Pro.
Pro.
Plus
Advantech
Pro. Plus
Active Template Library (ATL) x x x x x x
C Libraries and Runtimes x x x x x x
C++ Runtime Support for Exception Handling
and
Runtime Type Information x x x x x x
Full C Runtime x x x x x x
Standard I/O (STDIO) x x x x x x
Standard I/O ASCII (STDIOA) x x x x x x
String Safe Utility Functions x x x x x x
Standard String Functions - ASCII (corestra) x x x x x x
Component Services (COM and DCOM) x x x x x x
Component Object Model x x x x x x
COM x x x x x x
CoCreateGuid functionality for
OLE32 x x x x x x
COM Storage x x x x x x
DCOM x x x x x x
COM Storage x x x x x x
DCOM Remote Access x x x x x x
Minimal COM (No OLE Support) x x x x x x
CoCreateGuid functionality for
OLE32 x x x x x x
COM Storage x x x x x x
Speech Interface x x x
Speech API (SAPI) 5.0 x x x
Microsoft English (US) Windows CE Speech
Recognizer (available in 4.2 only)* x x
Lightweight Directory Access Protocol (LDAP) x x x x x x

TREK‐510Usermanual67
Client
Message Queuing (MSMQ) x x x x x x
SOAP Reliable Messaging Protocol (SRMP) x x x x x x
MSMQ ActiveX Wrappers x x x x x x
Microsoft Foundation Classes (MFC) x x x x x x
Object Exchange Protocol (OBEX) x x x x x x
OBEX Server x x x x x x
OBEX Inbox x x x x x x
OBEX File Browser x x x x x x
OBEX Client x x x x x x
Pocket Outlook Object Model (POOM) API x x
SOAP Toolkit x x x x x x
Client x x x x x x
Server x x x x x x
Standard SDK for Windows CE x x x x
.NET Compact Framework x x x x x x
OS Dependencies for .NET Compact
Framework 2.0 x x x x x x
Smart Device Authentication Utility x x x x x x
.NET Compact Framework 2.0 x x x x x x
SQL Server CE 2.0 .NET Data Provider x x x x x x
SQL Server 2000 .NET Data Provider x x x x x x
SQL Server CE 2.0 x x x x x x
XML x x x x x x
MSXML 3.0 x x x x x x
XML Core Services and Document
Object Model
(DOM) x x x x x x
XML HTTP x x x x x x
XML Query Languages (XQL) x x x x x x
XML Stylesheet Language
Transformations (XSLT) x x x x x x
XML SAX x x x x x x
XML Error Strings x x x x x x
XML Minimal Parser x x x x x x
Exchange Client x x x
APPLICATIONS - END USER

TREK‐510Usermanual68
ActiveSync x x
File Sync x x x x x x
Inbox Sync x x
Pocket Outlook Database Sync x x
CAB File Installer/Uninstaller x x x x x x
File Viewers* xx
Microsoft Excel Viewer* xx
Microsoft Image Viewer* xx
Microsoft PDF Viewer* xx
Microsoft PowerPoint Viewer* xx
Microsoft Word Viewer* xx
FLASH Update Sample Application x x x
Games x x x
Freecell x x x
Solitaire x x x
Help* x x x x
Inbox x x
Remote Desktop Connection x x x x
Remote Desktop Protocol (RDP) x x x x
User Interface Dialog Boxes x x x x
Smart Card Redirection x x x x
File Storage Redirection x x x x
Filtered File Storage Redirection x x x x
Cut/Copy/Paste Clipboard Redirection x x x x
Serial and Parallel Port Redirection x x x x
Audio Playback Redirection x x x x
Printer Redirection x x x x
Terminal Emulator x x x x x x
Windows Messenger x x
WordPad x x
CORE OS SERVICES
Battery Driver x x x x x x
Display Support x x x x x x
Serial Port Support x x x x x x
Parallel Port Support x x x x x x
Internet Appliance (IABASE) Support x x x
Notification LED Support x x x

TREK‐510Usermanual69
PNP Notifications x x x x x x
USB Host Support x x x x x x
USB Human Input Device (HID) Class Driver x x x x x x
USB HID Keyboard and Mouse x x x x x x
USB HID Keyboard Only x x x x x x
USB HID Mouse Only x x x x x x
USB Printer Class Driver x x x x x x
USB Storage Class Driver x x x x x x
USB Remote NDIS Class Driver x x x x x x
Debugging Tools x x x
Keyboard Test Application x x x
Touch Driver Test Application x x x
Remote Display Application x x x
Tiny Kernel Test Sample Application x x x
Toolhelp API x x x x x x
LMemDebug Memory Debugging Hooks x x x
Notification (Choose 1) x x x
UI based Notification x x x
Non UI based Notification x x x
Power Management (Choose 1) x x x
Power Management (Full) x x x x x x
Power Management (Minimal) x x x
Device Manager x x x x x x
Kernel Features x x x x x x
Target Control Support (Shell.exe) x x x x x x
Fiber API x x x x x x
FormatMessage API x x x x x x
Memory Mapped Files x x x x x x
Message Queue - Point-to-Point x x x x x x
COMMUNICATIONS SERVICES AND NETWORKING
Networking Features x x x x x x
Domain Discovery x x x x x x
Extended DNS Querying and Update
(DNSAPI) x x x x x x
Secure DDNS x x x x x x
Extensible Authentication Protocol x x x x x x
Firewall x x x

TREK‐510Usermanual70
Internet Connection Sharing (ICS) x x x x x x
Gateway Logging x x x x x x
IPSec v4 x x x x x x
NDIS Packet Capturing DLL x x x
NDIS User-mode I/O Driver x x x x x x
Network Bridging x x x x x x
Network Driver Architecture (NDIS) x x x x x x
Network Utilities (IpConfig, Ping, Route) x x x x x x
Reference Gateway User Interface x x x
Remote Configuration Framework x x x
TCP/IP x x x x x x
IP Helper API x x x x x x
TCP/IPv6 x x x x x x
Universal Plug and Play (UPnP) x x x x x x
Control Point API x x x x x x
Device Host API x x x x x x
Device Host API (Minimal Subset) x x x x x x
Sample UPnP IGD Schema
Implementation x x x x x x
UPnP Tools x x x x x x
UPnP Audio-Video DCP x x x x x
AV Control Point API x x x x x
AV Device API x x x x x
AV Renderer Sample x x
USB Flash Config Tool x x x
Windows Networking API/Redirector
(SMB/CIFS) x x x x x x
Winsock Support x x x x x x
Networking - Local Area Network (LAN) x x x x x x
Native Wi-Fi WLAN Access Point
Components x x x x x x
Native Wi-Fi WLAN STA x x x x x x
Wired Local Area Network (802.3, 802.5) x x x x x x
Wireless LAN (802.11) STA - Automatic
Configuration
and 802.1x x x x x x x
Networking - Personal Area Network (PAN) x x x

TREK‐510Usermanual71
Bluetooth x x x
Bluetooth Protocol Stack with Transport
Driver
Support x x x
Bluetooth Stack with Integrated
CSR Chipset
Driver x x x
Bluetooth Stack with Universal
Loadable Driver x x x
Bluetooth Stack with Integrated
SDIO Driver x x x
Bluetooth Stack with Integrated
USB Driver x x x
Bluetooth Stack with Integrated
UART Driver x x x
Bluetooth Profiles Support x x x
Bluetooth HS/HF and Audio
Gateway
Service x x x
Bluetooth LAP and Configuration
Utility x x
Bluetooth DUN Gateway x x x
Bluetooth PAN x x x
Bluetooth HID Device Support x x x
Bluetooth HID – Keyboard x x x
Bluetooth HID – Mouse x x x
IrDA x x x
Networking - Wide Area Network (WAN) x x x x x x
Dial Up Networking (RAS/PPP) x x x x x x
AutoDial x x x x x x
Standard Modem Support for Dial Up
Networking x x x x x x
Point-to-Point Protocol over Ethernet
(PPPoE) x x x x x x
Telephony API (TAPI 2.0) x x x x x x
Unimodem support x x x x x x
Virtual Private Networking x x x x x x
PPTP x x x x x x

TREK‐510Usermanual72
L2TP/IPSec x x x x x x
Servers x x x x x x
Core Server Support x x x x x x
FTP Server x x x
File Server x x x
File Server Customizable UI x x x
Windows Peer-to-Peer Networking x x x
Peer Name Resolution Protocol (PNRP) x x x
Identity Manager x x x
Print Server x x x
RAS Server/PPTP Server (Incoming) x x
Telnet Server x x x
Web Server (HTTPD) x x x x x x
Active Server Pages (ASP) Support x x x x x x
JScript 5.6 x x x x x x
VBScript 5.6 x x x x x x
Device Management ISAPI Extension x x x x x x
WebDAV Support x x x x x x
Web Server Administration ISAPI x x x x x x
Web Proxy x x x
Parental Controls x x x
Simple Network Time Protocol (SNTP) x x x
SNTP Server x x x
SNTP Client with DST x x x
SNTP Automatic Updates and Server
Synchronization x x x
DEVICE MANAGEMENT
Device Management Client x x x
Simple Network Management Protocol (SNMP) x x x
FILE SYSTEMS AND DATA STORE
Compression x x x x x x
Database Support x x x x x x
File and Database Replication (Choose 1) x x x
Bit-based x x x x x x
Count-Based x x x
File System - Internal (Choose 1) x x x
RAM and ROM File System x x x x x x

TREK‐510Usermanual73
ROM-only File System x x x
Registry Storage (Choose 1) x x x
Hive-based Registry x x x x x x
RAM-based Registry x x x
Storage Manager x x x
Binary Rom Image File System x x x
Storage Manager Control Panel Applet x x x x x x
EDB Database Engine x x x
Partition Driver x x x x x x
CD/UDFS File System x x x x x x
FAT File System x x x x x x
Transaction-Safe FAT File System (TFAT) x x x
System Password x x x x x x
FONTS
Arial x x x
Arial (Subset 1_30) x x x
Arial Black x x x
Arial Bold x x x
Arial Bold Italic x x x
Arial Italic x x x
Comic Sans MS x x x
Comic Sans MS x x x
Comic Sans MS Bold x x x
Courier New x x x
Courier New (Subset 1_30) x x x x x x
Courier New Bold x x x
Courier New Bold Italic x x x
Courier New Italic x x x
Georgia x x x
Georgia x x x
Georgia Bold x x x
Georgia Bold Italic x x x
Georgia Italic x x x
Impact x x x
Kino x x x
MSLogo x x x
Symbol x x x

TREK‐510Usermanual74
Tahoma x x x
Tahoma (Subset 1_07) x x x x x x
Tahoma Bold x x x
Times New Roman x x x
Times New Roman (Subset 1_30) x x x
Times New Roman Bold x x x
Times New Roman Bold Italic x x x
Times New Roman Italic x x x
Trebuchet MS x x x
Trebuchet MS x x x
Trebuchet MS Bold x x x
Trebuchet MS Bold Italic x x x
Trebuchet MS Italic x x x
Verdana x x x
Verdana x x x
Verdana Bold x x x
Verdana Bold Italic x x x
Verdana Italic x x x
Webdings x x x
Wingding x x x x x x
INTERNATIONAL
Input Method Manager (IMM) x x x x x x
Locale Services (Choose 1) x x x
National Language Support (NLS) x x x x x x
English (US) National Language Support only x x x
Locale Specific Support x x x
Arabic x x x
Fonts x x x
Tahoma (subset 1_08) x x x
Tahoma Bold (subset 1_08) x x x
Arial (subset 1_08) x x x
Arial Bold (subset 1_08) x x x
Courier New (subset 1_08) x x x
Keyboard x x x
Arabic Keyboard (101) x x x
Chinese (Simplified) x x x
Agfa AC3 Font Compression x x x

TREK‐510Usermanual75
Fonts x x x
SimSun & NSimSun (Choose 1) x x x
SimSun & NSimSun x x x
SimSun & NSimSun (Subset
2_20) x x x
SimSun & NSimSun (Subset
2_50) x x x
SimSun & NSimSun (Subset
2_60) x x x
SimSun & NSimSun (Subset
2_70) x x x
SimSun & NSimSun (Subset
2_80) x x x
SimSun & NSimSun (Subset
2_90) x x x
SC_Song x x x
GB18030 Data Converter x x x
Input Method Editor (Choose 1) x x x
MSPY 3.0 for Windows CE x x x
MSPY 3.0 for Windows CE
Database
(Choose 1) x x x
1.1 MB - Minimal
Database x x x
1.3 MB - Compact
Database x x x
1.7 MB - Standard
Database x x x
Double Spelling (Shuang Pin) soft
keyboard –
Large x x x
Double Spelling (Shuang Pin) soft
keyboard –
Small x x x
Pocket IME x x x
Double Spelling (Shuang Pin)
soft
keyboard – Small x x x

TREK‐510Usermanual76
Chinese (Traditional) x x x
Agfa AC3 Font Compression x x x
Fonts x x x
MingLiU & PMingLiU (Choose 1) x x x
MingLiU & PMingLiU x x x
MingLiU & PMingLiU (Subset
2_70) x x x
MingLiU & PMingLiU (Subset
2_80) x x x
MingLiU & PMingLiU (Subset
2_90) x x x
MS Ming x x x
Input Method Editor x x x
Pocket IME x x x
Input Methods x x x
Input by Radical (Chang Jei) x x x
Handwriting Recognizer Engine
(HWX) x x
MboxCHT HWX Sample UI x x
Phonetic Input (Bopomofo) x x x
English (Worldwide) x x x
Input Methods x x x
Handwriting Recognizer Engine
(HWX) x x
English (U.S.) x x x
Input Methods x x x
Transcriber Handwriting
Recognition
Application x x
French x x x
Input Methods x x x
Transcriber Handwriting
Recognition
Application x x
German x x x
Input Methods x x x
Transcriber Handwriting x x

TREK‐510Usermanual77
Recognition
Application
Hebrew x x x
Fonts x x x
Tahoma (subset 1_08) x x x
Arial (subset 1_08) x x x
Tahoma Bold (subset 1_08) x x x
Arial Bold (subset 1_08) x x x
Courier New (subset 1_08) x x x
Keyboard x x x
Hebrew Keyboard x x x
Indic x x x
Hindi x x x
Fonts x x x
Mangal x x x
Keyboard x x x
Hindi Traditional Keyboard x x x
Marathi x x x
Fonts x x x
Mangal x x x
Keyboard x x x
Marathi Keyboard x x x
Punjabi x x x
Fonts x x x
Raavi x x x
Keyboard x x x
Punjabi Keyboard x x x
Telugu x x x
Fonts x x x
Gautami x x x
Keyboard x x x
Telugu Keyboard x x x
Gujarati x x x
Fonts x x x
Shruti x x x
Keyboard x x x
Gujarati Keyboard x x x

TREK‐510Usermanual78
Kannada x x x
Fonts x x x
Tunga x x x
Keyboard x x x
Kannada Keyboard x x x
Tamil x x x
Fonts x x x
Latha x x x
Keyboard x x x
Tamil Keyboard x x x
Japanese x x x
Agfa AC3 Font Compression x x x
Fonts x x x
MS Gothic (Choose 1) x x x
MS Gothic & MS PGothic &
MS UI Gothic x x x
MS Gothic & MS PGothic &
MS UI Gothic
(Subset 1_50) x x x
MS Gothic & MS PGothic &
MS UI Gothic
(Subset 1_60) x x x
MS Gothic & MS PGothic &
MS UI Gothic
(Subset 1_80) x x x
MS Gothic & MS PGothic &
MS UI Gothic
(Subset 1_90) x x x
MS Gothic & MS PGothic &
MS UI Gothic
(Subset 1_70) x x x
MS Gothic & MS PGothic
(Subset 30) x x x
MS Gothic & MS PGothic
(Subset
30_1_19) x x x
MS Mincho & MS PMincho x x x
Input Method Editor (Choose 1) x x x

TREK‐510Usermanual79
IME 3.1 x x x
IME 3.1 Database (Choose 1) x x x
Standard Database x x x
Compact Database x x x
Optional UI Components x x x
Dictionary Tool x x x
Properties Dialog Box x x x
Advanced Settings
Dialog Box
(Landscape mode
only) x x x
System Tray Icon
Manager x x x
Pocket IME (Choose Additional
Databases) x x x
Name/Place Database x x x
Supplemental Database x x x
Test IME x x x
Input Methods x x x
All Characters List x x x
Handwriting Recognizer Engine
(HWX) x x
Character Auto Complete –
HWX Sample UI x x
Multibox HWX Sample UI x x
Kana Soft Keyboard x x x
Romaji/English Soft Keyboard x x x
Search by Radical x x x
Search by Stroke x x x
Korean x x x
Agfa AC3 Font Compression x x x
Fonts x x x
Gulim (GL_CE) x x x
Gulim & GulimChe (Choose 1) x x x
Gulim & GulimChe (Subset
1_30) x x x
Gulim & GulimChe (Subset x x x

TREK‐510Usermanual80
1_40)
Gulim & GulimChe (Subset
1_50) x x x
Gulim & GulimChe (Subset
1_60) x x x
Input Method Editor x x x
IME 97 x x x
Input Methods x x x
Handwriting Recognizer Engine
(HWX) x x
MboxKOR HWX Sample UI x x
Korean Soft Keyboard Sample x x x
Thai x x x
Fonts x x x
Tahoma (subset 1_08) x x x
Keyboard x x x
Thai Kedmanee Keyboard x x x
Multilingual User Interface (MUI) x x x
Unicode Script Processor for Complex Scripts x x x
Internet Client Services
Browser Application x x x x
Internet Explorer 6.0 for Windows CE -
Standard
Components x x x x
Internet Explorer 6.0 Sample Browser x x x x
TV-Style Navigation Components x x
Pocket Internet Explorer x x
Internet Explorer 6.0 for Windows CE Components x x
Internet Explorer Browser Control Host x x x x
Internet Explorer HTML/DHTML API x x x x
Internet Explorer HTML Application x x x x
Filter and Translation x x x x
Internet Explorer Plug-in Image Decoder
API x x x x
Internet Explorer PNG Image
Decoder x x x x
Internet Explorer Theme Library x x x x

TREK‐510Usermanual81
Internet Explorer Multiple-Language Base
API x x x x x
Internet Explorer Multiple-Language Full
API x x x x
Optional Charset/Encoding in registry x x x x
Internet Explorer RPC Support x x x x
Internet Explorer TV-Style Navigation x x
Fixed-Width Layout x x
Directional Tabbing x x
Disable Vertical Scroll Bar and Events x x
Customizable Font Range x x
URL Moniker Services x x x x x
Windows Internet Services x x x x x
Passport SSI 1.4 Authentication x x x x x
Platform for Privacy Preferences (P3P) x x x x x
XML Data Islands x x x x x
XML MIME Viewer x x x x x
Pocket Internet Explorer HTML View (WEBVIEW) x x
Internet Options Control Panel x x x x
Scripting x x x x x x
JScript 5.6 x x x x x x
Script Authoring (Jscript) x x x x x x
Script Encode (Jscript) x x x x x x
VBScript 5.6 x x x x x x
Script Authoring (VBScript) x x x x x x
Script Encode (VBScript) x x x x x x
MsgBox and InputBox support x x x x x x
GRAPHICS AND MULTIMEDIA TECHNOLOGIES
Graphics x x x
Raster Fonts Support x x x
V1 Font Compatibility x x x
Alphablend API (GDI version) x x x
Gradient Fill Support x x x x x x
Multiple Monitor Support x x x
Imaging x x x x x x
Still Image Codec Support (Encode and
Decode) x x x x x x

TREK‐510Usermanual82
Still Image Decoders x x x x x x
PNG Decoder x x x x x x
BMP Decoder x x x x x x
GIF Decoder x x x x x x
ICO Decoder x x x x x x
JPG Decoder x x x x x x
Still Image Encoders x x x x x x
GIF Encoder x x x x x x
BMP Encoder x x x x x x
JPG Encoder x x x x x x
PNG Encoder x x x x x x
Direct3D Mobile x x x x x x
DirectDraw x x x x x x
Audio x x x x x x
Audio Compression Manager x x x x x x
GSM 6.10 Codec x x x x x x
MSFilter Codec x x x x x x
Waveform Audio x x x x x x
Media x x x
Streaming Media Playback (requires WMP
application) x x
WMA and MP3 Local Playback x x x
WMA and MP3 Streaming (requires WMP
application) x x
Digital Rights Management x x x
Digital Rights Management (DRM) x x x
DRM for Portable Devices x x x
DRM License Acquisition OCX x x x
DirectShow x x x x x x
DirectShow Core x x x x x x
DirectShow Display x x x x x x
DirectShow Error Messages x x x x x x
DMO Wrapper Filter x x x x x x
ACM Wrapper Filter x x x x x x
Media Formats x x x x x x
AVI Filter x x x x x x
MPEG-1 Parser/Splitter x x x x x x

TREK‐510Usermanual83
Audio Codecs and Renderers x x x
G.711 Audio Codec x x x x x x
GSM 6.10 Audio Codec x x x x x x
IMA ADPCM Audio Codec x x x x x x
MP3 Codec x x x
MPEG-1 Layer 1 and 2 Audio
Codec x x x x x x
MS ADPCM Audio Codec x x x x x x
Waveform Audio Renderer x x x x x x
WMA Codec x x x x x x
WMA Voice Codec x x x x x x
Wave/AIFF/au/snd File Parser x x x x x x
Video Codecs and Renderers x x x x x x
DirectShow Video Renderer x x x x x x
MPEG-1 Video Codec x x x x x x
MS RLE Video Codec x x x x x x
Overlay Mixer x x x x x x
Video/Image Compression
Manager x x x x x x
WMV/MPEG-4 Video Codec x x x x x x
DVD-Video x x x
DVD-Video x x x
DVD-Video Samples x x x
Windows Media Player x x x x
Windows Media Player x x x x
Windows Media Player OCX x x x x
Windows Media Technologies x x x x x
ASX v1 and M3U File Support x x x x x
ASX v2 File Support x x x x x
ASX v3 File Support x x x x x
Windows Media Multicast and
Multi-Bit Rate x x x x x
NSC File Support x x x x x
Windows Media Streaming from
Local Storage x x x x x
Windows Media Streaming over
HTTP x x x x x

TREK‐510Usermanual84
Windows Media Streaming over
MMS x x x x x
SECURITY
Authentication Services (SSPI) x x x x x x
NTLM x x x x x x
Kerberos x x x x x x
Schannel (SSL/TLS) x x x x x x
Cryptography Services (CryptoAPI 1.0) with High
Encryption
Provider x x x x x x
Certificates (CryptoAPI 2.0) x x x x x x
Cryptographic Messaging (PKCS#7) x x x x x x
Personal Information Exchange
Standard
(PKCS #12) x x x x x x
Diffie-Hellman/DSS Provider x x x
Smart Card Encryption Provider x x x
Local Authentication Sub-System x x x
Password Local Authentication Plug-in x x x
Microsoft Certificate Enrollment Tool Sample x x x
Credential Manager x x x x x x
SHELL AND USER INTERFACE
Graphics, Windowing and Events x x x x x x
Minimal GWES Configuration x x x x x x
Minimal GDI Configuration x x x x x x
Minimal Input Configuration x x x x x x
Minimal Window Manager Configuration x x x x x x
Shell x x
Graphical Shell (Choose 1) x x
Standard Shell x x x x x x
Windows Thin Client Shell x x
AYGShell API Set x x x x
Command Shell x x x x x x
Console Window x x x x x x
Command Processor x x x x x x
User Interface x x x x x x
Accessibility x x x x x x

TREK‐510Usermanual85
Common Dialog Support x x x x x x
Controls Option B x x x
Control Panel Applets x x x x x x
Customizable UI x x x x x x
Windows XP-like Sample Skin x x x x x x
Menu Tool Tip x x x x x x
Mouse x x x x x x
Network User Interface x x x x x x
Overlapping Menus x x x x x x
Software Input Panel x x x x x x
Software-based Input Panel Driver x x x x x x
Software-based Input Panel (SIP)
(Choose 1 or more) x x x x x x
SIP for Small Screens x x x x x x
SIP for Large Screens x x x x x x
Touch Screen (Stylus) x x x x x x
Quarter VGA Resources - Portrait Mode x x x
Common Controls x x x x x x
Animation Control x x x x x x
Common Control x x x x x x
Windows CE Error Reporting x x x
Error Report Generator x x x
Report Upload Client x x x
Report Upload Client User Interface x x x
Error Report Transfer Driver x x x
Error Reporting Control Panel x x x
VOICE OVER IP PHONE SERVICES
Phone IME x x x
PC Authentication x x x
Telephony User Interface x x x
VoIP Application Interface Layer (VAIL) x x x
VAIL Database Store x x x
Phone Provisioner x x x
Reference Media Manager x x x
Real-time Communications (RTC) Client API x x x
SIREN/G.722.1 Codecs x x x

TREK‐510Usermanual86
www.advantech.com
Pleaseverifyspecificationsbeforequoting.Thisguideisintendedforreference
purposesonly.
Allproductspecificationsaresubjecttochangewithoutnotice.
Nopartofthispublicationmaybereproducedinanyformorbyanymeans,
electronic,photocopying,recordingorotherwise,withoutpriorwritten
permissionofthepublisher.
Allbrandandproductnamesaretrademarksorregisteredtrademarksoftheir
respectivecompanies.
©AdvantechCo.,Ltd.2010
TREK‐510Usermanual87
FCC ID: M82-TREK-510 This device complies with Part 15 of the FCC Rules.
Operation is subject to the following two conditions: (1) this device may not
cause harmful interference and (2) this device must accept any interference
received, including interference that may cause undesired operation.
“Complies with CANADA RSS-210
This equipment has been tested and found to comply with the limits for a Class
B digital device, pursuant to part 15 of the FCC rules. These limits are
designed to provide reasonable protection against harmful interference in a
residential installation. This equipment generates, uses and can radiate radio
frequency energy and, if not installed and used in accordance with the
instructions, may cause harmful interference to radio communications.
However, there is no guarantee that interference will not occur in a particular
installation. If this equipment does cause harmful interference to radio or
television reception, which can be determined by turning the equipment off and
on, the user is encouraged to try to correct the interference by one or more of
the following measures: -Reorient or relocate the receiving antenna. -Increase
the separation between the equipment and receiver. -Connect the equipment
into an outlet on a circuit different from that to which the receiver is connected.
-Consult the dealer or an experienced radio/TV technician for help.
b. FCC Part 15.21 information for user
You are cautioned that changes or modifications not expressly approved by
the party responsible for compliance could void your authority to operate the
equipment.
This device complies with Part 15 of the FCC Rules. Operation is subject to the
following two conditions: (1) this device may not cause harmful interference
and (2) this device must accept any interference received, including
interference that may cause undesired operation
Notes and Warnings to the User and Installer:
Caution:
This Installation Guide is intended for use by the professional wireless LAN
system installer.
The device cannot be sold retail, to the general public or by mail order. It must
be sold to dealers or have strict marketing control.
Warning: It is the responsibility of the professional installer to ensure that the
system is used exclusively for fixed, point-to-point operations.
Warning: When using the device in the United States (or where FCC rules
apply), it is the responsibility of the professional installer to ensure to control
the output power not greater then the application.
Who Should Use this Guide:
Installation of this device should be accomplished only by a qualified wireless
LAN system installer who is: -Knowledgeable of the use, installation and
configuration procedures and associated networking
components. -Knowledgeable of each system component’s equipment User
and Installation Guide. -Knowledgeable of the installation and configuration
procedures for the site’s network infrastructure system and wiring.
-Knowledgeable of the installation procedures, safety, and code
requirements for the site’s antenna, antenna mast, antenna cabling, and
installation. We highly recommend that the antenna installation be performed
by a qualified antenna installation professional.
Users should not attempt to make such connections themselves, but should
contact the appropriate electrical inspection authority, or electrician, as
appropriate.