Advantech Co TREK520 Computer User Manual
Advantech Co Ltd Computer
Users Manual

User Manual
TREK-520
Computer

Copyright
The documentation and the software
included with this
product
are
copyrighted
2010 by Advantech Co., Ltd. All rights
are reserved. Advantech Co.,
Ltd.
reserves the
right to make improvements
in the products described
in this
manual at
any time without notice. No
part
of this manual may
be
reproduced,
copied, translated
or
transmitted in any form
or by
any means without the
prior
written permission of Advantech Co., Ltd. Information provided
in this
manual is
intended to be accurate and
reliable. How- ever, Advantech Co., Ltd. assumes
no responsibility for its use, nor for any infringements of the rights of third
parties, which may result from its use.
Acknowledgements
Intel and Atom are trademarks of Intel Corporation. Microsoft Windows
and
MS-DOS are registered trademarks of Microsoft Corp. All other product
names or trademarks are
properties of their respective owners.
Product Warranty (2 years)
Advantech warrants to you, the original purchaser, that each of its
products will
be free from defects in materials and workmanship for two years from the date
of purchase.
This
warranty does not apply to
any
products
which
have been repaired
or
altered by persons other than repair
personnel authorized by Advantech, or
which
have been subject
to misuse,
abuse,
accident or
improper installation.
Advantech assumes no liability under the terms of this warranty as a
consequence of such events.
Because of
Advantech’s
high quality-control standards and rigorous testing,
most of our customers never need to use
our repair service. If
an Advantech
product is defective, it will be repaired or replaced at no charge during the
warranty period. For out- of-warranty
repairs, you will
be billed according
to the
cost
of replacement materials, service time
and freight.
Please consult your
dealer for more details.
If you think you have a defective product, follow these steps:
1.
Collect all the
information about the problem encountered. (For example,
CPU speed, Advantech products used, other hardware and software used,
etc.) Note anything abnormal and list any onscreen messages you get
when the problem occurs.
2.
Call your dealer and describe the
problem. Please
have
your manual,
product, and any helpful information readily
available.
3.
If your product is diagnosed as defective, obtain an RMA (return
merchandise authorization) number from
your dealer. This allows us to
process
your
return more quickly.
4.
Carefully pack
the defective product, a fully-completed Repair and
Replacement Order Card
and
a
photocopy proof of
purchase date (such
as
your sales receipt) in a shippable container. A product returned
without
proof of the purchase date is not eligible for warranty service.
5.
Write
the RMA
number
visibly on the outside of the
package
and ship it
prepaid to your dealer.
TREK-520 User Manual
ii

Declaration of Conformity
This product
has
passed the CE test for
environmental specifications.
Test conditions for passing included
the
equipment being
operated within
an industrial enclosure.
In order to protect the product from being
damaged by ESD
(Electrostatic Discharge) and EMI leakage,
we
strongly
recommend
the use of CE-compliant industrial enclosure
products.
FCC Class B
Note: This
equipment has been tested and found to comply with the limits
for a Class B
digital device, pursuant to part 15 of
the FCC Rules. These
limits are designed to provide reasonable protection against harmful
interference in a residential installation. This equipment generates uses
and can radiate radio frequency energy and, if not installed
and used
in
accordance with the instructions, may
cause harmful interference to
radio
communications. However, there is no guarantee that interference
will not occur in a
particular
installation. If
this equipment
does cause
harmful interference to radio or television reception, which can be
determined by turning the equipment off
and on, the user is encouraged
to try to correct the interference by one or more of the
following
measures:
!
Reorient or relocate the receiving antenna.
!
Increase the separation between the
equipment and receiver.
!
Connect
the
equipment into an
outlet on a
circuit different from that
to which the receiver is connected.
!
Consult the dealer or an experienced
radio/TV technician for help.
This device complies with Part 15 of the FCC Rules.
Operation is subject to the following two conditions:
(1) this device may not cause harmful interference and
(2) this device must accept any interference received, including interference that
may cause undesired operation. “Complies with CANADA RSS-210
FCC Part 15.21 information for user
You are cautioned that changes or modifications not expressly approved by the
party responsible for compliance could void your authority to operate the
equipment.
This device complies with Part 15 of the FCC Rules. Operation is subject to the
following two conditions:
(1) this device may not cause harmful interference and
(2) this device must accept any interference received, including interference that
may cause undesired operation
Notes and Warnings to the User and Installer:
Caution:
This Installation Guide is intended for use by the professional wireless LAN
system installer.
The device cannot be sold retail, to the general public or by mail order. It must be
sold to dealers or have strict marketing control.
Warning: It is the responsibility of the professional installer to ensure that the
system is used exclusively for fixed, point-to-point
operations.
Warning: When using the device in the United States (or where FCC rules apply),
it is the responsibility of the professional installer
to ensure to control the output power not greater then the application.
Who Should Use this Guide:
Installation of this device should be accomplished only by a qualified wireless LAN
system installer who is: -Knowledgeable of the use, installation and configuration
procedures and associated networking components. -Knowledgeable of each
system component’s equipment User and Installation Guide. -Knowledgeable of
the
installation and configuration procedures for the site’s network infrastructure
system and wiring.
-Knowledgeable of the installation procedures, safety, and code requirements for
the site’s antenna, antenna mast, antenna cabling, and installation. We highly
recommend that the antenna installation be performed by a qualified antenna
installation Professional.
Users should not attempt to make such connections themselves, but should
contact the appropriate electrical inspection authority, or
electrician, as appropriate.
1. This Transmitter must not be co-located or operating in conjunction with any other
antenna or transmitter.
2. This equipment complies with FCC RF radiation exposure limits set forth for an
uncontrolled environment. This equipment should be installed and operated with a
minimum distance of 20 centimeters between the radiator and your body.
In the users manual of the end product, the end user has to be informed to keep at least
20cm separation with the antenna while this end product is installed and operated. The
end user has to be informed that the FCC radio-frequency exposure guidelines for an
uncontrolled environment can be satisfied. The end user has to also be informed that any
changes or modifications not expressly approved by the manufacturer could void the
user's authority to operate this equipment.
Technical Support and Assistance
1.
Visit the Advantech web site at
www.advantech.com/support
for the
latest information about the product.
2.
Contact the distributor,
sales representative, or Advantech's customer
service center for
technical support
if you need
additional assistance.
Please have the following information ready before you call:
–
Product name and serial number
–
Description of your
peripheral
attachments
–
Description of your software (operating
system, version, application
software, etc.)
–
A complete description of the problem
–
The exact wording of any error messages

Warnings, Cautions and Notes
Warning!
Warnings indicate conditions, which
if
not
observed, can cause
personal
Injury!
Caution!
Cautions are included to help you avoid damaging hardware or
losing data. e.g.
There is
a danger of a
new battery exploding if it
is incorrectly
installed. Do
not
attempt to recharge, force open,
or heat the battery.
Replace
the battery only with the same or equivalent type
recommended by the manufacturer. Discard used batteries
according
to the manufacturer's instructions.
Note!
Notes provide optional additional
information.
Document Feedback
To
assist us in making
improvements
to this
manual,
we would welcome
comments and constructive criticism. Send all
such in writing to:
support@advantech.com
Packing List
Before setting up, check that the items
listed
below are included, in
good
condition. If any item does not accord
with the table, please contact your dealer
immediately.
!
TREK-520 series Computing Box
!
Accessories for TREK-520
!
Warranty card
!
Power cord: DC power inlet cable
!
Videio in/CAN cable
!
“
Drivers, Utilities and User Manual" CD-ROM

Safety Instructions
1.
Read these safety instructions carefully.
2.
Keep this User Manual for later reference.
3.
Disconnect this
equipment from
any AC outlet before cleaning. Use a
damp cloth. Do not use liquid or spray detergents for cleaning.
4.
For plug-in equipment, the power outlet socket must be located near
the
equipment and must be easily accessible.
5.
Keep this equipment away
from humidity.
6.
Put this equipment on a reliable surface during installation.
Dropping it or
letting it fall may
cause
damage.
7.
The
openings
on the enclosure are for air convection. Protect the
equipment from overheating. DO NOT COVER THE OPENINGS.
8.
Make sure the voltage of
the power
source is correct
before
connecting the equipment to the power
outlet.
9.
Position the power cord so that people
cannot step on it. Do not place
anything over the power cord.
10.
All cautions and warnings on the equipment should be noted.
11 .
If the equipment is not used for a long time, disconnect it from the power
source to avoid damage by transient overvoltage.
12.
Never pour any liquid into an opening. This
may cause fire or electrical
shock.
13.
Never open
the equipment. For safety reasons, the equipment
should
be opened only by qualified service
personnel.
14.
If one of the following situations arises, get the equipment checked
by
service personnel:
15.
The
power cord or plug is damaged.
16.
Liquid
has penetrated into the
equipment.
17.
The
equipment has been exposed to moisture.
18.
The equipment does not work well,
or you cannot get it to work according
to the user's manual.
19.
The
equipment has been dropped and damaged.
20.
The equipment has obvious signs of breakage.
21. DO NOT LEAVE THIS EQUIPMENT IN AN ENVIRONMENT WHERE THE
STORAGE TEMPERATURE MAY GO BELOW -30° C (-22° F) OR ABOVE 70° C
(158° F). THIS COULD DAMAGE THE EQUIPMENT. THE EQUIPMENT
SHOULD BE IN A CONTROLLED ENVIRONMENT.
Operating temperature: 50° C
22.
CAUTION: DANGER OF EXPLOSION IF BATTERY IS INCORRECTLY
REPLACED. REPLACE ONLY
WITH THE SAME OR EQUIVALENT
TYPE RECOMMENDED BY THE MANUFACTURER, DISCARD USED
BATTERIES ACCORDING TO THE MANUFACTURER'S
INSTRUCTIONS.
23.
The
sound pressure level
at the
operator's position according to IEC
704-1:1982
is no more than 70
dB (A).
DISCLAIMER:
This set of instructions
is given according to IEC 704-1.
Advantech disclaims all responsibility for the accuracy of any
statements
contained herein.

Wichtige Sicherheishinweise
1.
Bitte lesen sie Sich diese Hinweise
sorgfältig durch.
2.
Heben Sie diese Anleitung für den späteren Gebrauch
auf.
3.
Vor jedem Reinigen ist das Gerät vom Stromnetz zu trennen. Verwenden
Sie Keine Flüssig-oder Aerosolreiniger. Am besten dient ein
angefeuchtetes Tuch zur Reinigung.
4.
Die NetzanschluBsteckdose soll nahe dem Gerät angebracht und
leicht zugänglich sein.
5.
Das Gerät ist vor Feuchtigkeit zu
schützen.
6.
Bei der Aufstellung des Gerätes ist auf sicheren Stand zu achten. Ein
Kippen oder Fallen könnte Verletzungen hervorrufen.
7.
Die Belüftungsöffnungen dienen
zur Luftzirkulation die das Gerät vor
überhit- zung schützt. Sorgen Sie dafür, daB diese Öffnungen nicht
abgedeckt werden.
8.
Beachten Sie beim. AnschluB an
das Stromnetz die AnschluBwerte.
9.
Verlegen Sie die NetzanschluBleitung so, daB niemand darüber fallen
kann. Es sollte auch nichts auf der Leitung abgestellt werden.
10.
Alle Hinweise und Warnungen die
sich am Geräten befinden sind zu
beachten.
11 .
Wird das Gerät über einen längeren Zeitraum
nicht benutzt, sollten Sie es
vom Stromnetz trennen. Somit wird im Falle einer Überspannung eine
Beschädigung vermieden.
12.
Durch die
Lüftungsöffnungen dürfen niemals
Gegenstände oder
Flüssigkeiten
in das Gerät
gelangen. Dies könnte einen Brand bzw.
elektrischen Schlag aus- lösen.
13.
Öffnen Sie niemals das Gerät. Das Gerät darf aus Gründen der elektrischen
Sicherheit nur von authorisiertem Servicepersonal geöffnet werden.
14.
Wenn folgende Situationen auftreten ist das Gerät vom Stromnetz zu
trennen und von einer qualifizierten Servicestelle zu überprüfen:
15.
Netzkabel oder Netzstecker sind beschädigt.
16.
Flüssigkeit ist in das Gerät eingedrungen.
17.
Das Gerät war Feuchtigkeit ausgesetzt.
18.
Wenn das
Gerät nicht der
Bedienungsanleitung
entsprechend funktioniert
oder
Sie mit Hilfe dieser Anleitung keine
Verbesserung erzielen.
19.
Das Gerät ist gefallen und/oder das Gehäuse ist beschädigt.
20.
Wenn das
Gerät deutliche Anzeichen eines
Defektes aufweist.
21.
VOSICHT: Explisionsgefahr bei
unsachgemaben
Austausch der
Batterie.Ersatz nur durch densellben order einem vom
Hersteller
empfohlene-mahnlichen Typ. Entsorgung gebrauchter Batterien navh
Angaben des Herstellers.
22.
ACHTUNG: Es besteht die Explosionsgefahr, falls die Batterie auf nicht
fach- männische
Weise gewechselt wird.
Verfangen Sie die Batterie
nur
gleicher
oder entsprechender Type, wie
vom Hersteller empfohlen.
Entsorgen Sie Batterien nach Anweisung des Herstellers.
23.
Der arbeitsplatzbezogene Schalldruckpegel nach DIN
45 635 Teil 1000
beträgt
70dB(A) oder weiger.
Haft ungsausschluss: Die Bedienungsanleitungen
wurden
entsprechend
der
IEC-
704-1
erstellt.
Advantech
lehnt
jegliche
Verantwortung
für
die
Richtigkeit
der
in diesem Zusammenhang getätigten Aussagen ab.

Safety Precaution - Static Electricity
Follow these simple precautions to protect
yourself
from harm and the products
from damage.
!
To avoid electrical shock, always disconnect the power from
your PC
chassis before you work on it. Don't touch any
components on the CPU
card or other cards while the PC is on.
!
Disconnect power before making any configuration changes. The sudden
rush of power as you connect a jumper or install
a card may damage
sensitive electronic components.
Warning!
1.
Input voltage rated: 12-24 Vdc.
2.
Transport: carry
the unit with
both hands and handle with care.
3.
Maintenance:
to
properly maintain and clean
the
surfaces, use
only approved products or
clean with
a dry applicator.
4.
CompactFlash:
Turn off the power before inserting or removing
CompactFlash storage cards.
European Contact information:
Advantech Europe GmbH
Kolberger Straße 7
D-40599 Düsseldorf, Germany
Tel: 49-211-97477350
Fax: 49-211-97477300

Chapter
1
1
General Information This
chapter gives background
information on the TREK-520
Computing Box.
Sections include:
! Introduction
! General Specifications
! Dimensions

1.1 Introduction
The TREK-520 is a dedicated box computer for industrial, transport trucks,
buses and taxis. TREK-520 combined with variety of I/O connectors can be
connected to devices like OBD-II (see Ch3.3) or TPMS (Tire Pressure
Monitoring System) external modules via COM port. Dual display/dual audio
interfaces supporting different resolutions can deliver different applications to
different displays; eg: one application to a driver and another to a digital
signage application.
Built-in wireless communications (WWAN, WLAN, BT) enable TREK-520 to
send important driver/ location/cargo information back to the control center.
TREK-520 can also operate in extreme environments with features like a
wide working temperature range (-30 to 70 degrees). TREK-520 also uses a
special design to handle the critical issue of in power. Special power
protection (ISO7637-2/SAE J1455 Class A/ SAE J1113) and power
management software (Ignition on/off, delay on/off, low battery monitor)
prevent electrical noise and surges from impacting the system, guarding
against damage from transient power.

Rear-Side Connectors
1.2 General Specifications
Key features
z Supports Win CE 6.0 and Linux
z Automotive grade working temperature range (-30° C to 70° C)
z Rich I/O including CAN, RS-232, J1708, Line out, Mic in, USB, min USB Client
z Built-in communication modules, including GSM/GPRS/HSDPA/CDMA,
WLAN & Bluetooth
z GPS with AGPS and dead reckoning technology (speed line)
z Certifications: CE/FCC/e-mark, MIL-SD810F, ISO 7637-2, SAE J1455, SAE
J1113 regulations
z Ignition on/off delay; SW detectable/controllable for power management
1.2.1
General
!
Dimensions
: (W x H x D): 190x134x45.5 mm.
!
Weight
: 900 g.
!
Power supply
:
–
Input voltage
: 12
~ 24Vdc, support ignition cold crank
–
Ignition on/off
–
Low battery shut-down protection threshold
(optional)
: When the
battery
voltage level
drops below 11V for more than 30 seconds,
TREK-520 will automatically shut down in order to prevent “deep
discharge” situations and TREK-520 can be re-activated only when the
voltage is > 11V.
–
Power on delay
:
Default 2 seconds. When
the TREK-520 is powered
on via ignition key, the system will
delay 2
seconds to power
on.
–
Power off delay
: Default 5 seconds. When TREK-520 power is
controlled by ignition key
and turns
off by the key (ignition=off), the
TREK-520 will
start
the shut procedure after 5
seconds.
–
Hard off
delay
: Default
30
seconds. When TREK-520 power
is
controlled
by ignition key and turns off by the key (ignition=off), the
TREK-520 will cut off the 5VSB power after 30 seconds. In
this event
when the shutdown process is longer than 30 seconds, the power will
be shut down hard,
turning off the TREK-520's power
and 5VSB.
Note!
For more detail of function please
refer to
Chapter 4, Section
4.3.2 of this manual.
!
Power consumption
: The maximum current consumption is about 32.4
watts. The power
consumption is 12 watts in normal mode (with only XPE
running;
no I/O device and modules connected to
the TREK-520).
!
Front panel and back cover
: IP65 Sealed; NEMA4 compliant
(Not including the I/O ports).
!
Enclosure
: Ruggedized aluminum without ventilation
holes.

1.2.2
Standard PC Functions
CPU
:
TI ARM Cortex-A8 AM3703 800MHz
System chipset
:.
System memory
:
On board chip up to 1G
Serial ports
: RS-232, smart Display, WLAN,GPS, WWAN, VIO, USB 2.0, Client
Universal serial bus (USB) port
: Supports up to three USB2.0.
One from smart display port.
Bluetooth: One Class2 Bluetooth V2.1 + EDR module/ BT 3.0
Watchdog timer
: 63-level timer
intervals automatically
generate system reset
when the system stops
due to a program error. Jumper selection
and software enabled/disabled.
RTC Battery
: 3.0 V @ 200
mA lithium battery.
Power management
: Supports power saving
modes including Normal
/
Standby/Suspend modes.
CAN bus
Audio controller
:
Stereo sound
:
Audio interface
:
Optional modules
: 12
channels GPS, quad-band
GSM/GPRS, WLAN card
1.2.3
To u ch s cr e e n
Typ e
: Analog Resistive
Light transmission
: 80%
Controller
: RS-232
interface
Power consumption
: <5.5 V@ 20 mA
Durability
: > 10 million depressions
Software driver
: Supports Windows XP/XP Embedded, Win CE
1.2.4
Environment
High/low temperature:
-30 ~ 70° C
Relative humidity
:
10 ~ 95% @ 40° C (non-condensing)
Shock
: 30 G peak acceleration (11 msec duration)
Certifications
: CE, FCC, CCC, Emark, CB.
Vibration
: 5 ~ 500 Hz SAE J1455 4.9.4.2, MIL-STD-810F 514.5
1.4 Dimensions
Figure 1.1
TREK-520 dimensions

Chapter 2
System Setup
This chapter details system setup
on TREK-550.
Sections include:
!A Quick Tour of the computer box
!Installation Procedures
!Running the BIOS Setup
Program
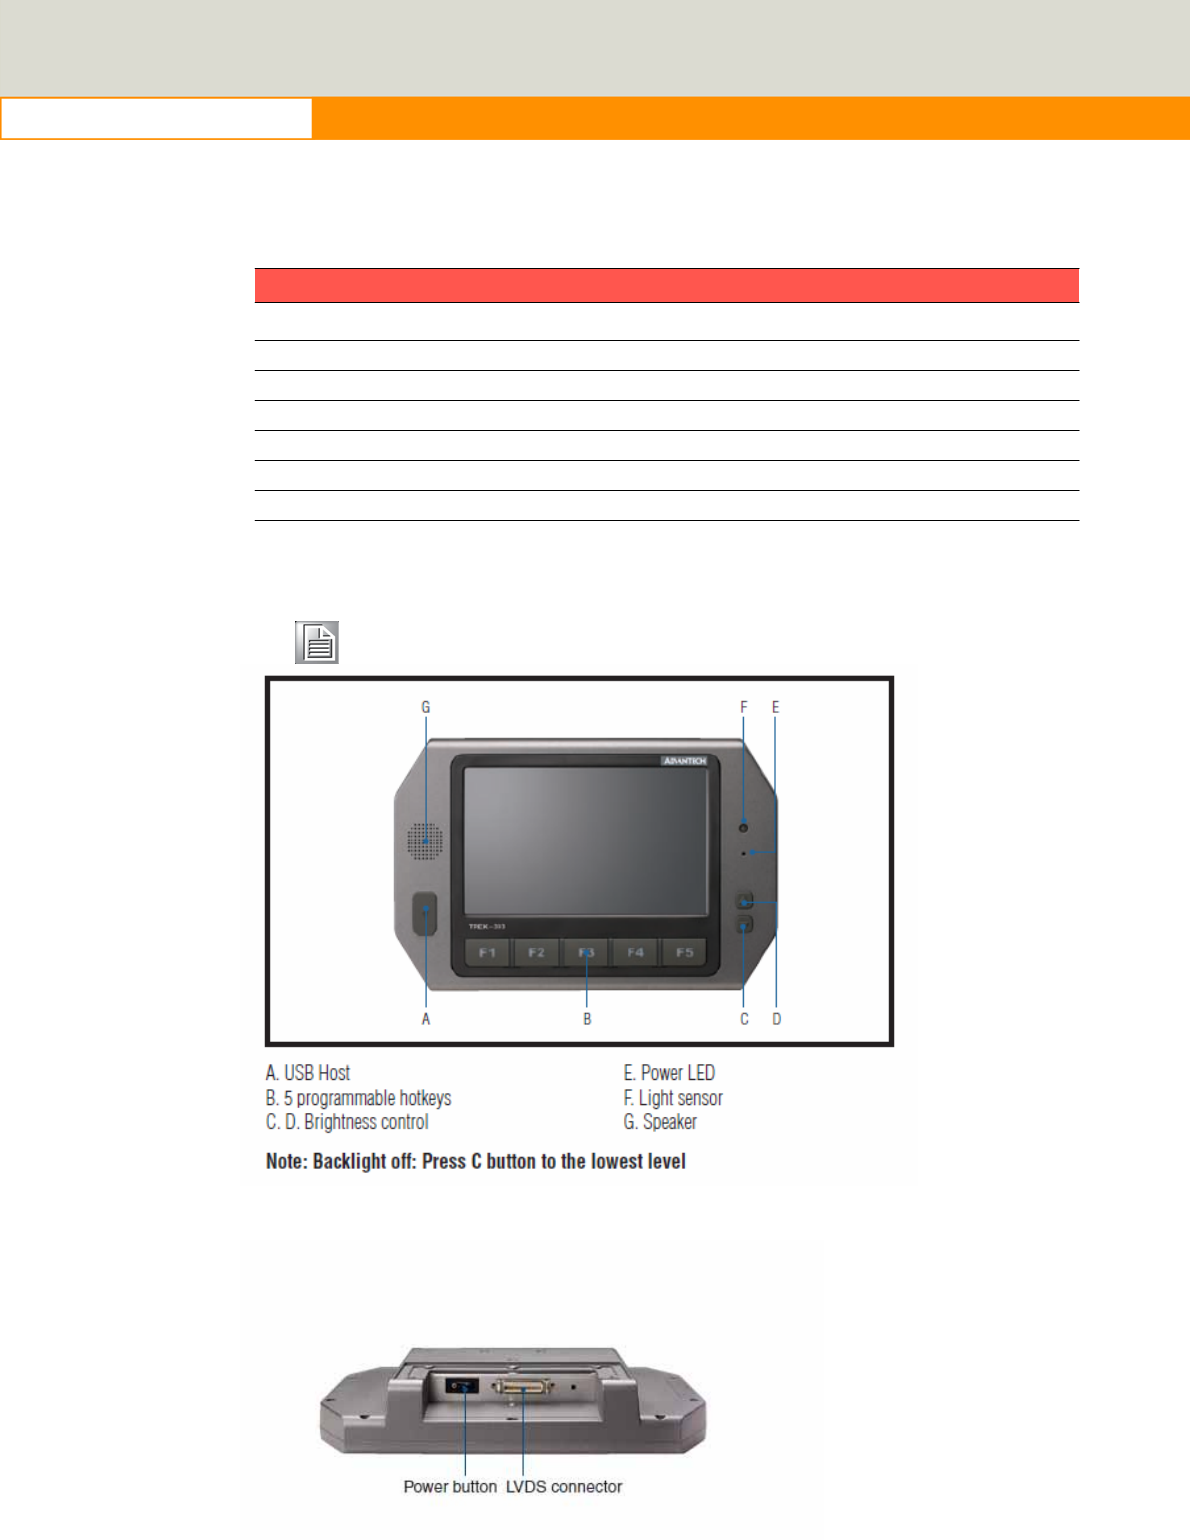
2.1 A Quick Tour of the TREK-520 Computing box.
Before
starting to set up the Computing Box,
take
a
moment
to become familiar with the
locations and
purposes of the controls,
drives, connectors and ports, which are illustrated
in
the figures below. When the
Computer
box
is placed inside truck glove cabinet or under
the passenger’s seat next to the driver, its front appears as shown
in
Figure 2.1.
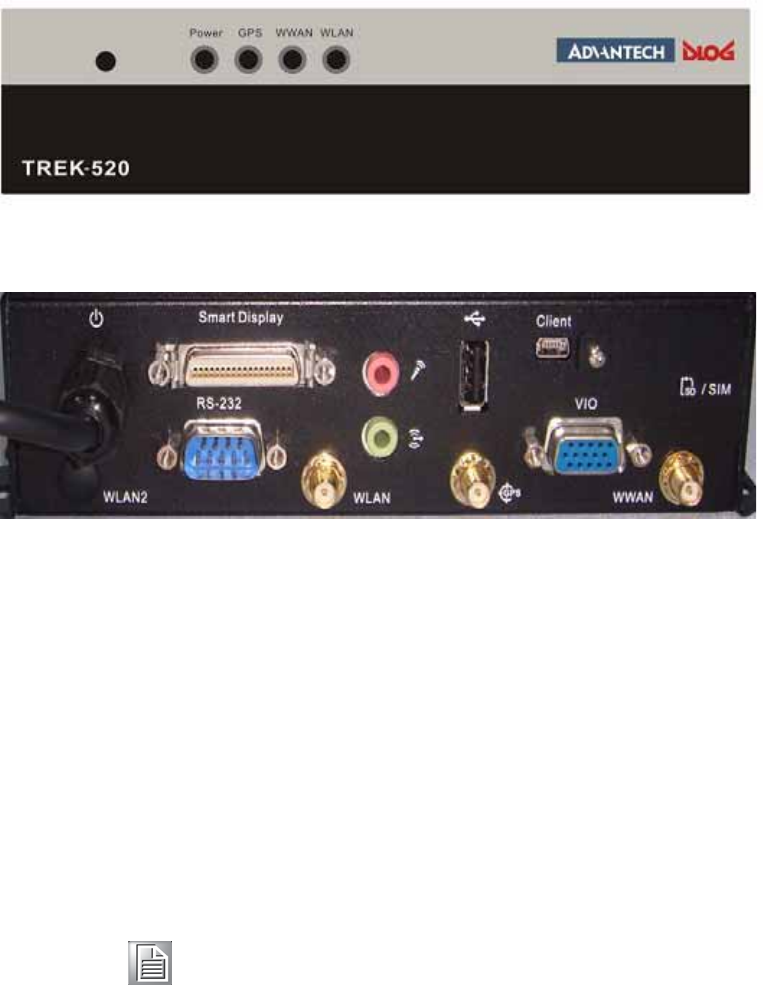
Figure 2.1. front view of TREK-520
Figure
2.2Rear view of
Figure 2.2. Rear view of TREK-520
2.3 Installing System Software
Recent
releases of operating systems from major
vendors include
setup
programs which load automatically and guide users through the entire
process
of operating system installation. The
guidelines below
help to
determine the
steps necessary to install your operating system on
the
computer hard drive.
Note!
Some distributors and system integrators may have already
pre- installed system software prior to shipment of your
Mounted
Computer.
The BIOS of the computer supports system
boots-up directly from the drive
whenever it is connected
using a USB interface.
Power on
the computer, or reset the system
by pressing the “Ctrl”
+ “Alt”
+ “Del”
keys simultaneously. The computer
will automatically load the operating
system from
the diskette .

When
presented with the opening screen of a
setup
/ installation
program,
simply fol- low the onscreen
instructions. The
setup program guides
users
through preparations of the
hard drive, and installation of the operating
system.
When presented
with an operating
system command
prompt,
like, A:\>, then it
is
nec- essary to partition
and
format
the hard
drive, and manually copy the
operating sys- tem files to
it.
Refer
to the operating system user instructions
about partitioning and formatting the hard drive.
Note!
The drivers and utilities used for the TREK-520 are subject to change without
notice. If in doubt, check
Advantech's
website or contact our
application engineers for the latest information
regarding
drivers and utilities.
2.4 Programming Function Keys and GPIO/CAN BUS
The Mount Computer provides five function keys, GPIO and CAN bus as
shown in section 2.1. These functions must be activated with the correct
software, that’s why we
provide
an AP
library
for customers to design their own
software. Refer to Appendix
C
for more detail.

Chapter
3
Pin Assignments
This appendix explains pin
assignments on the TREK-520.
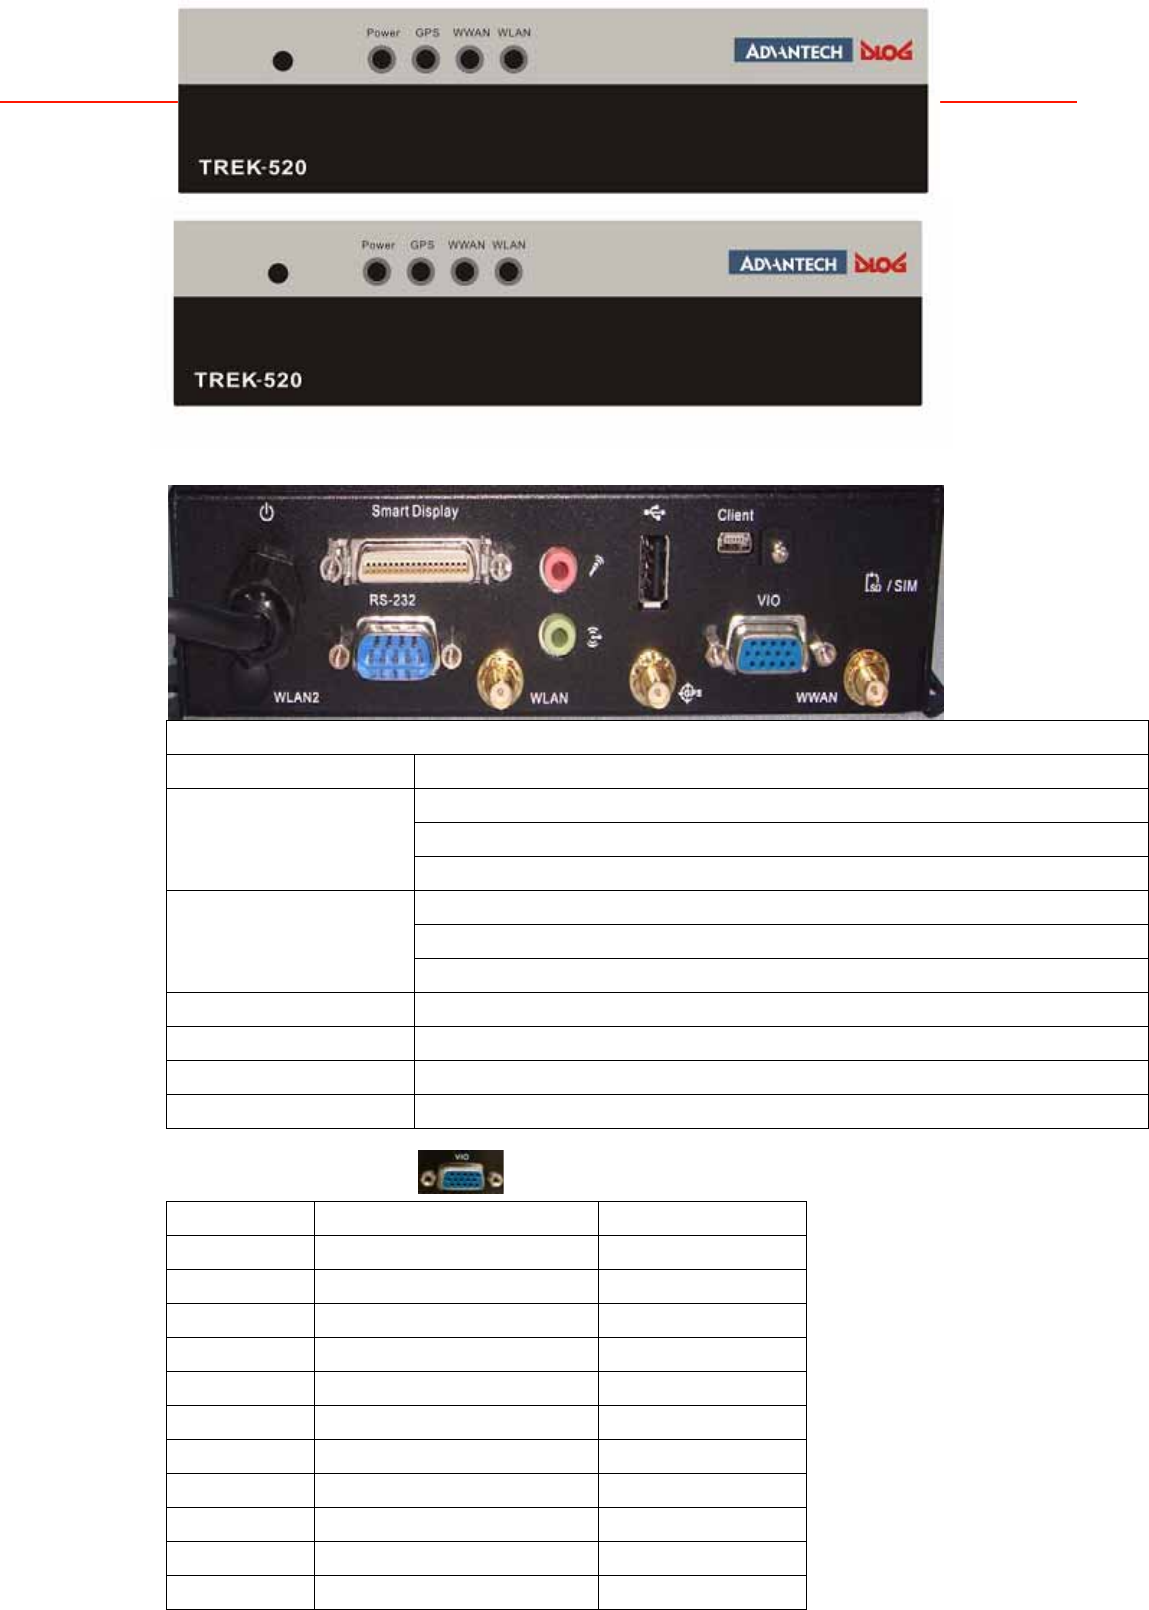
3.1 Front Side Connectors
3.2 Rear Side Connectors
IO Ports
RESET button 1 x RESET button at the I/O plate
1 x CAN 2.0B I/F (support J1939 protocol)
1 x J1708 I/F (support J1587 protocol)
CAN 1 x OBD2 I/F (support ISO 15765 protocol)
1 x MIC-in
1 x Line-out
Audio 1 x built-in loud speaker (reserved)
LVDS connector 1 x high density connector for TREK-3xx
RS-232 1 x 4-wire COM port with 12V/1A DC output
USB Host 2 x USB host I/F by USB A-type connector (5V/1A)
DIO Isolated 4 x DI and 2 x DO
3.3 VIO
A(DSUB15) Define B(Housing)
1 ODB_CAN_H 1
2 ODB_CAN_L 2
3 CAN_H 3
4 CAN_L 4
5 J1708_DN 5
6 J1708_DP 6
7 ISO_GND 7
8 DGND 8
9 VGA_ISO_DO_1 9
10 VGA_ISO_DO_2 10
11 VGA_ISO_DI_1 11

12 VGA_ISO_DI_2 12
3.4 Smart Display Connector
Smart Display Connector
Pin
Signal
Pin
Signal
1 Backlight Enable output 2 Panel Power Enable output
3 LVDS Ground 4 Reset Button Input
5 LVDS Clock + 6 LVDS Clock -
7 LVDS Ground 8 LVDS Ground
9 LVDS Data2 + 10 LVDS Data2 -
11 RS232 TXD1 12 RS232 RXD1
13 LVDS Data1 + 14 LVDS Data1 -
15 LVDS Ground 16 LVDS Ground
17 LVDS Data0 + 18 LVDS Data0 -
19 USB D+ 20 USB D-
21 USB Ground 22 USB Ground
23 +12VDC output 24 +12VDC output
25 +12VDC output 26 +12VDC output
27 Power Ground 28 Power Ground
29 Power Ground 30 Power Ground
31 RS232 TXD2 32 RS232 RXD2
33 RS232 RTS2 34 Power Button Input
35 Audio Ground 36 Mono. Line-out
3.5 RS-232 Connector
RS-232 Connector
Pin
Signal
Pin
Signal
1 RS-232 DCD 2 RS-232 RXD
3 RS-232 TXD 4 RS-232 DTR
5 RS-232 Ground 6 RS-232 DSR
7 RS-232 RTS 8 RS-232 CTS
9 RS-232 RI / +5V / +V12

Chapter 4
Software demo application setup
This appendix explains the
software demo application for
TREK-520.
Sections include:
! Introduction
! How to set up demo application
21
www.advantech.com
4.1 Introduction
To
make the hardware easier
to
access
for programmers, Advantech has
developed an demo program in order to let customer test the functions on
TREK-520. This document describes detailed information for each Advantech
demo program so that
application developers can become
more
familiar with
using them.
For technical support, contact Advantech application engineers
worldwide. For news updates, visit our website:
www.advantech.com
4.1.1
Execute J1939 demo program
This
section explains
how to install the
Advantech demo program in Windows
XP Pro / Embedded.
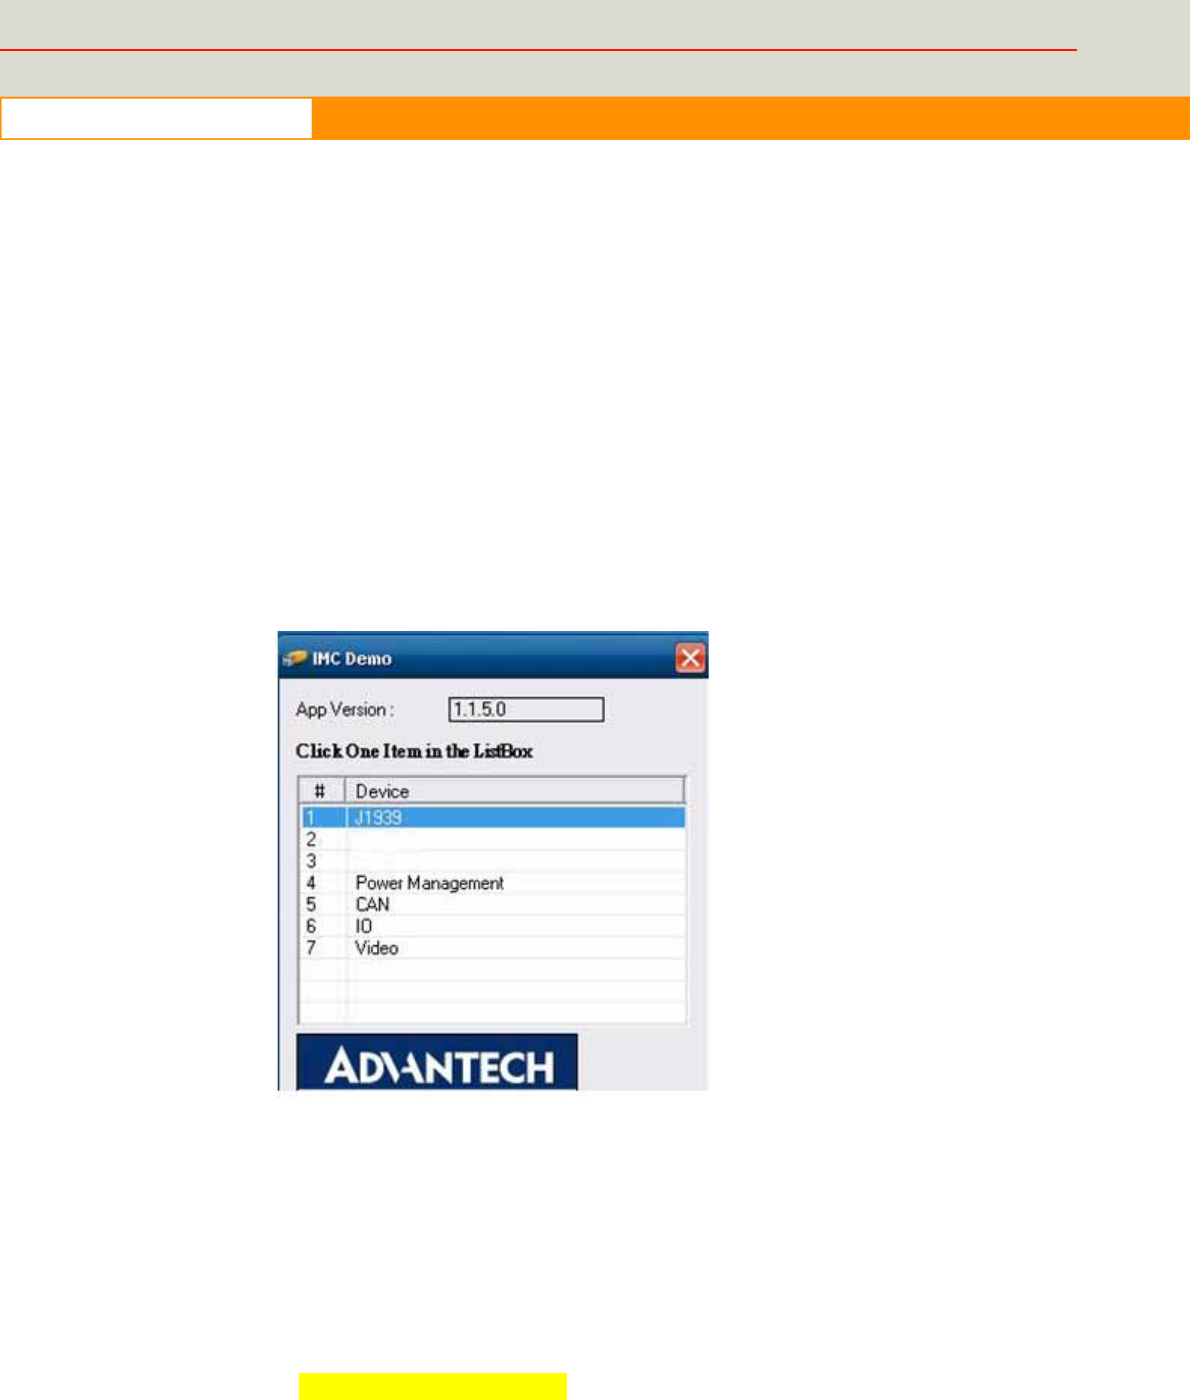
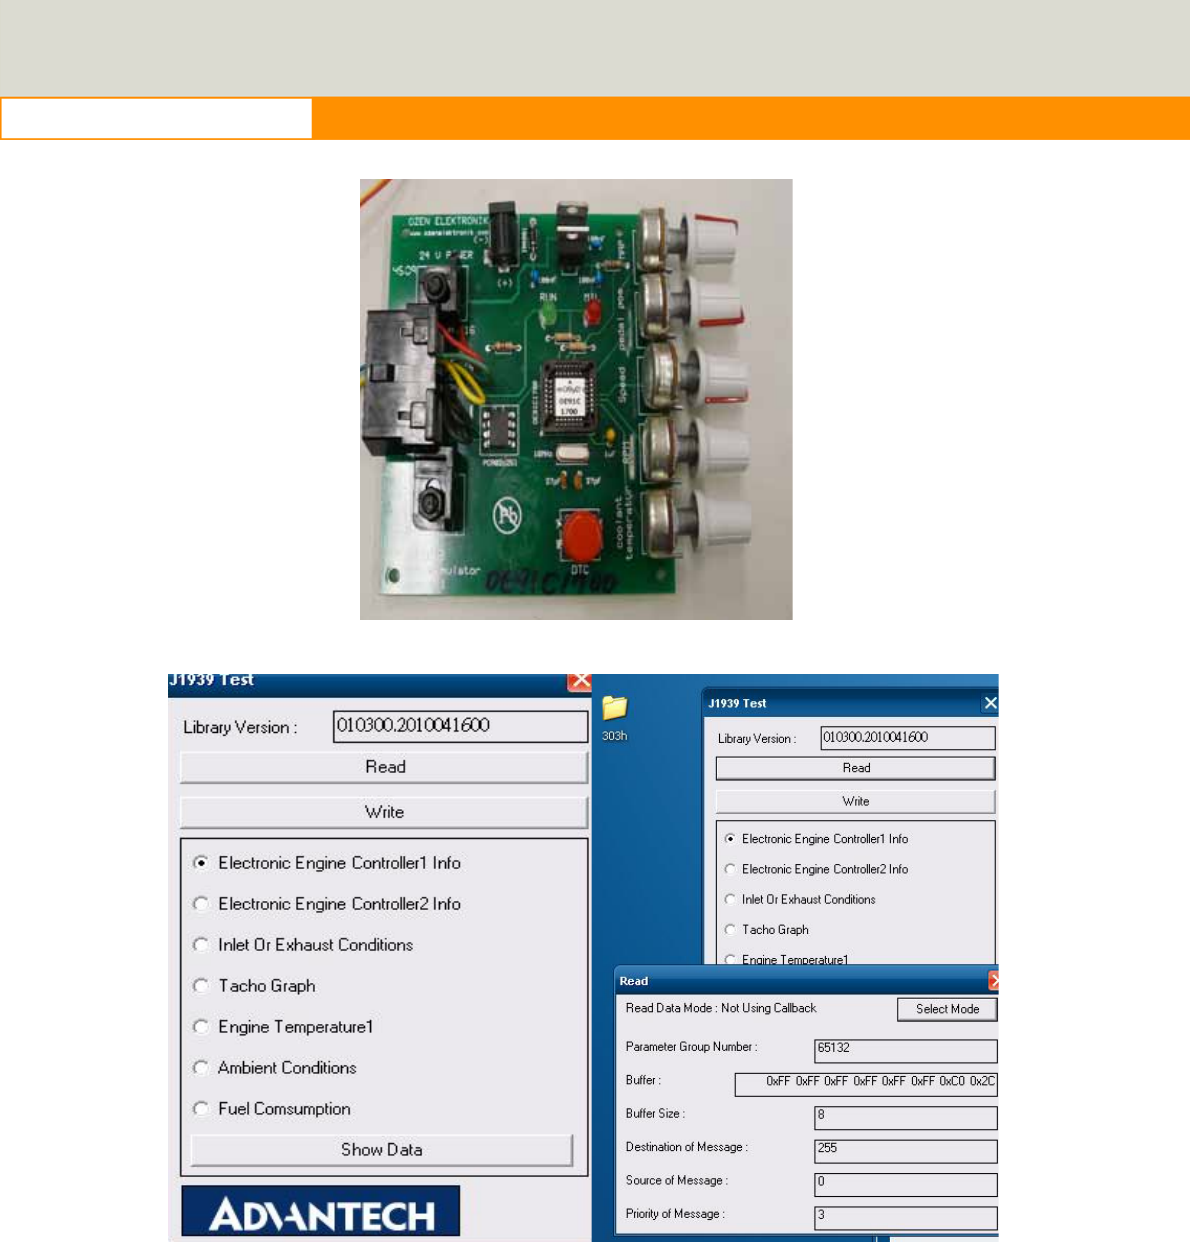
1. Execute the test program called “IMC_Demo”
Figure 4. 1
2. Click J1939: customer may connect directly to the truck; we use a
simulator board below to explain how J1939 protocol can be executed.
First, connect to the simulator board to TREK-520 CAN port and console
PC, once the simulator is powered on (connect to the truck), you can start
getting the data, just click [Read], you may get the data you need from the
simulator, click [Read], you may transfer the data to Console
Smulator vendor name:
22
www.advantech.com
Figure 4.2 J1939 truck simulator
Figure 4.3 Figure 4.4
TREK-520 User Manual
22
23
www.advantech.com
4.1.2
CAN Test
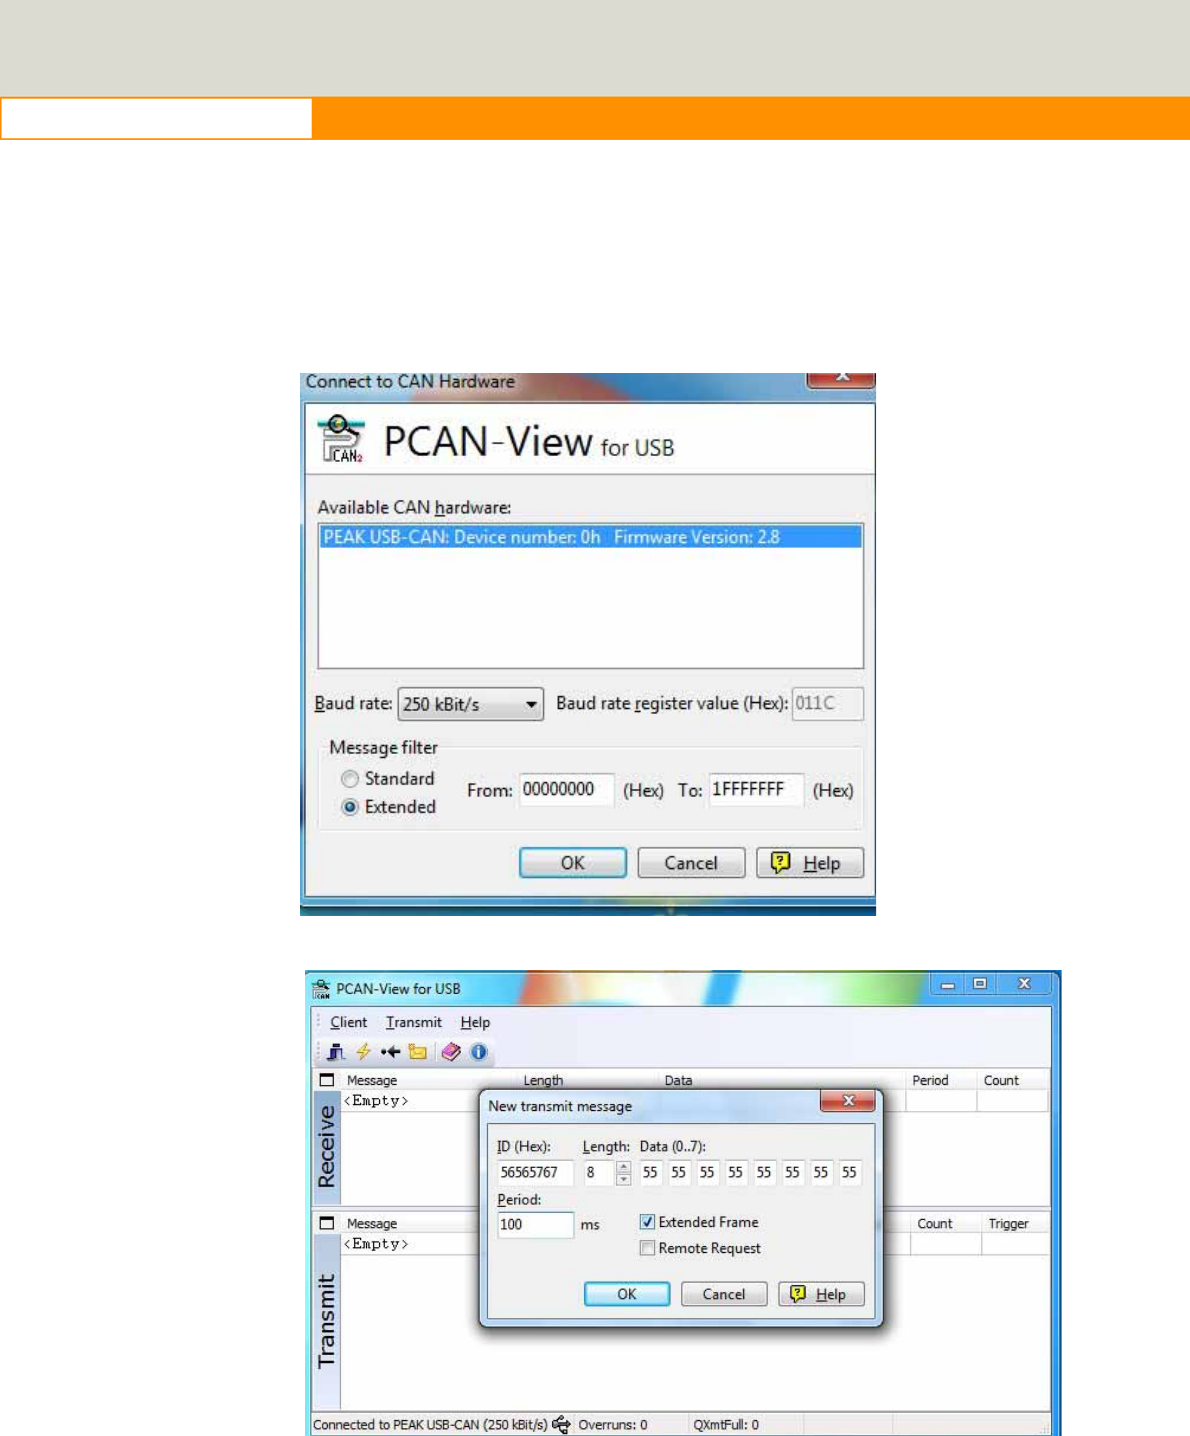
1. CAN: Console PC, install [PCAN_USB-to-CAN] test program, and use
USB to CAN fixture to connect to TREK-520 CAN port.
2. Execute PCAN-View USB→ Set Baud rate 250kBit/s→ Select
[Extended]→OK→ Transmit → New → ID(Hex) key in number → Data key
in any number→[Period] key in 100ms→Click [Extended Frame]→OK.
See below figure 4.
Figure 6. 11
Figure 4. 12
TREK-520 User Manual
22
24
www.advantech.com
Figure 4. 13
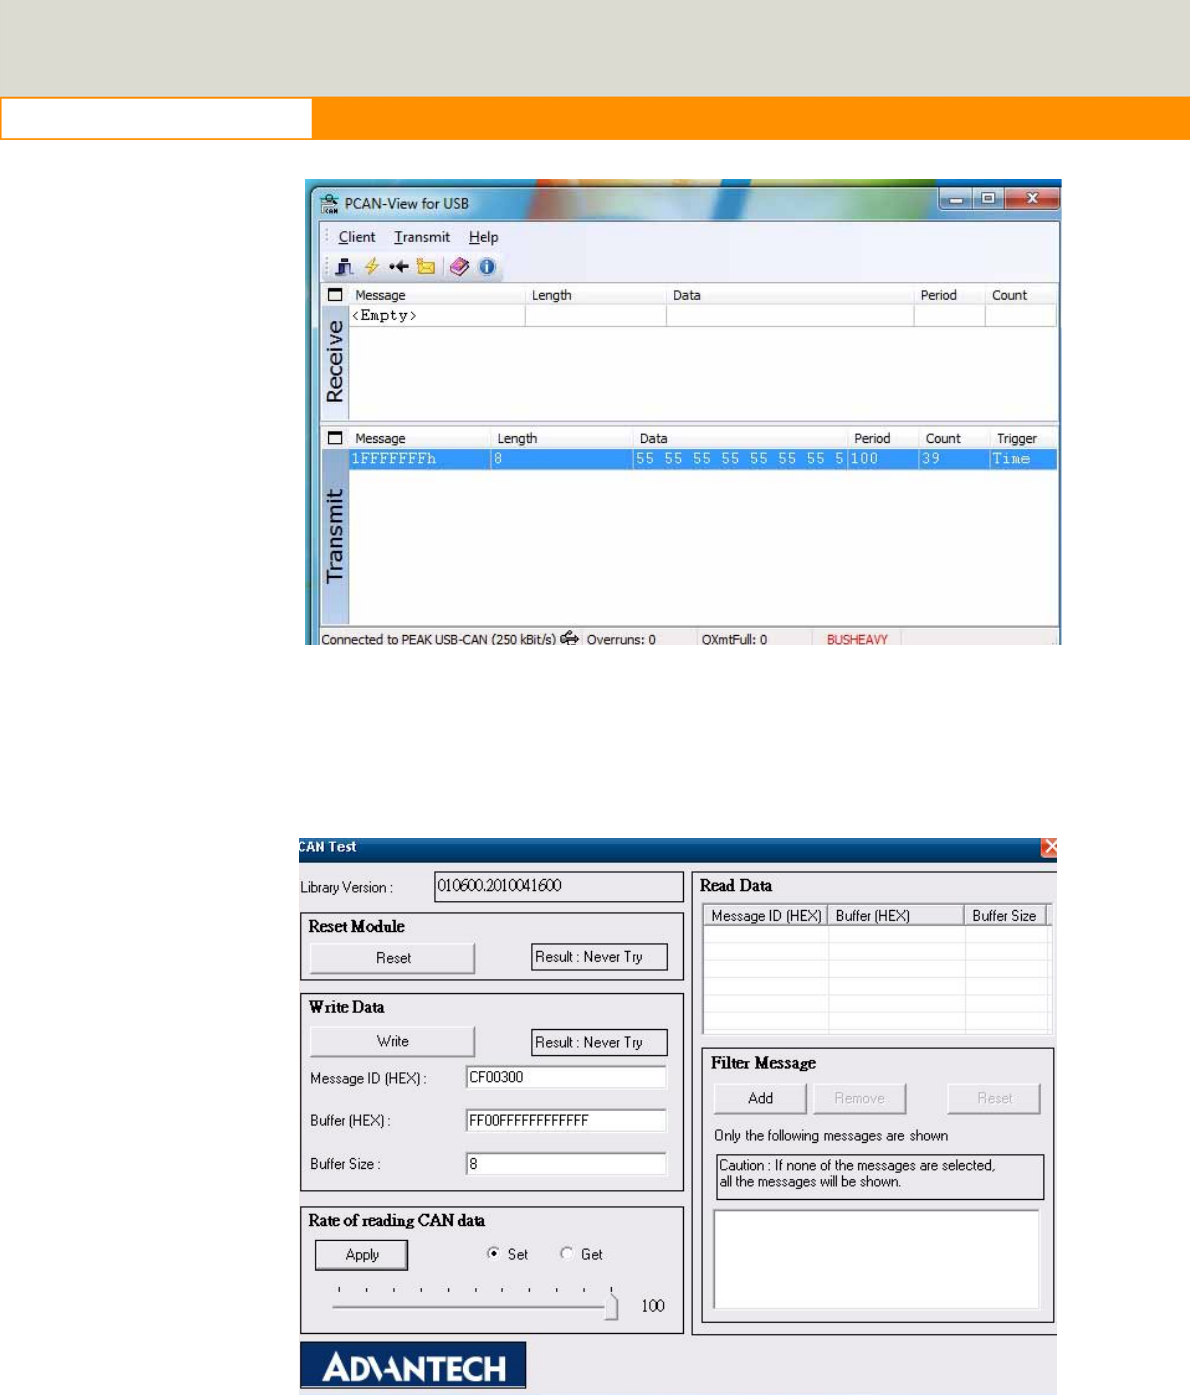
3. Then you may read the data of TREK-520 from Console PC, in the same
time, you may also press [Write Data] to write to Console PC. As for Filter
Message, it can filter out the message you don’t need, and keep the
message you need. See below Figure 4.
Figure 4. 14
25
www.advantech.com
4.2
RTC test
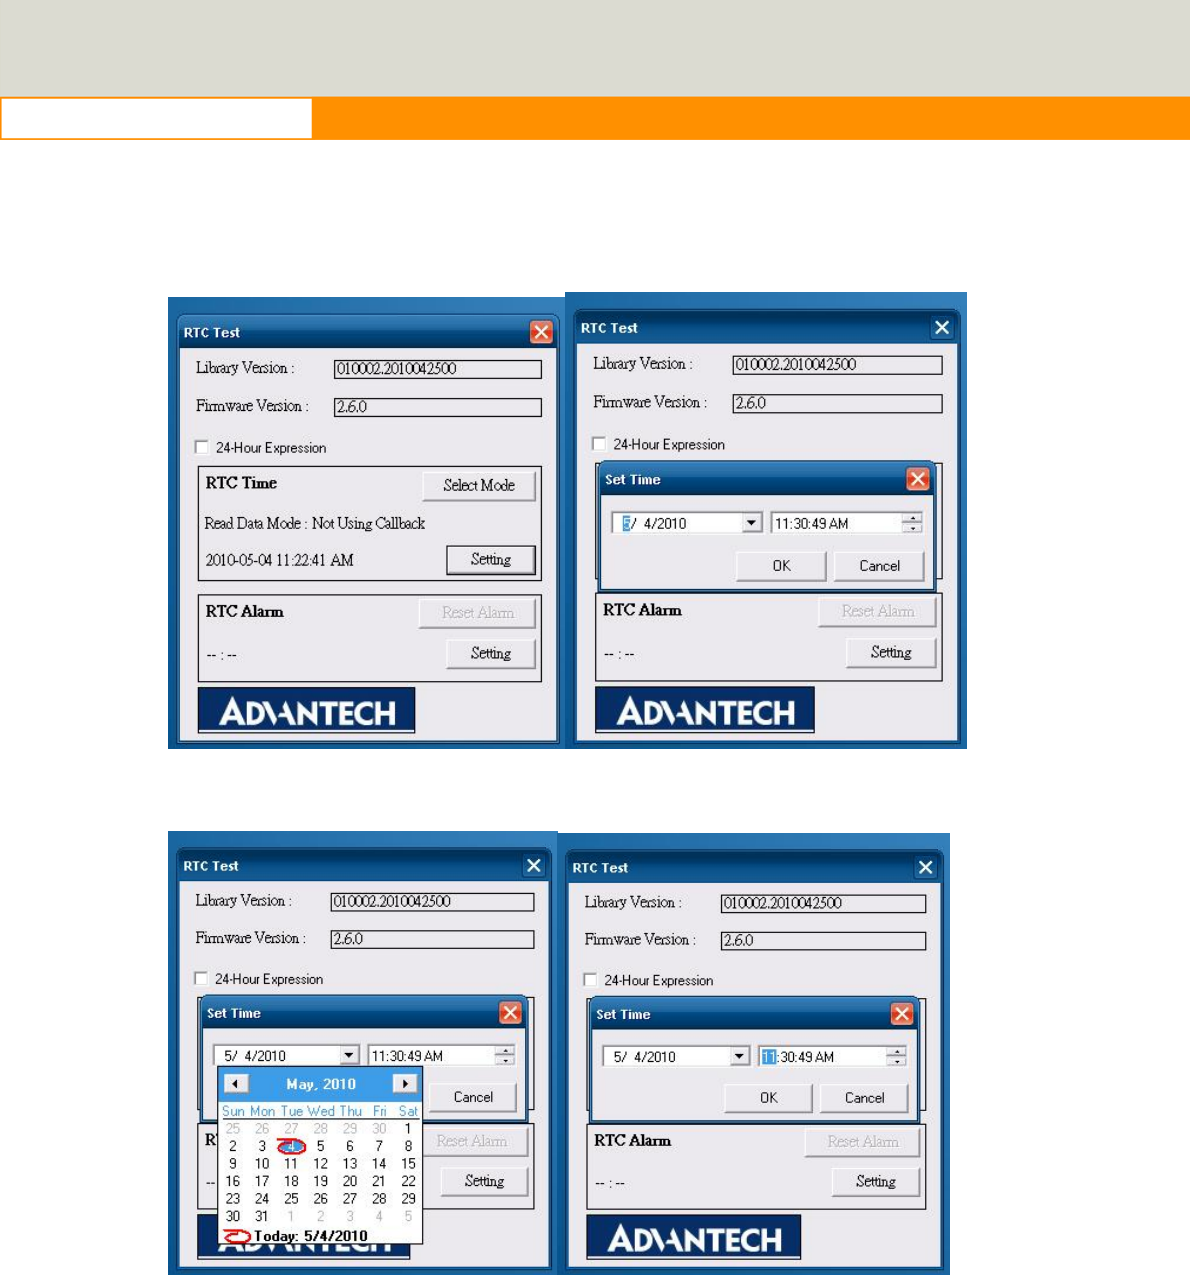
Execute “RTC test”
1. For RTC Time setting: You may set year, month, date, and time show as
below.
Figure 4.5 Figure 4.6
Figure 4. 7 Figure 4. 8
26
www.advantech.com
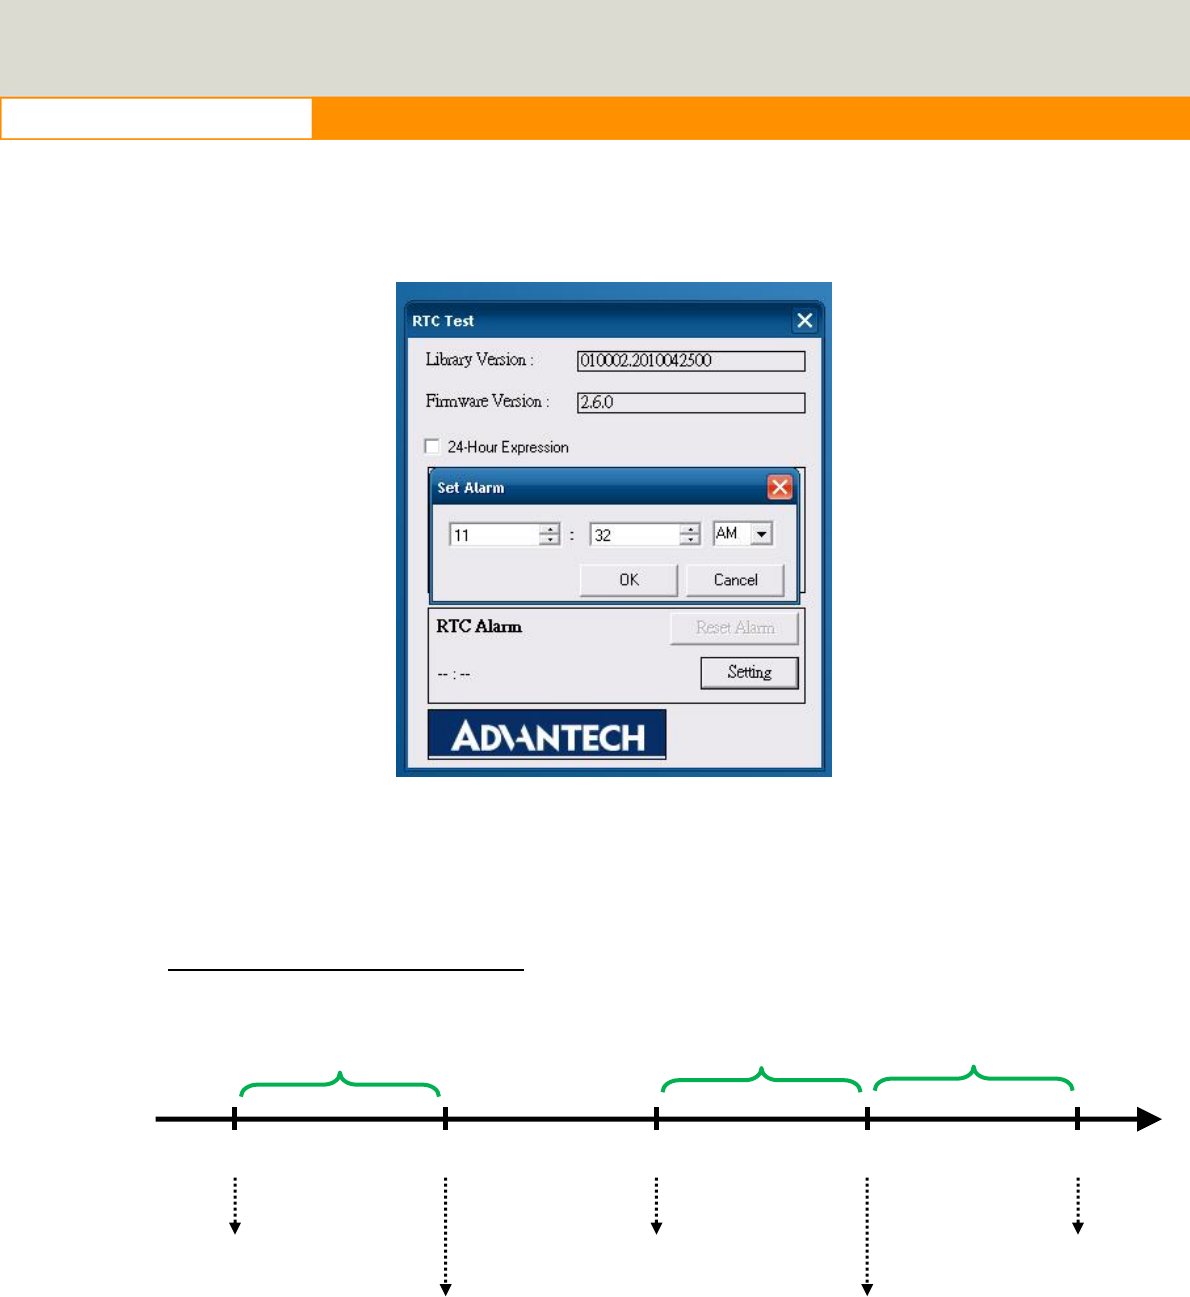
2. RTC Alarm Setting: You may also set Alarm time; you may wake up the system
by the time you have set. Please refer to below figure 4.
Figure 6.9
4.3
Power Management
4.3.1 Power management Mechanism
Normal Power Management Flow
T1T2T3T4T5
IgnitionON
SystemON
IgnitionOFF
SendPower
ButtonSignal
SystemOFF
ON_DELAYOFF_EVENT
_
DELAY HARD_OFF
_
DELAY

27
www.advantech.com
Low Battery Protection
When the system is ON, and
(1) The battery voltage (DC input) is lower than LOW_THRESHOLD (at T6)
(2) and this situation lasts for LOW_DELAY,
, then the system will send Power Button signal to OS (at T7) to start the shutdown
process.
At this time (T7), the LOW_HARD_DELAY is starting to countdown.
Once LOW_HARD__DELAY is over, the system power is removed abruptly.
Before T1 The system stays off.
power is fed in, but Ignition is OFF.
T1 Ignition is ON and the ON_DELAY is starting to count down.
T1 ~ T2 This duration is and it is ranged from 1 to 18000 seconds.
T2 Once the ON_DELAY is over, the system will stay On or OFF, depending
on the BIOS setting “POWER-ON after Power Fail”.
If “POWER-ON after Power Fail” is set as ON, the system will be powered
ON.
If “POWER-ON after Power Fail” is set as OF, the system will stay OFF
and you could press the power button to turn on system.
T2 ~ T3 The system is under normal operation.
T3 At this time, the Ignition is OFF, and OFF_EVENT_DELAY is starting to
count down.
T3 ~ T4 This duration is OFF_EVENT_DELAY and it is ranged from 1 to 18000
seconds.
T4 When the OFF_EVENT_DELAY is over, the system will send a power
button signal to the OS and the user application should prepare the
shutdown process.
The HARD_OFF_DELAY is starting to count down.
T4 ~ T5 This duration is HARD_OFF_DELAY and it is ranged from 1 to 18000
seconds.
T5 When the HARD_OFF_DELAY is count to zero, the system power is
removed abruptly to avoid extra and abnormal power drain from battery.
This parameter is fixed with a value of 60 seconds.
After T5 The system stays off.
T6T7
T8
SystemstaysON
LowBatteryis
Detected
SendPower
ButtonSignal
SystemOFF
LOW
_
HARD
_
DELAY
LOW
_
DELAY
28
www.advantech.com
LOW_DELAY is ranged from 1 to 3600 seconds.
LOW_HARD_ DELAY is fixed with a value of 60 seconds.
Note:
Q1: How is the low-battery event raised or canceled?
A1: The minimum value on LOW_DELAY parameter is 1 second. If the voltage remains
lower than the LOW_THRESHOLD in the duration of LOW_DELAY, the low-battery
event will be raised and immediately send a power button press signal to OS.
During the duration of LOW_DELAY, if the battery voltage is back to be higher than
LOW_THRESHOLD, the LOW_DELAY will be reset to predetermined value and stop
count down.
Therefore, the LOW_DELAY parameter acts as a filter to prevent incorrect
low-battery-event from happening.
4.3.2
Power Management demo program
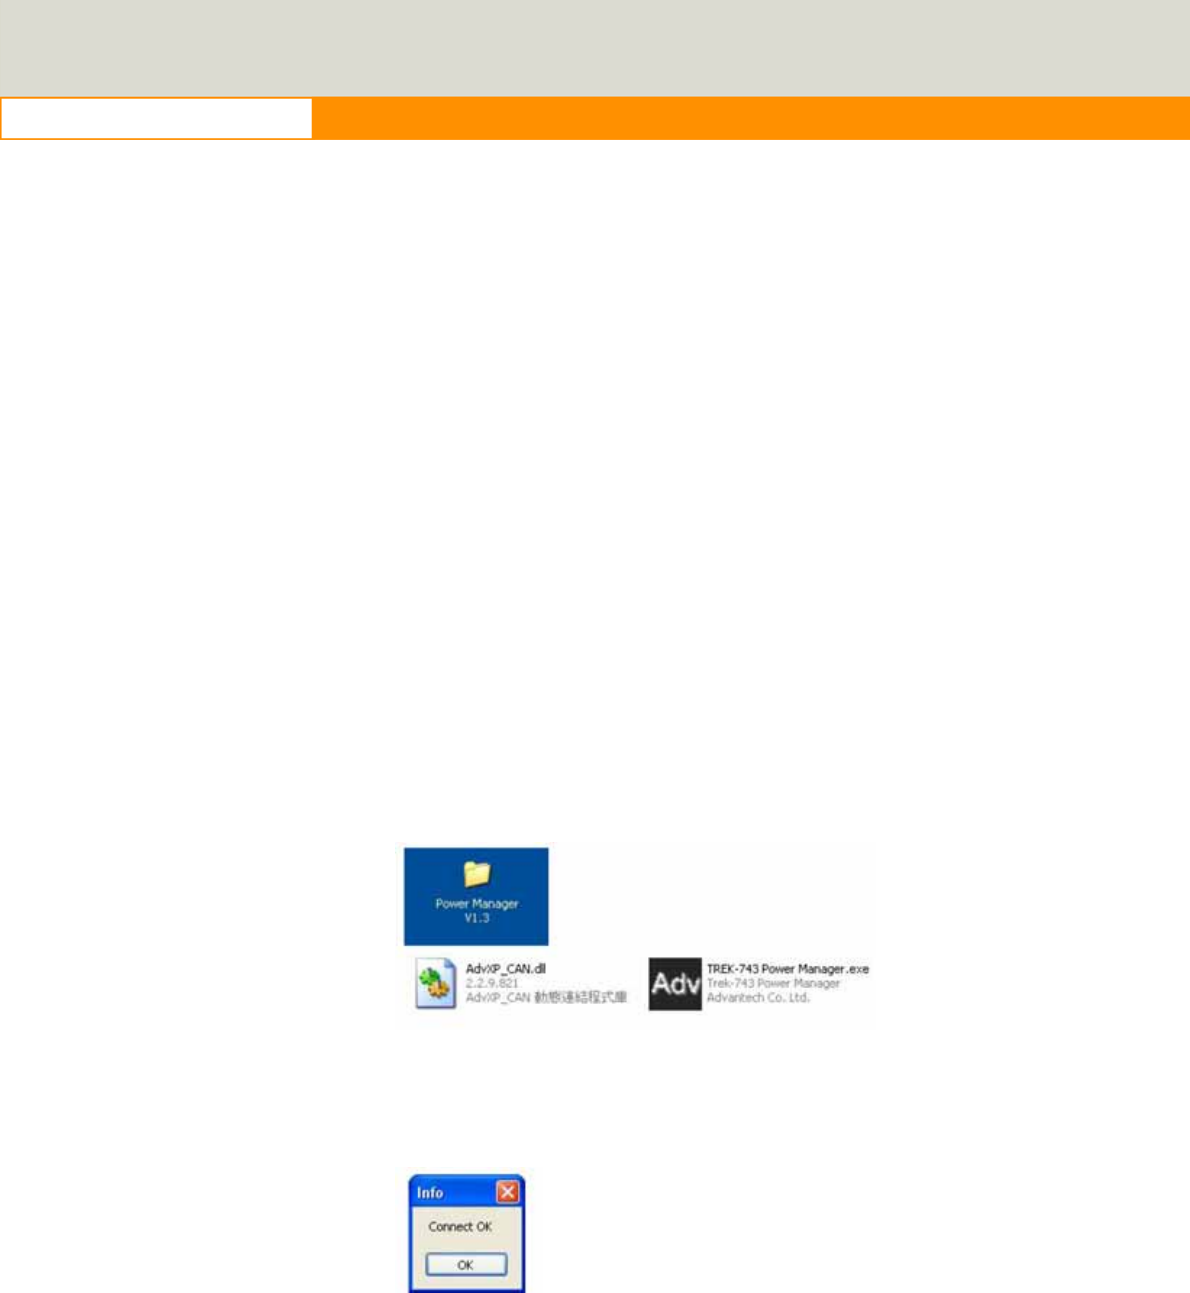
A. Check the files.
Make sure that there are two components include in TREK-520 Power Management
Tool. One is “AdvXP_CAN.dll”, another one is “TREK-520 Power Manager.exe”.
B. Start up the program
Execute Power Management tool and you will see a message box shows “Connect
OK”.
Then Click OK button and you will see the main page as below.
29
www.advantech.com
4.3.3
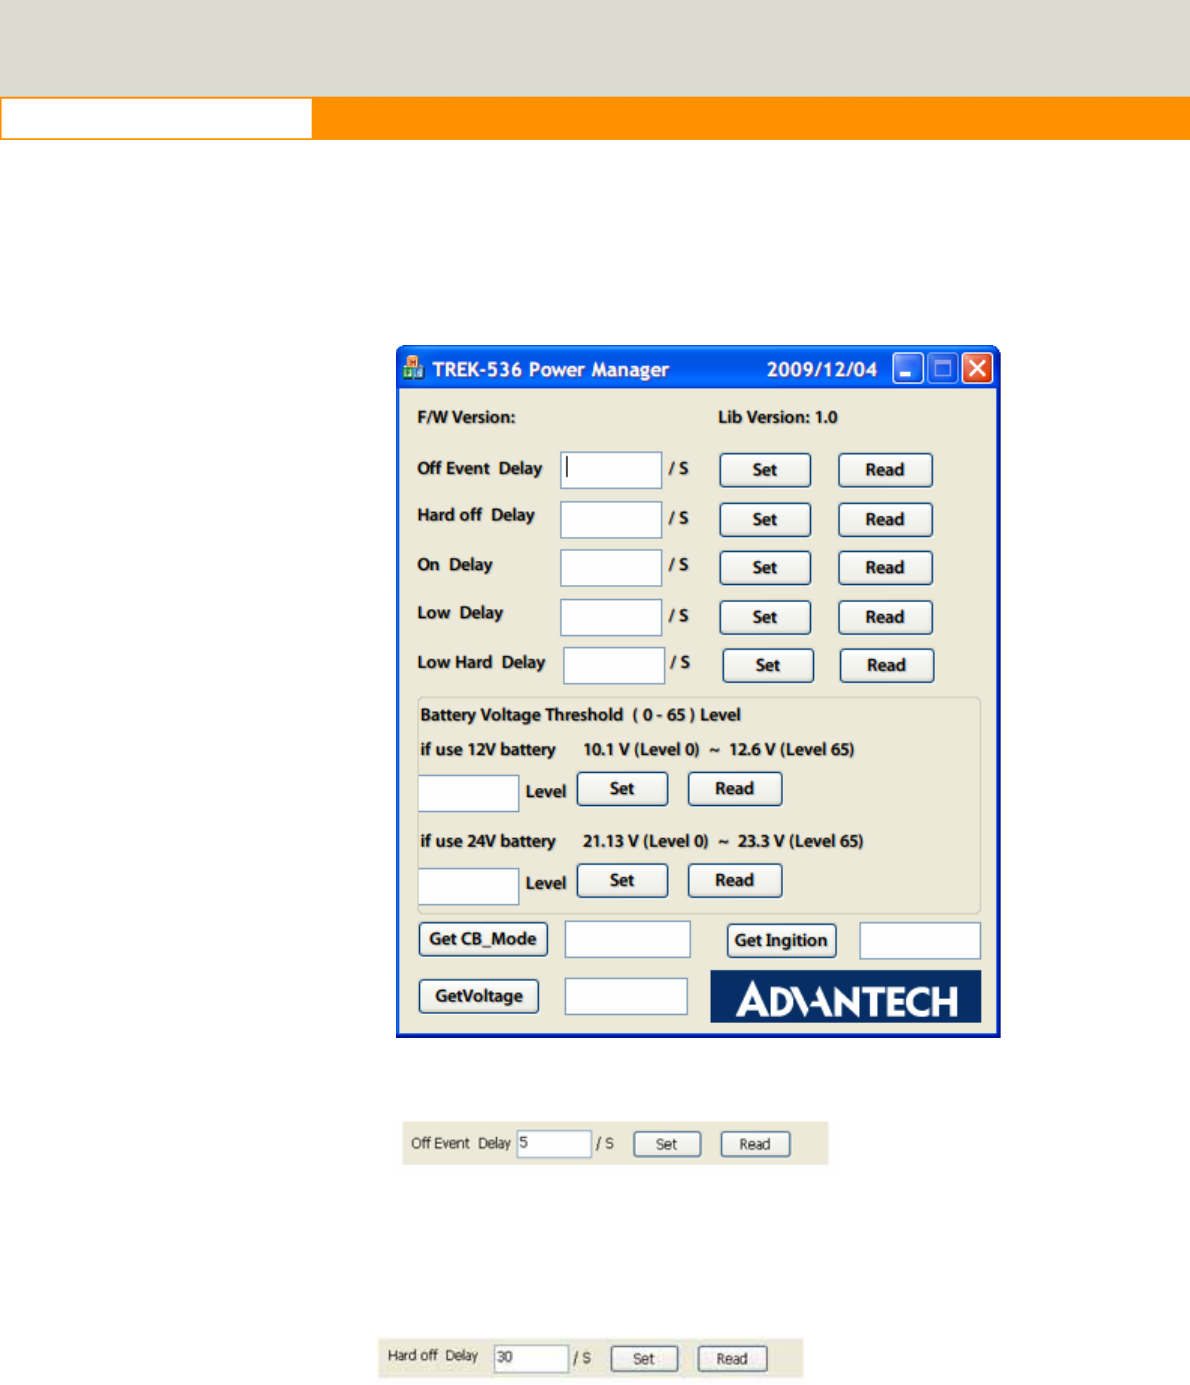
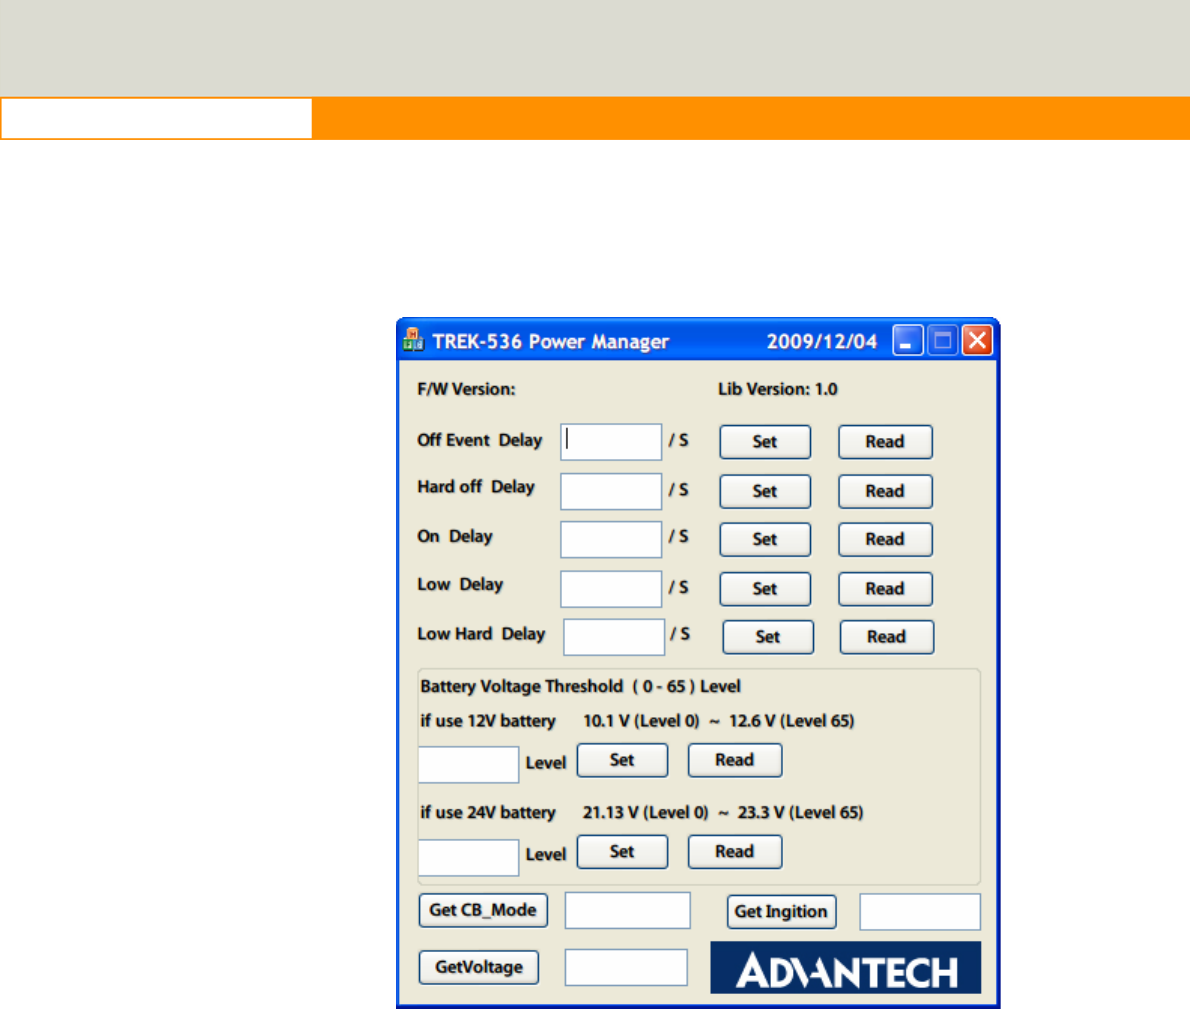
Power Management Parameter settings
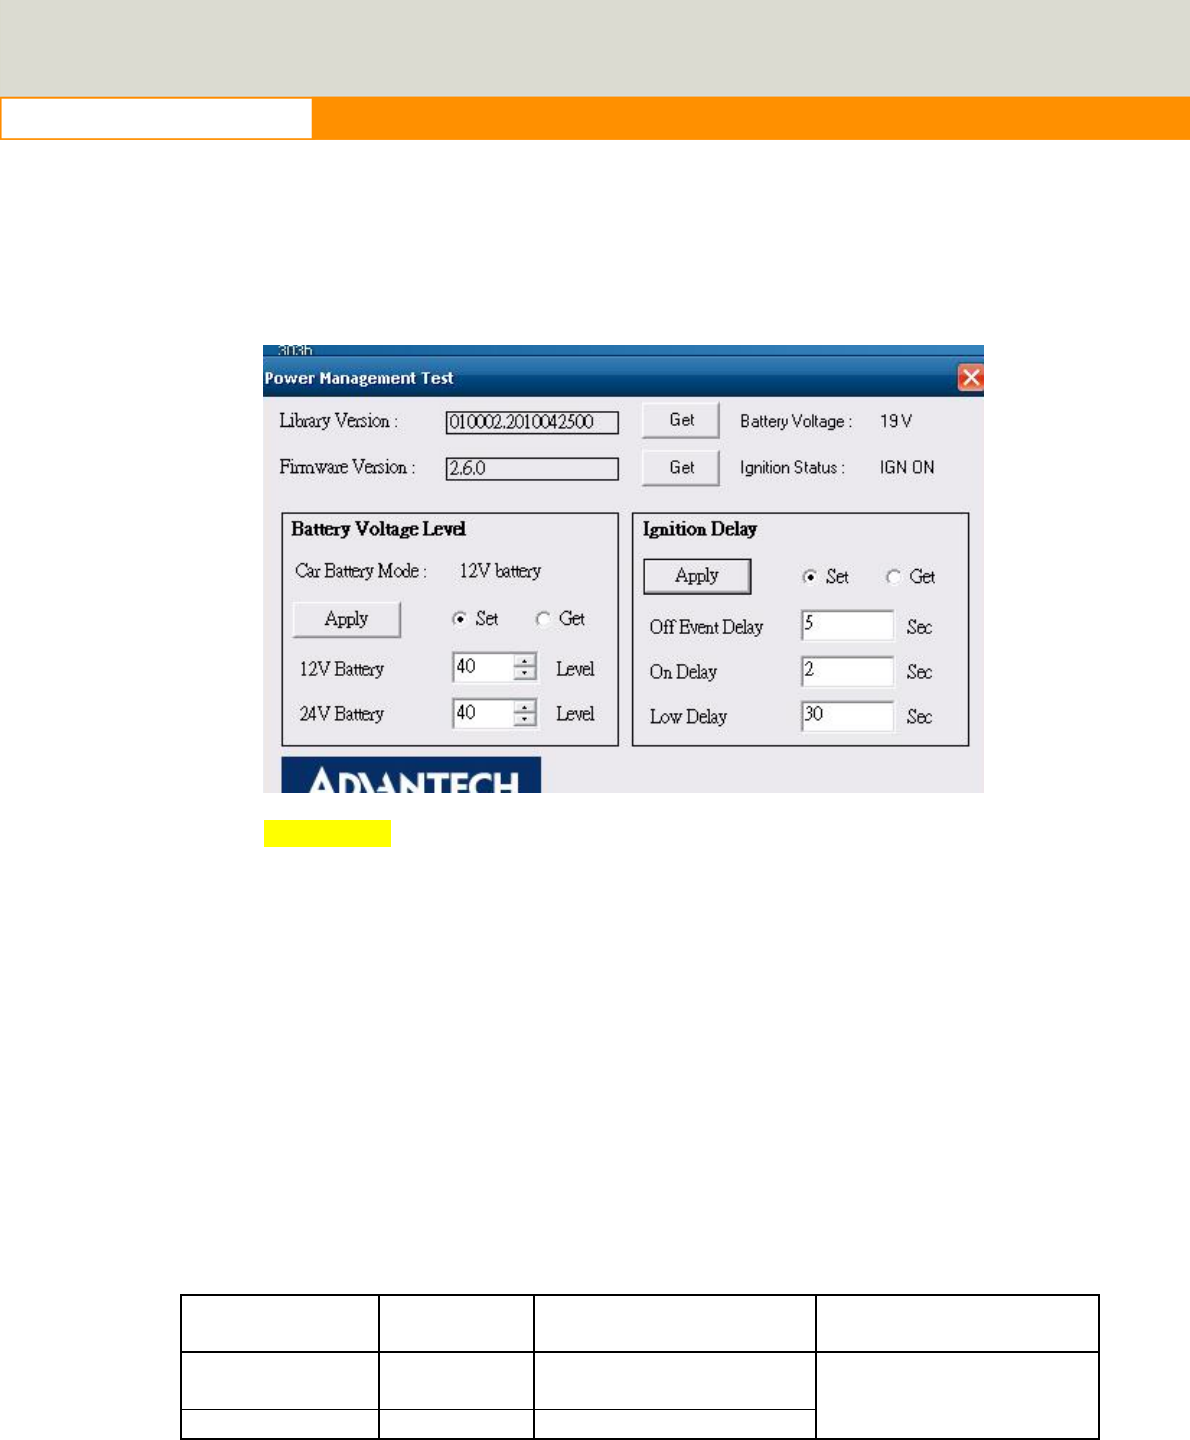
The parameters for power management on TREK-520 could be set by Demo program
(see the image below) or SDK/API.
Figure 4.9 power management demo utility
Figure 4.9 Off event delay
Off Event Delay – it means after 5 seconds delay from receiving of ignition OFF signal,
EC controller will send a shutdown event to make system start shutdown process
Figure 4.9 Hard Off delay
Hard off Delay – it means after 30 seconds from shutdown event, EC controller will
force power cut off at the same time.
30
www.advantech.com
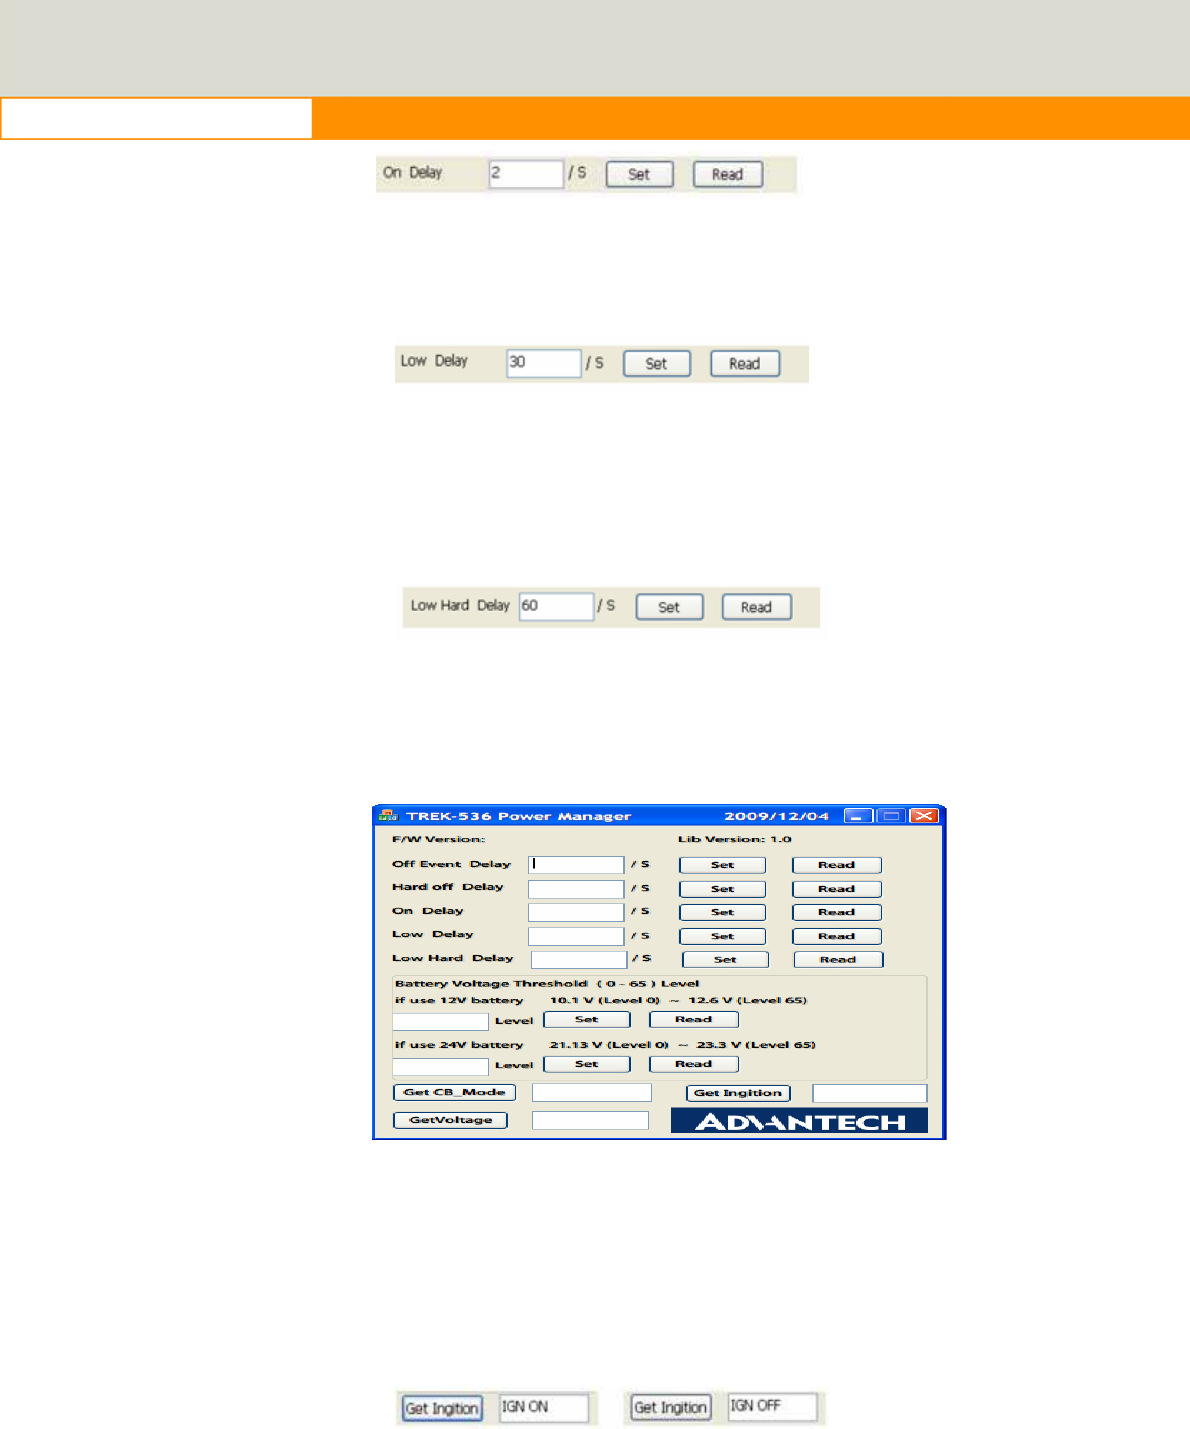
Figure 4.9 On delay
On Delay – it means after 2 seconds from receiving of ignition ON signal, EC controller
will send a power-on event to make system start booting process.
Figure 4.9 Low delay
Low Delay – it means after 30 seconds delay from receiving of Battery Voltage LOW
signal, EC controller will send a shutdown event to make system start shutdown
process.
Figure 4.9 Low hard delay
Low Hard Delay – it means after 60 seconds from Low Voltage shutdown event, EC
controller will force power cut off at the same time
Figure 4.9 Battery voltage Threshold level setting
You could set the LOW battery voltage value by changing level 0 to 65. For example, if
you’re using 12V battery, and you set level as 50, it means the LOW battery voltage
value is 10.147 + 50 x 0.0146 = 10.877 V.
Checks which source you’re connecting. DC supply or 12V or 24V battery.
Figure 4.9 check 12 or 24 battery
Check the ignition signal and see if it’s ON or OFF.
31
www.advantech.com
C. Read current status
The buttons which indicates by red squares can READ the current status of the system.
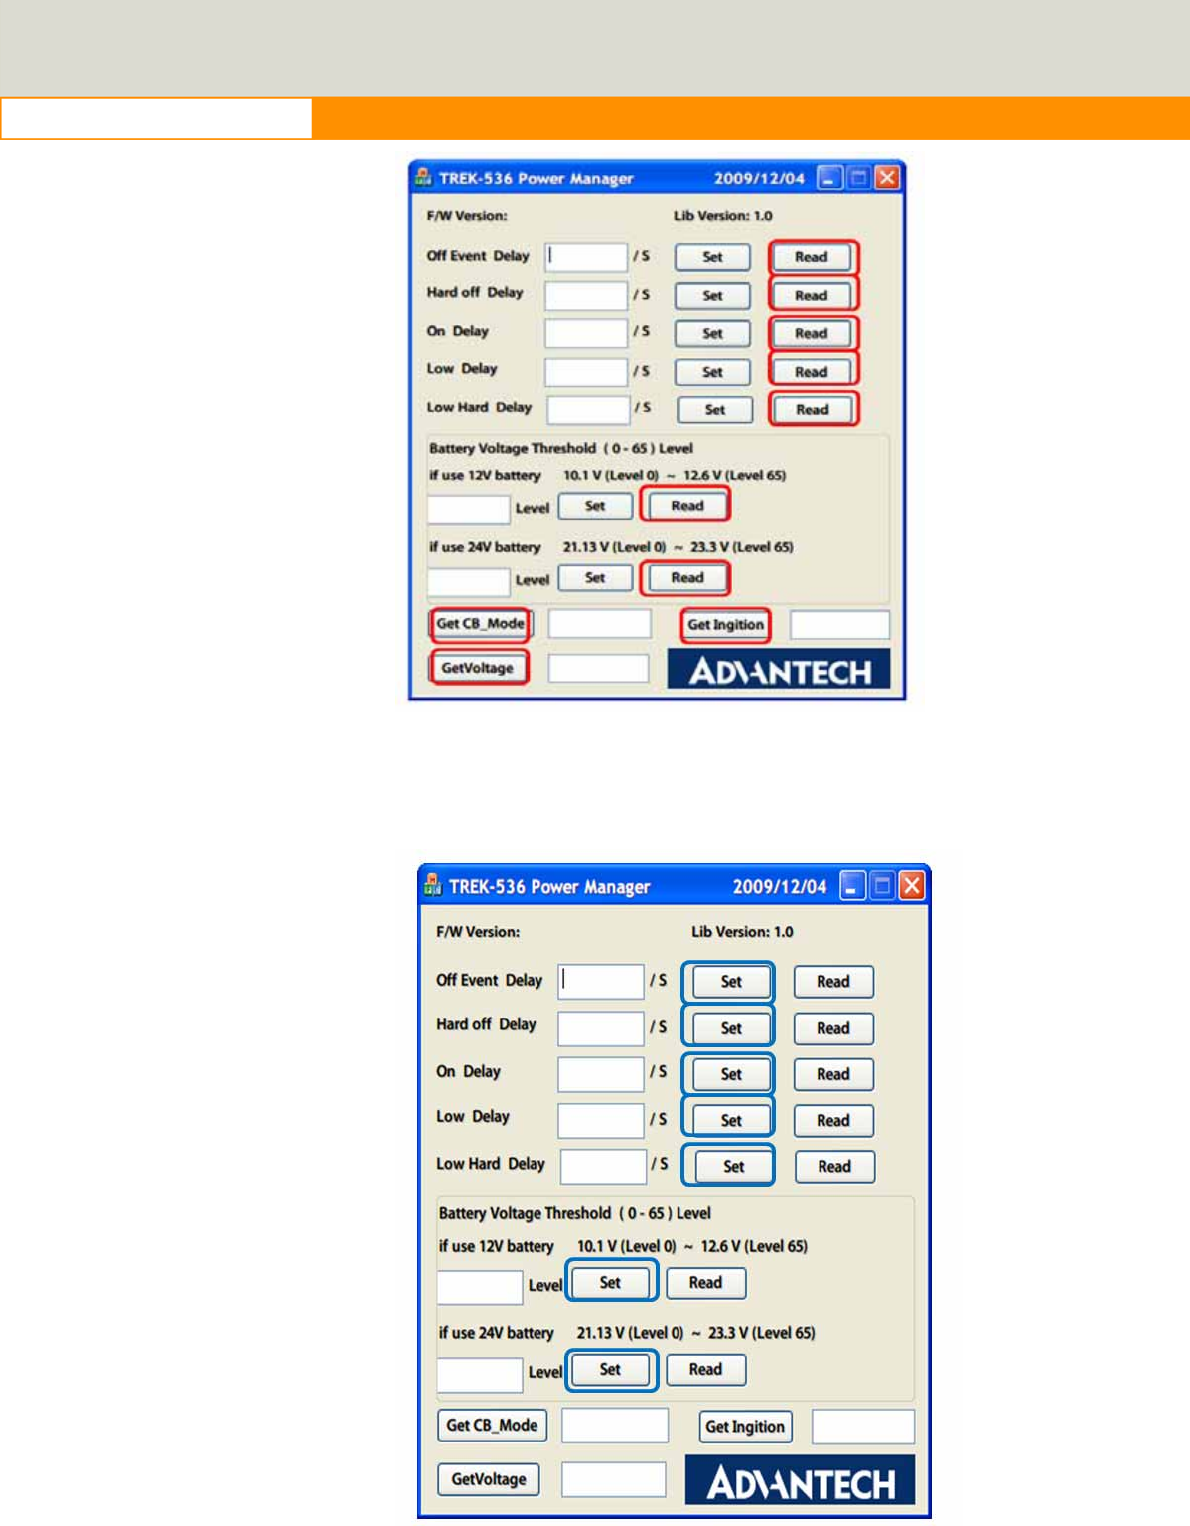
32
www.advantech.com
Figure 4.9 Read the value
D. Set the value
The buttons which indicates by blue squares can SET the value you want to the
system.
33
www.advantech.com
Figure 4.9 Set value
Execute “Power management test”, the Battery Voltage Level has 12V and
24V, you may set from 0~65 levels, press “Get” to know the value you set.
Figure 4.10
1. Off Event Delay: You may set how many seconds you want system auto
shut down after ignition off.
2. On Delay: You may set how many seconds you want the system to auto
power on.
3. Low Delay: When the battery voltage is below certain value you set, it will
automatically shut down to prevent the system will consume the battery.
4.3.4
TREK-520 power consumption
OS: Windows Embedded Standard
Burn-in test V6.0
Idle Mode 100% Burn-in Test
Mode Off mode (S5)
w/o
TREK-303H 12V / 1.04A 12V / 1.20A
w/ TREK-303H 12V / 1.51A 12V / 1.94A
12V / 1.75mA
*Doesn’t support S1, S3, S4

34
www.advantech.com
4.4
Dead reckoning
We will need a 3-axis accelerometer that our software can talk to.
We use this to characterize driver behavior such as hard
accelerations, braking, and cornering. This also can tell us other
significant information that can be used in accident reconstruction,
etc… This one of the crucial items that we asked for in our
specification and our customers’ expectations are making this a
definite must have in our system. We won’t be needing any dead
reckoning functionality at this point in time… this is something we
may want to include in the future but in order to get cost down we
have decided to forgo this at this time. Please confirm that we will
have access to this or another accelerometer.
4.5
G- sensor
We currently, we don’t have documents about G-sensor, but a code
example is ready for customer reference. This code example ONLY
introduces how to access the G-sensor under Windows XP/XPe, but
users must control the G-sensor and develop their SW application by
themselves. Therefore, customer can decide how to set the
sensitivity value when to trigger G-sensor to send signal to CPU and
to back end server through WWAN module. G-sensor is located on
the motherboard inside the TREK-520. Please refer the link
(http://www.analog.com/static/imported-files/data_sheets/ADXL345.
pdf) for the G-sensor datasheet.

35
www.advantech.com
Appendix
A
This appendix explains the
TREK-303 detailed information.
36
www.advantech.com
Appendix A Paired with TREK-303 Specifications
Table 1.1: TREK-303 Specifications
Definition
Detail
Display
type:
7” TFT
LCD Max.
resolution:
8
00 x 480
Colors:
262K
Dot
size (mm) 0.0635 x
0.1905
Luminance:
5
00
cd/m2
Viewing
Angle (R/L/B/T)
7
0° /
70°/
6
0°/
60°
.
Note!
1.
The Brightness control is adjusted by the auto light sensor
in the front panel as default; it is also defined by button
on
the
front panel by manual.
2.
The color LCD display
37
www.advantech.com
TREK-303 Specification
TREK-303 demo SW application program
Figure 6. 17

38
www.advantech.com
1. Execute “Hot Key test” program Î
2. Brightness level: You may set panel’s brightness from level 0 ~10,
total 10 levels, when you finish setting the brightness level you want,
please click “Apply”. If you want to check the current brightness level of
TREK-303, please click “Get”.
3. Duty cycle: You may set every level’s brightness strength, total 10
levels, when you finish setting the brightness strength for each level,
please click “Apply”. If you want to check the current brightness
strength on certain level of TREK-303, please click “Get”.
4. Light sensor: When the sensor has detected the change of the
brightness in the environment, the value will change. The lowest level
of brightness, the lowest value it is presented. On the contrary, the
highest level of brightness, the highest value it is presented.
5. Hotkey: You may set the hotkey LED light brightness, the value is from
0 ~100.
6. Key Status: When you press Hot key, the status will change from 0 to
1.
7. Key function Definition: You may set the parameter to connect the
application program of the hot key.

39
www.advantech.com
www.advantech.com
Please verify specifications before quoting. This guide is intended for
reference purposes only.
All product specifications are subject to change without notice.
No part of this publication may be reproduced in any form or by any
means, electronic, photocopying, recording or otherwise, without prior
written permission of the publisher.
All brand and product names are trademarks or registered trademarks
of their respective companies.
© Advantech Co., Ltd. 2010