Advantra AR1800 4 Line Alphanumeric ReFlex Pager User Manual AR1800
Advantra International 4 Line Alphanumeric ReFlex Pager AR1800
Advantra >
AR1800

Messenger
AR1800
1
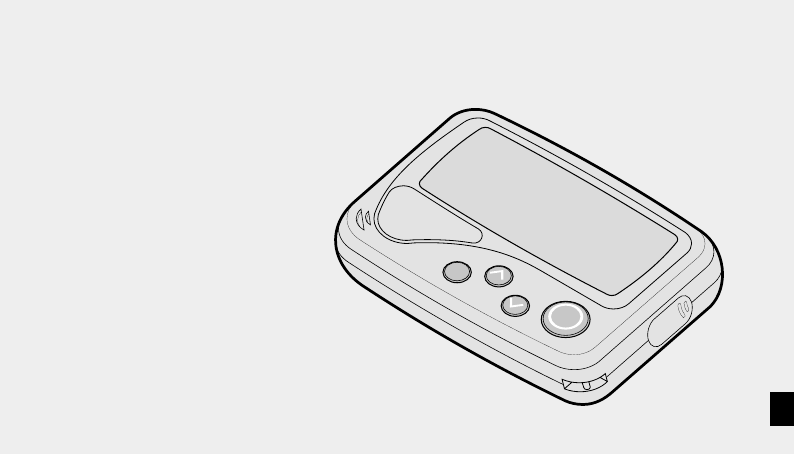
The Advantra Messenger AR1800
Congratulations on your purchase of the Advantra Messenger AR1800 pager.
Compact and feature rich, the AR1800 provides you with
leading two-way communication technology.
To get the most from your AR1800, please take a few
minutes to read this guide.
Contents at a Glance
Safety Instructions ............................. 3
Navigation Map .................................. 4
Basic Features ..................................... 6
Message Features .......................... 10
Settings ................................................ 20
Turning Off & On ............................. 20
© 2000, Advantra UK Ltd

2
Contents
For the safety of yourself and others ........... 3
Pager Navigation Map ...................................... 4
Basic Features ..................................................... 6
Pager Features 6
Fitting the Battery 7
Default Screen 8
Status Icons 8
Message Icons 9
Contacting your Pager 9
Subscription Services 9
Call Alert Reminder 9
Message Features ............................................ 10
Viewing the In-Box 10
Replying to a message 11
Viewing Information Service Messages 12
Viewing Messages in a Folder 13
Moving a Message 14
Sending a Message to the Trash Can 15
Displaying the Next Message 16
Setting a Message Reminder 17
Send All Messages to the Trash Can 18
Play Message as a Melody 19
Settings ............................................................... 20
Turning your Pager Off & On 20
Selecting Vibrate Mode (Toggle Vibrate) 21
Setting Single Shot and Daily Alarms 22
Setting Date and Time 24
Setting Folder Alerts 25
Auto Data Play (ADP) Alerts 26
Setting Quiet Time 27
Setting Screen Contrast 28
Setting Message Zoom Mode 29
Setting Hot Key Mode 30
Setting Alert Volume Mode 31
Setting Move/Delete Item Menu Order 32
Setting Over-The-Air Time Adjustment 33
Making a Service Request 34
Using the About Pager Features 35

3
For the safety of yourself and others:
Read these instructions. Keep these instructions. Heed all warnings. You must obey all operating
requirements posted or announced for two-way radio, mobile phones and two-way pagers.
In common with all two-way pagers, the AR1800 incorporates a low power transmitter. When the pager is
switched ON the transmitter will periodically transmit to post replies and maintain a link with your service
provider’s network. Compared with most other mobile equipment the transmitter uses low power (150 milli-W)
and only operates periodically for a short duration (around160 milli-seconds).
Planes, Hospitals and Other Areas
Switch OFF your pager whilst near medical equipment, within healthcare and Hospital facilities and whilst on
board any aircraft. Switch OFF your pager when entering a blasting area. Avoid bringing your pager into areas
where the atmosphere may contain explosive gasses or particles.
Lanyard/Chain
Only use attachments/accessories specified by the manufacturer. The lanyard (or chain), if supplied with your
pager, is for securing your pager only and for no other purpose. It is possible that in certain circumstances it could
cause injury if used otherwise.
Servicing
Refer all servicing to qualified service personnel. Contact your service provider for more information.
FCC Compliance Statement
This device complies with part 15 of the FCC rules. Operation is subject to the condition that this device does not
cause harmful interference.
4
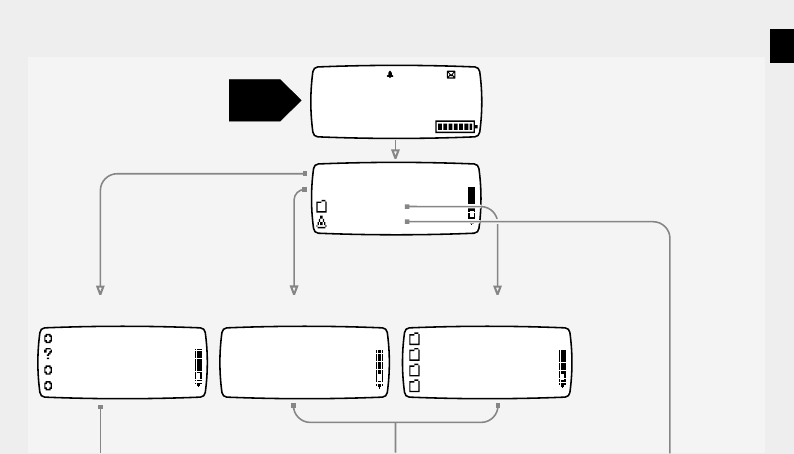
Pager Navigation Map
In-Box (pg 10)
15 Service 1
12 Service 2
03 Service 3
16 Service 4
Info Services (pg 12)
General
Addresses
Contacts
Reminders
Folders (pg 13)
04 In-Box
06 Info Services
Folders
Settings
Call me when you
I will be late du
The meeting will
Take the rest of
1:36Am Sat Jan 1
Storing
04 New Msgs
Start
Here
The number and choice of information
services will be determined by your
service provider
The name of the Service Request may
vary. Your service provider determines
the function of this item. Not all service
providers support this item
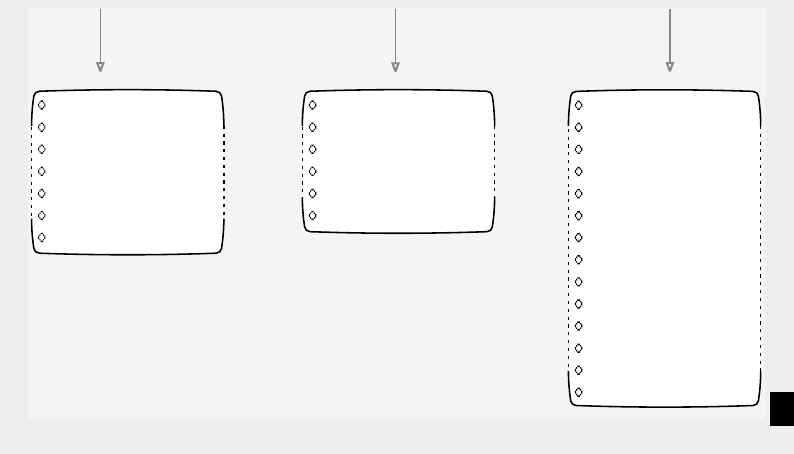
5
Replies
Move Message
Send To Trash
Next Message
Reminder
Del All Messages
Play As Melody
pg 11
pg 14
pg 15
pg 16
pg 17
pg 18
pg 19
Move Message
Send To Trash
Next Message
Reminder
Del All Messages
Play As Melody
pg 14
pg 15
pg 16
pg 17
pg 18
pg 19
Turn Pager Off
Toggle Vibrate
Set Alarms
Set Date & Time
Set Folder Alerts
Set Quiet Time
Set Contrast
Set Zoom
Set Hot Key
Set Volume
Set Move/Delete
Ota Time
Service Request
About Pager
pg 20
pg 21
pg 22
pg 24
pg 25
pg 27
pg 28
pg 29
pg 30
pg 31
pg 32
pg 33
pg 34
pg 35
6
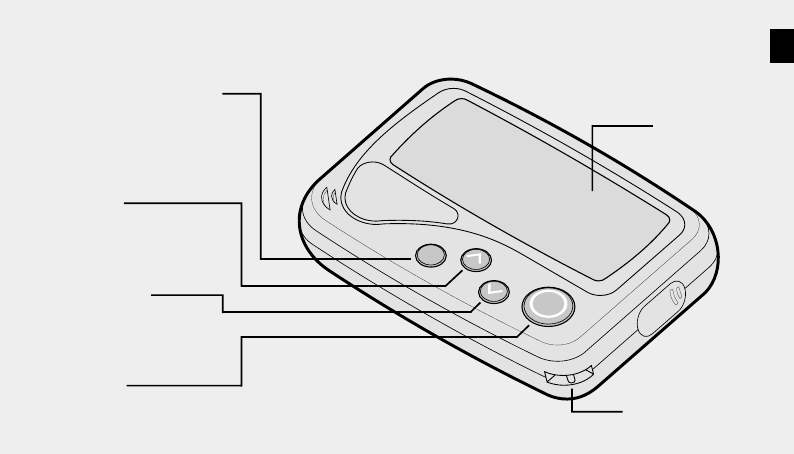
Pager Features
Basic Features
Display
Lanyard/Chain Loop
OK button
Use to accept a selection.
UP button
Use to highlight menu
items or increment a
selected value.
DOWN button
Use to highlight menu
items or decrement a
selected value.
BACK/BACKLIGHT button
Use to go back one menu
level without accepting the
latest changes. Press and hold
to turn on the backlight.
7
2. 1.
3.
4.
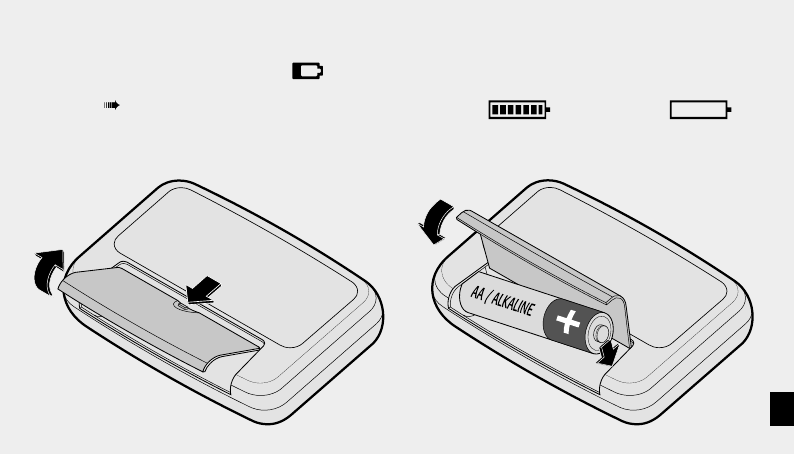
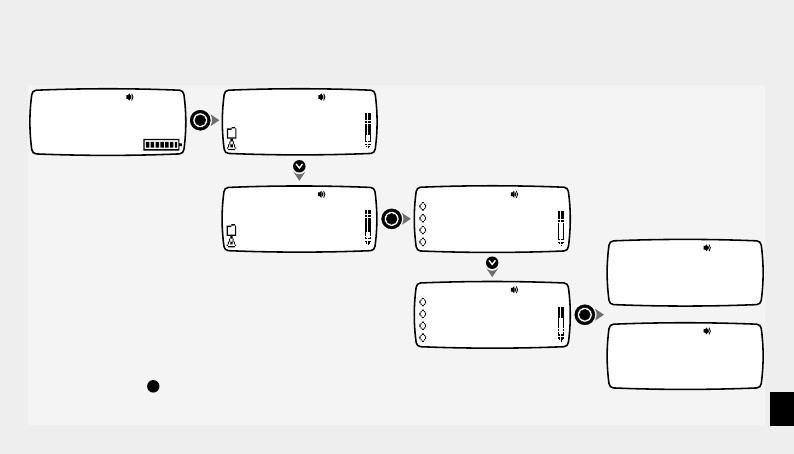
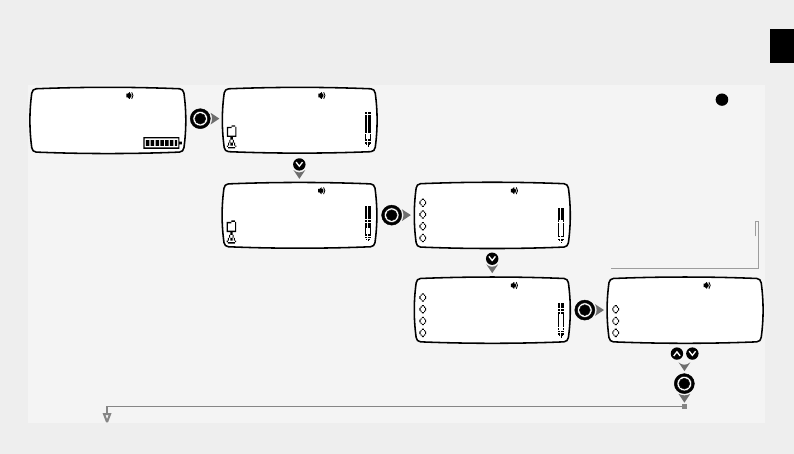
Fitting the Battery
Fit a new battery when the warning icon is
displayed or the Battery Status Indicator shows
low charge
Note: When the battery becomes low, a short beep
will sound every minute until a button is pressed.
Battery Status Indicator This is displayed on the default
screen. The more bars shown, the better the battery charge,
e.g. Battery Full Battery Empty
See page 20 for details about Turning your Pager Off & On
8
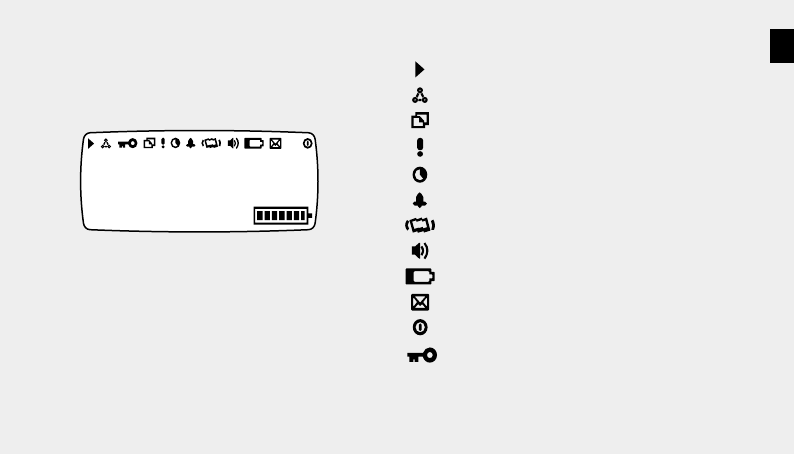
Status Icons
One or more messages queued for transmission
All alerts set to vibrate (pg 21)
Unread information service messages (pg 12)
Priority message received
Quiet Time feature set (pg 27)
Alarm set (pg 22) or message reminder set (pg 17)
Vibrate alert set for personal messages (pg 25)
Audible alert set for personal messages (pg 25)
Low battery warning (pg 7)
Unread personal messages (pg 10)
Pager switched off (pg 20)
Indicates internal tests being performed - may
appear briefly when a new battery is installed.
Default Screen
This screen is shown if a key is pressed when the
display is blank, or if the Back key is used to escape
all the way to the top level.
1:36Am Sat Jan 1
Full Service
The level of service may vary and depends on the
coverage offered in the area you are using your
AR1800. The messages used to indicate service
levels are defined by your service provider.

9
Contacting your Pager
Inform your contacts of your pager number.
For callers to send a message to your pager, they simply
phone your pager number. For further information
please refer to your service provider.
Subscription Services
Subscription Services are optional. Contact your service
provider for more information.
Call Alert Reminder (optional feature)
Your pager will give a short reminder alert at 1-minute
intervals if you do not acknowledge the initial call alert.
Message Icons
Unread message (pg 10)
Previously read message
Unread message containing replies
'Stale' message, no longer current in system
Reply sent successfully (pg 11)
Reply unsuccessful (pg 11)
Waiting to send a reply
Message improved by new transmission
Message set with reminder (pg 17)
Duplicate message received
Priority message received
Folder icon
Menu item
Trash Can
10
Message Features
04 In-Box
06 Info Services
Folders
Settings
1:36Am Sat Jan 1
Full Service
4 Messages
Call me when you
arrive at the airport
and I'll pick you up.
Sat Jan 01 00 12:00Am
Call me when you
I will be late du
The meeting will
Take the rest of
View the next section of a long messge
or the message options menu (pg 4)
View the previous section of a long message or
the options menu (pg 4)
View next message
Mini key to message icons (pg 9)
New message that cannot be replied to
Previously read message
New message that can be replied to (pg 11)
Old message that is no longer current in the system
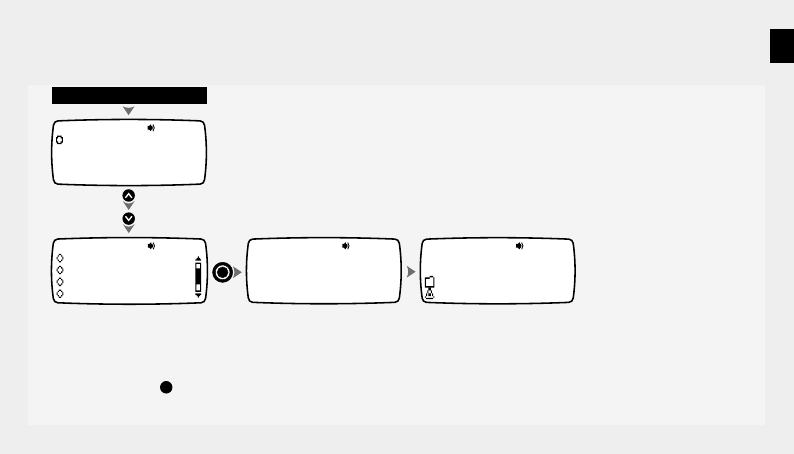
Viewing the In-Box Incoming messages are automatically
stored in the In-Box
Press the BACK key at any
time to go back one level
11
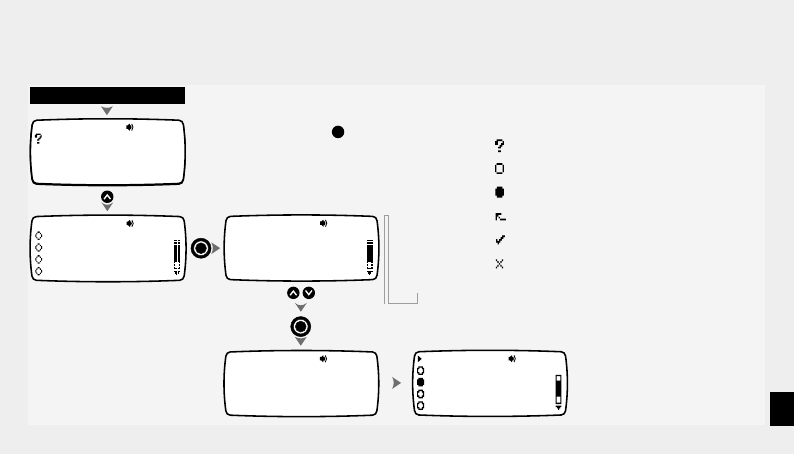
Replying to a message
Call me when you
arrive at the airport
and I'll pick you up.
Sat Jan 01 00 12:00Am
Display appropriate message
I will be late due
to a flight delay.
Sun Jan 02 00 10:37Am
Replies
Move Message
Send To Trash
Next Message
Sending reply
BACK to cancel
Reply:
Yes
No
OK
Call me when you
The meeting will
Take the rest of
I will be late du
Select required reply
The AR1800 allows you to return one or more
predetermined replies to the sender of a message.
Outgoing replies are either sent immediately or stored
until network coverage is suitable.
Press the BACK key at any
time to go back one level
Mini key to message icons (pg 9)
New message that can be replied to
New message that cannot be replied to
Previously read message
Reply pending - to be sent as soon as possible
Reply sent successfully
Reply unsuccessful
12
Viewing Information Service Messages
04 In-Box
06 Info Services
Folders
Settings
04 In-Box
06 Info Services
Folders
Settings
1:36Am Sat Jan 1
Full Service
04 Service 1
02 Service 2
00 Service 3
00 Service 4
Tampa Bay vs Redsk
Miami Dolphins sig
Yankees pulled bac
Steelers create bi
Tampa Bay vs
Redskins. Match
postponed due to
blizzard conditions
Select required Info Service
Select required message
4 Messages
Press the BACK key at any
time to go back one level
13
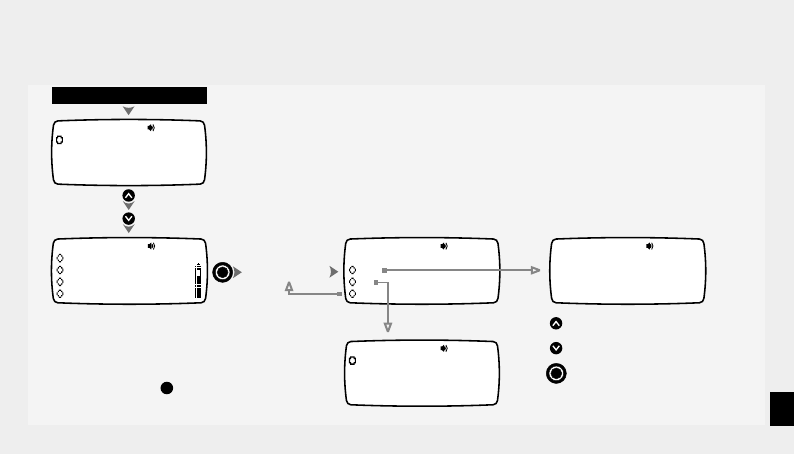
Viewing Messages in a Folder
04 In-Box
06 Info Services
Folders
Settings
04 In-Box
06 Info Services
Settings
Folders
Select required folder
Select required message
x2 Folder 0
Folder 1
Folder 2
Reminders
Hello, remember me
When you get to th
Did you see the ma
Don't use that ser
Hello, remember
me? We met last
week and you asked
me to give you a
1:36Am Sat Jan 1
Full Service
4 Messages
Press the BACK key at any
time to go back one level
The names given to the folders may
be different from those shown here
14
Moving a Message
I will be late du
The meeting will
Take the rest of
Your stock is $30
Call me when you
arrive at the airport
and I'll pick you up.
Sat Jan 01 00 12:00Am
Moved To
Folder 1
Move Message
Send To Trash
Next Message
Reminder
Display appropriate message
Move Message To
Folder 0
Folder 1
Folder 2 Select required destination folder
Press the BACK key at any
time to go back one level

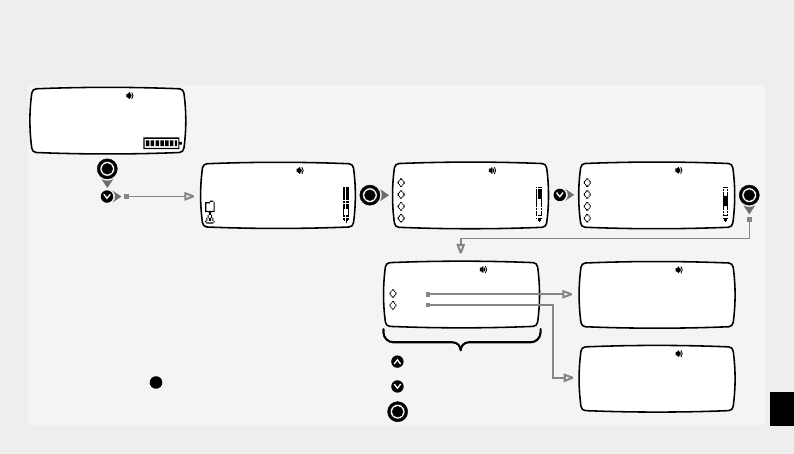
15
Sending a Message to the Trash Can
I will be late du
The meeting will
Take the rest of
Your stock is $30
Call me when you
arrive at the airport
and I'll pick you up.
Sat Jan 01 00 12:00Am
Message Sent
To Trash Can
Send To Trash
Move Message
Next Message
Reminder
Display appropriate message
Messages sent to the Trash Can are held within the Trash Folder
until they are replaced by other 'trashed' messages or deleted to
make space for new messages.
To recover a message from the Trash Folder, use the steps on page
13. Then move the message to another folder using the instructions
on page 14.
Press the BACK key at any
time to go back one level

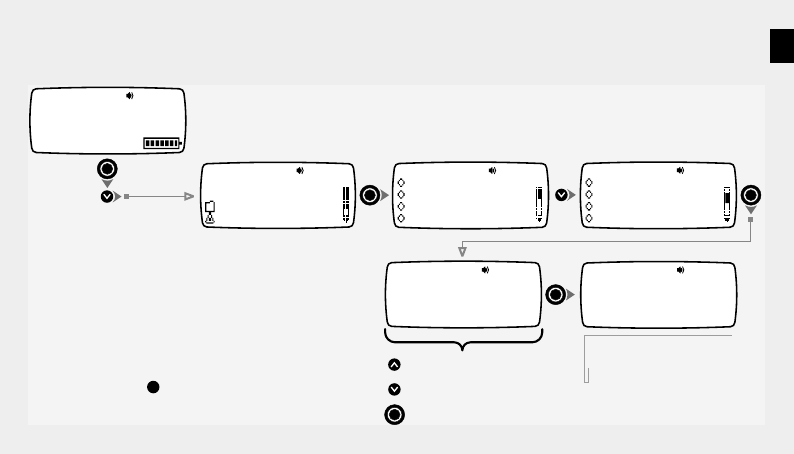
16
Displaying the Next Message
Call me when you
arrive at the airport
and I'll pick you up.
Sat Jan 01 00 12:00Am
Next Message
Move Message
Send To Trash
Reminder
Display message Note: You can also display the next
unread message using the button.
x2
The meeting will
now start at midday.
See you there!
Sat Jan 02 00 14:04Am
Press the BACK key at any
time to go back one level
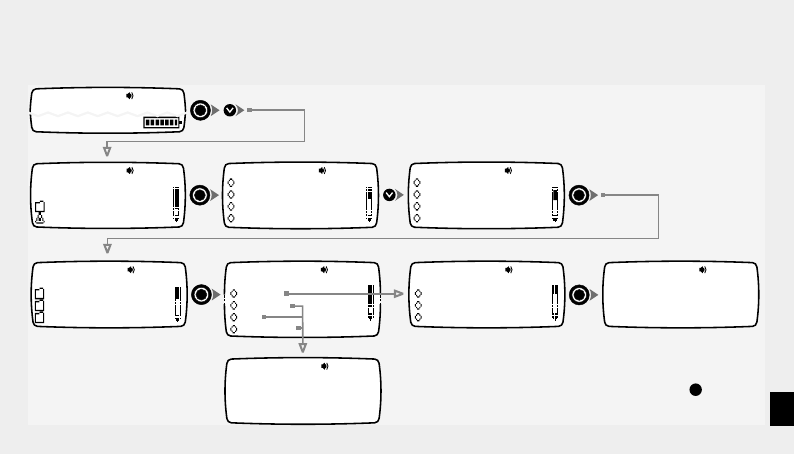
17
Setting a Message Reminder
x3
Call me when you
arrive at the airport
and I'll pick you up.
Sat Jan 01 00 12:00Am
Set Reminder
:03 Am04
Set Reminder
Thu 04 2000Jan
Moved To Reminders
4:03Am Thu Jan 04
Reminder
Move Message
Send To Trash
Next Message
Display appropriate message
Press to increment highlighted value
Press to decrement highlighted value
Press to fix highlighted value and move to next item
I will be late du
The meeting will
Take the rest of
Your stock is $30
Press the BACK key at any
time to go back one level
This function allows any message to be automatically displayed,
accompanied by an alert, at a pre-set time to act as a reminder.
The chosen message is moved into the Reminders folder.
A maximum of 16 reminders can be set at any one time.
Use the Move function to return a reminder message to its original
folder (pg 14).
18
Send All Messages to the Trash Can
00 In-Box
06 Info Services
Folders
Settings
x4
Call me when you
arrive at the airport
and I'll pick you up.
Sat Jan 01 00 12:00Am
Messages Sent
To Trash Can
Del All Messages
Send To Trash
Next Message
Reminder
Display appropriate message
This operation sends all messages (that have been read) in the
current folder to the Trash Can.
Messages sent to the Trash Can are held within the Trash Folder
until they are replaced by other 'trashed' messages or deleted to
make space for new messages.
To recover a message from the Trash Folder, use the steps on page
13. Then move the message to another folder using the instructions
on page 14.
Press the BACK key at any
time to go back one level
19
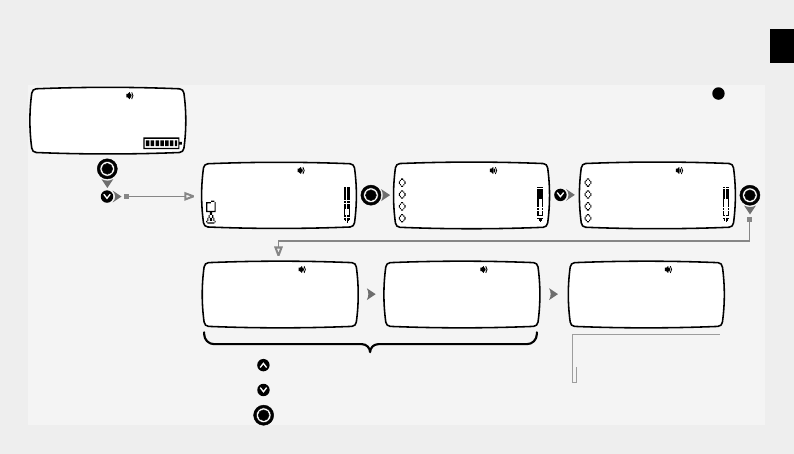
Play Message as a Melody
x5
Call me when you
arrive at the airport
and I'll pick you up.
Sat Jan 01 00 12:00Am
Call me when you
arrive at the airport
and I'll pick you up.
Sat Jan 01 00 12:00Am
Display appropriate message
Message plays
Play As Melody
Next Message
Reminder
Del All Messages
Yes
Save As Melody
No
Play Melody Again
1
Save As Melody No.
Own Melody
Press to increment Melody number
Press to decrement
Press to store melody
Melody number
Press the BACK key at any
time to go back one level
Note: You can also configure your pager to play all incoming
messages as melodies by selecting the Adp option in the Folder
Alerts function (pg 25).
Messages saved as 'Own Melody' settings can be applied for use as
main folder alerts (pg 25).

20
Settings
04 In-Box
06 Info Services
Folders
Settings
04 In-Box
06 Info Services
Folders
Settings
x3
Turn Pager Off
Toggle Vibrate
Set Alarms
Set Date & Time
Yes
Pager Off
No
Pager Off
1:36Am Sat Jan 1
Full Service
4 Messages
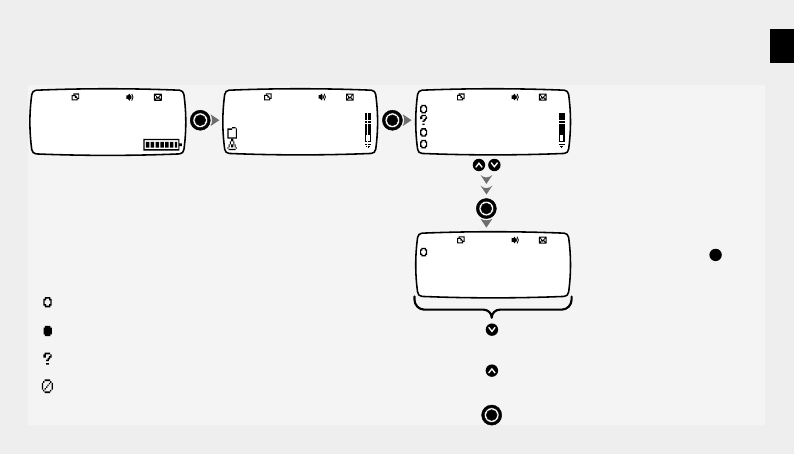
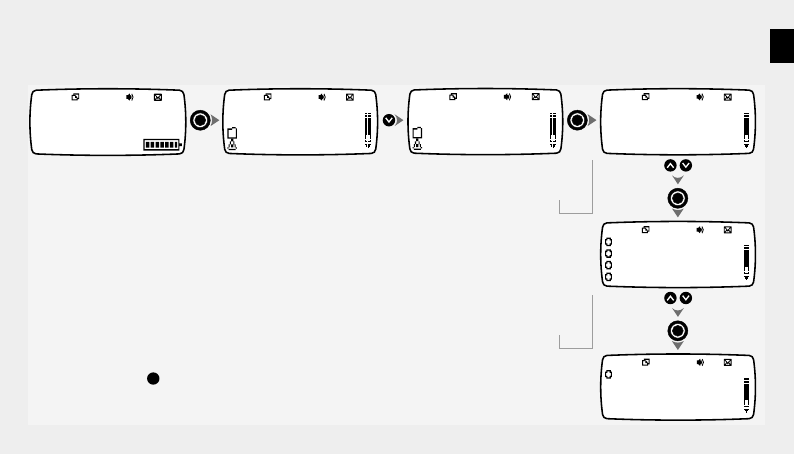
Turning your Pager Off & On
Press the BACK key at any
time to go back one level
Note: Once switched off, you can turn your pager back on by
pressing either the UP or DOWN keys until a beep is heard.
Note: All functions are disabled when the pager is switched off,
including alarms and reminders
21
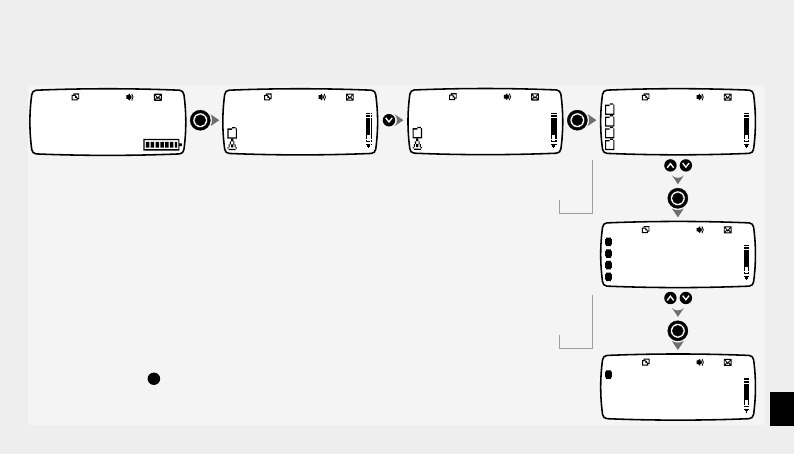
Selecting Vibrate Mode (Toggle Vibrate)
Vibrate
Disabled
04 In-Box
06 Info Services
Folders
Settings
04 In-Box
06 Info Services
Folders
Settings
1:36Am Sat Jan 1
Full Service
x3
or
Turn Pager Off
Toggle Vibrate
Set Alarms
Set Date & Time
Toggle Vibrate
Turn Pager Off
Set Alarms
Set Date & Time
Vibrate
Enabled
4 Messages
Use this function to enable or disable the Vibrate alert mode, which
can be used to temporarily replace all other alerts - for use in
situations where audible alerts would be unsuitable.
You can quickly enable the Vibrate alert (when the screen is blank)
by pressing and holding the UP key until the pager vibrates.
Press the BACK key at any
time to go back one level
22
Setting Single Shot and Daily Alarms
04 In-Box
06 Info Services
Folders
Settings
04 In-Box
06 Info Services
Folders
Settings
x3
x2
Turn Pager Off
Toggle Vibrate
Set Alarms
Set Date & Time
Set Alarms
Turn Pager Off
Toggle Vibrate
Set Date & Time
Alarm 1 Off
Set Alarms
Alarm 2 Off
Alarm 3 Off
Select alarm 1,2 or 3
1:36Am Sat Jan 1
Full Service
4 Messages
Press the BACK key at any
time to go back one level

23
Single
Set Alarm 1
Daily 12
Set Alarm 1 Single
:00 Am
12
Set Alarm 1 Daily
:00 Am
Jan
Set Alarm 1 Single
Mon 01 2000
Alarm 1 Single
12:00Am Jan Mon 01
Alarm 1 Daily
Every Day at 12:00Am
Press to increment highlighted value
Press to decrement highlighted value
Press to fix highlighted value and move to next item
Every Day
Set Alarm 1 Daily
Mon
Tue
Confirmation of settings
Off
Set Alarm 1
On
24
Setting Date and Time
04 In-Box
06 Info Services
Folders
Settings
x3
x3
Turn Pager Off
Toggle Vibrate
Set Alarms
Set Date & Time
Setting Date & Time
12:00 Am12Hr
Setting Date & Time
Mon Jan 012000
Set Date & Time
Turn Pager Off
Toggle Vibrate
Set Alarms
Date & Time
12:00Am Mon Jan 01
Press to increment highlighted value
Press to decrement highlighted value
Press to fix highlighted value and move to next item
Confirmation of settings
1:36Am Sat Jan 1
Full Service
4 Messages
Press the BACK key at any
time to go back one level
The Date & Time settings can also be updated automatically using
the OTA feature (pg 33).
25
Setting Folder Alerts
04 In-Box
06 Info Services
Folders
Settings
x3
x4
Turn Pager Off
Toggle Vibrate
Set Alarms
Set Date & Time
Select Msg. Folder
Service 1
Service 2
In-Box
Select Alert Type
Vibrate
Adp
No Alert
Melody
Select Melody
Chirp
Melody 1
Beep Melody Alert
Selected
Vibrate/Adp/No Alert
Selected
Set Folder Alerts
Toggle Vibrate
Set Alarms
Set Date & Time
1:36Am Sat Jan 1
Full Service
The Adp (Automatic Data Play) option plays incoming messages as
melody alerts. See page 26 for more details about the Adp feature.
Press the BACK key at any
time to go back one level

26
Auto Data Play (ADP) Alerts
When a Folder alert is set to ADP the pager will try to use the
message just received as if it were an alert. It does this by
searching the message for a sequence of digits, (such as a
telephone number), using the digits to represent the tempo,
repetition and notes of an alert. Frequently received
messages, e.g. a voice mail telephone number, can be
identified purely by the melody that they generate.
If the sequence is less than 5 digits a chirp is produced
instead.
A sequence of up to 40 digits can be interpreted as a melody.
If you like what you hear, that sequence can be saved as a
melody for later use.
00 01 02 03 04 05 06 08 09 10 11 12 13 15
16 17 18 19 20 21 22 24 25 26 27 28 29 31
32 33 34 35 36 37 38 40 41 42 43 44 45 47
48 49 50 51 52 53 54 56 57 58 59 60 61 63
07 14
23 30
39 46
55 62
The AR1800 interprets number sequences this way:
• The first digit sets the tempo of the melody
(1= slow, 9= fast)
• The second digit sets the number of repeats; the minimum
number of repeats is 5.
• The remaining digits are used in pairs to represent notes as
shown in the table below:

27
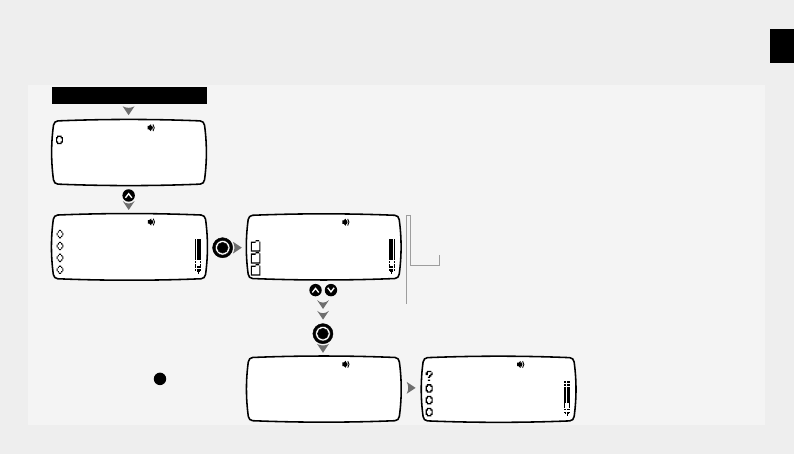
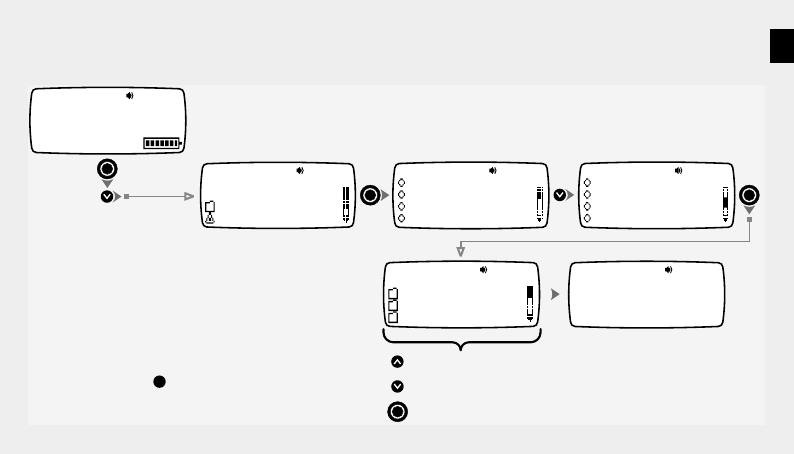
Setting Quiet Time
04 In-Box
06 Info Services
Folders
Settings
x3
x5
Turn Pager Off
Toggle Vibrate
Set Alarms
Set Date & Time
Set Quiet Time
Off
On
Set Quiet Time
Set Alarms
Set Date & Time
Set Folder Alerts
1:36Am Sat Jan 1
Full Service
12
Quiet Time Start
:00 Am 01
Quiet Time End
:00 Am
Quiet Time Between
12:00Am and 1:00Am
Quiet Time
Disabled
Press to increment highlighted value
Press to decrement highlighted value
Press to fix highlighted value and move to next item
Confirmation of settings
This function allows you to automatically switch the pager off and
on again at times when you do not wish to be disturbed.
Messages are still received during Quiet Time periods, however,
no alerts are given.
Press the BACK key at any
time to go back one level
28
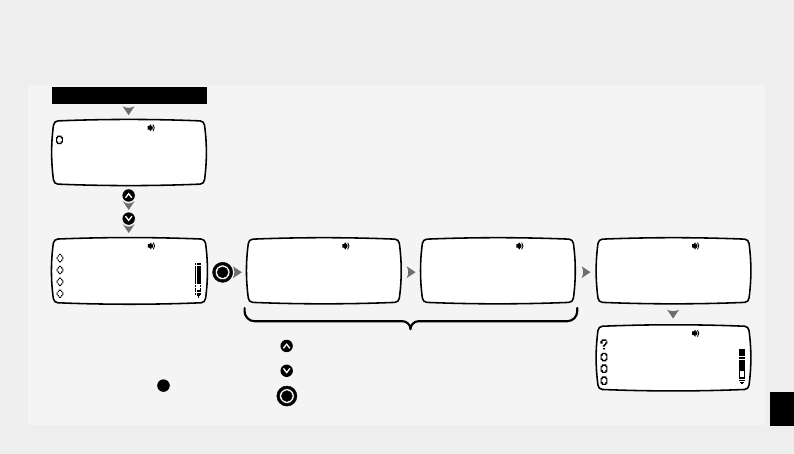
Setting Screen Contrast
x6
Set Contrast
Level 5
Set Contrast
Set Date & Time
Set Folder Alerts
Set Quiet Time
Contrast Set To
Level5
Press to increase contrast
Press to decrease contrast
Press to fix value and exit
Confirmation of setting
x3
1:36Am Sat Jan 1
Full Service
04 In-Box
06 Info Services
Folders
Settings
Turn Pager Off
Toggle Vibrate
Set Alarms
Set Date & Time
4 Messages
Press the BACK key at any
time to go back one level
29
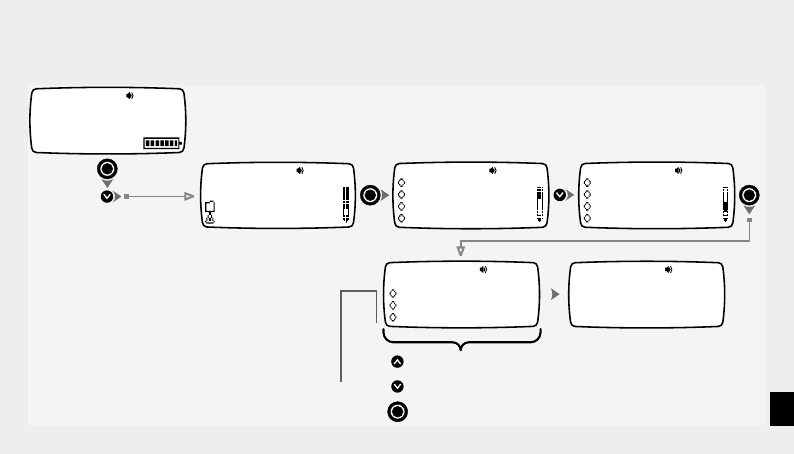
Setting Message Zoom Mode
x7
Set Zoom
Set Folder Alerts
Set Quiet Time
Set Contrast
Zoom On
Zoom Off
Set Zoom
Off
On
Press to change setting
Press to change setting
Press to select setting
x3
1:36Am Sat Jan 1
Full Service
04 In-Box
06 Info Services
Folders
Settings
Turn Pager Off
Toggle Vibrate
Set Alarms
Set Date & Time
4 Messages
When this mode is enabled, messages are
displayed in a larger font for extra legibility.
Press the BACK key at any
time to go back one level
30
Setting Hot Key Mode
x8
Turn Pager Off
Toggle Vibrate
Set Alarms
Set Date & Time Set Hot Key
Set Quiet Time
Set Contrast
Set Zoom
Jump Location
In-Box
Set Jump Location
Folder 0
Folder 1
In-Box
Press to move up thru list
Press to move down thru list
Press to select highlighted folder
x3
1:36Am Sat Jan 1
Full Service
04 In-Box
06 Info Services
Folders
Settings
4 Messages
This function allows you to define a particular folder that you
regularly need to access. Once the required folder is defined,
pressing the BACK key when the default screen is displayed will
cause the pager to jump directly to the folder.
Note: If the Hot Key folder is empty, the parent menu will be
displayed.
Press the BACK key at any
time to go back one level

31
Setting Alert Volume Mode
x9
Set Volume
Set Contrast
Set Zoom
Set Hot Key
Volume
Normal
Volume
Escalating
Normal
Press to change setting
Press to change setting
Press to select setting
Turn Pager Off
Toggle Vibrate
Set Alarms
Set Date & Time
x3
1:36Am Sat Jan 1
Full Service
04 In-Box
06 Info Services
Folders
Settings
4 Messages
Press the BACK key at any
time to go back one level
Escalating mode plays the alert muted for a short period, then at
full volume.

32
Setting Move/Delete Item Menu Order
x10
Set Move/Delete
Set Zoom
Set Hot Key
Set Volume
Preferred Order
Delete/Move
Set Preferred Order
Move/Delete
Delete/Move
Press to change setting
Press to change setting
Press to select setting
Turn Pager Off
Toggle Vibrate
Set Alarms
Set Date & Time
x3
1:36Am Sat Jan 1
Full Service
04 In-Box
06 Info Services
Folders
Settings
4 Messages
Press the BACK key at any
time to go back one level
This function allows fine tuning of your pager and determines the
order of the Move and Delete items in the message menu.
33
Setting Over-The-Air Time Adjustment
x11
Ota Time
Set Hot Key
Set Volume
Set Move/Delete
Ota Time
Gmt
Ota Time
Disabled
Local Time
Gmt
Press to change time zone
Press to change time zone
Press to select highlighted time zone
Turn Pager Off
Toggle Vibrate
Set Alarms
Set Date & Time
x3
1:36Am Sat Jan 1
Full Service
04 In-Box
06 Info Services
Folders
Settings
4 Messages
This feature allows you to determine how your pager uses timing
signals issued by the network to update its own date & time settings.
Note: This feature may not be offered by your service provider.
Disabled - pager ignores network time messages
Local Time - pager displays local time transmitted
by the network
Selected Time Zone - local network time is
converted to selected time zone
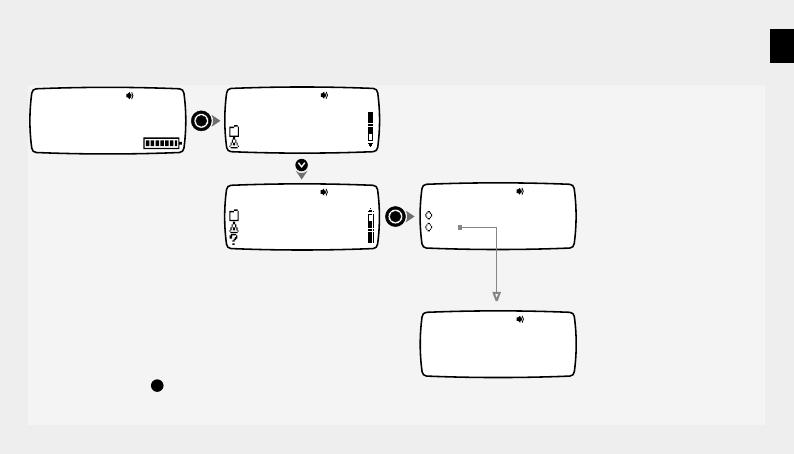
34
04
06 Info Services
In-Box
Folders
Settings
x4
Request Accepted
1:36Am Sat Jan 1
Full Service
06 Info Services
Folders
Settings
Service Request
Yes
Service Request
No
4 Messages
Making a Service Request
Press the BACK key at any
time to go back one level
The name of the Service Request may vary from what is shown here.
Your service provider determines the function of this item.
This function may not be supported by your service provider.
35
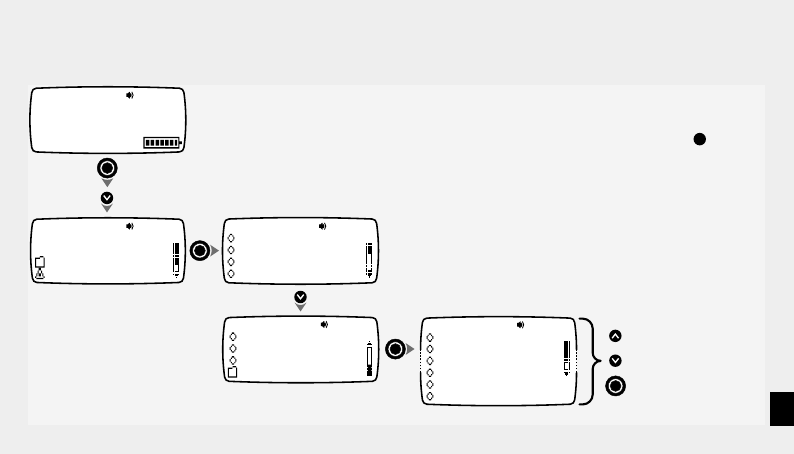
Using the About Pager Features
04 In-Box
06 Info Services
Folders
Settings
x3
x13
Turn Pager Off
Toggle Vibrate
Set Alarms
Set Date & Time
About Pager
Set Volume
Set Move/Delete
Ota Time
Helpline Number
Software Number
Serial Number
Memory Status
Diagnostics
Loyalty Points
Press to choose item
Press to choose item
Press to open selection
1:36Am Sat Jan 1
Full Service
4 Messages Press the BACK key at any
time to go back one level

36
Notes

37
Notes

38
Notes

39
Notes

40
Notes

4313 396 71771