Aeroview Electronic Technology AE-Q2 RC Quadcopter Drone User Manual user muanal
Aeroview Electronic Technology Co., LTD RC Quadcopter Drone user muanal
user muanal

Welcome to choose AFI product,
Please read this manual carefully before using.
Warning & Disclaimer
● This product is NOT a toy and is not suitable for children under the age of 18. Adults should keep the
Aeroeagle out of the reach of children and exercise caution when operating this aircraft in the presence
of children.
● This product is a flying quad-copter that offers easy flight under good working order as set forth below.
The information in this document affects your safety, your legal rights and responsibilities. Read this
entire document carefully to ensure proper configuration before use. Failure to read and follow the
instructions and warnings in this document may result in product loss, serious injury to you, or damage
to your aircraft.
● By using this product, you hereby signify that you have read this disclaimer carefully and that you
understand and agree to abide by the terms and conditions herein. You agree that you are solely
responsible for your own conduct while using this product, and for any consequences thereof. You
agree to use this product only for purposes that are proper and be in accordance with all applicable
laws, rules, and regulations, including international and domestic airspace regulations, and all terms,
precautions, practices,policies and guidelines AFI has made and may make available.
● AFI accepts no liability for damage, injury or any legal responsibility incurred directly or indirectly from
the use of this product. The user shall observe safe and lawful practices including, but not limited to,
those set forth in these Safety Guidelines.
AEROEAGLE
4-Motor Aerial Quadcopter
User Manual
● Please do not use chemicals for wiping the head.
● Please do not spill or paint acidity medicament on the head.
● Please keep the head from high temperature or fire place.
● Please do not strong press or bang the head.
Attention
Aeroview Electronic Technology Co.,Ltd
Add:No.108 Zhenxiang Street,Yonger Village,Tanzhou Town,
Zhongshan City,Guangdong Province
Tel:+86 760 86283558
Fax:+86 760 86283258
E-mail:admin@afiuav.com
FCC Statement
This equipment has been tested and found to comply with the limits for a Class B digital device,
pursuant to Part 15 of the FCC Rules. These limits are designed to provide reasonable
protection against harmful interference in a residential installation. This equipment generates
uses and can radiate radio frequency energy and, if not installed and used in accordance with
the instructions, may cause harmful interference to radio communications. However, there is
no guarantee that interference will not occur in a particular installation. If this equipment does
cause harmful interference to radio or television reception, which can be determined by turning
the equipment off and on, the user is encouraged to try to correct the interference by one or
more of the following measures:
-- Reorient or relocate the receiving antenna.
-- Increase the separation between the equipment and receiver.
-- Connect the equipment into an outlet on a circuit different from that to which the receiver is
connected.
-- Consult the dealer or an experienced radio/TV technician for help.
This device complies with part 15 of the FCC Rules. Operation is subject to the following two
conditions:(1) This device may not cause harmful interference, and (2) this device must accept
any interference received, including interference that may cause undesired operation.
Changes or modifications not expressly approved by the party responsible for compliance
could void the user's authority to operate the equipment.
This equipment should be installed and operated with minimum distance 20cm between the radiator &
your body.

Magnetic Calibration Instruction
Magnetic Calibration Steps:
① Power on the quad-copter, place it on the flat ground, switch SWC and SWA
both at Gear 1.
② Keep the remote controller accelerator at the smallest condition(rockers at
the bottom position).Turn SWC from Gear 1 To Gear 3,then back to Gear1.3
times same operation quickly,keeping the yellow lamp on,horizontal
calibration begins,if not,please take the first step to start again.
③ Turn the aircraft 2-3 circles slowly with yellow lamp on,if the front lamp turns
off,it means the aircraft is not put flat,please lay the aircraft flat before
continue turning.
Battery Preparation
Power on: Short press the button, then long press for 4 seconds
Power off: Long press for 4 seconds.
SWA
SWC
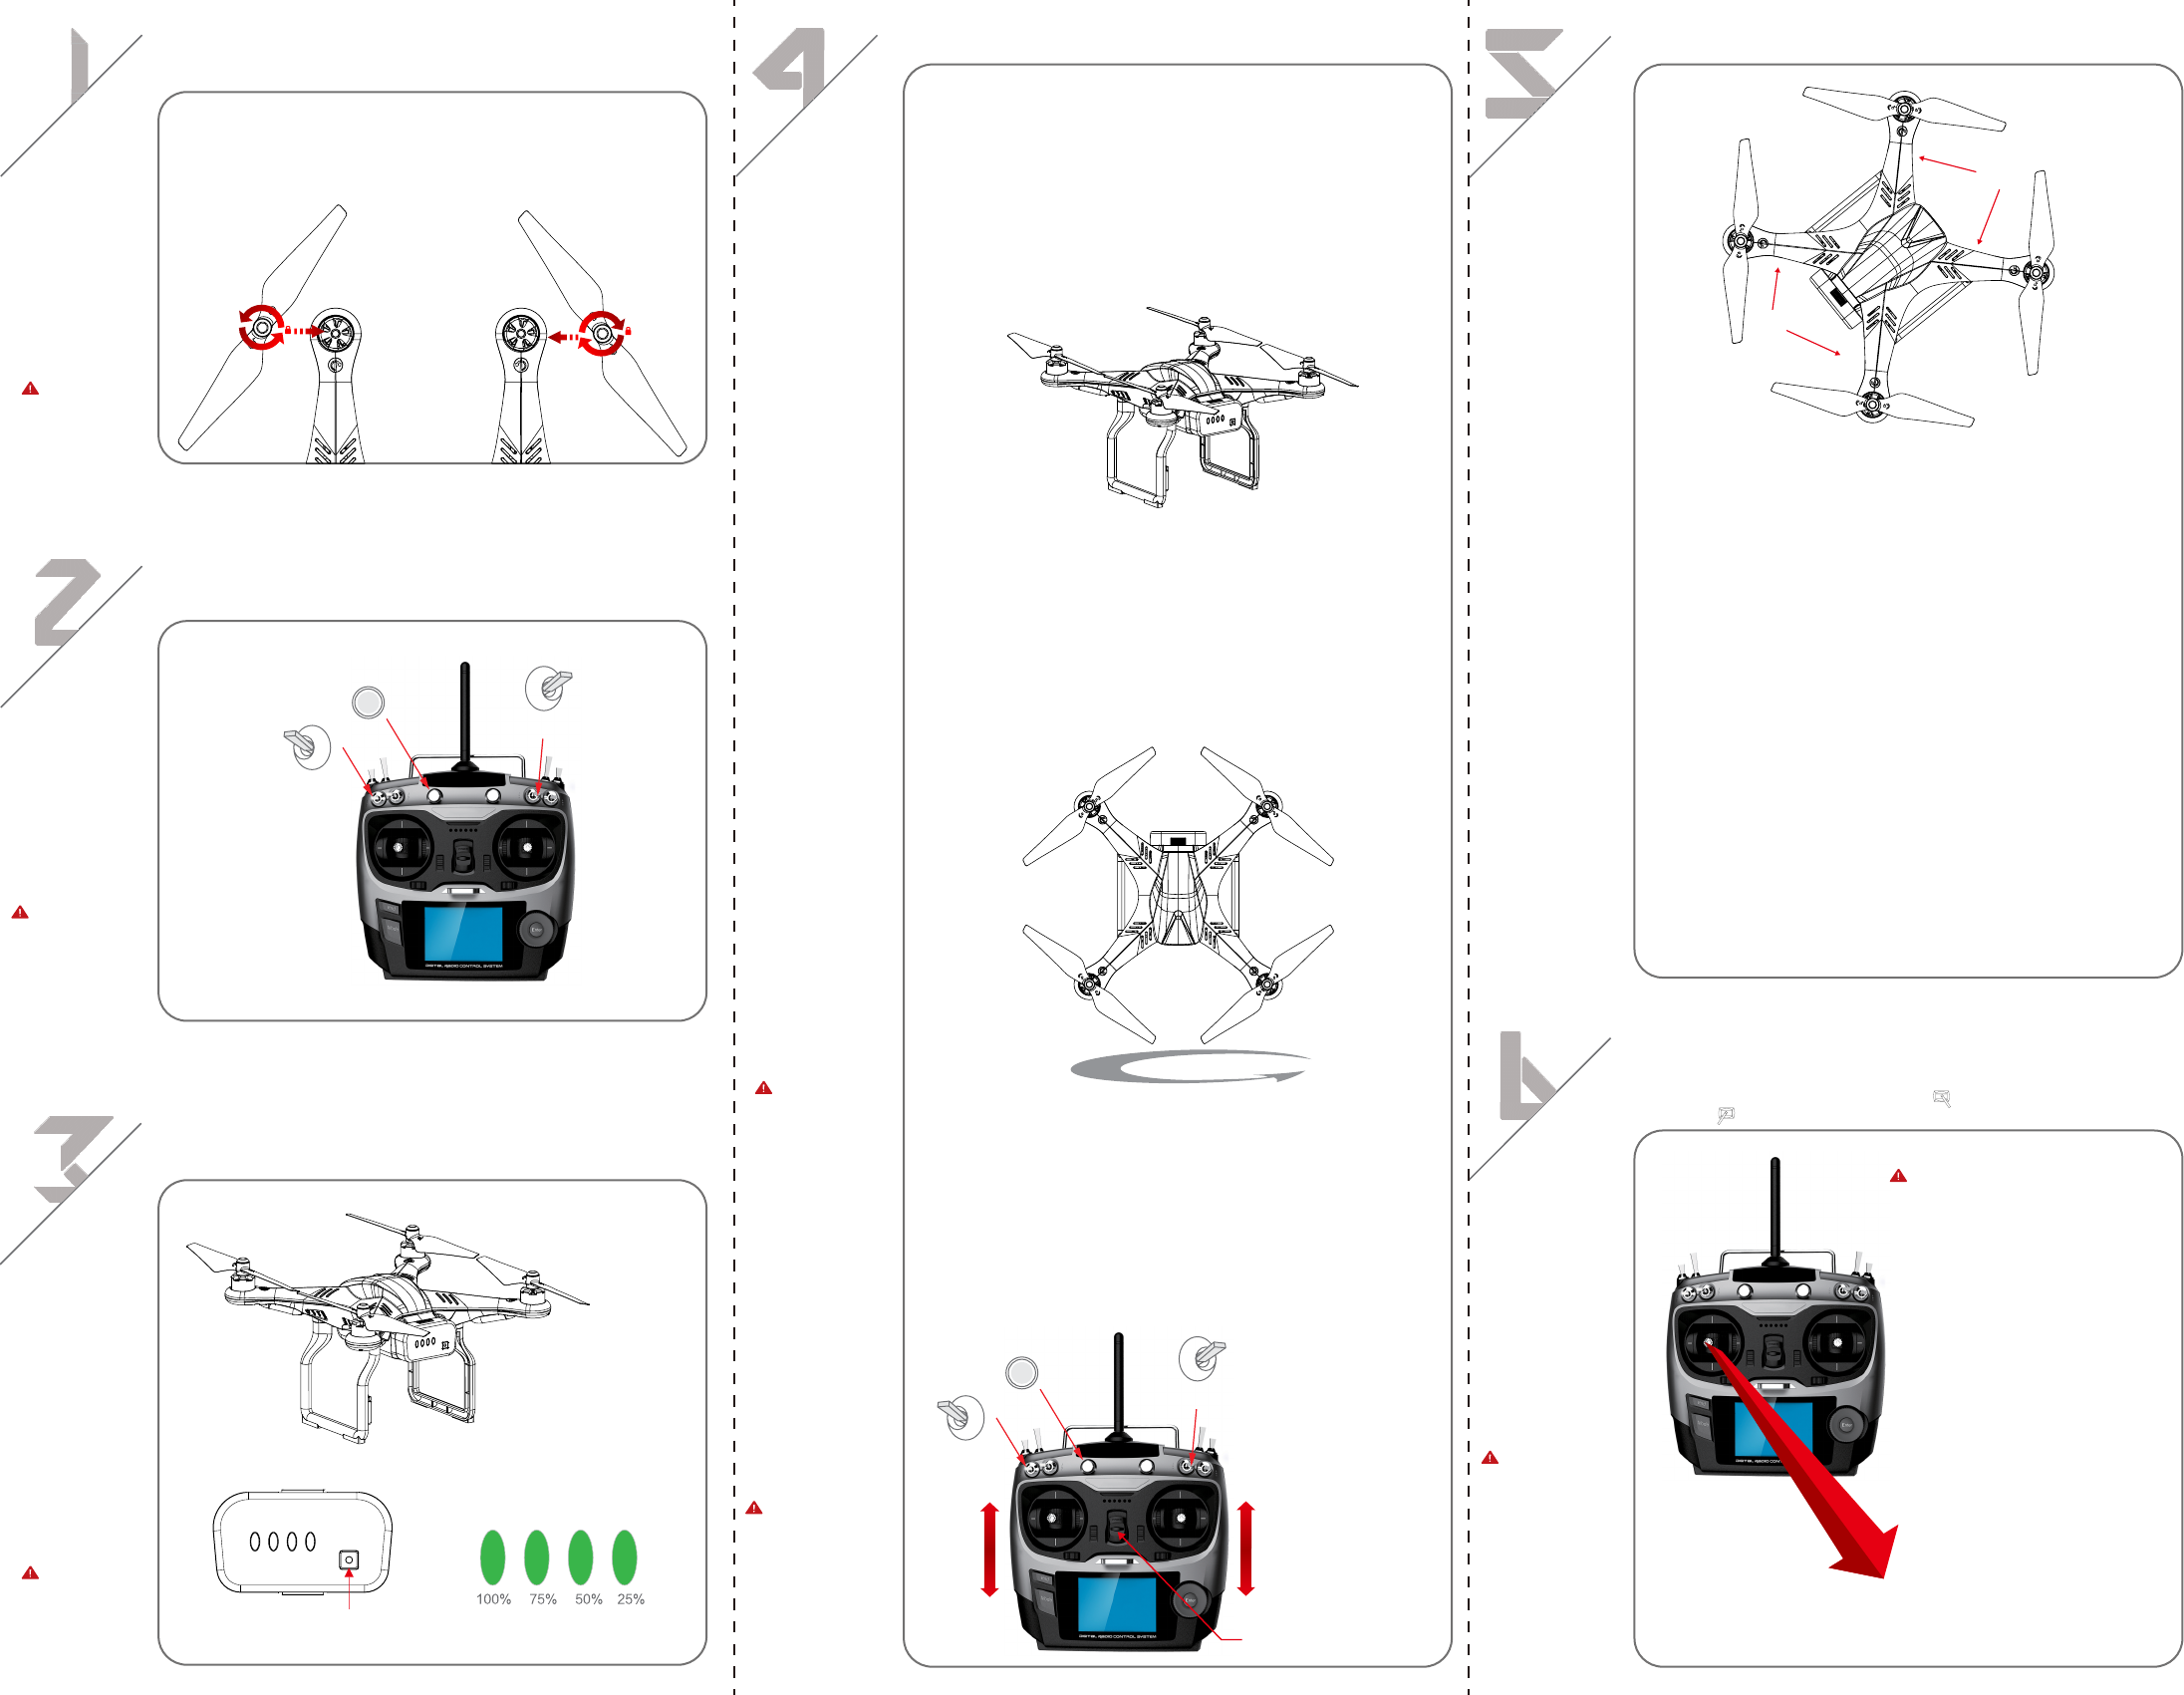
Install The Propellers
Anti-clockwise screw the propellers with black caps onto the pointed motors.
Clockwise screw the propellers with grey caps onto the no-pointed motors.
Attention:
Do not use the
screw glue when
installing the
propellers
Remote Controller Preparation
Ensure the switch of SWA and SWC placed on the top position.Install 8 units AA
batteries.
Attention:
If the remote
controller starts
“BB…”alarms,
please exchange
the battery.
Tilting Control Knob
Attention:
When the power
is off,short press
once to check
the battery
capacity.
Battery Switch
Battery Capacity Indicator Lamp
④ Keep the remote controller accelerator at the smallest condition(rockers at
the bottom position).Turn SWC from Gear 1 To Gear 3,then back to
Gear 1.3 times same operation quickly,when the front lamp turns off,vertical
calibration begins,if not,please take the first step to restart.
⑤ Keep the aircraft front vertically downwards,when the green lamp keeps
bright, the vertical calibration begins. Rotate the aircraft 2-3 circles
anti-clockwise slowly with green lamp on.When the front lamp turns off,it
means that the aircraft front is not towards downwards vertically,please put
the aircraft front vertically downwards before continuing rotating.
⑥ Keep the remote controller accelerator at the smallest condition(rockers at
the bottom position).Turn SWC from Gear 1 To Gear 3,then back to Gear1.
3 times same operation quickly,when the green lamp twinkles,the magnetic
calibration data storing begins.
⑦ Wait for the green lamp twinkle,when the front lamp turns red, magnetic
calibration successful; When the front lamp turns red slow twinkle,
magnetic calibration error; If the front lamp turns yellow twinkle, magnetic
calibration failed. Please restart the magnetic calibration once again.
SWA
SWC
Tilting Control Knob
Gear 1: Manual Operation
Gear 2:Attitude Mode
Gear 3:GPS Mode
Gear 1
Gear 2
Controller Switch
LED Flight Indicator Lamp
Front Lamp
Back Lamp
Back Lamp:
Slow Green Lamp: Safe for flight (with GPS)(flight indicator lamp)
Slow Yellow Lamp: Semi-safe for flight (without GPS)(flight indicator lamp)
Quick Yellow Lamp: Remote controller turn-off(flight indicator lamp)
Quick Red Lamp: Battery low power warning(flight indicator lamp)
Keeping Red Lamp: Return home
Front Lamp:
Quick Yellow Lamp: Need demagnetization
Slow Red Lamp: Magnetic calibration error
Keeping Yellow Lamp: Horizontal calibration(magnetic calibration
indicator lamp)
Keeping Green Lamp: Vertical calibration(magnetic calibration indicator lamp)
Quick Green Lamp: Saving the calibration data
Green Lamp Off: Calibration completed
Other Abnormal Conditions: Front and back lamp both under quick red flash
If Calibration Needed: Front and back lamp both under slow red flash
Start Your Trial Flight
Place the quad-copter flat on the ground and make sure the battery power indicator
lamp facing you.Turn on the remote controller, then turn on the aircraft battery. As
the pic shown,pull outward the bottom-right( ) rocker to unlock the motor, pull the
bottom-left( ) rocker to lock the motor. Flight starts.
Attention:
Please stop the
motor once the
aircraft lands.Do
not stop the motor
during flight.
Please carefully
review all related
necessary flight
information and
control the attitude
when you try the
first flight.
Remote Controller Indicator Light:
1.Red light keeps bright, yellow
light turns off: normal operation
or battery indication
2.Buzzer keeps flashing: Low voltage
3.Red and yellow light keep flashing
at the same time, while buzzer
alarms: hardware with fault.
CAUTION
SWA
Gear 1:
Manual Operation
Gear 2:
Attitude Mode
Gear 3:
GPS Mode
Attention:
SWA Gear 2--
Return home,
which can be only
shifted to return
home when GPS
location function
is available before
the motor unlocked.
Switch the accelerator rocker to bottom-right--Power on the motor
Switch the accelerator rocker to bottom-left--Power off the motor