Alco Electronics CN6212 Laptop User Manual
Alco Electronics Ltd Laptop
User manual

e-manual
avita-americas.com
CN6212 F561
Laptop
1
LIBER e-manual
Some of the following information may not apply to your particular
product; however, as with any electronic product, precautions
should be observed during handling and use.
• Read these instructions.
• Keep these instructions.
• Heed all warnings.
• Follow all instructions.
• Do not use this apparatus near water.
• Clean only with dry cloth.
• Do not block any ventilation openings. Install in accordance
with the manufacturer’s instructions.
• Do not install near any heat sources such as radiators, heat
registers, stoves, or other apparatus (including ampliers) that
produce heat.
• Protect the power cord from being walked on or pinched
particularly at plugs, convenience receptacles, and the point
where they exit from the apparatus.
• Only use attachments / accessories specied by the manufacturer.
• Unplug this apparatus during lightning storms or when unused
for long periods of time.
• Refer all servicing to qualied service personnel. Servicing is
required when the apparatus has been damaged in any way,
such as power-supply cord or plug is damaged, liquid has been
spilled or objects have fallen into the apparatus, the apparatus
has been exposed to rain or moisture, does not operate normally,
or has been dropped.
IMPORTANT SAFETY
INSTRUCTIONS
2
LIBER e-manual
ADDITIONAL SAFETY INFORMATION
• The AC adapter and apparatus shall not be exposed to dripping
or splashing and no objects lled with liquids, such as vases,
shall be placed on the apparatus.
• Always leave sucient space around the product for ventilation.
Do not place product in or on a bed, rug, in a bookcase or cabinet
that may prevent air ow through vent openings.
• Do not place lighted candles, cigarettes, cigars, etc. on the
product.
• Care should be taken so that objects do not fall into the product.
• Do not attempt to disassemble the cabinet. This product does
not contain customer serviceable components.
• To prevent the risk of re or electric shock, do not expose this
apparatus to rain or moisture.
• Do not play your headset at high volume. Hearing experts warn
against extended high-volume play.
CAUTION: RISK OF EXPLOSION IF BATTERY IS REPLACED BY AN
INCORRECT TYPE. DISPOSE OF USED BATTERIES ACCORDING TO
THE INSTRUCTIONS.
Battery safety!
This device contains a built-in battery, improper use of which may
result in explosion. Do not heat, open, puncture, mutilate, or dispose
of the product in re. Do not leave the device in direct sunlight for
an extended period of time, which could cause melting or battery
damage. The battery in this device is not user replaceable and
should only be replaced by AVITA or a AVITA Authorized Service
Provider.
3
LIBER e-manual
FCC INFORMATION
This device complies with Part 15 of the FCC Rules. Operation
is subject to the following two conditions: (1) This device may
not cause harmful interference, and (2) this device must accept
any interference received, including interference that may cause
undesired operation.
This equipment has been tested and found to comply with the
limits for a Class B digital device, pursuant to Part 15 of FCC Rules.
These limits are designed to provide reasonable protection against
harmful interference in a residential installation. This equipment
generates, uses, and can radiate radio frequency energy and, if
not installed and used in accordance with the instructions, may
cause harmful interference to radio communications.
However, there is no guarantee that interference will not occur
in a particular installation. If this equipment does cause harmful
interference to radio or television reception, which can be
determined by turning the equipment off and on, the user is
encouraged to try to correct the interference by one or more of
the following measures:
• Reorient or relocate the receiving antenna.
• Increase the separation between the equipment and receiver.
• Connect the equipment into an outlet on a circuit dierent
from that to which the receiver is connected.
• Consult the dealer or an experienced radio/TV technician for
help.
Warning: Changes or modications not expressly approved by the
party responsible for compliance could void the user’s authority
to operate the equipment.
CAN ICES-3(B) / NMB-3(B)
4
LIBER e-manual
This device complies with Industry Canada License-exempt RSS
Standard(s). Operation is subject to the following two conditions:
(1) This device may not cause interference, and (2) this device must
accept any interference, including interference that may cause
undesired operation of the device.
SAR
The radiated output power of this device is below the FCC radio
frequency exposure limits. Nevertheless, the device should be used
in such a manner that the potential for human contact is minimized
during normal operation. The exposure standard for wireless
devices employs a unit of measurement known as the Specic
Absorption Rate, or SAR. The SAR limit set by the FCC is 1.6 W/Kg.
Tests for SAR are conducted using standard operating positions
accepted by the FCC with the device transmitting at its highest
certied power level in all tested frequency bands. Although the
SAR is determined at the highest certied power level, the actual
SAR level of the device while operating can be well below the
maximum value. This is because the device is designed to operate
at multiple power levels so as to use only the power required to
reach the network. In general, the closer you are to a wireless
base station antenna, the lower the power output. To avoid the
possibility of exceeding the FCC radio frequency exposure limits,
human proximity to the antenna should be minimized. For body
worn operation, this device has been tested and meets the FCC
RF exposure.
Warning: the AC adapter is used as disconnect device and it should
remain readily operable during intended use. In order to disconnect
the mains plug from mains completely, the ac adapter should be
disconnected from the mains socket outlet completely. The socket
outlet shall be installed near the equipment and shall be easily
accessible.

5
LIBER e-manual
ImportantSafety Instruction ...................................................1
Getting Started ....................................................................... 6
Getting to know LIBER ...................................................................... 6
Charging LIBER ..................................................................................... 10
Turning LIBER on ...................................................................................12
Put LIBER to Sleep ..................................................................................15
Power Management .............................................................................16
Basics ....................................................................................... 17
Start menu ............................................................................................... 17
Fingerprint ......................................................................................... 20
Action center ......................................................................................... 21
Task view .................................................................................................. 23
Using the touchpad ............................................................................ 24
Using the keyboard ............................................................................. 27
Connections and Setup .......................................................... 30
External display ..................................................................................... 30
Connecting to a Wi-Fi network ....................................................... 33
Airplane mode ...................................................................................... 34
Bluetooth ...................................................................................... 35
Brightness ...................................................................................... 36
Volume ..................................................................................................... 37
Troubleshooting ...................................................................... 38
Specifications ........................................................................... 40
Legal and Safety Notices ......................................................... 41
Contents
6
LIBER e-manual
Getting Started
Getting to know LIBER
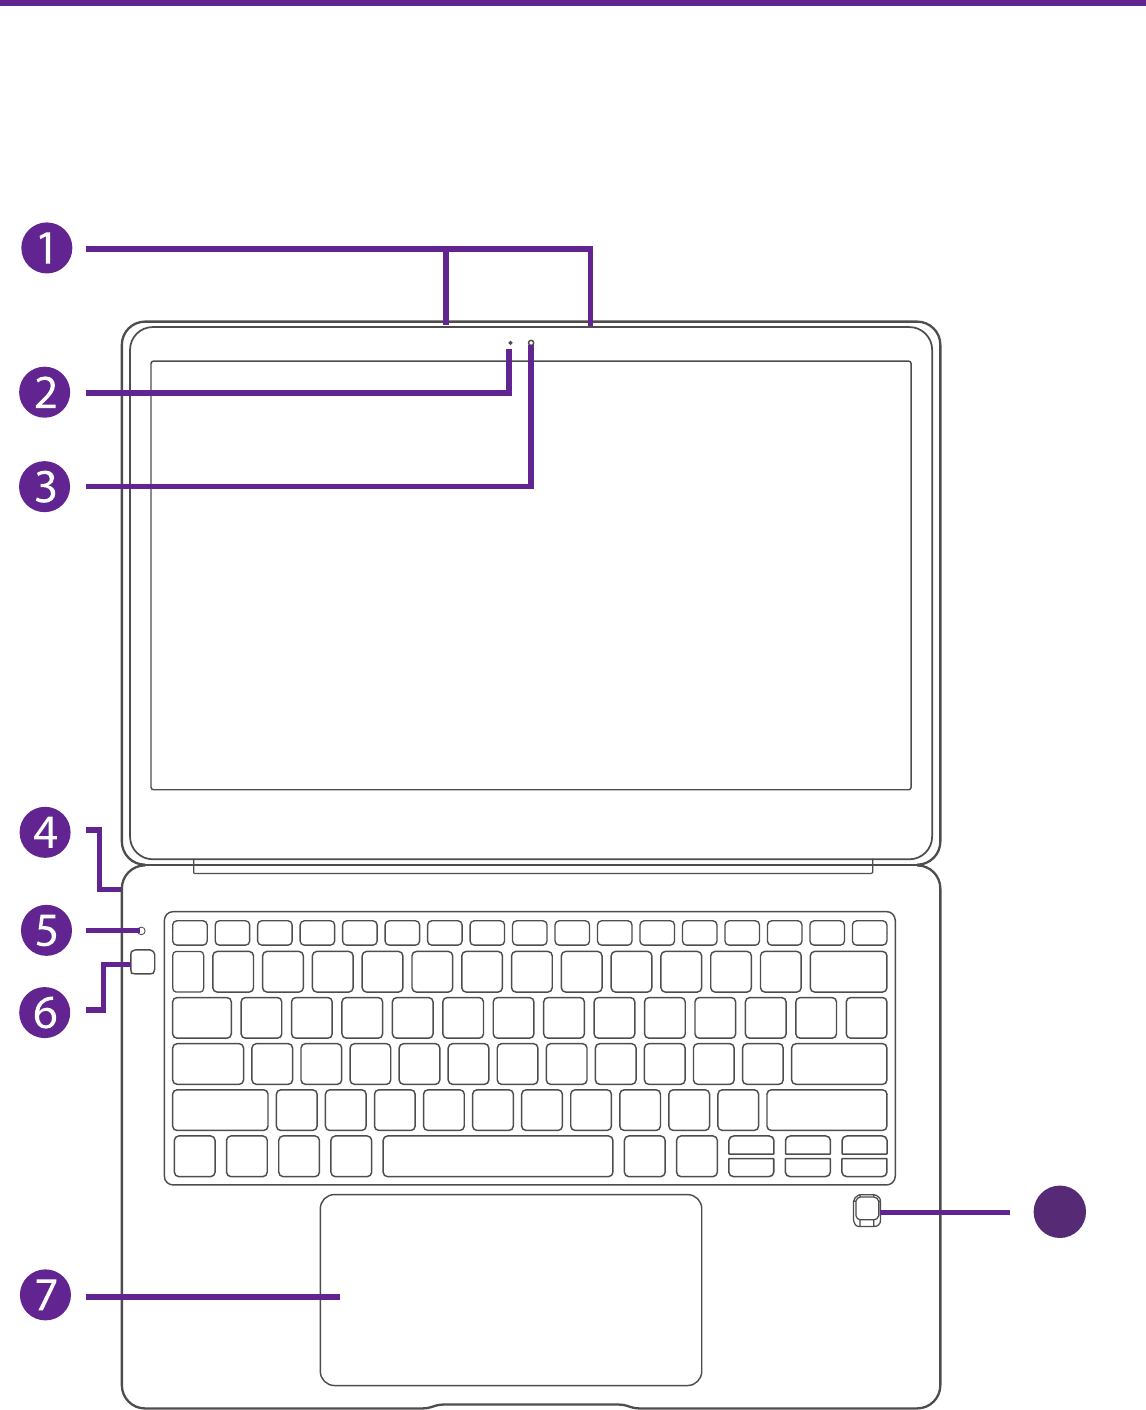
Top view
8

7
LIBER e-manual
Camera indicator
The camera indicator lights up when the built-in camera is in
use.
Camera
The built-in camera allows you to take still photos and record
videos.
Microphone
For voice input.
Power indicator
The power indicator lights up when the Notebook PC is
powered on and blinks slowly when the Notebook PC is in
Standby mode.
Power button
Press and hold it to turn the Notebook PC on or o.
Touchpad
Moves the cursor and selects options.
Functions as a mouse.
Headphone jack
Headphone connection for personal listening.
8Fingerprint sensor
Touch it to open the PC screen if you set the ngerprint.

8
LIBER e-manual
Right side
DC jack
Connects with 19V DC charger.
Charging indicator
Shows the battery's charge status.
- Orange: Charging
- Green: Fully charged
- Orange (blinking): Low battery
USB-C (Type C) port (5Vdc,1.5A)
Connects to a USB storage device or a mouse, keyboard, or
camera.
Dongle (option A)
USB-A (Type A) port (5Vdc,1.5A)
Connects to a USB storage device or
a mouse, keyboard, or camera.
HDMI port
Connects with TV or external display.
USB-C (Type C) port
Connects to a USB storage device or a mouse, keyboard, or
camera or support HDMI & Display (without charge function).

9
LIBER e-manual
Dongle (option B)
USB-A (Type A) port (5Vdc,1.5A)
Connects to a USB storage device or
a mouse, keyboard, or camera.
HDMI port
Connects with TV or external display.
USB-C (Type C) port
Connects to a USB storage device or a mouse, keyboard, or
camera or support HDMI & Display (without charge function).
10
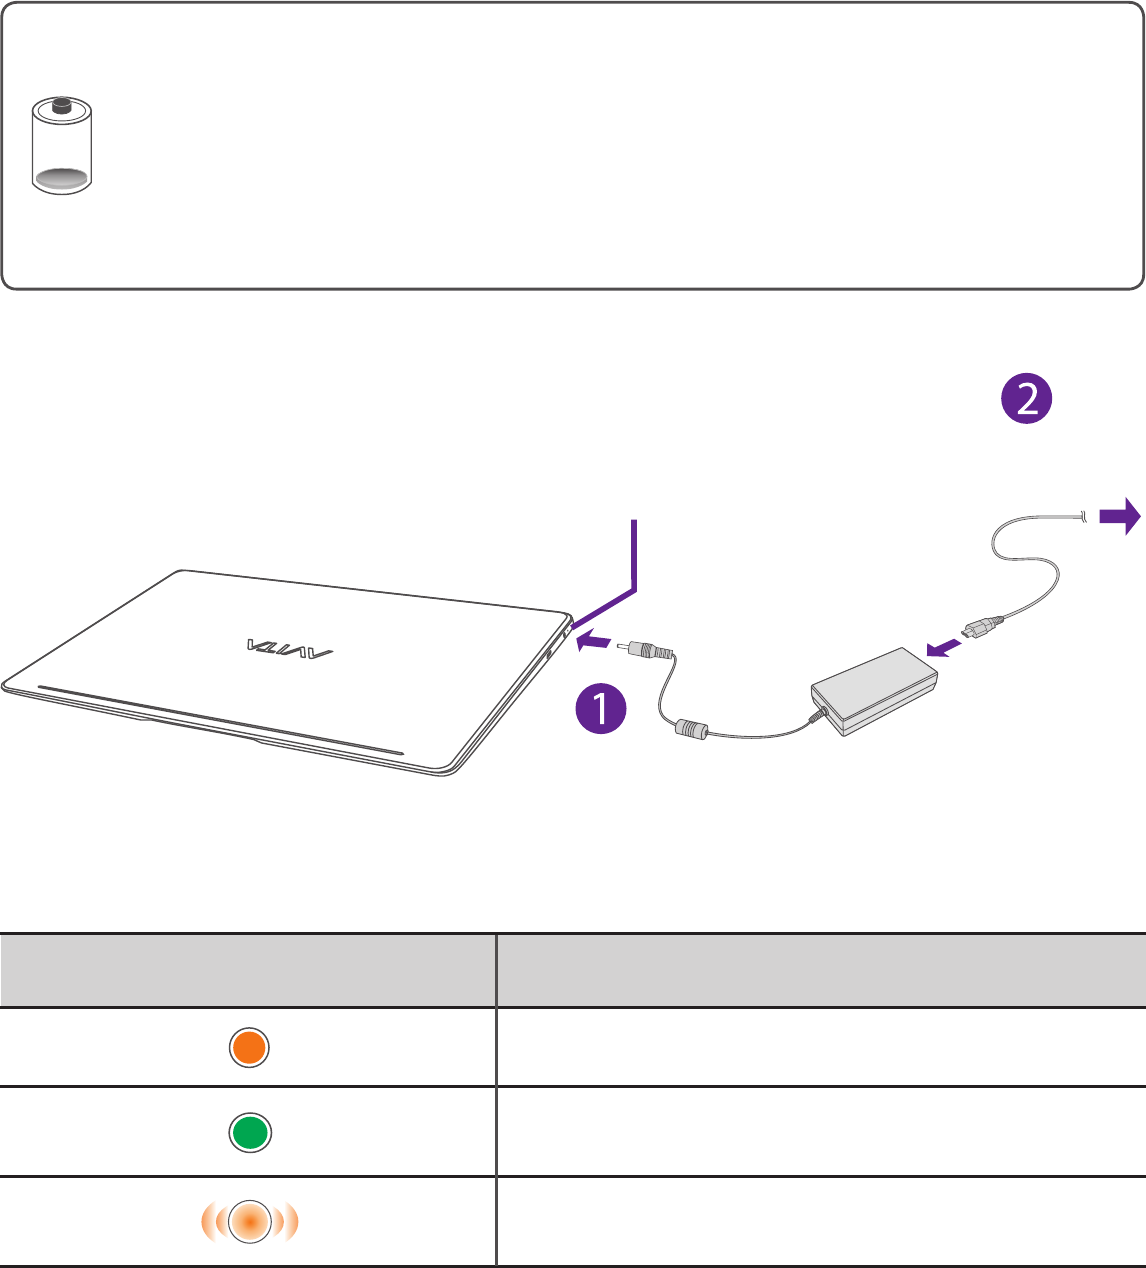
LIBER e-manual
Charging LIBER
IMPORTANT! Please Read.
We recommend fully charging your Notebook PC before
using it for the rst time. For optimal operation, please
connect the provided AC adaptor to your Notebook PC
when it falls below 20% charge.
To wall socket
Charging indicator Status
Orange: Charging
Green: Fully charged
Orange (blinking): Low battery
Charging
indicator

11
LIBER e-manual
NOTE
• Use ONLY the included AC Adaptor to charge the battery.
• The AC Adaptor may vary in appearance, depending on models
and your region.
• Charging time will vary depending on remaining battery level.
Charging from 0% to 70% will take approximately 1.5 hours.
You may not be able to turn on your Notebook PC within a few
minutes if the battery was fully drained.
In order to keep the battery working in best condition,
please pay attention to the following:
• The included AC adaptor is for use with this unit only. Do
not use it with other equipment.
• Please do not charge the battery in high temperatures.
• Do not wait for the battery to be fully depleted before
charging again. Keep the battery charged as needed.
• If your Notebook PC has not been used for a long period
of time, the battery might be in over discharge protection
mode and may take longer to charge.
12
LIBER e-manual
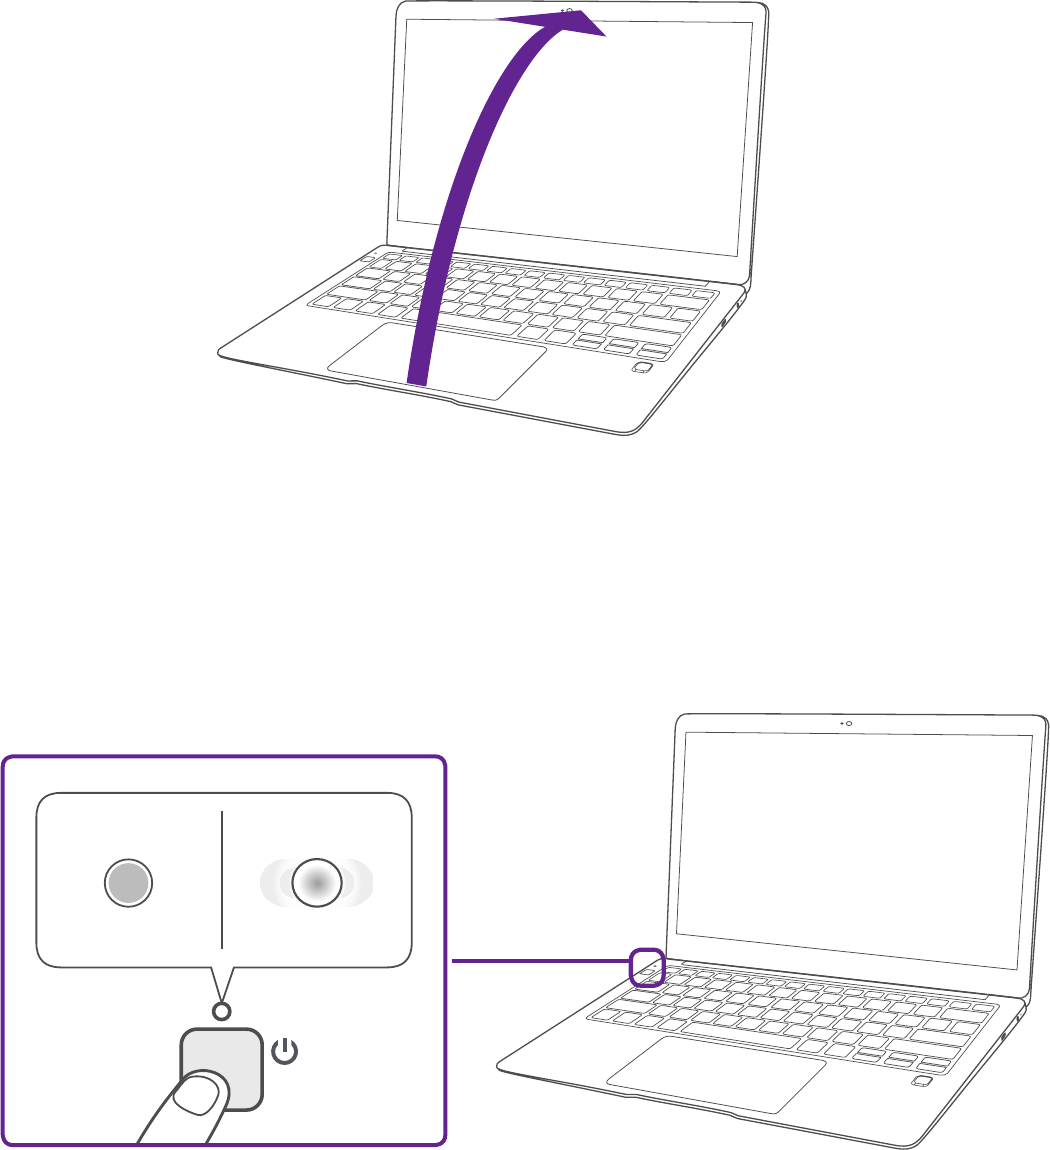
Turning LIBER on
Starting for the rst time
When using the Notebook PC for the first time, you will be
required to setup the following:
1. Open the screen panel. you can adjust the angle according
to the requirements.
2. Press and hold the Power button on your Notebook PC until
the AVITA logo appears.
StandbyPower on
(White)
(White - blinking)

13
LIBER e-manual
3. Select the language, then click .
4. Follow the onscreen instructions to congure your Notebook
PC.
About Windows Activation
Windows will be active automatically once you connect your
Notebook PC to a WiFi network.
14
LIBER e-manual
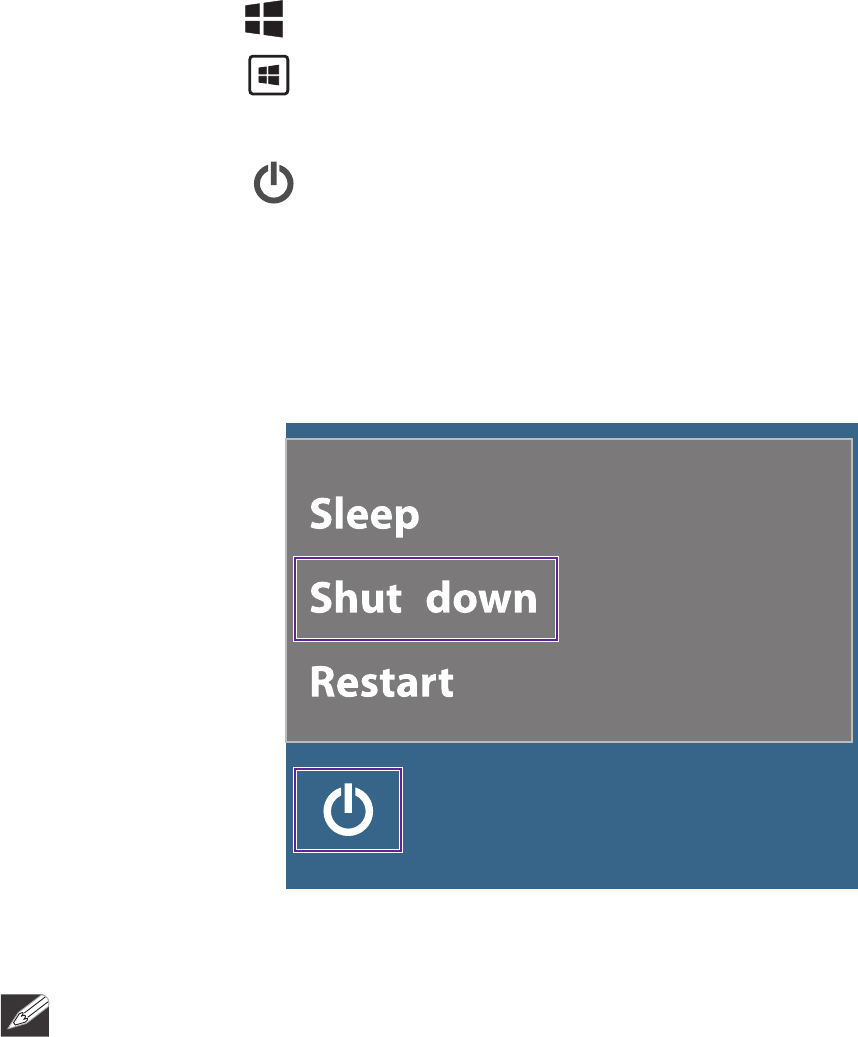
Turning LIBER o
1. Click the icon in the lower-left corner of the screen or
press the Start key on the keyboard to get to the Start
menu.
2. Click the Power icon in the lower-left corner of the
screen
, it will display 3 options (Sleep, Shut down and
Restart).
3.
Select Shut down to power the Notebook PC o.
NOTE
• Save all data before turning your Notebook PC o.
• If your Notebook PC is unresponsive, press and hold the Power
button for several seconds and follow the on-screen instructions
to force SHUT DOWN the unit.

15
LIBER e-manual
Putting LIBER to Sleep
You can put your Notebook PC to Sleep mode by doing either
of the following:
• Go to the Start menu and click the Power icon in the
lower-left corner of the screen
,
select and click Sleep.
• Briefly press the Power button to put the Notebook PC
in sleep mode. If you don’t operate for some time, the
Notebook PC will enter sleep mode automatically.
16
LIBER e-manual
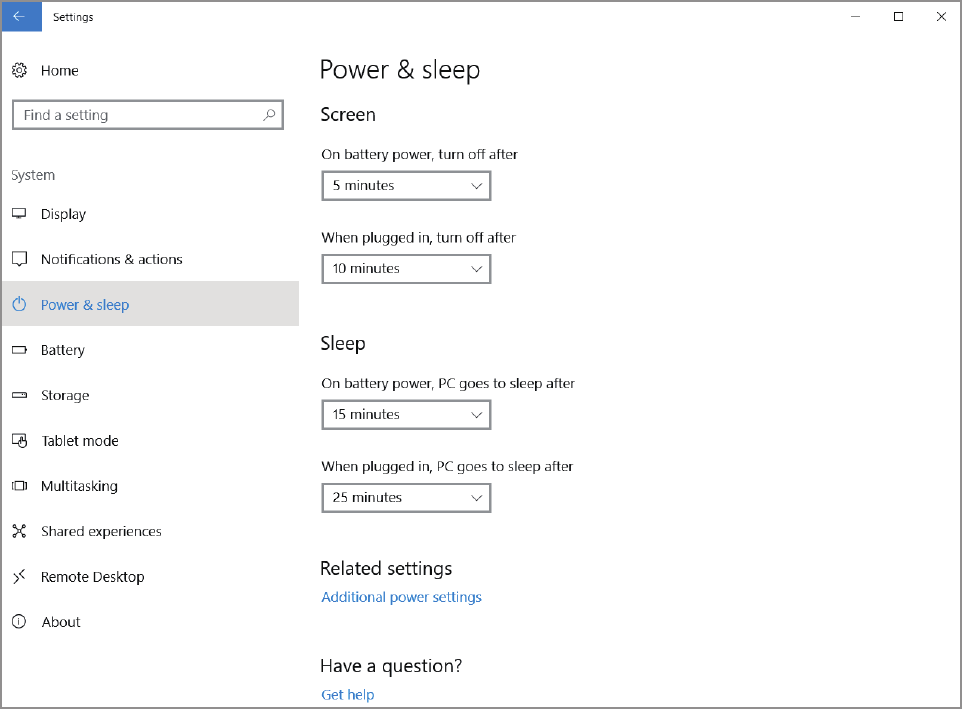
Power Management
When the apparatus is not connected power adaptor and not
providing the main function or when other energy-using products
are not dependent on its function, the default system settings and
its characteristics enable the apparatus to activate display sleep
mode within 5 minutes of user inactivity, and to activate a distinct
sleep mode within 10 minutes of user inactivity. In the same
scenario, when the apparatus is connected to power adaptor, will
activate display sleep mode within 15 minutes of user inactivity,
and activate a distinct sleep mode within 25 minutes of user
inactivity. When in sleep mode, the system becomes fully usable
within 5 seconds via network connections or user interface devices.
The power management function is automatically switched on by
the default system settings.
Go to Settings -> System -> Power & sleep to manage how your
Notebool PC use power.
17
LIBER e-manual
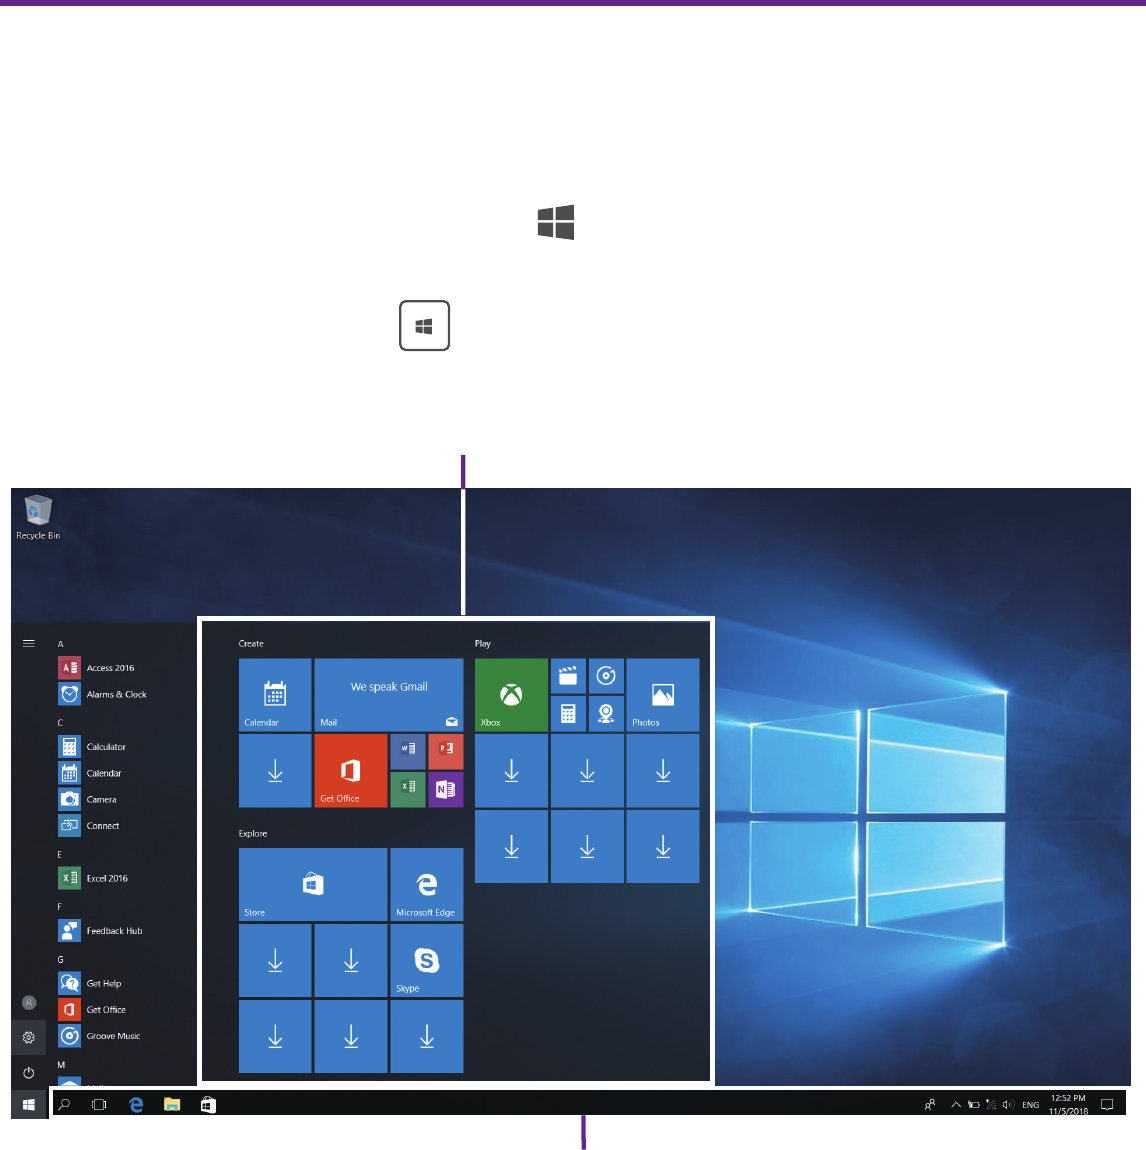
Start menu
Microsoft Windows 10 is a new operating system that is used to
control a computer.
Click the icon in the lower-left corner of
the screen to get to the Start menu. You can also open the Start
menu by pressing the Start key on the keyboard.
Live titles
Taskbar
Basics
Live Tiles on the screen change and update in real time so you
can get real-time updates about news or sports, check what
your friends are up to, and get the latest weather forecast.
18
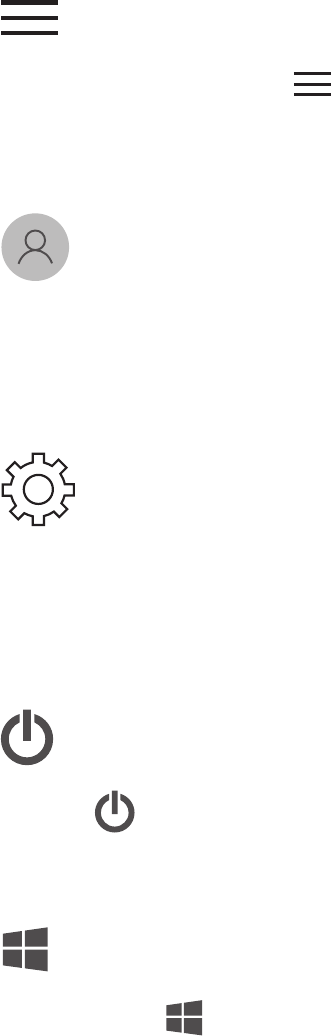
LIBER e-manual
Account options
Click on your account name to change account settings, lock
your device or sign out of your account.
Settings
Allows you to access the settings of your Notebook PC. Click it
to enter the Settings screen.
Power
Click
icon to Sleep, Shut down or Restart your Notebook PC.
Expand
Click this icon in the upper-left corner of the screen to
expand the START menu.
Start
Click the Start icon to open/close the Windows Start menu.
19
LIBER e-manual
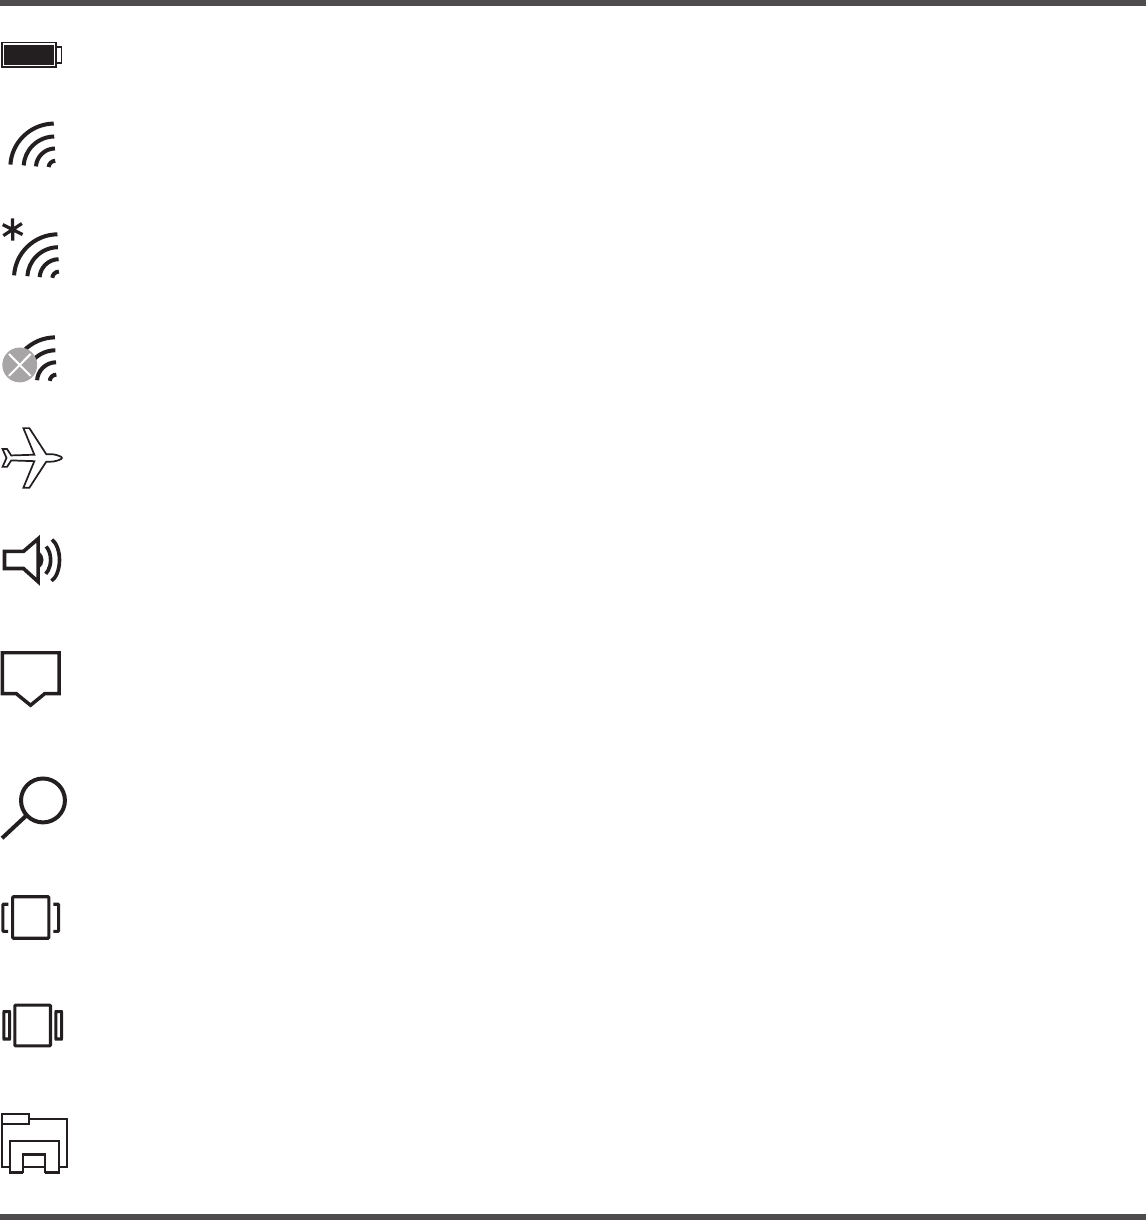
Taskbar
The below table lists some of the frequently used icons in the
Taskbar:
Shows the battery status.
Displays when Wi-Fi is turned on but there is NO a
Wi-Fi network connection.
Displays when a Wi-Fi network connected.
Displays when Wi-Fi is turned o.
Airplane mode is on.
Adjusts the speaker volume.
Shows the recent task.
Launches Search.
Shows all opened tasks in a single view.
Launches the File Explorer.
Launches Action Center
Icon Description
20
LIBER e-manual
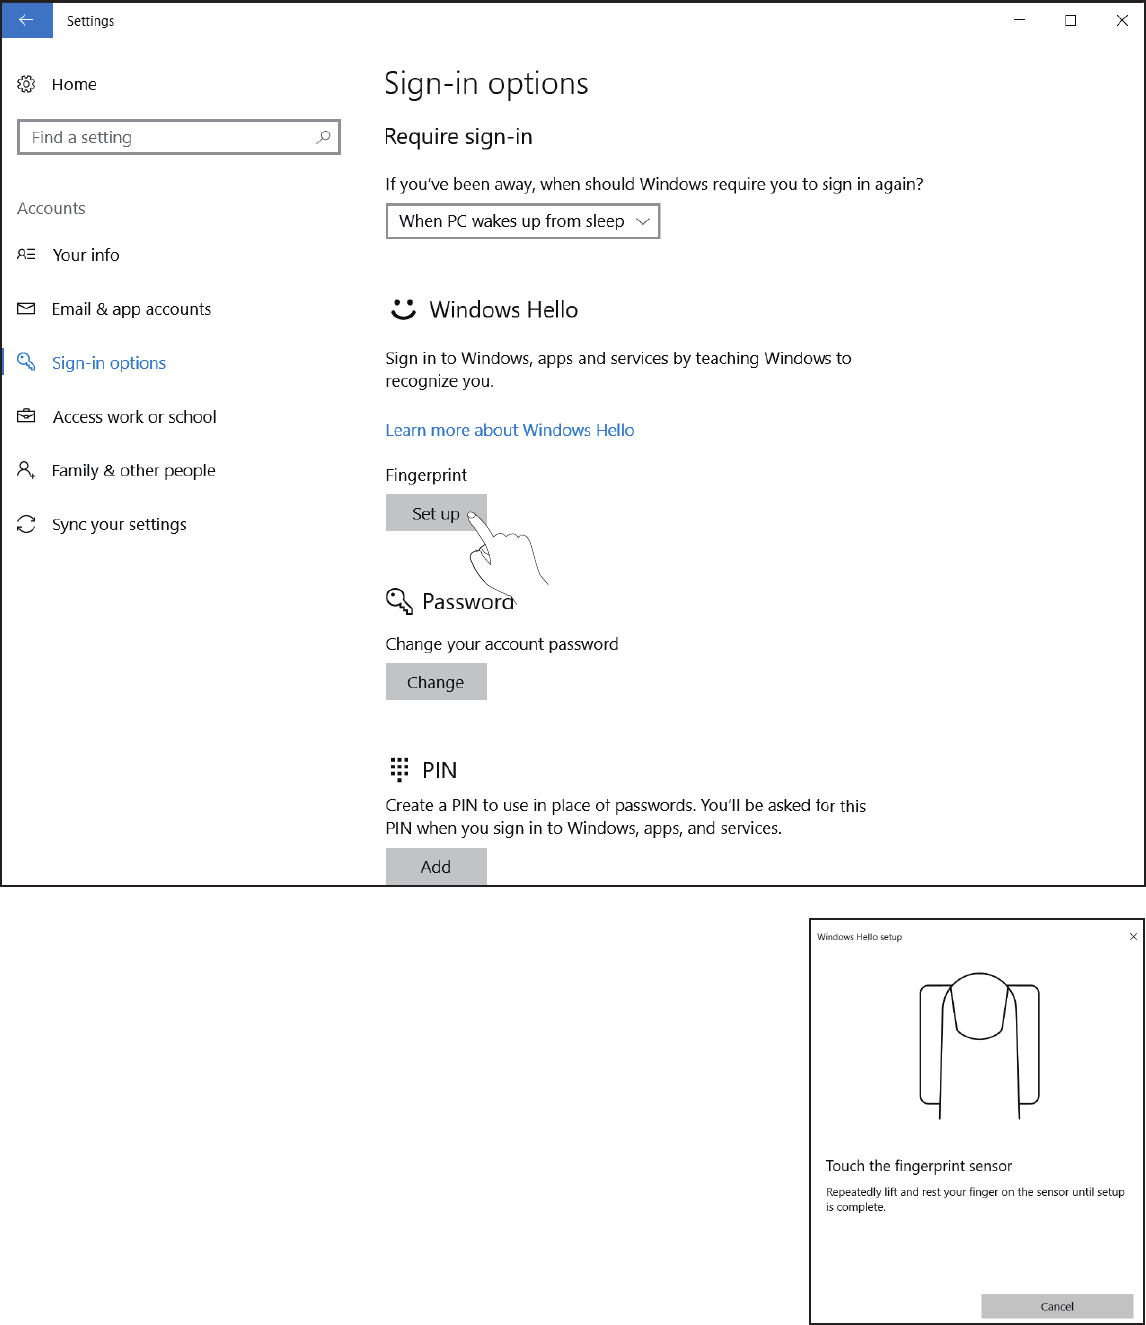
Fingerprint
1. Go to Settings -> Accounts-> Sign-in options-> to select the
ngerprint.
2.
Follow the onscreen instructions to input
PIN, then touch the ngerprint senesor to
set ngerprint.
3.
Follow the onscreen instructions to finish
other required setting.
21
LIBER e-manual
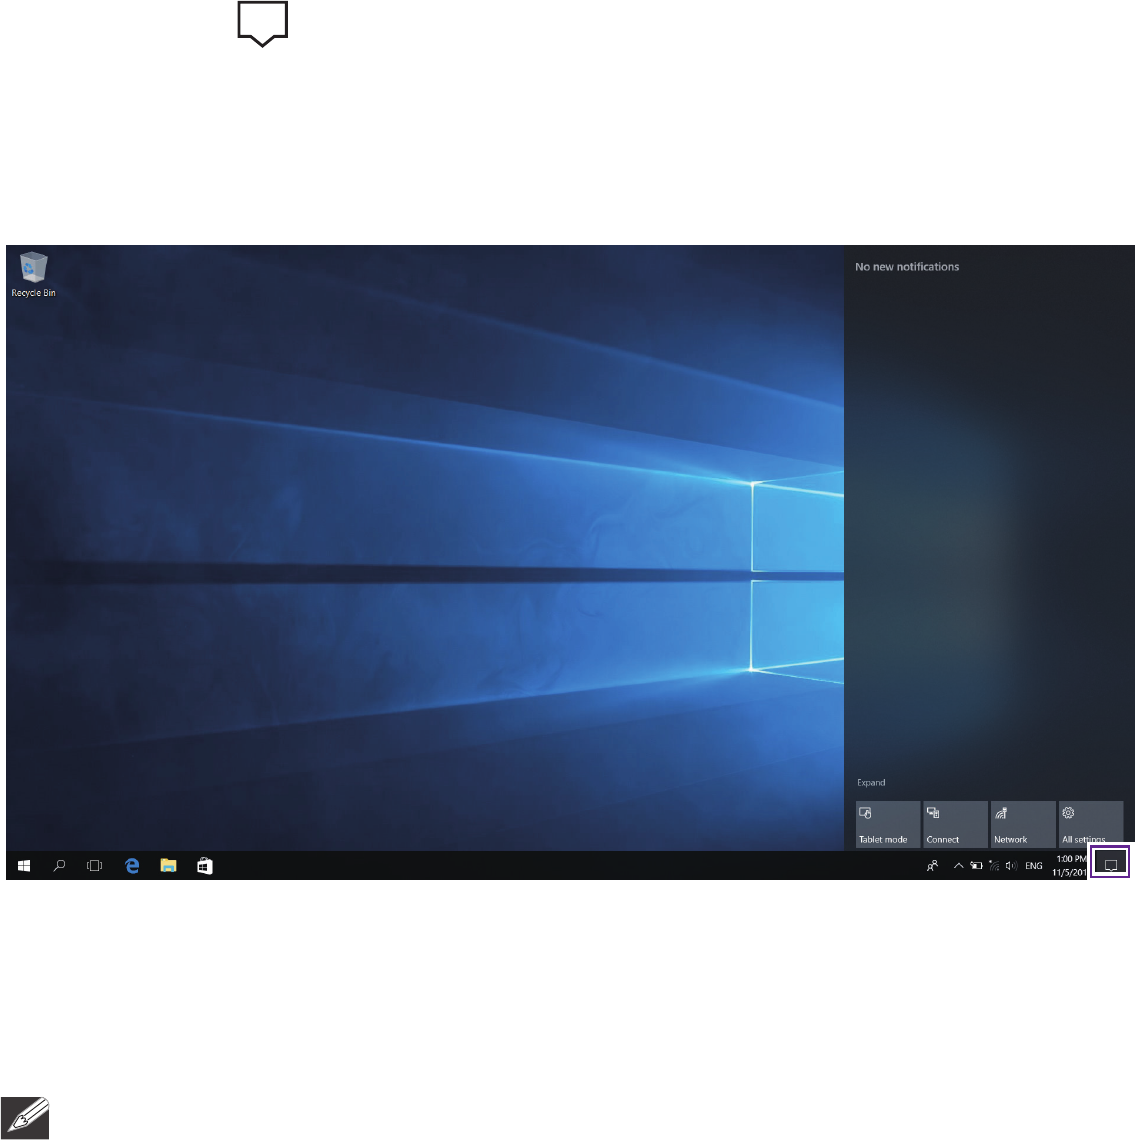
Action Center
It allows you to receive system notifications, such as updates. It
also has a really useful quick Actions on the bottom.
Checking notications
1. Click the icon in the lower-right corner of the screen to
launch the ACTION CENTER screen.
2. All messages appears in the Action Center and you can
select and click them to read.
Tip: You can go to Settings -> System -> Notifications &
actions to set the Notications and Actions.
NOTE
• Select Expand or Collapse to expand or minimize the Quick
Actions menu.

22
LIBER e-manual
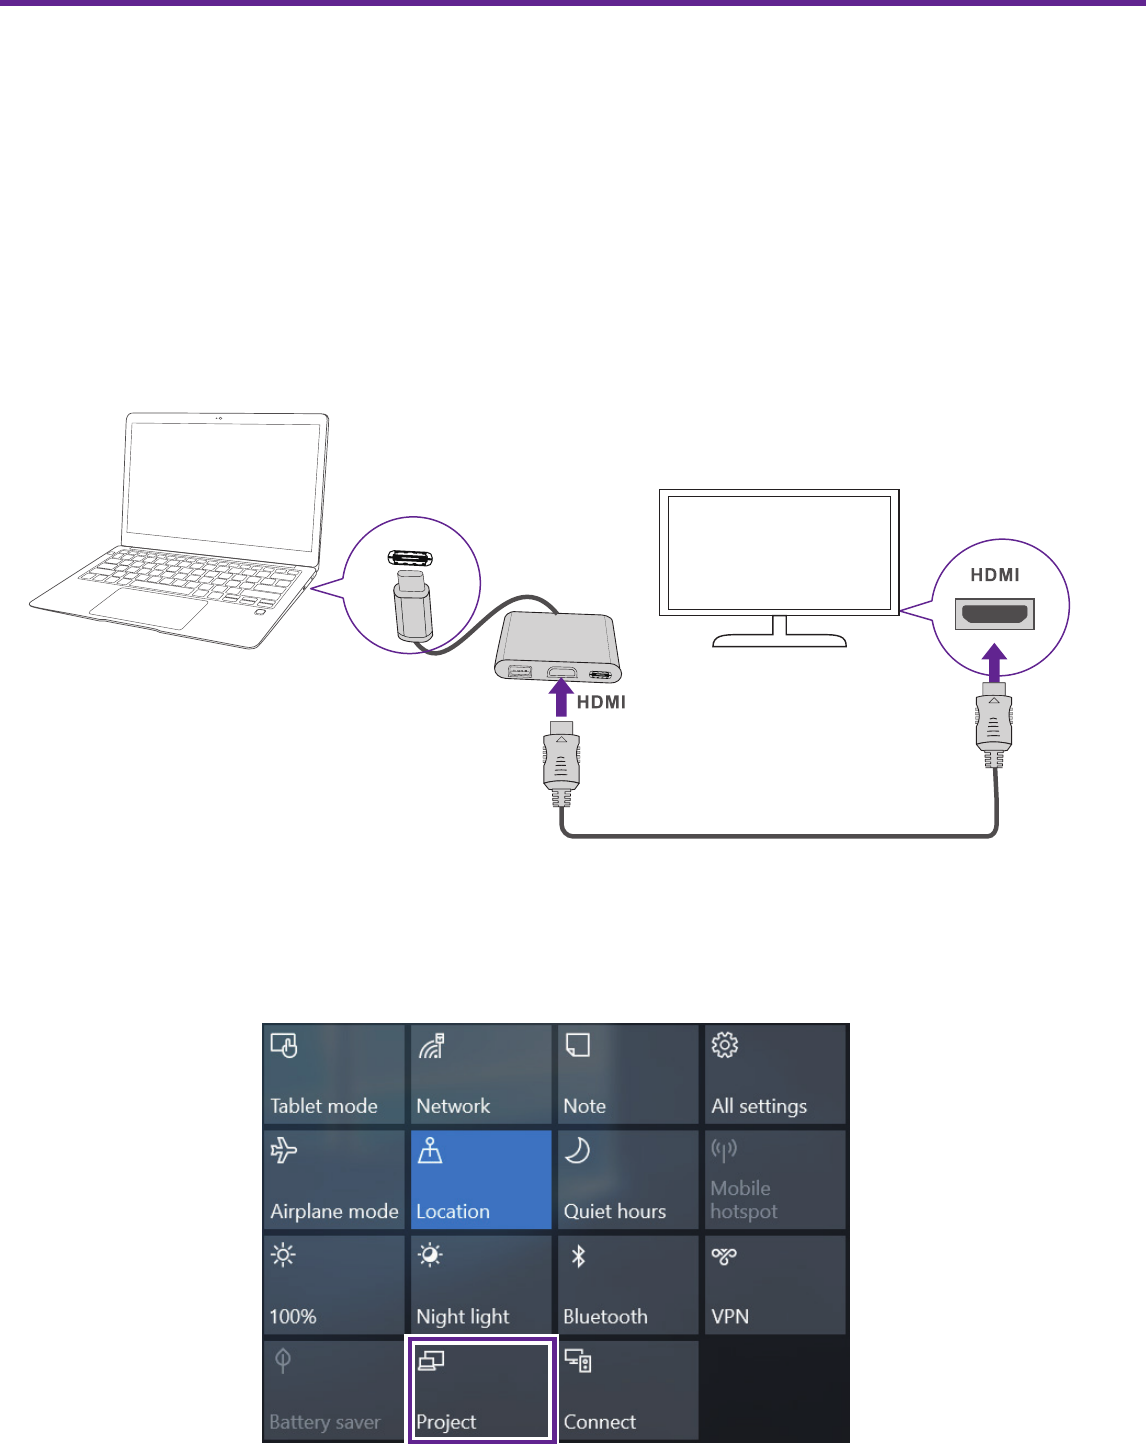
Quick Actions menu
Tablet mode Opens or closes the Tablet mode.
Connect Searches for wireless display and audio
devices.
Network Enables or disables Network, and connects
to a wireless network so that you can
check email, search the Web, access social
media websites.
All settings Allows you to access the settings of your
Notebook PC.
Airplane mode Enables or disables Airplane mode. Turns it
on to stop all wireless communication.
Location
Enables or disables Location. If this setting is
on, each person who signs in to this device
can change their own location settings.
Quiet hours Turns on/o Quiet hours.
Mobile hotspot Actives the Mobile hotspot.
Brightness level Allows you to set the brightness level of
the screen.
Night light Allows you to set the Night light level.
Bluetooth Enables or disables Bluetooth.
VPN Add a VPN connection.
Battery saver Turns on/o Battery saver.
Project Opens the Project options.
23
LIBER e-manual
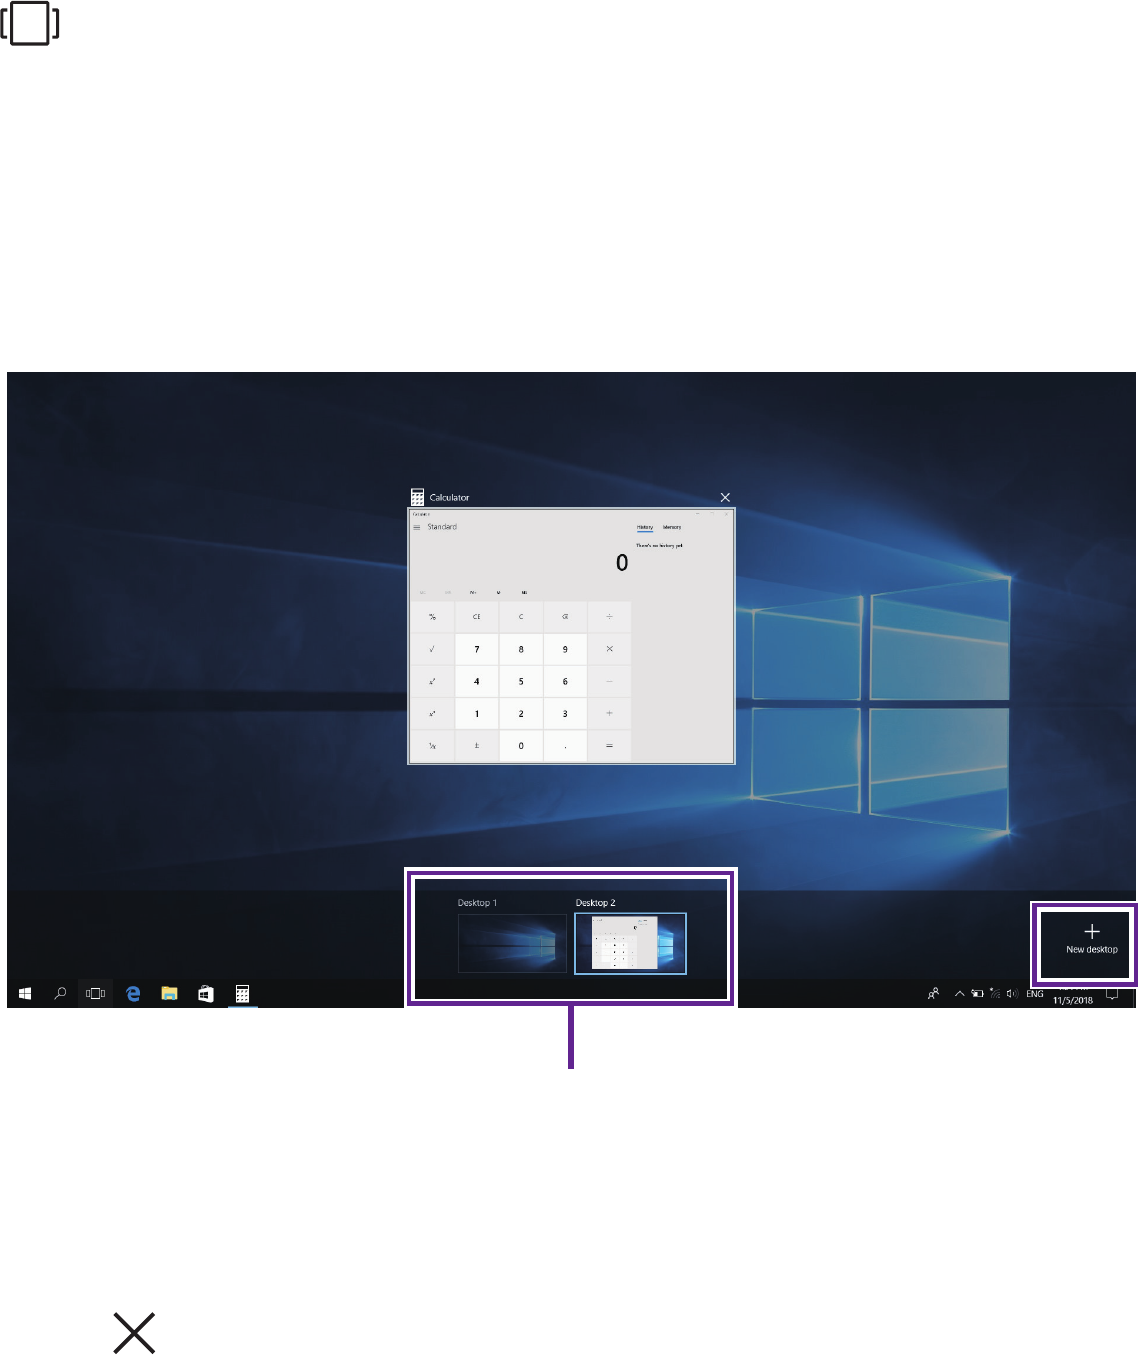
Task view
If you have a lot of apps and programs opened, click the
icon on the taskbar to see all of your running apps and
programs. You can select and click any item to open it.
Select and click + New desktop, a new desktop will be added.
Then you can open your desired apps and programs on the new
desktop.
Creating a new desktop
Move the cursor over the desktop you want to delete, then
select in the upper-right corner of the desktop.
Deleting a desktop
Desktop list
24
LIBER e-manual
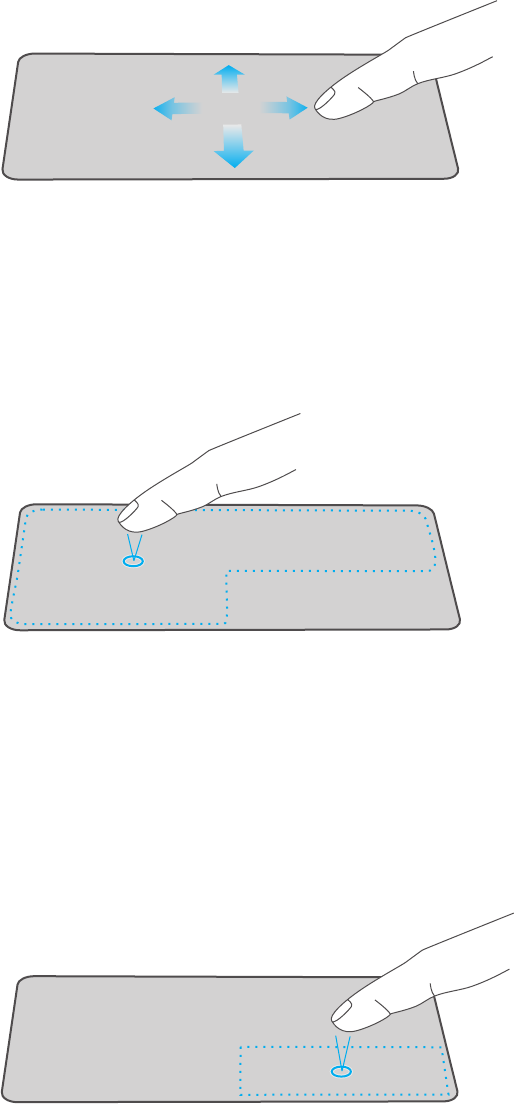
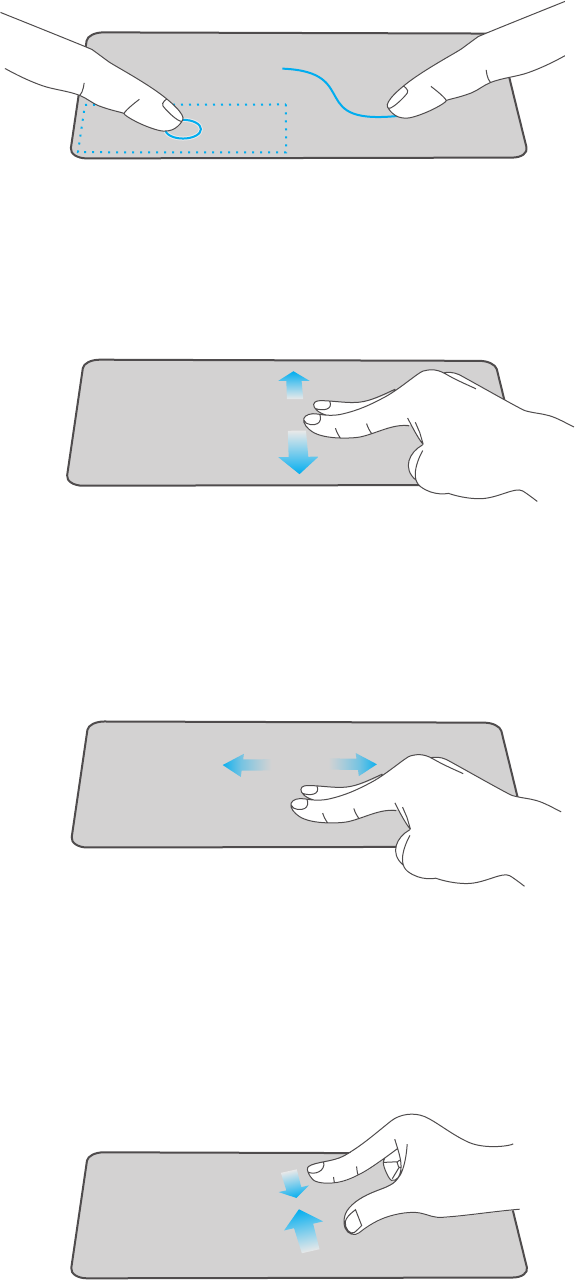
Right-click
Use the Touchpad to move the cursor or select an item. The left
and right buttons of the Touchpad act the same as the left and
right buttons of a mouse.
Slide your nger on the Touchpad to move the cursor.
• In the Start menu, click an app to launch it.
• On the File Explorer desktop, double click an application to
launch it.
Moving
Left-click
Using the Touchpad
• In the Start menu, click an app to select it and launch the
Setting bar.
• On the File Explorer desktop, click an application to open the
right-click menu.
25
LIBER e-manual
Press and hold the left button. Select an item using your other
nger then drag and drop it to a new position.
Slide two ngers to scroll up or down.
Dragging and dropping
Two-nger scroll (up/down)
Slide two ngers to scroll left or right.
Two-nger scroll (left/right)
Pinch two ngers while viewing a website, map, or image.
Zoom out
26
LIBER e-manual
Zoom in
Spread two fingers apart while viewing a website, map, or
image.
NOTE
• Please keep your fingers dry and clean when using the
Touchpad.
27
LIBER e-manual
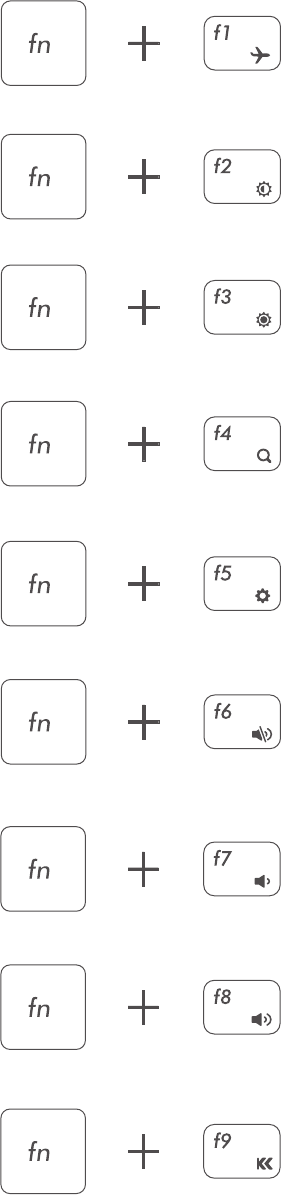
Using the Keyboard
Function keys
Press and hold the Fn key, then press a hot key to trigger the
following commands:
Turns the Airplane mode on and o.
Decreases the screen brightness.
Increases the screen brightness.
Launches the Settings screen.
Turns the speakers on and o.
Decreases the sound volume.
Increases the sound volume.
Returns to the previous media le.
Launches the Search Windows.

28
LIBER e-manual
Windows keys
Plays or pauses a selected media le.
Skips to the next media le.
Switches between the display screen and an
external monitor (if connected).
Enables or disables the backlight.
Enables or disables the Touchpad.
Launches the desktop
Launches Action Center
Launches File Explorer
Launches Feedback Hub
Opens or closes the Start menu.
You can also use the following shortcuts to help you to launch
the applications and navigate the Windows 10.

29
LIBER e-manual
Activates the Lock screen
Launches the CONNECT screen
Launches Settings screen
Prints the current screen.
Minimizes all currently active windows
Opens the Run window
Launches the PROJECT screen
Chooses the programs on the taskbar
Launches Search window
Opens Ease of Access setting menu
Opens the context menu of the Start button
30
LIBER e-manual
Connections and Setup
External display
You can connect the Notebook PC to an external display
device. The cables required to connect an external display are
sold separately.
Connecting to a display
1.
Connect the Notebook PC to a TV or other display device
using an HDMI cable (not cluded) through the Mini HDMI port.
2. Turn on your TV or other display device and select its input
mode.
3. Go to Action Center menu, select and click Project.
TV
HDMI cable
(not included)
dongle
USB
31
LIBER e-manual
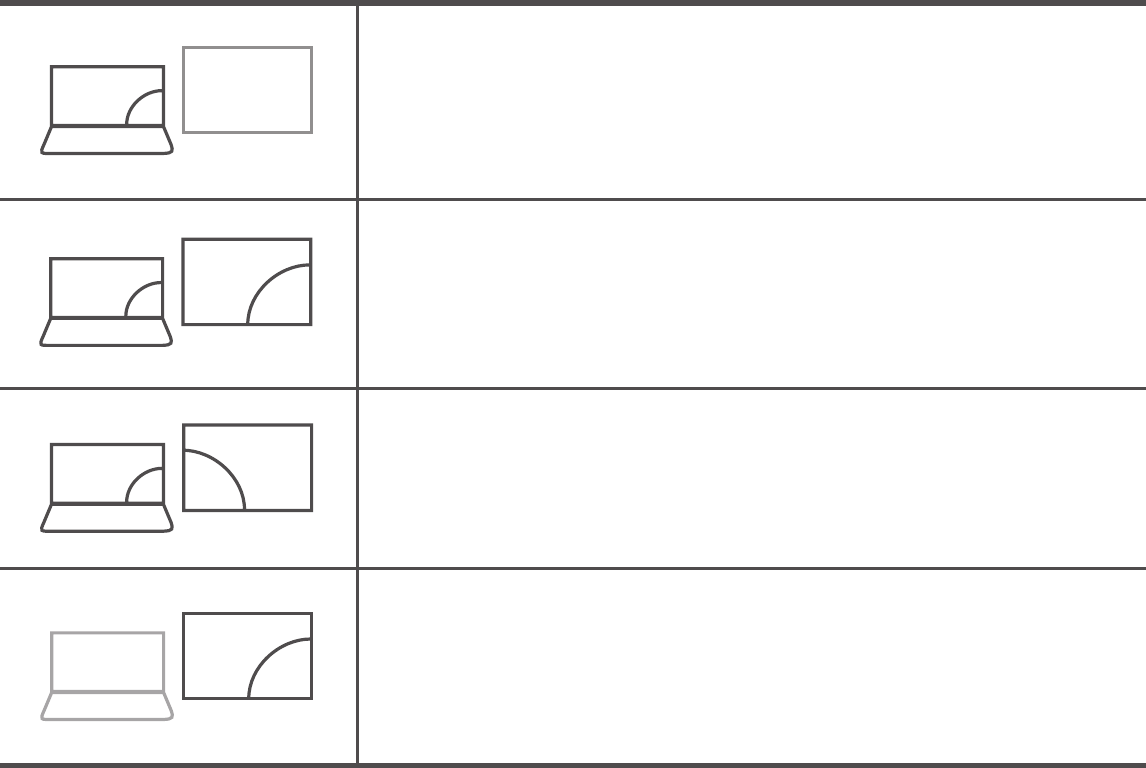
4. Select your desired mode as following:
PC screen only
Shows the screen on the Notebook PC
only.
Duplicate
Shows the screen on both the Notebook
PC and the external display.
Second screen only
Shows the screen on the external display
only.
Extend
Extends the screen to the external display.
Tip: You can also select the dual view (extend) mode. Go to
Settings -> System -> Display, and select Detect on the
Multiple displays option.
32
LIBER e-manual
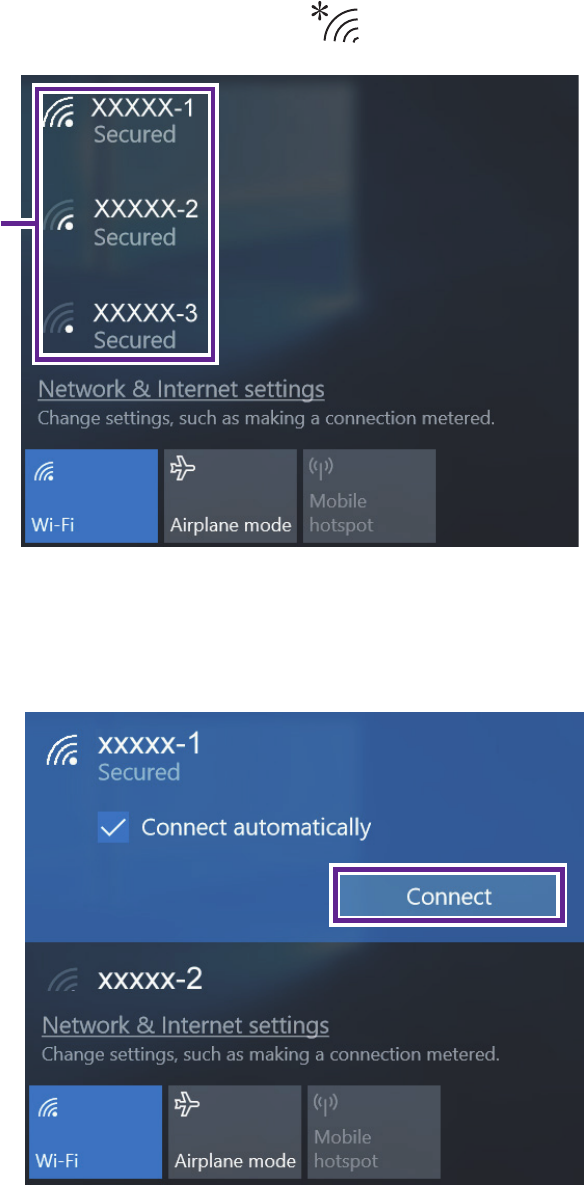
1.
On the Taskbar, select and click .
2.
Select a network from the list of detected wireless networks and
select Connect automatically -> Connect
3.
Enter the Access Point's password, if necessary, and select Next.
Connecting to a Wi-Fi network
Connect the Notebook PC to a wireless network to use the
Internet.
Access Point
(AP) list

33
LIBER e-manual
Tip: You can also
go to Settings -> Network & Internet -> Wi-Fi,
click it to On
.
NOTE
• If the device nds a network that you connected to previously,
it will connect to it automatically.
• If the Wi-Fi network does not appear in the list, it maybe a
hidden network, please click "Hidden Network" and input
SSID name of network along with password for a connection.
34
LIBER e-manual
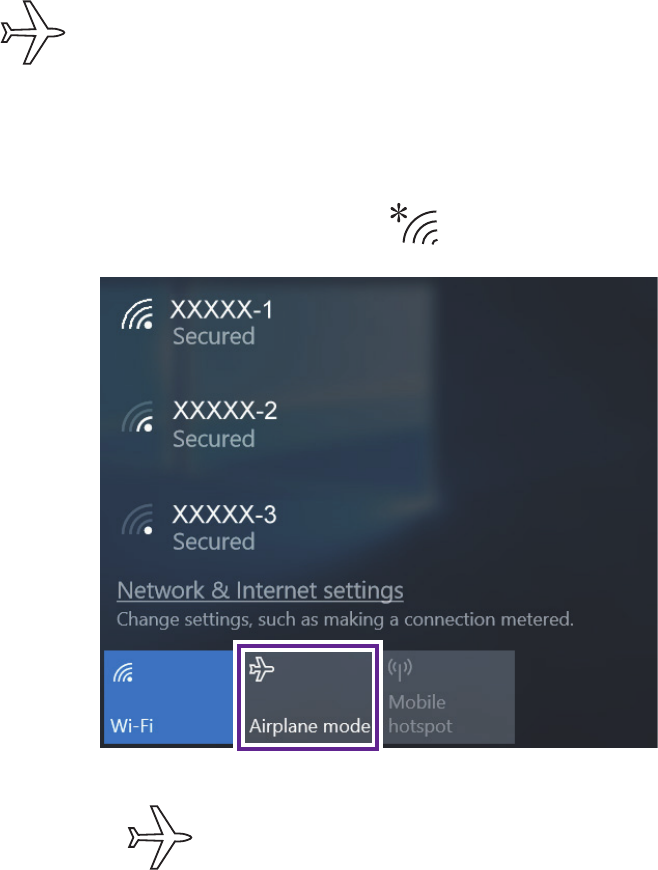
If you see icon displayed in the lower-right corner of the
screen, the Airplane mode is on. You should turn off the Airplane
mode to enable the wireless network.
The Airplane mode disables the wireless connection, allowing you
to use your Notebook PC safely while in-ight.
Airplane mode
1.
On the Taskbar, select and click .
2.
Select and click
Airplane mode
.
Tip: You can also go to Settings -> Network & Internet -> Airplane
mode, click it to On
.
35
LIBER e-manual
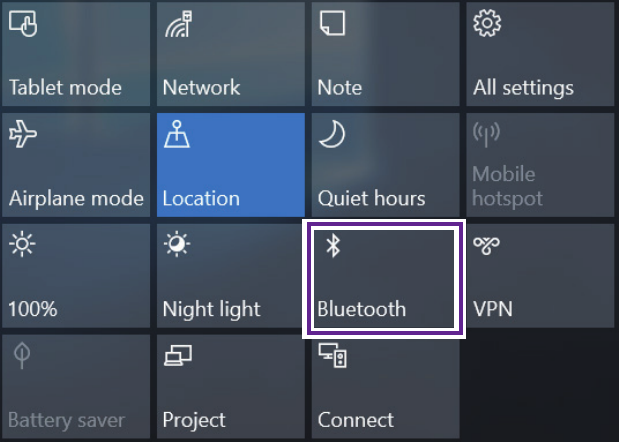
Bluetooth
You can use Bluetooth to communicate between the Notebook
PC and other Bluetooth devices, such as a smartphone.
1. Go to Action Center menu, select and click Bluetooth to
turn it on.
2. Then the Notebook PC will be a discoverable bluetooth
device and you can scan it on your other bluetooth device.
Tip:
You can also go to Settings -> Devices -> Bluetooth, click it
to On.
36
LIBER e-manual
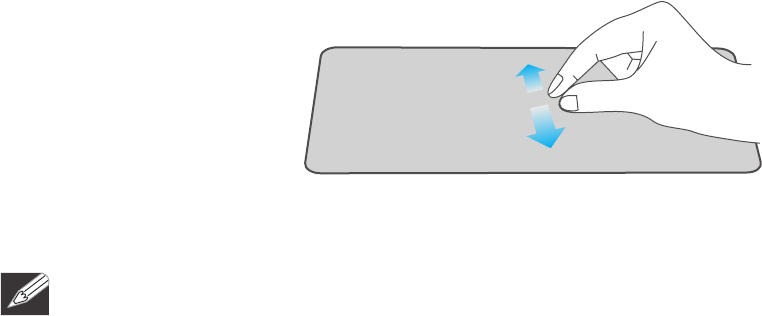
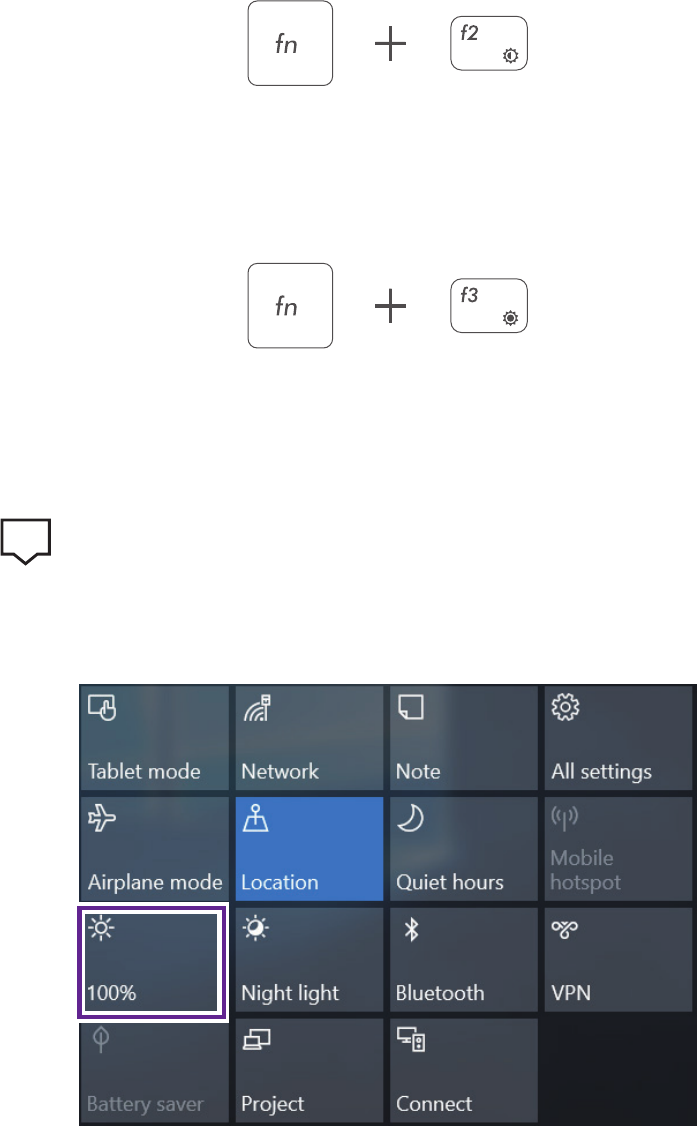
You can adjust the brightness level of the screen accroding to
your requirements.
Press and hold the Fn key, then press the F2 key to decrease the
brightness of the computer screen.
Press and hold the Fn key, then press the F3 key to
increase
the
brightness of the computer screen.
Using the keyboard to adjust brightness
Using the taskbar to adjust brightness
Brightness
Click the icon in the lower-right corner of the screen to
launch the ACTION CENTER menu. Select and click brightness
setting.
37
LIBER e-manual
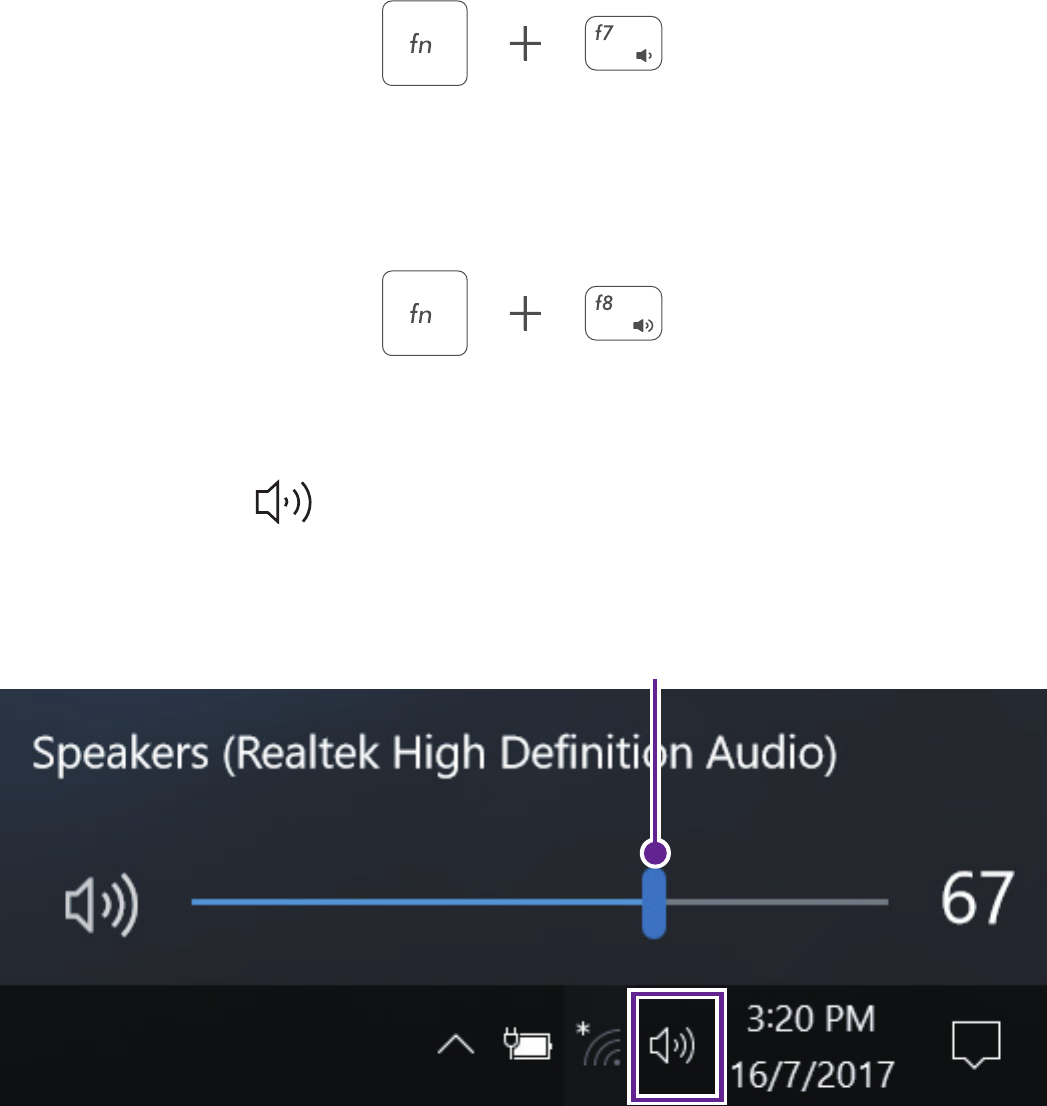
You can adjust the system volume or sound volume when
playing music or video.
Press and hold the Fn key, then press the F7 key to decrease the
sound volume.
Press and hold the Fn key, then press the F8 key to
increase
the
sound volume.
Select and click on the Taskbar, then drag the adjustment
bar to your desired volume.
Using the keyboard to control volume
Volume
Using the taskbar to control volume
Volume adjustment bar

38
LIBER e-manual
If your PC isn't running well, resetting it might help. This lets
you choose to keep your personal files or remove them, and
then reinstalls Windows. Click Get started and then choose an
option.
Keep my les
Removes apps and settings, but keeps your personal les.
Remove everything
Removes all of your personal les, apps, and settings.
Start up from a device or disc (such as a USB drive), change
your PC’s firmware settings, change Windows startup settings,
or restore Windows from the system image. This will restart
your PC.
If you want to perform this action, click Restart Now.
NOTE
Third-party applications will be removed.
You can go to Settings -> Update & security -> Recovery to
recover your Notebook PC
.
When a problem occurs with the Notebook PC, it is easy to restore
the Notebook PC to the factory default settings. Back up important
data regularly before a problem occurs with the Notebook PC.
Troubleshooting
Reset this PC
Advanced startup
39
LIBER e-manual
Notebook PC displays network or service error message
•When you are located in places with poor signal, your
Notebook PC may lose its Wi-Fi connection. Try moving closer
to the Wi-Fi router.
Notebook PC is frozen or a serious error appears
•If the Notebook PC is frozen or suspended, you may need to
close the application or refresh your Notebook PC.
• If the Notebook PC is frozen or slow to respond, press and hold
the power button for several seconds and follow the on-screen
instructions to force SHUT DOWN the unit, then press the
power button to turn on your Notebook PC again.
Windows is not active automatically
Windows will be active automatically once you connect your
Notebook PC to a Wi-Fi network.
• Make sure that you have a Wi-Fi network connection.
The device won’t start
• This may happen if your battery is empty. Please connect the
provided AC adapter to a wall outlet.
Q & A

40
LIBER e-manual
Specications and external appearance are subject to change
without notice.
Specications
USB port
USB 3.0 High speed
WiFi Connection
IEEE 802.11 b/g/n/ac
Bluetooth
Bluetooth 4.0
Power
DC 19V (operates with supplied AC adaptor)
Processor
Intel® Core™ i5-7Y54
Display
1920 x 1080 FHD, IPS
Camera
Front 2.0MP
CPU Speed
1.2GHz
RAM
8GB DDR3

41
LIBER e-manual
Legal and Safety Notices
Copyright and Trademark Notices
Intel, the Intel logo and the Intel Inside logo are trademarks of Intel
Corporation in the U.S. and/or other countries.
The Wi-Fi CERTIFIED Logo is a certification mark of the Wi-Fi
Alliance.
The Wi-Fi Protected Setup Mark is a mark of the Wi-Fi Alliance.
The Bluetooth® word mark and logos are registered trademarks
owned by the Bluetooth SIG Inc. Other trademarks and trade names
are those of their respective owners.
About HDMI
High-Definition Multimedia Interface (HDMI) is a high-speed digital
interface that can transmit uncompressed high definition video
and digital multichannel audio. It delivers high quality picture and
sound quality. HDMI is fully backward compatible with DVI. As
required by the HDMI standard, connecting to HDMI or DVI products
without HDCP (High bandwidth Digital Content Protection) will
result in no Video or Audio output.
HDMI, the HDMI logo, and High-Definition
Multimedia Interface are trademarks, registered
trademarks, or service marks of HDMI Licensing,
LLC in the United States and/or other countries.
All other trademark appearing herein are the property of their
respective owners. Specifications subject to change without notice.

42
LIBER e-manual
AVITA Computer makes the following limited warranty. This limited
warranty extend to the original consumer purchaser and is limited
to non-commercial use of the product.
One Year Parts & Labor Warranty
AVITA Computer products purchased in the United States or
Canada are warranted
to be free from defects in materials or workmanship for a period of
one year from the
date of their original retail purchase. If the unit fails to conform to
this warranty, we will service the product using new or refurbished
parts and products, at AVITA Computer’s sole discretion.
During a period of one year from the eective warranty date, AVITA
Computer will
provide, when needed, service labor to repair a manufacturing
defect at its designated Service Center. To obtain warranty service
in the United States or Canada, you must rst contact our Customer
Support Center at support.avita-americas.com. The determination
of service will be made by AVITA Computer Customer Support.
PLEASE DO NOT RETURN YOUR UNIT TO AVITA Computer
WITHOUT PRIOR AUTHORIZATION. New or remanufactured
replacements for defective parts or products will be used for repairs
by AVITA Computer at its designated Service Center for one year
from the eective warranty date. Such replacement parts or products
are warranted for an additional one year from the date of repair or
replacement. The Customer will be required to ship the unit to the
Service Center indicated at the time Customer Support is contacted
to make the necessary repairs. The customer is responsible for all
transportation charges to the service facility.
Limited Warranty

43
LIBER e-manual
Packaging and Shipping Instruction
When you send the product to the AVITA Computer service facility
you must use the original carton box and packing material or an
equivalent as designated by AVITA Computer.
Your Responsibility
(1) You must retain the original sale receipt to provide proof of
purchase.
(2) These warranties are eective only if the product is purchased
and operated in the United States or Canada.
(3) Warranties extend only to defects in material or workmanship,
and do not extend to any product or parts which have been lost
or discarded, or damage to product or parts caused by misuse,
accident, improper operation or maintenance, or use in violation
of instructions provided with the product, or to product which
has been altered or modied without authorization of AVITA
Computer, or to products or parts thereof which have had the
serial number removed or changed.
Out of Warranty
In the event your product requires repair after the limited warranty
period has expired, please contact our Customer Support Center at
support.avita-americas.com
Important: You are responsible for any transportation, shipping or
insurance relative to the return of product to our Product Returns
Center.
All warranties implied by state law, including the implied warranties
of merchantability and tness for a particular purpose, are expressly
limited to the duration of the limited warranties set forth above.
With the exception of any warranties implied by state law as hereby
limited, the foregoing warranty is exclusive and in lieu of all other
warranties, guarantees, agreements and similar obligations of
44
LIBER e-manual
manufacturer or seller with respect to the repair or replacement
of any parts. In no event shall AVITA Computer be liable for
consequential or incidental damages.
No person, agent, distributor, dealer or company is authorized
to change, modify or extend the terms of these warranties in any
manner whatsoever. The time within action must be commenced
to enforce any obligation of AVITA Computer arising under the
warranty or under any statute, or law of the United States or Canada
or any state thereof, is hereby limited to one year from the date
of purchase. This limitation does not apply to implied warranties
arising under state law.
This warranty gives you specic legal rights and you may also have
other rights, which may vary, from state to state. Some states do not
allow limitation on how long an implied warranty lasts, when an
action may be brought, or the exclusion or limitation of incidental
or consequential damages, so the above provisions may not apply
to you.
For more information on other products and services, please visit
our web site at: support.avita-americas.com
Important: Also keep your “Bill of Sale” as proof of purchase.
FOR SUPPORT AND SERVICE, PLEASE CONTACT US support.avita-
americas.com
45
LIBER e-manual
FCC SUPPLIER’S DECLARAT ION OF CONFORMITY
Product information
Product Name: Laptop
Model No.: CN212
Trade Mark: AVITA
Applicable standards: FCC CFR Title 47 Part 15 Subpart B
This device complies with related rules, operation is subject to
the following two conditions.
(1). This device may not cause harmful interference and,
(2). This device must accept any interference received,
including interference that may cause undesired operation.
Le présent appareil est conforme aux CNR d'Industrie Canada
applicables aux appareils radio exempts de licence. L'exploitation
est autorisée aux deux conditions suivantes: (1) l'appareil ne doit
pas produire de brouillage, et (2) l'utilisateur de l'appareil doit
accepter tout brouillage radioélectrique subi, même si le
brouillage est susceptible d'en compromettre le fonctionnement.
The test result has been evaluated by SHENZHEN HUATONGWEI
INTERNATIONAL INSPECTION CO., LTD. laboratory and showed in
the test report
FCC ID:A2HCN6212, IC:9903A-CN6212
It is understood that each unit marketed is identical to the device
as tested, and any changes to the device that could adversely
affect the emission characteristics will require retest.
46
LIBER e-manual
The following responsible party designated in FCC §2.909 is
responsible for this declaration:
Company Name: MLB INTERNATIONAL INC.
Company Address: P.O. BOX 1214, LOCKPORT, NY 14095
Person-in-charged: Mario Boltri
(Full Name)
Telephone Number: 1-716-240-0902
Date: 13-July-2018