Alco Electronics ONB14AV204 Clock Radio User Manual
Alco Electronics Ltd Clock Radio
User Manual
PRODUCT GUIDE
Model: ONB14AV204
Clock Radio
with Bluetooth® Technology
SAFETY PRECAUTIONS
The lightning flash with an arrowhead symbol, within the equilateral triangle, is intended to alert the
user to the presence of uninsulated “dangerous voltage” within the product’s enclosure that may be of
sucient magnitude to cause an electric shock.
The exclamation point within the equilateral triangle is intended to alert the user to the presence of
important operating and maintenance (servicing) instructions in this owner’s guide.
* SEE GRAPHIC SYMBOLS ON THE BOTTOM OF UNIT *
Rating plate was located at bottom of enclosure of the apparatus.
FCC Information
This device complies with Part 15 of the FCC rules. Operation is subject to the following two conditions:
(1) This device may not cause harmful interference, and (2) This device must accept any interference received, including
interference that may cause undesired operation.
WARNING: Changes or modifications to this unit not expressly approved by the party responsible for compliance
could void the user’s authority to operate the equipment.
NOTE: This equipment has been tested and found to comply with the limits for a Class B digital device, pursuant to
part 15 of the FCC Rules. These limits are designed to provide reasonable protection against harmful interference in a
residential installation. This equipment generates, uses, and can radiate radio frequency energy and, if not installed and
used in accordance with the instructions, may cause harmful interference to radio communications.
However, there is no guarantee that interference will not occur in a particular installation. If this equipment does cause
harmful interference to radio or television reception, which can be determined by turning the equipment o and on,
the user is encouraged to try to correct the interference by one or more of the following measures:
• Reorientorrelocatethereceivingantenna.
• Increasetheseparationbetweentheequipmentandreceiver.
• Connecttheequipmentintoanoutletonacircuit
dierent from that to which the receiver is connected.
• Consultthedealeroranexperiencedradio/TVtechnicianforhelp.
Warnings:
• Toreducetheriskofreorelectricshock,donotexposethisapparatustorainormoisture.
• TheAC/DCadapterisusedasdisconnectdevice.TheAC/DCadapterofapparatusshouldnotbeobstructedOR
shouldbeeasilyaccessedduringintendedused.Tobecompletelydisconnectthepowerinput,theAC/DCadapter
of apparatus should be disconnected from the mains.
• Minimum10cm(4inches)distancesaroundtheapparatusforsucientventilation.
• Battery-shallnotbeexposedtoexcessiveheatsuchassunshine,reorthelike.
• Theventilationshouldnotbeimpededbycoveringtheventilationopeningswithitemssuchasnewspaper,table-
cloths, curtains etc.
• Nonakedamesourcessuchaslightedcandlesshouldbeplacedontheapparatus.
• TheAC/DCadapterandapparatusshallnotbeexposedtodrippingorsplashingandthatnoobjectslledwith
liquids,suchasvases,shallbeplacedonAC/DCadapterandapparatus.
On Use
Never use the unit where it would be subject to:
- Heatsourcessuchasradiatorsorairducts.
- Directsunlight.
- Excessivedust.
- Moistureorrain.
- Mechanicalvibrationorshock.
- Unevensurface.
This symbol indicates that this product
incorporates double insulation between the
hazardous mains voltage and user accessible parts.
IMPORTANT SAFETY
INSTRUCTIONS
1. Read these instructions.
2. Keep these instructions.
3. Heed all warnings.
4. Follow all instructions.
5. Do not use this apparatus near water.
6. Clean only with dry cloth.
7. Do not block any ventilation openings. Install in accordance with the manufacturer’s instructions.
8. Do not install near any heat sources such as radiators, heat registers, stoves, or other apparatus
(including amplifiers) that produce heat.
9. Donotdefeatthesafetypurposeofthepolarizedorgrounding-typeplug.Apolarizedplughastwo
blades with one wider than the other. A grounding type plug has two blades and a third grounding
prong. The wide blade or the third prong are provided for your safety. If the provided plug does not
fit into your outlet, consult an electrician for replacement of the obsolete outlet.
10. Protect the power cord from being walked on or pinched particularly at plugs, convenience receptacles,
and the point where they exit from the apparatus.
11. Onlyuseattachments/accessoriesspeciedbythemanufacturer.
12. Use only with a cart, stand, tripod, bracket, or table specified by the manufacturer,
orsoldwiththeapparatus.Whenacartisused,usecautionwhenmovingthecart/
apparatuscombinationtoavoidinjuryfromtip-over.
13.
Unplug this apparatus during lightening storms or when unused for a long period of time.
14. Refer all servicing to qualified service personnel. Servicing is required when the
apparatushasbeendamagedinanyway,suchasthepower-supplycordorplugisdamaged,liquidhas
spilled or objects have fallen into the apparatus, the apparatus has been exposed to rain or moisture,
does not operate normally, or has been dropped.
Portable Cart Warning
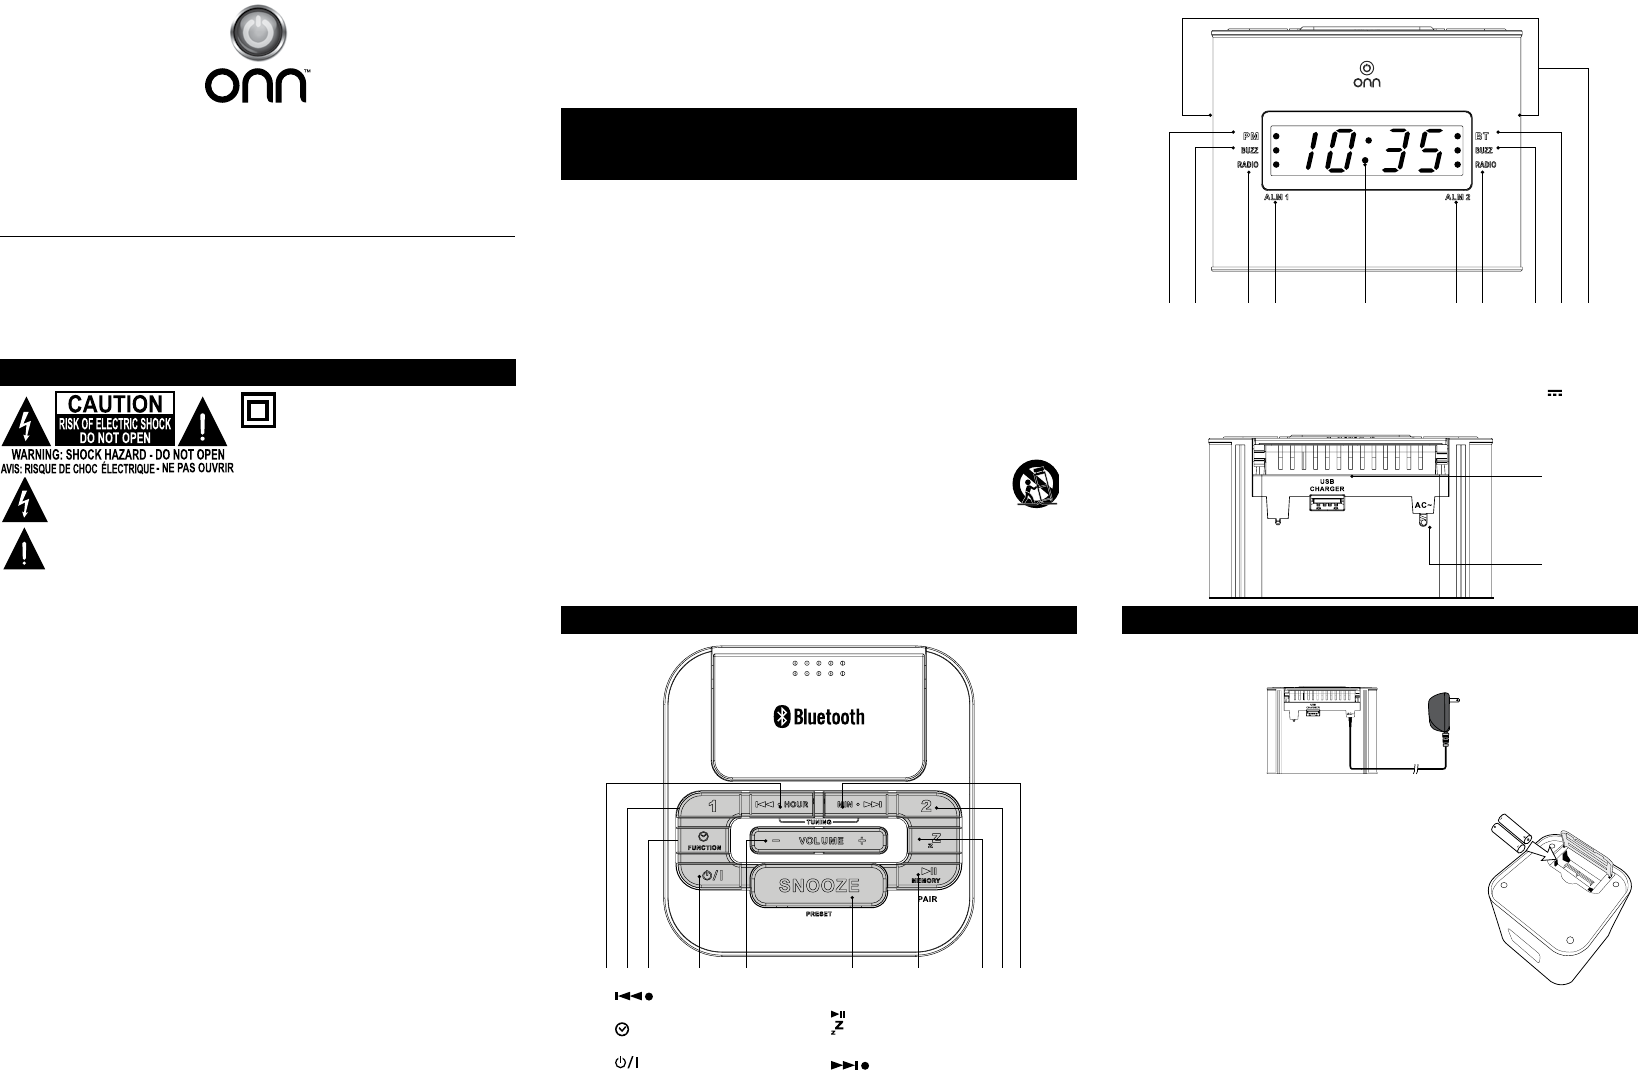
LOCATION OF CONTROLS
Top View
1. HOUR/TUNINGButton
2. 1 (Alarm 1) Button
3. (Clock) /FUNCTION Button
(FM/AM/Bluetooth®mode)
4. (Standby/On)Button
5. -VOLUME+Button
2348
59
6 7
110
6. PRESET/SNOOZEButton
7. (Play/Pause)/MEMORY/PAIRButton
8. (Sleep) Button
9. 2 (Alarm 2) Button
10. MIN/TUNINGButton
Front & Rear View
11 12 13 14 15 16 17 18 19 20
11. PM Indicator
12. BUZZ(Alarm1/beepalarmindicator)
13. RADIO alarm for alarm 1 Indicator)
14. ALM1 (Alarm 1 indicator)
15. Display(Hour Digits:Minute Digits)
16. ALM2 (Alarm 2 indicator)
17. RADIO alarm for alarm 2 Indicator
18. BUZZ(Alarm2/beepalarmindicator)
19. BT (Bluetooth® pairing for Indicator)
20. Speakers
21. USB Charger only (Max.5V 2.1A)
22. AC Power adaptor
22
21
• Donotplaceanyheavyobjectsontopoftheunit.
• WhentheunitisusedwithanACpoweradapter,donotwraptheunitinacloth,blanket,etc..Ifyoudoso,the
temperature inside and outside the unit may rise considerably, resulting in malfunctioning of the unit.
• Iftheunitisbroughtdirectlyfromacoldtoawarmlocation,orisplacedinaverydamproom,themoisture
may condense on the lens inside the unit. Should this occur, the unit will not operate. In this case, remove the
disc and leave the unit in a warm place for several hours until the moisture evaporates.
• Fortheunittooperateatitsbest,itshouldnotbesubjecttotemperaturesbelow41°F(5°C)orabove95°F
(35°C).
POWER SUPPLY
Using AC Adaptor
Before use, make sure that the rated voltage of your unit matches your local voltage.
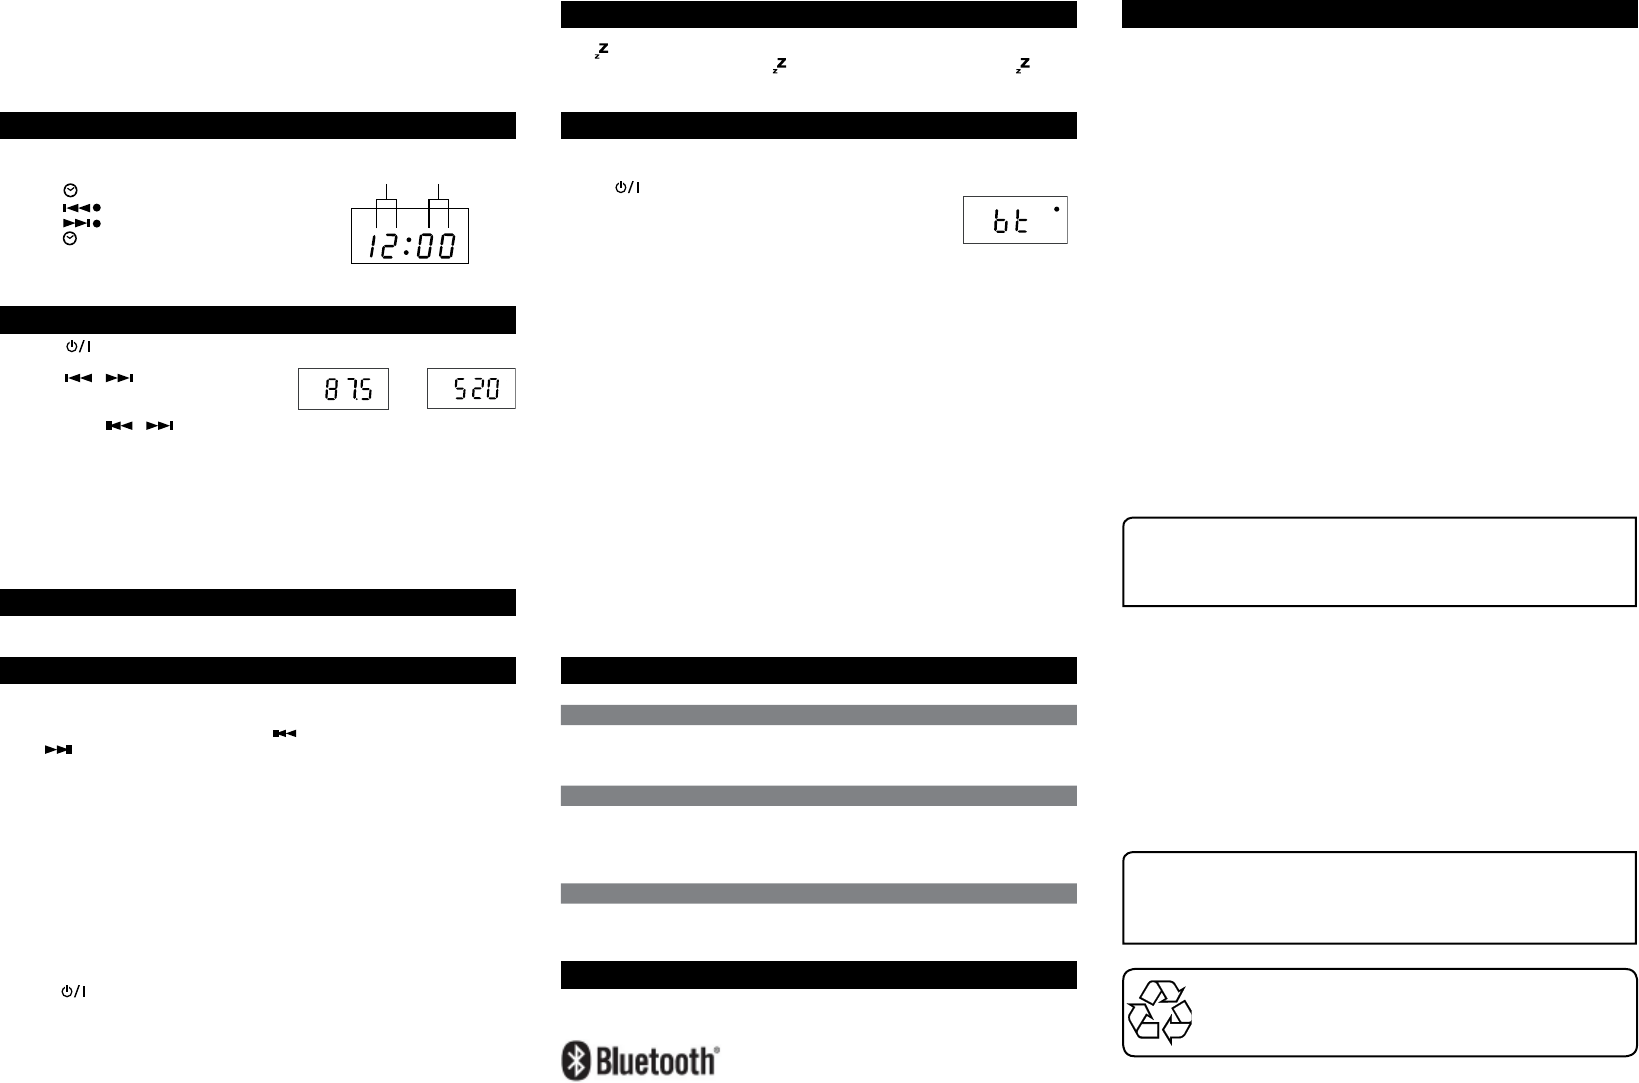
Power Backup During Power Interruption
1. Open the battery compartment door on the bottom of the unit and insert
2AA-batteries(notincluded)intothebatterycompartment.
Note:Makesurethatthepositive(+)andnegative(-)terminalsonthe
batteryalignwiththe+and-symbolsinthebatterycompartment.
2. Close the battery compartment door.
We strongly recommend you install 2 AA-batteries for the power backup
function. If the AC power supply is interrupted, the battery supplies power to
keep the clock operating and the alarm time in memory.
To Wall Outlet
AC Adapter
• Duringapoweroutage,thetimeismaintainedbutthe displayturnsoto
conserve battery power until electrical power is restored. The alarm will also
not function, but the alarm time will be saved in memory. No other features of the clock radio will operate when
using backup battery power, this includes the radio which only functions with electrical AC power.
• Thisbatteryisonlyforclockoperationandalarmmemoryduringpowerinterruption.Youcannotlistentotheradio
with the battery.
When to Replace the Battery
To check the battery condition, unplug the AC adapter from the wall outlet and plug it in again aer a few minutes. If
the displayed time is incorrect, replace the battery with a new one.
Caution: To prevent electrical shock do not insert a Polarized plug into any outlet unless all blades can be fully inserted
and are unexposed aer insertion.
EN-1 EN-2 EN-3
1. Press the (Standby/On)buttontoturntheuniton.
2. Press the FUNCTION button to 87.5(FM) or 520(AM) band.
3. Press the or button to tune in to a station.
• AdjusttheVOLUMEcontroltoobtainthedesiredvolume.
Searching for a Station Automatically
• Pressandholdthe or button until the tuner starts searching for a station, then release. Aer finding
a clear station, the search stops automatically.
Note: The search may not stop at a station with a very weak signal.
Presetting Stations
The unit can store a total of 20 stations in memory
(10 X FM, 10 X AM). Presetting allows you to tune in to a station directly.
1. Tune in to a desired station (see previous section).
2. Press the MEMORY button. The preset number will blink on the display.
3. Press the PRESET button repeatedly to select the preset number you desire.
4. Press the MEMORY button again to store it in memory.
5. Repeatsteps1-4tostoreotherstations.
LIMITED WARRANTY
VENTURER ELECTRONICS (“VENTURER”) makes the following limited warranty. This limited warranty extend
totheoriginalconsumerpurchaserandislimitedtonon-commercialuseoftheproduct.
Ninety (90) Day Parts & Labor Warranty
VENTURER products purchased in the United States are warranted to be free from defects in materials or
workmanship for a period of ninety (90) days from the date of their original retail purchase. If the unit fails to
conform to this warranty, we will service the product using new or refurbished parts and products, at VENTURER’s
sole discretion.
During a period of ninety (90) days from the eective warranty date, VENTURER will provide, when needed, service
labor to repair a manufacturing defect at its designated Service Center. To obtain warranty service in the Untied
States, you must first contact our Customer Support Center at www.venturer.com. The determination of service
will be made by VENTURER Customer Support. PLEASE DO NOT RETURN YOUR UNIT TO VENTURER
WITHOUT PRIOR AUTHORIZATION. New or remanufactured replacements for defective parts or products
will be used for repairs by VENTURER at its designated Service Center for ninety (90) days from the eective
warranty date. Such replacement parts or products are warranted for an additional ninety (90) days from the date
of repair or replacement. The Customer will be required to ship the unit to the Service Center indicated at the time
Customer Support is contacted to make the necessary repairs. The customer is responsible for all transportation
charges to the service facility.
Packaging and Shipping Instruction
When you send the product to the VENTURER service facility you must use the original carton box and packing
material or an equivalent as designated by VENTURER.
Your Responsibility
(1) You must retain the original sale receipt to provide proof of purchase.
(2) These warranties are eective only if the product is purchased and operated in the U.S.A. or Canada.
(3) Warranties extend only to defects in material or workmanship, and do not extend to any product or parts which
have been lost or discarded, or damage to product or parts caused by misuse, accident, improper operation
or maintenance, or use in violation of instructions provided with the product, or to product which has been
altered or modified without authorization of VENTURER, or to products or parts thereof which have had the
serial number removed or changed.
Out of Warranty
In the event your product requires repair after the limited warranty period has expired,
please contact our Customer Support Center at www.venturer.com
Important: You are responsible for any transportation, shipping or insurance relative
to the return of product to our Product Returns Center.
All warranties implied by state law, including the implied warranties of merchantability and fitness for a particular
purpose, are expressly limited to the duration of the limited warranties set forth above. With the exception of any
warranties implied by state law as hereby limited, the foregoing warranty is exclusive and in lieu of all other warranties,
guarantees, agreements and similar obligations of manufacturer or seller with respect to the repair or replacement
of any parts. In no event shall VENTURER be liable for consequential or incidental damages.
No person, agent, distributor, dealer or company is authorized to change, modify or extend the terms of these
warranties in any manner whatsoever. The time within action must be commenced to enforce any obligation of
VENTURER arising under the warranty or under any statute, or law of the United States or any state thereof, is
hereby limited to ninety (90) days from the date of purchase. This limitation does not apply to implied warranties
arising under state law.
This warranty gives you specific legal rights and you may also have other rights, which may vary from state to state.
Some states do not allow limitations on how long an implied warranty lasts, when an action may be brought, or
the exclusion or limitation of incidental or consequential damages, so the above provisions may not apply to you.
For more information on other products and services, please visit our web site at:
www.venturer.com
Important: Also keep your “Bill of Sale” as proof of purchase.
Model no. ................................................. Product name ...................................................
Type of set ............................................................................................................................
Serial no. ................................................. Invoice no. ..........................................................
Date purchased........................................ Dealer name ......................................................
FOR SERVICE AND REPAIR, PLEASE VISIT www.venturer.com
Design and specifications are subject to change without notice.
As concerns grow about the environmental impact of outdated electronic
products, Venturer Electronics is committed to being a part of the solution.
Free of charge, Venturer Electronics customers can return qualifying units to us
forrecycling.Formoredetails,pleasevisitourwebsiteatwww.venturer.com/
recycle.
Printed in China 811-806091W010
CLOCK SETTING
LISTENING TO THE RADIO
1. Connect the adaptor to power the unit on.
(Setting the clock can only be done in STANDBY mode.)
2. Press the button, the hour and minute digits blink.
3. Press the HOUR button to adjust the hour digits.
4. Press the MIN button to adjust the desired minutes then
press the button once to confirm.
Note:
• “PM” is displayed between 12 noon and midnight. 12:00 PM=Noon.
TIME DISPLAY INDICATOR
Hour Digits Minute Digits
or
FM/AMDISPLAYINDICATOR
Adjust Display Brightness
Press and hold the SNOOZE button to adjust the Display brightness once time .
BRIGHTNESS ADJUSTMENT
SLEEP TIMER SETTING
While listening to the radio, you can select the time interval in minutes before the unit turns o automatically.
1. Press (SLEEP) to select among 90 MIN, 80 MIN, 70 MIN, 60 MIN, 50 MIN, 40 MIN, 30 MIN, 20 MIN, 10 MIN and OFF.
2. When sleep is activated, press and hold (SLEEP) to view remaining sleep time. Press (SLEEP)
again when the remaining sleep time is displayed to change the sleep time.
Note: Sleep is automatically deactivated when the unit is turned o.
Note: Aer setting alarm, you can press the 1/2 button to view the set alarm time. If 1/2 set to the same time, only
1 will alarm on.
To Change the Alarm Time
Just follow the instructions above to set the alarm time again.
To Turn O Alarm
1. Snooze (If you want to snooze a few more minutes)
Press the SNOOZE button to mute the sound for 9 minutes. Snooze function continues to operate 59 minutes
aer the preset alarm time.
2. To shut o alarm
Press the (Standby/On) button(alarmsettingwillstayactive,itwillturnonagain,24hourslater-thetime
that the alarm is set to).
To Cancel Alarm Mode
In standby mode, press and hold the 1 (Alarm 1) or 2 (Alarm 2) buttons for 2 seconds until the ALM1 (alarm1) or
ALM2(alarm2) indicator disappears.
WAKE UP TO ALARM (BEEP OR RADIO)
To Set Alarm1
1. When in Standby mode, press the 1 button, the alarm indicator will light up.
2. Hold and press 1 button, the hour digit will flash, press button repeatedly to adjust the hour.
3. Press button repeatedly to adjust the minute.
4. Press the Function button to select alarm mode : radio or beep.
For radio alarm, first tune in to a desired station and adjust the volume. The indicator beside radio will light up.
For beep alarm, just select it. The indicator beside buzz will light up, , and press 1 to confirm.
5. The alarm will wake up to “Radio” or “Beep” when alarm timer reaches the preset time and then shut o automatically
aer 59 minutes.
Note: the Alarm 2 setting is the same as Alarm 1.
Warning:
• Dangerofexplosionifbatteryisincorrectlyreplaced.Replaceonlywiththesameorequivalenttype.
• BesuretoinstallthebatterybeforedisconnectingtheACadapter.
• Whenthe unitis leunplugged foralongtime,removethebattery toavoid unduebattery dischargeand unit
damage from battery leakage.
• Batteryshallnotbeexposedtoexcessiveheatsuchassunshine,reorthelike.
• DonotmixoldandnewbatteriesandDonotmixalkaline,standard(carbon-zinc)orrechargeable(Ni-MH,Ni-Cd,etc.)
batteries.
PLAYBACK VIA BLUETOOTH® ENABLED DEVICES
The unit can be paired and connected to the Bluetooth® enabled devices such as a smart phone.
Initial device pairing and connection
In order to pair and connect your Bluetooth® device for the first time:
1. Press the (Standby/On)to turn on the unit.
Press the Function button to Bluetooth® mode.
•TheBluetooth® indicator light glows red and flashes
which means the unit is in Bluetooth®mode and ready to pair.
2. Turn on the Bluetooth® device you wish to pair and connect.
3. Press and hold the PAIR button on the unit. The Bluetooth® indicator light will start flashing rapidly which
means it is pairing.
4. On your Bluetooth® enabled device, search for the“ONB14AV204” in the list of discovered devices and select
it. It may take the unit and Bluetooth® enabled device a few seconds to pair.
5. When the Bluetooth® indicator glows a solid red, the unit and the Bluetooth® enabled device are now paired
and connected.
6. You can now enjoy audio from the unit.
•TheunitcanonlybeconnectedtooneBluetooth® device at a time.
•IfyourBluetoothdevice(e.g.Smartphoneetc.)needthePINcodewhilepairing,
pleaseenter4-digitnumber:0000.
Reconnecting a Bluetooth® enabled device
Bluetooth® enabled devices must be reconnected when the device has been turned o or the unit has been turned o.
1. Turn on the Bluetooth® device that has already been paired with the unit.
2. Press the Power button to turn on the unit. Press the Function button to Bluetooth® mode.
3. Depending on your Bluetooth® device, your device may automatically connect to the unit.
• If the device does not automatically connect to the unit, press and hold the PAIR button on the unit until
the Bluetooth® indicator light starts flashing rapidly, then search for the “ONB14AV204” in its list of your
Bluetooth® devices and select it.
4. Once the Bluetooth® indicator turns a solid red, the Bluetooth® enabled device is paired and connected.
Pair and connect with another new device
In order to pair the unit to a new device, you must first disconnect the currently paired and connected Bluetooth®
device from the unit.
1. On the currently paired and connected Bluetooth® device, select the “ONB14AV204” from the list of currently
paired and connected devices, and disconnect it. Please refer to your Bluetooth® enabled device User’s Guide for
direction on how to disconnect a device. Or turn o it.
2. Follow the Initial device pairing and connection instructions above.
BLUETOOTH®
DISPLAY INDICATOR
TROUBLESHOOTING GUIDE
Problems Solutions
RADIO
Poor FM reception •Rotatetheunithorizontallyuntilorientationwithbestreceptionisfound.
•Electricalinterferenceinyourhomecancausepoorreception.Movetheunitaway
from them (especially those with motors and transformers).
Poor AM reception •Rotatetheunithorizontallyuntilorientationwithbestreceptionisfound.
CLOCK
Clock does not show the
correct time.
•Therehasbeenanelectricalpowerinterruption.
Alarm does not come on
at the preset time.
To turn on the RADIO or BEEP alarm, check the following points:
•Isthecurrenttimecorrectlysetonthetimedisplay?CheckthePMindicator.
•Isthealarmtimecorrectlyset?
BLUETOOTH®
Bluetooth® devices
doesn’t pair with this
unit.
•MakesureyourBluetooth® device is working properly.
Make sure the source is Bluetooth® mode.
•Checkyourdevice’smanualfordetailson
Bluetooth® pairing and linking.
SPECIFICATION
Power source AC 120V ~ 60Hz 19W
For the power backup function: AA x 2 batteries
The Bluetooth® word mark and logos are registered
trademarks owned by Bluetooth SIG, Inc.
EN-4 EN-5