Alco Electronics RCS13101T Internet Music System User Manual
Alco Electronics Ltd Internet Music System
User Manual
1
ACS3101E
user manual
2
* SEE REAR OF UNIT FOR GRAPHIC SYMBOLS *
The lightning flash with an arrowhead symbol, within the
equilateral triangle, is intended to alert the user to the
presence of uninsulated "dangerous voltage" within the
product's enclosure that may be of sufficient magnitude to
cause an electric shock.
The exclamation point within the equilateral triangle is
intended to alert the user to the presence of important
operating and maintenance (servicing) instructions in this
owner's manual.
Safety Instructions
WARNINGS:
• TO PREVENT FIRE OR SHOCK HAZARD, DO NOT EXPOSE THE UNIT
TO RAIN OR MOISTURE.
• TO AVOID ELECTRICAL SHOCK, DO NOT OPEN THE CABINET. REFER
SERVICING TO QUALIFIED PERSONNEL ONLY.
• THE APPARATUS SHALL NOT BE EXPOSED TO DRIPPING OR
SPLASHING AND THAT NO OBJECTS FILLED WITH LIQUID, SUCH AS
VASES, SHALL BE PLACED ON THE APPARATUS.
FCC Statements
NOTE: This equipment has been tested and found to comply with
the limits for a Class B digital device, pursuant to Part 15 of the FCC
Rules. These limits are designed to provide reasonable protection
against harmful interference in a residential installation. This
equipment generates, uses and can radiate radio frequency energy
and, if not installed and used in accordance with the instructions,
may cause harmful interference to radio communications. However,
there is no guarantee that interference will not occur in a particular
installation. If this equipment does cause harmful interference to
radio or television reception, which can be determined by turning
the equipment off and on, the user is encouraged to try to correct the
interference by one or more of the following measures:
– Reorient or relocate the receiving antenna.
– Increase the separation between the equipment and receiver.
– Connect the equipment into an outlet on a circuit different from
that to which the receiver is connected.
– Consult the dealer or an experienced radio/TV technician for help.
WARNING:
Changes or modifications to this unit not expressly approved by the
party responsible for compliance could void the user’s authority to
operate the equipment.
FCC RF Radiation Exposure Statement
Caution: To maintain compliance with the FCC’s RF exposure
guidelines, place the Internet Music System at least 20cm from
nearby persons.
Service Information
This product should be serviced only by those specially trained in
appropriate servicing techniques. For instructions on how to obtain
service, refer to the warranty included in this guide.
CAN ICES-3 (B)/ NMB-3(B)
This product contains a
low power laser device.
Warnings:
• The AC power plug is used as disconnect device and it should
remain readily operable during intended used. In order to
disconnect the apparatus from the mains completely, the AC
power plug should be disconnected from the mains socket outlet
completely.
• The mains plug of apparatus should not be obstructed OR should
be easily accessed during intended use.
• Minimum 10 cm (4 inches) distances around the apparatus for
sufficient ventilations.
• The ventilation should not be impeded by covering the ventilation
openings with items such as newspaper, table-cloths, curtains, etc.
• No naked ame sources such as lighted candles should be placed
on the apparatus.
On Safety
As the laser beam used in this compact disc player could be harmful
to the eyes, do not attempt to disassemble the casing. Refer servicing
to qualified personnel only.
• Do not put any foreign objects in the disc compartment. If you do
so, the laser beam interlock may be defeated allowing the laser to
remain on when the lid is opened.
• Should any objects or liquids fall into the unit, disconnect the
power supply and have the unit checked by qualified personnel
before any further operation.
On Operation
Since the CD system oers a wide dynamic range, the peaks of the
high level inputs are recorded with high fidelity, and the noise level
is very low. Do not turn up the volume while listening to a part of
the disc with no audio signals or very low level inputs. If you do so,
the speakers may be damaged when the peak level of the sound is
played. The lens of the laser should be kept clean. Do not touch the
lens. If you do so, the lens may be damaged and the unit will not
operate correctly.
On Use
Never use the unit where it would be subject to:
- Heat sources such as radiators or air ducts.
- Direct sunlight.
- Excessive dust.
- Moisture or rain.
- Mechanical vibration or shock.
- Uneven surface.
• Do not place any heavy objects on top of the unit.
• When the unit is used with an AC power plug, do not wrap the unit
in a cloth, blanket, etc. If you do so, the temperature inside and
outside the unit may rise considerably, resulting in malfunctioning
of the unit.
• If the unit is brought directly from a cold to a warm location, or is
placed in a very damp room, the moisture may condense on the
lens inside the unit. Should this occur, the unit will not operate. In
this case, remove the disc and leave the unit in a warm place for
several hours until the moisture evaporates.
• For the unit to operate at its best, it should not be subject to
temperatures below 41°F (5°C) or above 95°F (35°C).
Additional safety information
• Apparatus shall not be exposed to dripping or splashing and no
objects lled with liquids, such as vases, shall be placed on the
apparatus.
• Always leave sucient space around the product for ventilation.
Do not place product in or on a bed, rug, in a bookcase or cabinet
that may prevent air flow through vent openings.
• Do not place lighted candles, cigarettes, cigars, etc. on the product.
• Connect power plug only to AC power source as marked on the
product.
• Care should be taken so that objects do not fall into the product.
• Do not attempt to disassemble the cabinet. This product does not
contain customer serviceable components.
Double insulation when servicing use
only identical replacement parts.
ACS3101E
Equipment tested for
compliance as a
complete unit
3
System connections
Remote Control
Battery Replacement
When the battery becomes weak, the operating distance of the
remote control will be greatly reduced and you will need to replace
the battery.
Note:
If the remote control is not going to be used for a long time, remove
the battery.
WARNING:
• Do not dispose of the battery in a re or it may leak and/or explode.
• Batteries should not be exposed to excessive heat such as
sunshine, fire or the like.
CAUTION:
Danger of explosion if battery is incorrectly replaced. Replace only
with the same or equivalent type.
Using the Remote Control
• Point the remote control at the REMOTE SENSOR located on the
unit.
• When using this unit in very bright light, the infrared REMOTE
SENSOR may not work properly.
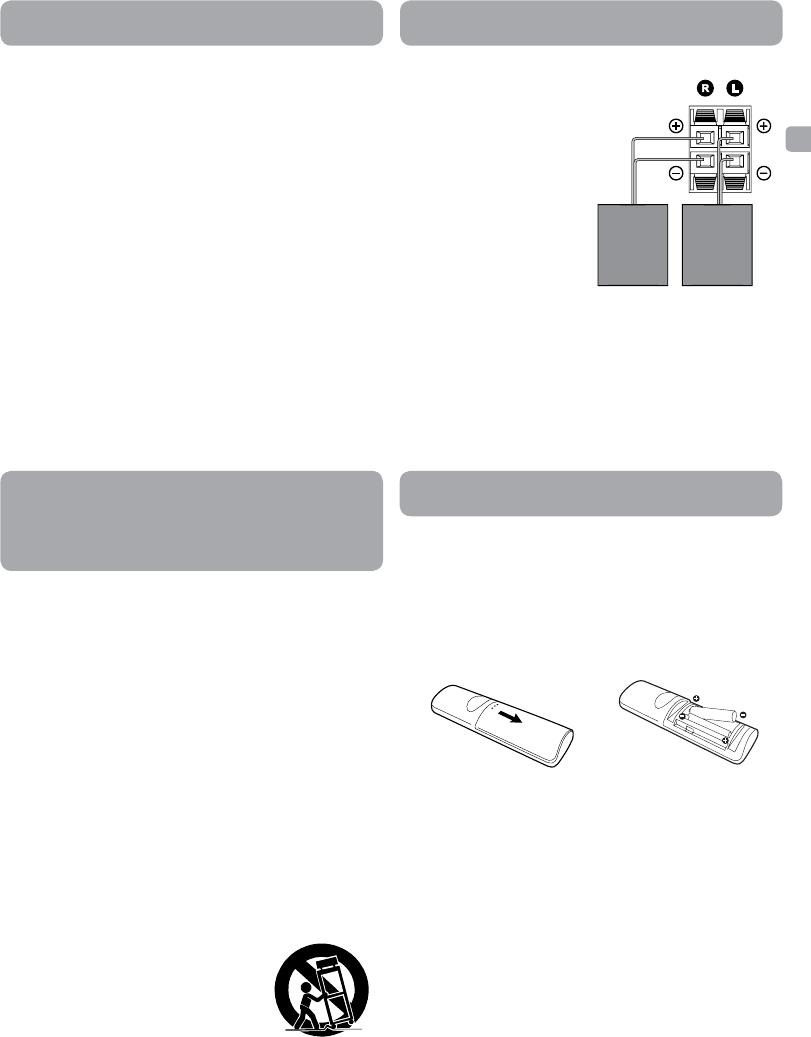
To Change Remote Battery
1. Open the battery door. 2. Insert 2 AAA size batteries.
1. Read these instructions.
2. Keep these instructions.
3. Heed all warnings.
4. Follow all instructions.
5. Do not use this apparatus near water.
6. Clean only with a dry cloth.
7. Do not block the ventilation openings. Install in accordance with
the manufacturer's instructions.
8. Do not install near any heat sources such as radiators, heat
registers, stoves, or other apparatus (including amplifiers) that
produce heat.
9. Do not defeat the safety purpose of a polarized or grounding -
type plug. A polarized plug has two blades with one wider than
the other. A grounding type plug has two blades and a third
grounding prong. The wide blade or the third prong are provided
for your safety. If the provided plug does not fit into your outlet,
consult an electrician for replacement of the obsolete outlet.
10. Protect the power cord from being walked on or pinched
particularly at plugs, convenience receptacles, and the point
where they exit from the apparatus.
11. Only use attachments/accessories specified by the manufacturer.
12. Use only with a cart, stand, tripod, bracket, or table specified
by the manufacturer, or sold with the apparatus. When a cart is
used, use caution when moving the cart/apparatus combination
to avoid injury from tip-over.
13. Unplug this apparatus during lightning
storms or when unused for long periods of
time.
14. Refer all servicing to qualified service
personnel. Servicing is required when
the apparatus has been damaged in
any way, such as the AC power cord or
plug is damaged, liquid has spilled or
objects have fallen into the apparatus,
the apparatus has been exposed to rain or moisture, does not
operate normally, or has been dropped.
IMPORTANT SAFETY
INSTRUCTIONS
Precautions
• This compact disc player uses a laser to read the music on the disc.
The laser mechanism corresponds to the cartridge and stylus of a
record player. Although this product incorporates a laser pick-up
lens, it is completely safe when operated according to directions.
• Discs rotate at high speed inside the player. Do not use damaged,
warped, or cracked discs.
• Do not touch the pick-up lens which is located inside the disc
compartment. To keep dust from collecting on the pick-up lens, do
not leave the compartment door open for an extended period of
time. If the lens becomes dirty, clean it with a soft brush, or use an
air blower brush designed for camera lenses.
Headset safety
• Have a Blast-Just Not in your eardrums! Make sure you turn down
the volume on the unit before you put on headphones. Increase
the volume to the desired level only after headphone are in place.
• Do not play your headset at high volume. Hearing experts warn
against extended high-volume play.
• If you experience ringing in your ears, reduce volume or
discontinue use.
• You should use with extreme caution or temporarily discontinue
use in potentially hazardous situations. Even if your headset is an
open-air designed to let you to hear outside sounds, do not turn up
the volume so high that you are unable to hear what is around you.
• Excessive sound pressure from earphones and headphone can
cause hearing loss.
Safety Instructions
Portable Cart Warning
Connect the speakers to the R (R+, R-) terminals and the L (L+, L-)
terminals.
Note:
Connecting speakers other than
the speakers supplied with the
unit may damage the unit.
CAUTIONS:
• Ensure that the power supply in your house complies with that
indicated on the identification sticker located on the back of your
unit (AC 120V ~ 60Hz).
• If you are not going to use the unit for a long time, disconnect the
AC power plug from the wall outlet.
• This unit is designed for continuous use. Switching o the unit
to standby mode does not disconnect it from the power supply.
To completely isolate the equipment, remove the plug from the
power outlet as some components remain connected to the
electrical supply.
Right Left
Silver cord (+)
Silver (Line dot) cord (-)
EN
4
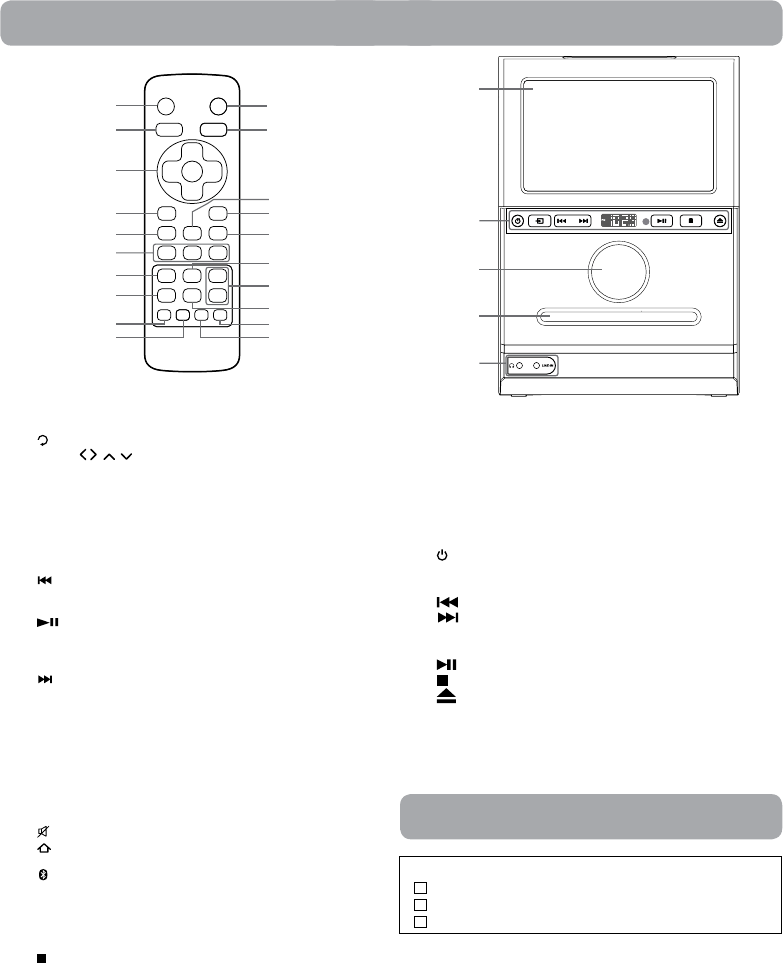
Unit
1. STANDBY button
Press to standby the unit.
Press and hold to shut down the unit.
2. (RETURN) button
3. Cursor ( , , , ) buttons
Move between selections on a menu screen and adjust certain
settings.
OK button
Confirm selections on a menu screen.
4. INTERNET button
Press to return to Internet mode.
5. CD button
Press to return to CD mode.
6. PREV button
Move back through tracks on the disc.
Press to tune the FM frequencey.
PLAY/ PAUSE button
Start or resume playback of a disc.
Press once to pause playback. Press subsequently to advance
frame by frame on a CD.
NEXT button
Skip to next track on a disc.
Press to tune the FM frequencey.
7. GALLERY button
Press to return to Gallery folder.
8. PLAY MUSIC button
Press to select the Play Music mode.
9. REPEAT button
Press to repeat the desired songs when playing CD.
10. RANDOM button
Press to random playing CD.
11. MUTE button
12. (Home screen) button
Press to return to home screen page.
13. Bluetooth button
Press to select the Bluetooth mode.
14. LINE IN button
Press to select the Line In mode.
15. FM button
Press to return to FM mode.
16. STOP button
Stop playing a disc.
17. VOL + / - buttons
Adjust the volume level.
18. SCREEN button
Press to switch screen on/off.
19. MEMORY button
Press to memory the radio station.
20. EQ button
Press to select the desired music mode (POP / CLASSIC / FLAT /
JAZZ ).
Control Reference Guide
Remote Control
1
2
3
4
5
6
7
8
11
12
14
15
16
18
13
17
20
19
10
9
1. Screen
Micro SD Card Slot
Support up to 32G (Micro SD card not included)
Micro HDMI jack
Micro USB jack
2. STANDBY/ON button
Press and hold to shut down the control panel.
Function button
button
button
Display
Remote Sensor
button
button
button
3. Master Volume knob
4. CD Door
5. Headphone jack
LINE IN jack
1
2
3
4
5
Please check and identify the supplied accessories.
Remote Control with 2 “AAA”batteries ..........................................x 1
HDMI converter cable ................................................................x 1
USB converter cable ...................................................................x 1
Accessories
5
First Time Operation
Turning Your Unit On for the First Time
When using the unit for the first time, you will be required to setup
the following:
1. Select the language, then tap Start.
2. Select the Wi-Fi.
3. If you have a Google account, select "Yes". Then tap a network
name to see more details or connect to it, and enter a password
if necessary.
When prompted, sign in using the email address and password
for your Google Account. If you don’t have one yet, go ahead and
create one.
4. Follow the onscreen instructions to setup the unit.
Basic Operation
Using the Touchscreen
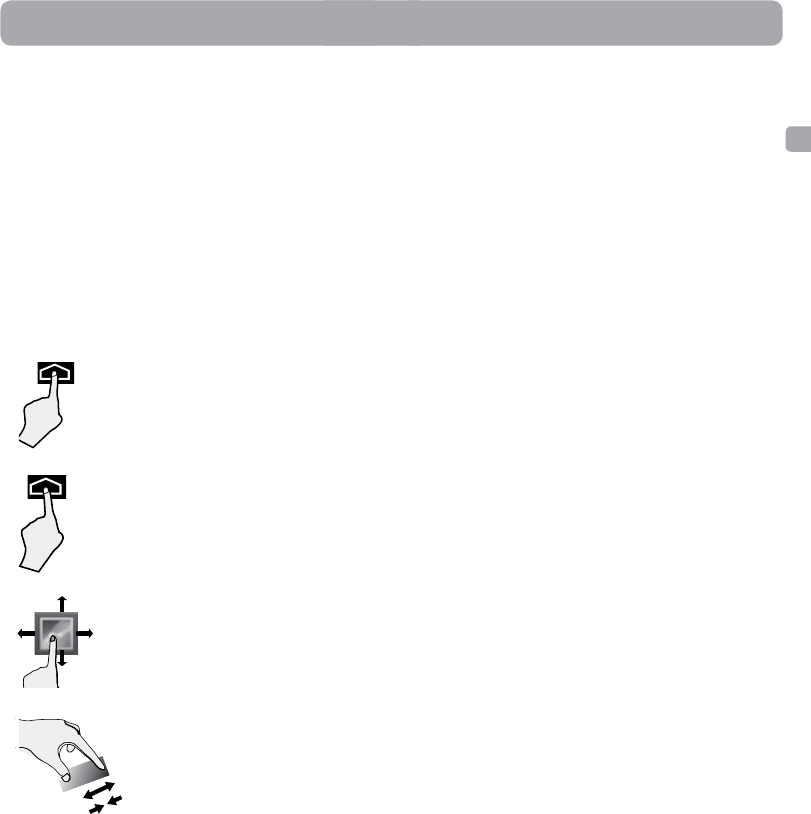
Here are some basic procedures for interacting with the touchscreen.
Tap
To select an item on the touchscreen, lightly
tap it.
Press & Hold
In some instances, touching the item and
holding your finger on it will present other
options or menus.
Drag or Swipe
While holding an item such as an icon, it
can sometimes be moved by dragging it to
another area or screen. You may also be able
to swipe your finger across a screen or item
to navigate or move it.
Zoom
By placing two fingers on the screen, you
can slide them apart to "Zoom In", or pinch
them together to "Zoom Out".
Using the Android System
Download apps on Google PlayTM
In addition to the apps that are preloaded on the system, you can
choose from hundreds of thousands of apps from the Google Play
store. Simply tap on the Play Store icon to find and download the
apps you want.
Customizing the Home Screen
• Moving Apps to the Home screen: Tap All Apps button to open
All Apps screen, press & hold an icon or widget and slowly to
drag it to the location of your choice.
• Move apps or widgets: Press & hold an icon or widget, slowly to
drag it to the screen edge, the screen will switch and you can
release the app on the screen of your choice.
• Grouping apps: Press & hold an app icon and drag it on top of
another app. This will create a folder for these apps which can
be renamed by tapping on the folder once and then tapping
the folder’s name. Additional apps can be dropped into the
folder.
• Delete apps or widgets from the Home screen: Press & hold an
icon or widget, when the " X " icon appears at the left of the
screen, drag the icon or widget into it. This will remove the app
or widget from the Home screen. However, the app won’t be
deleted from the system. It can still be found in the All Apps
button.
• Modify your Wallpaper: Press & hold an empty space on your
Home screen, and choose your wallpaper from Gallery, Live
Wallpapers or Wallpapers.
Voice Search & Voice Actions
Turn Voice Search or Voice Action On
You can initiate a Voice Search or Voice Action by tapping the
Microphone icon in the top right corner of the Home screen.
When you’re viewing the Google Now screen, you don’t have to
touch anything. Just say “Google.”
Note:
To detect when you say “Google” to launch Voice Search or
Voice Actions, Google analyzes sound picked up by your unit’s
microphone in intervals of a few seconds or less. The sound is
immediately discarded after analysis and is not stored on the device
or sent to Google servers.
Using Voice Search
After tapping the microphone icon, just say whatever it is you want
Google to search for.
Using Voice Actions
There are many actions that the unit can perform using "Voice
Actions". For example, you can send emails, set alarms, play a
song, or navigate to a website. Just tap the Microphone icon,
and say what you want the unit to do. As you speak, Voice Search
analyzes your speech and initiates the action.
If Voice Search doesn’t understand you, it lists a set of possible
meanings. Just tap the one you want.
EN
6
Notification & Status Bar
Some indicators that inform you about the status of your unit are
shown at the top of the screen.
Notification Shade
Notifications may come from the system, a game, an application
such as E-mail, or the music player.
When Notifications are available, related icons will appear in
the top left corner of the screen. To open the Notification Shade,
touch the Notification icon and swipe your finger down. Some
notifications allow you to take specific actions by tapping icons
within the notification.
After you are finished with a notification, just slide it away to the left
or right. If you want to dismiss all notifications, tap the Dismiss icon
at the top of the notification.
Status Bar & Quick Settings
The Status Bar in the top right corner shows various indicators,
including Wi-Fi connection
and battery status. To access "Quick Settings", touch the status bar
and swipe down. You can then adjust various settings on the tablet
by touching the corresponding square.
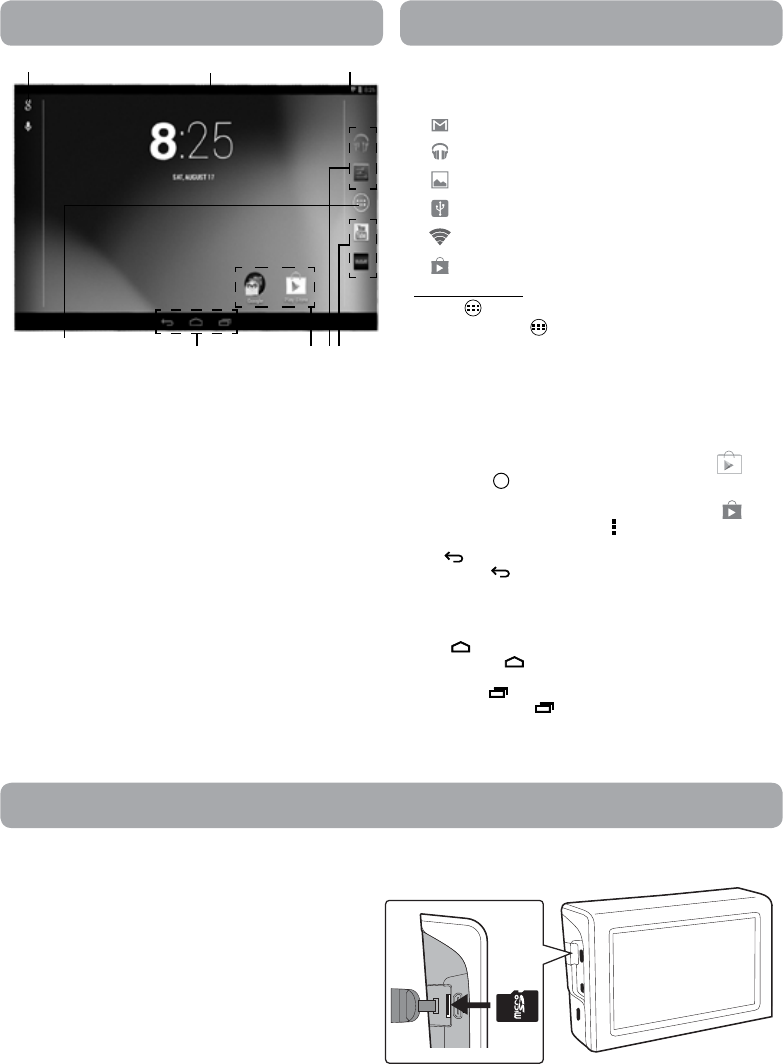
App Icons
Status Bar
Navigation Buttons
Google Search Notification Bar
All Apps
Navigating the Home Screen
The below table lists are some of the frequently used icons in the
Notification & Status bar:
Item Description
Message Received new message.
Music Play Music application is running.
Screenshots Screenshot captured.
USB tethering Has connected to a PC and the USB
tethering is turned on.
Wi-Fi Has a Wi-Fi Internet connection.
Play Store An update for an app is available.
Notication & Status Icons
Home Screen Icons
All Apps
Tap the All Apps icon to enter the All Apps screen.
In All Apps screen, you can:
• Move between screens: Slide left or right.
• Open an App: Tap its icon.
• Copy an App icon to the Home screen: Press & hold the icon or
widget icon and slowly to drag it to the Home screen.
• View widgets: Tap the widgets tab at the top of a All Apps
screen. Widgets are app information displays that can be placed
on your Home screen.
• Get more apps: Tap the Google Play Store icon , or the
Shop icon i at the upper right corner.
• View info about an App: Press & hold it, and drag it to the top of
the screen, then drop the app over the App Info icon .
Tip: Most apps include a Menu icon near the top or bottom of the
screen that lets you control the app’s settings.
Back
Tap Back icon to return to the previous screen.
• The Back icon remains on the bottom of the screen at all times,
allowing you to navigate back to the previous screen.
• Once you go back to the Home screen, you can’t go back any
further in your history.
Home
Tap Home icon from anywhere on your unit to return to the
Home screen.
Recent Apps
Tap Recent Apps icon to view recently used apps. Tap an app to
use it again.
You can slide down to see more apps. You can also slide it away to
the left or right.
Insert a Micro SD card
To increase the memory storage capacity, remove the rubber
cover on the side of screen and insert a Micro SD card (not
included) into the unit’s Micro SD slot until it clicks.
To remove a Micro SD card, push in on the edge of the card until
it pops out of the card slot.
Insert a Micro SD card
7
Connections
Micro-USB
Connect your unit to a PC or a USB storage device with a USB cable
(not included) and USB converter cable (included) to transfer music,
pictures and other files in both directions.
Notes:
• To change your unit’s USB connection options, you should go to
Settings > DEVICE > Storage, and tap Menu icon at the upper
right corner. Then tap USB computer connection to enter to
setup.
• The unit can be connected to a keyboard, a mouse or other input
devices via a USB cable and use it just as you would connect with
a PC.
Micro SD
Remove the rubber cover on the side of screen and insert the micro
SD card into the unit’s Micro SD slot until it clicks.
To check the storage of the micro SD card, go to
Settings > DEVICE > Storage
Remove the micro SD card by pushing in on the card's edge. The
card will pop out and can be removed.
Notes:
• You can use microSDTM card and microSDHCTM card (up to 32GB,
SD card not included).
• Never remove or insert micro SD card in On mode.
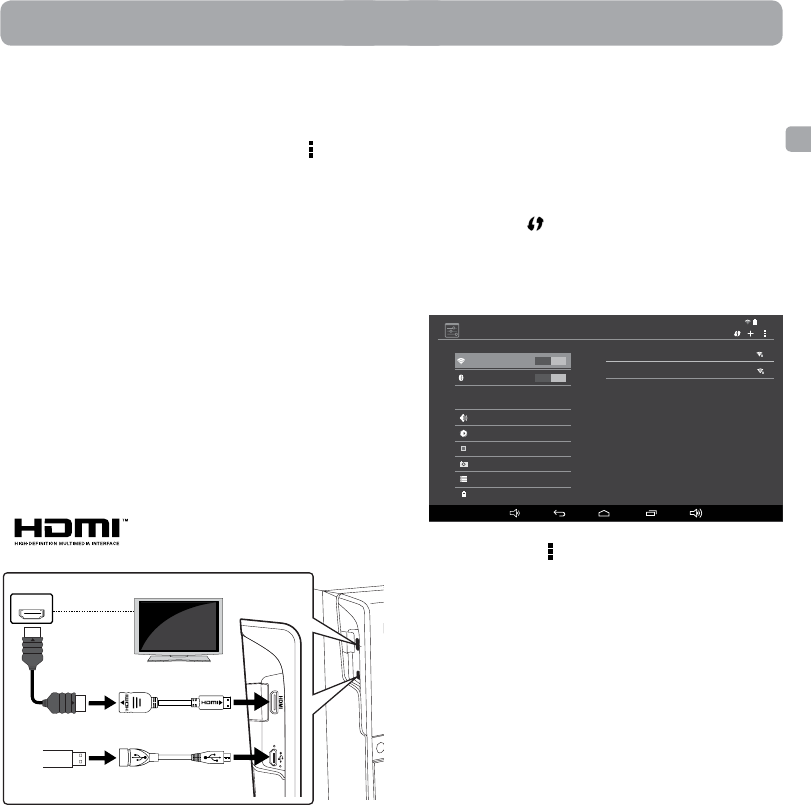
Micro-HDMI
Connect your unit to a TV or other display device with a HDMI cable
(not included) and HDMI converter cable (included) to output the
video.
Notes:
• To change your unit’s HDMI options, you should go to
Settings > HDMI > to modify each setting.
Wi-Fi
Connect to a Wi-Fi Network
1. Go to Settings > WIRELESS & NETWORKS > Wi-Fi, and slide the
Wi-Fi switch to the ON position.
2. The device will scan Wi-Fi networks automatically and display the
available names.
• If the device finds a network that you connected to previously, it
will connect to it automatically.
3. Tap a network name to connect to it, and enter a password if
necessary.
4. Alternatively, if your Wi-Fi router supports Wi-Fi Protected Setup,
tap the WPS icon at the top of the screen, and then press the
WPS button on your router.
5. If your network does not broadcast its SSID, tap the Plus icon
+ at the top of the screen, and enter the Network SSID (name)
of the network. If necessary, enter security or other network
configuration details.
VPN (Virtual Private Network)
You can create virtual private network (VPN) and connect to your
private network securely through a public network, such as the
internet. You must set a lock screen PIN or password before you can
use credential storage.
Add VPN network and follow the instructions on the screen.
HDMI, the HDMI logo and High-Definition
Multimedia Interface are trademarks or
registered trademarks of HDMI Licensing, LLC. Note:
you can tap Menu icon at the upper right corner in the Settings
screen for advanced settings.
Settings
WIRELESS & NETWORKS
Wi-Fi
Bluetooth
More...
DEVICE
ScreenshotSetting
Storage
Battery
Hdmi
Sound
Display
6:14
ON
OFF
CoffeeShopWF
WPS available
MyHomeWF
Connected
EN
HDMI Converter Cable (included)
USB Converter Cable (included)
TV
HDMI IN
High
Definition
TV
HDMI Cable
(not included)
Control
Panel
8
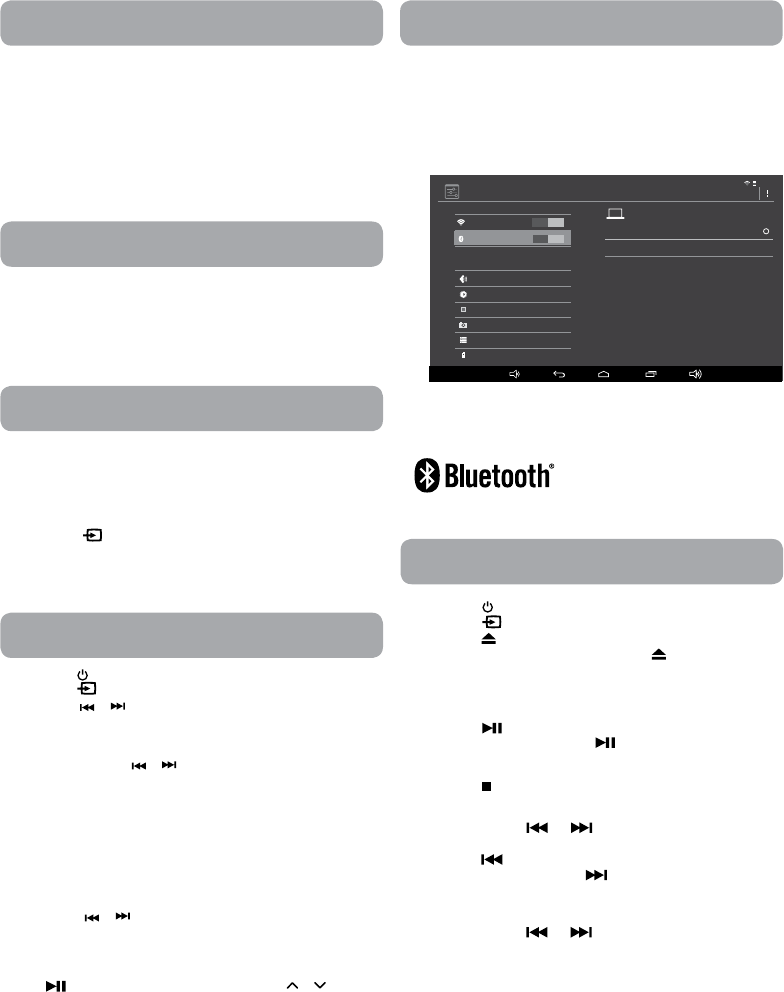
Connect a Bluetooth® device to the Main Unit
To Adjust the Volume
The volume can be adjusted using the Master Volume Knob on the
main unit, or the Volume Up/Down Buttons on the remote control.
For Personal Listening
Connect headphones (Ø3.5mm stereo mini plug) to the earphone
jack. Adjust the VOLUME levels to obtain the desired volume.
When headphones are connected, the speakers are automatically
muted.
Warning: Excessive sound pressure from earphones and headphones
can cause hearing loss.
Listen to the Radio
1. Press the button to turn the unit on.
2. Press the button to FM mode.
3. Press the or button to tune in to a station.
4. Adjust the volume levels.
Searching for a Station Automatically
• Press and hold the or button until the tuner starts searching
for a station, then release. After tuning in a station, the search
stops.
• The search may not stop at a station with a very weak signal.
Presetting Stations
The unit can store a total of 20 stations in memory. Presetting allows
you to tune in to a station directly.
1. Tune in to a desired station.
2. Press and hold the MEMORY button. The preset number will blink
and the “PXX” indicator will be shown on the display.
3. Press the or button to select the preset number.
4. Press the MEMORY button again to store it in memory.
5. Repeat steps 1-4 to store other stations.
Tuning into a Preset Station
Press PLAY/PAUSE button on the unit or press or button on
the remote control to select a preset number.
For Better reception
FM: Fully unwind the antenna wire. Extend the antenna wire and
place it in the position that sounds best.
Note: Do not connect the FM antenna to an outside antenna.
Volume Adjustment
This system supports a variety of equalizers and sound effects.
During playback, press the EQ button to select a desired music
mode. Each time the EQ button is pressed, the music mode will be
changed to the next one as follows:
POP / CLASSIC / FLAT / JAZZ
Preset EQ
You can connect audio devices such as your iPod, CD players or MP3
players to the unit via the LINE IN jack. To do this, connect an audio
cable from the line out or headphone out jack of the other audio
device to the LINE IN jack on the unit’s front panel.
Listening to the Connected Device
1. Press the button to LINE IN mode and “ L-in ” is shown on the
display.
2. Turn on the audio device you’ve attached to the LINE IN jack.
Line-In Playback
1. Press the button to turn on the unit.
2. Press the button to CD mode.
3. Press the button to open the CD door. Place a disc in the center
with the label side up and then press the button again to close
the CD door. Then, it plays automatically.
• Adjust the volume levels.
To Pause Playback
• Press the button.
• To resume playback, press the button again.
To Stop Playback
• Press the button.
Skipping to Another Track
• Press either the or button according to the desired
direction.
• Press the button to skip to the start of the current track or skip
to previous tracks. Press the button to skip to the beginning
of the next track.
Locating a Particular Point on a Track
• Keep either the or button pressed during playback,
according to the desired direction, and release at the desired
point.
CD Playback
Settings
WIRELESS & NETWORKS
Wi-Fi
Bluetooth
More...
DEVICE
ScreenshotSetting
Storage
Battery
SEARCH FOR DEVICES
Hdmi
Sound
Display
6:14
ON
RCA RCS13101E
RCS13101T
Not visible to other Bluetooth device
AVAILABLE DEVICES
ON
The system can wirelessly receive and playback audio from a
Bluetooth-equipped smartphone, tablet, or computer.
1. Go to Settings > WIRELESS & NETWORKS > BLUETOOTH, and
slide the Bluetooth® switch to the ON position.
2. Turn on the Bluetooth® device you wish to pair and connect.
3. On your Bluetooth® enabled device, search for the “RCA
RCS13101E" in the list of discovered devices and select it.
Note: If your Bluetooth® device (e.g. Smart phone etc.) need the
PIN code while pairing, please enter 4-digit number: 0000.
The Bluetooth® word mark and logos
are registered trademarks owned by
Bluetooth SIG, Inc.
9
Repeat the current track
• Press the REPEAT button until “ rP1 ” blinks on the display. The
current track will be played repeatedly.
Repeat the Entire CD
• Press the REPEAT button until “ rPA ” stops blinking and remains
on. All tracks will be played repeatedly.
Cancel Playback Mode
• Press the REPEAT button to cancel the playing until “ OFF ”
appears.
Random Playback
Random Playback
• Press the RANDOM button on the remote control and “ rdn ” will
be shown on the display. All tracks will be played randomly. After
all tracks have played, the unit will stop automatically.
Cancel Random Playback
• Press the RANDOM button on the remote control again during
RANDOM playback to return to normal playback and “ OFF ” will
be shown on the display.
Repeat Playback Troubleshooting Guide
No power.
• System does not turn on.
• Make sure AC power plug is secure in the outlet, and outlet has
power.
The remote control does not function.
• Make sure the infrared remote sensor is not blocked.
• Point the remote directly at the infrared remote sensor on the
unit.
• Replace the battery in the remote control with a new one.
Poor FM reception.
• Make sure FM antenna wire is fully extended.
• Electrical interference in your home can cause poor reception.
Move the unit away from them (especially those with motors and
transformers).
The CD Disc does not play.
• Make sure you’ve selected CD mode.
• Make sure disc label is facing up.
• Make sure disc is clean.
• Pause mode is activated.
• Disc may be damaged or dirty; check disc.
Severe hum or noise is heard.
• The plugs and jacks are dirty. Wipe them with a cloth slightly
moistened with alcohol.
• Clean the disc.
Cleaning the Disc
A defective or soiled disc inserted into the unit can cause sound to
drop out during playback.
Handle the disc by holding its inner and outer edges.
• Do NOT touch the surface of the unlabeled side of the disc.
• Do NOT stick paper or tape on the surface.
• Do NOT expose the disc to direct sunlight or
excessive heat.
• Clean the disc before playback. Wipe the disc
from the center outward with a cleaning cloth.
• NEVER use solvents such as benzine or alcohol to clean the disc.
• Do NOT use irregular shaped discs (example: heart shaped,
octagonal, etc.). They may cause malfunctions.
Cleaning the Unit
• Be sure to turn the unit off and disconnect the AC power adapter
before cleaning the unit.
• Wipe the unit with a dry soft cloth. If the surfaces are extremely
dirty, wipe clean with a cloth that has been dipped in a weak
soap-and-water solution and wrung out thoroughly, then wipe
with a dry cloth.
• Never use alcohol, benzine, thinner, cleaning fluid or other
chemicals. Do NOT use compressed air to remove dust.
Important Note
• Before transporting the unit, remove the disc from the disc
compartment.
Maintenance
EN