Aleis 9060 9060 SERIES ISO RFID READER User Manual 2
Aleis Pty Ltd 9060 SERIES ISO RFID READER Users Manual 2
Aleis >
Contents
- 1. Users Manual 1
- 2. Users Manual 2
Users Manual 2

Aleis Pty Ltd
PO BOX 63
Jandowae 4410
QLD Australia
ACN 130 754 826
www.aleis.com
Reader
User Guide
ISO8151 & ISO8152
Including
Aleis DataLink
Version Draft A 19/08/2009
Fixed Race Reader
IMPORTAT! This User Guide must be read in conjunction with
Reader, prior to use.
Copyright Aleis Pty Ltd 2009
13429 A1064AUS

Aleis 8050 Series Operational Manual
Aleis 8050 Series
2 of 35

Aleis 8050 Series Operational Manual
Aleis 8050 Series
3 of 35
Regularity otices and Conformity ................................................................................................................................ 4
Important User Instructions ............................................................................................................................................ 5
1.0
8050 Reader Instructions ...................................................................................................................................... 5
2.0
The 8050 Keypad ................................................................................................................................................. 6
3.0
8050 Series Reader Method of Use ....................................................................................................................... 6
3.1 How to: Read & Record RFIDs ......................................................................................................................... 6
3.2 How to: Create Sessions using menu. ................................................................................................................ 6
3.3 How to: Create Sessions using F1 and F2 Keys. ................................................................................................ 7
3.4 How to: Upload RFIDs into the Reader ............................................................................................................. 7
3.5 How to: Compare RFIDs in the Reader ............................................................................................................. 8
3.6 Formatting the File System ................................................................................................................................ 9
3.7 How to Format your reader ................................................................................................................................ 9
4.0
8050 Series Menu Tree ........................................................................................................................................ 10
5.0
Audio and Visual Alerts ..................................................................................................................................... 11
6.0
Menu ..................................................................................................................................................................... 12
6.1 Session ............................................................................................................................................................. 12
6.2
Read Setup ........................................................................................................................................................ 12
6.3 System Setup .................................................................................................................................................... 13
6.4 Reader Information .......................................................................................................................................... 14
6.5 Memory Status ................................................................................................................................................. 14
7.0
Battery Charging ................................................................................................................................................. 15
7.1
Battery Charging Requirements ........................................................................................................................ 15
7.2
Race Charging using Gel Cell Batteries ............................................................................................................ 15
7.3
Battery Charging Options ................................................................................................................................. 15
7.4
Alternative Recharging Methods ...................................................................................................................... 15
8.0
The Clock on the 8050 Reader ............................................................................................................................ 16
9.0
Using Bluetooth (On ISO8151BT & ISO8152BTmodels only) ........................................................................ 16
9.1
BlueTooth PIN code ......................................................................................................................................... 16
10.0
Aleis DataLink Software ..................................................................................................................................... 17
10.1
Aleis DataLink Installation ........................................................................................................................... 18
10.2
Aleis DataLink Operation ............................................................................................................................. 18
10.3
Aleis DataLink Menu Screen ........................................................................................................................ 19
10.4
Producer Transfer (Australia Only) .............................................................................................................. 20
10.5
3
rd
Party Transfer (Australia Only) ............................................................................................................... 23
10.6
Retrieve Tag Bucket (Australia Only) .......................................................................................................... 26
10.7
Tag Replacement (Australia Only) ............................................................................................................... 28
10.8
NLIS Upload Centre (Australia Only) .......................................................................................................... 31
11.0
Rail Measurements for fixed race systems ........................................................................................................ 32
12.0
Aleis Conditions of Sale ....................................................................................................................................... 33
Aleis 8050 Series Operational Manual
Aleis 8050 Series
4 of 35
Regularity otices and Conformity
USA – FCC
Information to the user (FCC Part 15.105)
This equipment has been tested and found to comply with the limits for a Class B digital device, pursuant to
Part 15 of the FCC Rules. These limits are designed to provide reasonable protection against harmful
interference in a residential installation. This equipment generates, uses and can radiate radio frequency
energy and, if not installed and used in accordance with the instructions, may cause harmful interference to
radio communications. However, there is no guarantee that interference will not occur in a particular
installation. If this equipment does cause harmful interference to radio or television reception, which can be
determined by turning the equipment off and on, the user is encourage to try to correct the interference by one
or more of the following measures:
Reorient or relocate the receiving antenna
Increase the separation between the equipment and receiver
Connect the equipment into an outlet on a circuit different from that to which the receiver is
connected
Consult the dealer or an experienced radio/TV technician for help
Modification warning (FCC Part 15.21)
Warning: Any changes or modifications not expressively approved by Aleis could void the user's authority to
operate this equipment.
Canada
This Class B digital apparatus complies with Canadian ICES-003.
Cet appareil numérique de la classe B est conforme à la norme NMB-003 du Canada.
Europe CE
This device has been tested and meets the Electromagnetic Compatibility requirements for EN300 330
Australia and ew Zealand - C-Tick
This device has been tested and meets the Electromagnetic Compatibility requirements for CISPR 11
Antenna Warning
This device has been designed to operate with the antennas listed below. The ISO8050 Series Readers are only
approved with the detachable antennas below. In accordance with RSS-GEN Issue 2 June 2007 Section 7.1.4
and FCC Part 15.21, antennas not included in this list are strictly prohibited for use with this device.
Aleis Part Number Antenna Size Antenna Description
4028 1200mm x 600mm Loop antenna
4027 1200mm x 400mm Loop antenna
4026 900mm x450mm Loop antenna
4025 600mm x 400mm Loop antenna
4024 500mm x 400mm Loop antenna

Aleis 8050 Series Operational Manual
Aleis 8050 Series
5 of 35
Important User Instructions
1.0 8050 Reader Instructions
IMPORTAT
Must be read prior to using system
USER ISTRUCTIOS
The following instructions must be wholly adhered to or permanent damage to the antenna/reader and/or permanent
data loss can occur. Non-conformance to the handling and operating instructions will immediately void all warranties
for the antenna/reader and software.
1. Battery must be charged every two months and for maximum performance, batteries need to be charged before and
after use.
2. The clock will lose time if the battery is run or left flat. Use DataLink to update your time.
3. Charge for 24 hours for 1
st
initial charge.
4. Unit is ready to use straight out of the box. No need to change any settings. If settings are changed unit can be reset
to factory defaults. (See Menu tree in this manual)
5. WARNING: All Aleis Warranties will be immediately voided if this reader is used in any way with HyperTerminal
6. Up to 1,000 sessions, with maximum of 4,000 RFID numbers per session or 100,000 total records. Data must be
cleared at 100,000 total records, or 1000 sessions whatever comes first
7. During transportation, readers must be protected from shock in a padded case or box.
8. Aleis suggests a form of transient protection unit be used while charging the reader to help prevent power
surges/spikes
9. Charging batteries: please note specific male and female groove when fitting charge leads to unit.
10. Have only one reading system at a time switched on.
11. Do not hose or submerge antenna/reader in water.
12. Use only a very lightly damp cloth to clean antenna/reader.
13. Do not use chemicals to clean antenna/reader.
14. Do not use wand as a prodder or as any form of a cattle motivator.
15. Do not drop reader boxes as electronics are contained within.
16. All boxes with seals are to be kept sealed.
17. Do not remove any VOID stickers from readers.
18. Do not drill holes in antenna.
19. Do not hold or lift system with the hose that runs between the reader and the antenna.
20. The race antenna must be fastened to the wooden panel by four bolts in the holes provided—two in the top of the
antenna, and two in the bottom of the antenna. Ref to Rail Measurements for Fixed Race Systems for setup.
21. (For RF link models) Do not have metal objects between reader and RF Link as it will affect range and data may
not be transferred and may be lost.
22. Aleis DataLink software is a free program for producers to transfer cattle to the LIS database.
23. Aleis Conditions of Sale apply.
Aleis 8050 Series Operational Manual
Aleis 8050 Series
6 of 35
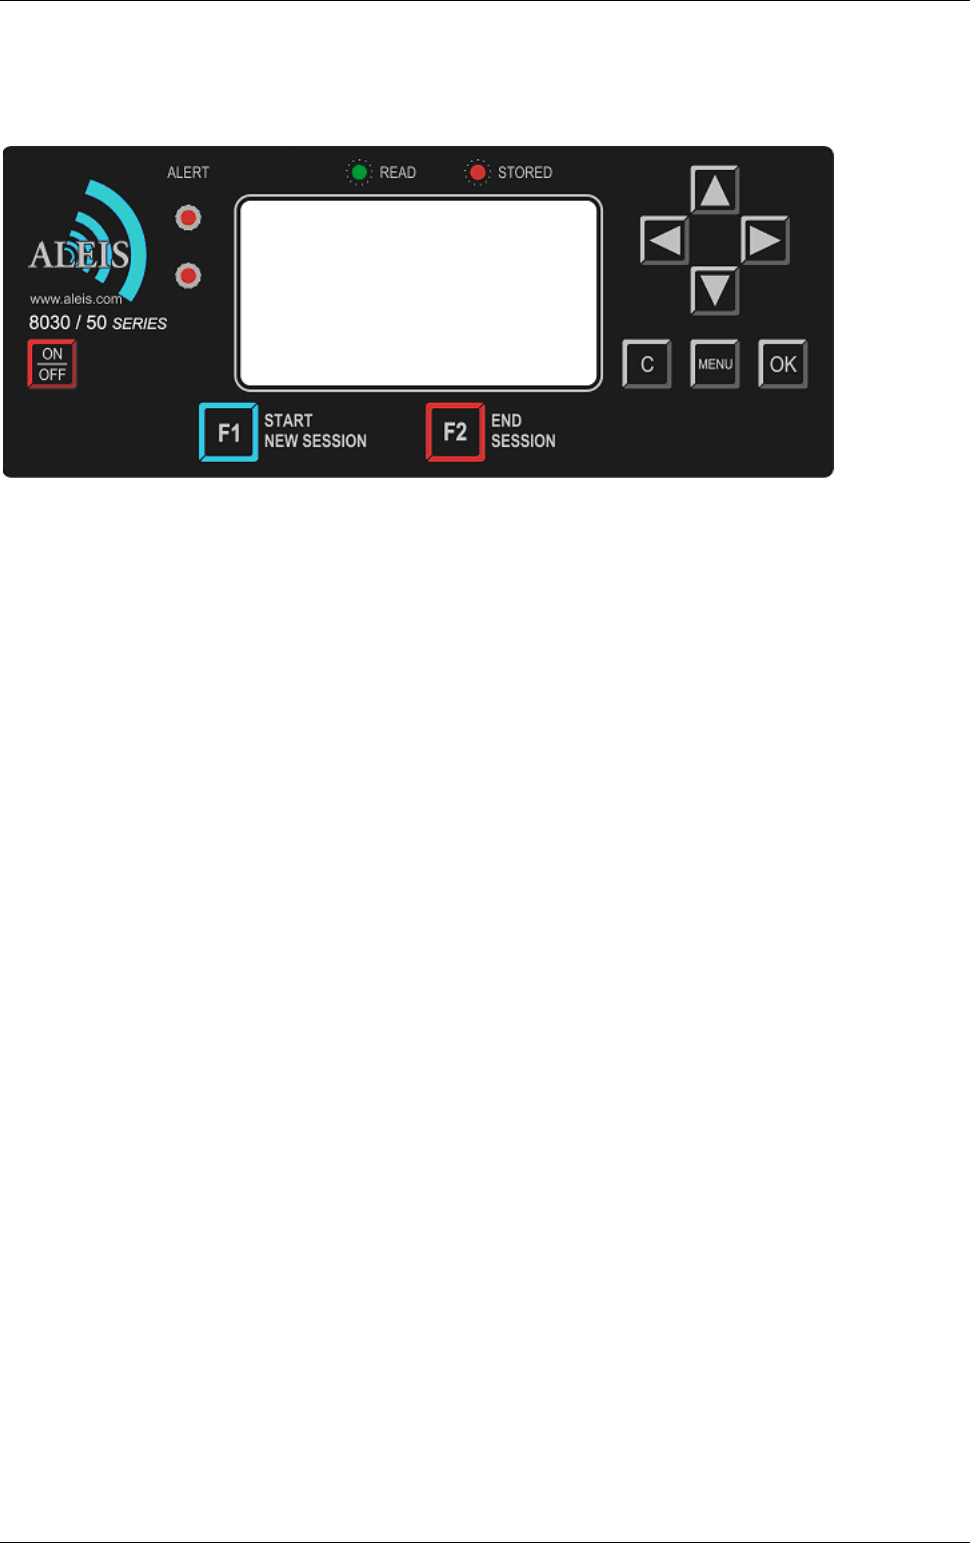
2.0 The 8050 Keypad
3.0 8050 Series Reader Method of Use
Helpful Hints
First, it is recommended to go to Menu Setup diagram in User Guide, then go to
MEU key on reader, and become familiar with the settings in the reader while
looking at the User Guide.
Pressing C once takes you back to previous step.
Keep session numbers recorded somewhere so you know which cattle are recorded
in individual session numbers.
Screen will automatically turn off if not used within 30 minutes. (Menu selectable)
3.1 How to: Read & Record RFIDs
1. Turn the 8050 Series Reader ON.
2. Press the button on the wand and wave the wand past the RFID device - ear tag or rumen
pellet. When reading rumen pellets, simply wave the wand in a reverse ‘L’ pattern behind
the front leg of the animal, or in front of the brisket.
3. When you have finished reading, you may turn the Reader OFF, and download it later at
your PC, or you may start a new session and read another group of animals.
3.2 How to: Create Sessions using menu.
1. To start a new session to read another group of animals, simply press the MENU button.
2. The word ‘Session’ will be highlighted, press the OK button.
3. The word ‘New’ will be highlighted, press the OK button.
1.4. Select Yes by using the left arrow key, then press the OK button. (If previous Sessions are
empty, you will not be able to create a new Session)
5. Press the C button (located to the left of the MEU button) until you return to the main
reading screen, and read the next group of cattle.
Directional Keys

Aleis 8050 Series Operational Manual
Aleis 8050 Series
7 of 35
3.3 How to: Create Sessions using F1 and F2 Keys.
1. Press F2 to end current session.
2. Press F1 to start new session. Four Beeps will be heard.
Note: you can start a new session even if the one you have ended has no RFID devices in it.
3.4 How to: Upload RFIDs into the Reader
The feature of uploading RFIDs into the 8050 portable wand is to allow you to find particular
RFIDs that you need to identify. For example, if you need to find a particular animal that was
treated with a certain medicinal treatment, you can upload the RFID into the reader. When you
read the animal with that RFID, the reader will alert you with a long series of beeps so that you
will know you have found the animal you were looking for.
To use this feature, there are two steps you will need to perform:
1. Create a file to upload into the reader.
2. Upload the RFIDs into the reader.
Before starting you will need:
1. Aleis DataLink installed on your computer.
2. A working COM port – you can check this by turning your 8050 reader on, and then opening
Aleis DataLink. Down the bottom right corner of the Aleis DataLink screen, you should see
that the software has connected to a particular unit.
3. A list of RFIDs that you want to put into the reader.
Step 1: Creating a file to upload into the reader.
Creating the file to upload into the reader is very easy. You can do this in Microsoft Excel or
Wordpad or Notepad. All you need to do is have a list of RFIDs with the word TAG as the first
entry, ie at the top of the list. It must look like this:
TAG
982 000023661452
982 000016654299
982 000027909419
982 000024909416
982 000009161045
982 000024566253
982 000015883922
982 000030781909
If you are using Microsoft Excel, then simply put this in Column A, with the word TAG
in Row 1.
Once you have done this, you will need to save this as a text file (*.txt). It is very important that
you save this as a text file or the operation will not work. Hint: When you save this, give it a
name that is five letters or less.

Aleis 8050 Series Operational Manual
Aleis 8050 Series
8 of 35
Step 2: Upload the files into the reader.
1. Open up Aleis DataLink.
2. Once the software has found the reader, click on the Open button located at the left side
of the DataLink screen (there is a big yellow manilla folder on the button).
3. Find the file that you created, and click on the open button.
4. You will see that file name listed in the main screen of Aleis DataLink where the session
names and numbers are normally displayed.
5. Click on that file name.
6. Now click on the Upload button located at the left side of the DataLink screen.
7. You will be asked to enter a name. If you want to change the name, go ahead and type
in what you would like, then click on the OK button.
8. When it has been successfully uploaded, you will see at the bottom left of the DataLink
screen, the words, “Upload Complete”.
3.5 How to: Compare RFIDs in the Reader
You want to ensure that every time you read an RFID, the reader is checking it against the list of
RFIDs you have uploaded into the reader. To make this happen, do the following:
1. Ensure the reader is turned on.
2. Start a new session – as per your requirements . . . so you will be using a template that you
are planning to do your work with.
3. Once you have started the new session, and you are in the main reading screen, press the
MENU button.
4. Scroll down to Read Setup and press the OK button.
5. Scroll down to Comparison and press the OK button.
6. Scroll down to
Session ( ) and press the OK button.
7. Scroll back to the name you saved the uploaded file as and press the OK button.
8. Press the C button (located beside the MENU button).
9. The reader will then reboot – now press the MENU button again.
10. Scroll down to Read Setup and press the OK button.
11. Scroll down to Alert and press the OK button.
12. Ensure Condition is highlighted and press the OK button.
13. Scroll down to
On Match and press the OK button – you will see a tick appear in the
box.
14. Press the C button (located beside the MENU button).
15. Scroll down to Action and press the OK button.
16. Scroll down to
Msg, LEDs, Buzzer and press the OK button – you will see a tick appear
in the box.
17. Press the C button (located beside the MENU button).
18. Scroll down to Duration and press the OK button.
19. Choose the setting you want and press the OK button. ‘Until Keypress’ means that the
reader will continue to beep and flash the LEDs until any key on the reader is pressed.
20. Press the C button (located beside the MENU button) three times – until you see the main
reading screen.
21. Turn the reader off and then back on.
22. The reader is now ready to use and will compare the RFIDs you read against the list you
uploaded.
**Note: When you upload another new list of RFIDs into the reader, in Step 6 of the
above, you will need to tick the box
Current Session and then scroll back down and tick
the
Session ( ) again to reactivate the reader to search
Aleis 8050 Series Operational Manual
Aleis 8050 Series
9 of 35
3.6 Formatting the File System
Formatting of the file system is very important to keep your reader operating at its maximum
performance. Once the reader has read and stored a lot of tags eg 40000+ you may notice a slow
down in its performance when storing and recalling data. This is similar to your PC when the
Hard Drive gets full. When you clear the reader it doesn’t actually remove the data so you can
retrieve it if you accidentally have cleared the reader. When a “Format file system” is done the
data then is lost.
Formatting of the file system should be done every 2-4 months for Heavy users or 4-6 months
for light users.
Before formatting the file system make sure you have saved any data in the reader. After
formatting the data is OT recoverable.
When the reader is formatted your templates will also be cleared so note down the names and the
fields in the template so you can set them up again.
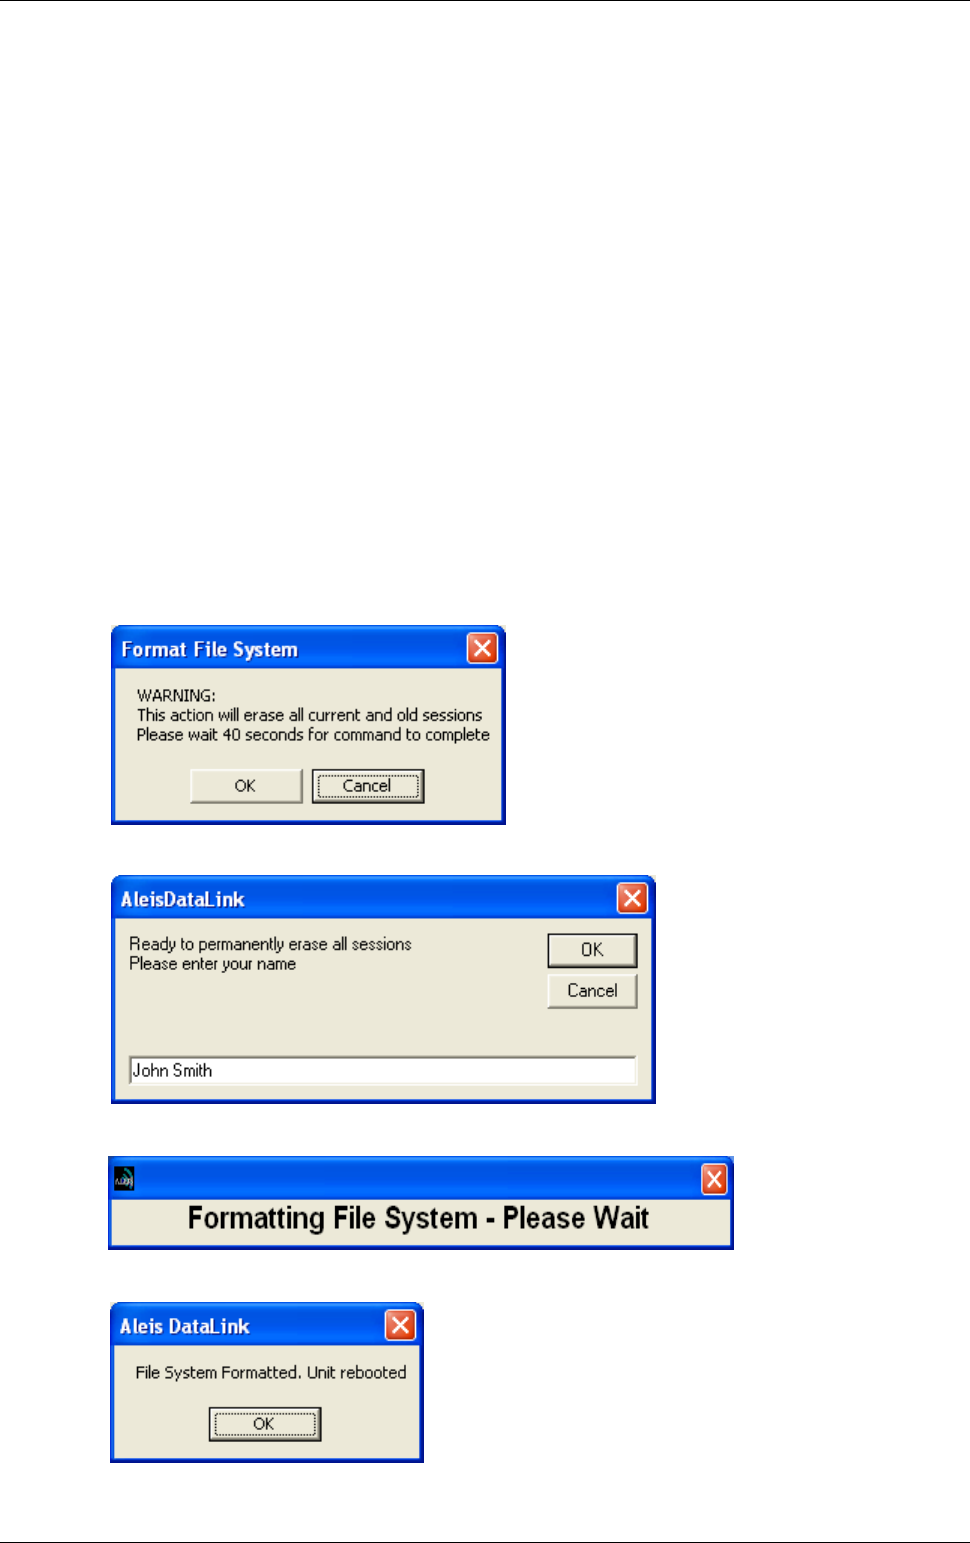
3.7 How to Format your reader
ote: Read above “Formatting File System in Reader” first
Step 1 Open DataLink
Step 2 Click on “Setup”.
Step 3 Click on “Format file system”
Step 4 Click on “OK”
Step 5 Type in your Name and click on “OK”
Step 6 The reader will now be formatting the file system
Step 7 Click on the “OK”
Your reader is now formatted.
Aleis 8050 Series
10 of 35
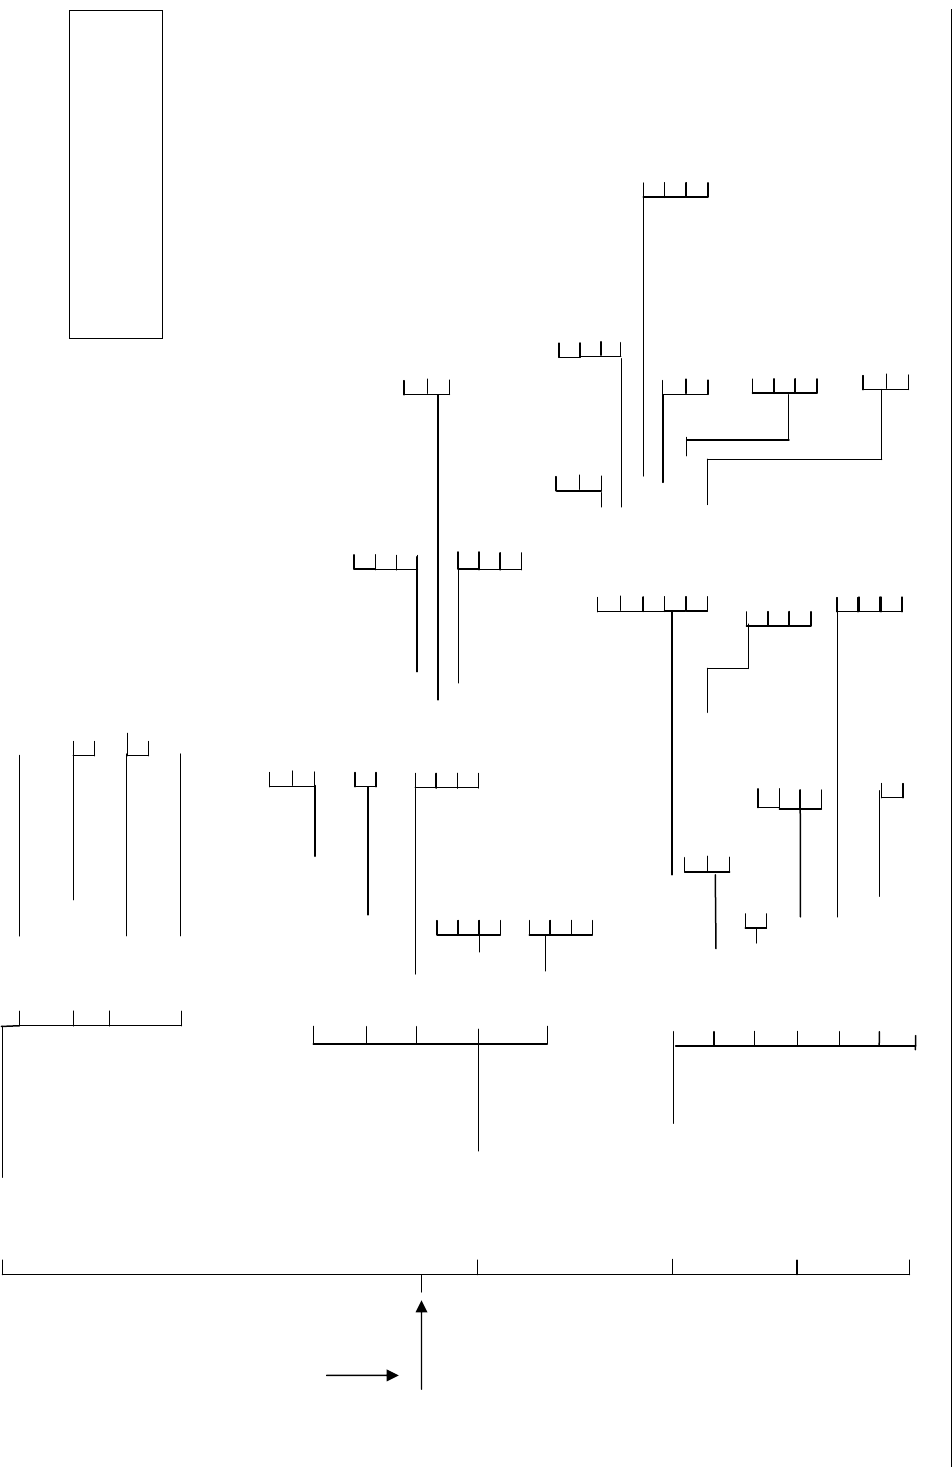
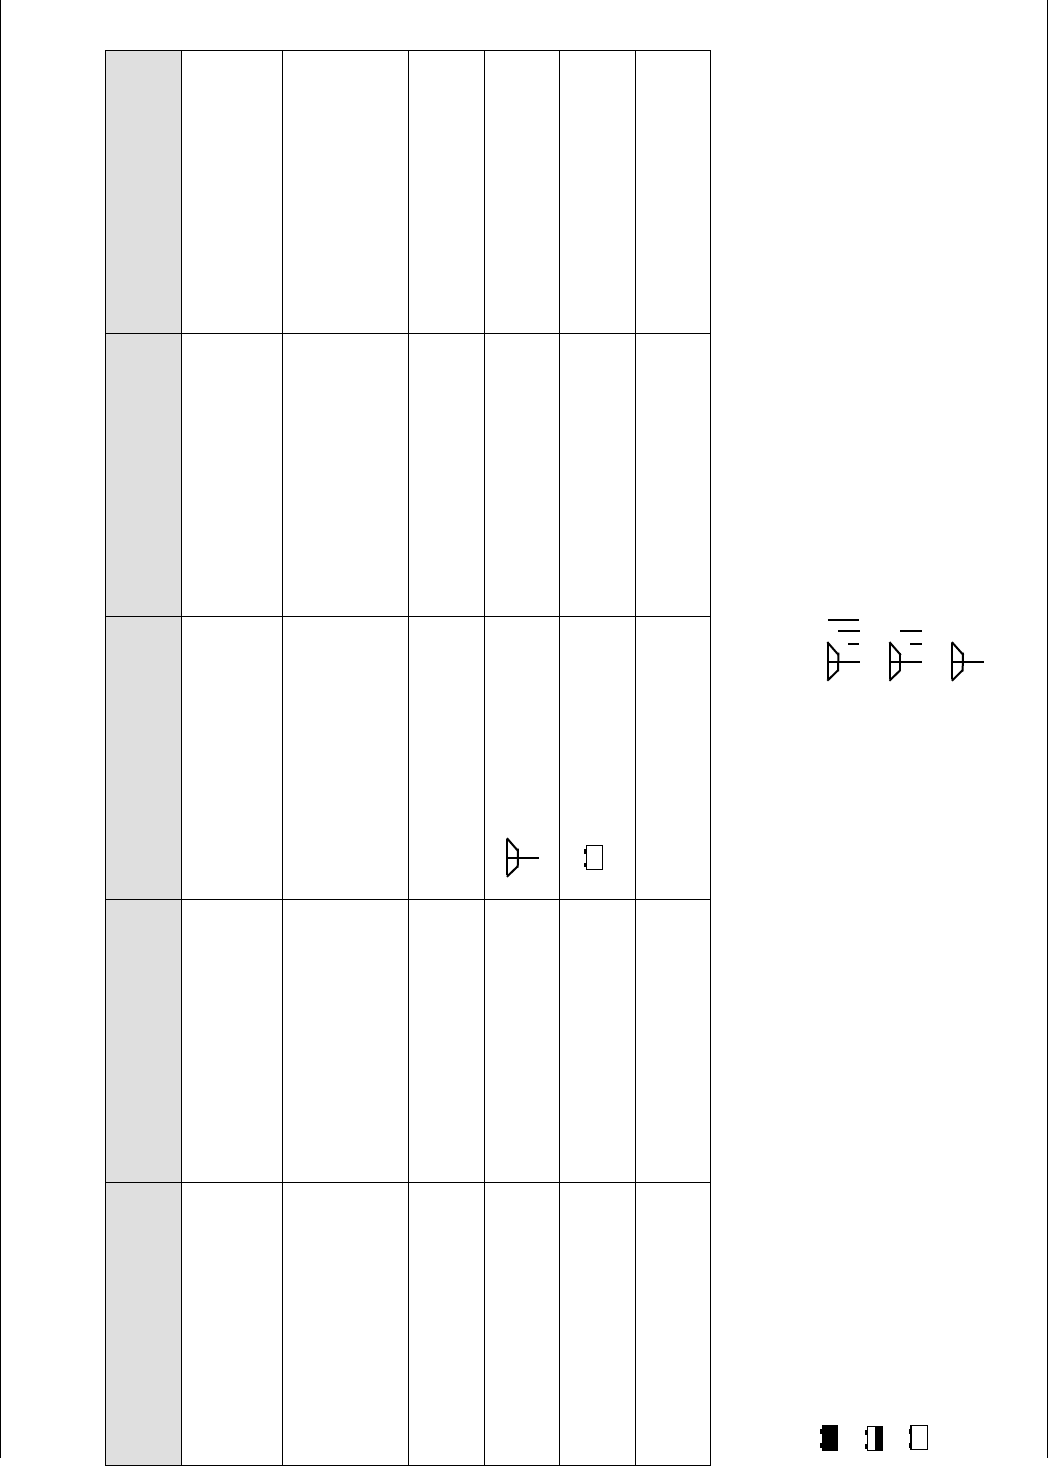
4.0 8050 Series Menu Tree
MENU
Turn Unit ON
Session
Read Setup
System Setup
Reader Information
Memory Status
Load/Save Profile
Comparison
Alert
Storage
Send
Communications
Display
Buzzer
Sleep Timer
Read Timer
Load Defaults
Set Date/Time
Load Profile
Save Profile
Load Defaults
Current Session
Sessions ( )
On Read
On Match
On No-Match
No Send
On Read
On Match
On No-Match
No Storage
Condition
Action
Duration
Message
On Read
On Match
On No-Match
No Alert
Msg
Msg, LEDs
Msg, LEDs, buzzer
2 seconds
5 seconds
10 seconds
Until keypress
8030/50 Series
9030/50/60 Series
Off
On
3 seconds
**
5 seconds
10 seconds
Continuous
5 minutes
15 minutes
30 minutes
Disabled
Backlight Threshold
Backlight Mode
LCD Contrast
Off
On key-press
On low-light
Always On
Interface
Protocol
Serial Baud
Tag Format
Scale Interface
Tag Filter
Serial
RF Modem
Bluetooth
Tiris
Aleis
Combined (Tiris/Aleis)
Allflex USA
9600
38400
57600
115200
Notes:
Reader Defaults in Bold text.
** Handheld units only
Read Animal
Read Industrial
Read Both
ISO 26 Digit
ISO 27 Digit
16 Digit
No Scales
Ruddweigh
Thunderbird
Tru-Test
New
Send to PC
Clear
Select
Current Session
All Sessions
Current Session
All Sessions
Select Session
Create New Session
Aleis 8050 Series Operational Manual
Aleis 8050 Series
11 of 35
5.0 Audio and Visual Alerts
Features Buzzer LCD Display LED’s at Top of LCD 6 Auxiliary LED’s – 3 each
side of the screen
Valid READ One beep Current RFID number, eg.
971 000000002861, at top of
screen
READ LED blinks once
Valid READ & ID STORED Two beeps Current RFID number, eg.
971 000000002861, at top of
screen, and counter at bottom
right of screen will increase.
READ and STORED LED’s
blink once
No ID Read One long beep
(after read on time out)
NO RFID READ
No RF Signal being received.
Two very quick beeps
(every 30 seconds)
(Flashing)
Battery Charge at Low Level Three very quick beeps
(every 60 seconds)
Battery Charge at Critically
Low Level
Constant Beeping BATTERY LOW Flashes as unit is about to
turn off.
Legend for LCD Visual Displays.
Battery Level Indicator BlueTooth RF Signal Indicator
BT
(Solid)
Connected
BT
(Flashing)
Not Fitted
Fully Charged
Half Charged
No Charge—unit will turn off
Signal at Full Strength
Signal at 2/3 Strength
No Signal—no IDs will be sent
(Flashing)

Aleis 8050 Series Operational Manual
Aleis 8050 Series
12 of 35
6.0 Menu Main Menu (Reader selection choices)
6.1 Session
ew
-New Session
Send to PC
Send to PC
Current Session
All Sessions
Clear
Clear
Current Session
All Sessions
Select
- Selects Session number and count.
6.2 Read Setup
Load/Save Profile
Load defaults – (Resets Read Setup to factory defaults)
Comparison
Compare with
Current Session
Session (Select which session number you want to
compare RFID’s with)
Alert
Alert Options
Condition
Alert Condition
On Read
On Match
On No Match
No alert
Action
Alert Action
Msg = Message on screen
Msg,LED’s = Message & Lights
Msg, LED’s, Buzzer = Message, Lights & Buzzer
Duration
Duration
2 Seconds
5 Seconds
10 Seconds
Until Keypress

Aleis 8050 Series Operational Manual
Aleis 8050 Series
13 of 35
Storage
Store Condition
On Read
On Match
On No-Match
No Alert
Send
Send Condition
On Read
On Match
On No-Match
No Send
6.3 System Setup
Communications
Interface
Select Interface
Serial
RF Modem
Bluetooth
Protocol
Select Protocol
Tiris
Aleis
Combined (Tiris/Aleis)
Allfex USA
Serial Baud
9600
38400
57600
115200
Tag Format
ISO 26 Digit
ISO 27 Digit
16 Digit
Scale Interface
No Scales
Ruddweigh
Thunderbird
Tru-Test
Display
Backlight Threshold
(Select required lighting Eg 1 = always bright. 16 = will come on when
very dark. Subject to Backlight Mode selection below)
Backlight Mode
Off
On key-press
On low-light
Always On
LCD Contrast
(Select required contrast Eg 90 = light contrast. 120= very dark. Subject to
viewing angle)

Aleis 8050 Series Operational Manual
Aleis 8050 Series
14 of 35
Buzzer
Buzzer On/Off
Off
On
Sleep Timer
Sleep Timer
5 Minutes
15 Minutes
30 Minutes
Disabled
Read Timer
Read Timer
3 Seconds
5 Seconds
10 Seconds
Continuous
Load Defaults
Load Defaults
8030/50 Series
9030/50/60 Series
Set Date/Time
-Sets Date and Time
6.4 Reader Information
(This is for technical assistance only & product identification)
Reader Info
Hardware: (Hardware Version)
Software: (Software Version)
Date: (Software Date)
Serial o: (Reader Serial Number)
Reader Type: (Aleis Reader Model)
6.5 Memory Status
Used Memory X% Percentage of Used Memory
Free Memory X% Percentage of Free Memory
Reclaimable Memory X% Percentage of Recoverable Cleared Memory
(old Sessions)

Aleis 8050 Series Operational Manual
Aleis 8050 Series
15 of 35
7.0 Battery Charging
The battery in the unit can be charged by using the 6-pin connector on the side of the unit.
7.1 Battery Charging Requirements
• Charge unit using supplied charger only.
• Aleis suggests a form of transient protection unit be used while charging the reader
to help prevent power surges/spikes.
• Do not use Reader while it is being charged.
• Ensure when fitting charger connector that the male and female groove are aligned
and pushed in correctly.
• For Race units Battery is not to be run dead flat. Unit must be charged prior to
storage and every two months to maintain battery life.
• Battery is not to be run dead flat. Must charge reader prior to storage and every two
months to maintain battery life.
7.2 Race Charging using Gel Cell Batteries
• To ensure that the battery receives a full charge, charge the unit overnight (Min
8hrs).
• To verify that the unit is charging, turn unit on and the battery icon will fill up, i.e.
the icon will turn black, as the batteries are charged.
• Readers can be left on charge – once the reader batteries have been charged, the
charger will then automatically convert to trickle charge and no damage will be done
to the batteries. (A transient protector is recommended to help prevent spikes
through the power line damaging the charger and reader. Aleis part number 4059)
• The battery does not have to be flat to be charged. It is recommended that after each
use, the unit is charged.
• Charge the battery prior to use and every 4-6weeks. If the unit is not used for a long
period of time, recharge unit overnight prior to use.
7.3 Battery Charging Options
An optional Car Cigarette Lighter Battery Charger is available
7.4 Alternative Recharging Methods
Contact Aleis for alternative methods of charging.

Aleis 8050 Series Operational Manual
Aleis 8050 Series
16 of 35
8.0 The Clock on the 8050 Reader
The clock on the 8050 Reader is what will put the date and time stamp on each RFID that is read by
the reader. To reset or change the date and time on the clock, simply plug the 8050 Reader into
your computer, turn the reader on, and then open Aleis DataLink. (This is the default setting in
DataLink Setup). After 30 seconds, the reader will automatically be updated with the date and time
that is on your computer. Please ensure the date and time on your computer is correct. This
feature can be disabled in the DataLink setup menu by un ticking the box.
You can also change the clock in the Menu through System Setup.
OTE: The clock will lose time if the battery is run or left flat.
9.0 Using Bluetooth (On ISO8151BT & ISO8152BTmodels only)
The Bluetooth is turned on via the menu.
Eg. Menu/System Setup/Communications/Interface/Bluetooth
The BT symbol will appear solid if a Bluetooth is fitted. If it flashes a Bluetooth is not fitted.
Notes:
1. The Bluetooth Feature is only available if you have a ISO8151BT or ISO8152BT model.
If you don’t your unit can be upgraded for this feature. Contact the supplier for further
information and costing.
2. Bluetooth is a way you can communicate to a PC, PDA or other device without using the
serial cable, referred to as a Wireless connection.
3. The PC or device that the reader is going to communicate to must have Bluetooth fitted.
The PC or device sets up the link between the two units.
9.1 BlueTooth PI code
The Pin Code or access code as it is sometimes referred to is the serial number on the side
of the Reader.
If the sticker is missing, when you discover the Reader on the PC or device, the 4 number
which comes up in the name of the reader discovered, is the pin number.
Refer to your PC or other devices manual to see how to discover and connect to a BlueTooth device
Aleis DataLink Software

Aleis 8050 Series Operational Manual
Aleis 8050 Series
17 of 35
10.0 Aleis DataLink Software
IMPORTAT
Must be read prior to using software
This software has been purposefully designed to download the RFID’s and/or respective data relating to
those RFID’s from the Aleis 7000 8030/50 and 9030/50/60 Series Readers. Aleis accepts no responsibility
for any form of improper use, negligent or otherwise, resulting in the loss of RFID’s with the use of this
software. All practical assistance will be given in the operation and understanding of this software, and this
can be obtained by contacting Aleis or an Aleis distributor. Copying of this software is strictly prohibited.
1. This software is designed for Aleis 7000 8030/50 and 9030/50/60 Series Readers ONLY.
2. Aleis Reader must be plugged into computer this software is installed on.
3. Aleis Reader must be turned ON before opening Aleis DataLink.
4. Aleis DataLink PC Requirements:
Operating Systems
•
Windows ME
•
Windows NT 4.0
•
Windows 2000
•
Windows XP (Recommended)
•
Vista
Minimum Hardware
•
Pentium 233 MHz (Recommended: Pentium 500MHz or greater)
•
64 MB RAM (Recommended: 128 MB RAM or greater)
•
20 MB hard drive space
This software package serves as an easy download program which automatically downloads the reader’s
session list. Once the reader is downloaded, you can then save particular downloaded sessions or all
downloaded sessions on your computer. You can then open these saved files in Excel or your desired
program. The program also allows you to transfer animals on the NLIS database.
Special features include:
• Auto-detects what com-port reader is plugged into.
• Quick and easy animal transfers to the NLIS database for Producers and 3
rd
party users.
• Downloading all animal data from reader to excel.
• Loading tag file buckets from database to the reader.
• Updating Readers software.
• Updates clock on reader to time displayed on computer. (For models that have clocks.)

Aleis 8050 Series Operational Manual
Aleis 8050 Series
18 of 35
10.1 Aleis DataLink Installation
To install DataLink:
1. Place the DataLink CD into the CD drive; the program will automatically begin
installation.
If not Go to My Computer Double click on the CD Rom Drive Browse the CD and
Double click on the icon called DataLink
2. Follow the installation prompts, and click on Finish when installation is complete.
10.2 Aleis DataLink Operation
Operating Aleis DataLink:
IMPORTAT: The Aleis Reader must be plugged securely into your computer and turned on
before opening Aleis DataLink.
1.0 Plugging the Aleis Reader into your computer.
Plug the 9 pin female serial connector into the 9 Pin male serial connection at the back of
your computer or laptop. Some laptops do not have a serial connection, and so a Serial to
USB adaptor can be used. Should such an adaptor be used, Aleis DataLink works just as
effectively provided you have installed the drivers for the adaptor correctly.
2.0 Opening Aleis DataLink.
1. Turn Aleis Reader on
2 Double click on the Aleis DataLink icon located on your desktop.
3. This will open up the software for operation. As soon as the program is opened, it
will automatically download the reader for you.
Aleis 8050 Series Operational Manual
Aleis 8050 Series
19 of 35
10.3 Aleis DataLink Menu Screen
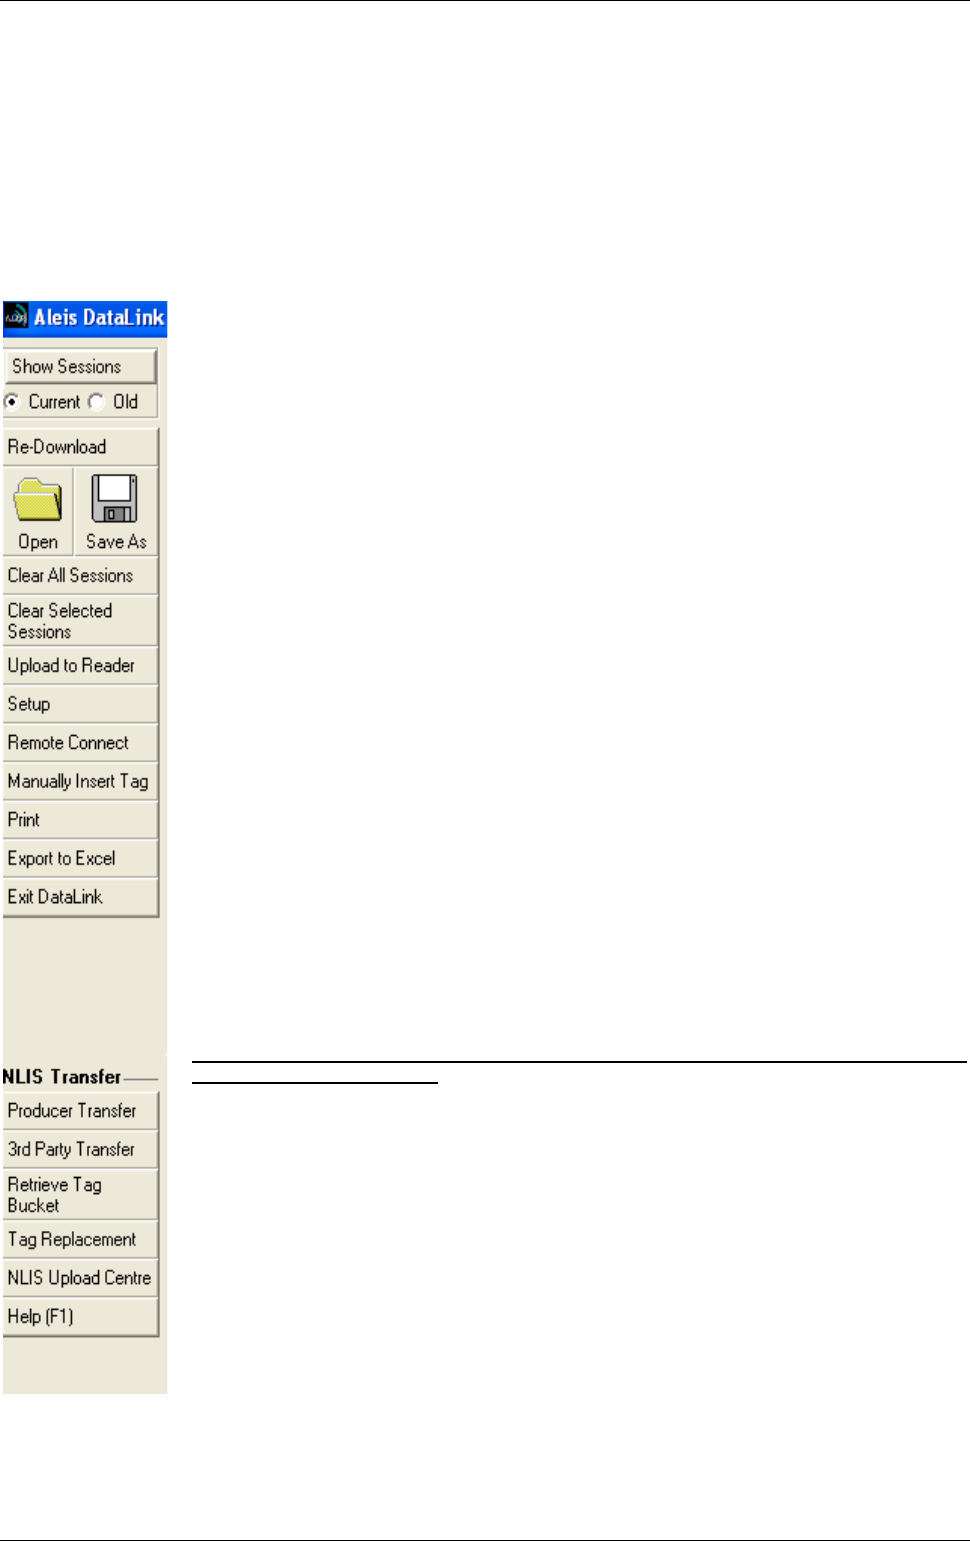
Full Index for Help in software (F1)
Brief overview of Aleis DataLink Menu Screen
Show Session- Displays lists of sessions when you select old or current
Current -Displays current session
Old- Displays sessions previously cleared from reader
Re-downloads session out of reader
Open: Opens sessions previously saved on computer
Save As: Saves sessions to file of choice on computer
Clears all sessions from reader
Clears selected session from reader
Uploads selected session to reader
Setup 1: Update reader software, 2: Format file systems, 3: Advanced features
Remote Connect only used in multiple reader situations
Gives the ability to enter RFID number or NLIS number manually in the event of tag failure.
Prints selected information
Exports session to Excel
Exits DataLink
Below are a list of options used for transferring information and retrieving information from the
LIS database (Australia Only)
Used for producers to transfer livestock to the NLIS database
Used for third party to transfer livestock to the NLIS database
Retrieves all NLIS numbers recorded to individual PIC from NLIS database
Used for replacing non reading identification tags
History of all transfers to NLIS Database
Gives a full index of all help functions
Aleis 8050 Series Operational Manual
Aleis 8050 Series
20 of 35
10.4 Producer Transfer (Australia Only)
This opens the NLIS Transfer Wizard, using the selected fields in the current session(s). This button is used
for Producer to Producer transfers.
For further information please use the help feature in Aleis DataLink.
Producer Transfer Steps
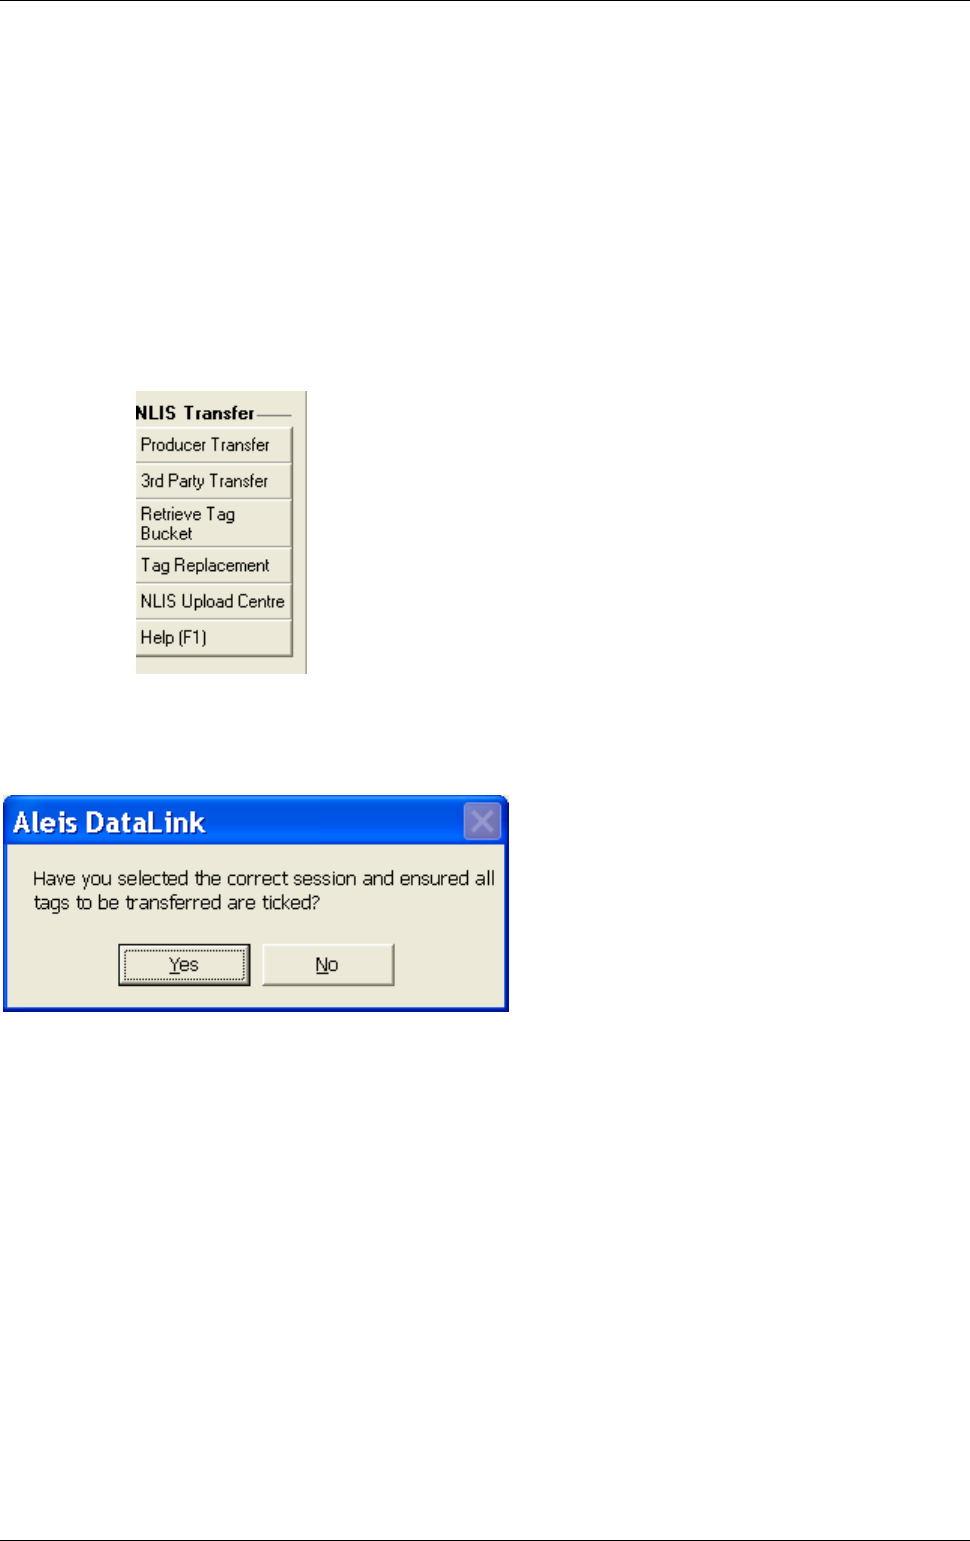
Step 1 Click on the "Producer Transfer" button.
You will be presented with the following Box
Step 2 Click on "Yes" if you are sure you have selected the correct session and
unticked any tags not to be transferred.
Aleis 8050 Series Operational Manual
Aleis 8050 Series
21 of 35
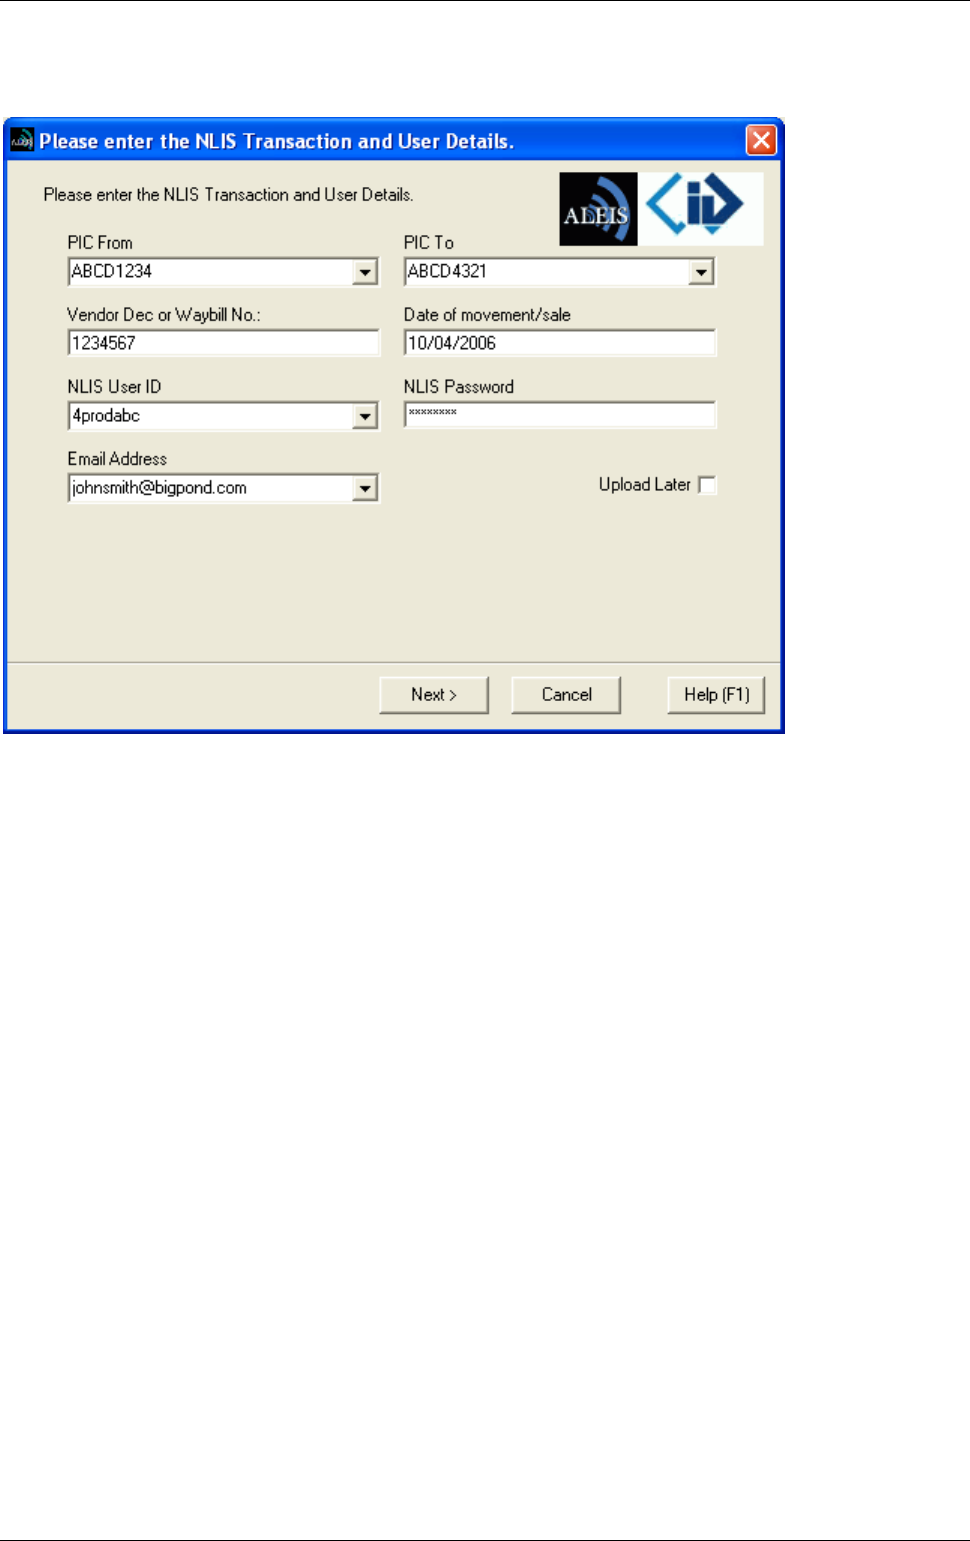
You will then be presented with the following Box
Step 3 After completing the form Click on "Next"
If you choose to tick the Upload Later box the Transfer will not be completed but you can complete
the transfer at any time by resuming the upload from the Upload Centre.
The PIC From PIC To and Vendor Dec/Waybill No. can be loaded straight into the form if the
fields PI1, PI2 and VEN were used as Data entry on Data entry readers.
Aleis 8050 Series Operational Manual
Aleis 8050 Series
22 of 35
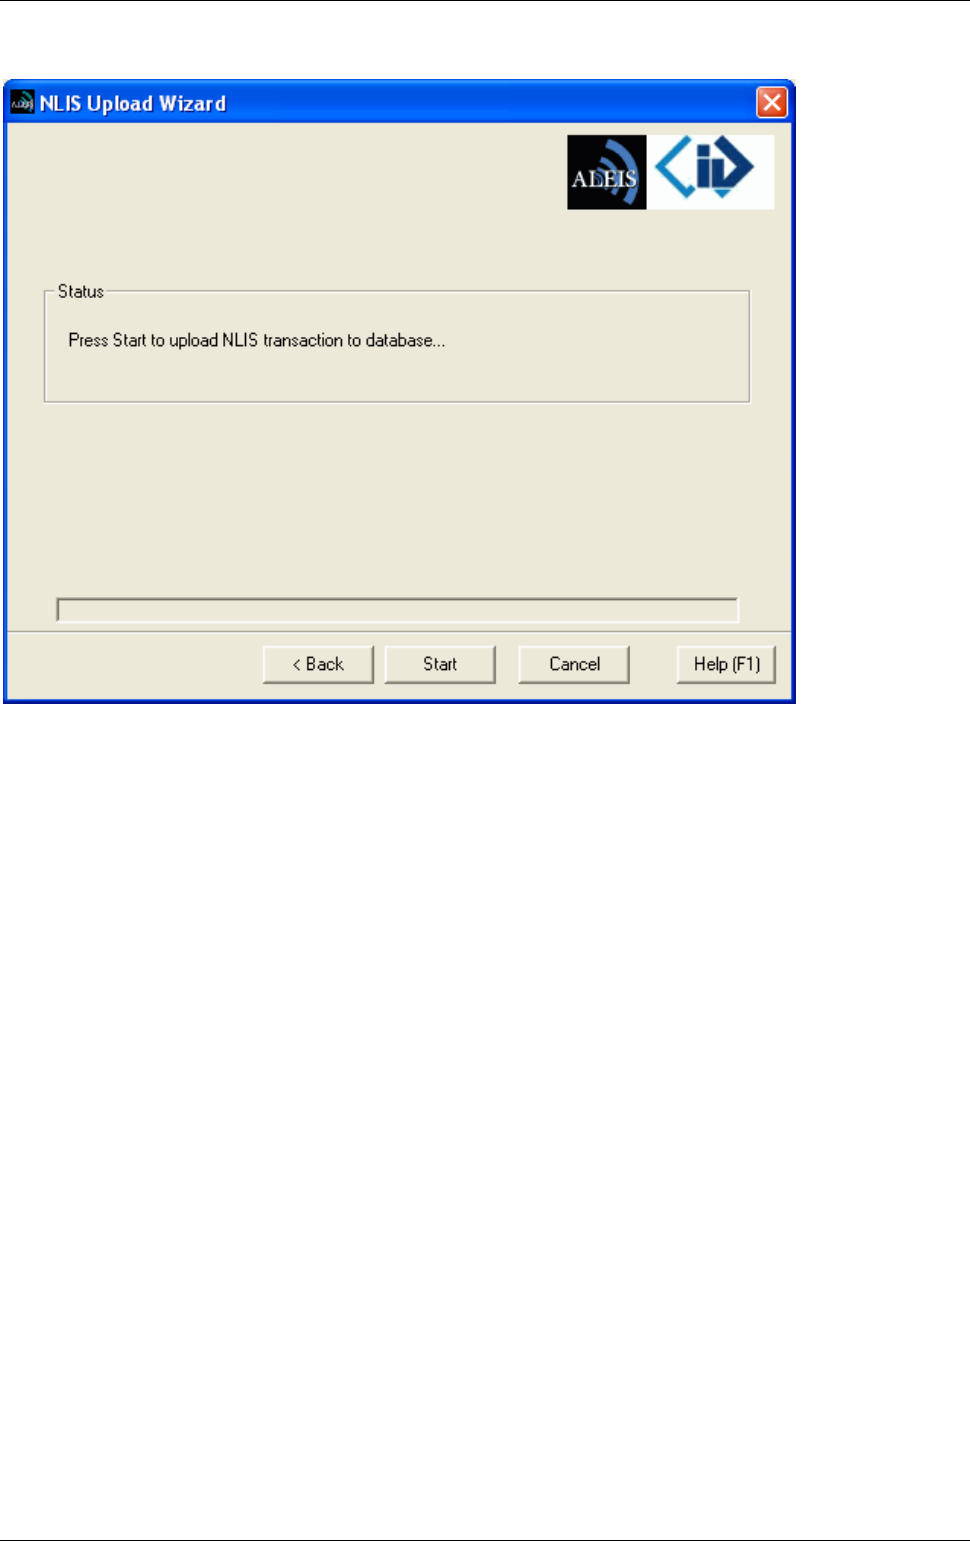
You will then be presented with the following Box
Step 4 Click on the "Start" box
On a successful or unsuccessful transfer you will get a message in the status box.
Aleis 8050 Series Operational Manual
Aleis 8050 Series
23 of 35
10.5 3
rd
Party Transfer (Australia Only)
This opens the NLIS Transfer Wizard, using the selected fields in the current session(s). This button is used
for Third Party transfers with or without written permission.
For further information please use the help feature in Aleis DataLink
3rd Party Transfer Steps
Step 1 Click on the "3rd Party Transfer" button.
You will be presented with the following Box
Step 2 Click on "Yes" if you are sure you have selected the correct session and
unticked any tags not to be transferred.
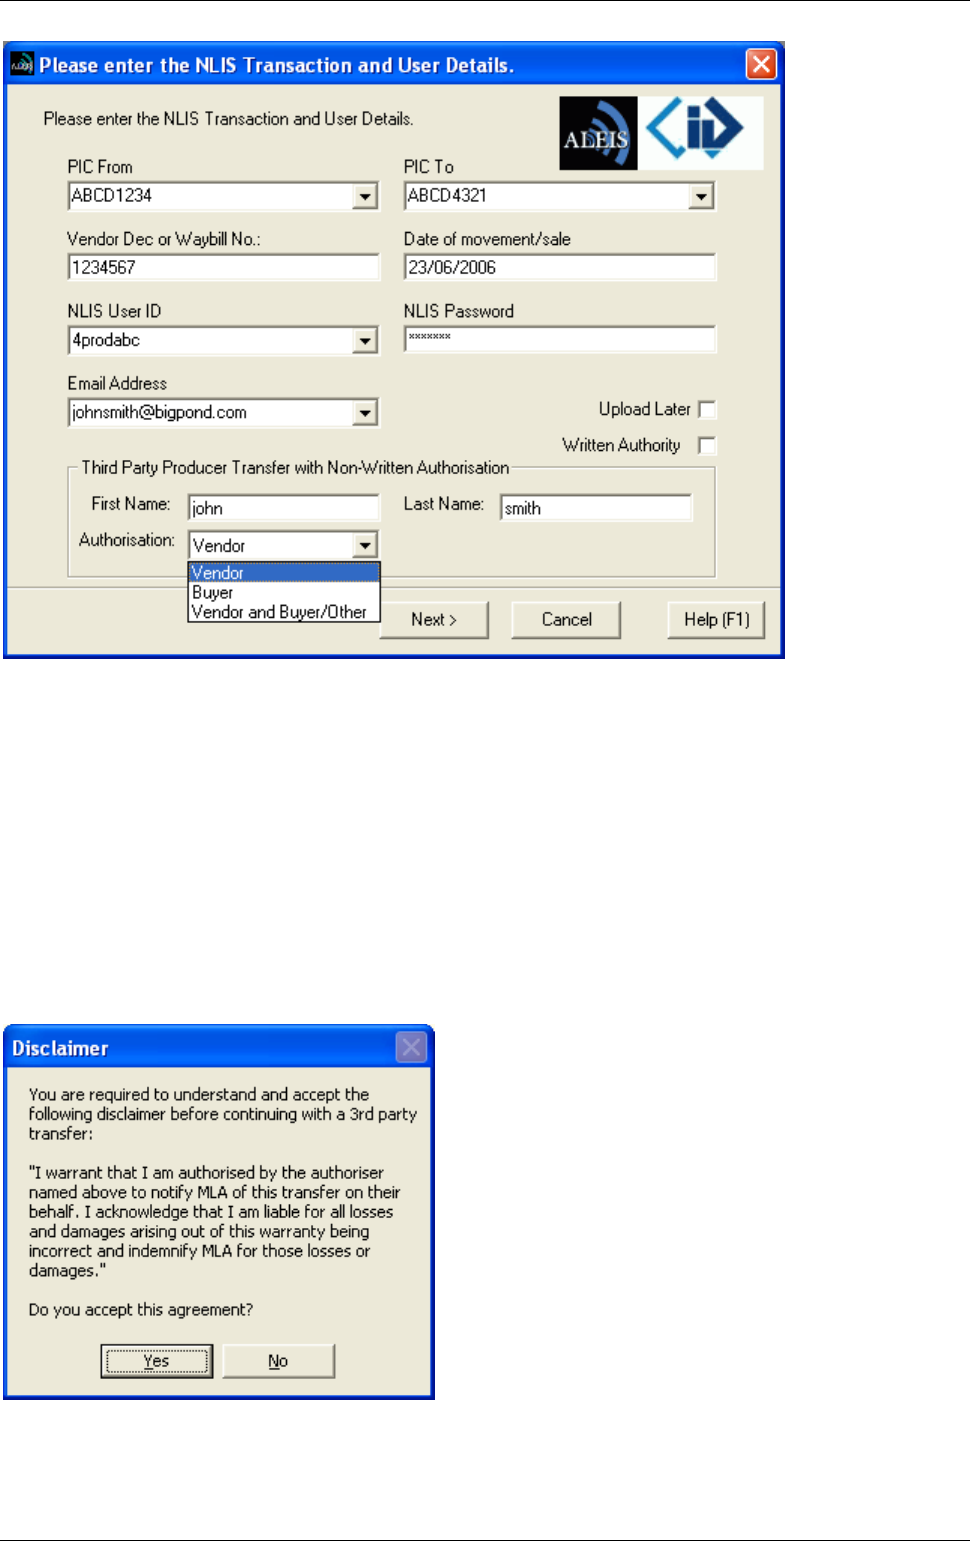
You will then be presented with the following Box
Aleis 8050 Series Operational Manual
Aleis 8050 Series
24 of 35
Step 3 After completing the form Click on "Next"
If you choose to tick the Upload Later box the Transfer will not be completed but you can complete
the transfer at any time by resuming the upload from the Upload Centre.
The PIC From PIC To and Vendor Dec/Waybill No. can be loaded straight into the form if the
fields PI1, PI2 and VEN were used as Data entry on Data entry readers.
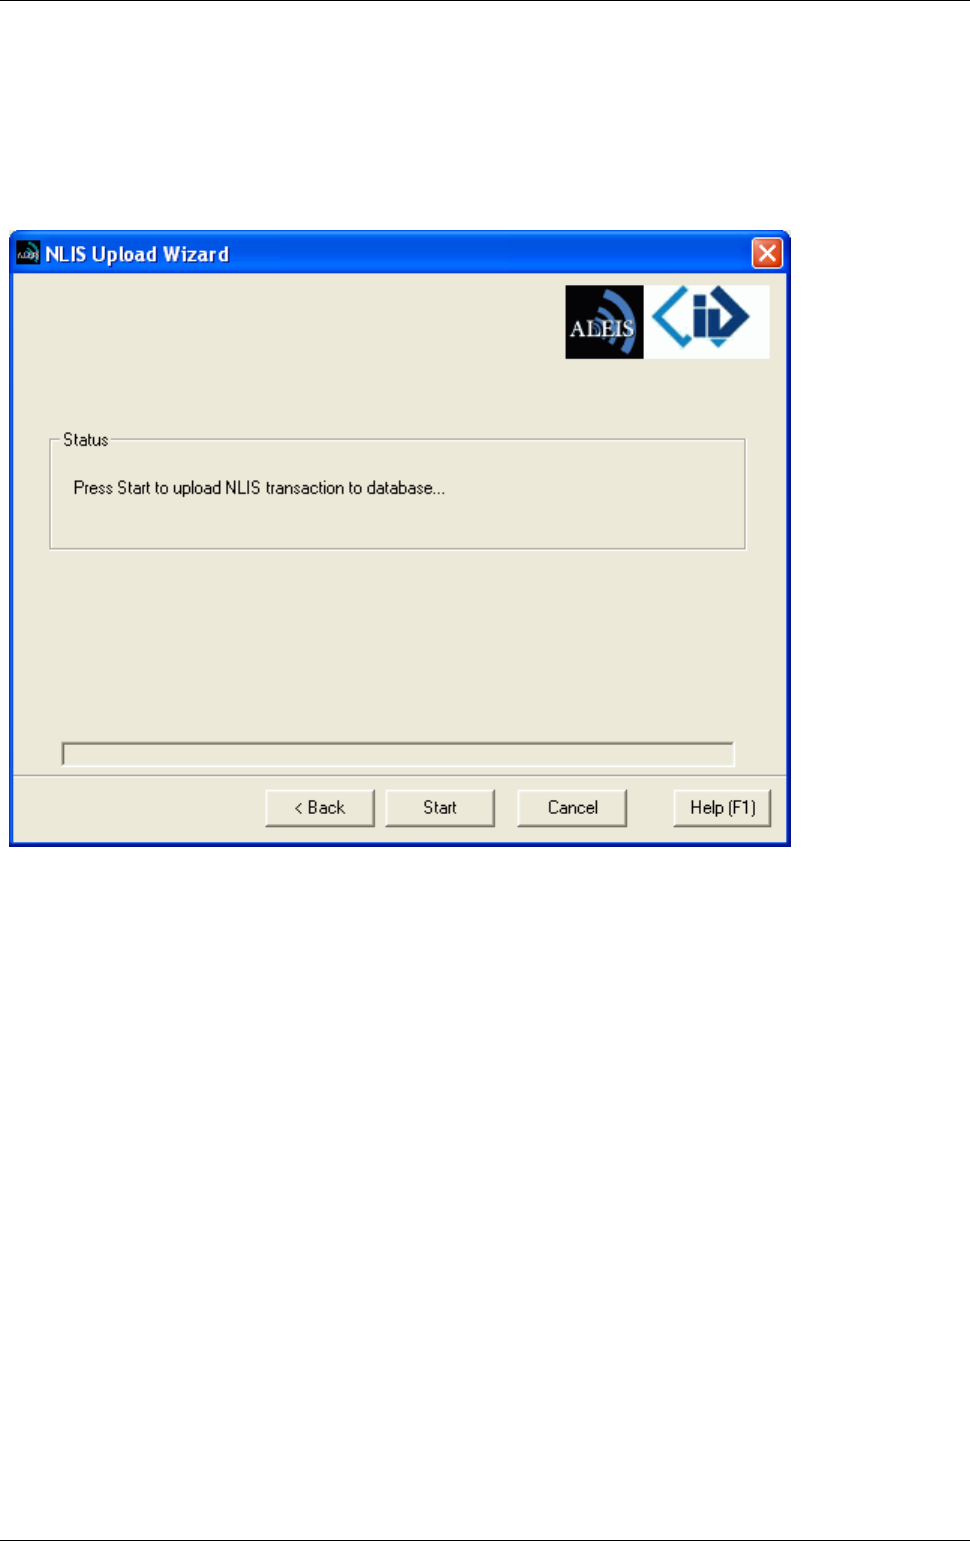
You will then be presented with the following Box
Aleis 8050 Series Operational Manual
Aleis 8050 Series
25 of 35
Step 4 Click on "Yes"
You have to accept this agreement to finish the transaction
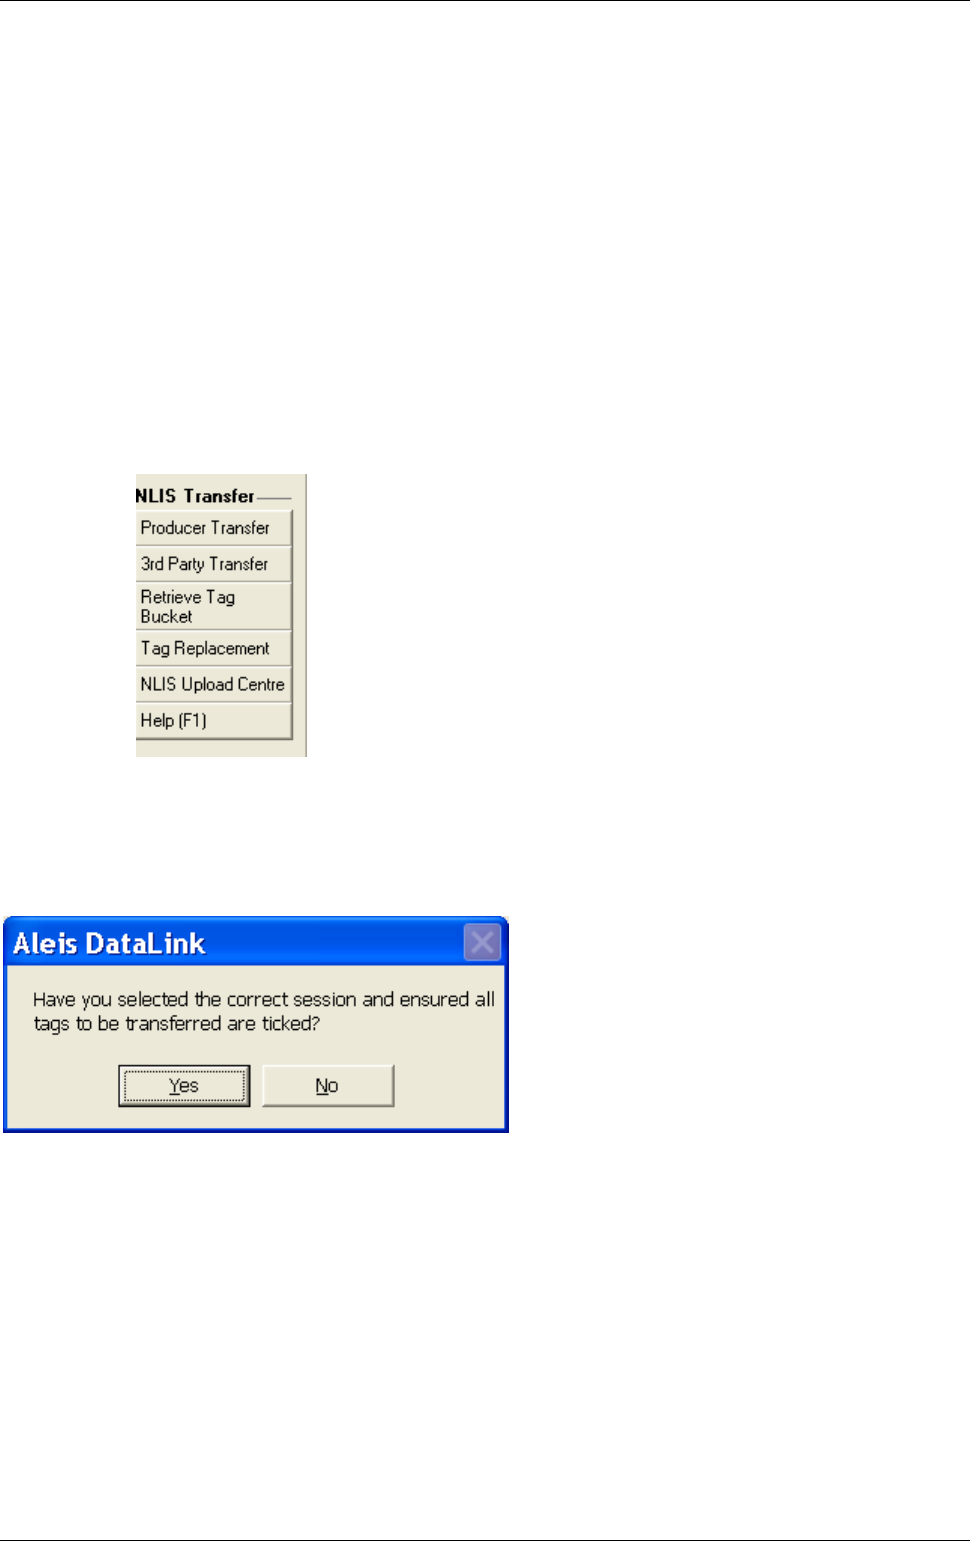
You will then be presented with the following Box
Step 5 Click on the "Start" Box
On a successful or unsuccessful transfer you will get a message in the status box.
Aleis 8050 Series Operational Manual
Aleis 8050 Series
26 of 35
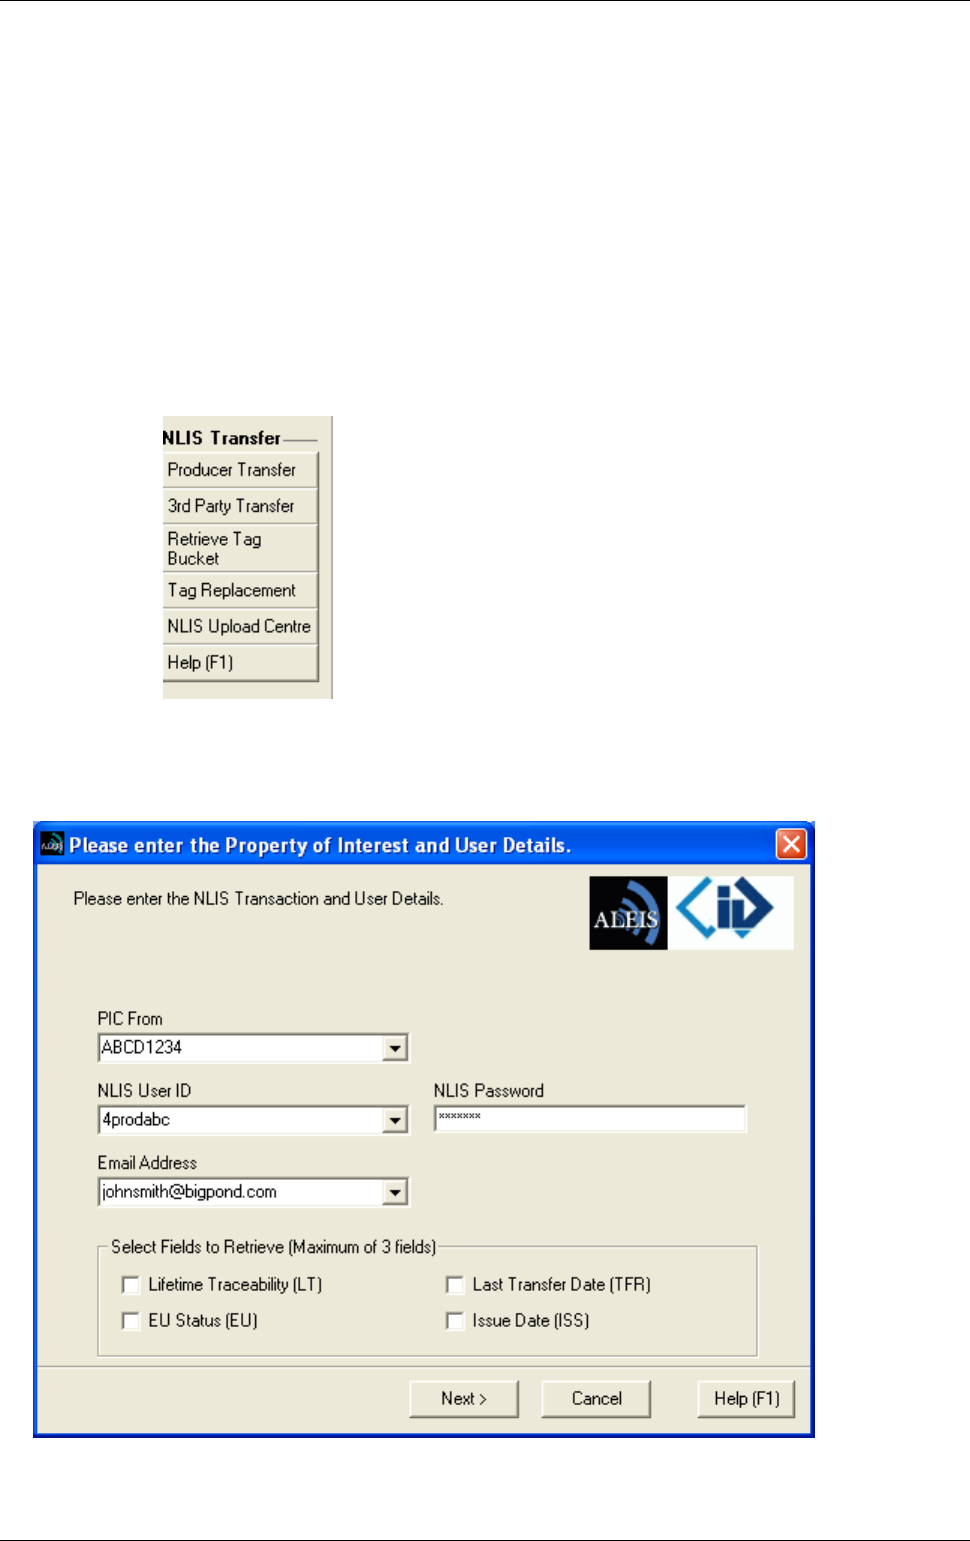
10.6 Retrieve Tag Bucket (Australia Only)
This opens the NLIS Transfer Wizard, to retrieve all RFID and NLIS ID tag numbers that match a specific
PIC from the NLIS database. You can also retrieve the Lifetime Traceability (LT), EU Status (EU), Last
Transfer Date (TFR) and the Issue Date (ISS)
For further information please use the help feature in Aleis DataLink
Retrieve Tag Bucket Steps
Step 1 Click on the "Retrieve Tag Bucket" button.
You will then be presented with the following Box
Aleis 8050 Series Operational Manual
Aleis 8050 Series
27 of 35
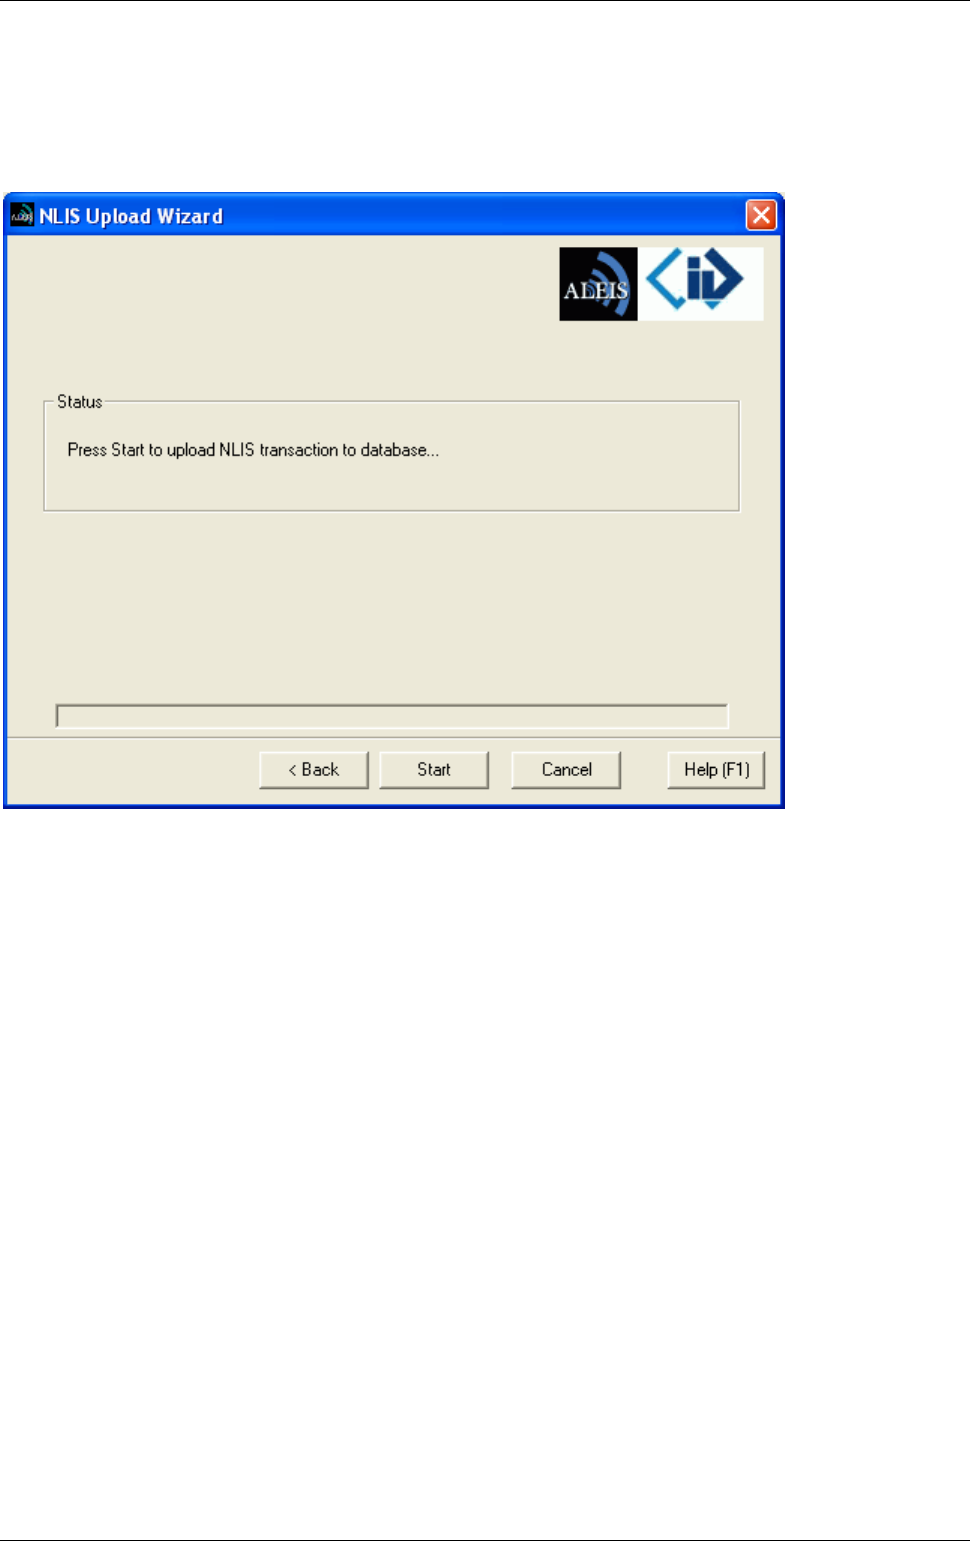
Step 2 After completing the form Click on "Next"
You will then be presented with the following Box
Step 3 Click on "Start"
The Tag Bucket will be loaded into the main screen of DataLink.
Aleis 8050 Series Operational Manual
Aleis 8050 Series
28 of 35
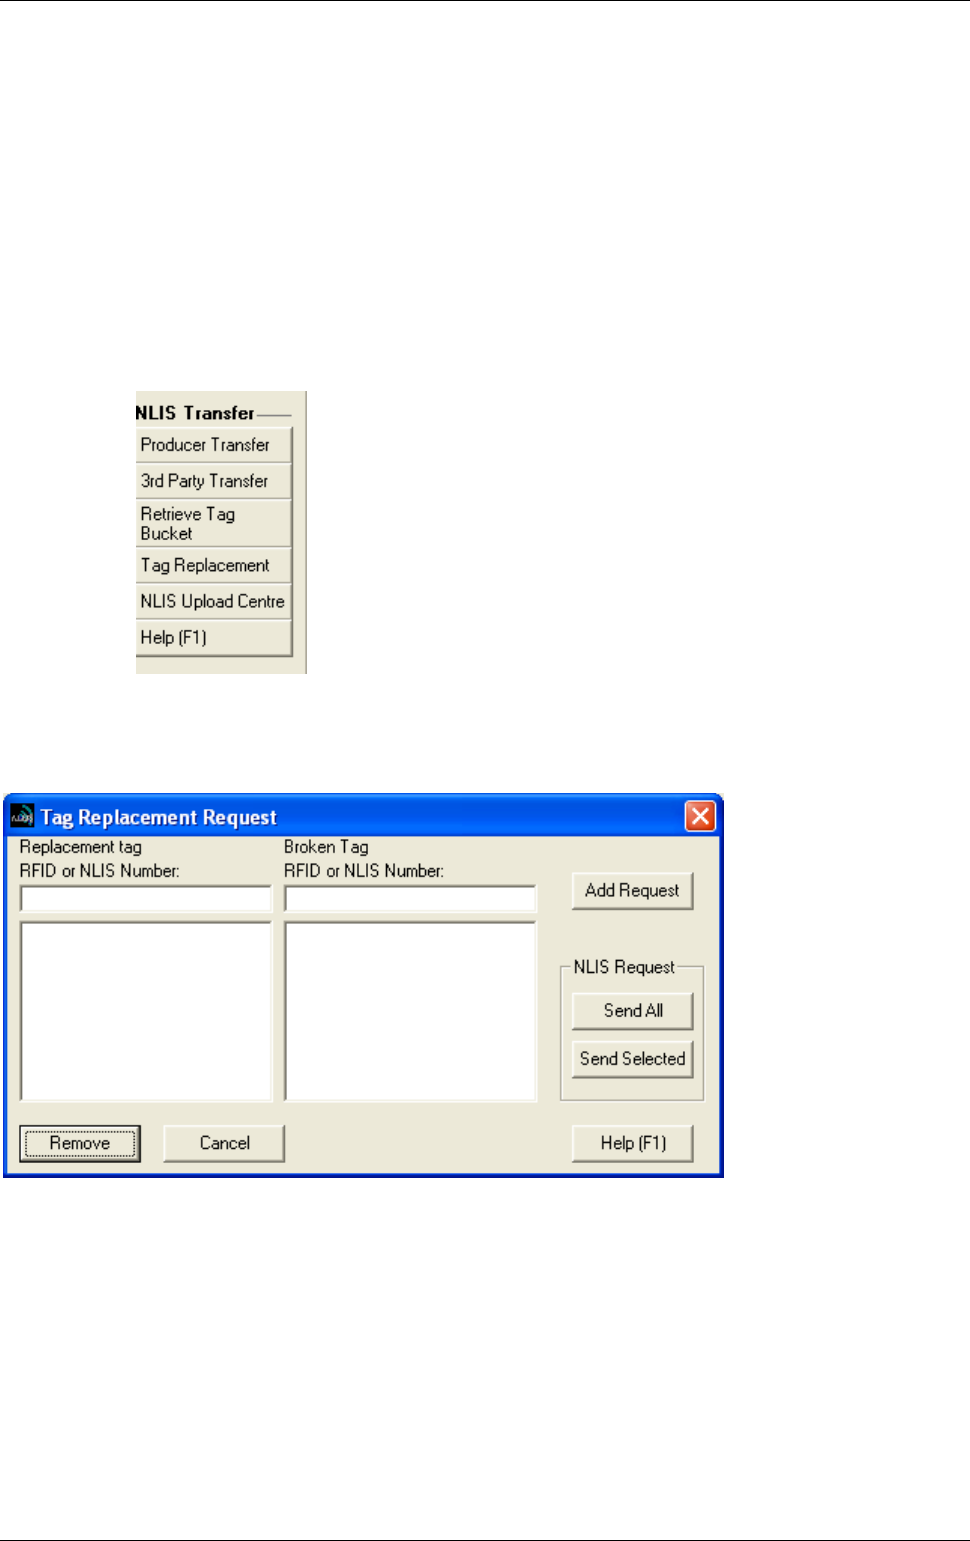
10.7 Tag Replacement (Australia Only)
This opens the NLIS Tag Replacement Request form using the selected tags in the current session. This
button is used for replacing defective RFID tags.
For further information please use the help feature in Aleis DataLink
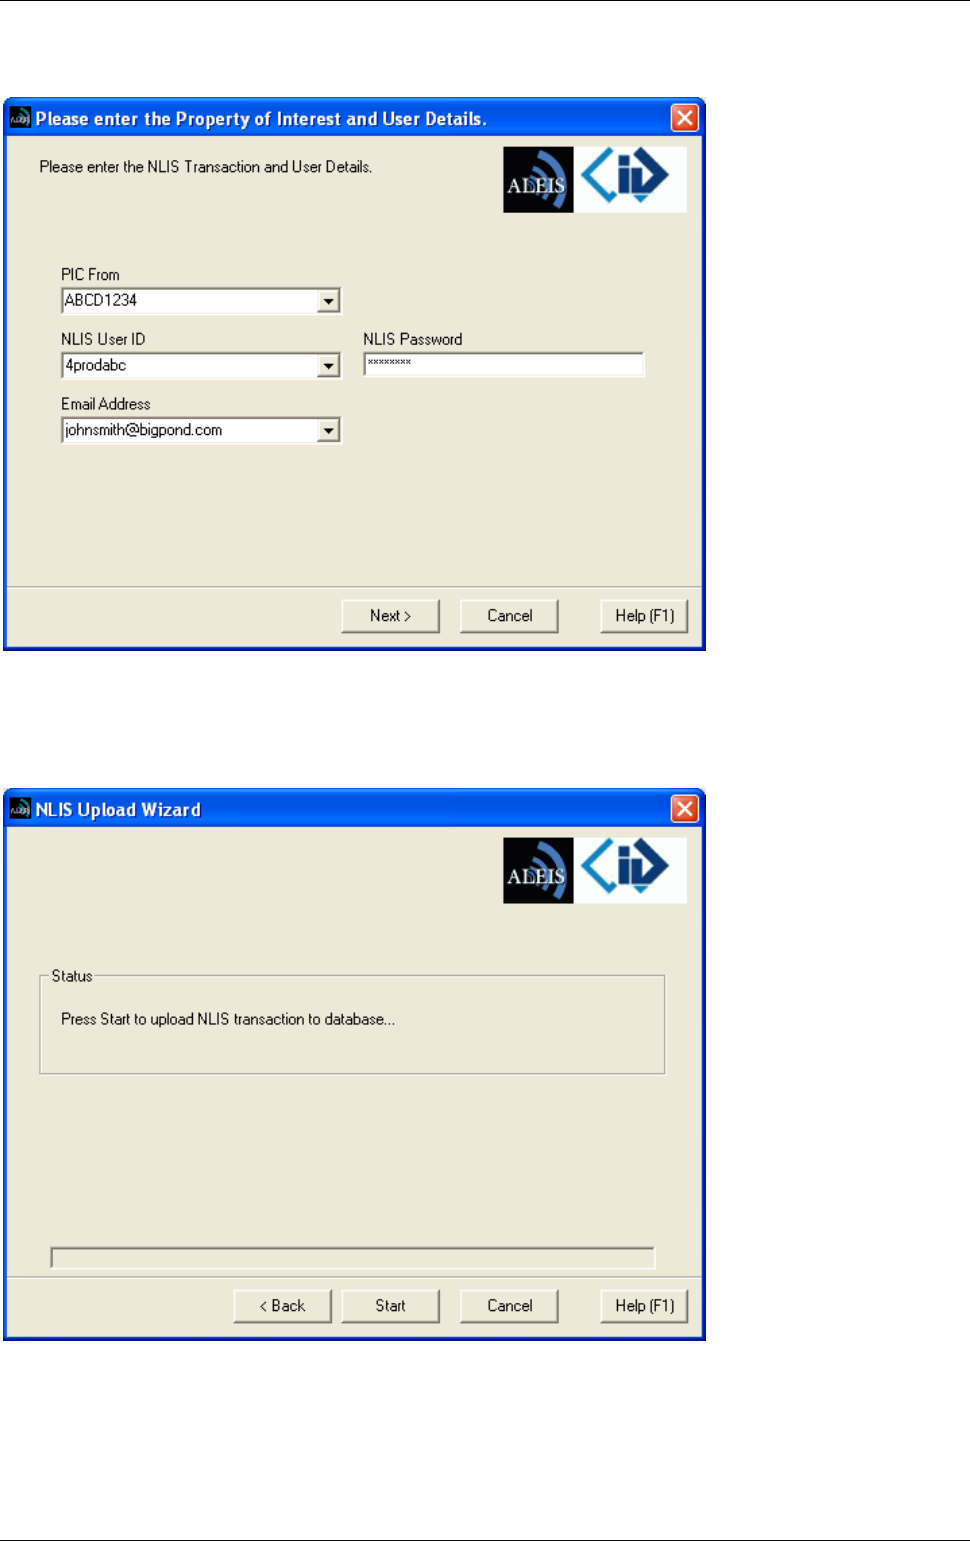
Tag Replacement Steps
Step 1 Click on the "Tag Replacement" button.
You will be presented with the following Box
If there are any tags in the current session you are given the option to load them into the
Replacement tag box.
Aleis 8050 Series Operational Manual
Aleis 8050 Series
29 of 35
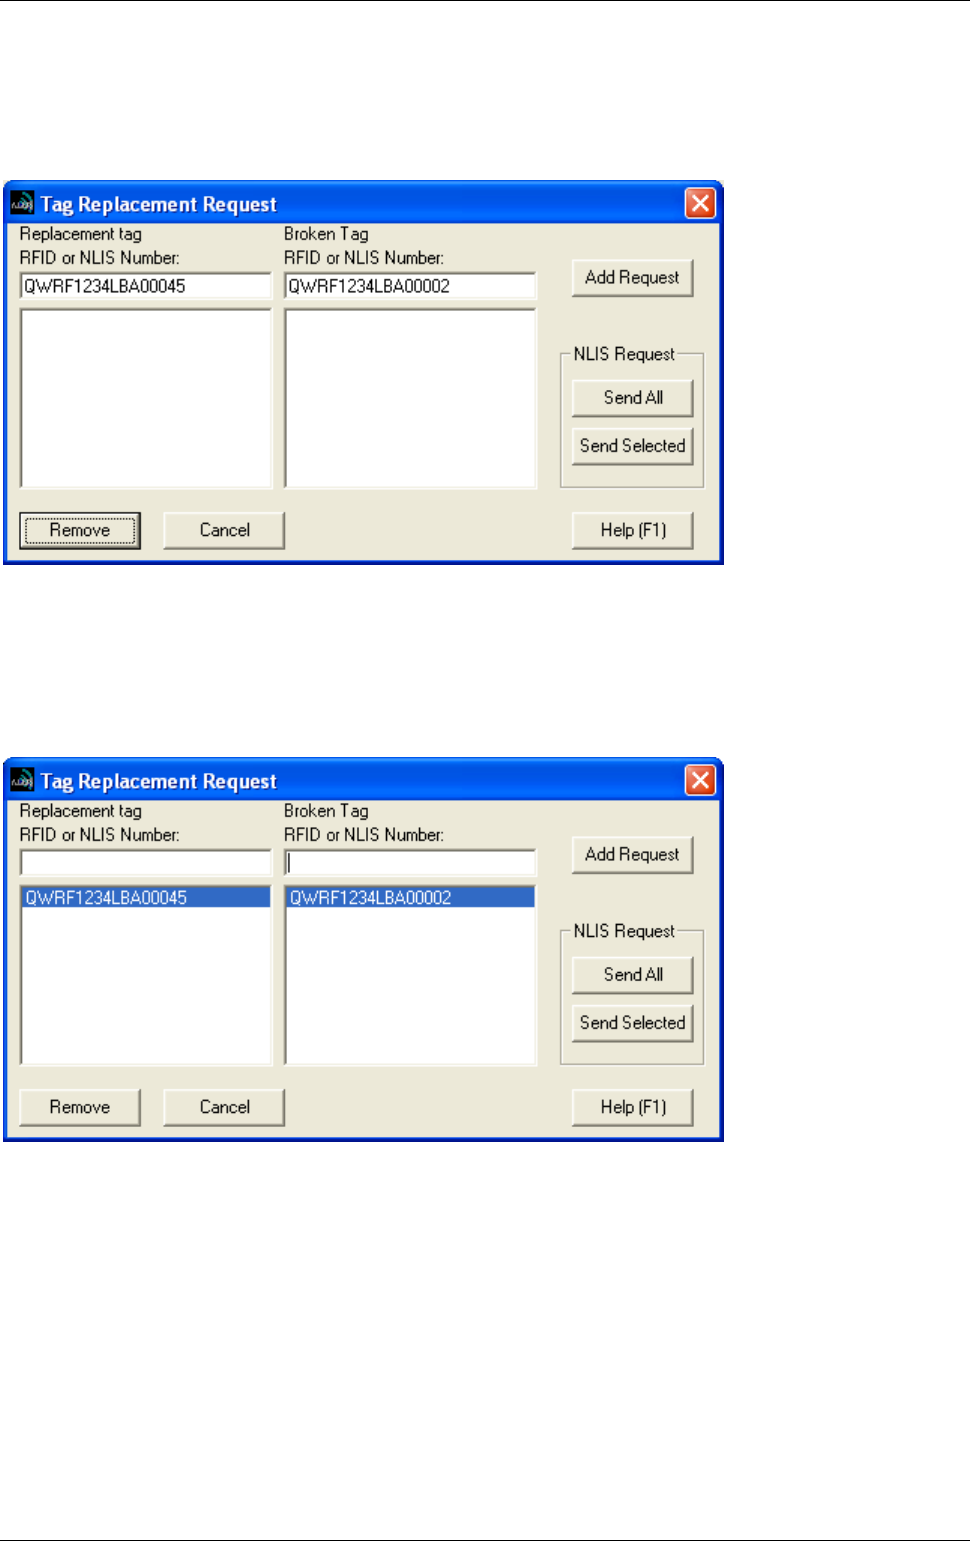
Step 2 Type in the Replacement tag and the Broken tag in the boxes below
Step 3 Click on the "Add Request" Box and the tags will be inserted into the box below.
Step 4 Click on the "Send All" or "Send Selected" button (it can only send the selected tags if
required)
Aleis 8050 Series Operational Manual
Aleis 8050 Series
30 of 35
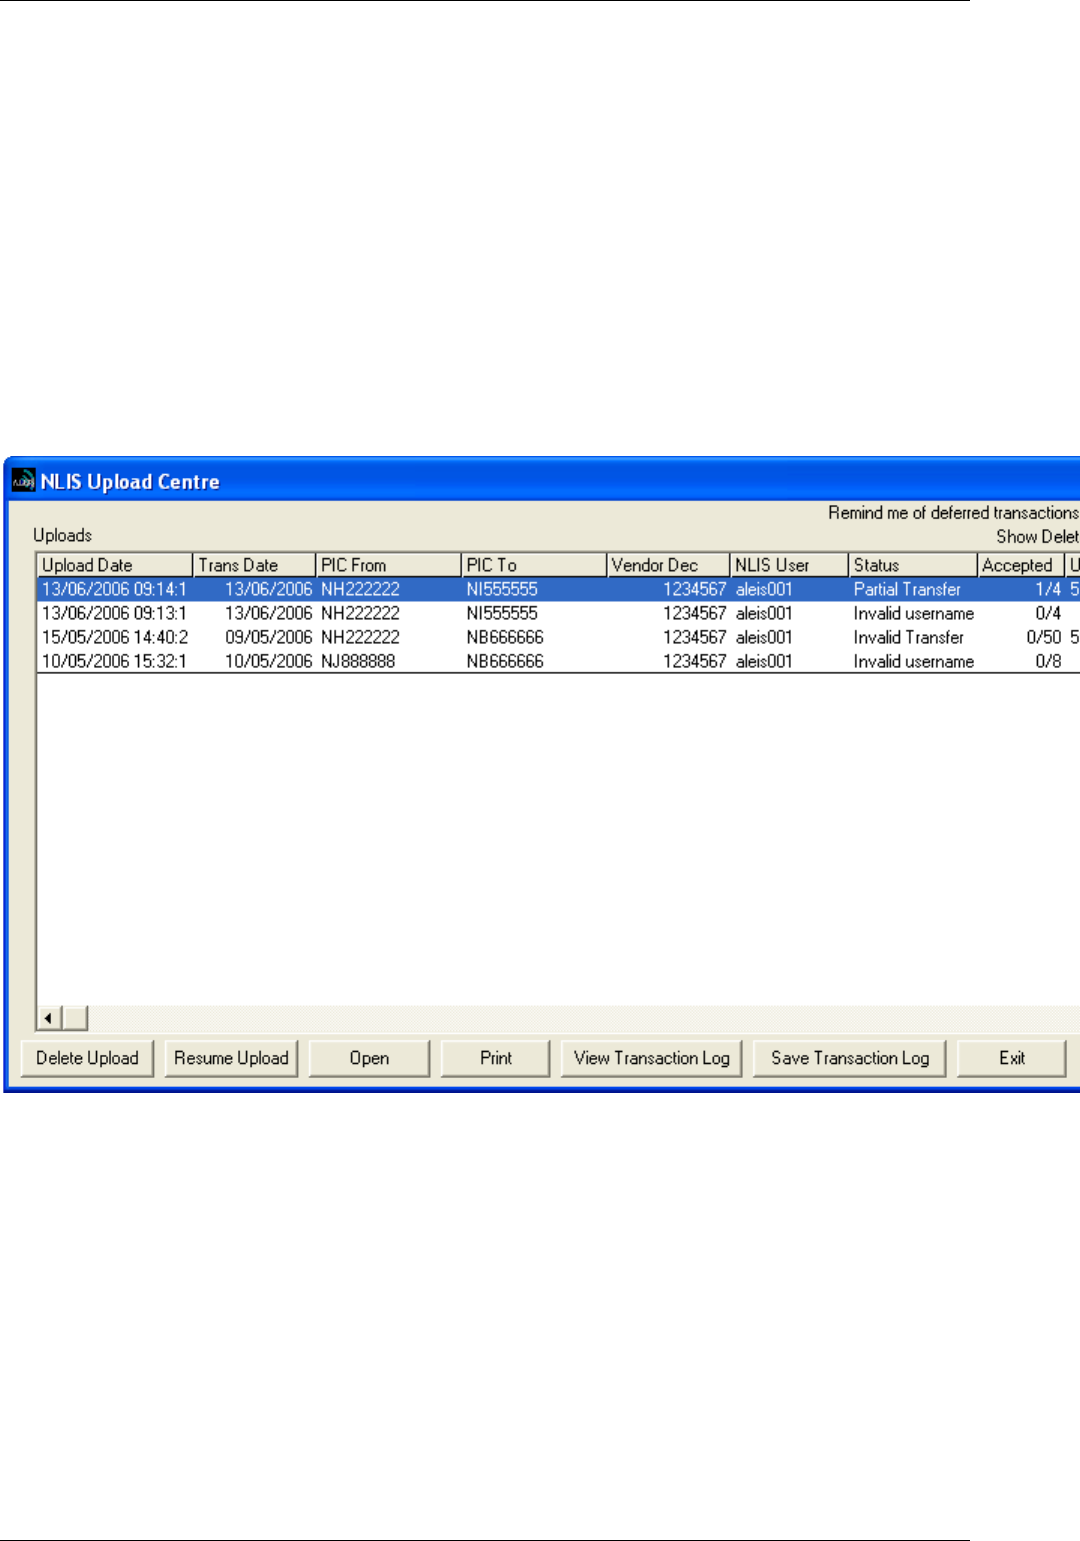
You will be presented with the following Box
Step 5 After completing the form Click on "Next"
You will be presented with the following Box
Step 6 Click on "Start"
On a successful or unsuccessful tag replacement you will get a message in the status box
Aleis 8050 Series Operational Manual
Aleis 8050 Series
31 of 35
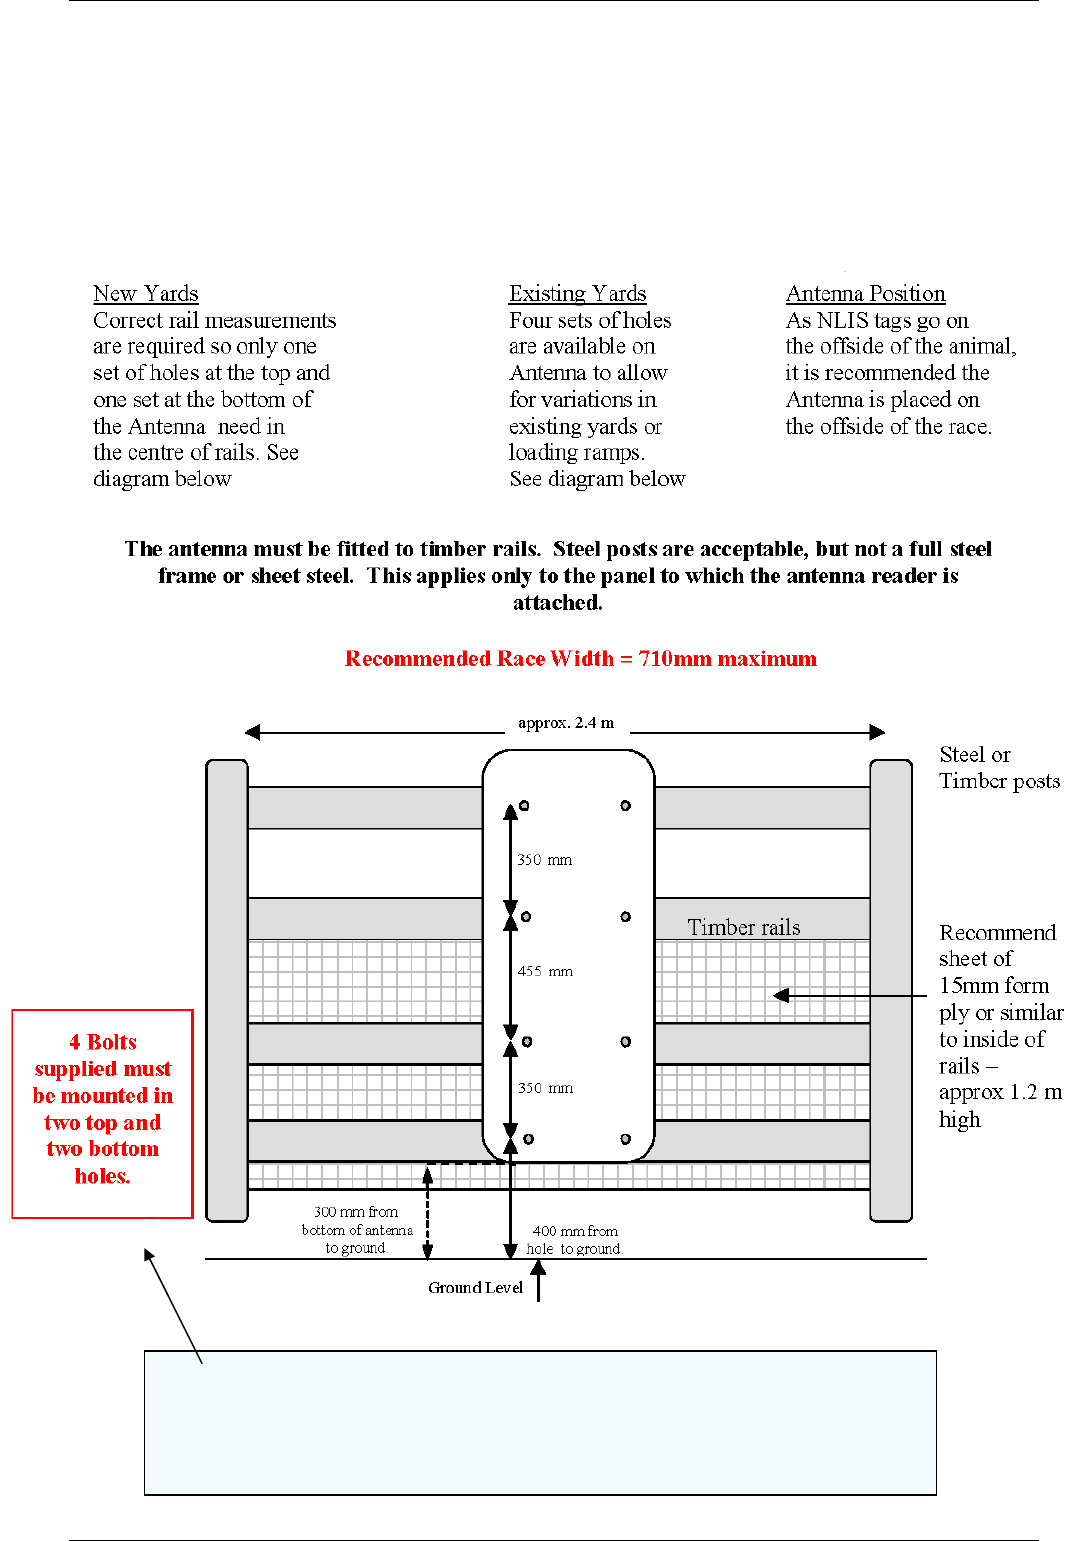
10.8 LIS Upload Centre (Australia Only)
This opens the Upload Centre screen, which displays all transactions with the NLIS database. Both
successful and unsuccessful transactions are displayed and information regarding the transaction.
For further information please use the help feature in Aleis DataLink
Aleis 8050 Series Operational Manual
Aleis 8050 Series
32 of 35
11.0 Rail Measurements for fixed race systems
Antenna Mounting Measurements
Bottom of Antenna to be mounted 300 mm from ground where animal actually stands.
Antenna bolt hole spacings are marked on diagram above. Holes are pre-drilled in
antenna.
DO NOT DRILL HOLES IN ANTENNA YOURSELF.
10.10.01

Aleis 8050 Series Operational Manual
Aleis 8050 Series
33 of 35
12.0 Aleis Conditions of Sale
1. In these conditions:
(1) `Vendor' means Aleis Pty Ltd ACN 130 754 826 of the Cnr Old Rosevale & Jandowae/Kingaroy Rds, Jandowae, Queensland, 4410 which
is the seller of the goods
(2) ‘Factory’ means the Vendor’s principal place of business at the Cnr Old Rosevale & Jandowae /Kingaroy Rds, Jandowae, Queensland 4410.
(3) Purchaser' means the customer(s) described overleaf which is the purchaser of the goods.
(4) `Goods' means the products and, if any, services specified overleaf
(5) Nothing in these conditions shall be read or applied so as to exclude, restrict or modify or have the effect of excluding, restricting or modifying
any condition, warranty, guarantee, right or remedy implied by law (including the Trade Practices Act 1974) and which by law cannot be
excluded, restricted or modified.
(6) Words denoting the singular number only include the plural number and vice versa; where reference to any gender includes every other
gender and words denoting individuals include corporations
2. These conditions (which shall only be waived in writing signed by the vendor) shall prevail over all conditions of the purchaser's order to the extent of any
inconsistency.
3. The goods and all other products sold by vendor are sold on these terms and conditions.
4. Unless previously withdrawn, vendor's quotation is open for acceptance within the period stated therein or, when no period is so stated, within thirty (30)
days only after its date. The vendor reserves the right to refuse any order based on this quotation within 7 days after the receipt of the order.
5. The cost of any special packing and packing materials used in relation to the goods shall be at the purchaser's expense notwithstanding that such cost
may have been omitted from any quotation.
6. The purchaser waives any claim for shortage or discrepancy of any goods delivered if a claim in respect thereof has not been lodged with vendor within
seven (7) days from the date of receipt of goods by the purchaser.
7. All specifications, drawings, and particulars of weights and dimensions submitted by vendor are approximate only and any deviation shall not be taken to
vitiate any contract with vendor or form grounds for any claim against vendor. The descriptions, illustrations and performances contained in catalogues,
price lists and other advertising matter do not form part of the contract of sale of the goods. Where specifications, drawings or other particulars are
supplied by purchaser, vendor's price is made on estimates of quantities required. Should there be any adjustments in quantities above or below the
quantities estimated by vendor and set out in a quotation, then any such increase or decrease shall be adjusted on a unit rate basis according to unit
prices set out herein.
8.1 Any performance figures given by vendor are estimates only. Vendor shall be under no liability for damages for failure to attain such figures unless
specifically guaranteed in writing and any such written guarantee shall be subject to the recognised tolerances applicable to such figures.
8.2 The Purchaser acknowledges that frequency from other products, for example computer equipment, videos, loud speakers and other metal products may
affect the goods’ performance. The Vendor gives no warranty that in the event of any frequency disruption the goods will remain fit for the purpose
intended. The Vendor will not be liable for any claims made as a result of other equipment or other things interfering with the performance of the goods
whether on account of frequency disruption or otherwise.
9. Delivery dates mentioned are an estimate only and vendor shall not be liable for late delivery or non-delivery and under no circumstances shall the
vendor be liable for any loss, damage or delay occasioned to the purchaser arising from late or non-delivery or late installation of the goods.
10. (1) Unless specifically agreed otherwise in writing, delivery shall be ex-factory. The Purchaser must make its own arrangements for the transport
of the goods from the factory and any assistance that the Vendor gives in transporting the goods shall not effect the rights of the Vendor
under this Clause. Vendor is not responsible for any loss or damage to goods in transit.
(2) Risk in the goods shall pass to the Purchaser upon dispatch of goods from Factory.
11. (1) Vendor's liability for goods manufactured by it is limited to making good any defects by repairing the same or at vendor's option by
replacement, within a period not exceeding twelve calendar months after the goods have been dispatched (or installed by Aleis) provided
that:
(a) defects have arisen solely from faulty materials or workmanship;
(b) the goods have not received maltreatment, inattention or interference;
(c) accessories of any kind used by the purchaser are manufactured by or approved by vendor;
(d) the seals of any kind on the goods remain unbroken; and
(e) the defective parts are promptly returned free of cost to vendor.
(f) all freight is paid by the purchaser.
(2) If goods are not manufactured by vendor the guarantee of the manufacturer thereof shall be accepted by the purchaser and is the only
guarantee given to purchaser in respect of the goods.

Aleis 8050 Series Operational Manual
Aleis 8050 Series
34 of 35
(3) Vendor shall not be liable for and purchaser releases vendor from any claims in respect of faulty or defective design of any goods supplied
unless such design has been wholly prepared by vendor and the responsibility for any claim has been specifically accepted by vendor in
writing and in any event vendor's liability hereunder shall be strictly limited to the replacement of defective parts in accordance with para
11(1) of these conditions.
(4) Except as provided herein, all express and implied warranties, guarantees and conditions under statute or general law as to merchantability,
description, quality, suitability or fitness of the goods for any purpose or as to design, assembly, installation, materials or workmanship or
otherwise are hereby expressly excluded and vendor shall not be liable for physical or financial injury, loss or damage or for consequential
loss or damage of any kind arising out of the supply, layout, assembly, installation or operation of the goods or arising out of vendor's
negligence or in any way whatsoever.
12. Vendor's liability for a breach of a condition or warranty implied by Div 2 of Pt V of the Trade Practices Act 1974 (other than s 69) is hereby limited to:
(1) in the case of goods, any one or more of the following:
(a) the replacement of the goods or the supply of equivalent goods;
(b) the repair of the goods;
(c) the payment of the cost of replacing the goods or of acquiring equivalent goods;
(d) the payment of the cost of having the goods repaired; or
(2) in the case of services:
(a) the supplying of the services again; or
(b) the payment of the cost of having the services supplied again.
13. Vendor's liability under s 74H of the Trade Practices Act 1975 is expressly limited to a liability to pay to the purchaser an amount equal to:
(1) the cost of replacing the goods;
(2) the cost of obtaining equivalent goods; or
(3) the cost of having the goods repaired, whichever is the lowest amount.
14. Unless otherwise stated all prices quoted by vendor are net, exclusive of tax. Prices quoted are those ruling at the date of issue of quotation and are
based on rates of freight, insurance, customs duties, exchange, shipping expenses, sorting and stacking charges, cartage, rate of weighs, cost of
materials and other charges affecting the cost of production ruling on the date the quotation is made and any alterations thereto either before acceptance
of or during the currency of the contract shall be to the purchaser's account.
15 The purchase price in relation to goods shall be payable and payment or balance thereof shall be made immediately at time of order, or otherwise as
agreed in writing.
16. Vendor reserves the following rights in relation to the goods until all accounts owed by the purchaser to vendor are fully paid:
(1) legal ownership of the goods;
(2) to enter the purchaser's premises (or the premises of any associated company or agent where the goods are located) without liability for
trespass or any resulting damage and retake possession of the goods; and
(3) to keep or resell any goods repossessed pursuant to (2) above;
If the goods are resold, or products manufactured using the goods are sold, by the purchaser, the purchaser shall hold such part of the proceeds of any
such sale as represents the invoice price of the goods sold or used in the manufacture of the goods sold in a separate identifiable account as the
beneficial property of vendor and shall pay such amount to vendor upon request. Notwithstanding the provisions above vendor shall be entitled to
maintain an action against the purchaser for the purchase price and the risk of the goods shall pass to the purchaser upon delivery.
17. Any property of the purchaser under vendor's custody or control shall be entirely at the purchaser's risk as regards loss or damage caused to the property
or by it.
18. Vendor reserves the right to make a reasonable charge for storage if the purchaser does not take delivery of goods within fourteen days of notification
that the goods are ready for collection.
19. Vendor shall not be under any obligation to accept goods returned by the purchaser and will do so only on terms to be agreed in writing in each individual
case.
20. All goods to be supplied by vendor shall be as described on the quotation overleaf and the description on such order modified as so agreed shall prevail
over all other descriptions including any purchaser's specification or inquiry.
21. No order may be cancelled except with consent in writing and on terms which will indemnify vendors against all losses.
22. The contract for sale of the goods is made in the state of Queensland and the parties agree to submit all disputes arising between them to the courts of
such state at any court competent to hear appeals therefrom.

Aleis 8050 Series Operational Manual
Aleis 8050 Series
35 of 35
23.
The Purchaser shall pay all and any import duties, levies or imports and/or any sales, use, excise, gross receipts, value added, goods and services tax,
property or other taxes or duties of any kind whatsoever assessed upon or relating in any way to the goods ordered by the Purchaser irrespective of the
person, nation, state or authority requiring payment thereof.
24. If the Vendor has not paid for any goods on the due date specified in this Agreement, without prejudice to any other right or remedy, all outstanding
money shall bear interest on daily balances until paid at the rate of 1.5% per month and such money together with all interest shall be recoverable
forthwith from the Purchaser.
The Purchaser charges as a fixed charge with the payment of all monies now or in the future becoming owing hereunder all his property both real and personal (other
than property referred to in Section 262 (i) of the Corporations Law) and as a separate charge charges all his other property with the payment of all monies now or in
the future becoming owing hereunder, provided that this second charge will be a floating charge in respect of the Purchaser’s current assets but otherwise will be a
fixed charge. The Purchaser irrevocably makes, nominates, constitutes and appoints, and in the place and stead of the Purchaser puts and deputes the Vendor and
(if the Vendor is a corporation) the directors, general manager and secretary for the time being of the Vendor jointing and each of them severally to be the Attorney or
Attorneys of Purchaser at any time after default as aforesaid has been made (sufficient proof of which will be the Statutory Declaration of the Attorney or Attorneys or
either or any of them) to do all such things as may be required to consent to any Caveat or other like instrument under the Real Property Legislation of any other
jurisdiction in the form prepared by the Vendor’s Solicitor over any or all of the Purchaser’s property and to execute a mortgage and/or charge or other like instrument
under the Real Property Legislation of any other jurisdiction in such form and containing such terms and conditions as the Vendor may require over any or all of the
Purchaser’s property and from time to time to appoint a substitute or substitutes and such appointment or appointments at pleasure to revoke and another or other
substitute or substitutes to appoint and generally to do, execute and perform any act, deed, matter or thing for that purpose as fully and effectually as the Purchaser
could do and the Purchaser agrees to ratify and confirm all and whatever the said Attorney or Attorneys or any substitute or substitutes lawfully do or cause to be
done for that purpose. The End Ver10/05/01