Allflex USA 30005 EID reader for livestock counting with a BT module User Manual
Allflex USA, Inc. EID reader for livestock counting with a BT module
Contents
- 1. User Manual
- 2. Users Manual
Users Manual
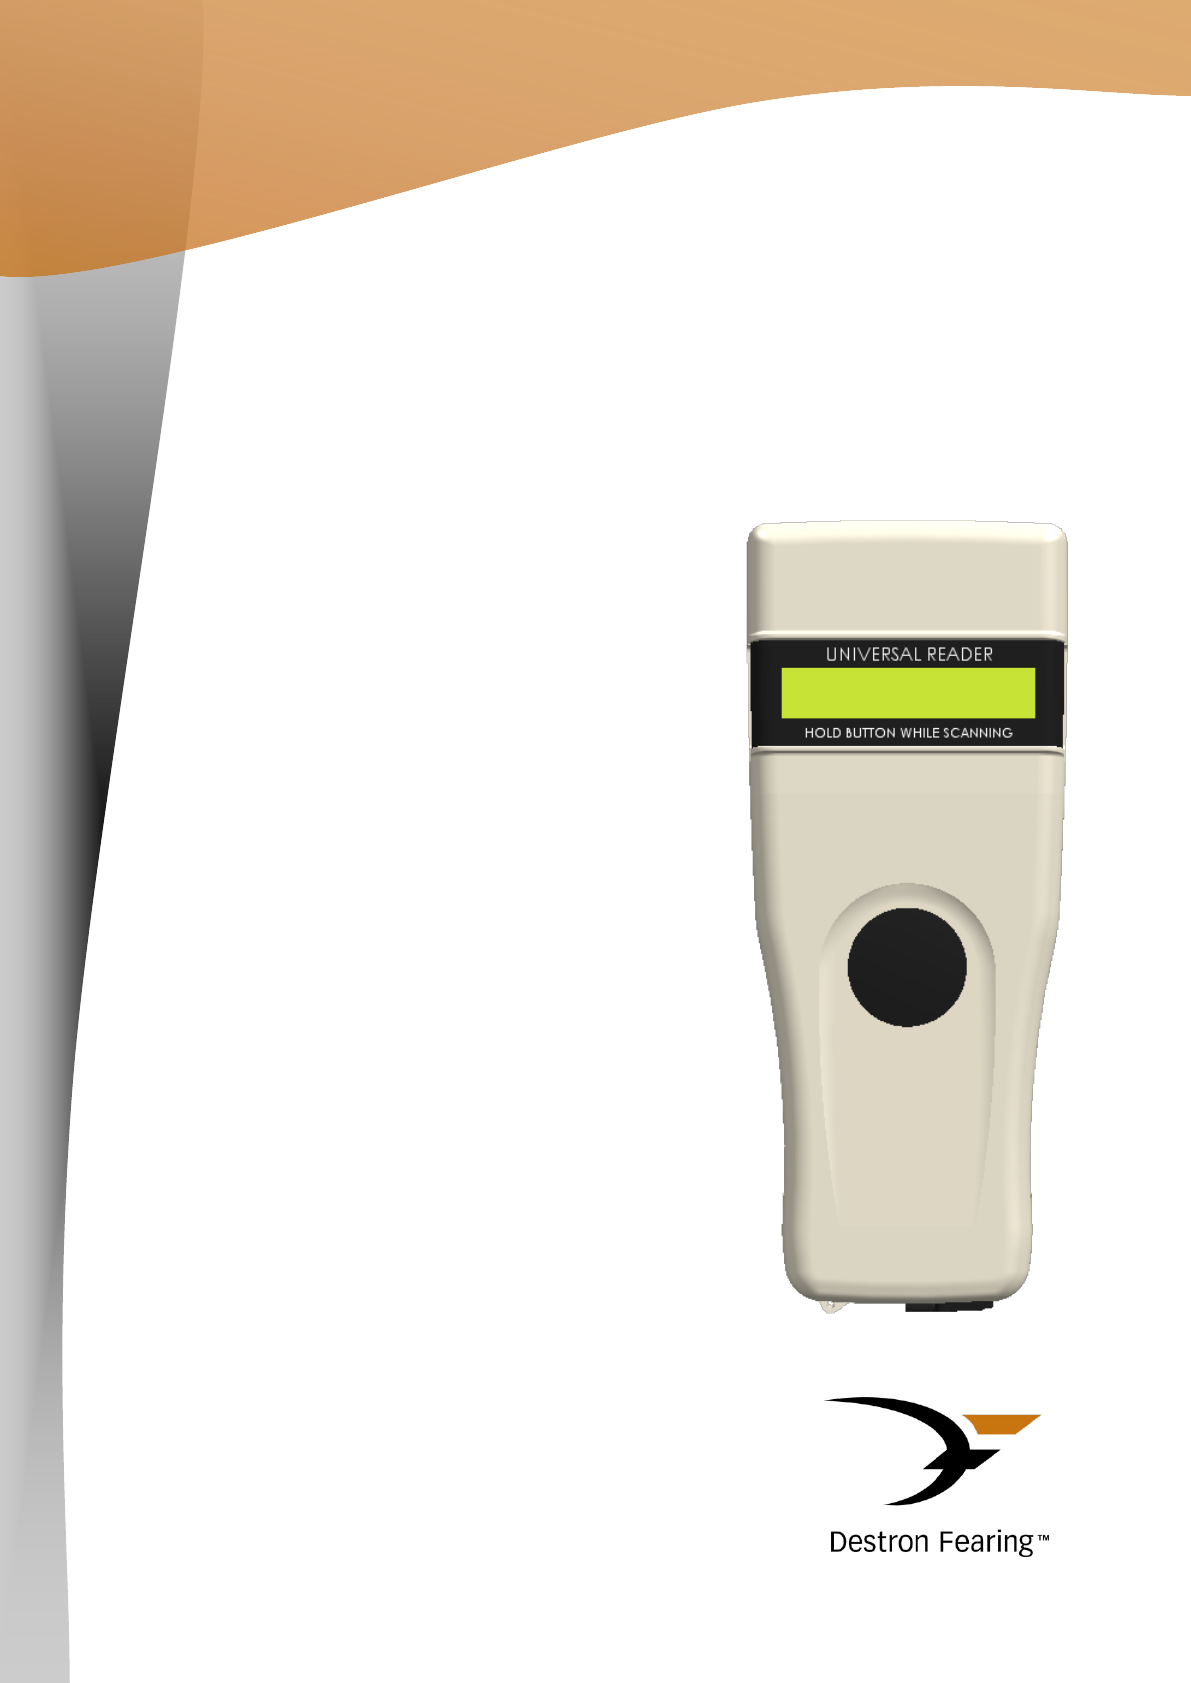
GPR+
GLOBAL POCKET READER™ PLUS
USER
MANUAL
Rev 1.6

User Manual
2
Table of contents
1 Description .............................................................................................................................. 3
2 Reader and Packing ............................................................................................................. 3
3 Operation and settings ......................................................................................................... 4
3.1 Getting Started ............................................................................................................ 4
3.2 Battery handling instructions ...................................................................................... 4
3.3 Power on / off instructions .......................................................................................... 5
3.4 Reading an implanted microchip ............................................................................ 5
3.4.1 Scanning and LOCATING AN IMPLANTED MICROCHIP ............................................ 5
3.4.2 Read range performances ............................................................................................ 6
3.5 Memory management ............................................................................................... 6
3.6 Temperature measurement ....................................................................................... 6
3.7 BLUETOOTH® management ....................................................................................... 7
3.8 Tones ............................................................................................................................. 7
4 Connecting the reader to a PC .......................................................................................... 8
4.1 Using USB interface ...................................................................................................... 8
4.2 Using Bluetooth® interface to pair, from Windows .................................................. 9
5 Connecting the reader to an application on smart phone or on mobile device ..... 10
5.1 Pairing with iPhone®/iPad® devices ...................................................................... 10
5.2 Pairing with Android™ devices................................................................................ 10
6 TROUBLESHOOTING.............................................................................................................. 11
7 Specifications ....................................................................................................................... 12
8 Reader physical integrity .................................................................................................... 13
9 Limited Product Warranty ................................................................................................... 13
10 Regulatory information ....................................................................................................... 13
10.1 USA-Federal Communications Commission (FCC) ............................................... 13
10.2 Canada – Industry Canada (IC) ............................................................................. 14
10.3 Miscellaneous information ....................................................................................... 14
10.4 Trademarks ................................................................................................................. 14
10.5 Apple - Legal Notice ................................................................................................. 14
11 Regulatory Compliance ..................................................................................................... 14
User Manual
3
1 Description
GPR+ is a universal portable reader for RFID microchips with the purpose of identifying animals.
The device can read a wide range of technologies: FDX-B ISO, HDX ISO, FDX-A (FECAVA), Trovan
and Avid Encrypted. GPR+ can also read and display the Microchip Temperature™ when reading
microchips with temperature sensing implants from Allflex or Destron Fearing.
In addition to its microchip reading functions, the GPR+ scanner can store up to 3000 IDs, each
associated with a time/date stamp in its internal memory and transmit them to a personal computer
via an USB cable or wirelessly using Bluetooth®.
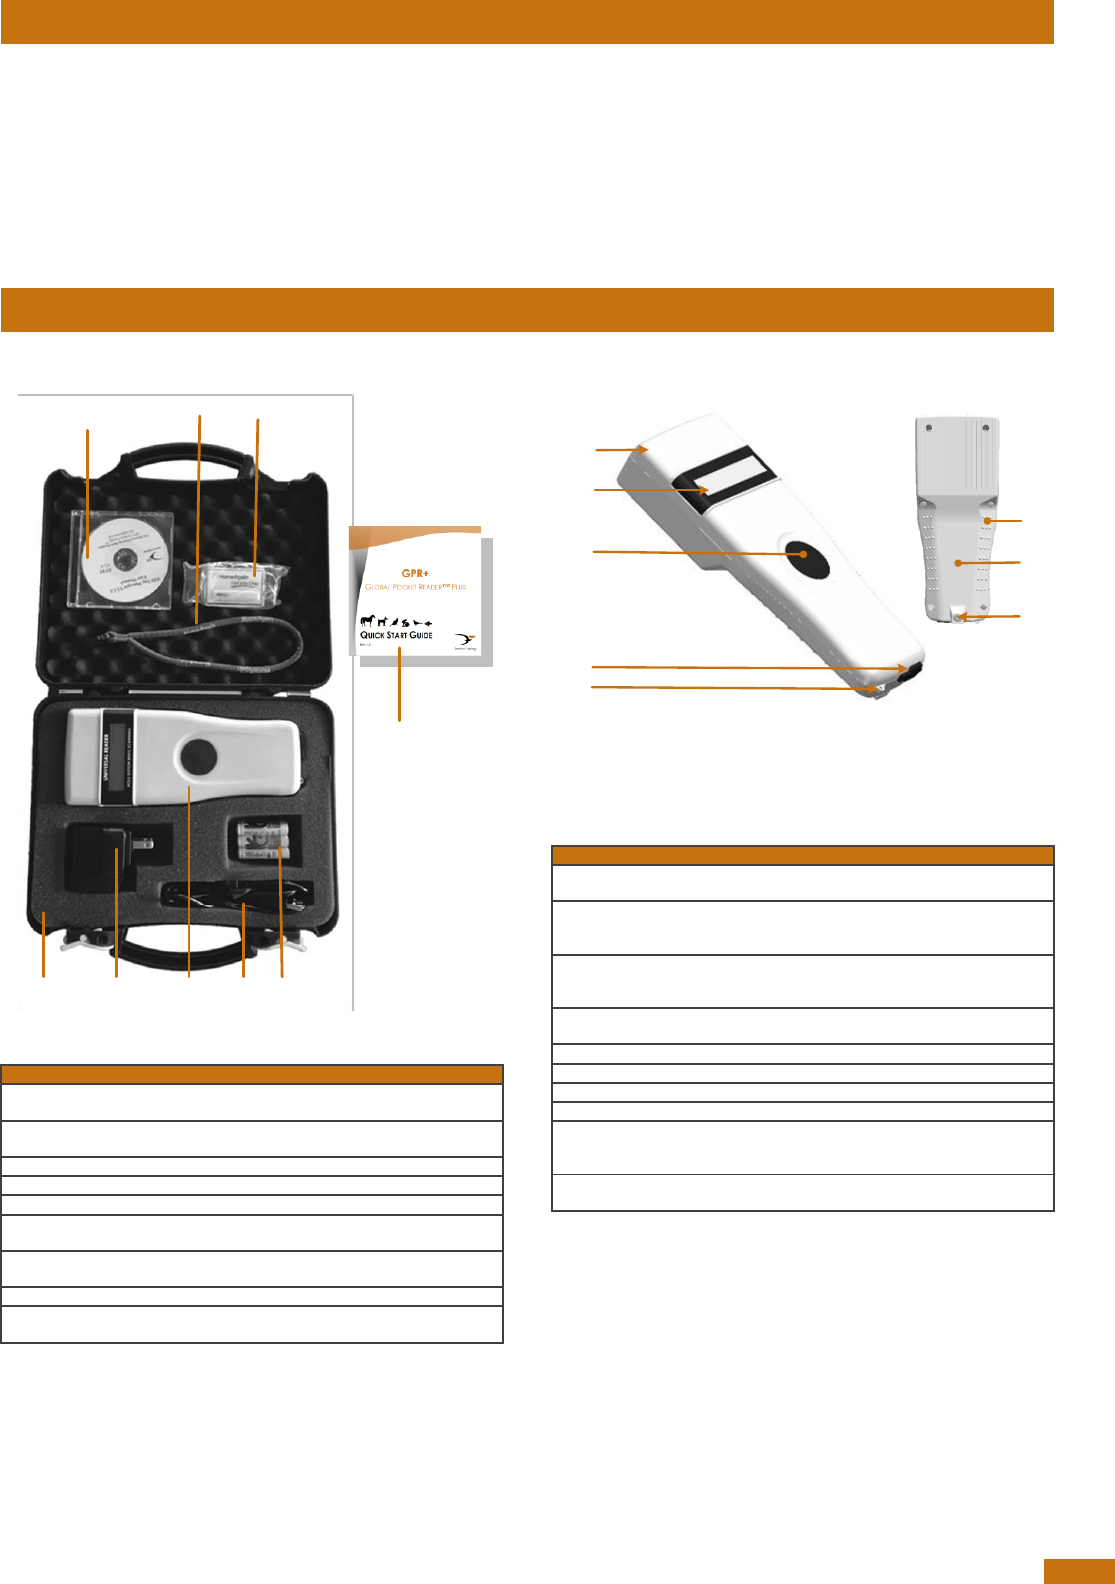
2 Reader and Packing
Figure 1 – Packing
Table 1 – Packing list
Item
Features
Description
1
Plastic case
Use to transport the reader in a
robust case
2
Wall adapter
Powers the reader and charges
batteries.
3
Reader
-
4
Notice
Quick start notice
5
USB Cable
Conveys data to and from reader.
6
Rechargeable NiMH
battery
Supplies the reader.
7
CD-ROM
Contains PC Software, software
guide and user manual
8
Lanyard
-
9
Key chain with test
microchip
1 implant to demonstrate and test
reading capabilities.
Figure 2 - Reader features and user interface.
Table 2 – Reader features and description of use
Item
Feature
Description of use
1
Antenna
Emits activation signal and receives
RFID microchip signal.
2
Large graphical
readout with
backlight
Displays information about current
reader status.
3
“SCAN” button
Applies power and causes activation
signal to be emitted for reading
microchips
4
USB connector
Electrical interface for attaching USB
cable.
5
Eyelet
Eyelet to place the lanyard
6
Handle grip
Anti-slip griping surface
7
Battery cover
Cover to access batteries
8
Battery door screw
Screw on batteries cover
9
Bluetooth® (internal)
Wireless interface to communicate
data to and from reader (not
pictured)
10
Audible beeper
Beeper to identify the different reader
functionalities
789
2 51 3 6
4
1
2
3
5
4
8
7
6
9 & 10
3 Operation and settings
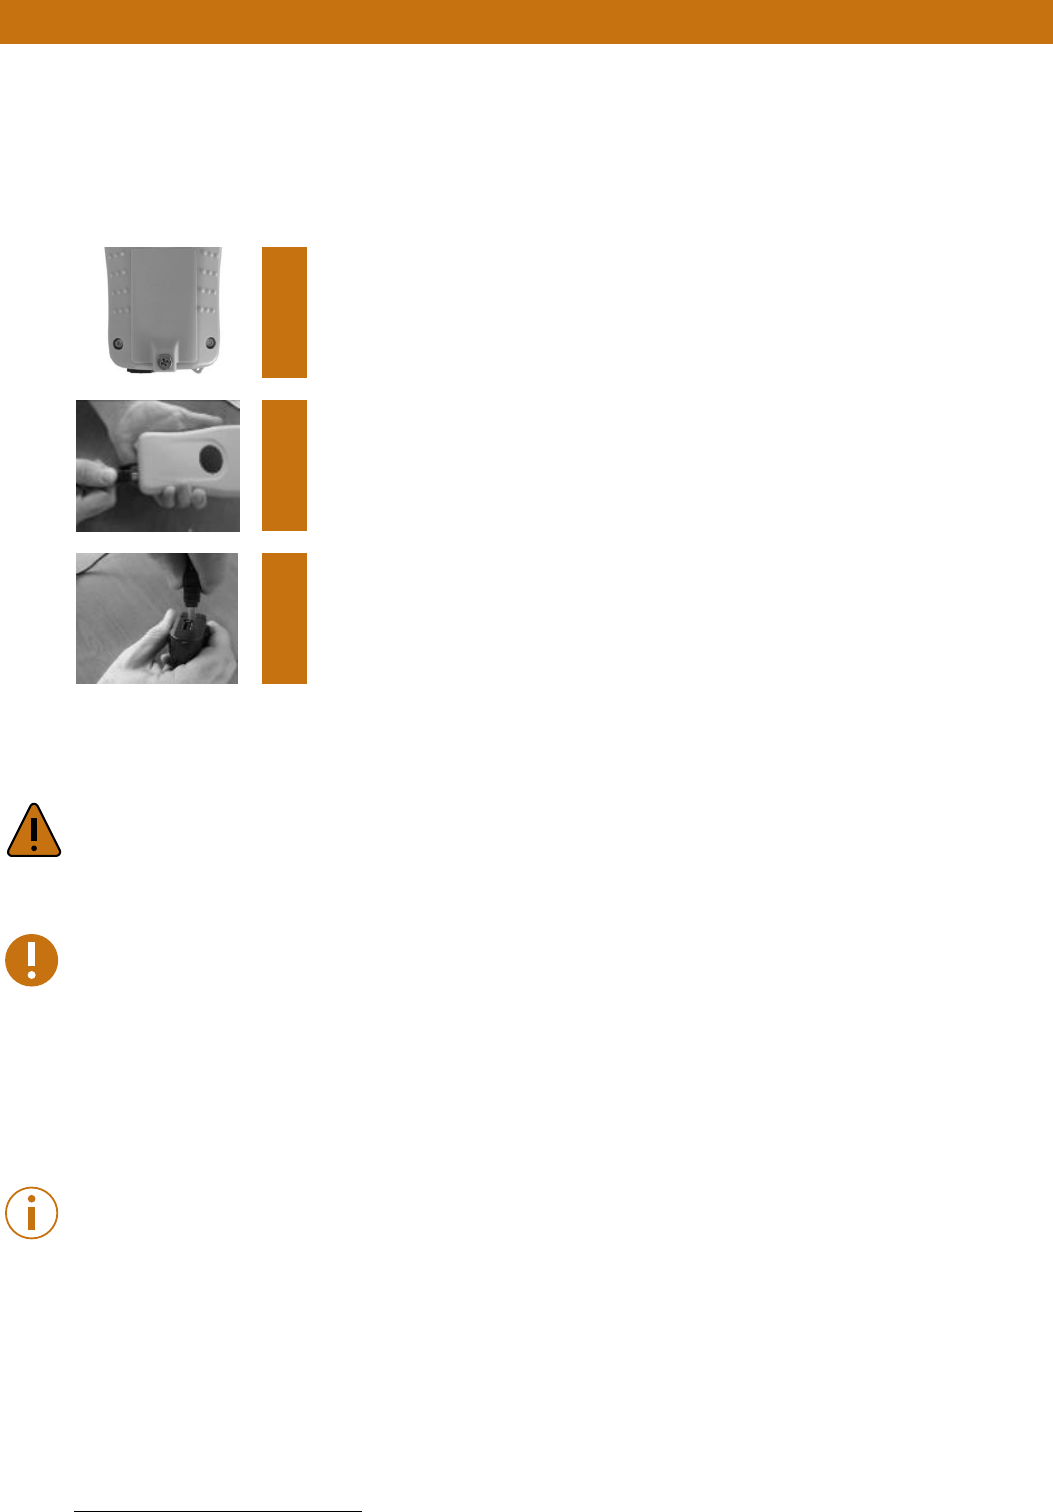
3.1 Getting Started
GPR+ comes supplied with six AAA rechargeable NiMH batteries which must be fully charged prior to
use, as diagram below (step 1 through 3).
If preferred, six standard non-rechargeable AAA Alkaline
1
batteries can also be used and only step 1
should be followed (step 2 and step 3 do not apply).
1
Remove retention screw located on center of back of GPR+. Place
batteries according to polarity indicators. Replace lid and screw.
2
Remove USB plug and attach cable in the GPR+.
3
Plug the adaptor into power outlet. The battery level icon will flash
while charging and stop flashing when fully charged. A full charge will
take approximately 3 hours.
3.2 Battery handling instructions
Please read and follow the handling instructions for the battery before use. Improper use of the
battery may cause heat, fire, rupture, damage or capacity deterioration of the battery.
Caution
DO NOT MIX RECHARGEABLE AND NON-RECHARGEABLE BATTERIES.
RISK OF EXPLOSION IF BATTERY IS REPLACED BY AN INCORRECT TYPE. DISPOSE OF USED BATTERIES
ACCORDING TO THE INSTRUCTIONS.
Warning
Use rechargeable batteries with the same capacity.
Do not use this reader near water when connected to the AC/DC adapter.
Do not install near any heat sources such as radiators, heat registers, stoves, or other apparatus that
produce heat.
Do not charge the battery pack from AC main sources during electrical storms or when unused for
long periods of time.
The batteries must be charged indoors only, at temperature between 0° and +40°C.
For best battery performance, charge unit at least every three months, if reader is unused.
Notice
Use the adapter and the USB cable provided with the reader to charge the batteries.
1
We recommend Duracell® or Energizer® alkaline batteries
User Manual
5
3.3 Power on / off instructions
To turn the GPR+ on, press and release the “SCAN” button once. During this start up time the reader
will display the screen below, beep once, and then display “READY”.
Note 1 - Once activated, the reader will stay on for 2 minutes by default.
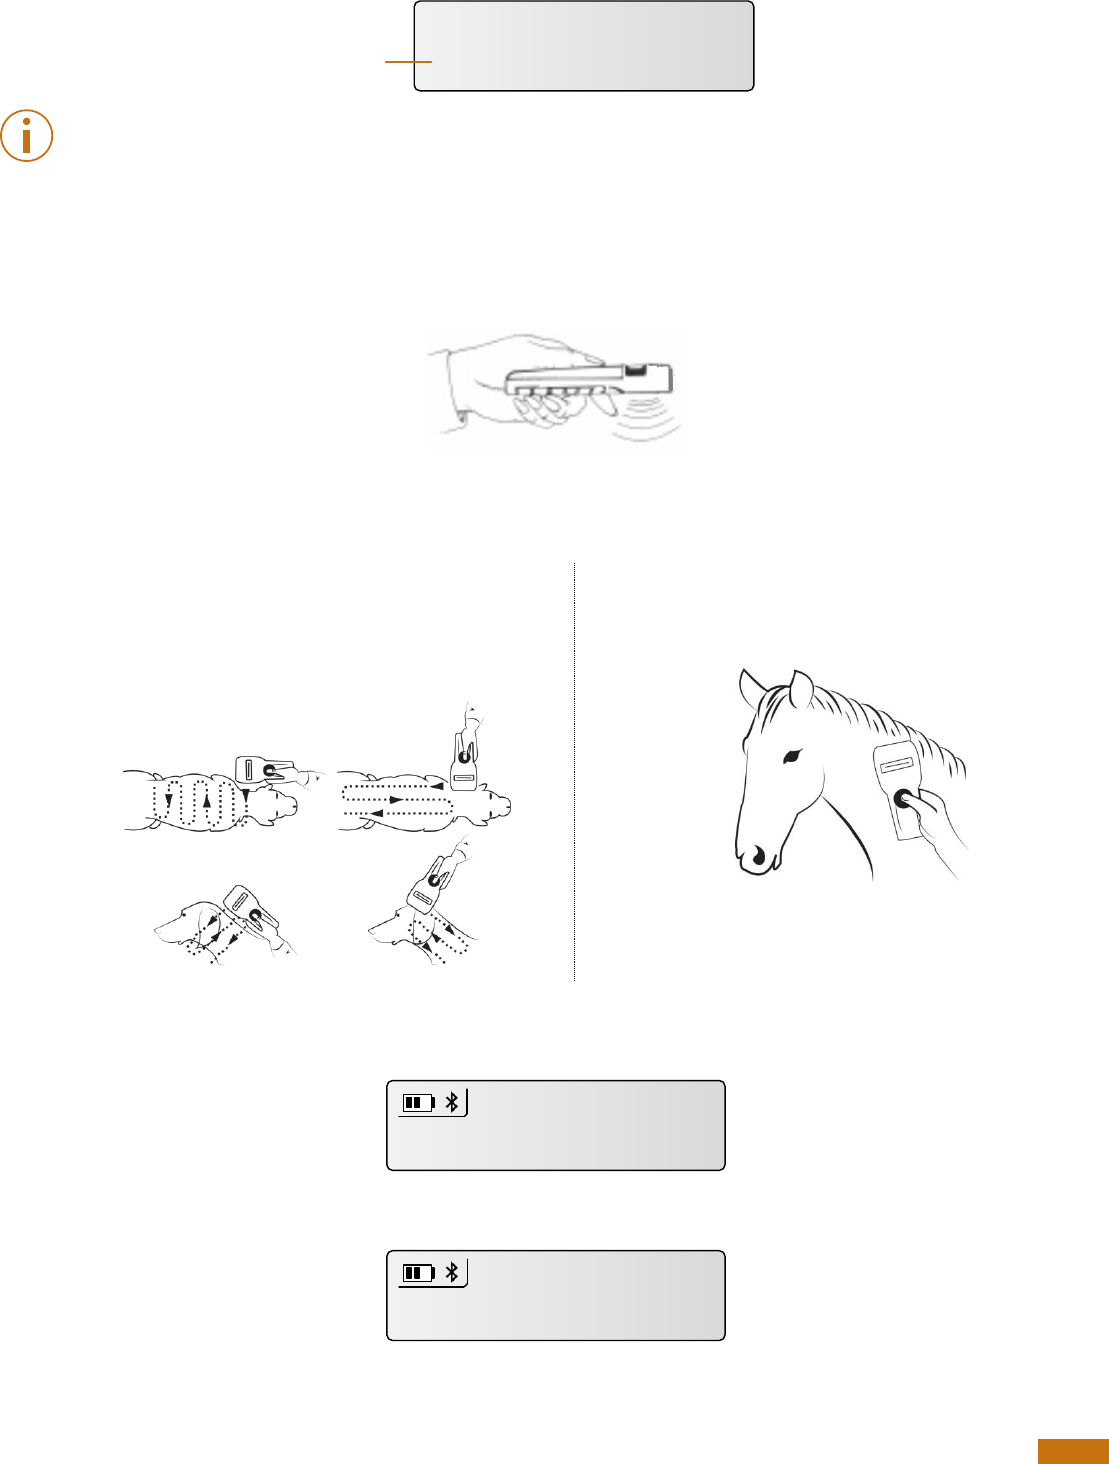
3.4 Reading an implanted microchip
3.4.1 Scanning and LOCATING AN IMPLANTED MICROCHIP
When searching implantable microchips, place the reader so it touches the animal as shown in
pictures.
Use the following scanning patterns to locate the Microchip. Perform pattern 1 and 2 on Left, Top
and Right sides of animal’s neck and shoulders.
For Pets
For other species
Keep scanner touching animal and scan slowly
following patterns below:
Keep scanner touching animal over standard
location for particular species.
To search for microchips, press and hold down the SCAN button. The reader will display
“SEARCHING” until a microchip is found or the scan button released.
If the microchip was not found (see message below), re-test the Scanner with the test chip and
rescan the animal, moving slower and varying angle of scans.
The following pictures show the result of a successful reading session:
Welcome
V0.86.00
Firmware version
Pattern 1 Pattern 2
SEARCHING...
NO ID FOUND

User Manual
6
Note 2 – If a microchip was found and the reader is connected via its USB interface or its Bluetooth®
interface to a host computer, it will send the microchip number to the host computer.
3.4.2 Read range performances
Figure 3 illustrates the reading zone of the reader, within which microchips can be successfully
detected and read. Optimum read distance occurs depending upon the orientation of the
microchip. Microchips and implants read best when positioned as shown below.
Figure 3 - Optimum Read Distance Microchip Orientation (position 1, 2, 3 and 4)
Typical read distances will vary when reading different types of microchips
3.5 Memory management
The GPR+ can store up to 3000 IDs, each associated with a time/date stamp, in its internal memory
and transmit them to a personal computer via an USB cable or wirelessly using Bluetooth®.
The tool “GPR+ Software” allows you to enable/disable the memory storage (refer to the “GPR+
Software User Guide”). By default, the memory storage is DISABLED.
When memory is enabled and a microchip is read, the GPR+ displays above the microchip number,
the number of microchips stored in memory as shown in picture below.
3.6 Temperature measurement
The GPR+ can read and display the Microchip Temperature™ when reading microchips with
temperature sensing
2
implants from Allflex or Destron Fearing.
The Microchip Temperature™ is displayed above the microchip number as shown in picture below.
2
Microchip Temperature™ range is from 33ºC (91.4ºF) to 43ºC (109.4ºF). If the temperature is below or above this range, it will display
“TEMP BELOW RANGE” OR “TEMP ABOVE RANGE”.
985005624300245
985005624300245
MEM:0008
985005624300245
37.5°C / 99.5°F
User Manual
7
3.7 BLUETOOTH® management
The GPR+ is equipped with a Class 2
3
Bluetooth® module to communicate. This device is compliant
with the Bluetooth® Serial Port Profile (SPP).
Enable the Bluetooth® feature by using the “GPR+ Software” (refer to section Using Bluetooth®
interface to pair, from Windows and the document “GPR+ Software User Guide”). By default, the
Bluetooth module is DISABLED.
Bluetooth® works on a premise that one end of the communication will be paired to the other one.
A host initiates communications and looks for other devices to connect. Smart phones and
computers usually establish the connection with readers which are connectable and discoverable.
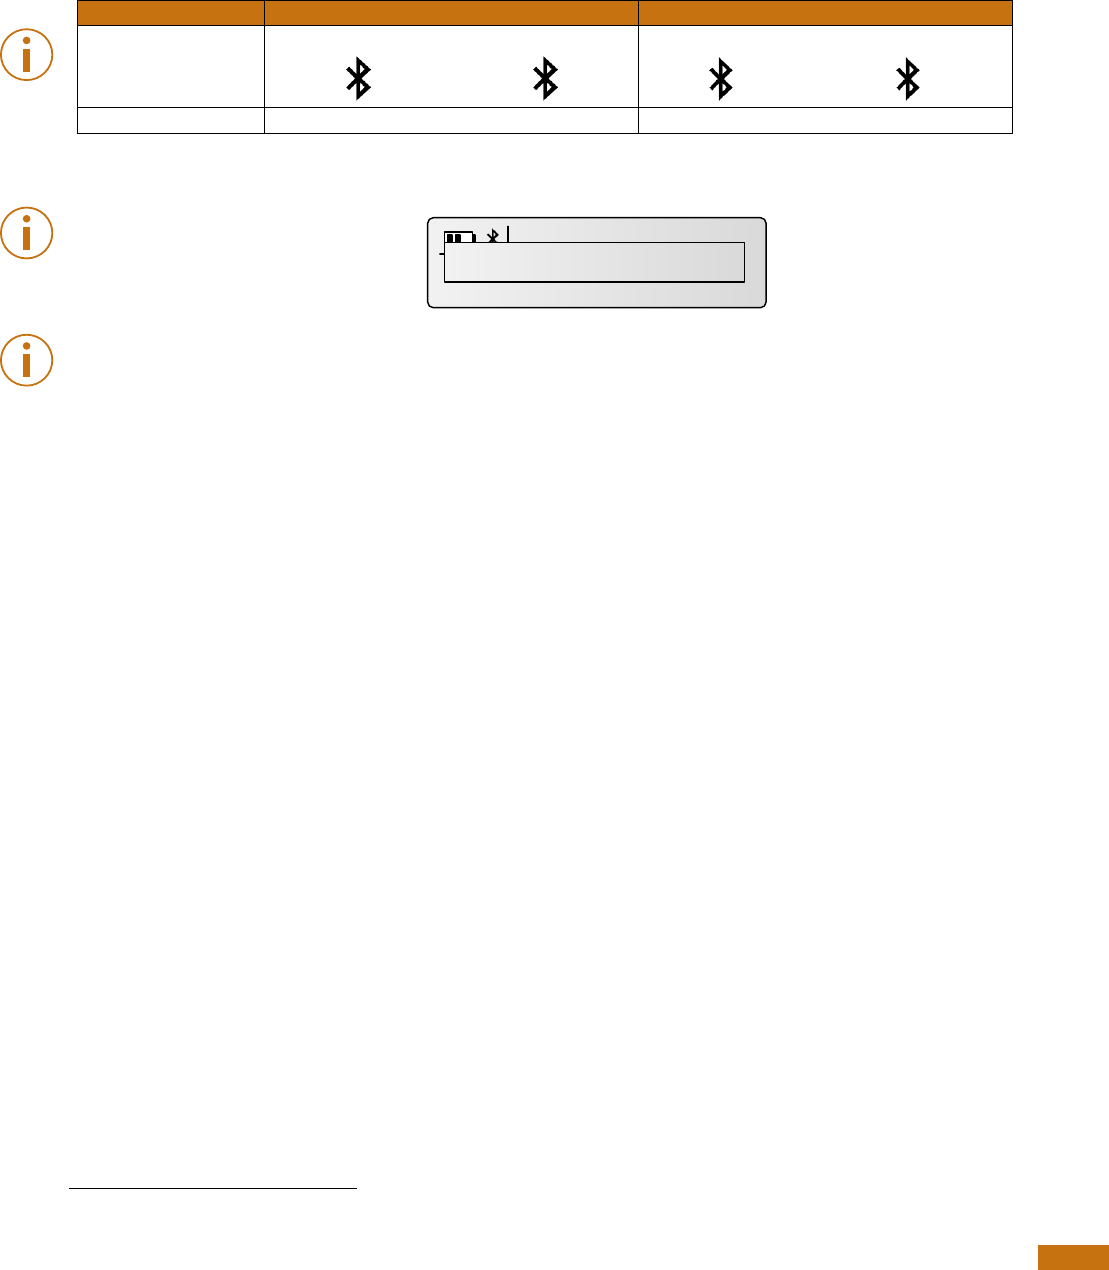
Note 3 – Understanding the Bluetooth® icon:
Disabled
Connectable mode
Host mode
No icon
Blinking
Fixed
Blinking
Fixed
Not connected
Connected
Not connected
Connected
Note 4 – A single beep is emitted with a visual message when the Bluetooth® connection is
established. Three beeps are emitted with a visual message when the disconnection occurs.
Note 5 – If you are using a Smartphone or a PDA, an application is required (not supplied).
3.8 Tones
The scanner has distinct Beep tones for different functions: after start up, when scan button is
pushed, when scan button is released, when microchip is found, or during low battery condition.
3
Operating distance of communication is around 15 m (49 ft).
M
M
982005624300245
37.5°C / 99.5°F
Bluetooth connected!
User Manual
8
4 Connecting the reader to a PC
The device can connect to a personal computer (PC) in 2 ways: by a wired USB connection or by a
wireless Bluetooth® connection.
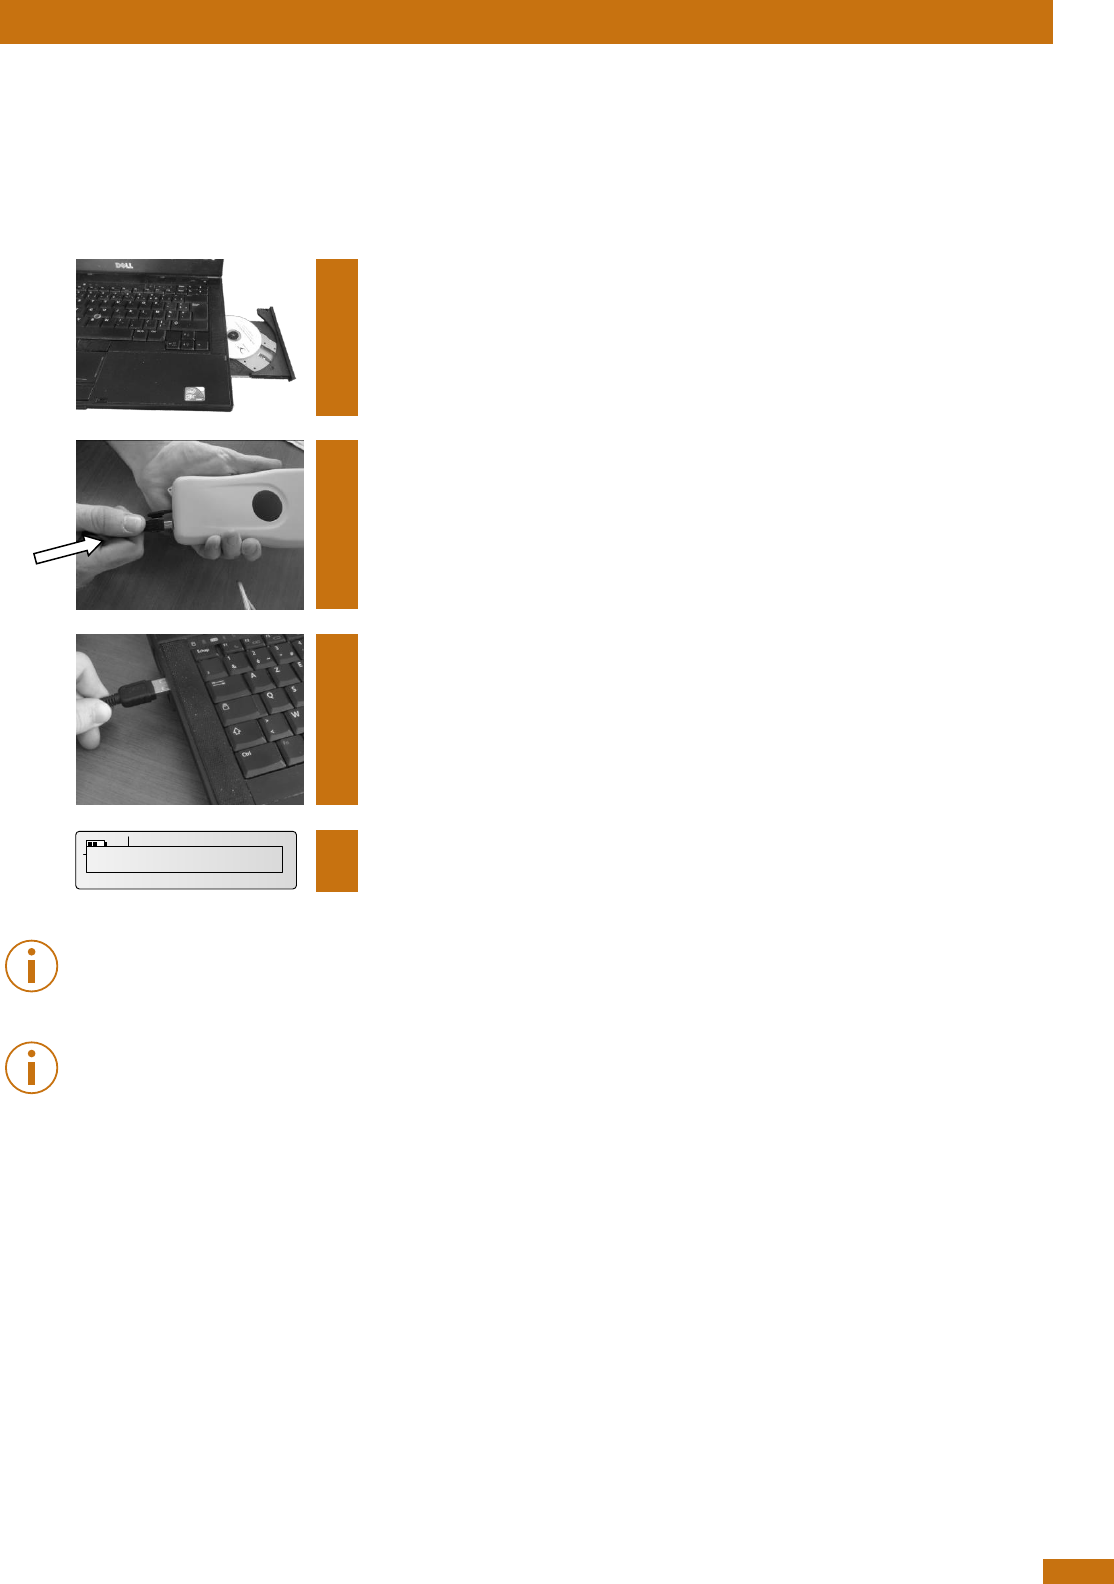
4.1 Using USB interface
The USB port allows the device to send and receive data via a USB connection.
To establish a USB connection, simply connect the reader to a PC with the USB cable.
1
Install the GPR+ Software provided on the CD-ROM first in order to pre-
install USB drivers for the reader. When reader is connected, Windows
will automatically find the driver and install the reader properly.
2
Remove the protective cap covering the reader’s USB connector
(replace protective cap to guard the reader against foreign material
contamination once the USB cable is removed).
Install the USB cable by engaging it into the connector.
3
Plug the other extremity of the USB cable into a USB port on your
computer.
A message is displayed on screen
Note 6 – Once the USB cable is connected, the reader is automatically powered on and it will
remain activated until the cable is disconnected. The reader will be able to read a microchip if
sufficiently charged batteries are inserted. With depleted batteries, the reader will not be able to
read a microchip, but will remain on and can only communicate with computer.
Note 7: The reader cannot read microchips without batteries inserted. Therefore it is not possible to
read an implant although the other functions are fully active.
982005624300245
USB Connected!
User Manual
9
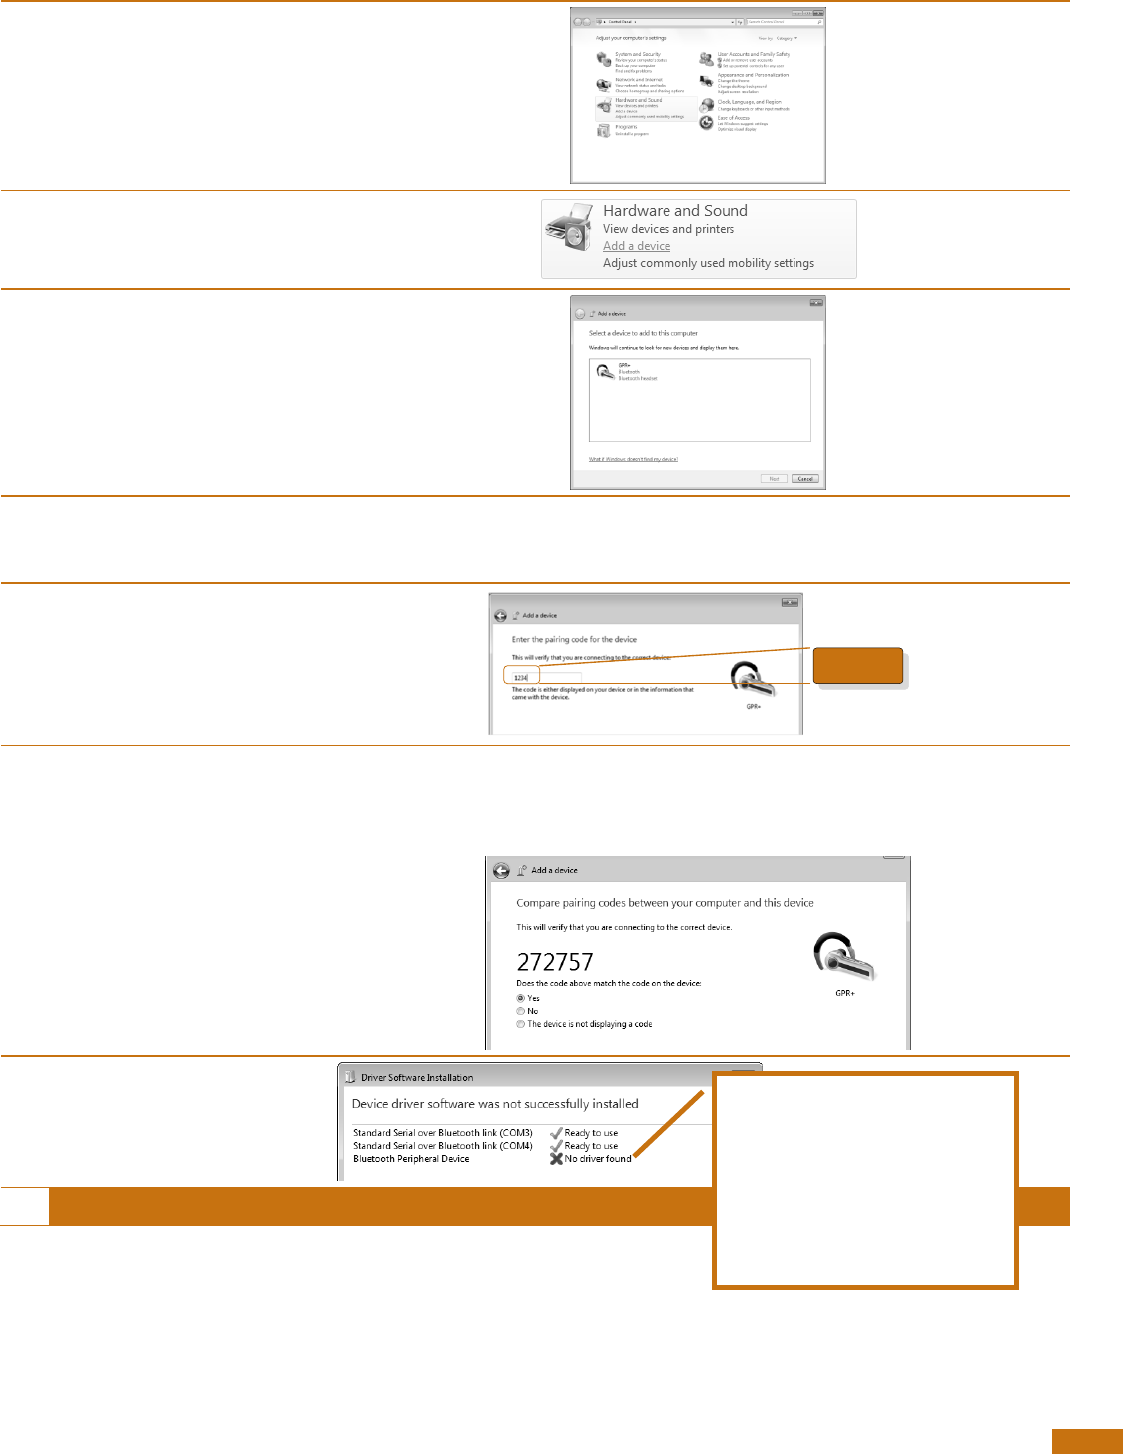
4.2 Using Bluetooth® interface to pair, from Windows
Alternately, you can pair the reader using Windows Control Panel.
Find below the instructions for pairing with Windows 7:
1
Open Windows’ Control
Panel
2
In “Hardware and Sound”
section, select “Add a
device”
3
Switch-on the reader and
wait until the reader
appears in the device list
as following:
4
Select the appropriate
reader and click with right
button
NOTE: Your reader may appear as a Bluetooth headset.
5
Type the PIN code and
click Next.
NOTE: If the reader is configured with Bluetooth Authentication option
enabled, the pairing process is based on a code generated
automatically. In this case, click next to continue (the code will not
appear on the reader)
6
Windows will now install
the driver needed as
following:
7
Your reader is now ready to connect.
1234
“Bluetooth Peripheral
Device” is a service
dedicated to Apple’s
devices and is unknown
from Windows’ operating
system that the reason why
the PC mentions “no driver
found”.
User Manual
10
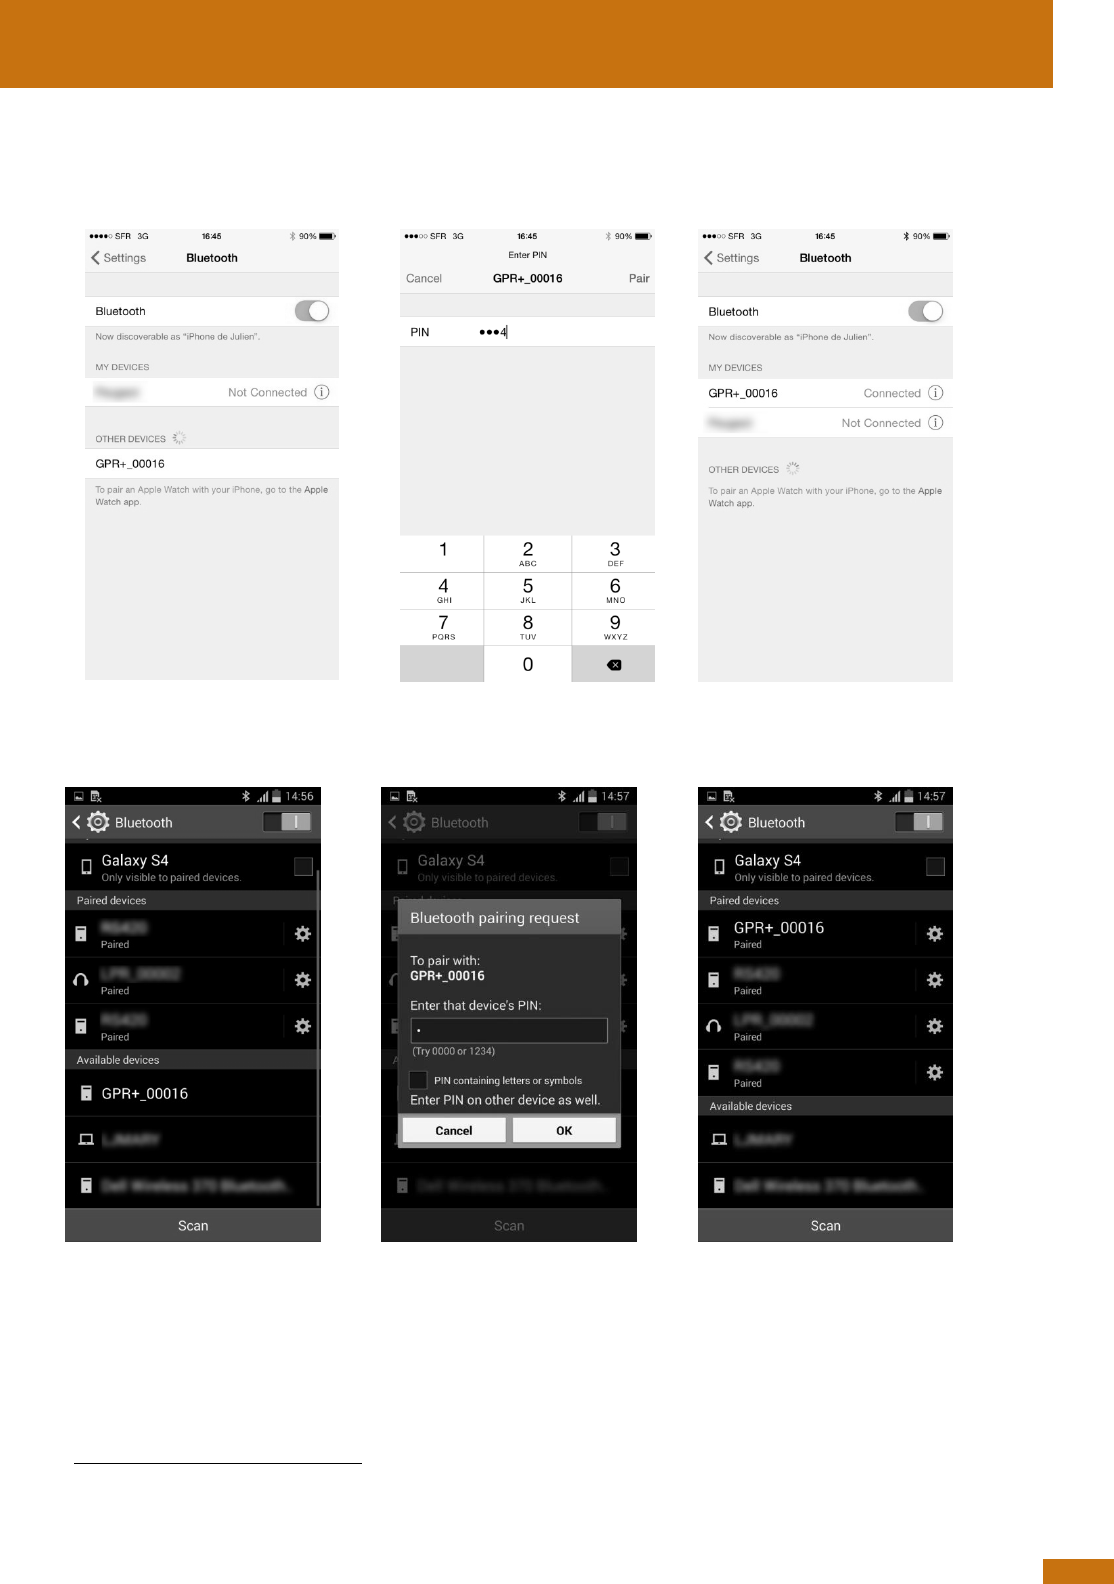
5 Connecting the reader to an application
4
on smart phone
or on mobile device
The device can connect to a smart phone or to a mobile device only through wireless Bluetooth®
connection.
5.1 Pairing with iPhone®/iPad® devices
5.2 Pairing with Android™ devices
Make sure your reader is on
and tap on GPR+
Type 1234
Paired
4
Application not provided.
5
Once paired to the iPhone, your reader will automatically switch into master mode to be able the reconnect to the iPhone
automatically the next time.
Make sure your reader is on
and tap on GPR+
Type 1234
Paired5

User Manual
11
6 TROUBLESHOOTING
MICROCHIP NOT DETECTED:
► Verify that GPR+ is able to read test microchip provided on key chain.
► Confirm that scanning is being performed away from metal objects and computer
equipment, including metal collars and metal tags and away from stainless steel table.
► Scan animal following patterns on page 7, with slow movements and reader touching
animal all the time. If the animal moves too quickly, the microchip may not be located
in the reading zone long enough for the ID code information to be obtained.
► Replace batteries if power is weak, as it might not be sufficient to activate the field
and reading distances can be reduced.
► Some animals might be implanted with two microchips too close to each other. In
these cases, there is a risk that reader performance might be affected. Continue to
scan as indicated on page 7, with slow movements, trying to identify one microchip at
a time.
MICROCHIP IS FOUND BUT NOT STORED IN MEMORY.
► Verify scanner reads test chip
► Verify Memory is enabled.
CANNOT DOWNLOAD MEMORY:
► Make sure memory is enabled in reader settings (Refer to GPR+ Software User Guide
on the CD for more information)
MICROCHIP IS FOUND BUT DOES NOT DISPLAY TEMPERATURE
6
► Verify Microchip is a temperature sensing implant from ALLFLEX or DESTRON FEARING
► Verify Temperature Scanning is enabled.
READER DOES NOT START
► Verify batteries have been installed correctly and have full charge.
LOW BATTERIES
► If reader displays “Low battery” with standard AAA cells: Replace the batteries
► If reader displays “Low battery” with rechargeable cells: Recharge the batteries
DEPLETED BATTERIES
► If reader displays “Battery depleted” with standard AAA cells: Replace the batteries
► If reader displays “Battery depleted” with rechargeable cells: Recharge the batteries
BLUETOOTH NOT VISIBLE:
► Check Bluetooth icon appears on the reader. If not, enable Bluetooth using GPR+
Software.
BLUETOOTH VISIBLE BUT NOT CONNECTABLE:
► Make sure your reader is configured to be visible and connectable in GPR+ Software
(Refer to GPR+ Software User Guide on the CD for more information)
INCORRECT DATE / TIME
► Connect the reader to GPR+ Software, this will synchronize the date and time with the
computer.
6
only with microchips dedicated to temperature measurement

User Manual
12
7 Specifications
General
Norms
ISO 11784 and ISO 11785 for HDX, FDX-B, FDX-A (FECAVA), Trovan and Avid
Encrypted microchips and implants
Special feature:
Temperature scanning with TS and BT implants between 33°C and 43°C
(between 91.4°F and 109.4°F)
User interface
Graphical display: 122 x 32 dots - visual area: 56 x 12.7 mm
1 button
1 buzzer
USB port and Bluetooth® module
USB interface
CDC class (Serial emulation) and HID class
Bluetooth® interface
Class 2(up to 15m)
Serial Port Profile (SPP)
Memory
3000 IDs
Batteries
6 “AAA” 1.5V Alkaline or 6 NiMH rechargeable “AAA” 1.2V
Date/Time autonomy
2 months without reader usage @ 20°C
Battery charge duration
Up to 3h30 in fast charge (external power supply)
Up to 9h00 in slow charge (computer)
Reading distances
Up to 10 cm (3.9 in) depending on microchip type and microchip
orientation.
Mechanical and physicals
Ingress Protection
IP54 with closed battery door.
Dimensions
202 x 80 x 36.5 mm (7.95 x 3.15 x 1.44 in)
Weight
330 g (including batteries) (11.6 oz)
Operating Temperature
0° to +50°C (+32° to +122°F)
Storage Temperature
-20° to +65°C (-4° to +149°F)
Humidity
10% - 90%
Non Condensing
Default settings
Memory Storage
Disabled
ID code format:
15 digits
Temperature scanning
Enabled
Timestamp
Disabled
Bluetooth®
Disabled
Bluetooth® pin code
1234
Beeper
Enabled

User Manual
13
8 Reader physical integrity
The device has been built from rugged and durable materials to withstand use in harsh environments
for long periods of time. However, the reader contains electronic components that can be
damaged if they are deliberately exposed to extreme abuse. This damage can adversely affect, or
stop the reader's operation. The user must avoid deliberately striking other surfaces and objects with
the device. Damage that results from such handling is not covered by the warranty described
below.
9 Limited Product Warranty
Manufacturer guarantees this product against all defects due to faulty materials or workmanship for
a period of one year following the date of purchase. The warranty does not apply to any damage
resulting from an accident, misuse, modification or an application other than that described in this
manual and for which the device was designed.
If the product develops a malfunction during the warranty period, manufacturer will repair or
replace it free of charge. The cost of shipment is at the customer's expense, whereas return shipment
is paid by manufacturer.
Refer all servicing to qualified service personnel. Servicing is required when the reader has been
damaged in any way, such as power-supply cord or plug is damaged, liquid has been spilled or
objects have fallen into the apparatus, the apparatus has been exposed to rain or moisture, does
not operate normally, or has been dropped.
10 Regulatory information
10.1 USA-Federal Communications Commission (FCC)
This device complies with part 15 of FCC rules. Operation is subject to the following two conditions:
(1) This device may not cause interference, and (2) this device must accept any interference,
including interference that may cause undesired operation of the device.
This equipment has been tested and found to comply with the limits for a Class B digital device,
pursuant to Part 15 of FCC Rules. These limits are designed to provide reasonable protection against
harmful interference in a residential installation. This equipment generates, uses, and can radiate
radio frequency energy. If not installed and used in accordance with the instructions, it may cause
harmful interference to radio communications. However, there is no guarantee that interference will
not occur in a particular installation. If this equipment does cause harmful interference to radio or
television reception, which can be determined by tuning the equipment off and on, the user is
encouraged to try and correct the interference by one or more of the following measures:
Reorient or relocate the receiving antenna.
Increase the distance between the equipment and the receiver.
Connect the equipment to outlet on a circuit different from that to which the receiver is
connected.
Consult the dealer or an experienced radio/TV technician for help.
Notice to consumers:
Any changes or modifications not expressly approved by the party responsible for compliance could
void the user’s authority to operate the equipment.
User Manual
14
10.2 Canada – Industry Canada (IC)
This device complies with RSS 210 of Industry Canada. Operation is subject to the following two
conditions:
(1) This device may not cause interference, and (2) this device must accept any interference,
including interference that may cause undesired operation of this device.”
L’utilisation de ce dispositif est autorisée seulement aux conditions suivantes :
(1) Il ne doit pas produire d’interférence et (2) l’utilisateur du dispositif doit être prêt à accepter toute
interférence radioélectrique reçu, même si celle-ci est susceptible de compromettre le
fonctionnement du dispositif.
Avis aux consommateurs:
Toutes modifications non expressément approuvées par la partie responsable de la conformité
peuvent annuler le droit de l'utilisateur à utiliser cet équipement.
10.3 Miscellaneous information
Snapshots are according to the latest version at the moment this document was printed.
Changes may occur without notice.
10.4 Trademarks
Bluetooth® is a registered trademark of Bluetooth SIG, Inc.
Windows is a trademark or registered trademark of Microsoft Corporation in the United States and/or
other countries.
All other trademarks are trademarks of their respective owners.
10.5 Apple - Legal Notice
iPhone, iPad are a trademark of Apple Inc., registered in the U.S. and other countries.
“Made for iPhone,” and “Made for iPad” mean that an electronic accessory has been designed to
connect specifically to iPhone, or iPad, respectively, and has been certified by the developer to
meet Apple performance standards.
Apple is not responsible for the operation of this device or its compliance with safety and regulatory
standards.
Please note that the use of this accessory with iPhone or iPad may affect wireless performance.
11 Regulatory Compliance
ISO 11784 & 11785
This device complies with the standards set forward by the International Standardization
Organization. Specifically with standards:
11784: Radio frequency identification of animals -- Code Structure
11785: Radio frequency identification of animals -- Technical Concept.
FCC WMQ-30005
IC 4284A-30005
CE Marking