Altai Technologies C22221000 C2s Dual-band 2x2 802.11ac WiFi AP/Bridge User Manual
Altai Technologies Limited C2s Dual-band 2x2 802.11ac WiFi AP/Bridge
User Manual

Altai Technologies Ltd. All rights reserved
C2s Dual-band 2x2 802.11ac WiFi
AP/Bridge
Model: C2-2221-000
Installation Guide
Version 1.0
Date: May, 2016

ii
Altai Technologies Ltd. All rights reserved
Altai C2s
Dual-Band 2x2 802.11ac
WiFi AP/CPE
Installation Guide
Copyright © 2016 Altai Technologies Limited
ALL RIGHTS RESERVED.
Altai Technologies Limited
Unit 209, 2/F, Lakeside 2,
10 Science Park West Avenue,
Hong Kong Science Park,
Shatin, New Territories,
Hong Kong
Telephone: +852 3758 6000
Fax: +852 2607 4021
Web: www.altaitechnologies.com
Customer Support Centre:
Email: support@altaitechnologies.com

iii
Altai Technologies Ltd. All rights reserved
Altai C2s
Dual-Band 2x2 802.11ac
WiFi AP/CPE
Installation Guide
Radio Frequency Interference Requirements
This device complies with Part 15 of FCC Rules.
Operation is subject to the following conditions:
1. This device may not cause harmful interference.
2. This device must accept any interference received, including
interference that may cause undesired operation.
3. This device should not be co-located or operating in conjunction with
any other antenna or transmitter.
Interference Statement
This equipment has been tested and found to comply with the limits for a
Class B digital device, pursuant to Part 15 of the FCC Rules; these limits are
designed to provide reasonable protection against harmful interference in a
residential installation. This equipment generates uses and can radiate radio
frequency energy and, if not installed and used in accordance with the
instructions, may cause harmful interference to radio communications.
However, there is no guarantee that interference will not occur in a
particular installation. If this equipment does cause harmful interference to
radio or television reception, which can be determined by turning the
equipment off and on, the user is encouraged to try to correct the
interference by one of the following measures:
• Reorient or relocate the receiving antenna.
• Increase the separation between the equipment and receiver.
• Connect the equipment into an outlet on a circuit different from that
to which the receiver is connected.
• Consult the dealer or an experienced radio/TV technician for help.
FCC Caution: To assure continued compliance, (example – use only shielded
interface cables when connecting to computer or peripheral devices). Any
changes or modifications not expressly approved by the party responsible for
compliance could void the user’s authority to operate this equipment.
Warning
The antenna(s) used for this transmitter must be installed to provide a
separation distance of at least 45 cm from all persons and must not be
collocated or operating in conjunction with any other antenna or
transmitter, except in accordance with FCC multi-transmitter product
procedures

iv
Altai Technologies Ltd. All rights reserved
Altai C2s
Dual-Band 2x2 802.11ac
WiFi AP/CPE
Installation Guide
.
C2s access points require professional installation.
Please install a lightning arrestor to protect the access point for lightning
dissipation during rainstorms. Lightning arrestors are mounted outside the
structure and must be grounded by means of a ground wire to the nearest
ground rod or item that is grounded.
Disclaimer
All specifications are subject to change without prior notice. Altai
Technologies assumes no responsibilities for any inaccuracies in this
document or for any obligation to update information in this document. This
document is provided for information purposes only. Altai Technologies
reserves the right to change, modify, transfer, or otherwise revise this
publication without notice.

v
Altai Technologies Ltd. All rights reserved
Altai C2s
Dual-Band 2x2 802.11ac
WiFi AP/CPE
Installation Guide
Table of contents
TABLEOFCONTENTS ...................................................................................................................... V
1.INTRODUCTION ......................................................................................................................1
2.FIELDINSTALLATION...............................................................................................................2
2.1.UNPACKTHESHIPMENT .........................................................................................................2
2.2.HARDWAREOVERVIEW ............................................................................................................... 3
2.3.PREPARATIONFORINSTALLINGC2S............................................................................................... 5
2.4.CABLEFEED‐THROUGH................................................................................................................ 5
2.5.MOUNTINGOPTIONS .................................................................................................................. 6
2.6.POWEROPTIONSANDCABLECONNECTIONINSTRUCTIONS ................................................................. 7
2.7.C2SWATERPROOFPROTECTION ................................................................................................... 9
3.ELECTRICALPROTECTION......................................................................................................11
3.1.SURGEPROTECTOR ................................................................................................................... 11
3.2.LIGHTNINGPROTECTIONSYSTEM................................................................................................. 11
3.3.LANCABLEFOROUTDOORINSTALLATION..................................................................................... 11

1
Altai C2s
Dual-Band 2x2 802.11ac
WiFi AP/CPE
Installation Guide
Altai Technologies Ltd. All rights reserved
1. Introduction
This guide is designed to provide the information needed to mount Altai C2s
Super WiFi AP/CPE at the site location.
The document is applicable for hardware platform C2s and the following
models.
Product name: C2s Dual-band 2x2 802.11ac WiFi AP/Bridge
It is assumed in this document that a site survey has been performed before
the site installation. The appropriate antenna pole and AP locations have
been selected. It is a good practice to have a document which consists of a
map and drawing illustrating the AP and poles locations. A planning on IP
network is also an important issue for network planning.
The user may need to refer the following document during C2s installation
and Configuration.
[1] C2s Configuration Manual
[2] C2s Data Sheet
2
Altai C2s
Dual-Band 2x2 802.11ac
WiFi AP/CPE
Installation Guide
Altai Technologies Ltd. All rights reserved
2. Field Installation
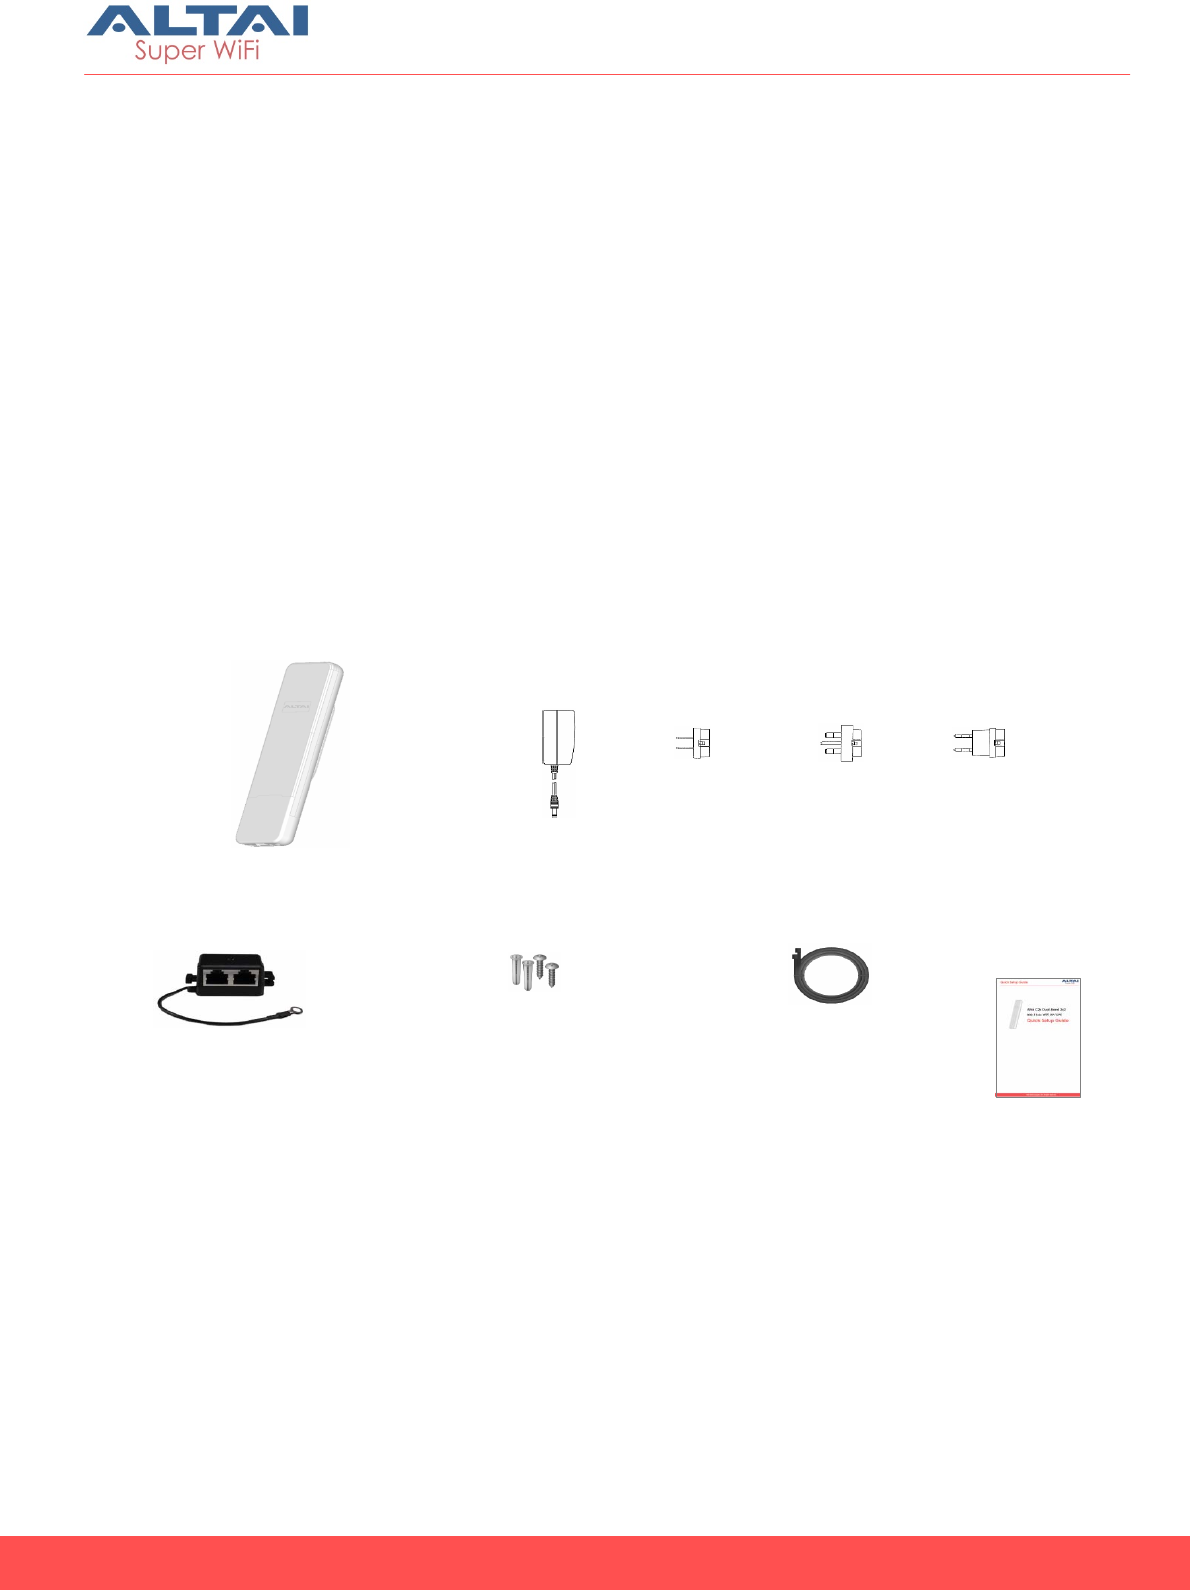
2.1. Unpack the shipment
Check the equipment and the installation kits against the packing list to
ensure that the equipment part numbers, parts, and the ancillary equipment
included in the shipment match what is specified on the packing list. The
shipment consists of a C2s Super WiFi AP/CPE and an installation kit in the
container. If there is any difference from the packing list, you may need to
contact the sales representative.
Inspect the equipment to see if there is any shipping damage. If it does have
any damage, you can contact the sales representative for repair or
replacement.
Figure 1 C2s Package Contents
or
or
EU Plug
UK Plug
US Plug
Cable Ties (Qty.
2)
+
Mounting Anchors (Qty. 2)
and Screws (Qty. 2)
DC Injector
C2s Main Unit AC Adapter
Quick Start
Guide
3
Altai C2s
Dual-Band 2x2 802.11ac
WiFi AP/CPE
Installation Guide
Altai Technologies Ltd. All rights reserved
2.2. Hardware Overview
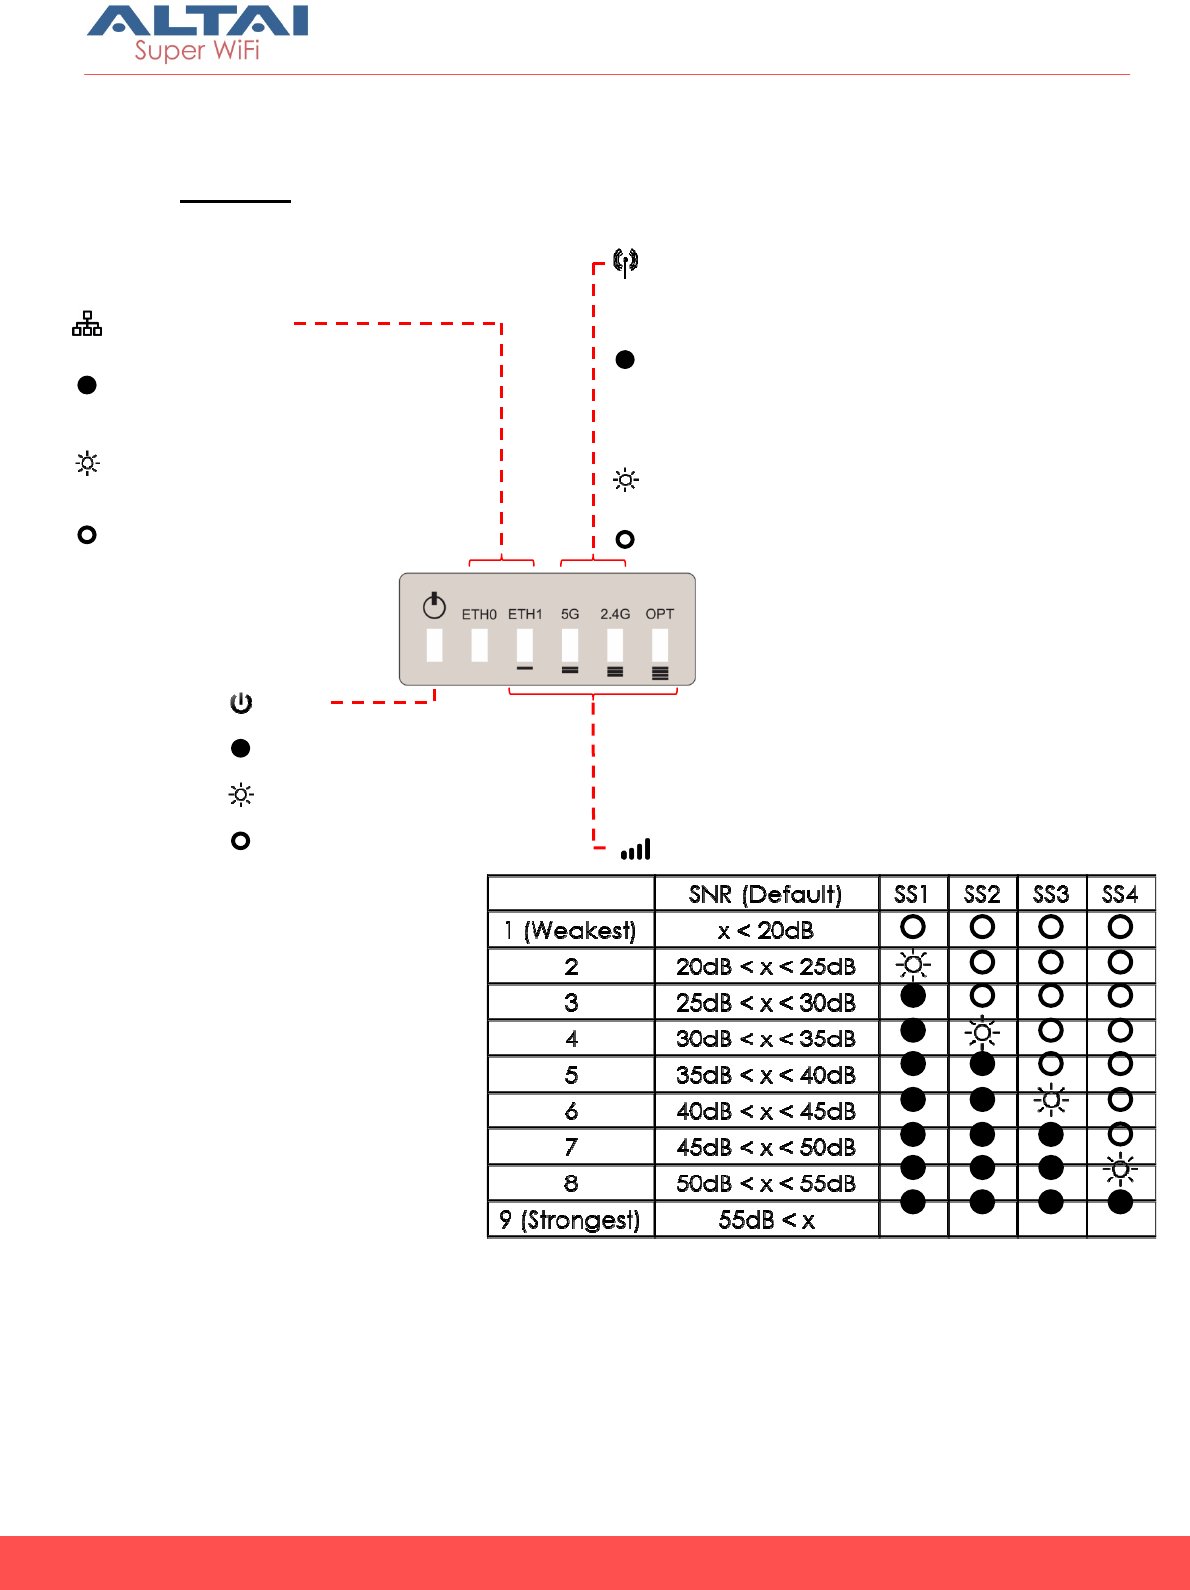
LED Panel
Power
Solid Yellow: Power on
Off: No Power Received Signal Strength
(Station/Repeater/Bridge Mode)
2.4G/5G Radio WiFi
(AP/STA/Repeater/Bridge Mode)
Solid Green:
1. AP Mode on but with no Clients Associated
2. STA/Repeater Mode on but not connected to AP
3. Bridge Mode on but not connected to Remote Peer
Flashing Green: AP Mode with at least one Client
Associated for Data Transmitting/Receiving
Off: Radio Disabled
LAN (Ethernet 0/1)
Solid Blue/Green: LAN Connected
(Blue for 1Gbps; Green for 100/10Mbps)
Flashing Blue/Green: Data
Transmitting/Receiving
Off: LAN Disconnected
Flashing Yellow: AP Booting Up
4
Altai C2s
Dual-Band 2x2 802.11ac
WiFi AP/CPE
Installation Guide
Altai Technologies Ltd. All rights reserved
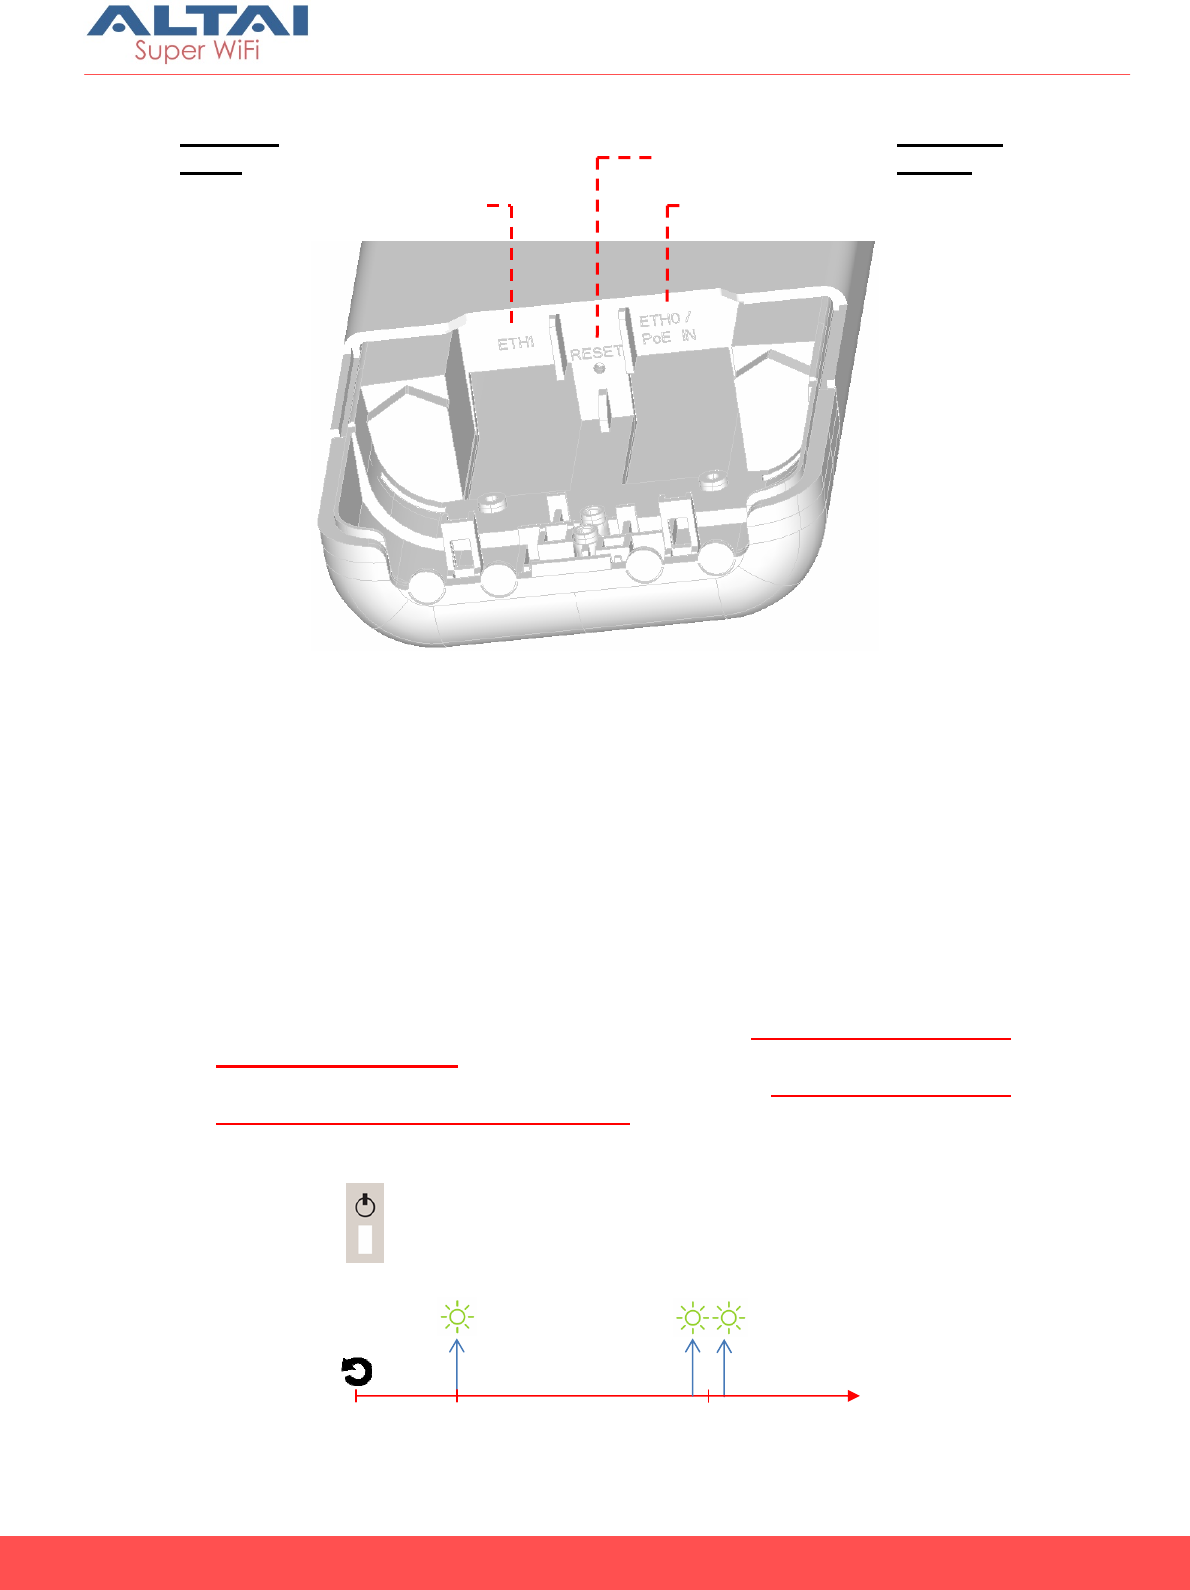
Ethernet Ports and
Reset Button
ETH0/PoE IN:
It is used to connect to power source (see the Power Options in the
following section) and provides 10/100/1000 Mbps network interface for LAN
connection.
ETH1:
It provides 10/100/1000 Mbps network interface for LAN connection with
peripherals.
Reset Button:
It serves two functions for C2s operation:
• Reboot: Press and hold the Reset Button for 2-3 seconds until the
Power LED blink once.
• Factory Reset: Press and hold the Reset Button for 5-8 seconds until the
Power LED blink twice consecutively.
Reset Button
Eth. Port 0
Eth. Port 1
0s
2-3s 5-8s
Power LED
Reboot Factory Reset
5
Altai C2s
Dual-Band 2x2 802.11ac
WiFi AP/CPE
Installation Guide
Altai Technologies Ltd. All rights reserved
2.3. Preparation for Installing C2s
Before installation, please prepare the following tools:
1) Needle-Nose Pliers (for cable feed-through)
2) Screw Driver (for wall mount)
3) RJ45 Shielded Connector Crimper
4) STP CAT5e/6 Straight Cable x 2
5) Waterproof Sealing Tapes and Electrical Tapes
6) Grounding Cable
7) An 802.3at to Passive PoE Adapter (Optional and ordered separately
when using with 802.3at-compliant PoE switch or PoE injector)
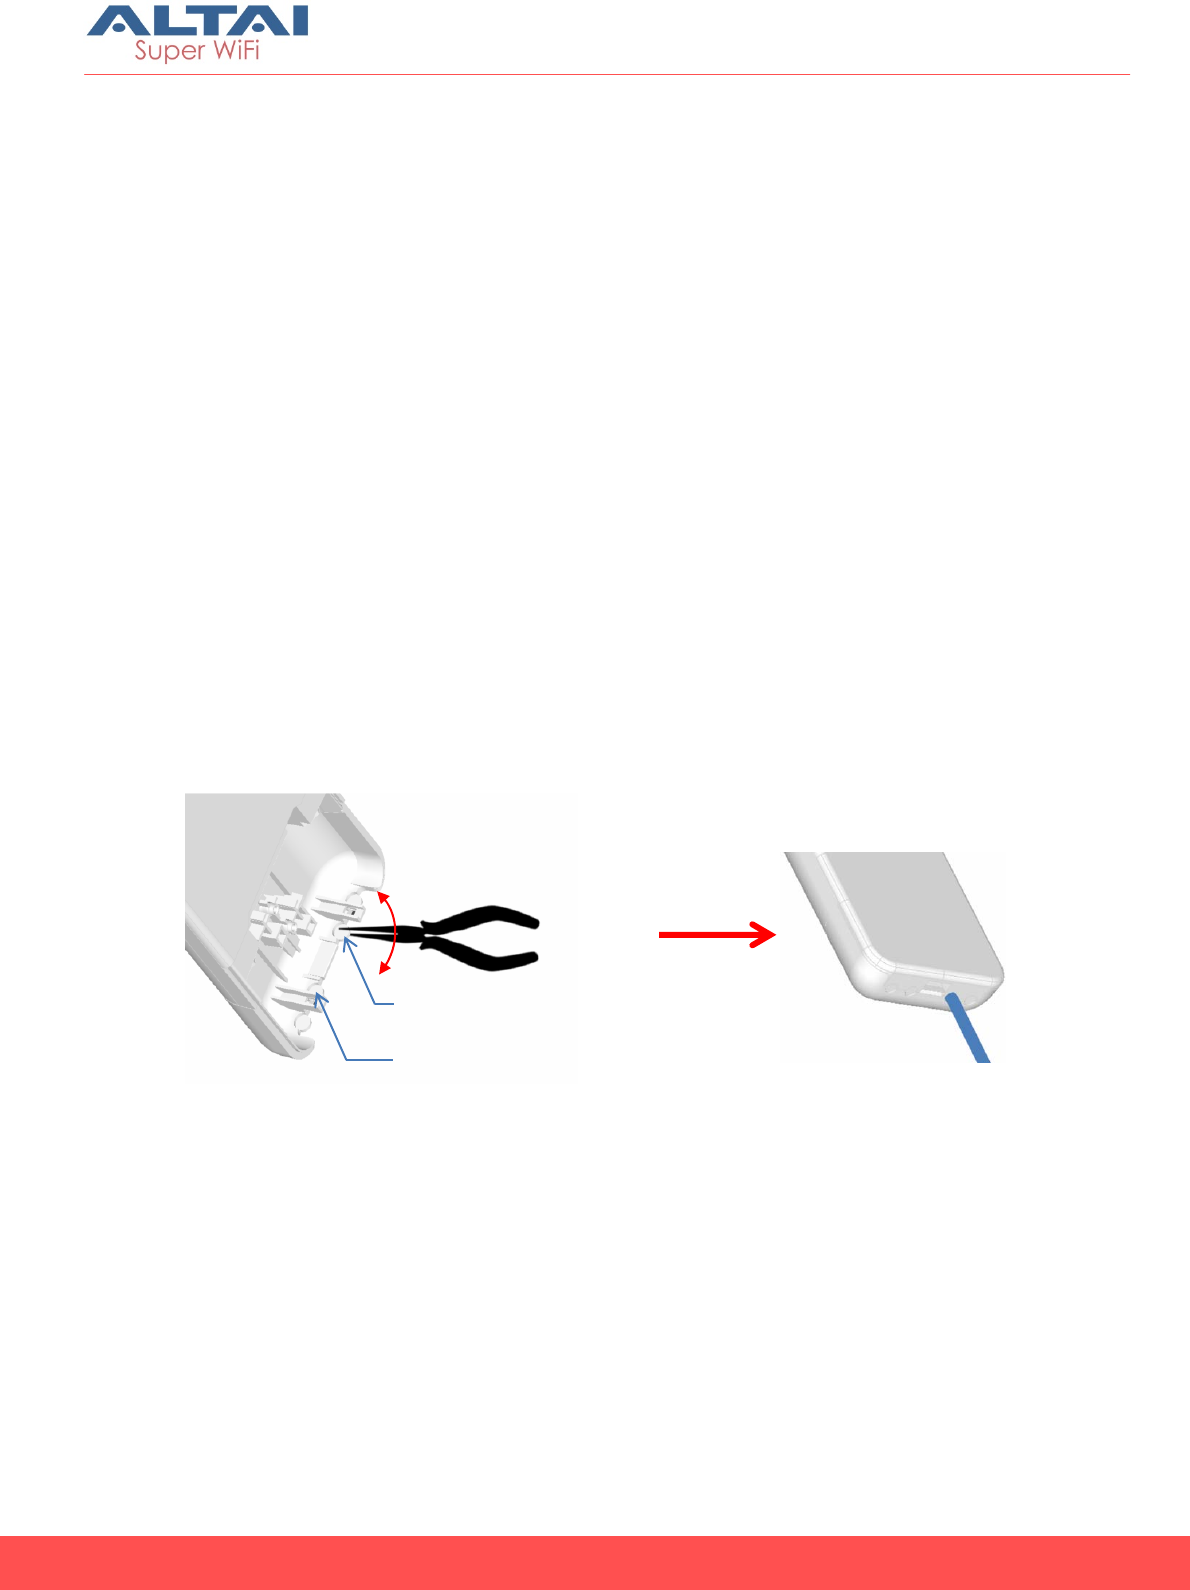
2.4. Cable Feed-Through
1. Prepare a pair of needle-nose pliers.
2. Follow the instructions on the drawing below to cut a feed-through hole
for ETH0 Port cabling.
3. Cut another hole with pliers for ETH1 Port cabling if necessary.
For ETH1 Port Cabling
For ETH0 Port Cabling
6
Altai C2s
Dual-Band 2x2 802.11ac
WiFi AP/CPE
Installation Guide
Altai Technologies Ltd. All rights reserved
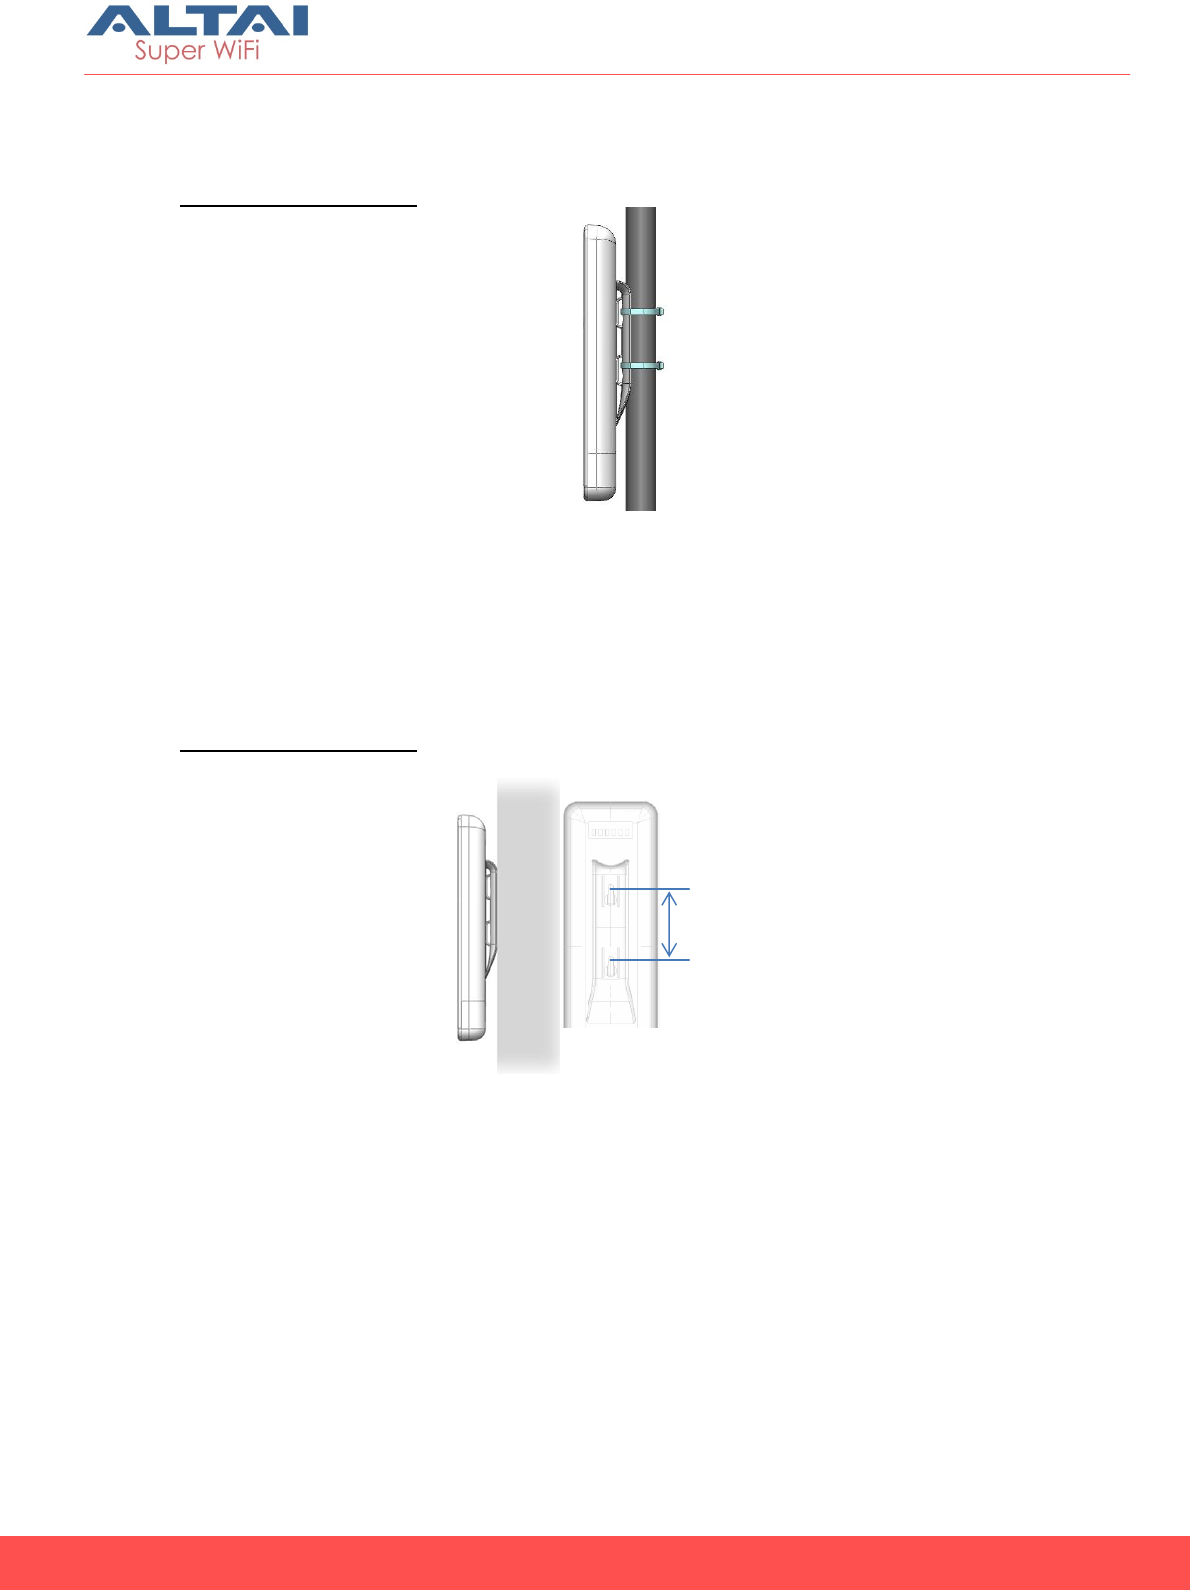
2.5. Mounting Options
Option 1: Pole Mount
1. Orient the device to point to the target coverage area (for AP mode) or
to the target AP (for Station mode).
2. Loop two cable ties through the slots on the back of the device and then
wrap them around the pole.
3. Tighten the cable ties to ensure the device is firmly in place.
Option 2: Wall Mount
1. Using the back mount base as reference, mark the location of the
mounting holes on a flat wall surface.
2. Drill mounting holes on the marked locations. The two holes should be
60mm (2.3 inches) apart.
3. Fasten the device to the wall using the mounting anchors and screws
provided.
60mm
7
Altai C2s
Dual-Band 2x2 802.11ac
WiFi AP/CPE
Installation Guide
Altai Technologies Ltd. All rights reserved
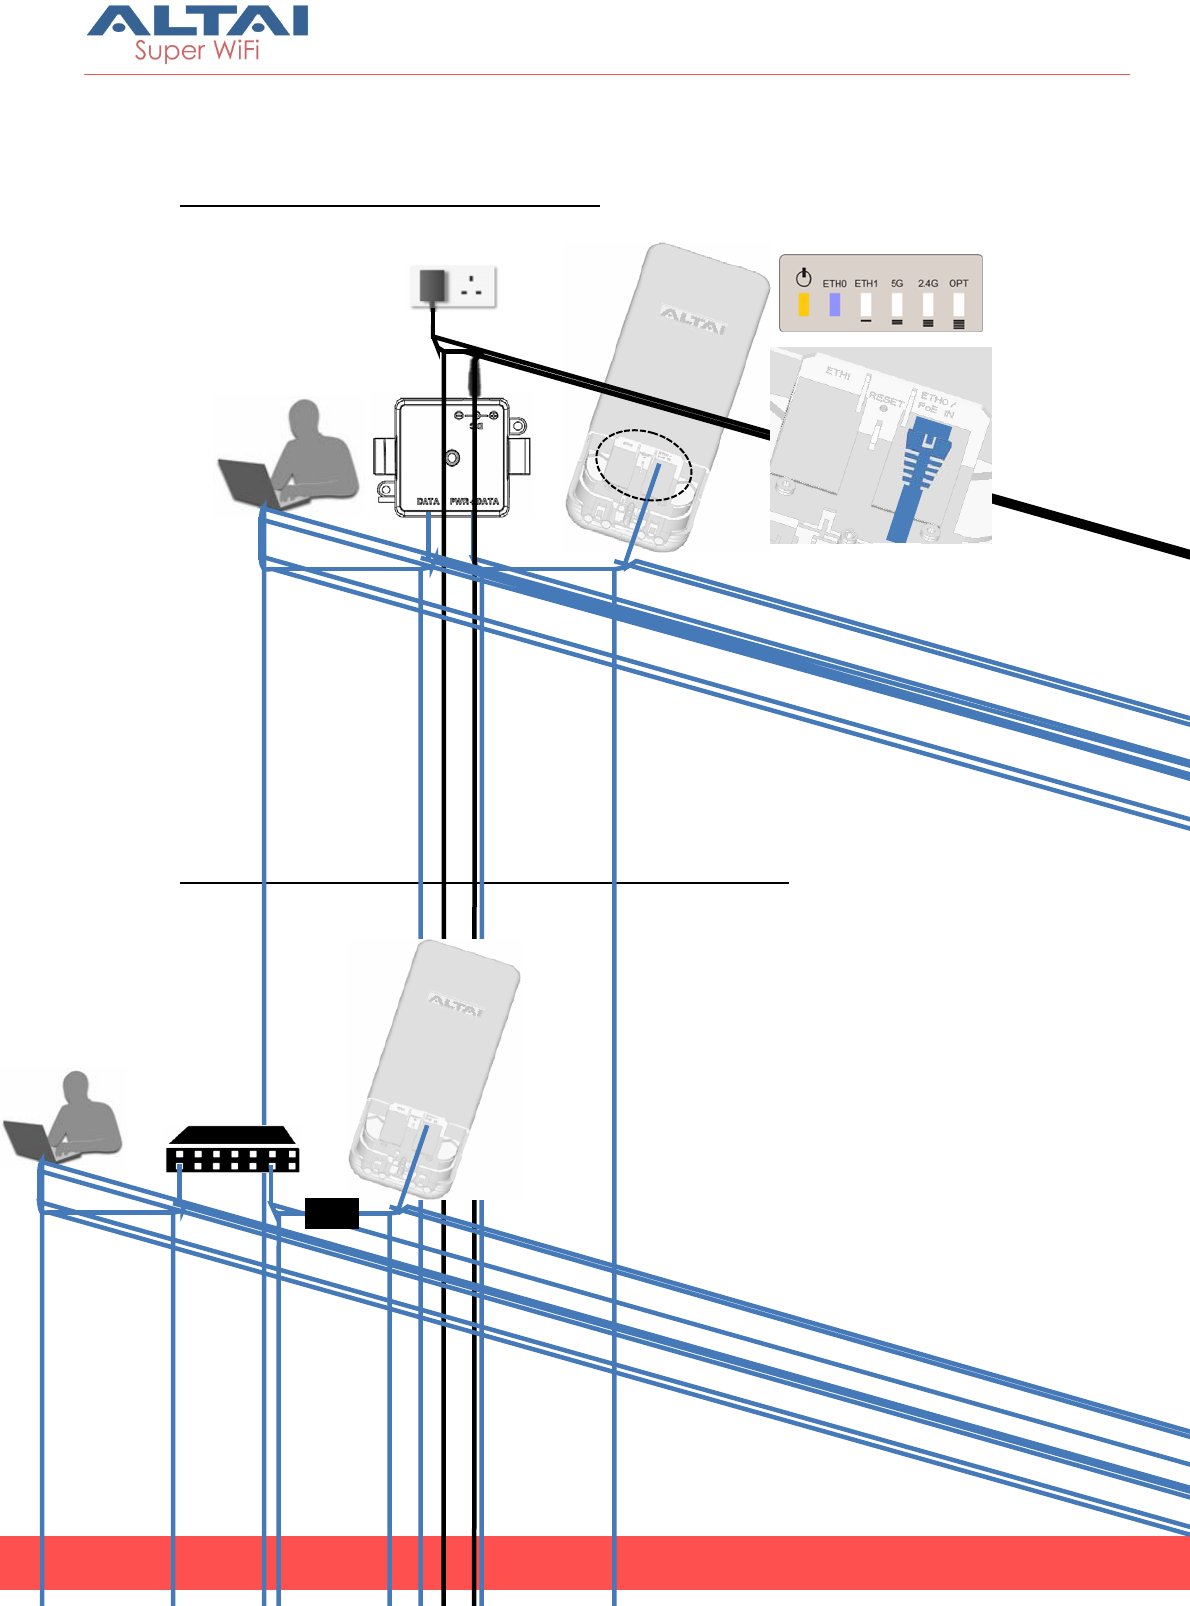
2.6. Power Options and Cable Connection Instructions
Option 1: AC Adapter and DC Injector
1. Connect C2s ETH0 port to a DC injector’s “PWR+DATA” port with an
Ethernet Cable.
2. Connect a computer to the DC injector’s “DATA” port with another
Ethernet Cable.
3. Connect the AC power adapter to the DC injector and plug it into a
power socket.
4. Make sure the Power LED light is yellow and ETH 0 LED light is
blue/green.
Option 2: 802.3at-compliant PoE switch / PoE Injector
1. Connect C2s ETH0 port to an 802.3at to Passive PoE Adapter’s
“PWR+DATA” port with an Ethernet Cable.
802.3at-
Compliant PoE
Switch
802.3at to Passive PoE
Adapter (Separately ordered)

8
Altai C2s
Dual-Band 2x2 802.11ac
WiFi AP/CPE
Installation Guide
Altai Technologies Ltd. All rights reserved
2. Connect a port of an 802.3at PoE Switch to the PoE Adapter “802.3at”
port with another Ethernet Cable.
3. Make sure the Power LED light is yellow and the ETH0 LED light is
blue/green.
4. Connect a computer to the switch.

9
Altai C2s
Dual-Band 2x2 802.11ac
WiFi AP/CPE
Installation Guide
Altai Technologies Ltd. All rights reserved
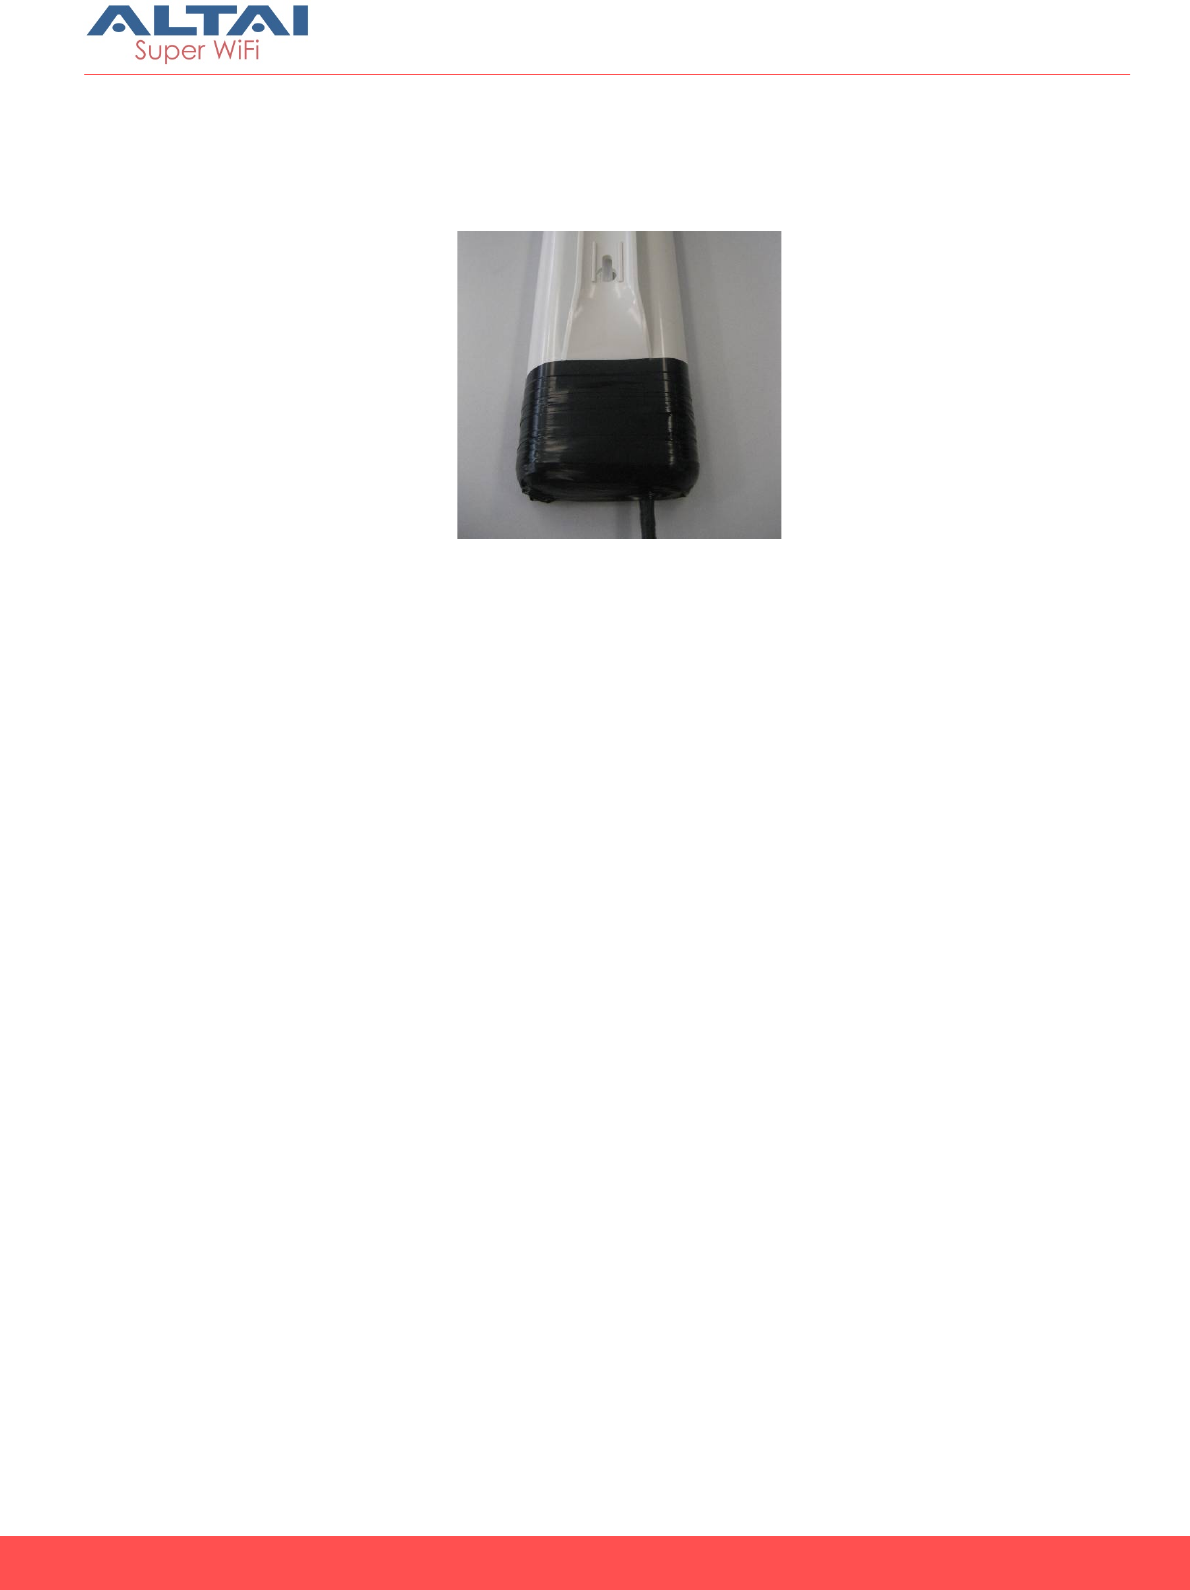
2.7. C2s Waterproof Protection
Especially for outdoor installation, waterproof protection can enhance the
protection from water Ingress. Both the LAN cable and the unit should be
wrapped.
1. Wrap the cable with a layer of rubber tape. Start from 5cm below the
connector. Wrap a loop and overlap a half. Continue until it reaches
under the connector.
2. Wrap the C2s unit with a layer of rubber tape. Start from 1cm above of
the lid. Wrap a loop and overlap a half. Continue until it reaches the
bottom. The bottom should be completely shielded by the rubber tape.
10
Altai C2s
Dual-Band 2x2 802.11ac
WiFi AP/CPE
Installation Guide
Altai Technologies Ltd. All rights reserved
3. Wrap the C2s unit with a layer of electrical tape. Start from 1cm above
the rubber tape wrapping. Wrap a loop and overlap a half. Continue
until it reaches the bottom.

11
Altai C2s
Dual-Band 2x2 802.11ac
WiFi AP/CPE
Installation Guide
Altai Technologies Ltd. All rights reserved
3. Electrical Protection
3.1. Surge Protector
It is strongly advised the C2s unit be installed with surge protector (ordered
separately), especially for outdoor deployment, to protect it against
electrical surge. The surge protector should be grounded properly and
installed as close to the C2s unit as possible in order to prevent the C2s from
the electrical damage.
3.2. Lightning Protection System
The C2s unit should be installed with a lightning rod and protected by
relevant lightning protection system to avoid any potential electrical
damage caused by lightning.
3.3. LAN Cable for Outdoor Installation
STP cable with shielded connectors is required to protect the C2s against
ESD. Follow the instruction to crimp the cable:
1. Cut about 4cm of the wire coating.
2. Untwist eight wires with the order from left to right: Orange White,
Orange, White Green, Blue, White Blue, Green, White Brown, Brown.
The order will be the same on both sides.
3. Straighten eight wires and cut the wire with only 2cm extension
4. Insert the wires into an RJ45 modular jack. The hook should face
down. All eight wires should touch the top of the jack.
5. The foil and the shield of RJ45 connector should have direct contact.
6. Insert the modular jack into the crimping tool. Press down on the tool
firmly.