Altec Lansing M402TX Wireless Snooze Remote User Manual part 1
Altec Lansing, LLC Wireless Snooze Remote part 1
Contents
- 1. user manual part 1
- 2. user manual part 2
user manual part 1

Altec Lansing FPO NAME M402/M402SR
Digital Speaker System and Alarm Clock for iPod
User Guide

ii
Welcome
Thank you for purchasing the Altec Lansing FPO NAME digital
speaker system. Designed specifically to work with your iPod,
this system provides high-quality audio and radio performance
that brings out the best in your music. This Altec Lansing speaker
system is designed to work with:
• iPodtouch • iPodwithvideo
• iPodnano(3rdgeneration) • iPodnano(1stgeneration)
• iPodclassic • iPodwithcolordisplay
• iPodnano(2ndgeneration) • iPodmini
Please carefully read this User Guide for instructions on setting up
and using your FPO NAME speaker system. Prior to installing or
operating the Altec Lansing FPO NAME speaker system, refer to
the end of this guide for important product safety information.
Getting Assistance
Altec Lansing Technical Support is ready to assist you. You can find
answers to frequently asked questions, ask a question using email,
receive service over the Internet or speak directly with a representa-
tive.Call1-866-570-5702orvisitwww.alteclansing.com.
Registering Your Product
Visit www.alteclansing.com to register your product online, so
we can provide you with the best possible service and technical
support.
FCC Compliance
Changes or modifications not expressly approved by the party
responsible for compliance could void the user’s authority to
operate this equipment.
ThisdevicecomplieswithPart15oftheFCCRules.Operationis
subject to the following two conditions:
1)Thisdevicemaynotcauseharmfulinterference,and
2)Thisdevicemustacceptanyinterferencereceived,including
interference that may cause undesired operation.

1
CAUTION
Topreventelectricshockdonotusethis(polarized)plugwithanextensioncord,receptacle
or other outlet unless the blades can be fully inserted to prevent blade exposure.
WARNING
To reduce the risk of fire or electric shock, do not expose this appliance to rain or moisture.
IMPORTANT SAFETY INSTRUCTIONS
1. Readtheseinstructions.
2. Keeptheseinstructions.
3. Heedallwarnings.
4. Follow all instructions.
5. Donotusethisapparatusnearwater–Thisapparatusshallnotbeexposedtodripping
or splashing, and no objects filled with liquids, such as vases, shall be placed on the
apparatus.
6. Cleanonlywithdrycloth.
7. Donotblockanyventilationopenings.Installinaccordancewiththemanufacturer’s
instructions. The apparatus should not be situated on a bed, sofa, rug or similar surface
that may block the ventilation openings. The apparatus must not be placed in a built-in
installation, such as a closed bookcase or cabinet that may impede the flow of air
through the ventilation openings. Ventilation should not be impeded by covering the
openings with items such as newspapers, tablecloths, curtains, etc.
8. Donotinstallnearanyheatsourcessuchasradiators,heatregisters,stoves,orother
apparatus(includingampliers)thatproduceheat.
9. No naked flame sources, such as lighted candles, should be placed on the apparatus.
10.Donotdefeatthesafetypurposeofthepolarizedorgrounding-typeplug.Apolarized
plug has two blades with one wider than the other. A grounding type plug has two
blades and a third grounding prong. The wide blade or the third prong is provided for
your safety. If the provided plug does not fit into your outlet, consult an electrician for the
replacement of the obsolete outlet.
11.Protectthepowercordfrombeingwalkedonorpinched–particularlyatplugs,
convenience receptacles, and the point where they exit from the apparatus.
12.Donotinstallinanareathatimpedestheaccesstothepowerplug.Disconnectingthe
power plug is the only way to completely remove power to the product and must be
readily accessible at all times.
13.Powersource–Useonlypowersuppliesofthetypespeciedintheoperating
instructions or as marked on the appliance. If a separate power supply is included with
thisapparatus,donotsubstitutewithanyotherpowersupply–useonlymanufacturer-
provided power supplies.
14.Unplugthisapparatusduringlightningstormsorwhenunusedforlongperiodsoftime.
15.Referallservicingtoqualiedservicepersonnel.Servicingisrequiredwhenthe
apparatus has been damaged in any way, such as power-supply cord or plug is
damaged, liquid has been spilled or objects have fallen into the apparatus, the
apparatus has been exposed to rain or moisture, does not operate normally, or has
been dropped. For service, refer to qualified service personnel, return to the dealer, or
call the Altec Lansing service line for assistance.
16.Forproductsthatincorporatebatteries,pleaserefertolocalregulationsforproper
battery disposal.
17.Onlyuseattachments/accessoriesspeciedbythemanufacturer.
18.Useonlywiththecart,stand,tripod,bracket,ortablespeciedbythe
manufacturer or sold with the apparatus. When a cart is used, use
cautionwhenmovingthecart/apparatuscombinationtoavoidinjury
from tip-over.
Safety Information
The lightning flash with arrowhead, within an equilateral
triangle, is intended to alert the user to the presence of
un-insulated “dangerous voltage” within the product’s
enclosure that may be of sufficient magnitude to constitute
a risk of electric shock to persons.
Caution: To prevent the risk of electric shock, do not
removecover(orback).Nouser-serviceablepartsinside.
Referservicingtoqualiedservicepersonnel.
The exclamation point within an equilateral triangle is
intended to alert the user to the presence of important
operatingandmaintenance(servicing)instructionsinthe
literature accompanying the appliance.
2
Contents
Safety Information .................................................................................................................................................................................. 1
Package Contents .................................................................................................................................................................................. 3
Getting Started .......................................................................................................................................................................................4
Placing and Removing iPod Inserts ....................................................................................................................................................... 5
Speaker Features and Indicators ...........................................................................................................................................................6
Speaker Controls .................................................................................................................................................................................... 7
Enhanced Remote Features ................................................................................................................................................................... 9
Wireless Snooze Remote Features (M402SR model only) ...................................................................................................................11
Listening to Your iPod ..........................................................................................................................................................................12
Charging your iPod ...............................................................................................................................................................................12
Listening to the FM Radio .................................................................................................................................................................... 13
Listening to a Non-docking iPod or Other Portable Audio Device ....................................................................................................... 14
Mood Light ........................................................................................................................................................................................... 15
Setting the Clock Display .....................................................................................................................................................................16
Setting the Alarm ..................................................................................................................................................................................18
Setting the Sleep Timer ........................................................................................................................................................................ 20
Maintaining Your Speaker System .......................................................................................................................................................20
Troubleshooting ....................................................................................................................................................................................21
Warranty ............................................................................................................................................................................................... 24
Customer Service ................................................................................................................................................................................. 24
3
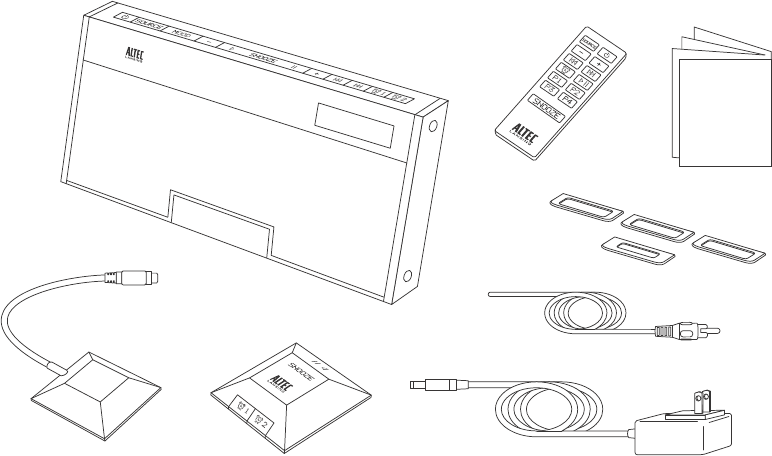
Package Contents
Altec Lansing FPO NAME speaker system
Power supply
Enhanced remote
FM radio antenna
Wirelesssnoozeremote
(M402SRmodelonly)
Snoozeremotereceiver
(M402SRmodelonly)
User Guide and
Quick Connect Instructions
iPod insert set
4
Getting Started
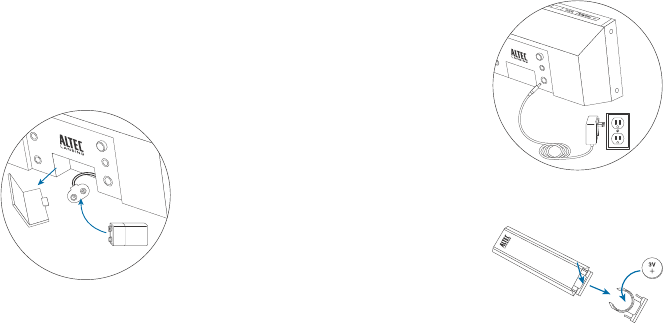
How to Install the Backup Battery
This Altec Lansing FPO NAME speaker system uses a backup battery
system to provide continuous clock settings in the event of a power failure.
Withthebackupbattery(notincluded)installed,ifapowerfailureoccurs
or the AC cord is accidentally disconnected, the display will not remain
lit and the alarm will not function, but the current time will be temporarily
maintained. Otherwise, you must reset the time and alarm settings.
1 Make sure the AC adapter is
connected.
Your settings may be lost during
battery installation if the AC adapter
isn’t connected.
2 Open the battery compartment
cover.
The compartment cover is located on
the bottom of the system.
3 Insert one 9-volt battery (not included).
Besuretocheckthatthepolarity(+and–endsofthebatteries)
matches the illustration inside the battery compartment. Altec Lansing
recommends the use of alkaline batteries for longer life.
4 Close the battery compartment cover.
How to Install the AC Adapter
1 Connect the AC adapter cable plug
into the speaker system’s jack.
The jack is located on the back of the
system.
2 Plug the AC adapter into the wall
outlet.
How to Install the Enhanced Remote
Battery
Theenhancedremotebattery(included)is
not installed at the factory. To install the battery, follow the steps below:
1 Pull out the battery holder.
The battery door is located on the
lower end of the remote. Simply pull
the tab to open the battery holder.
2 Position the battery (included) so it
sits in the battery holder correctly.
Makesurethepolarity(the+and–sidesofthebattery)iscorrect.
3 Replace the battery door.
NOTE Please discard used batteries properly.
ANTENNA
SNOOZE
REMOTE
CLOCK
AU X
DC
SNOOZE
REMOTE
ANTENNA
FM
CLOCK
AUX
DC

5
Placing and Removing iPod Inserts
Your Altec Lansing FPO NAME speaker system includes removable
inserts for today’s popular iPod models. These inserts ensure that your
iPod properly fits in the speaker system’s dock. As new iPod models are
introduced, new inserts will be made available to customers. You may also
use the inserts supplied with your iPod or available for purchase at
www.apple.com.
How to Place an Insert
1 Select the correct insert for your
iPod.
Using the correct insert ensures a
proper fit for your iPod.
2 Gently press the iPod insert into
the dock.
Now you can carefully place your iPod
into the dock.
NOTE Your iPod cannot be in a case or a “skin.”
How to Remove an Insert
1 Remove your iPod.
2 Grip the insert and pull gently upward.
6
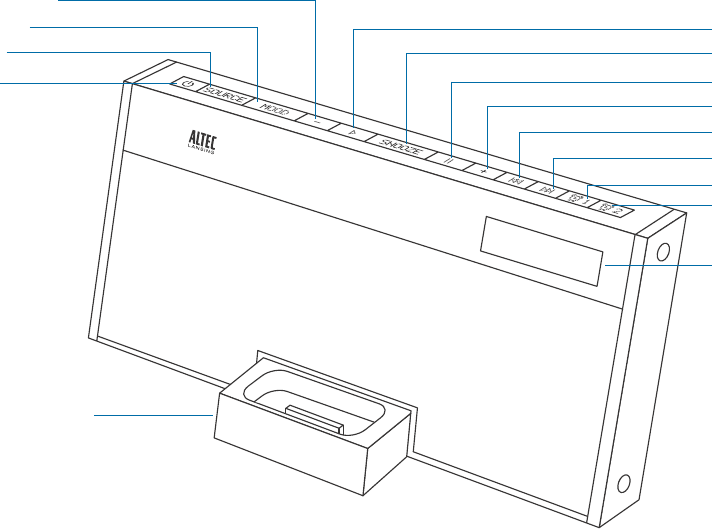
Speaker Features and Indicators
Universal docking station for iPod
Volume decrease button
Mood light button
Source button
Power button
Play/Snooze/Pausebutton
Snoozebar
Pause button
Volume increase button
Track back button
Track forward button
Alarm1button
Alarm2button
LCD display

7
Speaker Controls
Turn on your speaker system Ensure the AC adapter is connected to the system and plugged into the wall. See the Getting Started
section for more information. Press the button.
Turn off your speaker system Press the button. Whenever you are finished using your speaker system, please remember to turn it
andyouriPodorotherMP3playerofftoconserveelectricity.
Change audio source Press the button to cycle through and select the audio source: iPod, FM radio or AUX IN.
Play a track from your iPod In iPod mode, press the button. See the Listening to Your iPod section for more information.
Pause your iPod In iPod mode, Press the button.
Turn up the volume PresstheVOLUMEINCREASEbutton.
Turn down the volume PresstheVOLUMEDECREASEbutton.
Skip to the beginning of the current song on
your iPod In iPod mode, press the button.
RewindthecurrentlyplayingtrackonyouriPod In iPod mode, push and hold the button.
Skip to the beginning of the next song on
your iPod In iPod mode, press the button.
Fast-forward the currently playing track on
your iPod In iPod mode, push and hold the button.
Tune radio stations In FM radio mode, use the and buttons. See the Listening to the Radio section for additional
information.

8
Scan radio stations In FM radio mode, press and hold the or button. See the Listening to the Radio section for additional
information.
Listentoanon-dockingiPodorMP3player See the Listening to a Non-docking iPod or Other Portable Audio Device section for specific information
on using devices attached to your speaker system’s AUX IN connector.
Turn on the mood light Press the MOOD button. See the Mood Light section for more information.
Set the clock See the Setting the Clock Display section for detailed instructions on setting the clock.
Set the alarm See the Setting the Alarm section for instructions on setting the alarms.
Turn off the alarm PresstheALARM1orALARM2buttonwhenthealarmissounding.
Snoozefor5to60minutes(user-denable) Press the SNOOZE button when the alarm is sounding. See the Setting the Alarm section to learn how to
setthesnoozeduration.
Speaker Controls

9
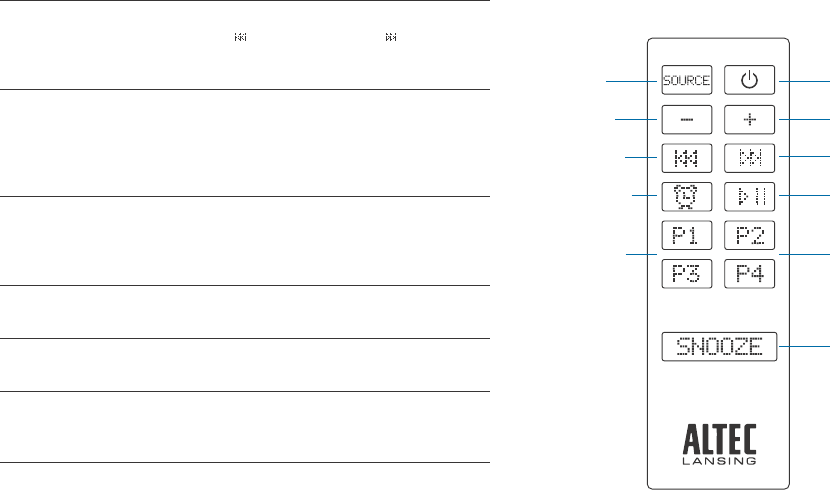
IR Enhanced Remote Features
The enhanced remote lets you operate many functions of your Altec Lansing FPO NAME speaker system:
Turn on your speaker system Press the button.
Turn off your speaker system Press the button.
Change audio source Press the button to cycle through and select the audio source: iPod, FM radio or AUX IN.
Play a track from your iPod In iPod mode, press the button. See the Listening to Your iPod section for more information.
Pause your iPod In iPod mode, Press the button.
Turn up the volume PresstheVOLUME+button.
Turn down the volume PresstheVOLUME–button.
Skip to the beginning of the current song
on your iPod In iPod mode, press the button.
Rewindthecurrentlyplayingtrackon
your iPod In iPod mode, push and hold the button.
Skip to the beginning of the next song on
your iPod In iPod mode, press the button.
Fast-forward the currently playing track on
your iPod In iPod mode, push and hold the button.
Tune radio stations In FM radio mode, use the and buttons. See the Listening to the Radio section for additional information.
10
Poweron/offbutton
Source button
Play/pausebutton
Volume+button
Volume–button
Track back button Track forward button
FM preset buttons FM preset buttons
Alarm select button
Snoozebutton
Seek radio stations
InFMradiomode,pressandholdtheTRACK
BACK orTRACKFORWARD button. See
the Listening to the Radio section for additional
information.
Store a radio station
In FM radio mode, tune to the station you’d
like to store, and then press and hold one of
thePRESETbuttons(P1,P2,P3orP4).See
the Listening to the Radio section for more
information.
Select a preset radio station
InFMradiomode,pressthePRESETbutton
(P1,P2,P3orP4)thatcorrespondstothe
station you’d like to hear. See the Listening to
the Radio section for more information.
Set the alarm See the Setting the Alarm section for
instructions on setting the alarms.
Turn off the alarm PresstheALARM1orALARM2buttonwhen
the alarm is sounding.
Snoozefor5to60minutes
(user-denable)
Press the SNOOZE button when the alarm is
sounding. See the Setting the Alarm section to
learnhowtosetthesnoozeduration.
NOTE Forbestresults,aimtheIRremotecontroltowardtheFPONAMEspeaker
system.
11
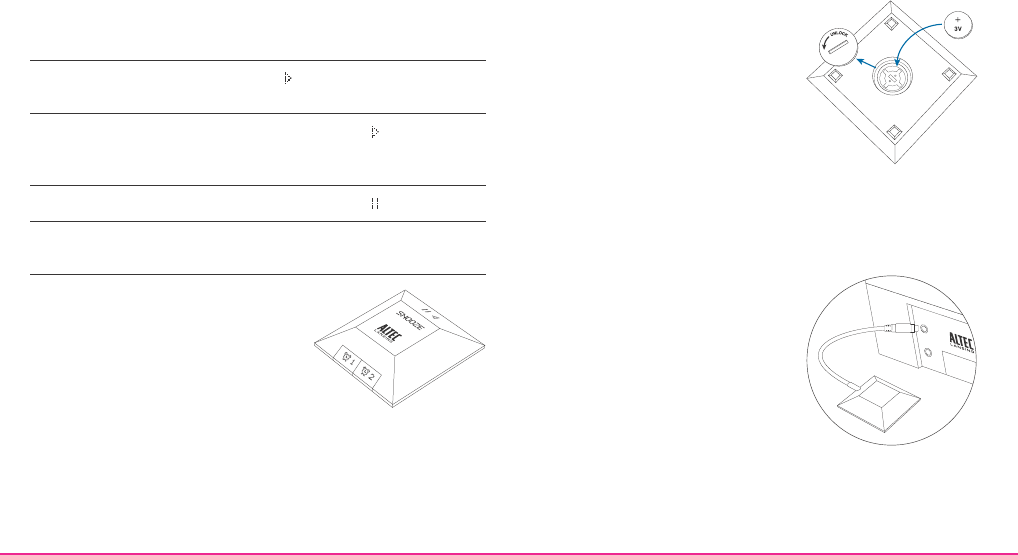
Wireless Snooze Remote Features (M402SR model only)
1 Open the battery compartment.
Use a coin or screwdriver to turn the
battery compartment door counter-
clockwise.
2 Position the battery (included) so it
sits in the battery holder correctly.
Makesurethepolarity(the+and–
sidesofthebattery)iscorrect.
3 Replace the battery door.
NOTE Please discard used batteries properly.
How to Connect and Pair the Wireless Snooze Remote
1 Connect the snooze remote
receiver to the SNOOZE REMOTE
jack.
The jack is located on the back of the
system(M402SRmodelonly).
2 Press the PAIRING button on the
snooze remote receiver until the
LED light stays lit.
3 Press any button on the wireless
snooze remote twice.
TheLEDlightonthesnoozeremotereceiverwillturnoffoncethe
pairing process is complete.
NOTE Anytimeabuttononthewirelesssnoozeremoteispressed,the
LEDlightonthesnoozeremotereceiverwillash.
ThewirelesssnoozeremoteletsyouoperateselectfunctionsofyourAltec
Lansing FPO NAME speaker system from across the room. There’s no need
to aim it at the speaker system.
Snooze Press the buttontoactivatethesnooze
timer.
Play a track from your iPod
In iPod mode, press the button. See the
Listening to Your iPod section for more
information.
Pause your iPod In iPod mode, press the button.
Turn off the alarm PresstheALARM1orALARM2button
when the alarm is sounding.
NOTE See the Using the Wireless Snooze
Remote section for installation and pairing
instructions.
Using the Wireless Snooze
Remote (M402SR model only)
TheM402SRmodelcomeswithawireless
snoozeremotethatallowsyoutosnoozwandturnoffyouralarm(andplay/
pauseyouriPod)fromacrosstheroom–upto30feet(10meters)away.
Inorderforthewirelesssnoozeremotetocontrolthespeakersystem,the
snoozeremotereceivermustbeconnectedtothebackofthespeaker
systemandpairedwiththewirelesssnoozeremote.
How to Install the Wireless Snooze Remote Battery
Thewirelesssnoozeremotebattery(included)isnotinstalledatthefactory.
Toinstallthewirelesssnoozeremotebattery,followthestepsbelow:
ANTENNA
SNOOZE
REMOTE

12
Listening to Your iPod
1 Dock your iPod in the Altec Lansing FPO NAME speaker
system.
2 Select iPod mode.
Press the buttononyourM402orenhancedremoteuntil
the iPod icon appears on the LCD.
3 Press the button on your iPod, speaker system, enhanced
remote, or wireless snooze remote (M402SR model only).
Music from your iPod will start playing. The speaker system and its
remotearecapableofcontrollingbasicfunctionsof3rd-generation
iPods and the iPod touch.
4 Adjust the volume.
UsetheVOLUMEINCREASEandVOLUMEDECREASEbuttonson
the Altec Lansing speaker system to adjust the system volume. Or,
usetheVOLUME+andVOLUME–buttonsontheenhancedremote.
5 Find your desired song.
Press the or button on your speaker system or enhanced remote
to go to the next or previous track. Press and hold the or button
on your speaker system or enhanced remote while track is playing for
high-speed forward or reverse music search of the current track.
How to Access Additional Features on Your iPod Using
the Enhanced Remote
Shuffle your entire song
library
PresstheP1buttononceonthe
enhanced remote. The icon will be
displayed.
Shuffle albums
PresstheP1buttontwiceonthe
enhanced remote. The icon will be
displayed.
Repeatthecurrentsong
PresstheP2buttononceonthe
enhanced remote. The icon will be
displayed.
Repeatthecurrentplaylist
PresstheP2buttontwiceonthe
enhanced remote. The icon will be
displayed.PresstheP2buttonagainto
cancel the repeat setting.
Access the previous playlist PresstheP3buttonontheenhanced
remote.
Access the next playlist Press the P4 button on the enhanced
remote.
Charging your iPod
Whenever your iPod is docked and your Altec Lansing FPO NAME speaker
systemispluggedintoanACoutlet,youriPodischarging(untilfully
charged)–evenifthespeakersystemisswitchedoff.