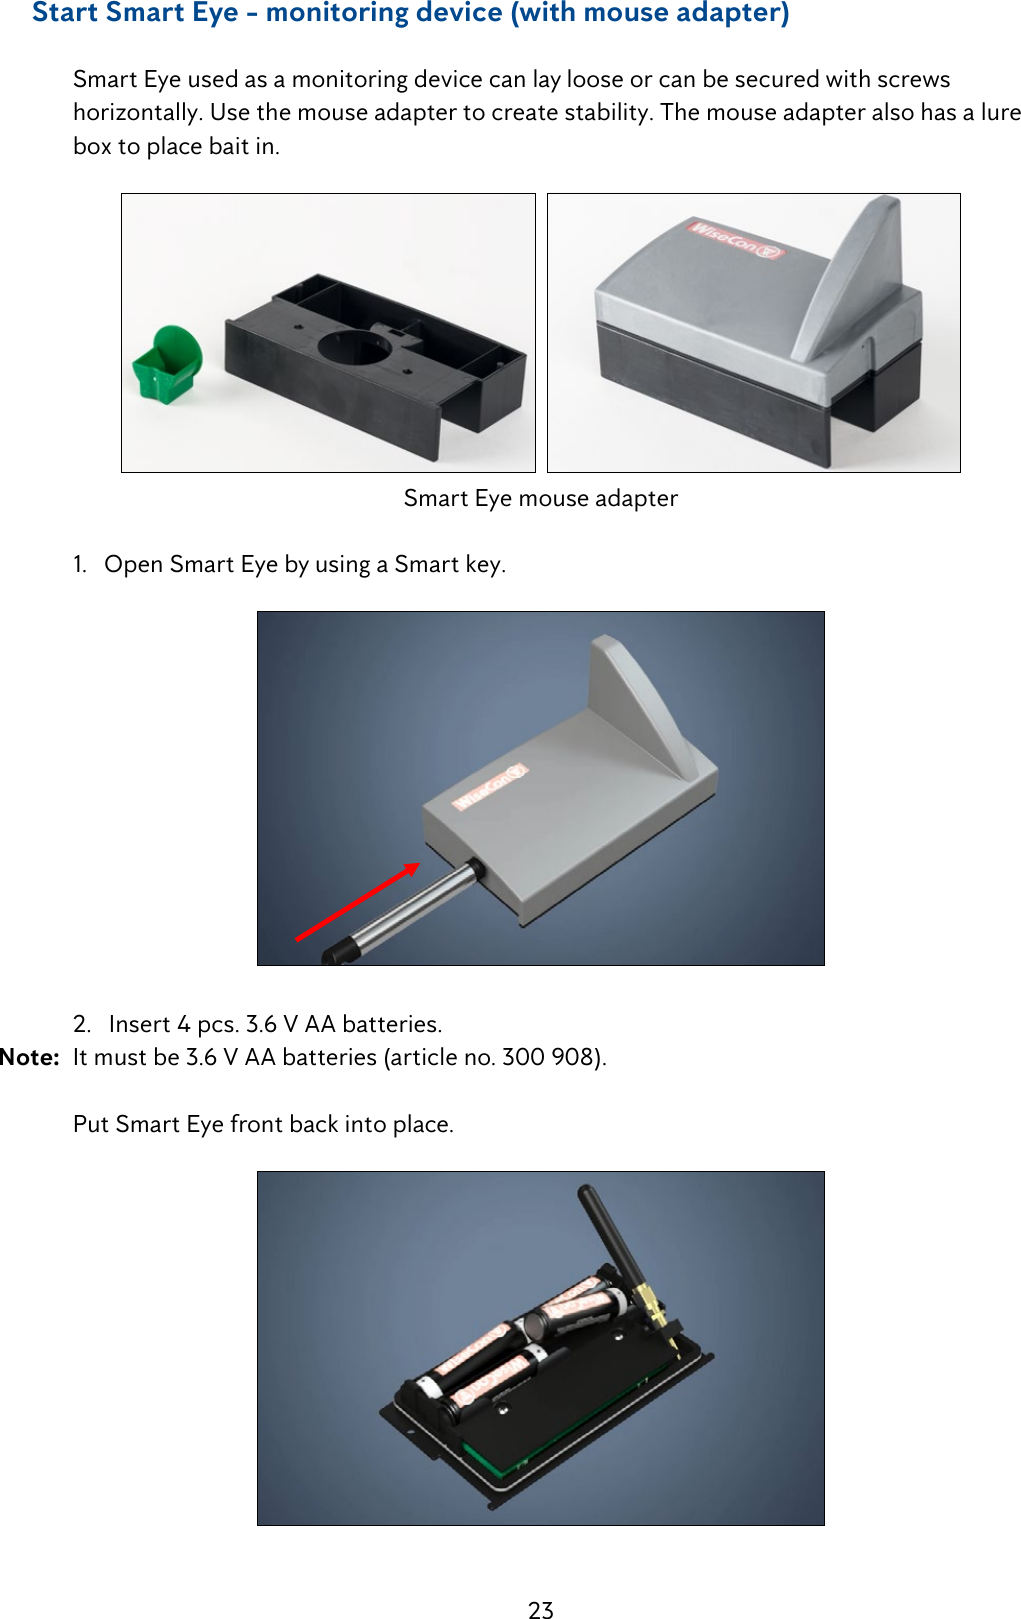
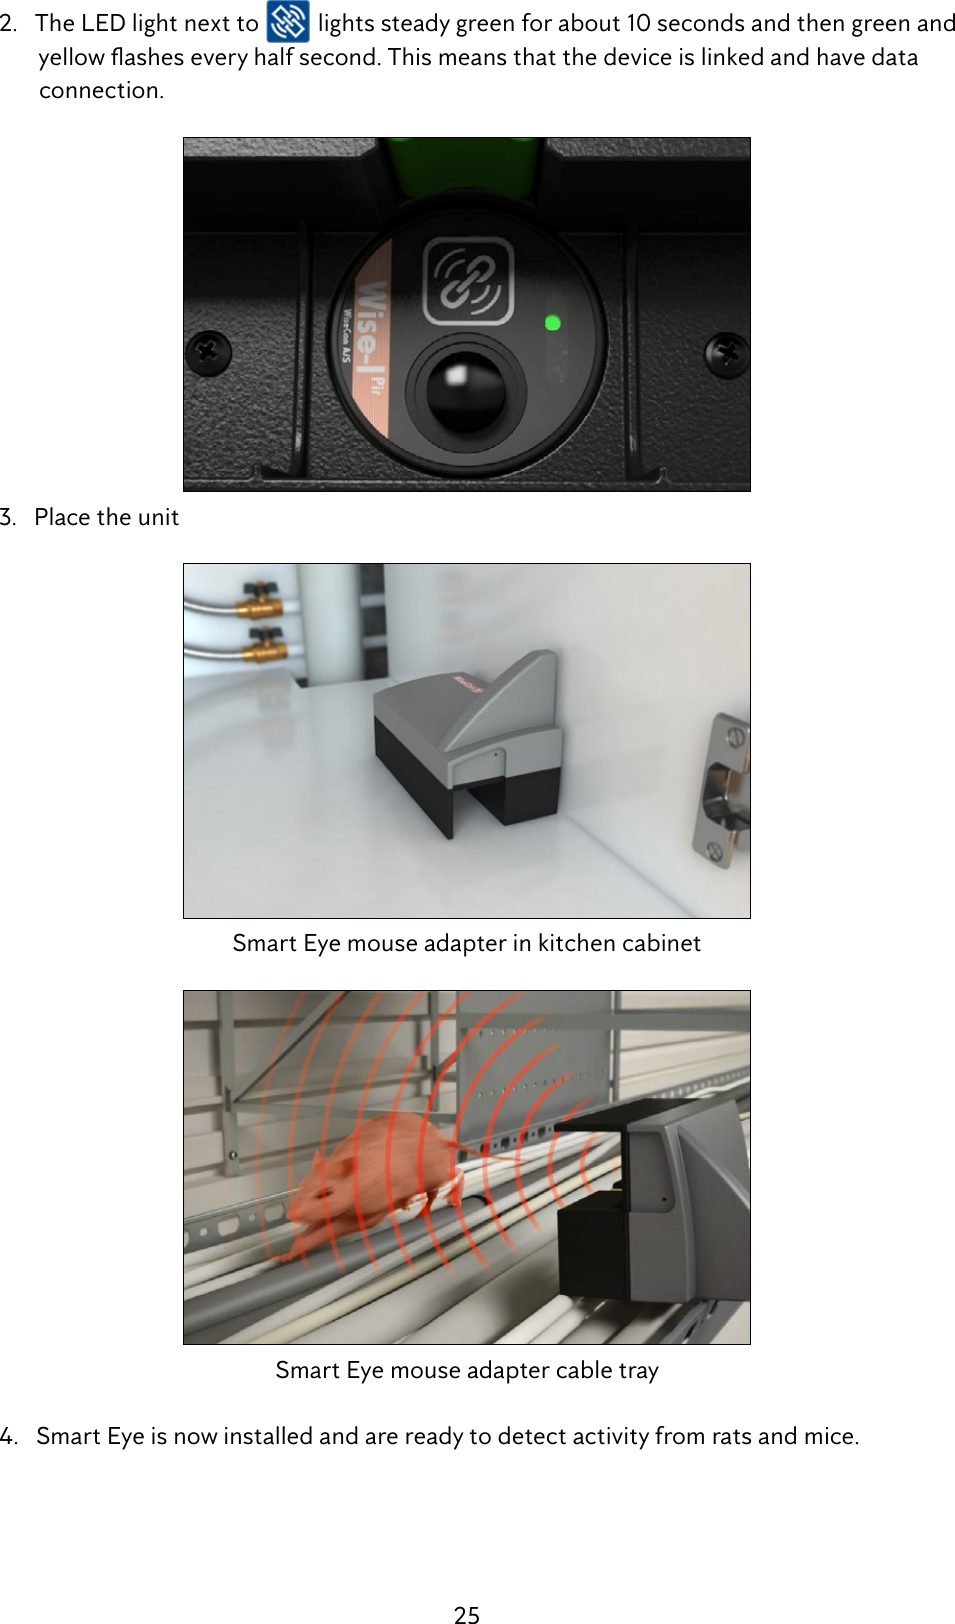
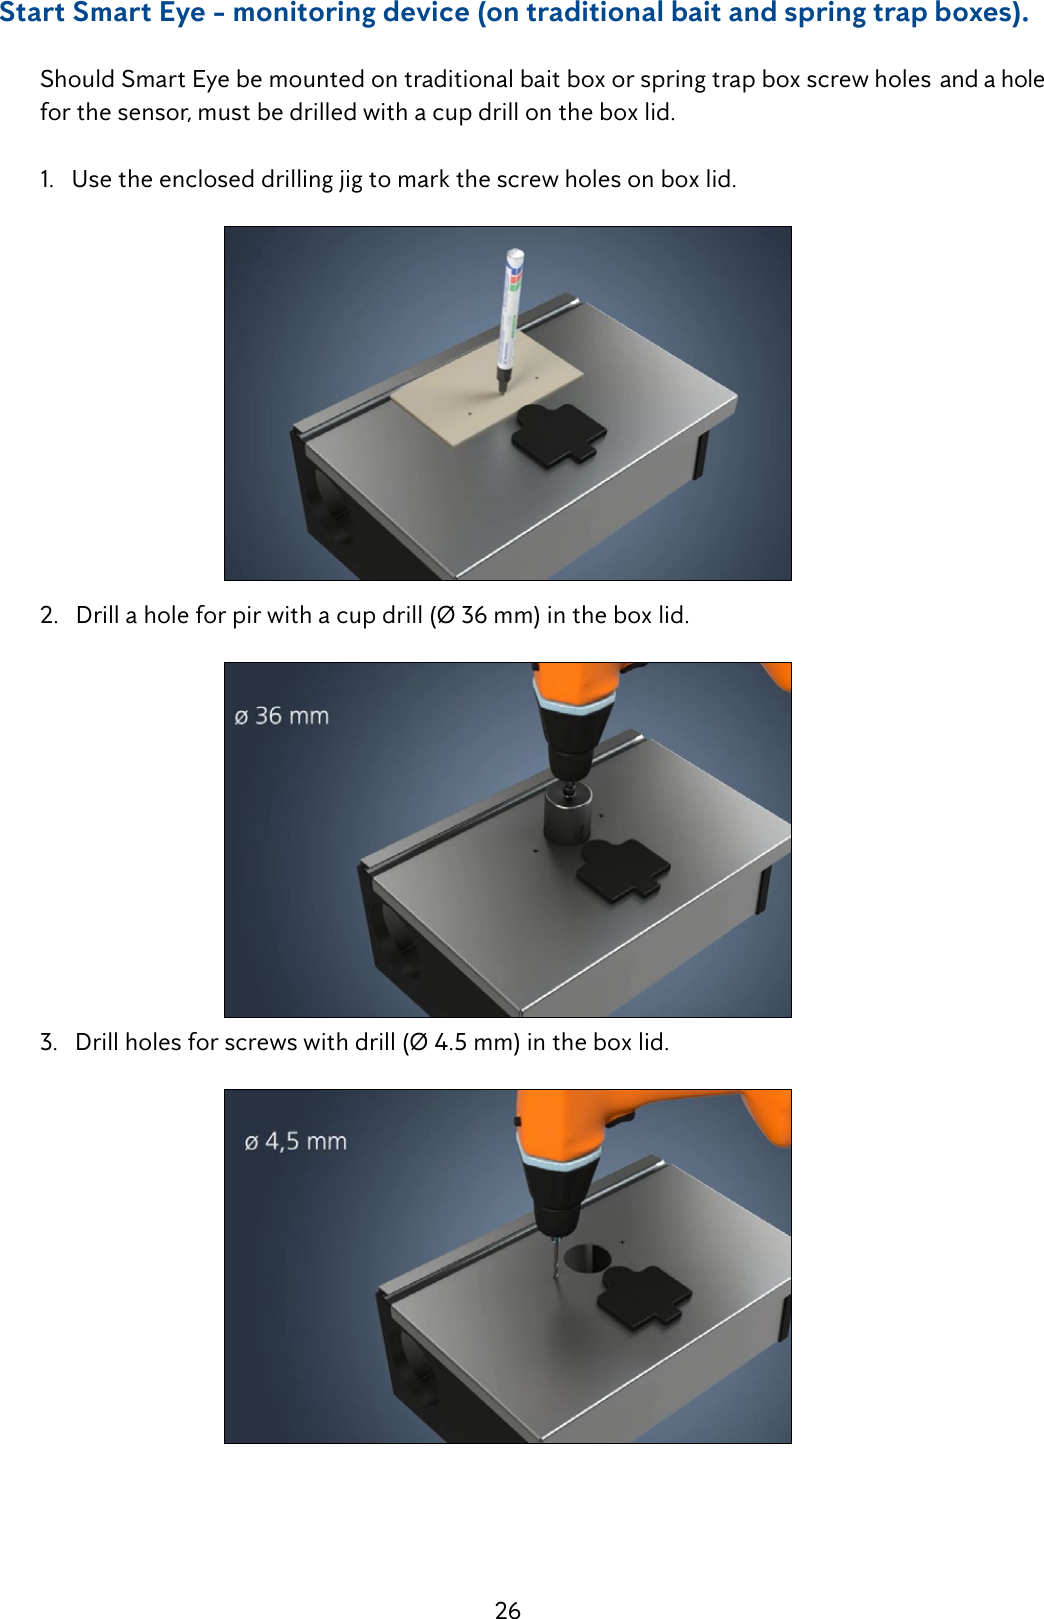
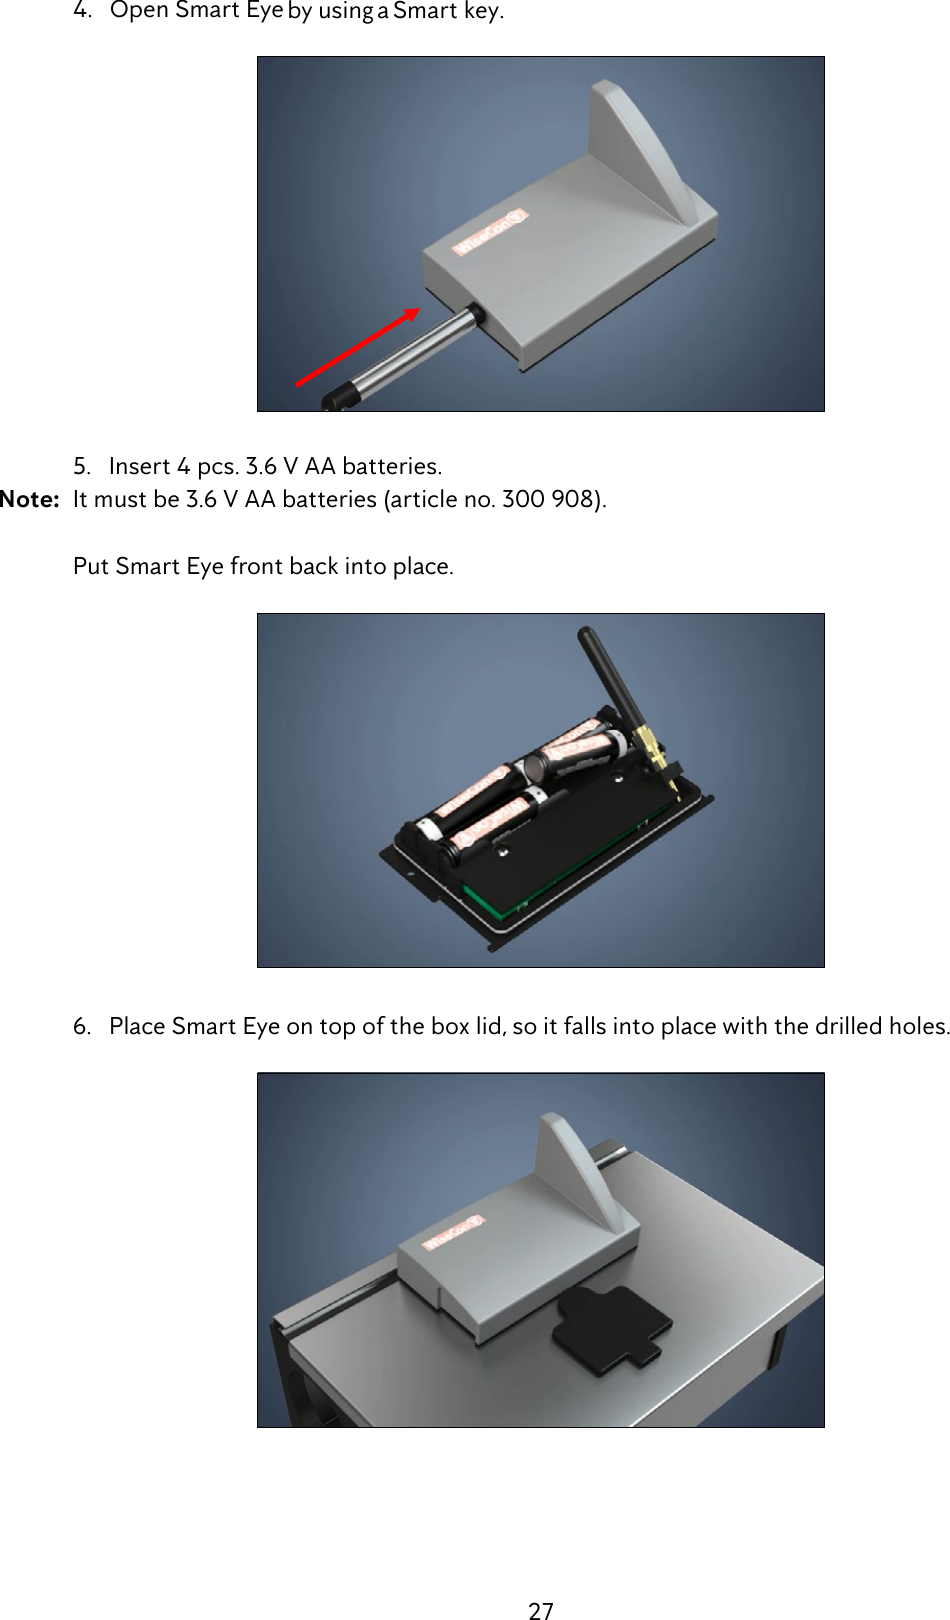
Anticimex Innovation Center A S 300101 Rodent surveillance and trap system User Manual op instructions
Anticimex Innovation Center A/S Rodent surveillance and trap system op instructions
Contents
- 1. fact sheet
- 2. manual
- 3. op instructions
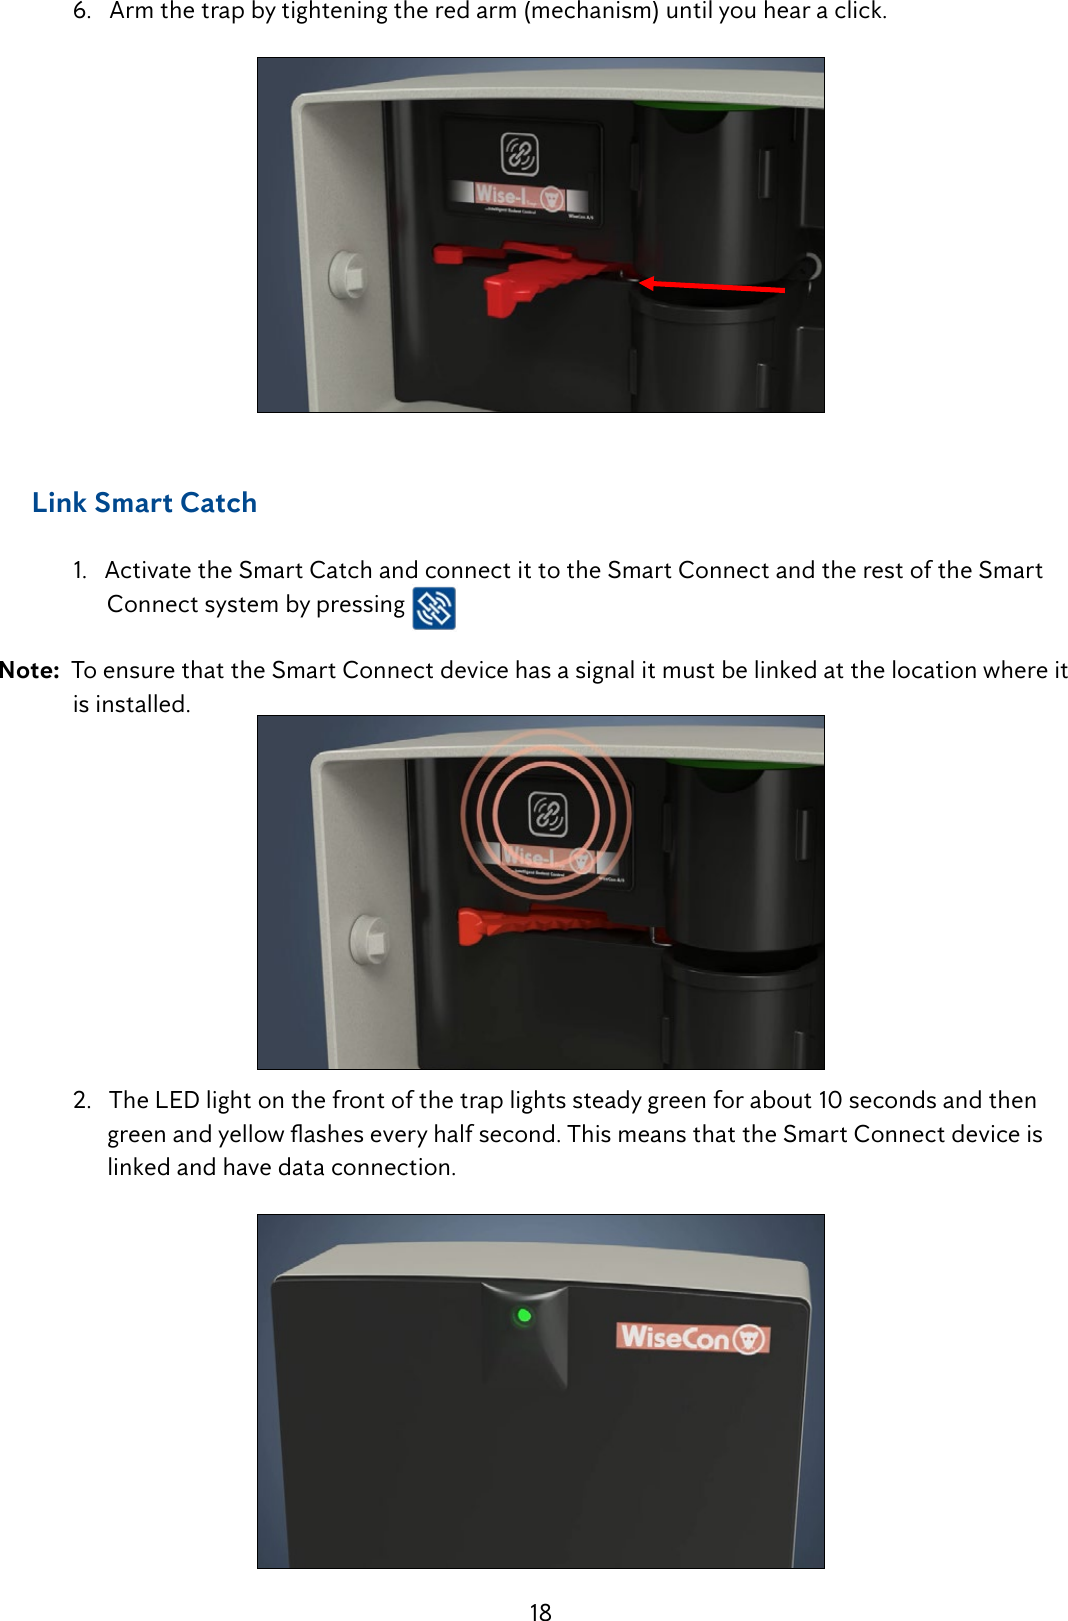
op instructions

![9SIM card information Below is a list of the functions that a SIM card must have in order to work in an Anticimex Smart product. 1. Create a connection to the Internet, via. EDGE/2G* 2. Send and receive SMSs on the same number 3.PINlockmustbeturnedo** 4. SIM card must not be a prepaid card * The SIM card may not be forced to use 3G ** Can be done by inserting the SIM card into a mobile phone Anticimex recommends a SIM card of the type Machine-To-Machine (M2M) This type of SIM card is designed to be used in equipment such as Anticimex’s devices.Getting started with Smart Connect system Registration of user and Smart Connect system on WisePlan Before a Smart Connect system can be used, you need to register as a user and register your Smart Connect system on WisePlan. WisePlan is the software / control system that monitors your Smart Connect system. Registration is done online on http://www.wisecon.dk/wiseplan BesuretohaveyourSmartConnect’sserialnumberandvericationcodeready.Youwillnd theserialnumberandvericationcodeonthebackofyourSmartConnect.(OnlytheSmart Connect have to be created manually on WisePlan. Smart Catch and Smart Eye are created automatically when connected to the system). Make sure you also have the phone number of the Smart Connect’s SIM card ready. User registration 1. Follow the link to the website: http://www.wisecon.dk/wiseplan 2. Press [Register new user]. (If you are registered as a user already log in via [WisePlan Login]).](https://usermanual.wiki/Anticimex-Innovation-Center-A-S/300101.op-instructions/User-Guide-3758091-Page-9.png)
![10 3.Entertheserialnumberandvericationcode.Press[Next].Youwillndtheserialnumber andvericationcodeonthebackofyourSmartConnect. 4. Enter company name and address, and select language in alarm texts. Press [Next]. 5. Enter your name, email and mobile number. Press [send code to my phone]. 6.YouwillreceiveanSMSwithacodethatmustbeentered(seenextpicture). 7. Enter the received code and press [Next].](https://usermanual.wiki/Anticimex-Innovation-Center-A-S/300101.op-instructions/User-Guide-3758091-Page-10.png)
![11 8. Enter the Smart Connect system’s name. Remember, to give it a descriptive name such as Smart Connect system and client name. 8.1 Enter the country where the Smart Connect system is located. 8.2 Enter the phone number of the SIM card inserted in the Smart Connect. 8.3 Enter the phone company that the SIM card is from (if the company is not listed - choose other and enter GPRS details). 8.4 Press [Next]. 9. Select the username and password you want to use at log in. Press [Create New User]. 10. The image below will be displayed. Press [OK]. Registration is now complete and the Smart Connect system and you as a user has been created on WisePlan. Youwillnowautomaticallybesenttotheadministrationpage.Ontheadministrationpage, you can see operating information and download statistics, create new traps / devices and users, as well as edit existing ones. YouarenowreadytoinstallandinserttheSIMcardinyourSmartConnect.](https://usermanual.wiki/Anticimex-Innovation-Center-A-S/300101.op-instructions/User-Guide-3758091-Page-11.png)
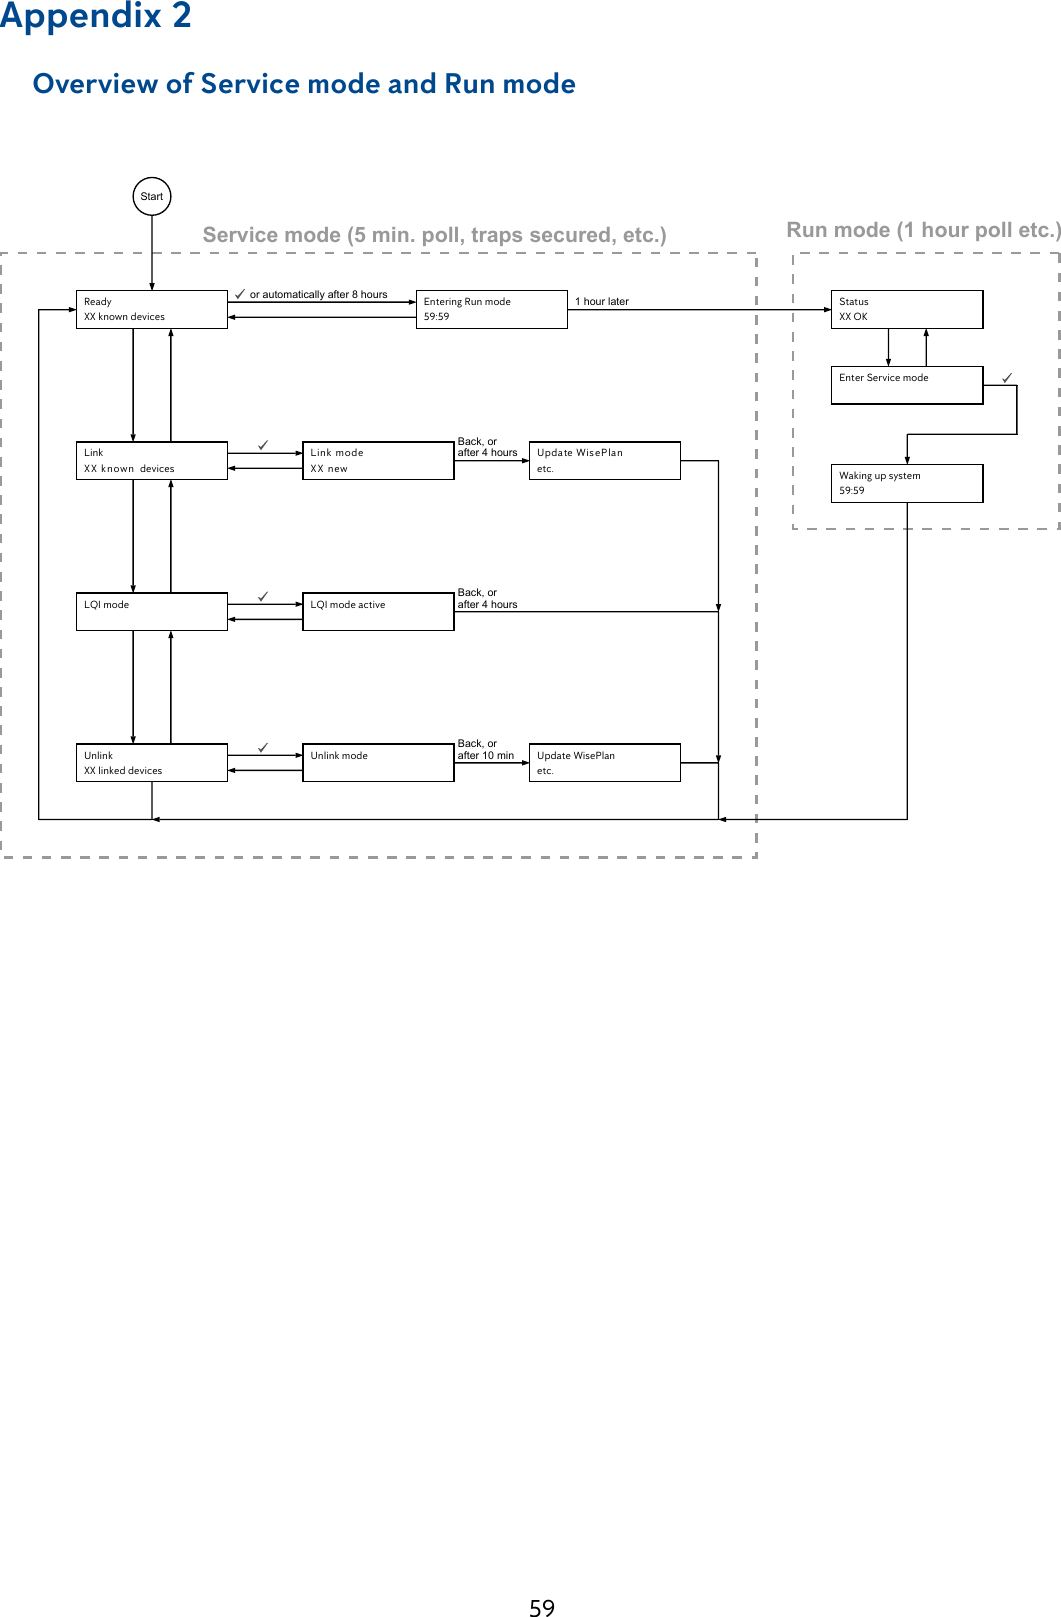
![13 Start Smart Connect 1. Insert the SIM card and connect Smart Connect to the power supply. Pull battery slip out of the back. 2. After a short while, Smart Connect will turn on. When a Smart Connect is started up for thersttime,itwillgodirectlyintoServicemode,soSmartCatchandSmartEyedevices can be connected securely. It is seen by the display showing [Service mode - 0 OK] (see illustration and explanation of the Service mode below).Service mode EVERY TIME you need to work with a Smart Connect system installation ON SITE, it must be put in Service mode to work in Link, LQI and Unlink. This is done by pressing [Enter Service Mode]. As long as a Smart Connect has not linked with any Smart Catch or Smart Eye devices it will go directly into Service mode, when it is turned on, but as soon as devices have been linked to the Smart Connect, you must put the Smart Connect system devices in Service mode. This is explained on the next page. Service mode is one of the most important features. In Service mode you can safely work/ handle all Smart Connect devices, as the Service mode prevents traps from shooting and prevent any PIR registration. This means that you will not get harmed or accidently activate PIR sensors.](https://usermanual.wiki/Anticimex-Innovation-Center-A-S/300101.op-instructions/User-Guide-3758091-Page-13.png)
![14 Service mode has a poll period of 5 minutes, which means that the Smart Connect devices contacttheSmartConnecteveryfthminute,andthereforeyouwillknowthatanychanges havebeenupdated/madecorrectlyeveryfthminute.BeforetheinstallationgoesintoService mode, the system must wake up. It can be seen on the countdown, how long it takes before Service mode is enabled. Service mode is always activated at the full hour. When the Smart Connect system is not in Service mode the poll period is 60 minutes. The Service mode can ONLY be activated via WisePlan Pro or ON SITE on the Smart Connect. 1. Press [down arrow] until the display shows Service mode. 2. Press [OK] to activate/enter Service mode. Before the installation goes into Service mode, the system must wake up. It can be seen on the countdown, how long it takes before Service mode is enabled. Service mode is always activated at the full hour. 3. After activating Service mode you can safely start to set up the rest of your Smart Connect system. 4.AllSmartCatchandSmartEyedeviceswillashwithbriefgreenashesaslongastheyare in Service mode. That way you know that the Smart Connect device is safe to handle. 5.RemembertoputyoursysteminRunmodewhenyouarenishedworkingwithyour installation on site. If you forget to put the system in Run mode, it will automatically enter Run mode after 9 hours. Press [OK] to put the system in Run mode.](https://usermanual.wiki/Anticimex-Innovation-Center-A-S/300101.op-instructions/User-Guide-3758091-Page-14.png)
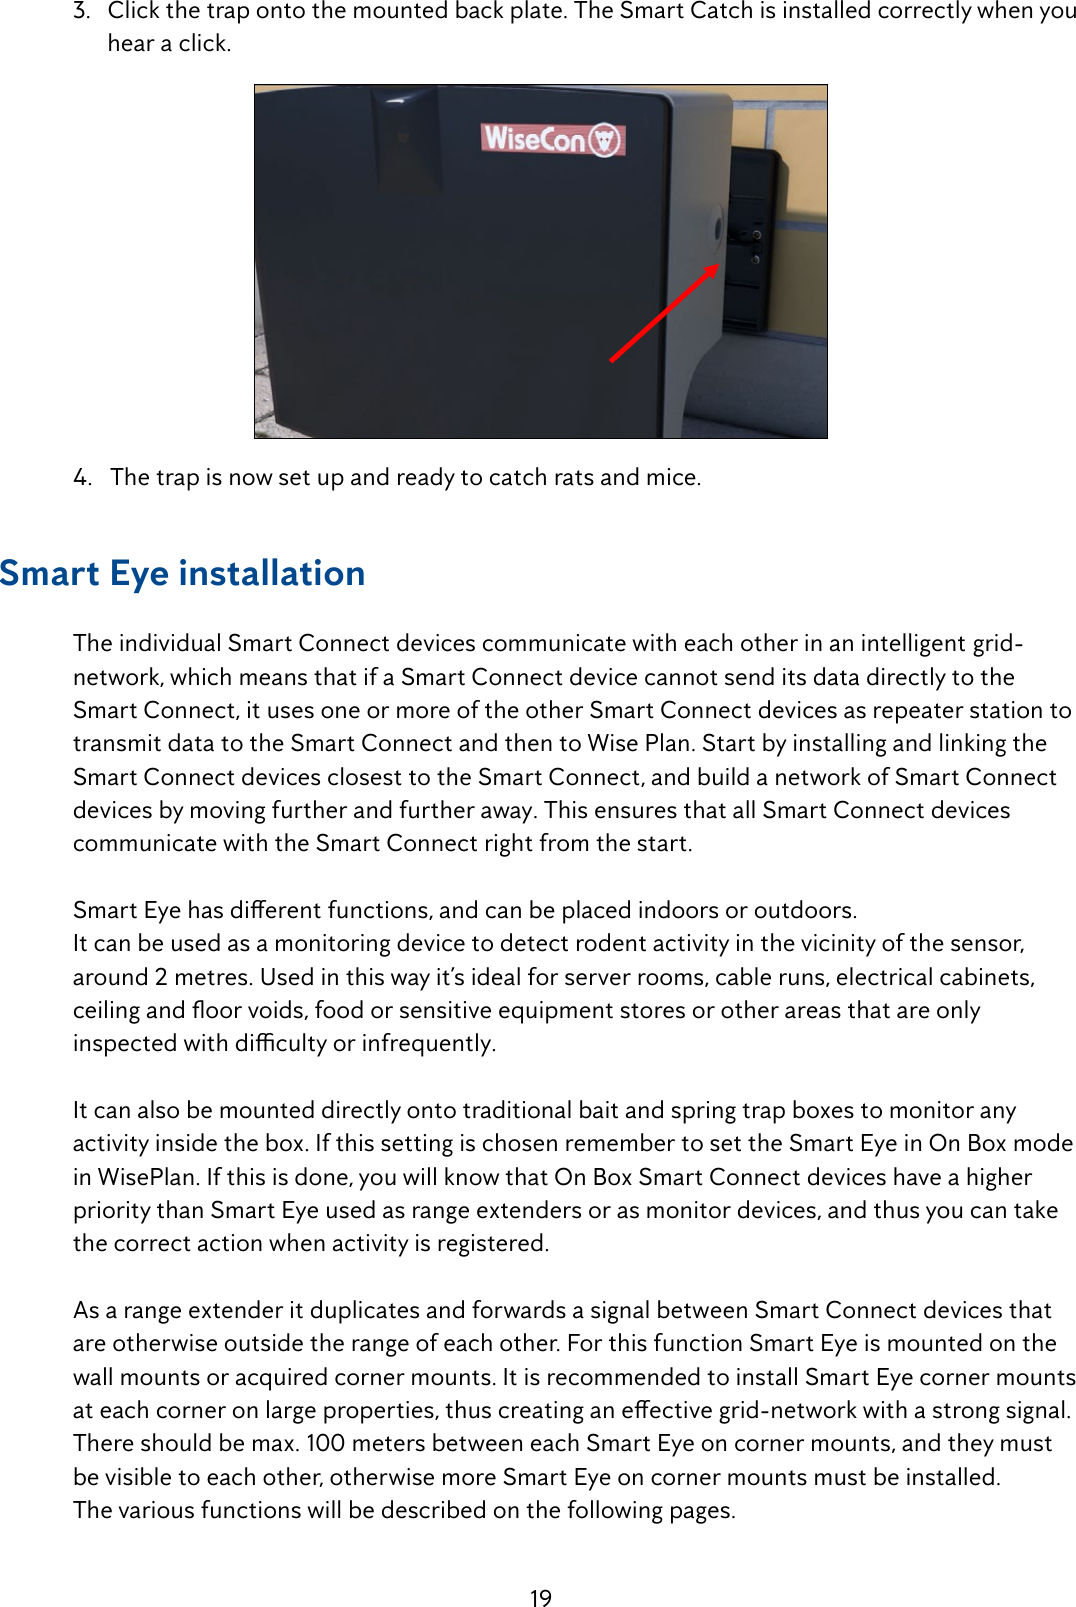
![15 6. Smart Connect shows [Running] in the display when the system is in Run mode. Make Smart Connect ready to link with Smart Catch and Smart Eye 1. Press [down arrow] until the display shows Link. 2. Press [OK] The Smart Connect is now ready to link up with Smart Catch and Smart Eye devices also called SmartConnectdevices.Youcannowgototheinstallationofthesedevices.](https://usermanual.wiki/Anticimex-Innovation-Center-A-S/300101.op-instructions/User-Guide-3758091-Page-15.png)


![29 3. Place the box. 4. Smart Eye is now installed and is ready to detect activity from rats and mice.Service mode remote activate / deactivate (only via WisePlan Pro) It is an advantage to set a Smart Connect system in Service mode via WisePlan Pro before you go to the installation’s location, as it otherwise can take up to an hour before the system wakes up (due the normal poll period of 60 minutes). By activating the Service mode via WisePlan Pro it is ensured that the installation can be inspected right away when you arrive at the location. 1. To activate Service mode via WisePlan Pro, you have to choose the Smart Connect of a specicinstallationinyourtraplistorbysearchingfortheserialnumber. 2. When you have chosen a Smart Connect press [Setup] in the menu. 3.CheckotheServicemodebox. 4. Afterwards press [Apply changes] to activate the Smart Connect next time it contacts WisePlan. 5.Whenyouarenishedwithyourinspection,remembertocheckotheServicemodebox and press [Apply changes], so the system start to run normally again (If you forget - Service mode will automatically be exited after 8 hours (see image next page)).](https://usermanual.wiki/Anticimex-Innovation-Center-A-S/300101.op-instructions/User-Guide-3758091-Page-29.png)
![30Unlocking Smart Connect’s screen 1. To ensure that only authorized people can use the Smart Connect system, a screen lock is installed on the Smart Connect. To unlock the Smart Connect you have to press the [arrow up] and [arrow down] button at the same time for 10 seconds. Then the screen will be turned on.](https://usermanual.wiki/Anticimex-Innovation-Center-A-S/300101.op-instructions/User-Guide-3758091-Page-30.png)
![31Emptying of Smart Catch 1. Press [down arrow] until the display shows [Enter Service mode]. 2. Press [OK] to activate/enter Service mode. 3.RemovethetrapfromthexedbackplatebyusingaSmartkey. 4. The trap is emptied by lifting the red arm. The trap can be armed at the same time, by lifting the red arm until you hear a click. Note: Remember, to deposit the dead animal properly!](https://usermanual.wiki/Anticimex-Innovation-Center-A-S/300101.op-instructions/User-Guide-3758091-Page-31.png)
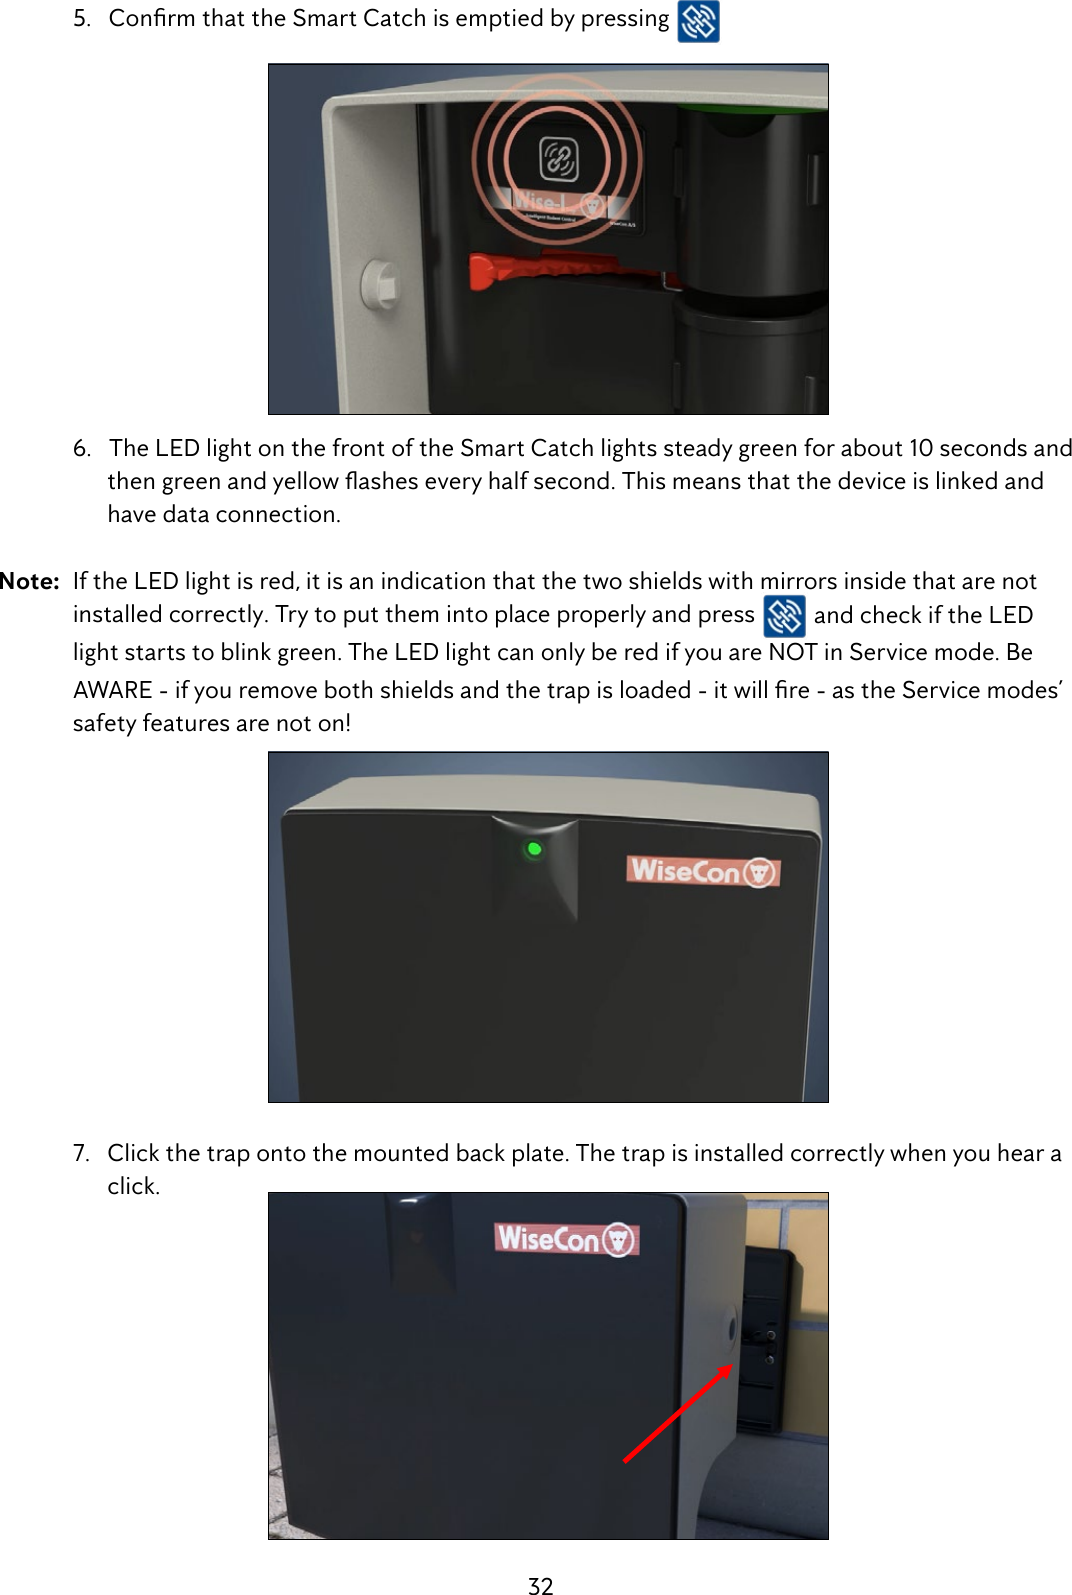
![33 8. The trap is now ready to catch rats and mice again. 9.RemembertoputyoursysteminRunmodewhenyouarenishedworkingwithyour installation on site. If you forget to put the system in Run mode, it will automatically enter Run mode after 8 hours. Press [OK] to put the system in Run mode. 10. Smart Connect shows [Running] in the display when the system is in Run mode.Placement of Smart Connect and Smart Connect devices in WisePlan When all devices in a Smart Connect system are installed, they must be placed in WisePlan, so they can be easily found again, when activity is registered or batteries need changing ect. At the same time the Smart Connect system can be administered through WisePlan. 1. Search for devices on the trap list. 2. Click on the Placement icon .](https://usermanual.wiki/Anticimex-Innovation-Center-A-S/300101.op-instructions/User-Guide-3758091-Page-33.png)
![34 3. The Smart Connect and the Smart Connect devices apear on the left side (see image below). Thedierentdevicesaremarkedwithasingleletter,soitispossibletoseewhatkindofunititis. = Smart Connect = Smart Catch = Smart Eye 4. Enter the address of the Smart Connect’s location and press [Find address on the map]. 5. Drag Smart Connect to the current location on the map by holding your mouse over M and then move it. SmartConnect’slocationisrememberedforfutureusebyllingincommenteldsonthe right page. Finish by pressing the [Save Location].](https://usermanual.wiki/Anticimex-Innovation-Center-A-S/300101.op-instructions/User-Guide-3758091-Page-34.png)
![35 6. Now Smart Catches and Smart Eye can be placed on the map. The order is unimportant. WhenaSmartConnectdeviceisplaced,llininformationaboutitslocationinthe commenteldontheright. Press [Save Location].By staircase 7. Keep placing Smart Connect devices until all devices have the correct location.Connect the PIR sensor on Smart Catch and Smart Eye 1.AllPIRsensorsareturnedobydefault,soyoumustconnecttheSmartConnectdevices that should be active as follows. Click the icon linked Smart Connect devices . 2.YouwillseethedevicelistwithSmartEyeandSmartCatches. Here it is possible to see serial number, comments, operation status, time of last status, number of shots, active since and PIR status on all devices.](https://usermanual.wiki/Anticimex-Innovation-Center-A-S/300101.op-instructions/User-Guide-3758091-Page-35.png)
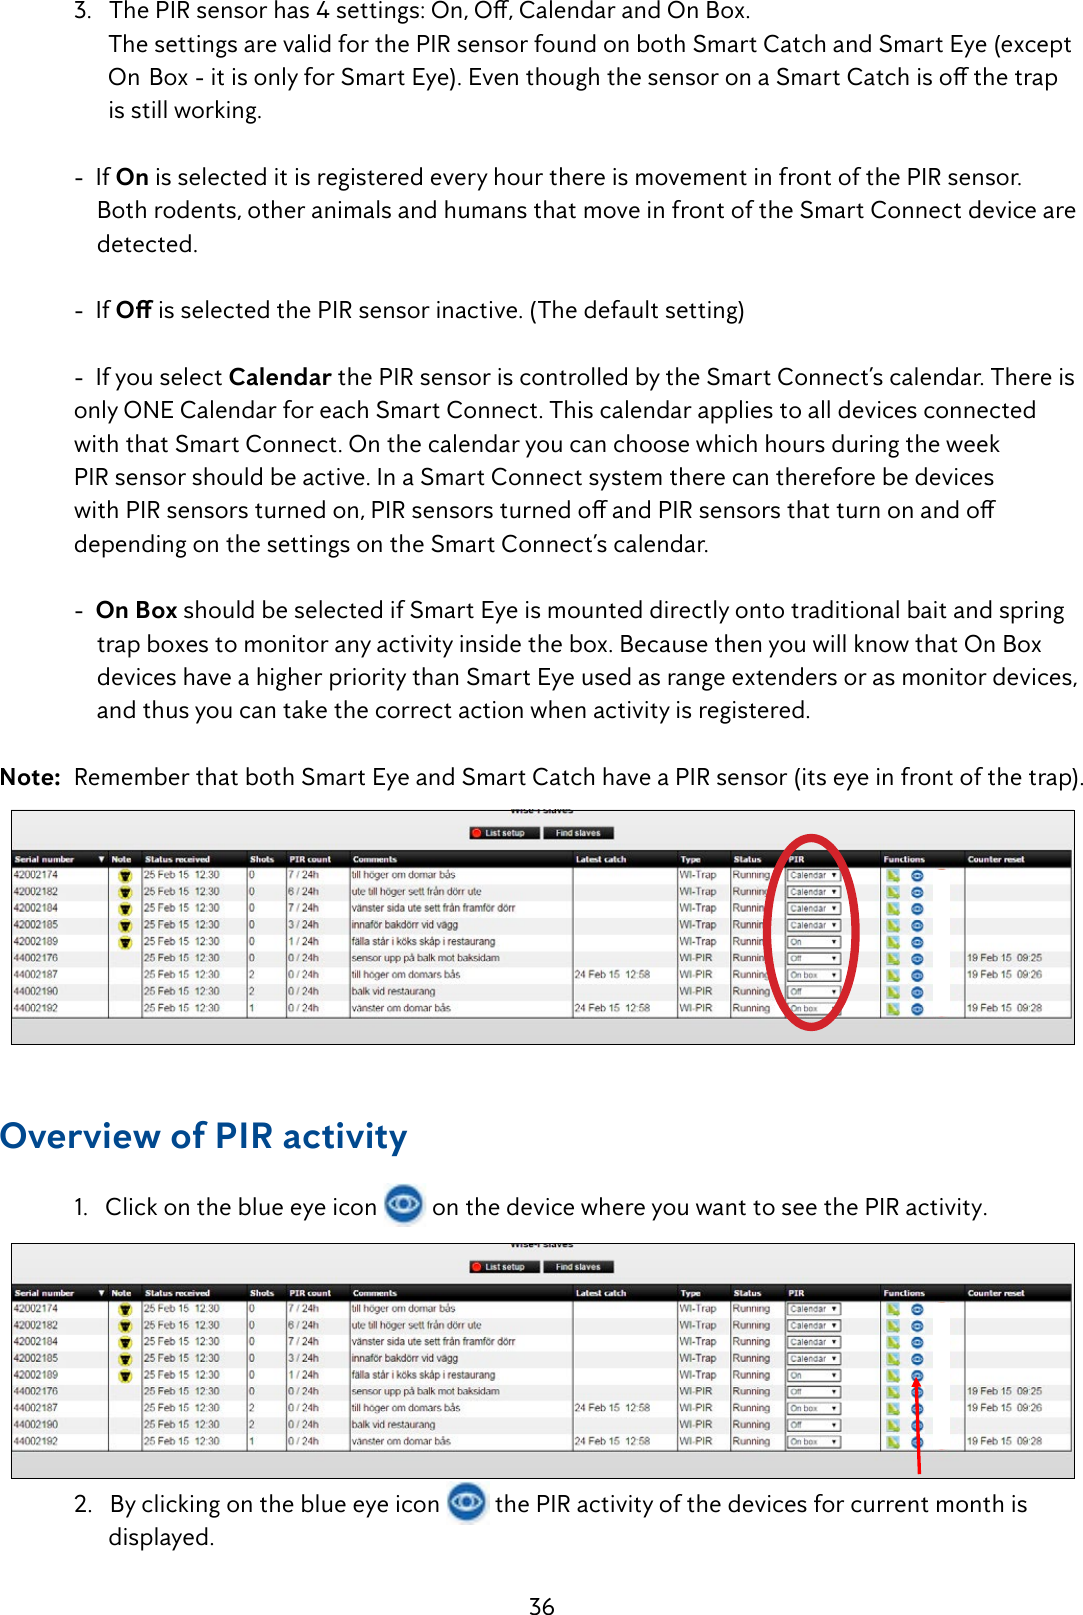
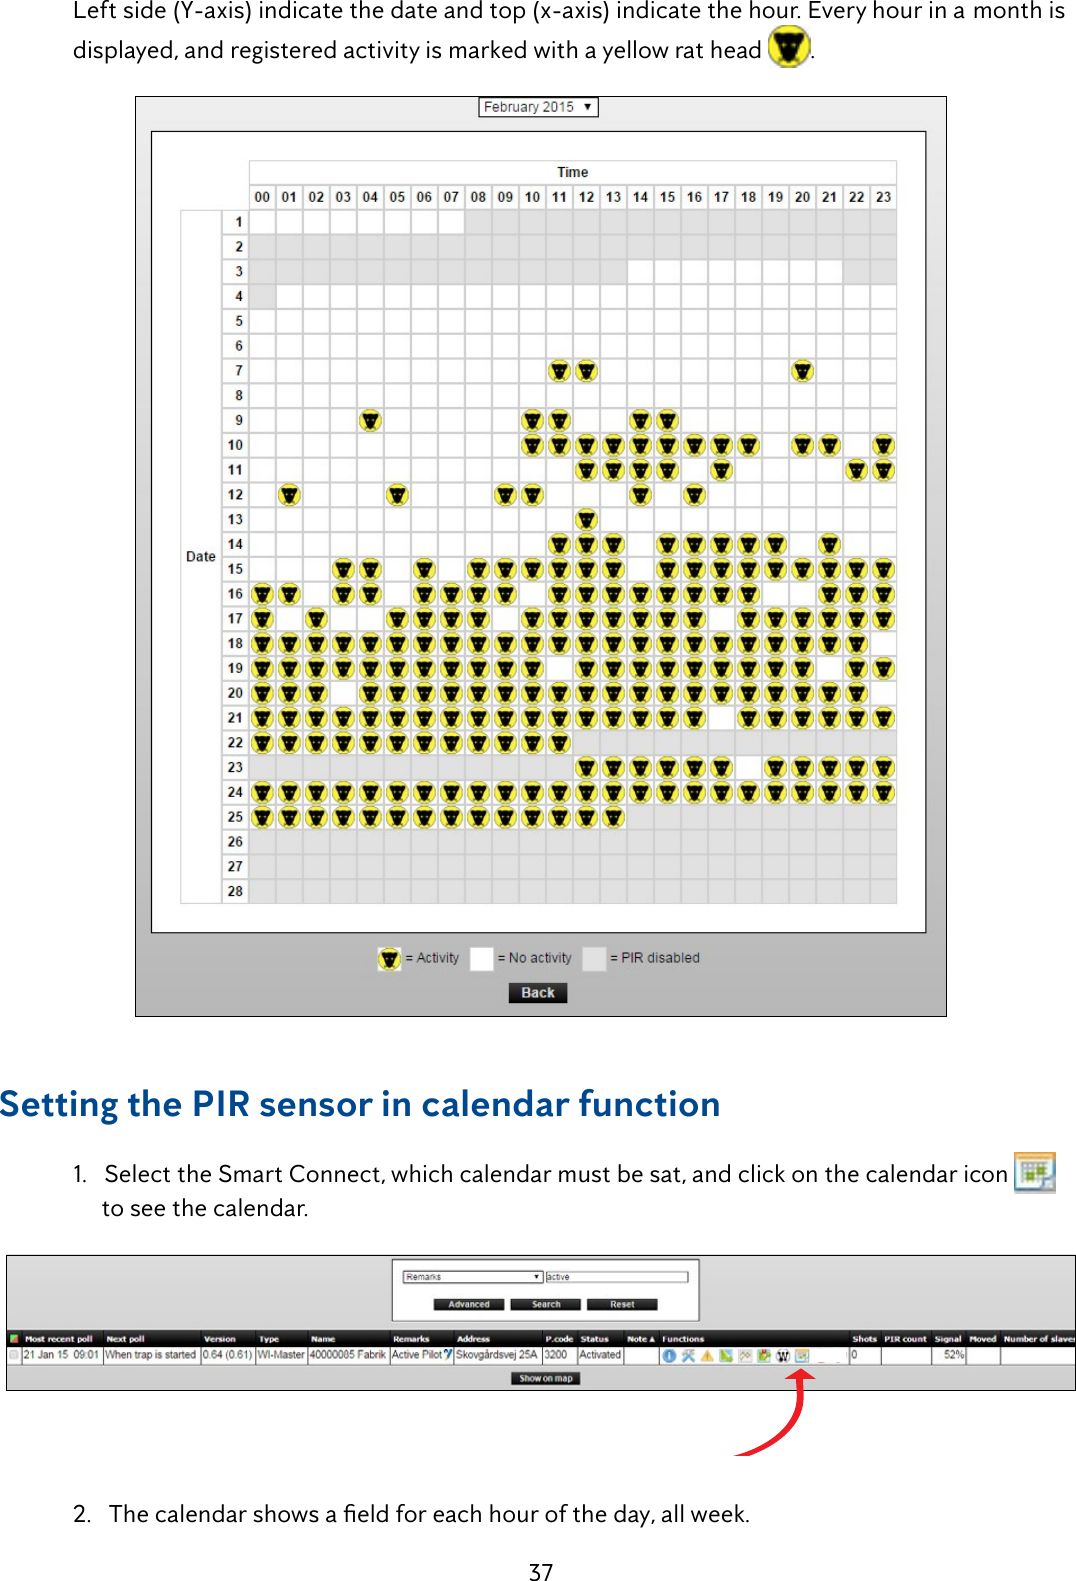
![38 YoucannowclickoneachboxtoactivatethePIRsensorinthathour.Thechoiceappliesto ALL PIR sensors under the Smart Connect that have selected ”calendar” under PIR settings. Theeldcanbeselectedindividuallywith[Control-click]orgatheredby[clickanddrag]. When a period of a day is selected, press [Apply Changes]. 3. In the example below PIR is active throughout Saturday and Sunday and weekdays from pm. 18-06 except Wednesday which is from pm. 21-06. All periods can be deleted by pressing the white box of weekdays. Remote / automatic start (only with WisePlan Pro) YoucanremotelystartaSmartCatchiftheredarm(mechanism)hasbeenarmed,butyou have missed pressing the link button afterwards to activate the trap. Smart Eye in On Box mode can also be remotely started if you have missed pressing the link button after inspection. 1. Press the automatic start icon and the Smart Connect device will be activated.](https://usermanual.wiki/Anticimex-Innovation-Center-A-S/300101.op-instructions/User-Guide-3758091-Page-38.png)
![40Unlink devices - Remove devices from your Smart Connect system 1. Smart Connect devices can be removed and disconnected from its Smart Connect by using Unlink. Press [arrow down] twice until the display shows Unlink in the menu.](https://usermanual.wiki/Anticimex-Innovation-Center-A-S/300101.op-instructions/User-Guide-3758091-Page-40.png)
![41 2. Press [OK] 3.Nowyouscrollthroughtheserialnumberstondthedevicetoberemoved. By pressing [arrow down] until the correct serial number is found. (In this case the correct serial number is 42003397). 4. Press [OK]](https://usermanual.wiki/Anticimex-Innovation-Center-A-S/300101.op-instructions/User-Guide-3758091-Page-41.png)
![42 5.Youwillnowbeaskedtoconrmthatyouwanttoremovethedevicewithserialnumber 42003397. Press [OK] toconrmtheremoval. The device will be removed (Unlinked) and the next device can be removed by scrolling to the correct serial number with [down arrow] and thereafter pressing [OK] 6. Finish by pressing [Return] . Hereafter WisePlan is also updated with new informations. When a device is removed from the Smart Connect it is reported to the device and to WisePlan. This removes the device from its current Smart Connect, and it can thereafter be linked to another Smart Connect, when desired. It is important that a device is removed correctly otherwise it cannot be linked to another Smart Connect. This is a safety measure to ensure that the devices are not moved involuntarily to other systems.Note: Be aware that if a device that acts as a repeater for other Smart Connect devices is removed, there is a risk that the signal is lost. Therefore it is recommended to always install and link a new device, BEFORE the old device is removed and uninstalled.Test the signal strength (LQI mode) LQI mode (Link Quality Information) is used to test the signal strength in larger installations, in order to determine the possible need for extra devices to amplify the radio signal. WhenaSmartConnectisputinLQImodethedevices’LEDlightsashesyellow/redto indicate good quality of the signal. Yellow/red = Good signal No light = No signal LQI mode can ONLY be used with devices that are already linked to the Smart Connect.](https://usermanual.wiki/Anticimex-Innovation-Center-A-S/300101.op-instructions/User-Guide-3758091-Page-42.png)
![43 1. Press [arrow down] 3 times to enter LQI mode. 2. Press [OK] 3. Wait until the clock has counted down so all devices are awakened. After this LQI mode is enabled. Now all the devices’ signal strength can be checked and inspected. If a device has no signal, it can perhaps be moved a little (if it is OK from a pest control perspective). Otherwise, an additional device between the device with no signal and its nearest neighbour can be installed. Remember to link the new device and then test the signal with LQI mode again.](https://usermanual.wiki/Anticimex-Innovation-Center-A-S/300101.op-instructions/User-Guide-3758091-Page-43.png)
![44Change password 1. Click on [Change password]. 2. Enter the desired password and repeat this. Click on [Change password]. 3. The password is now changed.Administration of users and alarm recipients An alarm recipient will not be able to log on to WisePlan but will ONLY receive alarms from Smart Connect system on his/her cell and email. A user will have access to WisePlan and receive alarms on SMS and email. In the following sections, creating alarm recipients and creating users are presented. Create a new alarm recipient 1. Click on [Users] to enter the User menu.](https://usermanual.wiki/Anticimex-Innovation-Center-A-S/300101.op-instructions/User-Guide-3758091-Page-44.png)
![45 2. Click on [Create new alarm recipient] 3.Filloutthecommenteldsandclickon[Next]. 4. Select the Smart Connect systems and alarms the new alarm recipient should be connected to. Click on [Create new alarm recipient]. The alarm recipient is now created, and the person will receive alarms from the selected SmartConnectsystems.YouwillbereturnedtotheUsermenu. Create new user A user will be able to log on WisePlan, and will be able to use the functions from the rights granted to that user. 1. Click [Users] to get to the User menu.](https://usermanual.wiki/Anticimex-Innovation-Center-A-S/300101.op-instructions/User-Guide-3758091-Page-45.png)
![46 2. Click on [Create New User]. 3.Filloutthecommenteldsandclickon[Next]. 4. Choose what rights the new user should have and click on [Next].](https://usermanual.wiki/Anticimex-Innovation-Center-A-S/300101.op-instructions/User-Guide-3758091-Page-46.png)
![47 5. Select the Smart Connect systems and alarms the new user should be connected to. Click on [Next]. 6. Enter the username and password that the new user must use at login. Click on [Create New User]. The new user is now created in WisePlan and you will be returned to the User menu. Edit users 1. Click [Users] to enter the User menu. 2. Click [Edit] on the user that must be edited.](https://usermanual.wiki/Anticimex-Innovation-Center-A-S/300101.op-instructions/User-Guide-3758091-Page-47.png)
![48 3. Now the user’s e-mail, name and mobile number etc. can be edited if desired. Click on [Next]. 4. Now the user’s rights can be edited if desired. Click on [OK]. 5. Now there can be edited in the Smart Connect systems and alarms the user is attached to, if desired. Click [OK]. YouwillbereturnedtotheUsermenu.](https://usermanual.wiki/Anticimex-Innovation-Center-A-S/300101.op-instructions/User-Guide-3758091-Page-48.png)
![49 Delete users 1. Click [Users] to enter the User menu. 2. Click [Delete] on the user that must be deleted. 3. Click on [Delete user]. The user is now deleted and you will be returned to the User menu.Note: If the user is the only one that is connected to the Smart Connect system the user cannot be deletedbeforeaddinganewusertotheaectedSmartConnectsystem.Thisisdoneas described in the previous section Edit users. Press [Users] to get to the User menu, from where you can add a new user.](https://usermanual.wiki/Anticimex-Innovation-Center-A-S/300101.op-instructions/User-Guide-3758091-Page-49.png)
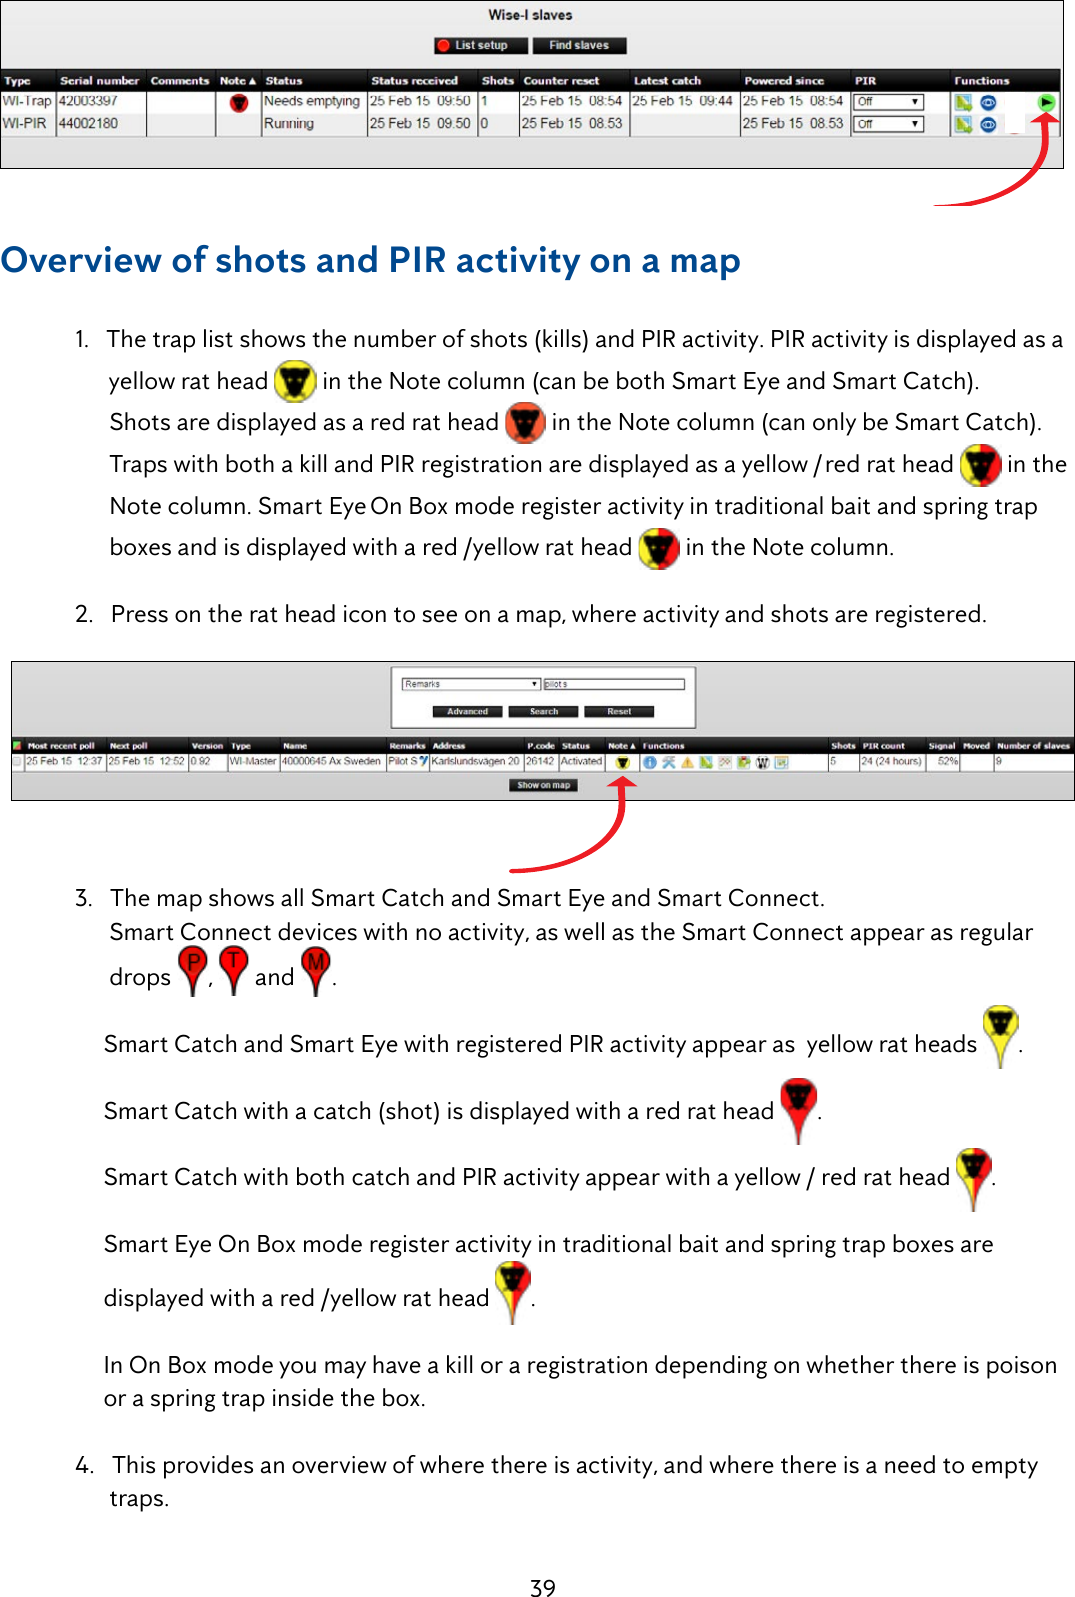
![50Trap (device) administration 1. Click on [Traps] to get to the trap list. 2. The trap list shows the Smart Connect systems (and the Smart Pipes and Smart Boxes you manage or own) connected to the user who is logged on WisePlan. If this user has rights to see / manage all Smart Connect systems in the company, these can be selected by clicking on [View all]. Sort the trap list 1.Youcansortofthetraplistbyclickingontheheadlines. Search after traps (devices) 1. Click on [Search]. In the search dialog box, you can search for Smart Connect systems (SmartConnect)basedondierentcriteria.](https://usermanual.wiki/Anticimex-Innovation-Center-A-S/300101.op-instructions/User-Guide-3758091-Page-50.png)
![51 Trap information 1. Click on [Traps] to get to the trap list. 2. Click on [Info]. 3. On this page the most recent operating information from Smart Connect system / Smart Connect is displayed.](https://usermanual.wiki/Anticimex-Innovation-Center-A-S/300101.op-instructions/User-Guide-3758091-Page-51.png)
![52 Trap setup 1. Click on [Setup]. 2. On the Setup Page Smart Connects (Smart Connect systems) can be activated and deactivated. At the same time, it is possible to change the Smart Connect name, operating parameters and mobile number. The following items can be changed: Status: Select whether the Smart Connect (Smart Connect system) should be activated and deactivated. Deactivation should only be used in the event of theft. Storage: Allows you to register that the Smart Connect system is put in storage. Trap name: Change Smart Connect system’s name. Reporting period: This value changes how often Smart Connect should report back to WisePlan. Alarm recipients: Here is shown who is connected to which Smart Connect systems as alarm recipients. It is possible to add or remove recipients by clicking on [Edit Recipients]. The trap’s country code: Select the country where the Smart Connect system is located. The trap’s phone number: Smart Connect mobile number. Time zone: Select which timezone Smart Connect system is in. Phone company: Choose the phone company where the SIM card is from.](https://usermanual.wiki/Anticimex-Innovation-Center-A-S/300101.op-instructions/User-Guide-3758091-Page-52.png)
![53 3. Be sure to click [Apply Changes] to save any changes made. 4. Click on [Traps] to return to the trap list.Alarms 1. Click on [Events]. 2. The alarms received from Smart Connect system can be seen in events, as well as the alarm recipient or user who has signed for each alarm. 3. An alarm is signed for by clicking on [Read]. 4. Click on [Traps] to return to the trap list.](https://usermanual.wiki/Anticimex-Innovation-Center-A-S/300101.op-instructions/User-Guide-3758091-Page-53.png)
![54Statistics 1. Click on [Statistics] in the trap list on the desired Smart Connect (Smart Connect system). 2. It is possible to get a graph of the number of shots (killed mice and rats) that have been in a Smart Connect system in a given period. Choose a period to see the desired statistics. 3. Choose the information you want the statistics/graph to include. Click on [Show graph]. 4. It is also possible to export statistics and graphs to Excel, click on [Download as CSV] and savethele.](https://usermanual.wiki/Anticimex-Innovation-Center-A-S/300101.op-instructions/User-Guide-3758091-Page-54.png)
![55Statistics for several Smart Connect systems at a time 1. It is possible to extract statistics from several Smart Connect systems. This is done by clicking on [Statistics] in the top menu. 2. Select the Smart Connect systems where statistics are desired. 3. It is possible to search for Smart Connect systems from ZIP code, or to view all. 4. Mark the Smart Connect systems where statistics are desired by selecting them in the right window, or click on the markers on the map. 5. Choose the information you want to include in the statistics and click [Show graph]. This will display a graph for each of the selected traps.](https://usermanual.wiki/Anticimex-Innovation-Center-A-S/300101.op-instructions/User-Guide-3758091-Page-55.png)
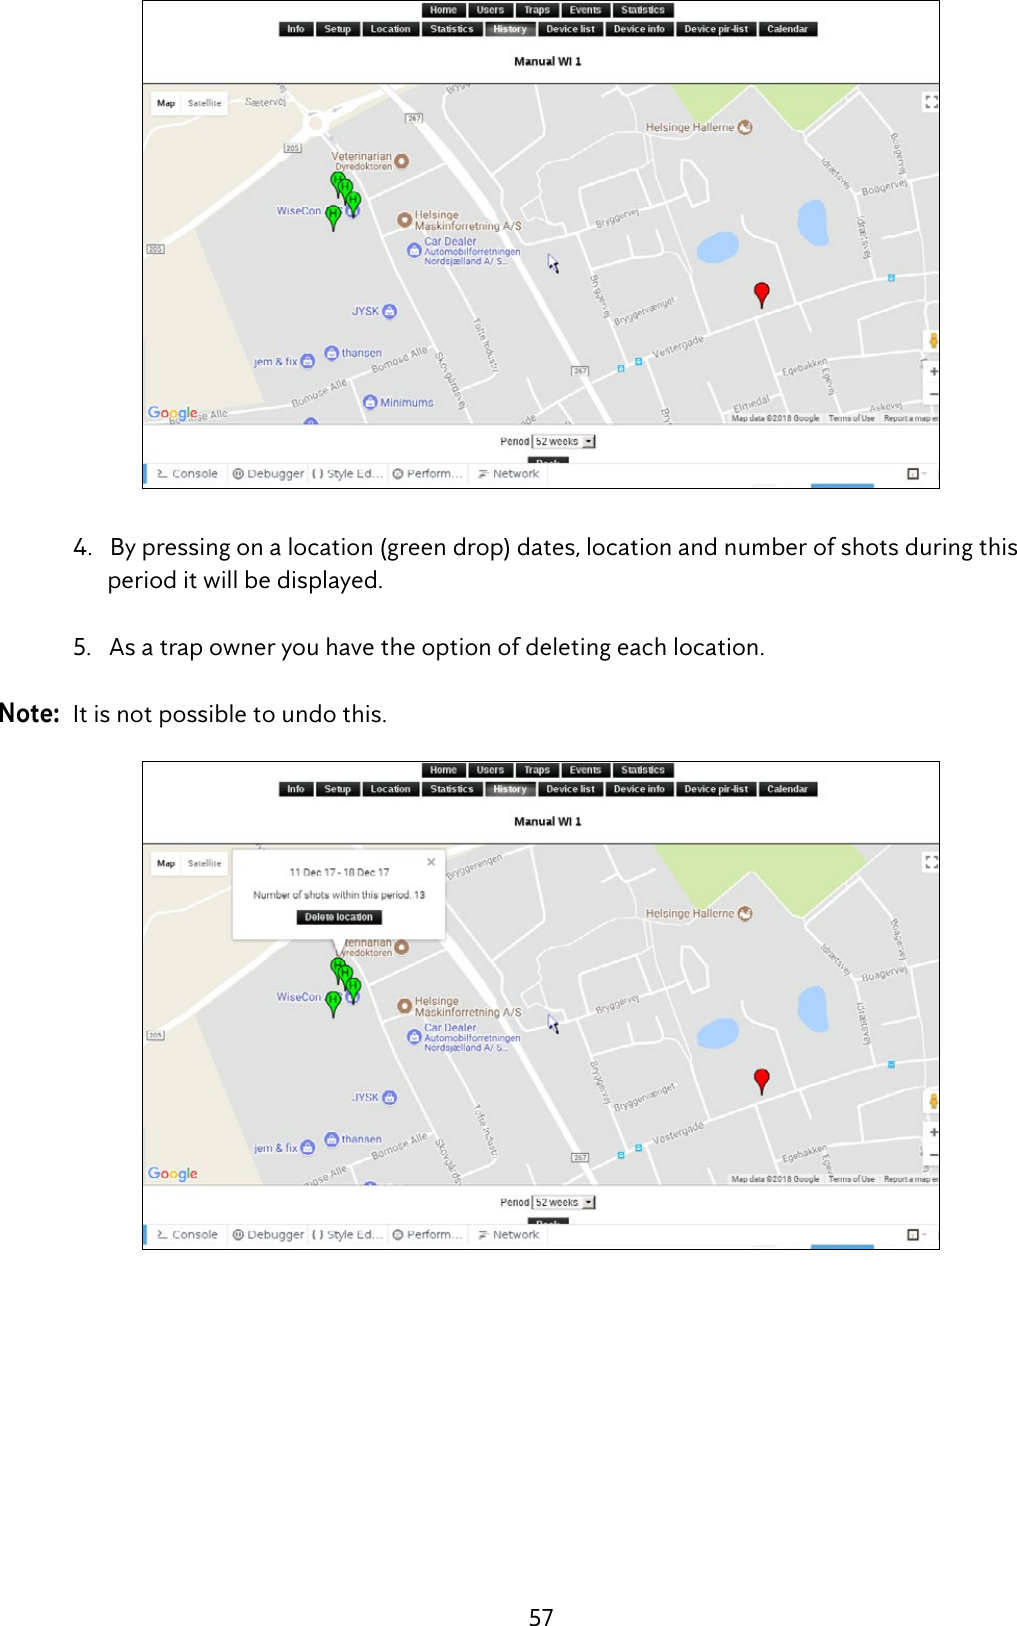
![56 6. Click on [Traps] to return to the trap list.History It is possible to get an overview of the Smart Connect current and historical location in a selected interval, max. a year back. 1. Click on [History]. 2. A map appears with Smart Connect’s current location (marked in red), and the Smart Connect’s historic locations within the selected period (marked in green). By moving the cursor (mouse pointer) over a location, the period in which the Smart Connect was located here is displayed. 3. Select the history period under the map.](https://usermanual.wiki/Anticimex-Innovation-Center-A-S/300101.op-instructions/User-Guide-3758091-Page-56.png)