AnyDATA Korea ADU-510D CDMA 1x/EVDO USB Modem User Manual 1
AnyDATA Korea Inc. CDMA 1x/EVDO USB Modem 1
Users Manual

ADU-510
(User Manual)
SW-ADU-510-UG-V1.0E(IUSACELL)
January 18. 2008
전자 메일로 제출인쇄 단추

AnyDATA.NET USB Modem (User
Manual)
AnyTime AnyPlace AnyWireless Data Solutions™ 2/65
AnyDATA CDMA Module Series Reference Design Specification
Copyright © 2000-2007 AnyDATA.N ET Inc. All Rights Reserved.
Any part of this document may not be distributed, communicated, reproduced or transmitted in any form
or by any means, electronic or mechanical or otherwise, for any purpose, without the permission
of
AnyDATA Corp.
This document can be subjected to revision without further notice
.
Contact Address
AnyDATA.NET Inc.(Korea)
DaeGo Bldg, 8 th., 1591-10
Kwanyang-dong, Dongan_gu,
Anyang City, Kyunggi-do Korea.
http://www.anydata.co.kr
e-mail: infodata@anydata.net
Rep:+82-31-380-7100
Fax:+82-31-476-6021
FCC Warning: RF Exposure to Radio Frequency Radiation
The radiated output power of this device is below the FCC radio frequency exposure limits. Nevertheless,
the device should be used in such a manner that the potential for human contact during normal operation
is minimized. In order to avoid the possibility of exceeding the FCC radio frequency exposure limts, the
gain of the external antenna must not exceed 1dBi. This device is compliant with the parameters of
Specific Absorption Rate (SAR) government regulations.

AnyDATA.NET USB Modem (User
Manual)
AnyTime AnyPlace AnyWireless Data Solutions™ 3/65
Contents
1. ADU-510 Features .....................................................................................................................................
4
2. LED Indicators ...........................................................................................................................................
52.1 POWER ...............................................................................................................................................
5
2.2 IDLE / BUSY ........................................................................................................................................
5
3. Program Installation ..................................................................................................................................
63.1 Introduction ..........................................................................................................................................
6
3.2 Minimum System Requirement ............................................................................................................
63.2.1 PC Hardware .................................................................................................................................
6
3.2.2 Operating System .........................................................................................................................
6
3.3 USB Driver Installation and Uninstall (Windows 2000) ........................................................................
73.3.1 USB Driver Installation (Automatic) ..............................................................................................
7
3.3.2 USB Driver Installation (Manual) .................................................................................................
10
3.3.3 USB Driver Uninstall ...................................................................................................................
18
3.4 USB Driver Installation and Uninstall (Windows XP) .........................................................................
203.4.1 USB Driver Installation (Automatic) ............................................................................................
20
3.4.2 USB Driver Installation (Manual) .................................................................................................
23
3.4.3 USB Driver Uninstall ...................................................................................................................
29
3.5 USB Driver Installation and Uninstall (Windows Vista) ......................................................................
313.5.1 USB Driver Installation (Automatic) ............................................................................................
31
3.5.2 USB Driver Installation (Manual) .................................................................................................
34
3.5.3 USB Driver Uninstall ...................................................................................................................
41
3.6 Installing Easy Wireless Net Software ...........................................................................................
43
4. Using Easy Wireless Net Program ..........................................................................................................
474.1 Exiting the program ............................................................................................................................
47
4.2 Screen Display of Easy Wireless Net ................................................................................................
484.2.1 Executed Screen .........................................................................................................................
48
4.2.2 Descriptions of each icon ............................................................................................................
49
4.2.3 Descriptions for each button .......................................................................................................
50
4.2.4 Setting Environment ....................................................................................................................
51
4.2.5 Connecting to the Internet ...........................................................................................................
55
4.2.6 Disconnecting to the Internet ......................................................................................................
55
4.2.7 Sending and Receiving SMS ......................................................................................................
56 4.2.7.1 Writing New Message .................................................................................................................... 57
4.2.7.2 Viewing sent message ................................................................................................................... 59
4.2.7.3 Viewing received or saved message .............................................................................................. 60
4.2.8 Phonebook ..................................................................................................................................
61
5. Troubleshooting .......................................................................................................................................
62
6. Quick Guide .............................................................................................................................................
656.1 Display Indicators ..............................................................................................................................
65

AnyDATA.NET USB Modem (User
Manual)
AnyTime AnyPlace AnyWireless Data Solutions™ 4/65
1. ADU-510 Features
Ear Jack
LED
USB

AnyDATA.NET USB Modem (User
Manual)
AnyTime AnyPlace AnyWireless Data Solutions™ 5/65
2. LED Indicators
2.1 POWER
Mode Descriptions
RED Modem power on state
OFF Modem power off state
2.2 IDLE / BUSY
Mode Descriptions
GREEN Success to network acquisition (Idle state)
BLUE Data(Voice) call is connected
BLUE BLINK Incoming voice call and not connected yet
OFF No service or Searching the network

AnyDATA.NET USB Modem (User
Manual)
AnyTime AnyPlace AnyWireless Data Solutions™ 6/65
3. Program Installation
3.1 Introduction
This section describes step-by-step method to install ANYDATA.NET USB MODEM and Easy Wireless
Net Software.
Note : Must install the software before connecting ANYDATA.NET USB MODEM to PC/Notebook.
3.2 Minimum System Requirement
3.2.1 PC Hardware
Recommend to use PC/Notebook at speed of 300 MHz or higher.
Minimum 233 MHz speed required, * Intel Pentium/Celeron products,
AMD K6/Athlon/Duron products or compatible processors
Recommend to use 128MB RAM or higher
Minimum 64MB of memory must be used,
but in this case the performance will be degraded and certain features will be limited.
At least 100 MB of free hard disk space is required.
Motherboard or PCI card that supports USB.
Video adaptor with Super VGA (800 x 600) or higher resolution and Monitor
CD-ROM or DVD Optical Drive
Keyboard and Mouse
3.2.2 Operating System
Windows XP Home or Professional ( with Service Pack 2 )
Windows 2000 (with Service Pack 4 for optimal performances)
Windows Vista
< Recommended parameters >
Windows Update : Keep your computer up to date
AnyDATA.NET USB Modem (User
Manual)
AnyTime AnyPlace AnyWireless Data Solutions™ 7/65
3.3 USB Driver Installation and Uninstall (Windows 2000)
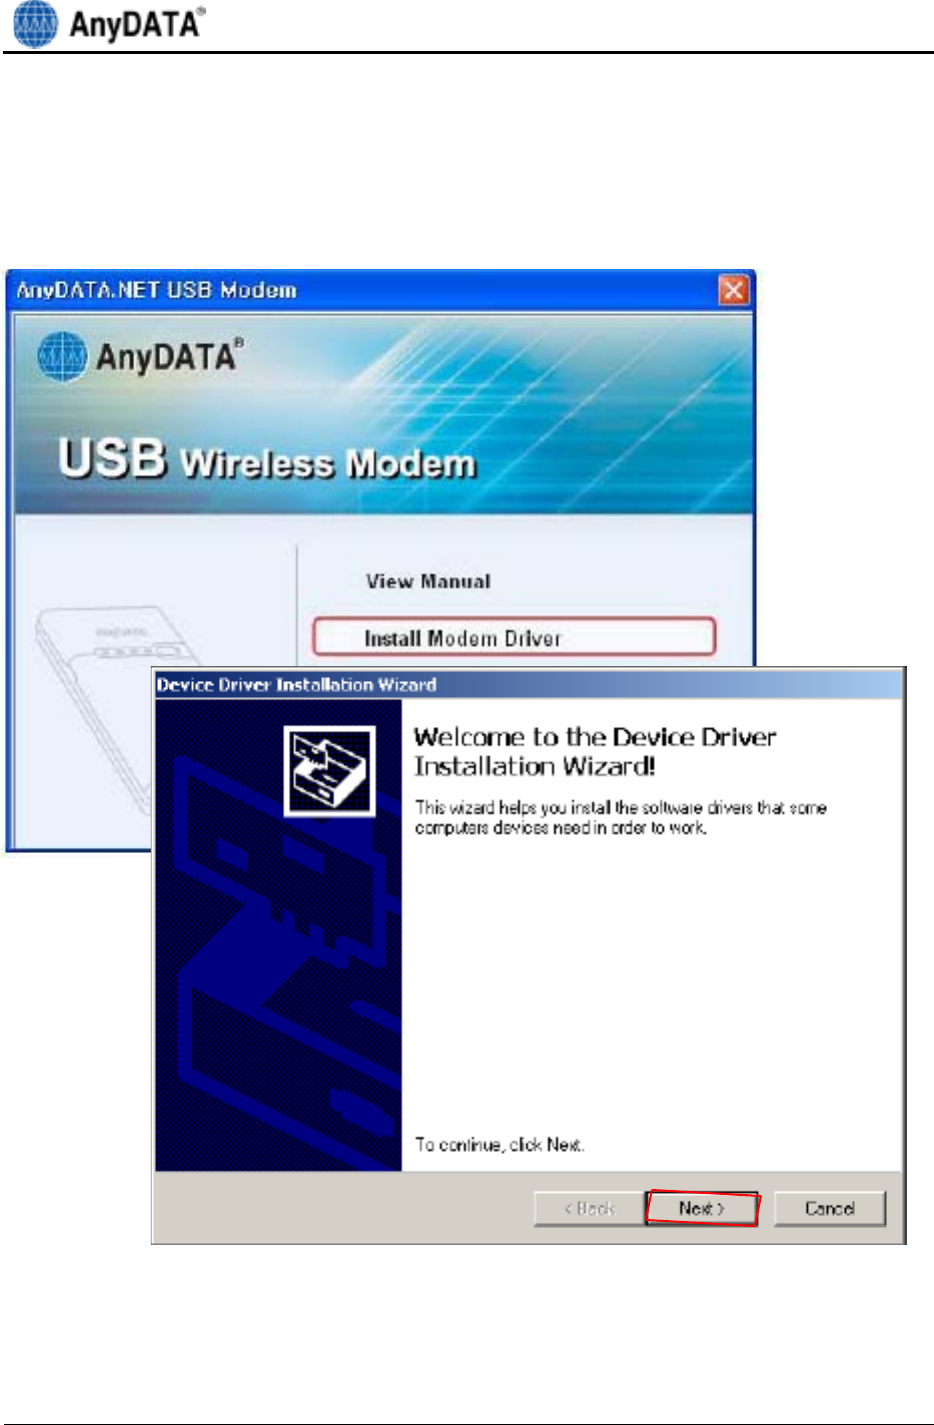
3.3.1 USB Driver Installation (Automatic)
1. The installation of the USB Wireless Modem Connect should run automatically upon selecting this
option on the menu of the Installation CD. Click <Install Modem Driver> on the menu.
AnyDATA.NET USB Modem (User
Manual)
AnyTime AnyPlace AnyWireless Data Solutions™ 8/65
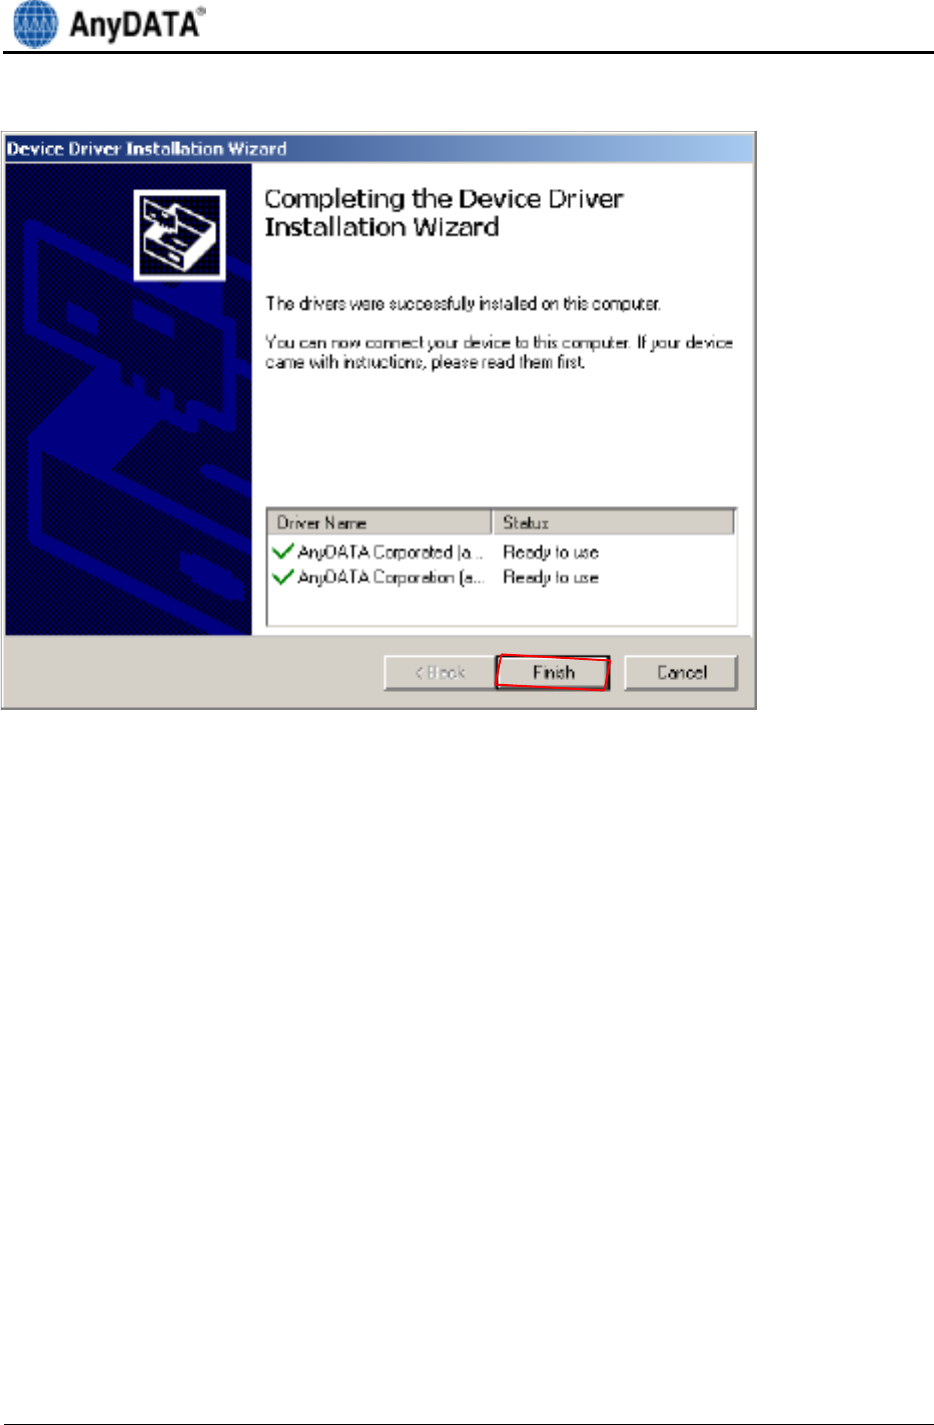
2. The computer needs to restart after the driver installation completed.

AnyDATA.NET USB Modem (User
Manual)
AnyTime AnyPlace AnyWireless Data Solutions™ 9/65
3. Connect the modem and PC`s USB port, and check if the driver is installed properly in
<Device Manager>. See the followings to the location of <Device Manager>
[Start ▶ Control Panel ▶ System ▶ Hardware Tab▶Device Manager]
As shown in below with red boxed that shows <AnyDATA CDMA USB Modem> and
<AnyDATA CDMA USB Serial 1/2 Device>, the driver has been successfully installed.

AnyDATA.NET USB Modem (User
Manual)
AnyTime AnyPlace AnyWireless Data Solutions™ 10/65
3.3.2 USB Driver Installation (Manual)
1. Connect the modem and PC`s USB port with supplied USB cable.
※ The manual driver installation shall be required twice.
2. Installing <AnyDATA USB Modem Driver> window will appear.
Select <Search for a suitable driver for my device (recommended) >.
3. Press button to move to next step.

AnyDATA.NET USB Modem (User
Manual)
AnyTime AnyPlace AnyWireless Data Solutions™ 11/65
4. A window that displays a proper path of Driver will appear.
Select <CD-ROM drives> and press button.
5. Select from the CD`s path <CD Rom Drive: \\Driver\\> folder for appropriate OS.
AnyDATA.NET USB Modem (User
Manual)
AnyTime AnyPlace AnyWireless Data Solutions™ 12/65
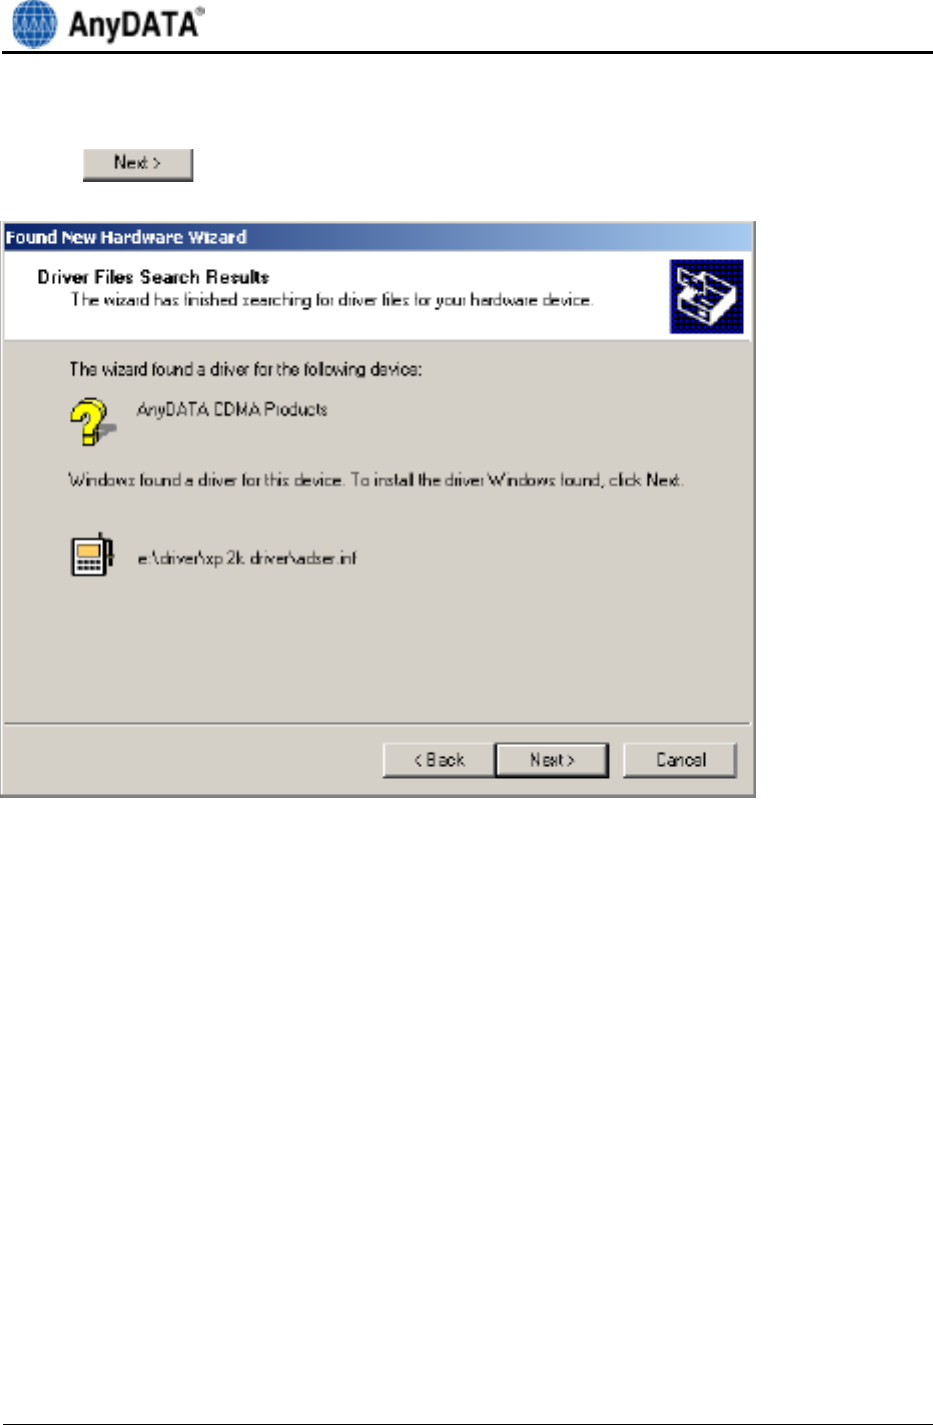
6. A window that searches <AnyDATA CDMA USB Modem> will appear.
7. Press button to move to next step.
8. Process of installing <AnyDATA CDMA USB Modem>.

AnyDATA.NET USB Modem (User
Manual)
AnyTime AnyPlace AnyWireless Data Solutions™ 13/65
9. If the installation of <AnyDATA CDMA USB Modem> has been completed, following window
will
appear.

AnyDATA.NET USB Modem (User
Manual)
AnyTime AnyPlace AnyWireless Data Solutions™ 14/65
10. Next, it will install <AnyDATA CDMA USB Serial
Device>.
11. Select < Search for a suitable driver for my device (recommended)
>.
12. Press button to move to next step.

AnyDATA.NET USB Modem (User
Manual)
AnyTime AnyPlace AnyWireless Data Solutions™ 15/65
13. A window that displays a proper path of Driver will appear.
Select <CD-ROM drives> and press button.
14. Select from the CD`s path <CD Rom Drive: \\Driver\\> folder for appropriate OS.
15. Press button to move to next step.
16. Window that searches <AnyDATA CDMA USB Serial Device> will
appear.

AnyDATA.NET USB Modem (User
Manual)
AnyTime AnyPlace AnyWireless Data Solutions™ 16/65
17. Press button to move to next step.
This will complete the driver installation.

AnyDATA.NET USB Modem (User
Manual)
AnyTime AnyPlace AnyWireless Data Solutions™ 17/65
18. Connect the modem and PC`s USB port, and check if the driver is installed properly in
<Device Manager>. See the followings to the location of <Device Manager>
[Start ▶ Control Panel ▶ System ▶ Hardware Tab ▶ Device Manager]
As shown in below with red boxed that shows <AnyDATA CDMA USB Modem> and
<AnyDATA CDMA USB Serial 1/2 Device>, the driver has been successfully installed.

AnyDATA.NET USB Modem (User
Manual)
AnyTime AnyPlace AnyWireless Data Solutions™ 18/65
3.3.3 USB Driver Uninstall
1. Disconnect the modem from USB port before uninstalling the driver.
2. By clicking on under the driver folder in CD, this will start as shown below.
3. Select <Install> to uninstall the driver.
To stop removing the driver, select <Cancel>.

AnyDATA.NET USB Modem (User
Manual)
AnyTime AnyPlace AnyWireless Data Solutions™ 19/65
4. As shown below, click <Finish> then the driver will be uninstalled.
5. The computer must restart after the driver is uninstalled.

AnyDATA.NET USB Modem (User
Manual)
AnyTime AnyPlace AnyWireless Data Solutions™ 20/65
3.4 USB Driver Installation and Uninstall (Windows XP)
3.4.1 USB Driver Installation (Automatic)
1. The installation of the USB Wireless Modem Connect should run automatically upon selecting this
option on the menu of the Installation CD. Click <Install Modem Driver> on the menu.

AnyDATA.NET USB Modem (User
Manual)
AnyTime AnyPlace AnyWireless Data Solutions™ 21/65
2. The computer needs to restart after the driver installation completed.
To restart the computer later, select <I want to manually reboot later>.

AnyDATA.NET USB Modem (User
Manual)
AnyTime AnyPlace AnyWireless Data Solutions™ 22/65
3. Connect the modem and PC`s USB port, and check if the driver is installed properly in
<Device Manager>. See the followings to the location of <Device Manager>
[Start ▶ Control Panel ▶ System ▶ Hardware Tab ▶ Device Manager]
As shown in below with red boxed that shows <AnyDATA CDMA USB Modem> and
<AnyDATA CDMA USB Serial 1/2 Device>, the driver has been successfully installed.

AnyDATA.NET USB Modem (User
Manual)
AnyTime AnyPlace AnyWireless Data Solutions™ 23/65
3.4.2 USB Driver Installation (Manual)
1. Connect the modem and PC`s USB port with supplied USB cable.
※ The manual driver installation shall be required twice.
2. Installing <AnyDATA USB Modem Driver> window will appear.
Select <Install from a list or specific location (Advanced )>.
3. Press button to proceed.
4. A window that displays a proper path of Driver will
appear.
5. Select from the CD`s path <CD Rom Drive: \\Driver\\> folder for appropriate
OS.
6. Press button to proceed.

AnyDATA.NET USB Modem (User
Manual)
AnyTime AnyPlace AnyWireless Data Solutions™ 24/65
7. A window that searches <AnyDATA CDMA USB Modem> will appear.
8. Process of installing <AnyDATA CDMA USB Modem>.

AnyDATA.NET USB Modem (User
Manual)
AnyTime AnyPlace AnyWireless Data Solutions™ 25/65
9. If the installation of <AnyDATA CDMA USB Modem> has been completed,
following window will appear.
10. Next, it will install <AnyDATA CDMA USB Serial
Device>.
11. Select <Install from a list or specific location (Advanced)>.

AnyDATA.NET USB Modem (User
Manual)
AnyTime AnyPlace AnyWireless Data Solutions™ 26/65
12. Press button to proceed.
13. Select the proper path from the CD window will appear.
14. Select from the CD`s path <CD Rom Drive: \\Driver\\> folder for appropriate
OS.
15. Press button to move to next step.

AnyDATA.NET USB Modem (User
Manual)
AnyTime AnyPlace AnyWireless Data Solutions™ 27/65
16. Window that searches <AnyDATA CDMA USB Serial Device> will appear.
17. If the installation has done properly, this window will appear.
This will complete the driver installation.

AnyDATA.NET USB Modem (User
Manual)
AnyTime AnyPlace AnyWireless Data Solutions™ 28/65
22. Connect the modem and PC`s USB port, and check if the driver is installed properly in
<Device Manager>. See the followings to the location of <Device Manager>
[Start ▶ Control Panel ▶ System ▶ Hardware Tab ▶ Device Manager]
As shown in below with red boxed that shows <AnyDATA CDMA USB Modem> and
<AnyDATA CDMA USB Serial 1/2 Device>, the driver has been successfully installed.

AnyDATA.NET USB Modem (User
Manual)
AnyTime AnyPlace AnyWireless Data Solutions™ 29/65
3.4.3 USB Driver Uninstall
1. Disconnect the modem from USB port before uninstalling the driver.
2. By clicking on under the driver folder in CD, this will start as shown below.
3. Select <Install> to uninstall the driver.
To stop removing the driver, select <Cancel>.

AnyDATA.NET USB Modem (User
Manual)
AnyTime AnyPlace AnyWireless Data Solutions™ 30/65
4. As shown below, click <Finish> then the driver will be uninstalled.
5. The computer must restart after the driver is
uninstalled.
AnyDATA.NET USB Modem (User
Manual)
AnyTime AnyPlace AnyWireless Data Solutions™ 31/65
3.5 USB Driver Installation and Uninstall (Windows Vista)
※The same will apply to Windows Vista 64bit.
3.5.1 USB Driver Installation (Automatic)
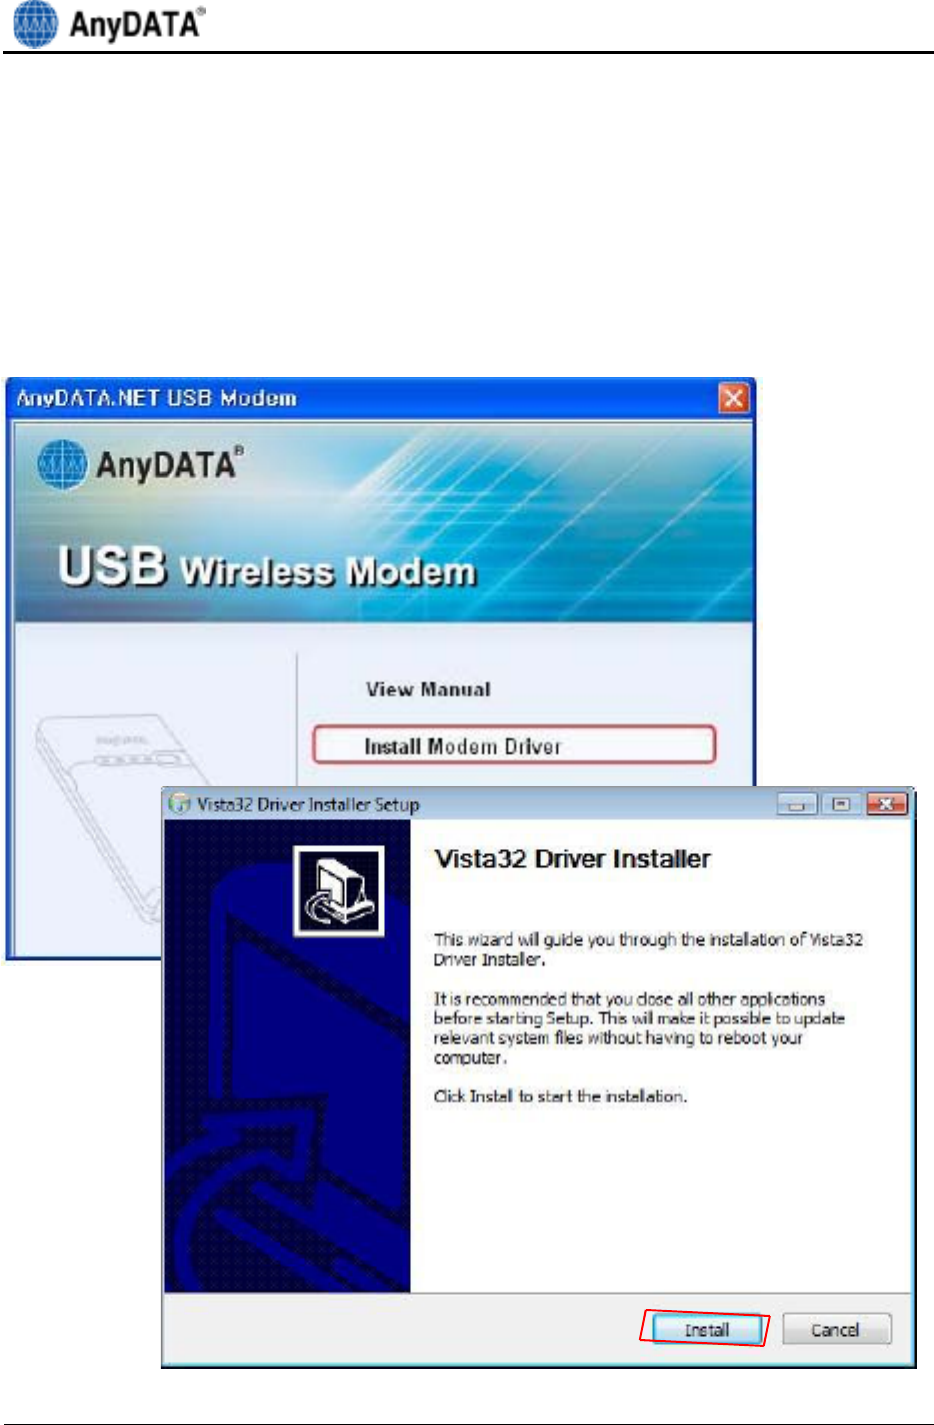
1. The installation of the USB Wireless Modem Connect should run automatically upon selecting this
option on the menu of the Installation CD. Click <Install Modem Driver> on the menu.

AnyDATA.NET USB Modem (User
Manual)
AnyTime AnyPlace AnyWireless Data Solutions™ 32/65
2. The computer needs to restart after the driver installation completed.
To restart the computer later, select <I want to manually reboot later>.

AnyDATA.NET USB Modem (User
Manual)
AnyTime AnyPlace AnyWireless Data Solutions™ 33/65
3. Connect the modem and PC`s USB port, and check if the driver is installed properly in
<Device Manager>. See the followings to the location of <Device Manager>
[Start ▶ Control Panel ▶ System and Maintenance ▶Device Manager]
As shown in below with red boxed that shows <AnyDATA CDMA USB Modem> and
<AnyDATA CDMA USB Serial Device>, the driver has been successfully installed.

AnyDATA.NET USB Modem (User
Manual)
AnyTime AnyPlace AnyWireless Data Solutions™ 34/65
3.5.2 USB Driver Installation (Manual)
1. Connect the USB Modem to the computer.
※ The manual driver installation shall be required twice.
2. Click <Locate and install driver software (recommended)> when shown in below.
ㅁa
3. Click <Continue> when <User Account Control> is shown.
4. Click <I don`t have the disc. Show me other options.> as shown below.

AnyDATA.NET USB Modem (User
Manual)
AnyTime AnyPlace AnyWireless Data Solutions™ 35/65
5 Click <Browse my computer for driver software (advanced)>.
6. Click <Browse> and click <Next> as shown below.

AnyDATA.NET USB Modem (User
Manual)
AnyTime AnyPlace AnyWireless Data Solutions™ 36/65
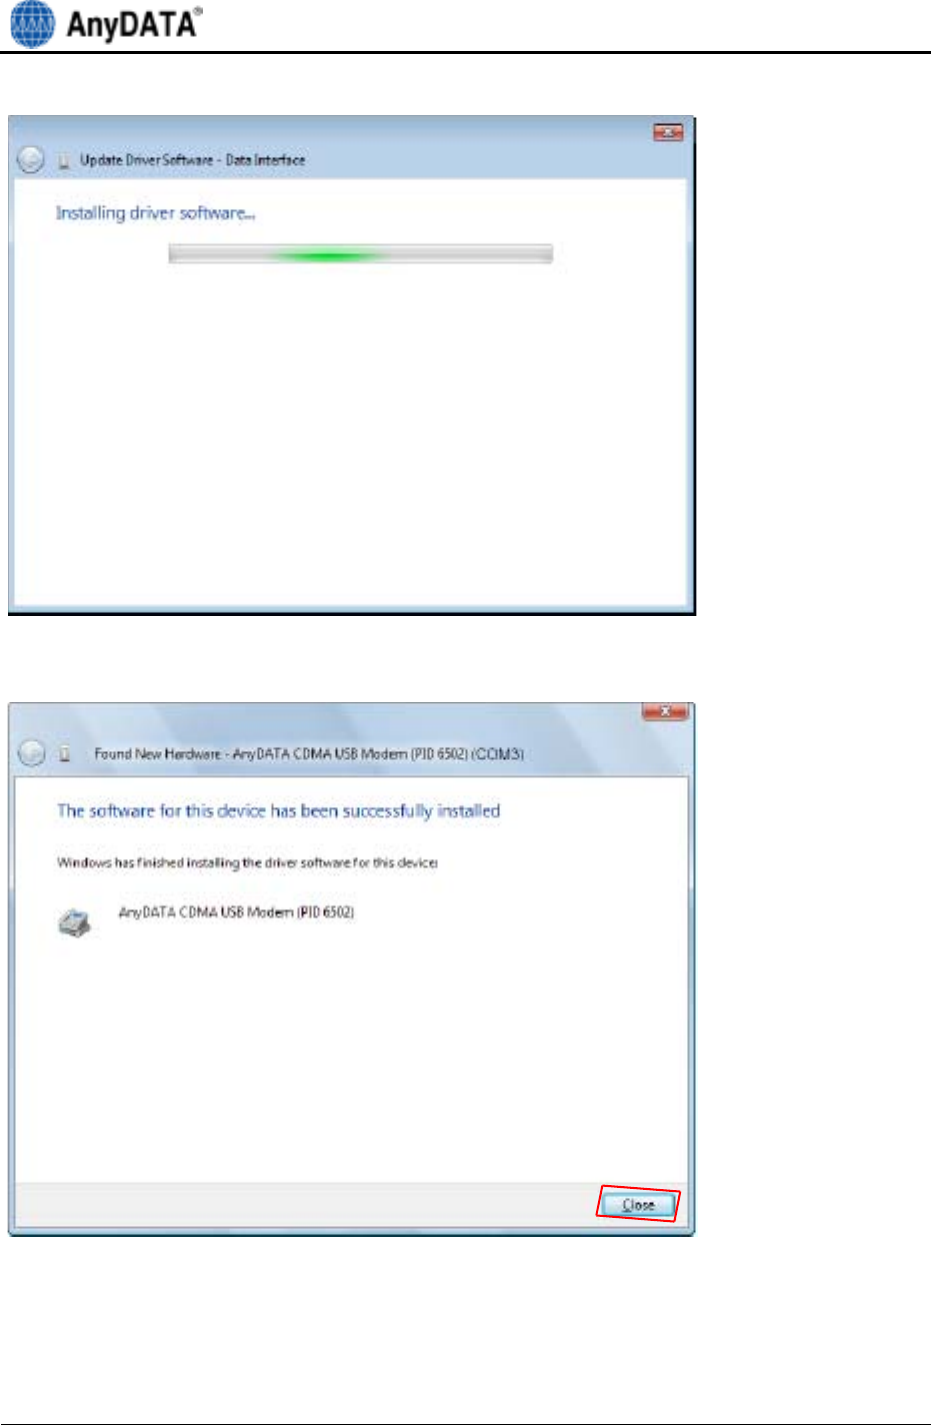
7. <Installing driver software> will be shown as below.
8. Click <close> if driver will be installed successfully as shown below.
※After the Windows shown above, the driver installation is required one more time.

AnyDATA.NET USB Modem (User
Manual)
AnyTime AnyPlace AnyWireless Data Solutions™ 37/65
9. Click <Locate and install driver software (recommended)> when shown below.
10. Click <Continue> when <User Account Control> is shown.
11. Click <I don`t have the disc. Show me other options.>

AnyDATA.NET USB Modem (User
Manual)
AnyTime AnyPlace AnyWireless Data Solutions™ 38/65
12 Click <Browse my computer for driver software (advanced)>.
13. Click <Browse> and click <Next> as shown below.
AnyDATA.NET USB Modem (User
Manual)
AnyTime AnyPlace AnyWireless Data Solutions™ 39/65
14. <Installing driver software> will be shown as below.
15. Click <close> when the driver will be installed successfully as shown below.

AnyDATA.NET USB Modem (User
Manual)
AnyTime AnyPlace AnyWireless Data Solutions™ 40/65
16. Connect the modem and PC`s USB port, and check if the driver is installed properly in
<Device Manager>. See the followings to the location of <Device Manager>
[Start ▶ Control Panel ▶ System and Maintenance ▶Device Manager]
As shown in below with red boxed that shows <AnyDATA CDMA USB Modem> and
<AnyDATA CDMA USB Serial Device>, the driver has been successfully installed.

AnyDATA.NET USB Modem (User
Manual)
AnyTime AnyPlace AnyWireless Data Solutions™ 41/65
3.5.3 USB Driver Uninstall
1. Disconnect the modem from USB port before uninstalling the driver.
2. By clicking on under the driver folder in CD, this will start as shown below.
3. Select <Install> to uninstall the driver.
To stop removing the driver, select <Cancel>.

AnyDATA.NET USB Modem (User
Manual)
AnyTime AnyPlace AnyWireless Data Solutions™ 42/65
4. As shown below, click <Finish> then the driver will be uninstalled.
5. The computer must restart after the driver is
uninstalled.

AnyDATA.NET USB Modem (User
Manual)
AnyTime AnyPlace AnyWireless Data Solutions™ 43/65
3.6 Installing Easy Wireless Net Software
1. Double click <Setup.exe> from the supplied CD.
2. Select the desire language as shown below.
3. Press button to proceed. By pressing button, the installation of Easy
Wireless Net Program will stop.
4. Welcoming message for using Easy Wireless Net Program window will appear.
5. Press button to proceed.
6. Next window is related to License Agreement. Please read carefully.

AnyDATA.NET USB Modem (User
Manual)
AnyTime AnyPlace AnyWireless Data Solutions™ 44/65
7. Press <I Agree> button to advance to the next step.
8. Next window displays asking proper path for installing the program.
Default path is <C:\\Program Files\\AnyDATA\
\EasyWirelessNet>

AnyDATA.NET USB Modem (User
Manual)
AnyTime AnyPlace AnyWireless Data Solutions™ 45/65
9. Press button to install the program.
10. When program has been successfully installed, following window will display.

AnyDATA.NET USB Modem (User
Manual)
AnyTime AnyPlace AnyWireless Data Solutions™ 46/65
11. Press button for ending the program installation.
This is install the Easy Wireless Net Program.
<Remark> If modem is not connected to PC/Notebook and device driver is not installed, then the program will not
launch even after completion of installation program.

AnyDATA.NET USB Modem (User
Manual)
AnyTime AnyPlace AnyWireless Data Solutions™ 47/65
4. Using Easy Wireless Net Program
4.1 Exiting the program
From the Easy Wireless Net program, by pressing button will quit the program.
Note:
If DUN is running or SMS is transferring, the program will end after the completion of these commands.

AnyDATA.NET USB Modem (User
Manual)
AnyTime AnyPlace AnyWireless Data Solutions™ 48/65
4.2 Screen Display of Easy Wireless Net
4.2.1 Executed Screen
End & Minimize
Connect EVDO
Information
SMS, Phone
Book,
Configuration
Action Window

AnyDATA.NET USB Modem (User
Manual)
AnyTime AnyPlace AnyWireless Data Solutions™ 49/65
4.2.2 Descriptions of each icon
Display Function
RSSI Signal Strength Indicator
Calling Possible
Calling not Possible
New message arrived.
Voice Mail arrived.
Voice Mail and New Message arrived.
Supports Hybrid mode
Only 1X mode available
Only EVDO mode available
USB connected
Roaming
Connected to the Modem
Either the cable is disconnected to the modem
or improper port connection.
Internet connected
Internet disconnected

AnyDATA.NET USB Modem (User
Manual)
AnyTime AnyPlace AnyWireless Data Solutions™ 50/65
4.2.3 Descriptions for each button
Display Function
connected to the Internet button.
Disconnecting to the Internet
Setup Easy Wireless Net
SMS menu
Phonebook Menu

AnyDATA.NET USB Modem (User
Manual)
AnyTime AnyPlace AnyWireless Data Solutions™ 51/65
4.2.4 Setting Environment
There are 4 options and please refer to below for explanations.
[ About ] Tab
Display the version for Easy Wireless Net program.

AnyDATA.NET USB Modem (User
Manual)
AnyTime AnyPlace AnyWireless Data Solutions™ 52/65
[ Basic ] Tab
The basic configuration for connect to the network using EVDO modem.
All values are set automatically, however if wants to change the value then check
appropriate
box/boxes in the left and press button to take effect.
UserName:
Password:
ServiceNum: Internet Connect Dial Number

AnyDATA.NET USB Modem (User
Manual)
AnyTime AnyPlace AnyWireless Data Solutions™ 53/65
[ Advance] Tab
This part is to change the important parameter for EVDO modem.
If wants to change the value then check appropriate box/boxes in the left and press
button to take effect.
Pref Mode:
Select a mode among <1x only>, <EVDO only> and <1x + EVDO>

AnyDATA.NET USB Modem (User
Manual)
AnyTime AnyPlace AnyWireless Data Solutions™ 54/65
[ User] Tab
If wants to change the value then check appropriate box/boxes in the left and press
button to take effect.
Always On Top:
The program window will be always top if <ON> is selected.
Battery Warning Sound:
Disable : Do not use battery warning feature.

AnyDATA.NET USB Modem (User
Manual)
AnyTime AnyPlace AnyWireless Data Solutions™ 55/65
4.2.5 Connecting to the Internet
Must set proper UserName, Password, and ServiceNum in the above settings.
Then press button, it will automatically connected to the Internet.
If the modem is trying to connect or connected to the Internet, this icon will appear as shown
above. If it cannot connect to the Internet, then icon will appear.
4.2.6 Disconnecting to the Internet
When user is ready to disconnect from the Internet, press button to end the connection.
Please check the following if abrupt disconnection of modem occurred:
1) Did I intentionally disconnect USB modem?
2) Are cables properly connected?
3) Did I intentionally change Port number in environment settings?
4) Did I quit/exit the program?

AnyDATA.NET USB Modem (User
Manual)
AnyTime AnyPlace AnyWireless Data Solutions™ 56/65
4.2.7 Sending and Receiving SMS
Press button.
As seen in above, there will be three buttons
(new message, sent message, and received message from the left).
Pressing each button will transfer to appropriate screen.

AnyDATA.NET USB Modem (User
Manual)
AnyTime AnyPlace AnyWireless Data Solutions™ 57/65
4.2.7.1 Writing New Message
1) By pressing <Write Message> icon, the new window will appear for inserting the message.
2) Write the message in the window then press button to move to the next step.
Note:
By pressing special characters that is highlighted, that character will be written on the message
window.
3) Input a phone number/numbers for sending SMS. It is possible to add upto 5 numbers.
By pressing a Phonebook ( button), a separate window will appear to select phone
numbers.

AnyDATA.NET USB Modem (User
Manual)
AnyTime AnyPlace AnyWireless Data Solutions™ 58/65
4) After inserting phone numbers, press button to move to the next step.
5) After selecting the number, press button to send the message.
Sending Message has failed.

AnyDATA.NET USB Modem (User
Manual)
AnyTime AnyPlace AnyWireless Data Solutions™ 59/65
4.2.7.2 Viewing sent message
1) By pressing <Outbox> icon, you will see a screen as below.
2) All sent messages will be shown.
3) Select the message then press button to delete this message.
4) Select the message then press button to display all the contents in the window.
5) By pressing button, the selected message will be ready to send to a new number.
Message read.
Unread message.
Sent message.
Note:Description of icons.

AnyDATA.NET USB Modem (User
Manual)
AnyTime AnyPlace AnyWireless Data Solutions™ 60/65
4.2.7.3 Viewing received or saved message
1) By pressing <InBox> icon, you will see a screen as below.
2) All received messages will be shown.
3) It will indicate whether the message was read or not.
4) Select the message then press
button to delete this message.
5) Select the message then press button to view the whole contents in the display.
By pressing button, the selected message will be ready to send to a new number.
Message read.
Unread message.
Sent message.
Note: Description of icons.

AnyDATA.NET USB Modem (User
Manual)
AnyTime AnyPlace AnyWireless Data Solutions™ 61/65
4.2.8 Phonebook
This is a feature to store phone numbers that uses often into RUIM and to make calls accordingly.
By pressing Phonebook button, following window will appear.
[1/100] Maximum number of Phone numbers can be stored and currently saved phone numbers.
Start searching.
All: Find and display any characters that matches from the Phone Number into a Phone
Number List
Index: Finds a phone number based on the index.
Name: Finds all names that contain any one of the letter to be searched.
Phone: Finds all numbers that contains any one of the number to be searched.
Sends SMS message to the selected phone number.
Deletes selected number.
Saves Phone Number into the recorded Index number.
If the same Index number already exists then requires editing of the contents.

AnyDATA.NET USB Modem (User
Manual)
AnyTime AnyPlace AnyWireless Data Solutions™ 62/65
5. Troubleshooting
Q: I cannot connect to the Internet?
A: Please check <environment setting> of program for correct ID, password and Service number. For
proper ID, password and Service number, please contact service provider for more information.
Q: The Internet connection speed is too slow.
A: Please check whether the modem is set at 1X mode. If USB modem is set at 1X mode, then the
Internet is not connected as EVDO mode. EVDO icon must be appeared in the display to assure that
it has been connected as an EVDO mode.
Q: The Internet connection is poor and frequently it gets disconnected.
A: The CDMA frequency is at unstable state. Try to move to a different place then use it again. Also, if
you touch or block the USB modem with hand/body contact, the modem connection speed degrades.
Please be careful not to touch the modem with your hand or any part of the body.
Q: All of the display on the program`s screen shows as prohibited icons.
A: Please check whether the port is properly set for communicating between computer and the modem
in the <environment setting> category.
Q: After the installation of the program, the program does not run and displays
following message
A: This means that USB modem and the compute are not connected properly. Please double check
whether USB modem is connected properly to the computer.

AnyDATA.NET USB Modem (User
Manual)
AnyTime AnyPlace AnyWireless Data Solutions™ 63/65
Q: During the running of the program, following message appears and the program halts.
A: The actual connection of USB modem and computer has been disconnected. Please check whether
the cable is dismounted, cable is disconnected or USB modem power has been turned off. Then try to
reconnect the modem.
Q: Cannot make a call
A: If you see a [EVDO] icon in the display, call cannot be made. Please change mode other
than
[EVDO] mode then try to make a call. There are three different icons in that field, [1X], [1X/EVDO] and
[EVDO].
Q: How many people can I send SMS messages at once?
A: It is possible to send maximum of 5 people at once.
Q: The program has ended but the USB modem power is turned off.
A: The power of USB modem is not controlled by the program. The point USB modem turns
on
automatically is when USB cable is connected to the PC/Notebook. In order to turn off the modem,
press ON/OFF button for at least 5 seconds.
Q: Easy Wireless Net program displays <DB xxxx Error> message and terminates.
A: Easy Wireless Net program uses mdb format type of database file. This type of format is preinstalled
when using Windows XP, Windows 2000 OS in a computer. However, this type of database file has
been removed by some other program.
Need to update following two (2) files from Microsoft site:
1. MDAC : < http://www.microsoft.com/downloads/details.aspx?FamilyID=6c050fe3-c795-4b7d-
b037-185d0506396c&DisplayLang=en>
2. Jet Engine 4.0:
<http://www.microsoft.com/downloads/details.aspx?FamilyID=2deddec4-350e-4cd0-a12a-
d7f70a153156&DisplayLang=en>

AnyDATA.NET USB Modem (User
Manual)
AnyTime AnyPlace AnyWireless Data Solutions™ 64/65
Q: After click internet button, following message appears and do not connect internet.
A: There may be something wrong with your audio device. Please check whether your audio device
driver has been installed.

AnyDATA.NET USB Modem (User
Manual)
AnyTime AnyPlace AnyWireless Data Solutions™ 65/65
6. Quick Guide
6.1 Display Indicators
The display may show the following icons to indicate the USB modem`s status or function.
Display Function
RSSI Signal Strength Indicator
Calling Possible
Calling not Possible
New message arrived.
Voice Mail arrived.
Voice Mail and New Message arrived.
Supports Hybrid mode
Only 1X mode available
Only EVDO mode available
USB connected
Roaming
Connected to the Modem
Either the cable is disconnected to the modem or improper port connection.
Internet connected
Internet disconnected
connected to the Internet button.
Disconnecting to the Internet
Setup Easy Wireless Net
SMS menu
Phonebook Menu
Sending message.