Apple 2310 Handheld Device User Manual iPod touch User Guide
Apple Inc. Handheld Device iPod touch User Guide
Apple >
Contents
User Manual 3

Bring up the keyboard Tap inside a text eld.
Move to another text eld Tap another text eld, or tap the Next or Previous
button.
Submit a form Once you nish lling out a form, tap Go or
Search. Most pages also have a link you can tap
to submit the form.
Close the keyboard without submitting
the form
Tap Done.
Enable AutoFill to help you ll out web forms: In Settings, choose Safari > AutoFill,
then do one of the following:
• To use information from contacts, turn Use Contact Info on, then choose My Info and
select the contact you want to use.
Safari uses information from Contacts to ll in contact elds on web forms.
• To use information from names and passwords, turn Names & Passwords on.
When this feature is on, Safari remembers names and passwords of websites you
visit and automatically lls in the information when you revisit the website.
• To remove all AutoFill information, tap Clear All.
Searching the Web
By default, Safari searches using Google. You can search using Yahoo!, instead.
Search the web:
1 Tap the search eld (on the right side of the title bar).
2 Type a word or phrase that describes what you’re looking for, then tap Google.
3 Tap a link in the list of search results to open a webpage.
Set Safari to search using Yahoo!: From the Home screen choose Settings > Safari >
Search Engine, then choose Yahoo!.
Bookmarks
You can bookmark webpages you want to return to later.
Bookmark a webpage: Open the page and tap . Then tap Add Bookmark.
When you save a bookmark you can edit its title. By default, bookmarks are saved at
the top level of Bookmarks. Tap Bookmarks to choose another folder.
If you use Safari on a Mac, or Safari or Microsoft Internet Explorer on a PC, you can sync
bookmarks with the web browser on your computer.
58 Chapter 4 Safari

Sync bookmarks with your computer:
1 Connect iPod touch to your computer.
2 In iTunes, select iPod touch in the sidebar.
3 Click the Info tab, select “Sync … bookmarks” under Web Browser, then click Apply.
See “Syncing” on page 9.
Sync bookmarks with MobileMe: In Settings on iPod touch, select Bookmarks in your
MobileMe account. See “Setting Up Accounts” on page 13.
Open a bookmarked webpage: Tap , then choose a bookmark or tap a folder to
see the bookmarks inside.
Edit a bookmark or bookmark folder: Tap , choose the folder that has the
bookmark or folder you want to edit, then tap Edit. Then do one of the following:
• To make a new folder, tap New Folder.
• To delete a bookmark or folder, tap , then tap Delete.
• To reposition a bookmark or folder, drag .
• To edit the name or address, or to put it in a dierent folder, tap the bookmark or folder.
When you’re nished, tap Done.
Web Clips
Add web clips to the Home screen for fast access to your favorite webpages. Web clips
appear as icons on the Home screen, and you can arrange your web clips along with
the other icons. See “iPod touch Applications” on page 19.
Add a web clip: Open the webpage and tap . Then tap “Add to Home Screen.”
When you open a web clip, Safari automatically zooms and scrolls to the area of the
webpage that was displayed when you saved the web clip. The displayed area is also
used to create the icon for the web clip on your Home screen, unless the webpage
comes with its own custom icon.
When you add a web clip, you can edit its name. If the name is too long (more than
about 10 characters), it may appear abbreviated on the Home screen.
Web clips aren’t bookmarks, and aren’t synced by MobileMe or iTunes.
Delete a web clip:
1 Touch and hold any icon on the Home screen until the icons start to wiggle.
2 Tap in the corner of the web clip you want to delete.
3 Tap Delete, then press the Home button to save your arrangement.
59
Chapter 4 Safari

App Store 5
About the App Store
You can search for, browse, review, purchase, and download applications from the App
Store directly to iPod touch. Applications you download and install from the App Store
on iPod touch are backed up to your iTunes library the next time you sync iPod touch
with your computer. You can also install applications you’ve purchased or downloaded
through iTunes on your computer when you sync with iPod touch.
Note: The App Store is not available in all regions.
To use the App Store, iPod touch must join a Wi-Fi network that’s connected to the
Internet. See “Connecting to the Internet” on page 35. You also need an iTunes Store
account (not available in some countries) to download applications. By default,
iPod touch gets your iTunes Store account settings from iTunes. If you don’t have an
iTunes Store account, or if you want to make purchases from another iTunes Store
account, go to Settings > Store. See “Store” on page 125.
Browsing and Searching
Browse the featured selections to see new, notable, or recommended applications,
or browse Top 25 to see the most popular applications. If you’re looking for a specic
application, use Search.
60
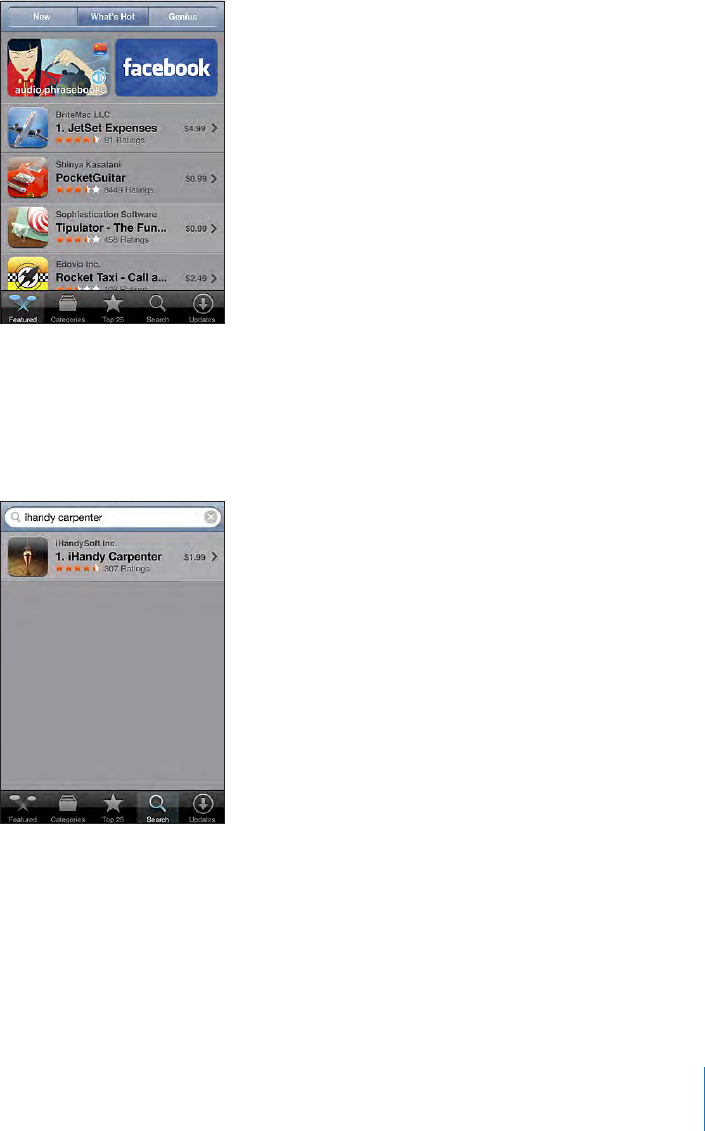
Browse applications: Tap Featured, Categories, or Top 25. Choose a category, or
choose a sorting method at the top of the screen to browse by lists such as New,
What’s Hot, Genius, Top Paid, or Top Free.
Browse using Genius: Tap Genius to see a list of recommended apps based on what’s
already in your app collection. To turn Genius on, follow the onscreen instructions.
Genius is a free service, but it requires an iTunes Store account.
Search for applications: Tap Search, tap the search eld and enter one or more words,
then tap Search.
61
Chapter 5 App Store
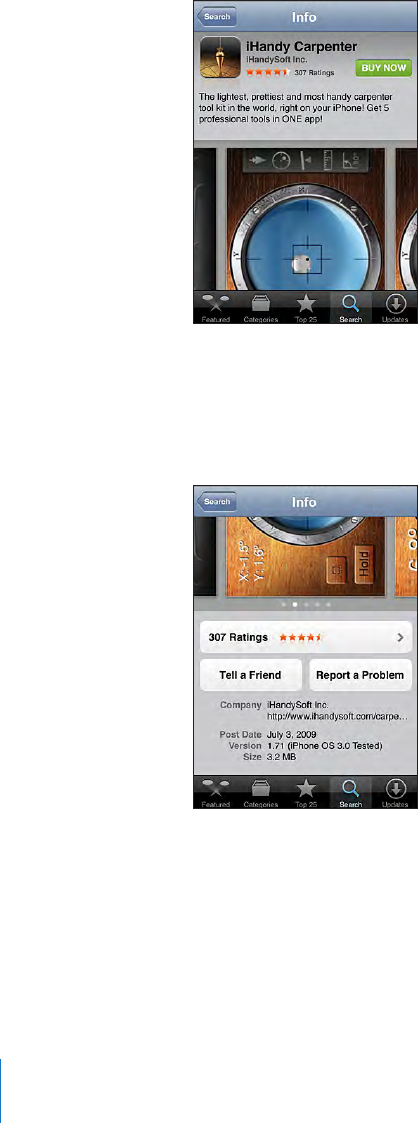
Info Screen
Tap any application in a list to see more information, such as the application’s price,
screenshots, ratings, and other information.
If you’ve already installed the application, “Installed” appears instead of the price on
the Info screen.
Email a link to the application’s Info page in iTunes: Tap “Tell a Friend” near the
bottom of the Info screen.
View screenshots: Swipe left or right over a screenshot to view additional screenshot
pages. Double-tap to zoom in.
Get ratings and read reviews: Tap Ratings near the bottom of the Info screen.
Report a problem: Tap “Report a Problem” near the bottom of the Info screen. Select a
problem from the list or type optional comments, then tap Report.
62 Chapter 5 App Store

Downloading Applications
When you nd an application you want in the App Store, you can purchase and
download it to iPod touch. If the application is free, you can download it without
charge after providing your iTunes account information.
Once you download an application, it’s immediately installed on iPod touch.
Purchase and download an application:
1 Tap the price (or tap Free), then tap Buy Now.
2 Sign in to your account as requested, then tap OK.
If you don’t have an iTunes Store account, tap Create New Account to set one up.
Downloads for purchase are charged to your iTunes Store account. For additional
downloads made within the next fteen minutes, you don’t have to enter your
password again.
Some applications allow you to make purchases within the application. You can restrict
in-app purchases in Settings. See “Restrictions” on page 119 .
Some applications use push notications to alert you of new information, even when
the application isn’t running. Notications dier depending upon the application, but
may include text or sound alerts, and a numbered badge on the application’s icon on
the Home screen. See “Notications” on page 116 .
You can redeem iTunes Store gift cards, gift certicates, or other promotional codes to
make purchases. When you’re signed in to your account, your remaining store credit
appears with your account information at the bottom of most App Store screens.
Enter a redemption code: Tap Redeem near the bottom of the Featured screen,
then follow the onscreen instructions.
See the status of downloading applications: After you begin downloading an
application, its icon appears on the Home screen and shows a progress indicator.
If a download is interrupted, iPod touch starts the download again the next time it has
an Internet connection. Or, if you open iTunes on your computer, iTunes completes the
download to your iTunes library (if your computer is connected to the Internet and
signed in to the same iTunes account).
63
Chapter 5 App Store

Deleting Applications
You can delete applications you’ve installed from the App Store. If you delete an
application, data associated with the application will no longer be available to
iPod touch, unless you reinstall the application and restore its data from a backup.
You can reinstall an application and restore its data as long as you backed up
iPod touch with iTunes on your computer. (If you try to delete an application that
hasn’t been backed up to your computer, an alert appears.) To retrieve the application
data, you must restore iPod touch from a backup containing the data. See “Restoring
from a Backup” on page 157.
Delete an App Store application:
1 Touch and hold any application icon on the Home screen until the icons start to
wiggle.
2 Tap in the corner of the application you want to delete.
3 Tap Delete, then press the Home button to save your arrangement.
When you delete an application, its data is no longer accessible via the iPod touch user
interface, but it isn’t erased from your iPod touch. For information about erasing all
content and settings, see “Erase All Content and Settings” in iPod touch settings. See
“Resetting iPod touch” on page 122.
Writing Reviews
You can write and submit your own application reviews directly on iPod touch.
Write a review:
1 Tap Ratings near the bottom of the Info screen.
2 On the Reviews screen, tap “Write a Review.”
3 Select the number of stars (1–5) for your rating of the application, and enter your
nickname, a title for the review, and optional review comments. If you’ve written
reviews before, the nickname eld is already lled in. Otherwise, you’re asked to create
a reviewer nickname.
4 Tap Send.
You must be signed in to your iTunes Store account and have purchased or
downloaded the item in order to submit reviews.
64 Chapter 5 App Store

Updating Applications
Whenever you access the App Store, it checks for updates to applications you’ve
installed. The App Store also automatically checks for updates every week. The App
Store icon shows the total number of application updates available.
If an update is available and you access the App Store, the Updates screen appears
immediately. Application updates are downloaded and automatically installed when
you choose to update them. Application upgrades are new releases that can be
purchased or downloaded through the App Store on iPod touch or the iTunes Store on
your computer.
Update an application:
1 At the bottom of the screen, tap Updates.
2 Tap an application to see more information about the update.
3 Tap Update.
Update all applications: At the bottom of the screen, tap Updates, then tap
Update All.
If you try to update an application purchased from a dierent iTunes Store account,
you’re prompted for that account’s ID and password in order to download the update.
Syncing Purchased Applications
iTunes automatically syncs applications you’ve downloaded or purchased on
iPod touch to your iTunes library when you connect iPod touch to your computer.
This lets you access the downloads on your computer and provides a backup if you
delete applications from iPod touch.
Downloaded applications are backed up the next time you sync with iTunes.
Afterwards, only application data is backed up when you sync with iTunes.
Applications are synced to the Applications list in your iTunes library. iTunes creates
the list if it doesn’t exist.
65
Chapter 5 App Store

Mail 6
Mail works with MobileMe, Microsoft Exchange, and many of the most popular email
systems—including Yahoo! Mail, Google email, and AOL—as well as other industry-
standard POP3 and IMAP email systems. You can send and receive embedded photos
and graphics, and view PDFs and other attachments.
To download and send messages in Mail, iPod touch must join a Wi-Fi network that is
connected to the Internet. See “Connecting to the Internet” on page 35.
Setting Up Email Accounts
You can set up email accounts on iPod touch in either of the following ways:
Set up an account directly on iPod touch. See “• Setting Up Accounts” on page 13.
In iTunes, use the iPod touch preference panes to sync email accounts settings from •
your computer. See “Syncing” on page 9.
Sending Email
You can send an email message to anyone who has an email address.
Compose and send a message:
1 Tap .
2 Type a name or email address in the To eld, or tap to add a name from your
contacts.
As you type an email address, matching email addresses from your contacts list appear
below. Tap an address to add it. To add more names, tap Return or .
Note: If you’re composing a message from your Microsoft Exchange account and
have access to your enterprise Global Address List (GAL), matching addresses from the
contacts on iPod touch appear rst, followed by matching GAL addresses.
66
3 Tap Cc/Bcc/From if you want to copy or blind copy the message to others, or change
the account you send the message from. If you have more than one email account,
you can tap the From eld to change the account you’re sending from.
4 Enter a subject, then your message.
You can tap Return to move from one eld to another.
5 Tap Send.
Send a photo in an email message In Photos, choose a photo, tap , then tap Email
Photo or Email Video. You can also copy and
paste photos.
The photo is sent using your default email
account (see “Mail” on page 127 ).
Send a video in an email message In Photos, choose a video, then touch and hold
the video until the Copy command appears.
Tap Copy. Go to Mail and create a new message.
Tap to place an insertion point where you want
the video, then tap the insertion point to display
the edit commands and tap Paste.
The video is sent using your default email
account (see “Mail” on page 127 ).
Save a draft of a message to complete later Tap Cancel, then tap Save. The message is saved
in the Drafts mailbox.
Reply to a message Tap . Tap Reply to reply only to the sender
or tap Reply All to reply to the sender and all
recipients. Type your return message, then tap
Send.
Files or images attached to the initial message
aren’t sent back.
Forward a message Open a message and tap , then tap Forward.
Add one or more email addresses, type your
message, then tap Send.
When you forward a message, you can include
the les or images attached to the original
message.
Share contact information In Contacts, choose a contact, tap Share Contact
at the bottom of the Info screen, then tap Email.
Checking and Reading Email
The Mail icon shows the total number of unread messages in all your inboxes. You may
have other unread messages in other mailboxes.
Number of unread
emails in your inboxes
67
Chapter 6 Mail
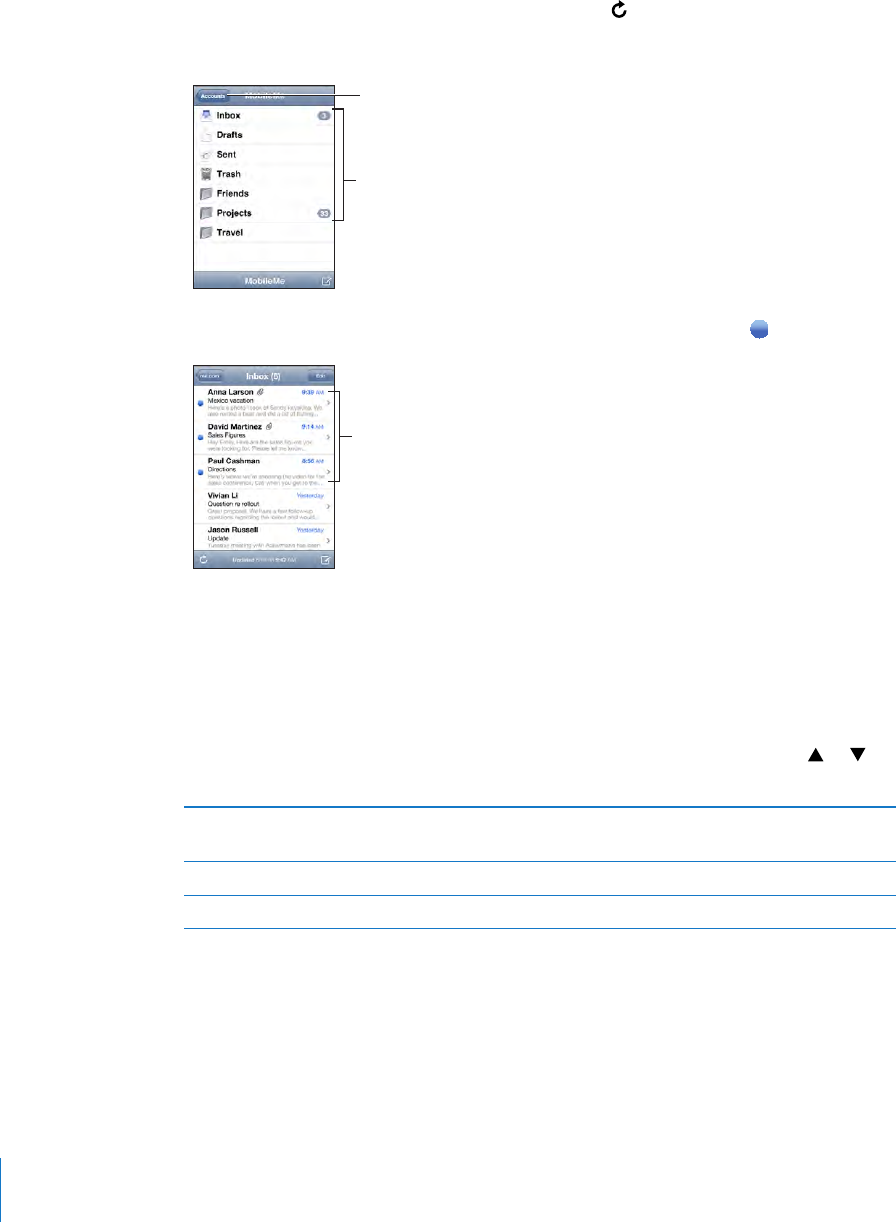
Check for new messages: Choose a mailbox or tap at any time.
On each account screen, you can see the number of unread messages in each mailbox.
Number of unread
messages
Tap to see all your
email accounts
Tap a mailbox to see its messages. Unread messages have a blue dot next to them.
Unread messages
When you open a mailbox, Mail loads the number of most recent messages specied
in your Mail settings, if the messages haven’t already been loaded automatically. (See
“Mail” on page 12 7.)
Load additional messages: Scroll to the bottom of the list of messages and tap Load
More Messages.
Read a message: Tap a mailbox, then tap a message. Within a message, tap or to
see the next or previous message.
Zoom in on part of a message Double-tap an area of the message to zoom in.
Double-tap again to zoom out.
Resize any column of text to t the screen Double-tap the text.
Resize a message manually Pinch to zoom in or out.
68 Chapter 6 Mail

Follow a link Tap the link.
Text links are typically underlined and blue.
Many images are also links. A link can take you
to a webpage, open a map, or open a new
preaddressed email message.
Web and map links open Safari or Maps on
iPod touch. To return to your email, press the
Home button and tap Mail.
See a link’s destination address Touch and hold the link. The address is displayed,
and you can choose to open the link in Safari or
copy the link address to the clipboard.
iPod touch displays picture attachments in many commonly used formats (JPEG, GIF,
and TIFF) inline with the text in email messages. iPod touch can play many audio
attachments (such as MP3, AAC, WAV, and AIFF). You can download and view les
(such as PDF, webpage, text, Pages, Keynote, Numbers, and Microsoft Word, Excel,
and PowerPoint documents) attached to messages you receive.
Open an attached le: Tap the attachment. It downloads to iPod touch and then
opens.
Tap attachment
to download
You can view attachments in portrait or landscape orientation. If the format of an
attached le isn’t supported by iPod touch, you can see the name of the le but you
can’t open it. iPod touch supports the following document types:
.doc Microsoft Word
.docx Microsoft Word (XML)
.htm webpage
.html webpage
.key Keynote
.numbers Numbers
.pages Pages
69
Chapter 6 Mail
.pdf Preview, Adobe Acrobat
.ppt Microsoft PowerPoint
.pptx Microsoft PowerPoint (XML)
.rtf Rich Text Format
.txt text
.vcf contact information
.xls Microsoft Excel
.xlsx Microsoft Excel (XML)
Save an attached photo to your Saved Photos album: Tap the photo, then tap Save
Image. If the photo hasn’t been downloaded yet, tap the download notice rst.
Save an attached video to your Saved Photos album: Touch and hold the
attachment, then tap Save Video. If the video hasn’t been downloaded yet, tap the
download notice rst.
See all the recipients of a message Tap Details.
Tap a name or email address to see the recipient’s
contact information. Then tap an email address
to contact the person. Tap Hide to hide the
recipients.
Add an email recipient to your contacts list Tap the message and, if necessary, tap Details
to see the recipients. Then tap a name or email
address and tap Create New Contact or “Add to
Existing Contact.”
Mark a message as unread Open the message and tap “Mark as Unread.”
A blue dot appears next to the message in the
mailbox list until you open it again.
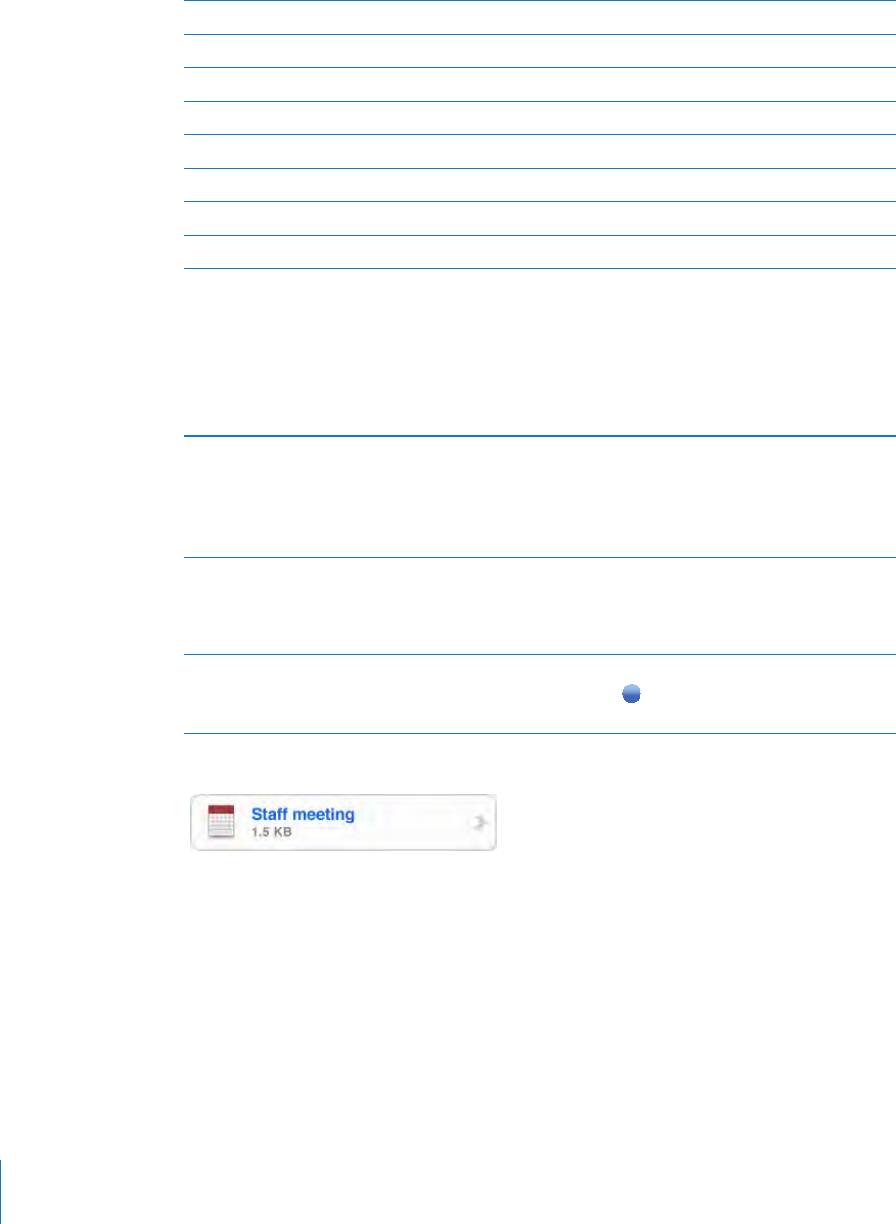
Open a meeting invitation: Tap the invitation.
You can get contact information for the organizer and other attendees, set an alert,
add notes to the event, and add comments that are included in your response emailed
to the organizer. You can accept, tentatively accept, or decline the invitation. See
“Responding to Meeting Invitations” on page 77.
Turn Push on or o: In Settings, choose “Mail, Contacts, Calendars” > Fetch New Data,
then turn Push on or o.
70 Chapter 6 Mail
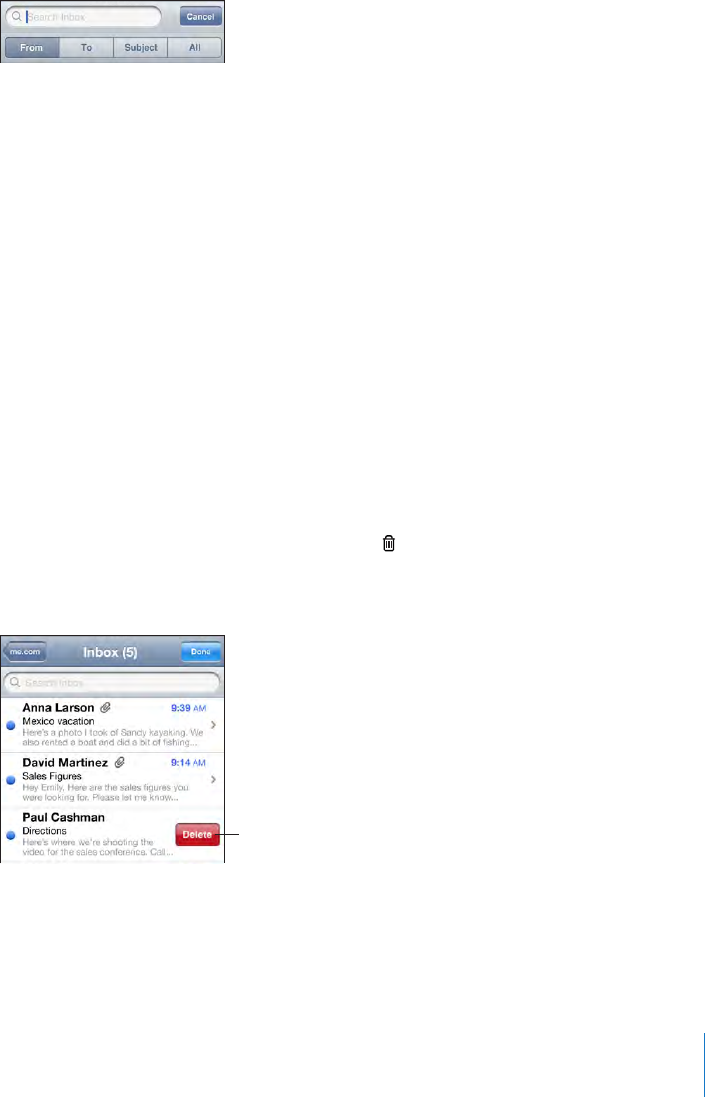
Searching Email
You can search the To, From, and Subject elds of email messages. Mail searches the
downloaded messages in the currently open mailbox. For MobileMe, Exchange, and
some IMAP mail accounts, you can also search messages on the server.
Search email messages: Open a mailbox, scroll to the top, and enter text in the Search
eld. Tap From, To, Subject, or All (From, To, and Subject) to choose which elds you
want to search. (Tap the status bar to scroll quickly to the top of the list and reveal the
search eld.)
Search results for the messages already downloaded to iPod touch appear
automatically as you type. Tap Search to dismiss the keyboard and see more of the
results.
Search messages on the server: Tap “Continue Search on Server” at the end of the
search results.
Note: Search results of messages on servers may vary depending on the type of
account. Some servers may search only whole words.
Organizing Email
You can delete messages one at a time, or select a group to delete all at once. You can
also move messages from one mailbox or folder to another.
Delete a message: Open the message and tap .
You can also delete a message directly from the mailbox message list by swiping left
or right over the message title, then tapping Delete.
To show the
Delete button,
swipe left or
right over
the message.
71
Chapter 6 Mail

Delete multiple messages: When viewing a list of messages, tap Edit, select the
messages you want to delete, then tap Delete.
Move a message to another mailbox or folder: When viewing a message, tap ,
then choose a mailbox or folder.
Move multiple messages: When viewing a list of messages, tap Edit, select the
messages you want to move, then tap Move and select a mailbox or folder.
72 Chapter 6 Mail

Calendar 7
About Calendar
Calendar lets you view individual calendars for your dierent accounts or a combined
calendar for all accounts. You can view your events in a continuous list, by day, or by
month, and search events by title, invitee, or location.
You can sync iPod touch with the calendars on your computer. You can also make, edit,
or cancel appointments on iPod touch, and have them synced back to your computer.
You can subscribe to Google, Yahoo!, or Mac OS X iCal calendars using a CalDAV or
iCalendar (.ics) account. If you have a Microsoft Exchange account, you can receive and
respond to meeting invitations.
Syncing Calendars
You can sync Calendar in either of the following ways:
In iTunes, use the iPod touch preference panes to sync with iCal or Microsoft •
Entourage on a Mac, or Microsoft Outlook 2003 or 2007 on a PC when you connect
iPod touch to your computer. See “Syncing” on page 9.
In Settings on iPod touch, select Calendar in your MobileMe or Microsoft •
Exchange accounts to sync your calendar information over the air. See “Setting Up
Accounts” on page 13.
To sync calendars, iPod touch must join a Wi-Fi network that is connected to the
Internet. See “Connecting to the Internet” on page 35.
73
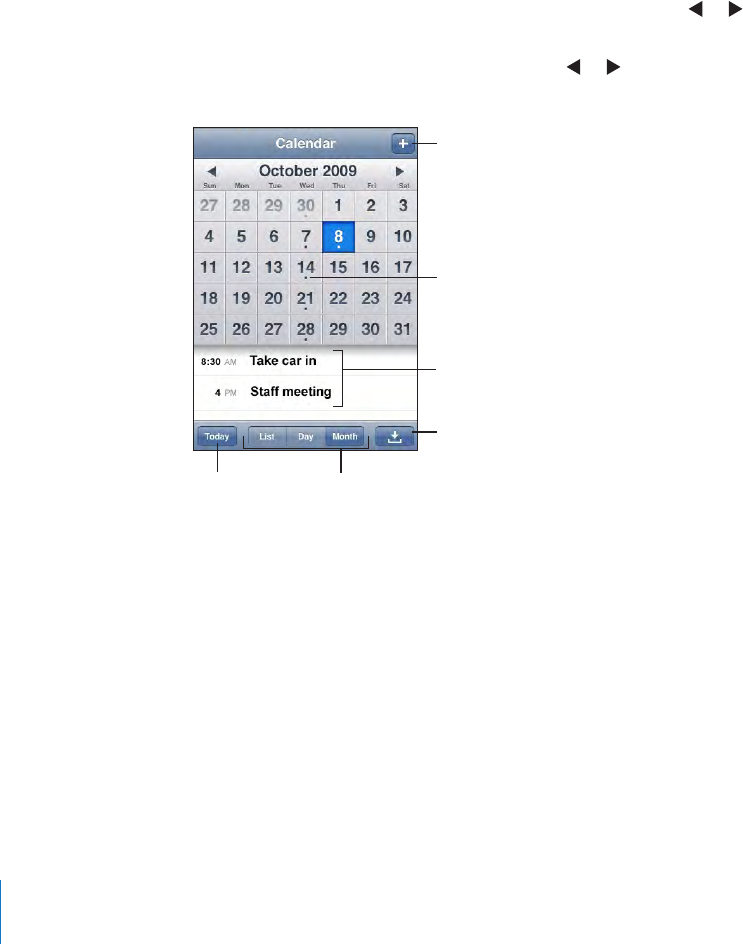
Viewing Your Calendar
You can view individual calendars for your dierent accounts or a combined calendar
for all accounts.
View a dierent calendar: Tap Calendars, then select a calendar. Tap All Calendars to
view combined events from all calendars.
You can view your calendar events in a list, by day, or by month. The events for all of
your synced calendars appear in the same calendar on iPod touch.
Switch views: Tap List, Day, or Month.
• List view: All your appointments and events appear in a scrollable list.
• Day view: Scroll up or down to see the events in a day. Tap or to see the
previous or next day’s events.
• Month view: Tap a day to see its events. Tap or to see the previous or next
month.
Add an event
Days with dots
have scheduled
events
Go to today Switch views
Respond to
calendar invitation
Events for
selected day
See the details of an event: Tap the event.
74 Chapter 7 Calendar

Searching Calendars
You can search the titles, invitees, and locations of the events in your calendars.
Calendar searches the calendar you’re currently viewing, or all calendars if you’re
viewing them all.
Search events: In list view, enter text in the search eld.
Search results appear automatically as you type. Tap Search to dismiss the keyboard
and see more results.
Subscribing to and Sharing Calendars
You can subscribe to calendars that use the CalDAV or iCalendar (.ics) formats. Many
calendar-based services, including Yahoo!, Google, and the Mac OS X iCal application,
support either format.
Subscribed calendars are read only. You can read events from subscribed calendars on
iPod touch, but can’t edit them or create new events. You also can’t accept invitations
from CalDAV accounts.
Subscribe to a CalDAV or .ics calendar:
1 In Settings, choose “Mail, Contacts, Calendars,” then tap Add Account.
2 Choose Other, then choose either Add CalDAV Account or Add Subscribed Calendar.
3 Enter your account information, then tap Next to verify the account.
4 Tap Save.
Apple provides links to a number of free iCal calendars—for national holidays or
sports events, for example—that you may want to subscribe to. The calendars are
automatically added to iCal on your desktop when you download them. You can then
sync them to iPod touch as described in “Subscribing to and Sharing Calendars” on
page 75. Go to /www.apple.com/downloads/macosx/calendars.
75
Chapter 7 Calendar

You can also subscribe to an iCal (or other .ics) calendar published on the web by
tapping a link to the calendar you receive in an email message on iPod touch.
Adding Calendar Events to iPod touch
You can also enter and edit calendar events directly on iPod touch.
Add an event: Tap and enter event information, then tap Done.
You can enter any of the following:
Title•
Location•
Starting and ending times (or turn on All-day if it’s an all-day event)•
Repeat times—none, or every day, week, two weeks, month, or year•
Alert time—from ve minutes to two days before the event•
When you set an alert, the option to set a second alert appears. When an alert goes
o, iPod touch displays a message. You can also set iPod touch to play a sound (see
“Alerts” on page 78).
Important: If you’re traveling, iPod touch may not alert you at the correct local time.
To manually set the correct time, see “Date and Time” on page 121.
Notes•
To select which calendar to add the event to, tap Calendar. Read-only calendars don’t
appear in the list.
Edit an event Tap the event, then tap Edit.
Delete an event Tap the event, tap Edit, then scroll down and tap
Delete Event.
76 Chapter 7 Calendar
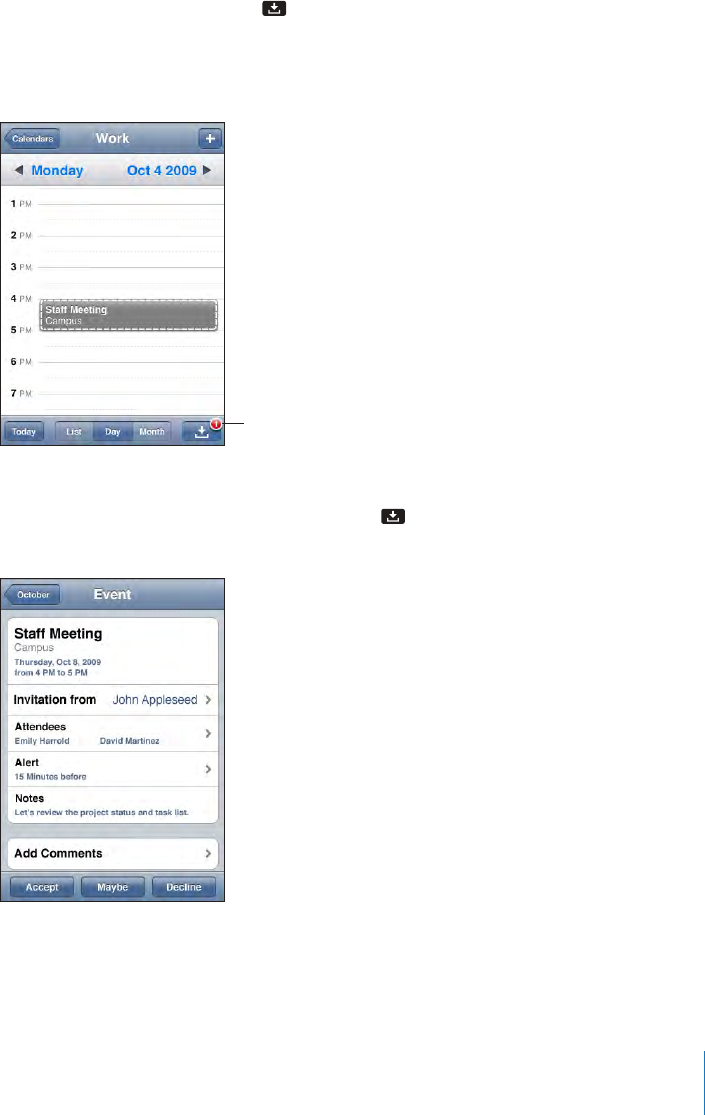
Responding to Meeting Invitations
If you have a Microsoft Exchange account set up on iPod touch with Calendars
enabled, you can receive and respond to meeting invitations from people in your
organization. When you receive an invitation, the meeting appears in your calendar
with a dotted line around it. The icon in the lower-right corner of the screen
indicates the total number of new invitations you have, as does the Calendar icon on
the Home screen. To receive and respond to meeting invitations, iPod touch must join
a Wi-Fi network that is connected to the Internet.
Number of
meeting invitations
Respond to an invitation in Calendar:
1 Tap a meeting invitation in the calendar, or tap to display the Event screen and tap
an invitation.
Tap “Invitation from” to get contact information for the meeting organizer. Tap the •
email address to send a message to the organizer.
77
Chapter 7 Calendar

Tap Attendees to see the other people invited to the meeting. Tap a name to see •
an attendee’s contact information. Tap the email address to send a message to the
attendee.
Tap Alert to set iPod touch to sound an alert before the meeting.•
Tap Add Comments to add comments in the email response to the meeting •
organizer. You comments will also appear in your Info screen for the meeting.
Notes are made by the meeting organizer.
2 Tap Accept, Maybe, or Decline.
When you accept, tentatively accept, or decline the invitation, a response email that
includes any comments you added is sent to the organizer.
If you accept or tentatively accept the meeting, you can change your response later.
Tap Add Comments if you want to change your comments.
Exchange meeting invitations are also sent in an email message, which lets you open
the meeting’s Info screen from Mail.
Open a meeting invitation in an email message: Tap the invitation.
Alerts
Set calendar alerts: In Settings, choose General > Sounds, then turn Calendar Alerts
on. If Calendar Alerts is o when an event is about to occur, iPod touch displays a
message but makes no sound.
Sound alerts for invitations: In Settings, choose “Mail, Contacts, Calendar.”
Under Calendars, tap New Invitation Alert to turn it on.
78 Chapter 7 Calendar

Photos 8
About Photos
iPod touch lets you carry photos and videos with you, so you can share them with your
family, friends, and associates. You can sync photos and videos (Mac only) from your
computer, and use photos as wallpaper. You can also send photos and videos in email
messages, and upload photos to MobileMe galleries.
Syncing Photos and Videos with Your Computer
iTunes can sync your photos and videos (Mac only) with the following applications:
• Mac: iPhoto 4.0.3 or later, or Aperture
• PC: Adobe Photoshop Elements 3.0 or later
See “Syncing with iTunes” on page 9.
iPod touch supports H.264 and MPEG-4 video formats, with AAC audio. If you are
having trouble syncing a video to iPod touch, you might be able to use iTunes to
create an iPod touch version of the video.
Create an iPod touch version of a video:
1 Copy the video to your iTunes library.
2 In iTunes, select Movies in the Library list and select the video you want to sync.
3 Choose Advanced > “Create iPod or iPhone Version.”
For additional information, go to support.apple.com/kb/HT1211.
Viewing Photos and Videos
Photos and videos (Mac only) synced from your computer’s photo application or saved
from an email message can be viewed in Photos.
79
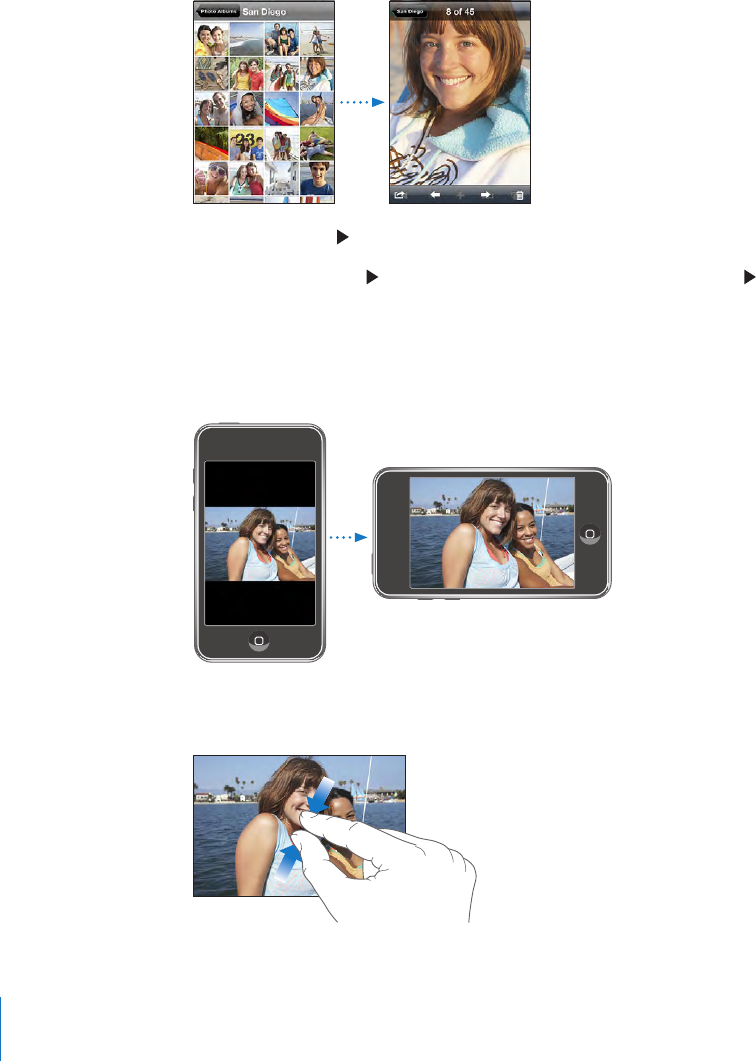
View photos and videos:
1 In Photos, tap a photo album.
2 Tap a thumbnail to see the photo or video in full screen.
Show or hide the controls: Tap the full-screen photo or video to show the controls.
Tap again to hide the controls.
Play a video: Tap in the center of the screen.
To replay a video, tap at the bottom of the screen. If you don’t see , tap the screen
to show the controls.
View a photo or video in landscape orientation: Rotate iPod touch sideways. The
photo or video reorients automatically and, if it’s in landscape format, expands to t
the screen.
Zoom in on part of a photo: Double-tap where you want to zoom in. Double-tap
again to zoom out. You can also pinch to zoom in or out.
80 Chapter 8 Photos

View video in full screen, or t video to screen: Double tap the screen to scale the
video to ll the screen. Double-tap again to t the video to the screen.
Pan around a photo: Drag the photo.
See the next or previous photo or video: Flick left or right. Or tap the screen to show
the controls, then tap or .
Slideshows
You can view photo albums as slideshows, complete with background music.
View a photo album as a slideshow: Tap an album, then tap .
Videos play automatically when they appear during the slideshow.
Stop a slideshow: Tap the screen.
Set slideshow settings: In Settings, choose Photos and set the following options:
• To set the length of time each slide is shown, tap Play Each Slide For and choose a time.
• To set transition eects when moving from photo to photo, tap Transition and choose a
transition type.
• To set whether slideshows repeat, turn Repeat on or o.
• To set whether photos and videos are shown in random order, turn Shue on or o.
Play music during a slideshow: In iPod, play a song, then choose Photos from the
Home screen and start a slideshow.
Sharing Photos and Videos
You can send photos and videos in email messages, and add photos to MobileMe
galleries. You can also copy and paste photos and videos, save photos and videos from
email messages to Photos, and save images from webpages to Photos.
Sending a Photo or Video in an Email Message
Send a photo: Choose a photo and tap , then tap Email Photo.
81
Chapter 8 Photos

If you don’t see , tap the screen to show the controls.
Paste a video in an email message:
1 Touch and hold a video until the Copy command appears.
2 Tap Copy.
3 Go to Mail and create a new message.
4 Tap to place an insertion point where you want to place the video, then tap the
insertion point to display the edit commands.
5 Tap Paste.
If necessary, iPod touch may compress the photo.
Copying and Pasting Photos and Videos
You can copy a photo or video from Photos and paste it to an email message. Some
third-party applications may also support copying and pasting photos and videos.
Copy a photo or video: Hold your nger on the screen until the Copy button appears,
then tap Copy.
Paste a photo or video: Tap to place an insertion point where you want to place the
photo or video, then tap the insertion point and tap Paste.
Adding a Photo to a MobileMe Gallery
If you have a MobileMe account, you can add photos directly from iPod touch to a
gallery you’ve created. You can also add photos to someone else’s MobileMe gallery if
that person has enabled email contributions.
Before you can add photos to a gallery in your MobileMe account, you must:
Set up your MobileMe account on iPod touch•
Publish a MobileMe gallery, and allow adding photos via email or iPod touch•
Join a Wi-Fi network that’s connected to the Internet•
For more information about creating a gallery and adding photos to it, see MobileMe
Help.
Add a photo to your gallery: Choose a photo and tap , then tap “Send to
MobileMe.” Enter a title and description, if you like, then select the album to add the
photo to and tap Publish.
If you don’t see , tap the screen to show the controls.
iPod touch tells you when the photo has been published, and gives you options to
view it on MobileMe or email a link to a friend.
Adding a photo to someone else’s gallery: Choose a photo and tap , then tap
“Email Photo.” Enter the album’s email address, then click Send.
82 Chapter 8 Photos

Saving Photos and Videos from Email Messages and Webpages
Save a photo in an email message to your Saved Photos album: Tap the photo, then
tap Save Image. If the photo hasn’t been downloaded yet, tap the download notice
rst.
Save a video in an email message to your Saved Photos album: Touch and hold the
attachment, then tap Save Video. If the video hasn’t been downloaded yet, tap the
download notice rst.
Save a photo on a webpage to your Saved Photos album: Touch and hold the photo,
then tap Save Image.
You can download the photos and videos in your Saved Photos album to your
computer’s photo application by connecting iPod touch to your computer.
Assigning a Photo to a Contact
You can assign a photo to a contact.
Assign a photo to a contact:
1 Choose any photo on iPod touch and tap .
2 Tap “Assign to Contact” and choose a contact.
3 Position and size the photo until it looks the way you want.
Drag the photo to pan, and pinch to zoom in or out.
4 Tap Set Photo.
You can also assign a photo to a contact in Contacts by tapping Edit and then tapping
the picture icon.
Wallpaper
You see a wallpaper background picture as you unlock iPod touch.
Set a photo as wallpaper:
1 Choose any photo and tap , then tap Use As Wallpaper.
2 Drag the photo to pan, or pinch the photo to zoom in or out, until it looks the way
you want.
3 Tap Set Wallpaper.
You can also choose from several wallpaper pictures included with iPod touch by
choosing Settings > Wallpaper > Wallpaper from the Home screen.
83
Chapter 8 Photos

Contacts 9
Adding Contacts
You can add contacts to iPod touch in the following ways:
In iTunes, sync contacts from Google or Yahoo!, or sync with applications on your •
computer (see “Syncing” on page 9)
Set up MobileMe or Microsoft Exchange accounts on iPod touch, with Contacts •
enabled (see “Setting Up Accounts” on page 13 )
Install a prole that sets up an Exchange account, with Contacts enabled (see •
“Installing Conguration Proles” on page 15)
Set up an LDAP account on iPod touch•
Enter contacts directly on iPod touch•
The number of contacts you can add is limited only by the amount of memory on
iPod touch.
Set up an LDAP account:
1 In Settings, tap “Mail Contacts, Calendars,” then tap Add Account.
2 Tap Other, then tap Add LDAP Account.
3 Enter your LDAP account information and tap Next to verify the account.
4 Tap Save.
When you set up an LDAP account, you can view and search for contacts on your
company or organization’s LDAP server. The server appears as a new group in Contacts.
Since LDAP contacts aren’t downloaded to iPod touch, you must have an Internet
connection to view them. Check with your system administrator for specic account
settings and other requirements (such as VPN).
84
Searching Contacts
You can search rst, last, and company names in your contacts on iPod touch. If you
have a Microsoft Exchange account set up on iPod touch, you may also be able to
search your enterprise Global Address List (GAL) for contacts in your organization.
If you have an LDAP account set up on iPod touch, you can search contacts on your
organization’s LDAP server.
When you enter search information, contacts with matching information appear
immediately as you start to type.
Search contacts: In Contacts, tap the search eld at the top of any list of contacts
and enter a rst, last, or company name. (To scroll quickly to the top of the list, tap the
status bar.)
Search a GAL: Tap Groups, tap Directories at the bottom of the list, then enter a rst,
last, or company name.
You can’t edit GAL contacts or save them to iPod touch.
Search an LDAP server: Tap Groups, tap the LDAP server name, then enter a rst, last,
or company name.
You can’t edit LDAP contacts or save them to iPod touch.
Managing Contacts on iPod touch
Add a contact on iPod touch: Tap Contacts and tap .
Delete a contact In Contacts, choose a contact, than tap Edit. Scroll
down and tap Delete Contact.
Add a contact from the keypad Tap Keypad, enter a number, then tap . Tap
Create New Contact and enter information, or tap
“Add to Existing Contact” and choose a contact.
Edit contact information In Contacts, choose a contact, then tap Edit. To
add an item, tap . To delete an item, tap .
Enter a pause in a number Tap , then tap Pause. Pauses appear as
commas when the number is saved.
Assign a photo to a contact:
1 Tap Contacts and choose a contact.
2 Tap Edit and tap Add Photo, or tap the existing photo.
3 Tap Choose Photo and choose a photo.
4 Drag and scale the photo as desired.
5 Tap Set Photo.
85
Chapter 9 Contacts

YouTube 10
Finding and Viewing Videos
YouTube features short videos submitted by people from around the world.
To use some features on iPod touch, you need to sign in to a YouTube account
when prompted. For information about requirements and how to get a YouTube
account, go to www.youtube.com.
Note: YouTube isn’t available in all languages and locations.
To use YouTube, iPod touch must join a Wi-Fi network that is connected to the Internet.
See “Connecting to the Internet” on page 35.
Browse videos: Tap Featured, Most Viewed, or Favorites. Or tap More to browse by
Most Recent, Top Rated, History, Subscriptions, or Playlists.
• Featured: Videos reviewed and featured by YouTube sta.
• Most Viewed: Videos most seen by YouTube viewers. Tap All for all-time most viewed
videos, or Today or This Week for most-viewed videos of the day or week.
• Favorites: Videos you’ve added to Favorites. When you sign in to a YouTube account,
account favorites appear and any existing favorites can be synced to your account.
• Most Recent: Videos most recently submitted to YouTube.
• Top Rated: Videos most highly rated by YouTube viewers. To rate videos, go to
www.youtube.com.
• History: Videos you’ve viewed most recently.
• Subscriptions: Videos from YouTube accounts to which you’ve subscribed. You must
be signed in to a YouTube account to use this feature.
• Playlists: Videos you’ve added to playlists. You must be signed in to a YouTube
account to use this feature.
86
Search for a video:
1 Tap Search, then tap the YouTube search eld.
2 Type a word or phrase that describes what you’re looking for, then tap Search.
YouTube shows results based on video titles, descriptions, tags, and user names. Listed
videos show title, rating, number of views, length, and the account name that posted
the video.
Play a video: Tap the video.
The video begins to download to iPod touch and a progress bar appears. When
enough of the video has downloaded, it begins to play. You can also tap to start the
video.
Controlling Video Playback
When a video starts playing, the controls disappear so they don’t obscure the video.
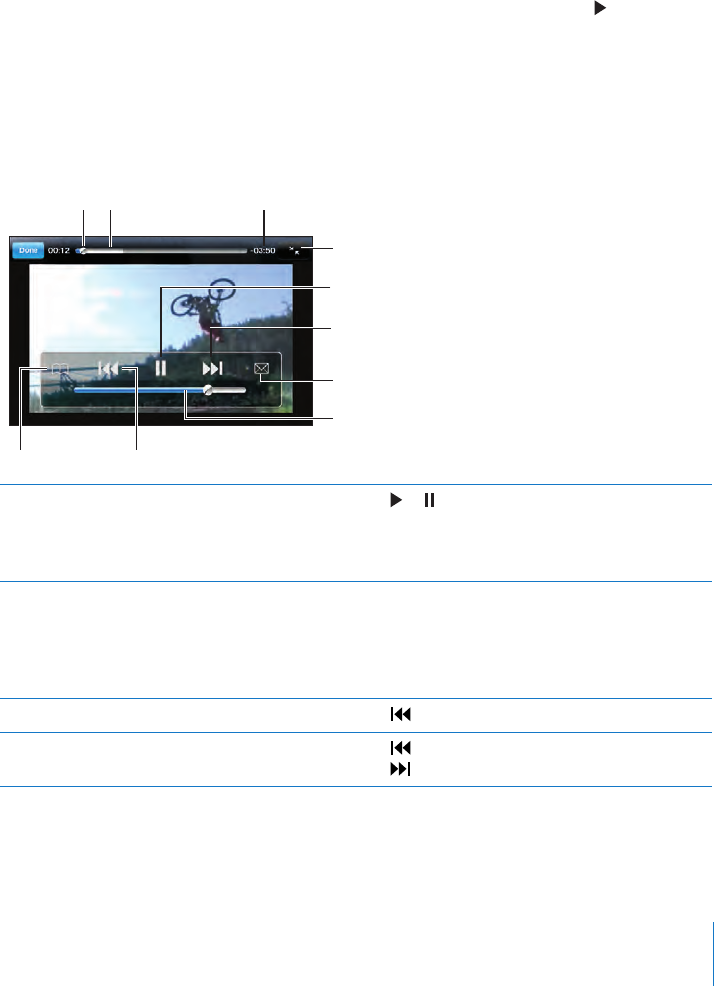
Show or hide the video controls: Tap the screen.
Next/
Fast-forward
Play/Pause
Email
Scale
Download progress
Volume
Playhead Scrubber bar
Bookmark Previous/rewind
Play or pause a video Tap or . You can also press the center button
on the iPod touch headset (included with
Fall 2009 models with 32 GB or more) or the
equivalent button on your Bluetooth headset.
Adjust the volume Drag the volume slider, or use the volume
buttons on the side of iPod touch. You can also
use the volume buttons on the iPod touch
headset (only on Fall 2009 models with 32 GB or
more).
Start a video over Tap .
Skip to the next or previous video in a list Tap twice to skip to the previous video.
Tap to skip to the next video.
87
Chapter 10 YouTube