Apple 2310 Handheld Device User Manual iPod touch User Guide
Apple Inc. Handheld Device iPod touch User Guide
Apple >
Contents
User Manual 4
Rewind or fast-forward Touch and hold or .
Skip to any point in a video Drag the playhead along the scrubber bar.
Stop watching a video before it nishes playing Tap Done, or press the Home button.
Toggle between scaling a video to ll the screen
or t to the screen
Double-tap the video. You can also tap to
make the video ll the screen, or tap to make
it t the screen.
Add a video to Favorites using video controls Start playing a video and tap .
Email a link to the video using video controls Start playing a video and tap .
Managing Videos
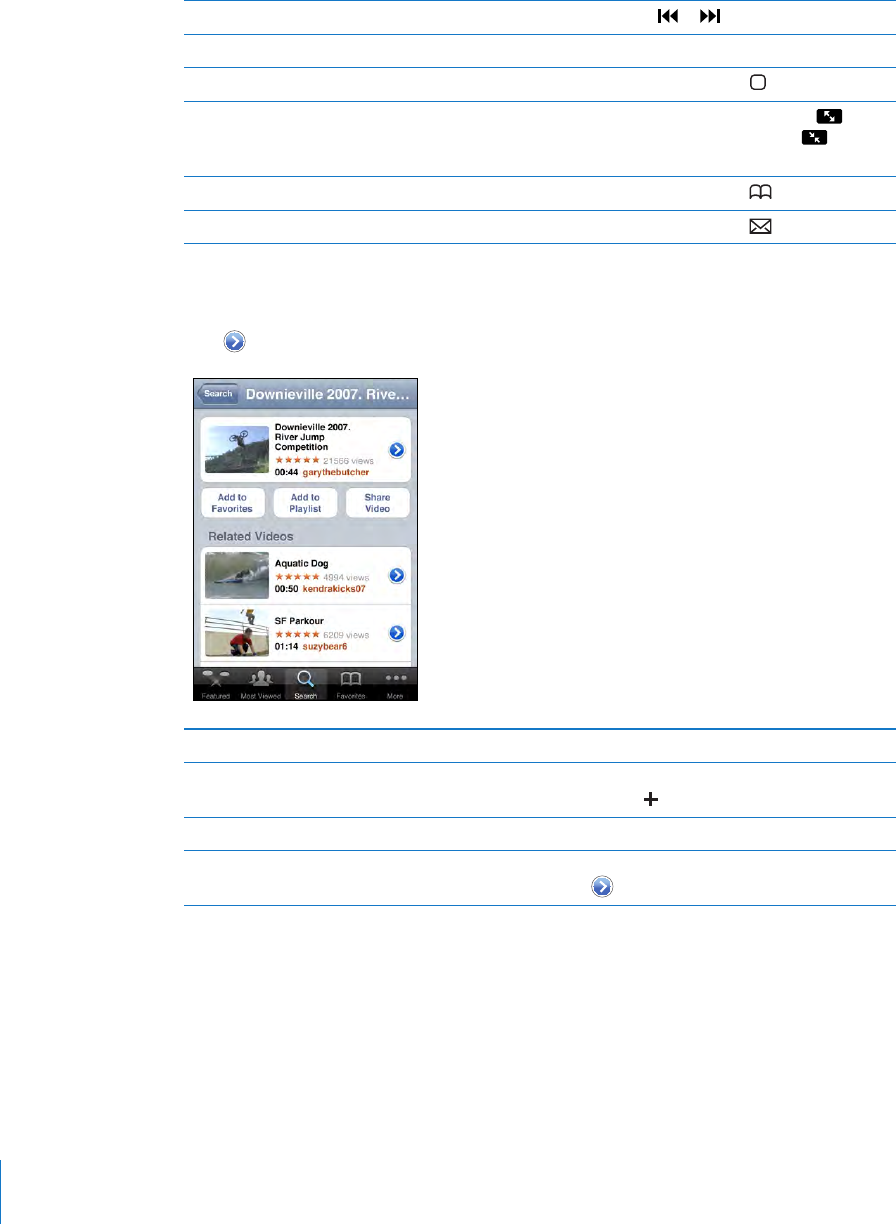
Tap next to a video to see related videos and more controls for managing videos.
Add the video to Favorites Tap “Add to Favorites.”
Add the video to a playlist Tap “Add to Playlist,” then select an existing
playlist or tap to create a new playlist.
Email a link to the video Tap Share Video.
Browse and view related videos Tap a video in the list of related videos to view,
or tap next to a video for more information.
88 Chapter 10 YouTube
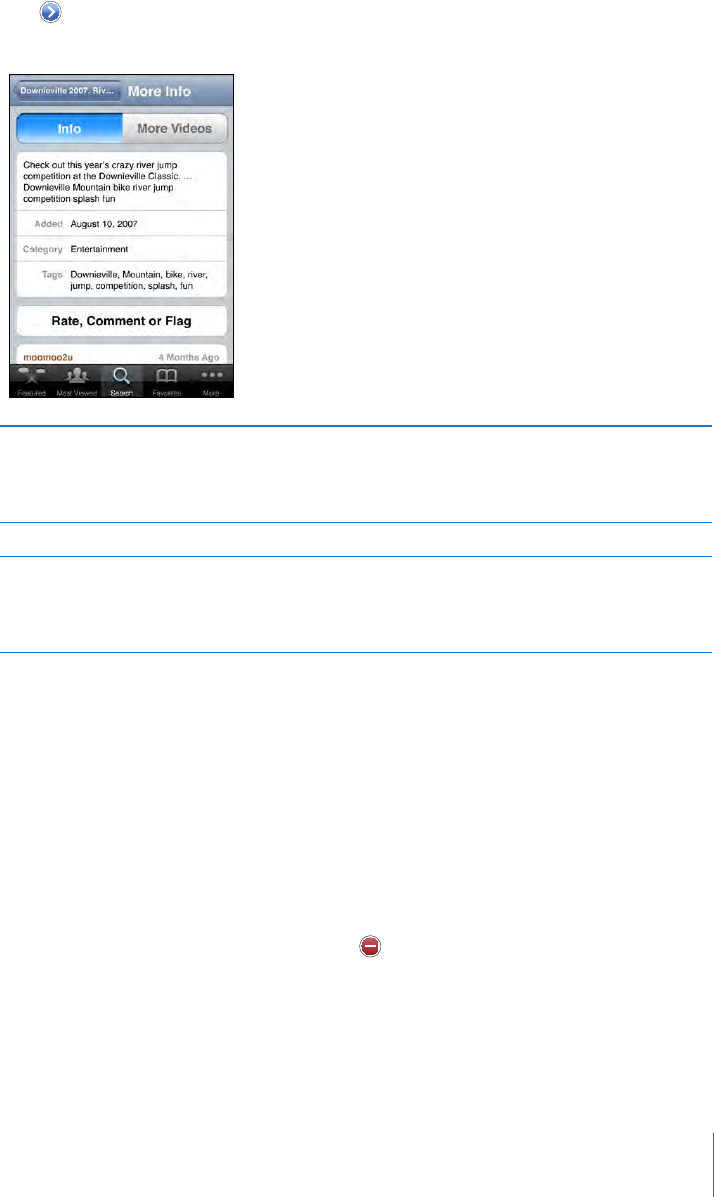
Getting More Information
Tap next to the video to show the video’s comments, description, date added,
and other information.
Rate the video or add a comment On the More Info screen, tap “Rate, Comment, or
Flag,” then choose “Rate or Comment.” You must
be signed in to a YouTube account to use this
feature.
See more videos from this account On the More Info screen, tap More Videos.
Subscribe to this YouTube account On the More Info screen, tap More Videos, then
tap “Subscribe to <account>” at the bottom of
the video list. You must be signed in to a YouTube
account to use this feature.
Using YouTube Account Features
If you have a YouTube account, you can access account features such as
subscriptions, comments and ratings, and playlists. To create a YouTube account,
go to www.youtube.com.
Show favorites you’ve added to your account: In Favorites, tap Sign In, then enter
your username and password to see your account favorites. Any existing favorites
you’ve added to iPod touch can be merged with your account favorites when you
sign in.
Delete a favorite: In Favorites, tap Edit, tap next to a video, then tap Delete.
Show subscriptions you’ve added to your account: In Subscriptions, tap Sign In, then
enter your username and password to see your account subscriptions. Tap an account
in the list to see all videos for that account.
89
Chapter 10 YouTube
Unsubscribe from a YouTube account: In Subscriptions, tap an account in the list,
then tap Unsubscribe.
View playlists: In Playlists, tap a playlist to see the list of videos you’ve added. Tap any
video in the playlist to begin playing videos from that point in the playlist.
Edit a playlist: In Playlists, tap Edit, then do one of the following:
• To delete the entire playlist, tap next to a playlist, then tap Delete.
• To create a new playlist, tap , then enter a name for the playlist.
Add a video to a playlist: Tap next to a video, then tap “Add to Playlist” and choose
a playlist.
Delete a video from a playlist:
1 In Playlists, tap a playlist, then tap Edit.
2 Tap next to a playlist, then tap Delete.
Changing the Browse Buttons
You can replace the Featured, Most Viewed, Bookmarks, and Search buttons at the
bottom of the screen with ones you use more frequently. For example, if you watch
top rated videos often but don’t watch many featured videos, you could replace the
Featured button with Top Rated.
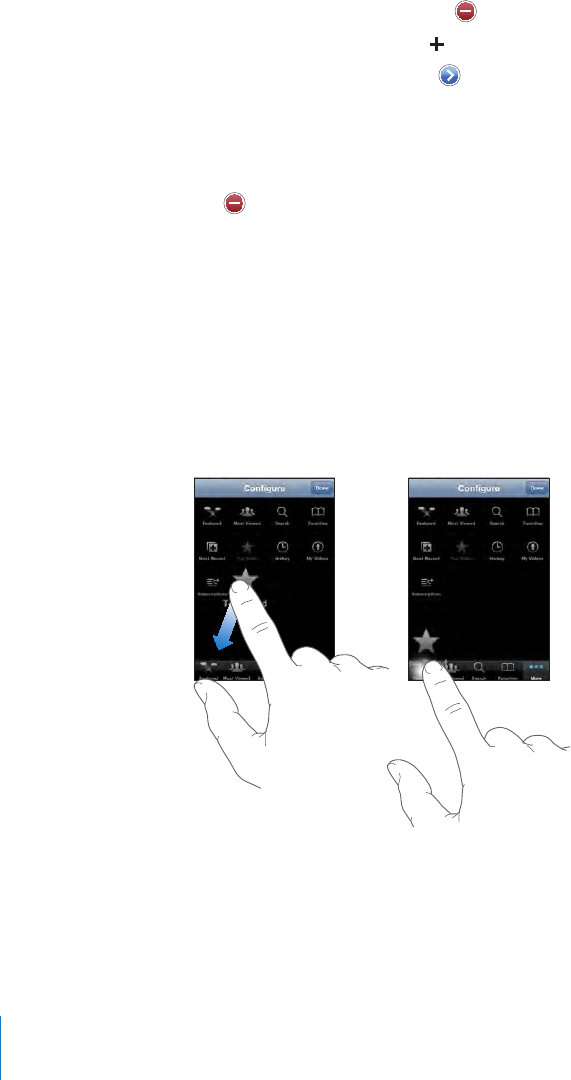
Change the browse buttons: Tap More and tap Edit, then drag a button to the
bottom of the screen, over the button you want to replace.
You can drag the buttons at the bottom of the screen left or right to rearrange them.
When you nish, tap Done.
When you’re browsing for videos, tap More to access the browse buttons that aren’t
visible.
90 Chapter 10 YouTube

Stocks 11
Viewing Stock Quotes
Stocks lets you see the latest available quotes for your selected stocks, funds, and
indexes. To use Stocks, iPod touch must join a Wi-Fi network that is connected to the
Internet. See “Connecting to the Internet” on page 35.
Quotes are updated every time you open Stocks when connected to the Internet.
Quotes may be delayed by up to 20 minutes or more depending upon the reporting
service.
Add a stock, fund, or index to the stock reader:
1 Tap , then tap .
2 Enter a symbol, company name, fund name, or index, then tap Search.
3 Select an item from the search results and tap Done.
View charts in landscape orientation: Rotate iPod touch sideways. Flick left or right to
view the other charts in your stock reader.
Show the progress of a stock, fund, or index over time: Tap the stock, fund, or index
in your list, then tap 1d, 1w, 1m, 3m, 6m, 1y, or 2y. The chart adjusts to show progress
over one day, one week, one month, three months, six months, one year, or two years.
91

When you’re viewing a chart in landscape orientation, you can touch the chart to
display the value for a specic point in time.
Use two ngers to see the change in value over a specic period of time.
Delete a stock: Tap and tap next to a stock, then tap Delete.
Change the order of the list: Tap . Then drag next to a stock or index to a new
place in the list.
Switch the display to percentage change, price change, or market capitalization:
Tap any of the values along the right side of the screen. Tap again to switch to another
view. Or tap and tap %, Price, or Mkt Cap, then tap Done.
Getting More Information
See the summary, chart, or news page about a stock, fund, or index: Select the stock,
fund, or index in your list, then ick the pages underneath the stock reader to view the
summary, chart, or recent news page.
On the news page, you can scroll up and down to read headlines, or tap a headline to
view the article in Safari.
See more information at Yahoo.com: Select the stock, fund, or index in your list, then
tap .
92 Chapter 11 Stocks

Maps 12
Finding and Viewing Locations
WARNING: For important information about driving and navigating safely, see the
Important Product Information Guide at www.apple.com/support/manuals/ipodtouch.
Maps provides street maps, satellite photos, a hybrid view, and street views of locations
in many of the world’s countries. You can get detailed driving, public transit, or walking
directions and trac information. Find your current (approximate) location, and use
your current location to get driving directions to or from another place.
To use Maps, iPod touch must join a Wi-Fi network that is connected to the Internet.
See “Connecting to the Internet” on page 35.
Important: Maps, directions, and location-based applications provided by Apple
depend on data collected and services provided by third parties. These data services
are subject to change and may not be available in all geographic areas, resulting in
maps, directions, or location-based information that may be unavailable, inaccurate, or
incomplete. Compare the information provided on iPod touch to your surroundings
and defer to posted signs to resolve any discrepancies. In order to provide your
location, data is collected in a form that doesn’t personally identify you. If you don’t
want such data collected, don’t use the feature. Not using this feature won’t impact the
non–location-based functionality of your iPod touch.
Find a location and see a map:
1 Tap the search eld to bring up the keyboard.
2 Type an address, intersection, area, landmark, bookmark, contact, or zip code.
3 Tap Search.
93
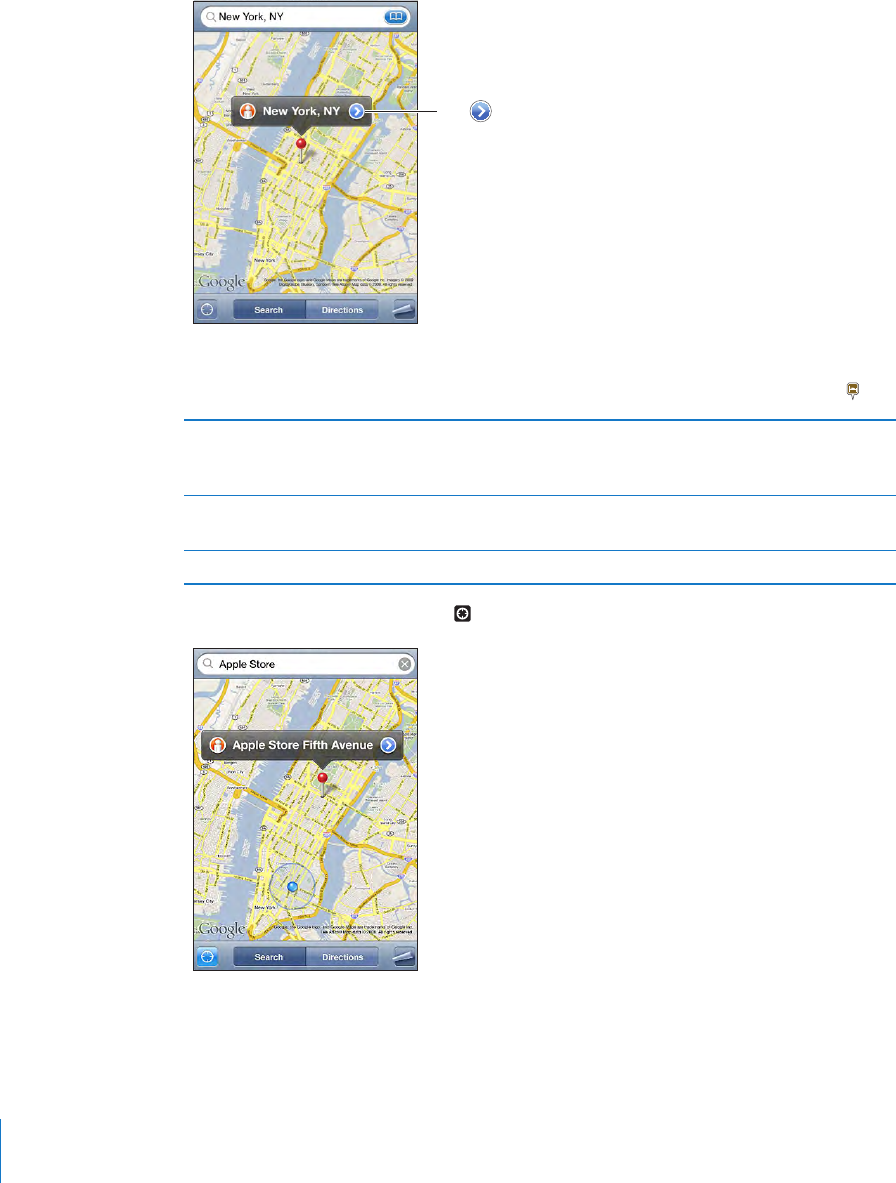
A pin marks the location. Tap the pin to see the name or description of the location.
Tap to get
information about
the location, get
directions, add the
location to your
bookmarks or
contacts list, or
email a link to
Google Maps.
Locations can include places of interest added by Google My Maps users (“User-
created content”), and sponsored links that appear as special icons (for example, ).
Zoom in to a part of a map Pinch the map with two ngers. Or double-tap
the part you want to zoom in on. Double-tap
again to zoom in even closer.
Zoom out Pinch the map. Or tap the map with two ngers.
Tap with two ngers again to zoom out further.
Pan or scroll to another part of the map Drag up, down, left, or right.
Find your current location: Tap .
94 Chapter 12 Maps
Your current (approximate) location is indicated by a blue marker. If your location can’t
be determined precisely, a blue circle also appears around the marker. The size of the
circle depends on how precisely your location can be determined—the smaller the
circle, the greater the precision.
If you drag the map and tap again, iPod touch centers the map back to your
approximate location.
iPod touch uses Location Services to determine your location. Location Services uses
available information from local Wi-Fi networks (if you have Wi-Fi turned on). This
feature isn’t available in all areas.
If Location Services is turned o, you’ll be prompted to turn it on. You can’t nd your
current location if Location Services is turned o. See “Location Services” on page 118 .
To conserve battery life, turn Location Services o when you’re not using it. In Settings,
choose General > Location Services.
Get information about your current location: Tap the blue marker, then tap .
iPod touch displays the address of your current location, if available. You can use this
information to:
Get directions•
Add the location to contacts•
Send the address via email•
Bookmark the location•
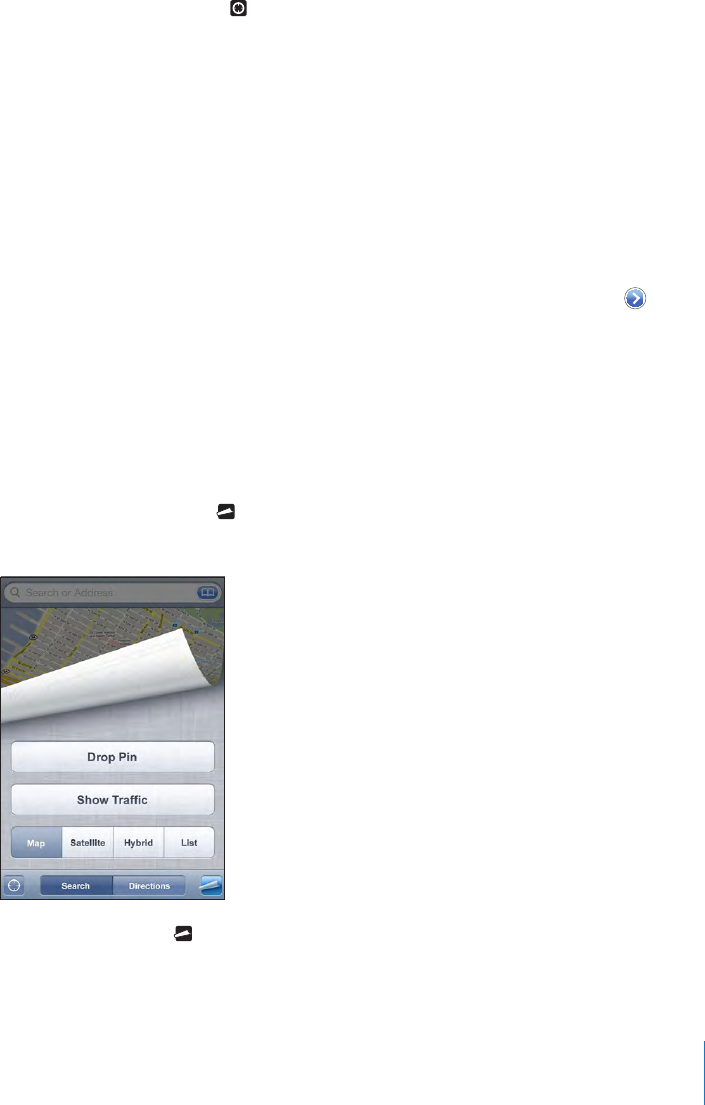
Use the dropped pin: Tap , then tap Drop Pin.
A pin drops down on the map, which you can then drag to any location you choose.
Replace the pin: Tap , then tap Replace Pin. iPod touch drops the pin in the area
you’re currently viewing.
95
Chapter 12 Maps

See a satellite or hybrid view: Tap , then tap Satellite or Hybrid to see just a satellite
view or a combined street map and satellite view.
To return to map view, tap Map.
See the Google Street View of a location: Tap . Flick left or right to pan through
the 360° panoramic view. (The inset shows your current view.) Tap an arrow to move
down the street.
Tap to return to map view
To return to map view, tap the map inset in the lower-right corner. Street View isn’t
available in all areas.
96 Chapter 12 Maps

See the location of someone’s address in your
contacts list
Tap in the search eld, then tap Contacts
and choose a contact.
To locate an address in this way, the contact
must include at least one address. If the contact
has more than one address, choose the one you
want to locate. You can also nd the location of
an address by tapping the address directly in
Contacts.
Add a location to your contacts list Find a location, tap the pin that points to it, tap
next to the name or description, tap “Add to
Contacts,” then tap “Create New Contact” or “Add
to Existing Contact.”
Email a link to a Google Maps location Find a location, tap the pin that points to it, tap
next to the name or description, then tap
Share Location and tap Email.
Bookmarking Locations
You can bookmark locations that you want to nd again later.
Bookmark a location: Find a location, tap the pin that points to it, tap next to the
name or description, then tap “Add to Bookmarks” at the bottom of the Info screen.
See a bookmarked location or recently viewed location: Tap in the search eld,
then tap Bookmarks or Recents.
Getting Directions
You can get step-by-step directions for driving, taking public transit, or walking to a
destination.
Get directions:
1 Tap Directions.
2 Enter starting and ending locations in the Start and End elds. By default, iPod touch
starts with your current approximate location (if available). Tap in either eld to
choose a location in Bookmarks (including your current approximate location and the
dropped pin, if available), Recents, or Contacts.
For example, if a friend’s address is in your contacts list, you can tap Contacts and tap
your friend’s name instead of having to type the address.
To reverse the directions, tap .
3 Tap Route (if you entered locations manually), then select driving ( ), public transit ( ),
or walking ( ) directions.
The travel options available depend on the route.
97
Chapter 12 Maps
4 Do one of the following:
• To view directions one step at a time, tap Start, then tap to see the next leg of the
trip. Tap to go back.
• To view all the directions in a list, tap , then tap List. Tap any item in the list to see
a map showing that leg of the trip. Tap Route Overview to return to the overview
screen.
If you’re driving or walking, the approximate distance and travel time appear at the top
of the screen. If trac data is available, the driving time is adjusted accordingly.
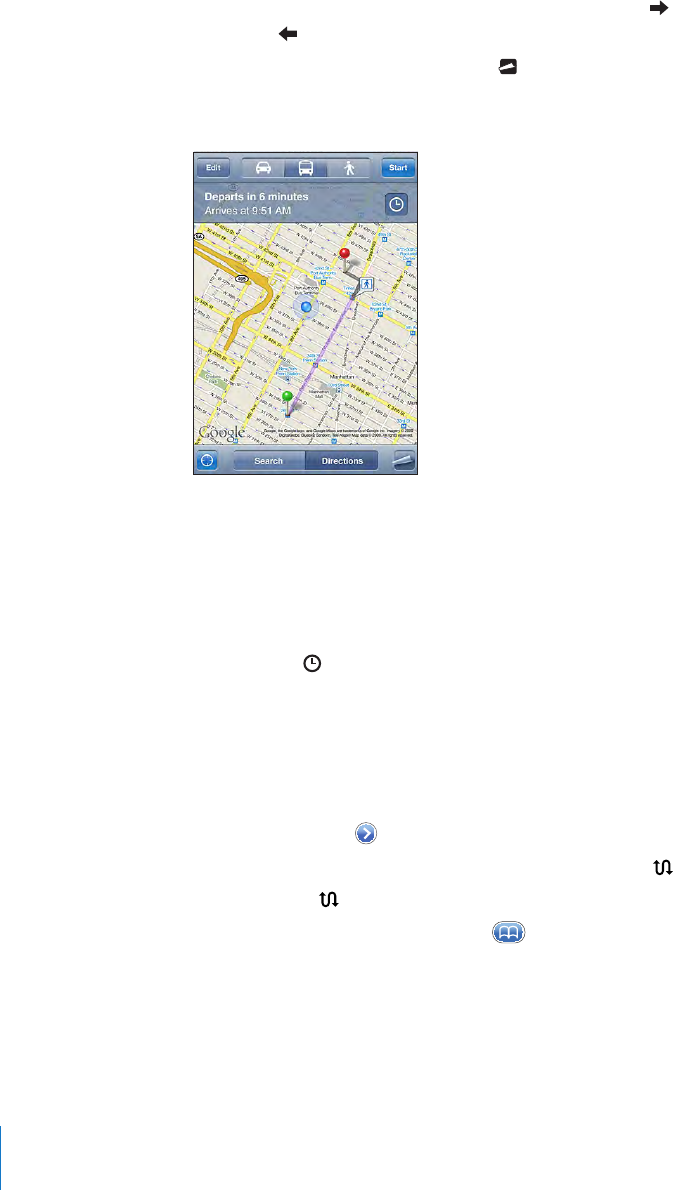
If you’re taking public transit, the overview screen shows each leg of the trip and the
mode of transportation, including where you need to walk. The top of the screen
shows the time of the bus or train at the rst stop, the estimated arrival time, and the
total fare. Tap to set your departure or arrival time, and to choose a schedule for
the trip. Tap the icon at a stop to see the departure time for that bus or train, and to
get a link to the transit provider’s website or contact info. When you tap Start and step
through the route, detailed information about each leg of the trip appears at the top
of the screen.
You can also get directions by nding a location on the map, tapping the pin that
points to it, tapping , then tapping Directions To Here or Directions From Here.
Switch start and end points, for reverse directions: Tap .
If you don’t see , tap List, then tap Edit.
See recently viewed directions: Tap in the search eld, then tap Recents.
98 Chapter 12 Maps

Showing Trac Conditions
When available, you can show highway trac conditions on the map.
Show or hide trac conditions: Tap , then tap Show Trac or Hide Trac.
Highways are color-coded according to the ow of trac:
Green = more than
50 miles per hour
Yellow = 25–50
miles per hour
Gray = no data
currently available
Red = less than 25
miles per hour
If you don’t see color-coded highways, you may need to zoom out to a level where you
can see major roads, or trac conditions may not be available for that area.
Finding and Contacting Businesses
Find businesses in an area:
1 Find a location—for example, a city and state or country, or a street address—or scroll
to a location on a map.
2 Type the kind of business in the text eld and tap Search.
Pins appear for matching locations. For example, if you locate your city and then type
“movies” and tap Search, pins mark movie theatres in your city.
Tap the pin that marks a business to see its name or description.
Find businesses without nding the location rst: Type things like:
restaurants san francisco ca•
apple inc new york•
99
Chapter 12 Maps
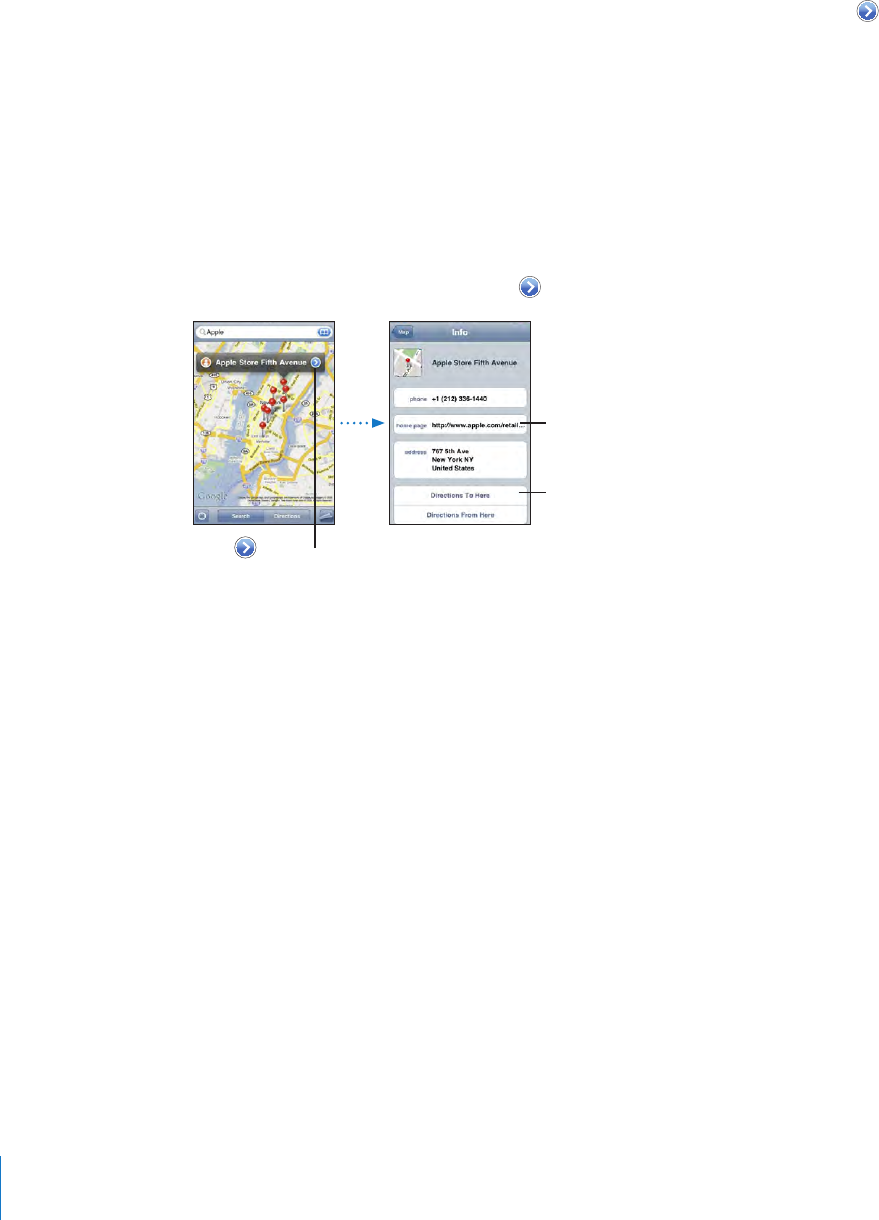
Contact a business or get directions: Tap the pin that marks a business, then tap
next to the name.
From there, you can do the following:
Tap an email address to send email to, or a web address to visit.•
For directions, tap Directions To Here or Directions From Here.•
To add the business to your contacts list, scroll down and tap “Create New Contact” •
or “Add to Existing Contact.”
Share the location of the business by email•
See a list of the businesses found in the search: From the Map screen, tap List.
Tap a business to see its location. Or tap next to a business to see its information.
Get
directions
Visit
website
Tap to show
contact info
100 Chapter 12 Maps
Weather 13
Viewing Weather Summaries
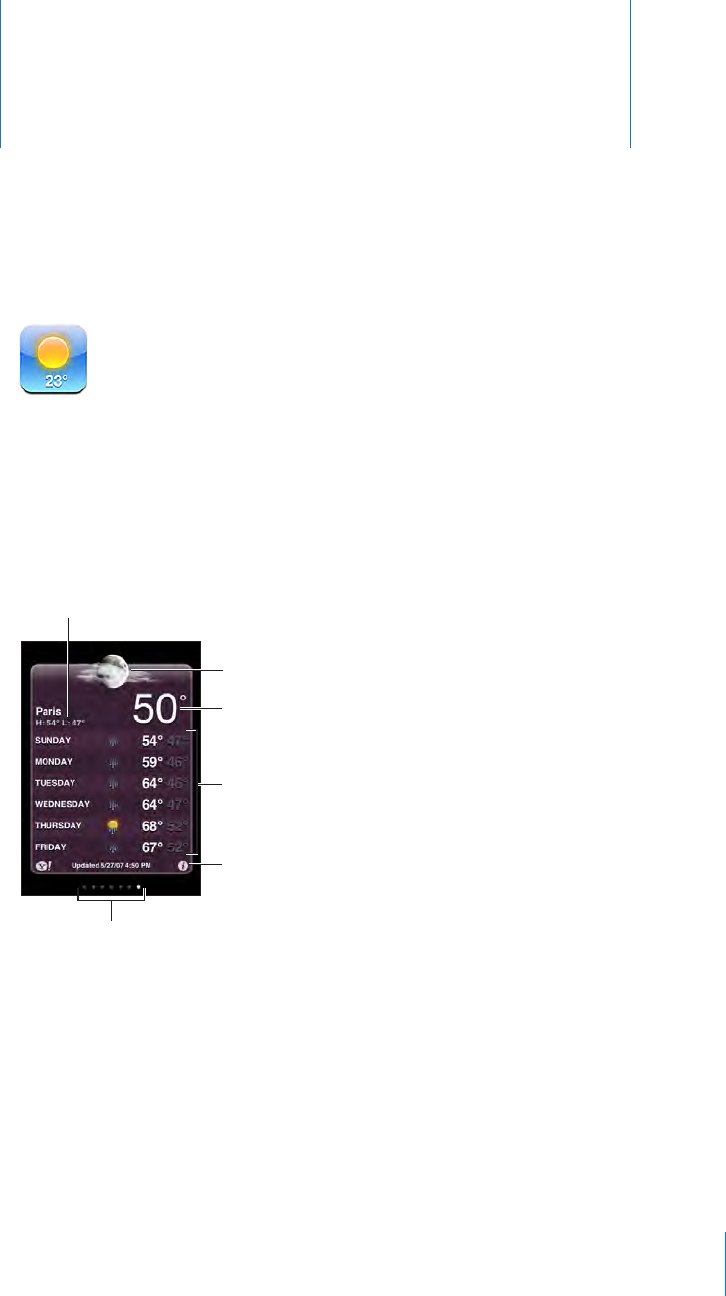
Tap Weather from the Home screen to get the current temperature and six-day
forecast for one or more cities around the world. To use Weather, iPod touch must join
a Wi-Fi network that is connected to the Internet. See “Connecting to the Internet” on
page 35.
Six-day forecast
Current temperature
Current conditions
Add and delete cities
Number of cities stored
Today’s high and low
If the weather board is light blue, it’s daytime in that city—between 6:00 a.m. and 6:00
p.m. If the board is dark purple, it’s nighttime—between 6:00 p.m. and 6:00 a.m.
101

Add a city:
1 Tap , then tap .
2 Enter a city name or zip code, then tap Search.
3 Choose a city in the search list.
Switch to another city: Flick left or right, or tap to the left or right of the row of dots.
The number of dots below the weather board shows how many cities are stored.
Reorder cities: Tap , then drag next to a city to a new place in the list.
Delete a city: Tap and tap next to a city, then tap Delete.
Display temperature in Fahrenheit or Celsius: Tap , then tap °F or °C.
Getting More Weather Information
You can see a more detailed weather report, news and websites related to the city,
and more.
See information about a city at Yahoo.com: Tap .
102 Chapter 13 Weather

Voice Memos 14
Recording Voice Memos
Voice Memos lets you use iPod touch as a portable recording device (not available on
rst-generation iPod touch).
Important: To use Voice Memos on iPod touch, you must connect the Apple
Earphones with Remote and Mic (included with Fall 2009 models with 32 GB or more)
or a compatible accessory with microphone (such as Apple-branded earbuds or
authorized third-party accessories marked with the Apple “Made for iPod” logo).
You can adjust the recording level by moving the microphone closer to or further
away from what you’re recording. For better recording quality, the loudest level on the
level meter should be between –3dB and 0 dB.
Record button
Audio level meter
Go to voice memos
103
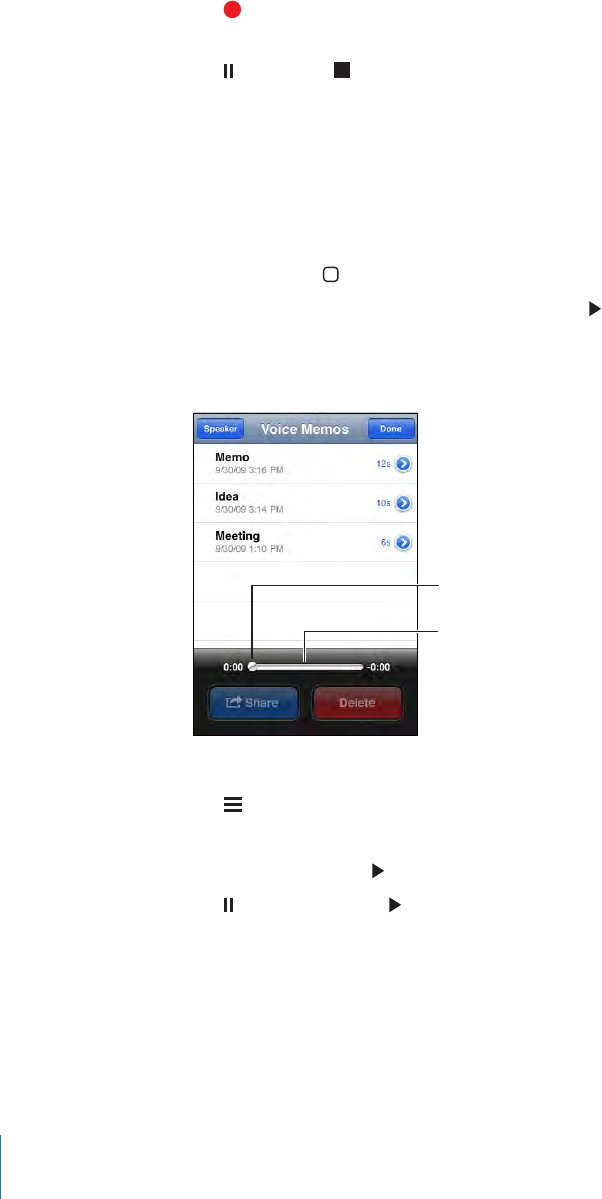
Record a voice memo:
1 Tap to start recording. You can also press the center button on a compatible three-
button headset with mic.
2 Tap to pause or to stop recording. You can also press the center button on a
compatible three-button headset with mic to stop recording.
You can record in either mono or stereo depending upon the external microphone
you use.
When you start a voice recording, iPod touch makes a shutter sound.
To use other applications while recording your voice memo, you can lock iPod touch or
press the Home button.
Play back a voice memo you just recorded: Tap .
Listening to Voice Memos
Scrubber bar
Playhead
Play a voice memo you’ve previously recorded:
1 Tap .
Memos are listed in chronological order, with the most recent memo rst.
2 Tap a memo, then tap .
Tap to pause, then tap again to resume playback.
Skip to any point in a memo: Drag the playhead along the scrubber bar.
Listen through the built-in speaker: Tap Speaker.
Managing Voice Memos
Delete a voice memo: Tap a memo in the list, then tap Delete.
104 Chapter 14 Voice Memos
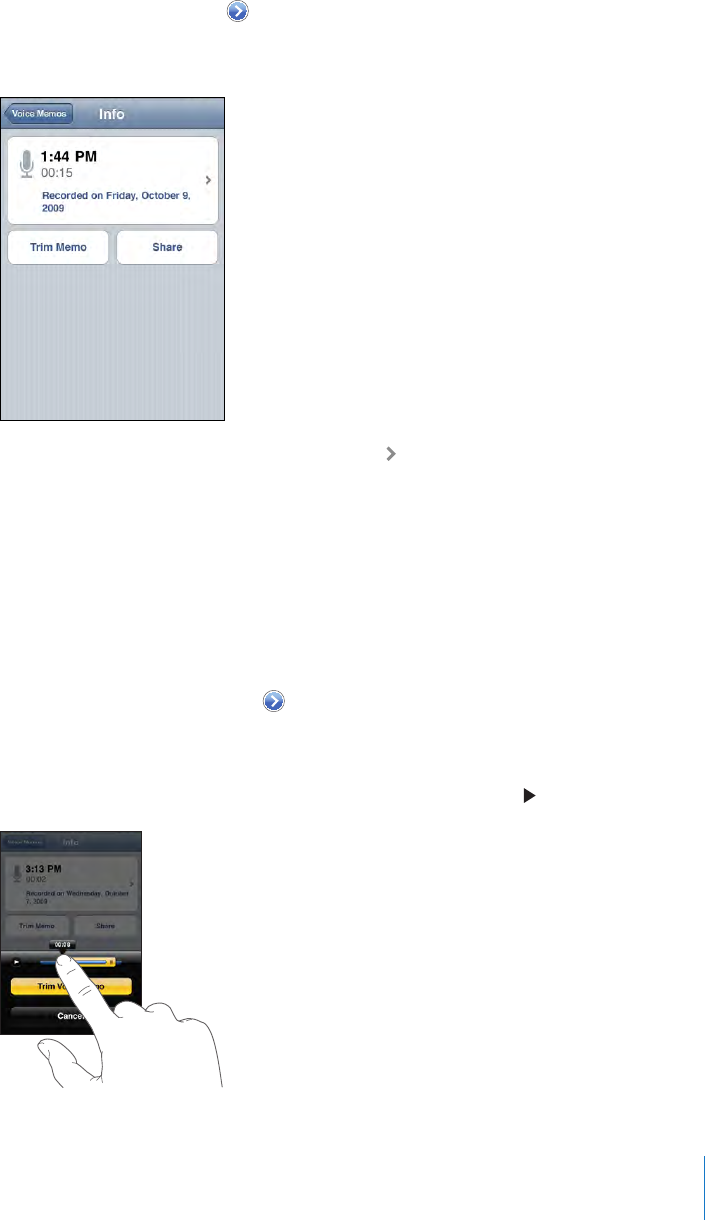
See more information: Tap next to the memo. The Info screen displays information
about the length, recording time and date, and provides additional editing and
sharing functions.
Add a label to a memo: On the Info screen tap , then select a label in the list on the
Label screen. To create a custom label, choose Custom at the bottom of the list, then
type a name for the label.
Trimming Voice Memos
You can trim the beginning or ending of a voice memo to eliminate unwanted pauses
or noise.
Trim a voice memo:
1 On the Voice Memos screen, tap next to the memo you want to trim.
2 Tap Trim Memo.
3 Using the time markers as a guide, drag the edges of the audio region to adjust the
beginning and end of the voice memo. To preview your edit, tap .
105
Chapter 14 Voice Memos

4 Tap Trim Voice Memo.
Important: Edits you make to voice memos can’t be undone.
Sharing Voice Memos
You can share your voice memos as attachments in email messages.
Share a voice memo:
1 On the Voice Memos screen or Info screen, tap Share.
2 Choose Email Voice Memo to open a new message in Mail with the memo attached.
A message appears if the le you’re trying to send is too large.
Syncing Voice Memos
iTunes automatically syncs voice memos to your iTunes library when you connect
iPod touch to your computer. This lets you listen to voice memos on your computer
and provides a backup if you delete them from iPod touch.
Voice memos are synced to the Voice Memos playlist. iTunes creates the playlist if it
doesn’t exist. When you sync voice memos to iTunes, they remain in the Voice Memos
application until you delete them. If you delete a voice memo on iPod touch, it isn’t
deleted from the Voice Memos playlist in iTunes. However, if you delete a voice memo
from iTunes, it is deleted from iPod touch the next time you sync with iTunes.
You can sync the iTunes Voice Memos playlist to the Music application on iPod touch
using the Music pane in iTunes.
Sync the Voice Memos playlist to iPod touch:
1 Connect iPod touch to your computer.
2 In iTunes, select iPod touch in the sidebar.
3 Select the Music tab.
4 Select the “Include voice memos” checkbox and click Apply.
106 Chapter 14 Voice Memos

Notes 15
Writing and Reading Notes
Notes are listed in the order of the last modied date, with the most recently modied
note at the top. You can see the rst few words of each note in the list. Rotate
iPod touch to view notes in landscape orientation and type using a larger keyboard.
Add a note: Tap , then type your note and tap Done.
Read a note: Tap the note. Tap or to see the next or previous note.
Edit a note: Tap anywhere on the note to bring up the keyboard.
Delete a note: Tap the note, then tap .
Searching Notes
You can search the text of notes.
107

Search for notes:
1 Drag the note list down or tap the status bar to expose the search window.
2 Enter text in the search eld.
Search results appear automatically as you type. Tap Search to dismiss the keyboard
and see more of the results.
Emailing Notes
Email a note: Tap the note, then tap .
To email a note, iPod touch must be set up for email. See “Setting Up Email
Accounts” on page 66.
Syncing Notes
You can set up iTunes to automatically sync your notes with email applications such as
Mac OS X Mail (requires Mac OS X version 10.5.7 or later) or Microsoft Outlook 2003 or
2007 on a PC. See “Syncing with iTunes” on page 9.
108 Chapter 15 Notes

Clock 16
World Clocks
You can add clocks to show the time in other major cities and time zones around the
world.
View clocks: Tap World Clock.
If the clock face is white, it’s daytime in that city. If the clock face is black, it’s nighttime.
If you have more than four clocks, ick to scroll through them.
Add a clock:
1 Tap World Clock.
2 Tap , then type the name of a city.
Cities matching what you’ve typed appear below.
3 Tap a city to add a clock for that city.
If you don’t see the city you’re looking for, try a major city in the same time zone.
Delete a clock: Tap World Clock and tap Edit. Then tap next to a clock and tap
Delete.
Rearrange clocks: Tap World Clock and tap Edit. Then drag next to a clock to a new
place in the list.
109

Alarms
You can set multiple alarms. Set each alarm to repeat on days you specify, or to sound
only once.
Set an alarm:
1 Tap Alarm and tap .
2 Adjust any of the following settings:
• To set the alarm to repeat on certain days, tap Repeat and choose the days.
• To choose the ringtone that sounds when the alarm goes o, tap Sound.
• To set whether the alarm gives you the option to hit snooze, turn Snooze on or o.
If Snooze is on and you tap Snooze when the alarm sounds, the alarm stops and
then sounds again in ten minutes.
• To give the alarm a description, tap Label. iPod touch displays the label when the
alarm sounds.
If at least one alarm is set and turned on, appears in the iPod touch status bar at the
top of the screen.
Turn an alarm on or o: Tap Alarm and turn any alarm on or o. If an alarm is turned
o, it won’t sound again unless you turn it back on.
If an alarm is set to sound only once, it turns o automatically after it sounds. You can
turn it on again to reenable it.
Change settings for an alarm: Tap Alarm and tap Edit, then tap next to the alarm
you want to change.
Delete an alarm: Tap Alarm and tap Edit, then tap next to the alarm and tap
Delete.
Stopwatch
Use the stopwatch to time an event:
1 Tap Stopwatch.
2 Tap Start to start the stopwatch.
• To record lap times, tap Lap after each lap.
• To pause the stopwatch, tap Stop. Tap Start to resume.
• To reset the stopwatch, tap Reset when the stopwatch is pause.
If you start the stopwatch and go to another iPod touch application, the stopwatch
continues running in the background.
110 Chapter 16 Clock

Timer
Set the timer: Tap Timer, then ick to set the number of hours and minutes. Tap Start
to start the timer.
Choose the sound: Tap When Timer Ends.
Set a sleep timer: Set the timer, then tap When Timer Ends and choose Sleep iPod.
When you set a sleep timer, iPod touch stops playing music or video when the
timer ends.
If you start the timer and then switch to another iPod touch application, the timer
continues running.
111
Chapter 16 Clock

Calculator 17
Using the Calculator
Tap numbers and functions in Calculator just as you would with a standard calculator.
When you tap the add, subtract, multiply, or divide button, a white ring appears
around the button to let you know the operation to be carried out. Rotate iPod touch
to get an expanded scientic calculator.
Standard Memory Functions
• C: Tap to clear the displayed number.
• MC: Tap to clear the memory.
• M+: Tap to add the displayed number to the number in memory. If no number is in
memory, tap to store the displayed number in memory.
• M-: Tap to subtract the displayed number from the number in memory.
• MR: Tap to replace the displayed number with the number in memory. If the button
has a white ring around it, there is a number stored in memory.
The stored number remains in memory when you switch between the standard and
scientic calculators.
112

Scientic Calculator Keys
Rotate iPod touch to landscape orientation to display the scientic calculator.
2nd Changes the trigonometric buttons (sin, cos, tan, sinh, cosh, and tanh) to their inverse
functions (sin-1, cos-1, tan-1, sinh-1, cosh-1, and tanh-1). It also changes ln to log2, and ex to
2x. Tap 2nd again to return the buttons to their original functions.
(Opens a parenthetical expression. Expressions can be nested.
)Closes a parenthetical expression.
%Calculates percentages, adds markups, and subtracts discounts. To calculate a
percentage, use it with the multiplication (x) key. For example, to calculate 8% of 500,
enter
500 x 8 % =
which returns 40.
To add a markup or subtract a discount, use it with the plus (+) or minus (–) key.
For example, to compute the total cost of a $500 item with an 8% sales tax, enter
500 + 8 % =
which returns 540.
1/x Returns the reciprocal of a value in decimal format.
x2Squares a value.
x3Cubes a value.
yxTap between values to raise the rst value to the power of the second value.
For example, to compute 34, enter
3 yx 4 =
which returns 81.
x! Calculates the factorial of a value.
√Calculates the square root of a value.
x√yUse between values to calculate the x root of y. For example to compute 4√81, enter
81 x√y 4 =
which returns 3.
113
Chapter 17 Calculator

log Returns the log base 10 of a value.
sin Calculates the sine of a value.
sin-1 Calculates the arc sine of a value. (Available when the 2nd button is tapped.)
cos Calculates the cosine of a value.
cos-1 Calculates the arc cosine of a value. (Available when the 2nd button is tapped.)
tan Calculates the tangent of a value.
tan-1 Calculates the arc tangent of a value. (Available when the 2nd button is tapped.)
ln Calculates the natural log of a value.
log2 Calculates the log base 2. (Available when the 2nd button is tapped.)
sinh Calculates the hyperbolic sine of a value.
sinh-1 Calculates the inverse hyperbolic sine of a value. (Available when the 2nd button is
tapped.)
cosh Calculates the hyperbolic cosine of a value.
cosh-1 Calculates the inverse hyperbolic cosine of a value. (Available when the 2nd button is
tapped.)
tanh Calculates the hyperbolic tangent of a value.
tanh-1 Calculates the inverse hyperbolic tangent of a value. (Available when the 2nd button is
tapped.)
exTap after entering a value to raise the constant “e” (2.718281828459045...) to the power
of that value.
2xCalculates 2 to the power of the displayed value. For example, 10 2x = 1024. (Available
when the 2nd button is tapped.)
Rad Changes the mode to express trigonometric functions in radians.
Deg Changes the mode to express trigonometric functions in degrees.
πEnters the value of π (3.141592653589793...).
EE An operator that multiplies the currently displayed value by 10 to the power of the next
value you enter.
Rand Returns a random number between 0 and 1.
114 Chapter 17 Calculator

Settings 18
Settings allows you to customize iPod touch applications, set the date and time,
congure your network connection, and enter other preferences for iPod touch.
Wi-Fi
Wi-Fi settings determine whether iPod touch uses local Wi-Fi networks to connect to
the Internet.
Turn Wi-Fi on or o: Choose Wi-Fi and turn Wi-Fi on or o.
Join a Wi-Fi network: Choose Wi-Fi, wait a moment as iPod touch detects networks
in range, then select a network. If necessary, enter a password and tap Join. (Networks
that require a password appear with a lock icon.)
Once you’ve joined a Wi-Fi network manually, iPod touch automatically joins it
whenever the network is in range. If more than one previously used network is in
range, iPod touch joins the one last used.
When iPod touch is joined to a Wi-Fi network, the Wi-Fi icon in the status bar at
the top of the screen shows signal strength. The more bars you see, the stronger the
signal.
Set iPod touch to ask if you want to join a new network: Choose Wi-Fi and turn “Ask
to Join Networks” on or o.
When you’re trying to access the Internet, by using Safari or Mail for example, and you
aren’t in range of a Wi-Fi network you‘ve previously used, this option tells iPod touch
to look for another network. iPod touch displays a list of all available Wi-Fi networks
that you can choose from. (Networks that require a password appear with a lock
icon.) If “Ask to Join Networks” is turned o, you must manually join a network to
connect to the Internet when a previously used network isn’t available.
Forget a network, so iPod touch doesn’t join it automatically: Choose Wi-Fi and tap
next to a network you’ve joined before. Then tap “Forget this Network.”
115

Join a closed Wi-Fi network: To join a Wi-Fi network that isn’t shown in the list of
scanned networks, choose Wi-Fi > Other, then enter the network name. If the network
requires a password, tap Security, tap the type of security the network uses, and enter
the password.
You must already know the network name, password, and security type to connect to
a closed network.
Some Wi-Fi networks may require you to enter or adjust additional settings, such as a
client ID or static IP address. Ask the network administrator which settings to use.
Adjust settings to connect to a Wi-Fi network: Choose Wi-Fi, then tap next to a
network.
VPN
This setting appears when you have VPN congured on iPod touch, allowing you to
turn VPN on or o. See “Network” on page 117.
Notications
This setting appears when you’ve installed an application from the App Store that uses
the Apple Push Notication service.
Push notications are used by applications to alert you of new information, even when
the application isn’t running. Notications dier depending upon the application, but
may include text or sound alerts, and a numbered badge on the application’s icon on
the Home screen.
You can turn notications o if you don’t want to be notied or want to conserve
battery life.
Turn all notications on or o: Tap Notications and turn notications on or o.
Turn sounds, alerts, or badges on or o for an application: Tap Notications, then
choose an application from the list and choose the types of notication you want to
turn on or o.
Brightness
Screen brightness aects battery life. Dim the screen to extend the time before you
need to recharge iPod touch, or use Auto-Brightness.
Adjust the screen brightness: Choose Brightness and drag the slider.
Set whether iPod touch adjusts screen brightness automatically: Choose Brightness
and turn Auto-Brightness on or o. If Auto-Brightness is on, iPod touch adjusts the
screen brightness for current light conditions using the built-in ambient light sensor.
116 Chapter 18 Settings