Contents
Manual pages 101-150

Map Views
You can choose classic, satellite, hybrid, or terrain view. You can also see a location in
street view, when available.
Change the view: Tap or drag the bottom-right corner of the screen, then tap Classic,
Satellite, Hybrid, or Terrain.
See a street view: Tap a drop pin, then tap ;QWECP±KEMWRQTFQYPQTNGHVQT
right, to pan through the 360° panoramic view. The inset in the lower-right corner
shows your current view. Tap an arrow to move down the street. Street view isn’t
available in all areas.
To return to map view, tap the inset.
;HW[VYL[\YU[VTHW]PL^
101
Chapter 15 Maps

Getting Directions
You can get step-by-step driving, public transit, or walking directions.
Get directions:
1 Tap Directions.
2 6CRVJG°GNFUCVVJGVQRQHVJGUETGGPVQGPVGT[QWTUVCTVKPICPFGPFKPINQECVKQPU
Normally, iPad starts with your current location (if available).
If an address is in your contacts list, tap , choose the contact, and tap Directions
To Here or Directions From Here.
Tap to reverse the directions.
3 Select directions for driving ( ), public transit ( ), or walking ( ) at the bottom of
the screen.
The available travel options depend on the route.
4 Do one of the following:
To view directions one step at a time, tap Start, and then tap to see the next leg of
the trip. Tap to go back.
To view the directions in a list, tap Start, and then tap . Tap any item in the list
to see a map showing that leg of the trip. Tap Route Overview to return to the
overview screen.
;QWECPCNUQIGVFKTGEVKQPUD[°PFKPICNQECVKQPQPVJGOCRVCRRKPIVJGRKPVJCV
points to it, tapping , then tapping Directions To Here or Directions From Here.
Get reverse directions: Tap to switch the start and end points.
See recently viewed directions: Tap KPVJGUGCTEJ°GNFVJGPVCR4GEGPVU
See driving or walking directions: Tap or .
If you’re driving or walking, the approximate distance and travel time appear onscreen.
+HVTCÓEFCVCKUCXCKNCDNGVJGFTKXKPIVKOGCFLWUVUCEEQTFKPIN[
See public transit directions: Tap .
Tap to set your departure or arrival time, and to choose a schedule for the trip.
Tap Start, then tap to see the Route Overview screen. From there, you see the
estimated arrival time, total fare, information about each leg of the trip, and the
mode of transportation—including where you need to walk.
102 Chapter 15 Maps

5JQYKPI6TCÓE%QPFKVKQPU
9JGPCXCKNCDNG[QWECPUJQYVTCÓEEQPFKVKQPUHQTOCLQTUVTGGVUCPFJKIJYC[UQP
the map.
5JQYQTJKFGVTCÓEEQPFKVKQPUTap or drag the bottom-right corner of the screen,
VJGPVWTP6TCÓEQPQTQÒ
.YLLU$WVZ[LK
ZWLLKSPTP[
@LSSV^$ZSV^LY
[OHU[OLWVZ[LK
ZWLLKSPTP[
9LK$Z[VWHUKNV
5VTGGVUCPFJKIJYC[UCTGEQNQTEQFGFCEEQTFKPIVQVJG±QYQHVTCÓE+HCUVTGGVQT
JKIJYC[KUITC[VTCÓEFCVCKUP¨VCXCKNCDNG
+H[QWFQP¨VUGGVTCÓEEQPFKVKQPU\QQOQWVVQUGGOCLQTTQCFU6TCÓEEQPFKVKQPUCTG
not available in all areas.
Finding and Contacting Businesses
Find businesses in an area:
1 Find a location—for example, a city or a street address—or scroll to a location on
the map.
2 6[RGVJGMKPFQHDWUKPGUUKPVJG5GCTEJ°GNFCPFVCR5GCTEJQPVJGMG[DQCTF
Pins appear for matching locations in the area. For example, if you locate your city and
then type “movies” and tap Search, pins mark movie theaters in your city.
Tap the pin that marks a business to see its name or description.
(KPFDWUKPGUUGUYKVJQWV°TUV°PFKPIVJGNQECVKQPType things like:
restaurants san francisco ca
apple inc new york
103
Chapter 15 Maps
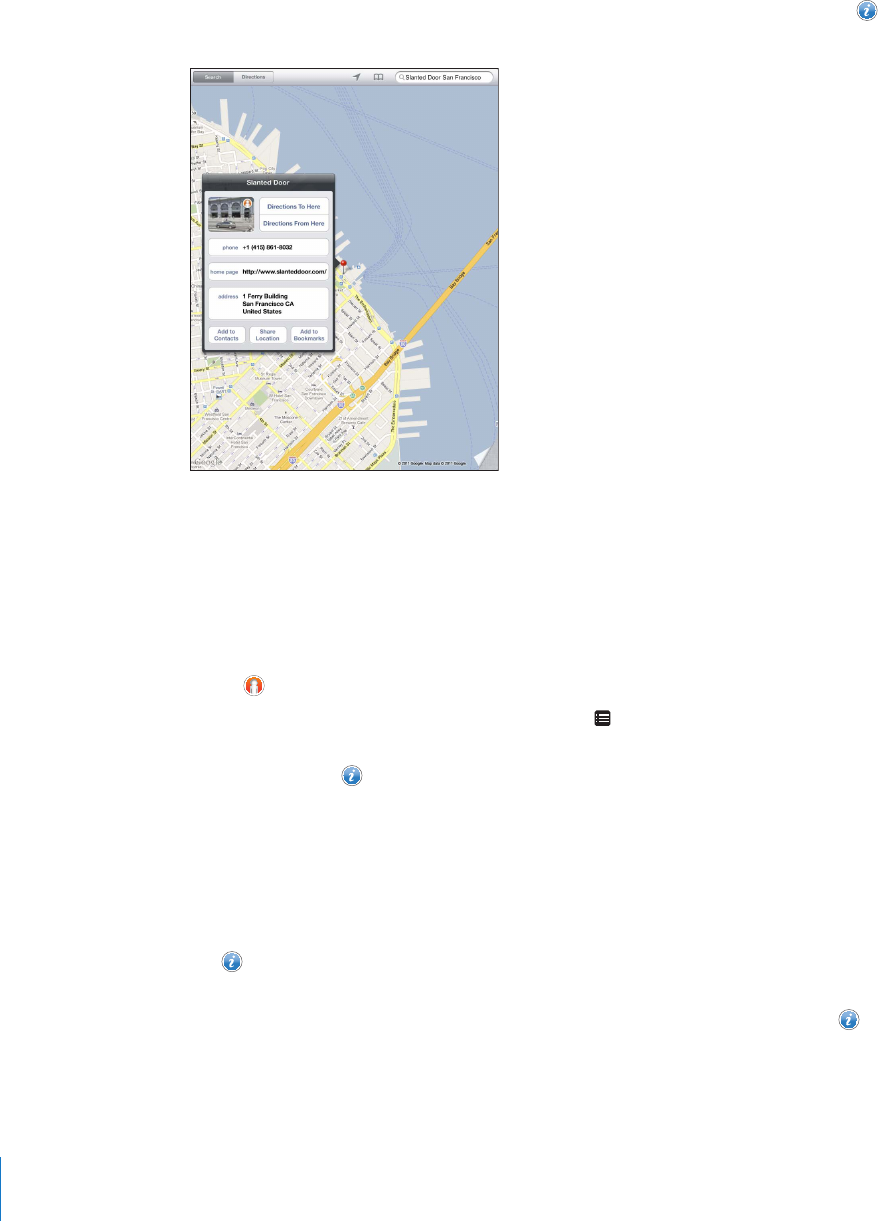
Contact a business or get directions: Tap the pin that marks a business, then tap
next to the name.
From there, you can do the following:
6CR&KTGEVKQPU6Q*GTGQT&KTGEVKQPU(TQO*GTGVQ°PFFKTGEVKQPU
Tap Home Page to visit the website, or Email to send an email.
Tap “Add to Contacts,” and then tap “Create New Contact” or “Add to Existing
Contact.”
Share the location of the business by email.
Tap to see a street view.
See a list of businesses found in the search: Tap KPVJGUGCTEJ°GNF
Choose a business from the Results list to see its location. Tap the pin that marks a
business, then tap next to the business to see its information.
Sharing Location Information
You can add a location to your contacts. You can also send links to a map location
in email.
Add a location to your contacts list: Find a location, tap the pin that points to it,
tap next to the name or description, tap “Add to Contacts,” and then tap “Create
New Contact” or “Add to Existing Contact.”
Email a link to a map location: Find a location, tap the pin that points to it, tap ,
and then tap Share Location.
104 Chapter 15 Maps

iPod 16
Adding Music and More to iPad
Browse your music collection by song, artist, album, genre, or composer. Listen to your
songs, audiobooks, and podcasts. Create and manage playlists, or use Genius to create
playlists for you. Stream your music, podcasts, or audiobooks wirelessly to an Apple TV
using AirPlay.
There are two ways to get music and other content onto iPad:
Transfer content by syncing it from iTunes on your computer. You can sync all of
[QWTOWUKEQT[QWECPUGNGEVURGEK°EUQPIURQFECUVUCPFK6WPGU7EQNNGEVKQPU5GG
“Syncing with iTunes” on page 24.
Use the iTunes Store on iPad to purchase and download songs, albums, TV shows,
movies, music videos, and audiobooks. You can also stream and download audio
and video podcasts, as well as iTunes U content. After listening to a podcast or
watching a TV show, you can tap a link to get more episodes from the iTunes Store.
See Chapter 17, “iTunes Store,” on page 113 .
Playing Music and Other Audio
Listen to audio using the built-in speaker. You can also attach wired headphones to the
headphones port, or pair wireless Bluetooth headphones. Sound doesn’t come out of
the speaker when you attach or pair headphones.
WARNING: For important information about avoiding hearing loss, see the
iPad Important Product Information Guide at support.apple.com/manuals/ipad.
Playing Songs
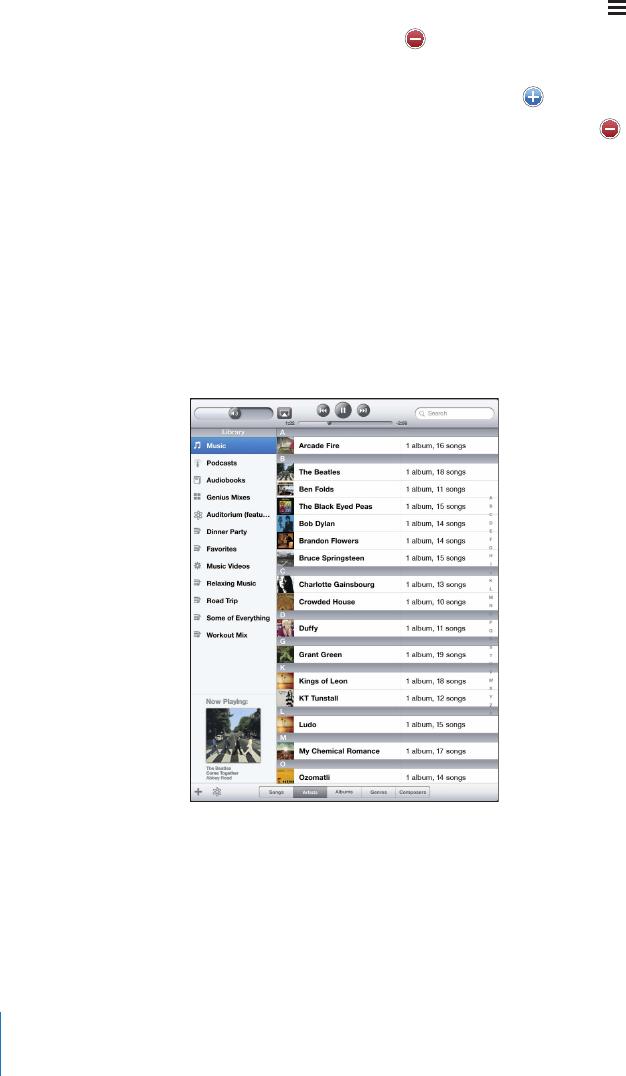
Browse your collection: Tap Music, Podcasts, Audiobooks, iTunes U, or Purchased. At
the bottom of the screen, tap Songs, Artists, Albums, Genres, or Composers to browse.
105
Browse Genius playlists or Genius Mixes: Tap Genius or Genius Mixes. If Genius
doesn’t appear, you may need to turn on Genius in iTunes, then sync iPad. See “Making
Genius Playlists” on page 110 .
Play a song: Tap the song.
Controlling Song Playback
When you play a song, the Now Playing screen appears.
Pause a song Tap .
Resume playback Tap .
Raise or lower the volume Drag the onscreen volume slider or use the iPad
volume buttons.
Restart a song or a chapter in an
audiobook or podcast
Tap .
Skip to the next song or chapter in
an audiobook or podcast
Tap .
Go to the previous song or chapter
in an audiobook or podcast
Tap twice.
Rewind or fast-forward Touch and hold or —the longer you hold the
control, the faster the song rewinds or fast-forwards.
View album art full-size Tap the album cover when playing a song.
You can display playback controls when you’re listening to music and using another
app—or even when iPad is locked.
106 Chapter 16 iPod
Display audio playback controls from another app or from the Lock screen: Double-
click the Home DWVVQPVJGP±KEMHTQONGHVVQTKIJVCNQPIVJGDQVVQOQHVJGUETGGP
After using the controls, tap iPod to go your iPod library or click the Home button to
return to the app you were using.
If iPad is locked, the controls appear at the top of the screen and then disappear after
[QW°PKUJWUKPIVJGO
Additional Song Controls
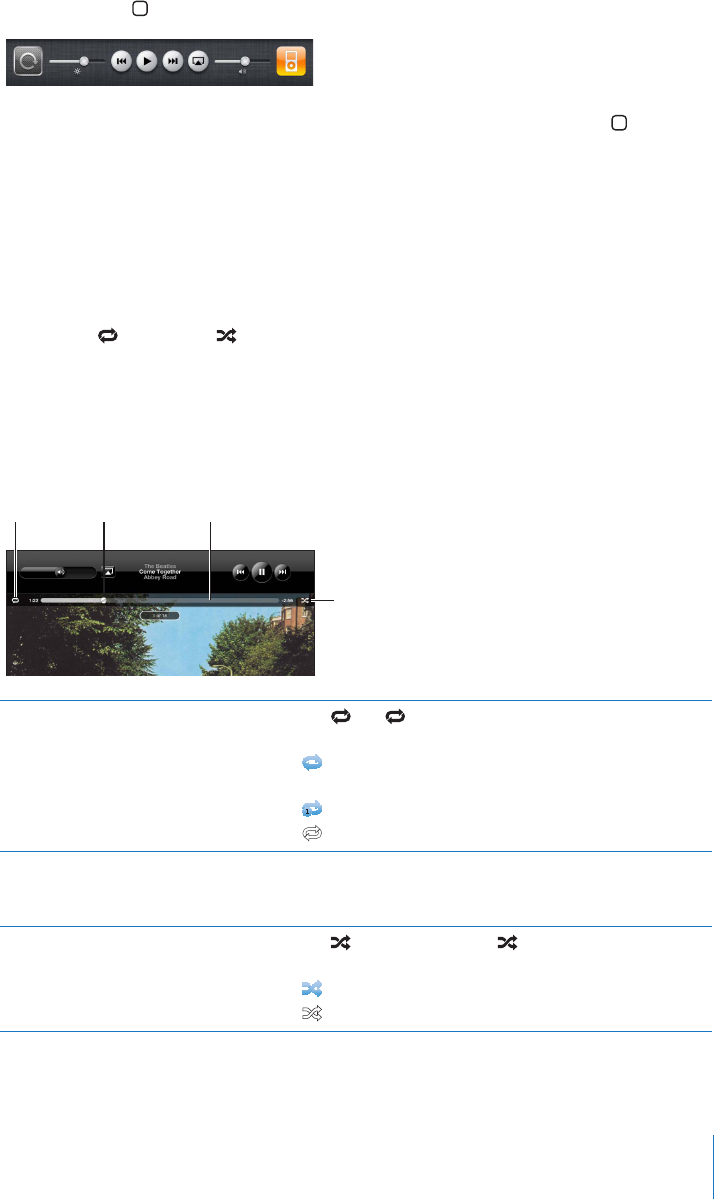
From the Now Playing screen, tap the album cover to see the controls.
The repeat CPFUJWÔG controls appear along with the scrubber bar. You can see
elapsed time, remaining time, and the song number.
Drag the playhead along the scrubber bar to skip to any point in the song. You can
CFLWUVVJGUETWDTCVGHTQOJKIJURGGFVQ°PGD[UNKFKPI[QWT°PIGTFQYPCU[QWFTCI
the playhead along the scrubber bar. The scrub rate becomes slower the farther down
[QWUNKFG[QWT°PIGT
9LWLH[ 7SH`OLHK :JY\IILYIHY
:O\MMSL
Set iPad to repeat songs Tap . Tap again to set iPad to repeat only the
current song.
= iPad is set to repeat all songs in the current album
or list.
= iPad is set to repeat the current song over and over.
= iPad isn’t set to repeat songs.
Skip to any point in a song Drag the playhead along the scrubber bar. Slide your
°PIGTFQYPVQCFLWUVVJGUETWDTCVG6JGUETWDTCVG
DGEQOGUUNQYGTVJGHCTVJGTFQYP[QWUNKFG[QWT°PIGT
5GVK2CFVQUJWÔGUQPIU Tap VQUJWÔGUQPIU6CR again to set iPad to play
songs in order.
K2CFKUUGVVQUJWÔGUQPIU
= iPad is set to play songs in order.
107
Chapter 16 iPod
5JWÔGVJGVTCEMUKPCP[RNC[NKUV
album, or other list of songs
From the Now Playing screen, tap the album art to show
the song controls onscreen. Tap at the bottom of the
UETGGPVJGPVCR5JWÔG at the top of the list of songs.
9JGVJGTQTPQVK2CFKUUGVVQUJWÔGKH[QWVCR5JWÔGCV
the top of a list of songs, iPad plays the songs from that
list in random order.
Play music on an AirPlay sound system
or Apple TV
Tap and choose a sound system. If doesn’t appear
or if you don’t see the AirPlay system you’re looking for,
make sure it’s on the same wireless network.
Switch from AirPlay back to iPad Tap and choose iPad from the list.
Podcast and Audiobook Controls
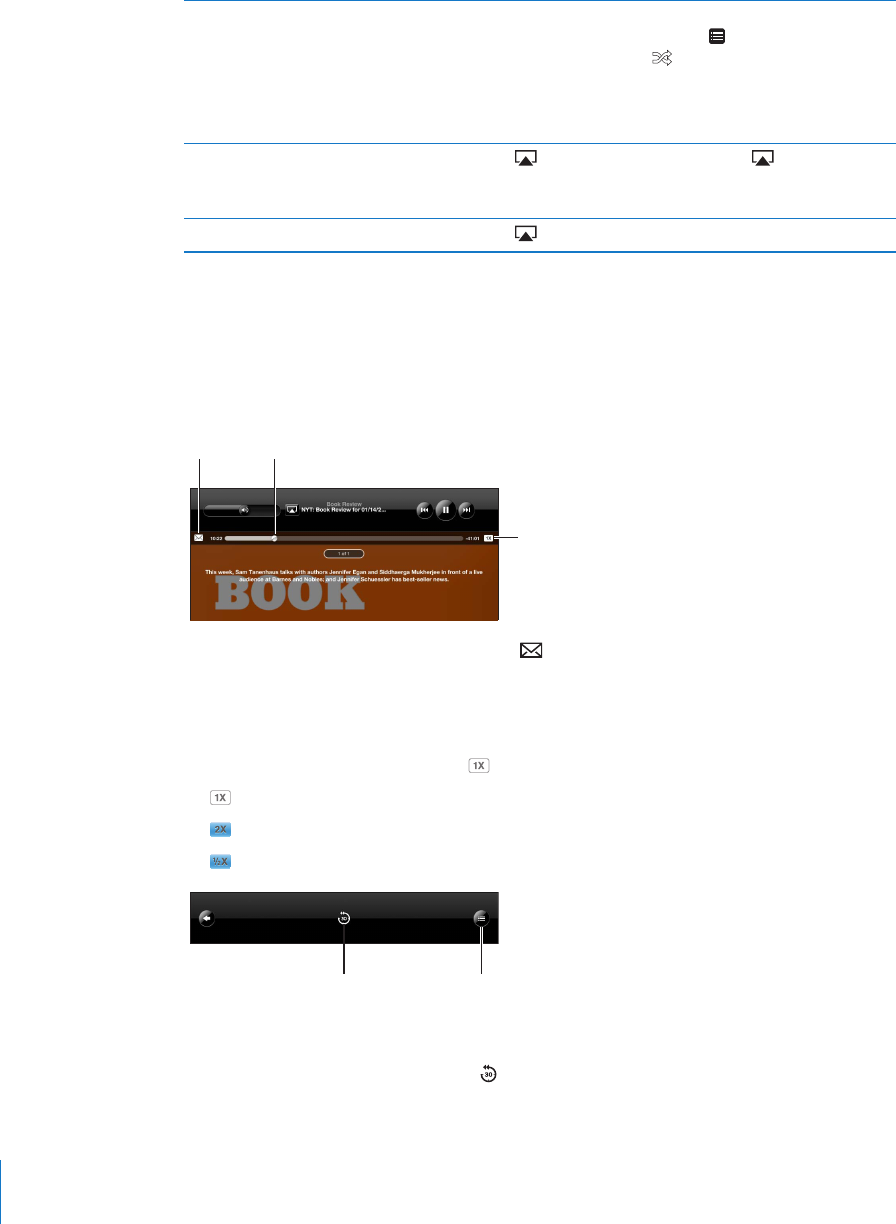
From the Now Playing screen, tap the podcast or audiobook cover to see the controls.
The email control and playback speed control appear along with the scrubber bar.
You can see elapsed time, remaining time, and the episode or chapter number. The
scrubber bar lets you skip to any point in the podcast or audiobook.
,THPS 7SH`OLHK
7SH`IHJR
ZWLLK
Send an email link to this podcast: Tap .
Skip to any point: &TCIVJGRNC[JGCFCNQPIVJGUETWDDGTDCT#FLWUVVJGUETWDTCVG
HTQOJKIJURGGFVQ°PGD[UNKFKPI[QWT°PIGTFQYPCU[QWFTCIVJGRNC[JGCFCNQPI
VJGUETWDDGTDCT6JGUETWDTCVGDGEQOGUUNQYGTVJGHCTVJGTFQYP[QWUNKFG[QWT°PIGT
Change the playback speed: Tap to change the speed.
= Play at normal speed
= Play at double speed
= Play at half speed
;YHJRSPZ[
ZLJVUK
YLWLH[
The 30-second repeat control and track list control appear at the bottom of the screen.
Play back the last 30 seconds: Tap .
108 Chapter 16 iPod

See other podcasts in a series or chapters in an audiobook: Tap . Tap the podcast or
audiobook thumbnail to return to the Now Playing screen.
Viewing All Tracks on an Album
See all the tracks on the album that contains the current song: On the Now Playing
screen, tap . Tap a track to play it. Tap the album thumbnail to return to the Now
Playing screen.
In track list view, you can assign ratings to songs. You can use ratings to create smart
playlists in iTunes that dynamically update to include, for example, your highest
rated songs.
Rate a song: &TCI[QWTVJWODCETQUUVJGTCVKPIDCTVJG°XGFQVUWPFGTVJGRNC[JGCF
VQIKXGVJGUQPI\GTQVQ°XGUVCTU
Searching Music
You can search the titles, artists, albums, and composers of songs, podcasts, and other
content you’ve synced to iPad.
Search music, podcasts, audiobooks, or other content in your library: Enter text in the
UGCTEJ°GNFCVVJGVQRQHCUQPINKUVRNC[NKUVCTVKUVNKUVQTQVJGTXKGYQH[QWTK2QFEQPVGPV
6CRVJGUVCVWUDCTVQUETQNNSWKEMN[VQVJGVQRQHCNKUVCPFTGXGCNVJGUGCTEJ°GNF
Search results appear automatically as you type. Tap Search to dismiss the keyboard
and see more of the results.
You can also use Spotlight to search for music. See “Spotlight Search” on page 157.
Using Playlists
A playlist is a custom compilation of songs. You might want to create a playlist for a
URGEK°EOQQFQTQEECUKQPQTQTICPK\G[QWTOWUKENKDTCT[;QWECPWUGVJTGGMKPFUQH
playlists on iPad—standard playlists, Genius playlists, and Genius Mixes.
Creating Playlists
You can make playlists from the music, podcasts, or audiobooks in your iPod library.
Make a standard playlist:
1 Tap iPod, then tap at the bottom of the screen.
2 Enter a name for the playlist, then tap Save.
3 Tap PGZVVQ[QWTUGNGEVKQPUVJGPVCR&QPGYJGP[QW°PKUJUGNGEVKPI;QWECPCNUQ
tap Sources to browse for selections.
4 9JGP[QW°PKUJVCR&QPG
109
Chapter 16 iPod
You can also make playlists from other categories in your iPod library, such as podcasts
or audiobooks.
When you make a playlist on iPad, the playlist is also saved in the iTunes library on
your computer the next time you sync.
Edit a playlist: Tap the playlist, tap Edit, then do one of the following:
To move a selection higher or lower in the list, drag next to the selection.
To delete a selection, tap next to the selection, then tap Delete. Deleting a song
from a playlist doesn’t delete it from iPad.
To add more songs, tap Add Songs, tap next to the selection, then tap Done.
Clear a playlist: Tap the playlist, tap Edit, then tap .
Making Genius Playlists
)GPKWU°PFUUQPIUKP[QWTK6WPGUNKDTCT[VJCVIQITGCVVQIGVJGT#)GPKWURNC[NKUVKUC
collection of songs that are picked for you to go with a song you choose from your library.
You can create Genius playlists in iTunes and sync them to iPad. You can also create
and save Genius playlists on iPad.
6QWUG)GPKWUQPK2CF°TUVVWTPQP)GPKWUKPK6WPGUVJGPU[PEK2CFYKVJK6WPGU
Genius is a free service, but requires an Apple ID.
110 Chapter 16 iPod

Make a Genius playlist on iPad:
1 Tap , then tap New.
2 Tap a song in the list. Genius creates a playlist of similar songs.
You can also make a Genius playlist of songs that go great with the song you’re
playing. From the Now Playing screen, tap the album cover to display additional
controls, then tap .
Save a Genius playlist: In the playlist, tap Save. The playlist is saved in Genius with the
title of the song you picked.
You can make and save as many Genius playlists as you want. If you save a Genius
playlist created on iPad, it syncs back to iTunes the next time you connect.
Refresh a Genius playlist: In the playlist, tap Refresh.
4GHTGUJKPIC)GPKWURNC[NKUVETGCVGUC)GPKWURNC[NKUVQHFKÒGTGPVUQPIUVJCVIQITGCV
with the song you picked. You can refresh any Genius playlist, whether it was created
in iTunes and synced to iPad, or created on iPad.
Create a Genius playlist from a new song: In the playlist, tap New, then pick a new song.
Delete a saved Genius playlist: Tap the Genius playlist, then tap Delete.
Once a Genius playlist is synced back to iTunes, you won’t be able to delete it directly
from iPad. You can use iTunes to edit the playlist name, stop syncing, or delete the playlist.
Playing Genius Mixes
)GPKWUCWVQOCVKECNN[UGCTEJGU[QWTK2CFNKDTCT[CPF°PFUUQPIUHTQO[QWTNKDTCT[KP
that genre or format. Genius Mixes are recreated each time you listen to them, so
they’re always new and fresh.
)GPKWU/KZGUETGCVGUFKÒGTGPVOKZGUFGRGPFKPIQPVJGXCTKGV[QHOWUKE[QWJCXGKP
your iPad library. For example, you may have Genius Mixes that highlight Classical,
Jazz, or Alternative Rock songs.
Browse Genius Mixes: On the left side of the iPod window (below Genius), tap
Genius Mixes.
Play a Genius Mix: Tap the mix.
111
Chapter 16 iPod

Home Sharing
Home Sharing lets you play music, movies, and TV shows on iPad from the iTunes
library on your Mac or PC.
Note: Booklets, albums, LPs, and other bonus content can’t be shared.
iPad and your computer must be on the same Wi-Fi network. iTunes on your computer
must be open, with Home Sharing turned on and logged in to the same Apple
account as Home Sharing on iPad.
Turn on Home Sharing in iTunes: On your computer, open iTunes and choose
Advanced > Turn On Home Sharing. Enter your Apple ID and password, then click
Create Home Share.
Play music or video on iPad from your iTunes library:
1 In Settings, choose iPod then, under Home Sharing, enter the same Apple ID and
password you used when turning on Home Sharing in iTunes.
2 In iPod, tap More, then tap Shared and choose your iTunes library.
The Playlists, Artists, Songs, and other tabs in iPod now show the content of your
iTunes library, instead of your iPad content.
Return to the content on your iPad: In iPod, tap More, then tap Shared and choose
iPad at the top of the list.
Transferring Content
You can transfer purchases you make on iPad to a computer that’s authorized to play
content from your Apple ID. To authorize the computer, open iTunes on the computer
and choose Store > Authorize This Computer.
Transfer purchased content: Connect iPad to your computer. iTunes asks if you want
to transfer purchased content.
112 Chapter 16 iPod

iTunes Store 17
About the iTunes Store
Use the iTunes Store to add content to your iPad. You can browse and purchase
music and TV shows, buy and rent movies, or download and play podcasts or
iTunes U collections.
/CP[OQXKGUCPF68UJQYUCTGCXCKNCDNGKPDQVJUVCPFCTFCPFJKIJFG°PKVKQP6Q
access the iTunes Store, iPad must have an Internet connection. See “Connecting to the
Internet” on page 29.
Note: The iTunes Store is not available in all regions, and iTunes Store content may
vary across regions.
Transferring Content
You can transfer purchases you make on iPad to a computer authorized to play
content from your Apple ID.
Authorize a computer: Open iTunes on the computer, then choose Store >
Authorize Computer.
Transfer purchased content: %QPPGEVK2CFVQ[QWTEQORWVGTK6WPGUXGTK°GUVJCV
you want to transfer purchased content.
113

Finding Music, Videos, and More
Browse content: At the top of the screen, browse by Genres, Featured, Top Charts,
or Genius. At the bottom of the screen, tap Music, Movies, TV Shows, Podcasts,
Audiobooks, iTunes U, or Downloads.
Search for content: 6CRVJGUGCTEJ°GNFCVVJGVQRQHVJGUETGGPVJGPWUGVJG
onscreen keyboard to enter one or more words. Tap Search on the keyboard. Search
results are grouped by category, such as Movies, Albums, or Podcasts.
Tap an item to see more information. You can read reviews, write your own review,
or email a link about the item to a friend. Depending on the item, you can also buy,
download, or rent it.
Following Artists and Friends
Use iTunes Ping to connect with the world’s music fans. Follow favorite artists to learn
about new releases and upcoming concerts and tours, get an insider’s perspective
VJTQWIJVJGKTRJQVQUCPFXKFGQUCPFNGCTPCDQWVVJGKTOWUKECNKP±WGPEGU4GCF
friends’ comments about the music they’re listening to, and see what they’re buying
and which concerts they plan to attend. Express your musical likes and post comments
for your own followers.
6QETGCVGCPFGZRNQTGOWUKECNEQPPGEVKQPU[QWPGGFVQETGCVGCRTQ°NG
%TGCVG[QWTK6WPGU2KPIRTQ°NGOpen the iTunes application on your Mac or PC,
click Ping, and follow the onscreen instructions.
114 Chapter 17 iTunes Store

Explore iTunes Ping on your iPad: 1RGPVJGK6WPGUCRRVCR2KPIVCR/QTG°TUV
if Ping isn’t visible), and then:
Tap Activity to see the latest from the people you follow. Updates include purchases,
reviews, likes, comments, and posts.
Tap People to see who you’re following and who’s following you, and to search for
artists or friends.
6CR/[2TQ°NGVQTGXKGY[QWTRTQ°NGKPHQTOCVKQP
Follow an artist: 6CR(QNNQYQPVJGCTVKUV¨URTQ°NGRCIG
By searching: 6CR2GQRNGGPVGTVJGCTVKUV¨UPCOGKPVJGUGCTEJ°GNFCVVJGVQRQHVJG
page, then tap Search. Tap the artist’s name in the list of results, then tap Follow.
While browsing: 6CR2TQ°NGCVVJGDQVVQOQHCP[CNDWORCIGVJGPVCR(QNNQY
Follow a friend: %JQQUG[QWTUVCTVKPIITQWRQHHTKGPFUYJGP[QWUGVWR[QWTRTQ°NG
using iTunes on your Mac or PC. After that, you can follow friends using Ping on iPad.
By searching: 6CR2GQRNGGPVGT[QWTHTKGPF¨UPCOGKPVJGUGCTEJ°GNFVJGPVCR
Search. Tap your friend’s name in the list of matches, then tap Follow.
While exploring Ping: Tap a person’s name, then tap Follow.
9JGP[QWHQNNQYUQOGQPGVJG[FQP¨VCWVQOCVKECNN[HQNNQY[QW+P[QWTRTQ°NG[QWECP
choose to approve or decline follow requests as they arrive, or simply accept all new
followers without review.
Share your thoughts: As you browse albums and songs, tap Post to comment on a
RKGEGQHOWUKEQTVCR.KMGLWUVVQUC[[QWNKMGKV;QWTHTKGPFUYKNNUGG[QWTVJQWIJVUKP
their iTunes Ping Activity feed.
Share concert plans: 6CR%QPEGTVUQP[QWTRTQ°NGRCIGVQUGGWREQOKPI
performances by the artists you follow, and to see which of your friends are going to a
show. Tap Tickets to buy your own ticket, or tap I’m Going to let others know you’ll be
there too. (Not available in all countries or regions.)
Purchasing Music or Audiobooks
9JGP[QW°PFCUQPICNDWOQTCWFKQDQQM[QWNKMGKPVJGK6WPGU5VQTG[QWECP
purchase and download it to iPad. You can also preview it to make sure it’s what you
want.
To make purchases or write reviews, you need an Apple ID. iPad gets your account
settings from iTunes when you sync. If you don’t have an Apple ID, or if you want to
OCMGRWTEJCUGUHTQOCFKÒGTGPV#RRNG+&IQVQ5GVVKPIU 5VQTG
You don’t need an Apple ID to play or download podcasts or iTunes U classes.
Preview a song: Tap the number in the column, then tap .
Preview an audiobook: Tap the item.
115
Chapter 17 iTunes Store

Purchase and download a song, album, or audiobook:
1 Tap the price and tap Buy.
2 Sign in using your Apple ID if requested, then tap OK.
If you don’t have an Apple ID, tap Create New Apple ID to set one up.
Purchases are charged to your Apple ID. If you make additional purchases within
°HVGGPOKPWVGU[QWFQP¨VJCXGVQGPVGT[QWTRCUUYQTFCICKP
An alert appears if you previously purchased one or more songs from an album.
Tap Buy if you want to purchase the entire album including the songs you already
purchased, or tap Cancel if you want to purchase any remaining songs individually.
Once you purchase an item, it begins downloading. See “Checking Download Status” on
page 117.
Purchased songs are added to the Purchased playlist on iPad (iPod > Purchased). If you
delete the Purchased playlist, iTunes creates a new one when you buy an item from
the iTunes Store.
;QWECPWUGK6WPGU5VQTGIKHVECTFUIKHVEGTVK°ECVGUQTQVJGTRTQOQVKQPCNEQFGUVQ
make purchases. When you sign in to your account, your remaining store credit
appears with your account information at the bottom of most iTunes Store screens.
Enter a redemption code: Tap Music, scroll to the bottom of the screen, tap Redeem,
and follow the onscreen instructions.
Purchasing or Renting Videos
9JGP[QW°PFCOQXKG68UJQYQTOWUKEXKFGQ[QWNKMGKPVJGK6WPGU5VQTG[QWECP
purchase and download it to iPad. You can purchase movies and TV shows in standard
RQTJKIJFG°PKVKQPRHQTOCV+H[QWRWTEJCUGCJKIJFG°PKVKQPXGTUKQP[QW
CNUQTGEGKXGVJGUVCPFCTFFG°PKVKQPXGTUKQP
Preview a video: Tap Preview.
Purchase or rent a video:
1 Tap Buy or Rent.
2 Sign in using your Apple ID if requested, then tap OK.
If you don’t have an Apple ID, tap Create New Apple ID to set one up.
Your purchase is charged to your Apple ID. For additional purchases made within the
PGZV°HVGGPOKPWVGU[QWFQP¨VJCXGVQGPVGT[QWTRCUUYQTFCICKP
Once you purchase an item it begins downloading. Rented movies won’t begin playing
until the download completes. See “Checking Download Status” on page 117.
Purchased videos are added to the Purchased playlist on iPad (iPod > Purchased). If
you delete the Purchased playlist, iTunes creates a new one the next time you buy an
item from the iTunes Store. Purchased videos also appear in the Video app.
116 Chapter 17 iTunes Store

;QWECPWUGK6WPGU5VQTGIKHVECTFUIKHVEGTVK°ECVGUQTQVJGTRTQOQVKQPCNEQFGUVQOCMG
purchases. When you’re signed in using your Apple ID, your remaining store credit
appears with your account information at the bottom of most iTunes Store screens.
Enter a redemption code: Tap Music, then tap Redeem at the bottom of the screen
and follow the onscreen instructions.
Listening to or Watching Podcasts
You can listen to audio podcasts or watch video podcasts on iPad. You can also
download podcasts to iPad, and sync them to the iTunes library on your computer
when you connect.
Tap Podcasts at the bottom of the iTunes Store screen. Browse by Featured or Top
Charts. To see a list of episodes, tap a podcast. The icon indicates video podcasts.
Listen to a podcast: Tap the podcast title.
Download a podcast: Tap the Free button, then tap Get Episode. Downloaded
podcasts appear in the Podcasts list in iPod.
Listen to or watch a podcast you downloaded: In iPod, tap Podcasts, then tap the
podcast. Video podcasts also appear in the Video app.
Get more episodes of the podcast you downloaded: In the Podcasts list in iPod,
tap the podcast, then tap Get More Episodes.
Delete a podcast: In the Podcasts list in iPod, swipe left or right on the podcast, then
tap Delete.
Checking Download Status
You can check the Downloads screen to see the status of in-progress and scheduled
downloads, including purchases you’ve pre-ordered.
See the status of items being downloaded: Tap Downloads.
To pause a download, tap .
If a download is paused or interrupted, iPad starts the download again the next time
it connects to the Internet. Or, if you open iTunes on your computer, iTunes completes
the download to your iTunes library (if your computer has an Internet connection and
is signed in using the same Apple ID).
See the status of pre-ordered items: Tap Downloads.
Pre-ordered items appear in a list until the date the item is released. Tap the item for
release date information. Once the item is available for download, a download icon
appears next to the download.
Download a pre-ordered item: Tap the item, then tap .
117
Chapter 17 iTunes Store

Pre-ordered items aren’t downloaded automatically when they’re released. Return to
the Downloads screen to begin the download.
Some albums include bonus content, which is downloaded to your iTunes library on
your computer. Not all bonus content is downloaded directly to iPad.
Download bonus content: Sign in using your Apple ID. In iTunes, choose Store >
“Check for Available Downloads,” then click Check.
Syncing Content
iTunes automatically syncs everything you download or purchase on iPad to your
iTunes library when you connect iPad to your computer. This lets you access the
downloads on your computer and provides a backup if you delete purchased content
from iPad.
Purchased content is synced to the “Purchased on <name of your iPad>” playlist.
iTunes creates the playlist if it doesn’t exist. iTunes also syncs your purchases to the
Purchased playlist that iTunes uses for purchases you make on your computer, if that
playlist exists and is set to sync with iPad.
Podcasts you download sync to the Podcast list in your iTunes library.
Viewing Apple ID Information
To view iTunes Store information for your Apple ID on iPad, scroll to the bottom of the
screen and tap Sign In. If you’re already signed in, tap Account. Or, go to Settings >
Store and tap View Apple ID. You must be signed in to view your account information.
Verifying Purchases
You can use iTunes on your computer to verify that all the music, videos, apps, and
other items you bought from the iTunes Store or App Store are in your iTunes library.
You might want to do this if a download was interrupted.
Verify your purchases:
1 Make sure your computer has an Internet connection.
2 In iTunes, choose Store > Check for Available Downloads.
3 Enter your Apple ID and password, then click Check.
Purchases not yet on your computer are downloaded.
The Purchased playlist displays your purchases. However, because you can add or
remove items in this list, it might not be accurate. To see all of your purchases, sign in
to your account, choose Store > View My Account, then click Purchase History.
118 Chapter 17 iTunes Store

App Store 18
About the App Store
Use the App Store to add apps to iPad. Browse, purchase, and download apps
URGEK°ECNN[FGUKIPGFHQTK2CFQTHQTK2JQPGCPFK2QFVQWEJ
Apps you download from the App Store and install on iPad are backed up to your
iTunes library the next time you sync. When you sync, you can also install apps on iPad
that you purchase through iTunes on your computer. iPad works with most iPhone and
iPod touch apps, so if you already have apps for your iPhone or iPod touch, you can
sync them to iPad from your Mac or PC. Use them at their original size, or tap in the
lower-right corner of the screen to expand them.
Note: The App Store and some apps are not available in all areas. App availability and
RTKEKPICTGUWDLGEVVQEJCPIG
To use the App Store, iPad must have an Internet connection. See “Connecting to the
Internet” on page 29. You also need an Apple ID (not available in some countries) to
download apps. iPad gets your Apple ID settings from iTunes. If you don’t have an
#RRNG+&QTKH[QWYCPVVQOCMGRWTEJCUGUWUKPICFKÒGTGPV#RRNG+&IQVQ5GVVKPIU
Store. See “Store” on page 170.
119
Browsing and Searching
Browse Featured to see new, notable, or recommended apps, or browse Top Charts to
UGGVJGOQUVRQRWNCTCRRNKECVKQPU+H[QW¨TGNQQMKPIHQTCURGEK°ECRRWUG5GCTEJ
Browse apps: Tap Featured, Top Charts, or Categories at the bottom of the screen.
Browse using Genius: Tap Genius to see a list of recommended apps, based on what’s
already in your app collection. To turn Genius on, follow the onscreen instructions.
Genius is a free service, but it requires an Apple ID.
Search for apps: 6CRVJGUGCTEJ°GNFCVVJGVQRQHVJGUETGGPCPFGPVGTQPGQTOQTG
words. Choose from the list of suggestions, or tap Search on the keyboard.
Getting More Information
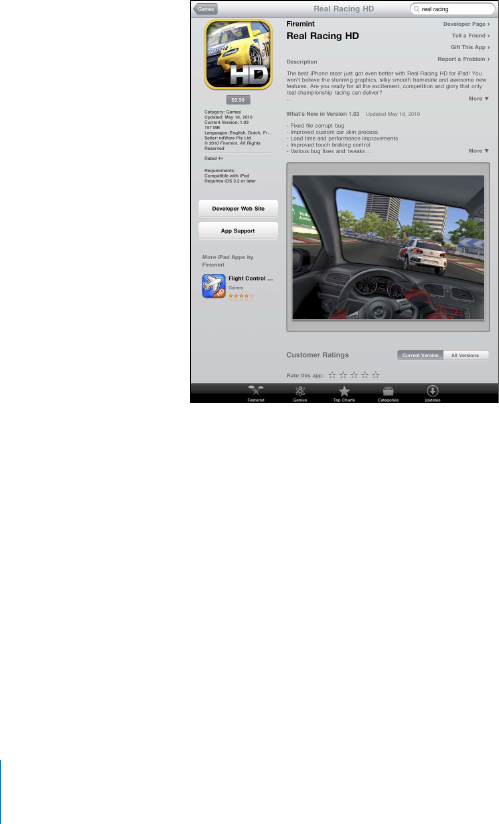
Tap any app in a list to see the Info screen, which shows the app’s price, screenshots,
and ratings.
Email a link to the app’s Info page: Tap “Tell a Friend” at the top of the screen.
Report a problem: Tap “Report a Problem” at the top of the Info screen. Select a
problem from the list or type your comments, then tap Report.
View screenshots: 5ETQNNFQYPVQVJGUETGGPUJQVUVJGP±KEMNGHVQTTKIJVVQUGG
additional screenshots.
Get ratings and read reviews: Scroll down to “Customer Ratings and Reviews.”
120 Chapter 18 App Store

Buying Apps
9JGP[QW°PFCPCRR[QWYCPVKPVJG#RR5VQTG[QWECPRWTEJCUGCPFFQYPNQCFKV
to iPad. If the app is free, you can download it without charge.
Once you download an app, it’s immediately installed on iPad.
Purchase and download an app:
1 Tap the price, then tap Buy App (or tap Free, then tap Install App).
2 Sign in using your Apple ID if requested, then tap OK.
If you don’t have an Apple ID, tap Create New Apple ID to set one up.
Purchases are charged to your Apple ID. If you make additional purchases within
°HVGGPOKPWVGU[QWFQP¨VJCXGVQGPVGT[QWTRCUUYQTFCICKP
;QWECPWUGK6WPGU5VQTGIKHVECTFUIKHVEGTVK°ECVGUQTQVJGTRTQOQVKQPCNEQFGUVQ
make purchases. When you sign in using your Apple ID, your remaining store credit
appears with your account information at the bottom of most App Store screens.
Enter a redemption code: Tap Featured or Top Charts, scroll to the bottom of the
screen, tap Redeem, then follow the onscreen instructions.
See the status of app downloads: After you begin downloading an app, its icon
appears on the Home screen with a progress indicator.
If a download is interrupted, iPad starts the download again the next time it connects
to the Internet. Or, if you open iTunes on your computer, iTunes completes the
download to your iTunes library (if your computer is connected to the Internet and
signed in using the same Apple ID).
Using Apps
Apps designed for iPad work in any orientation—portrait or landscape. When you use
CPCRRKPNCPFUECRGQTKGPVCVKQPKV°NNUVJGUETGGP
On iPad, you can use apps designed for iPhone or iPod touch at their original size,
or expand them.
Expand an app: Tap in the lower-right corner.
Return an app to its original size: Tap in the lower-right corner.
Some apps let you make purchases within the app. You can restrict in-app purchases
in Settings. See “Restrictions” on page 158 .
121
Chapter 18 App Store

5QOGCRRUWUGRWUJPQVK°ECVKQPUVQCNGTV[QWQHPGYKPHQTOCVKQPGXGPYJGPVJG
CRRKUP¨VTWPPKPI0QVK°ECVKQPUXCT[D[CRRDWVOC[KPENWFGVGZVQTUQWPFCNGTVUQTC
number on the app icon on the Home screen.
Updating Apps
The App Store checks for updates to apps you install. The App Store icon shows the
total number of app updates available.
If an update is available when you access the App Store, the Updates screen appears
immediately. App updates are downloaded and installed when you choose to
update them.
Note: App upgrades are new releases, which you can purchase or download.
Update an app:
1 At the bottom of the screen, tap Updates.
2 Tap an app to see more information about the update.
3 Tap Update.
Update all apps: At the bottom of the screen, tap Updates, then tap Update All.
+H[QWVT[VQWRFCVGCPCRRRWTEJCUGFYKVJCFKÒGTGPV#RRNG+&[QW¨TGRTQORVGFHQT
that Apple ID and password.
Writing Reviews
You can write and submit app reviews on iPad.
Write a review:
1 On the Info screen, scroll down to “Customer Ratings and Reviews.”
2 Tap “Write a Review.”
3 5GVVJGTCVKPI£UVCTUGPVGTCVKVNGHQTVJGTGXKGYCPFCFFQRVKQPCNTGXKGY
comments.
4 Tap Submit.
Before submitting a review, you must be signed in with your Apple ID and have
purchased or downloaded the app.
122 Chapter 18 App Store

Deleting Apps
You can delete iPad apps that you’ve installed from the App Store. You can’t delete
built-in iPad apps.
When you sync, iTunes automatically backs up any apps you download to iPad. If you
delete an app on iPad, you can reinstall it if it was previously synced.
Important: If you delete an app, the documents associated with the app are deleted
from iPad, unless you reinstall the app and restore its data from a backup using iTunes.
Delete an App Store app:
1 6QWEJCPFJQNFCP[CRRKEQPQPVJG*QOGUETGGPWPVKNVJGKEQPUUVCTVVQLKIING
2 Tap in the corner of the app you want to delete.
3 Tap Delete.
Press the Home button to cancel.
When you delete an app, its data is no longer accessible, but it isn’t erased from
iPad. For information about erasing all content and settings, see “Resetting iPad” on
page 162.
Syncing Purchases
When you connect iPad to your computer, iTunes automatically syncs apps you
download or purchase on iPad to your iTunes library. This lets you access the
downloaded apps on your computer and provides a backup if you delete apps
from iPad.
Downloaded apps are backed up the next time you sync with iTunes. Afterwards, only
app data is backed up when you sync with iTunes.
Apps are synced to the Apps list in your iTunes library.
123
Chapter 18 App Store
iBooks 19
About iBooks
iBooks is a great way to read and buy books. Download the free iBooks app from
the App Store, and then get everything from classics to best sellers from the built-in
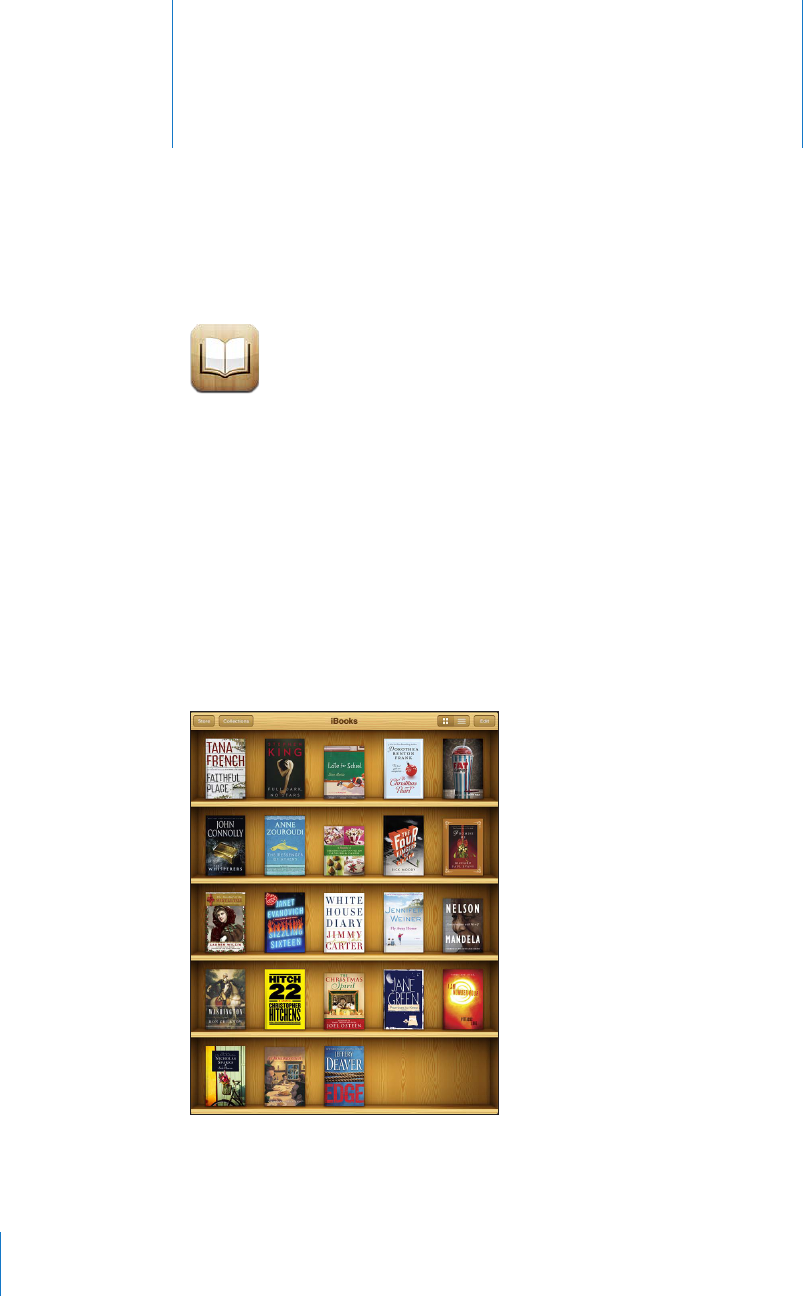
iBookstore. Once you download a book, it’s displayed on your bookshelf.
Add ePub books and PDFs to your bookshelf using iTunes. Then tap a book to start
TGCFKPIK$QQMUTGOGODGTU[QWTNQECVKQPUQ[QWECPGCUKN[TGVWTPVQYJGTG[QWNGHVQÒ
A wide range of display options makes the books easy to read.
iBooks and the iBookstore aren’t available in all languages and locations.
(]HPSHISLVU[OLP)VVRZ[VYL;P[SLH]HPSHIPSP[`PZZ\IQLJ[[VJOHUNL
124

To download the iBooks app and use the iBookstore, you need an Internet connection
and an Apple account. If you don’t have an Apple account, or if you want to make
RWTEJCUGUWUKPICFKÒGTGPV#RRNG+&IQVQ5GVVKPIU 5VQTG
Syncing Books and PDFs
You can download or purchase from the iBookstore. You can also add DRM-free ePub
DQQMUCPF2&(UVQ[QWTK6WPGUNKDTCT[6JGTGCTGUGXGTCNYGDUKVGUVJCVQÒGTDQQMUKP
ePub and PDF format.
Use iTunes to sync your books and PDFs between iPad and your computer. When iPad
is connected to your computer, the Books pane lets you select which items to sync.
Sync an ePub book or PDF to iPad: Download the book or PDF using your computer.
6JGPKPK6WPGUEJQQUG(KNG #FFVQ.KDTCT[CPFUGNGEVVJG°NG%QPPGEVK2CFVQ[QWT
computer, select the book or PDF in the Books pane in iTunes, and then sync iPad.
If a PDF doesn’t appear in the Books pane, you need to change its type in iTunes.
5GCTEJ[QWTK6WPGUNKDTCT[VQ°PFVJG2&(°NGUGNGEVKVVJGPEJQQUG(KNG )GV+PHQ+P
VJG1RVKQPUUGEVKQPQHVJG°NGKPHQTOCVKQPYKPFQYEJQQUG$QQMHTQOVJG/GFKC-KPF
pop-up menu, then click OK.
Using the iBookstore
In the iBooks app, tap Store to open the iBookstore. From there, you can browse
HGCVWTGFDQQMUQTDGUVUGNNGTUCPFDTQYUGHQTDQQMUD[CWVJQTQTVQRKE9JGP[QW°PF
a book you like, you can purchase and download it.
Note: Some features of the iBookstore may not be available in all locations.
Get more information: In the iBookstore, you can read a summary of the book, read
or write a review, and download a sample of the book before buying it.
Purchase a book: Find a book you want, tap the price, then tap Buy Now. Sign in using
your Apple ID, then tap OK. Some books may be free for downloading.
The purchase is charged to your Apple account. If you make additional purchases
YKVJKPVJGPGZV°HVGGPOKPWVGU[QWFQP¨VJCXGVQGPVGT[QWTRCUUYQTFCICKP
If you’ve already purchased a book and want to download it again, tap Purchases in
VJGK$QQMUVQTGCPF°PFVJGDQQMKPVJGNKUV6JGPVCR4GFQYPNQCF
Books that you purchase are synced to your iTunes library the next time you sync iPad
with your computer. This provides a backup in case you delete the book from iPad.
125
Chapter 19 iBooks

Reading Books
Reading a book is easy. Go to the bookshelf and tap the book you want to read. If you
don’t see the book you’re looking for, tap Collections to view other groups of books.
Turn pages: 6CRPGCTVJGTKIJVQTNGHVOCTIKPQHCRCIGQT±KEMNGHVQTTKIJV6QEJCPIG
the direction the page turns when you tap the left margin, go to Settings > iBooks.
)QVQCURGEK°ERCIGTap near the center of the current page to show the controls.
Drag the page navigation control at the bottom of the screen to the desired page,
then let go.
Go to the table of contents: Tap near the center of the current page to show the
controls, then tap 6CRCPGPVT[VQLWORVQVJCVNQECVKQPQTVCR4GUWOGVQTGVWTPVQ
the current page.
Add or remove a bookmark: Tap the ribbon button to set a bookmark. You can have
multiple bookmarks. To remove a bookmark, tap it. You don’t need to add a bookmark
YJGP[QWENQUGCDQQMDGECWUGK$QQMUTGOGODGTUYJGTG[QWNGHVQÒCPFTGVWTPU
there when you open the book again.
Add, remove, or edit a highlight: Touch and hold any word until it’s selected. Use the
ITCDRQKPVUVQCFLWUVVJGUGNGEVKQPVJGPVCR*KIJNKIJV6QTGOQXGCJKIJNKIJVVCRVJG
highlighted text, then tap Remove Highlight. To change the color of a highlight, tap
the highlighted text, then tap Colors and select a color from the menu.
Add, view, or remove a note: Touch and hold any word until it’s selected. Use the grab
RQKPVUVQCFLWUVVJGUGNGEVKQPVJGPVCR0QVG6[RGUQOGVGZVVJGPVCR&QPG6QXKGYC
note, tap the indicator in the margin near the highlighted text. To remove a note, tap
the highlighted text, then choose Delete Note. To change the color of a note, tap the
highlighted text, then tap Colors and select a color from the menu.
126 Chapter 19 iBooks

See all your bookmarks, highlights and notes: To see the bookmarks, highlights, and
notes you’ve added, tap , then tap Bookmarks. To view a note, tap its indicator.
Enlarge an image: Double-tap an image.
To read a book while lying down, use the screen rotation lock to prevent iPad from
rotating the display when you tilt iPad. For information, see “Viewing in Portrait or
Landscape” on page 16.
Reading PDFs
You can use iBooks to read PDFs. Go to the bookshelf and tap Collections, select a
collection, then tap the PDF you want to read.
Turn pages: Flick left or right.
Enlarge a page: Pinch to zoom in on the page, then scroll to see the portion you want.
)QVQCURGEK°ERCIGTap near the center of the current page to show the controls.
Then, in the page navigation controls at the bottom of the page, drag until the desired
RCIGPWODGTCRRGCTUQTVCRCVJWODPCKNVQLWORVQVJCVRCIG
Add or remove a bookmark: To add a bookmark, tap the ribbon button. You can have
multiple bookmarks. To remove a bookmark, tap it. You don’t need to set a bookmark
YJGP[QWENQUGC2&(DGECWUGK$QQMUTGOGODGTUYJGTG[QWNGHVQÒCPFTGVWTPUVJGTG
when you open the PDF again.
Go to the table of contents: Tap near the center of the current page to show the
controls, then tap 6CRCPGPVT[VQLWORVQVJCVNQECVKQPQTVCR4GUWOGVQTGVWTPVQ
VJGEWTTGPVRCIG+HVJGCWVJQTJCUP¨VFG°PGFCVCDNGQHEQPVGPVU[QWECPVCRCRCIG
icon instead.
Changing a Book’s Appearance
To change the appearance of a book, access the controls by tapping near the center of
a page.
Change the font or type size: Tap , then in the list that appears, tap or to
reduce or enlarge the type size. To change the font, tap Fonts, then select one from the
list. Changing the font and size also changes text formatting.
Change the brightness: Tap VJGPCFLWUVVJGDTKIJVPGUU
Change the page and type color: Tap , then turn the Sepia option on to change
the color of the page and type. This setting applies to all books.
;QWECPEJCPIGVJGYC[VJCVK$QQMULWUVK°GUVJGVGZVQHRCTCITCRJUKP5GVVKPIU K$QQMU
127
Chapter 19 iBooks

Searching Books and PDFs
You can search for the title or author of a book to quickly locate it on the bookshelf.
;QWECPCNUQUGCTEJVJGEQPVGPVUQHCDQQMVQ°PFCNNVJGTGHGTGPEGUVQCYQTFQT
RJTCUG[QW¨TGKPVGTGUVGFKP;QWECPCNUQUGPFCUGCTEJVQ9KMKRGFKCQT)QQINGVQ°PF
other related resources.
Search for a book: Go to the bookshelf. Tap the status bar to scroll to the top of the
screen, then tap the magnifying glass. Enter a word that’s in the title of a book, or the
author’s name, then tap Search. Matching books appear on the bookshelf.
Search in a book: Open a book and tap near the center of the page to show the
controls. Tap the magnifying glass, then enter a search phrase and tap Search. Tap a
search result to go to that page in the book.
To send your search to Google or Wikipedia, tap Search Google or Search Wikipedia.
Safari opens and displays the result.
To quickly search for a word in a book, touch and hold the word, then tap Search.
.QQMKPIWRVJG&G°PKVKQPQHC9QTF
;QWECPNQQMWRVJGFG°PKVKQPQHCYQTFWUKPIVJGFKEVKQPCT[
Look up a word: Select a word in a book, then tap Dictionary in the menu that
appears. Dictionaries may not be available for all languages.
Having a Book Read to You
If you have a visual impairment, you can use VoiceOver to read a book aloud. See
“VoiceOver” on page 13 8 .
Some books may not be compatible with VoiceOver.
Printing or Emailing a PDF
You can use iBooks to send a copy of a PDF via email, or to print all or a portion of the
PDF to a supported printer.
Email a PDF: Open the PDF, then tap and choose Email Document. A new message
CRRGCTUYKVJVJG2&(CVVCEJGF6CR5GPFYJGP[QW°PKUJCFFTGUUKPICPFYTKVKPI[QWT
message.
Print a PDF: Open the PDF, then tap and choose Print. Select a printer and the
page range and number of copies, then tap Print. For information about supported
printers, see “Printing” on page 40.
You can only email or print PDFs. These options aren’t available for ePub books.
128 Chapter 19 iBooks

Organizing the Bookshelf
Use the bookshelf to browse your books and PDFs. You can also organize items
into collections.
Sort the bookshelf: Go to the bookshelf and tap , then select a sort method from
the choices at the bottom of the screen.
Rearrange items: Touch and hold a book or PDF, then drag it to a new location on
the bookshelf.
Delete an item from the bookshelf: Go to the bookshelf and tap Edit. Tap each book
or PDF that you want to delete so that a checkmark appears, then tap Delete. When
[QW°PKUJFGNGVKPIVCR&QPG+H[QWFGNGVGCDQQM[QWRWTEJCUGF[QWECPFQYPNQCFKV
again from Purchases in iBookstore. If you’ve synced your device with your computer,
the book also remains in your iTunes Library.
Create, rename, or delete a collection: Tap Collections to display the collections list.
Tap New to add a new collection. To delete a collection tap Edit, then tap and tap
Delete. You can’t edit or remove the built-in Books and PDFs collections. To edit the
PCOGQHCEQNNGEVKQPVCRKVUPCOG9JGP[QW°PKUJVCR&QPG
Move a book or PDF to a collection: Go to the bookshelf and tap Edit. Tap each book
or PDF that you want to move so that a checkmark appears, then tap Move and select
a collection. An item can be in only one collection at a time. When you add a book
or PDF to your bookshelf, it’s put in the Books or PDF collection. From there, you can
OQXGKVVQCFKÒGTGPVEQNNGEVKQP;QWOKIJVYCPVVQETGCVGEQNNGEVKQPUHQTYQTMCPF
school, for example, or for reference and leisure reading.
View a collection: Tap Collections, then tap an item in the list that appears.
129
Chapter 19 iBooks

Game Center 20
About Game Center
You can discover new games and share your game experiences with friends around
the world in Game Center.
+PXKVG[QWTHTKGPFUVQRNC[QTWUGCWVQOCVEJVQ°PFQVJGTGSWCNN[OCVEJGF
opponents. Check leaderboards to see who the best players are. Earn bonus points by
CEJKGXKPIURGEK°ECEEQORNKUJOGPVUKPCICOG
Note: Game Center may not be available in all countries or regions, and the available
games may vary by country or region.
To use Game Center, you need an Internet connection and an Apple ID. If you already
have an iTunes Store, MobileMe, or other Apple account, you can use that Apple ID
with Game Center. If you don’t already have an Apple ID, you can create one in Game
Center, as described below.
Setting Up Game Center
9JGP[QW°TUVQRGP)COG%GPVGT[QW¨TGCUMGFKH[QWYCPVVQCNNQYRWUJPQVK°ECVKQPU
0QVK°ECVKQPUKPENWFGCNGTVUUQWPFUCPFKEQPDCFIGUVJCVNGV[QWMPQYCDQWV)COG
Center events, even if you’re not using Game Center. For example, you might receive
an alert that a friend has invited you to play a game.
#NNQYPQVK°ECVKQPUTap OK.
+H[QWVCR&QP¨V#NNQY[QWYQP¨VTGEGKXGPQVK°ECVKQPUHQT)COG%GPVGT;QWECP
VWTPPQVK°ECVKQPUQPCVCNCVGTVKOGKH[QWYCPVCPF[QWECPURGEKH[YJCVMKPFUQH
PQVK°ECVKQPU[QWYCPVVQIGV
130

6WTPPQVK°ECVKQPUQPQTQÒ+P5GVVKPIUEJQQUG0QVK°ECVKQPU6WTPKPIQÒ0QVK°ECVKQPU
FKUCDNGUCNNPQVK°ECVKQPUHQTCNNCRRU;QWECPCNUQUKNGPEGPQVK°ECVKQPUWUKPIVJG5KFG
Switch (see “Side Switch” on page 160).
5RGEKH[YJKEJPQVK°ECVKQPU[QWYCPVHQT)COG%GPVGTIn Settings, choose
0QVK°ECVKQPU )COG%GPVGTVJGPEQP°IWTGVJG5QWPFU#NGTVUCPF$CFIGUUGVVKPIU
+H)COG%GPVGTFQGUP¨VCRRGCTVWTPQP0QVK°ECVKQPU
Set up Game Center information for your Apple ID:
1 Enter your Apple ID and password, then tap Sign In.
You may be asked to provide additional information. If you don’t have an Apple ID, you
can create one by tapping Create New Account.
2 Tap Agree to accept the Game Center Terms & Conditions.
3 Enter a nickname—the name others will see and know you by.
4 %QP°IWTG[QWT)COG%GPVGTUGVVKPIU
To allow other users to invite you to play a game, leave Allow Game Invites turned
QP1VJGTYKUGVCRVQVWTPKVQÒ
6QCNNQYQVJGTWUGTUVQ°PF[QWD[[QWTGOCKNCFFTGUUNGCXG(KPF/G$['OCKN
VWTPGFQP1VJGTYKUGVCRVQVWTPKVQÒ
8GTKH[[QWTCEEQWPVGOCKN;QWECPGPVGTCFKÒGTGPVCFFTGUUKH[QWFQP¨VYCPVVQWUG
VJGQPGHQTVJG#RRNG+&[QWWUGFVQUKIPKP6QEQP°TOVJKUCFFTGUUCU[QWTU[QW
need to respond to the email that will be sent to that address.
To add other email addresses that people can use to contact you in Game Center,
tap Add Another Email.
5 6CR0GZVYJGP[QWTCEEQWPVKUEQP°IWTGF
Change Game Center settings for your Apple ID:
1 Tap Me, then tap your account banner.
2 Tap View Account.
3 Make your changes, then tap Done.
5KIPKPWUKPICFKÒGTGPV#RRNG+&
1 Tap Me, then tap the account banner.
2 Tap Sign Out.
3 Enter the new Apple ID and password, then tap Sign In.
131
Chapter 20 Game Center

Games
Purchasing and Downloading Games
Games for the Game Center are available from the App Store. If you haven’t entered
credit card information for your Apple ID, you’ll be prompted to enter that information
before you can purchase and download games.
Purchase and download games: Tap Games, then tap Find Game Center Games.
The Game Center section of App Store displays games that work with Game Center.
You can browse this section, and purchase and download games from it. See
Chapter 18, “App Store,” on page 119 .
If you want to purchase a game that a friend has, tap the game on your friend’s info
screen to go directly to that game in the App Store.
Playing Games
The Games screen displays the games you download from the App Store. For each
of the games, your number of achievements and your ranking among all the game’s
players are displayed.
Get information about a game: Tap Games, then tap a game. If available, you can
FKURNC[VJGICOG¨UNGCFGTDQCTFUUGG[QWTCEJKGXGOGPVUHQTVJGICOGCPF°PFQWV
who’s recently played the game.
Play a game: Tap Games, choose a game, then tap Play.
Depending on the game, the home screen may provide instructions or other
information, and let you view leaderboards and achievements, set game options, and
start a single or multiplayer game. To play against others, you can either invite a friend
QTWUGCWVQOCVEJVQJCXG)COG%GPVGT°PFQVJGTRNC[GTUHQT[QW(QTKPHQTOCVKQP
about making friends in Game Center, see “Friends” on page 134.
For multiplayer games, you can also send a game invitation from the Friends screen.
Invite a friend to a multiplayer game from the Friends screen:
1 Tap Friends at the bottom of the screen.
2 Choose a friend.
3 Choose a game and tap Play.
If the game allows or requires additional players, you can choose players to invite,
then tap Next.
4 Enter and send your invitation, then wait for the others to accept.
5 Start the game.
If a friend isn’t available or doesn’t respond to your invitation, you can tap Auto-Match
VQJCXG)COG%GPVGT°PFCPQVJGTRNC[GTHQT[QWQTVCR+PXKVG(TKGPFVQVT[KPXKVKPI
some other friend.
132 Chapter 20 Game Center

Other players may invite you to play the game.
Respond to an invitation to play a game: Tap Accept or Decline in the alert
that appears.
You can disable multiplayer games in Restrictions. See “Restrictions” on page 158 .
;QWECPRTGXGPVQVJGTRNC[GTUHTQOKPXKVKPI[QWVQRNC[ICOGUD[VWTPKPIQÒ#NNQY
Game Invites in Game Center settings. See “Your Status and Account Information” on
page 135.
Return to Game Center: Press the Home button, then tap Game Center on the
Home screen.
You can also press the Home button twice quickly and choose Game Center from your
recent apps.
Leaderboards
Some games provide one or more leaderboards to show the ranking of the game’s
players, with their scores, times, or other measures of the players’ success.
See a game’s leaderboard: Tap Games, then choose the game and tap Leaderboard.
You may also be able to view leaderboards from within a game.
If a game has variations (such as Easy, Normal, and Hard), the Categories screen lets
you choose the leaderboard for the game in general, or for one of the variations.
The leaderboard shows the ranking of your friends, and of all players. You may be able
VQXKGYNGCFGTDQCTFUVCVUHQTCURGEK°EVKOGRGTKQFUWEJCUVQFC[VJKUYGGMQTCNNVKOG
Rotate iPad to see a leaderboard in landscape orientation.
Start playing a game from the leaderboard: Tap Play in the upper-right corner.
133
Chapter 20 Game Center

Achievements
5QOGICOGUTGYCTF[QWYKVJDQPWURQKPVUHQTURGEK°ECEJKGXGOGPVU
See the possible achievements for a game: Tap Games, choose a game, then
tap Achievements.
For each achievement, Game Center shows how many bonus points are awarded,
and whether you’ve completed the achievement. The total points awarded for your
CEJKGXGOGPVUCRRGCTCVVJGVQR;QWECPIGVDQPWURQKPVUHQTCURGEK°ECEJKGXGOGPV
only once.
You may also be able to view achievements from within a game.
Recently Played
Some games let you see which of your friends have recently played the game.
See who’s recently played a game: Tap Games, tap a game, then tap Recently Played.
Get information about a player: Tap a player’s name in the list.
Friends
Game Center puts you in contact with players around the world. You add friends to
Game Center by making a request, or by accepting a request from another player.
Add a friend to Game Center:
1 Tap Friends or Requests.
2 Tap , then enter a friend’s email address or Game Center nickname.
Matching addresses and names from your contacts appear as you type. Tap a contact
to include that person in your request. Tap to browse your contacts.
To add several friends at once, enter additional contacts.
3 Enter a message for your request, then tap Send.
To become a friend, a person must accept your request.
Other players might send you a request. If you receive an alert, you can accept the
request from there, or close it and respond to the request later from the Request
screen. A badge on the Requests button displays the number of outstanding
friend requests.
Respond to a friend request: Tap Requests, tap the name of the person making the
request, then tap Accept, Ignore, or Report a Problem.
When a player accepts another player’s request, they each become the other’s friend.
Friends’ names appear on the Friends screen.
Get information about a friend: Tap the friend’s name.
134 Chapter 20 Game Center

Search for a friend: Tap the status bar to scroll to the top of the screen, then tap the
UGCTEJ°GNFCPFUVCTVV[RKPI(TKGPFUYJQOCVEJ[QWTUGCTEJCRRGCTCU[QWV[RG
A friend’s info page shows how many friends (including you) the person has, the
PWODGTQHFKÒGTGPVICOGU[QWTHTKGPFJCURNC[GFCPFJQYOCP[CEJKGXGOGPVU[QWT
friend has completed. The info screen may also show:
The games you’ve played together
The games you have in common
Other games your friend has
You can tap a game in any of the lists to see your position and your friend’s position
on the overall leaderboard, and your respective accomplishments for the game.
Invite a friend to play a game: Tap Friends, tap the friend’s name, tap a game, then
tap Play. See “Playing Games” on page 132.
Remove a friend: Tap Friends, tap a name, then tap Unfriend and tap Remove.
+HCRNC[GTKUQÒGPUKXGQTGZJKDKVUKPCRRTQRTKCVGDGJCXKQT[QWECPTGRQTVVJGRTQDNGO
Report a problem with a friend: Tap Friends, tap the friend’s name, then tap “Report a
Problem.” Describe the problem, then tap Report to send the report.
+H[QWVWTPQÒ/WNVKRNC[GT)COGUKP5GVVKPIU[QWECP¨VUGPFQTTGEGKXGCKPXKVCVKQPUVQ
play games. See “Restrictions” on page 158 .
Your Status and Account Information
The Me screen summarizes information about your friends, your games, and your
achievements.
6JGVGZV°GNFKPVJGEGPVGTQHVJGUETGGPNGVU[QWGPVGT[QWTEWTTGPVUVCVWUOGUUCIG
Your status appears along with your nickname in other players’ Friends screens.
Change your status: 6CRVJGUVCVWU°GNFVQGPVGTQTWRFCVG[QWTUVCVWU
View your account information: Tap the account banner, then tap View Account.
You can change or update the following settings:
Nickname
Allow game invites
Find Me By Email
Your email address for Game Center
Additional email addresses
9JGP[QW°PKUJVCR&QPG
135
Chapter 20 Game Center

;QWECPCNUQUKIPQWVCPFUKIPKPVQCFKÒGTGPVCEEQWPVQTETGCVGCPGYCEEQWPV
Sign out: Tap the account banner, then tap Sign Out.
5KIPKPVQCFKÒGTGPVCEEQWPVEnter the username and password, then tap Sign In.
Create a new account: Tap Create New Account and follow the onscreen instructions.
Parental Controls
;QWECPWUGRCTGPVCNEQPVTQNUVQOCPCIGVJGYC[[QWTHCOKN[CFFUHTKGPFUCPFLQKPU
multiplayer games in Game Center.
Set up Game Center parental controls: Choose Settings > General > Restrictions, then
tap Enable Restrictions. Enter a four-digit passcode, then reenter the passcode.
You can enable restrictions for the following settings:
Multiplayer games
Adding friends
For more information, see “Restrictions” on page 15 8 .
136 Chapter 20 Game Center

Accessibility 21
In addition to the many features that make iPad easy to use for everyone, iPad includes
universal access features.
Universal Access Features
Universal access features make iPad easy to use for people who have a vision
impairment, are deaf or hard of hearing, or have a physical or learning disability.
The accessibility features on iPad include:
Support for playback of closed-captioned content
VoiceOver screen reader
<QQOOCIPK°ECVKQP
White on Black
Large Text
Mono Audio
Speak Auto-text
Support for braille displays
Zoom, White on Black, and Mono Audio work with all apps. Large Text works with Mail
and Notes. VoiceOver works with the built-in iPad apps, and with some third-party
apps you can download from the App Store. Closed-captioning works with videos and
podcasts that support it.
For more information about the iPad accessibility features, go to
www.apple.com/accessibility/ipad.
;QWECPVWTPKPFKXKFWCNCEEGUUKDKNKV[HGCVWTGUQPQTQÒKP#EEGUUKDKNKV[UGVVKPIUQPK2CF
;QWECPCNUQVWTPUQOGCEEGUUKDKNKV[HGCVWTGUQPQTQÒKPK6WPGUYJGP[QWEQPPGEV
iPad to your computer.
137

6WTPCEEGUUKDKNKV[HGCVWTGUQPQTQÒKPK6WPGU
1 Connect iPad to your computer.
2 In iTunes, select iPad in the sidebar.
3 +PVJG5WOOCT[RCPGENKEM%QP°IWTG7PKXGTUCN#EEGUUKPVJG1RVKQPUUGEVKQP
4 Select the accessibility features you want to use and click OK.
The features you select are available immediately on iPad when you click OK.
VoiceOver
VoiceOver describes aloud what appears onscreen, so that you can use iPad without
seeing it.
VoiceOver tells you about each element on the screen as you select it. When you select
CPGNGOGPVCDNCEMTGEVCPINGGPENQUGUKVHQTVJGDGPG°VQHVJQUGYJQECPUGGVJG
screen) and VoiceOver speaks the name or describes the item. The enclosing rectangle
is referred to as the VoiceOver cursor.
6QWEJVJGUETGGPQTFTCI[QWT°PIGTUVQJGCTFKÒGTGPVKVGOUQPVJGUETGGP6QKPVGTCEV
with items on the screen, such as buttons and links, use the gestures described in
“VoiceOver Gestures” on page 140. When you select text, VoiceOver reads the text.
If you turn on Speak Hints, VoiceOver may tell you the name of the item. When you
select a control (such as a button or switch), VoiceOver provides instructions for you—
for example, “double-tap to open.”
When you go to a new screen, VoiceOver plays a sound and automatically selects and
URGCMUVJG°TUVGNGOGPVQHVJGUETGGPV[RKECNN[VJGKVGOKPVJGWRRGTNGHVEQTPGT
VoiceOver also lets you know when the display changes to landscape or portrait
orientation, and when the screen is locked or unlocked.
Note: 8QKEG1XGTURGCMUKPVJGNCPIWCIGURGEK°GFKP+PVGTPCVKQPCNUGVVKPIUYJKEJOC[
DGKP±WGPEGFD[VJG4GIKQP.QECNGUGVVKPI8QKEG1XGTKUCXCKNCDNGKPOCP[NCPIWCIGU
but not all.
138 Chapter 21 Accessibility

Setting Up VoiceOver
VoiceOver changes the gestures you use to control iPad. Once you turn VoiceOver on,
[QWOWUVWUG8QKEG1XGTIGUVWTGUVQQRGTCVGK2CF¤GXGPVQVWTP8QKEG1XGTQÒCICKP
and resume standard operation.
6WTP8QKEG1XGTQPQTQÒQPK2CFIn Settings, choose General > Accessibility >
8QKEG1XGTVJGPVCRVJG8QKEG1XGT1P1ÒUYKVEJ
6WTP8QKEG1XGTQPQTQÒKPK6WPGUSelect iPad in the iTunes sidebar. In the Options
UGEVKQPQHVJG5WOOCT[RCPGENKEM%QP°IWTG7PKXGTUCN#EEGUU5GNGEV8QKEG1XGTVJGP
click OK.
;QWECPCNUQUGV6TKRNGENKEM*QOGVQVWTP8QKEG1XGTQPQTQÒ5GG¥Triple-Click
Home” on page 150.
Note: You cannot use VoiceOver and Full-screen Zoom at the same time.
VoiceOver Settings
You can set VoiceOver to give spoken hints, increase or decrease the speaking rate, or
give typing feedback.
6WTPURQMGPJKPVUQPQTQÒIn Settings, choose General > Accessibility > VoiceOver,
VJGPVCRVJG5RGCM*KPVU1P1ÒUYKVEJ5RQMGPJKPVUCTGVWTPGFQPD[FGHCWNV
Set the VoiceOver speaking rate: In Settings, choose General > Accessibility >
8QKEG1XGTVJGPCFLWUVVJG5RGCMKPI4CVGUNKFGT
You can choose what kind of feedback you get when you type. You can set VoiceOver
to speak characters, words, both, or nothing. If you choose to hear both characters and
words, VoiceOver speaks each character as you type it, then speaks the whole word
when you enter a space or punctuation.
Choose typing feedback: In Settings, choose General > Accessibility > VoiceOver >
Typing Feedback. You can choose Characters, Words, Characters and Words, or Nothing
for software keyboards and for Apple Wireless Keyboards.
Use phonetics In Settings, choose General > Accessibility > VoiceOver, then tap
the Use Phonetics switch to turn it on.
Use this feature when you type or read character-by-character,
to help make clear which characters were spoken. When Use
2JQPGVKEUKUVWTPGFQP8QKEGQXGT°TUVURGCMUVJGEJCTCEVGTVJGP
speaks a word beginning with the character. For example, if you
type the character “f,” VoiceOver speaks “f,” and then a moment
later, “foxtrot.”
Use pitch change In Settings, choose General > Accessibility > VoiceOver, then tap
the Use Pitch Change switch to turn it on.
VoiceOver uses a higher pitch when entering a letter, and a lower
pitch when deleting a letter. VoiceOver also uses a higher pitch
YJGPURGCMKPIVJG°TUVKVGOQHCITQWRUWEJCUCNKUVQTVCDNG
and a lower pitch when speaking the last item of a group.
139
Chapter 21 Accessibility

$[FGHCWNV8QKEG1XGTWUGUVJGNCPIWCIGVJCV¨UUGVHQTK2CF;QWECPUGVCFKÒGTGPV
language for VoiceOver.
Change the language spoken by VoiceOver: In Settings, choose General >
International > Language, then select a language and tap OK.
5QOGNCPIWCIGUOC[DGKP±WGPEGFD[VJG4GIKQP.QECNUGVVKPI+P5GVVKPIUEJQQUG
General > International > Region Format, then select the format.
Set the rotor options for web browsing: In Settings, choose General > Accessibility >
VoiceOver > Web Rotor. Tap to select or deselect options. To change the position of an
item in the list, touch next to the item, then drag up or down.
Select the languages available in the Language rotor: In Settings, choose General
> Accessibility > VoiceOver > Language Rotor and tap to select the language or
languages you want to appear in the Language rotor. To change the position of a
language in the list, touch next to the language and drag up or down.
The Language rotor is always available when you’ve selected more than one language.
VoiceOver Gestures
When VoiceOver is turned on, it changes the gestures you use to control iPad, so that
you can hear descriptions without activating buttons. These VoiceOver gestures let you
move around the screen and control the individual elements that you select. Some
8QKEG1XGTIGUVWTGUWUGVYQVJTGGQTHQWT°PIGTUVQVCRQT±KEM(QTDGUVTGUWNVUYJGP
WUKPIOQTGVJCPQPG°PIGTTGNCZCPFNGV[QWT°PIGTUVQWEJVJGUETGGPYKVJUQOG
space between them.
6JGTGCTGOCP[YC[UVQGPVGT8QKEG1XGTIGUVWTGU(QTGZCORNG[QWECPVYQ°PIGTVCR
D[WUKPIGKVJGTVYQ°PIGTUQPQPGJCPFQTQPG°PIGTQPGCEJJCPF;QWECPCNUQWUG
[QWTVJWODU6T[FKÒGTGPVVGEJPKSWGUVQFKUEQXGTYJCVYQTMUDGUVHQT[QW
If your gestures don’t work, try quicker movements, especially for double-tapping and
±KEMKPIIGUVWTGU6Q±KEMVT[SWKEMN[DTWUJKPIVJGUETGGPYKVJ[QWT°PIGTQT°PIGTU
Practice gestures: In Settings, choose General > Accessibility > VoiceOver > Practice
Gestures, then tap the Practice VoiceOver Gestures button. Practice the gestures
described in “VoiceOver Settings¦DGNQY9JGP[QW°PKUJRTCEVKEKPIVCR&QPG
/CMGUKPING°PIGT±KEMKPIIGUVWTGUSWKEMN[VQFKUVKPIWKUJVJGOHTQOFTCIIKPIIGUVWTGU
140 Chapter 21 Accessibility

Here’s a summary of VoiceOver gestures:
Navigate and Read
Tap: Speak item.
Flick right or left: Select the next or previous item.
Flick up or down:6JGGÒGEVXCTKGUFGRGPFKPIQPVJG4QVQT%QPVTQNUGVVKPI5GG
“Using VoiceOver” on page 143.
6YQ°PIGTVCR Stop speaking the current item.
6YQ°PIGT±KEMWR Read all, from the top of the screen.
6YQ°PIGT±KEMFQYP Read all, from the current position.
6JTGG°PIGT±KEMWRQTFQYP Scroll one page at a time.
6JTGG°PIGT±KEMTKIJVQTNGHV Go to the next or previous page (for example, on the
Home screen or in Safari).
6JTGG°PIGTVCR Speak the scroll status (which page or rows are visible).
(QWT°PIGT±KEMWRQTFQYP)QVQVJG°TUVQTNCUVGNGOGPVQPCRCIG
(QWT°PIGT±KEMTKIJVQTNGHV Go to the next or previous section (for example, on
a webpage).
Select and Activate
Double-tap: Activate selected item.
6QWEJCPKVGOYKVJQPG°PIGTVCRVJGUETGGPYKVJCPQVJGT°PIGT¥URNKVVCRRKPI¦
Activate item.
Double-tap and hold (1 second) + standard gesture: Use a standard gesture.
The double-tap and hold gesture tells iPad to interpret the subsequent gesture as
standard. For example, you can double-tap and hold, and then without lifting your
°PIGTFTCI[QWT°PIGTVQUNKFGCUYKVEJ
You can use standard gestures when VoiceOver is turned on, by double-tapping
CPFJQNFKPI[QWT°PIGTQPVJGUETGGP#UGTKGUQHVQPGUKPFKECVGUVJCVPQTOCN
IGUVWTGUCTGKPHQTEG6JG[TGOCKPKPGÒGEVWPVKN[QWNKHV[QWT°PIGTVJGP8QKEG1XGT
gestures resume.
6YQ°PIGTFQWDNGVCR Play or pause in iPod, YouTube, or Photos. Start or stop
the stopwatch.
6JTGG°PIGTFQWDNGVCR Mute or unmute VoiceOver.
6JTGG°PIGTVTKRNGVCR6WTPVJGFKURNC[QPQTQÒ
141
Chapter 21 Accessibility

Rotor Control
The rotor is a virtual control that acts like a physical dial when VoiceOver is turned
on. Use the rotor to change VoiceOver settings and to access additional commands
and features.
Operate the rotor: 4QVCVGVYQ°PIGTUQPVJGK2CFUETGGPVQ¥VWTP¦VJGFKCNCPFEJQQUG
items on the rotor. Flick up and down to use the selected item.
6JGGÒGEVQHVJGTQVQTFGRGPFUQPYJCV[QW¨TGFQKPI(QTGZCORNGKH[QW¨TGTGCFKPI
text in an email, you can use the rotor to switch between hearing text spoken word-
D[YQTFEJCTCEVGTD[EJCTCEVGTQTNKPGD[NKPGYJGP[QW±KEMWRQTFQYP9JGP[QW
browse a webpage, use the rotor to choose whether you hear text word-by-word or
EJCTCEVGTD[EJCTCEVGTJGCTLWUVVJGJGCFGTUJGCTLWUVVJGNKPMUCNNQHVJGOXKUKVGF
links, or links not yet visited), hear form elements, or hear descriptions of images. You
ECPWUGVJGTQVQTUGVVKPIVQJGCTCNNQHVJGVGZVQTVQLWORHTQOQPGGNGOGPVQHC
certain type (such as headers or links) to another.
Reading text
Select and hear text by:
Character
Word
Line
Browsing a webpage
Select and hear text by:
Character
Word
Line
Heading
Link
Visited link
Non-visited link
In-page link
Form control
Table
Row (when navigating a table)
List
Landmark
Image
Static text
Zoom in or out
142 Chapter 21 Accessibility

Entering text
Move insertion point and hear text by:
Character
Word
Line
Select edit function
Select language
Using a control
Select and hear values by:
Character
Word
Line
#FLWUVVJGXCNWGQHVJGEQPVTQNQDLGEV
Using VoiceOver
Unlock iPad: Select the Unlock button, then double-tap the screen.
Select items on the screen: &TCI[QWT°PIGTCETQUUVJGUETGGP8QKEG1XGTKFGPVK°GU
each element as you touch it. You can also move systematically from one element
VQVJGPGZVD[±KEMKPINGHVQTTKIJVYKVJQPG°PIGT'NGOGPVUCTGUGNGEVGFHTQONGHV
VQTKIJVVQRVQDQVVQO(NKEMTKIJVVQIQVQVJGPGZVGNGOGPVQT±KEMNGHVVQIQVQVJG
previous element.
“Tap” a selected item when VoiceOver is turned on: Double-tap anywhere on
the screen.
Speak the text of an element, character-by-character, word-by-word, or line-by-line:
9KVJVJGGNGOGPVUGNGEVGF±KEMWRQTFQYPYKVJQPG°PIGT(NKEMFQYPVQTGCFVJG
PGZVEJCTCEVGTQT±KEMWRVQTGCFVJGRTGXKQWUEJCTCEVGT6YKUVVJGTQVQTEQPVTQNVQTGCF
word-by-word or line-by-line.
Adjust a slider: 9KVJQPG°PIGT±KEMWRVQKPETGCUGVJGUGVVKPIQTFQYPVQFGETGCUG
VJGUGVVKPI8QKEG1XGTURGCMUVJGUGVVKPICU[QWCFLWUVKV
Scroll a list or area of the screen: (NKEMWRQTFQYPYKVJVJTGG°PIGTU(NKEMFQYPVQ
RCIGFQYPQT±KEMWRVQRCIGWR9JGPRCIKPIVJTQWIJCNKUV8QKEG1XGTURGCMUVJG
range of items displayed (for example, “showing rows 5 through 10”).
Scroll continuously through a list: Double-tap and hold. When you hear a series of
VQPGU[QWECPOQXG[QWT°PIGTWRQTFQYPVQUETQNNVJGNKUV%QPVKPWQWUUETQNNKPI
UVQRUYJGP[QWNKHV[QWT°PIGT
143
Chapter 21 Accessibility

Use an index: Some lists have an alphabetical index along the right side. The index
ECP¨VDGUGNGEVGFD[±KEMKPIDGVYGGPGNGOGPVU[QWOWUVVCRVJGKPFGZVQUGNGEV
KV9KVJVJGKPFGZUGNGEVGF±KEMWRQTFQYPVQOQXGCNQPIVJGKPFGZ;QWECPCNUQ
FQWDNGVCRVJGPUNKFG[QWT°PIGTWRQTFQYP
Rearrange the Home screen: On the Home screen, select the icon you want to move.
Double-tap and hold, then drag the icon. VoiceOver speaks the row and column
position as your drag the icon. Release the icon when it’s in the location you want. You
can drag additional icons. Drag an item to the left or right edge of the screen to move
KVVQCFKÒGTGPVRCIGQHVJG*QOGUETGGP9JGP[QW°PKUJTGCTTCPIKPIVJGKEQPURTGUU
the Home button.
;QWECPVWTPURGCMKPIQÒUVQRURGCMKPICPKVGOVWTPVJGFKURNC[QÒQTJCXG
VoiceOver speak the entire screen.
Mute VoiceOver &QWDNGVCRYKVJVJTGG°PIGTU&QWDNGVCRYKVJVJTGG
°PIGTUCICKPVQVWTPURGCMKPIDCEMQP6QOWVGQPN[
VoiceOver sounds, set the Side Switch to silent.
Stop speaking an item 6CRQPEGYKVJVYQ°PIGTU6CRCICKPYKVJVYQ°PIGTUVQ
resume speaking. Speaking automatically resumes when
you select another item.
6WTPQÒVJGFKURNC[YJKNG[QWWUG
VoiceOver
6TKRNGVCRYKVJVJTGG°PIGTU4GRGCVVQVWTPVJGFKURNC[
on again.
Speak the entire screen from the top (NKEMWRYKVJVYQ°PIGTU
Speak from the current item to the
bottom of screen
(NKEMFQYPYKVJVYQ°PIGTU
You can hear iPad status information by tapping the status bar at the top of the screen.
This includes the time, battery life, Wi-Fi signal strength, and more.
Entering and Editing Text
9JGP[QWUGNGEVCVGZV°GNFYKVJ8QKEG1XGT[QWECPWUGVJGQPUETGGPMG[DQCTFVQ
GPVGTVGZV;QWECPWUGVJGGFKVKPIHGCVWTGUQHK2CFVQEWVEQR[QTRCUVGKPVJGVGZV°GNF
Note: Safari doesn’t support copying webpage content. The editing features work only
KPGFKVCDNGVGZV°GNFU
Enter text:
1 7UG8QKEG1XGTVQUGNGEVCPGFKVCDNGVGZV°GNFVJGPFQWDNGVCRVQFKURNC[VJGKPUGTVKQP
RQKPVCPFDTKPIWRVJGQPUETGGPMG[DQCTF+HVJG°GNFCNTGCF[EQPVCKPUVGZVVJG
insertion point is placed at the beginning or at the end of the text. Double-tap again
to place the insertion point at the opposite end. VoiceOver tells you the position of the
insertion point.
144 Chapter 21 Accessibility

The insertion point and onscreen keyboard may appear automatically when you
UGNGEVCVGZV°GNF8QKEG1XGTCPPQWPEGUYJGP[QW¨TGKPGFKVKPIOQFG¤DCUGFQPVJG
rotor setting.
2 To type, do one of the following:
¥6QWEJV[RG¦D[FTCIIKPI[QWT°PIGTVQUGNGEVCMG[VJGPNKHVKPI[QWT°PIGTVQGPVGT
the character.
¥5VCPFCTFV[RG¦D[±KEMKPINGHVQTTKIJVVQUGNGEVCMG[QPVJGMG[DQCTFVJGPFQWDNG
tapping to enter the character.
'PVGTCEJCTCEVGTD[FTCIIKPI[QWT°PIGTCTQWPFVJGMG[DQCTFVQUGNGEVCMG[CPF
YJKNGJQNFKPIVJGMG[YKVJQPG°PIGTVCRRKPIVJGUETGGPYKVJCPQVJGT°PIGT
VoiceOver speaks the key when it’s selected, and again when it’s entered.
Enter an accented character: Double-tap and hold, until you hear a sound indicating
that the alternate characters have appeared, then drag left or right to select and hear
VJGEJQKEGU4GNGCUG[QWT°PIGTVQGPVGTVJGEWTTGPVUGNGEVKQP
Move the insertion point: Flick up or down to move the insertion point forward or
backward in the text. VoiceOver makes a sound when the insertion point moves, and
speaks the character that the insertion point moved across. Use the rotor to choose
whether you want to move the insertion point by characters, words, or lines.
Select text: Use the rotor to choose edit. Flick up or down to choose between the
Select and Select All functions, then double-tap. If you chose Select, the word closest
to the insertion point is selected when you double-tap. If you chose Select All, all the
text is selected.
Pinch to increase or decrease the selection.
Cut, copy, or paste: /CMGUWTGVJGTQVQTKUUGVVQGFKV9KVJVGZVUGNGEVGF±KEMWRQT
down to choose Cut, Copy, or Paste, then double-tap.
Undo: 5JCMGK2CFQT±KEMNGHVQTTKIJVVQEJQQUGVJGCEVKQPVQWPFQVJGPFQWDNGVCR
Change the pitch: In Settings, choose General > Accessibility > VoiceOver, then tap the
Use Pitch Change button. Then, when you delete a letter, it’s spoken with a lower pitch.
Speak keys phonetically: In Settings, choose General > Accessibility > VoiceOver,
then tap the Use Phonetics button. Then, when you pause on a key, VoiceOver speaks
the letter of that key phonetically (for example, alpha for a, bravo for b, charlie for c,
and so on).
145
Chapter 21 Accessibility

Controlling VoiceOver Using an Apple Wireless Keyboard
You can control VoiceOver using an Apple Wireless Keyboard paired with iPad. See
“Using Bluetooth Devices” on page 43.
The VoiceOver keyboard commands let you navigate the screen, select items, read
UETGGPEQPVGPVUCFLWUVVJGTQVQTCPFRGTHQTOQVJGT8QKEG1XGTCEVKQPU#NNVJGMG[DQCTF
commands (except one) include Control-Option, abbreviated in the table below as “VO.”
VoiceOver Help speaks keys or keyboard commands as you type them. You can
use VoiceOver Help to learn the keyboard layout and the actions associated with
key combinations.
VoiceOver Keyboard Commands
VO = Control-Option
Read all, starting from the current position 81£#
Read from the top 81£$
Move to the status bar 81£/
Press the Home button 81£*
Select the next or previous item 81£4KIJV#TTQYQT81£.GHV#TTQY
Tap an item 81£5RCEGDCT
&QWDNGVCRYKVJVYQ°PIGTU 81£¦¦
Choose the next or previous rotor item 81£7R#TTQYQT81£&QYP#TTQY
Choose the next or previous speech rotor item 81£%QOOCPF£.GHV#TTQYQT81£%QOOCPF£
Right Arrow
Adjust speech rotor item 81£%QOOCPF£7R#TTQYQT81£%QOOCPF£
Down Arrow
Mute or unmute VoiceOver 81£5
6WTPVJGUETGGPEWTVCKPQPQTQÒ 81£5JKHV5
Turn on VoiceOver help 81£-
4GVWTPVQVJGRTGXKQWUUETGGPQTVWTPQÒ
VoiceOver help
Escape
Quick Nav
6WTPQP3WKEM0CXVQEQPVTQN8QKEG1XGTWUKPIVJGCTTQYMG[U3WKEM0CXKUQÒD[FGHCWNV
6WTP3WKEM0CXQPQTQÒ .GHV#TTQY£4KIJV#TTQY
Select the next or previous item Right Arrow or Left Arrow
5GNGEVVJGPGZVQTRTGXKQWUKVGOURGEK°GF
by the rotor setting
Up Arrow or Down Arrow
146 Chapter 21 Accessibility

5GNGEVVJG°TUVQTNCUVKVGO %QPVTQN£7R#TTQYQT%QPVTQN£&QYP#TTQY
“Tap” an item 7R#TTQY£&QYP#TTQY
Scroll up, down, left, or right 1RVKQP£7R#TTQY1RVKQP£&QYP#TTQY
1RVKQP£.GHV#TTQYQT1RVKQP£4KIJV#TTQY
Change the rotor 7R#TTQY£.GHV#TTQYQT7R#TTQY£4KIJV#TTQY
Using Maps
Use VoiceOver to zoom in or out, select pins, and get information about locations.
Zoom in or out: 7UGVJGTQVQTVQEJQQUG\QQOOQFGVJGP±KEMWRQTFQYPVQ\QQO
in or out.
Select a pin: 6QWEJCRKPQT±KEMNGHVQTTKIJVVQOQXGHTQOQPGKVGOVQCPQVJGT
Get information about a location: With a pin selected, double-tap to display the
KPHQTOCVKQP±CI(NKEMNGHVQTTKIJVVQUGNGEVVJG±CIVJGPFQWDNGVCRVQFKURNC[VJG
information page.
Using a Braille Display with VoiceOver
Setting Up a Braille Display
You can use a refreshable Bluetooth braille display to read VoiceOver output in
braille. In addition, braille displays with input keys and other controls can be used
to control iPad when VoiceOver is turned on. iPad works with many of the most
popular wireless braille displays. For a list of supported braille displays, see
www.apple.com/accessibility/voiceover/devicesupport.
Set up a braille display:
1 Turn on the braille display.
2 On iPad, turn on Bluetooth.
In Settings, choose General > Bluetooth, then tap the Bluetooth switch.
3 In Settings, choose General > Accessibility > VoiceOver > Braille, then choose the
braille display.
6WTPEQPVTCEVGFDTCKNNGQPQTQÒIn Settings, choose General > Accessibility >
VoiceOver > Braille, then tap the Contracted Braille switch.
Choosing a Language
The braille display uses the language that’s set for Voice Control. By default, this is the
language that’s set for iPad in Settings > International > Language. You can use the
8QKEG1XGTNCPIWCIGUGVVKPIVQUGVCFKÒGTGPVNCPIWCIGHQT8QKEG1XGTCPFDTCKNNGFKURNC[U
Set the language for VoiceOver: In Settings, choose General > International >
Voice Control, then choose the language.
If you change the language for iPad, you may need to reset the language for VoiceOver
and your braille display.
147
Chapter 21 Accessibility

Controlling VoiceOver with Your Braille Display
You can set the leftmost or rightmost cell of your braille display to provide system
status and other information:
Announcement History contains an unread message
The current Announcement History message has not been read
VoiceOver speech is muted
The iPad battery is low (less than 20% charge)
iPad is in landscape orientation
6JGUETGGPFKURNC[KUVWTPGFQÒ
The current line contains additional text to the left
The current line contains additional text to the right
Set the leftmost or rightmost cell to display status information: In Settings, choose
General > Accessibility > VoiceOver > Braille > Status Cell, then tap Left or Right.
See an expanded description of the status cell: On your braille display, press the
status cell’s router button.
Zoom
The Zoom accessibility feature lets you magnify the entire screen to help you see
what’s on the display.
6WTP<QQOQPQTQÒIn Settings, choose General > Accessibility > Zoom, then tap the
<QQO1P1ÒUYKVEJ1TWUG6TKRNGENKEM*QOGUGG¥Triple-Click Home” on page 150).
Zoom in or out: &QWDNGVCRVJGUETGGPYKVJVJTGG°PIGTU$[FGHCWNVVJGUETGGPKU
OCIPK°GFRGTEGPV+H[QWOCPWCNN[EJCPIGVJGOCIPK°ECVKQPD[WUKPIVJGVCR
CPFFTCIIGUVWTGFGUETKDGFDGNQYK2CFCWVQOCVKECNN[TGVWTPUVQVJCVOCIPK°ECVKQP
YJGP[QW\QQOKPD[FQWDNGVCRRKPIYKVJVJTGG°PIGTU
+PETGCUGOCIPK°ECVKQP9KVJVJTGG°PIGTUVCRCPFFTCIWRVQKPETGCUGOCIPK°ECVKQP
QTFQYPVQFGETGCUGOCIPK°ECVKQP6JGVCRCPFFTCIIGUVWTGKUUKOKNCTVQCFQWDNGVCR
GZEGRV[QWFQP¨VNKHV[QWT°PIGTUQPVJGUGEQPFVCR¤KPUVGCFFTCI[QWT°PIGTUQP
the screen.
Move around the screen: 9JKNG\QQOGFKPFTCIVJGUETGGPYKVJVJTGG°PIGTU
*QNFQPG°PIGTPGCTVJGGFIGQHVJGFKURNC[VQRCPVQVJCVUKFGQHVJGUETGGPKOCIG
/QXG[QWT°PIGTENQUGTVQVJGGFIGVQRCPOQTGSWKEMN[9JGP[QWQRGPCPGY
screen, Zoom always goes to the upper-center of the screen.
While using Zoom with an Apple Wireless Keyboard (see “Controlling VoiceOver Using
an Apple Wireless Keyboard” on page 14 6), the screen image follows the insertion
point, keeping it in the center of the display.
148 Chapter 21 Accessibility

Large Text
Large Text lets you make the text larger in Mail and Notes. You can choose 20-point,
24-point, 32-point, 40-point, 48-point, or 56-point text.
Set the text size: In Settings, choose General > Accessibility, tap Large Text, then tap
the text size you want.
White on Black
Use White on Black to invert the colors on the iPad display, which may make it
easier to read the screen. When White on Black is turned on, the screen looks like a
photographic negative.
Invert the screen’s colors: In Settings, choose General > Accessibility, then tap “White
on Black.”
Mono Audio
Mono Audio combines the sound of the left and right channels into a mono signal
played on both sides. This lets users with hearing impairment in one ear hear the
entire sound signal with the other ear.
6WTP/QPQ#WFKQQPQTQÒIn Settings, choose General > Accessibility, then tap the
Mono Audio button.
Speak Auto-Text
Speak Auto-text speaks the text corrections and suggestions iPad makes when you type.
6WTP5RGCM#WVQVGZVQPQTQÒIn Settings, choose General > Accessibility, then tap
the Speak Auto-text button.
Speak Auto-text also works with VoiceOver or Zoom.
149
Chapter 21 Accessibility

Triple-Click Home
6TKRNGENKEM*QOGKUCPGCU[YC[VQVWTPUQOGCEEGUUKDKNKV[HGCVWTGUQPQTQÒD[
quickly pressing the Home button three times. You can set Triple-click Home to turn
8QKEG1XGTQPQTQÒVWTP9JKVGQP$NCEMQPQTQÒQTCUMKH[QWYQWNFNKMGVQVTKRNGENKEM
the Home button to:
6WTP8QKEG1XGTQPQTQÒ
6WTP9JKVGQP$NCEMQPQTQÒ
6WTP<QQOQPQTQÒ
6TKRNGENKEM*QOGKUPQTOCNN[VWTPGFQÒ
Set the Triple-click Home function: In Settings, choose General > Accessibility >
Triple-click Home, then choose the function you want.
Closed Captioning and Other Helpful Features
Many standard features available on iPad also help make it accessible to all users,
including those with disabilities.
Widescreen Keyboards
All the built-in iPad apps show a larger onscreen keyboard when you rotate iPad to
landscape view. You can also type using an Apple Wireless Keyboard.
Minimum Font Size for Mail Messages
To increase readability, set the minimum font size for Mail message text to Large,
Extra Large, or Giant. See “Mail” on page 164.
Universal Access in Mac OS X
Take advantage of the Universal Access features in Mac OS X when you use iTunes to
sync information and content from your iTunes library to iPad. In the Finder, choose
Help > Mac Help, then search for “universal access.”
For more information about iPad and Mac OS X accessibility features, go to
www.apple.com/accessibility.
Closed Captioning
You can turn on closed captioning for videos in Video settings. See “Video” on
page 168.
150 Chapter 21 Accessibility