Contents
Manual Pages 51-100

For tips about searching the Internet, visit www.google.com/help/features.html or
help.yahoo.com/us/yahoo/search/basics.
Find the search word or phrase on the current webpage: At the bottom of the
TGUWNVUNKUVVCRVJGGPVT[DGNQY1P6JKU2CIGVQ°PFVJG°TUVQEEWTTGPEGQHCYQTFQT
RJTCUG6Q°PFUWDUGSWGPVQEEWTTGPEGUVCR0GZVCVVJGDQVVQOQHVJGUETGGP
$[FGHCWNV5CHCTKUGCTEJGUWUKPI)QQING6QEJCPIGVJGFGHCWNVVQCFKÒGTGPVUGCTEJ
engine, in Settings, choose Safari > Search Engine, and choose a search engine.
Bookmarks
You can bookmark a webpage you want to return to later.
Bookmark a webpage: Open the page and tap . Then tap Add Bookmark.
When you save a bookmark, you can edit its title. By default, bookmarks are saved at
VJGVQRNGXGNQH$QQMOCTMU6CR$QQMOCTMUVQEJQQUGCFKÒGTGPVHQNFGT
If you use Safari on a Mac, or Safari or Microsoft Internet Explorer on a PC, you can sync
bookmarks with the web browser on your computer.
Sync bookmarks with your computer:
1 Connect iPad to your computer.
2 In iTunes, select iPad in the sidebar.
3 Click the Info tab, select “Sync Safari bookmarks” under Other, then click Apply.
For more information, see “Syncing with iTunes” on page 24.
Sync bookmarks with MobileMe: In Settings on iPad, select Bookmarks in your
MobileMe account. See “Setting Up MobileMe Accounts” on page 31.
Open a bookmarked webpage: Tap , then choose a bookmark or tap a folder to
see the bookmarks inside.
Edit a bookmark or bookmark folder: Tap , choose the folder that has the
bookmark or folder you want to edit, then tap Edit. Then do one of the following:
To make a new folder, tap New Folder.
To delete a bookmark or folder, tap , then tap Delete.
To reposition a bookmark or folder, drag .
6QGFKVVJGPCOGQTCFFTGUUQTVQRWVKVKPCFKÒGTGPVHQNFGTtap the bookmark or folder.
9JGP[QW°PKUJVCR&QPG
51
Chapter 4 Safari

Web Clips
Add web clips to the Home screen for fast access to your favorite webpages. Web clips
appear as icons on the Home screen, and you can arrange them along with the app
icons. See “Rearranging App Icons” on page 38.
Add a web clip: Open the webpage and tap . Then tap “Add to Home Screen.”
When you open a web clip, Safari automatically zooms and scrolls to the area of the
webpage that was displayed when you saved the web clip. The displayed area is also
used to create the icon for the web clip on your Home screen, unless the webpage
comes with its own custom icon.
When you add a web clip, you can edit its name. If the name is too long (more than
about 10 characters), it may appear abbreviated on the Home screen.
Web clips aren’t synced by MobileMe or iTunes, but they are backed up by iTunes.
Delete a web clip:
1 6QWEJCPFJQNFCP[KEQPQPVJG*QOGUETGGPWPVKNVJGKEQPUUVCTVVQLKIING
2 Tap in the corner of the web clip you want to delete.
3 Tap Delete, then press the Home button to save your arrangement.
52 Chapter 4 Safari

Mail 5
About Mail
Read this chapter to learn how to use Mail to read your email messages and compose
new messages.
You can view messages from all your email accounts at once, and Mail displays
message threads so it’s easy to follow a conversation. You can send or receive
embedded photos and graphics, and view PDFs and other attachments. Use AirPrint
to print messages and their attachments.
Mail works with MobileMe, Microsoft Exchange, and many of the most popular
email services—including Yahoo! Mail, Google email, and AOL—as well as other
industry-standard POP3 and IMAP email services.
To send or receive messages in Mail, iPad must have an Internet connection. See
“Connecting to the Internet” on page 29.
Setting Up Email Accounts
You can set up email accounts on iPad in either of the following ways:
Set up an account directly on iPad. See “ Adding Mail, Contacts, and Calendar
Accounts” on page 31.
In iTunes, use the iPad settings panes to sync email accounts settings from your
computer. See “Syncing with iTunes” on page 24.
53
Sending Email
You can send an email message to anyone who has an email address.
Compose and send a message:
1 Tap at the top of the screen.
26[RGCPCOGQTGOCKNCFFTGUUKPVJG6Q°GNFQTVCR to add a name from your contacts.
As you type an email address, matching email addresses from your contacts list appear.
Tap an address to add it. To add more names, tap .
Note: If you’re composing a message from your Microsoft Exchange account and
have access to your enterprise Global Address List (GAL), matching addresses from the
EQPVCEVUQPK2CFCRRGCT°TUVHQNNQYGFD[OCVEJKPI)#.CFFTGUUGU
3 Tap Cc/Bcc/From if you want to copy or blind copy the message to others, or change
the account you send the message from. If you have more than one email account,
[QWECPVCRVJG(TQO°GNFVQEJCPIGVJGCEEQWPV[QW¨TGUGPFKPIHTQO
4 'PVGTCUWDLGEVVJGP[QWTOGUUCIG
;QWECPVCR4GVWTPVQOQXGHTQOVJG5WDLGEV°GNFVQVJGOGUUCIG°GNF
5 Tap Send.
Send a photo in an email message In Photos, choose a photo, tap , then tap Email Photo.
To send multiple photos in the same message, tap
when viewing thumbnails in an album. You can also copy
and paste photos.
The photo is sent using your default email account. To
change your default sending account, see “Mail, Contacts,
Calendars” on page 163.
Save a draft of a message to
complete later
Tap Cancel, then tap Save. The message is saved in the
Drafts mailbox. To quickly open the most recently saved
draft, touch and hold .
Reply to a message Open a message and tap . Tap Reply to reply only
to the sender or Reply All to reply to the sender and all
recipients. Type your return message, then tap Send.
Files or images attached to the initial message aren’t
sent back.
Forward a message Open a message and tap , then tap Forward. Add one
or more email addresses, type your message, and then
tap Send.
9JGP[QWHQTYCTFCOGUUCIG[QWECPKPENWFGVJG°NGUQT
images attached to the original message.
Share contact information In Contacts, choose a contact, then tap Share. Add one or
more email addresses, type your message, then tap Send.
54 Chapter 5 Mail
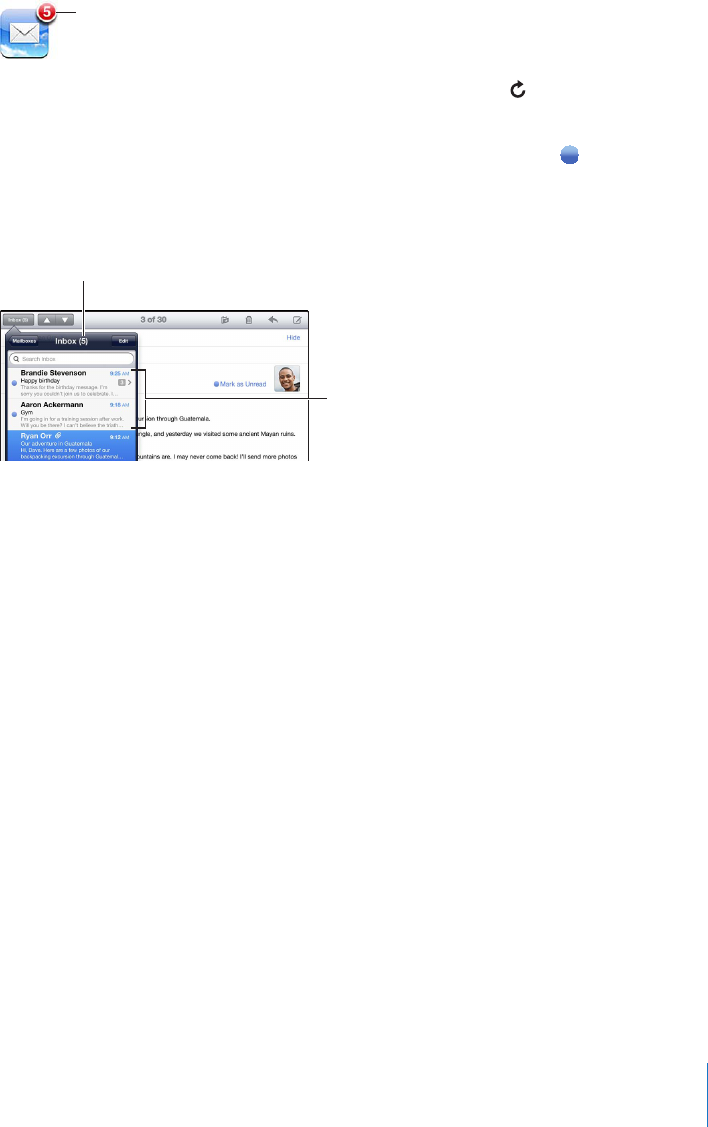
Checking and Reading Email
The Mail icon shows the total number of unread messages in all your inboxes. You may
have other unread messages in other mailboxes.
5\TILYVM\UYLHK
TLZZHNLZPU`V\Y
PUIV_LZ
Check for new messages: Choose a mailbox, tap Inbox, or tap .
On each account screen, you can see the number of unread messages in each mailbox.
Tap a mailbox to see its messages. Unread messages have a blue dot next to them.
If you have more than one mail account, tap Mailboxes to switch between accounts.
6QXKGYCNNQH[QWTOGUUCIGUKPCWPK°GFKPDQZVCR#NN+PDQZGU
5\TILYVM
\UYLHKTLZZHNLZ
<UYLHK
TLZZHNLZ
Related messages are grouped together in a thread1PN[VJG°TUVOGUUCIGKUFKURNC[GF
in the inbox, and the number of related messages is indicated. To view the thread, tap
KV6QVWTPOGUUCIGVJTGCFUQÒIQVQ5GVVKPIU ¥/CKN%QPVCEVU%CNGPFCTU¦CPFVWTPQÒ
“Organize by Thread.”
9JGP[QWQRGPCOCKNDQZ/CKNNQCFUVJGPWODGTQHOQUVTGEGPVOGUUCIGUURGEK°GF
in your Mail settings, if the messages haven’t already been loaded automatically. See
“Mail, Contacts, Calendars” on page 163.
55
Chapter 5 Mail
Load additional messages: Scroll to the bottom of the list of messages and tap Load
More Messages.
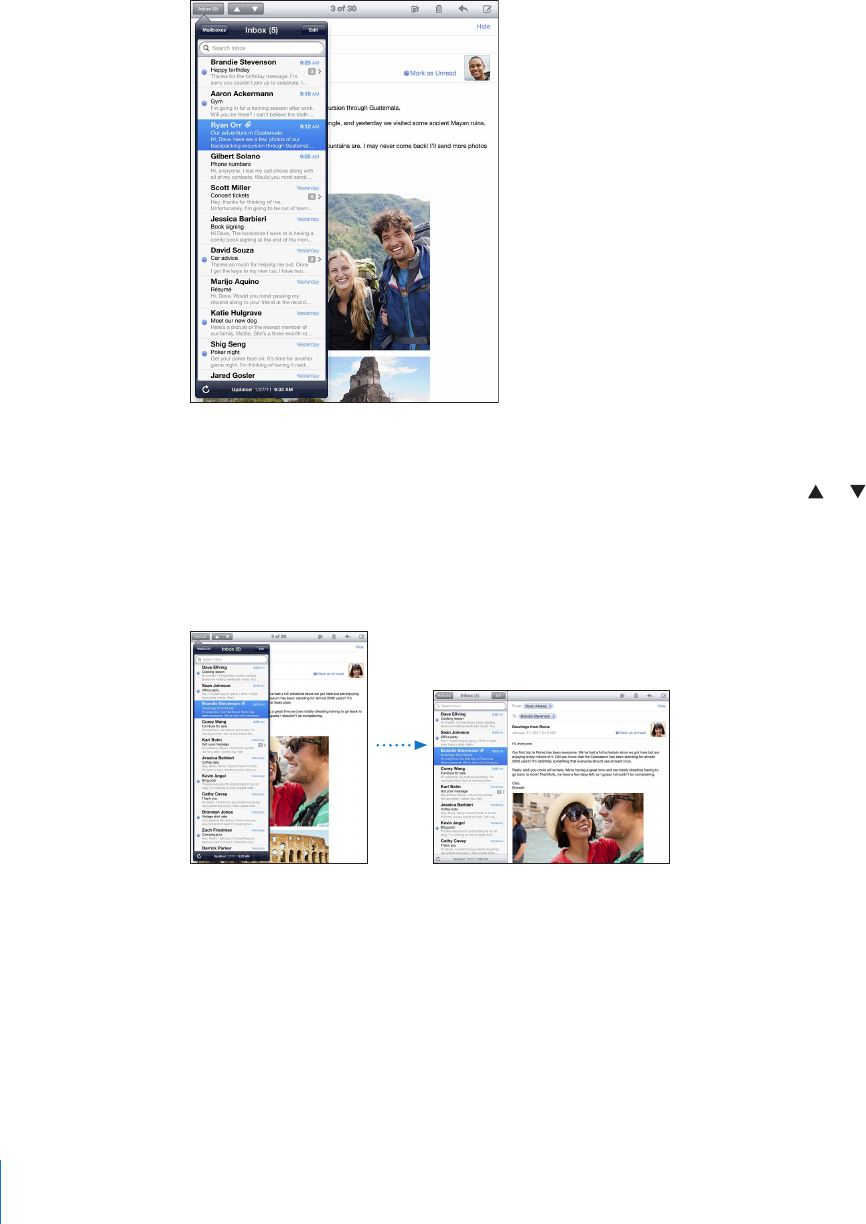
Read a message: Tap a mailbox, then tap a message. Within a message, tap or to
see the next or previous message.
Rotating iPad between portrait and landscape orientation lets you focus on a single
message, or see all the messages so you can quickly scan and view the ones you’re
most interested in.
56 Chapter 5 Mail

Zoom in on part of a message Double-tap the area to zoom in. Double-tap again to
zoom out.
4GUK\GCP[EQNWOPQHVGZVVQ°V
the screen
Double-tap the text.
Resize a message Pinch to zoom in or out.
Follow a link Tap the link.
Text links are typically underlined and blue. Many images
are also links. A link can take you to a webpage, open a
map, or open a new preaddressed email message.
Web and map links open Safari or Maps on iPad. To return
to Mail, press the Home button and tap Mail.
See a link’s destination address Touch and hold the link. You can open the link in Safari or
copy the link address to the clipboard.
iPad displays picture attachments in many commonly used formats (JPEG, GIF, and
TIFF) inline with the text in email messages. iPad can play many audio attachments
UWEJCU/2##%9#8CPF#+((;QWECPFQYPNQCFCPFXKGY°NGUUWEJCU2&(
webpage, text, Pages, Keynote, Numbers, and Microsoft Word, Excel, and PowerPoint
documents) attached to messages you receive.
1RGPCPCVVCEJGF°NGTap the attachment to download it to iPad and then open it.
+HK2CFFQGUP¨VUWRRQTVVJGHQTOCVQHCPCVVCEJGF°NG[QWECPUGGVJGPCOGQHVJG°NG
but you can’t open it.
1RGPCPCVVCEJGF°NGYKVJCFKÒGTGPVCRRTouch and hold the attachment, then
choose an app. If you don’t have any apps that can open the attachment, you can
XKGYKVRTQXKFGFKV¨UC°NGV[RGVJCVK2CFUWRRQTVU
For a list of supported document formats, see “Email Attachment Won’t Open” on
page 185.
Save an attached photo to your Saved Photos album: Tap the photo, then tap
Save Image.
See all the recipients of a message Tap Details at the top of the screen.
Tap a name or email address to see the recipient’s contact
information. Tap the email address to contact the person.
Tap Hide to hide the recipients.
Add an email recipient to your
contacts list
Tap the message and tap Details to see the recipients.
Then tap a name or email address and tap Create New
Contact or “Add to Existing Contact.”
Mark a message as unread Open the message and tap “Mark as Unread” next to the
UWDLGEVNKPG
A blue dot appears next to the message in the mailbox
list until you open it again.
57
Chapter 5 Mail

Open a meeting invitation: Tap the invitation.
You can get contact information for the organizer and other invitees, set an alert, add
notes to the event, and add comments that are included in your response emailed
to the organizer. You can accept, tentatively accept, or decline the invitation. See
“Responding to Meeting Invitations” on page 89.
Save an attached photo to Photos: Tap the photo, then tap Save Image.
Searching Email
;QWECPUGCTEJVJG6Q(TQOCPF5WDLGEV°GNFUQHGOCKNOGUUCIGU/CKNUGCTEJGUVJG
downloaded messages in the currently open mailbox. For MobileMe, Exchange, and
some IMAP mail accounts, you can also search messages on the server.
Search email messages: Open a mailbox, scroll to the top, and enter text in the Search
°GNF6CR(TQO6Q5WDLGEVQT#NN(TQO6QCPF5WDLGEVVQEJQQUGYJKEJ°GNFU[QW
want to search. (Tap the status bar to scroll quickly to the top of the list and reveal the
UGCTEJ°GNF
Search results for the messages already downloaded to iPad appear automatically as
you type. Tap Search to dismiss the keyboard and see more of the results.
Delete or move found messages: After completing a search, tap Edit, then select the
messages you want to delete or move. A checkmark appears next to each message
you select. To delete the messages, tap Delete. To move the messages, tap Move, then
tap a destination folder.
Search messages on the server: Tap “Continue Search on Server” at the end of the
search results.
Note: Search results of messages on servers may vary, because some servers search
only whole words.
58 Chapter 5 Mail

Printing Messages and Attachments
You can use AirPrint to print email messages, and attachments that iPad can view.
Print an email message: Tap , then tap Print. Select the print options you want,
then tap Print.
To print an image without the rest of the email message, save the image (tap the
image and tap Save Image), then open Photos and print the image from your Saved
Photos album.
Print an attachment: Tap the attachment to view it, then tap and tap Print. Select
the options you want, then tap Print.
For information about using AirPrint printers see “Printing” on page 40.
Organizing Email
You can delete messages one at a time, or select a group to delete all at once. You can
also move messages from one mailbox or folder to another.
Delete a message: Open the message and tap . Or, swipe left or right over the
message title in the message list, then tap Delete.
Delete multiple messages: When viewing a list of messages, tap Edit, select the
messages you want to delete, then tap Delete. You can also search for messages and
choose the ones you want to delete. See “Searching Email” on page 58.
/QXGCOGUUCIGVQCFKÒGTGPVOCKNDQZQTHQNFGTWhen viewing a message, tap ,
then choose a mailbox or folder.
Move multiple messages: When viewing a list of messages, tap Edit, select the
messages you want to move, then tap Move and select a mailbox or folder. You can
also search for messages and choose the ones you want to move. See “Searching
Email” on page 58.
59
Chapter 5 Mail

Camera 6
About Camera
With iPad, you have a great still camera and video camera wherever you go. iPad has a
DCEMECOGTCVJCVVCMGURJQVQUCPFJKIJFG°PKVKQPXKFGQCPFCHTQPVECOGTCVJCVNGVU
you make FaceTime video calls and take photos and videos of yourself.
Use the screen to control the back camera and to see the photo or video you’re
VCMKPI;QWECPVCRCP[YJGTGQPVJGUETGGPVQUGNGEVCURGEK°EQDLGEVQTCTGCCPF
CWVQOCVKECNN[CFLWUVVJGGZRQUWTGDCUGFQPVJCVRCTVQHVJGKOCIG#WVQHQEWUWRVQ
about 4 inches or 10 cm) and a 5x digital zoom let you take great close-ups.
If you have an Internet connection and location services is turned on, photos and
videos are tagged with location data. You can use location data with some apps and
photo-sharing websites to track and post where you took the photos. For example, the
Photos app organizes photos by location.
Note: +HNQECVKQPUGTXKEGUKUVWTPGFQÒYJGP[QWQRGP%COGTC[QWOC[DGCUMGFVQ
turn it on. If you don’t want to include location data with your photos and videos,
you can use Camera without turning on location services. See “Location Services” on
page 153 .
60
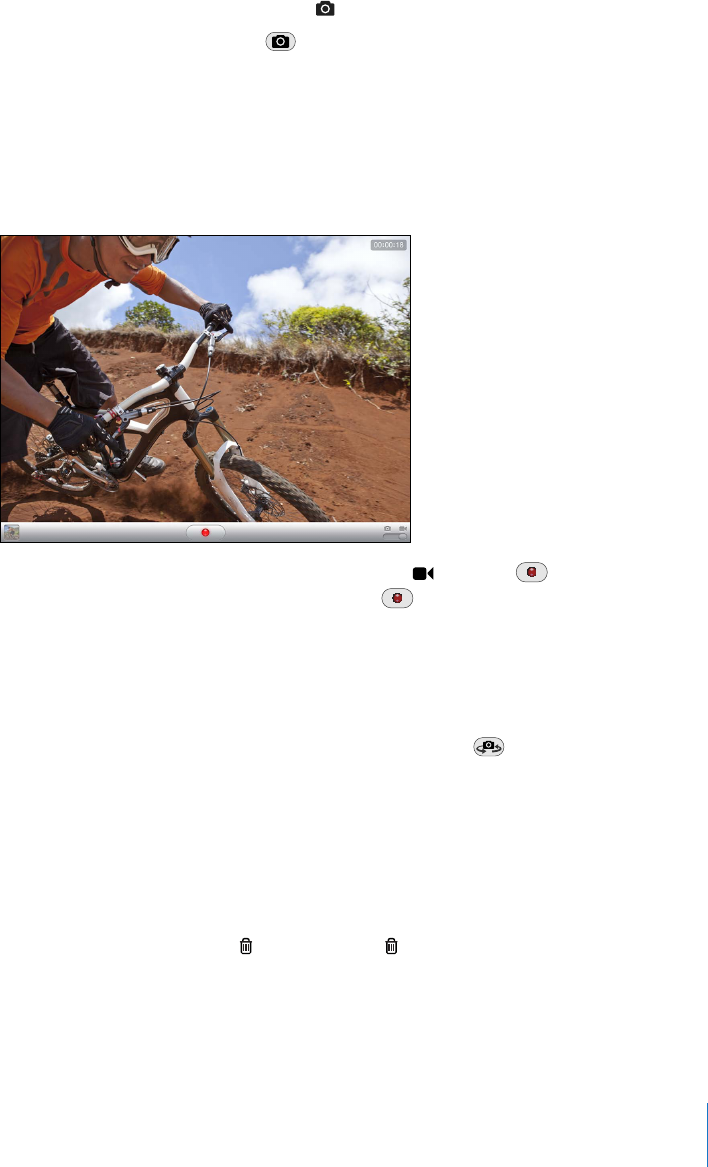
Taking Photos and Recording Videos
Taking photos and recording videos with iPad is as easy as pointing and tapping. Make
sure the Camera/Video switch is set to .
Take a photo: Aim iPad and tap .
When you take a photo or start a video recording, iPad makes a shutter sound. You can
use the volume buttons to control the volume of the shutter sound. You don’t hear a
sound if you set the Side Switch to silent. See “Buttons” on page 10.
Note: +PUQOGTGIKQPUVJGUQWPFGÒGEVUHQT%COGTCCTGRNC[GFGXGPKHVJG5KFG5YKVEJ
is set to silent.
Record a video: Slide the Camera/Video switch to , then tap to start recording.
The record button blinks while you record. Tap again to stop recording.
Change the focus area and set the exposure: Tap where you want to focus or set the
GZRQUWTG%COGTCCFLWUVUVJGGZRQUWTGHQTVJGUGNGEVGFCTGCQHVJGKOCIG
Zoom in or out: Tap the screen, then drag the slider at the bottom to zoom in or out
(back camera, in camera mode only).
Switch between the front camera and back camera: Tap in the upper-right
corner of the screen.
Review a photo or video you’ve just taken: Tap the thumbnail of your last shot, in the
lower-left corner of the screen.
Use the left and right arrows at the bottom of the screen to review other photos and
XKFGQUKPVJG%COGTC4QNNQTLWUV±KEMNGHVQTTKIJV6CR&QPGVQTGVWTPVQECOGTCQT
video mode. If you don’t see the controls, tap the screen to display them.
Delete a photo or video: Tap . If you don’t see , tap the screen to display the controls.
Take a screenshot: Quickly press and release both the Sleep/Wake button and the
*QOGDWVVQP6JGUETGGP±CUJGUYJGPVJGUETGGPUJQVKUVCMGPCPFVJGUETGGPUJQVKU
added to the Camera Roll album.
61
Chapter 6 Camera

Viewing and Sharing Photos and Videos
The photos and videos you take with Camera are saved in the Camera Roll album on
iPad. You can view the Camera Roll album from either Camera or Photos.
View photos and videos in the Camera Roll album: In Camera, tap the thumbnail
image in the lower-left corner of the screen. In Photos, tap the Camera Roll album. Tap
VJGNGHVQTTKIJVDWVVQPQT±KEMNGHVQTTKIJVVQ±KRVJTQWIJVJGRJQVQUCPFXKFGQU
When viewing a photo or video in the Camera Roll album, tap the screen to display
the controls.
For more information about viewing and sharing photos and videos, see:
“ Viewing Photos and Videos” on page 70
“ Sharing Photos” on page 73
Trimming Videos
;QWECPVTKOVJGHTCOGUHTQOVJGDGIKPPKPICPFGPFQHCXKFGQVJCV[QWLWUVTGEQTFGF
or any other video in the Camera Roll album. You can replace the original video or save
the trimmed version as a new video clip.
Trim a video:
1 While viewing a video, tap the screen to display the controls.
2 Drag either end of the frame viewer at the top of the video, then tap Trim.
3 Tap Trim Original or “Save as New Clip.”
Important: If you choose Trim Original, the trimmed frames are permanently deleted
from the original video. If you choose “Save as New Clip,” a new trimmed video clip is
UCXGFKPVJG%COGTC4QNNCNDWOCPFVJGQTKIKPCNXKFGQKUWPCÒGEVGF
Uploading Photos and Videos to Your Computer
You can upload the photos and videos you take with Camera to photo applications on
your computer, such as iPhoto on a Mac.
Upload photos and videos to your computer: Connect iPad to your computer.
Mac: Select the photos and videos you want and click the Import or Download
button in iPhoto or other supported photo application on your computer.
PC: Follow the instructions that came with your photo application.
If you delete the photos and videos from iPad when you upload them to your
computer, they’re removed from the Camera Roll album. You can use the Photos
settings pane in iTunes to sync photos and videos (videos can be synced with Macs
only) to the Photos app on iPad.
62 Chapter 6 Camera

FaceTime 7
About FaceTime
FaceTime lets you make video calls over Wi-Fi. Use the front camera to talk face-to-face,
or the back camera to share what you see around you.
To use FaceTime, you need iPad 2 and a Wi-Fi connection to the Internet. The person
you call must also have a device or computer that works with FaceTime. For more
information, see “FaceTime” on page 169.
Note: FaceTime may not be available in all countries or regions.
63

Signing In
To use FaceTime, you need an Apple ID. If you have an iTunes Store account, MobileMe
account, or other Apple account, you can use that Apple ID with FaceTime. If you don’t
have an Apple ID, you can create one when you open FaceTime.
You don’t need to sign in or out every time you use FaceTime. Once you sign in, you
can start a FaceTime call right away.
Sign in to FaceTime:
1 Open FaceTime, enter your Apple ID and password, then tap Sign In. If you don’t
already have an Apple account, you can tap Create New Account and set one up now.
2 On the FaceTime screen, enter the email address others should use to call you in
(CEG6KOGVJGPVCR0GZV+HVJKUKUVJG°TUVVKOG[QW¨XGWUGFVJKUCFFTGUUHQT(CEG6KOG
[QWOC[PGGFVQEJGEMHQTPGYGOCKNKPVJCVCEEQWPVCPFTGRN[VQVJGEQP°TOCVKQP
OGUUCIGHTQO#RRNG+H[QW¨XGCNTGCF[CFFGFVJGCEEQWPVVQ/CKNQPK2CFXGTK°ECVKQP
is automatic.)
Now you can choose a contact and start a FaceTime call, and others can call you using
the email address you provided. If you use more than one email address, you can add
the others as described below.
Create a new account:
1 Open FaceTime and tap Create New Account.
2 Follow the onscreen instructions. The email address you enter will be the Apple ID for
the new account.
3 On the FaceTime screen, enter the email address you want others to use to call you.
This address doesn’t need to be the same as the address you entered for your Apple ID,
but it must be a working email address.
4 4GRN[VQVJGEQP°TOCVKQPGOCKNUGPVHTQO#RRNGVQVJGGOCKNCFFTGUU[QWGPVGTGFKP
the previous step.
If you have more than one email address, you can let people call you using any of them.
Add email addresses: Choose Settings > FaceTime, then tap Add Another Email.
Sign out: ;QWFQP¨VPQTOCNN[PGGFVQUKIPQWVQH(CEG6KOG¤LWUVUKIPKPQPEG
and open FaceTime later without being asked to sign in again. You can’t receive
FaceTime calls while you’re signed out. But if you do need to sign out, choose
Settings > FaceTime, then tap Account.
6WTPQÒ(CEG6KOGIf you don’t want to receive FaceTime calls, choose Settings >
(CEG6KOGCPFVWTPQÒ(CEG6KOG
64 Chapter 7 FaceTime

Making a FaceTime Call
To make a FaceTime call, open the FaceTime app, then choose someone from your
contacts, favorites, or list of recent calls.
Call a contact: Tap Contacts, choose a name, then tap the email address or phone
number they use with FaceTime.
Add a contact: Tap Contacts, tap , then enter the person’s name and their email
address or phone number. For a contact outside your region, be sure to enter
the complete number, including country code and area code—for example,
+1 (408) 555-1234 in the United States.
Restart a recent call: Tap Recents, then choose a name or number.
Call a favorite: Tap Favorites, then tap a name in the list.
While You’re Talking
While talking to someone in FaceTime, you can switch cameras, change camera
orientation, mute your microphone, move your picture-in-picture display, open
CPQVJGTCRRNKECVKQPCPF°PCNN[GPF[QWTECNN
Switch between the front and back cameras: Tap .
Change camera orientation: Rotate iPad. The image your friend sees changes to match.
To avoid rotating the screen as you move the camera around, turn on the orientation
lock. See “Viewing in Portrait or Landscape” on page 16.
Mute your microphone: Tap . Your friend can still see you, and you can still see and
hear your friend.
Move your picture-in-picture display: Drag the small window to any corner.
Use another application during a call: Press the Home button, then tap an
application icon. You can still talk with your friend, but you can’t see each other. To
return to the video, tap the green bar at the top of the screen.
End the call: Tap .
65
Chapter 7 FaceTime
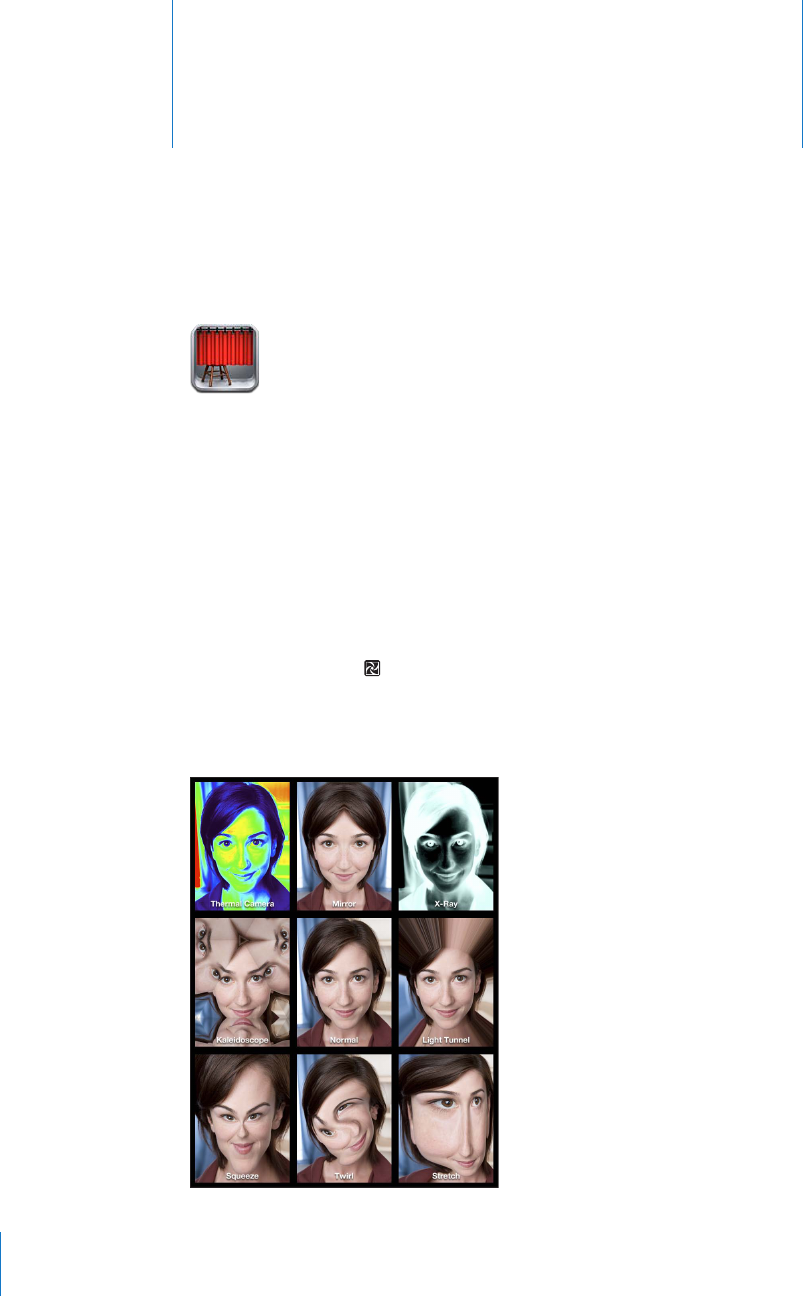
Photo Booth 8
About Photo Booth
It’s easy to take a photo using Photo Booth. Make your photo more interesting by
CRRN[KPICPGÒGEVYJGP[QWVCMGKV2JQVQ$QQVJYQTMUYKVJDQVJVJGHTQPVCPF
back cameras.
5GNGEVKPICP'ÒGEV
$GHQTG[QWVCMGCRKEVWTG[QWECPUGNGEVCPGÒGEVVQCRRN[VQVJGRKEVWTG
5GNGEVCPGÒGEVTap VJGPVCRVJGGÒGEV[QWYCPVVQWUG
Distort an image: +H[QWUGNGEVCFKUVQTVKQPGÒGEVFTCI[QWT°PIGTCETQUUVJGUETGGP
to change the distortion. You can also pinch, swipe, or rotate the image to change
the distortion.
66

Taking a Photo
To take a Photo Booth photo, simply aim iPad and tap.
Take a photo: Aim iPad and tap .
When you take a photo, iPad makes a shutter sound. You can use the volume buttons
on the side of the iPad to control the volume of the shutter sound. You won’t hear a
sound if you set the Side Switch to silent. See “Buttons” on page 10
Note: +PUQOGTGIKQPUVJGUQWPFGÒGEVUCTGRNC[GFGXGPKHVJG5KFG5YKVEJKUUGV
to silent.
Switch between the front and back cameras: Tap at the bottom of the screen.
Review the photo you’ve just taken: Tap the thumbnail of your last shot. Swipe left or
right to view more thumbnails.
If you don’t see the controls, tap the screen to display them.
Delete a photo: Select a thumbnail, then tap .
Manage photos: Tap the thumbnail of the photo—you can select more than one.
Tap , then tap Email, Copy, or Delete.
Viewing and Sharing Photos
The photos you take with Photo Booth are saved in the Camera Roll album on iPad.
You can view the Camera Roll album in the Photos app.
View photos in the Camera Roll album: +P2JQVQUVCRVJG%COGTC4QNNCNDWO6Q±KR
through the photos, tap the left or right button, or swipe left or right.
You can use Mail to send a Photo Booth photo in an email message.
Send a photo: Tap a thumbnail to select the photo, or tap again to select more than
one photo. Tap , then tap the Email button at the bottom of the screen.
Mail opens and creates a new message with the photo attached.
67
Chapter 8 Photo Booth

Uploading Photos to Your Computer
Upload the photos you take with Photo Booth to photo applications on your
computer, such as iPhoto on a Mac.
Upload photos to your computer: Connect iPad to your computer.
Mac: Select the photos to upload, then click the Import or Download button in
iPhoto or other supported photo application on your computer.
PC: Follow the instructions that came with your photo application.
If you delete the photos from iPad when you upload them to your computer, they’re
removed from the Camera Roll album. You can use the Photos settings pane in iTunes
to sync photos to the Photos app on iPad.
68 Chapter 8 Photo Booth

Photos 9
About Photos
K2CFNGVU[QWECTT[RJQVQUCPFXKFGQUYKVJ[QWUQ[QWECPGPLQ[VJGOYJGTGXGT[QW
are. You can easily share them with family and friends, either directly on iPad, or on an
HDTV using AirPlay and Apple TV. You can even print photos from iPad using AirPrint.
If your iPad has a camera, you can view photos and videos as you take them. You can
sync photos and videos from your computer, import them from a digital camera or
iPhone, or save them from email or the web. Use them in apps, send them in email
messages, or upload them to your MobileMe Gallery. You can use iPad as a photo
frame that displays an animated slideshow of your images.
Syncing Photos and Videos with Your Computer
iPad supports standard photo formats such as JPEG, TIFF, GIF, and PNG. You use iTunes
to sync photos to iPad. When syncing photos to iPad, iTunes automatically creates a
size optimized for iPad, if necessary. See “Setting Up Syncing” on page 24.
iPad supports H.264 and MPEG-4 video formats, with AAC audio. You use iTunes to
sync videos taken with a digital camera, iPhone, or iPod touch (4th generation) to iPad.
69

Importing Photos and Videos from iPhone or a Digital Camera
With the iPad Camera Connection Kit (sold separately), you can import photos and
videos directly from a digital camera or iPhone, or from an SD memory card.
Import photos:
1 Insert the SD Card Reader or Camera Connector, included in the iPad Camera
Connection Kit, into the iPad dock connector.
To connect a camera or iPhone, use the USB cable that came with the camera or
iPhone, and connect it to the USB port on the Camera Connector. If you’re using
iPhone, make sure it’s turned on and unlocked. To connect a camera, make the sure
the camera is turned on and in transfer mode. For help, see the documentation that
came with the camera.
To use an SD memory card, insert it in the slot on the SD Card Reader. Don’t force
VJGECTFKPVQVJGUNQVKV°VUQPN[QPGYC[
For more information about the connectors, see the iPad Camera Connection Kit
documentation.
2 Unlock iPad.
3 The Photos app opens and displays the photos and videos that are available for
importing.
4 Select the photos and videos you want to import.
To import all of the items, tap Import All.
6QKORQTVLWUVUQOGQHVJGKVGOUVCRVJGQPGU[QWYCPVVQKPENWFGCEJGEMOCTM
appears on each), then tap Import, and select Import Selected.
5 After the photos are imported, you can choose to keep or delete the photos and
videos on the card, camera, or iPhone.
6 Disconnect the SD Card Reader or Camera Connector.
To view the photos, look in the Last Import album. A new Event contains all the photos
that were selected for import.
To transfer the photos to your computer, connect iPad to your computer and import
the images with a photo application such as iPhoto or Adobe Elements.
Viewing Photos and Videos
Photos lets you view photos synced from your computer’s photo application, imported
from a digital camera or iPhone, or saved from an email message or webpage.
Photos organizes collections by Albums, Events, Faces, and Places. Places uses
the location information encoded in photos, but not all photos may have this
information—it requires a camera that supports geotagging. Events and Faces must
°TUVDGEQP°IWTGFKPK2JQVQQT#RGTVWTGQPC/CEVJGPU[PEGFVQK2CF
70 Chapter 9 Photos

View photos:
1 In Photos, tap Photo, Albums, Events, Faces, or Places.
To open a collection, tap it. Or, pinch the collection to spread out a preview of the
photos it contains, then let go to open it. Photos are sorted by creation date.
When you’re viewing Places, tap a pin on the map to display the location, then pinch
to zoom and show all photos taken at this location.
2 Tap a thumbnail to view a photo in full screen.
You can also pinch to zoom in on the photo.
71
Chapter 9 Photos
Show or hide the controls: Tap the photo to show the controls. Tap again to hide
the controls.
View a photo in landscape orientation: Rotate iPad sideways. The photo or video
TGUK\GUCWVQOCVKECNN[VQ°VVJGUETGGP
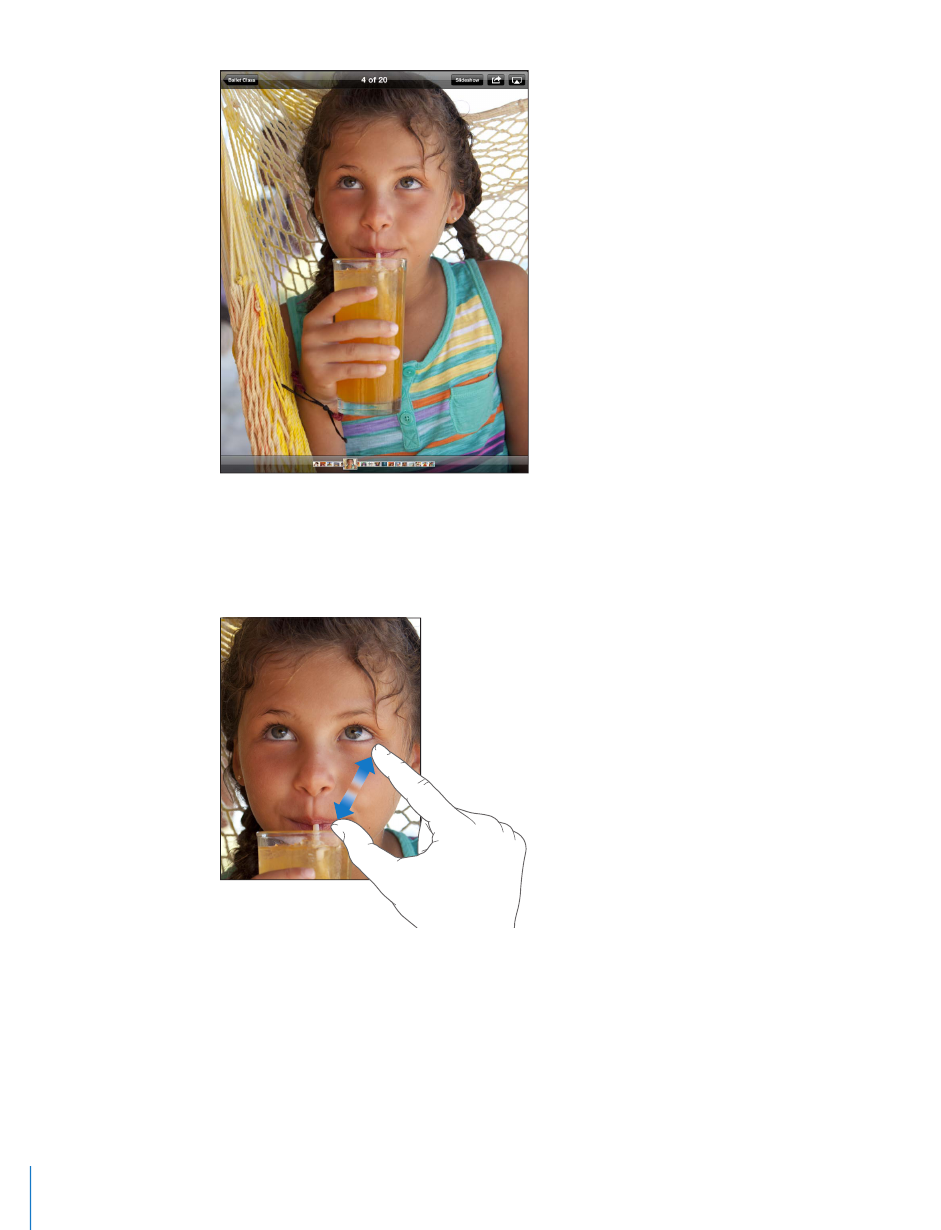
Zoom in on part of a photo: Double-tap where you want to zoom in. Double-tap
again to zoom out. You can also pinch to zoom in or out.
Pan a photo: Drag the photo.
See the next or previous photo: Flick left or right. Or tap the screen to show the
VJWODPCKNUCETQUUVJGDQVVQOVJGPVCRQTFTCIVQXKGYCFKÒGTGPVRJQVQ
Delete a photo: You can delete photos from the Saved Photos album, which contains
photos you save from email or the web. For photos synced from your computer, you
need to delete the photo from the album on your computer, then sync iPad again.
72 Chapter 9 Photos

Rotate a photo: Tap . To rotate it more, tap again.
View photos or videos on a TV using AirPlay and Apple TV: Make sure iPad is on the
same wireless network as Apple TV, then tap and choose Apple TV from the list.
9JGP[QW±KEMVJTQWIJRJQVQUQPK2CFVJGXKFGQQPVJG68WRFCVGUCU[QWRCWUG
See “Using AirPlay” on page 45 for more information.
Sharing Photos
You can share your photos as slideshows, complete with music and transitions. With
AirPlay and Apple TV, you can wirelessly stream your photos to a TV. You can send
photos and videos in email messages, and add photos to your MobileMe Gallery. You
can also copy and paste photos, save photos from email messages to Photos, and save
images from webpages to a photo album.
Slideshows
You can create and view a slideshow that shows your photos with transitions and
music. You can view a slideshow on iPad, or stream it wirelessly to an Apple TV. You can
CNUQWUGK2CFVQXKGYCUNKFGUJQYQPCPGZVGTPCNFKURNC[UWEJCUCRTQLGEVQT
View a slideshow:
1 Tap an album to open it.
You can select an album that contains photos, videos, or both. If your iPad has a
camera, photos and videos you’ve shot appear in the Camera Roll album.
2 Tap the Slideshow button and, in the list that appears, select slideshow options. You can:
Select a song from your music library to play music during the slideshow.
5GNGEVCVTCPUKVKQPGÒGEVVJCVRNC[UDGVYGGPRJQVQU
To set how long each photo is displayed, go to General > Settings > Photos. You can
also set whether the slideshow repeats, or plays in a random sequence.
Available transitions are determined by how you view the slideshow. If you’re
connected to an Apple TV, choose one of the available transitions. If iPad is connected
VQC68QTRTQLGEVQTWUKPICXKFGQECDNGEJQQUGVJG&KUUQNXGVTCPUKVKQP(QTKPHQTOCVKQP
about connecting to an external display, see Chapter 10, “Videos,” on page 77.
3 Tap Start Slideshow.
To stop the slideshow, tap the screen.
If you’re using AirPlay to stream the photos to an Apple TV, tap and select the
Apple TV from the list. See “Using AirPlay” on page 45 for more information.
Sending a Photo or Video in an Email Message
Send a photo or video: Tap a photo or video, tap , then tap Email Photo.
If you don’t see , tap the screen to show the controls.
73
Chapter 9 Photos

Send multiple photos or videos: Tap an album, then tap . Tap each of the photos
or videos you want to send (a checkmark appears on each thumbnail), then tap Email.
If the Email button is unavailable, select fewer items.
Copy a photo or video:
1 Tap .
2 Tap to select the photo or video you want to copy.
3 Tap Copy.
Paste a photo or video: Tap to place the insertion point where you want to paste the
photo or video, then tap the insertion point and tap Paste.
Adding a Photo or Video to a MobileMe Gallery
If you’re a MobileMe subscriber, you can add photos and videos from iPad to your
MobileMe Gallery. You can also add items to someone else’s MobileMe Gallery if they
allow email contributions.
Before you can add photos to a gallery in your MobileMe account, you must:
Set up your MobileMe account on iPad. If you don’t have a MobileMe account,
go to www.apple.com/mobileme/setup/ipad.html.
Publish a MobileMe Gallery and allow adding photos from email or iPad.
Add a photo or video to your gallery: Choose a photo or video and tap , then tap
“Send to MobileMe.” Enter a title and description if you like, select the album to add
the photo to, then tap Publish.
If you don’t see , tap the screen to show the controls.
iPad tells you when the photo has been published, and gives you options to view it on
MobileMe or email a link to a friend.
Add a photo to someone else’s gallery: Choose a photo and tap , then tap “Email
Photo.” Enter the album’s email address, then click Send.
Saving Photos from Email Messages or Webpages
Save a photo from an email message to your Saved Photos album: Tap the photo,
VJGPVCR5CXG+OCIG+HVJGRJQVQJCUP¨VDGGPFQYPNQCFGFVCRVJGFQYPNQCFKEQP°TUV
Save a photo from a webpage to your Saved Photos album: Touch and hold the
photo, then tap Save Image.
Copy photos from the Saved Photos album to your computer: Connect iPad to your
computer’s USB port, then use a photo application, such as iPhoto on a Mac, to copy
the images.
74 Chapter 9 Photos

Assigning a Photo to a Contact
You can assign a photo to a contact.
Assign a photo to a contact:
1 Choose a photo on iPad, then tap .
2 Tap “Assign to Contact,” then choose a contact.
3 Drag the photo to pan, and pinch to zoom in or out, until the photo looks the way
you want.
4 Tap Set Photo.
In Contacts, you can assign a photo to a contact by tapping Edit and then tapping
the picture icon.
Printing Photos
You can use AirPrint to print photos from iPad.
Print a photo: Tap , then tap Print. Tap Select Printer to select a printer and set
printer options such as the number of copies, then tap Print. If your printer has a tray
for photo paper, it may automatically switch to that tray when you print a photo.
For more information, see “Printing” on page 40.
Wallpaper and Lock Screen Photos
You can display a photo in the wallpaper background of the Lock screen and Home
screen. You can choose from several wallpaper pictures included with iPad, or you can
use a photo of your own.
Set a photo as screen wallpaper:
1 Choose any photo and tap , then tap Use As Wallpaper.
2 Drag to pan the photo, or pinch the photo to zoom in or out, until it looks the way you
YCPV#RJQVQVJCV¨UCVNGCUVZRKZGNU°NNUVJGUETGGPYJGPK2CFKUTQVCVGF
3 Tap Set Wallpaper. Then tap to use the image as wallpaper for the Home screen, on the
Lock screen, or both.
To choose from several wallpaper pictures included with iPad, go to Settings >
Brightness & Wallpaper.
75
Chapter 9 Photos
Using Picture Frame
9JGPK2CFKUNQEMGF[QWECPFKURNC[CPCNDWOQHRJQVQU6JKUKUCITGCVYC[VQGPLQ[
iPad while charging it in an iPad Dock.
To change Picture Frame settings, go to Settings > Picture Frame, then set any of the
following options:
The transition you select is played between photos. The duration of the slideshow
can’t be changed.
Picture Frame can zoom the image to focus on faces in the image. It can also
randomly select one of the faces as the center of focus, if more than one face is
RTGUGPVKPVJGKOCIG2KEVWTG(TCOGWUGUVJGHCEGKFGPVK°ECVKQPKPHQTOCVKQPKP
photos imported from iPhoto or Aperture on a Mac. Zooming in on faces isn’t an
option with the Origami transition.
2KEVWTG(TCOGECPFKURNC[CNNRJQVQUQTLWUVVJQUGKPCP#NDWO(CEGUQT'XGPV
ECVGIQT[5GNGEVCPQRVKQPVJGPTG°PG[QWTUGNGEVKQPKPVJGNKUVVJCVCRRGCTU6JG
Faces, Albums, and Event selections are the same as those in the Photos app.
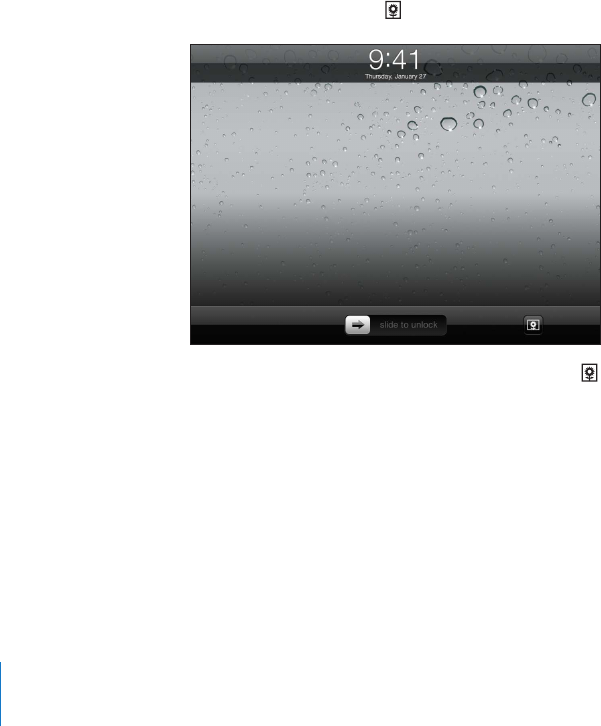
Start or stop Picture Frame:
1 Press the Sleep/Wake button to lock iPad.
2 On the Lock screen, tap .
3 Tap the screen to pause the slideshow, then tap to return to the Lock screen,
or slide the slider to unlock iPad.
6QVWTPQÒ2KEVWTG(TCOGIQVQ5GVVKPIU )GPGTCN 2CUUEQFG.QEM
76 Chapter 9 Photos

Videos 10
About Videos
You can use iPad to view movies, music videos, video podcasts, and, if they’re available
in your area, TV shows. iPad also supports special features such as chapters, subtitles,
alternate audio, and closed captioning.
You can rent or purchase videos from the iTunes Store, and you can use a video
CFCRVGTECDNGVQYCVEJXKFGQUQPC68QTRTQLGEVQT+H[QWJCXGCP#RRNG68[QWECP
use AirPlay to watch the videos wirelessly on a TV.
77
Playing Videos
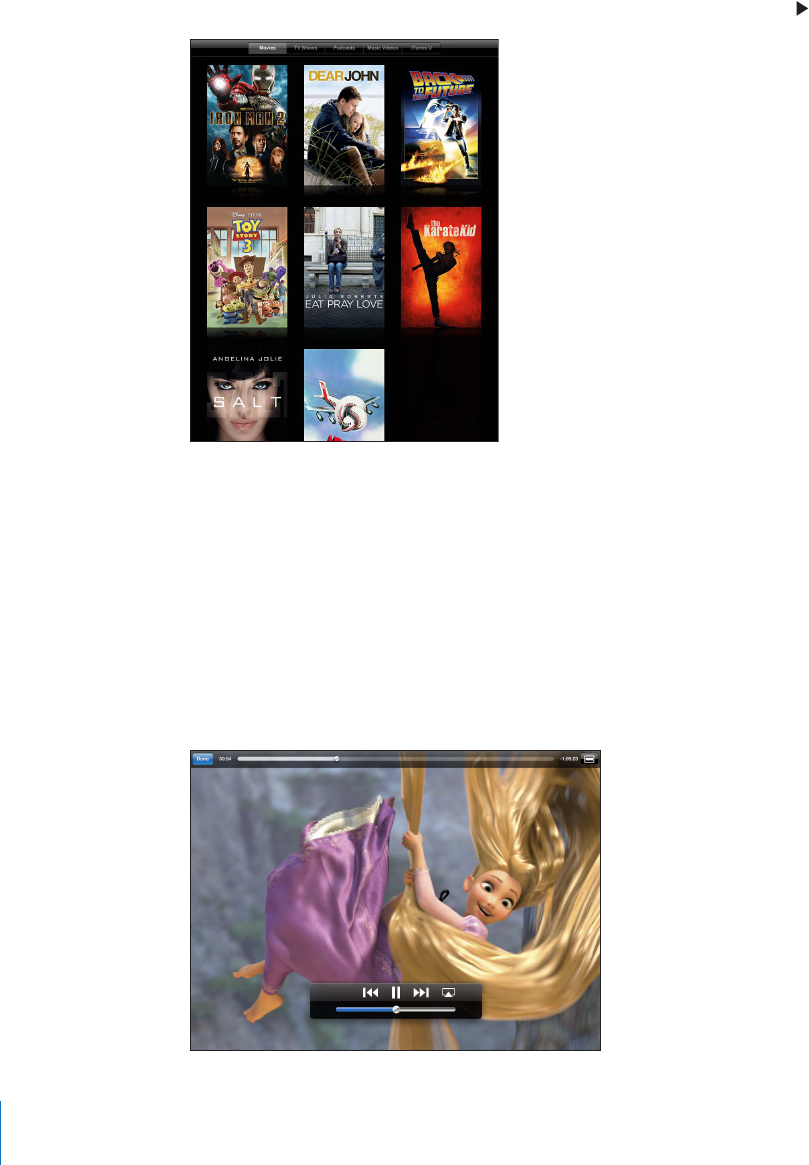
Play a video: Tap Videos, then tap a category of videos, such as Movies. Tap the video
[QWYCPVVQYCVEJ+HVJGXKFGQJCUEJCRVGTUVCRCEJCRVGTVKVNGQTLWUVVCR .
Display playback controls: While a video is playing, tap the screen to show the
controls. Tap again to hide them.
Controlling Video Playback
Rotate iPad to play videos in widescreen orientation and take full advantage of
the display.
&TCIVJGRNC[JGCFCNQPIVJGUETWDDGTDCTVQUMKRVQCP[RQKPVKPVJGXKFGQ6QCFLWUV
VJGUETWDTCVGHTQOHCUVVQUNQYUNKFG[QWT°PIGTFQYPCU[QWFTCIVJGRNC[JGCFCNQPI
the scrubber bar.
78 Chapter 10 Videos
Pause a video Tap or press the center button (or equivalent
button) on a compatible headset.
Resume playback Tap or press the center button (or equivalent
button) on a compatible headset.
Raise or lower the volume Drag the volume slider, or use the iPad volume
buttons or the buttons on a compatible headset.
Start a video over Drag the playhead on the scrubber bar all the
way to the left, or tap if the video doesn’t
contain chapters.
Skip to the next chapter (if available) Tap or press the center button (or equivalent
button) on a compatible headset twice quickly.
Go to the previous chapter (if available) Tap or press the center button (or equivalent
button) on a compatible headset three times
quickly.
5VCTVRNC[KPICVCURGEK°EEJCRVGTKHCXCKNCDNG Tap , then choose a chapter from the list.
Rewind or fast-forward Touch and hold or .
Skip to any point in a video Drag the playhead along the scrubber bar. Slide
[QWT°PIGTFQYPVQCFLWUVVJGUETWDTCVGHTQO
fast to slow.
5VQRYCVEJKPICXKFGQDGHQTGKV°PKUJGURNC[KPI Tap Done, or press the Home button.
5ECNGCXKFGQVQ°NNVJGUETGGPQT°VVQVJG
screen
Tap VQOCMGVJGXKFGQ°NNVJGUETGGPQTVCR
VQOCMGKV°VVJGUETGGP;QWECPCNUQFQWDNG
tap the video to switch views.
9JGP[QWUECNGCXKFGQVQ°NNVJGUETGGPVJG
sides or top may be cropped. When you scale it
VQ°VVJGUETGGP[QWOC[UGGDNCEMDCTUQPVJG
sides or above and below the video.
Play a video on Apple TV using AirPlay Tap and choose an Apple TV. See “Watching
Videos on a TV” on page 80.
5GNGEVCFKÒGTGPVCWFKQNCPIWCIGKHCXCKNCDNG Tap , then choose a language from the Audio
list.
Show or hide subtitles (if available) Tap VJGPEJQQUGCNCPIWCIGQT1ÒHTQOVJG
Subtitles list.
Show or hide closed captioning (if available) Tap to show or hide captions, if the movie has
them.
Syncing Videos
Use iTunes to sync videos to iPad. When iPad is connected to your computer, use the
Movies, TV Shows, Podcasts, and iTunes U panes to select which videos to sync.
79
Chapter 10 Videos

Watching Rented Movies
;QWECPTGPVOQXKGUKPUVCPFCTFQTJKIJFG°PKVKQPHQTOCVHTQOVJGK6WPGU5VQTGCPF
watch them on iPad. You can download rented movies on iPad, or transfer them from
iTunes on your computer to iPad. (Rented movies aren’t available in all regions.)
A movie must be completely downloaded before you can watch it. You can pause a
download and continue it later. Rented movies expire after a certain number of days,
CPFQPEG[QWUVCTVCOQXKG[QWJCXGCNKOKVGFCOQWPVQHVKOGVQ°PKUJYCVEJKPIKV
Movies are automatically deleted when they expire. Before renting a movie, check the
iTunes Store for the expiration time.
View a rented movie: Choose Videos, tap the Movies category, then tap the movie
[QWYCPVVQYCVEJ5GNGEVCEJCRVGTQTLWUVVCR .
Transfer rented movies to iPad: Connect iPad to your computer. Then select iPad in
the iTunes sidebar, click Movies, and select the rented movies you want to transfer.
Your computer must be connected to the Internet. Movies rented on iPad cannot be
transferred to a computer.
Watching Videos on a TV
To watch videos on a TV, you can connect iPad using AirPlay and Apple TV, or use a
cable to connect iPad directly to your TV or AV receiver. For more information about
EQPPGEVKPIK2CFVQC68QTRTQLGEVQTUGG¥Video” on page 168.
Connect using AirPlay: Start video playback, then tap and choose your Apple TV
from the list of AirPlay devices. See “Using AirPlay” on page 45 for more information.
While video is playing, you can exit Video and use other apps.
To return playback to iPad: Open Videos, then tap and choose iPad from the list.
Deleting Videos from iPad
To save space, you can delete videos from iPad.
Delete a video: In the videos list, tap and hold a movie until the delete button
appears, then tap 6CR%CPEGNQT*QOGYJGP[QW°PKUJFGNGVKPIXKFGQU
When you delete a video (other than rented movies) from iPad, it isn’t deleted from
your iTunes library on your computer, and you can sync the video back to iPad later.
If you don’t want to sync the video back to iPad, set iTunes to not sync the video. See
“Syncing with iTunes” on page 24.
Important: If you delete a rented movie from iPad, it’s deleted permanently and can’t
be transferred back to your computer.
80 Chapter 10 Videos

YouTube 11
Finding and Viewing Videos
YouTube features short videos submitted by people from around the world.
You can watch the latest, most popular videos, search for videos about topics of
KPVGTGUV±CI[QWTHCXQTKVGUCPFSWKEMN[CEEGUUXKFGQUVJCV[QWWRNQCFVQ;QW6WDG
from your computer.
To use certain YouTube features on iPad, you need to sign in to a YouTube account
when prompted. For information about requirements and how to get a YouTube
account, go to www.youtube.com.
Note: YouTube isn’t available in all languages and locations.
To use YouTube, iPad must have an Internet connection. See “Connecting to the
Internet” on page 29.
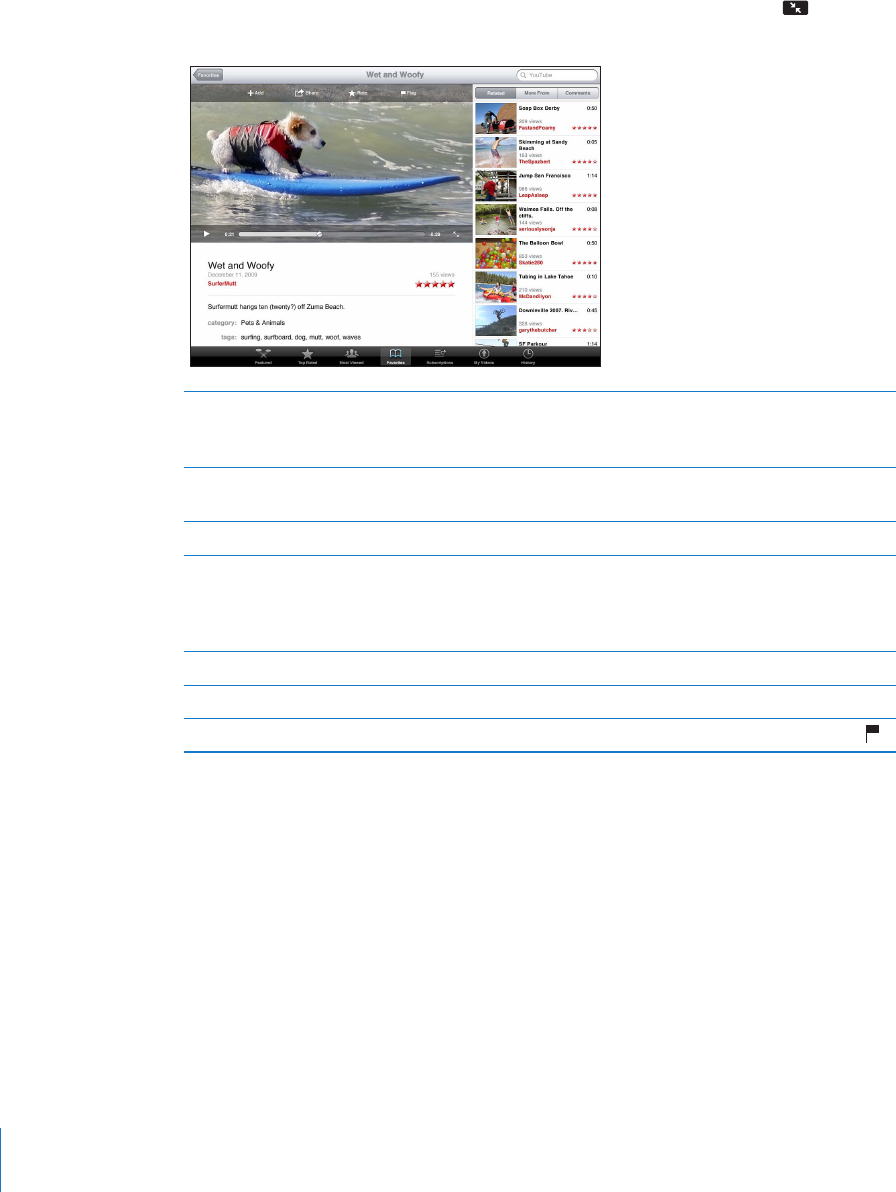
Browse videos: Tap a button in the toolbar to select a category.
Featured: 8KFGQUTGXKGYGFCPFHGCVWTGFD[;QW6WDGUVCÒ
Top Rated: Videos most highly rated by YouTube viewers. You can rate videos on
iPad, if you have a YouTube account.
Most Viewed: Videos most seen by YouTube viewers. Tap All for all-time most viewed
videos, or Today or This Week for most-viewed videos of the day or week.
Favorites: Videos you added to Favorites. When you sign in to a YouTube account,
account favorites appear.
Most Recent: Videos most recently submitted to YouTube.
Subscriptions: Videos from YouTube accounts you subscribe to. You must be signed
in to a YouTube account to use this feature.
81

Playlists: Videos you add to playlists. You must be signed in to a YouTube account to
use this feature.
My Videos: Videos that you’ve upload to YouTube. You must be signed in to a
YouTube account to use this feature.
History: Videos you’ve viewed most recently.
Search for a video:
1 6CRVJG;QW6WDGUGCTEJ°GNF
2 Type a word or phrase, then tap Search.
YouTube shows results based on searching video titles, descriptions, tags, and user
names. Each search result shows the title, rating, number of views, length, and the
name of the account the video was posted from.
Play a video: Tap the video.
The video begins downloading to iPad, and a progress bar appears. When enough of
the video has downloaded, it begins to play. You can also tap to start the video.
82 Chapter 11 YouTube
Controlling Video Playback
Rotate iPad to landscape orientation to view the video at its maximum size. When a
video is playing, the controls disappear so they don’t obscure the video.
Show or hide the video controls: Tap the screen.
Play or pause a video Tap or . You can also press the center button
(or equivalent button) on a compatible headset.
Adjust the volume Drag the volume slider, or use the iPad volume
buttons or the volume buttons on a compatible
headset.
Start a video over Tap .
Skip to the next or previous video in a list Tap twice to skip to the previous video.
Tap to skip to the next video.
Rewind or fast-forward Touch and hold or .
Skip to any point in a video Drag the playhead along the scrubber bar.
Stop watching a video Tap Done, or press the Home button.
Toggle between full-screen and standard mode Double-tap the video. You can also tap to
OCMGVJGXKFGQ°NNVJGUETGGPQT to make it
°VVJGUETGGP
Add a video to Favorites Start playing a video, then tap .
Email a link to the video Start playing a video, then tap .
Play a video on Apple TV using AirPlay Tap and choose Apple TV. For information, see
“Using AirPlay” on page 45.
View information about a video Tap to exit full-screen mode and view related
videos, comments, and more controls.
83
Chapter 11 YouTube
Managing Videos
While watching a full-screen video, tap to display the controller, then tap to see
related videos and options for managing videos.
Rate a video or add a comment Tap the video to display the toolbar, then tap
Rate and select a rating. You must be signed in to
a YouTube account.
See more videos from this YouTube user In the sidebar, tap “More From.” You must be
signed in to a YouTube account.
See videos similar to this one In the sidebar, tap “Related.”
Subscribe to videos by this YouTube user On the More Info screen, tap More Videos, then
tap “Subscribe to <account>” at the bottom
of the video list. You must be signed in to a
YouTube account.
Add a video to Favorites or a playlist Tap Add, then select Favorites or a playlist.
Email a link to a video Tap Share.
Flag a video Tap the movie to display the toolbar, then tap .
Watching YouTube on a TV
If you have an Apple TV, you can use AirPlay to watch YouTube videos on a TV. See
“Controlling Video Playback” on page 83.
;QWECPCNUQEQPPGEVK2CFFKTGEVN[VQ[QWT68QTCRTQLGEVQTCPFYCVEJ;QW6WDGQP
VJGNCTIGUETGGP(QTOQTGKPHQTOCVKQPCDQWVWUKPIK2CFYKVJC68QTRTQLGEVQTUGG
“Video” on page 168.
84 Chapter 11 YouTube

Calendar 12
About Calendar
iPad makes it easy to stay on schedule. You can view calendars individually, or several
calendars at once. You can view your events by day, week, or month, or in a list. You
can also search events by title, invitee, or location.
You can sync iPad with the calendars on your computer. You can also create, edit,
or cancel events on iPad, and sync them back to your computer. You can subscribe
to Google, Yahoo!, or iCal calendars. You can subscribe to read-only iCalendar (.ics)
ECNGPFCTUQTKORQTVKEU°NGUHTQOGOCKN+H[QWJCXGC/KETQUQHV'ZEJCPIGCEEQWPVQTC
supported CalDAV account, you can receive and respond to meeting invitations from
others, and invite people to events you’ve scheduled.
Syncing Calendars
You can sync your calendars in these ways:
In iTunes, use the iPad settings panes to sync with iCal or Microsoft Entourage on a
Mac, or with Microsoft Outlook on a PC, when you connect iPad to your computer.
See “Syncing with iTunes” on page 24.
In Settings on iPad, turn on Calendars in your MobileMe, Google, Yahoo!, or
Microsoft Exchange account to sync your calendar information over the air. If your
company or organization supports it, you can also set up a CalDAV account. See
“Adding Mail, Contacts, and Calendar Accounts” on page 31. To sync calendars over
the air, iPad must be connected to the Internet.
85

Adding, Editing, and Deleting Calendar Events
You can create and edit calendar events directly on iPad.
If you have a Microsoft Exchange account with calendars enabled, or a supported
CalDAV account, you can invite other people to your event or meeting.
Add an event: Tap and enter event information, then tap Done.
You can enter the following:
Title
Location
Starting and ending times (or turn on All-day, if it’s an all-day event)
Repeat times—none, or every day, week, two weeks, month, or year
#NGTVVKOG¤HTQO°XGOKPWVGUVQVYQFC[UDGHQTGVJGGXGPV
When you set an alert, the option to set a second alert appears. When an alert
occurs, iPad displays a message. To set iPad to play a sound, see “Alerts” on page 90.
Important: When you travel, iPad may not alert you at the correct local time. To
manually set the correct time, see “Date and Time” on page 160. For information
CDQWVCFLWUVKPIVJGECNGPFCTVKOG\QPGUGG¥Viewing Your Calendars” on page 86.
Notes
If you have more than one calendar, you can select which calendar to add the event to.
Read-only calendars don’t appear in the list.
Edit an event Tap the event, then tap Edit.
Delete an event Tap the event, tap Edit, then scroll down and tap
Delete Event.
Viewing Your Calendars
You can view a single calendar, selected calendars, or all calendars at once. This makes
it easy to manage work and family calendars at the same time.
8KGYCFKÒGTGPVECNGPFCTTap Calendars, then select the calendars you want to view.
6QXKGY[QWTEQPVCEVU¨DKTVJFC[UCUFG°PGFKP%QPVCEVUUGNGEVVJG$KTVJFC[UECNGPFCT
You can view calendar events in a list, or by day, week, or month. The events for all of
your selected calendars appear on iPad.
Switch views: Tap List, Day, Week, or Month.
86 Chapter 12 Calendar

List view: All your appointments and events appear in a scrollable list, next to the
UGNGEVGFFC[6QXKGYCFKÒGTGPVFC[VCR or or select a day from the timeline
below the calendar.
Day view: Scroll up or down to see the day’s events. Tap or to see the previous
or next day’s events, or select a day from the timeline below the calendar.
Week view: Scroll up or down to see the week’s events. Tap or to see the
previous or next week, or select a week from the timeline below the calendar.
Month view: Tap a day to see its events. Tap or to see the previous or next
month, or select a month from the timeline below the calendar.
See the details of an event: Tap the event.
87
Chapter 12 Calendar

See events adjusted for a time zone: In Settings, go to “Mail, Contacts, Calendars.”
Under Calendars, tap Time Zone Support. Turn on Time Zone Support and select a
OCLQTEKV[HQTVJGVKOG\QPG[QWYCPVVQWUG9JGP6KOG<QPG5WRRQTVKUQÒ
iPad Wi-Fi + 3G displays events in the time zone of your current location as determined
by the cellular network time.
Searching Calendars
You can search the titles, invitees, notes, and locations of the events in your calendars.
%CNGPFCTUGCTEJGULWUVVJGECNGPFCTQTECNGPFCTU[QW¨TGEWTTGPVN[XKGYKPI
Search for events: 'PVGTVGZVKPVJGUGCTEJ°GNF
Search results appear as you type. Tap a result to view the event. Tap the calendar to
close the list of search results.
Subscribing to Calendars
You can subscribe to calendars that use the iCalendar (.ics) format. Many calendar-based
services, including Yahoo!, Google, and iCal on the Mac, support calendar subscriptions.
Subscribed calendars are read-only. You can read events from subscribed calendars on
iPad, but you can’t edit them or create new events.
Subscribe to a CalDAV or .ics calendar:
1 In Settings, choose “Mail, Contacts, Calendars,” then tap Add Account.
2 Choose Other, then choose Add Subscribed Calendar.
3 Enter your account information, then tap Next to verify the subscription.
4 Tap Save.
Apple provides links to a number of free iCal calendars—for national holidays or sports
events, for example—that you may want to subscribe to.
You can also subscribe to an iCal (or other .ics) calendar published on the web, by
tapping a calendar link you receive in an email message on iPad.
88 Chapter 12 Calendar

Responding to Meeting Invitations
If you have a Microsoft Exchange account on iPad with Calendars enabled, a supported
CalDAV account, or a MobileMe calendar, you can receive and respond to meeting
invitations from people in your organization.
When you receive an invitation, the meeting appears in your calendar with a dotted
line around it. The icon in the lower-right corner of the screen shows the number
of new invitations you have. To receive and respond to meeting invitations, iPad must
have an Internet connection.
Respond to an invitation in Calendar:
1 Tap a meeting invitation in the calendar, or tap to display the Event screen and
then tap an invitation.
Tap “Invitation from” to get contact information for the meeting organizer. Tap the
email address to send the organizer a message.
Tap Invitees to see who is invited to the meeting. Tap a name to see the attendee’s
contact information. Tap an email address to send a message to the attendee.
Tap Alert to set iPad to sound an alert before the meeting.
Tap Add Comments to add comments for the meeting organizer. Your comments
will also appear in the Info screen for the meeting.
Notes are made by the meeting organizer.
2 Tap Accept, Maybe, or Decline.
When you accept, tentatively accept, or decline the invitation, the organizer is sent a
response that includes any comments you add.
You can change your response later, unless you decline. Tap Add Comments to change
or add comments.
89
Chapter 12 Calendar

Importing Calendar Files from Mail
;QWECPCFFGXGPVUVQCECNGPFCTD[KORQTVKPICECNGPFCT°NGHTQOCPGOCKNOGUUCIG
;QWECPKORQTVCP[UVCPFCTFKEUECNGPFCT°NG
+ORQTVGXGPVUHTQOCECNGPFCT°NGIn Mail, open the message and tap the calendar
°NG9JGPVJGNKUVQHGXGPVUCRRGCTUVCR#FF#NNEJQQUGVJGECNGPFCT[QWYCPVVQCFF
the events to, and tap Done.
Alerts
Set calendar alerts: In Settings, choose General > Sounds, then turn Calendar Alerts
QP+H%CNGPFCT#NGTVUKUQÒYJGPCPGXGPVQEEWTUK2CFFKURNC[UCOGUUCIGDWVOCMGU
no sound.
Sound alerts for invitations: In Settings, choose “Mail, Contacts, Calendar.” Under
Calendars, tap New Invitation Alert to turn it on.
90 Chapter 12 Calendar
Contacts 13
About Contacts
iPad lets you easily access and edit your contact lists from personal, business, and
organizational accounts. You can search across all of your groups, and the information
in Contacts is automatically accessed to make addressing emails quick and easy.
You can add contacts directly on iPad, or sync contacts from applications on your
computer. If you have a MobileMe or Microsoft Exchange account with Contacts
enabled, or a supported CardDAV account, you can sync your contacts over the air
without connecting iPad to your computer.
91

Syncing and Adding Contacts
You can add contacts to iPad in these ways:
Enter contacts on iPad
In iTunes, sync contacts from Google or Yahoo!, or sync with applications on your
computer (see “Syncing with iTunes” on page 24)
Set up a MobileMe or Microsoft Exchange account on iPad with Contacts enabled
(see “Adding Mail, Contacts, and Calendar Accounts” on page 31 )
+PUVCNNCRTQ°NGVJCVUGVUWRCP'ZEJCPIGCEEQWPVYKVJ%QPVCEVUGPCDNGFUGG
“Setting Up Microsoft Exchange Accounts” on page 172)
Set up an LDAP or CardDAV account on iPad to access business or school directories
(see “LDAP and CardDAV Accounts” on page 173 )
Searching Contacts
;QWECPUGCTEJ°TUVNCUVCPFEQORCP[PCOGUKP[QWTEQPVCEVUQPK2CF+H[QWJCXGC
Microsoft Exchange account on iPad, you may also be able to search your enterprise
Global Address List (GAL) for contacts in your organization. If you have an LDAP
account on iPad, you can search contacts on your organization’s LDAP server. If you
have a CardDAV account, you can search contacts synced to iPad, or searchable
contacts on a supported CardDAV server.
When you enter search information, contacts with matching information appear as
you type.
Search contacts: +P%QPVCEVUVCRVJGUGCTEJ°GNFCVVJGVQRQHVJGUETGGPCPFGPVGTC
°TUVNCUVQTEQORCP[PCOG6QUETQNNSWKEMN[VQVJGVQRQHVJGNKUVVCRVJGUVCVWUDCT
Search a GAL: 6CR)TQWRUVCRVJG'ZEJCPIGUGTXGTPCOGVJGPGPVGTC°TUVNCUVQT
company name.
You can’t edit GAL contacts or save them to iPad.
Search an LDAP server: 6CR)TQWRUVCRVJG.UGTXGTPCOGVJGPGPVGTC°TUVNCUV
or company name.
You can’t edit LDAP contacts or save them to iPad.
Search a CardDAV server: Tap Groups, tap the searchable CardDAV group at the
bottom of the list, then enter your search.
You can’t edit searchable CardDAV contacts from the server, but you can edit synced
CardDAV contacts on iPad.
92 Chapter 13 Contacts

Managing Contacts
You can edit your contacts and mark as favorites the ones you use frequently
with FaceTime.
Add a contact on iPad: Tap Contacts, then tap .
Delete a contact In Contacts, choose a contact, then tap Edit.
Scroll down, then tap Delete Contact.
Add a contact to FaceTime Favorites In Contacts, choose a contact, then tap Favorites.
Edit FaceTime Favorites In FaceTime, tap Favorites, then tap Edit. To delete
an item, tap .
Edit contact information In Contacts, choose a contact, then tap Edit. To
add an item, tap . To delete an item, tap .
Assign a photo to a contact:
1 Tap Contacts, then choose a contact.
2 Tap Edit and tap Add Photo, or tap the existing photo.
3 Tap an album, then tap a photo.
4 Drag and scale the photo.
5 Tap Choose.
Using Contact Information
You can use the information on a contact’s Info screen to:
Create an email message in Mail, addressed to the contact
Open the contact’s home page in Safari
Find the location of the contact’s address in Maps, and get directions
Share the contact information with others
Call a contact using FaceTime
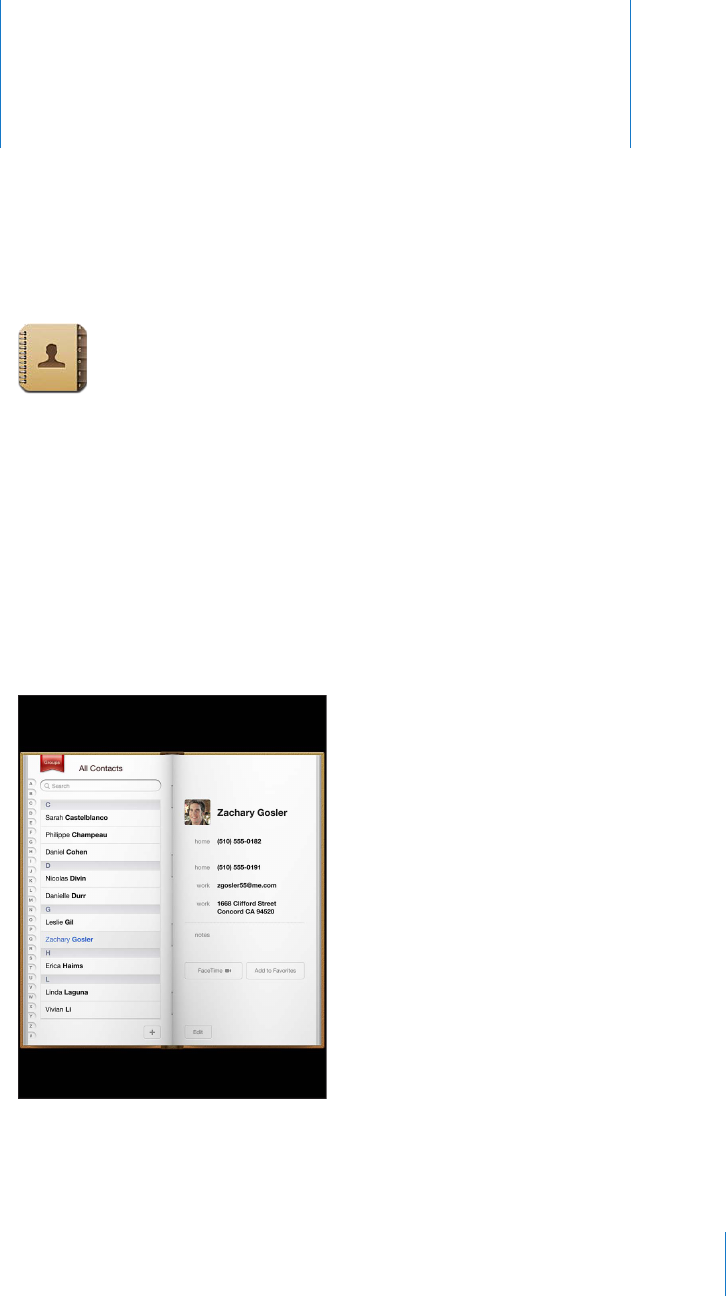
Use a contact’s info screen: Tap Contacts and choose a contact, then tap an item.
Placing a FaceTime call: Tap Contacts and choose a contact, then tap FaceTime and
choose an email address or phone number to use for the call. If you don’t see the
FaceTime button, turn on FaceTime in Settings > FaceTime.
93
Chapter 13 Contacts

7PK°GF%QPVCEVU
When you sync contacts with multiple accounts, you might have entries for the same
person in more than one account. To keep redundant contacts from appearing in the
#NN%QPVCEVUNKUV[QWECPNKPMEQPVCEVUVJCVJCXGVJGUCOG°TUVCPFNCUVPCOGDWVPQV
CFKÒGTGPVRTG°ZUWÓZQTOKFFNGPCOGCPFFKURNC[VJGOCUCUKPINGWPK°GFEQPVCEV.
9JGP[QWXKGYCWPK°GFEQPVCEVVJGVKVNG7PK°GF+PHQCRRGCTUCVVJGDQVVQOQHVJG
EQPVCEV¨UGPVT[7PK°GFEQPVCEVUCRRGCTQPN[YJGP[QWXKGYVJG#NN%QPVCEVUNKUV
Link contacts: (KPFVJG°TUVEQPVCEVVJCV[QWYCPVVQNKPMVJGPVCR'FKV6CR and
select the other contact, then tap Link.
When a contact is linked, tap the silhouette icon to view, add, or delete linked entries.
.KPMGFEQPVCEVUCTGP¨VOGTIGF7PNGUU[QWGFKVCWPK°GFEQPVCEVVJGEQPVCEVKPGCEJ
UQWTEGCEEQWPVTGOCKPUUGRCTCVG+H[QWEJCPIGKPHQTOCVKQPKPCWPK°GFEQPVCEVVJG
changes are copied to each source account that information already exists in. If you
CFFKPHQTOCVKQPVQCWPK°GFEQPVCEVVJCVKPHQTOCVKQPKUCFFGFVQVJGEQPVCEVKPGCEJ
source account.
94 Chapter 13 Contacts
Notes 14
Writing and Reading Notes
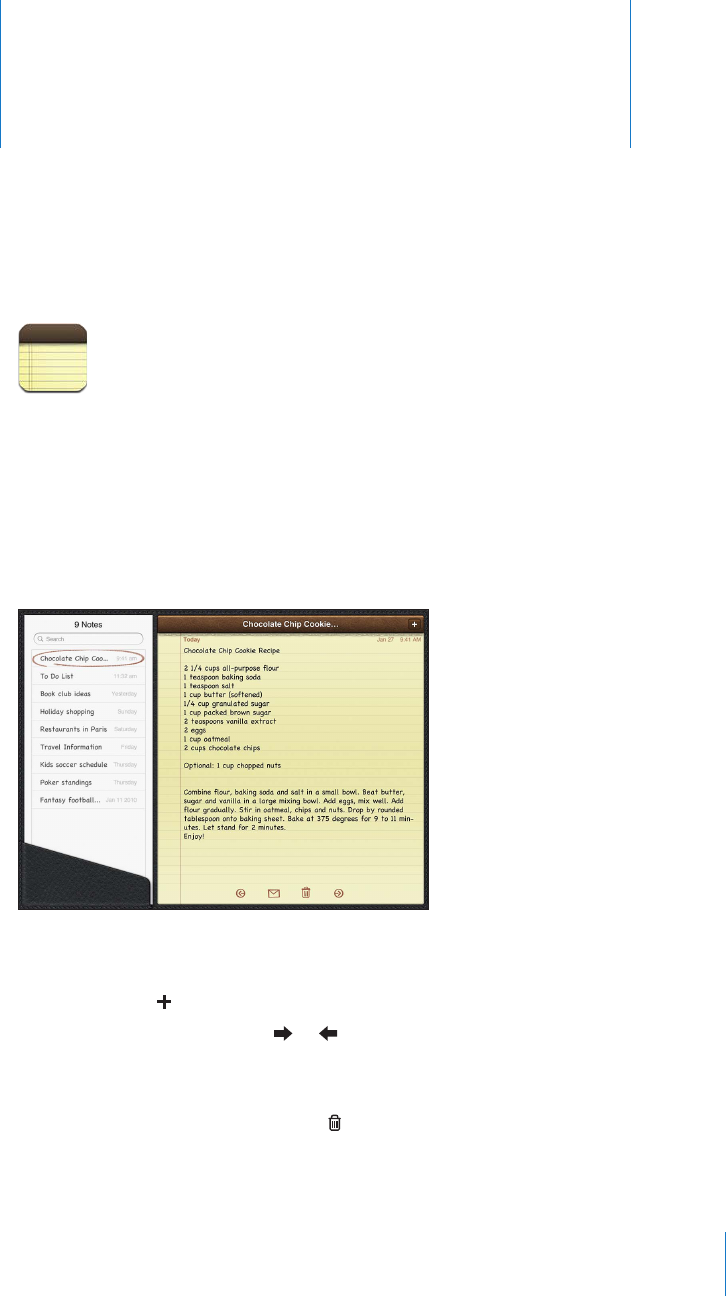
9KVJKVUNCTIGFKURNC[CPFQPUETGGPMG[DQCTFK2CFOCMGULQVVKPIPQVGUGCU[
You can view notes in landscape or portrait orientation. In portrait orientation, tap
Notes to view a list of your notes. In landscape orientation, the list of notes appears on
the left, and the current note is circled in red.
0QVGUCTGNKUVGFD[NCUVOQFK°GFFCVGYKVJVJGOQUVTGEGPVPQVGCVVJGVQR6JGNKUV
UJQYUVJG°TUVHGYYQTFUQHGCEJPQVG6CRCPQVGKPVJGNKUVVQXKGYQTGFKVKV
Add a note: Tap , type the note, then tap Done.
Read a note: Tap the note. Tap or to see the next or previous note.
Edit a note: Tap anywhere on the note to bring up the keyboard. Edit the note, then
tap Done.
Delete a note: Tap the note, then tap .
Change the font used to display notes: In Settings, choose Notes and select a font
from the list.
95

Searching Notes
;QWECPUGCTEJVJGVGZVQHPQVGUVQ°PFCRCTVKEWNCTPQVG
Search for notes: 'PVGTVGZVKPVJGUGCTEJ°GNFVJCVCRRGCTUCVVJGVQRQHVJGPQVGUNKUV
(In portrait orientation, tap Notes to display the notes list.)
Search results appear automatically as you type. Tap the keyboard button to dismiss
the keyboard and see more results. To view a note, tap it in the search results list.
Emailing Notes
Email a note: Tap the note, then tap .
To email a note, iPad must be set up for email. See “Setting Up Email Accounts” on
page 53.
Syncing Notes
You can set iTunes to automatically sync your notes with some email applications.
See “Setting Up Syncing” on page 24.
You can also sync notes over the air, when iPad has an Internet connection. Go to
Settings > Notes, then select the default mail account for syncing notes. New notes
you create on iPad will be stored in the account you select. To view notes stored in a
URGEK°ECEEQWPVQRGP0QVGUCPFVCR#EEQWPVU
96 Chapter 14 Notes
Maps 15
About Maps
Maps provides classic, satellite, hybrid, and terrain views of locations in many countries.
Search for a location, then get detailed driving, public transit, or walking directions, as
YGNNCUVTCÓEKPHQTOCVKQP
WARNING: For important information about driving and navigating safely, see the
Important Product Information Guide at support.apple.com/manuals/ipad.
To use Maps, iPad must have an Internet connection. See “Connecting to the
Internet” on page 29.
Important: Maps, directions, and location-based apps provided by Apple depend
QPFCVCUGTXKEGURTQXKFGFD[VJKTFRCTVKGU6JGUGFCVCUGTXKEGUCTGUWDLGEVVQEJCPIG
and may not be available in all geographic areas, resulting in maps, directions, or
location-based information that may be unavailable, inaccurate, or incomplete.
Compare the information provided on iPad to your surroundings, and defer to posted
signs to resolve any discrepancies. To provide your location, data is collected which
doesn’t identify you personally. If you don’t want this data collected, don’t use the
HGCVWTG0QVWUKPIVJKUHGCVWTGFQGUP¨VCÒGEVVJGPQP£NQECVKQPDCUGFHWPEVKQPCNKV[QH
your iPad.
+HNQECVKQPUGTXKEGUKUVWTPGFQÒYJGP[QWQRGP/CRU[QWOC[DGCUMGFVQVWTPKV
on. You can use Maps without turning on location services. See “Location Services” on
page 153 .
Finding and Viewing Locations
;QWECPUGCTEJHQTNQECVKQPU°PF[QWTEWTTGPVNQECVKQPFTQRCRKPVQOCTMCNQECVKQP
CPFIGVFKÒGTGPVOCRXKGYUKPENWFKPI)QQING5VTGGV8KGYU
97
Searching for Locations
You can search for locations in many ways—by address, intersection, area, landmark,
bookmark, contact, or zip code.
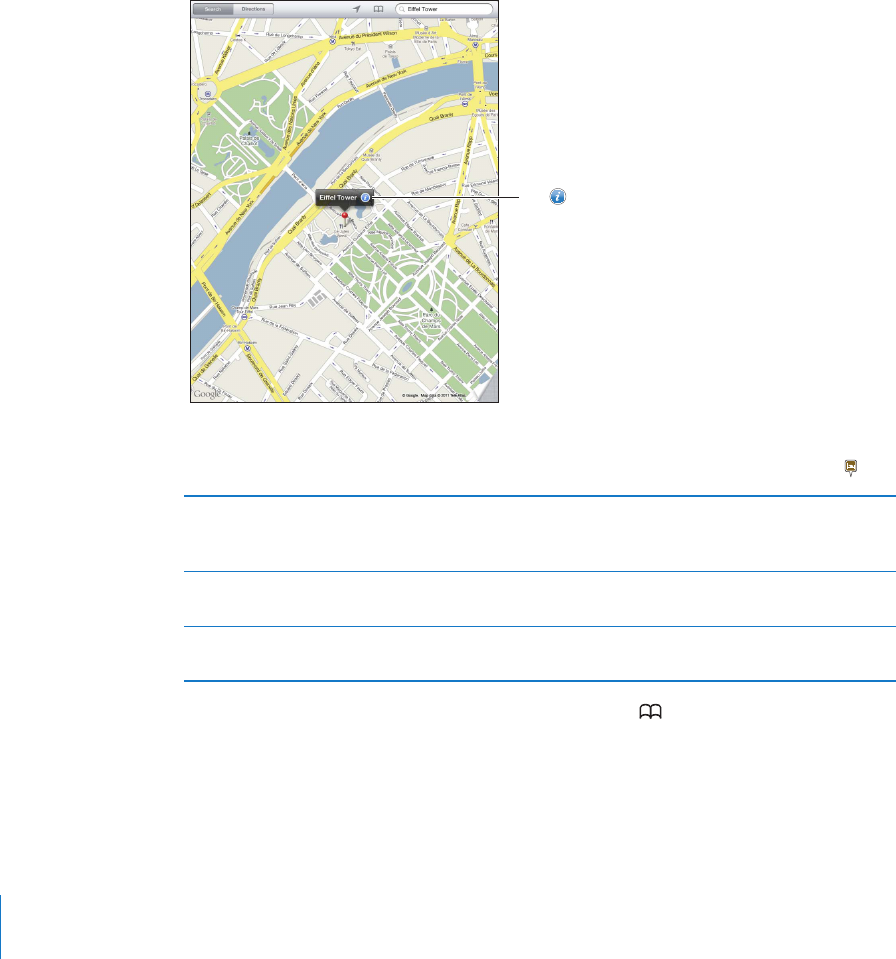
Find a location and see a map:
1 6CRVJGUGCTEJ°GNFVQDTKPIWRVJGMG[DQCTF
2 Type an address or other search information.
3 Tap Search.
A pin marks the location.
;HW[VNL[
PUMVYTH[PVUHIV\[
[OLSVJH[PVUNL[
KPYLJ[PVUZHKK[OL
SVJH[PVU[V`V\Y
IVVRTHYRZVY
JVU[HJ[ZSPZ[VY
LTHPSHSPUR[V
.VVNSL4HWZ
A location can include places of interest added by Google My Maps users (“User-
created content”), and sponsored links that appear as special icons (for example, ).
Zoom in 2KPEJVJGOCRYKVJVYQ°PIGTU1TFQWDNGVCRVJGRCTV
you want to zoom in on. Double-tap again to zoom in
even closer.
Zoom out 2KPEJ[QWT°PIGTUCRCTVQPVJGOCR1TVCRVJGOCRYKVJ
VYQ°PIGTU6CRYKVJVYQ°PIGTUCICKPVQ\QQOQWVHWTVJGT
Pan or scroll &TCIWRFQYPNGHVQTTKIJVVQXKGYCFKÒGTGPVRCTVQH
the map.
See the location of an entry in your Contacts list: Tap at the top of the screen and
choose a contact.
The contact must include at least one address. If the contact has more than one address,
EJQQUGVJGQPGVQNQECVG;QWECPCNUQVCRCPCFFTGUUKP%QPVCEVUVQ°PFCNQECVKQP
98 Chapter 15 Maps

Finding Your Current Location
#SWKEMVCR°PFU[QWTEWTTGPVNQECVKQP6JGQPUETGGPFKIKVCNEQORCUUUJQYUYJKEJ
direction you’re facing.
Find your current location: Tap in the status bar at the top of the screen.
A blue marker shows your current location. If Maps can’t determine your exact
location, a blue circle appears around the marker. The size of the circle depends on
how precisely your location can be determined—the smaller the circle, the greater
the precision.
If you drag the map, then tap again, iPad centers the map back to your current
location.
Use the digital compass: Tap a second time. changes to and a small digital
compass CRRGCTUQPUETGGP7UGVJGFKIKVCNEQORCUUVQ°PFYJKEJFKTGEVKQP
you’re heading.
Note: ;QWPGGFVQECNKDTCVGVJGEQORCUUVJG°TUVVKOG[QWWUGKVCPF[QWOC[PGGFVQ
calibrate it occasionally after that.
Calibrate the compass: When the calibrate U[ODQNCRRGCTUYCXGK2CFKPC°IWTG
eight. You may be asked to move away from a source of interference.
See which way you’re facing: Hold iPad level to the ground. The compass rotates to
point north.
Return to map view: Tap to go back to the map view.
iPad uses Location Services to determine your location. Location Services uses
available information from local Wi-Fi networks if you have Wi-Fi turned on. This
feature isn’t available in all areas.
;QWTEWTTGPVNQECVKQPECP¨VDGHQWPFKH.QECVKQP5GTXKEGUKUVWTPGFQÒUQ[QWOC[DG
prompted to turn it on. See “Location Services” on page 153.
9JGP[QW¨TGPQVWUKPI.QECVKQP5GTXKEGU[QWECPVWTPKVQÒVQEQPUGTXGDCVVGT[RQYGT
In Settings, choose General > Location Services.
Get information about your current location: Tap the blue marker, then tap . iPad
displays the address of your current location, if available. You can use this information to:
Get directions to or from this location
Add the location to contacts
Send the address in email
Bookmark the location
See a street view (when available)
99
Chapter 15 Maps
Marking a Location with a Drop Pin
A drop pin lets you mark a location by hand.
Drop a pin: Touch and hold any location on the map. Or, you can drag or tap the
lower-right corner of the screen, then tap Drop Pin.
A pin drops on the map. Touch and hold the pin, then drag it to any location you choose.
Bookmarking Locations
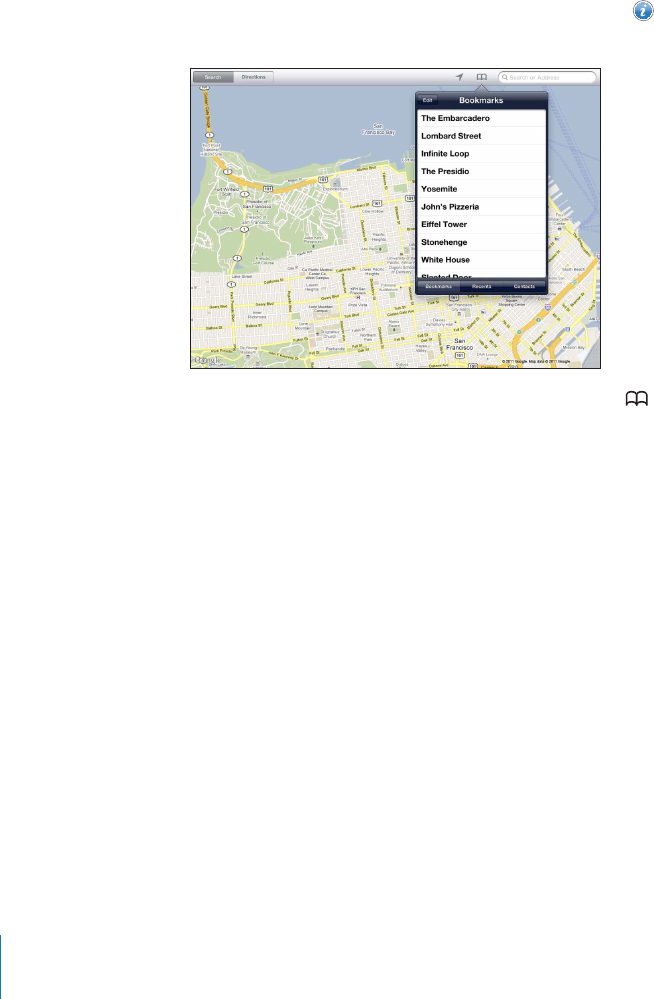
;QWECPDQQMOCTMCP[NQECVKQPVJCV[QWYCPVVQ°PFNCVGT
Bookmark a location: Find a location, tap the pin, tap next to the name or
description, then tap “Add to Bookmarks.”
See a bookmarked or recently viewed location: Tap at the top of the screen, then
tap Bookmarks or Recents.
Clear the list of recents: Tap Clear.
Rearrange or delete a bookmark: Tap Edit.
100 Chapter 15 Maps