Apple A1550 Tablet Device User Manual A1550 User Manual v1 0 Part5
Apple Inc. Tablet Device A1550 User Manual v1 0 Part5
Apple >
Contents
A1550_User_Manual_v1.0_Part5

12
90
Camera at a glance
Quick! Get the camera! FromtheLockscreen,justswipe up. Or swipe up from the bottom
edge of the screen to open Control Center, then tap .
Note: When you open Camera from the Lock screen, you can view and edit photos and videos
you take while the device is locked by tapping the thumbnail at the lower-left corner of the
screen.Tosharephotosandvideos,rstunlockiPad.
With iPad, you can take both still photos and videos using the front FaceTime camera or the back
camera.
View the photos and
videos you’ve taken.
View the photos and
videos you’ve taken.
Take a photo.
Take a photo.
Turn on HDR.
Turn on HDR.
Switch between cameras.
Switch between cameras.
Camera
Apple Confidential

Chapter 12 Camera 91
Take photos and videos
Cameraoersseveralmodes,whichletyoushootstills,square-formatphotos,time-lapse,videos,
and panoramas.
Choose a mode. Drag up or down, or tap the camera mode labels to choose Time-Lapse, Video,
Photo, Square, or Pano.
Take a photo. Choose Photo, then tap the white Take Picture button or press either
volume button.
•Take Burst shots: (iPadAir2)TouchandholdtheTakePicturebuttontotakerapid-rephotos
inbursts(availablewhileinSquareorPhotomode).Theshuttersoundisdierent,andthe
countershowshowmanyshotsyou’vetaken,untilyouliftyournger.Toseethesuggested
shots and select the photos you want to keep, tap the thumbnail, then tap Select. The gray
dot(s) mark the suggested photos. To copy a photo from the burst as a separate photo in your
Bursts album in Photos, tap the circle in the lower-right corner of the photo. To delete the
burst of photos, tap it, then tap .
•Apply a lter: Tap toapplydierentcoloreects,suchasMonoorChrome.Toturnoa
lter,tap ,thentapNone.Youcanalsoapplyalterlater,whenyoueditthephoto.SeeEdit
photos and trim videos on page 87.
Arectanglebrieyappearswheretheexposureisset.Whenyouphotographpeople,face
detection (iPad 3rd generation or later) balances the exposure across up to 10 faces. A rectangle
appears for each face detected.
Exposure is automatic, but you can set the exposure manually for the next shot by tapping an
objectorareaonthescreen.WithaniSightcamera,tappingthescreensetsthefocusandthe
exposure,andfacedetectionistemporarilyturnedo.Tolocktheexposureandfocus,touch
and hold until the rectangle pulses. Take as many photos as you want. When you tap the screen
again, the automatic settings and face detection turn back on.
Adjust the exposure. Tap to see next to the exposure rectangle, then slide up or down to
adjusttheexposure.
Apple Confidential

Chapter 12 Camera 92
Take a panorama photo. (iSight camera) Choose Pano, tap the Take Picture button, then pan
slowlyinthedirectionofthearrow.Topanintheotherdirection,rsttapthearrow.Topan
vertically,rstrotateiPadtolandscapeorientation.Youcanreversethedirectionofaverticalpan,
too.
Capture an experience with time-lapse. Choose Time-Lapse, set up iPad where you want, then
taptheRecordTime-LapseVideobuttontostartcapturingasunset,aoweropening,orother
experiences over a period of time. Tap the Record Time-Lapse Video button again to stop. The
time-lapse photos are compiled into a short video that you can watch and share.
Shoot some video. Choose Video, then tap the Record Video button or press either volume
button to start and stop recording. Video records at 30 fps (frames per second).
Take it slow. (iPad Air 2) Choose Slo-Mo to shoot slow motion video at 120 fps. You can set which
section to play back in slow-motion when you edit the video.
Set the slow-motion section of a video. Tap the thumbnail, then use the vertical bars beneath
the frame viewer to set the section you want to play back in slow motion.
Zoom in or out. (iSight camera) Pinch the image on the screen. With iPad Air (all models) and
iPad mini 2 and later, zooming works in video mode as well as photo mode.
If Location Services is turned on, photos and videos are tagged with location data that can be
used by apps and photo-sharing websites. See Privacy on page 42.
Use the capture timer to put yourself in the shot. Avoid “camera shake” or add yourself to a
picturebyusingthecapturetimer.Toincludeyourself,rststabilizeiPadandframeyourshot.
Tap , tap 3s (seconds) or 10s, then tap the Take Picture button.
Want to capture what’s displayed on your screen? Simultaneously press and release the Sleep/
Wake and Home buttons. The screenshot is added to the Photos tab in Photos and can also be
viewed in the Camera Roll album or All Photos album (if you’re using iCloud Photo Library).
Make it better. You can edit photos and trim videos, right on iPad. See Edit photos and trim
videos on page 87.
Use Siri. Say something like:
•“Open Camera”
•“Take a picture”
Apple Confidential

Chapter 12 Camera 93
HDR
HDR (High Dynamic Range) helps you get great shots, even in high-contrast situations. The best
partsofthreequickshots,takenatdierentexposures(long,normal,andshort),areblended
together into a single photo.
Use HDR. (iSight camera on iPad 3rd generation or later) Tap HDR. For best results, keep both
iPadandthesubjectstill.
Keep the normal photo and the HDR version. Go to Settings > Photos & Camera > Keep Normal
Photo. Both the normal and HDR versions of the photo appear in Photos. HDR versions of photos
in your albums are marked with “HDR” in the corner.
View, share, and print
Photos and videos you take are saved in Photos. With iCloud Photo Library enabled, all new
photos and videos are automatically uploaded and available in Photos on all your iOS 8.1 or
later devices set up with iCloud Photo Library. See iCloud Photo Library on page 84. With iCloud
PhotoLibraryturnedo,youcancollectupto1,000ofyourmostrecentphotosfromallofyour
enabled devices in the My Photo Stream album. See My Photo Stream on page 84.
View your photos. Tap the thumbnail image, then swipe left or right to see the photos you’ve
taken recently. Tap All Photos to see everything in the Photos app.
Tap the screen to show or hide the controls.
Get sharing and printing options. Tap . See Share from apps on page 36.
Upload photos and videos. Use iCloud Photo Library to upload photos and videos from your
iPad to iCloud and access them on your iOS 8.1 or later devices signed in to iCloud using the
same Apple ID. You can also upload and download your photos and videos from the Photos app
on iCloud.com. See iCloud Photo Library on page 84.
Sync photos and videos to iPad from your Mac. Use the Photos settings pane in iTunes. See
Sync with iTunes on page 20.
Camera settings
Go to Settings > Photos & Camera for camera options, which include:
•iCloud Photo Library, My Photo Stream, and iCloud Photo Sharing
•Slideshow
•Grid
•HDR
AdjustthevolumeoftheshuttersoundwiththeRingerandAlertssettingsinSettings>Sounds.
Or mute the sound using the Ring/Silent switch. (In some countries muting is disabled.)
Apple Confidential
13
94
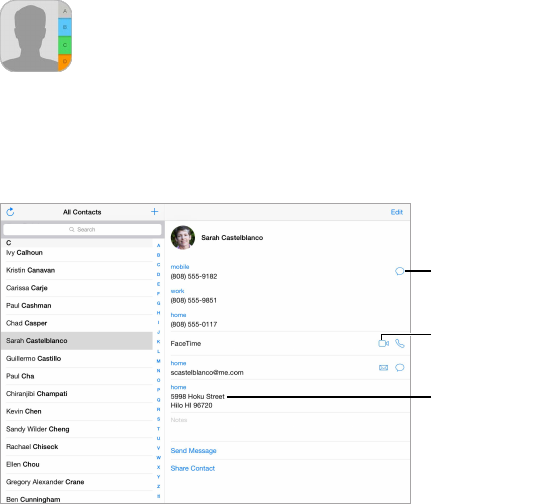
Contacts at a glance
iPad lets you access and edit your contact lists from personal, business, and other accounts.
Open in
Messages.
Open in
Messages.
Open in
FaceTime.
Open in
FaceTime.
Open in Maps.
Open in Maps.
Set your My Info card for Safari, Siri, and other apps. Go to Settings > Mail, Contacts, Calendars,
tap My Info, then select the contact card with your name and information.
Let Siri know who’s who. WhileeditingyourMyInfocard,tapAddRelatedNametodene
relationships you want Siri to know about, so you can say things like “send a message to my
sister.” You can also add relationships using Siri. Say, for example, “John Appleseed is my brother.”
Use Siri. Say, for example, “Sarah Castelblanco is my sister.”
Find a contact. Usethesearcheldatthetopofthecontactslist.Youcanalsosearchyour
contacts using Spotlight Search (see Spotlight Search on page 33).
Use Siri. Say, for example, “What’s my brother’s work address?”
Share a contact. Tap a contact, then tap Share Contact. See Share from apps on page 36.
Change a label. Ifaeldhasthewronglabel,suchasHomeinsteadofWork,tapEdit.Thentap
the label and choose one from the list, or tap Custom Field to create one of your own.
Add your friends’ social proles. Whileviewingacontact,tapEdit,thentap“addsocialprole.”
You can add Twitter, Facebook, LinkedIn, Flickr, Myspace, and Sina Weibo accounts, or create a
custom entry.
Delete a contact. Go to the contact’s card, then tap Edit. Scroll down, then tap Delete Contact.
Contacts
Apple Confidential
Chapter 13 Contacts 95
Add contacts
Besides entering contacts, you can:
•Use your iCloud contacts: Go to Settings > iCloud, then turn on Contacts.
•Import your Facebook Friends: Go to Settings > Facebook, then turn on Contacts in the “Allow
These Apps to Use Your Accounts” list. This creates a Facebook group in Contacts.
•Use your Google contacts: Go to Settings > Mail, Contacts, Calendars, tap your Google account,
then turn on Contacts.
•Access a Microsoft Exchange Global Address List: Go to Settings > Mail, Contacts, Calendars, tap
your Exchange account, then turn on Contacts.
•Set up an LDAP or CardDAV account to access business or school directories: Go to Settings > Mail,
Contacts, Calendars > Add Account > Other. Tap Add LDAP account or Add CardDAV account,
then enter the account information.
•Sync contacts from your computer: In iTunes on your computer, turn on contact syncing in the
device info pane. For information, see iTunes Help.
•Import contacts from a vCard: Tap a .vcf attachment in an email or message.
Search a directory. Tap Groups, tap the GAL, CardDAV, or LDAP directory you want to search,
then enter your search. To save a person’s info to your contacts, tap Add Contact.
Show or hide a group. Tap Groups, then select the groups you want to see. This button appears
only if you have more than one source of contacts.
Update your contacts using Twitter, Facebook, and Sina Weibo. Go to Settings > Twitter,
Settings > Facebook, or Settings > Sina Weibo, then tap Update Contacts. This updates contact
photos and social media account names in Contacts.
Unify contacts
When you have contacts from multiple sources, you might have multiple entries for the same
person. To keep redundant contacts from appearing in your All Contacts list, contacts from
dierentsourcesthathavethesamenamearelinkedanddisplayedasasingleunied contact.
Whenyouviewauniedcontact,thetitleUniedInfoappears.
Unify contacts. If two entries for the same person aren’t linked automatically, you can unify them
manually. Edit one of the contacts, tap Link Contact, then choose the other contact to link to.
Linkedcontactsaren’tmerged.Ifyouchangeoraddinformationinauniedcontact,the
changes are copied to each source account where that information already exists.
Ifyoulinkcontactswithdierentrstorlastnames,thenamesontheindividualcardswon’t
change,butonlyonenameappearsontheuniedcard.Tochoosewhichnameappearswhen
youviewtheuniedcard,tapEdit,tapthelinkedcardwiththenameyouprefer,thentapUse
ThisNameForUniedCard.
Contacts settings
Go to Settings > Mail, Contacts, Calendars, where you can:
•Change how contacts are sorted
•Displaycontactsbyrstorlastname
•Change how long names are shortened in lists
•Choose to show recent contacts in the multitasking screen
Apple Confidential
Chapter 13 Contacts 96
•Set a default account for new contacts
•Set your My Info card
Apple Confidential
14
97
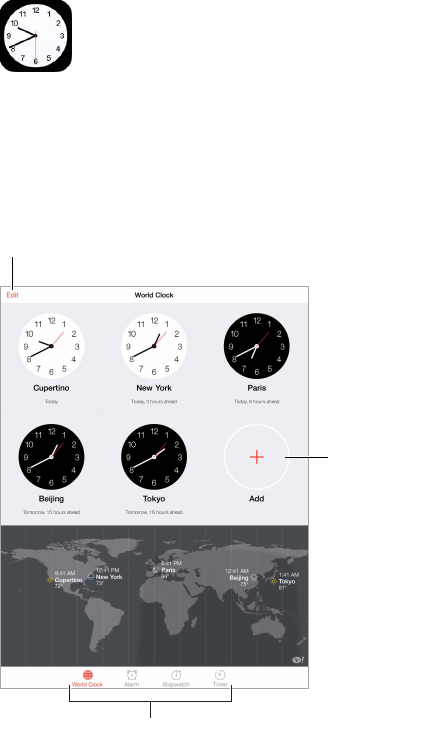
Clock at a glance
TherstclockdisplaysthetimebasedonyourlocationwhenyousetupiPad.Addotherclocks
toshowthetimeinothermajorcitiesandtimezones.
Add a clock.
Add a clock.
View clocks, set an alarm,
time an event, or set a timer.
View clocks, set an alarm,
time an event, or set a timer.
Delete clocks or
change their order.
Delete clocks or
change their order.
Clock
Apple Confidential
Chapter 14 Clock 98
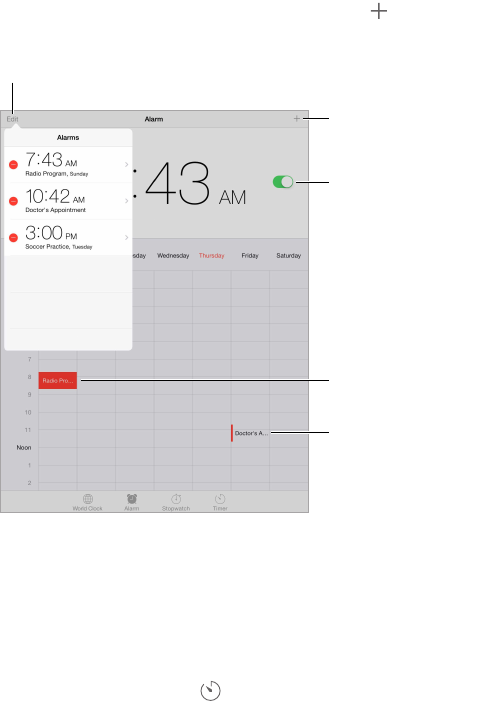
Alarms and timers
Want iPad to wake you? Tap Alarm, then tap . Set your wake-up time and other options, then
give the alarm a name (like “Good morning”).
Add an alarm.
Add an alarm.
Turn the alarm on/off.
Turn the alarm on/off.
Selected alarm
Selected alarm
Additional alarm
Additional alarm
View and change alarms.
View and change alarms.
Keep track of time. Use the stopwatch to keep time, record lap times, or set a timer to alert you
when time’s up.
Want to fall asleep to music or a podcast? Tap Timer, tap When Timer Ends, then choose Stop
Playing at the bottom.
Get quick access to clock features. Swipe up from the bottom edge of the screen to open
Control Center, then tap . You can access Timer from Control Center even when iPad is locked.
You can also navigate to the other clock features.
Use Siri. Say something like:
•“Set the timer for 3 minutes”
•“Wake me up tomorrow at 7 a.m.”
•“What alarms do I have set?”
Apple Confidential
15
99
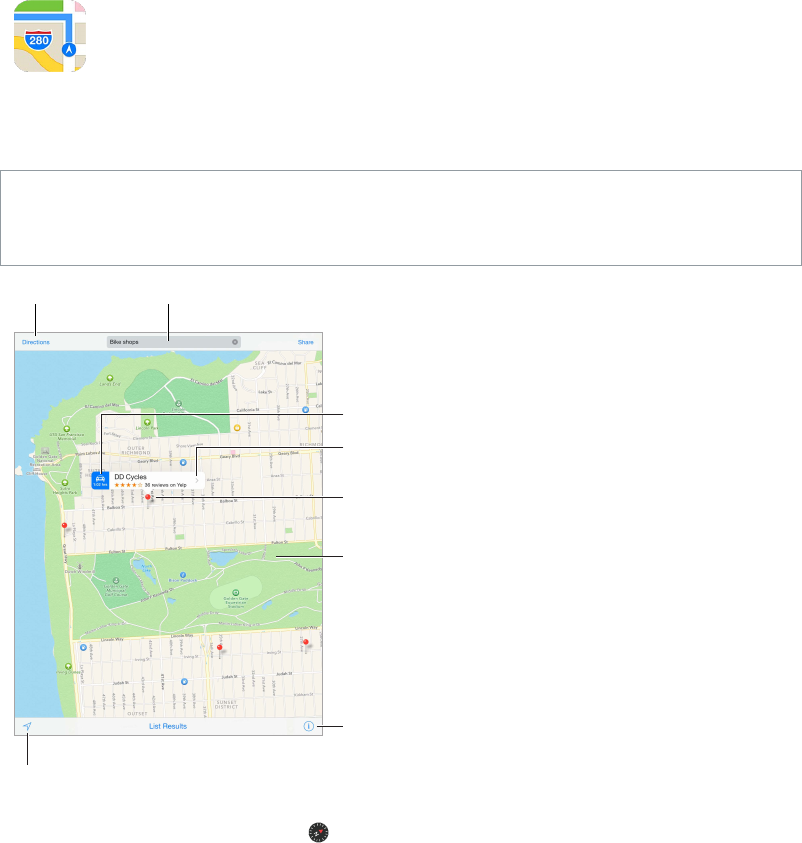
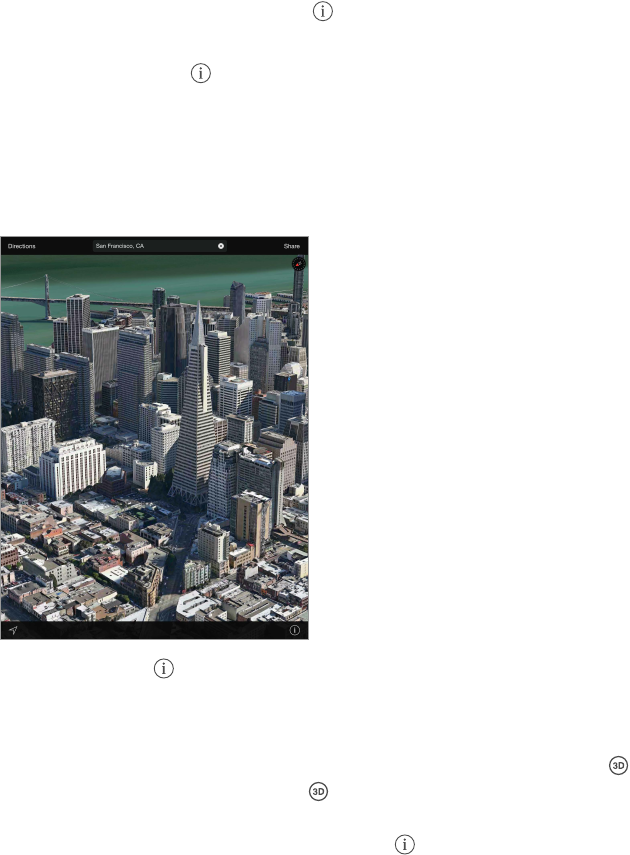
Find places
WARNING: For important information about navigation and avoiding distractions that could
lead to dangerous situations, see Important safety information on page 159. See also Privacy on
page 42.
Get more info.
Tap a pin to display
the banner.
Choose the view, drop a
pin, or show traffic.
Get directions. Enter a search.
Show your current location.
Quick driving directions
Double-tap to zoom in;
tap with two fingers to
zoom out. Or pinch.
MovearoundMapsbydraggingthescreen.Tofaceadierentdirection,rotatewithtwongers.
To return to north, tap the compass in the upper right.
Zoom in or out. Double-tapwithonengertozoomin,andtapwithtwongerstozoomout—
or pinch open or closed. The scale appears in the upper left while zooming, or if you touch the
screenwithtwongers.Tochangehowdistanceisshown(milesorkilometers),gotoSettings>
Maps.
Search for a location. Tapthesearcheld.Youcansearchforalocationindierentways.For
example:
•Intersection (“8th and market”)
•Area (“greenwich village”)
Maps
Apple Confidential

Chapter 15 Maps 100
•Landmark (“guggenheim”)
•Zip code
•Business (“movies,” “restaurants san francisco ca,” “apple inc new york”)
Maps may also list recent locations, searches, or directions that you can choose from.
Use Siri. Say,forexample,“Findcoeenearme.”
Find the location of a contact, or of a favorite or recent search. Tap Favorites.
Choose your view. Tap , then choose Standard, Hybrid, or Satellite.
Manually mark a location. Touch and hold the map until the dropped pin appears.
Get more info
Get info about a location. Tap a pin to display its banner, then tap . Info might include Yelp
reviews and photos, a webpage link, directions, and more.
To share the location, add the location to your Favorites, or use another app you install, tap .
See Share from apps on page 36.
Get directions
Note: To get directions, iPad must be connected to the Internet. To get directions involving your
current location, Location Services must also be on.
Get directions. Tap Directions, enter the starting and ending locations, then tap Route. Or,
choose a location or a route from the list, if available. Tap to select driving or walking directions,
or to use an app for public or other modes of transportation.
If a location banner is showing, directions to that location from your current location appear. To
getotherdirections,tapthesearcheld.
If multiple routes appear, tap the one you want to take.
•Hear turn-by-turn directions (iPad Wi-Fi + Cellular): Tap Start.
Maps follows your progress and speaks turn-by-turn directions to your destination. To show or
hide the controls, tap the screen.
If iPad auto-locks, Maps stays onscreen and continues to announce instructions. You can also
open another app and continue to get turn-by-turn directions. To return to Maps, tap the
banner across the top of the screen.
Withturn-by-turndirections,nightmodeautomaticallyadjuststhescreenimageforeasier
viewing at night.
•View turn-by-turn directions (iPad Wi-Fi only): Tap Start, then swipe left to see the
next instruction.
•See the route overview: Tap Overview.
•View the directions as a list: Tap List Steps.
•Stop turn-by-turn directions: Tap End. Or ask Siri to “stop navigating.”
Get directions from your current location. Tap on the banner of your destination. Tap to
select driving or walking directions, or to use an app for public or other modes of transportation.
Use Siri. Say something like:
•“Give me directions home”
Apple Confidential
Chapter 15 Maps 101
•“Directions to my dad’s work”
•“What’s my ETA?”
•“Find a gas station”
Use Maps on your Mac to get directions. Open Maps on your Mac (OS X Mavericks or later), get
directions for your trip, then choose File > Share > Send to your device. Your Mac and iPad must
both be signed in to iCloud using the same Apple ID.
Find out about trac conditions. Tap ,thentapShowTrac.Orangedotsshowslowdowns,
andreddotsshowstop-and-gotrac.Toseeanincidentreport,tapamarker.
Report a problem. Tap , then tap Report a Problem.
3D and Flyover
With 3D and Flyover, on iPad 3rd generation or later, you can see three-dimensional views and
evenyovermanyoftheworld’smajorcities.
View 3D map. Tap ,thentapShow3DMap.Or,dragtwongersup.(Zoominforacloserlook
if Show 3D Map doesn’t appear.)
Adjust the angle. Dragtwongersupordown.
Take a Flyover Tour. An aerial tour is available for select cities, indicated by next to the city
name. (Zoom out if you don’t see any markers.) Tap the name of the city to display its banner,
then tap Tour to begin the tour. To stop the tour, tap the screen to display the controls, then tap
End Flyover Tour. To return to standard view, tap .
Maps settings
Go to Settings > Maps. Settings include:
•Navigation voice volume (iPad Wi-Fi + Cellular)
•Distances in miles or kilometers
•Maplabels(theseappearinthelanguagespeciedinSettings>General>International>
Language)
Apple Confidential
16
102
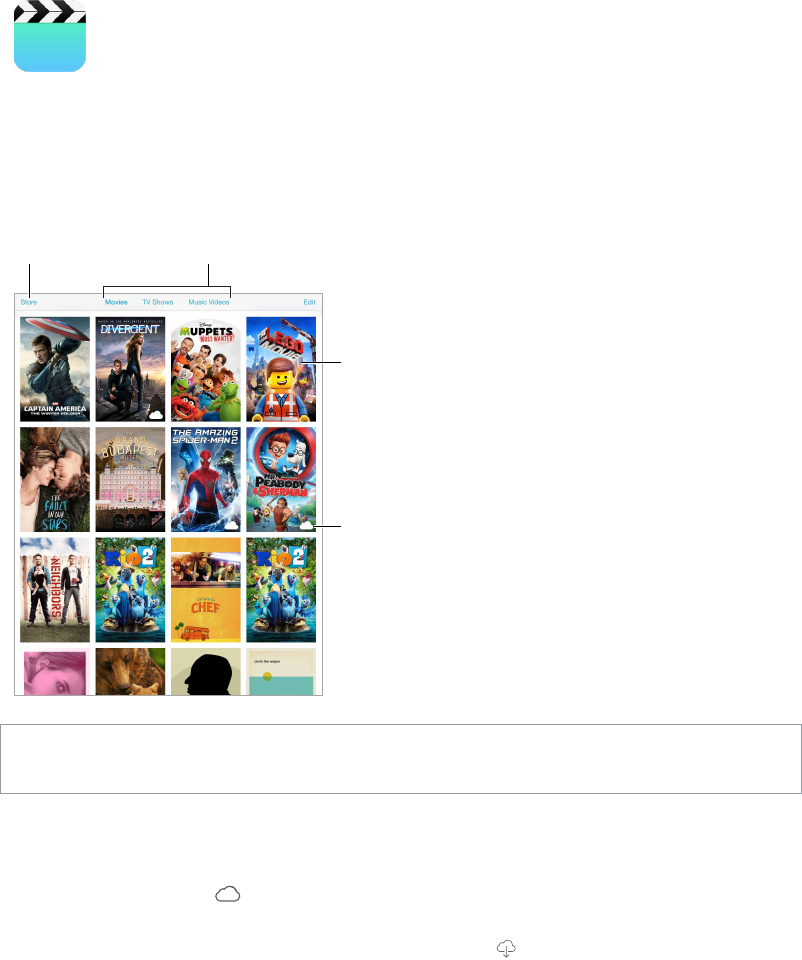
Videos at a glance
Open the Videos app to watch movies, TV shows, and music videos. To watch video podcasts,
open the Podcasts app—see Podcasts at a glance on page 127. To watch videos you record using
Camera on iPad, open the Photos app.
This video hasn’t been
downloaded to iPad.
This video hasn’t been
downloaded to iPad.
Tap to play.
Tap to play.
Choose a category.
Choose a category.
Add to your library.
Add to your library.
WARNING: For important information about avoiding hearing loss, see Important safety
information on page 159.
Watch a video. Tap the video in the list of videos.
What about videos you shot with iPad? Open the Photos app.
Stream or download? If appears on a video thumbnail, you can watch it without
downloading it to iPad, if you have an Internet connection. To download the video to iPad so you
can watch without using a Wi-Fi or cellular connection, tap in the video details.
Looking for podcasts or iTunes U videos? Open the Podcasts app or download the free iTunes U
app from the App Store.
Set a sleep timer. Open the Clock app and tap Timer, then swipe to set the number of hours and
minutes. Tap When Timer Ends and choose Stop Playing, tap Set, then tap Start.
Videos
Apple Confidential

Chapter 16 Videos 103
Add videos to your library
Buy or rent videos from the iTunes Store. Tap Store in the Videos app, or open the iTunes Store
app on iPad, then tap Movies or TV Shows. The iTunes Store is not available in all areas. See
Chapter 22, iTunes Store, on page 115.
Transfer videos from your computer. Connect iPad, then sync videos from iTunes on your
computer. See Sync with iTunes on page 20.
Stream videos from your computer. Turn on Home Sharing in iTunes on your computer. Then,
on iPad, go to Settings > Videos and enter the Apple ID and password you use for Home Sharing
on your computer. Then open Videos on iPad, and tap Shared at the top of the list of videos.
Convert a video for iPad. If you try to sync a video from iTunes and a message says the video
can’t play on iPad, try converting the video. Select the video in iTunes on your computer, then
choose File > Create New Version > Create iPad or Apple TV Version. Then sync the converted
video to iPad.
Delete a video. Tap Edit in the upper right of your collection, then tap on the video thumbnail.
If you don’t see the Edit button, look for on your video thumbnails—those videos haven’t
been downloaded to iPad, so you can’t delete them. To delete an individual episode of a series,
tap the series, then swipe left on the episode in the Episodes list.
Deleting a video (other than a rented movie) from iPad doesn’t delete it from the iTunes library
on your computer or from your purchased videos in iCloud, and you can sync the video or
download it to iPad again later. If you don’t want to sync a deleted video back to iPad, set iTunes
to not sync the video. See Sync with iTunes on page 20.
Important: If you delete a rented movie from iPad, it’s deleted permanently and cannot be
transferred back to your computer.
Control playback
Select audio
language,
subtitles,
or closed
captions.
Select audio
language,
subtitles,
or closed
captions.
Drag to adjust
the volume.
Drag to adjust
the volume.
Drag to skip
forward or back.
Drag to skip
forward or back.
Tap to show
or hide the
controls.
Tap to show
or hide the
controls.
Watch on a
TV with
Apple TV.
Watch on a
TV with
Apple TV.
The Grand Budapest Hotelis available on iTunes.
The Grand Budapest Hotel© 2014 TGBH LLC, Twentieth Century Fox Film
Corporation and TSG Entertainment Finance LLC. All rights reserved.
The Grand Budapest Hotelis available on iTunes.
The Grand Budapest Hotel© 2014 TGBH LLC, Twentieth Century Fox Film
Corporation and TSG Entertainment Finance LLC. All rights reserved.
Scale the video to ll the screen or t to the screen. Tap or . Or double-tap the video. If
youdon’tseethescalingcontrols,yourvideoalreadytsthescreenperfectly.
Start over from the beginning. If the video contains chapters, drag the playhead along the
scrubber bar all the way to the left. If there are no chapters, tap .
Apple Confidential

Chapter 16 Videos 104
Skip to the next or previous chapter. Tap or . You can also press the center button or
equivalent on a compatible headset two times (skip to next) or three times (skip to previous).
Rewind or fast-forward. Touch and hold or . Or drag the playhead left or right. Move your
ngertowardthebottomofthescreenasyoudragfornercontrol.
Select a dierent audio language. Ifthevideooersotherlanguages,tap , then choose a
language from the Audio list.
Show subtitles or closed captions. Tap .Notallvideosoersubtitlesorclosedcaptions.
Customize the appearance of closed captions. Go to Settings > General > Accessibility >
Subtitles & Captioning.
See closed captions and subtitles for the deaf and hard of hearing. Go to Settings > General >
Accessibility > Subtitles & Captioning, then turn on Closed Captions + SDH.
Watch the video on a TV. Tap . For more about AirPlay and other ways to connect, see
AirPlay on page 40.
Videos settings
Go to Settings > Videos, where you can:
•Choose where to resume playback the next time you open a video
•Choose to show only videos that are downloaded to this device
•Log in to Home Sharing
Apple Confidential
17
105
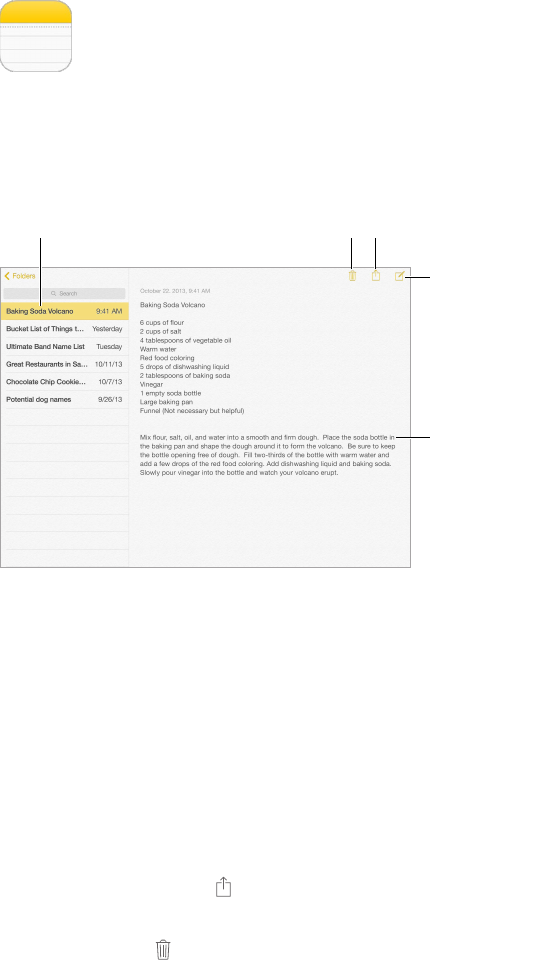
Notes at a glance
Type notes on iPad, and iCloud makes them available on your other iOS devices and Mac
computers. You can also read and create notes in other accounts, such as Gmail or Yahoo!.
Tap a note to view it.
Tap a note to view it.
Delete the note.
Delete the note.
Add a
new note.
Add a
new note.
Tap the text
to edit it.
Tap the text
to edit it.
Print or share the note.
Print or share the note.
See your notes on your other devices. If you use an icloud.com, me.com, or mac.com email
address for iCloud, go to Settings > iCloud, then turn on Notes. If you use Gmail or another IMAP
account for iCloud, go to Settings > Mail, Contacts, Calendars, then turn on Notes for the account.
Your notes appear in Notes on all your iOS devices and Mac computers that use the same
Apple ID.
See just the note. Use iPad in portrait orientation. To see the notes list again in portrait
orientation, swipe from left to right.
Search for a note. TaptheSearcheldatthetopofthenoteslist,thentypewhatyou’re
lookingfor.YoucanalsosearchfornotesfromtheHomescreen—justdragdownthemiddleof
the screen.
Share or print a note. Tap at the bottom of the note. You can share via Messages, Mail,
or AirDrop.
Delete a note. Tap , or swipe left over the note in the notes list.
Use Siri. Say something like:
•“Create new note travel items.”
•“Add toothbrush to travel items.”
Notes
Apple Confidential

Chapter 17 Notes 106
•“Add umbrella.”
Use notes in multiple accounts
Share notes with other accounts. You can share notes with other accounts, such as Google,
Yahoo!, or AOL. Go to Settings > Mail, Contacts, Calendars, add the account if it’s not already
there, then turn on Notes for the account.
Create a note in a specic account. Tap Accounts, select the account, then tap . If you don’t
seetheAccountsbutton,taptheNotesbuttonrst.
Choose the default account for new notes. Go to Settings > Notes.
See all the notes in an account. Tap Accounts at the top of the notes list, then choose
the account.
Apple Confidential
18
107
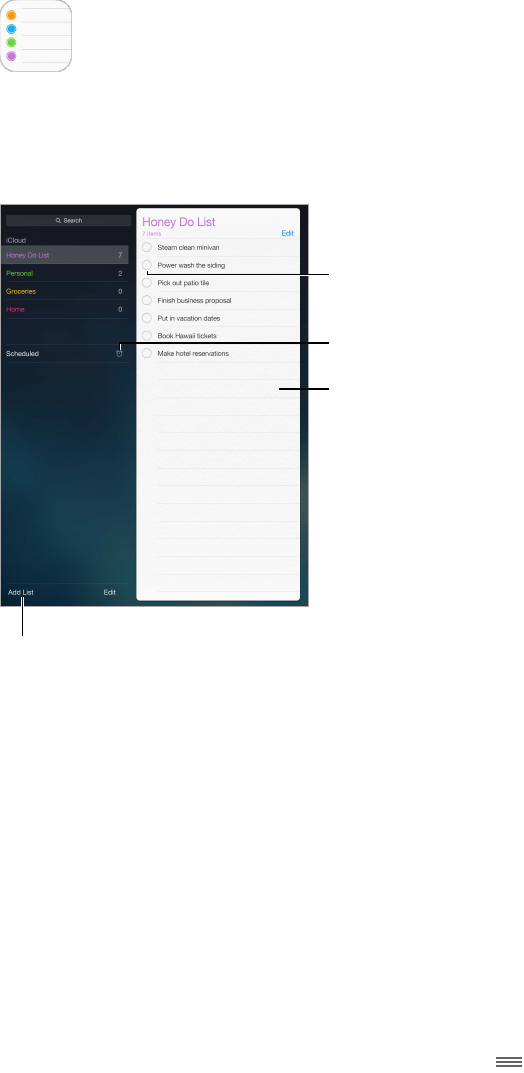
Reminders at a glance
Reminders lets you keep track of all the things you need to do.
Scheduled items
Scheduled items
Add a reminder.
Add a reminder.
Mark the reminder
as completed.
Mark the reminder
as completed.
Add a list.
Add a list.
Add a reminder. Tap a list, then tap a blank line.
Share a list. Tap a list, then tap Edit. Tap Sharing, then tap Add Person. The people you share with
also need to be iCloud users. After they accept your invitation to share the list, you’ll all be able
to add, delete, and mark items as completed. Family members can also share a list. See Family
Sharing on page 37.
Use Siri. Say something like:
•“Remember to take an umbrella”
•“Add artichokes to my groceries list”
•“Read my work to-do list”
Delete a list. While viewing a list, tap Edit, then tap Delete List. All of the reminders in the list are
also deleted.
Delete a reminder. Swipe the reminder left, then tap Delete.
Change the order of lists or reminders. Tap Edit, then touch and move the item.
Reminders
Apple Confidential