Apple A1550 Tablet Device User Manual A1550 User Manual v1 0 Part7
Apple Inc. Tablet Device A1550 User Manual v1 0 Part7
Apple >
Contents
A1550_User_Manual_v1.0_Part7

Chapter 24 iBooks 125
Organize books
Sort the list.
Sort the list.
View collections.
View collections.
Download from iCloud.
Download from iCloud.
Change views.
Change views.
View on the
iBooks Store
View on the
iBooks Store
View books by title or cover. Tap or .
Organize your books with collections. Tap Select, then select some books to move them into a
collection. To edit or create collections, tap the name of the current collection (at the top of the
screen). Some built-in collections, such as PDFs, can’t be renamed or deleted.
Rearrange books. While viewing books by cover, touch and hold a cover then drag it to a new
location. While viewing books by title, sort the list using the buttons at the top of the screen. The
All Books collection is automatically arranged for you; switch to another collection if you want to
manually arrange your books.
Search for a book. PulldowntorevealtheSearcheldatthetopofthescreen.Searchinglooks
for the title and the author’s name.
Hide purchased books you haven’t downloaded. Tap the name of the current collection (at the
top of the screen), then turn on Hide iCloud Books.
Read PDFs
Sync a PDF. On a Mac, add the PDF to iBooks for OS X, open iTunes, select the PDF, then sync. In
iTunes on your Windows computer, choose File > Add to Library, select the PDF, then sync. See
iTunes Help for more info about syncing.
Add a PDF email attachment to iBooks. Open the email message, then touch and hold its PDF
attachment. Choose Open in iBooks from the menu that appears.
Print a PDF. With the PDF open, tap then choose Print. You’ll need an AirPrint-compatible
printer. For more about AirPrint, see AirPrint on page 40.
Email a PDF. With the PDF open, tap , then choose Email.
Apple Confidential
Chapter 24 iBooks 126
iBooks settings
Go to Settings > iBooks, where you can:
•Sync collections and bookmarks (including notes and current page information) with your
other devices.
•Display online content within a book. Some books might access video or audio that’s stored
on the web.
•Change the direction pages turn when you tap in the left margin.
Apple Confidential
25
127
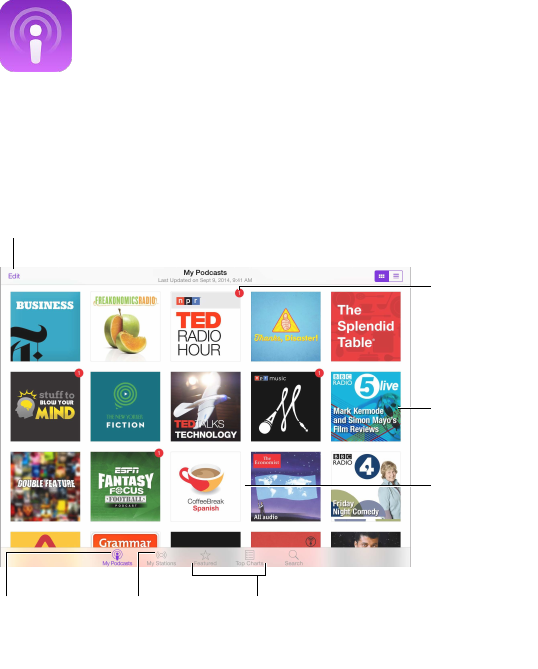
Podcasts at a glance
Open the Podcasts app, then browse, subscribe to, and play your favorite audio or video podcasts
on iPad.
Delete or rearrange podcasts.
Delete or rearrange podcasts.
Tap a podcast
to view and
play episodes.
Tap a podcast
to view and
play episodes.
New
episodes
New
episodes
See your
subscriptions
and downloaded
podcasts.
See your
subscriptions
and downloaded
podcasts.
Organize and
automatically
update your
favorites.
Organize and
automatically
update your
favorites.
Browse for
podcasts.
Browse for
podcasts.
Swipe down
to update
or search.
Swipe down
to update
or search.
Get podcasts and episodes
Discover more podcasts. Tap Featured or Top Charts at the bottom of the screen.
Search for new podcasts. Tap Search at the bottom of the screen.
Search your library. Tap My Podcasts, then drag down the center of the screen to reveal the
Searcheld.
Podcasts
Apple Confidential
Chapter 25 Podcasts 128
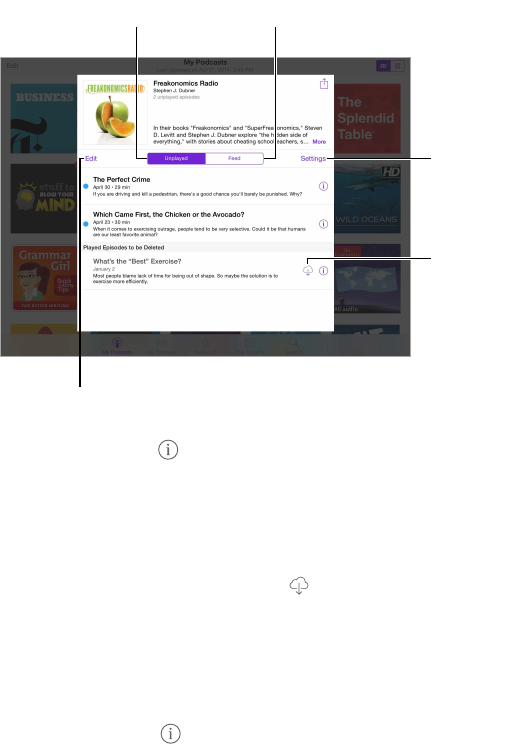
Preview or stream an episode. Tap the podcast, then tap an episode.
Subscribe
or adjust
subscription
preferences.
Subscribe
or adjust
subscription
preferences.
Download
the episode.
Download
the episode.
Select episodes to
mark, delete, or save.
Select episodes to
mark, delete, or save.
View unplayed
episodes.
View unplayed
episodes.
View available
episodes.
View available
episodes.
Get more info. Tap to get episode details. Tap any link in podcast or episode descriptions to
open them in Safari.
Find new episodes. TapUnplayedtondepisodesyouhaven’tyetheard.
Browse episodes. Tap Feed to see episodes available to download or stream.
Download an episode to iPad. Tap next to the episode.
Get new episodes as they're released. Subscribe to the podcast. If you’re browsing Featured
podcasts or Top Charts, tap the podcast, then tap Subscribe. If you’ve already downloaded
episodes, tap My Podcasts, tap the podcast, tap Settings at the top of the episode list, then turn
on Subscription.
Save episodes. Tap next to an episode, then tap Save Episode. Tap Delete Download to delete
a saved episode.
Apple Confidential

Chapter 25 Podcasts 129
Control playback
Use the playback controls to go forward and back in a podcast, set the speed, skip episodes,
and more.
Tap to start over, or
double-tap to go to
the previous episode.
Tap to start over, or
double-tap to go to
the previous episode.
Skip to the
next episode.
Skip to the
next episode.
Tap to see
more info.
Tap to see
more info.
See a list of
episodes.
See a list of
episodes.
Drag to skip
forward or
back.
Drag to skip
forward or
back.
Tap to speed up or slow down.
Tap to speed up or slow down.
See podcast info while you listen. Tap the podcast image on the Now Playing screen.
Skip forward or back with greater accuracy. Moveyourngertowardthetopofthescreenas
you drag the playhead left or right. When you’re close to the playback controls, you can scan
quickly through the entire episode. When you’re close to the top of the screen, you can scan one
second at a time.
Use Siri. Say something like:
•“Play podcasts”
•“Play it twice as fast”
•“Skip ahead 10 seconds”
Apple Confidential
Chapter 25 Podcasts 130
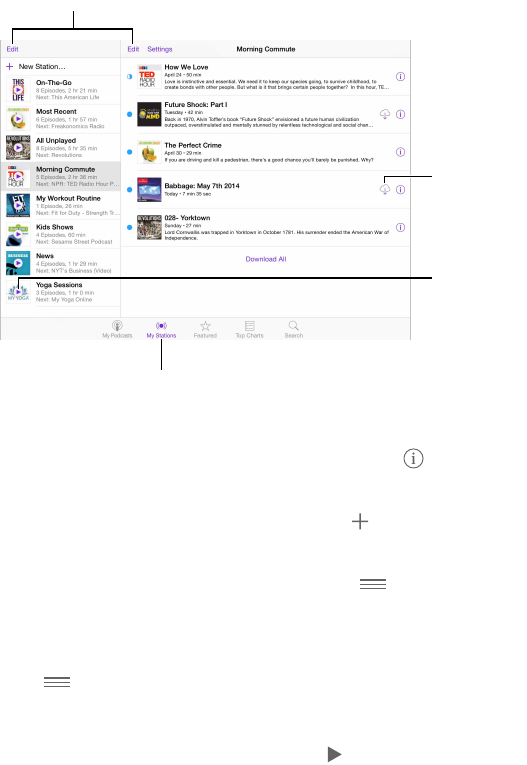
Organize your favorites into stations
Organize your favorite podcasts into custom stations, and update episodes automatically across
all your devices.
Delete or rearrange stations or podcasts.
Delete or rearrange stations or podcasts.
Organize selected podcasts
and episodes into stations.
Organize selected podcasts
and episodes into stations.
Play the
latest
episode.
Play the
latest
episode.
Download
the episode.
Download
the episode.
Pull together episodes from dierent podcasts. To add episodes to your On-The-Go station, tap
My Stations, tap On-The-Go, then tap Add. Or tap next to any episode in your library. You can
also touch and hold any episode, then tap Add to On-The-Go.
Create a station. Tap My Stations, then tap .
Change the order of the station list or the podcasts in a station. Tap My Stations, tap Edit above
the station list or the episode list, then drag up or down.
Change the playback order for episodes in a station. Tap the station, then tap Settings.
Rearrange your podcast library. Tap My Podcasts, tap list view in the upper right, tap Edit, then
drag up or down.
List oldest episodes rst. Tap My Podcasts, tap a podcast, then tap Settings.
Play podcasts from the station list. Tap next to the station name.
Podcasts settings
Go to Settings > Podcasts, where you can:
•Choose to keep your podcast subscriptions up to date on all your devices
•Choose how frequently Podcasts checks your subscriptions for new episodes
•Have episodes downloaded automatically
•Choosewhethertokeepepisodesafteryounishthem
Apple Confidential
A
131
Accessibility features
iPadoersmanyaccessibilityfeatures:
Vision
•VoiceOver
•Support for braille displays
•Zoom
•Invert Colors and Grayscale
•Speak Selection
•Speak Screen
•Speak Auto-Text
•Large, bold, and high-contrast text
•Button Shapes
•Reduce screen motion
•On/oswitchlabels
•Assignable tones
•Video Descriptions
Hearing
•Hearing aids
•Mono audio and balance
•Subtitles and closed captions
Interaction
•Siri
•Widescreen keyboards
•Guided Access
•Switch Control
•AssistiveTouch
Turn on accessibility features. Go to Settings > General > Accessibility, or use the Accessibility
Shortcut. See Accessibility Shortcut on page 132.
With your voice, you can also use Siri to open apps, invert colors, read the screen in some apps,
and work with VoiceOver. For information, see Use Siri on page 48.
Use iTunes on your computer to congure accessibility on iPad. You can choose some
accessibility options in iTunes on your computer. Connect iPad to your computer, then select
iPadintheiTunesdevicelist.ClickSummary,thenclickCongureAccessibilityatthebottomof
the Summary screen.
Accessibility
Appendix
Apple Confidential
Appendix A Accessibility 132
For more information about iPad accessibility features, go to www.apple.com/accessibility/.
Accessibility Shortcut
Use the Accessibility Shortcut. Press the Home button quickly three times to turn any of these
featuresonoro:
•VoiceOver
•Invert Colors
•Grayscale
•Zoom
•Switch Control
•AssistiveTouch
•Guided Access (The shortcut starts Guided Access if it’s already turned on. See Guided
Access on page 147.)
•Hearing Aid Control (if you have paired Made for iPhone hearing aids)
Choose the features you want to control. Go to Settings > General > Accessibility > Accessibility
Shortcut, then select the accessibility features you use.
Not so fast. To slow down the triple-click speed, go to Settings > General > Accessibility > Home-
click Speed. (This also slows down double-clicks.)
VoiceOver
VoiceOver describes aloud what appears onscreen, so you can use iPad without seeing it.
VoiceOver tells you about each item on the screen as you select it. The VoiceOver cursor (a
rectangle) encloses the item and VoiceOver speaks its name or describes it.
Touchthescreenordragyourngeroverittoheartheitemsonthescreen.Whenyouselect
text, VoiceOver reads the text. If you turn on Speak Hints, VoiceOver may tell you the name of the
item and provide instructions—for example, “double-tap to open.” To interact with items, such as
buttons and links, use the gestures described in Learn VoiceOver gestures on page 135.
Whenyougotoanewscreen,VoiceOverplaysasound,thenselectsandspeakstherstitem
on the screen (typically in the upper-left corner). VoiceOver also lets you know when the display
changes to landscape or portrait orientation, and when the screen becomes dimmed or locked.
Note: VoiceOverspeaksinthelanguagespeciedinSettings>General>Language&Region.
VoiceOver is available in many languages, but not all.
VoiceOver basics
Important: VoiceOver changes the gestures you use to control iPad. When VoiceOver is on, you
mustuseVoiceOvergestures—eventoturnVoiceOvero.
Turn VoiceOver on or o. Go to Settings > General > Accessibility > VoiceOver, or use the
Accessibility Shortcut. See Accessibility Shortcut above.
Use Siri. Say:
•“Turn VoiceOver on”
•“TurnVoiceOvero”
Apple Confidential
Appendix A Accessibility 133
Explore. Dragyourngeroverthescreen.VoiceOverspeakseachitemyoutouch.Liftyournger
to leave an item selected.
•Select an item: Tapit,orliftyourngerwhiledraggingoverit.
•Select the next or previous item: Swiperightorleftwithonenger.Itemorderisleft-to-right,
top-to-bottom.
•Select the item above or below: Set the rotor to Vertical Navigation, then swipe up or down
withonenger.Ifyoudon’tndVerticalNavigationintherotor,youcanaddit;seeUse the
VoiceOver rotor on page 136.
•Select the rst or last item on the screen: Tapwithfourngersatthetoporbottomofthescreen.
•Select an item by name: Triple-tapwithtwongersanywhereonthescreentoopentheItem
Chooser.Thentypeanameinthesearcheld,orswiperightorlefttomovethroughthelist
alphabetically, or tap the table index to the right of the list and swipe up or down to move
quickly through the list of items. You can also use handwriting to select an item by writing its
name; see Writewithyournger on page 138. To dismiss the Item Chooser without making a
selection,doatwo-ngerscrub(movetwongersbackandforththreetimesquickly,making
a “z”).
•Change an item’s name so it’s easier to nd: Select the item, then double-tap and hold with two
ngersanywhereonthescreen.
•Speak the text of the selected item: Set the rotor to characters or words, then swipe down or up
withonenger.
•Turn spoken hints on or o: Go to Settings > General > Accessibility > VoiceOver > Speak Hints.
•Use phonetic spelling: Go to Settings > General > Accessibility > VoiceOver >
Phonetic Feedback.
•Speak the entire screen, from the top: Swipeupwithtwongers.
•Speak from the current item to the bottom of the screen: Swipedownwithtwongers.
•Pause speaking: Taponcewithtwongers.Tapagainwithtwongerstoresume,orselect
another item.
•Mute VoiceOver: Double-tapwiththreengers;repeattounmute.Ifyou’reusinganexternal
keyboard, press the Control key.
•Silence sound eects: GotoSettings>General>Accessibility>VoiceOver,thenturnoUse
SoundEects.
Use a larger VoiceOver cursor. Go to Settings > General > Accessibility > VoiceOver, then turn on
Large Cursor.
Adjust the speaking voice. YoucanadjusttheVoiceOverspeakingvoice:
•Change the volume: Use the volume buttons on iPad. You can also add volume to the rotor,
thenswipeupanddowntoadjust;seeUse the VoiceOver rotor on page 136.
•Change the speech rate: Go to Settings > General > Accessibility > VoiceOver, then drag the
Speaking Rate slider. You can also set the rotor to Speech Rate, then swipe up or down
toadjust.
•Use pitch change: VoiceOverusesahigherpitchwhenspeakingtherstitemofagroup(such
as a list or table) and a lower pitch when speaking the last item of a group. Go to Settings >
General > Accessibility > VoiceOver > Use Pitch Change.
•Speak punctuation: Set the rotor to Punctuation, then swipe up or down to to select how much
you want to hear.
Apple Confidential

Appendix A Accessibility 134
•Control audio ducking: To choose whether audio that’s playing is turned down while VoiceOver
speaks, set the rotor to Audio Ducking, then swipe up or down.
•Change the language for iPad: Go to Settings > General > Language & Region. VoiceOver
pronunciationofsomelanguagesisaectedbytheRegionFormatyouchoosethere.
•Change pronunciation: Set the rotor to Language, then swipe up or down. Language is
available in the rotor only if you add a language at Settings > General > Accessibility >
VoiceOver > Speech > Rotor Languages.
•Choose which dialects are available in the rotor: Go to Settings > General > Accessibility >
VoiceOver>Speech>RotorLanguages.Toadjustvoicequalityorspeakingrate,tap next
to the language. To remove languages from the rotor or change their order, tap Edit, tap the
delete button or drag up or down, then tap Done.
•Set the default dialect for the current iPad language: Go to Settings > General > Accessibility >
VoiceOver > Speech.
•Download an enhanced quality reading voice: Go to Settings > General > Accessibility >
VoiceOver > Speech, tap a language, then tap Enhanced Quality. If you’re using English, you
can choose to download Alex (869 MB), the same high-quality U.S. English voice used for
VoiceOver on Mac computers.
Use iPad with VoiceOver
Unlock iPad. Press either the Home button or the Sleep/Wake button, swipe to select the Unlock
button, then double-tap the screen.
Enter your passcode silently. To avoid having your passcode spoken as you enter it, use
handwriting; see Writewithyournger on page 138.
Open an app, toggle a switch, or tap an item. Select the item, then double-tap the screen.
Double-tap the selected item. Triple-tap the screen.
Adjust a slider. Selecttheslider,thenswipeupordownwithonenger.
Use a standard gesture. Double-tapandholdyourngeronthescreenuntilyouhearthree
risingtones,thenmakethegesture.Whenyouliftyournger,VoiceOvergesturesresume.For
example,todragavolumesliderwithyourngerinsteadofswipingupanddown,selectthe
slider, double-tap and hold, wait for the three tones, then slide left or right.
Scroll a list or area of the screen. Swipeupordownwiththreengers.
•Scroll continuously through a list: Double-tap and hold until you hear three rising tones, then
drag up or down.
•Use the list index: Some lists have an alphabetical table index along the right side. Select the
index, then swipe up or down to move through the index. You can also double-tap, hold, then
slideyourngerupordown.
•Reorder a list: You can change the order of items in some lists, such as the Rotor items in
Accessibility settings. Select to the right of an item, double-tap and hold until you hear
three rising tones, then drag up or down.
Open Notication Center. Selectanyiteminthestatusbar,thenswipedownwiththreengers.
TodismissNoticationCenter,doatwo-ngerscrub(movetwongersbackandforththree
times quickly, making a “z”).
Open Control Center. Selectanyiteminthestatusbar,thenswipeupwiththreengers.To
dismissControlCenter,doatwo-ngerscrub.
Apple Confidential
Appendix A Accessibility 135
Switch apps. Double-clicktheHomebuttontoseeopenapps,swipeleftorrightwithonenger
to select an app, then double-tap to switch to it. Or, set the rotor to Actions while viewing open
apps, then swipe up or down.
Rearrange your Home screen. Select an icon on the Home screen, double-tap and hold, then
drag.Liftyourngerwhentheiconisinitsnewlocation.Draganicontotheedgeofthescreen
to move it to another Home screen. You can continue to select and move items until you press
the Home button.
Speak iPad status information. Tap the status bar at the top of the screen, then swipe left or
right to hear information about the time, battery state, Wi-Fi signal strength, and more.
Speak notications. Go to Settings > General > Accessibility > VoiceOver, then turn on Always
SpeakNotications.Notications,includingthetextofincomingtextmessages,arespoken
astheyoccur,evenifiPadislocked.Unacknowledgednoticationsarerepeatedwhenyou
unlock iPad.
Turn the screen curtain on or o. Triple-tapwiththreengers.Whenthescreencurtainison,the
screencontentsareactiveeventhoughthedisplayisturnedo.
Learn VoiceOver gestures
WhenVoiceOverison,standardtouchscreengestureshavedierenteects,andadditional
gestures let you move around the screen and control individual items. VoiceOver gestures
includetwo-,three-,andfour-ngertapsandswipes.Forbestresultsusingmulti-ngergestures,
relaxandletyourngerstouchthescreenwithsomespacebetweenthem.
YoucanusedierenttechniquestoenteraparticularVoiceOvergesture.Forexample,youcan
performatwo-ngertapusingtwongersononehand,oronengeroneachhand.Youcan
even use your thumbs. Some people use a split-tap gesture: instead of selecting an item and
double-tapping,touchandholdanitemwithonenger,thentapthescreenwithanothernger.
Trydierenttechniquestodiscoverwhichworksbestforyou.Ifagesturedoesn’twork,trya
quicker movement, especially for a double-tap or swipe gesture. To swipe, try brushing the
screenquicklywithyourngerorngers.
In VoiceOver settings, you can enter a special area where you can practice VoiceOver gestures
withoutaectingiPadoritssettings.
Practice VoiceOver gestures. Go to Settings > General > Accessibility > VoiceOver, then tap
VoiceOverPractice.Whenyounishpracticing,tapDone.Ifyoudon’tseetheVoiceOverPractice
button, make sure VoiceOver is turned on.
Here are some key VoiceOver gestures:
Navigate and read
•Tap: Select and speak the item.
•Swipe right or left: Select the next or previous item.
•Swipe up or down: Depends on the rotor setting. See Use the VoiceOver rotor on page 136.
•Two-nger swipe up: Read all from the top of the screen.
•Two-nger swipe down: Read all from the current position.
•Two-nger tap: Stop or resume speaking.
•Two-nger scrub: Movetwongersbackandforththreetimesquickly(makinga“z”)todismiss
an alert or go back to the previous screen.
•Three-nger swipe up or down: Scroll one page at a time.
Apple Confidential

Appendix A Accessibility 136
•Three-nger swipe right or left: Go to the next or previous page (on the Home screen, for
example).
•Three-nger tap: Speak additional information, such as position within a list or whether text
is selected.
•Four-nger tap at top of screen: Selecttherstitemonthepage.
•Four-nger tap at bottom of screen: Select the last item on the page.
Activate
•Double-tap: Activate the selected item.
•Triple-tap: Double-tap an item.
•Split-tap: As an alternative to selecting an item and double-tapping to activate it, touch and
holdanitemwithonenger,thentapthescreenwithanother.
•Double-tap and hold (1 second) + standard gesture: Use a standard gesture. The double-tap and
hold gesture tells iPad to interpret the next gesture as standard. For example, you can double-
tapandhold,thenwithoutliftingyournger,dragyourngertoslideaswitch.
•Two-nger double-tap: Play or pause in Music, Videos, or Photos. Take a photo or start or pause
recording in Camera. Start or stop the stopwatch.
•Two-nger double-tap and hold: Changeanitem’slabeltomakeiteasiertond.
•Two-nger triple-tap: Open the Item Chooser.
•Three-nger double-tap: Mute or unmute VoiceOver.
•Three-nger triple-tap: Turnthescreencurtainonoro.
Use the VoiceOver rotor
Use the rotor to choose what happens when you swipe up or down with VoiceOver turned on, or
to select special input methods such as Braille Screen Input or Handwriting.
Operate the rotor. Rotatetwongersonthescreenaroundapointbetweenthem.
Choose your rotor options. Go to Settings > General > Accessibility > VoiceOver > Rotor, then
select the options you want to include in the rotor.
Theavailablerotoroptionsandtheireectsdependonwhatyou’redoing.Forexample,ifyou’re
reading an email, you can use the rotor to switch between hearing text spoken word-by-word or
character-by-character when you swipe up or down. If you’re browsing a webpage, you can set
therotortospeakallthetext(eitherword-by-wordorcharacter-by-character),ortojumpfrom
one item to another of a certain type, such as headers or links.
WhenyouuseanAppleWirelessKeyboardtocontrolVoiceOver,therotorletsyouadjustsettings
such as volume, speech rate, use of pitch or phonetics, typing echo, and reading of punctuation.
See Use VoiceOver with an Apple Wireless Keyboard on page 139.
Use the onscreen keyboard
Whenyouactivateaneditabletexteld,theonscreenkeyboardappears(unlessyouhavean
Apple Wireless Keyboard attached).
Apple Confidential

Appendix A Accessibility 137
Activate a text eld. Selectthetexteld,thendouble-tap.Theinsertionpointandtheonscreen
keyboard appear.
Enter text. Type characters using the onscreen keyboard:
•Standard typing: Select a key on the keyboard by swiping left or right, then double-tap to enter
thecharacter.Ormoveyourngeraroundthekeyboardtoselectakeyand,whilecontinuing
totouchthekeywithonenger,tapthescreenwithanothernger.VoiceOverspeaksthekey
when it’s selected, and again when the character is entered.
•Touch typing: Touchakeyonthekeyboardtoselectit,thenliftyourngertoenterthe
character.Ifyoutouchthewrongkey,slideyourngertothekeyyouwant.VoiceOver
speaks the character for each key as you touch it, but doesn’t enter a character until you lift
yournger.
•Direct Touch typing: VoiceOverisdisabledforthekeyboardonly,soyoucantypejustasyoudo
whenVoiceOveriso.
•Choose typing style: Go to Settings > General > Accessibility > VoiceOver > Typing Style. Or, set
the rotor to Typing Mode, then swipe up or down.
Move the insertion point. Swipe up or down to move the insertion point forward or backward in
the text. Use the rotor to choose whether you want to move the insertion point by character, by
word,orbyline.Tojumptothebeginningorend,double-tapthetext.
VoiceOver makes a sound when the insertion point moves, and speaks the character, word, or
line that the insertion point moves across. When moving forward by words, the insertion point
is placed at the end of each word, before the space or punctuation that follows. When moving
backward, the insertion point is placed at the end of the preceding word, before the space or
punctuation that follows it.
Move the insertion point past the punctuation at the end of a word or sentence. Use the rotor
to switch back to character mode.
When moving the insertion point by line, VoiceOver speaks each line as you move across it.
When moving forward, the insertion point is placed at the beginning of the next line (except
when you reach the last line of a paragraph, when the insertion point is moved to the end of the
linejustspoken).Whenmovingbackward,theinsertionpointisplacedatthebeginningofthe
line that’s spoken.
Change typing feedback. Go to Settings > General > Accessibility > VoiceOver >
Typing Feedback.
Use phonetics in typing feedback. Go to Settings > General > Accessibility > VoiceOver >
PhoneticFeedback.Textisreadcharacterbycharacter.VoiceOverrstspeaksthecharacter,then
its phonetic equivalent—for example, “f” and then “foxtrot.”
Delete a character. Use with any of the VoiceOver typing styles. VoiceOver speaks each
character as it’s deleted. If Use Pitch Change is turned on, VoiceOver speaks deleted characters in
a lower pitch.
Select text. Set the rotor to Edit, swipe up or down to choose Select or Select All, then double-
tap. If you choose Select, the word closest to the insertion point is selected when you double-
tap.Toincreaseordecreasetheselection,doatwo-ngerscrubtodismissthepop-upmenu,
then pinch.
Cut, copy, or paste. Set the rotor to Edit, select the text, swipe up or down to choose Cut, Copy,
or Paste, then double-tap.
Undo. Shake iPad, swipe left or right to choose the action to undo, then double-tap.
Apple Confidential
Appendix A Accessibility 138
Enter an accented character. In standard typing style, select the plain character, then double-tap
and hold until you hear a sound indicating alternate characters have appeared. Drag left or right
toselectandhearthechoices.Releaseyourngertoenterthecurrentselection.Intouchtyping
style, touch and hold a character until the alternate characters appear.
Change the keyboard language. Set the rotor to Language, then swipe up or down. Choose
“defaultlanguage”tousethelanguagespeciedinLanguage&Regionsettings.TheLanguage
rotor item appears only if you select more than one language in Settings > General >
Accessibility > VoiceOver > Speech.
Write with your nger
Handwritingmodeletsyouentertextbywritingcharactersonthescreenwithyournger.In
addition to normal text entry, use handwriting mode to enter your iPad passcode silently or open
apps from the Home screen.
Enter handwriting mode. Use the rotor to select Handwriting. If Handwriting isn’t in the rotor, go
to Settings > General > Accessibility > VoiceOver > Rotor, then add it.
Choose a character type. Swipeupordownwiththreengerstochooselowercase,numbers,
uppercase, or punctuation.
Hear the currently selected character type. Tapwiththreengers.
Enter a character. Tracethecharacteronthescreenwithyournger.
Enter a space. Swiperightwithtwongers.
Go to a new line. Swiperightwiththreengers.
Delete the character before the insertion point. Swipeleftwithtwongers.
Select an item on the Home screen. Start writing the name of the item. If there are multiple
matches,continuetospellthenameuntilit’sunique,orswipeupordownwithtwongersto
choose from the current matches.
Enter your passcode silently. Set the rotor to Handwriting on the passcode screen, then write
the characters of your passcode.
Use a table index to skip through a long list. Select the table index to the right of the table (for
example, next to your Contacts list or in the VoiceOver Item Chooser), then write the letter.
Set the rotor to a web browsing element type. Writetherstletterofapageelementtype.For
example, write “l” to have up or down swipes skip to links, or “h” to skip to headings.
Exit handwriting mode. Doatwo-ngerscrub,orturntherotortoadierentselection.
Type onscreen braille
WithBrailleScreenInputenabled,youcanuseyourngerstoenter6-dot,8-dot,orcontracted
braillecodesdirectlyontheiPadscreen.TapcodeswithiPadlayingatinfrontofyou(tabletop
mode),orholdiPadwiththescreenfacingawaysoyourngerscurlbacktotapthescreen
(screen away mode).
Turn on Braille Screen Input. UsetherotortoselectBrailleScreenInput.Ifyoudon’tnditinthe
rotor, go to Settings > General > Accessibility > VoiceOver > Rotor, then add it.
Enter braille codes. PlaceiPadatinfrontofyouorholditwiththescreenfacingaway,thentap
thescreenwithoneorseveralngersatthesametime.
Adjust entry dot positions. Tomovetheentrydotstomatchyournaturalngerpositions,
double-tapsixoreightngersatthesametime.
Apple Confidential
Appendix A Accessibility 139
Switch between 6-dot, 8-dot, and contracted braille. Swipetotherightwiththreengers.Toset
the default, go to Settings > General > Accessibility > VoiceOver > Braille > Braille Screen Input.
Enter a space. Swiperightwithonenger.(Inscreenawaymode,swipetoyour right.)
Delete the previous character. Swipeleftwithonenger.
Move to a new line (typing). Swiperightwithtwongers.
Cycle through spelling suggestions. Swipeupordownwithonenger.
Select an item on the Home screen. Start entering the name of the item. If there are multiple
matches,continuetospellthenameuntilitisunique,orswipeupordownwithonengerto
select a partial match.
Open the selected app. Swiperightwithtwongers.
Turn braille contractions on or o. Swipetotherightwiththreengers.
Translate immediately (when contractions are enabled). Swipedownwithtwongers.
Stop entering braille. Doatwo-ngerscrub,orsettherotortoanothersetting.
Use VoiceOver with an Apple Wireless Keyboard
You can control VoiceOver using an Apple Wireless Keyboard paired with iPad. See Bluetooth
devices on page 41.
Use VoiceOver keyboard commands to navigate the screen, select items, read screen contents,
adjusttherotor,andperformotherVoiceOveractions.MostcommandsusetheControl-Option
key combination, abbreviated in the list that follows as “VO.”
You can use VoiceOver Help to learn the keyboard layout and the actions associated with various
key combinations. VoiceOver Help speaks keys and keyboard commands as you type them,
without performing the associated action.
VoiceOver keyboard commands
VO = Control-Option
•Turn on VoiceOver Help: VO–K
•Turn o VoiceOver Help: Escape
•Select the next or previous item: VO–Right Arrow or VO–Left Arrow
•Double-tap to activate the selected item: VO–Space bar
•Press the Home button: VO–H
•Touch and hold the selected item: VO–Shift–M
•Move to the status bar: VO–M
•Read from the current position: VO–A
•Read from the top: VO–B
•Pause or resume reading: Control
•Copy the last spoken text to the clipboard: VO–Shift–C
•Search for text: VO–F
•Mute or unmute VoiceOver: VO–S
•Open Notication Center: Fn–VO–Up Arrow
•Open Control Center: Fn–VO–Down Arrow
•Open the Item Chooser: VO–I
Apple Confidential
Appendix A Accessibility 140
•Change the label of the selected item: VO–/
•Double-tap with two ngers: VO–”-”
•Adjust the rotor: Use Quick Nav (see below)
•Swipe up or down: VO–Up Arrow or VO–Down Arrow
•Adjust the speech rotor: VO–Command–Left Arrow or VO–Command–Right Arrow
•Adjust the setting specied by the speech rotor: VO–Command–Up Arrow or VO–Command–
Down Arrow
•Turn the screen curtain on or o: VO–Shift–S
•Return to the previous screen: Escape
•Switch apps: Command–Tab or Command–Shift–Tab
Quick Nav
Turn on Quick Nav to control VoiceOver using the arrow keys.
•Turn Quick Nav on or o: Left Arrow–Right Arrow
•Select the next or previous item: Right Arrow or Left Arrow
•Select the next or previous item specied by the rotor: Up Arrow or Down Arrow
•Select the rst or last item: Control–Up Arrow or Control–Down Arrow
•Tap an item: Up Arrow–Down Arrow
•Scroll up, down, left, or right: Option–Up Arrow, Option–Down Arrow, Option–Left Arrow, or
Option–Right Arrow
•Adjust the rotor: Up Arrow–Left Arrow or Up Arrow–Right Arrow
Single-key Quick Nav for web browsing
When you view a webpage with Quick Nav enabled, you can use the following keys on the
keyboard to navigate the page quickly. Typing the key moves to the next item of the indicated
type. To move to the previous item, hold the Shift key as you type the letter.
•Turn on Single-key Quick Nav: VO-Q
•Heading: H
•Link: L
•Text eld: R
•Button: B
•Form control: C
•Image: I
•Table: T
•Static text: S
•ARIA landmark: W
•List: X
•Item of the same type: M
•Level 1 heading: 1
•Level 2 heading: 2
•Level 3 heading: 3
•Level 4 heading: 4
•Level 5 heading: 5
•Level 6 heading: 6
Apple Confidential
Appendix A Accessibility 141
Text editing
Usethesecommands(withQuickNavturnedo)toworkwithtext.VoiceOverreadsthetextas
you move the insertion point.
•Go forward or back one character: Right Arrow or Left Arrow
•Go forward or back one word: Option–Right Arrow or Option–Left Arrow
•Go up or down one line: Up Arrow or Down Arrow
•Go to the beginning or end of the line: Command–Left Arrow or Command–Down Arrow
•Go to the beginning or end of the paragraph: Option–Up Arrow or Option–Down Arrow
•Go to the previous or next paragraph: Option–Up Arrow or Option–Down Arrow
•Go to the top or bottom of the text eld: Command–Up Arrow or Command–Down Arrow
•Select text as you move: Shift + any of the insertion point movement commands above
•Select all text: Command–A
•Copy, cut, or paste the selected text: Command–C, Command–X, or Command–V
•Undo or redo last change: Command–Z or Shift–Command–Z
Support for braille displays
You can use a Bluetooth braille display to read VoiceOver output, and you can use a braille
display with input keys and other controls to control iPad when VoiceOver is turned on. For a list
of supported braille displays, go to www.apple.com/accessibility/ios/braille-display.html.
Connect a braille display. Turn on the display, then go to Settings > Bluetooth and turn on
Bluetooth. Then go to Settings > General > Accessibility > VoiceOver > Braille and choose
the display.
Adjust Braille settings. Go to Settings > General > Accessibility > VoiceOver > Braille, where you
can:
•Choose contracted, uncontracted 8-dot, or uncontracted 6-dot braille input or output
•Turn on the status cell and choose its location
•Turn on Nemeth code for equations
•Display the onscreen keyboard
•Choose to have the page turned automatically when panning
•ChangethebrailletranslationfromUniedEnglish
For information about common braille commands for VoiceOver navigation, and for information
specictocertaindisplays,gotosupport.apple.com/kb/HT4400.
Set the language for VoiceOver. Go to Settings > General > Language & Region.
If you change the language for iPad, you may need to reset the language for VoiceOver and your
braille display.
You can set the leftmost or rightmost cell of your braille display to provide system status and
other information:
•Announcement History contains an unread message
•The current Announcement History message hasn’t been read
•VoiceOver speech is muted
•The iPad battery is low (less than 20% charge)
•iPad is in landscape orientation
Apple Confidential

Appendix A Accessibility 142
•Thescreendisplayisturnedo
•The current line contains additional text to the left
•The current line contains additional text to the right
Set the leftmost or rightmost cell to display status information. Go to Settings > General >
Accessibility > VoiceOver > Braille > Status Cell, then tap Left or Right.
See an expanded description of the status cell. On your braille display, press the status cell’s
router button.
Read math equations
VoiceOver can read aloud math equations encoded using:
•MathML on the web
•MathML or LaTeX in iBooks Author
Hear an equation. Have VoiceOver read the text as usual. VoiceOver says “math” before it starts
reading an equation.
Explore the equation. Double-tap the selected equation to display it full screen and move
through it one element at a time. Swipe left or right to read elements of the equation. Use the
rotor to select Symbols, Small Expressions, Medium Expressions, or Large Expressions, then swipe
up or down to hear the next element of that size. You can continue to double-tap the selected
element to “drill down” into the equation to focus on the selected element, then swipe left or
right, up or down to read one part at a time.
Equations read by VoiceOver can also be output to a braille device using Nemeth code, as well
asthecodesusedbyUniedEnglishBraille,BritishEnglish,French,andGreek.SeeSupport for
braille displays on page 141.
Use VoiceOver with Safari
Search the web. Selectthesearcheld,enteryoursearch,thenswiperightorlefttomovedown
or up the list of suggested search phrases. Then double-tap the screen to search the web using
the selected phrase.
Skip to the next page element of a particular type. Set the rotor to the element type, then
swipe up or down.
Set the rotor options for web browsing. Go to Settings > General > Accessibility > VoiceOver >
Rotor. Tap to select or deselect options, or drag up to reposition an item.
Skip images while navigating. Go to Settings > General > Accessibility > VoiceOver > Navigate
Images. You can choose to skip all images or only those without descriptions.
Reduce page clutter for easier reading and navigation. Select the Reader item in the Safari
addresseld(notavailableforallpages).
If you pair an Apple Wireless Keyboard with iPad, you can use single-key Quick Nav commands to
navigate webpages. See Use VoiceOver with an Apple Wireless Keyboard on page 139.
Use VoiceOver with Maps
With VoiceOver, you can zoom in or out, select a pin, or get information about a location.
Explore the map. Dragyourngeraroundthescreen,orswipeleftorrighttomoveto
another item.
Zoom in or out. Selectthemap,settherotortoZoom,thenswipedownorupwithonenger.
Pan the map. Swipewiththreengers.
Apple Confidential
Appendix A Accessibility 143
Browse visible points of interest. Set the rotor to Points of Interest, then swipe up or down with
onenger.
Follow a road. Holdyourngerdownontheroad,waituntilyouhear“pausetofollow,”then
moveyourngeralongtheroadwhilelisteningtotheguidetone.Thepitchincreaseswhenyou
stray from the road.
Select a pin. Touch a pin, or swipe left or right to select the pin.
Get information about a location. With a pin selected, double-tap to display the information
ag.SwipeleftorrighttoselecttheMoreInfobutton,thendouble-taptodisplaythe
information page.
Hear location cues as you move about. Turn on Tracking With Heading in Maps to hear street
names and points of interest as you approach them.
Edit videos with VoiceOver
You can use VoiceOver gestures to trim Camera videos.
Trim a video. While viewing a video in Photos, double-tap the screen to display the video
controls, then select the beginning or end of the trim tool. Then swipe up to drag to the right, or
swipe down to drag to the left. VoiceOver announces the amount of time the current position
will trim from the recording. To complete the trim, select Trim, then double-tap.
Zoom
Manyappsletyouzoominoroutonspecicitems.Forexample,youcandouble-taporpinchto
look closer in Photos or expand webpage columns in Safari. There’s also a general Zoom feature
that lets you magnify the screen no matter what you’re doing. You can zoom the entire screen
(Full Screen Zoom) or zoom part of the screen in a resizable window and leave the rest of the
screenunmagnied(WindowZoom).And,youcanuseZoomtogetherwithVoiceOver.
Turn Zoom on or o. Go to Settings > General > Accessibility > Zoom. Or use the Accessibility
Shortcut. See Accessibility Shortcut on page 132.
Zoom in or out. WithZoomturnedon,double-tapthescreenwiththreengers.
Adjust the magnication. Double-tapwiththreengers,thendragupordown.Thisgesture
issimilartoadouble-tap,exceptyoudon’tliftyourngersafterthesecondtap—instead,drag
yourngersonthescreen.Youcanalsotriple-tapwiththreengers,thendragtheZoomLevel
sliderinthezoomcontrolsthatappear.Tolimitthemaximummagnication,gotoSettings>
General > Accessibility > Zoom > Maximum Zoom Level.
Pan to see more. Dragthescreenwiththreengers.Orholdyourngerneartheedgeofthe
screentopantothatside.Moveyourngerclosertotheedgetopanmorequickly.Or,ifyou
have detached the Zoom Controller, drag it.
Switch between Full Screen Zoom and Window Zoom. Triple-tapwiththreengers,thentap
Window Zoom or Full Screen Zoom in the zoom controls that appear. To choose the mode that’s
used when you turn on Zoom, go to Settings > General > Accessibility > Zoom > Zoom Region.
Resize the zoom window (Window Zoom). Triple-tapwiththreengers,tapResizeLens,then
drag any of the round handles that appear.
Move the zoom window (Window Zoom). Drag the handle at the bottom of the zoom window.
Apple Confidential
Appendix A Accessibility 144
Show the zoom controller. Go to Settings > General > Accessibility > Zoom, then turn on Show
Controller,ortriple-tapwiththreengers,thenchooseShowController.Thenyoucandouble-
taptheoatingZoomControlsbuttontozoominorout,single-tapthebuttontodisplaythe
zoom controls, or drag it to pan. To move the Zoom Controls button, tap and hold the button,
thendragittoanewlocation.Toadjustthetransparencyofthezoomcontroller,gotoSettings>
General > Accessibility > Zoom > Idle Visibility.
Have Zoom track your selections or the text insertion point. Go to Settings > General >
Accessibility > Zoom > Follow Focus. Then, for example, if you use VoiceOver, turning on this
option causes the zoom window to magnify each element on the screen as you select it using a
swipe in VoiceOver.
Zoom in on your typing without magnifying the keyboard. Go to Settings > General >
Accessibility>Zoom,thenturnonFollowFocusandturnoZoomKeyboard.Nowwhenyou
zoominwhiletyping(inMessagesorNotes,forexample),thetextyoutypeismagniedbutall
of the keyboard remains visible.
Display the magnied part of the screen in grayscale or inverted color. Triple-tap with three
ngers,thentaptheFiltersbuttoninthecontrolsthatappear.
While using Zoom with an Apple Wireless Keyboard, the screen image follows the insertion point,
keeping it in the center of the display. See Use an Apple Wireless Keyboard on page 31.
Invert Colors and Grayscale
Sometimes, inverting the colors or changing to grayscale on the iPad screen makes it easier
to read.
Invert the screen colors. Go to Settings > General > Accessibility > Invert Colors.
See the screen in grayscale. Go to Settings > General > Accessibility > Grayscale.
Turnonbotheectstoseeinvertedgrayscale.Youcanalsoapplytheseeectstojustthe
contents of the zoom window—see Zoom on page 143.
Speak Selection
EvenwithVoiceOverturnedo,youcanhaveiPadreadaloudanytextyouselect.
Turn on Speak Selection. Go to Settings > General > Accessibility > Speech. There you can also:
•Adjustthespeakingrate
•Choose to have individual words highlighted as they’re read
Have text read to you. Select the text, then tap Speak.
You can also have iPad read the entire screen to you. See Speak Screen, next.
Speak Screen
iPad can read the contents of the screen to you, even if you don’t use VoiceOver.
Turn on Speak Screen. Go to Settings > General > Accessibility > Speech.
Have iPad speak the screen. Swipedownfromthetopofthescreenwithtwongers.Usethe
controlsthatappeartopausespeakingoradjusttherate.
Highlight what’s being spoken. Turn on Highlight Content, below the Speak Screen switch when
it’s turned on.
Apple Confidential
Appendix A Accessibility 145
Use Siri. Say “speak screen.”
YoucanalsohaveiPadreadjusttextyouselect—seeSpeak Selection, above.
Speak Auto-Text
Speak Auto-text speaks the text corrections and suggestions iPad makes when you type.
Turn Speak Auto-text on or o. Go to Settings > General > Accessibility > Speech.
Speak Auto-text also works with VoiceOver and Zoom.
Large, bold, and high-contrast text
Display larger text in apps such as Settings, Calendar, Contacts, Mail, Messages, and Notes.
GotoSettings>General>TextSize,thenadjusttheslider.Forevenlargertext,gotoSettings>
General > Accessibility > Larger Text, then turn on Larger Accessibility Sizes.
Display bolder text on iPad. Go to Settings > General > Accessibility, then turn on Bold Text.
Increase text contrast where possible. Go to Settings > General > Accessibility, then turn on
Increase Contrast.
Button Shapes
iPad can add a colored background shape or an underline to buttons so they’re easier to see.
Emphasize buttons. Go to Settings > General > Accessibility, then turn on Button Shapes.
Reduce screen motion
Youcanstopthemovementofsomescreenelements,forexample,theparallaxeectoficons
and alerts against the wallpaper, or motion transitions.
Reduce motion. Go to Settings > General > Accessibility, then turn on Reduce Motion.
On/o switch labels
Tomakeiteasiertoseewhetherasettingisonoro,youcanhaveiPadshowanadditionallabel
onon/oswitches.
Add switch-setting labels. GotoSettings>General>Accessibility,thenturnonOn/OLabels.
Assignable tones
You can assign distinctive ringtones to people in your contacts list for audible FaceTime caller
ID. You can also assign distinct tones to alert you of a variety of other events, including new
voicemail, new mail, sent mail, Tweet, Facebook Post, and reminders. See Sounds and silence on
page 36.
You can purchase ringtones from the iTunes Store on iPad. See Chapter 22, iTunes Store, on
page 115.
Apple Confidential

Appendix A Accessibility 146
Video Descriptions
Video descriptions provide an audible description of video scenes. If you have a video that
includes video descriptions, iPad can play them for you.
Turn on Video Descriptions. Go to Settings > General > Accessibility > Video Descriptions.
Hearing aids
If you have Made for iPhone hearing aids (compatible with iPad 4th generation or later and
iPadmini),youcanuseiPadtoadjusttheirsettings,streamaudio,oruseiPadasaremotemic.
Pair with iPad. If your hearing aids aren’t listed in Settings > General > Accessibility > Hearing
Aids, you need to pair them with iPad. To start, open the battery door on each hearing aid. Next,
on iPad, go to Settings > Bluetooth and make sure Bluetooth is turned on. Then go to Settings >
General > Accessibility > Hearing Aids. Close the battery doors on your hearing aids and wait
until their name appears in the list of devices (this could take a minute). When the name appears,
tap it and respond to the pairing request.
Whenpairingisnished,youhearaseriesofbeepsandatone,andacheckmarkappearsnextto
the hearing aids in the Devices list. Pairing can take as long as 60 seconds—don’t try to stream
audioorotherwiseusethehearingaidsuntilpairingisnished.
You should only need to pair once (and your audiologist might do it for you). After that, each
time you turn your hearing aids back on, they reconnect to iPad.
Adjust hearing aid settings and view status. Go to Settings > General > Accessibility > Hearing
Aids, or choose Hearing Aids from the Accessibility Shortcut. See Accessibility Shortcut on
page 132. Hearing aid settings appear only after you pair your hearing aids with iPad.
For shortcut access from the Lock screen, go to Settings > General > Accessibility > Hearing Aids,
then turn on Control on Lock Screen. Use the settings to:
•Check hearing aid battery status.
•Adjustambientmicrophonevolumeandequalization.
•Choose which hearing aids (left, right, or both) receive streaming audio.
•Control Live Listen.
Stream audio to your hearing aids. Stream audio from Siri, Music, Videos, and more by choosing
your hearing aids from the AirPlay menu .
Use iPad as a remote microphone. You can use Live Listen to stream sound from the
microphone in iPad to your hearing aids. This can help you hear better in some situations by
positioning iPad nearer the sound source. Triple-click the Home button, choose Hearing Aids,
then tap Start Live Listen.
Use your hearing aids with more than one iOS device. If you pair your hearing aids with more
than one iOS device (both an iPhone and iPad, for example), the connection for your hearing
aids automatically switches from one to the other when you do something that generates audio
on the other device, or when you receive a phone call on iPhone. Changes you make to hearing
aid settings on one device are automatically sent to your other iOS devices. To take advantage
of this, all of the devices must be on the same Wi-Fi network and signed in to iCloud using the
same Apple ID.
Apple Confidential

Appendix A Accessibility 147
Mono audio and balance
Mono Audio combines the sound from the left and right channels into a mono signal played on
both channels. This way you can hear everything with either ear, or through both ears with one
channel set louder.
Turn Mono Audio on or o. Go to Settings > General > Accessibility > Mono Audio.
Adjust the balance. Go to Settings > General > Accessibility, then drag the Left Right Stereo
Balance slider.
Subtitles and closed captions
The Videos app includes an Alternate Track button you can tap to choose subtitles and
captionsoeredbythevideoyou’rewatching.Standardsubtitlesandcaptionsareusuallylisted,
but if you prefer special accessible captions, such as subtitles for the deaf and hard of hearing
(SDH), you can set iPad to list them instead, if they’re available.
Prefer accessible subtitles and closed captions for the hard of hearing in the list of available
subtitles and captions. Go to Settings > General > Accessibility > Subtitles & Captioning, then
turn on Closed Captions + SDH. This also turns on subtitles and captions in the Videos app.
Choose from available subtitles and captions. Tap while watching a video.
Customize your subtitles and captions. Go to Settings > General > Accessibility > Subtitles &
Captioning > Style, where you can choose an existing caption style or create a new style based
on your choice of:
•Font, size, and color
•Background color and opacity
•Text opacity, edge style, and highlight
Not all videos include closed captions.
Siri
WithSiri,youcandothingslikeopeningappsjustbyasking,andVoiceOvercanreadSiri
responses to you. For information, see Use Siri on page 48.
Widescreen keyboards
All built-in iPad apps show a larger onscreen keyboard when you rotate iPad to landscape view.
You can also type using an Apple Wireless Keyboard.
Guided Access
Guided Access helps an iPad user stay focused on a task. Guided Access dedicates iPad to a
single app, and lets you control which app features are available. Use Guided Access to:
•Temporarily restrict iPad to a particular app
•Disable areas of the screen that aren’t relevant to a task, or areas where an accidental gesture
might cause a distraction
•Limit how long someone can use an app
•Disable the iPad hardware buttons
Use Guided Access. Go to Settings > General > Accessibility > Guided Access, where you can:
Apple Confidential
Appendix A Accessibility 148
•TurnGuidedAccessonoro
•Tap Passcode Settings to set a passcode that controls the use of Guided Access (preventing
someone from leaving a session), and turn on Touch ID (as a way to end Guided Access)
•Tap Time Limits to set a sound or have the remaining Guided Access time spoken before time
ends
•Set whether other accessibility shortcuts are available during a session
Start a Guided Access session. After turning on Guided Access, open the app, then triple-click
theHomebutton.Adjustsettingsforthesession,thentapStart.
•Disable app controls and areas of the app screen: Draw a circle or rectangle around any part
ofthescreenyouwanttodisable.Dragthemaskintopositionorusethehandlestoadjust
its size.
•Enable the Sleep/Wake button and Volume buttons: Tap Options below Hardware Buttons.
•Keep iPad from switching from portrait to landscape or from responding to other motions: Tap
Options,thenturnoMotion.
•Prevent typing: TapOptions,thenturnoKeyboards.
•Ignore all screen touches: TurnoTouchatthebottomofthescreen.
•Set a session time limit: Tap Time Limit Options at the bottom of the screen.
End the session. Triple-click the Home button, then enter the Guided Access passcode, or use
Touch ID (if enabled).
Switch Control
Switch Control lets you control iPad using a single switch or multiple switches. Use any of several
methods to perform actions such as selecting, tapping, dragging, typing, and even free-hand
drawing. The basic technique is to use a switch to select an item or location on the screen, and
thenusethesame(ordierent)switchtochooseanactiontoperformonthatitemorlocation.
Three basic methods are:
•Item scanning (default),whichhighlightsdierentitemsonthescreenuntilyouselectone.
•Point scanning, which lets you use scanning crosshairs to pick a screen location.
•Manual selection, which lets you move from item to item on demand (requires multiple
switches).
Whichever method you use, when you select an individual item (rather than a group), a menu
appears so you can choose how to act on the selected item (tap, drag, or pinch, for example).
Ifyouusemultipleswitches,youcansetupeachswitchtoperformaspecicactionand
customize your item selection method. For example, instead of automatically scanning screen
items, you can set up switches to move to the next or previous item on demand.
YoucanadjustthebehaviorofSwitchControlinavarietyofways,tosuityourspecicneeds
and style.
Add a switch and turn on Switch Control
You can use any of these as a switch:
•An external adaptive switch: Choose from a variety of popular USB or Bluetooth switches.
•The iPad screen: Tap the screen to trigger the switch.
Apple Confidential
Appendix A Accessibility 149
•The iPad FaceTime camera: Move your head to trigger the switch. You can use the camera as
two switches: one when you move your head to the left, and the other when you move your
head to the right.
Add a switch and choose its action. Go to Settings > General > Accessibility > Switch Control >
Switches. If you use only one switch, it is your Select Item switch by default.
If you’re adding an external switch, you need to connect it to iPad before it will appear in the
list of available switches. Follow the instructions that came with the switch. If it connects using
Bluetooth, you need to pair it with iPad—turn on the switch, go to Settings > Bluetooth, tap the
switch, then follow the onscreen instructions. For more information, see Bluetooth devices on
page 41.
Turn on Switch Control. Go to Settings > General > Accessibility > Switch Control, or use the
Accessibility Shortcut. See Accessibility Shortcut on page 132.
Turn o Switch Control. Use any scanning method to select and tap Settings > General >
Accessibility > Switch Control. Or triple-click the Home button.
Basic techniques
Whether you use item scanning or point scanning, the Switch Control basics are the same.
Select an item. Trigger your Select Item switch when the item is highlighted (item scanning) or
under the crosshairs (point scanning).
Perform an action on the selected item. Choose a command from the control menu that
appears when you select the item. The layout of the menu depends on whether you use
Auto Tap.
•With Auto Tap o: The control menu includes only the Tap button and the More button (two
dots at the bottom). If you’re in a scrollable area of the screen, a Scroll button also appears.
To tap the highlighted item, trigger your Select Item button when Tap is highlighted. To see
additional action buttons, choose More at the bottom of the menu. If you have multiple
switches,youcansetoneupspecicallyfortapping.
•With Auto Tap on: To tap the item, do nothing—the item is automatically tapped when the
Auto Tap interval expires (0.75 seconds if you haven’t changed it). To see the control menu,
trigger your Select Item button before the Auto Tap interval expires. The control menu skips
the Tap button and goes right to the full set of action buttons.
Turn on Auto Tap. Go to Settings > General > Accessibility > Switch Control > Auto Tap. To tap an
itemwithAutoTapon,justwaitfortheAutoTapintervaltopass.
Dismiss the control menu without choosing an action. Tap while the original item is
highlighted and all the icons in the control menu are dimmed. Or choose Escape from the
control menu. The menu goes away after cycling the number of times you specify at Settings >
General > Accessibility > Switch Control > Loops.
Perform screen gestures. Choose Gestures from the control menu.
Scroll the screen. Select an item in a scrollable part of the screen, then:
•With Auto Tap o: Choose the Scroll Down button (next to the Tap button) in the control menu.
Or, for more scrolling options, choose More, then choose Scroll.
•With Auto Tap on: Choose Scroll from the control menu. If many actions are available, you
mighthavetochooseMorerst.
Tap the Home button. Choose Home in the control menu.
Apple Confidential
Appendix A Accessibility 150
Perform other hardware actions. Select any item, then choose Device from the menu that
appears. Use the menu to mimic these actions:
•Double-click the Home button for multitasking
•OpenNoticationCenterorControlCenter
•Press the Sleep/Wake button to lock iPad
•Rotate iPad
•Flip the Side Switch to mute iPad volume
•Press the volume buttons
•Hold down the Home button to open Siri
•Triple-click the Home button
•Shake iPad
•Press the Home and Sleep/Wake buttons simultaneously to take a screenshot
•Swipedownfromthetopwithtwongerstospeakthescreen(ifyouhaveSpeakScreen
turned on)
Item scanning
Item scanning alternately highlights each item or group of items on the entire screen until
you trigger your Select Item switch. If there are many items, Switch Control highlights them in
groups. When you select a group, highlighting continues with the items in the group. When you
select a unique item, scanning stops and the control menu appears. Item scanning is the default
whenyourstturnonSwitchControl.
Select an item or enter a group. Watch (or listen) as items are highlighted. When the item
you want to control (or the group containing the item) is highlighted, trigger your Select Item
switch. Work your way down the hierarchy of items until you select the individual item you want
to control.
Back out of a group. Trigger your Select Item switch when the dashed highlight around the
group or item appears.
Dismiss the control menu without performing an action. Trigger your Select Item switch when
the item itself is highlighted. Or choose Escape from the control menu.
Hear the names of items as they are highlighted. Go to Settings > General > Accessibility >
Switch Control, then turn on Speech. Or choose Settings from the control menu, then choose
Speech On.
Slow down the scanning. Go to Settings > General > Accessibility > Switch Control > Auto
Scanning Time.
Point scanning
Point scanning lets you select an item on the screen by pinpointing it with scanning crosshairs.
Switch to point scanning. Use item scanning to choose Point Mode from the control menu. The
vertical crosshair appears when you close the menu.
Select an item. Trigger your Select Item switch when the item you want is within the broad,
horizontalscanningband,thentriggeragainwhenthenescanninglineisontheitem.Repeat
for vertical scanning.
Rene your selection point. ChooseReneSelectionfromthecontrolmenu.
Return to item scanning. Choose Item Mode from the control menu.
Apple Confidential
Appendix A Accessibility 151
Manual selection
You can select a screen item directly using dedicated switches instead of having iPad alternately
highlight every item.
Stop scanning and highlight items yourself. Add switches in addition to your Select Item switch
to perform the Move To Next Item and Move To Previous Item actions. (You can use the iPad
FaceTime camera with head-left and head-right movements for these switches.) When you’ve
addedtheswitches,turnoSettings>General>Accessibility>SwitchControl>AutoScanning.
Important: Don’tturnoAutoScanningifyouuseonlyoneswitch.Youneedatleasttwo:oneto
move to an item and a second to select the item.
Settings and adjustments
Adjust basic settings. Go to Settings > General > Accessibility > Switch Control, where you can:
•Add switches and specify their function
•Turnoautoscanning(onlyifyou’veaddedaMovetoNextItemswitch)
•Adjusthowrapidlyitemsarescanned
•Setscanningtopauseontherstiteminagroup
•Choose how many times to cycle through the screen before hiding Switch Control
•TurnAutoTaponoroandsettheintervalforperformingasecondswitchactiontoshowthe
control menu
•Set whether a movement action is repeated when you hold down a switch, and how long to
wait before repeating
•Set whether and how long you need to hold a switch down before it’s accepted as a switch
action
•Have Switch Control ignore accidental repeated switch triggers
•Adjustthepointscanningspeed
•Turnonsoundeectsorhaveitemsreadaloudastheyarescanned
•Choose what to include in the Switch Control menu
•Set whether items should be grouped while item scanning
•Maketheselectioncursorlargeroradierentcolor
•Save custom gestures to the control menu (in Gestures > Saved)
Fine-tune Switch Control. Choose Settings from the control menu to:
•Adjustscanningspeed
•Change the location of the control menu
•Switch between item scan mode and point scan mode
•Choose whether point scan mode displays crosshairs or a grid
•Reverse the scanning direction
•Turnsoundorspeechaccompanimentonoro
•Turnogroupstoscanitemsoneatatime
Apple Confidential
Appendix A Accessibility 152
AssistiveTouch
AssistiveTouchhelpsyouuseiPadifyouhavedicultytouchingthescreenorpressingthe
buttons.YoucanuseAssistiveTouchwithoutanyaccessorytoperformgesturesthataredicult
foryou.Youalsocanuseacompatibleadaptiveaccessory(suchasajoystick)togetherwith
AssistiveTouch to control iPad.
TheAssistiveTouchmenuletsyouperformactionssuchasthesebyjusttapping(orthe
equivalent on your accessory):
•Press the Home button
•Summon Siri
•Performmulti-ngergestures
•AccessControlCenterorNoticationCenter
•AdjustiPadvolume
•Shake iPad
•Capture a screenshot
Turn on AssistiveTouch. Go to Settings > General > Accessibility > AssistiveTouch, or use the
Accessibility Shortcut. See Accessibility Shortcut on page 132. When AssistiveTouch is on, the
oatingmenubuttonappearsonthescreen.
Show or hide the menu. Taptheoatingmenubutton,orclickthesecondarybuttonon
your accessory.
Simulate pressing the Home button. Tap the menu button, then tap Home.
Lock or rotate the screen, adjust iPad volume, or simulate shaking iPad. Tap the menu button,
then tap Device.
Perform a swipe or drag that uses 2, 3, 4, or 5 ngers. Tap the menu button, tap Device >
More > Gestures, then tap the number of digits needed for the gesture. When the corresponding
circles appear on the screen, swipe or drag in the direction required by the gesture. When you
nish,tapthemenubutton.
Perform a pinch gesture. Tap the menu button, tap Favorites, then tap Pinch. When the pinch
circles appear, touch anywhere on the screen to move the pinch circles, then drag the pinch
circlesinorouttoperformapinchgesture.Whenyounish,tapthemenubutton.
Create your own gesture. You can add your own favorite gestures to the control menu (for
example,tapandholdortwo-ngerrotation).Tapthemenubutton,tapFavorites,thentapan
empty gesture placeholder. Or go to Settings > General > Accessibility > AssistiveTouch > Create
New Gesture.
Example 1: To create the rotation gesture, go to Settings > General > Accessibility >
AssistiveTouch > Create New Gesture. On the gesture recording screen that prompts you to
touchtocreateagesture,rotatetwongersontheiPadscreenaroundapointbetweenthem.
(Youcandothiswithasinglengerorstylus—justcreateeacharcseparately,oneafterthe
other.) If it doesn’t turn out quite right, tap Cancel, then try again. When it looks right, tap Save,
then give the gesture a name—maybe “Rotate 90.” Then, to rotate the view in Maps, for example,
open Maps, tap the AssistiveTouch menu button, and choose Rotate 90 from Favorites. When
thebluecirclesrepresentingthestartingngerpositionsappear,dragthemtothepointaround
which you want to rotate the map, then release. You might want to create several gestures with
dierentdegreesofrotation.
Apple Confidential
Appendix A Accessibility 153
Example 2: Let’s create the touch-and-hold gesture that you use to start rearranging icons on
yourHomescreen.Thistime,onthegesturerecordingscreen,holddownyourngerinonespot
untiltherecordingprogressbarreacheshalfway,thenliftyournger.Becarefulnottomove
yourngerwhilerecording,orthegesturewillberecordedasadrag.TapSave,thennamethe
gesture. To use the gesture, tap the AssistiveTouch menu button, then choose your gesture from
Favorites. When the blue circle representing your touch appears, drag it over a Home screen icon
and release.
If you record a sequence of taps or drags, they’re all played back at the same time. For example,
usingonengerorastylustorecordfourseparate,sequentialtapsatfourlocationsonthe
screencreatesasimultaneousfour-ngertap.
Exit a menu without performing a gesture. Tap anywhere outside the menu. To return to the
previous menu, tap the arrow in the middle of the menu.
Move the menu button. Drag it anywhere along the edge of the screen.
Adjust your accessory tracking speed. Go to Settings > General > Accessibility >
AssistiveTouch > Touch speed.
Hide the menu button (with accessory attached). Go to Settings > General > Accessibility >
AssistiveTouch > Always Show Menu.
Accessibility in OS X
Take advantage of the accessibility features in OS X when you use iTunes to sync information
and content from your iTunes library to iPad. In the Finder, choose Help > Help Center (or Help >
Mac Help in OS X Yosemite), then search for “accessibility.”
For more information about iPad and OS X accessibility features, go to
www.apple.com/accessibility/.
Apple Confidential
B
154
iPad in the enterprise
With support for secure access to corporate networks, directories, and Microsoft Exchange,
iPad is ready to go to work. For detailed information about using iPad in business, go to
www.apple.com/ipad/business/.
Mail, Contacts, and Calendar
To use iPad with your work accounts, you need to know the settings your organization requires.
If you received your iPad from your organization, the settings and apps you need might already
be installed. If it’s your own iPad, your system administrator may provide you with the settings for
you to enter, or have you connect to a mobile device management server that installs the settings
and apps you should have.
Organizational settings and accounts are typically in conguration proles. You might be asked to
installacongurationprolethatwassenttoyouinanemail,oronethatyouneedtodownload
fromawebpage.Whenyouopenthele,iPadasksforyourpermissiontoinstalltheprole,and
displays information about what it contains.
Inmostcases,whenyouinstallacongurationprolethatsetsupanaccountforyou,someiPad
settings can’t be changed. For example, your organization might turn on Auto-Lock and require
you to set a passcode in order to protect the information in the accounts you access.
YoucanseeyourprolesinSettings>General>Proles.Ifyoudeleteaprole,allofthesettings
andaccountsassociatedwiththeprolearealsoremoved,includinganycustomappsyour
organizationprovidedorhadyoudownload.Ifyouneedapasscodetoremoveaprole,contact
your system administrator.
Network access
A VPN (virtual private network) provides secure access over the Internet to private resources,
such as your organization’s network. You may need to install a VPN app from the App Store
thatconguresyouriPadtoaccessaparticularnetwork.Contactyoursystemadministratorfor
information about any apps and settings you need.
Apps
In addition to the built-in apps and the ones you get from the App Store, your organization
may want you to have certain other apps. They might provide you with a pre-paid redemption
code for the App Store. When you download an app using a redemption code, you own it, even
though your organization purchased it for you.
iPad in Business
Appendix
Apple Confidential
Appendix B iPad in Business 155
Your organization can also purchase App Store app licenses that are assigned to you for a period
of time, but that the organization retains. You’ll be invited to participate in your organization’s
program in order to access these apps. After you enroll with your Apple ID, you’re prompted to
installtheseappsasthey’reassignedtoyou.YoucanalsondtheminyourPurchasedlistinthe
App Store. An app you receive this way is removed if the organization assigns it to someone else.
Your organization might also develop custom apps that aren’t in the App Store. You install
them from a webpage or, if your organization uses mobile device management, you receive a
noticationaskingyoutoinstallthemovertheair.Theseappsbelongtoyourorganization,and
theymayberemovedorstopworkingifyoudeleteacongurationproleordissociateiPad
from the mobile device management server.
Apple Confidential

C
156
Use international keyboards
Internationalkeyboardsletyoutypetextinmanydierentlanguages,includingAsian
languages and languages written from right to left. For a list of supported keyboards, go to
www.apple.com/ipad/, choose your iPad, click Tech Specs, then scroll to Languages.
Manage keyboards. Go to Settings > General > Keyboard > Keyboards.
•Add a keyboard: Tap Add New Keyboard, then choose a keyboard from the list. Repeat to add
more keyboards.
•Remove a keyboard: Tap Edit, tap next to the keyboard you want to remove, tap Delete,
then tap Done.
•Edit your keyboard list: Tap Edit, drag next to a keyboard to a new place in the list, then
tap Done.
Toentertextinadierentlanguage,switchkeyboards.
Switch keyboards while typing. Touch and hold the Globe key to show all your enabled
keyboards.Tochooseakeyboard,slideyourngertothenameofthekeyboard,thenrelease.The
Globe key appears only if you enable more than one keyboard.
Youcanalsojusttap . When you tap , the name of the newly activated keyboard appears
briey.Continuetappingtoaccessotherenabledkeyboards.
Many keyboards provide letters, numbers, and symbols that aren’t visible on the keyboard.
Enter accented letters or other characters. Touch and hold the related letter, number, or symbol,
then slide to choose a variant. For example:
•On a Thai keyboard: Choose native numbers by touching and holding the related
Arabic number.
•On a Chinese, Japanese, or Arabic keyboard: Suggested characters or candidates appear at the
top of the keyboard. Tap a candidate to enter it, or swipe left to see more candidates.
Use the extended suggested candidate list. Tap the up arrow on the right to view the full
candidate list.
•Scroll the list: Swipe up or down.
•Return to the short list: Tap the down arrow.
When using certain Chinese or Japanese keyboards, you can create a shortcut for word and input
pairs. The shortcut is added to your personal dictionary. When you type a shortcut while using a
supported keyboard, the paired word or input is substituted for the shortcut.
Turn shortcuts on or o. Go to Settings > General > Keyboard > Shortcuts. Shortcuts are
available for:
•Simplied Chinese: Pinyin
•Traditional Chinese: Pinyin and Zhuyin
International Keyboards
Appendix
Apple Confidential
Appendix C International Keyboards 157
•Japanese: Romajiand50Key
Reset your personal dictionary. Go to Settings > General > Reset > Reset Keyboard Dictionary.
All custom words and shortcuts are deleted, and the keyboard dictionary returns to its
default state.
Special input methods
Youcanusekeyboardstoentersomelanguagesindierentways.AfewexamplesareChinese
CangjieandWubihua,JapaneseKana,andFacemarks.Youcanalsouseyourngerorastylusto
write Chinese characters on the screen.
Build Chinese characters from the component Cangjie keys. As you type, suggested
charactersappear.Tapacharactertochooseit,orcontinuetypinguptovecomponentstosee
more options.
Build Chinese Wubihua (stroke) characters. Use the keypad to build Chinese characters using
uptovestrokes,inthecorrectwritingsequence:horizontal,vertical,leftfalling,rightfalling,and
hook. For example, the Chinese character 圈 (circle) should begin with the vertical stroke 丨.
•As you type, suggested Chinese characters appear (the most commonly used characters
appearrst).Tapacharactertochooseit.
•If you’re not sure of the correct stroke, enter an asterisk (*). To see more character options, type
another stroke, or scroll through the character list.
•Tap the match key (匹配) to show only characters that match exactly what you typed.
Write Chinese characters. WriteChinesecharactersdirectlyonthescreenwithyournger
whenSimpliedorTraditionalChinesehandwritinginputisturnedon.Asyouwritecharacter
strokes, iPad recognizes them and shows matching characters in a list, with the closest match
at the top. When you choose a character, its likely follow-on characters appear in the list as
additional choices.
Matching characters
Matching characters
You can type some complex characters, such as 鱲 (part of the name for the Hong Kong
International Airport), by writing two or more component characters in sequence. Tap the
character to replace the characters you typed. Roman characters are also recognized.
Type Japanese kana. Use the Kana keypad to select syllables. For more syllable options, tap the
arrow key and select another syllable or word from the window.
Apple Confidential

Appendix C International Keyboards 158
Type Japanese romaji. UsetheRomajikeyboardtotypesyllables.Alternativechoicesappear
along the top of the keyboard; tap one to type it. For more syllable options, drag the list to the
left or tap the arrow key.
Type facemarks or emoticons. Use the Japanese Kana keyboard and tap the key. Or you can:
•Use the Japanese Romaji keyboard (QWERTY-Japanese layout): Tap , then tap the key.
•Use the Chinese (Simplied or Traditional) Pinyin or (Traditional) Zhuyin keyboard: Tap , then
tap the key.
Apple Confidential

D
159
Important safety information
WARNING: Failuretofollowthesesafetyinstructionscouldresultinre,electricshock,injury,or
damage to iPad or other property. Read all the safety information below before using iPad.
Handling Handle iPad with care. It is made of metal, glass, and plastic and has sensitive
electronic components inside. iPad can be damaged if dropped, burned, punctured, or crushed,
or if it comes in contact with liquid. Don’t use a damaged iPad, such as one with a cracked
screen,asitmaycauseinjury.Ifyou’reconcernedaboutscratching,considerusingacase
or cover.
Repairing Don’t open iPad and don’t attempt to repair iPad yourself. Disassembling iPad may
damageitormaycauseinjurytoyou.IfiPadisdamaged,malfunctions,orcomesincontactwith
liquid,contactAppleoranAppleAuthorizedServiceProvider.Youcanndmoreinformation
about getting service at www.apple.com/support/ipad/repair/.
Battery Don’t attempt to replace the iPad battery yourself—you may damage the battery,
whichcouldcauseoverheatingandinjury.Thelithium-ionbatteryiniPadshouldbereplaced
only by Apple or an authorized service provider, and must be recycled or disposed of separately
from household waste. Don’t incinerate the battery. For information about battery services and
recycling, go to www.apple.com/batteries/service-and-recycling/.
Distraction Using iPad in some circumstances may distract you and might cause a dangerous
situation (for example, avoid using headphones while riding a bicycle and avoid texting while
driving a car). Observe rules that prohibit or restrict the use of mobile devices or headphones.
Navigation Maps, directions, Flyover, and location-based apps depend on data services.
Thesedataservicesaresubjecttochangeandmaynotbeavailableinallareas,resultingin
maps, directions, Flyover, or location-based information that may be unavailable, inaccurate, or
incomplete. Some Maps features require Location Services. Compare the information provided
on iPad to your surroundings and defer to posted signs to resolve any discrepancies. Do not use
these services while performing activities that require your full attention. Always comply with
posted signs and the laws and regulations in the areas where you are using iPad and always use
common sense.
Safety, handling, and support
Appendix
Apple Confidential

Appendix D Safety, handling, and support 160
Charging Charge iPad with the included USB cable and power adapter, or with other third-
party “Made for iPad” cables and power adapters that are compatible with USB 2.0 or later, or
power adapters compliant with applicable country regulations and with one or more of the
following standards: EN 301489-34, IEC 62684, YD/T 1591-2009, CNS 15285, ITU L.1000, or another
applicable mobile phone power adapter interoperability standard. An iPad Micro USB Adapter
(available separately in some areas) or other adapter may be needed to connect iPad to some
compatible power adapters. Only micro USB power adapters in certain regions that comply
with applicable mobile device power adapter interoperability standards are compatible. Please
contactthepoweradaptermanufacturertondoutifyourmicroUSBpoweradaptercomplies
with these standards.
Usingdamagedcablesorchargers,orchargingwhenmoistureispresent,cancausere,electric
shock,injury,ordamagetoiPadorotherproperty.WhenyouusetheAppleUSBPowerAdapter
to charge iPad, make sure the USB cable is fully inserted into the power adapter before you plug
the adapter into a power outlet.
Lightning cable and connector Avoid prolonged skin contact with the connector when the
Lightning to USB Cable is plugged into a power source because it may cause discomfort or
injury.SleepingorsittingontheLightningconnectorshouldbeavoided.
Prolonged heat exposure iPad and its power adapter comply with applicable surface
temperature standards and limits. However, even within these limits, sustained contact with
warmsurfacesforlongperiodsoftimemaycausediscomfortorinjury.Usecommonsense
to avoid situations where your skin is in contact with a device or its power adapter when it’s
operating or plugged into a power source for long periods of time. For example, don’t sleep on a
device or power adapter, or place them under a blanket, pillow, or your body, when it’s plugged
into a power source. It’s important to keep iPad and its power adapter in a well-ventilated area
wheninuseorcharging.Takespecialcareifyouhaveaphysicalconditionthataectsyour
ability to detect heat against the body.
Hearing loss Listening to sound at high volumes may damage your hearing. Background noise,
as well as continued exposure to high volume levels, can make sounds seem quieter than they
actually are. Turn on audio playback and check the volume before inserting anything in your ear.
For more information about hearing loss, see www.apple.com/sound/. For information about
how to set a maximum volume limit on iPad, see Music settings on page 74.
To avoid hearing damage, use only compatible receivers, earbuds, headphones, speakerphones,
orearpieceswithiPad.TheheadsetssoldwithiPhone4sorlaterinChina(identiablebydark
insulating rings on the plug) are designed to comply with Chinese standards and are only
compatible with iPhone 4s or later, iPad 2 or later, and iPod touch 5th generation.
WARNING: To prevent possible hearing damage, do not listen at high volume levels for
long periods.
Radio frequency exposure iPad uses radio signals to connect to wireless networks. For
information about radio frequency (RF) energy resulting from radio signals and steps you can
take to minimize exposure, go to Settings > General > About > Legal > RF Exposure or visit
www.apple.com/legal/rfexposure/.
Apple Confidential
Appendix D Safety, handling, and support 161
Radio frequency interference Observe signs and notices that prohibit or restrict the use of
mobile devices (for example, in healthcare facilities or blasting areas). Although iPad is designed,
tested, and manufactured to comply with regulations governing radio frequency emissions, such
emissionsfromiPadcannegativelyaecttheoperationofotherelectronicequipment,causing
themtomalfunction.TurnoiPadoruseAirplaneModetoturnotheiPadwirelesstransmitters
when use is prohibited, such as while traveling in aircraft, or when asked to do so by authorities.
Medical device interference iPad contains components and radios that emit electromagnetic
elds.iPadalsocontainsmagnetsalongtheleftedgeofthedeviceandontherightsideofthe
frontglass,whichmayinterferewithpacemakers,debrillators,orothermedicaldevices.The
iPadSmartCoverandiPadSmartCasealsocontainmagnets.Theseelectromagneticeldsand
magnetsmayinterferewithpacemakers,debrillators,orothermedicaldevices.Maintainasafe
distance of separation between your medical device and iPad, the iPad Smart Cover, and the iPad
SmartCase.Consultyourphysicianandmedicaldevicemanufacturerforinformationspecicto
yourmedicaldevice.IfyoususpectiPadisinterferingwithyourpacemaker,debrillator,orany
other medical device, stop using iPad.
Not a medical device iPad is not designed or intended for use in the diagnosis of disease or
other conditions, or in the cure, mitigation, treatment, or prevention of disease.
Medical conditions IfyouhaveanymedicalconditionthatyoubelievecouldbeaectedbyiPad
(for example, seizures, blackouts, eyestrain, or headaches), consult with your physician prior to
using iPad.
Explosive atmospheres Charging or using iPad in any area with a potentially explosive
atmosphere,suchasareaswheretheaircontainshighlevelsofammablechemicals,
vapors, or particles (such as grain, dust, or metal powders), may be hazardous. Obey all signs
and instructions.
Repetitive motion When you perform repetitive activities such as typing or playing games on
iPad, you may experience discomfort in your hands, arms, wrists, shoulders, neck, or other parts
of your body. If you experience discomfort, stop using iPad and consult a physician.
High-consequence activities This device is not intended for use where the failure of the device
couldleadtodeath,personalinjury,orsevereenvironmentaldamage.
Choking hazard Some iPad accessories may present a choking hazard to small children. Keep
these accessories away from small children.
Important handling information
Cleaning Clean iPad immediately if it comes in contact with anything that may cause stains—
such as dirt, ink, makeup, or lotions. To clean:
•DisconnectallcablesandturniPado(pressandholdtheSleep/Wakebutton,thenslidethe
onscreen slider).
•Use a soft, lint-free cloth.
•Avoid getting moisture in openings.
•Don’t use cleaning products or compressed air.
ThefrontofiPadismadeofglasswithangerprint-resistantoleophobic(oilrepellant)coating.
This coating wears over time with normal usage. Cleaning products and abrasive materials will
further diminish the coating, and may scratch the glass.
Apple Confidential
Appendix D Safety, handling, and support 162
Using connectors, ports, and buttons Never force a connector into a port or apply excessive
pressure to a button, because this may cause damage that is not covered under the warranty. If
theconnectorandportdon’tjoinwithreasonableease,theyprobablydon’tmatch.Checkfor
obstructions and make sure that the connector matches the port and that you have positioned
the connector correctly in relation to the port.
Lightning to USB Cable Discoloration of the Lightning connector after regular use is normal.
Dirt, debris, and exposure to moisture may cause discoloration. If your Lightning cable or
connector become warm during use or your iPad won’t charge or sync, disconnect it from your
computer or power adapter and clean the Lightning connector with a soft, dry, lint-free cloth. Do
not use liquids or cleaning products when cleaning the Lightning connector.
Certain usage patterns can contribute to the fraying or breaking of cables. The Lightning to USB
Cable,likeanyothermetalwireorcable,issubjecttobecomingweakorbrittleifrepeatedlybent
in the same spot. Aim for gentle curves instead of angles in the cable. Regularly inspect the cable
andconnectorforanykinks,breaks,bends,orotherdamage.Shouldyoundanysuchdamage,
discontinue use of the Lightning to USB Cable.
Operating temperature iPad is designed to work in ambient temperatures between 32° and 95°
F (0° and 35° C) and stored in temperatures between -4° and 113° F (-20° and 45° C). iPad can be
damaged and battery life shortened if stored or operated outside of these temperature ranges.
Avoid exposing iPad to dramatic changes in temperature or humidity. When you’re using iPad or
charging the battery, it is normal for iPad to get warm.
If the interior temperature of iPad exceeds normal operating temperatures (for example, in a hot
car or in direct sunlight for extended periods of time), you may experience the following as it
attempts to regulate its temperature:
•iPad stops charging.
•The screen dims.
•A temperature warning screen appears.
•Some apps may close.
Important: You may not be able to use iPad while the temperature warning screen is displayed.
If iPad can’t regulate its internal temperature, it goes into deep sleep mode until it cools. Move
iPad to a cooler location out of direct sunlight and wait a few minutes before trying to use
iPad again.
For more information, see support.apple.com/kb/HT2101.
iPad Support site
Comprehensive support information is available online at
www.apple.com/support/ipad/. To contact Apple for personalized support (not available in all
areas), see www.apple.com/support/contact/.
Restart or reset iPad
If something isn’t working right, try restarting iPad, forcing an app to quit, or resetting iPad.
Restart iPad. HolddowntheSleep/Wakebuttonuntilthesliderappears.Slideyourngeracross
theslidertoturnoiPad.ToturniPadbackon,holddowntheSleep/Wakebuttonuntilthe
Apple logo appears.
Apple Confidential

Appendix D Safety, handling, and support 163
Force an app to quit. Hold down the Sleep/Wake button on top of iPad for a few seconds until a
red slider appears, then hold down the Home button until the app closes.
Ifyoucan’tturnoiPadoriftheproblemcontinues,youmayneedtoresetiPad.Dothisonlyif
you’re unable to restart iPad.
Reset iPad. Hold down the Sleep/Wake button and the Home button at the same time for at
least ten seconds, until the Apple logo appears.
You can reset the word dictionary, network settings, home screen layout, and location warnings.
You can also erase all of your content and settings.
Reset iPad settings
Reset iPad settings. Go to Settings > General > Reset, then choose an option:
•Reset All Settings: All your preferences and settings are reset.
•Erase All Content and Settings: Your information and settings are removed. iPad cannot be used
until it’s set up again.
•Reset Network Settings: When you reset network settings, previously used networks and VPN
settingsthatweren’tinstalledbyacongurationproleareremoved.(ToremoveVPNsettings
installedbyacongurationprole,gotoSettings>General>Prole,selecttheprole,then
tapRemove.Thisalsoremovesothersettingsoraccountsprovidedbytheprole.)Wi-Fiis
turnedoandthenbackon,disconnectingyoufromanynetworkyou’reon.TheWi-Fiand
“Ask to Join Networks” settings remain turned on.
•Reset Keyboard Dictionary: YouaddwordstothekeyboarddictionarybyrejectingwordsiPad
suggests as you type. Resetting the keyboard dictionary erases all words you’ve added.
•Reset Home Screen Layout: Returns the built-in apps to their original layout on the
Home screen.
•Reset Location & Privacy: Resets the location services and privacy settings to their defaults.
An app doesn’t ll the screen
Most apps for iPhone and iPod touch can be used with iPad, but they might not take advantage
of the large screen. In this case, tap to zoom in on the app. Tap to return to the original size.
Check the App Store to see if there’s a version of the app that’s optimized for iPad, or a universal
version that’s optimized for iPhone, iPod touch, and iPad.
Onscreen keyboard doesn’t appear
If iPad is paired with a Bluetooth keyboard, the onscreen keyboard doesn’t appear. To make the
onscreenkeyboardappear,presstheEjectkeyonaBluetoothkeyboard.Youcanalsomakethe
onscreenkeyboardappearbymovingtheBluetoothkeyboardoutofrangeorturningito.
Get information about your iPad
See information about iPad. Go to Settings > General > About. The items you can view include:
•Name
•Network
•Number of songs, videos, photos, and apps
Apple Confidential
Appendix D Safety, handling, and support 164
•Capacity and available storage space
•iOS version
•(Cellular models) Carrier
•Model number
•Serial number
•(Cellular models) Cellular Data Number
•Wi-Fi and Bluetooth addresses
•(Cellular models) IMEI (International Mobile Equipment Identity)
•(Cellularmodels)ICCID(IntegratedCircuitCardIdentier,orSmartCard)forGSMnetworks
•(Cellularmodels)MEID(MobileEquipmentIdentier)forCDMAnetworks
•Modemrmware
•Legal (including legal notices, and license, warranty, regulatory marks, and RF exposure
information)
Tocopytheserialnumberandotheridentiers,touchandholdtheidentieruntilCopyappears.
To help Apple improve products and services, iPad sends diagnostic and usage data. This data
doesn’t personally identify you, but may include location information.
View or turn o diagnostic information. Go to Settings > Privacy > Diagnostics & Usage.
Usage information
View cellular usage. Go to Settings > Cellular Data. See Cellular settings on page 166.
View other usage information. Go to Settings > General > Usage to:
•See Battery Usage, including the elapsed time since iPad has been charged and usage by app
•Display battery level as a percentage
•View overall storage availability and storage used per app
•View and manage iCloud storage
Disabled iPad
If iPad is disabled because you forgot your passcode or entered an incorrect passcode too many
times, you can restore iPad from an iTunes or iCloud backup and reset the passcode. For more
information, see Restore iPad on page 166.
If you get a message in iTunes that your iPad is locked and you must enter a passcode, see
support.apple.com/kb/HT1212.
VPN settings
A VPN (virtual private network) provides secure access over the Internet to private networks, such
as the network at your organization. You may need to install a VPN app from the App Store that
conguresiPadtoaccessanetwork.Contactyoursystemadministratorforinformationaboutthe
app and settings you need.
Apple Confidential
Appendix D Safety, handling, and support 165
Proles settings
CongurationprolesdenesettingsforusingiPadwithcorporateorschoolnetworksor
accounts.Youmightbeaskedtoinstallacongurationprolethatwassenttoyouinanemail,
oronethatisdownloadedfromawebpage.iPadasksforyourpermissiontoinstalltheprole,
anddisplaysinformationaboutwhatitcontains,whenyouopenthele.Youcanseetheproles
youhaveinstalledinSettings>General>Proles.Ifyoudeleteaprole,allofthesettings,apps,
anddataassociatedwiththeprolearealsodeleted.
Back up iPad
You can use iCloud or iTunes to automatically back up iPad. If you choose to back up using
iCloud, you can’t also use iTunes to automatically back up to your computer, but you can use
iTunes to manually back up to your computer. iCloud backs up iPad daily over Wi-Fi, when it’s
connected to a power source and is locked. The date and time of the last backup is listed at the
bottom of the Backup screen.
iCloud backs up your:
•Purchased music, movies, TV shows, apps, and books
•Photos and videos taken with iPad (if you use iCloud Photo Library, your photos and videos are
already stored in iCloud, so they won’t also be part of an iCloud backup)
•iPad settings
•App data
•Home screen, folders, and app layout
•Messages
•Ringtones
Note: Purchased content is not backed up in all areas.
Turn on iCloud backups. Go to Settings > iCloud, then log in with your Apple ID and password
if required. Go to Backup, then turn on iCloud Backup. To turn on backups in iTunes on your
computer, go to File > Devices > Back Up.
Back up immediately. Go to Settings > iCloud > Backup, then tap Back Up Now.
Encrypt your backup. iCloud backups are encrypted automatically so that your data is protected
from unauthorized access both while it’s transmitted to your devices and when it’s stored
in iCloud. If you’re using iTunes for your backup, select “Encrypt iPad backup” in the iTunes
Summary pane.
Manage your backups. Go to Settings > iCloud. You can manage which apps are backed up
toiCloudbytappingthemonoro.GotoSettings>iCloud>Storage>ManageStorageto
remove existing backups and manage iCloud Drive or Documents & Data. In iTunes, remove
backups in iTunes Preferences.
View the devices being backed up. Go to Settings > iCloud > Storage > Manage Storage.
Stop iCloud backups. GotoSettings>iCloud>Backup,thenturnoiCloudBackup.
Music not purchased in iTunes isn’t backed up in iCloud. Use iTunes to back up and restore that
content. See Sync with iTunes on page 20.
Important: Backups for music, movies, or TV show purchases are not available in all countries.
Previous purchases may not be restored if they are no longer in the iTunes Store, App Store, or
iBooks Store.
Apple Confidential
Appendix D Safety, handling, and support 166
Purchased content, iCloud Photo Sharing, and My Photo Stream content don’t count against your
5 GB of free iCloud storage.
For more information about backing up iPad, see support.apple.com/kb/HT5262.
Update and restore iPad software
You can update iPad software in Settings, or by using iTunes. You can also erase or restore iPad,
and then use iCloud or iTunes to restore from a backup.
Deleted data is no longer accessible through the iPad user interface, but it isn’t erased from iPad.
For information about erasing all content and settings, see Restart or reset iPad on page 162.
Update iPad
You can update iPad software in Settings or by using iTunes.
Update wirelessly on iPad. Go to Settings > General > Software Update. iPad checks for available
software updates.
Update software in iTunes. iTunes checks for available software updates each time you sync iPad
using iTunes. See Sync with iTunes on page 20.
For more information about updating iPad software, see support.apple.com/kb/HT4623.
Restore iPad
You can use iCloud or iTunes to restore iPad from a backup.
Restore from an iCloud backup. Reset iPad to erase all content and settings, then choose Restore
from a Backup and sign in to iCloud in Setup Assistant. See Restart or reset iPad on page 162.
Restore from an iTunes backup. Connect iPad to the computer you normally sync with, select
iPad in the iTunes window, then click Restore in the Summary pane.
When the iPad software is restored, you can either set it up as a new iPad, or restore your music,
videos, app data, and other content from a backup.
For more information about restoring iPad software, see support.apple.com/kb/HT1414.
Cellular settings
Use Cellular Data settings on iPad (Wi-Fi + Cellular models) to activate cellular data service, turn
cellularuseonoro,oraddaPersonalIdenticationNumber(PIN)tolocktheSIMcard.With
some carriers, you can also change your data plan.
Forthefollowingoptions,gotoSettings>CellularData,thenturntheoptionsonoro,orfollow
the onscreen instructions.
Turn Cellular Data on or o. IfCellularDataiso,alldataserviceswilluseonlyWi-Fi—including
email,webbrowsing,pushnotications,andotherservices.IfCellularDataison,carriercharges
may be incurred. For example, using certain features and services that transfer data, such as
Messages, could result in charges to your data plan.
Monitor and manage your cellular data network usage. You can see which apps use cellular
dataandturnotheoption,ifyouwant.
Turn LTE on or o. Turning on LTE loads data faster.
Apple Confidential

Appendix D Safety, handling, and support 167
Turn Data Roaming on or o. TurningoDataRoamingavoidscarrierchargeswhenusinga
networkprovidedbyadierentcarrier.
Set up Personal Hotspot. Personal Hotspot shares iPad’s Internet connection with your computer
and other iOS devices. See Personal Hotspot on page 40.
Set whether cellular data is used for apps and services. Go to Settings > Cellular, then turn
cellulardataonoroforanyappthatcanusecellulardata.Ifasettingiso,iPadusesonlyWi-Fi
for that service. The iTunes setting includes both iTunes Match and automatic downloads from
the iTunes Store and the App Store.
Activate, view, or change your cellular data account. Tap View Account, then follow the
onscreen instructions.
Lock the SIM card. Locking the SIM card with a PIN means you need to enter the PIN to use a
cellular connection on iPad.
Sell or give away iPad
Before you sell or give away your iPad, be sure to erase all content and your personal information.
If you enabled Find My iPad (see Find My iPad on page 45), Activation Lock is on. You need to
turnoActivationLockbeforethenewownercanactivateiPadunderhisorherownaccount.
Erase iPad and remove Activation Lock. Go to Settings > General > Reset > Erase All Content
and Settings.
See support.apple.com/kb/HT5661.
Learn more, service, and support
Refer to the following resources to get more iPad-related safety, software, service, and
support information.
To learn about Do this
Using iPad safely See Important safety information on page 159.
iPad service and support, tips, forums, and Apple
software downloads
Go to www.apple.com/support/ipad/.
The latest information about iPad Go to www.apple.com/ipad/.
Managing your Apple ID account Go to appleid.apple.com.
Using iCloud Go to help.apple.com/icloud/.
Using iTunes Open iTunes, then choose Help > iTunes Help. For an
online iTunes tutorial (not available in all areas), go to
www.apple.com/support/itunes/.
Using other Apple iOS apps Go to www.apple.com/support/ios/.
Obtaining warranty service First follow the advice in this guide. Then go to
www.apple.com/support/ipad/.
Viewing iPad regulatory information On iPad, go to Settings > General > About > Legal >
Regulatory.
Battery service Go to
www.apple.com/batteries/service-and-recycling/.
Using iPad in an enterprise environment Go to www.apple.com/ipad/business/.
Apple Confidential
Appendix D Safety, handling, and support 168
FCC compliance statement
Thisdevicecomplieswithpart15oftheFCCrules.Operationissubjecttothefollowingtwo
conditions: (1) This device may not cause harmful interference, and (2) this device must accept
any interference received, including interference that may cause undesired operation.
Note: This equipment has been tested and found to comply with the limits for a Class B digital
device, pursuant to part 15 of the FCC Rules. These limits are designed to provide reasonable
protection against harmful interference in a residential installation. This equipment generates,
uses, and can radiate radio frequency energy and, if not installed and used in accordance with
the instructions, may cause harmful interference to radio communications. However, there is
no guarantee that interference will not occur in a particular installation. If this equipment does
cause harmful interference to radio or television reception, which can be determined by turning
theequipmentoandon,theuserisencouragedtotrytocorrecttheinterferencebyoneor
more of the following measures:
•Reorient or relocate the receiving antenna.
•Increase the separation between the equipment and receiver.
•Connecttheequipmenttoanoutletonacircuitdierentfromthattowhichthereceiver
is connected.
•Consult the dealer or an experienced radio/TV technician for help.
Important: ChangesormodicationstothisproductnotauthorizedbyApplecouldvoid
the electromagnetic compatibility (EMC) and wireless compliance and negate your authority
to operate the product. This product has demonstrated EMC compliance under conditions
that included the use of compliant peripheral devices and shielded cables between system
components. It is important that you use compliant peripheral devices and shielded cables
between system components to reduce the possibility of causing interference to radios,
televisions, and other electronic devices.
Canadian regulatory statement
ThisdevicecomplieswithIndustryCanadalicence-exemptRSSstandard(s).Operationissubject
to the following two conditions: (1) this device may not cause interference, and (2) this device
must accept any interference, including interference that may cause undesired operation of
the device.
Operation in the band 5150-5250 MHz is only for indoor use to reduce the potential for harmful
interference to co-channel mobile satellite systems.
Users are advised that high-power radars are allocated as primary users (i.e., priority users) of the
bands 5250-5350 MHz and 5650-5850 MHz and that these radars could cause interference and/or
damage to LE-LAN devices.
Le présent appareil est conforme aux CNR d’Industrie Canada applicables aux appareils
radio exempts de licence. L’exploitation est autorisée aux deux conditions suivantes : (1)
l’appareil ne doit pas produire de brouillage, et (2) l’utilisateur de l’appareil doit accepter tout
brouillage radioélectrique subi, même si le brouillage est susceptible d’en compromettre
le fonctionnement.
Labande5150-5250MHzestréservésuniquementpouruneutilisationàl’intérieurande
réduirelesrisquesdebrouillagepréjudiciableauxsystèmesdesatellitesmobilesutilisantles
mêmes canaux.
Apple Confidential

Appendix D Safety, handling, and support 169
Les utilisateurs êtes avisés que les utilisateurs de radars de haute puissance sont désignés
utilisateurs principaux (c.-à-d., qu’ils ont la priorité) pour les bandes 5 250-5 350 MHz et 5 650-5
850 MHz et que ces radars pourraient causer du brouillage et/ou des dommages aux dispositifs
LAN-EL.
CAN ICES-3 (B)/NMB-3(B)
Disposal and recycling information
Your iPad and/or battery should not be disposed of with household waste. Dispose of
your iPad and/or battery in accordance with local environmental laws and guidelines. For
information about the recycling program at Apple and recycling collection points, visit
www.apple.com/recycling. For information about restricted substances and other environmental
initiatives at Apple, visit www.apple.com/environment/.
Battery replacement: The lithium-ion battery in iPad should be replaced by Apple or an
authorized service provider. For more information about battery services and recycling, go
to www.apple.com/batteries/service-and-recycling/.
California Battery Charger Energy Eciency
Türkiye
Türkiye Cumhuriyeti: AEEE Yönetmeliğine Uygundur.
Taiwan Battery Statement
China Battery Statement
European Union—Disposal Information
The symbol above means that according to local laws and regulations your product and/or its
battery shall be disposed of separately from household waste. When this product reaches its
end of life, take it to a collection point designated by local authorities. The separate collection
and recycling of your product and/or its battery at the time of disposal will help conserve
natural resources and ensure that it is recycled in a manner that protects human health and
the environment.
Apple Confidential

Appendix D Safety, handling, and support 170
Brasil—Informações sobre descarte e reciclagem
O símbolo indica que este produto e/ou sua bateria não devem ser descartadas no lixo
doméstico. Quando decidir descartar este produto e/ou sua bateria, faça-o de acordo com as
leis e diretrizes ambientais locais. Para informações sobre o programa de reciclagem da Apple,
pontos de coleta e telefone de informações, visite www.apple.com/br/environment/.
Información sobre eliminación de residuos y reciclaje
El símbolo indica que este producto y/o su batería no debe desecharse con los residuos
domésticos. Cuando decida desechar este producto y/o su batería, hágalo de conformidad
con las leyes y directrices ambientales locales. Para obtener información sobre el programa de
reciclajedeApple,puntosderecolecciónparareciclaje,sustanciasrestringidasyotrasiniciativas
ambientales, visite www.apple.com/la/environment/.
ENERGY STAR® compliance statement
To save energy, iPad is set to lock after two minutes of user inactivity. To change this setting,
go to Settings > General > Auto-Lock. To unlock iPad, press the Sleep/Wake button or the
Home button.
iPadmeetstheENERGYSTARguidelinesforenergyeciency.Reducingenergyconsumption
saves money and helps conserve valuable resources. For more information about ENERGY STAR,
go to www.energystar.gov.
Apple and the environment
At Apple, we recognize our responsibility to minimize the environmental impacts of our
operations and products. For more information, go to www.apple.com/environment/.
Apple Confidential

KApple Inc.
© 2015 Apple Inc. All rights reserved.
Apple, the Apple logo, AirDrop, AirPlay, AirPort, Apple TV,
FaceTime, Finder, GarageBand, Guided Access, iBooks,
iCloud Keychain, iMessage, iPad, iPad Air, iPhone, iPhoto, iPod,
iPod touch, iSight, iTunes, iTunes U, Keychain, Keynote, Mac,
Numbers, OS X, Pages, Passbook, Photo Booth, the Podcast
logo, Safari, Siri, Smart Cover, and Spotlight are trademarks of
Apple Inc., registered in the U.S. and other countries.
AirPrint,ApplePay,EarPods,Flyover,Hando,iPadmini,
Lightning, Multi-Touch, and Touch ID are trademarks of
Apple Inc.
Apple Store, Genius, iCloud, iTunes Extras, iTunes Match,
iTunes Plus, and iTunes Store are service marks of Apple Inc.,
registered in the U.S. and other countries.
Apple
1InniteLoop
Cupertino, CA 95014-2084
408-996-1010
www.apple.com
App Store, iBooks Store, and iTunes Radio are service marks of
Apple Inc.
IOS is a trademark or registered trademark of Cisco in the U.S.
and other countries and is used under license.
The Bluetooth® word mark and logos are registered
trademarks owned by Bluetooth SIG, Inc. and any use of such
marks by Apple Inc. is under license.
ENERGY STAR® is a U.S. registered trademark.
Adobe and Photoshop are trademarks or registered
trademarks of Adobe Systems Incorporated in the U.S. and/or
other countries.
Other company and product names mentioned herein may be
trademarks of their respective companies.
Everyeorthasbeenmadetoensurethattheinformationin
this manual is accurate. Apple is not responsible for printing or
clerical errors.
Some apps are not available in all areas. App availability is
subjecttochange.
019-00159/2015-06
Apple Confidential