Contents
- 1. User manual 1 of 5
- 2. User manual 2 of 5
- 3. User manual 3 of 5
- 4. User manual 4 of 5
- 5. User manual 5 of 5
User manual 4 of 5
Chapter 10 Calendar 69
Move an event to another calendar. Tap the event, tap Edit, tap Calendars, then select a calendar
to move it to.
Share iCloud calendars
With Family Sharing, a calendar shared with all the members of your family is created
automatically. See Family Sharing on page 32. You can share an iCloud calendar with other iCloud
users. When you share a calendar, others can see it, and you can let them add or change events.
You can also share a read-only version that anyone can view.
Create an iCloud calendar. Tap Calendars, tap Edit, then tap Add Calendar in the iCloud section.
Share an iCloud calendar. Tap Calendars, tap Edit, then tap the iCloud calendar you want to
share. Tap Add Person, then enter a name, or tap to browse your Contacts. Those you invite
receive an email invitation to join the calendar, but they need an iCloud account in order
to accept.
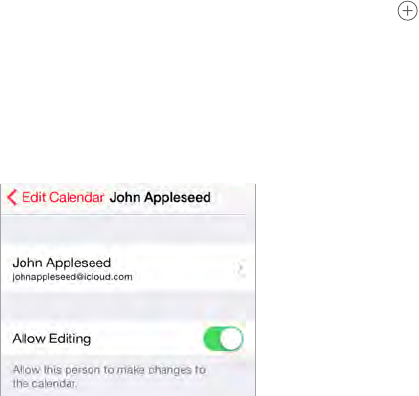
Change a person’s access to a shared calendar. Tap Calendars, tap Edit, tap the shared calendar,
thentaptheperson.Youcanturnohisorher’sabilitytoeditthecalendar,resendtheinvitation
to join the calendar, or stop sharing the calendar with that person.
Turn o notications for shared calendars. Whensomeonemodiesasharedcalendar,you’re
notiedofthechange.Toturnonoticationsforsharedcalendars,gotoSettings>Mail,
Contacts, Calendars > Shared Calendar Changes.
Share a read-only calendar with anyone. Tap Calendars, tap Edit, then tap the iCloud calendar
you want to share. Turn on Public Calendar, then tap Share Link to copy or send the URL for your
calendar. Anyone can use the URL to subscribe to the calendar using a compatible app, such as
Calendar for OS X.
Calendar settings
SeveralsettingsinSettings>Mail,Contacts,CalendarsaectCalendarandyourcalendar
accounts. These include:
•Syncing of past events (future events are always synced)
•Alert tone played for new meeting invitations
•Default calendar for new events
•Default time for alerts
•Timezonesupport,toshowdatesandtimesusingadierenttimezone
•Which day starts the week
•Display of Chinese, Hebrew, or Islamic dates
Apple Confidential
11
70
View photos and videos
The Photos app lets you view the photos and videos:
•Taken with Camera on iPod touch
•Stored in iCloud (see iCloud Photo Library on page 73)
•Shared from others (see iCloud Photo Sharing on page 73)
•Synced from your computer (see Sync with iTunes on page 16)
•Saved from an email, text message, webpage, or screenshot
Tap to view
full screen.
Tap to view
full screen.
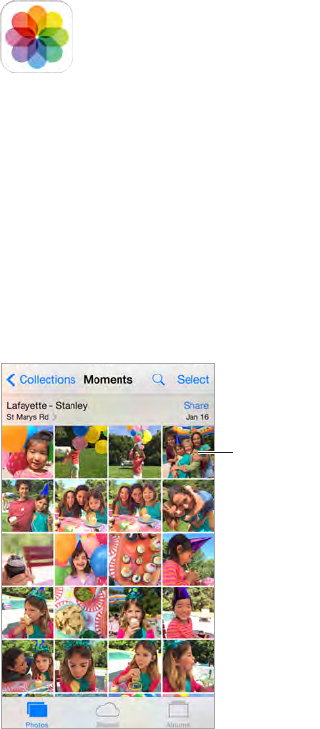
The Photos app includes tabs for Photos, Shared, and Albums.
•Tap Photos to see all your photos and videos, organized by Years, Collections, and Moments. To
quickly browse the photos in a collection or year, touch and hold for a moment, then drag.
•Tap Shared to see photos and videos you shared with others or that others shared with you.
See My Photo Stream on page 72 and iCloud Photo Sharing on page 73.
•Tap Albums to see how photos and videos are organized into albums on your iPod touch. See
Organize photos and videos, next.
View all your photos and videos. By default, Photos displays a representative subset of your
photos when you view by year or by collection. To see all your photos and videos, go to
Settings>Photos&Camera,thenturnoSummarizePhotos.
Photos
Apple Confidential

Chapter 11 Photos 71
View by location. While viewing by year or by collection, tap . Photos and videos that include
location information appear on a map, showing where they were taken.
While viewing a photo or video, tap to show and hide the controls. Swipe left or right to go
forward or backward.
Search photos. From Albums or Photos, tap to search by date (month and year), or place (city
and state). Search also keeps your Recent Searches on hand and gives you a list of suggested
searches.
Zoom in or out. Double-tap, or pinch a photo. When you zoom in, you can drag to see other
parts of the photo.
Play a video. Tap .Totogglebetweenfullscreenandt-to-screen,double-tapthescreen.
Play a slideshow. While viewing a photo, tap , then tap Slideshow. Select options, then tap
Start Slideshow. To stop the slideshow, tap the screen. To set other slideshow options, go to
Settings > Photos & Camera.
To stream a slideshow or video to a TV, see AirPlay on page 35.
Organize photos and videos
The Album tab includes albums you create and several default albums, depending on which
Photos features you use. Videos are automatically added to the Videos album, for example. You
see a My Photo Stream album if you use that feature (see My Photo Stream, next). If you use
iCloud Photo Library, you have an All Photos album, which includes all your photos and videos in
iCloud (see iCloud Photo Library on page 73); if you don’t use iCloud Photo Library, the Camera
Roll album includes photos and videos you took with iPod touch or saved to iPod touch from
other sources.
Note: If you use iCloud Photo Library, albums are stored in iCloud and are up to date and
accessible on any iOS 8.1 device using the same Apple ID. See iCloud Photo Library on page 73.
Create a new album. Tap Albums, tap , enter a name, then tap Save. Select photos and videos
to add to the album, then tap Done.
Add items to an existing album. While viewing thumbnails, tap Select, select items, tap Add To,
then select the album.
Manage albums. While viewing your album list, tap Edit.
•Rename an album: Select the album, then enter a new name.
•Rearrange albums: Drag .
•Delete an album: Tap .
With iCloud Photo Library, you can manage all your albums from any iOS 8.1 device set up with
iCloud Photo Library.
Mark your favorites. While viewing a photo or video, tap to automatically add it to the
Favorites album. A photo or video can be part of another album as well as Favorites.
Hide photos you want to keep but not show. Touch and hold a photo, then choose Hide. The
photo is moved to the Hidden album. Touch and hold a hidden photo to Unhide it.
Remove a photo or video from an album. Tap the photo or video, tap , then tap Delete Photo.
The photo or video is removed from the album and from the Photos tab.
Apple Confidential

Chapter 11 Photos 72
Delete a photo or video from Photos. Tap the Photos tab, tap the photo or video, tap , then
tap Delete Photo or Delete Video. Deleted photos and videos are kept in the Recently Deleted
album on iPod touch, with a badge showing the remaining days until the item is permanently
removed from iPod touch. To delete the photo or video permanently before the days expire,
tap the item, tap Delete, then tap Delete Photo or Delete Video. If you use iCloud Photo Library,
deleted photos and videos are permanently removed from all iOS 8.1 devices that use iCloud
Photo Library with the same Apple ID.
Recover a deleted photo or video. In the Recently Deleted album, tap the photo or video, tap
Recover, then tap Recover Photo or Recover Video to move the item to the Camera Roll or, if you
use iCloud Photo Library, the All Photos album.
My Photo Stream
My Photo Stream, turned on by default, automatically uploads new photos and videos to your
other devices that use My Photo Stream.
Turn My Photo Stream on or o. Go to Settings > Photos & Camera, or Settings > iCloud >
Photos.
Note: Photos stored in iCloud count against your total iCloud storage, but photos uploaded to
My Photo Stream don’t count additionally against your iCloud storage.
Use My Photo Stream without iCloud Photo Library. Photos and videos you take with
iPod touch are added to the My Photo Stream album when you leave the Camera app and
iPod touch is connected to Wi-Fi. Any photos you add—including screenshots and photos saved
from email, for example—also appear in your My Photo Stream album.
Photos and videos added to My Photo Stream on your other devices appear in your My Photo
Stream album on iPod touch. iOS devices can keep up to 1000 of your most recent photos in
iCloud for 30 days; you can choose to automatically import these photos to your computer, if you
want to keep them permanently.
Manage My Photo Stream contents. In the My Photo Stream album, tap Select.
•Save your best shots on iPod touch: Select the photos, then tap Add To.
•Share, print, or copy: Select the photos, then tap .
•Delete photos: Select the photos, then tap .
Note: Although deleted photos are removed from My Photo Stream on all your devices,
the original photos remain in Photos on the device on which they were originally taken.
Photos that you save to another album on a device or computer are also not deleted. See
support.apple.com/kb/HT4486.
Use My Photo Stream with iCloud Photo Library. If you enable iCloud Photo Library on
iPod touch, you can use My Photo Stream to upload recent photos and videos and view them on
other devices that do not have iCloud Photo Library enabled.
Apple Confidential
Chapter 11 Photos 73
iCloud Photo Library
iCloud Photo Library gives you access to your photos and videos on any supported iOS 8.1
device and on iCloud.com when using the same Apple ID. You can make changes to photos and
videos in the Photos app, preserve both the original and edited versions, and see the changes
updated across your devices (see Edit photos and trim videos on page 75). Store as many photos
and videos as your iCloud storage plan allows. If you turn on iCloud Photo Library, you can’t use
iTunes to sync photos and videos to iPod touch.
Turn on iCloud Photo Library. Go to Settings > iCloud > Photos. Or go to Settings > Photos &
Camera.
View photos and videos in iCloud Photo Library. In addition to viewing your photos and videos
in the Photos tab, organized by Years, Collections, and Moments, you can also view them as a
continuous stream, organized by date added, in the All Photos album.
Choose to optimize your storage or keep all your photos and videos in full-resolution on
iPod touch. Optimize iPod touch Storage, on by default, keeps lighter-weight versions, perfect
for viewing on iPod touch. Tap Download and Keep Originals to keep your full-resolution
originals on iPod touch. Full-resolution originals are always backed up and kept in your iCloud
Photo Library.
Download a full-resolution photo or video. If you’re not storing original versions on iPod touch,
simply pinch to zoom in to 100%, or tap Edit.
Note: To upload photos and videos to iCloud Photo Library, iPod touch must be connected to
Wi-Fi.
If your uploaded photos and videos exceed your storage plan, you can upgrade your
iCloud storage. Go to Settings > iCloud > Storage > Change Storage Plan to learn about the
available options.
iCloud Photo Sharing
With iCloud Photo Sharing, you can create albums of photos and videos to share, and subscribe
to other people’s shared albums. You can invite others using iCloud Photo Sharing (iOS 6 or later
or OS X Mountain Lion or later) to view your albums, and they can leave comments if they wish.
If they’re using iOS 7 or OS X Mavericks or later, they can add their own photos and videos. You
can also publish your album to a website for anyone to view. iCloud Photo Sharing works with or
without iCloud Photo Library and My Photo Stream.
Apple Confidential
Chapter 11 Photos 74
Note: To use iCloud Photo Sharing, iPod touch must be connected to the Internet.
Create new
shared albums
or add photos to
existing ones.
Create new
shared albums
or add photos to
existing ones.
Turn on iCloud Photo Sharing. Go to Settings > iCloud > Photos. Or go to Settings > Photos &
Camera.
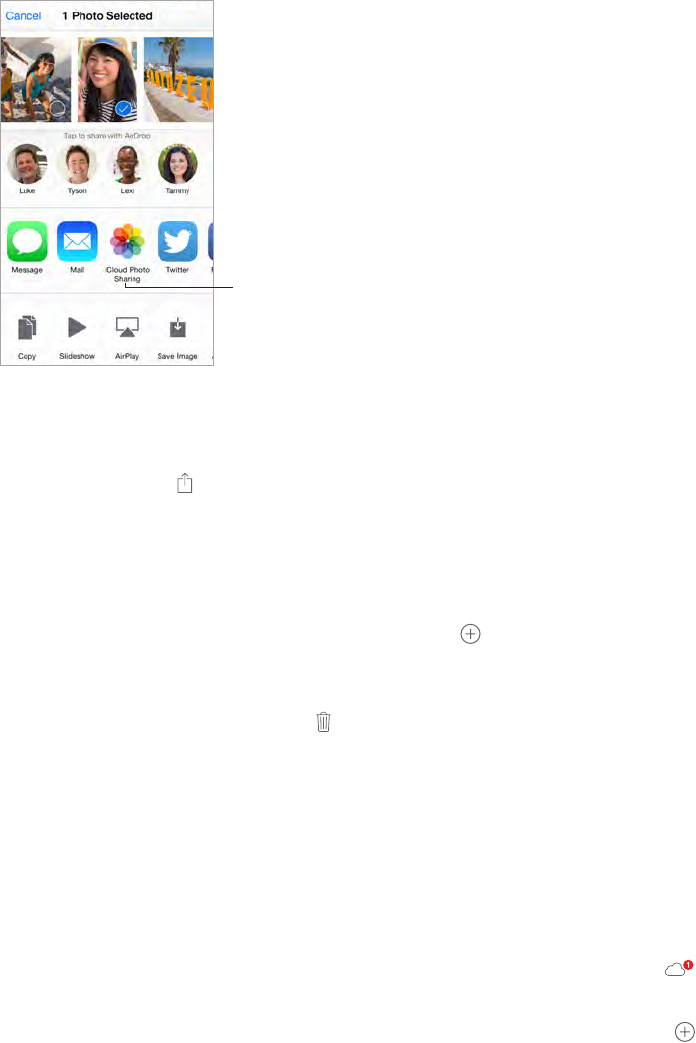
Share photos and videos. While viewing a photo or video, or when you’ve selected multiple
photos or videos, tap , tap iCloud Photo Sharing, add comments, then share to an existing
shared album or create a new one. You can invite people to view your shared album using their
email address or the mobile phone number they use for Messages.
Enable a public website. Select the shared album, tap People, then turn on Public Website. Tap
Share Link if you want to announce the site.
Add items to a shared album. View a shared album, tap , select items, then tap Done. You can
add a comment, then tap Post.
Delete photos from a shared album. Select the shared album, tap Select, select the photos
or videos you want to delete, then tap . You must be the owner of the shared album, or the
owner of the photo.
Delete comments from a shared album. Select the photo or video that contains the comment.
Touch and hold the comment, then tap Delete. You must be the owner of the shared album, or
the owner of the comment.
Rename a shared album. Tap Shared, tap Edit, then tap the name and enter a new one.
Add or remove subscribers, or turn Notications on or o. Select the shared album, then
tap People.
Subscribe to a shared album. When you receive an invitation, tap the Shared tab , then tap
Accept. You can also accept an invitation in an email.
Add items to a shared album you subscribed to. View the shared album, then tap . Select
items, then tap Done. You can add a comment, then tap Post.
See your Family album. When Family Sharing is set up, a shared album called “Family” is
automatically created in Photos on all family members’ devices. Everyone in the family can
contributephotos,videos,andcommentstothealbum,andbenotiedwheneversomething
new is added. For more information about setting up Family Sharing, see Family Sharing on
page 32.
Apple Confidential

Chapter 11 Photos 75
Other ways to share photos and videos
You can share photos and videos in Mail or Messages, or through other apps you install.
Share or copy a photo or video. View a photo or video, then tap . If you don’t see , tap the
screen to show the controls.
Tap More in Sharing to turn on the apps you want to use for sharing.
The size limit of attachments is determined by your service provider. iPod touch may compress
photo and video attachments, if necessary.
You can also copy a photo or video, then paste it into an email or text message (iMessage).
Share or copy multiple photos and videos. While viewing by moment, tap Share.
Save or share a photo or video you receive.
•Email: Tap to download it if necessary, then touch and hold the item to see sharing and
other options.
•Text message: Tap the item in the conversation, then tap .
Photos and videos that you receive in email messages or save from a webpage are saved to your
Photos tab. They can also be viewed in the Camera Roll or, if you’re using iCloud Photo Library,
the All Photos album.
Edit photos and trim videos
You can edit photos right on iPod touch. If your photos are stored in iCloud, your edits are
updated across all your devices set up with iCloud, and both your original and edited versions
are saved. If you delete a photo, it’s deleted from all your devices and iCloud. Photo app
extensions can provide special editing options. See App extensions on page 21.
Edit a photo. View the photo full screen, tap Edit, then tap one of the tools. To edit a photo not
taken with iPod touch, tap the photo, tap Edit, then tap Duplicate and Edit.
•Auto-enhance improves a photo’s exposure, contrast, saturation, and other qualities.
•With the Remove Red-eye tool , tap each eye that needs correcting.
•Tap , and Photos suggests an optimal crop, but you can drag the corners of the grid tool to
set your own crop. Move the wheel to tilt or straighten the photo. Tap Auto to align the photo
with the horizon, and tap Reset to undo alignment changes. Tap to rotate the photo 90
degrees. Tap to choose a standard crop ratio, such as 2:3 or Square.
Rotate photo.
Rotate photo.
Move the wheel to
tilt or straighten.
Move the wheel to
tilt or straighten.
Choose a standard
photo format.
Choose a standard
photo format.
•Photolters letyouapplydierentcoloreects,suchasMonoorChrome.
Apple Confidential
Chapter 11 Photos 76
•Tap Adjustments to set Light, Color, and B&W (black & white) options. Tap the down arrow,
then tap next to Light, Color, or B&W to choose the element you want to adjust. Move the
slidertothedesiredeect.
Compare the edited version to the original. Touch and hold the photo to view the original.
Release to see your edits.
Don’t like the results? Tap Cancel, then tap Discard Changes. Tap Done to save changes.
Revert to original. After you edit a photo and save your edits, you can revert to the original
image. Tap the image, tap Edit, then tap Revert.
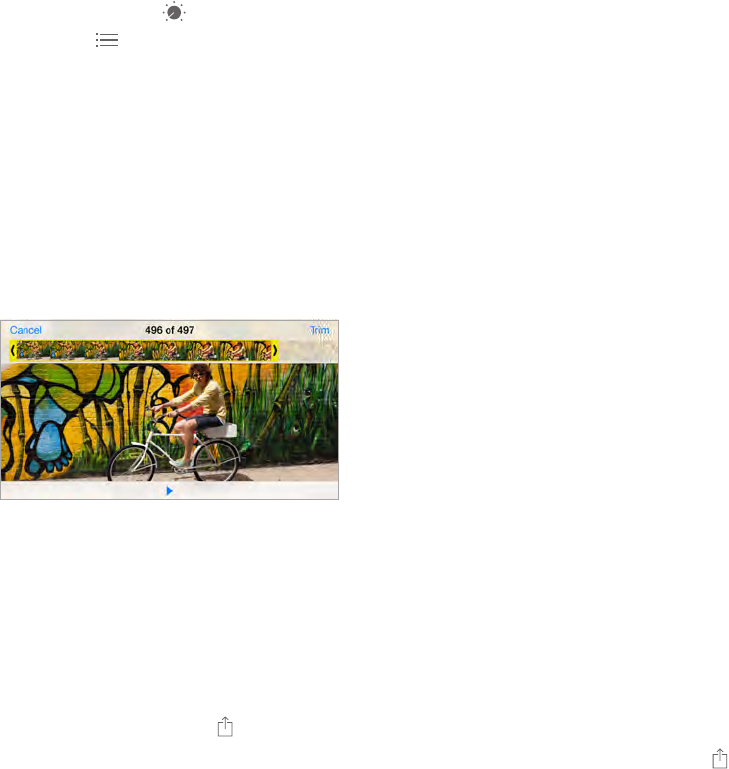
Trim a video. Tap the screen to display the controls, drag either end of the frame viewer, then
tap Trim.
Important: If you choose Trim Original, the trimmed frames are permanently deleted from the
original video. If you choose Save as New Clip, a new trimmed video clip is saved in your Videos
albumandtheoriginalvideoisunaected.
Print photos
Print to an AirPrint-enabled printer.
•Print a single photo: Tap , then tap Print.
•Print multiple photos: While viewing a photo album, tap Select, select the photos, tap , then
tap Print.
See AirPrint on page 35.
Photos settings
Settings for Photos are in Settings > Photos & Camera. These include:
•iCloud Photo Library, My Photo Stream, and iCloud Photo Sharing
•Photos Tab
•Slideshow
•Camera Grid
•HDR (High Dynamic Range) (models with iSight camera)
Apple Confidential
12
77
Camera at a glance
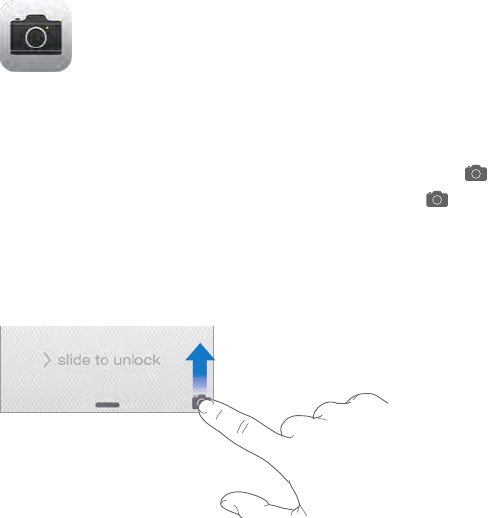
Quick! Get the camera! From the Lock screen, just swipe up. Or swipe up from the bottom
edge of the screen to open Control Center, then tap .
Note: When you open Camera from the Lock screen, you can view and edit photos and videos
you take while the device is locked by tapping the thumbnail at the lower-left corner of the
screen.Tosharephotosandvideos,rstunlockiPodtouch.
With iPod touch, you can take both still photos and videos using the FaceTime camera on the
front or, on some models, the iSight camera on the back.
Camera
Apple Confidential
Chapter 12 Camera 78
TheLEDash(modelswithaniSightcamera)providesextralightwhenyouneedit—evenasa
ashlight,justaswipeawayinControlCenter.SeeControl Center on page 30.
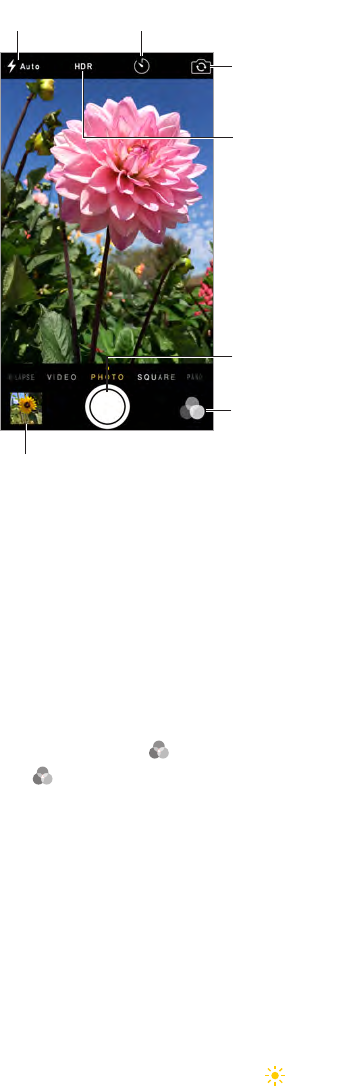
View the photos and videos you’ve taken.
View the photos and videos you’ve taken.
Switch between
cameras.*
Switch between
cameras.*
Filter
Filter
Take a photo.
Take a photo.
Take a
timed photo.*
Take a
timed photo.*
Set LED
flash mode.*
Set LED
flash mode.*
Turn on HDR.*
Turn on HDR.*
*Models with an iSight camera.
*Models with an iSight camera.
Take photos and videos
Cameraoersseveralphotoandvideomodes,whichletyoushootstills,square-formatphotos,
time-lapse, videos, and, on models with an iSight camera, panoramas.
Choose a mode. Drag the screen left or right, or tap the camera mode labels to choose Time-
Lapse, Video, Photo, Square, or Pano.
Take a photo. Choose Photo, then tap the Take Picture button or press either volume button.
Apply a lter. Tap toapplydierentcoloreects,suchasMonoorChrome.Toturnoalter,
tap ,thentapNone.Youcanalsoapplyalterlater,whenyoueditthephoto.SeeEdit photos
and trim videos on page 75.
Arectanglebrieyappearswheretheexposureisset.Whenyouphotographpeople,
face detection balances the exposure across up to 10 faces. A rectangle appears for each
face detected.
Exposure is automatic, but you can set the exposure manually for the next shot by tapping an
object or area on the screen. With an iSight camera, tapping the screen sets the focus and the
exposure,andfacedetectionistemporarilyturnedo.Tolocktheexposureandfocus,touch
and hold until the rectangle pulses. Take as many photos as you want. When you tap the screen
again, the automatic settings and face detection turn back on.
Adjust the exposure. Tap to see next to the exposure rectangle, then slide up or down to
adjust the exposure.
Apple Confidential
Chapter 12 Camera 79
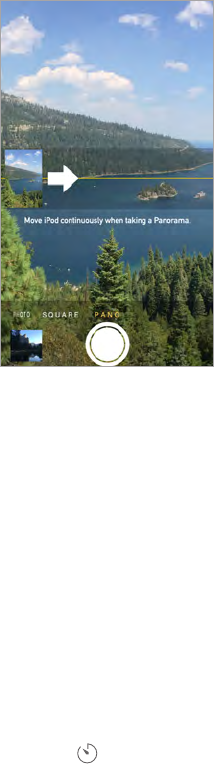
Take a panorama photo. (iSight camera) Choose Pano, tap the Take Picture button, then pan
slowlyinthedirectionofthearrow.Topanintheotherdirection,rsttapthearrow.Topan
vertically,rstrotateiPodtouchtolandscapeorientation.Youcanreversethedirectionofthe
vertical pan, too.
Capture an experience with time-lapse. (iSight camera) Choose Time-Lapse, set up iPod touch
where you want, then tap the Record Time-Lapse Video button to start capturing a sunset, a
oweropening,orotherexperiencesoveraperiodoftime.TaptheRecordTime-LapseVideo
button again to stop. The time-lapse photos are compiled into a short video that you can watch
and share.
Shoot some video. Choose Video, then tap the Record Video button or press either volume
button to start and stop recording. Video records at 30 fps (frames per second).
Zoom in or out. (iSight camera) Pinch the image on the screen.
If Location Services is turned on, photos and videos are tagged with location data that can be
used by apps and photo-sharing websites. See Privacy on page 36.
Use the capture timer to put yourself in the shot. Avoid “camera shake” or add yourself to a
picturebyusingthecapturetimer.Toincludeyourself,rststabilizeiPodtouchandframeyour
shot. Tap , tap 3s (seconds) or 10s, then tap the Take Picture button.
Want to capture what’s displayed on your screen? Simultaneously press and release the Sleep/
Wake and Home buttons. The screenshot is added to the Photos tab in Photos and can also be
viewed in the Camera Roll album or All Photos album (if you’re using iCloud Photo Library).
Make it better. You can edit photos and trim videos, right on iPod touch. See Edit photos and
trim videos on page 75.
Use Siri.Say something like:
•“Open Camera”
•“Take a picture”
HDR
HDR (High Dynamic Range) helps you get great shots, even in high-contrast situations. The best
partsofthreequickshots,takenatdierentexposures(long,normal,andshort),areblended
together into a single photo.
Apple Confidential

Chapter 12 Camera 80
Use HDR. (iSightcamera)TapHDR.Theashistemporarilyturnedo.Forbestresults,keepboth
iPod touch and the subject still.
Keep the normal photo in addition to the HDR version. Go to Settings > Photos & Camera >
Keep Normal Photo. Both the normal and HDR versions of the photo appear in Photos. HDR
versions of photos in your Albums are marked with “HDR” in the corner.
View, share, and print
Photos and videos you take are saved in Photos. With iCloud Photo Library turned on, all new
photos and videos are automatically uploaded and available in Photos on all your iOS 8.1 devices
set up with iCloud Photo Library. See iCloud Photo Library on page 73. With iCloud Photo Library
o,youcancollectupto1,000ofyourmostrecentphotosfromallofyourenableddevicesin
the My Photo Stream album. See My Photo Stream on page 72.
View your photos. Tap the thumbnail image, then swipe left or right to see the photos you’ve
taken recently. Tap All Photos to see everything in the Photos app.
Tap the screen to show or hide the controls.
Get sharing and printing options. Tap . See Share from apps on page 32.
Upload photos and videos. Use iCloud Photo Library to upload photos and videos from your
iPod touch to iCloud and access them on your iOS 8.1 devices signed into iCloud Photo Library
using the same Apple ID. You can also upload and download your photos and videos from the
Photos app on iCloud.com. See iCloud Photo Library on page 73.
Camera settings
Go to Settings > Photos & Camera for camera options, which include:
•iCloud Photo Library, My Photo Stream, and iCloud Photo Sharing
•Slideshow
•Grid
•HDR (models with iSight camera)
Adjust the volume of the shutter sound with the Ringer and Alerts settings in Settings > Sounds.
Or mute the sound using the Ring/Silent switch. (In some countries, muting is disabled.)
Apple Confidential
13
81
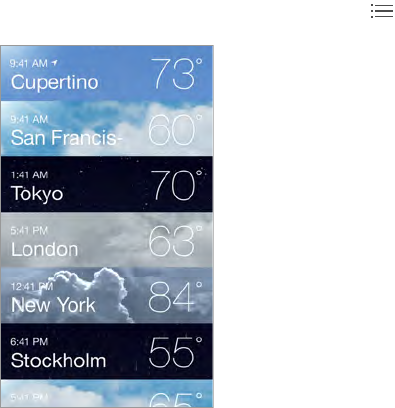
Get the current temperature and ten-day forecast for one or more cities around the world, with
hourly forecasts for the next 12 hours. Weather uses Location Services to get the forecast for your
current location.
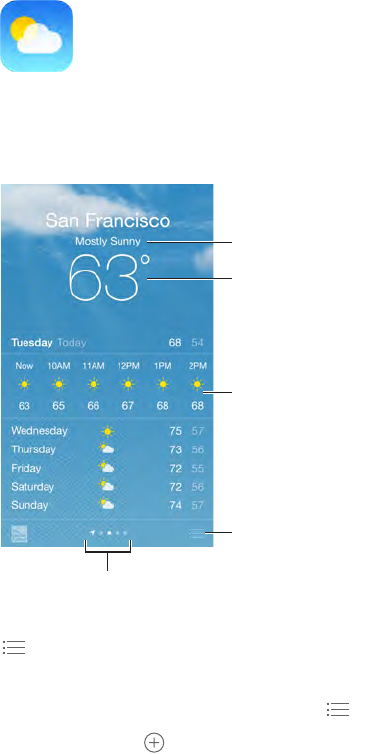
Current conditions
Current conditions
Add or delete cities.
Add or delete cities.
Current
temperature
Current
temperature
Current hourly
forecast
Current hourly
forecast
Number of cities stored
Number of cities stored
Swipe up to see your detailed forecast. Swipe left or right to see weather for another city, or tap
, then choose a city from the list. The leftmost screen shows your local weather when Location
Services is on (Settings > Privacy > Location Services).
Add a city or make other changes. Tap .
•Add a city: Tap . Enter a city or zip code, then tap Search.
•Rearrange the order of cities: Touch and hold a city, then drag it up or down.
•Delete a city: Slide the city to the left, then tap Delete.
•Choose Fahrenheit or Celsius: Tap °F or °C.
View the current hourly forecast. Swipe the hourly display left or right.
Use Siri. Say something like:
•“What’s the weather for today?”
•“How windy is it out there?”
•“When is sunrise in Paris?”
Weather
Apple Confidential
Chapter 13 Weather 82
See all cities at once. Pinch the screen or tap .
Turn local weather on or o. Go to Settings > Privacy > Location Services. See Privacy on
page 36.
Use iCloud to push your list of cities to your other iOS devices. Go to Settings > iCloud, then
make sure either iCloud Drive or Documents & Data is on. See iCloud on page 14.
Apple Confidential
14
83
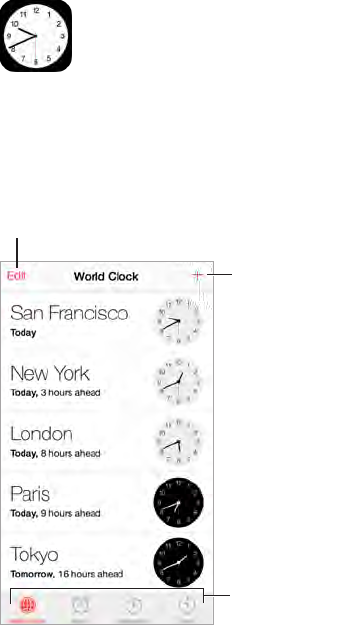
Clock at a glance
TherstclockdisplaysthetimebasedonyourlocationwhenyousetupiPodtouch.Addother
clocks to show the time in other major cities and time zones.
Delete clocks or change their order.
Delete clocks or change their order.
Add a clock.
Add a clock.
View clocks, set
an alarm, time
an event, or set
a timer.
View clocks, set
an alarm, time
an event, or set
a timer.
Clock
Apple Confidential
Chapter 14 Clock 84
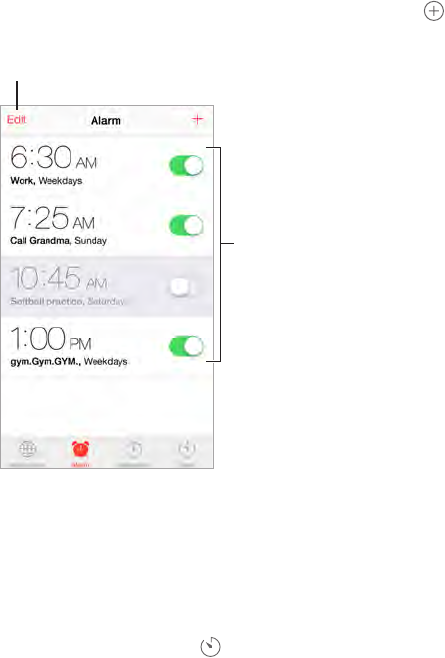
Alarms and timers
Want iPod touch to wake you? Tap Alarm, then tap . Set your wake-up time and other
options, then give the alarm a name (like “Good morning”).
Tap to change options or delete an alarm.
Tap to change options or delete an alarm.
Turn saved
alarms on or off.
Turn saved
alarms on or off.
No wasting time! You can also use the stopwatch to keep time, record lap times, or set a timer to
alert you when time’s up.
Want to fall asleep to music or a podcast? Tap Timer, tap When Timer Ends, then choose Stop
Playing at the bottom.
Get quick access to clock features. Swipe up from the bottom edge of the screen to open
Control Center, then tap . You can access Timer from Control Center even when iPod touch is
locked. You can also navigate to the other clock features.
Use Siri.Say something like:
•“Set the timer for 3 minutes”
•“Wake me up tomorrow at 7am”
•"Wake me up in 8 hours”
Apple Confidential
15
85
Find places
WARNING: For important information about navigation and avoiding distractions that could
lead to dangerous situations, see Important safety information on page 150. See also Privacy on
page 36.
Choose the view,
drop a pin, or
show traffic.
Choose the view,
drop a pin, or
show traffic.
Tap a pin to display
the banner.
Tap a pin to display
the banner.
Quick driving
directions
Quick driving
directions
Get more info.
Get more info.
Current location
Current location
Enter a search.
Enter a search.
Show your
current location.
Show your
current location.
Get directions.
Get directions.
MovearoundMapsbydraggingthescreen.Tofaceadierentdirection,rotatewithtwongers.
To return to north, tap the compass in the upper right.
Zoom in or out. Double-tapwithonengertozoomin,andtapwithtwongerstozoomout—
or pinch open or closed. The scale appears in the upper left while zooming, or if you touch the
screenwithtwongers.Tochangehowdistanceisshown(milesorkilometers),gotoSettings>
Maps.
Search for a location. Tapthesearcheld.Youcansearchforalocationindierentways.For
example:
•Intersection (“8th and market”)
•Area (“greenwich village”)
•Landmark (“guggenheim”)
Maps
Apple Confidential

Chapter 15 Maps 86
•Zip code
•Business (“movies,” “restaurants san francisco ca,” “apple inc new york”)
Maps may also list recent locations, searches, or directions that you can choose from.
Use Siri. Say,forexample,“Findcoeenearme.”
Find the location of a contact, or of a favorite or recent search. Tap Favorites.
Choose your view. Tap , then choose Standard, Hybrid, or Satellite.
Manually mark a location. Touch and hold the map until the dropped pin appears.
Get more info
Get info about a location. Tap a pin to display its banner, then tap . Info might include Yelp
reviews and photos, a webpage link, directions, and more.
To share the location, add the location to your Favorites, or use another app you install, tap .
See Share from apps on page 32.
Get directions
Note: To get directions, iPod touch must be connected to the Internet. To get directions
involving your current location, Location Services must also be on.
Get directions. Tap , enter the starting and ending locations, then tap Route. Or choose a
location or a route from the list, if available. Tap to select driving or walking directions, or to use
an app for public or other modes of transportation.
If a location banner is showing, directions to that location from your current location appear. To
getotherdirections,tapthesearcheld.
If multiple routes appear, tap the one you want to take.
•View turn-by-turn directions: Tap Start, then swipe left to see the next instruction.
•See the route overview: Tap Overview.
•View the directions as a list: Tap List Steps.
Get directions from your current location. Tap on the banner of your destination. Tap to
select driving or walking directions, or to use an app for public or other modes of transportation.
Use Siri. Say something like:
•“Give me directions home”
•“Directions to my dad’s work”
•“What’s my ETA?”
•“Find a gas station”
Use Maps on your Mac to get directions. Open Maps on your Mac (OS X Mavericks or later), get
directions for your trip, then choose File > Share > Send to your device. Your Mac and iPod touch
must both be signed into iCloud using the same Apple ID.
Find out about trac conditions. Tap ,thentapShowTrac.Orangedotsshowslowdowns,
andreddotsshowstop-and-gotrac.Toseeanincidentreport,tapamarker.
Report a problem. Tap , then tap Report a Problem.
Apple Confidential
Chapter 15 Maps 87
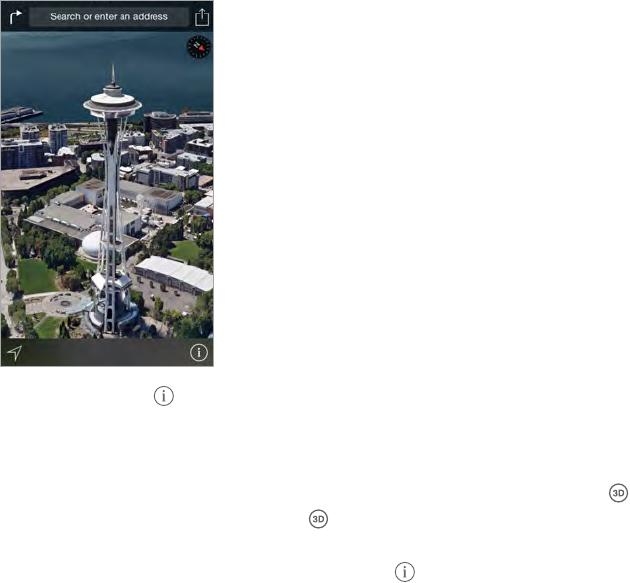
3D and Flyover
With3DandFlyover,youcanseethree-dimensionalviewsandevenyovermanyoftheworld’s
major cities.
The Transamerica Pyramid Building is a registered
service mark of Transamerica Corporation.
The Transamerica Pyramid Building is a registered
service mark of Transamerica Corporation.
View 3D map. Tap ,thentapShow3DMap.Or,dragtwongersup.(Zoominforacloserlook
if Show 3D Map doesn’t appear.)
Adjust the angle. Dragtwongersupordown.
Take a Flyover Tour. An aerial tour is available for select cities, indicated by next to the city
name. (Zoom out if you don’t see any markers.) Tap the name of the city to display its banner,
then tap Tour to begin the tour. To stop the tour, tap the screen to display the controls, then tap
End Flyover Tour. To return to standard view, tap .
Maps settings
Go to Settings > Maps. Settings include:
•Distances in miles or kilometers
•Maplabels(theseappearinthelanguagespeciedinSettings>General>International>
Language)
Apple Confidential
16
88
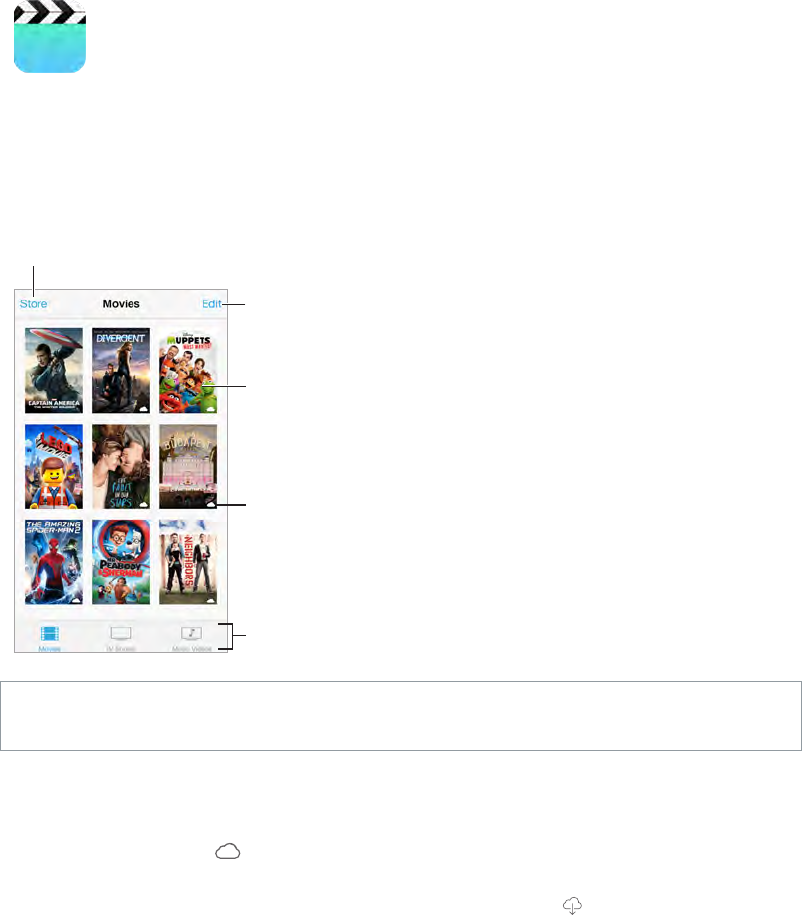
Videos at a glance
Open the Videos app to watch movies, TV shows, and music videos. To watch video podcasts,
open the Podcasts app—see Podcasts at a glance on page 115. To watch videos you record using
Camera on iPod touch, open the Photos app.
Choose a category.
Choose a category.
Delete videos from
your library.
Delete videos from
your library.
Add to your library.
Add to your library.
Tap a video
to play it.
Tap a video
to play it.
This video hasn’t
been downloaded
to iPod touch.
This video hasn’t
been downloaded
to iPod touch.
WARNING: For important information about avoiding hearing loss, see Important safety
information on page 150.
Watch a video. Tap the video in the list of videos.
What about videos you shot with iPod touch? Open the Photos app.
Stream or download? If appears on a video thumbnail, you can watch it without
downloading it to iPod touch, if you have an Internet connection. To download the video to
iPod touch so you can watch without using a Wi-Fi connection, tap in the video details.
Looking for podcasts or iTunes U videos? Open the Podcasts app or download the free iTunes U
app from the App Store.
Set a sleep timer. Open the Clock app and tap Timer, then swipe to set the number of hours and
minutes. Tap When Timer Ends and choose Stop Playing, tap Set, then tap Start.
Videos
Apple Confidential
Chapter 16 Videos 89
Add videos to your library
Buy or rent videos from the iTunes Store. Tap Store in the Videos app, or open the iTunes Store
app on iPod touch, then tap Videos. See Chapter 22, iTunes Store, on page 100. The iTunes Store
is not available in all areas.
Transfer videos from your computer. Connect iPod touch, then sync videos from iTunes on your
computer. See Sync with iTunes on page 16.
Stream videos from your computer. Turn on Home Sharing in iTunes on your computer. Then,
on iPod touch, go to Settings > Videos and enter the Apple ID and password you used to set up
Home Sharing on your computer. Then open Videos on iPod touch and tap Shared at the top of
the list of videos.
Convert a video to work with iPod touch. If you try to sync a video from iTunes to iPod touch
and a message says the video can’t play on iPod touch, you can convert the video. Select the
video in your iTunes library and choose File > Create New Version > “Create iPod or iPhone
Version.” Then sync the converted video to iPod touch.
Delete a video. Tap Edit in the upper right of your collection, then tap on the video thumbnail.
If you don’t see the Edit button, look for on your video thumbnails—those videos haven’t
been downloaded to iPod touch, so you can’t delete them. To delete an individual episode of a
series, swipe left on the episode in the Episodes list.
Deleting a video (other than a rented movie) from iPod touch doesn’t delete it from the iTunes
library on your computer, and you can sync the video back to iPod touch later. If you don’t want
to sync the video back to iPod touch, set iTunes to not sync the video. See Sync with iTunes on
page 16.
Important: If you delete a rented movie from iPod touch, it’s deleted permanently and cannot be
transferred back to your computer.
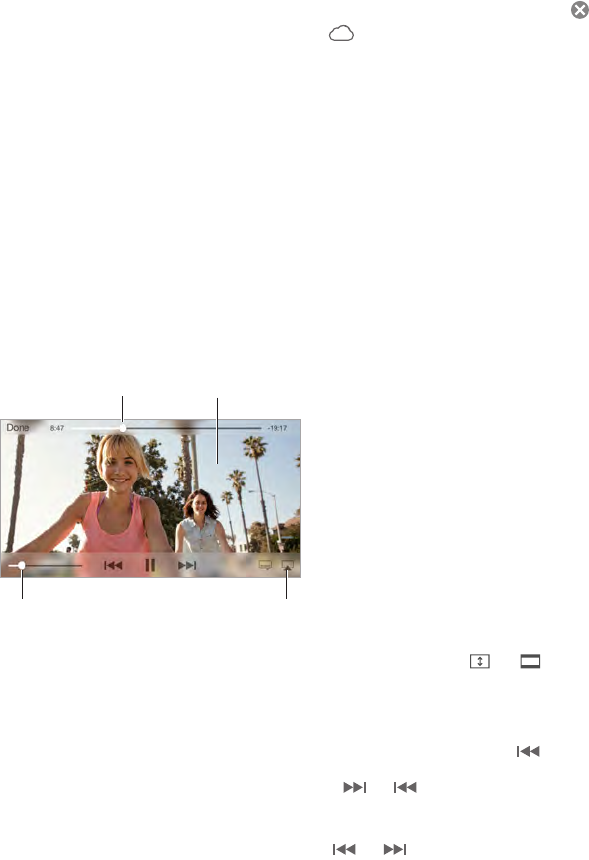
Control playback
Watch on a TV
with Apple TV.
Watch on a TV
with Apple TV.
Tap to show or
hide the controls.
Tap to show or
hide the controls.
Drag to skip
forward or back.
Drag to skip
forward or back.
Drag to adjust
the volume.
Drag to adjust
the volume.
Scale the video to ll the screen or t to the screen. Tap or . Or double-tap the video. If
youdon’tseethescalingcontrols,yourvideoalreadytsthescreenperfectly.
Start over from the beginning. If the video contains chapters, drag the playhead along the
scrubber bar all the way to the left. If there are no chapters, tap .
Skip to the next or previous chapter. Tap or . You can also press the center button or
equivalent on a compatible headset two times (skip to next) or three times (skip to previous).
Rewind or fast-forward. Touch and hold or . Or drag the playhead left or right. Move your
ngertowardthebottomofthescreenasyoudragfornercontrol.
Apple Confidential

Chapter 16 Videos 90
Select a dierent audio language. Ifthevideooersotherlanguages,tap , then choose a
language from the Audio list.
Show subtitles or closed captions. Tap .Notallvideosoersubtitlesorclosedcaptions.
Customize the appearance of closed captions. Go to Settings > General > Accessibility >
Subtitles & Captioning.
See closed captions and subtitles for the deaf and hard of hearing. Go to Settings > General >
Accessibility > Subtitles & Captioning, then turn on Closed Captions + SDH.
Watch the video on a TV. Tap . For more about AirPlay and other ways to connect, see
AirPlay on page 35.
Videos settings
Go to Settings > Videos, where you can:
•Choose where to resume playback the next time you open a video
•Choose to show only videos on iPod touch
•Log in to Home Sharing
Apple Confidential
17
91
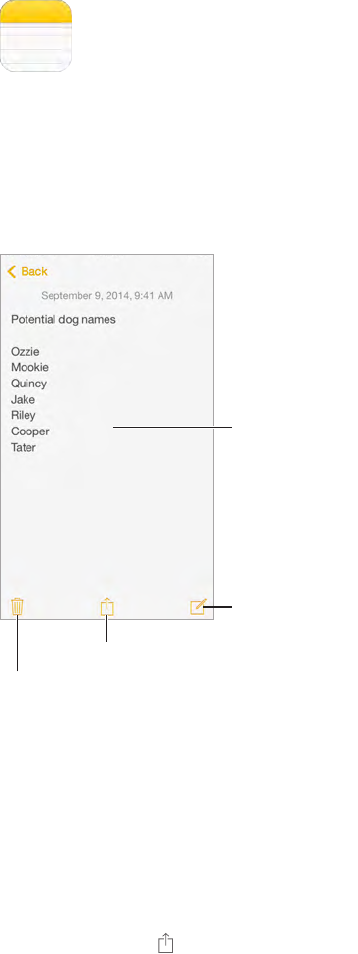
Notes at a glance
Type notes on iPod touch, and iCloud automatically makes them available on your other iOS
devices and Mac computers. You can also read and create notes in other accounts, such as Gmail
or Yahoo!.
Tap to edit.
Tap to edit.
Write a new note.
Write a new note.
Share or print.
Share or print.
Delete this note.
Delete this note.
See your notes on your other devices. If you use an icloud.com, me.com, or mac.com email
address for iCloud, go to Settings > iCloud, then turn on Notes. If you use Gmail or another IMAP
account for iCloud, go to Settings > Mail, Contacts, Calendars, then turn on Notes for the account.
Your notes appear in Notes on all your other iOS devices and Mac computers that use the same
Apple ID.
Search for a note. Scroll to the top of a list of notes (or tap the top of the screen) to reveal the
searcheld,thentaptheeldandtypewhatyou’relookingfor.Youcanalsosearchfornotes
from the Home screen—just drag down the middle of the screen.
Share or print. Tap at the bottom of the note. You can share via Messages, Mail, or AirDrop.
Delete a note. Swipe left over the note in the list of notes.
Use Siri. Say something like:
•"Create new note travel items.”
•"Add toothbrush to travel items.”
Notes
Apple Confidential
Chapter 17 Notes 92
•"Add umbrella.”
Use notes in multiple accounts
Share notes with other accounts. You can share notes with other accounts, such as Google,
Yahoo!, or AOL. Go to Settings > Mail, Contacts, Calendars, then turn on Notes for the account.
Create a note in a specic account. Tap Accounts at the top of a list of notes, select the account,
then tap New. Notes you create in the account on iPod touch show up in the notes folder of
the account.
Choose the default account for new notes. Go to Settings > Notes.
See all notes in an account. Tap Accounts at the top of a list of notes, then choose the account.
Apple Confidential
18
93
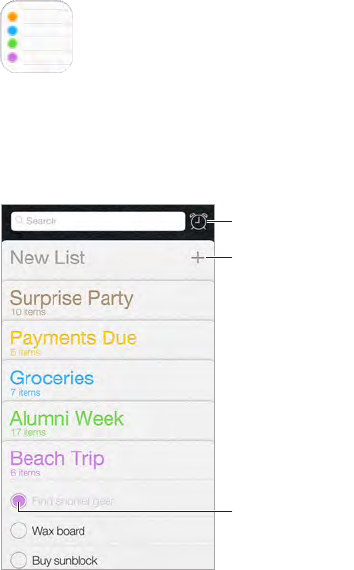
Reminders at a glance
Reminders lets you keep track of all the things you need to do.
Add a list.
Add a list.
Completed item
Completed item
Scheduled items
Scheduled items
Add a reminder. Tap a list, then tap a blank line.
Use Siri. Say something like:
•"Remember to take an umbrella.”
•"Add artichokes to my grocery list.”
•"Read my work to-do list.”
Share a list. Tap a list, then tap Edit. Tap Sharing, then tap Add Person. The people you share with
also need to be iCloud users. After they accept your invitation to share the list, you’ll all be able
to add, delete, and mark items as completed. Family members can also share a list. See Family
Sharing on page 32.
Delete a list. While viewing a list, tap Edit, then tap Delete List. All of the reminders in the list are
also deleted.
Delete a reminder. Swipe the reminder left, then tap Delete.
Change the order of lists. Touch and hold the list name, then drag the list to a new location. To
change the order of items in a list, tap Edit.
Reminders
Apple Confidential
Chapter 18 Reminders 94
What list was that in? Scrolltothetoptoseethesearcheld.Alllistsaresearchedbythe
remindername.YoucanalsouseSiritondreminders.Forexamplesay,“Findthereminder
about milk.”
WithOSXYosemite,youcanhandoremindersyou’reeditingbetweenyourMacand
iPod touch. See About Continuity features on page 22.
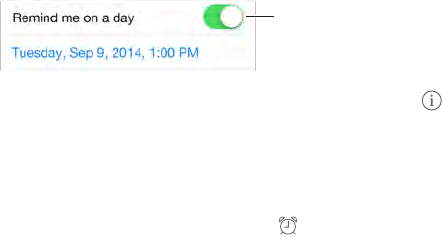
Scheduled reminders
Scheduled reminders notify you when they’re due.
Scheduled
reminder
Scheduled
reminder
Schedule a reminder. While editing a reminder, tap , then turn on “Remind me on a
day.” Tap Alarm to set the date and time. Tap Repeat to schedule the reminder for regularly
occurring intervals.
Use Siri. Say, for example, “Remind me to take my medicine at 6am tomorrow.”
See all scheduled reminders. Tap to show the Scheduled list.
Don’t bother me now. YoucanturnoRemindersnoticationsinSettings>Notications.To
silencenoticationstemporarily,turnonDoNotDisturb.
Reminders settings
Go to Settings > Reminders, where you can:
•Set a default list for new reminders
•Sync past reminders
Keep your reminders up to date on other devices. Go to Settings > iCloud, then turn on
Reminders. To keep up to date with Reminders on OS X, turn on iCloud on your Mac, too. Some
other types of accounts, such as Exchange, also support Reminders. Go to Settings > Mail,
Contacts, Calendars, then turn on Reminders for the accounts you want to use.
Apple Confidential
19
95
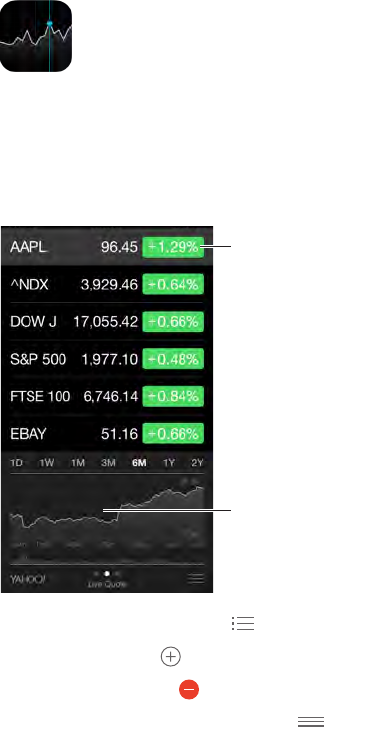
Keep track of the major exchanges and your stock portfolio, see the change in value over time,
and get news about the companies you’re watching.
Note: To use Stocks, iPod touch must be connected to the Internet. See Connect to the
Internet on page 14.
Tap to see percent
change. Tap again
to see market
capitalization.
Tap to see percent
change. Tap again
to see market
capitalization.
Swipe left or right
to see stats or
news articles.
Swipe left or right
to see stats or
news articles.
Manage your stock list. Tap .
•Add an item: Tap . Enter a symbol, company name, fund name, or index, then tap Search.
•Delete an item: Tap .
•Rearrange the order of items: Drag up or down.
While viewing stock info, you can tap any of the values along the right side of the screen to
switch the display to price change, market capitalization, or percentage change. Swipe the info
beneath the stock list to see the summary, chart, or news for the selected stock. Tap a news
headline to view the article in Safari.
YoucanalsoseeyourstocksintheTodaytabofNoticationCenter.SeeNoticationCenter on
page 30.
Note: Quotes may be delayed 20 minutes or more, depending upon the reporting service.
Add a news article to your reading list. Touch and hold the news headline, then tap Add to
Reading List.
Use Siri. Say, for example, “How are the markets doing?”
Stocks
Apple Confidential
Chapter 19 Stocks 96
Find out more. Tap YAHOO!
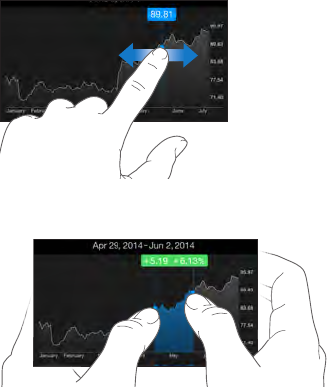
View a full-screen chart. Rotate iPod touch to landscape orientation. Swipe left or right to see
your other stock charts.
•See the value for a specic date or time: Touchthechartwithonenger.
•See the dierence in value over time: Touchthechartwithtwongers.
Use iCloud to keep your stock list up to date on your iOS devices. Go to Settings > iCloud, then
turn on iCloud Drive or Documents & Data. See iCloud on page 14.
Apple Confidential

20
97
Game Center at a glance
Game Center lets you play your favorite games with friends who have an iOS device or a Mac
(OS X Mountain Lion or later). You must be connected to the Internet to use Game Center.
WARNING: For important information about avoiding repetitive motion injuries, see Important
safety information on page 150.
Declare your status
or change your photo.
Declare your status
or change your photo.
See who’s the best.
See who’s the best.
Choose a game.
Choose a game.
It’s on!
It’s on!
Is it your turn?
Is it your turn?
Play, share, or
remove this game.
Play, share, or
remove this game.
Find someone
to play against.
Find someone
to play against.
Explore game
goals.
Explore game
goals.
Invite friends to play.
Invite friends to play.
Get started. Open Game Center. If you see your nickname at the top of the screen, you’re already
signed in. Otherwise, you’ll be asked for your Apple ID and password.
Get some games. Tap Games, then tap a recommended game, browse for games in the
App Store (look for Supports Game Center in the game details), or get a game one of your
friends has. See Play games with friends on page 98.
Play! Tap Games, choose a game, tap in the upper right, then tap Play.
Sign out? No need to sign out when you quit Game Center, but if you want to, go to Settings >
Game Center, then tap your Apple ID.
Game Center
Apple Confidential