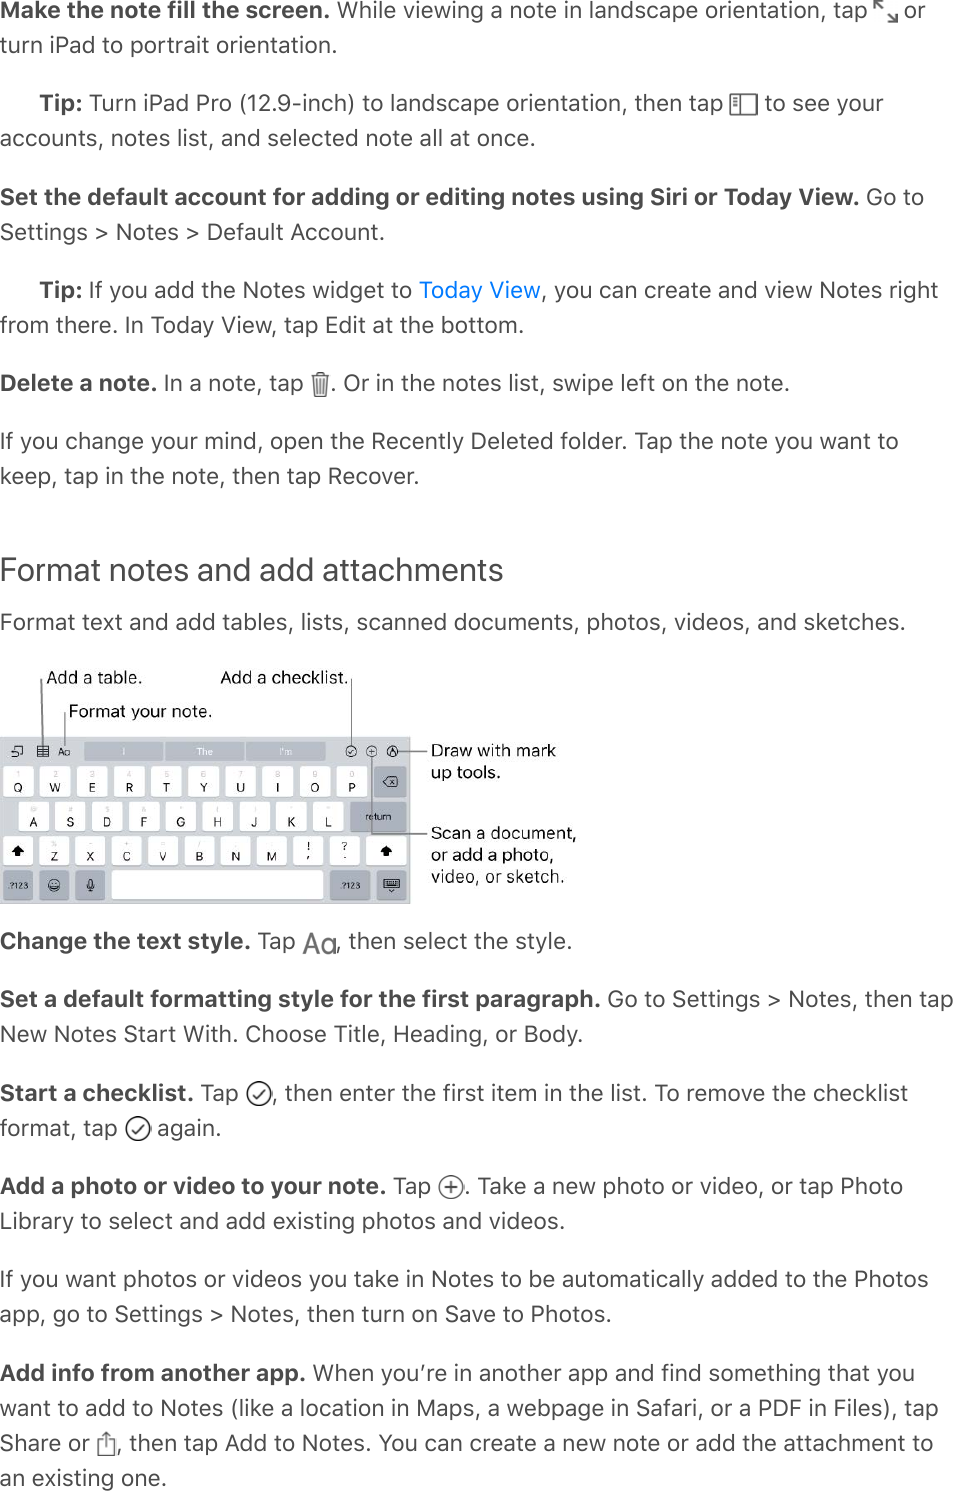
Apple A1893 Tablet Device User Manual iPad User Guide
Apple Inc. Tablet Device iPad User Guide
UserManual.wiki
>
Apple
>
A1893 User Manual
>
Users Manual 2
Contents
1.
Users Manual 1
2.
Users Manual 2
Users Manual 2
Navigation menu
Upload a User Manual
Namespaces
Wiki Guide
HTML
PDF
Info
Views
User Manual
Discussion / Help
Navigation
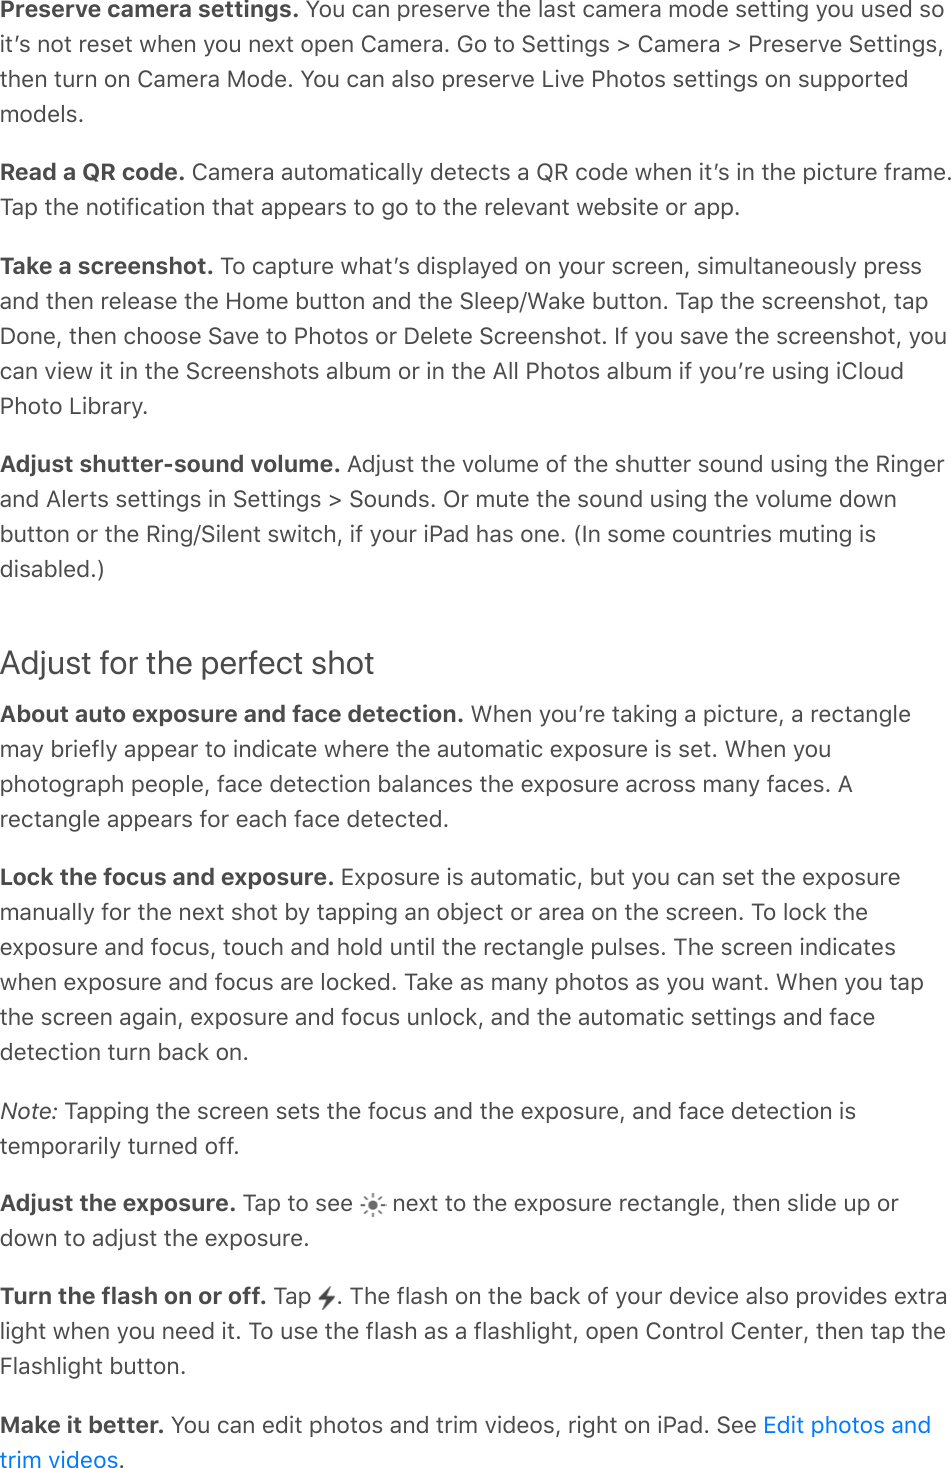
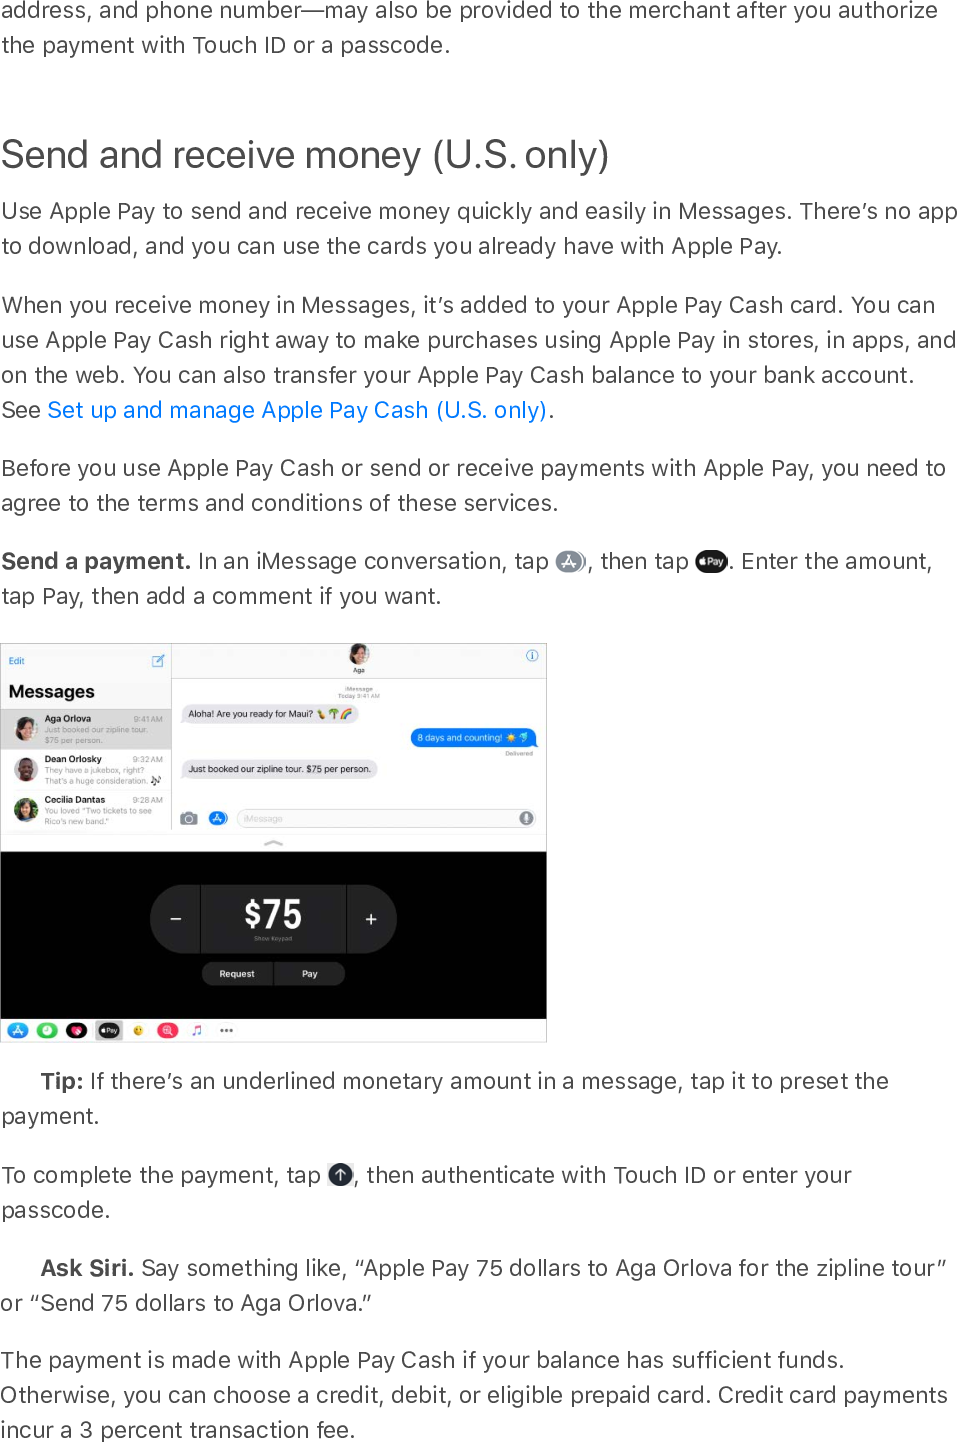
![Quickly reach a contact. Tap one of the buttons below the contactʼs name to start amessage, call, video call, or email. To change the default contact method (for a call, forexample), touch and hold the call button, then tap a phone number.If you use a third-party app to make video or audio calls, send messages, or send email,you may be able to set that app as the default.Change how your contacts are sorted and displayed. Go to Settings > Contacts.Share a contact. Tap a contact, then tap Share Contact. See . Sharing acontact shares all the info from the contactʼs card.Assign a photo to a contact. Tap a contact, tap Edit, then tap “add photo.” You can takea photo or add one from the Photos app.Change a label. If a field has the wrong label, such as Home instead of Work, tap Edit.Then tap the label and choose one from the list, or tap Custom Field to create one of yourown.Add your friendsʼ social profiles. While viewing a contact, tap Edit, then tap “add socialprofile.”Delete a contact. Go to the contactʼs card, then tap Edit. Scroll down, then tap DeleteContact.Add your contact infoiPad uses your Apple ID to create your My Card, but you may need to provide yourcontact information to complete it.Complete your My Card. Open Contacts, tap My Card at the top of your contacts list,then tap Edit. Contacts suggests addresses and phone numbers to help you set up yourMy Card.If there is no My Card, tap , then enter your information. To create a My Card with thisinformation, go to Settings > Contacts, tap My Info, then tap your name in the Contactslist.Edit your My Card. In Contacts, tap My Card at the top of your contacts list, then tapEdit.Add contact accountsBesides adding contacts individually, you can:Use your iCloud contacts: Go to Settings > [your name] > iCloud, then turn onContacts.Share from apps](https://usermanual.wiki/Apple/A1893.Users-Manual-2/User-Guide-3778156-Page-6.png)
![View directions as a list: Tap the route card at the bottom of the screen, then tapDetails.Even if you open another app, Maps continues to give you turn-by-turn directions. Toreturn to Maps, tap the banner across the top of the screen.View turn-by-turn or stop-by-stop directions. Find a walk, transit, or (on Wi-Fi-onlymodels) drive route, tap Go, then swipe each instruction left.See the route overview: Tap the route card at the bottom of the screen, then tapOverview. To zoom in, tap the route card, then tap Turn-by-turn (for drive and walkdirections) or Zoom In (for transit directions).View directions as a list: Tap the route card at the bottom of the screen, then tapDetails.Stop turn-by-turn directions. Tap End.Ask Siri. Say something like: “Stop navigating.”Make a quick detour. To add a stop along your route, tap the route card, then tap one ofthe suggested services, such as gas stations. Tap Go to add one to your route.Use Maps on your Mac to get directions. Open Maps on your Mac (OS X 10.9 or later),get directions for your trip, then choose File > Share > Send to [your device]. Your Macand iPad must both be set up with iCloud to use the same Apple ID.You can also use Handoff to send directions from iPad to Mac. See .Remove markers and routesRemove a marker. Tap the marker, tap Edit Location, then tap Remove Marker.Delete a route. Past routes are listed below the Search field. To remove one, swipe it tothe left.3D and FlyoverWith 3D and Flyover, you can see three-dimensional views of, and even fly over, many ofthe worldʼs major cities.View a 3D map. Drag two fingers up. (Zoom in for a closer look if the 3D map doesnʼtappear.) For best effect, use the satellite view. Tap , then tap Satellite.Adjust the angle. Drag two fingers up or down.Handoff](https://usermanual.wiki/Apple/A1893.Users-Manual-2/User-Guide-3778156-Page-15.png)

![?"*($.&?"4)*&@7#E&#&"(?3*&($&:5(/1&K,5( ?@#9:*1&K,5( ?!<3.&;($/#$0&($&4(&6#+<1&K:"$.(,*+(.:&+( (:/( D(:/(+/,A(2.0(5&,'.0,+():/3,/+(:/<,$%?(K:($:*2/:&(2.0(-$/"<<#*A(-500+D(>:80(':"/()#*A0/(80/2#$,&&'(,-(':"(+/,A(2.05&,'.0,+?!<3.&%(&%5*&)*]%&($&.$*?3(9:&+5#.%*$1&K,5( (:/( ?(N:"($,*(,&-:(5/0--(2.0($0*20/<"22:*(:/(0c"#8,&0*2(:*(,($:>5,2#<&0(.0,+-02(23:(2#>0-(P-%#5(2:(*0`2T(:/(2./00(2#>0-(P-%#52:(5/08#:"-T?!+#7*&%5*&?30*(&%(&;377&%5*&:+$**)&($&;3%&%(&%5*&:+$**)1&K,5( (:/( D(:/(+:"<&0S2,5(2.08#+0:?(\)(':"(+:*F2(-00(2.0(-$,&#*A($:*2/:&-D(':"/(8#+0:(,&/0,+'()#2-(2.0(-$/00*(50/)0$2&'?D97%3%#:<&/3%5&@3+%9$*&3)&@3+%9$*1&P:*(-"55:/20+(>:+0&-T(@.0*(3,2$.#*A(,(8#+0:D(5/0--2.0(B:>0(<"22:*(:/(2,5( ?(N:"/(8#+0:(-$/00*(-$,&0-(+:3*(2:(,($:/*0/(:)(':"/(+#-5&,'(-:':"($,*(-00(2.0(B:>0(-$/00*(,*+(:50*(:2.0/(,55-?(K:(/02"/*(2:(2.0(8#+0:D(2,5( (#*(2.0->,&&(8#+0:(3#*+:3?(C:/(>:/0(#*):/>,2#:*D(-00( ?'5((:*&#&03;;*$*)%&#903(&7#)49#4*1&P*:2(,8,#&,<&0():/(,&&(8#+0:-T(K,5( D(2.0*($.::-0(,&,*A",A0()/:>(2.0(9"+#:(&#-2?!5(/&:96%3%7*:&($&+7(:*0&+#.%3():1&P*:2(,8,#&,<&0():/(,&&(8#+0:-T(K,5( ?!**&:96%3%7*:&#)0&+7(:*0&+#.%3():&;($&%5*&0*#;&#)0&5#$0&(;&5*#$3)41&E:(2:(4022#*A-(dE0*0/,&(d(9$$0--#<#&#2'(d(4"<2#2&0-(k(O,52#:*#*AD(2.0*(2"/*(:*(O&:-0+(O,52#:*-(f(4]B?(K:$"-2:>#I0(2.0(,550,/,*$0(:)(-"<2#2&0-(,*+($&:-0+($,52#:*-D(2,5(42'&0?'5((:*&.7#E6#+<&U9#73%E1&E:(2:(4022#*A-(d(K6(d(#K"*0-(6#+0:-?#-(,8,#&,<&0(:*(#K"*0-?=#$2"/0(#*(=#$2"/0](https://usermanual.wiki/Apple/A1893.Users-Manual-2/User-Guide-3778156-Page-25.png)

![J1.0)12%E2#;P#46?"*($.&?"4)*&@7#E&#&?30*(1&K,5( ?@#9:*1&K,5( ?!<3.&;($/#$0&($&4(&6#+<1&K:"$.(,*+(.:&+( (:/( D(:/(+/,A(2.0(5&,'.0,+():/3,/+(:/<,$%?(K:($:*2/:&(2.0(-$/"<<#*A(-500+D(>:80(':"/()#*A0/(80/2#$,&&'(,-(':"(+/,A(2.05&,'.0,+?!<3.&%(&%5*&)*]%&($&.$*?3(9:&+5#.%*$1&K,5( (:/( ?(N:"($,*(,&-:(5/0--(2.0($0*20/<"22:*(:/(0c"#8,&0*2(:*(,($:>5,2#<&0(.0,+-02(23:(2#>0-(P-%#5(2:(*0`2T(:/(2./00(2#>0-(P-%#52:(5/08#:"-T?!+#7*&%5*&?30*(&%(&;377&%5*&:+$**)&($&;3%&%(&%5*&:+$**)1&K,5( (:/( D(:/(+:"<&0S2,5(2.08#+0:?(\)(':"(+:*F2(-00(2.0(-$,&#*A($:*2/:&-D(':"/(8#+0:(,&/0,+'()#2-(2.0(-$/00*(50/)0$2&'?D97%3%#:<&/3%5&@3+%9$*&3)&@3+%9$*1&P:*(-"55:/20+(>:+0&-T(@.0*(3,2$.#*A(,(8#+0:D(5/0--2.0(B:>0(<"22:*(:/(2,5( ?(N:"/(8#+0:(-$/00*(-$,&0-(+:3*(2:(,($:/*0/(:)(':"/(+#-5&,'(-:':"($,*(-00(2.0(B:>0(-$/00*(,*+(:50*(:2.0/(,55-?(K:(/02"/*(2:(2.0(8#+0:D(2,5( (#*(2.0->,&&(8#+0:(3#*+:3?(C:/(>:/0(#*):/>,2#:*D(-00( ?'5((:*&#&03;;*$*)%&#903(&7#)49#4*1&P*:2(,8,#&,<&0():/(,&&(8#+0:-T(K,5( D(2.0*($.::-0(,&,*A",A0()/:>(2.0(9"+#:(&#-2?!5(/&:96%3%7*:&($&+7(:*0&+#.%3():1&P*:2(,8,#&,<&0():/(,&&(8#+0:-T(K,5( ?#-(,8,#&,<&0(:*(#K"*0-?=#$2"/0(#*(=#$2"/0](https://usermanual.wiki/Apple/A1893.Users-Manual-2/User-Guide-3778156-Page-29.png)

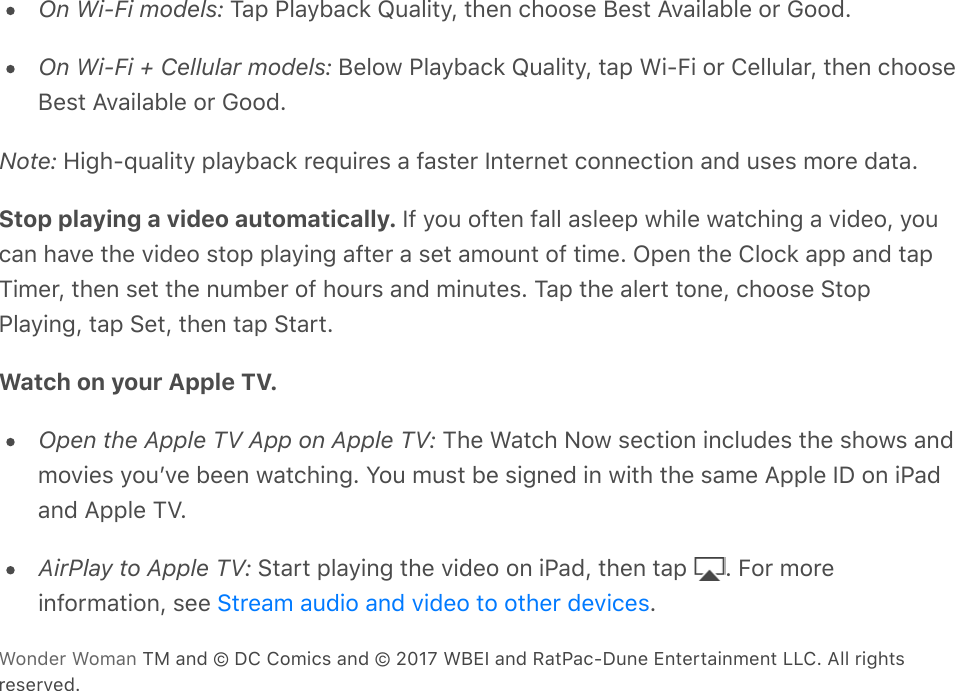
![NotesTake notesUse Notes to jot down important information, sketch ideas, and keep things organized.You can add attachments—like photos, scanned documents, web links, and maps—to anote, and you can lock a note to keep it private. You can also share a note so others canview and edit it.Store your notes securely in iCloud. Go to Settings > [your name] > iCloud, then turnon Notes. Your iCloud notes—and any changes you make to them—appear on all your iOSdevices and Mac computers where youʼre signed in to iCloud with the same Apple ID.Note: If youʼve been using an earlier version of Notes, you may need to upgrade youriCloud notes to use all the features—sketching, checklists, paragraph styles, passwordprotection, adding people, and more. See the website.Store certain notes only on your iPad. Go to Settings > Notes, then turn on “On MyiPad” Account. Notes in this account appear only on your iPad. Your notes in iCloud wonʼtbe affected.Create a new note. Tap . The first line of the note becomes the noteʼs title.Ask Siri. Say something like: “Create a new note.”Tip: You can quickly create a note or resume work on your last note by tapping theLock screen with Apple Pencil (on supported models). On other iPad models, you can dothis if you . To change the Lock screen behavior,go to Settings > Notes > Access Note from Lock Screen.Upgrade your notesadd the Notes control to Control Center](https://usermanual.wiki/Apple/A1893.Users-Manual-2/User-Guide-3778156-Page-31.png)


![Change the order of lists or reminders. Tap Edit, then touch and move the item.Search for a reminder. In the search field, enter the name of the reminder youʼre lookingfor.Keep your reminders up to date on other devices. Go to Settings > [your name] >iCloud, then turn on Reminders. Some other types of accounts, such as Exchange, alsosupport Reminders. You can change how reminders in the past are synced in Settings >Reminders.With OS X 10.10 or later, you can hand off reminders youʼre editing between your Macand iPad. See .Scheduled remindersScheduled reminders notify you when theyʼre due.Ask Siri. Say something like: “Remind me to take my medicine at 6 a.m. tomorrow.”Schedule a reminder. Swipe a reminder to the left, tap More, then turn on “Remind meon a day.” Tap Alarm to set the date and time. Tap Repeat to schedule the reminder forregularly occurring intervals.Donʼt bother me now. You can turn off Reminders notifications in Settings >Notifications. To silence notifications temporarily, turn on Do Not Disturb.Location-based remindersOn iPad Wi-Fi + Cellular models, Reminders can alert you when you arrive at or leave alocation.Handoff](https://usermanual.wiki/Apple/A1893.Users-Manual-2/User-Guide-3778156-Page-42.png)
![iTunes StoreFind music, movies, TV shows, and moreUse the iTunes Store to add music, movies, TV shows, and ringtones to iPad.Note: You need an Internet connection and an Apple ID to use the iTunes Store. TheiTunes Store isnʼt available in all regions.Browse by category or genre. Tap a category (Music, Movies, or TV Shows). To refinethe list, tap Genres.Ask Siri. Say something like: “Look for kidsʼ shows in iTunes.”If you know what youʼre looking for, tap Search. You can tap a search term thatʼstrending among other iTunes users, or enter info in the search field, then tap Search onthe keyboard.Ask Siri to tag it. When you hear music playing around you, ask Siri “What song isplaying?” Siri tells you the name and artist of the song and gives you an easy way topurchase it. The song is also tagged so you can preview or buy it later. To see your list oftagged songs, tap Music, tap , then tap Siri.Preview a song or video. Tap it.Add to your Wish List. To track a song you might want to buy later, add it to your WishList. View the song, tap , then tap Add to Wish List. To view your Wish List, tap , thentap Wish List.Purchase, rent, or redeemSign in with your Apple ID. If you arenʼt signed in with your Apple ID, the iTunes Storeasks you to do so before you make a purchase. To view or edit your Apple ID, go toSettings > [your name] > iTunes & App Store, then tap your Apple ID. If you donʼt have anApple ID, you can create one at the time of purchase.Buy and download an item. Tap the itemʼs price, then tap Buy. If the item is free, tapGet.If you see instead of a price, youʼve already purchased the item, and you candownload it again without a charge.](https://usermanual.wiki/Apple/A1893.Users-Manual-2/User-Guide-3778156-Page-50.png)
![Ask Siri. Say something like: “Purchase [song title] by [artist].”View and download your previous purchases. Tap Purchased. To automaticallydownload items that you purchased on other Apple devices, go to Settings >[your name] > iTunes & App Store, then turn on Automatic Downloads.Limit downloads to Wi-Fi connections (Wi-Fi + Cellular models). To preventdownloads from using cellular data, go to Settings > [your name] > iTunes & App Store,then turn off Use Cellular Data.See the progress of a download. Tap Downloads.Rent a movie. Tap the movieʼs rental price, then tap Rent. You can stream the movie toiPad or download the movie to play when youʼre offline. To start or continue the movie onanother iOS device (iOS 10.3 or later), Apple TV (tvOS 10.3 or later), or Mac (with iTunes12.6 or later), make sure youʼre signed in to the iTunes Store with the same Apple ID oneach device.When you rent a movie, you have 30 days to start watching it. After you start watchingthe movie, you can play it as many times as you want for 48 hours, after which the rentalperiod ends. When the rental period ends, the movie is deleted.Note: Movie rentals and streaming arenʼt available in all regions or for all movies. See theApple Support article Approve purchases with Family Sharing. With Family Sharing set up, the familyorganizer can review and approve purchases made by family members under a certainage. For more information, see .View and download family membersʼ purchases. With Family Sharing set up, you canview and download songs, TV shows, and movies purchased by your family members.Tap Purchased, tap My Purchases, then choose a family member.Hide individual purchases. Using iTunes on a computer, family members can hide any oftheir purchases so other family members canʼt view or download them.See your purchase history. To get a list of apps, songs, movies, TV shows, books, orother items you bought with your Apple ID, go to Settings > [your name] > iTunes &App Store. Tap your Apple ID, then tap View Apple ID; you might be asked to authenticateyour Apple ID. Scroll down, then tap Purchase History.Send a gift. To give an item, view it, tap , then tap Gift. To give an iTunes giftcertificate, tap a category (Music, Movies, or TV Shows), scroll to the bottom, then tapSend Gift.Redeem a gift card or code. Tap Music, scroll to the bottom, then tap Redeem.Ask Siri. Say something like: “Redeem an iTunes Store gift card.”What can I buy from the iTunes Store in my country or region?Family Sharing](https://usermanual.wiki/Apple/A1893.Users-Manual-2/User-Guide-3778156-Page-51.png)
![Purchase, redeem, and downloadSign in with your Apple ID. If you arenʼt signed in with your Apple ID, the App Store asksyou to do so before you make a purchase. To view or edit your Apple ID, go to Settings >[your name] > iTunes & App Store, then tap your Apple ID. If you donʼt have an Apple ID,you can create one at the time of purchase.Buy and download an app. Tap the appʼs price, then follow the instructions. If the app isfree, tap Get.If you see instead of a price, youʼve already purchased the app and you can downloadit again without a charge. While the app is downloading or updating, its icon appears onthe Home screen with a progress indicator.Your app updates automatically over Wi-Fi, so you can keep up with the latestimprovements and features. (To turn off automatic updates, go to Settings >[your name] > iTunes & App Store, then turn off Updates.)Ask Siri. Say something like: “Purchase [app name].”View and download your previous purchases. Tap Updates, tap your profile picture inthe upper right, then tap Purchased. To automatically download apps that you purchaseon other Apple devices, go to Settings > [your name] > iTunes & App Store, then turn onApps (below Automatic Downloads).Limit downloads to Wi-Fi connections (Wi-Fi + Cellular models). To preventApp Store downloads from using cellular data, go to Settings > [your name] > iTunes &App Store, then turn off Use Cellular Data.Approve purchases with Family Sharing. With Family Sharing set up, the familyorganizer can review and approve purchases made by other family members under acertain age. For more information, see .View and download family membersʼ app purchases. With Family Sharing set up, youcan view and download apps purchased by your family members who choose to sharetheir purchases. Tap Updates, tap your profile picture in the upper right, then choose afamily member to see their purchases. (Purchases made in an app shared with FamilySharing may not be accessible after the family member leaves the family group.)Restrict in-app purchases. Many apps provide extra content or enhancements for a fee.To prevent in-app purchases, go to Settings > General > Restrictions, make sureRestrictions is enabled, then turn off In-App Purchases. You can also , such as limiting app downloads by age ratings.Give an app. View the app, tap , then tap Gift (not available for all apps).Family Sharingset otherrestrictions](https://usermanual.wiki/Apple/A1893.Users-Manual-2/User-Guide-3778156-Page-53.png)

![Hide books you havenʼt downloaded. If you see on a cover or next to a title, you candownload the book again without charge. To remove from view the books that arenʼtdownloaded, tap the name of the current collection (at the top of the screen), then turnon Hide iCloud Books.Cite a book in another app. the book from your library to add its citationto a document in another app. In most apps, the citation for a book from the iBooks Storeincludes a link to the book.Note: When you drag and drop a PDF document from your library, the entire document—not a citation—is copied into the app.Read PDF documentsAdd a PDF email attachment to iBooks. Open the email message, touch and hold thePDF attachment in the message, then tap Copy to iBooks. Or, tap the PDF attachment toopen it, tap any page, tap , then tap Copy to iBooks.Print a PDF document. With the document open, tap , then choose Print (you need anAirPrint-compatible printer). For more about AirPrint, see .Mark up a PDF document. Tap , then use the drawing and annotation tools. (Tap nearthe center of a page if you donʼt see .) For more information, see .Email a PDF document. the document from your library into a message.Or, with the document open, tap , then choose Mail.Copy a PDF document into another app. the document from your libraryto add it to another app, such as Notes or Reminders.Access your entire library in iCloudYou can store your PDF files and other books in iCloud and access them on your otherdevices.Turn on iCloud for iBooks. Go to Settings > [your name] > iCloud > iCloud Drive >iBooks.After you turn on iCloud for iBooks, whenever you add a PDF file (or a book that doesnʼtcome from the iBooks Store) to iBooks, the document is uploaded to iCloud. Thedocument is also added to your other devices where youʼve turned on iCloud for iBooksand youʼre signed in to iCloud with the same Apple ID.To change whether to use iCloud for iBooks, go to Settings > iCloud > iCloud Drive, thenturn iBooks on or off.Drag and dropAirPrintUse MarkupDrag and dropDrag and drop](https://usermanual.wiki/Apple/A1893.Users-Manual-2/User-Guide-3778156-Page-59.png)
![H:<&!3$31&4,'(-:>02.#*A(&#%0M(a=&,'(5:+$,-2-?bI*:9"*&.7#E3)4&#)&*.3:(0*1&K,5(^#-20*(*:3?(_5#-:+0-(':"(.,80*F2()#*#-.0+(,/0(*0,/(2.02:5(:)(2.0(&#-2?a**.&E(9$&.(0+#:%&:96:+$3.%3():&9.&%(&0#%*&()&#77&E(9$&0*?3+*:1&E:(2:(4022#*A-(d=:+$,-2-D(2.0*(2"/*(:*(4'*$(=:+$,-2-?J1.0)12%E2#;P#46!5(/&%5*&.7#E6#+<&+()%$(7:1&@.#&0(5&,'#*A(,*(05#-:+0D(2,5(2.0(5&,'0/(*0,/(2.0(<:22:>:)(2.0(-$/00*?(43#50("5(2:(-00(2.0(-&005(2#>0/(,*+(-.,/#*A(:52#:*-?(43#50(+:3*(2:(.#+02.0(5&,'<,$%($:*2/:&-?@7#E1&K,5( ?@#9:*1&K,5( ?!<3.&Wf&:*+()0:&;($/#$0&($&6#+<&/3%53)&%5*&*.3:(0*1&K,5(,($#/$"&,/(,//:3?!<3.&;($/#$0&($&6#+<&/3%5&4$*#%*$&#++9$#+E1&]/,A(2.0(5&,'.0,+():/3,/+(:/(<,$%?(K:$:*2/:&(2.0(-$/"<<#*A(-500+D(>:80(':"/()#*A0/(80/2#$,&&'(,-(':"(+/,A(2.0(5&,'.0,+?H:<&!3$31&4,'(-:>02.#*A(&#%0Ma4%#5(<,$%(GV(-0$:*+-ba4%#5(2:(2.0(*0`2(05#-:+0b](https://usermanual.wiki/Apple/A1893.Users-Manual-2/User-Guide-3778156-Page-62.png)

![Add the shipping address and contact information for purchases.If your iPad is lost or stolen. If you enabled , you can use it to help locateand secure your iPad. You can also suspend or remove the ability to make purchasesusing your cards in Apple Pay:On a Mac or PC: Sign in to using your Apple ID, click Settings, click thelost iPad in the My Devices section, then click Remove in the Apple Pay section.On another iOS device: Go to Settings > [your name], tap the lost iPad, then tapRemove All Cards (below Apple Pay).You can also call the issuers of your cards.Note: If you sign out of iCloud in Settings > [your name], all your credit and debit cardsfor Apple Pay are removed from iPad. You can add the cards again the next time you signin to iCloud.Find My iPadiCloud.com](https://usermanual.wiki/Apple/A1893.Users-Manual-2/User-Guide-3778156-Page-71.png)
![Turn on iCloud Drive. Go to Settings > [your name] > iCloud, then turn on iCloud Drive).See .Invite others to view or edit a file. Tap Files > Browse > iCloud Drive. Touch and hold afile in iCloud Drive, tap Share, tap , then do one of the following:Send a link to the people you want to view and edit the file: Tap a method for sendinga link to the file, enter any other requested information, then send or post theinvitation. People need an Apple ID to open the file.Choose specific permission and access options: Tap Share Options, then selectpermission settings:Who can open, view, and print the file, but not make changes—only people youinvite or anyone with the link.Who can open, view, print, and make changes to the file—only people you invite oranyone with the link.When you allow people to edit a file, itʼs updated with everyoneʼs changes automatically.Use iCloud Drive](https://usermanual.wiki/Apple/A1893.Users-Manual-2/User-Guide-3778156-Page-73.png)
![Family SharingWith Family Sharing, up to six family members can share iTunes Store, App Store, andiBooks Store purchases; an Apple Music family membership; an iCloud storage plan; afamily calendar; family photos; and more, all without sharing accounts. For moreinformation, see the Apple Support article .To use Family Sharing, one adult family member (the organizer) chooses features for thefamily to share and invites up to five additional family members to participate. Whenfamily members join, Family Sharing is set up on their devices automatically.Family Sharing requires you to sign in to iCloud with your Apple ID, and to confirm theApple ID you use for the iTunes Store, App Store, and iBooks Store (you usually use thesame Apple ID for everything). Family Sharing is available on iOS devices with iOS 8 orlater, Mac computers with OS X 10.10 or later, and PCs with iCloud for Windows 5 or later.You can be part of only one family group at a time.Set up Family Sharing. Go to Settings > [your name] > Set Up Family Sharing, thenfollow the onscreen instructions. As the family organizer, you choose the features youwant to share and invite family members to join. Depending on the services you choose,you may be asked to set up an Apple Music family membership or an iCloud Storagesubscription. If you choose to share iTunes Store, App Store, and iBooks Store purchaseswith your family members, you agree to pay for any purchases they initiate while part ofthe family group.Create an Apple ID for a child. Go to Settings > [your name] > Family Sharing, then tapCreate a Child Account. For more information, see the Apple Support article .Family SharingFamilySharing and Apple ID for your child](https://usermanual.wiki/Apple/A1893.Users-Manual-2/User-Guide-3778156-Page-75.png)
![Accept an invitation to Family Sharing. Tap Accept in your invitation. Or, if you are nearthe organizer during the setup process, you can enter the Apple ID and password you usefor iCloud on the organizerʼs device.Share purchases. When your family uses iTunes Store, App Store, and iBooks Storepurchase sharing, all items are billed directly to the family organizerʼs Apple ID. Oncepurchased, an item is added to the initiating family memberʼs account and is shared withthe rest of the family.Access shared purchases from the iTunes Store. Open the iTunes Store, tapPurchased, then tap My Purchases at the top left. Choose a family member, tap acategory (for example, Music or Movies) at the top of the screen, then tap a purchaseditem.Access shared purchases from the App Store. Open the App Store, then tap the photoor at the top right. Tap Purchased, choose a family member, then tap a purchaseditem.Access shared purchases from the iBooks Store. Open iBooks, tap Reading Now, thentap the photo or at the top right. Choose a family member, tap a category (forexample, Books or Audiobooks), tap a genre, then tap a purchased item.Use a shared Apple Music family membership. If your family has an Apple Music familymembership, you can simply open Apple Music and start listening. Each family membergets their own music library and personal recommendations. Make sure youʼre signed inwith the Apple ID you entered in Family Sharing settings.Use a shared iCloud storage plan. If your family is sharing an iCloud storage plan(200 GB or 2 TB), you can privately use as much storage as you need. You can alsopurchase or use your own storage plan if you need more space.Turn on Ask to Buy. The family organizer can require young family members to requestapproval for purchases or free downloads. Go to Settings > [your name] > Family Sharing,then tap the personʼs name.Note: Age restrictions for Ask to Buy vary by region. In the United States, the familyorganizer can enable Ask to Buy for any family member under age 18; for children underage 13, itʼs enabled by default.Hide your iTunes Store, App Store, and iBooks Store purchases. To hide all yourpurchases from family members, go to Settings > [your name] > Family Sharing, thenturn off Share My Purchases. On your computer, you can also hide specific purchases sothey arenʼt available to other family members. For more information, see the AppleSupport article .Hide and unhide apps for your iPhone, iPad, iPod touch, or Mac](https://usermanual.wiki/Apple/A1893.Users-Manual-2/User-Guide-3778156-Page-76.png)
![Share photos or videos with family members. When you set up Family Sharing, ashared album called Family is automatically created in the Photos app on all familymembersʼ devices. To share a photo or video with family members, open the Photos app,then view a photo or video or select multiple photos or videos. Tap , tap iCloud PhotoSharing, add comments, then share to your shared family album. Members canunsubscribe from the family album, and the family organizer can delete it. See .Add an event to the family calendar. When you set up Family Sharing, a sharedcalendar called Family is automatically created in the Calendar app on all familymembersʼ devices. To add a family event, open the Calendar app, create an event, thenadd the event to the family calendar. Members can unsubscribe from the family calendar,and the family organizer can delete it. See .Set up a family reminder. When you set up Family Sharing, a shared list is automaticallycreated in the Reminders app on all family membersʼ devices. To add a reminder to thefamily list, open the Reminders app, tap the family list, then add a reminder to the list.Members can unsubscribe from the family reminder list, and the family organizer candelete it. See .Share your location with family members. Go to Settings > [your name] > iCloud >Share My Location. To find a family memberʼs location, use the Find My Friends app. Youcan also send or share your location with the Messages app (iOS 8 or later required). Formore information about using Messages to share your location, see .Keep track of your familyʼs devices. If family members enabled Share My Location iniCloud, you can help them locate missing devices. Open Find iPhone on your device or atiCloud.com. For more information, see .Leave Family Sharing. Go to Settings > [your name] > Family Sharing > [your name],then tap Leave Family Sharing. If youʼre the organizer, tap Stop Family Sharing. For moreinformation, see the Apple Support article .iCloudPhoto SharingShare iCloud calendarsReminder listsSend and receivemessagesFind your iPadLeave Family Sharing](https://usermanual.wiki/Apple/A1893.Users-Manual-2/User-Guide-3778156-Page-77.png)
![Two-factor authenticationTwo-factor authentication is an extra layer of security for your Apple ID designed toensure that youʼre the only person who can access your account, even if someone knowsyour password. Itʼs built into iOS 9 and later, and OS X 10.11 and later.Turn on two-factor authentication. Turn it on when asked while setting up iPad. Or, goto Settings > [your name] > Password & Security, then tap Turn On Two-FactorAuthentication.When asked, verify your identity with a six-digit verification code (as described below).You wonʼt be asked for a verification code again on your iPad unless you sign outcompletely, erase your iPad, sign in to your in Safari on your iPad,or need to change your Apple ID password for security reasons.Note: If you use two-step verification and upgrade to iOS 11 or later, your account mightbe migrated to use two-factor authentication. Your account will have an optional,additional recovery factor: a recovery key that can be generated on iPad. For moreinformation, see the Apple Support article .Verify your identity with a six-digit verification code. When youʼre asked on your iPadfor the code, look for a notification on any of your trusted devices or at a trusted phonenumber. On a trusted device, tap or click Allow to make a code appear on that device. Tosend the code to a trusted phone number, tap “Didnʼt get a verification code?”, thenchoose the phone number. Enter the code on your iPad.If you canʼt receive a verification code automatically on your trusted devices (describedbelow), and a trusted phone number (described below) is unavailable, you can get averification code from Settings on a trusted device, even if your device is offline. On atrusted iOS device, go to Settings > [your name] > Password & Security, then tap GetVerification Code. On a trusted Mac, choose Apple Menu > System Preferences >iCloud > Account Details > Security, then click Get Verification Code.Add another iOS device (iOS 9 or later) or a Mac (OS X El Capitan or later) as atrusted device. After you turn on two-factor authentication, use the same Apple ID tosign in to iCloud on another device. If you previously signed in, sign in again. (On an iOSdevice, go to Settings > [your name]. On a Mac, choose Apple Menu > SystemPreferences > iCloud.) Verify your identity with a six-digit verification code (as describedabove). You can receive verification codes on all your trusted devices.You wonʼt be asked for a verification code again on a trusted device unless you sign outcompletely, erase your device, sign in to your Apple ID account page in Safari on thatdevice, or need to change your Apple ID password for security reasons.Apple ID account pageSwitch from two-step verification to two-factorauthentication](https://usermanual.wiki/Apple/A1893.Users-Manual-2/User-Guide-3778156-Page-88.png)
![Add a trusted phone number. Go to Settings > [your name] > Password & Security, tapEdit (above the list of trusted phone numbers), then tap Add a Trusted Phone Number.You must verify at least one trusted phone number to enroll in two-factor authentication.You should also consider verifying other phone numbers you can access, such as a homephone, or a number used by a family member or close friend. Trusted phone numbersdonʼt automatically receive verification codes. If you canʼt access any trusted deviceswhen setting up a new device for two-factor authentication, tap “Didnʼt get a verificationcode?” on the new device, then choose one of your trusted phone numbers to receivethe verification code.Remove a trusted phone number. Go to Settings > [your name] > Password & Security,tap Edit (above the list of trusted phone numbers), then tap next to the phone number.Get a verification code on a trusted iPad, even when youʼre offline. If you need toenter a verification code on another device when setting it up for two-factorauthentication, but you canʼt receive the code on a trusted iPad automatically, you canget a verification code from Settings on the trusted iPad. Go to Settings > [your name] >Password & Security, then tap Get Verification Code.View or remove trusted devices. Go to Settings > [your name]. A list of the devicesassociated with your Apple ID appears near the bottom of the screen. To see if a listeddevice is trusted, tap it, then look for “This device is trusted and can receive Apple IDverification codes.” To remove a device, tap it, then tap Remove From Account.Turn off two-factor authentication. Sign in to your , tap Security,tap Edit, then tap Turn Off Two-Factor Authentication.For more help with two-factor authentication, see the Apple Support article .Touch ID(Supported models) When you set up Touch ID, you can unlock iPad by placing a fingeron the Home button. You can use Touch ID to authorize purchases from the iTunes Store,App Store, and iBooks Store, and to authorize payments with Apple Pay. You can alsosign in to many third-party apps using Touch ID.To use Touch ID, you must on your iPad. You must enter your passcodefor additional security validation when you do the following:Turn on or restart your deviceUpdate your softwareErase your deviceApple ID account pageTwo-factorauthentication for Apple IDset a passcode](https://usermanual.wiki/Apple/A1893.Users-Manual-2/User-Guide-3778156-Page-89.png)
![iCloud Keychain can also keep the accounts you use in Mail, Contacts, Calendar, andMessages up to date across all of your iOS devices and Mac computers.To learn more about iCloud Keychain, see the Apple Support article .Set up iCloud Keychain. Go to Settings > [your name] > iCloud > Keychain. Turn oniCloud Keychain, then follow the onscreen instructions.When you set up iCloud Keychain, you create an iCloud Security Code. You can use youriCloud Security Code to authorize additional devices to use your iCloud Keychain. Itʼs alsoused to verify your identity so that you can perform other iCloud Keychain actions, suchas recovering your iCloud Keychain if you lose all your devices.Set up iCloud Keychain on additional devices. Set up iCloud Keychain for each devicethat you want to add. When you turn on iCloud Keychain on an additional device, yourother devices that use iCloud Keychain receive a notification requesting approval for theadditional device. After you approve the additional device, your iCloud Keychainautomatically begins updating on that device.To approve iCloud Keychain on an additional device when you donʼt have access to yourother devices, follow the onscreen instructions to use your iCloud Security Code.Forgot your iCloud Security Code? If you enter the wrong iCloud Security Code toomany times when using iCloud Keychain, your iCloud Keychain is disabled on that device,and your keychain in iCloud is deleted. To reset or create a new iCloud Security Code, seethe Apple Support article .Find your iPadIf you misplace your iPad, the Find My iPhone app can help you locate it and protect yourdata. Use the Find My iPhone app on another iPad, iPhone, or iPod touch—or use the on any Mac or PC—to locate your iPad on a map, lock itremotely, play a sound, display a message, or erase all its data. Find My iPhone includes afeature called Activation Lock that prevents anyone else from activating and using youriPad, even if itʼs completely erased.You can also use Find My iPhone to locate your AirPods, your Apple Watch, and yourother iOS devices.Note: For more information about Find My iPhone, refer to the Help in the app.Allow Find My iPhone to locate your iPad. Go to Settings > [your name] > iCloud, thenturn on Find My iPad. Also turn on Send Last Location to have iPad send its last locationprior to the battery running out. (See if you need help setting up iCloud.)Frequently askedquestionsIf you enter your iCloud Security Code incorrectly too manytimesFind My iPhone web appiCloud](https://usermanual.wiki/Apple/A1893.Users-Manual-2/User-Guide-3778156-Page-91.png)