Apple E2422A Smart Cellular Phone User Manual iPhone 4 CDMA Unser Guide
Apple Inc. Smart Cellular Phone iPhone 4 CDMA Unser Guide
Apple >
Contents
- 1. Draft Regulatory Section of User Guide
- 2. Draft User Guide
- 3. Draft Regulatory section of user guide
- 4. Revised HAC Statement per section 20 19 f1 requirement
- 5. Revised with correct date HAC Disclosure Statement per section 20.19 f1
- 6. Revised User Guide
- 7. Final User Guide
- 8. Final version of User Manual
- 9. Final version of Product Info Guide
Final version of User Manual

iPhone
User Guide
For iOS 4.2 Software

Contents
9Chapter 1: iPhone at a Glance
9iPhone Overview
11 Buttons
14 iPhone Apps
17 Status Icons
19 Chapter 2: Getting Started
19 Viewing the User Guide on iPhone
19 What You Need
20 Installing the SIM Card
21 Activating iPhone
21 Setting Up iPhone
22 Disconnecting iPhone from Your Computer
22 Connecting to the Internet
25 Adding Mail, Contacts, and Calendar Accounts
29 Chapter 3: Basics
29 Using Apps
33 Customizing the Home Screen
37 Typing
45 Printing
47 Searching
48 Voice Control
50 Apple Earphones with Remote and Mic
51 Bluetooth Devices
52 Battery
54 Security Features
55 Cleaning iPhone
55 Restarting or Resetting iPhone
56 Chapter 4: Syncing and File Sharing
56 About Syncing
56 Syncing Accounts
57 Syncing with iTunes
2

58 iPhone Settings Panes in iTunes
61 Automatic iTunes Syncing
62 Manually Managing Content
62 Transferring Purchased Content to Another Computer
63 File Sharing
64 Chapter 5: Phone
64 Phone Calls
72 Visual Voicemail
74 Contacts
74 Favorites
74 Call Forwarding, Call Waiting, and Caller ID
76 Ringtones and the Ring/Silent Switch
77 International Calls
79 Chapter 6: Mail
79 Setting Up Email Accounts
80 Checking and Reading Email
82 Using Links and Detected Data
83 Viewing Attachments
85 Printing Messages and Attachments
85 Sending Email
87 Organizing Email
88 Searching Email
89 Chapter 7: Safari
89 Viewing Webpages
92 Searching
92 Printing Webpages, PDFs, and Other Documents
93 Bookmarks
94 Web Clips
95 Chapter 8: iPod
95 Getting Music, Videos, and More
96 Music and Other Audio
105 Videos
109 Setting a Sleep Timer
109 Changing the Browse Buttons
110 Chapter 9: Messages
110 Sending and Receiving Messages
112 Searching Messages
112 Sharing Photos and Videos
113 Sending Voice Memos
3
Contents

113 Editing Conversations
114 Using Contact Information and Links
114 Managing Previews and Alerts
115 Chapter 10: Calendar
115 About Calendar
115 Syncing Calendars
116 Viewing Your Calendars
117 Searching Calendars
117 Adding and Updating Events on iPhone
118 Responding to Meeting Invitations
120 Subscribing to Calendars
120 Importing Calendar Files from Mail
120 Alerts
121 Chapter 11: Photos
121 About Photos
121 Syncing Photos and Videos with Your Computer
122 Viewing Photos and Videos
124 Deleting Photos and Videos
124 Slideshows
124 Viewing Photos, Videos, and Slideshows on a TV
125 Sharing Photos and Videos
127 Printing Photos
127 Assigning a Photo to a Contact
128 Wallpaper
129 Chapter 12: Camera
129 About Camera
130 Taking Photos and Recording Videos
131 Viewing and Sharing Photos and Videos
132 Trimming Videos
132 Uploading Photos and Videos to Your Computer
133 Chapter 13: YouTube
133 Finding and Viewing Videos
134 Controlling Video Playback
135 Managing Videos
136 Getting More Information
137 Using YouTube Account Features
138 Changing the Browse Buttons
138 Sending Videos to YouTube
4Contents

139 Chapter 14: Stocks
139 Viewing Stock Quotes
140 Getting More Information
141 Chapter 15: Maps
142 Finding and Viewing Locations
146 Getting Directions
148 5JQYKPI6TCÓE%QPFKVKQPs
148 Finding and Contacting Businesses
149 Sharing Location Information
149 Bookmarking Locations
150 Chapter 16: Weather
150 Viewing Weather Summaries
151 Getting More Weather Information
152 Chapter 17: Notes
152 About Notes
152 Syncing Notes
153 Writing and Reading Notes
154 Searching Notes
154 Emailing Notes
155 Chapter 18: Clock
155 World Clocks
156 Alarms
157 Stopwatch
157 Timer
158 Chapter 19: Calculator
158 Using the Calculator
158 Standard Memory Functions
159 5EKGPVK°E%CNEWNCVQT-G[s
161 Chapter 20: Compass
161 Getting Compass Readings
162 Compass and Maps
164 Chapter 21: Voice Memos
164 Recording Voice Memos
165 Listening to Voice Memos
166 Managing Voice Memos
167 Trimming Voice Memos
5
Contents

167 Sharing Voice Memos
168 Syncing Voice Memos
169 Chapter 22: iTunes Store
169 About the iTunes Store
170 Finding Music, Videos, and More
171 Following Artists and Friends
173 Purchasing Ringtones
173 Purchasing Music or Audiobooks
174 Purchasing or Renting Videos
175 Streaming or Downloading Podcasts
176 Checking Download Status
176 Syncing Purchased Content
176 Changing the Browse Buttons
177 Viewing Account Information
177 Verifying Downloads
178 Chapter 23: App Store
178 About the App Store
179 Browsing and Searching
180 Info Screen
181 Downloading Apps
182 Deleting Apps
182 Writing Reviews
183 Updating Apps
183 Syncing Purchased Apps
184 Chapter 24: Game Center
184 About Game Center
184 Setting Up Game Center
186 Games
190 Friends
192 Your Status and Account Information
193 Chapter 25: Settings
193 Airplane Mode
195 Wi-Fi
196 VPN
196 Personal Hotspot
196 0QVK°ECVKQPs
196 Carrier
197 Sounds and the Ring/Silent Switch
197 Brightness
6Contents

198 Wallpaper
198 General
208 Mail, Contacts, Calendars
212 Phone
214 Safari
216 Messages
216 iPod
217 Photos
218 Notes
218 Store
218 Nike + iPod
219 Chapter 26: Contacts
219 About Contacts
219 Adding Contacts
220 Searching Contacts
221 Managing Contacts on iPhone
222 Using Contact Information
223 7PK°GF%QPVCEVs
225 Chapter 27: Nike + iPod
225 Activating Nike + iPod
226 Linking a Sensor
226 Working Out with Nike + iPod
227 Sending Workouts to Nikeplus.com
227 Calibrating Nike + iPod
228 Nike + iPod Settings
229 Chapter 28: iBooks
229 About iBooks
230 Syncing Books and PDFs
230 Using the iBookstore
231 Reading Books
232 Reading PDFs
232 Changing a Book’s Appearance
233 Searching Books and PDFs
233 .QQMKPIWRVJG&G°PKVKQPQHC9QTd
233 Having a Book Read to You
233 Printing or Emailing a PDF
234 Organizing the Bookshelf
234 Bookmark and Note Syncing
7
Contents

235 Chapter 29: Accessibility
235 Universal Access Features
236 VoiceOver
249 Zoom
249 Large Text
250 White on Black
250 Mono Audio
251 Speak Auto-text
251 Triple-Click Home
251 Closed Captioning and Other Helpful Features
253 Hearing Aid Compatibility
254 Appendix A: Support and Other Information
254 Apple iPhone Support Site
254 Restarting and Resetting iPhone
255 Backing Up iPhone
256 Updating and Restoring iPhone Software
258 Safety, Software, and Service Information
259 Using iPhone in an Enterprise Environment
259 Using iPhone with Other Carriers
259 Disposal and Recycling Information
261 Apple and the Environment
261 iPhone Operating Temperature
262 Index
8Contents
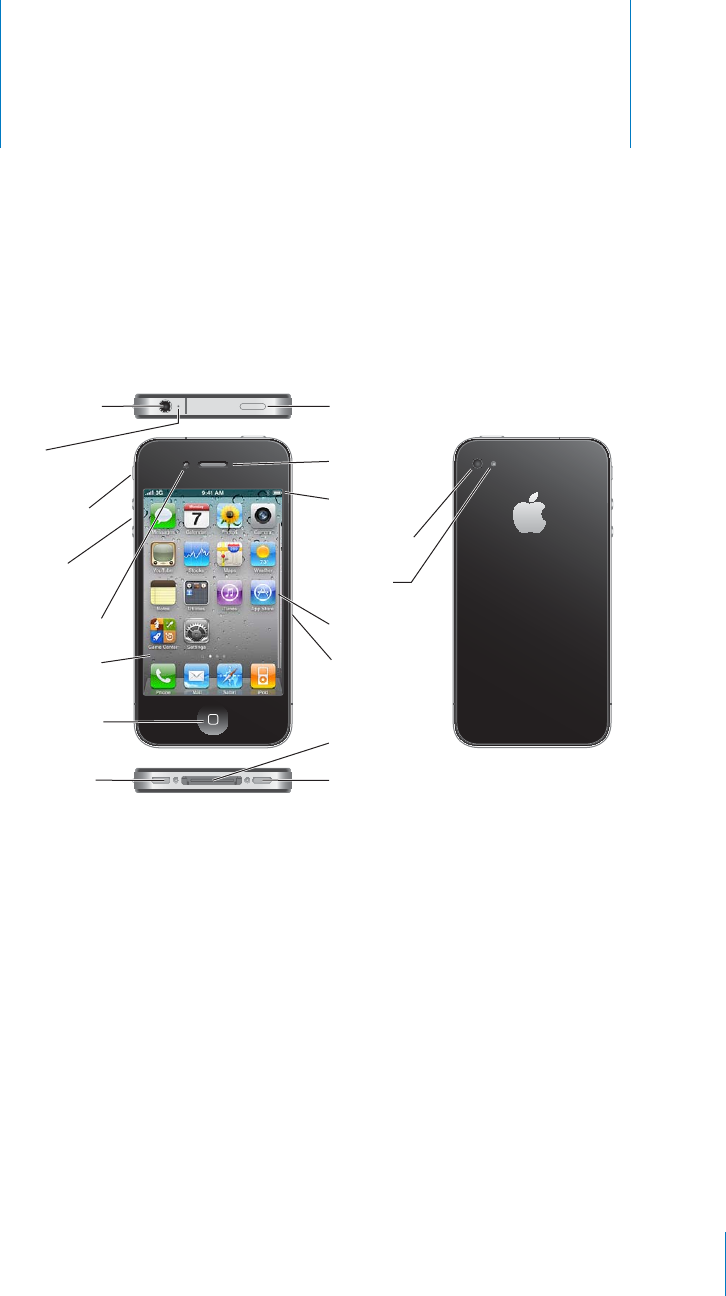
iPhone at a Glance 1
iPhone Overview
iPhone 4
/LHKZL[°QHJR
9LJLP]LY
9PUN:PSLU[
Z^P[JO
;VW
TPJYVWOVUL
=VS\TL
I\[[VUZ
(WWSL9L[PUH
KPZWSH`
:WLHRLY
/VTL°I\[[VU
-YVU[JHTLYH
4HPUJHTLYH
3,+MSHZO
:04°JHYK°[YH`
.:4TVKLS
+VJR
JVUULJ[VY
6U6MM
:SLLW>HRL
)V[[VT
TPJYVWOVUL
(WWPJVUZ
:[H[\Z°IHY
L3KRQH
9
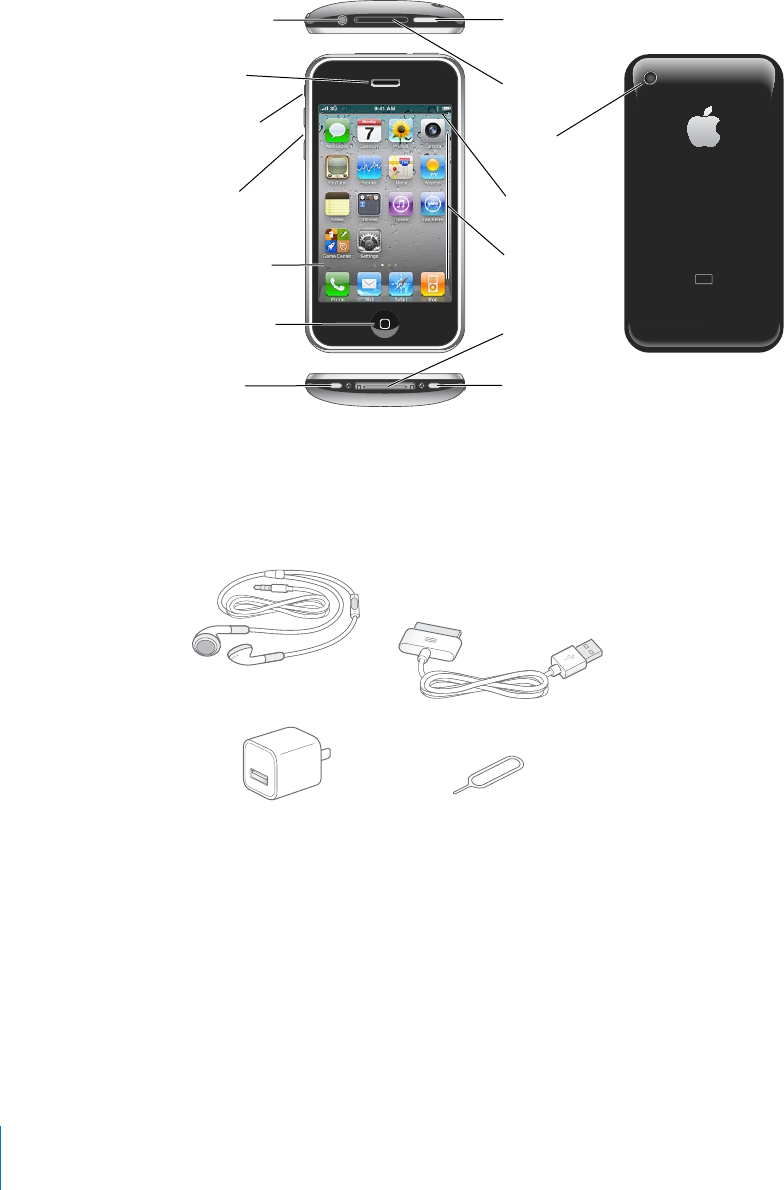
iPhone 3GS
L3KRQH
/LHKZL[QHJR
9LJLP]LY
9PUN:PSLU[
Z^P[JO *HTLYH
:04JHYK[YH`
=VS\TL
I\[[VUZ
;V\JOZJYLLU
:WLHRLY
+VJR
JVUULJ[VY
/VTLI\[[VU
6U6MM
:SLLW>HRL
4PJYVWOVUL
(WWPJVUZ
:[H[\ZIHY
;QWT*QOGUETGGPOC[NQQMFKÒGTGPVFGRGPFKPIQPVJGOQFGNQHK2JQPG[QWJCXG
and whether you’ve rearranged its icons.
Accessories
The following accessories are included with iPhone:
+VJR*VUULJ[VY[V<:)*HISL
(WWSL,HYWOVULZ
^P[O9LTV[LHUK4PJ
:04LQLJ[[VVS
<:)WV^LYHKHW[LY
Note: The SIM eject tool is not included in all countries or regions.
10 Chapter 1 iPhone at a Glance

Item What you can do with it
Apple Earphones with Remote and Mic Listen to music, videos, and phone calls. Use
the built-in microphone to talk. Press the center
button to answer or end a call. When listening to
iPod, press the button to play or pause a song,
or press twice quickly to skip to the next track.
Use the + and – buttons to adjust the volume
(iPhone 3GS or later). Press and hold the center
button to use Voice Control (iPhone 3GS or later).
Dock Connector to USB Cable Use the cable to connect iPhone to your
computer to sync and charge. The cable can be
used with the optional dock or plugged directly
into iPhone.
USB power adapter Connect the power adapter to iPhone using
the included cable, then plug it into a standard
power outlet to charge iPhone.
SIM eject tool (not included in all countries or
regions)
Eject the SIM card tray.
Buttons
#HGYUKORNGDWVVQPUOCMGKVGCU[VQVWTPK2JQPGQPQTQÒCFLWUVVJGXQNWOGCPF
switch between ring and silent modes.
1P1Ò5NGGR9CMG$WVVQP
9JGP[QW¨TGPQVCEVKXGN[WUKPIK2JQPG[QWECPNQEMKVVQVWTPQÒVJGFKURNC[CPFUCXG
the battery.
When iPhone is locked, nothing happens if you touch the screen. iPhone can still
receive calls, text messages, and other updates. You can also:
listen to music
adjust the volume using the buttons on the side of iPhone (or on the iPhone
earphones) while you’re on a phone call or listening to music
use the center button on iPhone earphones to answer or end a call, or to control
audio playback (see “Controlling Audio Playback” on page 97)
By default, iPhone locks if you don’t touch the screen for a minute.
6U6MM:SLLW
>HRLI\[[VU
11
Chapter 1 iPhone at a Glance
Lock iPhone 2TGUUVJG1P1Ò5NGGR9CMGDWVVQP
Unlock iPhone Press the Home DWVVQPQTVJG1P1Ò
Sleep/Wake button, then drag the slider.
6WTPK2JQPGEQORNGVGN[QÒ 2TGUUCPFJQNFVJG1P1Ò5NGGR9CMGDWVVQPHQT
a few seconds until the red slider appears, then
FTCIVJGUNKFGT9JGPK2JQPGKUQÒKPEQOKPIECNNU
go straight to voicemail.
Turn iPhone on 2TGUUCPFJQNFVJG1P1Ò5NGGR9CMGDWVVQP
until the Apple logo appears.
For information about changing how long before iPhone locks, see “Auto-Lock” on
page 201. For information about setting iPhone to require a passcode to unlock it, see
“Passcode Lock” on page 202.
Home Button
Press the Home button at any time to go to the Home screen, which contains your
iPhone apps. Tap any app icon to get started. To see apps you’ve recently used, double-
click the Home button (iPhone 3GS or later). See “Opening and Switching Apps” on
page 29.
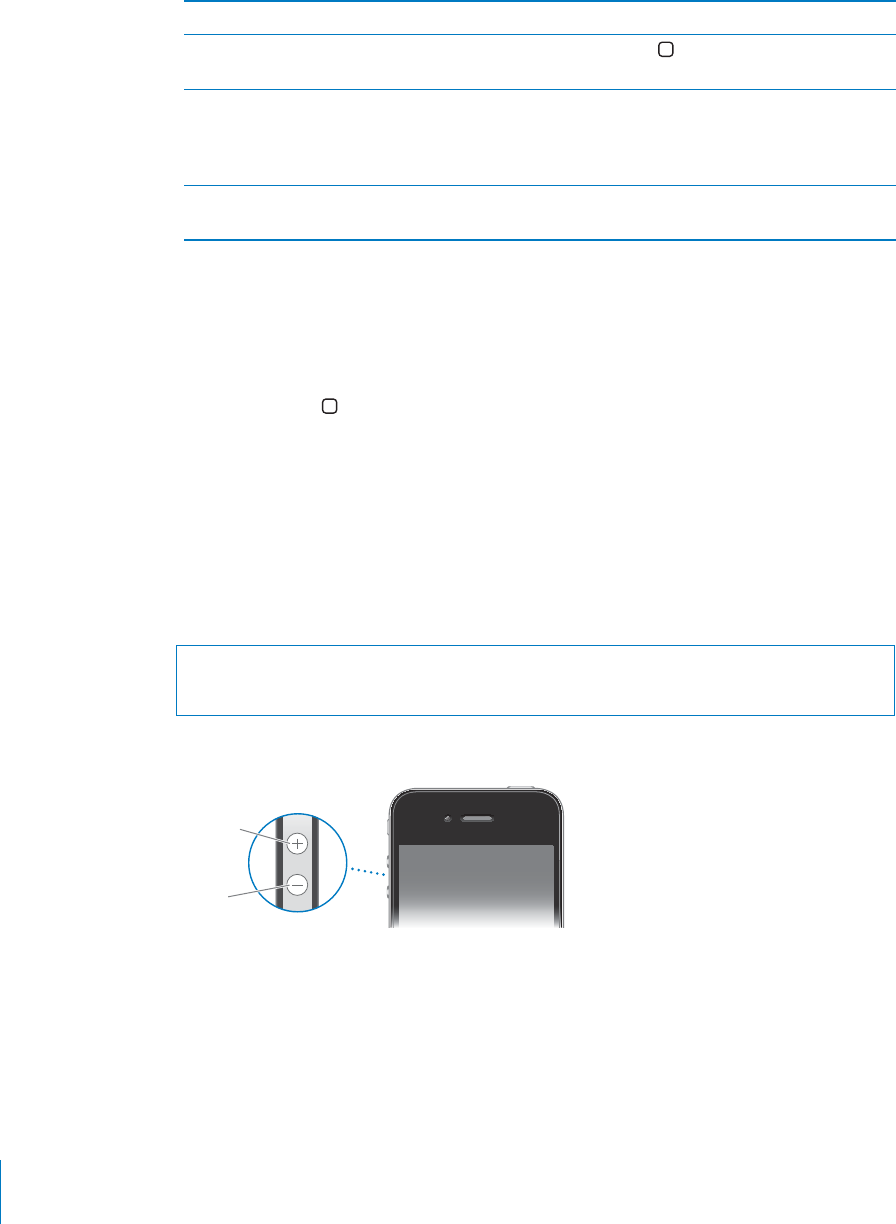
Volume Buttons
When you’re on the phone or listening to songs, movies, or other media, the buttons
on the side of iPhone adjust the audio volume. Otherwise, the buttons control the
XQNWOGHQTVJGTKPIGTCNGTVUCPFQVJGTUQWPFGÒGEVU
WARNING: For important information about avoiding hearing loss, see the Important
Product Information Guide at www.apple.com/support/manuals/iphone.
To adjust the volume, use the buttons on the side of iPhone.
=VS\TL
\W
=VS\TL
KV^U
To set a volume limit for music and videos on iPhone, see “Music” on page 216.
12 Chapter 1 iPhone at a Glance

Ring/Silent Switch
Flip the Ring/Silent switch to put iPhone in ring mode or silent mode.
9PUN
:PSLU[
In ring mode, iPhone plays all sounds. In silent mode, iPhone doesn’t ring or play alerts
CPFQVJGTUQWPFGÒGEVU
Important: Clock alarms, audio apps such as iPod, and many games still play sounds
through the built-in speaker when iPhone is in silent mode.
By default, when you get a call, iPhone vibrates whether it’s in ring mode or silent mode.
+HK2JQPGKUKPTKPIOQFG[QWECPUKNGPEGCECNND[RTGUUKPIVJG1P1Ò5NGGR9CMG
button or one of the volume buttons. Press a second time to send the call to voicemail.
For information about changing sound and vibrate settings, see “Sounds and the Ring/
Silent Switch” on page 197.
13
Chapter 1 iPhone at a Glance

iPhone App
s
The apps in the
f
ollowing table are included with iPhone
.
N
ote
:
App
f
unctionality and availability may vary, depending on the country or region
w
h
ere you purc
h
ase an
d
use iP
h
one
.
P
h
on
e
Make calls, with quick access to recent callers,
f
avorites, and all your contacts. Dial
manua
lly
using t
h
e numeric
k
e
y
pa
d
. Or just use voice
d
ia
l
ing. Visua
l
voicemai
l
presents
a list o
f
your voicemail messages—just tap to listen to any message, in any order. Make
FaceTime vi
d
eo ca
ll
s to ot
h
er iP
h
one 4 or iPo
d
touc
h
(4t
h
generation) users over Wi-Fi
.
S
ee C
h
a
p
te
r
5
,
“
P
h
on
e
,”
on pag
e
64
.
Mai
l
iPhone works with MobileMe, Microso
f
t Exchange, and many o
f
the most popular email
s
ystems—inc
l
u
d
ing Ya
h
oo!, Goog
l
e, an
d
AOL—as we
ll
as most in
d
ustry-stan
d
ar
d
POP3
an
d
IMAP emai
l
systems. View an
d
print PDFs an
d
ot
h
er attac
h
ments. Save attac
h
e
d
p
h
otos an
d
grap
h
ics to your Camera Ro
ll
a
lb
um. See C
h
apte
r
6
,
“
Mai
l
,”
on pag
e
7
9
.
Sa
f
ar
i
Browse we
b
sites over a ce
ll
u
l
ar
d
ata networ
k
or over Wi-Fi. Rotate iP
h
one si
d
eways
H
QTYKFGUETGGPXKGYKPI&QWDNGVCRVQ\QQOKPQTQWV¤5C
H
CTKCWVQOCVKECNN[
°
VUVJG
webpage column to the iPhone screen
f
or easy reading. Open multiple pages. Sync
bookmarks with Sa
f
ari or Microso
f
t Internet Explorer on your computer. Add Sa
f
ari web
clips to the Home screen
f
or
f
ast access to
f
avorite websites. Save images
f
rom websites
to your P
h
oto Li
b
rary. Print we
b
pages, PDFs, an
d
ot
h
er
d
ocuments t
h
at open in Quic
k
Loo
k
. See C
h
a
p
te
r
7
,
7
7
“
S
a
f
ar
i
,”
on pag
e
89
.
iPo
d
Listen to your songs, au
d
io
b
oo
k
s, an
d
po
d
casts. Create p
l
ay
l
ists, or use Genius to create
pla
y
lists
f
or
y
ou. Listen to Genius Mixes o
f
songs
f
rom
y
our librar
y
. Watch movies and
vi
d
eo po
d
casts in wi
d
escreen. Use AirP
l
ay to stream your music or vi
d
eos wire
l
ess
l
y to
an A
pple
TV or compati
bl
e au
d
io system. See C
h
apte
r
8
,
“
iPo
d
,”
on
page
9
5
.
M
essage
s
S
end and receive SMS text messages. View a list o
f
your previous conversations, and
tap a conversation to see t
h
e messages you sent an
d
receive
d
. Sen
d
p
h
otos, vi
d
eo
c
l
ips (iP
h
on
e
3
GS or later), contact in
f
ormation, and voice memos to MMS devices. See
C
h
a
p
te
r
9
,
“
M
essages
,”
on pag
e
1
1
0
.
Ca
l
en
d
a
r
View and search your MobileMe, iCal, Microso
f
t Entourage, Microso
f
t Outlook, or
Microso
f
t Exchange calendars. Enter events on iPhone and they sync back to the
ca
l
en
d
ar on your computer. Su
b
scri
b
e to ca
l
en
d
ars. See t
h
e
b
irt
hd
ays you’ve entere
d
in Contacts. Set alerts to remind you o
f
events, appointments, and deadlines. See
C
h
a
p
te
r
10
,
“
Calendar
,”
r
on pag
e
115
.
P
h
oto
s
View photos and videos you take with iPhone, save them
f
rom Mail or MMS messages
,
or sync them
f
rom your computer. View videos (iPhon
e
3
GS or
l
ater) in
p
ortrait or
landsca
p
e orientation. Zoom in on
p
hotos
f
or a closer look, or
p
rint them. Watch a
sl
i
d
es
h
ow. Emai
l
p
h
otos an
d
vi
d
eos, sen
d
t
h
em in MMS messages, or pu
bl
is
h
t
h
em to a
Mo
b
i
l
eMe ga
ll
ery. Assign images to contacts, an
d
use t
h
em as wa
ll
paper. View p
h
otos
by place, and i
f
you sync with iPhoto 8.0 (part o
f
iLi
f
e ‘09) or later, view photos by
events and
f
aces. See Cha
p
te
r
11
,
“
P
h
otos
,”
on
page
12
1
.
14
C
h
a
p
ter 1 iP
h
one at a G
l
anc
e
C
amera
Ta
k
e
ph
otos, an
d
recor
d
vi
d
eos (iP
h
on
e
3
GS or
l
ater). View t
h
em on iP
h
one, emai
l
t
h
em
,
s
end them in an MMS message, or upload them to your computer. Tap to
f
ocus on a
URGEK
°
EQDLGEVQTCTGC6TKOCPFUCXGXKFGQENKRU7RNQCFXKFGQUFKTGEVN[VQ;QW6WDG
Take a
f
riend’s picture and set iPhone to displa
y
it when that person calls
y
ou. See
C
h
a
p
te
r
12
,
“
C
amera
,”
on pag
e
129
.
YouTu
be
Play videos
f
rom YouTube’s online collection. Search
f
or any video, or browse
f
eatured,
most viewe
d
, most recent
l
y up
d
ate
d
, an
d
top-rate
d
vi
d
eos. Set up an
d
l
og in to your
YouTube account—then rate videos, sync your
f
avorites, view subscriptions, and more
.
Use AirP
l
ay to stream YouTu
b
e vi
d
eos to an App
le
TV. Up
l
oa
d
your own vi
d
eos ta
k
en
wit
h
iP
h
one. See C
h
a
p
te
r
13
,
“
YouTu
be
,
”
on pag
e
133
.
Stoc
ks
Watch your
f
avorite stocks, updated automatically
f
rom the Internet. View company
news and current trading in
f
ormation, such as opening or average price, trading
vo
l
ume, or mar
k
et ca
p
ita
l
ization. Rotate iP
h
one to see
d
etai
l
e
d
c
h
arts in
l
an
d
sca
p
e
QTKGPVCVKQP&TCI[QWT
°
PIGTCNQPIVJGEJCTVUVQVTCEMRTKEGRQKPVUQTWUGVYQ
°
PIGTU
to see a range
b
etween points. See C
h
apte
r
14
,
“
S
toc
k
s
,”
on pag
e
139
.
M
a
ps
S
ee a street map, satellite view, or hybrid view o
f
locations around the world. Zoom
in
f
or a closer look, or check out the Google Street View. Find and track
y
our current
(approximate) location. See which way you’re
f
acing (iPhon
e
3
GS or
l
ater, using its
b
ui
l
t
-
in compass). Get
d
etai
l
e
d
d
riving, pu
bl
ic transit, or wa
lk
ing
d
irections an
d
see current
JKIJYC
[
VTC
Ó
EEQPFKVKQPU(KPFDWUKPGUUGUKPVJGCTGCCPFECNNYKVJCUKPINGVCR5GG
C
h
a
p
te
r
15
,
“
M
a
p
s
,”
on pag
e
141
.
Weat
h
e
r
Get current weather conditions and a six-day
f
orecast. Add your
f
avorite cities
f
or a
q
uic
k
weat
h
er report anytime. See C
h
apte
r
16
,
“
Weather
,”
r
on pag
e
1
5
0
.
N
ote
s
J
ot notes on t
h
e go—remin
d
ers, grocery
l
ists,
b
ri
ll
iant i
d
eas. Sen
d
t
h
em in emai
l
. Sync
notes to Mail on your Mac, or Microso
f
t Outlook or Outlook Express on your PC. Sync
notes over t
h
e air (iP
h
on
e
3
GS or
l
ater) wit
h
your Mo
b
i
l
eMe, Goog
l
e, Ya
h
oo!, or IMAP
accounts. See C
h
a
p
te
r
17
,
7
7
“
N
ote
s
,”
on pag
e
1
5
2
.
C
l
oc
k
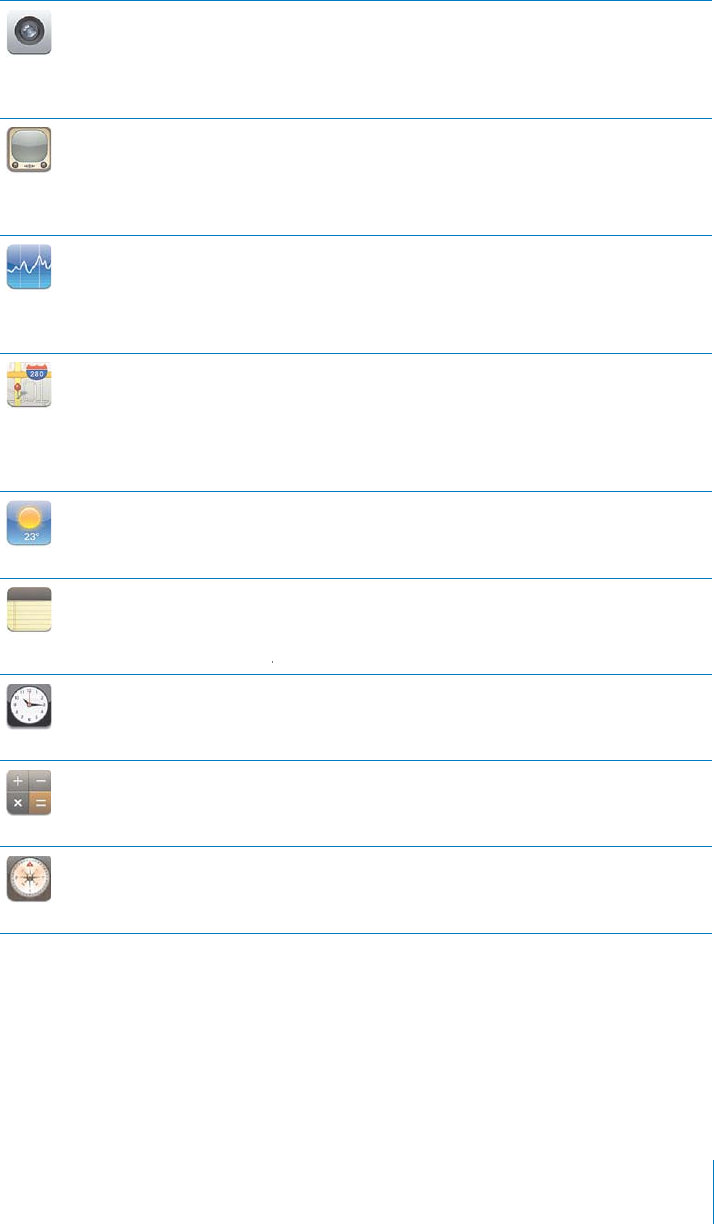
In the Utilities
f
older. View the time in cities around the world—create clocks
f
or your
f
avorites. Set one or more alarms. Use the sto
p
watch, or set a countdown timer. See
C
h
a
p
te
r
18
,
“
C
l
oc
k
,”
on pag
e
155
.
Ca
l
cu
l
ato
r
In the Utilities
f
older. Add, subtract, multiply, and divide. Rotate iPhone sideways to use
GZRCPFGFUEKGPVK
°
E
H
WPEVKQPU5GG%JCRVG
T
19
,
“
Calculator
,”
r
on pag
e
1
5
8
.
C
om
p
as
s
In the Utilities folder. Use the built-in digital compass (iPhon
e
3
GS or
l
ater) to
d
etermine your
h
ea
d
ing. Get your current coor
d
inates. C
h
oose
b
etween true nort
h
an
d
magnetic nort
h
. See C
h
apte
r
20
,
“
C
om
p
ass
,”
on pag
e
1
61
.
15
C
h
a
p
ter 1 iP
h
one at a G
l
anc
e
Vo
i
ce
M
emo
s
In the Utilities
f
older. Record voice memos on iPhone. Pla
y
them back on iPhone
or sync t
h
em wit
h
iTunes to
l
isten to voice memos on your computer. Attac
h
voice
memos to emai
l
or MMS messages. See C
h
apte
r
2
1
,
“
Vo
i
ce Memos
,”
on
page
16
4
.
i
Tune
s
S
earch the iTunes Store
f
or music, movies, TV shows, audiobooks, and more. Browse
,
p
review, an
d
d
own
l
oa
d
new re
l
eases, or see w
h
at’s
p
o
p
u
l
ar in t
h
e to
p
c
h
arts. Rent
movies an
d
TV s
h
ows to view on iP
h
one. Stream an
d
d
own
l
oa
d
po
d
casts. Fo
ll
ow your
H
CXQTKVGCTVKUVUCPF
H
TKGPFUVQ
°
PFQWVYJCVOWUKEVJG[¨TGNKUVGPKPIVQCPFVCNMKPICDQWV
S
ee C
h
a
p
te
r
22
,
“
iTunes
S
tor
e
,”
on pag
e
1
6
9
.
App
S
tor
e
S
earch the App Store
f
or iPhone apps you can purchase or download using your Wi-Fi
or cellular data network connection. Read reviews or write your own reviews
f
or your
f
avorite apps. Download and install the app on your Home screen. See Chapte
r
23
,
“
App
“
S
tor
e
,”
on pag
e
1
7
8
.
G
ame
C
ente
r
Discover new games and share your game experiences with
f
riends around the world
(iP
h
on
e
3
GS or later). Invite a
f
riend, or request a match with other worthy opponents
.
Check player rankings on the leaderboards. Earn achievements
f
or extras points. See
C
h
a
p
te
r
2
4
,
“
G
ame
C
ente
r
,”
r
on
page
18
4
.
Sett
i
ng
s
S
et up accounts an
d
a
d
just a
ll
iP
h
one settings in one convenient p
l
ace. Set your own
volume limit
f
or listening com
f
ort. Set your ringtone, wallpaper, screen brightness, and
s
ettings
f
or network, phone, mail, web, music, video, photos, and more. Use Location
S
ervices settings to set location privacy options
f
or Maps, Camera, Compass, and
applicable third-party apps. Set auto-lock and a passcode
f
or security. Restrict access
to ex
pl
icit iTunes content an
d
certain a
pp
s. Reset iP
h
one. See C
h
a
p
te
r
25
,
“
S
ettings
,”
on
pag
e
193
.
C
ontact
s
Get contact in
f
ormation synced
f
rom MobileMe, Mac OS X Address Book, Yahoo!
Address Book, Google Contacts, Windows Address Book (Outlook Express), Microso
f
t
Outlook, or Microso
f
t Exchange. Search, add, change, or delete contacts, which get
s
ynce
d
b
ac
k
to your computer. See C
h
apte
r
26
,
“
C
ontact
s
,”
on
page
2
1
9
.
Ni
k
e + iPo
d
Ni
k
e + iPo
d
(w
h
ic
h
appears w
h
en you activate it in Settings) turns iP
h
one into a
workout companion. Track your pace, time, and distance
f
rom one workout to the next
,
an
d
c
h
oose a song to power t
h
roug
h
your routine. (iP
h
on
e
3
GS or
l
ater. Requires se
l
ect
Ni
k
e s
h
oes an
d
a Ni
k
e + iPo
d
Sensor, so
ld
separate
l
y.) See C
h
apte
r
27
,
77
“
Ni
k
e + iPo
d
,”
on
pag
e
22
5
.
iBoo
ks
Download the
f
ree iBooks app
f
rom the App Store
f
or a great way to buy and read
books. Get everything
f
rom classics to best sellers
f
rom the built-in iBookstore
.
Add ePub books and PDFs to your bookshel
f
using iTunes. Print PDFs. See
C
h
a
p
te
r
28
,
“
iBoo
k
s
,”
on pag
e
229
.
16
C
h
a
p
ter 1 iP
h
one at a G
l
anc
e

Status Icons
The icons in the status bar at the top of the screen give information about iPhone:
Status icon What it means
Cell signal* Shows whether you’re in range of the cellular network
and can make and receive calls. The more bars, the
stronger the signal. If there’s no signal, the bars are
replaced with “No service.”
Airplane mode Shows that airplane mode is on—you cannot use the
phone, access the Internet, or use Bluetooth® devices.
Non-wireless features are available. See “Airplane
Mode”on page 193.
UMTS/EV-DO Shows that your carrier’s 3G UMTS (GSM) or EV-DO
(CDMA) network is available, and iPhone can connect
to the Internet over that network. See “How iPhone
Connects to the Internet” on page 22.
EDGE Shows that your carrier’s EDGE network is available
(GSM models), and iPhone can connect to the Internet
over that network. See “How iPhone Connects to the
Internet” on page 22.
GPRS/1xRTT Shows that your carrier’s GPRS (GSM) or 1xRTT (CDMA)
network is available, and iPhone can connect to the
Internet over that network. See “How iPhone Connects
to the Internet” on page 22.
Wi-Fi* Shows that iPhone is connected to the Internet over
a Wi-Fi network. The more bars, the stronger the
connection. See “Joining a Wi-Fi Network” on page 23.
Network activity Shows over-the-air syncing or other network activity.
Some third-party apps may also use the icon to show
an active process.
Call Forwarding Shows that Call Forwarding is set up on iPhone (GSM
models). See “Call Forwarding” on page 212.
VPN Shows that you’re connected to a network using VPN.
See “Network” on page 199.
Lock Shows that iPhone is locked. See “1P1Ò5NGGR9CMG
Button” on page 11.
TTY Shows that iPhone is set to work with a TTY machine.
See “Using iPhone with a Teletype (TTY) Machine” on
page 213.
17
Chapter 1 iPhone at a Glance

Status icon What it means
Play Shows that a song, audiobook, or podcast is playing.
See “Playing Songs and Other Audio” on page 96.
Portrait orientation lock Shows that the iPhone screen is locked in portrait
orientation. See “Viewing in Portrait or Landscape
Orientation” on page 32.
Alarm Shows that an alarm is set. See “Alarms” on page 156.
Location services Shows that some app is using location services. See
“Location Services” on page 200.
Bluetooth* Blue or white icon: Bluetooth is on and a device, such as
a headset or car kit, is connected. Gray icon: Bluetooth
is on, but no device is connected. No icon: Bluetooth is
VWTPGFQÒ5GG¥Bluetooth Devices” on page 51.
Battery Shows battery level or charging status. See “Battery” on
page 52.
6JGWUGQHEGTVCKPCEEGUUQTKGUYKVJK2JQPGOC[CÒGEVYKTGNGUURGTHQTOCPEG
18 Chapter 1 iPhone at a Glance

Getting Started 2
WARNING: To avoid injury, read all operating instructions in this guide
and safety information in the iPhone Important Product Information Guide at
www.apple.com/support/manuals/iphone before using iPhone.
Viewing the User Guide on iPhone
The iPhone User Guide can be viewed on iPhone by tapping the iPhone User Guide
bookmark in Safari, or by installing the free iBooks app and downloading the guide
from the Bookstore.
View the guide in Safari: Tap , then tap the iPhone User Guide bookmark.
You can add an icon for the guide to the Home screen by tapping , then tapping
¥#FFVQ*QOG5ETGGP¦6QXKGYVJGIWKFGKPCFKÒGTGPVNCPIWCIGVCR¥%JCPIG
Language” at the bottom of the screen on the main contents page.
Install the iBooks app:
1In App Store, search for “iBooks” and when you see it in the results list, tap it.
2Tap Free, then tap Install.
Download the iPhone User Guide:
1In iBooks, tap Store.
2Search for “iPhone User” and when you see it in the results list, tap it.
3Tap Free, then tap Get Book.
For more information about iBooks, see Chapter 28,“iBooks,” on page 229.
What You Need
To use iPhone, you need:
A wireless service plan with a carrier that provides iPhone service in your area
A Mac or a PC with a USB 2.0 port and one of the following operating systems:
Mac OS X v10.5.8 or later
Windows 7, Windows Vista, or Windows XP Home or Professional (SP3)
19
Screen resolution on your computer set to 1024 x 768 or higher
iTunes 10.1.2 or later, available at www.itunes.com/download
QuickTime 7.6.2 or later (for playing videos recorded by iPhone 3GS or later on
your computer)
An Apple ID (such as an iTunes Store account or MobileMe account) for purchases
from the iTunes Store or App Store
An Internet connection for your computer (broadband is recommended)
Installing the SIM Card
If your SIM card (GSM models) wasn’t preinstalled, you must install it before you can
use iPhone.
Installing the SIM Card in iPhone 4
4PJYV:04
JHYK
4PJYV:04
JHYK[YH`
7HWLYJSPW
VY:04
LQLJ[[VVS
Installing the SIM Card in iPhone 3GS
:04
JHYK
:04JHYK[YH`
7HWLYJSPWVY
:04LQLJ[[VVS
Install the SIM card:
1Insert the end of a paper clip or SIM eject tool into the hole on the SIM card tray.
2WUJ°TON[UVTCKIJVKPWPVKNVJGVTC[RQRUQWV
2Pull out the SIM card tray and place the SIM card in the tray as shown.
3With the tray aligned and the SIM card on top as shown, carefully replace the tray.
20 Chapter 2 Getting Started
Activating iPhone
You must activate iPhone by signing up for a service plan with an iPhone service
carrier in your area and registering iPhone with the network.
Your iPhone may have been activated at the time of purchase. If it isn’t activated,
contact your iPhone retailer or cellular service provider.
For more information about iPhone, go to www.apple.com/iphone.
Setting Up iPhone
Before you can use iPhone, you must set it up in iTunes. During setup, you can create a
new Apple ID or specify an existing Apple ID for making purchases with iPhone. (The
iTunes Store may not be available in all countries or regions.) iTunes also records the
serial number of your iPhone in case you need it.
Set up iPhone:
1Download and install the latest version of iTunes from www.itunes.com/download.
2Connect iPhone to a USB 2.0 port on your Mac or PC using the cable that came
with iPhone.
3Follow the onscreen instructions.
In the Set Up Your iPhone screen, select “Automatically sync contacts, calendars and
DQQMOCTMU¦VQEQP°IWTGVJQUGKVGOUVQU[PECWVQOCVKECNN[YJGP[QWEQPPGEVK2JQPG
to your computer. You can also customize your sync settings in iTunes. See “Syncing
with iTunes” on page 57.
Note: If you have a visual impairment, VoiceOver (iPhone 3GS or later) can help you
set up iPhone without a sighted assistant. VoiceOver describes aloud what appears on
the screen, so you can use iPhone without seeing it. When you connect iPhone to your
computer, iTunes detects whether you’re using a compatible screen reader on your
computer, such as VoiceOver (Mac) or GW Micro Window-Eyes (PC), and automatically
enables VoiceOver on iPhone. A sighted user can also enable VoiceOver on iPhone
using Accessibility settings. (VoiceOver may not be available in all languages.) See
“VoiceOver” on page 236.
21
Chapter 2 Getting Started

Disconnecting iPhone from Your Computer
You can disconnect iPhone from your computer at any time. However, if you
disconnect it while a sync is in progress, some data may not get synced until the next
time you connect iPhone to your computer.
When iPhone is syncing with your computer, iPhone shows “Sync in Progress.” If you
FKUEQPPGEVK2JQPGDGHQTGKV°PKUJGUU[PEKPIUQOGFCVCOC[PQVIGVVTCPUHGTTGF9JGP
the sync is complete, iTunes shows “iPhone sync is complete.”
Cancel a sync: Drag the slider on iPhone.
If you get a call during a sync, the sync is canceled and you can disconnect iPhone to
CPUYGTVJGECNN%QPPGEVK2JQPGCHVGTVJGECNNVQ°PKUJU[PEKPI
Connecting to the Internet
iPhone connects to the Internet whenever you use Mail, Safari, YouTube, Stocks, Maps,
Weather, the App Store, or the iTunes Store.
How iPhone Connects to the Internet
iPhone connects to the Internet using either a Wi-Fi network or a cellular data network.
iPhone does the following, in order, until connected:
Connects over the last Wi-Fi network you used that’s available.
If no previously used Wi-Fi networks are available, iPhone shows a list of Wi-Fi
networks in range. Tap a network and, if necessary, enter the password to join.
Networks that require a password show the lock icon next to them. You can
prevent iPhone from automatically showing available networks. See “Wi-Fi” on
page 195.
If no Wi-Fi networks are available or you choose not to join any, iPhone connects to
the Internet over a cellular data network ( , , or ). You can prevent iPhone from
using cellular data in Settings. See “Network” on page 199.
If a Wi-Fi network or a cellular data network isn’t available, iPhone can’t connect to
the Internet.
Note: The 3G (UMTS) cellular network supports simultaneous voice and data
communications on GSM models. For all other network connections (EDGE or GPRS
on GSM models, or EV-DO or 1xRTT on a CDMA model), you can’t use Internet services
while you’re on the phone unless iPhone also has a Wi-Fi connection to the Internet.
Many Wi-Fi networks can be used free of charge including, in some countries or
regions, Wi-Fi hotspots provided by your iPhone carrier. Some Wi-Fi networks require
a fee. To join a Wi-Fi network at a hotspot where charges apply, you can usually open
Safari to see a webpage that allows you to sign up for service.
22 Chapter 2 Getting Started

Joining a Wi-Fi Network
The Wi-Fi settings let you turn on Wi-Fi and join Wi-Fi networks.
Turn on Wi-Fi: Choose Settings > Wi-Fi and turn Wi-Fi on.
Join a Wi-Fi network: Choose Settings > Wi-Fi, wait a moment as iPhone detects
networks in range, then select a network (fees may apply to join some Wi-Fi networks).
If necessary, enter a password and tap Join (networks that require a password appear
with a lock icon).
Once you join a Wi-Fi network manually, iPhone automatically connects to it whenever
the network is in range. If more than one previously used network is in range, iPhone
joins the one last used.
When iPhone is connected to a Wi-Fi network, the Wi-Fi icon in the status bar at the
top of the screen shows the connection strength. The more bars you see, the stronger
the connection.
(QTKPHQTOCVKQPCDQWVEQP°IWTKPI9K(KUGVVKPIUUGG¥Wi-Fi” on page 195.
Cellular Data Network Access
iPhone can access the Internet through your iPhone carrier’s cellular network. Check
the carrier’s network coverage in your area for availability.
If iPhone is connected to the Internet via the cellular data network, the UMTS/EV-DO ( ),
EDGE ( ), or GPRS/1xRTT ( ) icon appears in the status bar.
GSM: On an EDGE or GPRS connection, you may not be able to receive calls while
iPhone is transferring data over the cellular network—downloading a webpage, for
example. Incoming calls go directly to voicemail.
CDMA: On EV-DO connections, data transfers are paused during incoming calls. On
1xRTT connections, incoming calls go directly to voicemail during data transfers.
Turn 3G on (GSM models): In Settings, choose General > Network and tap Enable 3G.
If you’re outside your carrier’s network, you may be able to access the Internet through
another carrier. To enable email, web browsing, and other data services whenever
possible, turn Data Roaming on.
Turn Data Roaming on: In Settings, choose General > Network and turn Data
Roaming on.
Important: Roaming charges may apply. To avoid data roaming charges, make sure
FCVCTQCOKPIKUVWTPGFQÒ
23
Chapter 2 Getting Started

Internet Access on an Airplane
#KTRNCPGOQFGVWTPUQÒVJGK2JQPGEGNNWNCT9K(K$NWGVQQVJCPF)25VTCPUOKVVGTUCPF
receivers to avoid interfering with aircraft operation. Airplane mode disables many
of the iPhone features. In some countries or regions, where allowed by the aircraft
operator and applicable laws and regulations, you can turn on Wi-Fi while airplane
mode is on, to:
Send and receive email
Browse the Internet
Sync your contacts, calendars, browser bookmarks, and notes (iPhone 3GS or later)
over the air
Stream YouTube videos
Get stock quotes
Get map locations
Get weather reports
Purchase music and apps
You may also be allowed to turn on Bluetooth to use Bluetooth devices with iPhone.
For more information, see “Airplane Mode” on page 193.
VPN Access
VPN (virtual private network) provides secure access over the Internet to private
networks, such as the network at your company or school. Use Network settings to
EQP°IWTGCPFVWTPQP8205GG¥Network” on page 199.
Personal Hotspot
You can use Personal Hotspot (Internet Tethering on GSM models) to share an Internet
connection with a computer connected to iPhone via Bluetooth or USB. With a CDMA
model, you can also use Personal Hotspot to share an Internet connection with a
computer or other Wi-Fi capable device—such as an iPod, iPad, or other iPhone—
connected to your iPhone via Wi-Fi.
Note: This feature may not be available in all countries or regions. Additional fees may
apply. Contact your carrier for more information.
;QW°TUVPGGFVQUGVWRVJGUGTXKEGYKVJ[QWTECTTKGT+H[QWJCXGP¨VFQPGVJKUVJG5GV
Up Internet Tethering or Set Up Personal Hotspot button appears in your Network
settings in place of the Internet Tethering or Personal Hotspot button. To contact your
carrier, tap Set Up Internet Tethering.
Personal Hotspot works only if iPhone is connected to the Internet over the cellular
data network.
24 Chapter 2 Getting Started

Share an Internet connection:
1In Settings, choose General > Network > Personal Hotspot (CDMA model) or Internet
Tethering (GSM models).
2Turn on Personal Hotspot or Internet Tethering.
3Connect a computer or other device to iPhone:
Wi-Fi (CDMA model): On the device, choose your iPhone from the list of available
Wi-Fi networks. Enter the Wi-Fi password for your iPhone when prompted.
USB: Connect your computer to iPhone using the Dock Connector to USB Cable.
In your computer’s Network preferences, choose iPhone.
1PC/CECRQRWRYKPFQYCRRGCTUVJG°TUVVKOG[QWEQPPGEVUC[KPI¥#PGY
PGVYQTMKPVGTHCEGJCUDGGPFGVGEVGF¦%NKEM0GVYQTM2TGHGTGPEGUEQP°IWTGVJG
network settings for iPhone, then click Apply. On a PC, use the Network Control
2CPGNVQEQP°IWTGVJGK2JQPGEQPPGEVKQP
Bluetooth: On iPhone, choose Settings > General > Bluetooth and turn on
Bluetooth. Then refer to the documentation that came with your computer to pair
and connect iPhone with your device.
When a device is connected, a blue band appears at the top of the iPhone screen.
Personal Hotspot remains on when you connect with USB, even when you aren’t
actively using the Internet connection.
Change the Wi-Fi password for iPhone (CDMA model): In Settings, choose
General > Network > Personal Hotspot > Wi-Fi Password, then enter a password of
at least 8 characters.
Changing the password disconnects any devices that are sharing the Internet
connection.
Monitor your cellular data network usage: In Settings, choose General > Usage.
Adding Mail, Contacts, and Calendar Accounts
About Accounts
iPhone works with MobileMe, Microsoft Exchange, and many of the most popular
Internet-based email, contacts, and calendar service providers. If you don’t already
have an email account, you can get a free account online at www.yahoo.com,
www.google.com, or www.aol.com. You can also try MobileMe, free for 60 days, at
www.me.com.
You can add contacts using an LDAP or CardDAV account if your company or
organization supports it. See “Adding Contacts” on page 219.
25
Chapter 2 Getting Started

You can add a CalDAV calendar account. See “Syncing Calendars” on page 115.
You can subscribe to iCal (.ics) calendars or import them from Mail. See “Subscribing to
Calendars” and “Importing Calendar Files from Mail” on page 120.
Setting Up MobileMe Accounts
To use MobileMe on iPhone, you need to set up a MobileMe Free Account or a
MobileMe Paid Subscription.
A MobileMe Free Account lets you use Find My iPhone (not available in all countries or
regions), a feature that helps you locate and protect the information on your iPhone if
it’s lost or stolen. See “Security Features” on page 54.
A MobileMe Paid Subscription lets you use Find My iPhone, plus the following features:
Mail account at me.com
Over-the-air syncing for contacts, calendars, bookmarks, and notes
MobileMe Gallery for sharing photos and videos
/QDKNG/GK&KUMHQTUVQTKPICPFUJCTKPI°NGU
You can try out these features with a 60-day free trial at www.apple.com/mobileme.
A MobileMe Free Account is available to any customer with an iPhone 4 running
iOS 4.2 or later. If you’ve already created an account for the App Store or Game Center,
you can use that Apple ID for your MobileMe Free Account. You can create a new
#RRNG+&KH[QWFQP¨VCNTGCF[JCXGQPGQTKH[QWYCPVCFKÒGTGPV#RRNG+&HQT[QWT
MobileMe account.
Set up a MobileMe Free Account:
1In Settings, tap “Mail, Contacts, Calendars.”
2Tap Add Account, then tap MobileMe.
3Enter your Apple ID and password, or tap Create Free Apple ID.
4Follow the onscreen instructions.
Verify your email address, if required.
5Make sure Find My iPhone is turned on.
Only one MobileMe account at a time can be used for Find My iPhone and for syncing
contacts, calendars, bookmarks, and notes.
To use Gallery, iDisk, and Find My iPhone on iPhone, download the free MobileMe
Gallery, MobileMe iDisk, and Find My iPhone apps from the App Store.
26 Chapter 2 Getting Started

Setting Up Microsoft Exchange Accounts
To use Microsoft Exchange on iPhone, you need to add an account with your
Microsoft Exchange account settings. See your service provider or system
administrator for those settings.
iPhone uses the Exchange ActiveSync protocol to sync email, calendars, and contacts
over the air with the following versions of Microsoft Exchange:
Exchange Server 2003 Service Pack 2
Exchange Server 2007 Service Pack 1
Exchange Server 2010
When setting up the account, you can choose which Exchange services you want to
use with iPhone:
Mail
Contacts
Calendars
Services you turn on are synced automatically over the air without having to connect
iPhone to your computer. See “Syncing Accounts” on page 56.
You can set up multiple Exchange accounts.
Set up an Exchange account:
1In Settings, tap “Mail, Contacts, Calendars.”
2Tap Add Account, then tap Microsoft Exchange.
3Enter your complete email address, domain (optional), user name, password, and a
description. The description can be whatever you like.
iPhone supports Microsoft’s Autodiscovery service, which uses your user name and
password to determine the address of the Exchange server. If the server’s address
can’t be determined, you’re asked to enter it. (Enter the complete address in the Server
°GNF1PEG[QWEQPPGEVVQVJG'ZEJCPIGUGTXGT[QWOC[DGRTQORVGFVQEJCPIG[QWT
passcode to match the policies set on the server.
4Tap the items you want to use on iPhone (mail, contacts, and calendars) and set how
many days of email you want to sync to iPhone.
27
Chapter 2 Getting Started

Setting Up Google, Yahoo!, and AOL Accounts
For many popular accounts (Google, Yahoo!, AOL), iPhone enters most of the settings
for you. When setting up the account, you can choose which account services you
want to use with iPhone. Services you turn on are synced automatically over the
air without having to connect iPhone to your computer. See “Syncing Accounts” on
page 56.
Set up an account:
1In Settings, tap “Mail, Contacts, Calendars.”
2Tap Add Account, then tap Google, Yahoo!, or AOL.
3Enter your name, complete email address, password, and a description. The description
can be whatever you like.
4Tap the items you want to use on iPhone. Available items depend upon the service
provider.
Setting Up Other Accounts
Choose Other Accounts to set up other accounts for mail (such as POP), contacts (such
as LDAP or CardDAV), or calendars (such as CalDAV). Contact your service provider or
system administrator to get the account settings you need.
Set up an account:
1In Settings, tap “Mail, Contacts, Calendars.”
2Tap Add Account, then tap Other.
3Choose the account type you want to add (Mail, Contacts, or Calendars).
4Enter your account information and tap Save.
28 Chapter 2 Getting Started
Bas
i
c
s
3
Us
i
ng App
s
6JGJKIJTGUQNWVKQP/WNVK6QWEJUETGGPCPFUKORNG
°
PIGTIGUVWTGUOCMGKVGCU[VQWUG
iPhone a
pp
s
.
Opening an
d
Switc
h
ing App
s
You open an app on iP
h
one
b
y tapping its icon on t
h
e Home screen
.
Return to t
h
e Home screen
:
Press t
h
e Home
b
utton
b
e
l
ow t
h
e
d
isp
l
ay
.
Switc
h
to anot
h
er Home screen
:
Flick le
f
t or right, or tap to the le
f
t or right o
f
the
row o
f
dots
.
P
ress t
h
e Home
b
utton
.
On iP
h
on
e
3
GS or
l
ater, you can quic
kl
y switc
h
b
etween t
h
e apps you’re using
;
mu
l
titas
k
ing a
l
so a
ll
ows certain apps to run in t
h
e
b
ac
k
groun
d.
29

View the most recently used apps (iPhone 3GS or later): Double-click the Home button.
The four most recently used app are shown at the bottom of the screen. Flick left to
see more apps.
Note: 1PK2JQPG)FQWDNGENKEMKPIVJG*QOGDWVVQPRGTHQTOUVJGCEVKQPURGEK°GF
by the Home Button setting. See “Home Button” on page 201.
Remove an app from the recents list: Touch and hold the app icon until it begins to
jiggle, then tap .
The app is added to recent apps again the next time you open it.
Scrolling
Drag up or down to scroll. On some screens such as webpages, you can also scroll side
to side.
&TCIIKPI[QWT°PIGTVQUETQNNYQP¨VEJQQUGQTCEVKXCVGCP[VJKPIQPVJGUETGGP
30 Chapter 3 Basics
Flick to scroll quickly.
You can wait for the scrolling to come to a stop, or touch anywhere on the screen to
stop it immediately. Touching the screen to stop scrolling won’t choose or activate
anything.
To quickly scroll to the top of a list, webpage, or email, just tap the status bar.
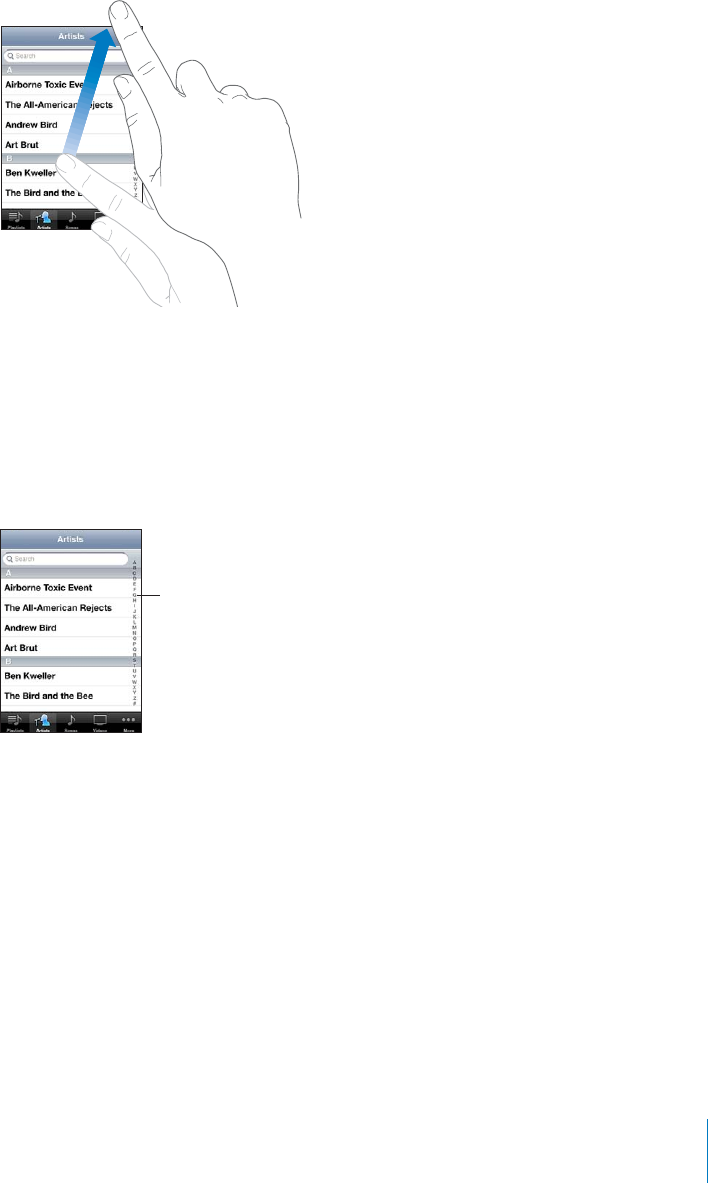
Find items in an indexed list: Tap a letter to jump to items starting with that letter.
&TCI[QWT°PIGTCNQPIVJGKPFGZVQUETQNNSWKEMN[VJTQWIJVJGNKUV
0UKL_
Choose an item: Tap an item in the list.
&GRGPFKPIQPVJGNKUVVCRRKPICPKVGOECPFQFKÒGTGPVVJKPIU¤HQTGZCORNGKVOC[
open a new list, play a song, open an email, or show someone’s contact information so
you can call that person.
31
Chapter 3 Basics
Z
oom
i
ng In or Out
W
h
en viewing p
h
otos, we
b
pages, emai
l
, or maps, you can zoom in an
d
out. Pinc
h
your
°
PIGTUVQIGVJGTQTCRCTV(QTRJQVQUCPFYGDRCIGU[QWECPFQWDNGVCRVCRVYKEG
q
uic
kl
y) to zoom in, t
h
en
d
ou
bl
e-tap again to zoom out. For maps,
d
ou
bl
e-tap to zoom
KPCPFVCRQPEGYKVJVYQ
°
PIGTUVQ\QQOQWV
Viewing in Portrait or Lan
d
scape Orientation
Many iP
h
one apps
l
et you view t
h
e screen in eit
h
er portrait or
l
an
d
scape orientation
.
4QVCVGK2JQPGCPFVJGFKURNC[TQVCVGUVQQCFLWUVKPICWVQOCVKECNN[VQ
°
VVJGPGY
s
creen or
i
entat
i
on
.
You may pre
f
er landscape orientation
f
or viewing webpages in Sa
f
ari, or when
entering text,
f
or example. In landscape orientation
:
We
b
pages sca
l
e to t
h
e wi
d
er screen, ma
k
ing t
h
e text an
d
images
l
arger
.
T
h
e onscreen
k
ey
b
oar
d
is
l
arger, w
h
ic
h
may
h
e
l
p increase your typing spee
d
a
n
d
accuracy
.
32
C
h
a
p
ter 3 Bas
i
c
s

The following apps support both portrait and landscape orientation:
Mail
Safari
Messages
Notes
Contacts
Stocks
iPod
Photos
Camera
Calculator
Movies viewed in iPod and YouTube appear only in landscape orientation. Street views
in Maps also appear only in landscape orientation.
Lock the screen in portrait orientation (iPhone 3GS or later): Double-click the Home
DWVVQP±KEMVJGDQVVQOQHVJGUETGGPHTQONGHVVQTKIJVVJGPVCR .
The portrait orientation lock ( ) icon appears in the status bar when the screen
orientation is locked.
Customizing the Home Screen
You can customize the layout of icons on the Home screen—including the Dock
icons along the bottom of the screen. If you want, arrange them over multiple Home
screens. You can also organize apps by grouping them in folders.
Rearranging Icons
You can arrange the icons on your Home screen in any order you want.
Rearrange icons:
1Touch and hold any icon on the Home screen until it begins to jiggle.
2Arrange the icons by dragging them.
3Press the Home button to save your arrangement.
You can also add links to your favorite webpages on the Home screen. See “Web
Clips” on page 94.
When iPhone is connected to your computer, you can rearrange icons on the Home
screen and the order of the screens. In iTunes, select iPhone in the Devices list, then
click Apps at the top of the screen.
33
Chapter 3 Basics
M
o
ve
a
n ic
o
n t
o
a
n
o
ther screen
:
While arranging icons, drag an icon to the side o
f
th
e screen
.
Create a
dd
itiona
l
Home screens
:
9JKNGCTTCPIKPIKEQPU
±
KEMVQVJGTKIJVOQUV*QOG
s
creen, then drag an icon to the right edge o
f
the screen until a new screen appears
.
You can create u
p
to 11 screens. The number o
f
dots above the Dock shows the
number o
f
screens you have, and which screen you’re viewing
.
Reset your Home screen to the de
f
ault layout
:
C
h
oose Settings > Genera
l
> Reset
a
n
d
tap Reset Home Screen Layout
.
Resetting the Home screen removes any
f
olders you’ve created and applies the de
f
ault
wa
ll
paper to your Home screen
.
Organizing wit
h
Fo
ld
er
s
Fo
ld
ers
l
et you organize icons on t
h
e Home screen. You can put up to 12 icons in a
f
older. iPhone automatically names a
f
older when you create it, based on the icons you
use to create the
f
older, but you can change the name anytime you want. Like icons
,
f
olders can be rearranged by dragging them around the Home screen. You can move
f
olders to a new Home screen or to the Dock
.
Create a
f
older
:
Touc
h
an
d
h
o
ld
an icon unti
l
t
h
e Home screen icons
b
egin to jigg
l
e,
th
en
d
rag t
h
e icon onto anot
h
er icon
.
3
4C
h
a
p
ter 3 Bas
i
c
s
iPhone creates a new
f
older that includes the two icons, and shows the
f
older’s name
.
;QWECPVCRVJGPCOG
°
GNFCPFGPVGTCFK
Ò
GTGPVPCOG
You can also create folders within iTunes
.
Create a
f
older using iTunes
:
Wit
h
iP
h
one connecte
d
to your computer, se
l
ect iP
h
one
in the Devices list in iTunes. Click A
pp
s at the to
p
o
f
the screen, and on the Home
s
creen near the top o
f
the window, drag an app on top o
f
another
.
A
dd an icon to a
f
olde
r
W
h
i
l
e arranging icons,
d
rag t
h
e icon onto
t
he
f
older
.
Remove an icon
f
rom a
f
olde
r
While arranging icons, tap to open the
f
older,
t
hen drag the icon out o
f
the
f
older
.
O
p
en a folde
r
Ta
p
the folder. You can then ta
p
an a
pp
icon to
o
p
en t
h
at a
pp.
Close a
f
olde
r
Ta
p
outside the
f
older, or
p
ress the Home button
.
Delete a
f
olde
r
Move all icons out o
f
the
f
older. The
f
older is
d
e
l
ete
d
automatica
ll
y w
h
en empty
.
Rename a
f
olde
r
While arranging icons, tap to open the
f
older,
th
en ta
p
t
h
e name at t
h
e to
p
an
d
use t
h
e
k
ey
b
oar
d
to enter a new name. Press t
h
e Home
b
utton to save your c
h
anges
.
9JGP[QW
°
PKUJQTICPK\KPI[QWT*QOGUETGGPRTGUUVJG*QOG
b
utton to save
your c
h
anges
.
Many apps, suc
h
as P
h
one, Messages, Mai
l
, an
d
t
h
e App Store,
d
isp
l
ay a
b
a
d
ge on t
h
eir
Home screen icon wit
h
a num
b
er (to in
d
icate incoming items) or exc
l
amation mar
k
(to indicate a problem). I
f
these apps are contained in a
f
older, the badge appears on
t
he
f
older. A numbered badge shows the total number o
f
items you haven’t attended
t
o, such as incoming phone calls, email messages, text messages, and updated apps to
d
ownload. An alert badge indicates a problem with an app in the
f
older
.
3
5
C
h
a
p
ter 3 Bas
i
c
s

A
dding Wallpape
r
You can set an image or photo as wallpaper
f
or the Lock screen. On iPhon
e
3
G
S
o
r
later, you can also set wallpaper
f
or your Home screen. You can choose an image that
came with iPhone, a photo
f
rom your Camera Roll, or a photo synced to iPhone
f
rom
your compu
t
er
.
T
h
e Loc
k
screen wa
ll
paper a
l
so appears w
h
en you’re on a ca
ll
wit
h
someone you
d
on’t
have a contact
p
hoto
f
or
.
Set wa
llp
a
p
er (iP
h
on
e
3
GS or
l
ater)
:
1
In Settings, choose Wallpaper, tap the image o
f
the Lock and Home screens, then tap
Wa
llp
a
p
er or an a
lb
um
.
2
Tap to choose an image or photo. If you chose a photo, drag to position it and pinch to
zoom in or out, unti
l
it
l
oo
k
s t
h
e way you want
.
3
Tap Set, then choose whether you want to use the photo as wallpaper
f
or your Loc
k
S
creen, Home screen, or
b
ot
h.
Set wa
llp
a
p
er (iP
h
one 3G)
:
1
C
h
oose Settings > Wa
ll
paper, t
h
en tap Wa
ll
paper or an a
lb
um
.
2
Tap to choose an image or photo. I
f
y
ou choose a photo, drag it to position it and
pinc
h
to zoom in or out, unti
l
it
l
oo
k
s t
h
e way you want
.
3
Ta
p
Set Wa
llp
a
p
er
.
36
C
h
a
p
ter 3 Bas
i
c
s
Typing
The onscreen keyboard appears anytime you need to type.
Entering Text
Use the keyboard to enter text, such as contact information, email, text messages, and
web addresses. The keyboard corrects misspellings, predicts what you're typing, and
learns as you use it.
Depending on the app you’re using, the intelligent keyboard may suggest corrections
as you type, to help prevent mistyped words.
Enter text:
1 6CRCVGZV°GNFUWEJCUKPCPQVGQTPGYEQPVCEVVQDTKPIWRVJGMG[DQCTF
2Tap keys on the keyboard.
5VCTVD[V[RKPIYKVJLWUV[QWTKPFGZ°PIGT#U[QWIGVOQTGRTQ°EKGPV[QWECPV[RG
more quickly using two thumbs.
#U[QWV[RGGCEJNGVVGTCRRGCTUCDQXG[QWTVJWODQT°PIGT+H[QWVQWEJVJGYTQPI
MG[[QWECPUNKFG[QWT°PIGTVQVJGEQTTGEVMG[6JGNGVVGTKUP¨VGPVGTGFWPVKN[QW
TGNGCUG[QWT°PIGTHTQOVJGMG[
37
Chapter 3 Basics
Delete the previous character Tap .
Type uppercase Tap the Shift key before tapping a letter. Or
touch and hold the Shift key, then slide to a letter.
Quickly type a period and space Double-tap the space bar. (You can turn this
HGCVWTGQPQTQÒKP5GVVKPIU )GPGTCN -G[DQCTF
Turn caps lock on Double-tap the Shift key. The Shift key turns
blue, and all letters you type are uppercase.
6CRVJG5JKHVMG[CICKPVQVWTPECRUNQEMQÒ
;QWECPVWTPVJKUHGCVWTGQPQTQÒKP5GVVKPIU
)GPGTCN -G[DQCTF
Show numbers, punctuation, or symbols Tap the Number key. Tap the Symbol key
to see additional punctuation and symbols.
Type letters or symbols that aren’t on the
keyboard
Touch and hold the related letter or symbol, then
slide to choose a variation.
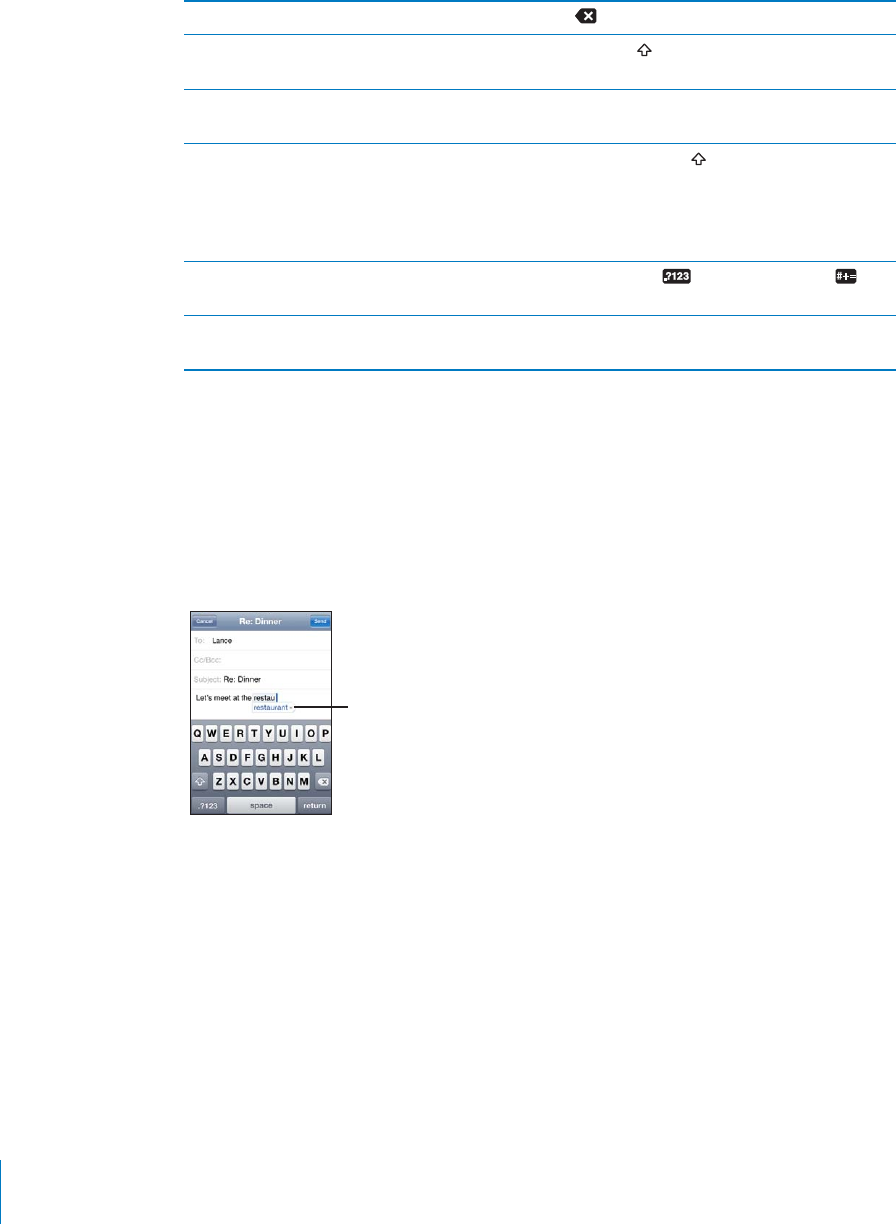
Dictionary
For many languages, iPhone has dictionaries to help you type. The appropriate
dictionary is activated when you select a supported keyboard.
For a list of supported languages, see www.apple.com/iphone/specs.html.
iPhone uses the active dictionary to suggest corrections or complete the word you’re
typing. You don’t need to interrupt your typing to accept the suggested word.
:\NNLZ[LK
^VYK
Accept or reject dictionary suggestions:
BTo reject the suggested word, °PKUJV[RKPIVJGYQTFCU[QWYCPVKVVJGPVCRVJG¥Z¦VQ
dismiss the suggestion before typing anything else. Each time you reject a suggestion
for the same word, iPhone becomes more likely to accept your word.
Note: If you’re entering Chinese or Japanese, tap one of the suggested alternatives.
BTo use the suggested word, type a space, punctuation mark, or return character.
iPhone also underlines words you’ve already typed that might be misspelled.
38 Chapter 3 Basics
Use spell checking to replace a misspelled word: Tap the underlined word, then tap
one of the suggested corrections.
If none of the suggestions is correct, you can correct the spelling of the selected word
by retyping it. To leave the word unchanged, tap somewhere else in the message area.
6WTPCWVQEQTTGEVKQPQPQTQÒ%JQQUG)GPGTCN -G[DQCTFVJGPVWTP#WVQ
%QTTGEVKQPQPQTQÒ#WVQ%QTTGEVKQPKUQPD[FGHCWNV
6WTPURGNNEJGEMKPIQPQTQÒ%JQQUG)GPGTCN -G[DQCTFVJGPVWTP%JGEM5RGNNKPI
QPQTQÒ5RGNNEJGEMKPIKUQPD[FGHCWNV
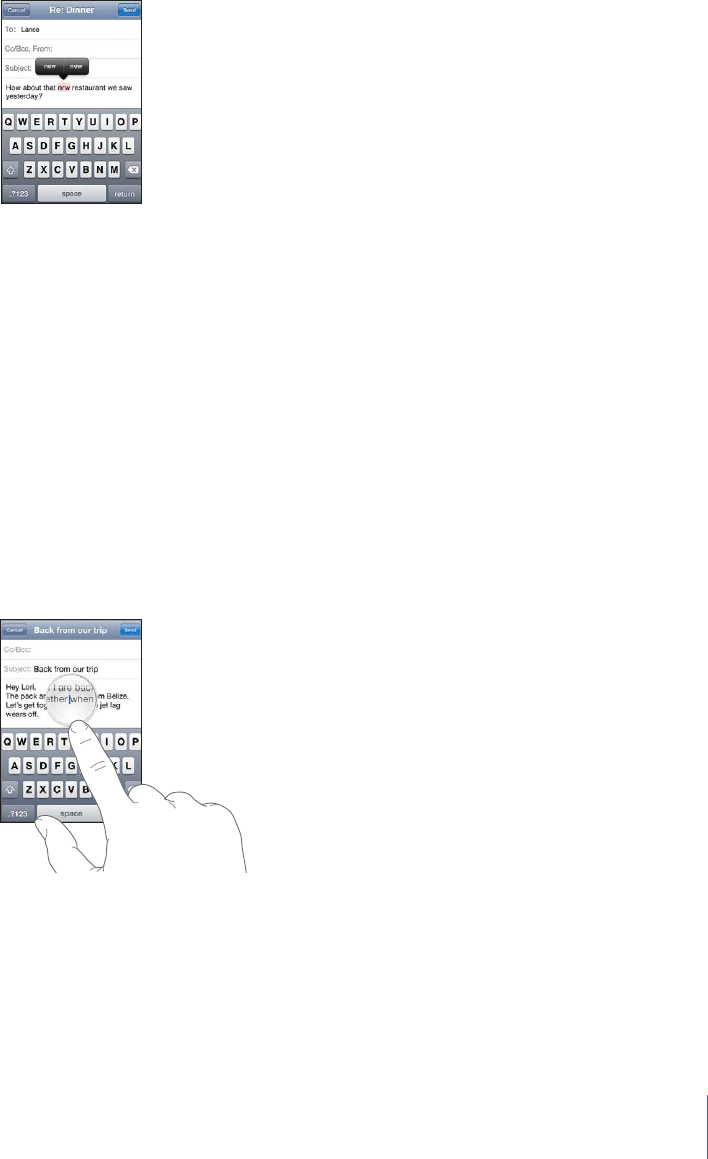
Editing—Cut, Copy, and Paste
The touchscreen makes it easy to make changes to text you’ve entered. An onscreen
magnifying glass helps you position the insertion point precisely where you need it.
Grab points on selected text let you quickly select more or less text. You can also cut,
copy, and paste text and photos within apps, or across multiple apps.
Position the insertion point: Touch and hold to bring up the magnifying glass, then
drag to position the insertion point.
Select text: Tap the insertion point to display the selection buttons. Tap Select to
select the adjacent word or tap Select All to select all text. You can also double-tap to
select a word. In read-only documents, such as webpages, or email or text messages
you’ve received, touch and hold to select a word.
39
Chapter 3 Basics

Drag the grab points to select more or less text.
Cut or copy text: Select text, then tap Cut or Copy.
Paste text: Tap the insertion point and tap Paste. The last text that you cut or copied is
inserted. Or select text and tap Paste to replace the text.
Undo the last edit: Shake iPhone and tap Undo.
International Keyboards
+PVGTPCVKQPCNMG[DQCTFUCNNQY[QWVQGPVGTVGZVKPOCP[FKÒGTGPVNCPIWCIGUKPENWFKPI
languages that are written from right to left. If you want to enter text in other
languages, you can use Settings to make additional keyboards available when
you type.
For a list of supported keyboards, go to www.apple.com/iphone/specs.html.
Add a keyboard:
1 +P5GVVKPIUEJQQUG)GPGTCN -G[DQCTF +PVGTPCVKQPCN-G[DQCTFU
The number before the arrow indicates the number of keyboards currently enabled.
2 6CR#FF0GY-G[DQCTFVJGPEJQQUGCMG[DQCTFHTQOVJGNKUV
Repeat to add more keyboards. Some languages have multiple keyboards available.
40 Chapter 3 Basics
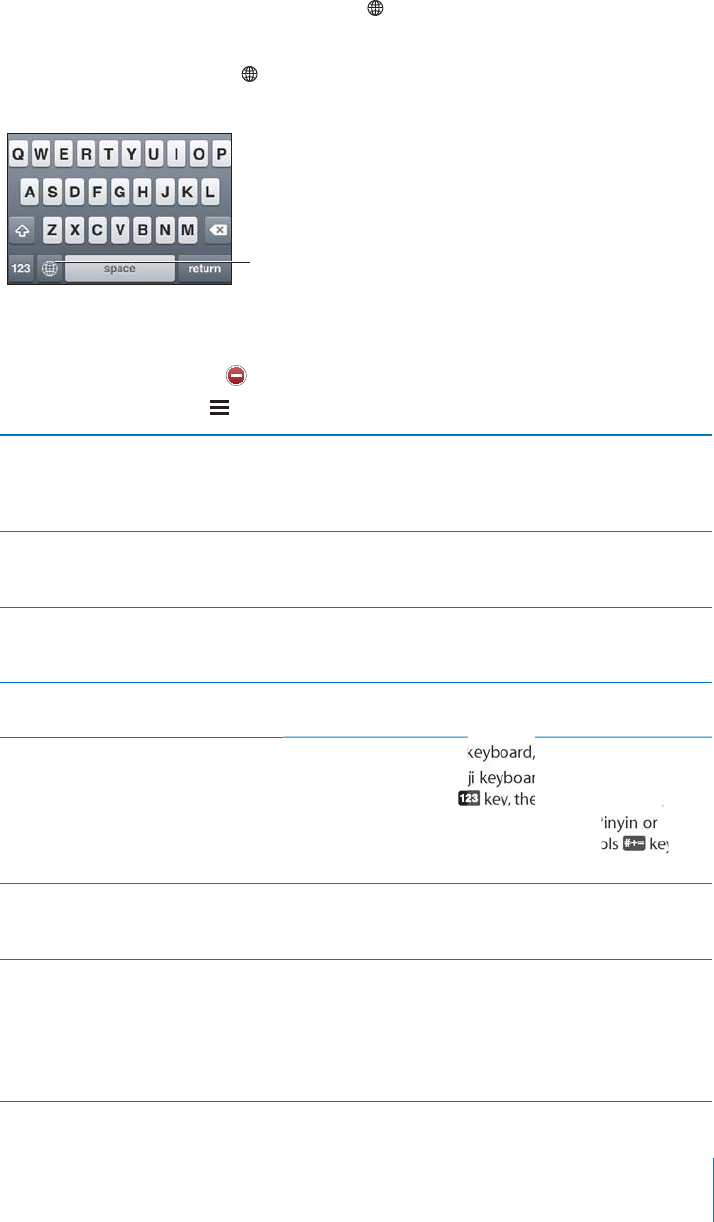
Switc
h
k
ey
b
oar
d
s w
h
en you’re typing
:
T
a
p
. When you tap the symbol, the name o
f
VJGPGYN[CEVKXCVGFMG[DQCTFCRRGCTUDTKG
±
[
You can a
l
so touc
h
an
d
h
o
ld
to display a list o
f
available keyboards. To choose a
MG[DQCTF
H
TQOVJGNKUVUNKFG[QWT
°
PIGTVQVJGPCOGQ
H
VJGMG[DQCTFVJGPTGNGCUG
;HWVY[V\JOHUK
OVSK[VZ^P[JO
RL`IVHYKZ
E
d
it your
k
ey
b
oar
d
l
ist
:
%
J
QQUG)GPGTC
N
-G[
D
QCT
F
+PVGTPCVKQPC
N
-G[
D
QCT
F
UV
J
GP
t
ap Edit and do one o
f
the
f
ollowing
:
To
d
e
l
ete a
k
ey
b
oar
d
,
t
a
p
,
t
h
en ta
p
De
l
ete
.
To reor
d
er t
h
e
l
ist,
d
rag next to a
k
ey
b
oar
d
to a new p
l
ace in t
h
e
l
ist
.
Type
l
etters, num
b
ers, or sym
b
o
l
s
th
at aren’t on t
h
e
k
ey
b
oar
d
Touc
h
an
d
h
o
ld
t
h
e re
l
ate
d
l
etter, num
b
er, or sym
b
o
l
, t
h
en
s
lide to choose a variation. On the Thai keyboards,
f
or
examp
l
e, you can c
h
oose native num
b
ers
b
y touc
h
ing an
d
h
o
ld
ing t
h
e re
l
ate
d
Ara
b
ic num
b
er
.
E
nter
J
a
p
anese
K
ana 7UGV
J
G-CPC
M
G[RC
F
VQUG
N
GEVU[
NN
C
DN
GU(QTOQTGU[
NN
C
DN
G
options, tap t
h
e arrow
k
ey an
d
se
l
ect anot
h
er sy
ll
a
bl
e or
word
f
rom the window
.
Enter Ja
p
anese
Q
WERT
Y
Use the QWERTY keyboard to input code
f
or Japanese
s
y
ll
a
bl
es. As you type, suggeste
d
sy
ll
a
bl
es appear. Tap t
h
e
s
y
ll
a
bl
e to c
h
oose it
.
Enter Emo
j
i picture c
h
aracter
s
Use t
h
e Emoji
k
ey
b
oar
d
. Avai
l
a
bl
e on
l
y on iP
h
ones
p
urc
h
ase
d
an
d
use
d
in Ja
p
an
.
Enter
f
acemark
s
7UKPIVJG,CRCPGUG-CPCMG[DQCTFVCRVJG¥@A@¦MG[
Using the Japanese Romaji keyboard (QWERTY-Japanese
l
ayout), tap t
h
e Num
b
er
MG[VJGPVCRVJG¥@A@¦MG[
7UKPIVJG%JKPGUG5KORNK
°
GFQT6TCFKVKQPCN
2
(Tra
d
itiona
l
) Z
h
uyin
k
ey
b
oar
d
s, tap t
h
e Sym
bo
y
,
V
J
GPVCRV
J
G¥@A@¦
M
G[
E
nter
K
orean 7UGV
J
G5GV-QTGCP
M
G[
D
QCT
F
VQV[RG*CPIW
N
N
GVVGTU6Q
t
ype
d
ou
bl
e consonants or compoun
d
vowe
l
s, touc
h
an
d
h
o
ld
t
h
e
l
etter, t
h
en s
l
i
d
e to c
h
oose t
h
e
d
ou
bl
e
l
etter
.
'PVGT5KORNK
°
GFQT6TCFKVKQPCN
C
h
inese Pinyi
n
Use the QWERTY keyboard to enter Pinyin
f
or Chinese
c
h
aracters. As you type, suggeste
d
C
h
inese c
h
aracters
a
ppear. Tap a suggestion to c
h
oose it, or continue entering
Pi
ny
i
n to see more opt
i
ons
.
I
f
you keep entering Pinyin without spaces, sentence
s
uggest
i
ons appear
.
41
C
h
a
p
ter 3 Bas
i
c
s

Enter Chinese Cangjie Use the keyboard to build Chinese characters from the
component Cangjie keys. As you type, suggested Chinese
characters appear. Tap a character to choose it, or continue
V[RKPIWRVQ°XGVQVCNEQORQPGPVUVQUGGOQTGEJCTCEVGT
options.
'PVGT5KORNK°GF%JKPGUG5VTQMG
(Wubi Hua)
7UGVJGMG[RCFVQDWKNF%JKPGUGEJCTCEVGTUWUKPIWRVQ°XG
strokes in the correct writing sequence: from left to right,
top to bottom, outside to inside, and from inside to the
closing stroke (for example, the Chinese character (circle)
should begin with the vertical stroke 䖹).
As you type, suggested Chinese characters appear (the most
EQOOQPN[WUGFEJCTCEVGTUCRRGCT°TUV6CRCEJCTCEVGTVQ
choose it.
If you’re not sure of the correct stroke, enter an asterisk (*).
To see more character options, type another stroke, or scroll
through the character list.
Tap the match (ˤਏ) key to show only characters that
match exactly what you typed. For example, if you type
ɿɿ (one one) and tap the match (ˤਏ) key, the less
commonly used ʆ (two) appears as an exact match.
Enter Traditional Chinese Zhuyin Use the keyboard to enter Zhuyin letters. As you type,
suggested Chinese characters appear. Tap a suggestion
to choose it, or continue entering Zhuyin letters to see
more options. After you type an initial letter, the keyboard
changes to show more letters.
If you keep entering Zhuyin without spaces, sentence
suggestions appear.
'PVGTJCPFYTKVVGP5KORNK°GFQT
Traditional Chinese
Write Chinese characters directly on the screen with your
°PIGT#U[QWYTKVGEJCTCEVGTUVTQMGUK2JQPGTGEQIPK\GU
them and shows matching characters in a list, with the
closest match at the top. When you choose a character, its
likely follow-on characters appear in the list as additional
choices.
You can get some complex characters by writing two or
more component characters. For example, enter °UJ
then 剾 (bristle), to get 䉍RCTVKCNPCOGQH*QPI-QPI
International Airport), which appears in the character list
with an arrow next to it. Tap the character to replace the
characters you entered.
9KVJ5KORNK°GF%JKPGUGJCPFYTKVKPI4QOCPEJCTCEVGTUCTG
also recognized.
%QPXGTVDGVYGGP5KORNK°GFCPF
Traditional Chinese
Select the character or characters you want to convert, then
tap Replace. See “Editing—Cut, Copy, and Paste” on page 39.
42 Chapter 3 Basics
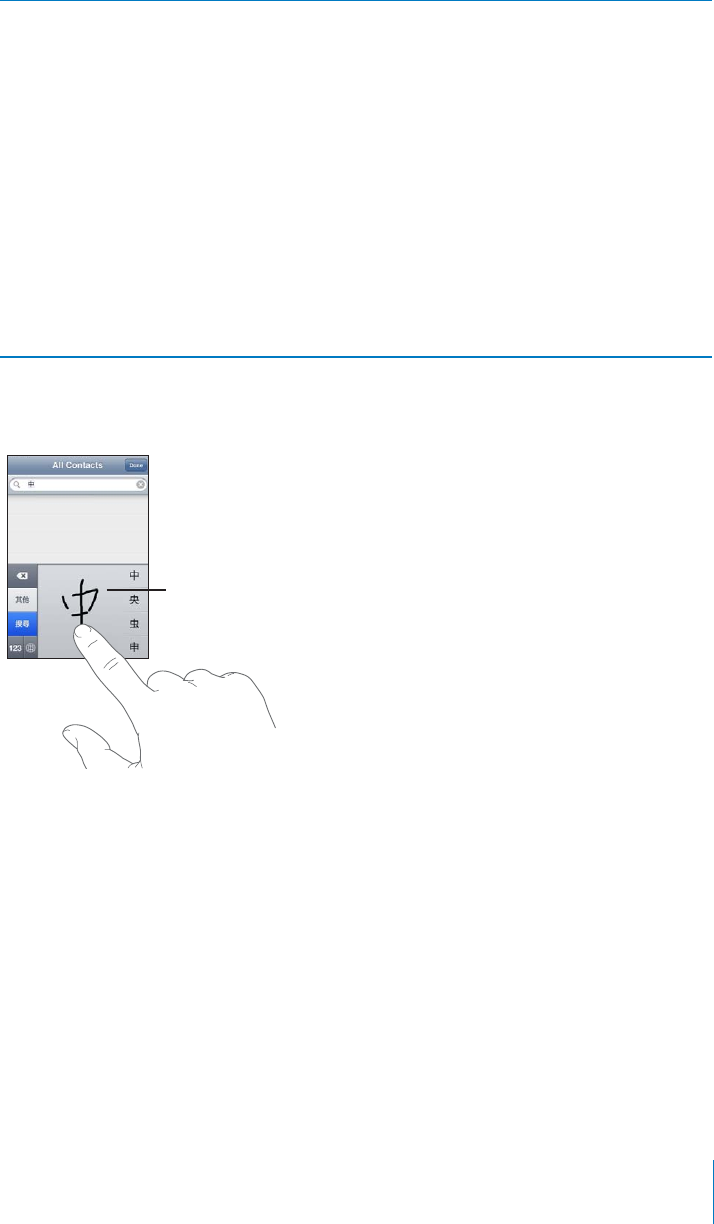
Enter Vietnamese Touch and hold a character to see the available diacritical
marks, then slide to choose the one you want.
You can also type the following key sequences to enter
characters with diacritical marks:
aa—âCEKTEWO±GZ
aw—ă (a caron)
ee—êGEKTEWO±GZ
oo—ôQEKTEWO±GZ
ow—ơ (o hook)
w—ư (u hook)
dd—đ (d dash)
as—á (a acute)
af—à (a grave)
ar—ả (a question mark)
ax—ã (a rising accent)
aj—ạ (a drop tone)
9JGP5KORNK°GFQT6TCFKVKQPCN%JKPGUGJCPFYTKVKPIHQTOCVUCTGVWTPGFQP[QWECP
GPVGT%JKPGUGEJCTCEVGTUYKVJ[QWT°PIGTCUUJQYP
;V\JOWHK
When using certain Chinese or Japanese keyboards, you can create a dictionary
of word and input pairs. When you type a word from the dictionary while using a
supported keyboard, the associated input is substituted for the word. The dictionary is
available for the following keyboards:
%JKPGUG5KORNK°GF2KP[KP
Chinese - Traditional (Pinyin)
Chinese - Traditional (Zhuyin)
Japanese (Romaji)
,CRCPGUG6GP-G[
43
Chapter 3 Basics

Add a word to the dictionary: +P5GVVKPIUEJQQUG)GPGTCN -G[DQCTF 'FKV7UGT
&KEVKQPCT[6CRVCRVJG9QTF°GNFCPFGPVGTVJGYQTFVJGPVCRVJG;QOK2KP[KPQT
<JW[KP°GNFCPFGPVGTVJGKPRWV
You can have multiple inputs for each word, depending on the keyboards you’ve
turned on.
Delete a word from the dictionary: Tap the word in the User Dictionary list, then tap
Delete Word.
Keyboard Layouts
You can use Settings to set the keyboard layouts for software and hardware keyboards.
The available layouts depend on the keyboard language.
Select a keyboard layout: +P5GVVKPIUEJQQUG)GPGTCN -G[DQCTF +PVGTPCVKQPCN
-G[DQCTFUVJGPUGNGEVCMG[DQCTF(QTGCEJNCPIWCIG[QWECPOCMGUGRCTCVG
selections for both the onscreen software and any external hardware keyboards.
The software keyboard layout determines the layout of the keyboard on the iPhone
screen. The hardware keyboard layout determines the layout of an Apple Wireless
-G[DQCTFEQPPGEVGFVQK2JQPG.
Using an Apple Wireless Keyboard
(QTGCUGQHV[RKPI[QWECPWUGCP#RRNG9KTGNGUU-G[DQCTFCXCKNCDNGUGRCTCVGN[
iPhone 3GS or later).
6JG#RRNG9KTGNGUU-G[DQCTFEQPPGEVUXKC$NWGVQQVJUQ[QWOWUVRCKTVJGMG[DQCTF
with iPhone. See “Pairing a Bluetooth Device with iPhone” on page 51.
Once the keyboard is paired with iPhone, it connects whenever the keyboard is within
range (up to 30 feet). You can tell that the keyboard is connected if the onscreen
MG[DQCTFFQGUP¨VCRRGCTYJGP[QWVCRKPCVGZV°GNF
Switch the language when using a hardware keyboard: Press and hold the
Command key, then tap the space bar to display a list of available languages. Tap the
URCEGDCTCICKPVQEJQQUGCFKÒGTGPVNCPIWCIG
Disconnect a wireless keyboard from iPhone: Press and hold the power button on
VJGMG[DQCTFWPVKNVJGITGGPNKIJVIQGUQÒ
iPhone disconnects the keyboard when it’s out of range.
Unpair a wireless keyboard from iPhone: In Settings, choose General > Bluetooth, tap
next to the device name, then tap “Forget this Device.”
;QWECPCRRN[FKÒGTGPVNC[QWVUVQCYKTGNGUUMG[DQCTF5GG¥+PVGTPCVKQPCN-G[DQCTFU”on
page 40 and “-G[DQCTF.C[QWVU” on page 44.
44 Chapter 3 Basics
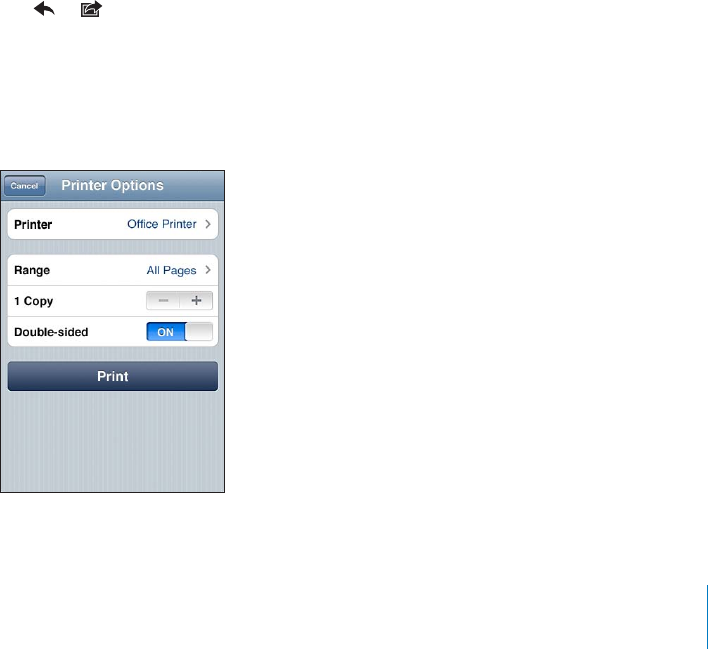
Printing
About AirPrint
AirPrint lets you print wirelessly to AirPrint-capable printers. You can print from the
following iOS apps:
Mail—email messages and attachments that can be viewed in Quick Look
Photos—photos
Safari—webpages, PDFs, and other attachments that can be viewed in Quick Look
iBooks—PDFs
Other apps available from the App Store may also support AirPrint.
AirPrint-capable printers don’t require setup; they just need to be connected to the
same Wi-Fi network as iPhone. (If you’re not sure whether your printer is AirPrint-capable,
refer to its documentation.)
For more information, go to support.apple.com/kb/HT4356.
Printing a Document
AirPrint uses your Wi-Fi network to send print jobs wirelessly to your printer. iPhone
must be connected to the same wireless network as the AirPrint printer.
Print a document:
1Tap or (depending on the app you’re using), then tap Print.
2Tap Select Printer to select a printer.
3Set printer options such as number of copies and double-sided output (if the printer
supports it). Some apps also let you set a range of pages to print.
4Tap Print.
45
Chapter 3 Basics

See the status o
f
a print job
:
Double-click the Home button, then ta
p
Print Center
.
T
h
e Print Center app appears as t
h
e most recent app w
h
en a
d
ocument is printing
.
A badge on the app icon shows how many documents are queued
f
or printing
.
I
f
you’re printing more than one document, select a print job to see its status summary
.
Cance
l
a print jo
b:
Dou
bl
e-c
l
ic
k
t
h
e Home
b
utton, tap Print Center, se
l
ect t
h
e print jo
b
(i
f
you’re printing more than one document), then tap Cancel Printing
.
46
C
h
a
p
ter 3 Bas
i
c
s
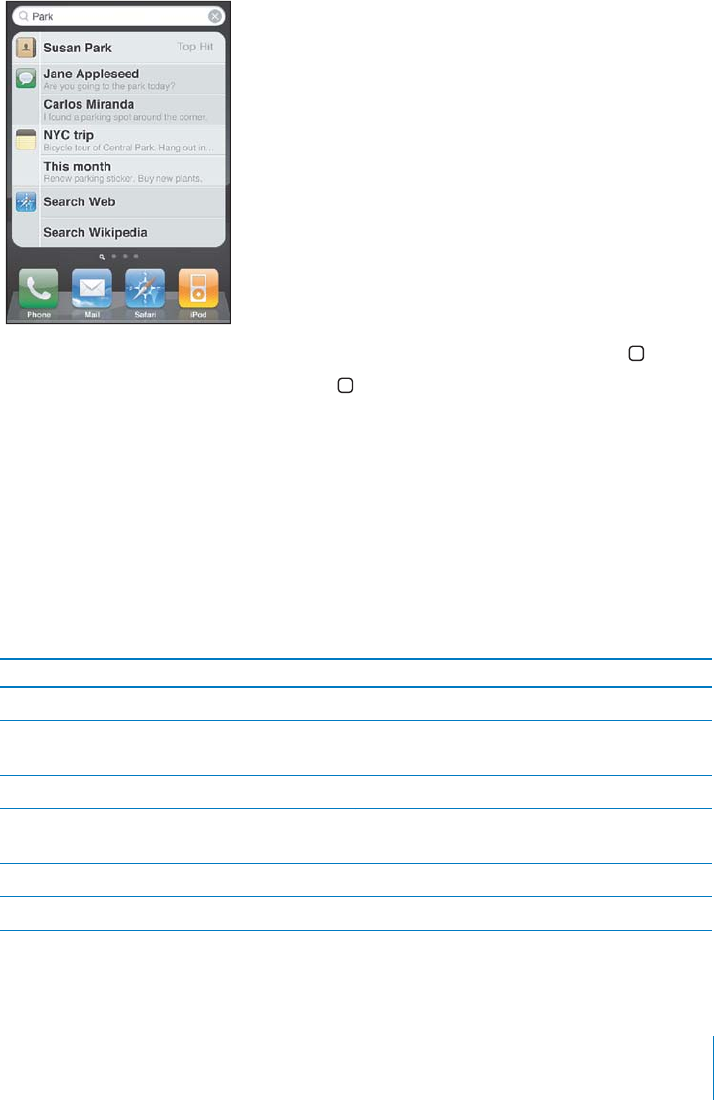
Searchin
g
You can searc
h
many apps on iP
h
one, inc
l
u
d
ing Mai
l
, Ca
l
en
d
ar, iPo
d
, Notes, Messages
(iP
h
on
e
3
GS or
l
ater), an
d
Contacts. You can searc
h
an in
d
ivi
d
ua
l
a
pp
, or searc
h
a
ll
a
pp
s
a
t once using Searc
h.
G
o to Searc
h:
1PVJGOCKP*QOGUETGGP
±
KEMNG
H
VVQTKIJVQTRTGUUVJG*QOG
button.
From t
h
e Searc
h
screen,
p
ress t
h
e Home
b
utton to return to t
h
e main Home
s
cr
ee
n pag
e.
Searc
h
iP
h
one
:
1PVJG5GCTEJUETGGPGPVGTVGZVKPVJG5GCTEJ
°
GNF5GCTEJTGUWNVU
a
ppear as you type. Tap an item in t
h
e
l
ist to open it. Tap Searc
h
to
d
ismiss t
h
e
k
ey
b
oar
d
an
d
see more resu
l
ts
.
Icons next to the search results show which a
pp
the results are
f
rom
.
iPhone may display a top hit
f
or you at the top o
f
the list, based on your previous
s
earches. The Sa
f
ari search results include o
p
tions to search the web or to search
Wi
k
i
p
e
d
ia
.
A
p
p
W
h
at’s searc
h
e
d
C
ontact
s
First,
l
ast, an
d
company names
Mai
l
6Q(TQOCPF5WDLGEV
°
GNFUQ
H
CNNCEEQWPVUVJG
t
ext o
f
messages isn’t searched)
Ca
l
en
d
a
r
Event tit
l
es, invitees,
l
ocations, an
d
notes
iPo
d
Music (names o
f
songs, artists, and albums) and
t
he titles o
f
p
odcasts, videos, and audiobooks
Messages (iP
h
on
e
3
GS or
l
ater
)
Names and text o
f
messages
N
ote
s
Text o
f
notes
47
C
h
a
p
ter 3 Bas
i
c
s
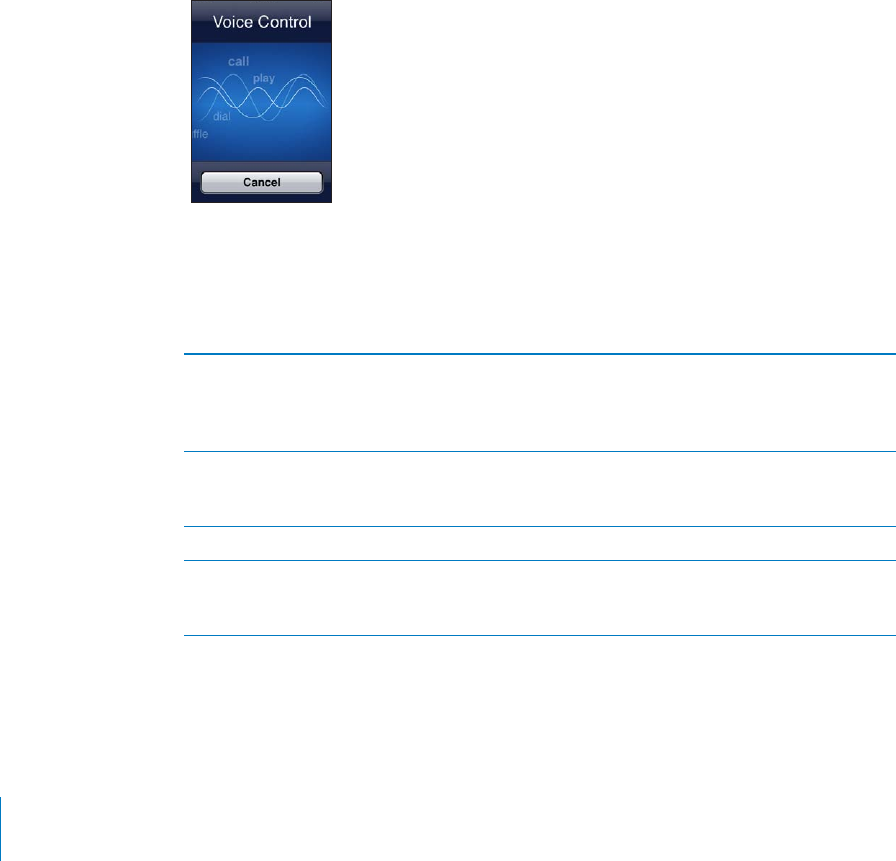
Search also searches the names of the native and installed apps on iPhone, so if you
have a lot of apps, you may want to use Search to locate and open apps.
Open apps from Search: Enter the app name, then tap to open the app directly from
the search results.
Use the Spotlight Search setting to specify which contents are searched and the order
the results are presented in. See “Spotlight Search” on page 201.
Voice Control
Voice Control (iPhone 3GS or later) lets you make phone calls and control iPod music
playback using voice commands.
Note: Voice Control may not be available in all languages.
Use Voice Control: Press and hold the Home button until the Voice Control screen
appears and you hear a beep. You can also press and hold the center button on the
iPhone earphones.
Use the following commands to make calls or play songs.
Call someone in contacts Say “call” or “dial,” then say the name of the
person. If the person has more than one phone
number, you can add “home” or “mobile,” for
example.
Make a FaceTime call to someone in contacts
(iPhone 4)
Say “FaceTime,” then say the name of the person.
If the person has more than one phone number,
you can add “home” or “mobile,” for example.
Dial a number Say “call” or “dial,” then say the number.
Control music playback Say “play” or “play music.” To pause, say “pause”
or “pause music.” You can also say “next song” or
“previous song.”
48 Chapter 3 Basics

Play an album, artist, or playlist Say “play,” then say “album,” “artist,” or “playlist”
and the name.
5JWÔGVJGEWTTGPVRNC[NKUV 5C[¥UJWÔG¦
Find out more about the currently playing song Say “what’s playing,” “what song is this,” “who
sings this song,” or “who is this song by.”
Use Genius to play similar songs Say “Genius,” “play more like this,” or “play more
songs like this.”
Find out the current time Say “what time is it?” or “what is the time?”
Cancel Voice Control Say “cancel” or “stop.”
For best results:
Speak into the iPhone microphone as if you were making a phone call. You can also
use the microphone on your Bluetooth headset or compatible Bluetooth car kit.
Speak clearly and naturally.
Say only iPhone commands and names, and numbers. Pause slightly between
commands.
Use full names.
For more about using Voice Control, including information about using Voice Control
KPFKÒGTGPVNCPIWCIGUIQVQsupport.apple.com/kb/HT3597.
Voice Control normally expects you to speak voice commands in the language that’s
set for iPhone (the setting in General > International > Language). Voice Control
settings let you change the language for speaking voice commands. Some languages
CTGCXCKNCDNGKPFKÒGTGPVFKCNGEVUQTCEEGPVU
Change the language or country: In Settings, choose General > International >
Voice Control and tap the language or country.
Voice Control for the iPod app is always on, but for better security you can prevent
voice dialing when iPhone is locked.
Prevent voice dialing when iPhone is locked: In Settings, choose General >
2CUUEQFG.QEMCPFVWTP8QKEG&KCNQÒ7PNQEMK2JQPGVQWUGXQKEGFKCNKPI
See “Voice Dialing” on page 65 and “Using Voice Control with iPod” on page 100.
49
Chapter 3 Basics

Apple Earphones with Remote and Mic
The Apple Earphones with Remote and Mic included with iPhone feature a
microphone, volume buttons, and an integrated button that allows you to answer and
end calls easily, and control audio and video playback.
*LU[LYI\[[VU
Plug in the earphones to listen to music or make a phone call. Press the center button
to control music playback and answer or end calls, even when iPhone is locked.
Pause a song or video Press the center button. Press again to resume
playback.
Skip to the next song Press the center button twice quickly.
Return to previous song Press the center button three times quickly.
Fast-forward Press the center button twice quickly and hold.
Rewind Press the center button three times quickly and
hold.
Adjust the volume (iPhone 3GS or later) Press the + or – button.
Answer an incoming call Press the center button.
End the current call Press the center button.
Decline an incoming call Press and hold the center button for about two
UGEQPFUVJGPNGVIQ6YQNQYDGGRUEQP°TO[QW
declined the call.
Switch to an incoming or on-hold call and put
the current call on hold
Press the center button. Press again to switch
DCEMVQVJG°TUVECNN
Switch to an incoming or on-hold call and end
the current call
Press and hold the center button for about two
UGEQPFUVJGPNGVIQ6YQNQYDGGRUEQP°TO[QW
GPFGFVJG°TUVECNN
Use Voice Control (iPhone 3GS or later) Press and hold the center button. See “Voice
Control”on page 48.
If you get a call while the earphones are plugged in, you can hear the ringtone
through both the iPhone speaker and the earphones.
50 Chapter 3 Basics

Bluetooth Devices
;QWECPWUGK2JQPGYKVJVJG#RRNG9KTGNGUU-G[DQCTFCPFQVJGT$NWGVQQVJFGXKEGU
such as Bluetooth headsets, car kits, and stereo headphones. Third-party Bluetooth
headphones may support volume and playback controls. See the documentation
VJCVECOGYKVJ[QWT$NWGVQQVJFGXKEG(QTUWRRQTVGF$NWGVQQVJRTQ°NGUIQVQ
support.apple.com/kb/HT3647.
Pairing a Bluetooth Device with iPhone
WARNING: For important information about avoiding hearing loss and about
driving safely, see the Important Product Information Guide at
www.apple.com/support/manuals/iphone.
$GHQTG[QWECPWUGC$NWGVQQVJFGXKEGYKVJK2JQPG[QWOWUV°TUVRCKTVJGO
Pair a Bluetooth headset, car kit, or other device with iPhone:
1Follow the instructions that came with the device to make it discoverable or to set it to
search for other Bluetooth devices.
2In Settings, choose General > Bluetooth and turn Bluetooth on.
3Choose the device on iPhone, and enter its passkey or PIN number. See the
instructions about the passkey or PIN that came with the device.
After you pair a Bluetooth device to work with iPhone, you must make a connection
to have iPhone use the device for your calls. See the documentation that came with
the device.
When iPhone is connected to a Bluetooth headset or car kit, outgoing calls are routed
through the device. Incoming calls are routed through the device if you answer using
the device, and through iPhone if you answer using iPhone.
Pair an Apple Wireless Keyboard with iPhone:
1In Settings, choose General > Bluetooth and turn Bluetooth on.
2 2TGUUVJGRQYGTDWVVQPQPVJG#RRNG9KTGNGUU-G[DQCTFVQVWTPKVQP
3On iPhone, select the keyboard listed under Devices.
4Type the passkey on the keyboard as instructed, then press Return.
Note: ;QWECPRCKTQPN[QPG#RRNG9KTGNGUU-G[DQCTFYKVJK2JQPGCVCVKOG6QRCKTC
FKÒGTGPVMG[DQCTF[QWOWUV°TUVWPRCKTVJGEWTTGPVQPG
For more information, see “7UKPICP#RRNG9KTGNGUU-G[DQCTF” on page 44.
51
Chapter 3 Basics
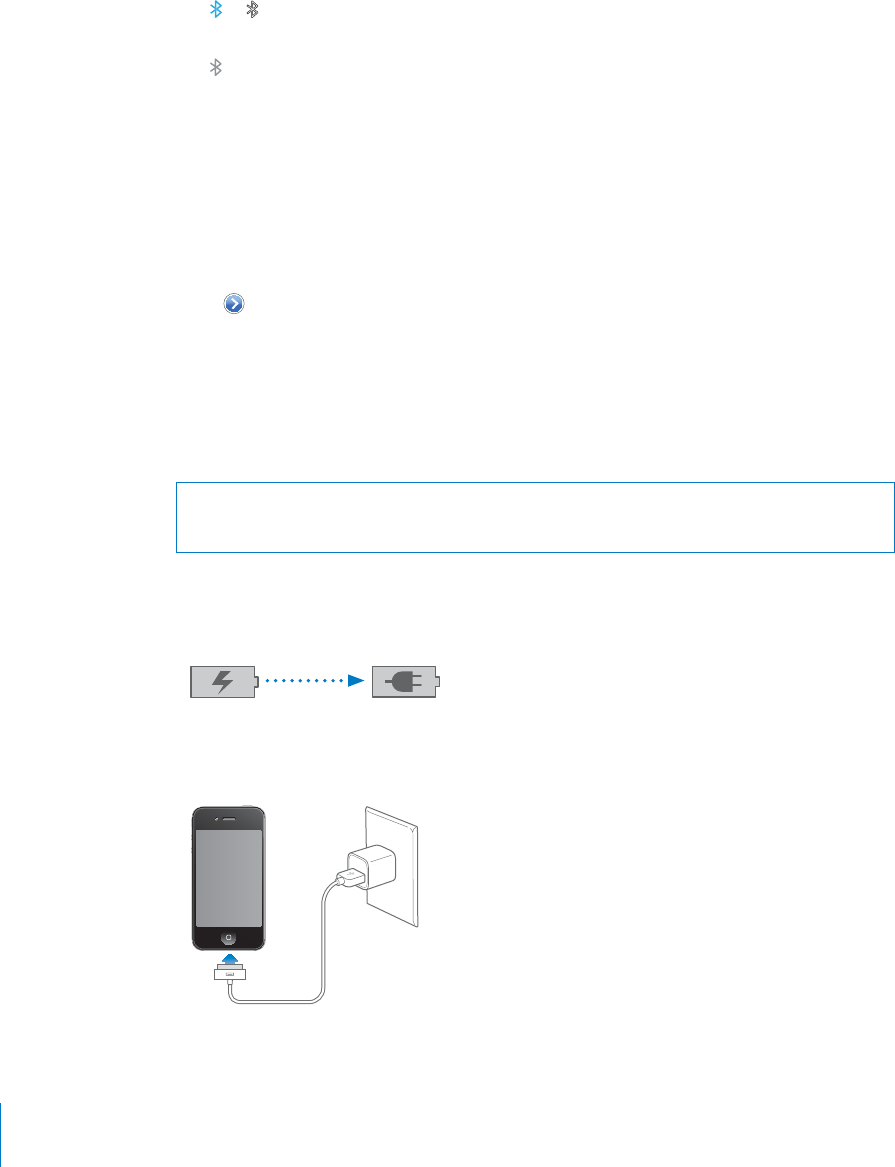
Bluetooth Status
The Bluetooth icon appears in the iPhone status bar at the top of the screen:
or : Bluetooth is on and a device is connected to iPhone. (The color depends on
the current color of the status bar.)
: Bluetooth is on but no device is connected. If you’ve paired a device with iPhone,
KVOC[DGQWVQHTCPIGQTVWTPGFQÒ
No Bluetooth icon: $NWGVQQVJKUVWTPGFQÒ
Unpairing a Bluetooth Device from iPhone
You can unpair a Bluetooth device if you don’t want to use it with iPhone any more.
Unpair a Bluetooth device:
1In Settings, choose General > Bluetooth and turn Bluetooth on.
2Tap next to the device name, then tap “Forget this Device.”
Battery
iPhone has an internal rechargeable battery.
Charging the Battery
WARNING: For important safety information about charging iPhone, see the
Important Product Information Guide at www.apple.com/support/manuals/iphone.
The battery icon in the upper-right corner shows the battery level or charging status.
You can also display the percentage of the battery charge (iPhone 3GS or later). See
“Usage”on page 198.
*OHYNPUN *OHYNLK
Charge the battery: Connect iPhone to a power outlet using the included Dock
Connector to USB Cable and USB power adapter.
52 Chapter 3 Basics
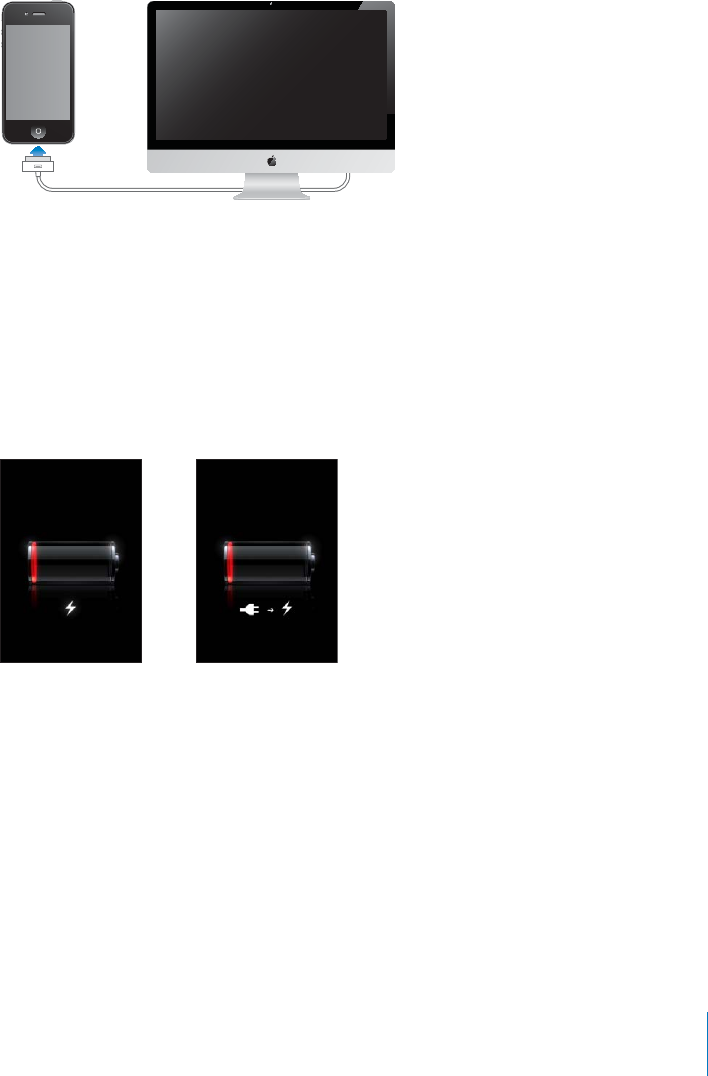
Charge the battery and sync iPhone: Connect iPhone to your computer using the
included Dock Connector to USB Cable. Or connect iPhone to your computer using the
included cable and the Dock, available separately.
Unless your keyboard has a high-powered USB 2.0 port, you must connect iPhone to a
USB 2.0 port on your computer.
Important: The iPhone battery may drain instead of charge if iPhone is connected to a
EQORWVGTVJCV¨UVWTPGFQÒQTKUKPUNGGRQTUVCPFD[OQFG
If you charge the battery while syncing or using iPhone, it may take longer to charge.
Important: If iPhone is very low on power, it may display one of the following images,
indicating that iPhone needs to charge for up to ten minutes before you can use it.
If iPhone is extremely low on power, the display may be blank for up to two minutes
before one of the low-battery images appears.
VY
Maximizing Battery Life
iPhone uses lithium-ion batteries. To learn more about how to maximize the lifespan
and battery life of your iPhone, go to www.apple.com/batteries.
Replacing the Battery
Rechargeable batteries have a limited number of charge cycles and may
eventually need to be replaced. The iPhone battery isn’t user replaceable; it can
be replaced only by an authorized service provider. For more information, go to
www.apple.com/support/iphone/service/battery.
53
Chapter 3 Basics

Security Features
Security features help protect the information on iPhone from being accessed by others.
Passcodes and Data Protection
You can set a passcode that you must enter each time you turn on or wake up iPhone.
Set a passcode: Choose Settings > General > Passcode Lock and enter a 4-digit
passcode, then enter the passcode again to verify it. iPhone then requires you to enter
the passcode to unlock it or to display the passcode lock settings.
Setting a passcode turns on data protection (iPhone 3GS or later). Data protection uses
your passcode as the key for encrypting mail messages and their attachments stored
on iPhone. (Data protection may also be used by some apps available in the App Store.)
A notice at the bottom of the Passcode Lock screen in Settings indicates when data
protection is enabled.
6QKPETGCUGVJGUGEWTKV[QHK2JQPGVWTPQÒ5KORNG2CUUEQFGCPFWUGCNQPIGTRCUUEQFG
with a combination of numbers, letters, punctuation, and special characters. See
“Passcode Lock” on page 202.
Important: On an iPhone 3GS that didn’t ship with iOS 4 or later, you must also restore
iOS software to enable data protection. See “Restoring iPhone” on page 257.
Prevent voice dialing when iPhone is locked: In Settings, choose General > Passcode
.QEMCPFVWTP8QKEG&KCNQÒ7PNQEMK2JQPGVQWUGXQKEGFKCNKPI
Find My iPhone
Find My iPhone helps you locate and secure your iPhone using the free Find My iPhone
app on another iPhone, iPad, or iPod touch, or using a Mac or PC with a web browser.
Find My iPhone includes:
Locate on a map: View the approximate location of your iPhone on a full-screen map
Display a Message or Play a Sound: Lets you compose a message that will appear
on your iPhone screen, or play a sound at full volume for two minutes, even if the
Ring/Silent switch is set to silent
Remote Passcode Lock: Lets you remotely lock your iPhone and create a 4-digit
passcode, if you haven’t set one previously
Remote Wipe: Lets you protect your privacy by erasing all media and data on
iPhone, restoring it to factory settings
Use Find My iPhone: You need to turn on Find My iPhone on iPhone before you can
use these features. See “Setting Up MobileMe Accounts” on page 26.
To locate your missing iPhone and use the other Find My iPhone features, download
the free Find My iPhone app from the App Store on another iOS device, or sign in to
me.com in a web browser on a Mac or PC.
54 Chapter 3 Basics

Note: Find My iPhone requires a MobileMe account. MobileMe is Apple’s online
service, which provides Find My iPhone for free to iPhone 4 customers, and additional
features with a paid subscription. MobileMe may not be available in all countries or
regions. For more information, see “Setting Up MobileMe Accounts” on page 26, or go
to www.apple.com/mobileme.
Cleaning iPhone
Clean iPhone immediately if it comes in contact with any contaminants that may cause
stains, such as ink, dyes, makeup, dirt, food, oils, or lotions. To clean iPhone, disconnect
CNNECDNGUCPFVWTPQÒK2JQPGRTGUUCPFJQNFVJG1P1Ò5NGGR9CMGDWVVQPVJGP
slide the onscreen slider). Then use a soft, slightly damp, lint-free cloth. Avoid getting
moisture in openings. Don’t use window cleaners, household cleaners, compressed air,
aerosol sprays, solvents, alcohol, ammonia, or abrasives to clean iPhone. The front cover
of iPhone 3GS and the front and back covers of iPhone 4 are made of glass and have
an oleophobic coating. To clean these surfaces, simply wipe with a soft, lint-free cloth.
The ability of this coating to repel oil will diminish over time with normal usage, and
TWDDKPIVJGUETGGPYKVJCPCDTCUKXGOCVGTKCNYKNNHWTVJGTFKOKPKUJKVUGÒGEVCPFOC[
scratch the glass.
For more information about handling iPhone, see the iPhone Important Product
Information Guide at www.apple.com/support/manuals/iphone.
Restarting or Resetting iPhone
If something isn’t working right, try restarting iPhone, force quitting an app, or
resetting iPhone.
Restart iPhone: 2TGUUCPFJQNFVJG1P1Ò5NGGR9CMGDWVVQPWPVKNVJGTGFUNKFGT
CRRGCTU5NKFG[QWT°PIGTCETQUUVJGUNKFGTVQVWTPQÒK2JQPG6QVWTPK2JQPGDCEMQP
RTGUUCPFJQNFVJG1P1Ò5NGGR9CMGDWVVQPWPVKNVJG#RRNGNQIQCRRGCTU
+H[QWECP¨VVWTPQÒK2JQPGQTKHVJGRTQDNGOEQPVKPWGU[QWOC[PGGFVQTGUGVK2JQPG
#TGUGVUJQWNFDGFQPGQPN[KHVWTPKPIK2JQPGQÒCPFQPFQGUP¨VTGUQNXGVJGRTQDNGO
Force quit an app: 2TGUUCPFJQNFVJG1P1Ò5NGGR9CMGDWVVQPHQTCHGYUGEQPFU
until a red slider appears, then press and hold the Home button until the app quits.
On iPhone 3GS or later, you can also remove an app from the recents list to force it to
quit. See “Opening and Switching Apps” on page 29.
Reset iPhone: 2TGUUCPFJQNFVJG1P1Ò5NGGR9CMGDWVVQPCPFVJG*QOGDWVVQPCV
the same time for at least ten seconds, until the Apple logo appears.
For more troubleshooting suggestions, see Appendix A,“Support and Other
Information,” on page 254.
55
Chapter 3 Basics

Syncing and File Sharing 4
About Syncing
Syncing copies information from your computer or online account to iPhone, then
keeps the information in sync by copying changes made in one location to the other.
You use iTunes on your computer to sync contacts, calendars, and other information;
iOS apps; photos and videos; and music and other iTunes content. By default, syncing
occurs whenever you connect iPhone to your computer.
;QWECPCNUQEQP°IWTGK2JQPGVQCEEGUUCEEQWPVUYKVJQPNKPGUGTXKEGRTQXKFGTUUWEJCU
MobileMe, Microsoft Exchange, Google, Yahoo!, and others. Your information on those
services is synced over the air.
Syncing Accounts
MobileMe, Microsoft Exchange, Google, Yahoo!, and other online service providers sync
information—which might include contacts, calendars, browser bookmarks, and notes
(iPhone 3GS or later)—via your Internet connection (over the air), so that you don’t
have to connect iPhone to your computer. The Internet connection can be over your
cellular network or your local Wi-Fi network.
Some service providers—including MobileMe and Microsoft Exchange—push
information updates. This means that syncing happens whenever any information is
changed. The Push setting in Fetch New Data must be turned on (it’s on by default).
For iPhone 3G users, iPhone must also be awake or connected to your computer or
a power adapter. Other providers sync by periodically “fetching” changes that have
occurred. Use the Fetch setting to determine how frequently this happens. See “Fetch
New Data” on page 209.
For information about setting up accounts on iPhone, see “Adding Mail, Contacts, and
Calendar Accounts” on page 25.
56

Syncing with iTunes
You can set iTunes to sync any or all of the following:
Contacts—names, phone numbers, addresses, email addresses, and more
Calendars—appointments and events
Email account settings
Webpage bookmarks
Notes
Ringtones
Music
Photos and videos (in your computer’s photo application or folder)
iTunes U collections
Podcasts
Books and audiobooks
Movies, TV shows, and music videos
Apps downloaded from the App Store
You can adjust sync settings whenever iPhone is connected to your computer.
Ringtones, music, audiobooks, podcasts, books, iTunes U collections, videos, and apps
are synced from your iTunes library. If you don’t already have content in iTunes, the
iTunes Store (not available in all countries or regions) makes it easy to preview content
and download it to iTunes. You can also add music to your iTunes library from your
CDs. To learn about iTunes and the iTunes Store, open iTunes and choose Help >
iTunes Help.
Contacts, calendars, notes, and webpage bookmarks are synced with applications on
your computer, as described in the following section. New entries or changes you
make on iPhone are synced to your computer, and vice versa.
iTunes also lets you sync photos and videos from an application or from a folder.
Email account settings are synced only from your computer’s email application to
K2JQPG6JKUCNNQYU[QWVQEWUVQOK\G[QWTGOCKNCEEQWPVUQPK2JQPGYKVJQWVCÒGEVKPI
email account settings on your computer.
Note: You can also set up email accounts directly on iPhone. See “Adding Mail,
Contacts, and Calendar Accounts”on page 25.
Purchases you make on iPhone in the iTunes Store or the App Store are synced back
to your iTunes library. You can also purchase or download content and apps from the
iTunes Store on your computer, and then sync them to iPhone.
57
Chapter 4 Syncing and File Sharing

You can set iPhone to sync with only a portion of what’s on your computer. For
example, you might want to sync only a group of contacts from your address book, or
only unwatched video podcasts.
Important: You should be logged in to your own user account on your computer
before connecting iPhone.
Set up iTunes syncing:
1Connect iPhone to your computer, and open iTunes.
2In iTunes, select iPhone in the Devices list.
3 %QP°IWTGVJGU[PEUGVVKPIUKPGCEJQHVJGUGVVKPIURCPGU
See the following section for descriptions of the panes.
4Click Apply in the lower-right corner of the screen.
By default, “Open iTunes when this iPhone is connected” is selected.
iPhone Settings Panes in iTunes
The following sections provide an overview of each of the iPhone settings panes. For
more information, open iTunes and choose Help > iTunes Help.
Note: Buttons for additional panes may appear in iTunes, depending on the types of
content in your iTunes library.
Summary Pane
Select “Open iTunes when this iPhone is connected” to have iTunes open and sync
iPhone automatically whenever you connect it to your computer. Deselect this option
if you want to sync only by clicking the Sync button in iTunes. For more information,
see “Automatic iTunes Syncing” on page 61.
Select “Sync only checked songs and videos” if you want iTunes to skip unchecked
items in your iTunes library when syncing.
58 Chapter 4 Syncing and File Sharing

5GNGEV¥2TGHGTUVCPFCTFFG°PKVKQPXKFGQU¦KH[QWYCPVK6WPGUVQU[PEUVCPFCTFFG°PKVKQP
KPUVGCFQHJKIJFG°PKVKQPXKFGQUK2JQPG
Select “Convert higher bit rate songs to 128 kbps AAC” if you want iTunes to convert
NCTIGTCWFKQ°NGUVQVJGUVCPFCTFK6WPGUCWFKQHQTOCVFWTKPIU[PEKPI
5GNGEV¥/CPWCNN[OCPCIGOWUKECPFXKFGQU¦VQVWTPQÒCWVQOCVKEU[PEKPIKPVJG/WUKE
and Video settings panes. See “Manually Managing Content” on page 62.
Select “Encrypt iPhone backup” if you want to encrypt the information stored on your
computer when iTunes makes a backup. Encrypted backups are indicated by a lock
icon, and a password is required to restore the information to iPhone. See “Backing Up
iPhone”on page 255.
%NKEM%QP°IWTG7PKXGTUCN#EEGUUVQVWTPQP#EEGUUKDKNKV[HGCVWTGUK2JQPG)5QTNCVGT
See Chapter 29,“Accessibility,” on page 235.
Info Pane
6JG+PHQRCPGNGVU[QWEQP°IWTGVJGU[PEUGVVKPIUHQT[QWTEQPVCEVUECNGPFCTUGOCKN
accounts, and web browser.
Contacts
Sync contacts with applications such as Mac OS X Address Book, Yahoo! Address
Book, and Google Contacts on a Mac, or with Yahoo! Address Book, Google Contacts,
Windows Address Book (Outlook Express), Windows Contacts (Vista and Windows 7),
or Microsoft Outlook 2003, 2007, or 2010 on a PC. (On a Mac, you can sync contacts
with multiple applications. On a PC, you can sync contacts with one application at
a time.)
+H[QWU[PEYKVJ;CJQQ#FFTGUU$QQM[QWQPN[PGGFVQENKEM%QP°IWTGVQGPVGT[QWT
new login information when you change your Yahoo! ID or password after you’ve
set up syncing.
Calendars
Sync calendars from applications such as iCal on a Mac, or from Microsoft Outlook
2003, 2007, or 2010 on a PC. (On a Mac, you can sync calendars with multiple
applications. On a PC, you can sync calendars with only one application at a time.)
Mail Accounts
Sync email account settings from Mail on a Mac, and from Microsoft Outlook 2003,
2007, or 2010 or Outlook Express on a PC. Account settings are transferred only from
your computer to iPhone. Changes you make to an email account on iPhone don’t
CÒGEVVJGCEEQWPVQP[QWTEQORWVGT
Note: The password for your Yahoo! email account isn’t saved on your computer,
so it can’t be synced and must be entered on iPhone. In Settings, choose “Mail,
Contacts, Calendars,” tap your Yahoo! account, and enter the password.
59
Chapter 4 Syncing and File Sharing

Web Browser
You can sync bookmarks on iPhone with Safari on a Mac, or with Safari or Microsoft
Internet Explorer on a PC.
Notes
Sync notes in the Notes app on iPhone with notes in Mail on a Mac or with
Microsoft Outlook 2003, 2007, or 2010 on a PC.
Advanced
These options let you replace the information on iPhone with the information on
your computer during the next sync.
Apps Pane
Use the Apps Pane to sync App Store apps, arrange apps on the iPhone Home screen,
or copy documents between iPhone and your computer.
Select “Automatically sync new apps” to sync new apps to iPhone that you
downloaded or synced from another device. If you delete an app on iPhone, you can
reinstall it from the Apps pane as long as it was previously synced.
;QWECPETGCVGFQEWOGPVUQPK2JQPGYKVJCRRUVJCVUWRRQTV°NGUJCTKPICPFVJGP
copy those documents to your computer. You can also copy documents from your
EQORWVGTVQK2JQPGCPFWUGVJGOYKVJCRRUVJCVUWRRQTV°NGUJCTKPI5GG¥File
Sharing”on page 63.
Ringtones Pane
Use the Ringtones pane to select the ringtones you want to sync to iPhone.
Music, Movies, TV Shows, Podcasts, iTunes U, and Books Panes
Use these panes to specify the media you want to sync. You can sync all music, movies,
TV shows, podcasts, iTunes U collections, books and audiobooks, or select the content
you want.
If you create a playlist folder (collection of playlists) in iTunes, the folder and its playlists
will be synced to iPhone. You can’t create playlist folders directly on iPhone.
If you listen to part of a podcast or audiobook, your place in the story is included if you
sync the content with iTunes. If you started listening to the story on iPhone, you can
RKEMWRYJGTG[QWNGHVQÒWUKPIK6WPGUQP[QWTEQORWVGT¤QTXKEGXGTUC
If you want to watch a rented movie from your computer on iPhone, sync it to iPhone
using the Movies pane in iTunes.
Only songs and videos encoded in formats that iPhone supports are synced
to iPhone. For information about which formats iPhone supports, go to
www.apple.com/iphone/specs.html.
60 Chapter 4 Syncing and File Sharing

Important: If you delete an item from iTunes, it will also be deleted from iPhone the
next time you sync.
Photos Pane
On a Mac, you can sync photos with Aperture or iPhoto 4.0.3 or later, and videos with
iPhoto 6.0.6 or later. On a PC, you can sync photos with Adobe Photoshop Elements
8.0 or later. You can also sync photos and videos from any Mac or PC folder that
contains images.
Automatic iTunes Syncing
By default, iPhone syncs whenever you connect it to iTunes. You can prevent iPhone
from syncing when you connect iPhone to a computer other than the one you usually
sync with.
6WTPQÒCWVQOCVKEU[PEKPIHQTK2JQPG
1Connect iPhone to your computer.
2In iTunes, select iPhone in the Devices list, then click Summary at the top of the screen.
3Deselect “Open iTunes when this iPhone is connected.”
9JGPCWVQOCVKEU[PEKPIKUVWTPGFQÒ[QWECPUVKNNU[PED[ENKEMKPIVJG5[PEDWVVQP
Prevent automatic syncing for all iPods, iPhones, and iPads:
1In iTunes, choose iTunes > Preferences (on a Mac) or Edit > Preferences (on a PC).
2Click Devices, then select “Prevent iPods, iPhones, and iPads from syncing
automatically.”
If this checkbox is selected, iPhone won’t sync, even if “Open iTunes when this iPhone
is connected” is selected in the Summary pane.
Prevent automatic syncing one time, without changing settings: Open iTunes,
connect iPhone to your computer, then press and hold Command-Option (on a Mac)
or Shift-Control (on a PC) until you see iPhone appear in the sidebar.
Sync manually: In iTunes, select iPhone in the sidebar, then click Sync in the bottom-
right corner of the window. Or, if you’ve changed any sync settings, click Apply.
61
Chapter 4 Syncing and File Sharing

Manually Managing Content
The manually managing feature lets you choose just the music, videos, and podcasts
you want to have on iPhone.
Set up iPhone for manually managing content:
1Connect iPhone to your computer.
2In iTunes, select iPhone in the sidebar.
3Click Summary at the top of the screen and select “Manually manage music and videos.”
4Click Apply.
Add items to iPhone: Drag a song, video, podcast, or playlist in your iTunes library to
iPhone (in the sidebar). Shift-click or Command-click (Mac) or Control-click (Windows)
to select multiple items to add at the same time.
iTunes syncs the content immediately. If you deselect “Manually manage music and
videos,” the content you added manually is removed from iPhone the next time iTunes
syncs content.
Remove items from iPhone: With iPhone connected to your computer, select iPhone
in the iTunes sidebar, and click its disclosure triangle to show contents. Select a
content area, such as Music or Movies, then select the items you want to delete and
press the Delete key on the keyboard.
Removing an item from iPhone doesn’t delete it from your iTunes library.
Note: Genius doesn’t work if you manually manage content. See “Using Genius on
iPhone”on page 102.
Transferring Purchased Content to Another Computer
You can transfer content on iPhone that was purchased using iTunes on one
computer to an iTunes library on another authorized computer. The computer must
be authorized to play content purchased using your Apple ID.
Authorize a computer: Open iTunes on the computer and choose Store > Authorize
Computer.
Transfer purchased content: Connect iPhone to the other computer. In iTunes,
choose File > Transfer Purchases from iPhone.
62 Chapter 4 Syncing and File Sharing

File Sharing
(KNG5JCTKPINGVU[QWVTCPUHGT°NGUDGVYGGPK2JQPGCPF[QWTEQORWVGT;QWECPUJCTG
°NGUETGCVGFYKVJCEQORCVKDNGCRRCPFUCXGFKPCUWRRQTVGFHQTOCV
#RRUVJCVUWRRQTV°NGUJCTKPICRRGCTKPVJG(KNG5JCTKPI#RRUNKUVKPK6WPGU(QT
each app, the Files list shows the documents that are on iPhone. See the app’s
FQEWOGPVCVKQPHQTJQYKVUJCTGU°NGUPQVCNNCRRUUWRRQTVVJKUHGCVWTG
6TCPUHGTC°NGHTQOK2JQPGVQ[QWTEQORWVGT
1Connect iPhone to your computer.
2In iTunes, select iPhone in the Devices list, then click Apps at the top of the screen.
3In the File Sharing section, select an app from the list on the left.
4 1PVJGTKIJVUGNGEVVJG°NG[QWYCPVVQVTCPUHGTVJGPENKEM¥5CXGVQ¦CPFEJQQUGC
destination on your computer.
6TCPUHGTC°NGHTQO[QWTEQORWVGTVQK2JQPG
1Connect iPhone to your computer.
2In iTunes, select iPhone in the Devices list, then click Apps at the top of the screen.
3In the File Sharing section, click Add.
4 5GNGEVC°NGVJGPENKEM%JQQUG/CEQT1-2%
6JG°NGKUVTCPUHGTTGFVQ[QWTFGXKEGCPFECPDGQRGPGFWUKPICPCRRVJCVUWRRQTVU
VJCV°NGV[RG6QVTCPUHGTOQTGVJCPQPG°NGUGNGEVGCEJCFFKVKQPCN°NG
&GNGVGC°NGHTQOK2JQPG5GNGEVVJG°NGKPVJG(KNGUNKUVVJGPVCR&GNGVG
63
Chapter 4 Syncing and File Sharing
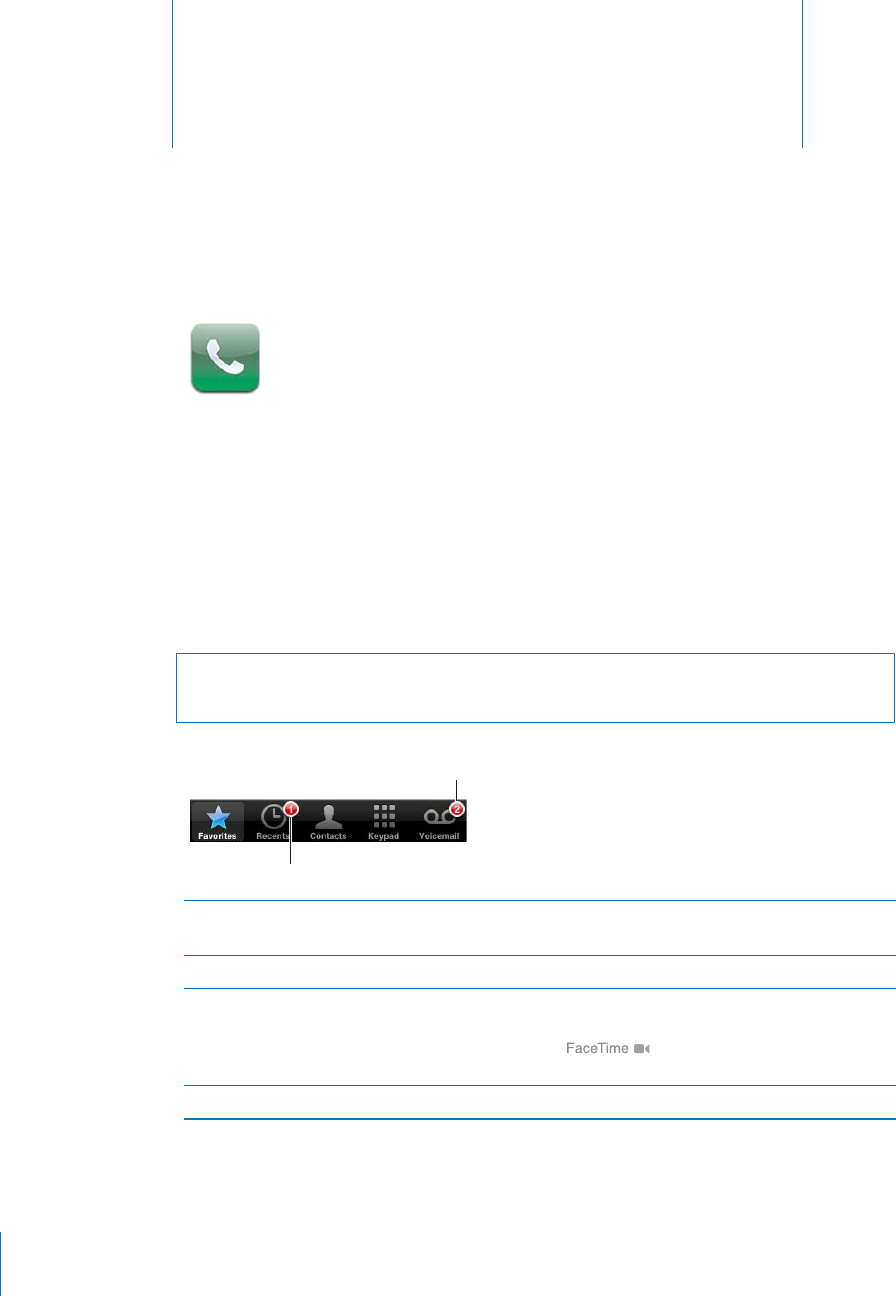
Phon
e
5
P
h
one Ca
lls
Ma
k
ing a ca
ll
on iP
h
one is as simp
l
e as tapping a name an
d
num
b
er in your contacts,
t
apping one o
f
your
f
avorites, or tapping a recent call to return it
.
Ma
k
ing Ca
lls
Buttons at the bottom o
f
the Phone screen give you quick access to your
f
avorites,
recent calls, your contacts, and a numeric keypad
f
or dialing manually
.
WARNIN
G:
For important in
f
ormation about driving sa
f
ely, see the Important Pro
d
uc
t
In
f
ormation Guide
at
www.a
ppl
e.com/su
pp
ort/manua
l
s/i
ph
o
n
e
.
5\TILYV
M
TPZZLKJHSS
Z
5\TILYVM\UOLHYK
]VPJLTHPSTLZZHNLZ
Use Contacts to ca
ll
someon
e
Ta
p
Contacts, c
h
oose a contact, t
h
en ta
p
a
ph
one
num
b
er
.
Call a
f
avorit
e
Ta
p
Favorites, t
h
en c
h
oose a contact
.
Return a recent ca
ll
Tap Recents, t
h
en tap a name or num
b
er in t
h
e
list. I
f
the call was a FaceTime video call (indicated
b
y
)
, ta
p
t
h
e item to ma
k
e a new
vi
d
eo ca
ll.
Dia
l
a num
b
e
r
6CR-G[RC
F
GPVGTV
J
GPWO
D
GTV
J
GPVCR%C
NN
6
4

If you copy a phone number to the clipboard, you can paste it to the numeric keypad
and dial it.
Paste a number to the keypad: Tap the screen above the keyboard, then tap Paste.
If the phone number you copied included letters, iPhone converts them to the
appropriate digits.
Redial the last number you dialed: 6CR-G[RCFVJGPVCR%CNN6CR%CNNCICKPVQFKCN
the number.
Voice Dialing
You can use Voice Control (iPhone 3GS or later) to call someone in your contacts or
FKCNCURGEK°EPWODGT
Note: Voice Control may not be available in all languages.
Use Voice Control to make a phone call: Press and hold the Home button until the
Voice Control screen appears and you hear a beep. Then use the commands described
below to make a call.
You can also press and hold the center button on the iPhone earphones to use
Voice Control.
Call someone in contacts Say “call” or “dial” then say the name of the person.
If the person has more than one number, specify
which one you want to call.
Examples:
Call John Appleseed
Call John Appleseed at home
Call John Appleseed, mobile
Dial a number Say “call” or “dial,” then say the number.
For best results, speak the full name of the person you’re calling. If you speak only the
°TUVPCOGCPF[QWJCXGOQTGVJCPQPGEQPVCEVYKVJVJCVPCOGK2JQPGCUMUYJKEJQH
those contacts you want to call. If there’s more than one number for the person you’re
calling, say which number to use. Otherwise, iPhone asks you.
When voice dialing a number, speak each digit separately—for example, say “four one
°XG°XG°XG°XGQPGVYQQPGVYQ¦
Note: For the “800” area code in the U.S., you can say “eight hundred.”
Prevent voice dialing when iPhone is locked: In Settings, choose General > Passcode
.QEMCPFVWTP8QKEG&KCNQÒ7PNQEMK2JQPGVQWUGXQKEGFKCNKPI
65
Chapter 5 Phone
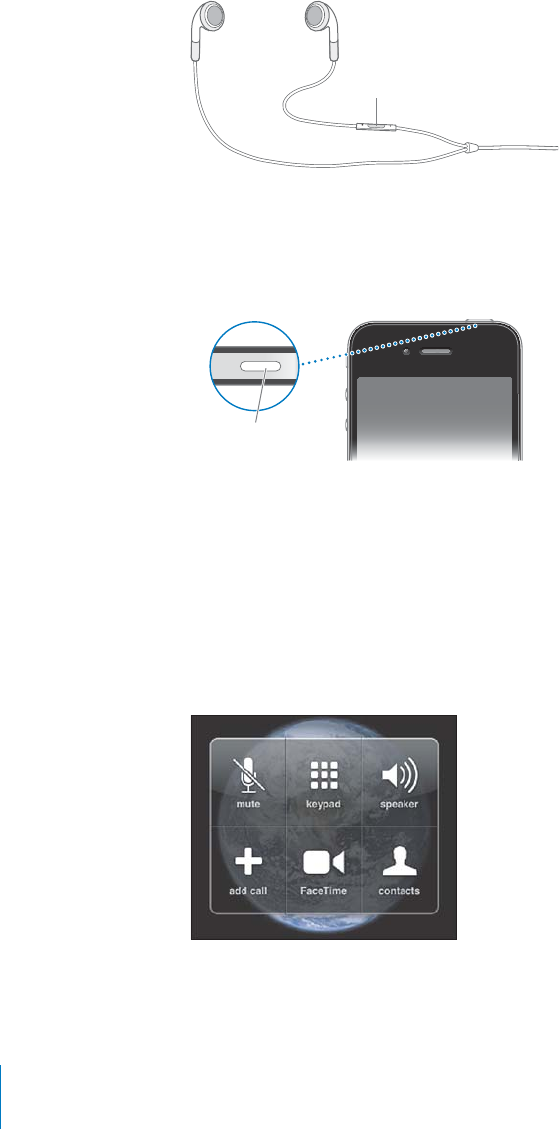
Receiving Call
s
When you receive a call, tap Answer. I
f
iPhone is locked, drag the slider. You can also
press t
h
e center
b
utton on your iP
h
one earp
h
ones to answer a ca
ll.
*LU[LYI\[[VU
Si
l
ence a ca
ll:
2TGUUVJG1P1
Ò
5NGGR9CMGDWVVQPQTGKVJGTXQNWOGDWVVQP;QWECP
s
till answer the call a
f
ter silencing it, until it goes to voicemail
.
Dec
l
ine a ca
ll:
Do one o
f
the
f
ollowing to send a call directly to voicemail
.
2TGUUVJG1P1
Ò
5NGGR9CMGDWVVQPVYKEGSWKEMN[
6U6MM:SLLW
>HRLI\[[VU
Press and hold the center button on the iPhone ear
p
hones
f
or about two seconds
.
6YQNQYDGGRUEQP
°
TOVJCVVJGECNNYCUFGENKPGF
Ta
p
Decline (i
f
iPhone is awake when a call comes in)
.
B
l
oc
k
ca
ll
s an
d
maintain Wi-Fi access to t
h
e Internet
:
In Settings, turn on Airp
l
ane
Mo
d
e, t
h
en ta
p
Wi-Fi to turn it on
.
W
h
i
l
e On a Ca
ll
W
h
en you’re on a ca
ll
, t
h
e screen s
h
ows ca
ll
options
.
T
h
e ca
ll
options may vary,
d
epen
d
ing on w
h
ic
h
iP
h
one you’re using
.
66
C
h
a
p
ter 5 P
h
on
e

Mute your line Tap Mute. You can still hear the caller, but the
caller can’t hear you.
Use the numeric keypad to enter information 6CR-G[RCF
Use the speakerphone or a Bluetooth device Tap Speaker. The Button is labeled Audio Source
when a Bluetooth device is available, which
lets you select the Bluetooth device, iPhone, or
Speaker Phone.
See contact information Tap Contacts.
Put a call on hold iPhone 4: Touch and hold Mute.
iPhone 3G or iPhone 3GS: Tap Hold.
Neither party can hear the other. When a call is
on hold, tap Hold again to return to the call.
Make another call Tap Add Call.
You can use other apps during a call—to check your schedule in Calendar, for example.
Use another app during a call: Press the Home button, then tap an app icon. To
return to the call, tap the green bar at the top of the screen.
Note: The 3G (UMTS) cellular network supports simultaneous voice and data
communications on GSM models. For all other network connections (EDGE or GPRS
on GSM models, or EV-DO or 1xRTT on a CDMA model), you can’t use Internet services
while you’re on the phone unless iPhone also has a Wi-Fi connection to the Internet.
End a call: Tap End Call. Or press the center button on your iPhone earphones.
Second Calls
During a call, you can make or receive another call. If you receive a second call, iPhone
beeps and shows the caller’s information and a list of options.
Note: Making and receiving a second call may be an optional service in some
countries or regions. Contact your carrier for more information.
Respond to a second incoming call:
To ignore the call and send it to voicemail: Tap Ignore.
6QJQNFVJG°TUVECNNCPFCPUYGTVJGPGYQPGTap Hold Call + Answer.
6QGPFVJG°TUVECNNCPFCPUYGTVJGPGYQPGOn GSM models, tap End Call + Answer.
On a CDMA model, tap End Call and when the second call rings back, tap Answer, or
drag the slider if the phone is locked.
If you’re on a FaceTime video call, you can either end the video call and answer the
incoming call, or decline the incoming call.
Make a second call: 6CR#FF%CNN6JG°TUVECNNKURWVQPJQNF
67
Chapter 5 Phone

Switch between calls: Tap Swap. The active call is put on hold.
On a CDMA model, you can’t switch between calls if the second call was outgoing,
but you can merge the calls. If you end the second call or the merged call, both calls
are terminated.
Merge calls: Tap Merge Calls.
On a CDMA model, you can’t merge calls if the second call was incoming.
Conference Calls
1P)5/OQFGNU[QWECPUGVWRCEQPHGTGPEGECNNVQVCNMYKVJWRVQ°XGRGQRNGCVC
time, depending on your carrier.
Note: Conference calling may be an optional service in some countries or regions.
Contact your carrier for information.
Create a conference call:
1Make a call.
2 6CR#FF%CNNCPFOCMGCPQVJGTECNN6JG°TUVECNNKURWVQPJQNF
3Tap Merge Calls. The calls are merged on one line and everyone can hear each other.
4Repeat steps two and three to add additional calls.
Drop one call Tap Conference and tap next to a call. Then
tap End Call.
Talk privately with a call Tap Conference, then tap Private next to a call.
Tap Merge Calls to resume the conference call.
Add an incoming call Tap Hold Call + Answer, then tap Merge Calls.
If your service includes conference calling, iPhone always has a second line available in
addition to the conference call.
Note: You can’t make a FaceTime video call when you’re on a conference call.
68 Chapter 5 Phone
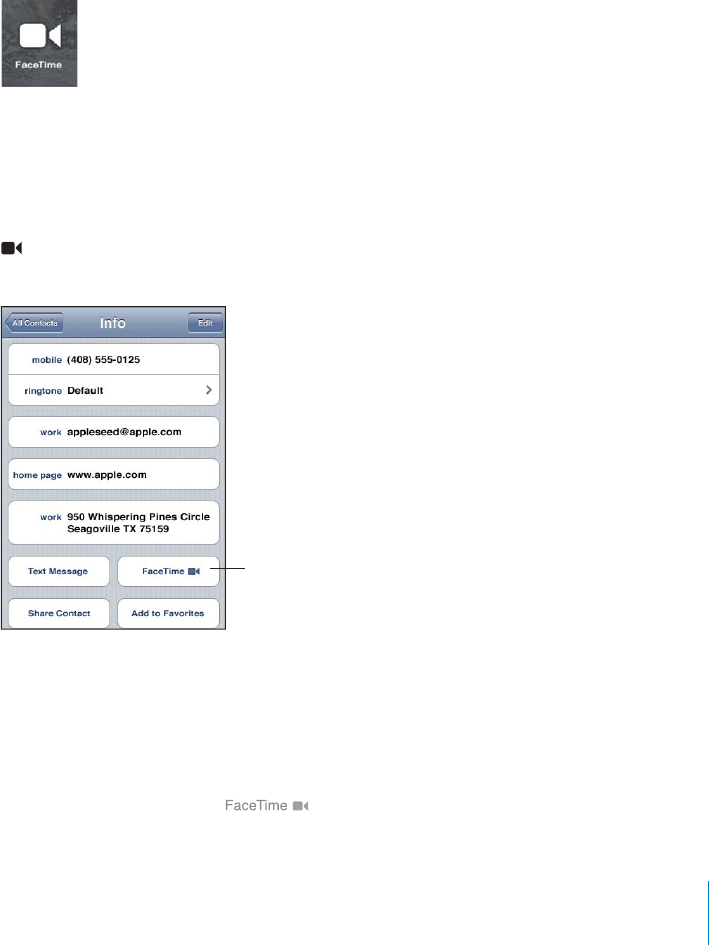
FaceT
i
m
e
FaceTime vi
d
eo ca
ll
s
l
et you see as we
ll
as
h
ear t
h
e person you’re ta
lk
ing to. You can
ma
k
e a vi
d
eo ca
ll
to someone wit
h
anot
h
er iP
h
one 4, an iPo
d
touc
h
(4t
h
generation),
or a Mac wit
h
FaceTime. No setup is nee
d
e
d
,
b
ut you must
h
ave a Wi-Fi connection to
t
he Internet. FaceTime uses the
f
ront camera so the person you call can see your
f
ace,
b
ut you can switc
h
to t
h
e main camera to s
h
are w
h
at you see aroun
d
you
.
N
ote
:
FaceTime may not
b
e avai
l
a
bl
e in a
ll
countries or regions
.
Ma
k
e a FaceTime ca
ll:
To an iP
h
one 4
:
Ca
ll
t
h
e
p
erson’s
ph
one num
b
er, t
h
en ta
p
FaceTime
.
O
r, in Contacts, ta
p
FaceTime
.
To an iPo
d
touc
h
(4t
h
generation) or a Mac
:
In
C
ontacts, ta
p
FaceTime
.
The contact in
f
ormation must include the email address that the person you’re calling
uses to s
i
gn
i
n to FaceT
i
me
.
appears on the FaceTime button in Contacts i
f
you’ve previously had a FaceTime
ca
ll
wit
h
t
h
at
p
erson
.
4HRLH
-HJL;PTL
]PKLVJHSS
Ma
k
e a FaceTime ca
ll
using Voice Contro
l:
Press an
d
h
o
ld
t
h
e Home
b
utton unti
l
t
h
e
Voice Control screen appears and you hear a beep. Then say “FaceTime,”
f
ollowed by
t
he name o
f
the
p
erson to call
.
I
f
you had a previous FaceTime video call with someone, you can make another video
call to that person b
y
tapping the entr
y
f
or that call in Recents. Previous FaceTime
vi
d
eo ca
ll
s are in
d
icate
d
b
y
.
6
9
C
h
a
p
ter 5 P
h
on
e

When the voice call is established, you see the image from the other person’s iPhone.
A picture-in-picture window shows the image from your iPhone that the other person
sees. You can drag the window to any corner. You can use FaceTime in portrait or
landscape orientation.
Video calls use the top microphone on iPhone.
If you move away from your Wi-Fi network, or it otherwise becomes unavailable, you’ll
get an option to redial the number for a voice call.
Note: When you make a FaceTime video call, your phone number is displayed even if
ECNNGT+&KUDNQEMGFQTVWTPGFQÒ
Receive a FaceTime video call: Click Accept.
Mute a FaceTime video call Tap at the bottom of the screen. You can still
hear and see the caller. The caller can see, but not
hear you.
Switch between the front and main cameras Tap at the bottom of the screen.
Use another app during a FaceTime video call Press the Home button, then tap an app icon.
You can still talk, but won’t see each other. To
return to the video call, tap the green bar at the
top of the screen.
End a FaceTime video call Tap at the bottom of the screen.
6QDNQEM(CEG6KOGXKFGQECNNU[QWECPVWTPQÒ(CEG6KOGKP5GVVKPIU
6WTP(CEG6KOGQPQTQÒIn Settings, choose Phone and tap the FaceTime switch.
FaceTime is on by default.
You can also disable FaceTime in Restrictions. See “Restrictions” on page 203.
70 Chapter 5 Phone

Using a Bluetooth Device for Calls
You can make and receive calls using a Bluetooth device paired with iPhone. See
“Pairing a Bluetooth Device with iPhone”on page 51.
For information about using a Bluetooth device to make and receive calls, see the
documentation that came with the device.
Listen to calls through iPhone when a Bluetooth device is connected: Do one of
the following:
Answer a call by tapping the iPhone screen.
During a call, tap Audio on iPhone. Choose iPhone to hear calls through iPhone or
Speaker Phone to use the speakerphone.
6WTPQÒ$NWGVQQVJ+P5GVVKPIUEJQQUG)GPGTCN $NWGVQQVJCPFFTCIVJGUYKVEJVQ1Ò
6WTPQÒVJG$NWGVQQVJFGXKEGQTOQXGQWVQHTCPIG;QWOWUVDGYKVJKPCDQWV
feet of a Bluetooth device for it to be connected to iPhone.
Emergency Calls
If iPhone is locked with a passcode, you may still be able to make an emergency call.
Make an emergency call when iPhone is locked: On the Enter Passcode screen, tap
Emergency Call, then dial the number using the numeric keypad.
In the U.S., location information (if available) is provided to emergency service
providers when you dial 911.
On a CDMA model, when an emergency call ends, iPhone enters Emergency call mode
to allow a call back from emergency services. While in this mode, data transmission
and text messages are blocked.
Exit emergency call mode (CDMA model): Do one of the following:
Tap the back button.
Press the Sleep/Wake or Home button.
Use the keypad to dial a non-emergency call.
Emergency call mode ends automatically after a few minutes, as determined by
your carrier.
Important: You should not rely on wireless devices for essential communications,
such as medical emergencies. Use of any cellular phone to call emergency services
may not work in all locations. Emergency numbers and services vary by country or
region. Only emergency numbers valid in the country or region where you’re making
the call will work, and sometimes an emergency call cannot be placed due to network
unavailability or environmental interference. Some cellular networks may not accept
an emergency call from iPhone if it doesn’t have a SIM card or if the SIM card is locked
(GSM models), or if you haven’t activated your iPhone. If you’re on a FaceTime video
call, you must end that call before you can call an emergency number.
71
Chapter 5 Phone

Visual Voicemai
l
On iPhone, visual voicemail lets you see a list o
f
your messages and choose which ones
t
o
l
isten to or
d
e
l
ete, wit
h
out
h
aving to
l
isten to instructions or prior messages
.
N
ote
:
Visua
l
voicemai
l
may not
b
e avai
l
a
bl
e in a
ll
countries or regions, or may
b
e an
optional service. Contact
y
our carrier
f
or more in
f
ormation. I
f
visual voicemail isn’t
a
vailable, tap Voicemail and
f
ollow the voice prompts to retrieve your messages
.
5\TILYVMTPZZLKJHSSZHUK\UOLHYK
]VPJLTHPSTLZZHNLZHWWLHYZVU[OL
/VTLZJYLLU7OVULPJVU
Setting Up Voicemai
l
6JG
°
TUVVKOG[QWVCR8QKEGOCKNK2JQPGRTQORVU[QWVQETGCVGCXQKEGOCKNRCUUYQTF
a
n
d
recor
d
y
our voicemai
l
greeting
.
C
h
ange your greeting
:
1
Tap Voicemai
l
, tap Greeting, t
h
en tap Custom
.
2
Tap Recor
d
w
h
en you’re rea
d
y to start
.
3
9JGP[QW
°
PKUJVCR5VQR6QTGXKGYVCR2NC[
To rerecor
d
, re
p
eat ste
p
s 2 an
d
3
.
4
Ta
p
S
ave
.
Use your carrier’s de
f
ault greeting Tap Voicemail, tap Greeting, then tap De
f
ault
.
Set an alert sound
f
or new voicemai
l
In Settings, c
h
oose Soun
d
s an
d
turn New
Voicemail on. The alert sounds once
f
or each new
XQKEGOCKN+
H
VJG4KPI5KNGPVUYKVEJKUQ
Ò
K2JQPG
won’t soun
d
a
l
erts
.
C
h
ange t
h
e voicemai
l
passwor
d
In Settings, c
h
oose P
h
one > C
h
ange Voicemai
l
Passwor
d.
C
h
ec
k
ing Voicemai
l
When you tap Phone, iPhone shows the number of missed calls and unheard
voicemai
l
messages
.
5\TILYVMTPZZLKJHSSZ
5\TILYVM\UOLHYK
]VPJLTHPSTLZZHNLZ
7
2
C
h
a
p
ter 5 P
h
on
e

Tap Voicemail to see a list of your messages.
:RPW[VHU`WVPU[PU
HTLZZHNL!+YHN[OL
WSH`OLHK
<UOLHYK
TLZZHNLZ 7SH`7H\ZL
*VU[HJ[PUMV
:JY\IILYIHY
:WLHRLYWOVUL(\KPV
^OLUH)S\L[VV[OKL]PJL
PZJVUULJ[LK;HW[V
JOVVZLH\KPVV\[W\[
9L[\YU[OLJHSS
Listen to a message: Tap the message. (If you’ve already heard the message, tap the
message again to replay it.) Use and to pause and resume playback.
Once you listen to a message, it’s saved until your carrier erases it.
Check voicemail from another phone: Dial your own number or your carrier’s remote
access number.
Deleting Messages
Select a message, then tap Delete.
Listen to a deleted message Tap Deleted Messages (at the end of the list),
then tap the message.
Undelete a message Tap Deleted Messages (at the end of the list),
then tap the message and tap Undelete.
Delete messages permanently Tap Deleted Messages (at the end of the list),
then tap Clear All.
Note: In some countries or regions, deleted visual voicemail messages may be
permanently erased by your carrier.
Getting Contact Information
Visual voicemail saves the date and time of the call, the length of the message, and
any available contact information.
See a caller’s contact information: Tap next to a message.
You can use the information to email or text the caller, or update contact info.
73
Chapter 5 Phone

Contacts
From a contact’s Info screen, a quick tap lets you make a phone call, create a new email
OGUUCIG°PFVJGNQECVKQPQHVJGKTCFFTGUUCPFOQTG5GG¥Searching Contacts” on
page 220.
Favorites
Favorites gives you quick access to your most-used phone numbers.
Add a contact’s phone number to your favorites list: Tap Contacts and choose a
contact. Then tap “Add to Favorites” and choose the phone number or email address
you want to add. On iPhone 4, choose whether to save the favorite as a voice call or as
a FaceTime call. If you save the contact as a FaceTime call, appears with the name
in the favorites list.
If someone already in your contacts calls you, you can add their name to favorites from
the recents list.
Add a contact to favorites from the recents list: Tap Recents and tap next to the
contact’s name, then tap “Add to Favorites.”
Call a contact from your favorites Tap Favorites and choose a contact. If appears
next to a name, you can tap the name to make a
FaceTime call.
Delete a contact from your favorites Tap Favorites and tap Edit. Then tap next to a
contact or number and tap Remove.
Reorder your favorites list Tap Favorites and tap Edit. Then drag next to a
contact to a new place in the list.
Call Forwarding, Call Waiting, and Caller ID
iPhone supports call forwarding, call waiting, and caller ID.
Call Forwarding
;QWECPUGVK2JQPGVQHQTYCTFKPEQOKPIECNNUVQCFKÒGTGPVPWODGT(QTGZCORNGKH
you’re going to an area with no cellular coverage, you may want to forward calls to a
number where you can be reached.
Note: FaceTime calls are not forwarded.
On GSM models, use the Call Forwarding setting to forward incoming calls to
another number.
Forward incoming calls (GSM models):
1In Settings, choose Phone > Call Forwarding, then turn on Call Forwarding.
2On the “Forward to” screen, enter the phone number you want calls forwarded to.
74 Chapter 5 Phone

When Call Forwarding is on, the call forwarding ( ) icon appears in the status bar
(GSM models). You must be in range of the cellular network when you set iPhone to
forward calls, or calls won’t be forwarded.
1PC%&/#OQFGN[QWVWTPECNNHQTYCTFKPIQPQTQÒD[FKCNKPIURGEKCNEQFGU
Turn on call forwarding (CDMA model): Enter *72 on the Phone keypad, followed by
the number you’re forwarding calls to, then tap Call.
6WTPQÒECNNHQTYCTFKPI%&/#OQFGNEnter *73 on the Phone keypad, then tap Call.
Call Waiting
Call waiting lets you know if you receive another call when you’re on the phone. You
can ignore the incoming call, put the current call on hold and answer the incoming
ECNNQTGPFVJGEWTTGPVECNNCPFCPUYGTVJGKPEQOKPIECNN+HECNNYCKVKPIKUQÒYJGP
you’re on the phone, incoming calls go directly to voicemail.
1P)5/OQFGNUWUGVJG%CNN9CKVKPIUGVVKPIVQVWTPECNNYCKVKPIQPQTQÒ
6WTPECNNYCKVKPIQPQTQÒ)5/OQFGNUIn Settings, choose Phone > Call Waiting,
VJGPVWTP%CNN9CKVKPIQPQTQÒ
On a CDMA model, call waiting is on by default. You can disable call waiting for a call
by appending a special code to the number when you dial it.
Disable call waiting during a call (CDMA model): Enter *70 after the number
you’re dialing.
To disable call waiting for a subsequent call, you must again enter *70 after the
number when you dial it.
Caller ID
Caller ID displays your name or phone number to the person you call, if the recipient’s
equipment has that capability and you haven’t blocked caller ID on your phone service.
Note: When you make a FaceTime call, your phone number is displayed even if caller ID
KUVWTPGFQÒQTDNQEMGF
1P)5/OQFGNUWUGVJG5JQY/[%CNNGT+&VQVWTPECNNGT+&QPQTQÒ
6WTPECNN+&QPQTQÒ)5/OQFGNUIn Settings, choose Phone > Show My Caller ID,
VJGPVWTP5JQY/[%CNNGT+&QPQTQÒ
On a CDMA model, caller ID is on by default. You can block your ID for a call you’re
making by appending a special code to the number when you dial it.
Disable caller ID for a call (CDMA model): Enter *67 after the number you’re dialing.
75
Chapter 5 Phone

Ringtones and the Ring/Silent Switch
iPhone comes with ringtones you can use for incoming calls, Clock alarms, and the
Clock timer. You can also purchase ringtones from songs in iTunes.
Ring/Silent Switch and Vibrate Modes
#UYKVEJQPVJGUKFGQHK2JQPGOCMGUKVGCU[VQVWTPVJGTKPIGTQPQTQÒ
6WTPVJGTKPIGTQPQTQÒFlip the switch on the side of iPhone.
9PUN
:PSLU[
Important: Clock alarms still sound even if you set the Ring/Silent switch to silent.
Set iPhone to vibrate: In Settings, choose Sounds. Separate controls let you set vibrate
for both ring mode and silent mode.
For more information, see “Sounds and the Ring/Silent Switch” on page 197.
Setting Ringtones
You can set the default ringtone for calls, and for Clock alarms and timers. You can also
assign individual ringtones to contacts so you know who’s calling.
Set the default ringtone: In Settings, choose Sounds > Ringtone, then choose a
ringtone.
Assign a ringtone to a contact: From Phone, tap Contacts and choose a contact. Tap
Edit, then tap Ringtone and choose a ringtone.
Purchasing Ringtones
You can purchase ringtones from the iTunes Store on iPhone. See “Purchasing
Ringtones” on page 173.
76 Chapter 5 Phone

International Calls
Making International Calls from Your Home Area
For information about making international calls from your home area, including rates
and other charges that may apply, contact your carrier or go to your carrier’s website.
Using iPhone Abroad
You may be able to use iPhone to make calls in other countries around the world,
depending on available networks.
Enable international roaming: Contact your carrier for information about availability
and fees.
Important: Voice and data roaming charges may apply. To avoid data roaming charges,
VWTP&CVC4QCOKPIQÒ
6WTP&CVC4QCOKPIQÒIn Settings, choose General > Network, then tap to turn Data
4QCOKPIQÒ&CVC4QCOKPIKUVWTPGFQÒD[FGHCWNV
6WTPKPI&CVC4QCOKPIQÒJGNRUVQCXQKFFCVCTQCOKPIEJCTIGUYJGPVTCXGNKPIQWVUKFG
your carrier’s network by disabling data transmission over the cellular network. You
can still access the Internet if you have a Wi-Fi connection. If Wi-Fi network access isn’t
available, however, you cannot:
Make or receive FaceTime video calls
Send or receive email
Browse the Internet
Sync your contacts, calendars, or bookmarks with MobileMe or Exchange
Stream YouTube videos
Get stock quotes
Get map locations
Get weather reports
Purchase music or apps
Other third-party apps that use data roaming may also be disabled.
+H&CVC4QCOKPIKUVWTPGFQÒ[QWECPUVKNNOCMGCPFTGEGKXGRJQPGECNNUCPFUGPFCPF
receive text messages. Voice roaming charges may apply. Visual voicemail is delivered
if there’s no charge; if your carrier charges for delivery of visual voicemail when
TQCOKPIVWTPKPI&CVC4QCOKPIQÒRTGXGPVUVJGFGNKXGT[QHXKUWCNXQKEGOCKN
Important: If Data Roaming is turned on, you may incur charges when roaming
outside your carrier’s network for the use of any of the features listed above, as well
as for delivery of visual voicemail. Check with your carrier for information about
roaming charges.
77
Chapter 5 Phone

;QWECPCNUQVWTPQÒEGNNWNCTFCVCVQRTGXGPVCP[EGNNWNCTFCVCWUCIG
6WTPQÒ%GNNWNCT&CVCIn Settings, choose General > Network, then tap the Cellular
&CVCUYKVEJVQVWTPKVQÒ
5GVK2JQPGVQCFFVJGEQTTGEVRTG°ZYJGPFKCNKPIHTQOCPQVJGTEQWPVT[In Settings,
tap Phone, then turn International Assist on. This lets you make calls to your home
country using the numbers in your contacts and favorites, without having to add a
RTG°ZQT[QWTEQWPVT[EQFG+PVGTPCVKQPCN#UUKUVYQTMUHQT75VGNGRJQPGPWODGTUQPN[
When you make a call using International Assist, “International Assist” appears on the
iPhone screen, alternating with the “calling …” message, until your call is connected.
Note: International Assist may not be available in all areas.
Set the carrier to use: In Settings, tap Carrier, then select the carrier you prefer. This
option is available only when you’re traveling outside your carrier’s network. You can
make calls only on carriers that have roaming agreements with your iPhone service
provider. For more information, see “Carrier” on page 196.
Get voicemail when visual voicemail isn’t available: Dial your own number (on
a CDMA model, dial your number followed by #), or touch and hold “1” on the
numeric keypad.
;QWECPWUG#KTRNCPG/QFGVQVWTPQÒEGNNWNCTUGTXKEGUCPFVJGPVWTP9K(KQPVQIGV
access to the Internet, while preventing voice roaming charges.
7UGCKTRNCPGOQFGVQVWTPQÒEGNNWNCTUGTXKEGUIn Settings, tap Airplane Mode to turn
it on, then tap Wi-Fi and turn Wi-Fi on. See “Airplane Mode” on page 193.
Incoming phone calls are sent to voicemail. To make and receive calls again and get
[QWTXQKEGOCKNOGUUCIGUVWTPCKTRNCPGOQFGQÒ
78 Chapter 5 Phone

Mai
l
6
Mail works with MobileMe, Microso
f
t Exchange, and many o
f
the most popular email
s
ystems—inc
l
u
d
ing Ya
h
oo!, Goog
l
e, an
d
AOL—as we
ll
as ot
h
er in
d
ustry-stan
d
ar
d
POP3 an
d
IMAP emai
l
systems. You can sen
d
an
d
receive p
h
otos, vi
d
eos, an
d
grap
h
ics
,
a
n
d
view PDFs an
d
ot
h
er attac
h
ments. You can a
l
so print messages, an
d
attac
h
ments
th
at o
p
en in Quic
k
Loo
k.
Setting Up Emai
l
Account
s
You can set up email accounts on iPhone in either o
f
the
f
ollowing ways
:
Set up an account directly on iPhone. See “
Adding Mail, Contacts, and Calendar
“
A
ccounts
”
on pag
e
2
5
.
In iTunes, use the iPhone settings panes to sync email accounts settings
f
rom your
com
p
uter. See
“
iP
h
one Settings Panes in iTunes
”
on pag
e
58
.
7
9
Checking and Reading Emai
l
The Mail icon on the Home screen shows the number o
f
unread messages in your
in
b
oxes. You may
h
ave ot
h
er unrea
d
messages in ot
h
er mai
lb
oxes
.
5\TILYVM\UYLHK
LTHPSZPU`V\YPUIV_LZ
In Mai
l
, t
h
e Mai
lb
oxes screen gives you quic
k
access to a
ll
your in
b
oxes an
d
ot
h
er
mailboxes. Tap an inbox to see the incoming messages
f
or that account. To see
incoming messages
f
or all your accounts, tap All Inboxes. I
f
only one mail account is
s
et up, on
l
y t
h
at in
b
ox appears on t
h
e Mai
lb
oxes screen
.
5\TILYVM\UYLHK
TLZZHNLZ
0UJVTPUN
TLZZHNLZMVYHSS
HJJV\U[Z
W
h
en you open a mai
lb
ox, Mai
l
retrieves an
d
d
isp
l
ays t
h
e most recent messages, an
d
s
hows the number o
f
unread messages at the top o
f
the screen. Unread messages
h
ave a
bl
ue
d
ot next to them. The number o
f
messages retrieved is determined by
your Mai
l
settings. See
“
Mai
l
”
on pag
e
2
1
0
.
I
f
y
ou organize messages b
y
thread, related messages appear as a single entr
y
in the
mai
lb
ox. Message t
h
rea
d
s
h
ave a num
b
er next to t
h
e rig
h
t arrow, s
h
owing t
h
e num
b
er
o
f
messages in the thread. A blue dot indicates that one or more messages in the
th
rea
d
are unrea
d
. T
h
e message
d
isp
l
aye
d
is t
h
e o
ld
est unrea
d
message, or t
h
e most
recent message i
f
all the messages are read
.
<UYLHKTLZZHNLZ
5\TILYVM
TLZZHNLZPU
[OYLHK
C
h
a
p
ter
6
Mai
l
See messages in a thread: Tap the thread in the mailbox.
Read a message: Tap a message. Within a message, tap or to see the next or
previous message.
6WTP¥1TICPK\G$[6JTGCF¦QPQTQÒIn Settings, choose “Mail, Contacts, Calendars,”
CPFVCRVJGUYKVEJVQVWTP1TICPK\G$[6JTGCFQPQTQÒ5GG¥Mail” on page 210.
If you set up more than one account, the Accounts section of the Mailboxes screen lets
you access your accounts. Tap an account to see its folders and mailboxes, including its
inbox. If only one account is set up, the folders and mailboxes for that account appear
on the Mailboxes screen.
5\TILYVM\UYLHK
TLZZHNLZ
;HW[VZLLHSS`V\Y
LTHPSHJJV\U[Z
Check for new messages: Choose a mailbox, or tap at any time.
Load additional messages: Scroll to the bottom of the list of messages and tap Load
More Messages.
Zoom in on part of a message Double-tap an area of the message. Double-tap
again to zoom out. Or pinch apart or together to
zoom in or out.
4GUK\GCP[EQNWOPQHVGZVVQ°VVJGUETGGP Double-tap the text.
See all the recipients of a message Tap Details.
Tap a name or email address to see the recipient’s
contact information. Then tap a phone number,
email address, or text message to contact the
person. Tap Hide to hide the recipients.
Add an email recipient to your contacts list Tap the message and, if necessary, tap Details
to see the recipients. Then tap a name or email
address and tap Create New Contact or “Add to
Existing Contact.”
Mark a message as unread Open the message and tap “Mark as Unread.”
A blue dot appears next to the message in the
mailbox list until you open it again.
81
Chapter 6 Mail

Open a meeting invitation: Tap the invitation.
You can get contact information for the organizer and other invitees, set an alert, add
notes to the event, and add comments that are included in your response emailed
to the organizer. You can accept, tentatively accept, or decline the invitation. See
“Responding to Meeting Invitations” on page 118.
6WTP2WUJQPQTQÒIn Settings, choose “Mail, Contacts, Calendars” > Fetch New Data,
VJGPVWTP2WUJQPQTQÒ5GG¥Fetch New Data” on page 209.
Using Links and Detected Data
iPhone detects web links, phone numbers, email addresses, and other types of
information that you can use to open a webpage, make a phone call, create a
preaddressed email message, create or add information to a contact, or perform some
other useful action. Detected data appears as blue underlined text. Tap the data to use
its default action, or touch and hold it to see other actions.
Link or image Tap to open the webpage in Safari.
Touch and hold to:
Open the webpage in Safari
Copy the link
Phone number Tap the number, then tap Call to dial the number.
Touch and hold to:
Dial the number
Send a text message
Create a new contact with the number
Add the number to an existing contact
Address Tap to display the location in Maps.
Touch and hold to:
Display the location in Maps
Create a new contact with the address
Add the address to an existing contact
Copy the address
82 Chapter 6 Mail
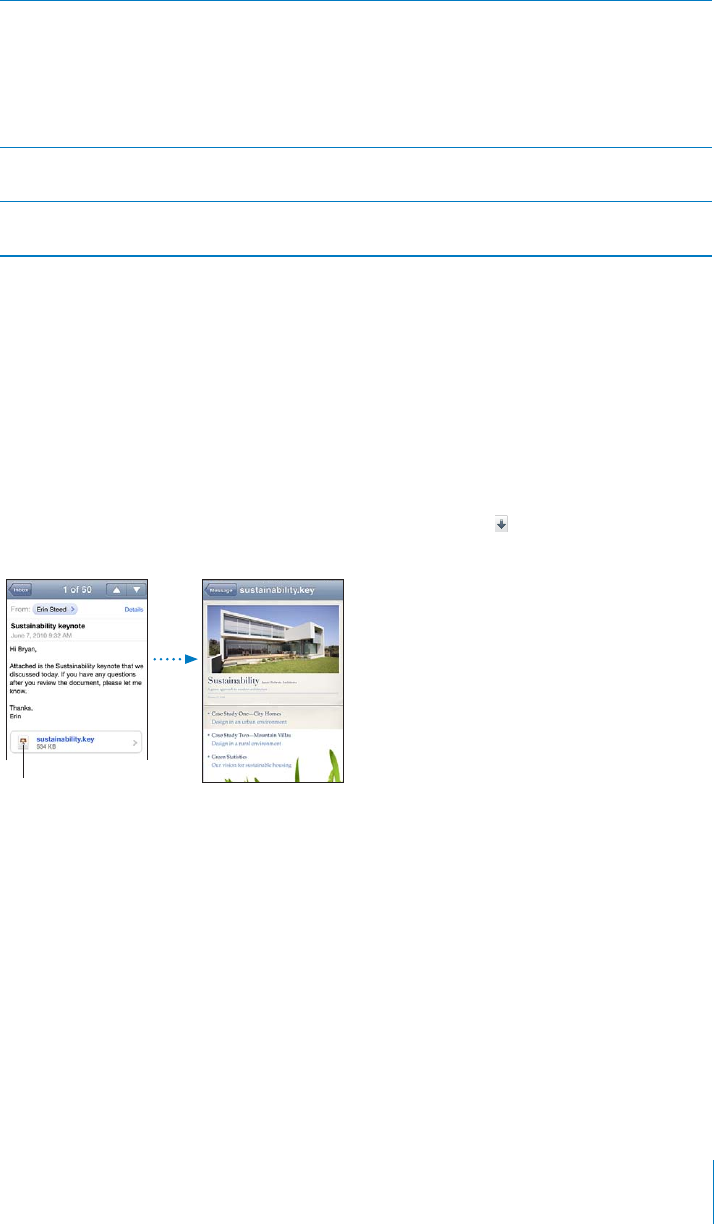
Email address Tap to create a new preaddressed email message.
Touch and hold to:
Create a new email message
Create a new contact with the address
Add the address to an existing contact
Copy the address
Day, date, or time Tap the item, then tap Create Event to create an
event in Calendar.
Tracking number (may not be available in all
countries or regions)
Tap to open the shipper’s webpage for the status
of a package.
Viewing Attachments
iPhone displays image attachments in many commonly used formats (JPEG, GIF, and
TIFF) inline with the text in email messages. iPhone can play many types of audio
CVVCEJOGPVUUWEJCU/2##%9#8CPF#+((;QWECPFQYPNQCFCPFXKGY°NGU
UWEJCU2&(YGDRCIGVGZV2CIGU-G[PQVG0WODGTUCPF/KETQUQHV9QTF'ZEGNCPF
PowerPoint documents) that are attached to messages you receive.
8KGYCPCVVCEJGF°NGTap the attachment to open it in Quick Look.
;QWOC[PGGFVQFQYPNQCFVJGCVVCEJOGPV°TUVD[VCRRKPI (if it appears at the end
of the message in a dotted box with the document name).
;HWH[[HJOTLU[
[VKV^USVHK
You can view attachments in portrait or landscape orientation.
83
Chapter 6 Mail

+HVJGHQTOCVQHCPCVVCEJGF°NGKUP¨VUWRRQTVGFD[K2JQPG[QWECPUGGVJGPCOGQHVJG
°NGDWV[QWECP¨VQRGPKVK2JQPGUWRRQTVUVJGHQNNQYKPIFQEWOGPVV[RGU
.doc Microsoft Word
.docx Microsoft Word (XML)
.htm webpage
.html webpage
.key -G[PQVG
.numbers Numbers
.pages Pages
.pdf Preview, Adobe Acrobat
.ppt Microsoft PowerPoint
.pptx Microsoft PowerPoint (XML)
.rtf Rich Text Format
.txt text
.vcf contact information
.xls Microsoft Excel
.xlsx Microsoft Excel (XML)
1RGPCPCVVCEJGF°NGYKVJCPQVJGTCRRTouch and hold the attachment, then
choose an app. If no apps are available, you can choose to open the attachment in
Quick Look.
Save an attached photo to your Camera Roll album: Tap the photo, then tap Save
+OCIG+HVJGRJQVQJCUP¨VDGGPFQYPNQCFGF[GVVCRVJGFQYPNQCFPQVKEG°TUV
Save an attached video to your Camera Roll album: Touch and hold the attachment,
then tap Save Video. If the video hasn’t been downloaded yet, tap the download
PQVKEG°TUV
84 Chapter 6 Mail

Printing Messages and Attachments
You can print email messages, and attachments that can be viewed in Quick Look.
Print an email message: Tap , then tap Print. Tap Select Printer to select a printer,
then set printer options such as number of copies and double-sided output (if the
printer supports it). Then tap Print.
To print an inline image without the rest of the email message, save the image (tap the
image and tap Save Image), then open Photos or Camera and print the image from
your Camera Roll album.
Print an attachment: Tap the attachment to view it in Quick Look, then tap and
tap Print. Tap Select Printer to select a printer, then set printer options such as the
range of pages, number of copies, and double-sided output (if the printer supports it).
Then tap Print.
For more information, see “Printing” on page 45.
Sending Email
You can send an email message to anyone who has an email address.
Compose and send a message:
1Tap .
2 6[RGCPCOGQTGOCKNCFFTGUUKPVJG6Q°GNFQTVCR to add a name from your contacts.
As you type an email address, matching email addresses from your contacts list appear
below. Tap an address to add it. To add more names, tap Return or .
Note: If you’re composing a message from your Microsoft Exchange account and
have access to your enterprise Global Address List (GAL), matching addresses from the
EQPVCEVUQPK2JQPGCRRGCT°TUVHQNNQYGFD[OCVEJKPI)#.CFFTGUUGU
3Tap Cc/Bcc/From if you want to copy or blind copy the message to others, or change
the account you send the message from. If you have more than one email account,
QTKH[QWJCXGGOCKNCNKCUGUHQT[QWT/QDKNG/GCEEQWPV[QWECPVCRVJG(TQO°GNFVQ
change the account or alias you’re sending from.
4Enter a subject, then your message.
;QWECPVCR4GVWTPVQOQXGHTQOQPG°GNFVQCPQVJGT
5Tap Send.
85
Chapter 6 Mail

Send a photo or video (iPhone 3GS or later) in
an email message
In Photos, choose a photo or video, tap , then
tap Email Photo or Email Video. You can also copy
and paste photos and videos.
To send multiple photos or videos at the same
time, tap when viewing thumbnails in an
album, then tap to select the photos and videos,
tap Share, and tap Email.
Paste and send a photo or video in an email
message
In Photos, touch and hold a photo or video until
the Copy command appears. Tap Copy. Go to
Mail and create a new message. Tap to place
the insertion point where you want the video,
then tap the insertion point to display the edit
commands and tap Paste.
To copy multiple videos, in Photos, open an
album, tap , tap to select photos and videos,
then tap Copy.
Save a draft of a message to complete later Tap Cancel, then tap Save. The message is saved
in the Drafts mailbox.
Open the most recently saved draft Touch and hold to open the most recently
saved draft from the last account you were
working in.
Reply to a message Tap . Tap Reply to reply only to the sender
or tap Reply All to reply to the sender and all
recipients. Type your return message, then tap
Send.
Files or images attached to the initial message
aren’t sent back.
Forward a message Open a message and tap , then tap Forward.
Add one or more email addresses, type your
message, then tap Send.
When you forward a message, you can include
VJG°NGUQTKOCIGUCVVCEJGFVQVJGQTKIKPCN
message.
Share contact information In Contacts, choose a contact, tap Share Contact
at the bottom of the Info screen, then tap Email.
86 Chapter 6 Mail
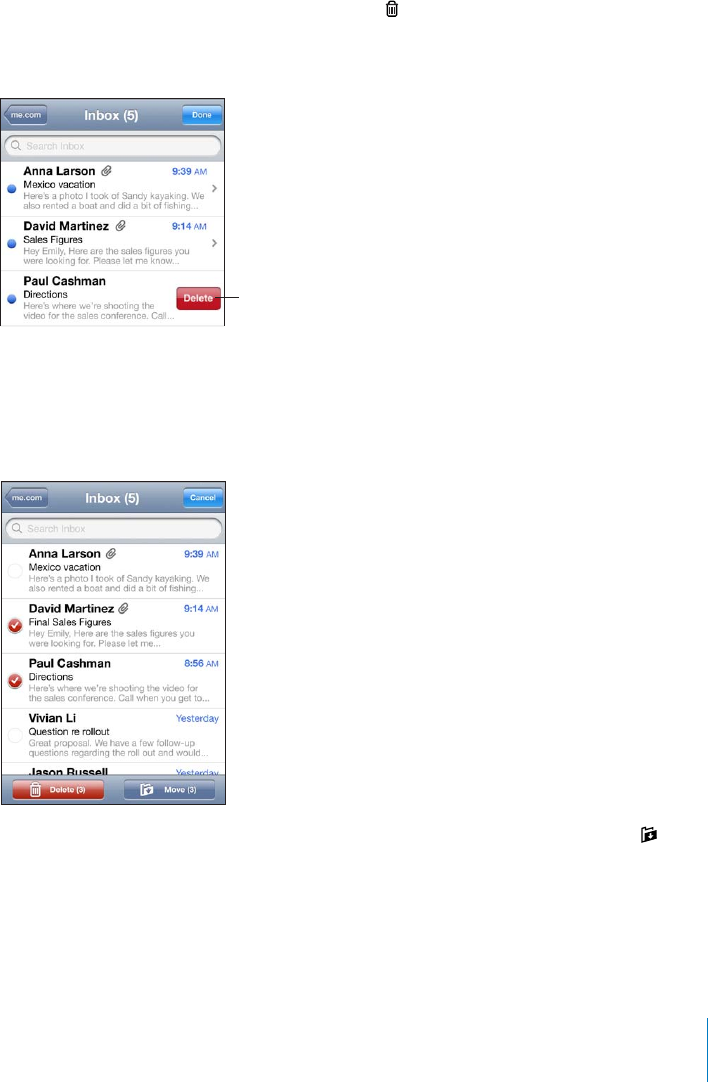
Organizing Email
You can organize messages in any mailbox, folder, or search results window. You
can delete messages one at a time, or select a group to delete all at once. You can
also move messages from one mailbox or folder to another in the same account or
DGVYGGPFKÒGTGPVCEEQWPVU
Delete a message: Open the message and tap .
You can also delete a message directly from the mailbox message list by swiping left
or right over the message title, then tapping Delete.
;VZOV^[OL
+LSL[LI\[[VU
Z^PWLSLM[VY
YPNO[V]LY
[OLTLZZHNL
Note: For Google accounts, tap Archive. Messages aren’t deleted, but are moved to
your account archive.
Delete multiple messages: When viewing a list of messages, tap Edit, select the
messages you want to delete, then tap Delete.
Move a message to another mailbox or folder: When viewing a message, tap , then
choose a mailbox or folder.
Tap Accounts to choose a mailbox or folder for another account.
Move multiple messages: When viewing a list of messages, tap Edit, select the
messages you want to move, then tap Move and choose a mailbox or folder.
87
Chapter 6 Mail

Searching Email
;QWECPUGCTEJVJG6Q(TQOCPF5WDLGEV°GNFUQHGOCKNOGUUCIGU/CKNUGCTEJGUVJG
downloaded messages in the currently open mailbox. For MobileMe, Exchange, and
some IMAP mail accounts, you can also search messages on the server.
Search email messages: Open a mailbox, scroll to the top, and enter text in the Search
°GNF6CR(TQO6Q5WDLGEVQT#NNVQEJQQUGYJKEJ°GNFU[QWYCPVVQUGCTEJ6QUETQNN
SWKEMN[VQVJGUGCTEJ°GNFCVVJGVQRQHVJGNKUVVCRVJGUVCVWUDCT
Search results for the messages already downloaded to iPhone appear automatically
as you type. Tap Search to dismiss the keyboard and see more of the results.
Search messages on the server: Tap “Continue Search on Server” at the end of the
search results.
Note: Search results of messages on servers may vary depending on the type of
account. Some servers may search only whole words.
Mail messages are included in searches from the Home screen. See “Searching” on
page 47.
88 Chapter 6 Mail
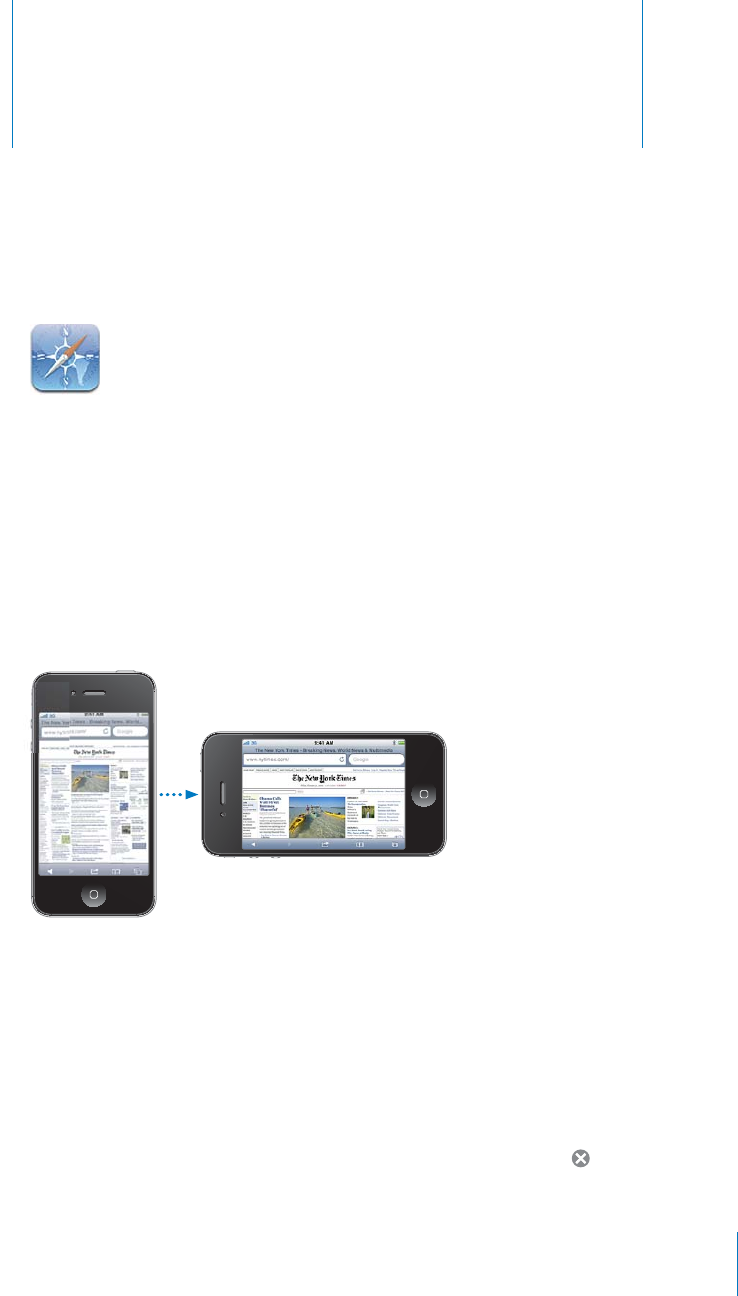
Sa
f
ar
i
7
S
a
f
ari lets you sur
f
the web and view webpages on iPhone as i
f
you were on your
computer. Create
b
oo
k
mar
k
s on iP
h
one an
d
sync t
h
em wit
h
your computer. A
dd
web clips to quickly access your
f
avorite sites directly
f
rom the Home screen. Print
we
b
pages, PDFs, an
d
ot
h
er
d
ocuments t
h
at open in Quic
k
Loo
k.
Viewing We
b
page
s
You can view webpages in either portrait or landsca
p
e orientation. Rotate iPhone and
VJGYGDRCIGTQVCVGUVQQCWVQOCVKECNN[CFLWUVKPIVQ
°
VVJGRCIG
Opening We
b
page
s
Open a we
b
page
:
6CRVJGCFFTGUU
°
GNFQPVJGNG
H
VUKFGQ
H
VJGVKVNGDCTVJGPV[RGVJG
YGDCFFTGUUCPFVCR)Q+
H
VJGCFFTGUU
°
GNFKUP¨VXKUKDNGVCRVJGUVCVWUDCTCVVJGVQRQ
H
VJGUETGGPVQSWKEMN[UETQNNVQVJGCFFTGUU
°
GNFCVVJGVQRQ
H
VJGYGDRCIG
As you type, we
b
a
dd
resses t
h
at start wit
h
t
h
ose
l
etters appear. T
h
ese are
b
oo
k
mar
k
e
d
RCIGUQTTGEGPVRCIGU[QW¨XGQRGPG
F
6CRCPC
FF
TGUUVQIQVQV
J
CVRCIG-GGRV[RKPI
i
f
you want to enter a web address that’s not in the list
.
'TCUGVJGVGZVKPVJGCFFTGUU
°
GNF
6CRVJGCFFTGUU
°
GNFVJGPVCR
.
89

Z
ooming and Scrolling
Z
oom
i
n or out
:
Dou
bl
e-ta
p
a co
l
umn on a we
b
page to expan
d
t
h
e co
l
umn
.
Dou
bl
e-tap again to zoom ou
t.
You can a
l
so pinc
h
to zoom in or out manua
ll
y
.
Scro
ll
aroun
d
a we
b
pag
e
Drag up,
d
own, or si
d
eways. W
h
en scro
ll
ing, you can touc
h
a
n
d
d
rag anyw
h
ere on t
h
e page wit
h
out activating any
l
in
k
s
.
Scroll within a
f
rame on a webpag
e
7UGVYQ
°
PIGTUVQUETQNNYKVJKPC
H
TCOGQPCYGDRCIG7UG
QPG
°
PIGTVQUETQNNVJGGPVKTGYGDRCIG
Scroll quickly to the top o
f
a webpag
e
Ta
p
the status bar at the to
p
o
f
the iPhone screen
.
Navigating We
b
page
s
Lin
k
s on we
b
pages typica
ll
y ta
k
e you to anot
h
er p
l
ace on t
h
e we
b.
Fo
ll
ow a
l
in
k
on a we
b
page
:
Ta
p
t
h
e
l
in
k.
You can also use web links to make a phone call, display a location in Maps, play
s
treaming audio, or create a preaddressed Mail message. To return to Sa
f
ari a
f
ter a lin
k
o
p
ens anot
h
er a
pp
,
p
ress t
h
e Home button and ta
p
Sa
f
ari
.
See a
l
in
k
’s
d
estination a
dd
res
s
Touc
h
an
d
h
o
ld
t
h
e
l
in
k
. T
h
e a
dd
ress
p
o
p
s u
p
next to
[QWT
°
PIGT;QWECPVQWEJCPFJQNFCPKOCIGVQUGGK
H
KV
h
as a
l
in
k.
Stop a webpage
f
rom loading
T
a
p
.
Re
l
oa
d
a we
b
pag
e
T
ap
.
Return to t
h
e previous or next pag
e
T
a
p
or
at the bottom o
f
the screen
.
Return to a recent
l
y viewe
d
pag
e
T
a
p
an
d
tap History. To c
l
ear t
h
e
h
istory
l
ist, tap C
l
ear
.
Create a prea
dd
resse
d
Mai
l
messag
e
Touc
h
an
d
h
o
ld
an emai
l
we
b
l
in
k
, t
h
en tap New Message
.
Create a new or a
dd
to an existing
con
t
ac
t
Touch and hold a web link containing contact in
f
ormation,
th
en tap Create New Contact or A
dd
to Existing Contact
.
Sen
d
a we
b
page URL via emai
l
T
a
p
an
d
tap “Mai
l
Lin
k
to t
h
is Page.
”
Save an image or p
h
oto to your
Camera Ro
ll
a
lb
u
m
Touc
h
an
d
h
o
ld
t
h
e image, t
h
en tap Save Image
.
90
C
h
a
p
ter
7
Sa
f
ar
i
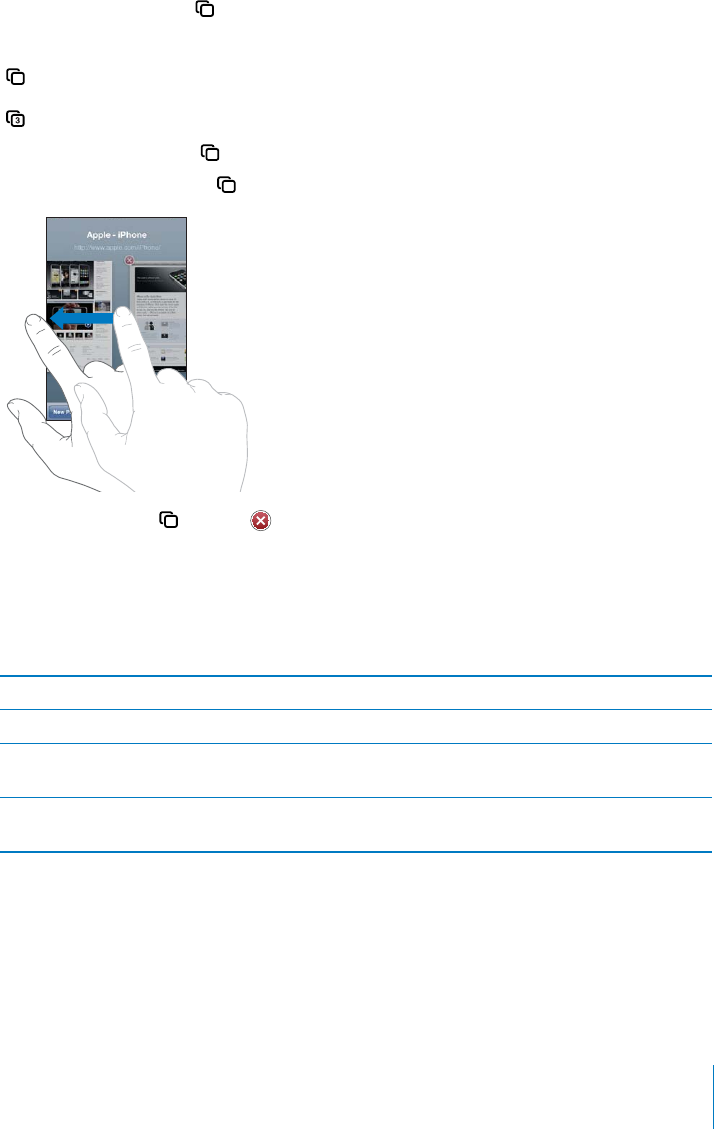
Opening Multiple Pages
You can have up to eight pages open at a time. Some links automatically open a new
page instead of replacing the current one.
The number inside the at the bottom of the screen shows how many pages are
open. If there’s no number inside, just one page is open. For example:
= one page is open
= three pages are open
Open a new page: Tap and tap New Page.
Go to another page: Tap CPF±KEMNGHVQTTKIJV6CRVJGRCIG[QWYCPVVQXKGY
Close a page: Tap and tap .
Entering Text and Filling Out Forms
5QOGYGDRCIGUJCXGVGZV°GNFUCPFHQTOUVQ°NNQWV;QWECPUGV5CHCTKVQTGOGODGT
PCOGUCPFRCUUYQTFUQHYGDUKVGU[QWXKUKVCPF°NNQWVVGZV°GNFUCWVQOCVKECNN[YKVJ
information from Contacts. See “Safari” on page 214.
Bring up the keyboard 6CRKPUKFGCVGZV°GNF
/QXGVQCPQVJGTVGZV°GNF 6CRCPQVJGTVGZV°GNFQTVCRVJG0GZVQT2TGXKQWUDWVVQP
Submit a form 1PEG[QW°PKUJ°NNKPIQWVCHQTOVCR)QQT5GCTEJ/QUV
pages also have a link you can tap to submit the form.
Close the keyboard without
submitting the form
Tap Done.
91
Chapter 7 Safari

'PCDNG#WVQ(KNNVQJGNR[QW°NNQWVYGDHQTOUIn Settings, choose Safari > AutoFill,
then do one of the following:
To use information from contacts, turn Use Contact Info on, then choose My Info and
select the contact you want to use.
5CHCTKWUGUKPHQTOCVKQPHTQO%QPVCEVUVQ°NNKPEQPVCEV°GNFUQPYGDHQTOU
To use information from names and passwords, turn Names & Passwords on.
When this feature is on, Safari remembers names and passwords of websites you
XKUKVCPFCWVQOCVKECNN[°NNUKPVJGKPHQTOCVKQPYJGP[QWTGXKUKVVJGYGDUKVG
To remove all AutoFill information, tap Clear All.
Searching
7UGVJGUGCTEJ°GNFVQGPVGTYQTFUCPFRJTCUGUHQTUGCTEJKPIDQVJVJGYGDCPFVJG
current webpage. As you type, suggested and recent searches appear.
Search the web:
1 6CRVJGUGCTEJ°GNFQPVJGTKIJVUKFGQHVJGVKVNGDCT
2Type a word or phrase that describes what you’re looking for, then tap a suggestion
from the list or tap Search.
3Tap a link in the list of search results to open a webpage.
Find the search word or phrase on the current webpage: Scroll to the bottom of the
TGUWNVUNKUVVJGPVCRVJGGPVT[DGNQY1P6JKU2CIGVQ°PFVJG°TUVQEEWTTGPEGQHVJG
UGCTEJYQTFQTRJTCUG6Q°PFUWDUGSWGPVQEEWTTGPEGUVCR0GZV
By default, Safari searches using Google. You can use other search engines.
5GV5CHCTKVQUGCTEJWUKPICFKÒGTGPVUGCTEJGPIKPGIn Settings, choose Safari >
5GCTEJ'PIKPGVJGPEJQQUGCFKÒGTGPVUGCTEJGPIKPG
Printing Webpages, PDFs, and Other Documents
You can print webpages, PDFs, and other documents that open in Quick Look from
Safari.
Print a webpage, PDF, or Quick Look document: Tap , then tap Print. Tap Select
Printer to select a printer, then set printer options such as number of copies and
double-sided output (if the printer supports it). If you’re printing a PDF or other Quick
Look document, you may be able to set the range of pages you want to print. Then
tap Print.
For more information, see “Printing” on page 45.
92 Chapter 7 Safari

Bookmarks
You can bookmark webpages you want to return to later.
Bookmark a webpage: Open the page and tap . Then tap Add Bookmark.
When you save a bookmark you can edit its title. By default, bookmarks are saved at
the top level of Bookmarks. Tap Bookmarks to choose another folder.
If you use Safari on a Mac, or Safari or Microsoft Internet Explorer on a PC, you can sync
bookmarks with the web browser on your computer.
Sync bookmarks with your computer:
1Connect iPhone to your computer.
2In iTunes, select iPhone in the Devices list.
3Click Info at the top of the screen, select “Sync … bookmarks” under Other, then
click Apply.
See “iPhone Settings Panes in iTunes” on page 58.
Sync bookmarks with MobileMe: In Settings on iPhone, select Bookmarks in your
MobileMe account. See “Setting Up MobileMe Accounts”on page 26.
Open a bookmarked webpage: Tap , then choose a bookmark or tap a folder to
see the bookmarks inside.
Edit a bookmark or bookmark folder: Tap , choose the folder that has the
bookmark or folder you want to edit, then tap Edit. Then do one of the following:
To make a new folder, tap New Folder.
To delete a bookmark or folder, tap , then tap Delete.
To reposition a bookmark or folder, drag .
6QGFKVVJGPCOGQTCFFTGUUQTVQRWVKVKPCFKÒGTGPVHQNFGTtap the bookmark or folder.
9JGP[QW°PKUJVCR&QPG
93
Chapter 7 Safari

Web Clips
Add web clips to the Home screen for fast access to your favorite webpages. Web clips
appear as icons on the Home screen, and you can arrange your web clips along with
the other icons. See “Customizing the Home Screen” on page 33.
Add a web clip: Open the webpage and tap . Then tap “Add to Home Screen.”
When you open a web clip, Safari automatically zooms and scrolls to the area of the
webpage that was displayed when you saved the web clip. The displayed area is also
used to create the icon for the web clip on your Home screen, unless the webpage
comes with its own custom icon.
When you add a web clip, you can edit its name. If the name is too long (more than
about 10 characters), it may appear abbreviated on the Home screen.
Web clips aren’t bookmarks, and aren’t synced by MobileMe or iTunes.
Delete a web clip:
1Touch and hold any icon on the Home screen until the icons start to jiggle.
2Tap in the corner of the web clip you want to delete.
3Tap Delete, then press the Home button to save your arrangement.
94 Chapter 7 Safari

iPod
8
Use the iPod app to enjoy your
f
avorite music, widescreen videos, and more. Browse
your content on iP
h
one
b
y p
l
ay
l
ists, artists, songs, vi
d
eos, or ot
h
er categories, or
b
rowse your a
lb
um artwor
k
using Cover F
l
ow. P
l
ay your music on AirP
l
ay spea
k
ers or
s
oun
d
systems, or watc
h
your vi
d
eos on a TV using AirP
l
ay an
d
App
le
TV.
Getting Music, Vi
d
eos, an
d
Mor
e
T
h
ere are two ways to get music, vi
d
eos, an
d
ot
h
er content onto iP
h
one
:
Trans
f
er music, videos, and more onto iPhone by syncing content
f
rom iTunes on
[QWTEQORWVGT;QWECPU[PECNNQ
H
[QWTOGFKCQT[QWECPUGNGEVURGEK
°
EUQPIU
vi
d
eos,
p
o
d
casts, an
d
iTunes U co
ll
ections. See
“
S
yncing wit
h
iTunes
”
on pag
e
57
.
7
7
Use t
h
e iTunes Store on iP
h
one to purc
h
ase an
d
d
own
l
oa
d
songs, a
lb
ums, TV s
h
ows,
movies, music vi
d
eos, ringtones, an
d
au
d
io
b
oo
k
s
d
irect
l
y to iP
h
one. You can a
l
so
s
tream and download audio and video
p
odcasts, as well as iTunes U content. A
f
ter
l
istening to a po
d
cast or watc
h
ing a TV s
h
ow, you can tap a
b
ui
l
t-in
l
in
k
to get more
e
p
isodes
f
rom the iTunes Store. See Cha
p
te
r
22
,
“
iTunes
S
tor
e
,”
on pag
e
1
6
9
.
9
5

Music and Other Audio
The high-resolution Multi-Touch display makes listening to songs on iPhone as much
a visual experience as a musical one. You can scroll through your playlists, or use
Cover Flow to browse your album artwork.
WARNING: For important information about avoiding hearing loss, see the Important
Product Information Guide at www.apple.com/support/manuals/iphone.
Playing Songs and Other Audio
You can browse content on iPhone by playlists, artists, songs, videos, and other
categories, or browse your album artwork using Cover Flow. Playlist folders, which you
can sync from iTunes, let you organize playlists into groups.
Browse your collection: Tap Playlists, Artists, or Songs. Tap More to browse Albums,
Audiobooks, Compilations, Composers, Genres, iTunes U, Podcasts, or Videos.
You can replace the browse buttons at the bottom of the screen with buttons you use
more frequently. See “Changing the Browse Buttons” on page 109.
Get more podcast episodes: 6CR2QFECUVUVCR/QTG°TUVKH2QFECUVUKUP¨VXKUKDNGVJGP
tap a podcast to see a list of episodes. Tap “Get More Episodes…” to see a list of more
episodes in the iTunes Store.
Browse Genius Mixes: 6CR)GPKWUVCR/QTG°TUVKH)GPKWUKUP¨VXKUKDNG+H)GPKWU
doesn’t appear, you need to turn on Genius in iTunes, and then sync iPhone with
iTunes. See “Using Genius on iPhone” on page 102.
Play a song: Tap the song.
5JCMGVQUJWÔG5JCMGK2JQPGVQVWTPUJWÔGQPCPFEJCPIGUQPIU5JCMGCP[VKOGVQ
change to another song.
;QWECPVWTP5JCMGVQ5JWÔGQPQTQÒKP5GVVKPIU K2QFKV¨UQPD[FGHCWNV5GG
“Music” on page 216.
96 Chapter 8 iPod
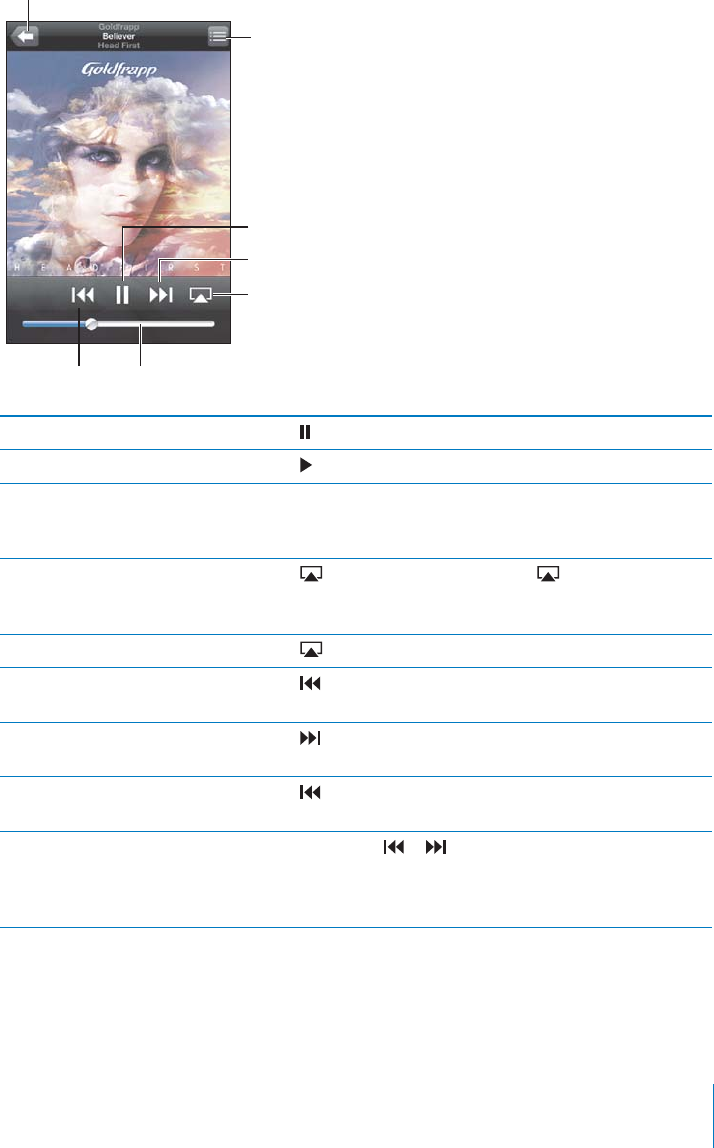
Controlling Audio Playbac
k
W
h
en you p
l
ay a song, t
h
e Now P
l
aying screen appears
.
5L_[-HZ[MVY^HYK
7SH`7H\ZL
;YHJR3PZ[
)HJR
=VS\TL7YL]PV\Z
9L^PUK
(PY7SH`
P
ause a song
T
a
p
,
or
p
ress t
h
e center
b
utton on t
h
e iP
h
one ear
ph
ones
.
Resume p
l
ay
b
ac
k
T
a
p
,
or
p
ress t
h
e center
b
utton on t
h
e iP
h
one ear
ph
ones
.
Raise or
l
ower t
h
e vo
l
um
e
Drag the volume slider or use the buttons on the side o
f
iP
h
one. You can a
l
so use t
h
e vo
l
ume
b
uttons on t
h
e iP
h
one
ear
ph
ones (iP
h
on
e
3
GS or
l
ater)
.
P
l
ay music on an AirP
l
ay soun
d
system or App
l
e T
V
T
a
p
and choose a sound system. I
f
doesn’t a
pp
ear or i
f
you don’t see the AirPlay system you’re looking
f
or, make sure
iP
h
one is on t
h
e same wire
l
ess networ
k.
Switch
f
rom AirPlay back to iPhon
e
T
a
p
and choose iPhone
f
rom the list
.
Restart a song or a c
h
apter in an
a
u
d
io
b
oo
k
or
p
o
d
cast
T
a
p
.
S
k
ip to t
h
e next song or c
h
apter in
a
n au
d
io
b
oo
k
or
p
o
d
cas
t
T
ap
,
or press t
h
e center
b
utton on t
h
e iP
h
one earp
h
ones
t
wice quic
kl
y
.
G
o to t
h
e previous song or c
h
apter
in an au
d
io
b
oo
k
or
p
o
d
cast
T
a
p
twice, or
p
ress t
h
e center
b
utton on t
h
e iP
h
one
earp
h
ones t
h
ree times quic
kl
y
.
Rewind or
f
ast-
f
orward Touc
h
an
d
h
o
ld
or
. T
h
e
l
onger you
h
o
ld
t
h
e contro
l,
t
he
f
aster the song rewinds or
f
ast-
f
orwards. On the iPhone
earp
h
ones, press t
h
e center
b
utton twice quic
kl
y an
d
h
o
ld
to
f
ast
f
orward, or three times quickly and hold to rewind
.
97
C
h
a
p
ter
8
iPo
d

Return to the iPod browse lists Tap , or swipe to the right over the album artwork.
Return to the Now Playing screen Tap Now Playing.
Display a song’s lyrics Tap the album artwork when playing a song. (Lyrics appear if
you’ve added them to the song using the song’s Info window
in iTunes.)
Display audio playback controls from another app or from the Lock screen
(iPhone 3GS or later): Double-click the Home DWVVQPVJGP±KEMHTQONGHVVQTKIJV
along the bottom of the screen.
The controls operate the currently playing app, or the most recent app that played, if
the audio is paused. The icon for the active app appears on the right. You can tap the
icon to open the app.
If iPhone is locked and music is playing, double-click the Home button.
Note: On iPhone 3G, if you’re listening to music while using another app, or if iPhone is
locked, you can display the playback controls by double-clicking the Home button.
See “Home Button” on page 201.
98 Chapter 8 iPod
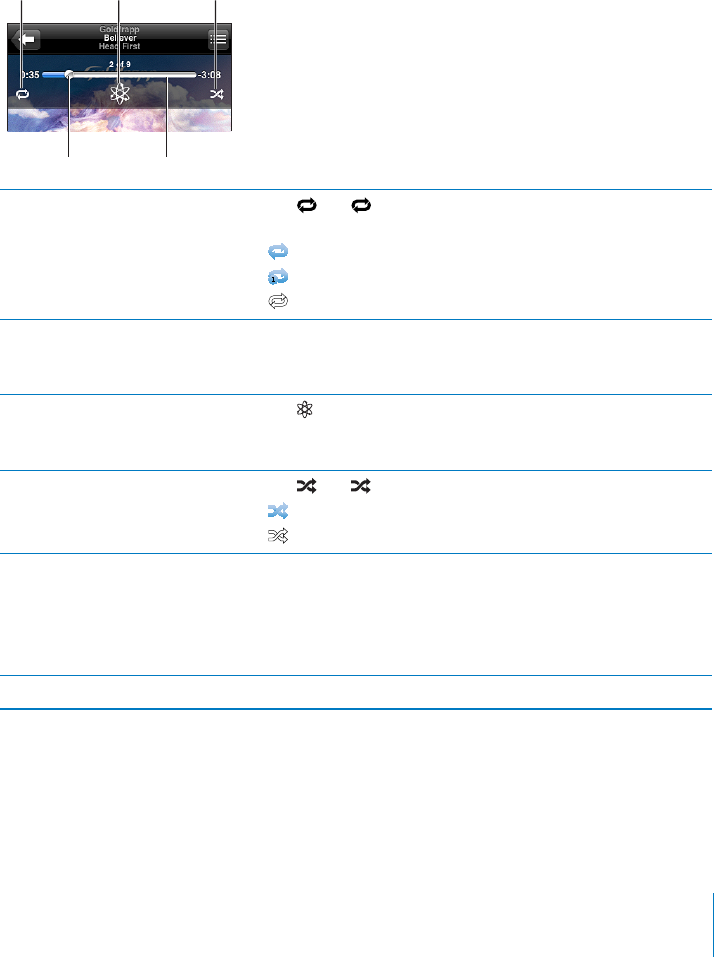
Additional Audio Controls
To display additional controls, tap the album artwork on the Now Playing screen.
6JGTGRGCV)GPKWUCPFUJWÔGEQPVTQNUCRRGCTCNQPIYKVJVJGUETWDDGTDCT;QWECP
see elapsed time, remaining time, and the song number. The song’s lyrics also appear, if
you’ve added them to the song in iTunes.
Use the scrubber bar to skip to any point along the timeline. You can adjust the scrub
TCVGHTQOJKIJURGGFVQ°PGD[UNKFKPI[QWT°PIGTFQYPCU[QWFTCIVJGRNC[JGCF
along the scrubber bar.
9LWLH[ :O\MMSL
.LUP\Z
:JY\IILYIHY
7SH`OLHK
Set iPhone to repeat songs Tap . Tap again to set iPhone to repeat only the
current song.
= iPhone is set to repeat all songs in the current album or list.
= iPhone is set to repeat the current song over and over.
= iPhone isn’t set to repeat songs.
Skip to any point in a song &TCIVJGRNC[JGCFCNQPIVJGUETWDDGTDCT5NKFG[QWT°PIGT
down to adjust the scrub rate. The scrub rate becomes slower
VJGHCTVJGTFQYP[QWUNKFG[QWT°PIGT
Make a Genius playlist Tap . The Genius playlist appears, with buttons that let you
create a new Genius playlist, refresh the current one, or save
the playlist. See “Using Genius on iPhone”on page 102.
5GVK2JQPGVQUJWÔGUQPIU Tap . Tap again to set iPhone to play songs in order.
K2JQPGKUUGVVQUJWÔGUQPIU
= iPhone is set to play songs in order.
5JWÔGVJGVTCEMUKPCP[RNC[NKUV
album, or other list of songs
6CR5JWÔGCVVJGVQRQHVJGNKUV(QTGZCORNGVQUJWÔGCNNVJG
UQPIUQPK2JQPGEJQQUG5QPIU 5JWÔG
9JGVJGTQTPQVK2JQPGKUUGVVQUJWÔGKH[QWVCR5JWÔGCVVJG
top of a list of songs, iPhone plays the songs from that list in
random order.
Hide lyrics +P5GVVKPIUEJQQUGK2QFVJGPVWTP.[TKEU2QFECUV+PHQQÒ
99
Chapter 8 iPod
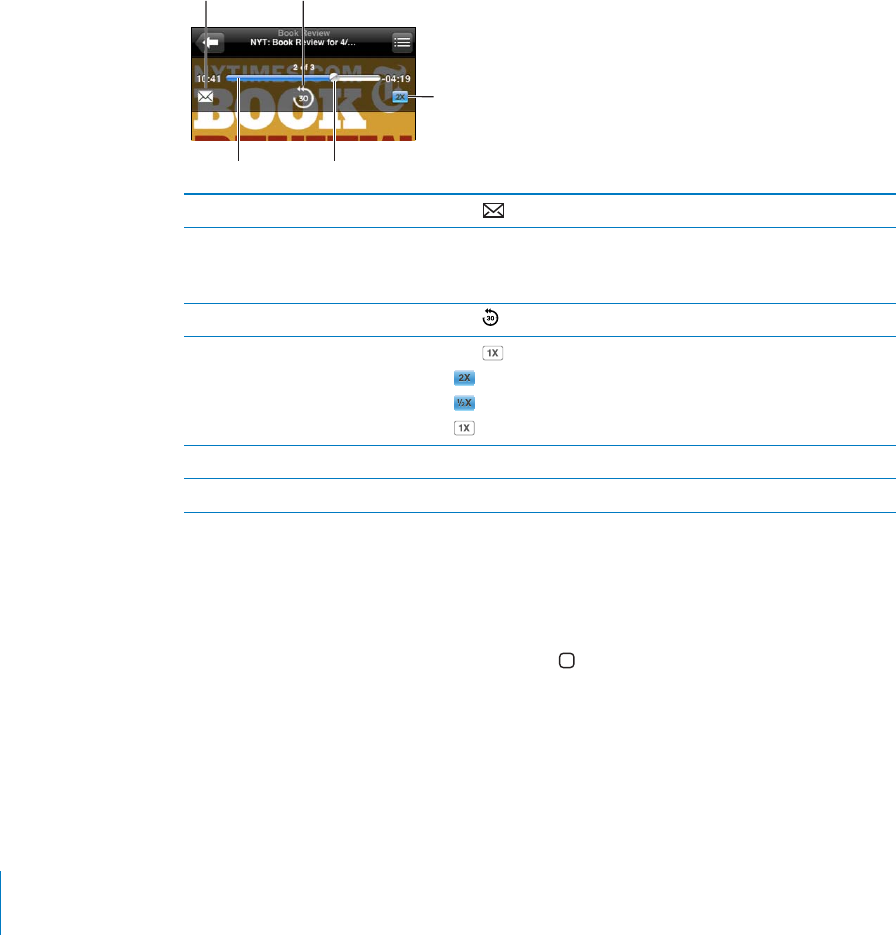
Podcast and Audiobook Controls
Additional controls and information appear on the Now Playing screen when you
begin playback.
The email, 30-second repeat, and playback speed controls appear along with
the scrubber bar. You can see elapsed time, remaining time, and the episode or
chapter number.
Use the scrubber bar to skip to any point along the timeline. You can adjust the scrub
TCVGHTQOJKIJURGGFVQ°PGD[UNKFKPI[QWT°PIGTFQYPCU[QWFTCIVJGRNC[JGCF
along the scrubber bar.
:JY\IILYIHY 7SH`OLHK
7SH`IHJR
ZWLLK
ZLJVUKYLWLH[,THPS
Send an email link to this podcast Tap .
Skip to any point &TCIVJGRNC[JGCFCNQPIVJGUETWDDGTDCT5NKFG[QWT°PIGT
down to adjust the scrub rate. The scrub rate becomes slower
VJGHCTVJGTFQYP[QWUNKFG[QWT°PIGT
Play back the last 30 seconds Tap .
Set the playback speed Tap . Tap again to change the speed.
= Play at double speed.
= Play at half speed.
= Play at normal speed.
Show or hide the controls Tap in the center of the screen.
Hide podcast information +P5GVVKPIUEJQQUGK2QFVJGPVWTP.[TKEU2QFECUV+PHQQÒ
Using Voice Control with iPod
You can use Voice Control (iPhone 3GS or later) to control music playback on iPhone.
Note: Voice Control may not be available in all languages.
Use Voice Control: Press and hold the Home button until the Voice Control screen
appears and you hear a beep. Then use the commands described below to play songs.
You can also press and hold the center button on the iPhone earphones to bring up
Voice Control.
100 Chapter 8 iPod
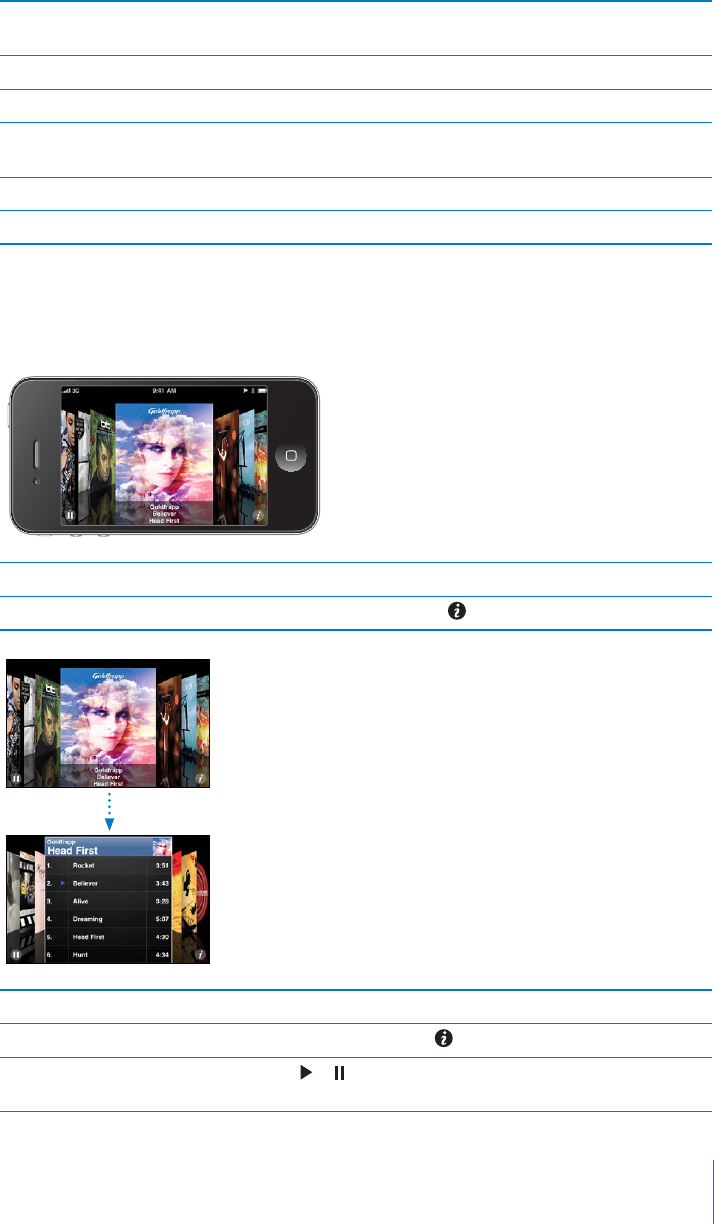
Control music playback Say “play” or “play music.” To pause, say “pause” or “pause music.”
You can also say “next song” or “previous song.”
Play an album, artist, or playlist Say “play,” then say “album,” “artist,” or “playlist” and the name.
5JWÔGVJGEWTTGPVRNC[NKUV 5C[¥UJWÔG¦
Find out more about the currently
playing song
Say “what’s playing,” “what song is this,” “who sings this song,”
or “who is this song by.”
Use Genius to play similar songs Say “Genius,” “play more like this,” or “play more songs like this.”
Cancel Voice Control Say “cancel” or “stop.”
Browsing Album Artwork in Cover Flow
When you’re browsing music, you can rotate iPhone sideways to see your iTunes
content in Cover Flow and browse your music by album artwork.
Browse album artwork Drag left or right.
See the tracks on an album Tap the album artwork or .
Play any track Tap the track. Drag up or down to scroll through the tracks.
Return to the artwork Tap the title bar. Or tap again.
Play or pause the current song Tap or . You can also press the center button on the
iPhone earphones.
101
Chapter 8 iPod

Viewing All Tracks on an Album
See all the tracks on the album that contains the current song: On the Now Playing
screen, tap . Tap a track to play it. Tap the album artwork thumbnail to return to the
Now Playing screen.
9H[PUNIHY
)HJR[V5V^
7SH`PUN
ZJYLLU
(SI\T[YHJRZ
In track list view, you can assign ratings to songs. You can use ratings to create
smart playlists in iTunes that dynamically update to include, for example, your highest
rated songs.
Rate a song: &TCI[QWT°PIGTCETQUUVJGTCVKPIDCTVQIKXGVJGUQPI\GTQVQ°XGUVCTU
Searching Audio Content
You can search the titles, artists, albums, and composers of songs, podcasts, and other
content you’ve synced to iPhone.
Search music: 'PVGTVGZVKPVJGUGCTEJ°GNFCVVJGVQRQHCUQPINKUVRNC[NKUVCTVKUVNKUV
or other view of your iPod content. (Tap the status bar to scroll quickly to the top of a
NKUVCPFTGXGCNVJGUGCTEJ°GNF
Search results appear as you type. Tap Search to dismiss the keyboard and see more of
the results.
Audio content is included in searches from the Home screen. See “Searching”on
page 47.
Using Genius on iPhone
)GPKWU°PFUUQPIUKP[QWTK6WPGUNKDTCT[VJCVIQITGCVVQIGVJGT#)GPKWURNC[NKUVKUC
collection of songs that are picked for you to go with a song you choose from your
library. A Genius Mix is a selection of songs of the same kind of music. Genius Mixes
are recreated each time you listen to them, so they’re always new and fresh.
You can create Genius playlists in iTunes and sync them to iPhone. You can also create
and save Genius playlists directly on iPhone.
102 Chapter 8 iPod
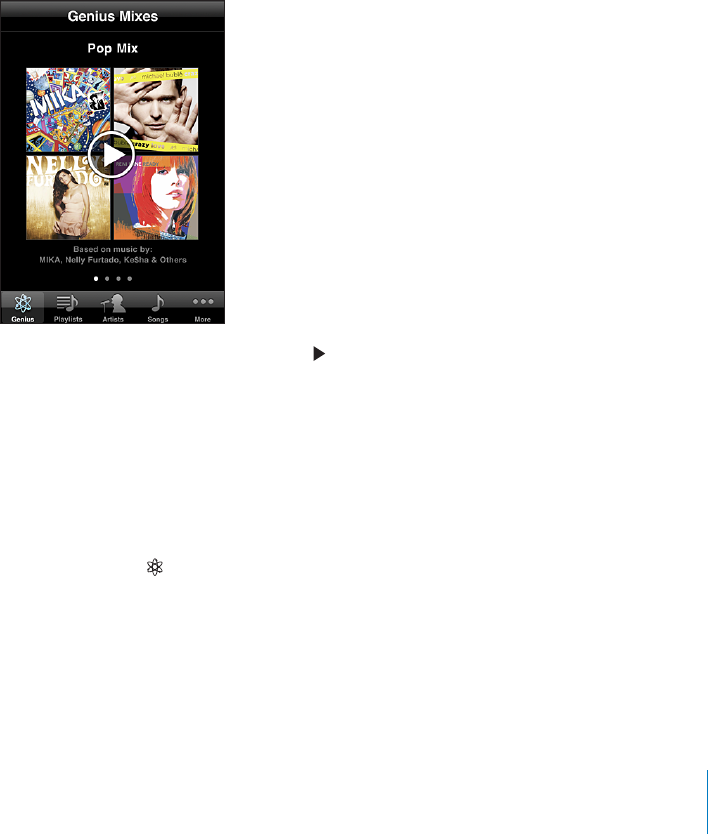
)GPKWU/KZGUCTGETGCVGFCWVQOCVKECNN[HQT[QWD[K6WPGUK6WPGUETGCVGUFKÒGTGPV
mixes depending on the variety of music you have in your iTunes library. For example,
you may have Genius Mixes that highlight R&B songs, or Alternative Rock songs.
6QWUG)GPKWUQPK2JQPG°TUVVWTPQP)GPKWUKPK6WPGUVJGPU[PEK2JQPGYKVJK6WPGU
Genius Mixes are synced automatically, unless you manually manage your music and
choose which mixes you want to sync in iTunes. Genius is a free service, but it requires
an Apple ID.
When you sync a Genius Mix, iTunes may select and sync songs from your library that
[QWJCXGP¨VURGEK°ECNN[EJQUGPVQU[PE
Browse Genius Mixes: 6CR)GPKWUVCR/QTG°TUVKH)GPKWUKUP¨VXKUKDNG6JGPWODGT
of dots at the bottom of the screen shows the number of mixes you’ve synced
from iTunes, and indicates which mix you’re viewing. Flick left or right to access your
other mixes.
Play a Genius Mix: Tap the mix or tap .
Make a Genius playlist on iPhone:
1 6CR2NC[NKUVUVCR/QTG°TUVKH2NC[NKUVUKUP¨VXKUKDNGVJGPVCR)GPKWU2NC[NKUV
2Tap a song in the list. Genius creates a playlist with additional songs that go great
with that song.
You can also make a Genius playlist of songs that go great with the song you’re
playing. Tap the album artwork on the Now Playing screen to display additional
controls, then tap .
Save a Genius playlist: In the playlist, tap Save. The playlist is saved in Playlists with
the title of the song you picked.
You can make and save as many Genius playlists as you want. If you save a Genius
playlist created on iPhone, it syncs back to iTunes the next time you connect.
103
Chapter 8 iPod

Refresh a Genius playlist: In the playlist, tap Refresh.
4GHTGUJKPICRNC[NKUVETGCVGUCRNC[NKUVQHFKÒGTGPVUQPIUVJCVIQITGCVYKVJVJGUQPI
you picked. You can refresh any Genius playlist, whether it was created in iTunes and
synced to iPhone, or created directly on iPhone.
/CMGC)GPKWURNC[NKUVWUKPICFKÒGTGPVUQPITap Genius Playlist, then tap New and
pick a song.
Delete a saved Genius playlist: Tap the Genius playlist, then tap Delete.
Once a Genius playlist is synced back to iTunes, you won’t be able to delete it directly
from iPhone. You can use iTunes to edit the playlist name, stop syncing, or delete
the playlist.
Creating Playlists
You can create and edit your own playlists on iPhone. You can also edit playlists synced
from iTunes on your computer.
Create a playlist:
1 6CR2NC[NKUVUVCR/QTG°TUVKH2NC[NKUVUKUP¨VXKUKDNGVJGPVCR¥#FF2NC[NKUV¦
2Type a name for your playlist, then tap Save.
3Browse for songs using the buttons at the bottom of the screen. Tap any song or video
to add it to the playlist. Tap Add All Songs at the top of any list of songs to add all the
songs in the list.
4 9JGP[QW°PKUJVCR&QPG
When you make a playlist and then sync iPhone to your computer, the playlist is
synced to your iTunes library.
Edit a playlist:
1 6CR2NC[NKUVUVCR/QTG°TUVKH2NC[NKUVUKUP¨VXKUKDNGVJGPVCRVJGRNC[NKUV[QWYCPVVQGFKV
2Tap Edit, then do one of the following:
To move a song higher or lower in the list, drag next to the song.
To delete a song from the playlist, tap next to a song, then tap Delete. Deleting a
song from a playlist doesn’t delete it from iPhone.
To add more songs, tap .
3 9JGP[QW°PKUJVCR&QPG
When you edit a playlist and then sync iPhone to your computer, the playlist is synced
to your iTunes library.
Delete a playlist: In Playlists, tap the playlist you want to delete, then tap Delete (scroll
VQVJGVQRQHVJGNKUVVQTGXGCNVJG&GNGVGDWVVQP%QP°TOD[VCRRKPI&GNGVG2NC[NKUV
Clear a playlist: In Playlists, tap the playlist you want to clear, then tap Clear (scroll to
VJGVQRQHVJGNKUVVQTGXGCNVJG%NGCTDWVVQP%QP°TOD[VCRRKPI%NGCT2NC[NKUV
104 Chapter 8 iPod
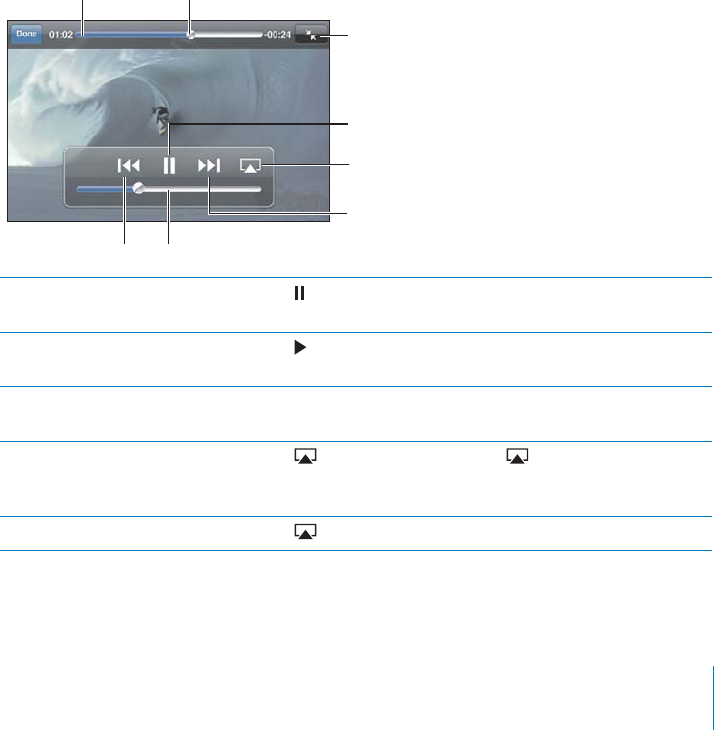
Video
s
Wit
h
iP
h
one, you can view vi
d
eo content suc
h
as movies, music vi
d
eos, an
d
vi
d
eo
podcasts. I
f
a video contains chapters, you can skip to the next or previous chapter
,
or bring up a list and start playing at any chapter that you choose. I
f
a video provides
a
lternate language
f
eatures, you can choose an audio language or display subtitles
.
P
l
aying Vi
d
eo
s
P
l
ay a vi
d
eo
:
6CR8KFGQUVCR/QTG
°
TUVK
H
8KFGQUKUP¨VXKUKDNGVJGPVCRVJGXKFGQ
Disp
l
ay p
l
ay
b
ac
k
contro
l
s
:
Tap t
h
e screen to s
h
ow t
h
e contro
l
s. Tap again to
h
i
d
e t
h
em
.
G
et more
p
o
d
cast or TV s
h
ow e
p
iso
d
es
:
6CR8KFGQUVCR/QTG
°
TUVK
H
8KFGQUKUP¨V
visible), then ta
p
a
p
odcast or TV show to see a list o
f
e
p
isodes. Ta
p
“Get More
E
p
isodes…” to see a list o
f
more e
p
isodes in the iTunes Store
.
Contro
ll
ing Vi
d
eo P
l
ay
b
ac
k
Videos play in landscape orientation to take
f
ull advantage o
f
the widescreen display
.
T
h
e scru
bb
er
b
ar
l
ets you s
k
ip to any point a
l
ong t
h
e time
l
ine. You can a
d
just t
h
e scru
b
TCVGD[UNKFKPI[QWT
°
PIGTFQYPCU[QWFTCIVJGRNC[JGCFCNQPIVJGUETWDDGTDCT
7SH`OLHK
:JY\IILYIHY
7SH`7H\ZL
5L_[-HZ[
MVY^HYK
:JHSL
9LZ[HY[9L^PUK =VS\TL
(PY7SH`
Pause a vi
d
e
o
T
a
p
,
or
p
ress t
h
e center
b
utton on t
h
e iP
h
one ear
ph
ones
(iP
h
on
e
3
GS
).
Resume p
l
ay
b
ac
k
T
a
p
,
or
p
ress t
h
e center
b
utton on t
h
e iP
h
one ear
ph
ones
(iP
h
on
e
3
GS
).
Raise or
l
ower t
h
e vo
l
um
e
Drag t
h
e vo
l
ume s
l
i
d
er. You can a
l
so use t
h
e vo
l
ume
b
uttons
on t
h
e iP
h
one ear
ph
ones (iP
h
on
e
3
GS or
l
ater)
.
P
l
ay a vi
d
eo on App
l
e T
V
using AirP
l
a
y
T
a
p
and choose an A
pp
le TV. I
f
doesn’t appear or i
f
you
d
on’t see the Apple TV you’re looking
f
or, make sure iPhone is
on t
h
e same wire
l
ess networ
k.
Switch
f
rom AirPlay back to iPhon
e
T
a
p
and choose iPhone
f
rom the list
.
10
5
C
h
a
p
ter
8
iPo
d
Skip to the next chapter
(if available)
Tap , or press the center button on the iPhone earphones
(iPhone 3GS or later) twice quickly.
Go to the previous chapter
(if available)
Tap , or press the center button on the iPhone earphones
(iPhone 3GS or later) three times quickly.
5VCTVRNC[KPICVCURGEK°EEJCRVGT
(if available)
Tap , then choose a chapter from the list.
Rewind or fast-forward Touch and hold or .
Skip to any point in a video &TCIVJGRNC[JGCFCNQPIVJGUETWDDGTDCT5NKFG[QWT°PIGT
down to adjust the scrub rate. The scrub rate becomes slower
VJGHCTVJGTFQYP[QWUNKFG[QWT°PIGT
Stop watching a video before
KV°PKUJGURNC[KPI
Tap Done. Or press the Home button.
5ECNGCXKFGQVQ°NNVJGUETGGP
QT°VVQVJGUETGGP
Tap VQOCMGVJGXKFGQ°NNVJGUETGGP6CR to make
KV°VVJGUETGGP;QWECPCNUQFQWDNGVCRVJGXKFGQVQUYKVEJ
DGVYGGP°VVKPICPF°NNKPIVJGUETGGP
9JGP[QWUECNGCXKFGQVQ°NNVJGUETGGPVJGUKFGUQTVQROC[
DGETQRRGFHTQOXKGY9JGP[QWUECNGKVVQ°VVJGUETGGP[QW
may see black bars on the sides or above and below the video.
Select an alternate audio
language (if available)
Tap , then choose a language from the Audio list.
Show or hide subtitles
(if available)
Tap VJGPEJQQUGCNCPIWCIGQT1ÒHTQOVJG5WDVKVNGUNKUV
Searching for Videos
You can search the titles of movies, TV shows, and video podcasts you’ve synced
to iPhone.
Search for a video: 'PVGTVGZVKPVJGUGCTEJ°GNFCVVJGVQRQHVJGNKUVQHXKFGQU
Search results appear as you type. Tap Search to dismiss the keyboard and see more
of the results.
Video content is included in searches from the Home screen. See “Searching” on
page 47.
106 Chapter 8 iPod

Watching Rented Movies and TV Shows
You can rent movies from the iTunes Store and watch them on iPhone. You can
download rented movies and TV shows directly to iPhone, or transfer movies from
iTunes on your computer to iPhone. (Rented movies and TV shows may not be
available in all countries or regions.)
See “Purchasing or Renting Videos” on page 174.
A movie or TV show must be completely downloaded before you can start watching it.
You can pause a download and resume it later.
Rented movies and TV shows expire after a certain time, and once you start a movie or
68UJQY[QWJCXGCNKOKVGFCOQWPVQHVKOGVQ°PKUJYCVEJKPIKV6JGVKOGTGOCKPKPI
appears near the title. Rented items are automatically deleted when they expire. Before
renting a movie or TV show, check the iTunes Store for the rental period.
View a rented movie or TV show: 1PK2JQPGEJQQUGK2QF 8KFGQUVCR/QTG°TUVKH
Videos isn’t visible), then select the movie or TV show.
On iPhone 3G and iPhone 3GS, you can transfer rented movies between iPhone and
your computer. On iPhone 4, you can transfer rented movies between iPhone and
your computer only if they were rented in iTunes on your computer. Movies rented on
iPhone 4 can’t be transferred to your computer.
Transfer a rented movie between iPhone and your computer:
1Connect iPhone to your computer.
2In iTunes, select iPhone in the Devices list, then click Movies.
3Click Move next to the item you want to transfer, then click Apply.
Your computer must be connected to the Internet.
107
Chapter 8 iPod

Watching Videos on a TV
You can watch videos on your TV by connecting iPhone to your TV or AV receiver with
an AV cable. Or, you can stream videos wirelessly to your TV using AirPlay and Apple TV.
Connect using an AV cable: Use the Apple Component AV Cable, Apple Composite
AV Cable, or other authorized iPhone-compatible cable. You can also use these cables
with the Apple Universal Dock to connect iPhone to your TV. The Apple Universal Dock
includes a remote that lets you control playback from a distance.
Stream videos using AirPlay: Start video playback, then tap and choose your
Apple TV from the list. If doesn’t appear or if you don’t see your Apple TV in the list
of AirPlay devices, make sure it’s on the same wireless network as iPhone. To return
playback to iPhone, tap again and choose iPhone from the list.
Apple cables and docks are available for purchase separately. Go to
www.apple.com/ipodstore (may not be available in all countries or regions)
or check with your local Apple retailer.
Converting Videos for iPhone
You can add videos other than those purchased from the iTunes Store to iPhone, such
as videos you create in iMovie on a Mac, or videos you download from the Internet
and then add to iTunes.
If you try to add a video from iTunes to iPhone and a message says the video can’t play
on iPhone, you can convert the video.
Convert a video to work with iPhone: Select the video in your iTunes library and
choose Advanced > “Create iPod or iPhone Version.” Then add the converted video
to iPhone.
Deleting Videos from iPhone
You can delete videos from iPhone to save space.
Delete a video: In the videos list, swipe left or right over the video, then tap Delete.
Deleting a video from iPhone (other than a rented movie or TV show) doesn’t delete
the video from your iTunes library. It may reappear on iPhone if the video in iTunes is
still set to sync.
Important: If you delete a rented movie or TV show from iPhone, it’s deleted
permanently and cannot be transferred back to your computer.
108 Chapter 8 iPod
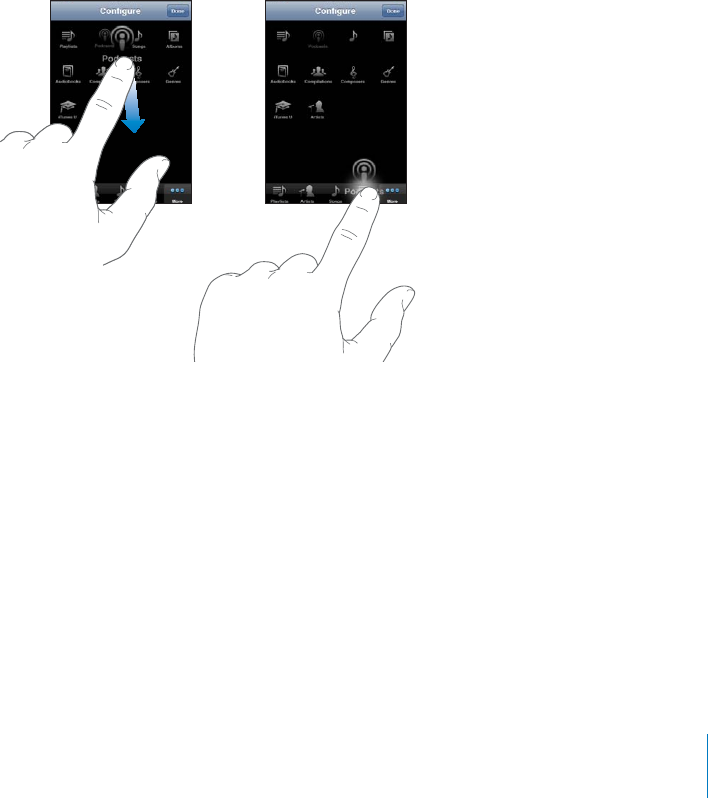
Setting a Sleep Timer
You can set iPhone to stop playing music or videos after a period of time.
Set a sleep timer: (TQOVJG*QOGUETGGPEJQQUG%NQEM 6KOGTVJGP±KEMVQUGVVJG
number of hours and minutes. Tap When Timer Ends and choose Sleep iPod, tap Set,
then tap Start to start the timer.
When the timer ends, iPhone stops playing music or video, closes any other open app,
and then locks itself.
Changing the Browse Buttons
You can replace the browse buttons at the bottom of the screen with buttons you
use more frequently. For example, if you often listen to podcasts, you can replace the
Songs button with Podcasts.
Change the browse buttons: Tap More and tap Edit, then drag a button to the
bottom of the screen, over the button you want to replace.
You can drag the buttons at the bottom of the screen left or right to rearrange them.
6CR&QPGYJGP[QW°PKUJ6CR/QTGCVCP[VKOGVQCEEGUUVJGDWVVQPU[QWTGRNCEGF
109
Chapter 8 iPod
M
essage
s
9
Sen
d
ing an
d
Receiving Message
s
WARNIN
G:
For important in
f
ormation about driving sa
f
ely, see the Important Pro
d
uc
t
In
f
ormation Guid
e
a
t
www.a
ppl
e.com/su
pp
ort/manua
l
s/i
ph
o
n
e
.
Messages
l
ets you exc
h
ange text messages wit
h
anyone using an SMS-capa
bl
e p
h
one
.
Messages a
l
so supports MMS, so you can sen
d
p
h
otos, vi
d
eo c
l
ips (iP
h
on
e
3
G
S
or
later), contact in
f
ormation, and voice memos to other MMS-ca
p
able devices. You can
enter mu
l
tip
l
e a
dd
ressees an
d
sen
d
a message to severa
l
peop
l
e at t
h
e same time
.
Note
:
S
MS or MMS support may not
b
e avai
l
a
bl
e in a
ll
countries or regions. A
dd
itiona
l
f
ees may apply
f
or use o
f
Messages. Contact your carrier
f
or more in
f
ormation
.
The Messages icon on the Home screen shows the number o
f
unread messages
you
h
ave
.
5\TILYVM
\UYLHKTLZZHNLZ
You can use Messages whenever you’re in range o
f
the cellular network. I
f
you can
ma
k
e a ca
ll
, you can sen
d
a message. Depen
d
ing on your p
h
one p
l
an, you may
b
e
charged
f
or the messages you send or receive
.
Sen
d
a message
:
T
a
p
,
t
h
en enter a
ph
one num
b
er or name, or ta
p
an
d
c
h
oose a
EQPVCEVHTQO[QWTEQPVCEVUNKUV6CRVJGVGZV°GNFCDQXGVJGMG[DQCTFV[RGCOGUUCIG
a
n
d
ta
p
Sen
d.
1
1
0

I
f
the message can’t be sent (i
f
you’re out o
f
cellular network range,
f
or example), an
a
lert badge appears on the Messages icon on the Home screen. I
f
Messages is in a
f
older, the alert badge appears on the
f
older
.
(SLY[IHKNL
Your conversations are save
d
in t
h
e Messages
l
ist. Conversations t
h
at contain unrea
d
messages
h
ave a
bl
ue
d
ot next to t
h
em. Ta
p
a conversation in t
h
e
l
ist to see t
h
e
conversation or a
dd
to it
.
;L_[TLZZHNLZ
`V\ZLU[
;L_[TLZZHNLZ
MYVT[OLV[OLY
WLYZVU
iP
h
one
d
isp
l
a
y
s t
h
e 50 most recent messages in t
h
e conversation. To see ear
l
ier
messages, scro
ll
to t
h
e top an
d
tap Loa
d
Ear
l
ier Messages
.
G
roup messaging (not avai
l
a
bl
e in a
ll
countries an
d
regions)
l
ets you sen
d
a message
t
o multi
p
le reci
p
ients
.
Send a message to a group o
f
people
:
T
a
p
,
then add recipients. I
f
you enter a
phone number manually (instead o
f
selecting it
f
rom Contacts), tap Return be
f
ore
entering anot
h
er entr
y.
N
ote
:
Check to make sure Group Messaging in Settings > Messages is turned on
.
Replies from any of the recipients are sent only to you, not to the other people
you texte
d.
Reply or send a message to a person or group you’ve texted be
f
ore
:
Tap an entry
i
n
t
he Messages list, then type a new message in the conversation and tap Send
.
Send a message to a favorite or to a recent call
:
1
Ta
p
P
h
one on t
h
e Home screen, t
h
en ta
p
Favorites or Recents
.
2
T
a
p
next to a name or num
b
er, t
h
en tap Text Message
.
3
I
f
multiple phone numbers appear, tap the one you want to text
.
111
C
h
a
p
ter
9
M
essage
s

When MMS is available, Messages allows you to include a subject in your text messages.
;QWECPVWTPVJKUHGCVWTGQPQTQÒKP/GUUCIGUUGVVKPIU+VKUVWTPGFQPD[FGHCWNV
+PENWFGQTTGOQXGVJGUWDLGEV°GNFIn Settings, tap Messages, then tap Show
Subject Field.
Note: 6JGUWDLGEV°GNFCPFVJG5JQY5WDLGEV(KGNFUGVVKPIFQP¨VCRRGCTKH//5KUP¨V
supported by your carrier.
6WTPEJCTCEVGTEQWPVKPIQPQTQÒIn Settings, tap Messages, then tap the Character
Count switch. The character count includes all characters—including spaces,
punctuation, and returns—and appears as you type when your message exceeds two
lines. You may want to count characters, for example, when carrier fees apply.
Note: 6JGEJCTCEVGTEQWPVFQGUP¨VCRRGCTKH[QWGPVGTVGZVKPVJGUWDLGEV°GNFQTCVVCEJ
a photo or video.
6WTP//5OGUUCIKPIQPQTQÒIn Settings, tap Messages, then tap MMS Messaging.
;QWOC[YCPVVQVWTP//5/GUUCIKPIQÒHQTGZCORNGVQRTGXGPVUGPFKPIQTTGEGKXKPI
attachments when fees apply.
Note: The MMS Messaging setting doesn’t appear if MMS isn’t supported by your carrier.
Searching Messages
You can search the content of messages in the Messages list (iPhone 3GS or later).
Search the Messages list: 6CRVJGVQRQHVJGUETGGPVQFKURNC[VJGUGCTEJ°GNFVJGP
VCRVJGUGCTEJ°GNFCPFGPVGTVJGVGZV[QW¨TGNQQMKPIHQT
Messages are included in searches from the Home screen. See “Searching” on page 47.
Sharing Photos and Videos
You can take a photo or make a video (iPhone 3GS or later) from within Messages and
include it in your conversation with another MMS-capable device. You can save photos
or videos you receive in Messages to your Camera Roll album.
If MMS isn’t supported by your carrier, doesn’t appear and you can’t send photos
or videos.
Send a photo or video: Tap and tap “Take Photo or Video” (iPhone 3GS or later; on
earlier models, tap “Take Photo”), or “Choose Existing” and select an item from a photo
album and tap Choose.
The size limit of attachments is determined by your carrier. If necessary, iPhone
may compress the photo or video. To learn about taking photos and videos, see
Chapter 12,“Camera,” on page 129.
112 Chapter 9 Messages
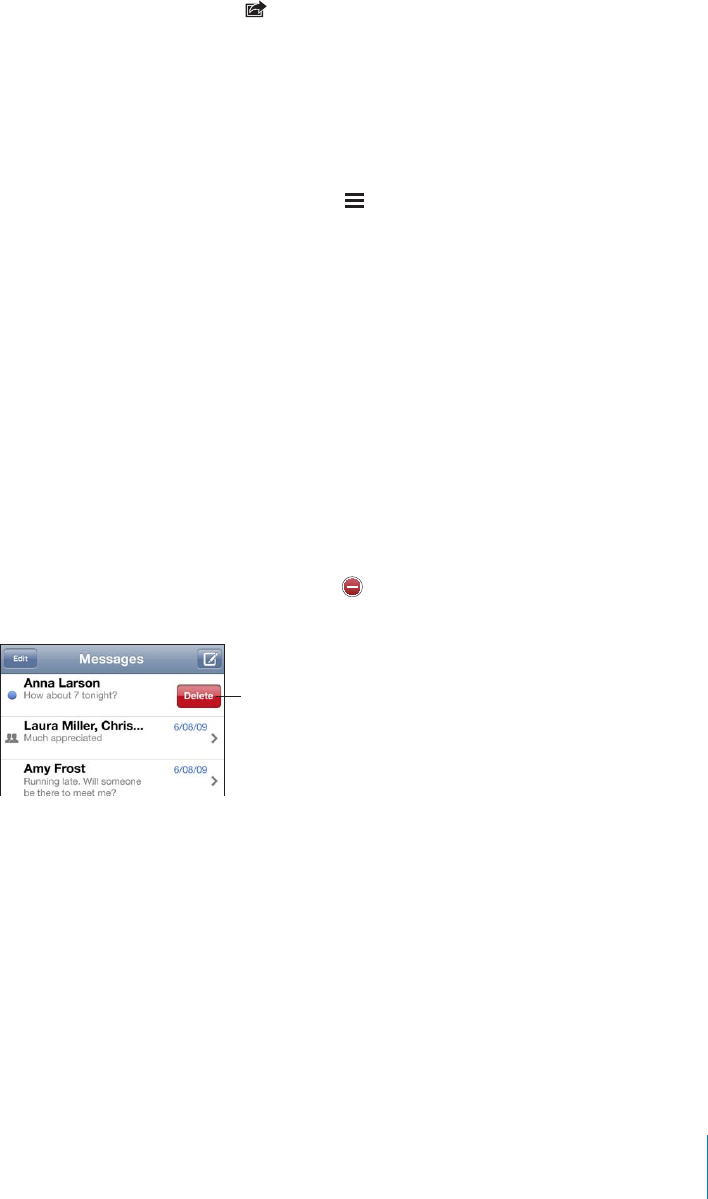
Save a photo or video attachment to your Camera Roll album: Tap the photo or
video in the conversation, tap , then tap Save Image or Save Video.
Copy a photo or video: Touch and hold the attachment, then tap Copy. You can paste
the photo or video to an Mail message or another MMS message.
Sending Voice Memos
You can send voice memos in a message to another MMS-capable device.
Send a voice memo: In Voice Memos, tap , tap the voice memo you want to send,
then tap Share and tap MMS. Address the message and tap Send.
Editing Conversations
If you want to keep just part of a conversation, you can delete the parts you don’t
want. You can also delete entire conversations from the Messages list.
Edit a conversation: Tap Edit. Tap the circles along the left side to select the parts of
VJGEQPXGTUCVKQP[QWYCPVVQFGNGVGVJGPVCR&GNGVG9JGP[QW¨TG°PKUJGFVCR&QPG
%NGCTCNNVGZVCPF°NGUYKVJQWVFGNGVKPIVJGEQPXGTUCVKQPTap Edit, then tap Clear All.
6CR%NGCT%QPXGTUCVKQPVQEQP°TO
Forward a conversation: Select a conversation, then tap Edit. Tap the circles on the
left side of the screen to select the parts of the conversation you want to include, then
tap Forward, enter one or more recipients, and tap Send.
Delete a conversation: Tap Edit, then tap next to the conversation and tap Delete.
You can also swipe left or right over the conversation and tap Delete.
;VZOV^[OL
+LSL[LI\[[VU
Z^PWLSLM[VYYPNO[
V]LY[OLTLZZHNL
113
Chapter 9 Messages

Using Contact Information and Links
Call, FaceTime, or email someone you’ve texted: Tap a message in the Text Messages
list and scroll to the top of the conversation. (Tap the status bar to scroll quickly to the
top of the screen.)
To call the person, tap Call.
To call the person using FaceTime, tap FaceTime.
To email the person, tap Contact Info, then tap an email address.
Follow a link in a message: Tap the link.
A link may open a webpage in Safari, make a phone call in Phone, open a
preaddressed message in Mail, or display a location in Maps. To return to your text
messages, press the Home button and tap Messages.
Add someone you’ve texted to your contacts list: Tap a phone number in the
Messages list, then tap “Add to Contacts.”
Send contact information: In Contacts, tap the person whose information you want
to share. Tap Share Contact at the bottom of the screen, then tap MMS. Address the
message and tap Send.
Save contact information received: Tap the contact bubble in the conversation and
tap Create New Contact or “Add to Existing Contact.”
Managing Previews and Alerts
By default, iPhone displays a preview of new messages when iPhone is locked or when
[QWCTGWUKPICPQVJGTCRR;QWECPVWTPVJKURTGXKGYQPQTQÒKP5GVVKPIU;QWECPCNUQ
enable alerts for text messages.
6WTPRTGXKGYUQPQTQÒIn Settings, choose Messages and tap Show Preview.
Repeat previews: In Settings, choose Messages and tap Repeat Alert. If you don’t
TGURQPFVQVJG°TUVRTGXKGYQHCPGYOGUUCIGVJGRTGXKGYYKNNDGFKURNC[GFVYKEGOQTG
Set whether an alert sounds when you get a text message or preview: In Settings,
choose Sounds, then tap New Text Message. Tap the alert sound you want, or None if
you don’t want an audible alert.
Important: +HVJG4KPI5KNGPVUYKVEJKUQÒVGZVCNGTVUYQP¨VUQWPF
114 Chapter 9 Messages

Calenda
r
10
A
b
out Ca
l
en
d
a
r
Ca
l
en
d
ar gives you rea
d
y access to your ca
l
en
d
ars an
d
events. You can view in
d
ivi
d
ua
l
ca
l
en
d
ars, or severa
l
ca
l
en
d
ars at once. You can view your events
b
y
d
ay,
b
y mont
h
,
or in a list. You can search the titles, invitees, locations, and notes o
f
events. I
f
you’ve
entered birthdays
f
or your contacts, you can view those birthdays in Calendar
.
You can sync iP
h
one wit
h
t
h
e ca
l
en
d
ars on your computer, an
d
wit
h
services suc
h
as
MobileMe, Microso
f
t Exchange, Yahoo!, and Google. You can also make, edit, or cancel
a
ppointments on iP
h
one an
d
h
ave t
h
em sync
b
ac
k
to your computer or ca
l
en
d
ar
a
ccount. I
f
you have a MobileMe, Microso
f
t Exchange, Google, Yahoo!, or CalDA
V
a
ccount, your ca
l
en
d
ars can sync over t
h
e air wit
h
out connecting iP
h
one to your
computer. MobileMe Shared Calendars that you’ve joined
f
rom your computer also
s
ync wit
h
iP
h
one
.
;QWECPUWDUETKDGVQTGCFQPN[K%CNGPFCTKEUECNGPFCTUQTKORQTVKEU
°
NGU
H
TQOGOCKN
I
f
you have a Microso
f
t Exchange account with Calendars enabled, or a supported
CalDAV account, you can receive and respond to meeting invitations
f
rom others, and
invite peop
l
e to events you’ve sc
h
e
d
u
l
e
d.
Syncing Ca
l
en
d
ar
s
You can sync Calendar in either o
f
the
f
ollowing ways
:
In iTunes, use the iPhone In
f
o pane to sync with iCal or Microso
f
t Entourage on a
Mac, or Microso
f
t Outlook 2003, 2007, or 2010 on a PC, when you connect iPhone to
your computer. See
“
iP
h
one Settings Panes in iTunes
”
on pag
e
58
.
In Settings on iPhone, turn on Calendars in your MobileMe, Microso
f
t Exchange,
G
oogle, or Yahoo! accounts to sync your calendar in
f
ormation over the air, or set
up a CalDAV account if your company or organization supports it. See “
Add
ing Mai
l
,
“
Contacts, an
d
Ca
l
en
d
ar Accounts
”
on pag
e
2
5
.
115
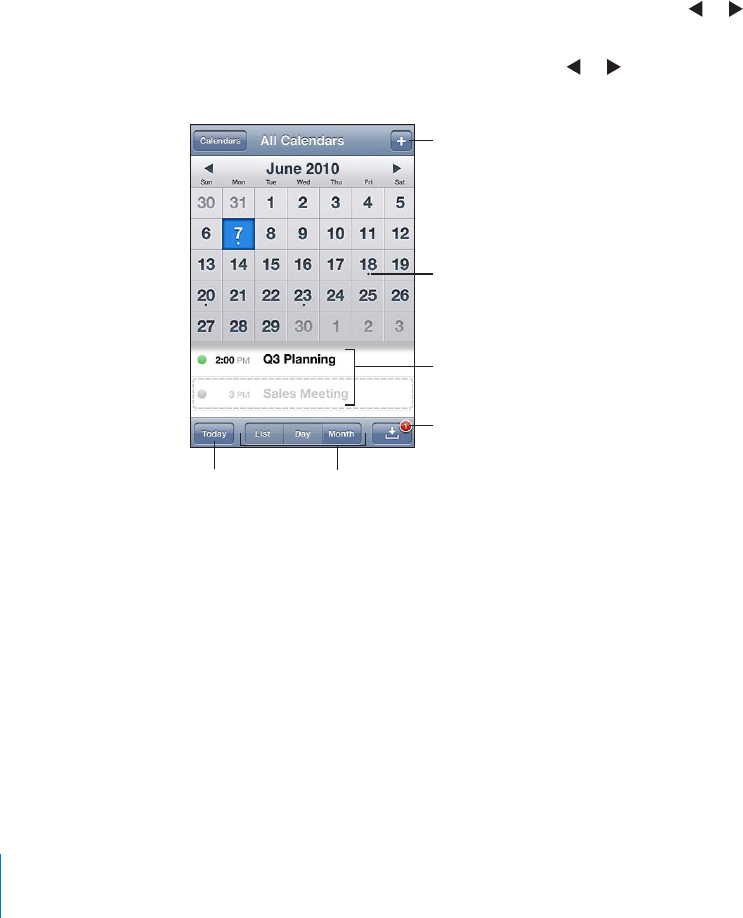
Viewing Your Calendars
You can view a single calendar, selected calendars, or all calendars at once.
Select calendars to view: Tap Calendars, then tap to select the calendars you want
to view. To quickly select or deselect all calendars, tap Show All Calendars or Hide All
Calendars. To view your contacts’ birthdays, tap Birthdays at the bottom of the screen.
Tap Done to view the selected calendars.
The events for all selected calendars appear in a single calendar on iPhone. You can
view your calendar events in a list, by day, or by month.
Switch views: Tap List, Day, or Month.
List view: All your appointments and events appear in a scrollable list.
Day view: Scroll up or down to see the events in a day. Tap or to see the
previous or next day’s events.
Month view: Tap a day to see its events. Tap or to see the previous or
next month.
(KKHUL]LU[
+H`Z^P[OKV[Z
OH]LZJOLK\SLK
L]LU[Z
.V[V[VKH` :^P[JO]PL^Z
9LZWVUK[V
JHSLUKHYPU]P[H[PVU
,]LU[ZMVY
ZLSLJ[LKKH`
See the details of an event: Tap the event.
Set iPhone to adjust event times for a selected time zone:
1In Settings, choose “Mail, Contacts, Calendars.”
2Under Calendars, tap Time Zone Support, then turn Time Zone Support on.
3Tap Time Zone, then search for a major city in the time zone you want.
When Time Zone Support is on, Calendar displays event dates and times in the time
\QPGQHVJGEKV[[QWUGNGEVGF9JGP6KOG<QPG5WRRQTVKUQÒ%CNGPFCTFKURNC[UGXGPVU
in the time zone of your current location as determined by the network time.
116 Chapter 10 Calendar

Searching Calendars
;QWECPUGCTEJVJGVKVNGUKPXKVGGUNQECVKQPUCPFPQVGU°GNFUQHVJGGXGPVUKP[QWT
calendars. Calendar searches only the events for the calendars you’re currently viewing.
Search for events: +PNKUVXKGYGPVGTVGZVKPVJGUGCTEJ°GNF
Search results appear as you type. Tap Search to dismiss the keyboard and see
more results.
Calendar events are included in searches from the Home screen. See “Searching”on
page 47.
Adding and Updating Events on iPhone
You can create and update calendar events directly on iPhone.
If you have a Microsoft Exchange account with Calendars enabled, or a supported
CalDAV account, you can invite other people to your event or meeting.
Add an event: Tap and enter event information, then tap Done.
You can enter any of the following:
Title
Location
Starting and ending times (or turn on All-day if it’s an all-day event)
Repeat times—none, or every day, week, two weeks, month, or year
Invitees (if supported by your calendar server)
#NGTVVKOG¤HTQO°XGOKPWVGUVQVYQFC[UDGHQTGVJGGXGPV
When you set an alert, the option to set a second alert appears. When an alert
IQGUQÒK2JQPGFKURNC[UCOGUUCIG;QWECPCNUQUGVK2JQPGVQRNC[CUQWPFUGG
“Alerts” on page 120).
117
Chapter 10 Calendar
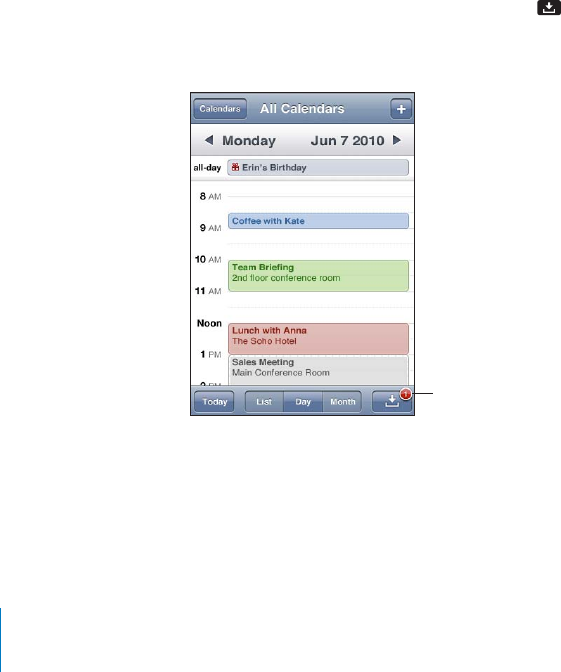
Important: Some carriers don’t support network time in all locations. If you’re
traveling, iPhone may not alert you at the correct local time. To manually set the
correct time, see “Date and Time” on page 204.
Calendar
You can change the default calendar using the Default Calendar setting. See
“Calendars”on page 211.
Notes
You can’t assign an event to a read-only calendar.
Events can also be created by tapping a day, date, or time in a Mail message. See
“Using Links and Detected Data”on page 82.
Update an event: Tap Edit and change event information. Tap Done when
[QW¨TG°PKUJGF
Delete an event: Tap the event, tap Edit, then scroll down and tap Delete Event.
Responding to Meeting Invitations
If you have a Microsoft Exchange or MobileMe account with Calendars enabled, or a
supported CalDAV account, you can receive and respond to meeting invitations from
people in your organization. When you receive an invitation, the meeting appears in
your calendar with a dotted line around it. appears in the lower-right corner of the
screen with a badge that shows the total number of new invitations you have. The
number of new invitations also appears on the Calendar icon on the Home screen.
5\TILYVM
TLL[PUNPU]P[H[PVUZ
118 Chapter 10 Calendar
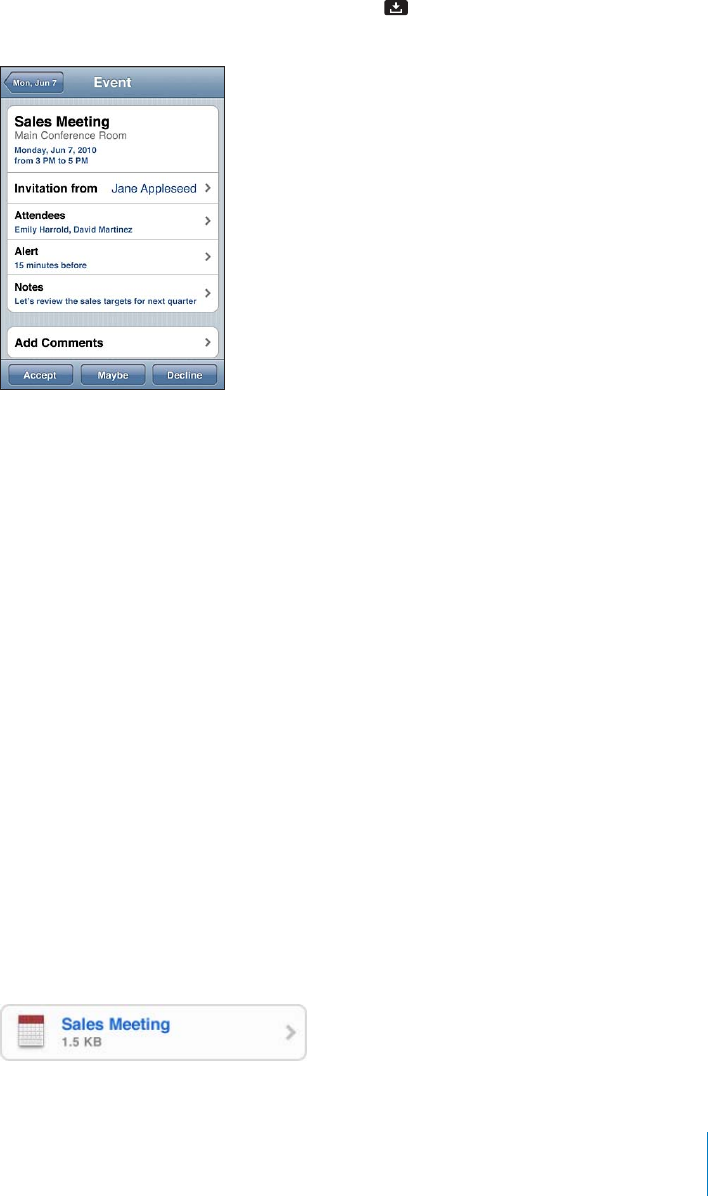
Respond to an invitation in Calendar:
1Tap a meeting invitation in the calendar, or tap to display the Event screen and tap
an invitation.
Tap “Invitation from” to get contact information for the meeting organizer. Tap the
email address to send a message to the organizer. If the organizer is in your contacts
list, you can also tap to call or send a text message.
Tap Invitees to see the other people invited to the meeting. Tap a name to see an
attendee’s contact information. Tap the email address to send a message to the
attendee. If the attendee is in your contacts list, you can also tap to call or send a
text message.
Tap Alert to set iPhone to sound an alert before the meeting.
Tap Add Comments to add comments in the email response to the meeting
organizer. You comments will also appear in your Info screen for the meeting.
Notes are made by the meeting organizer.
2Tap Accept, Maybe, or Decline.
When you accept, tentatively accept, or decline the invitation, a response email that
includes any comments you added is sent to the organizer.
If you accept or tentatively accept the meeting, you can change your response later.
Tap Add Comments if you want to change your comments.
Meeting invitations are also sent in an email message, which lets you open the
meeting’s Info screen from Mail.
Open a meeting invitation in an email message: Tap the invitation.
119
Chapter 10 Calendar

Subscribing to Calendars
You can subscribe to calendars that use the iCalendar (.ics) format. Many calendar-based
services support calendar subscriptions, including Yahoo!, Google, and the Mac OS X
iCal application.
Subscribed calendars are read-only. You can read events from subscribed calendars on
iPhone, but you can’t edit them or create new events.
Subscribe to a calendar:
1In Settings, choose “Mail, Contacts, Calendars,” then tap Add Account.
2Choose Other, then choose Add Subscribed Calendar.
3Enter the server information, then tap Next to verify the subscription.
4Tap Save.
You can also subscribe to an iCal (or other .ics) calendar published on the web by
tapping a link to the calendar you receive in an email or text message on iPhone.
Importing Calendar Files from Mail
;QWECPCFFGXGPVUVQCECNGPFCTD[KORQTVKPICECNGPFCT°NGHTQOCPGOCKNOGUUCIG
;QWECPKORQTVCP[UVCPFCTFKEUECNGPFCT°NG
+ORQTVGXGPVUHTQOCECNGPFCT°NGIn Mail, open the message and tap the calendar
°NG9JGPVJGNKUVQHGXGPVUCRRGCTUVCR#FF#NNEJQQUGVJGECNGPFCT[QWYCPVVQCFF
the events to, and tap Done.
Alerts
Set calendar alerts: In Settings, choose Sounds, then turn Calendar Alerts on. If
%CNGPFCT#NGTVUKUQÒYJGPCPGXGPVKUCDQWVVQQEEWTK2JQPGFKURNC[UCOGUUCIGDWV
makes no sound.
Important: +HVJG4KPI5KNGPVUYKVEJKUQÒECNGPFCTCNGTVUYQP¨VUQWPF
Sound alerts for invitations: In Settings, choose “Mail, Contacts, Calendar.” Under
Calendars, tap New Invitation Alert to turn it on.
120 Chapter 10 Calendar

Photo
s
11
A
b
out P
h
oto
s
iP
h
one
l
ets you carry p
h
otos an
d
vi
d
eos wit
h
you, so you can s
h
are t
h
em wit
h
your
f
amily,
f
riends, and associates. View your photos on iPhone or use AirPlay to view them
on a TV with Apple TV. You can sync photos and videos
f
rom your computer, view
p
h
otos an
d
vi
d
eos ta
k
en wit
h
iP
h
one, use p
h
otos as wa
ll
paper, an
d
assign p
h
otos
t
o identi
f
y contacts when they call. You can also send photos and videos in email
messages, sen
d
p
h
otos an
d
vi
d
eos in MMS messages, up
l
oa
d
p
h
otos an
d
vi
d
eos to
Mo
b
i
l
eMe ga
ll
eries, an
d
print p
h
otos
.
N
ote
:
Video
f
eatures are available on iPhon
e
3
GS or later. MMS is available i
f
su
pp
orted
b
y your carrier
.
Syncing P
h
otos an
d
Vi
d
eos wit
h
Your Compute
r
iTunes can sync your photos and videos with the
f
ollowing applications
:
M
ac
:
iP
h
oto 4.0.3 or
l
ater (syncing vi
d
eos requires iP
h
oto 6.0.6 or
l
ater), or Aperture
(p
h
otos on
l
y)
P
C:
A
d
o
b
e P
h
otos
h
op E
l
ements 8.0 or
l
ater (p
h
otos on
l
y)
You can also sync photos and videos
f
rom any
f
older on your computer that contains
images. See
“
S
yncing wit
h
iTunes
”
on pag
e
57
.
7
7
iPhone supports H.264 and MPEG-4 video
f
ormats, with AAC audio. I
f
you are having
t
rou
bl
e syncing a vi
d
eo to iP
h
one, you mig
h
t
b
e a
bl
e to use iTunes to create an iP
h
one
version o
f
the video
.
12
1
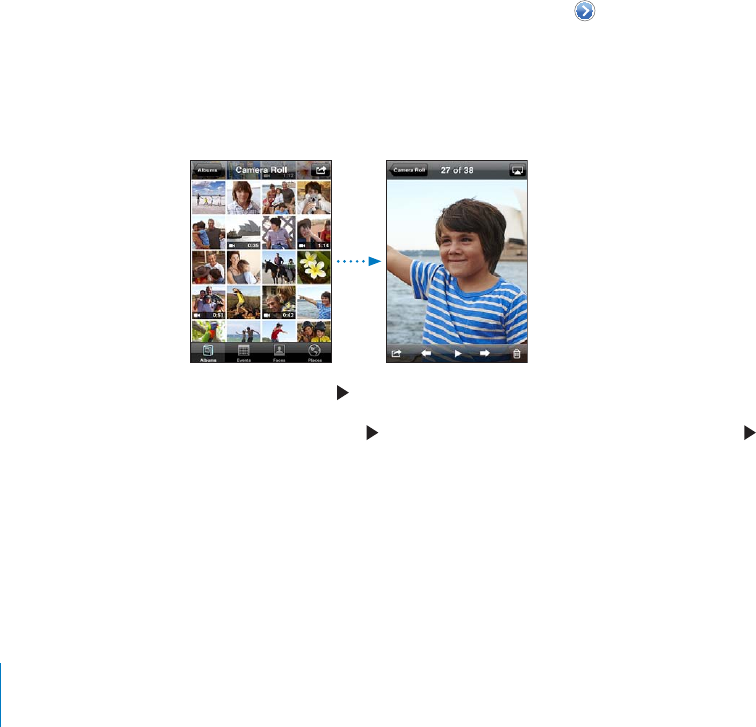
Create an iPhone version of a video:
1Copy the video to your iTunes library.
2In iTunes, select Movies in the Library list and select the video you want to sync.
3Choose Advanced > Create iPod or iPhone Version.
For more information, go to support.apple.com/kb/HT1211.
Viewing Photos and Videos
Photos and videos you take with iPhone, sync from your computer, or save from an
email or MMS message can be viewed in Photos. If you sync photos with iPhoto 8.0
(part of iLife ‘09) or later, you can view your photos and videos by the events and faces
[QW¨XGKFGPVK°GF;QWECPCNUQUGGVJGRNCEGUYJGTG[QWTRJQVQUCPFXKFGQUYGTG
taken if they’re tagged with location data.
View photos and videos:
1In Photos, tap a photo album. Tap the buttons at the bottom of the screen to view
your photos and videos by albums, events, faces, or places if available.
Photos are sorted by creation date. If you tap Places, a map shows each location that
you’ve tagged photos from. Tap a pin, then tap to see your photos and videos from
that location.
2Tap a thumbnail to see the photo or video in full screen.
Show or hide the controls: Tap the full-screen photo or video to show the controls.
Tap again to hide the controls.
Play a video: Tap in the center of the screen.
To replay a video, tap at the bottom of the screen. If you don’t see , tap the screen
to show the controls.
122 Chapter 11 Photos

V
iew a
p
hoto or video in landsca
p
e orientation
:
Rotate iPhone sideways. The photo or
XKFGQTQVCVGUCWVQOCVKECNN[CPFK
H
KV¨UKPYKFGUETGGP
H
QTOCVGZRCPFUVQ
°
VVJGUETGGP
Z
oom in on
p
art o
f
a
p
hoto
:
Dou
bl
e-tap w
h
ere you want to zoom in. Dou
bl
e-tap
a
gain to zoom out. You can a
l
so pinc
h
to zoom in or out
.
8KGYXKFGQKP
H
WNNUETGGPQT
°
VXKFGQVQUETGGP
Dou
bl
e ta
p
t
h
e screen to sca
l
e t
h
e
XKFGQVQ
°
NNVJGUETGGP&QWDNGVCRCICKPVQ
°
VVJGXKFGQVQVJGUETGGP
Pan aroun
d
a
ph
oto
:
Drag t
h
e p
h
oto
.
See t
h
e next or
p
revious
ph
oto or vi
d
eo
:
Flick le
f
t or right. Or tap the screen to show
th
e contro
l
s, t
h
en ta
p
or
.
123
C
h
a
p
ter 11 P
h
oto
s

Deleting Photos and Videos
You can delete photos and videos from Camera Roll on iPhone.
Delete photos and videos:
1Tap in the upper-right corner of the screen.
2Tap to select the photos and videos you want to delete.
The Delete button indicates the number of items you select.
3Tap Delete.
Slideshows
You can view a photo album as a slideshow, complete with background music.
View a photo album as a slideshow: Tap an album, then tap .
Videos play automatically when they appear during the slideshow.
Stop a slideshow: Tap the screen.
Set slideshow settings: In Settings, choose Photos and set the following options:
To set the length of time each slide is shown, tap Play Each Slide For and choose a time.
6QUGVVTCPUKVKQPGÒGEVUYJGPOQXKPIHTQORJQVQVQRJQVQtap Transition and choose a
transition type.
To set whether slideshows repeat, VWTP4GRGCVQPQTQÒ
To set whether photos and videos are shown in random order, VWTP5JWÔGQPQTQÒ
Play music during a slideshow: In iPod, play a song, then choose Photos on the
Home screen and start a slideshow.
Viewing Photos, Videos, and Slideshows on a TV
You can view photos, videos, and slideshows on your TV by connecting iPhone to
your TV or AV receiver with an AV cable. Or, you can stream photos and slideshows
wirelessly to your TV using AirPlay and Apple TV.
Connect using an AV cable: Use the Apple Component AV Cable, Apple Composite
AV Cable, or other authorized iPhone-compatible cable. You can also use these cables
with the Apple Universal Dock to connect iPhone to your TV or AV receiver. The Apple
Universal Dock includes a remote that lets you control playback from a distance.
Stream content using AirPlay: View a photo or slideshow, then tap and choose
your Apple TV from the list. If doesn’t appear or if you don’t see your Apple TV in
the list of AirPlay devices, make sure it’s on the same wireless network as iPhone. To
return playback to iPhone, tap again and choose iPhone from the list.
Apple cables and docks are available for purchase separately. Go to
www.apple.com/ipodstore (may not be available in all countries or regions)
or check with your local Apple retailer.
124 Chapter 11 Photos

Sharing Photos and Videos
You can send photos and videos in email and MMS messages, add photos and videos
to MobileMe galleries, and publish videos to YouTube. You can also copy and paste
photos and videos, save photos and videos from email messages to Photos, and save
images from webpages to Photos.
Sending a Photo or Video in an Email or MMS Message
Send a photo or video (iPhone 3GS or later) in an email message:
1Choose a photo or video and tap . If you don’t see , tap the screen to show
the controls.
2Tap Email Photo/Video.
The photo or video appears in a new mail message window.
3Compose your message, then tap Send.
4If sending a photo, you may be asked if you want to reduce the message size by
scaling the image. Tap the size you want to use.
Send multiple photos or videos at the same time: When viewing thumbnails in an
album, tap , then tap to select the photos or videos you want to send, tap Share,
and tap Email.
Send a photo or video via MMS: Choose a photo or video and tap , then tap MMS.
The size limit of attachments is determined by your carrier. If necessary, iPhone
may compress the photo or video. To learn about taking photos and videos, see
Chapter 12,“Camera,” on page 129.
Copying and Pasting Photos and Videos
You can copy a photo or video from Photos and paste it in an email or MMS message.
Some third-party apps may also support copying and pasting photos and videos.
Copy a photo or video: *QNF[QWT°PIGTQPVJGUETGGPWPVKNVJG%QR[DWVVQPCRRGCTU
then tap Copy.
Copy multiple photos or videos:
1Tap in the upper-right corner of the screen.
2Tap to select the photos and videos you want to copy.
The Copy button indicates the number of items you select.
3Tap Copy.
Paste a photo or video: Tap to place the insertion point where you want to place the
photo or video, then tap the insertion point and tap Paste.
125
Chapter 11 Photos

Adding a Photo or Video to a MobileMe Gallery
If you have a MobileMe account, you can add photos and videos directly from iPhone
to a gallery you’ve created. You can also add photos and videos to someone else’s
MobileMe gallery if that person has enabled email contributions.
Before you can add photos or videos to a gallery in your MobileMe account, you must:
Set up your MobileMe account on iPhone
Publish a MobileMe gallery, and allow adding photos via email or iPhone
For more information about creating a gallery and adding photos and videos to it, see
MobileMe Help.
Add a photo or video to your gallery: Choose a photo or video and tap , then tap
“Send to MobileMe.” Enter a title and description, if you like, then select the album to
add the photo or video to and tap Publish.
If you don’t see , tap the screen to show the controls.
iPhone tells you when the photo or video has been published, and gives you options
to view it on MobileMe or email a link to a friend.
Add a photo or video to someone else’s gallery: Choose a photo or video and tap ,
then tap “Email Photo/Video.” Enter the album’s email address, then click Send.
Publishing Videos to YouTube
If you have a YouTube account, you can publish videos directly from iPhone 3GS or
later to YouTube. Some videos may not be transferable, depending on the length of
the movie or other factors.
Publish a video to YouTube:
1While viewing a video, tap , then tap “Send to YouTube.”
2Sign in to your YouTube account.
3Enter publishing information such as Title, Description, and Tags.
4Tap Category to choose a category.
5Tap Publish.
126 Chapter 11 Photos

Saving Photos and Videos from Email Messages, MMS Messages, and
Webpages
Save a photo from an email message to your Camera Roll album: Tap the photo,
then tap Save Image. If the photo hasn’t been downloaded yet, tap the download
PQVKEG°TUV
Save a video from an email message to your Camera Roll album: Touch and hold
the attachment, then tap Save Video. If the video hasn’t been downloaded yet, tap the
FQYPNQCFPQVKEG°TUV
Save a photo from a webpage to your Camera Roll album: Touch and hold the
photo, then tap Save Image.
Save a photo or video from an MMS message to your Camera Roll album: Tap the
image in the conversation, tap , and tap Save Image or Save Video.
If you don’t see , tap the screen to show the controls.
You can download the photos and videos in your Camera Roll album to your
computer’s photo application by connecting iPhone to your computer.
Printing Photos
You can use AirPrint to print photos from iPhone.
Print a photo: Tap , then tap Print. Tap Select Printer to select a printer, set the
number of copies, then tap Print.
Print multiple photos: While viewing a photo album, tap . Select the photos you
want to print, then tap Print. Tap Select Printer to select a printer, set the number of
copies, then tap Print.
For more information, see “Printing” on page 45.
Assigning a Photo to a Contact
You can assign a photo to a contact. When that person calls, iPhone displays the photo.
Assign a photo to a contact:
1Choose Camera on the Home screen, then take someone’s picture. Or choose any
photo already on iPhone, and tap .
2Tap “Assign to Contact” and choose a contact.
3Position and size the photo until it looks the way you want.
Drag the photo to pan, and pinch to zoom in or out.
4Tap Set Photo.
You can also assign a photo to a contact in Contacts by tapping Edit and then tapping
“Add Photo.”
127
Chapter 11 Photos

Wallpaper
You can set a photo as wallpaper for the Lock screen. On iPhone 3GS or later, you can
also set wallpaper for your Home screen. The Lock screen wallpaper also appears when
you’re on a call with someone you don’t have a contact photo for.
Set a photo as wallpaper (iPhone 3GS or later):
1Choose any photo and tap , then tap Use As Wallpaper.
2Drag the photo to position it and pinch to zoom in or out, until it looks the way
you want.
3Tap Set, then choose whether you want to use the photo as wallpaper for your Lock
Screen, Home screen, or both.
You can also choose from several wallpaper pictures included with iPhone by choosing
Settings > Wallpaper from the Home screen. See “Adding Wallpaper” on page 36.
Set a photo as wallpaper (iPhone 3G):
1Choose any photo and tap , then tap Use As Wallpaper.
2Drag the photo to position it and pinch to zoom in or out, until it looks the way
you want.
3Tap Set Wallpaper.
You can also choose from several wallpaper pictures included with iPhone by choosing
Settings > Wallpaper from the Home screen.
128 Chapter 11 Photos

C
amera
12
A
b
out Camer
a
Wit
h
iP
h
one, you
h
ave a great sti
ll
camera an
d
vi
d
eo camera (iP
h
on
e
3
GS or
l
ater)
YJGTGXGT
[
QWIQK2JQPGJCUCOCKPECOGTCVJCVVCMGURJQVQUCPFJKIJFG
°
PKVKQP
XKFGQCP.'&
±
CUJ
H
QTRJQVQUCPFXKFGQUVCMGPYKVJVJGOCKPECOGTCCPFC
H
TQPV
camera that lets you make FaceTime video calls and take photos and videos o
f
yoursel
f.
The m
a
in c
a
mer
a
is
o
n the
ba
ck
of
iPh
o
ne
.
Y
ou
u
se the screen t
o
c
o
ntr
o
l the c
a
mer
a
a
nd to see the photo or video you’re taking. Tap-to-
f
ocus lets you tap anywhere on
VJGUETGGPVQ
H
QEWUQPCURGEK
°
EQDLGEVQTCTGCQ
H
[QWTUJQVCPFCWVQOCVKECNN[CFLWUV
t
he exposure. The macro auto
f
ocus
f
eature (about 10 cm) and a 5x digital zoom let
y
ou take great close-ups. (The video and tap-to-
f
ocus
f
eatures are available onl
y
on
iP
h
on
e
3
GS or
l
ater.)
I
f
location services is turned on,
p
hotos and videos (iPhon
e
3
GS or
l
ater) are tagge
d
with location data—including your current geographical coordinates provided by
G
PS, Wi-Fi, or cell-tower in
f
ormation. You can use location data with some a
pp
s and
p
h
oto-s
h
aring we
b
sites to trac
k
an
d
post w
h
ere you too
k
t
h
e p
h
otos. For examp
l
e, t
h
e
P
h
otos app organizes p
h
otos
b
y p
l
aces
.
N
ote
:
+
H
NQECVKQPUGTXKEGUKUVWTPGFQ
Ò
YJGP[QWQRGP%COGTC[QWOC[DGCUMGFVQ
t
urn it on. I
f
you don’t want to include location data with your photos and videos,
you can use Camera wit
h
out turning on
l
ocation services. See
“
Location
S
ervices
”
on
pag
e
200
.
129

Taking Photos and Recording Videos
Taking photos and recording videos with iPhone is as easy as point and tap.
*HTLYH=PKLV
Z^P[JO
-VJ\ZHYLH
:^P[JOJHTLYHZ
AVVT
;O\TIUHPSVM
SHZ[ZOV[
;HW[V
[HRLWOV[V
:L[3,+
MSHZOTVKL
;\YU/+9
VUVYVMM
Take a photo: Aim iPhone and tap .
Make sure the Camera/Video switch is set to .
When you take a photo or start a video recording, iPhone makes a shutter sound. You
can use the volume buttons on the side of the iPhone to control the volume of the
shutter sound. You don’t hear a sound if you set the Ring/Silent switch to silent. See
“Sounds and the Ring/Silent Switch” on page 197.
Note: +PUQOGTGIKQPUVJGUQWPFGÒGEVUHQT%COGTCCTGRNC[GFGXGPKHVJG4KPI5KNGPV
switch is set to silent.
On iPhone 4, you can turn on HDR to take HDR (high dynamic range) photos. HDR
blends the best parts of three separate exposures into a single photo. For best results,
iPhone and the subject should be stationary.
6WTP*&4QPQTQÒTap the HDR button at the top of the screen. The button indicates
YJGVJGT*&4KUQPQTQÒ*&4KUQÒD[FGHCWNV
Note: 9JGP*&4KUQPVJG±CUJKUVWTPGFQÒ
With HDR, you can save both the normal-exposure version and the HDR version of a
photo in the Camera Roll, or save just the HDR version. By default, both are saved.
Choose whether to save both the normal-exposure version and the HDR version
of photos: +P5GVVKPIUEJQQUG2JQVQUVJGPVWTP-GGR0QTOCN2JQVQQPQTQÒ+HVJG
UGVVKPIKUVWTPGFQÒQPN[VJG*&4XGTUKQPQHCRJQVQKUUCXGF
130 Chapter 12 Camera

If you save both versions, appears in the upper-left corner of the HDR photo
when you view the photos in Camera Roll (if the controls are visible).
Record a video: Slide the Camera/Video switch to , then tap to start recording.
The record button blinks while Camera is recording. Tap again to stop recording. You
can also press the center button on the iPhone earphones to start or stop recording.
A rectangle on the screen shows the area where the camera is focused and setting
the exposure.
Tap the screen to bring up the camera controls.
Change the focus area and set the exposure: Tap anywhere to focus the camera and
adjust the exposure for the selected area.
Zoom in or out: Tap the screen, then drag the slider at the bottom of the screen to
zoom in or out (main camera, in camera mode only).
5GV.'&±CUJOQFG6CRVJG±CUJDWVVQPKPVJGWRRGTNGHVEQTPGTQHVJGUETGGPVJGP
VCR1Ò#WVQQT1P
Switch between the main and front cameras: Tap in the upper-right corner of
the screen.
Review a photo or video you’ve just taken: Tap the thumbnail of your last shot, in the
lower-left corner of the screen.
Use the left and right arrows at the bottom of the screen to review other photos and
XKFGQUKPVJG%COGTC4QNNQTLWUV±KEMNGHVQTTKIJV6CR&QPGVQTGVWTPVQECOGTCQT
video mode. If you don’t see the controls, tap the screen to display them.
Delete a photo or video: Tap . If you don’t see , tap the screen to display the controls.
Take a screenshot: 3WKEMN[RTGUUCPFTGNGCUGVJG1P1Ò5NGGR9CMGCPF*QOG
DWVVQPUCVVJGUCOGVKOG#±CUJQHVJGUETGGPNGVU[QWMPQYVJGUETGGPUJQVYCU
taken. The screenshot is added to the Camera Roll album.
Viewing and Sharing Photos and Videos
The photos and videos you take with Camera are saved in the Camera Roll album on
iPhone. You can view the Camera Roll album from either Camera or Photos.
View photos and videos in the Camera Roll album: In Camera, tap the thumbnail
image in the lower-left corner of the screen. In Photos, tap the Camera Roll album. Tap
VJGNGHVQTTKIJVDWVVQPQT±KEMNGHVQTTKIJVVQ±KRVJTQWIJVJGRJQVQUCPFXKFGQU
When viewing a photo or video in the Camera Roll album, tap the screen to display the
controls. If you save both the normal and the HDR versions of a photo, appears
in the upper-left corner of the HDR photo (when the controls are visible).
For more information about viewing and sharing photos and videos, see:
“
Viewing Photos and Videos” on page 122
“Sharing Photos and Videos” on page 125
131
Chapter 12 Camera

Trimming Videos
You can trim the frames from the beginning and end of a video that you just recorded,
or any other video in the Camera Roll album. You can replace the original video or save
the trimmed version as a new video clip.
Trim a video:
1While viewing a video, tap the screen to display the controls.
2Drag either end of the frame viewer at the top of the video, then tap Trim.
3Tap Trim Original or “Save as New Clip.”
Important: If you choose Trim Original, the trimmed frames are permanently deleted
from the original video. If you choose “Save as New Clip,” a new trimmed video clip is
UCXGFKPVJG%COGTC4QNNCNDWOCPFVJGQTKIKPCNXKFGQKUWPCÒGEVGF
Uploading Photos and Videos to Your Computer
You can upload the photos and videos you take with Camera to photo applications on
your computer, such as iPhoto on a Mac.
Upload photos and videos to your computer: Connect iPhone to your computer.
Mac: Select the photos and videos you want and click the Import or Download
button in iPhoto or other supported photo application on your computer.
PC: Follow the instructions that came with your photo application.
If you delete the photos and videos from iPhone when you upload them to your
computer, they’re removed from the Camera Roll album. You can use the Photos
settings pane in iTunes to sync photos and videos to the Photos app on iPhone
(videos can be synced with Macs only). See “iPhone Settings Panes in iTunes” on
page 58.
132 Chapter 12 Camera

YouTub
e
13
Fin
d
ing an
d
Viewing Vi
d
eo
s
YouTube
f
eatures short videos submitted by people
f
rom around the world. To use
s
ome
f
eatures on iPhone, you need to sign in to a YouTube account when asked
.
For in
f
ormation about requirements and how to get a YouTube account, go to
www.youtu
b
e.c
o
m
.
N
ote
:
YouTu
b
e may not
b
e avai
l
a
bl
e in a
ll
l
anguages an
d
l
ocations
.
Browse vi
d
eos
:
Ta
p
Feature
d
, Most Viewe
d
, or Favorites. Or tap More to
b
rowse
b
y
Most Recent, Top Rate
d
, History, Su
b
scriptions, or P
l
ay
l
ists
.
Feature
d:
8KFGQUTGXKGYGFCPF
H
GCVWTGFD[;QW6WDGUVC
Ò
M
ost Viewe
d:
Videos most seen by YouTube viewers. Tap All
f
or all-time most viewed
videos, or Today or This Week
f
or most-viewed videos o
f
the day or week
.
Favor
i
tes
:
Vi
d
eos you’ve a
dd
e
d
to Favorites. W
h
en you sign in to a YouTu
b
e account,
a
ccount
f
avorites appear and any existing
f
avorites can be synced to your account
.
M
ost
R
ecent
:
Vi
d
eos most recent
l
y su
b
mitte
d
to YouTu
b
e
.
Top Rate
d:
Vi
d
eos most
h
ig
hl
y rate
d
b
y YouTu
b
e viewers. To rate vi
d
eos, go to
www.youtu
b
e.c
o
m
.
H
i
story
:
Vi
d
eos you’ve viewe
d
most recent
l
y
.
Su
b
scriptions
:
Videos
f
rom YouTube accounts to which you’ve subscribed. You must
be signed in to a YouTube account to use this
f
eature
.
P
l
ay
l
ists
:
Vi
d
eos you’ve a
dd
e
d
to p
l
ay
l
ists. You must
b
e signe
d
in to a YouTu
b
e
a
ccount to use this
f
eature
.
You can replace the browse buttons at the bottom o
f
the screen with buttons you use
more
f
requently. See
“
C
h
anging t
h
e Browse Buttons
”
on pag
e
138
.
133
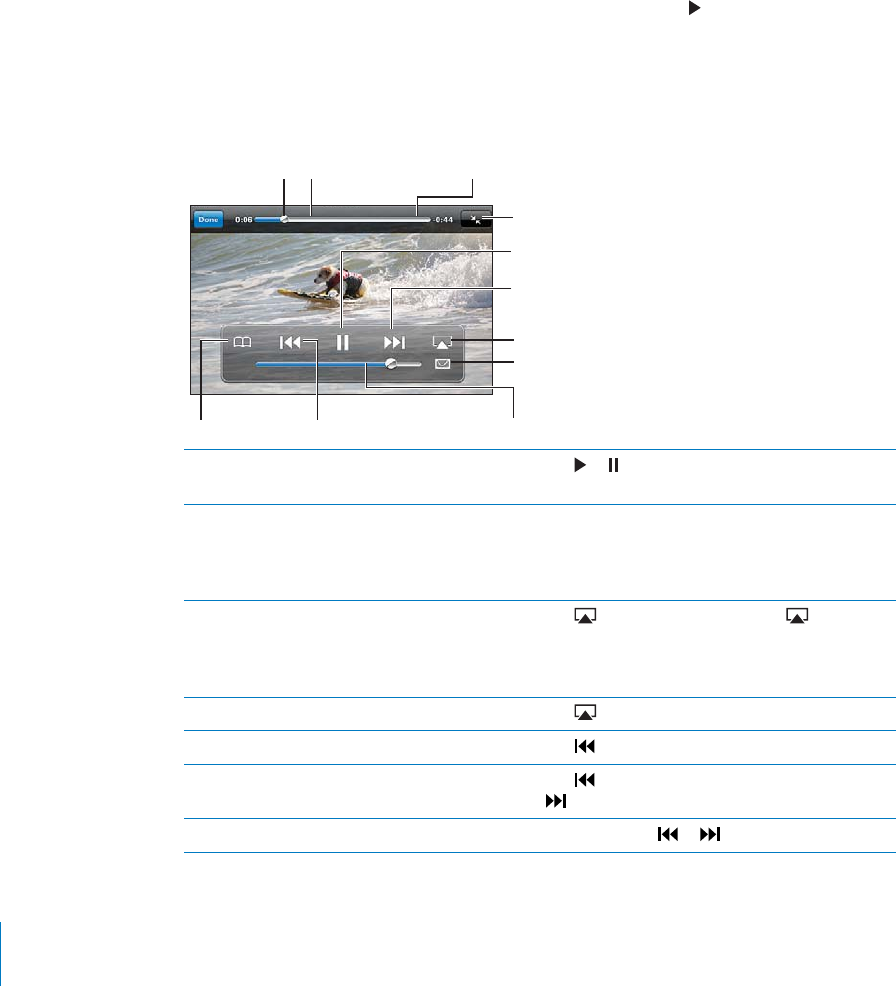
Search for a video:
1 6CR5GCTEJVCR/QTG°TUVKH5GCTEJKUP¨VXKUKDNGVJGPVCRVJG;QW6WDGUGCTEJ°GNF
2Type a word or phrase that describes what you’re looking for, then tap Search.
YouTube shows results based on video titles, descriptions, tags, and user names. Listed
videos show title, rating, number of views, length, and the account name that posted
the video.
Play a video: Tap the video.
The video begins to download to iPhone and a progress bar appears. When enough of
the video has downloaded, it begins to play. You can also tap to start the video.
Controlling Video Playback
When a video starts playing, the controls disappear so they don’t obscure the video.
Show or hide the video controls: Tap the screen.
5L_[
-HZ[MVY^HYK
7SH`7H\ZL
,THPS
:JHSL
+V^USVHKWYVNYLZZ
=VS\TL
7SH`OLHK :JY\IILYIHY
)VVRTHYR 7YL]PV\ZYL^PUK
(PY7SH`
Play or pause a video Tap or . You can also press the center button
on the iPhone earphones (iPhone 3GS or later).
Adjust the volume Drag the volume slider, or use the volume
buttons on the side of iPhone. You can also use
the volume buttons on the iPhone earphones
(iPhone 3GS or later).
Play a video on Apple TV using AirPlay Tap and choose an Apple TV. If doesn’t
appear or if you don’t see the Apple TV you’re
looking for, make sure it’s on the same wireless
network as iPhone.
Switch from AirPlay back to iPhone Tap and choose iPhone from the list.
Restart a video Tap .
Skip to the next or previous video in a list Tap twice to skip to the previous video. Tap
to skip to the next video.
Rewind or fast-forward Touch and hold or .
134 Chapter 13 YouTube
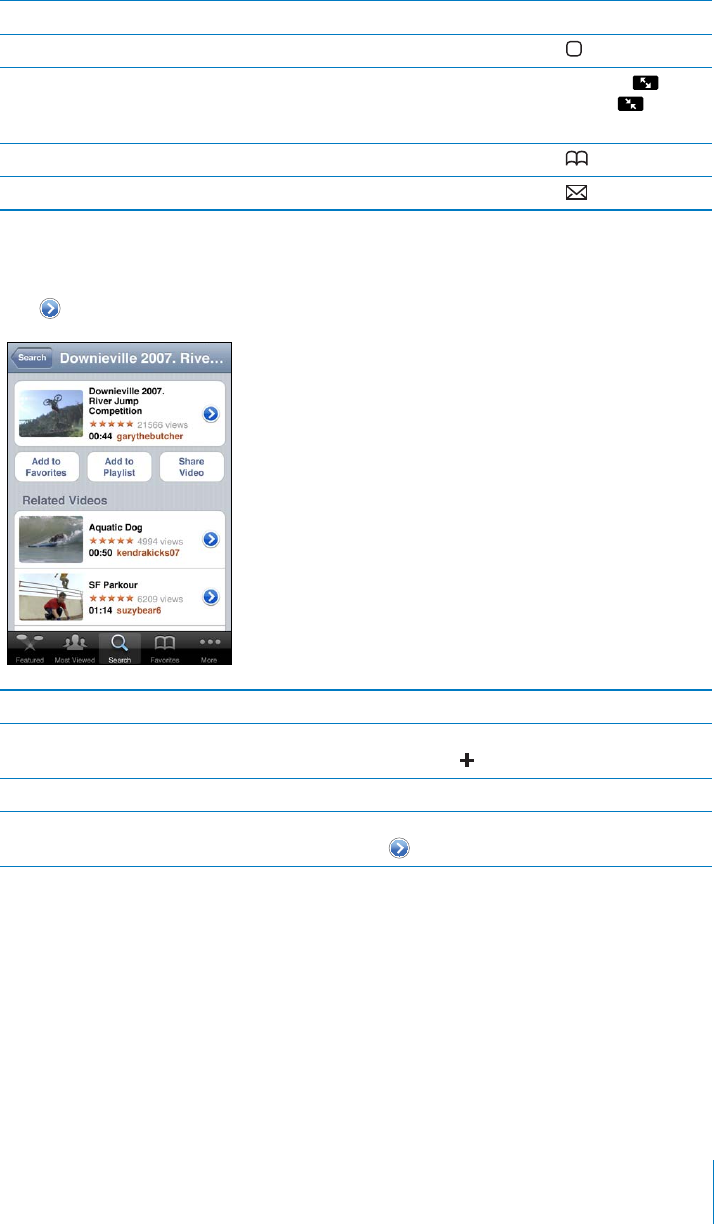
Skip to any point in a video Drag the playhead along the scrubber bar.
5VQRYCVEJKPICXKFGQDGHQTGKV°PKUJGURNC[KPI Tap Done, or press the Home button.
5YKVEJDGVYGGPUECNKPICXKFGQVQ°NNVJGUETGGP
QT°VVQVJGUETGGP
Double-tap the video. You can also tap to
OCMGVJGXKFGQ°NNVJGUETGGPQTVCR to make
KV°VVJGUETGGP
Add a video to Favorites using video controls Start playing a video and tap .
Email a link to the video using video controls Start playing a video and tap .
Managing Videos
Tap next to a video to see related videos and more controls for managing videos.
Add the video to Favorites Tap “Add to Favorites.”
Add the video to a playlist Tap “Add to Playlist,” then select an existing
playlist or tap to create a new playlist.
Email a link to the video Tap Share Video.
Browse and view related videos Tap a video in the list of related videos to view, or
tap next to a video for more information.
135
Chapter 13 YouTube
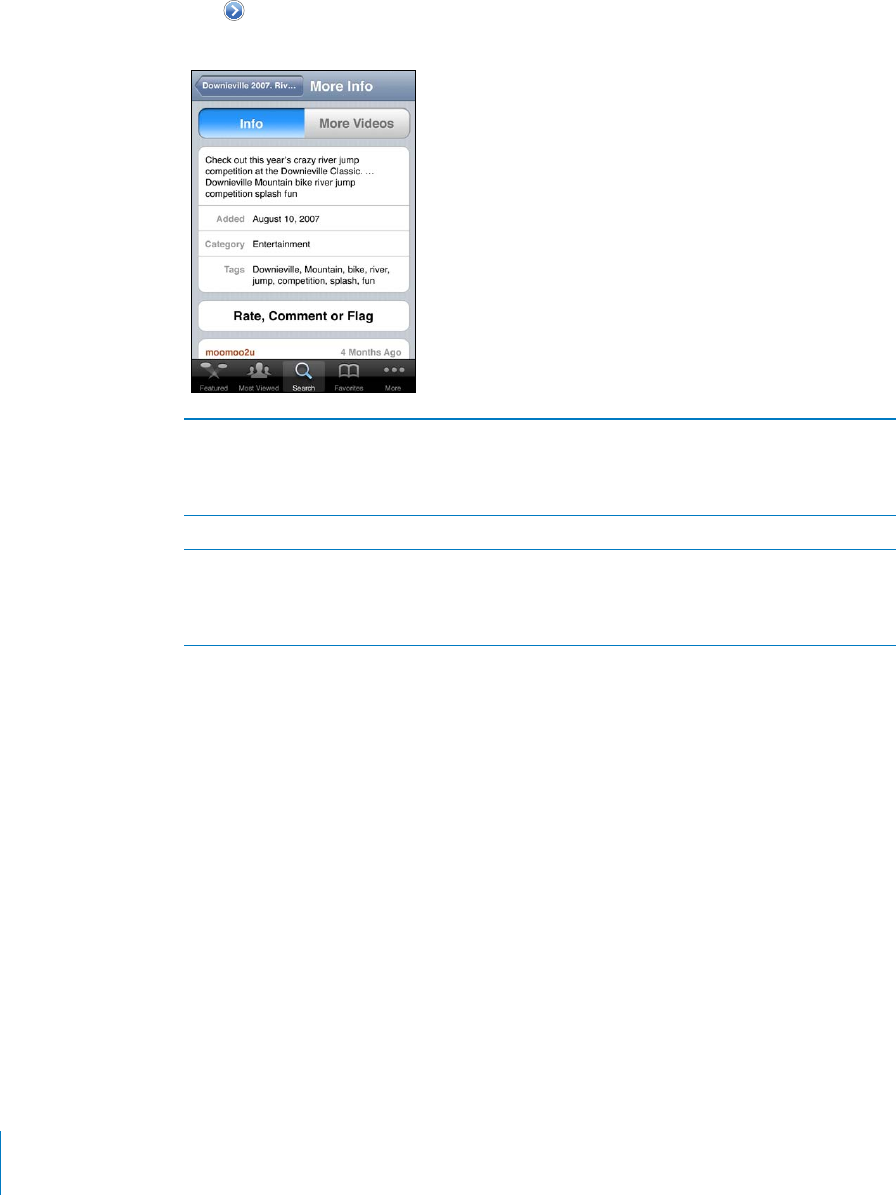
Getting More Information
Tap next to the video to show the video’s comments, description, date added, and
other information.
Rate the video or add a comment On the More Info screen, tap “Rate, Comment,
or Flag,” then choose “Rate or Comment.” You
must be signed in to a YouTube account to use
this feature.
See more videos from this account On the More Info screen, tap More Videos.
Subscribe to this YouTube account On the More Info screen, tap More Videos, then
tap “Subscribe to <account>” at the bottom of
the video list. You must be signed in to a YouTube
account to use this feature.
136 Chapter 13 YouTube

Using YouTube Account Features
If you have a YouTube account, you can access account features such as subscriptions,
comments and ratings, and playlists. To create a YouTube account, go to
www.youtube.com.
Show favorites you’ve added to your account: In Favorites, tap Sign In, then enter
your username and password to see your account favorites. Any existing favorites
you’ve added to iPhone can be merged with your account favorites when you sign in.
Delete a favorite: In Favorites, tap Edit, tap next to a video, then tap Delete.
Show subscriptions you’ve added to your account: In Subscriptions, tap Sign In, then
enter your username and password to see your account subscriptions. Tap an account
in the list to see all videos for that account.
Unsubscribe from a YouTube account: In Subscriptions, tap an account in the list,
then tap Unsubscribe.
View playlists: In Playlists, tap a playlist to see the list of videos you’ve added. Tap any
video in the playlist to begin playing videos from that point in the playlist.
Edit a playlist: In Playlists, tap Edit, then do one of the following:
To delete the entire playlist, tap next to a playlist, then tap Delete.
To create a new playlist, tap , then enter a name for the playlist.
Add a video to a playlist: Tap next to a video, then tap “Add to Playlist” and choose
a playlist.
Delete a video from a playlist:
1In Playlists, tap a playlist, then tap Edit.
2Tap next to a playlist, then tap Delete.
137
Chapter 13 YouTube

Changing the Browse Button
s
You can re
pl
ace t
h
e Feature
d
, Most Viewe
d
, Boo
k
mar
k
s, an
d
Searc
h
b
uttons at t
h
e
bottom o
f
the screen with ones you use more
f
requently. For example, i
f
you watch
t
op-rated videos o
f
ten but don’t watch many
f
eatured videos, you could replace the
Feature
d
b
utton wit
h
To
p
Rate
d.
C
h
ange t
h
e
b
rowse
b
uttons
:
Tap More an
d
tap E
d
it, t
h
en
d
rag a
b
utton to t
h
e
bottom o
f
the screen, over the button you want to replace
.
You can drag the buttons at the bottom o
f
the screen le
f
t or right to rearrange them
.
9JGP[QW
°
PKUJVCR&QPG
When you’re browsing
f
or videos, tap More to access the browse buttons that
a
ren’t visi
bl
e
.
Sen
d
ing Vi
d
eos to YouTu
be
I
f
you have a YouTube account, you can send videos directly to YouTube (iPhon
e
3
G
S
or
l
ater
)
. See
“
Pu
bl
is
h
ing Vi
d
eos to YouTu
be
”
on pag
e
126
.
138
C
h
a
p
ter 13 YouTu
be

Stock
s
14
Viewing Stoc
k
Quote
s
S
tocks lets you see the latest available quotes
f
or your selected stocks,
f
unds,
a
n
d
in
d
exes
.
Quotes are up
d
ate
d
every time you open Stoc
k
s w
h
en connecte
d
to t
h
e Internet
.
Quotes may
b
e
d
e
l
aye
d
b
y up to 20 minutes or more,
d
epen
d
ing upon t
h
e
report
i
ng serv
i
ce
.
A
dd a stock,
f
und, or index to the stock reader
:
1
T
a
p
,
t
h
en ta
p
.
2
Enter a symbol, company name,
f
und name, or index, then tap Search
.
3
S
elect an item
f
rom the search results and ta
p
Done
.
View c
h
arts in
l
an
d
sca
p
e orientation
:
Rotate iPhone sideways. Flick le
f
t or right to
view t
h
e ot
h
er c
h
arts in your stoc
k
rea
d
er
.
Show the progress o
f
a stock,
f
und, or index over time
:
Ta
p
the stock,
f
und, or index
in your
l
ist, t
h
en tap 1
d
, 1w, 1m, 3m, 6m, 1y, or 2y. T
h
e c
h
art a
d
justs to s
h
ow progress
over one
d
ay, one wee
k
, one mont
h
, t
h
ree mont
h
s, six mont
h
s, one year, or two years
.
W
h
en you view a c
h
art in
l
an
d
scape orientation, you can touc
h
t
h
e c
h
art to
d
isp
l
ay t
h
e
XCNWG
H
QTCURGEK
°
ERQKPVKPVKOG
139

7UGVYQ°PIGTUVQUGGVJGEJCPIGKPXCNWGQXGTCURGEK°ERGTKQFQHVKOG
Delete a stock: Tap and tap next to a stock, then tap Delete.
Change the order of the list: Tap . Then drag next to a stock or index to a new
place in the list.
Switch the view to percentage change, price change, or market capitalization: Tap
any of the values along the right side of the screen. Tap again to switch to another
view. Or tap and tap %, Price, or Mkt Cap, then tap Done.
Getting More Information
See the summary, chart, or news page about a stock, fund, or index: Select the stock,
HWPFQTKPFGZKP[QWTNKUVVJGP±KEMVJGRCIGUWPFGTPGCVJVJGUVQEMTGCFGTVQXKGYVJG
summary, chart, or recent news page.
On the news page, you can scroll up and down to read headlines, or tap a headline to
view the article in Safari.
See more information at Yahoo.com: Select the stock, fund, or index in your list, then
tap .
140 Chapter 14 Stocks

M
a
ps
15
WARNIN
G:
For important in
f
ormation about driving and navigating sa
f
ely, see the
Important Product In
f
ormation Guide
at
www.a
ppl
e.com/su
pp
ort/manua
l
s/i
ph
o
n
e
.
Maps provides street maps, satellite photos, a hybrid view, and street views o
f
NQECVKQPUKPOCP[Q
H
VJGYQTNF¨UEQWPVTKGUCPFTGIKQPU;QWECPIGVVTC
Ó
EKP
H
QTOCVKQP
a
n
d
d
etai
l
e
d
d
riving, pu
bl
ic transit, or wa
lk
ing
d
irections. Fin
d
an
d
trac
k
your current
(approximate)
l
ocation, an
d
use your current
l
ocation to get
d
riving
d
irections to or
f
rom another place. The built-in digital compass lets you see which way you’re
f
acing
.
(iP
h
on
e
3
GS or
l
ater)
.
I
mportant
:
Ma
p
s,
d
irections, an
d
l
ocation-
b
ase
d
a
pp
s
d
e
p
en
d
on
d
ata services. T
h
ese
d
ata services are su
b
ject to c
h
ange an
d
may not
b
e avai
l
a
bl
e in a
ll
geograp
h
ic areas
,
resulting in maps, directions, or location-based in
f
ormation that may be unavailable,
inaccurate, or incomplete. Compare the in
f
ormation provided on iPhone to your
s
urroundings, and de
f
er to posted signs to resolve any discrepancies
.
+
H
NQECVKQPUGTXKEGUKUVWTPGFQ
Ò
YJGP[QWQRGP/CRU[QWOC[DGCUMGFVQVWTPKV
on. You can use Maps wit
h
out turning on
l
ocation services. See
“
Location
S
ervices
”
on
pag
e
200
.
141
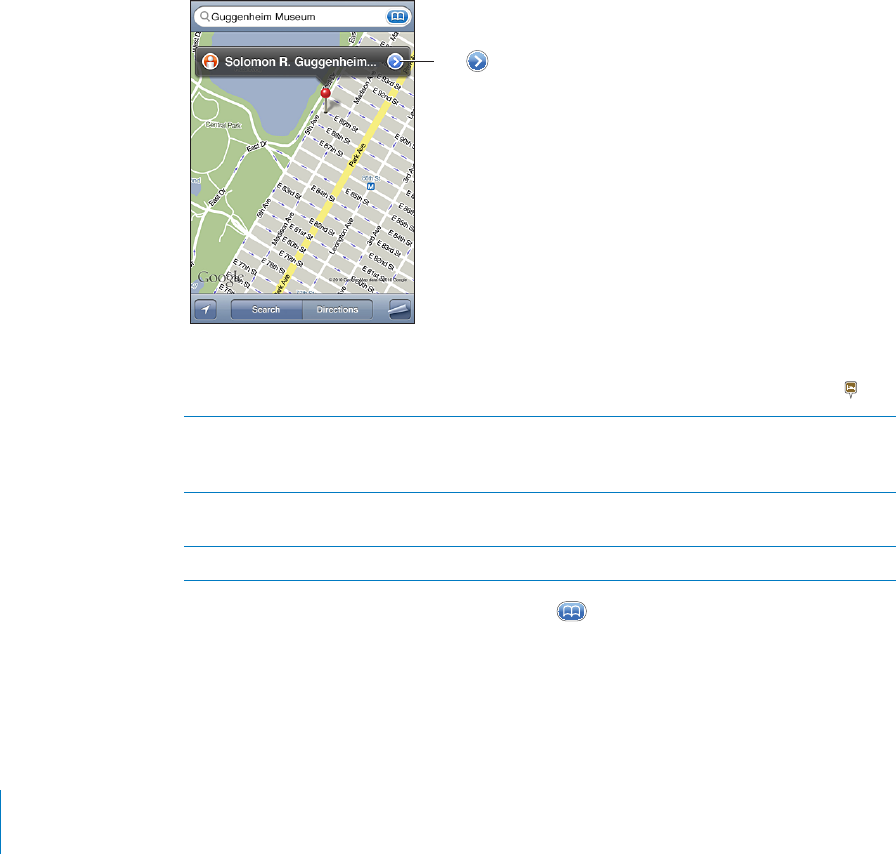
Finding and Viewing Locations
You can search for locations, get your current location, mark a location with the drop
pin, and get satellite and Google Street Views.
Searching for Locations
You can search for locations in many ways—by address, intersection, area, landmark,
bookmark, contact, or zip code, for example.
Find a location and see a map:
1 6CRVJGUGCTEJ°GNFVQDTKPIWRVJGMG[DQCTF
2Type an address or other search information.
3Tap Search.
A pin marks the location. Tap the pin to see the name or description of the location.
;HW[VNL[
PUMVYTH[PVUHIV\[
[OLSVJH[PVUNL[
KPYLJ[PVUZHKK[OL
SVJH[PVU[V`V\Y
IVVRTHYRZVY
JVU[HJ[ZSPZ[VY
LTHPSHSPUR[V
.VVNSL4HWZ
Locations can include places of interest added by Google My Maps users (“User-
created content”), and sponsored links that appear as special icons (for example, ).
Zoom in to a part of a map 2KPEJVJGOCRYKVJVYQ°PIGTU1TFQWDNGVCR
the part you want to zoom in on. Double-tap
again to zoom in even closer.
Zoom out 2KPEJVJGOCR1TVCRVJGOCRYKVJVYQ°PIGTU
6CRYKVJVYQ°PIGTUCICKPVQ\QQOQWVHWTVJGT
Pan or scroll to another part of the map Drag up, down, left, or right.
See the location of a contact’s address: Tap KPVJGUGCTEJ°GNFVJGPVCR%QPVCEVU
and choose a contact.
To locate an address in this way, the contact must include at least one address. If the
contact has more than one address, choose the one you want to locate. You can also
°PFVJGNQECVKQPQHCPCFFTGUUD[VCRRKPIVJGCFFTGUUFKTGEVN[KP%QPVCEVU
142 Chapter 15 Maps

Finding Your Current Location
#SWKEMVCR
°
PFU[QWTEWTTGPVCRRTQZKOCVGNQECVKQP
Fin
d
your current
l
ocation an
d
turn trac
k
ing mo
d
e on
:
T
a
p
.
Your current location is indicated by a blue marker. I
f
your location can’t be
d
etermined precisely, a blue circle also appears around the marker. The size o
f
the
circ
l
e
d
epen
d
s on
h
ow precise
l
y your
l
ocation can
b
e
d
etermine
d
—t
h
e sma
ll
er t
h
e
circ
l
e, t
h
e greater t
h
e precision
.
As you move aroun
d
, iP
h
one up
d
ates your
l
ocation, a
d
justing t
h
e map so t
h
at t
h
e
location indicator remains in the center o
f
the screen. I
f
you tap again unti
l
it is no
longer highlighted, or i
f
you drag the map, iPhone continues to update your location
DWVUVQRUEGPVGTKPIKVUQVJGNQECVKQPKP
H
QTOCVKQPOC[OQXGQ
Ò
VJGUETGGP
iP
h
one uses
l
ocation services to
d
etermine your
l
ocation. Location services uses
a
vailable in
f
ormation
f
rom cellular network data, local Wi-Fi networks (i
f
Wi-Fi is turned
on), an
d
GPS (ma
y
not
b
e avai
l
a
bl
e in a
ll
l
ocations). W
h
en an app is using
l
ocation
s
erv
i
ces, appears in t
h
e status
b
ar. Location services may not
b
e avai
l
a
bl
e in a
ll
countr
i
es or reg
i
ons
.
+
H
NQECVKQPUGTXKEGUKUVWTPGFQ
Ò
[QW¨NNDGRTQORVGFVQVWTPKVQP;QWECP¨V
°
PFCPF
VTCEM[QWTEWTTGPVNQECVKQPK
H
NQECVKQPUGTXKEGUKUVWTPGFQ
Ò
5GG
¥
Location
S
ervices
”
on
pag
e
200
.
6QEQPUGTXGDCVVGT[NK
H
GVWTPNQECVKQPUGTXKEGUQ
Ò
YJGP[QW¨TGPQVWUKPIKV+P5GVVKPIU
c
h
oose Genera
l
> Location Services
.
1
4
3
C
h
a
p
ter 15
M
ap
s
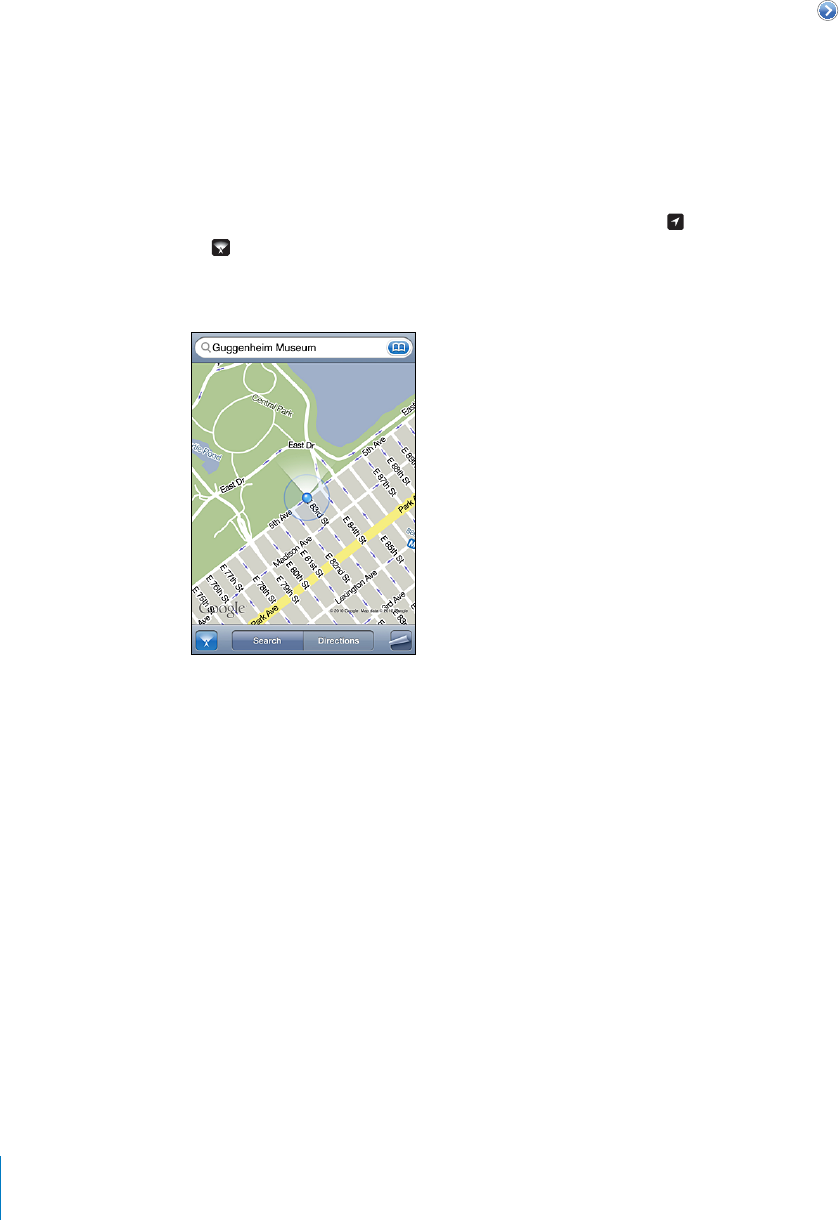
Get information about your current location: Tap the blue marker, then tap .
iPhone displays the address of your current location, if available. You can use this
information to:
Get directions
Add the location to contacts
Send the address via email or MMS
Bookmark the location
Show which way you’re facing (iPhone 3GS or later): Tap again. (The icon changes
to .) Maps uses the built-in compass to determine which way you’re facing. The
angle shows the accuracy of the compass reading—the smaller the angle, the greater
the accuracy.
Maps uses true north to determine your heading, even if magnetic north is set in
Compass. If the compass needs calibrating, iPhone asks you to wave the phone in
C°IWTGGKIJV+HVJGTG¨UKPVGTHGTGPEG[QWOC[DGCUMGFVQOQXGHTQOVJGUQWTEGQH
interference. See Chapter 20,“Compass,” on page 161.
Marking a Location with the Drop Pin
The drop pin lets you mark a location by hand.
Mark a location: Touch and hold the location on the map.
The drop pin appears where you’re touching the map.
Move the drop pin: Touch and hold, then drag the pin to a new location, or touch and
hold a new location until a new pin drops, replacing the previous one.
144 Chapter 15 Maps
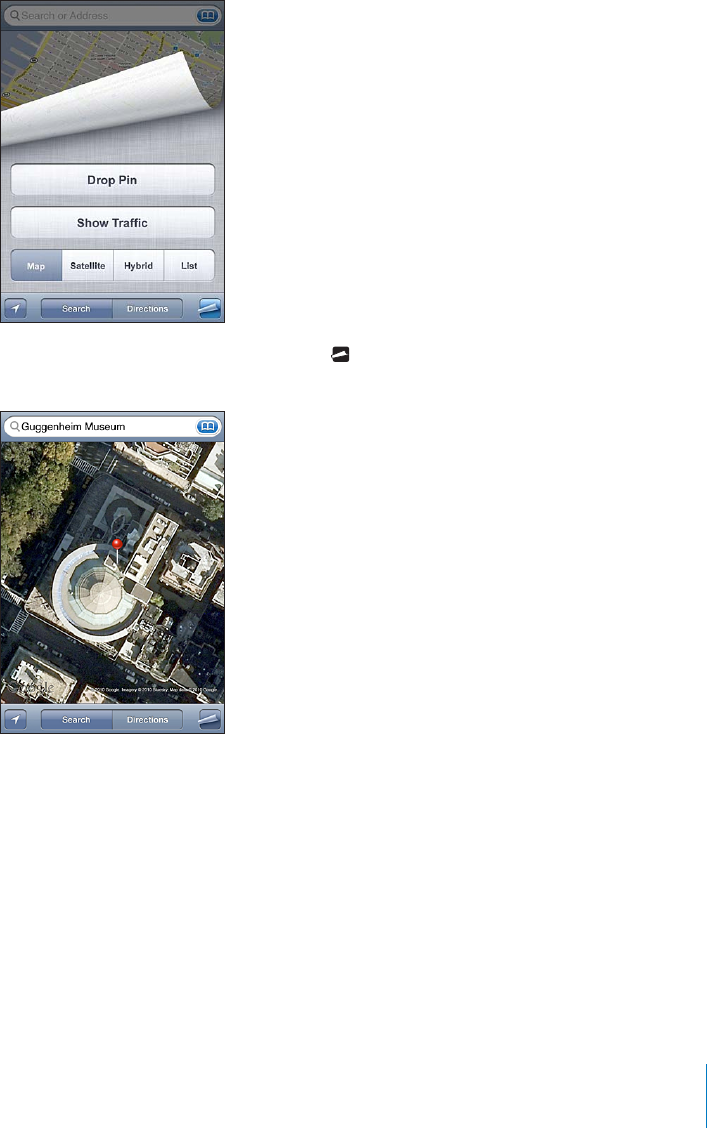
Satellite View and Street View
You can see a satellite view of a map, or a combined satellite and street map view. You
can also see a Google Street View of a location.
See a satellite view or hybrid view: Tap , then tap Satellite or Hybrid to see just a
satellite view or a combined street map and satellite view.
To return to map view, tap Map.
145
Chapter 15 Maps

See the Goo
g
le Street View o
f
a location
:
T
a
p
. Flick le
f
t or ri
g
ht to pan throu
g
h the
3
60° panoramic view. (T
h
e inset s
h
ows your current view.) Tap an arrow to move
d
own
t
he street. To return to map view, tap the map inset in the lower-right corner
.
;HW[VYL[\YU[VTHW]PL^
S
treet View may not be available in all areas
.
Gett
i
n
g
D
i
rect
i
on
s
You can get step-by-step directions
f
or driving, taking public transit, or walking to
a
d
estination
.
G
et
d
irections
:
1
Ta
p
Di
rect
i
ons
.
2
'PVGTUVCTVKPICPFGPFKPINQECVKQPUKPVJG5VCTVCPF'PF
°
GNFU$[FG
H
CWNVK2JQPGUVCTVU
with your current approximate location (i
f
available). Tap KPGKVJGT
°
GNFVQEJQQUG
a
location in Bookmarks (including
y
our current location and the dropped pin, i
f
a
vailable), Recents, or Contacts. I
f
KUP¨VUJQYKPIFGNGVGVJGEQPVGPVUQ
H
VJG
°
GNF
For example, i
f
a
f
riend’s address is in your contacts list, you can tap Contacts and tap
your
f
riend’s name instead o
f
having to type the address
.
To reverse t
h
e
d
irections, ta
p
.
3
Tap Route (i
f
you entered locations manually), then select directions by car
(
)
,
d
irections
b
y pu
bl
ic transit
(
)
, or
d
irections
b
y wa
lk
ing
(
).
T
h
e trave
l
o
p
tions avai
l
a
bl
e
d
e
p
en
d
on t
h
e route
.
4
Do one o
f
the
f
ollowing
:
14
6
C
h
a
p
ter 15
M
ap
s
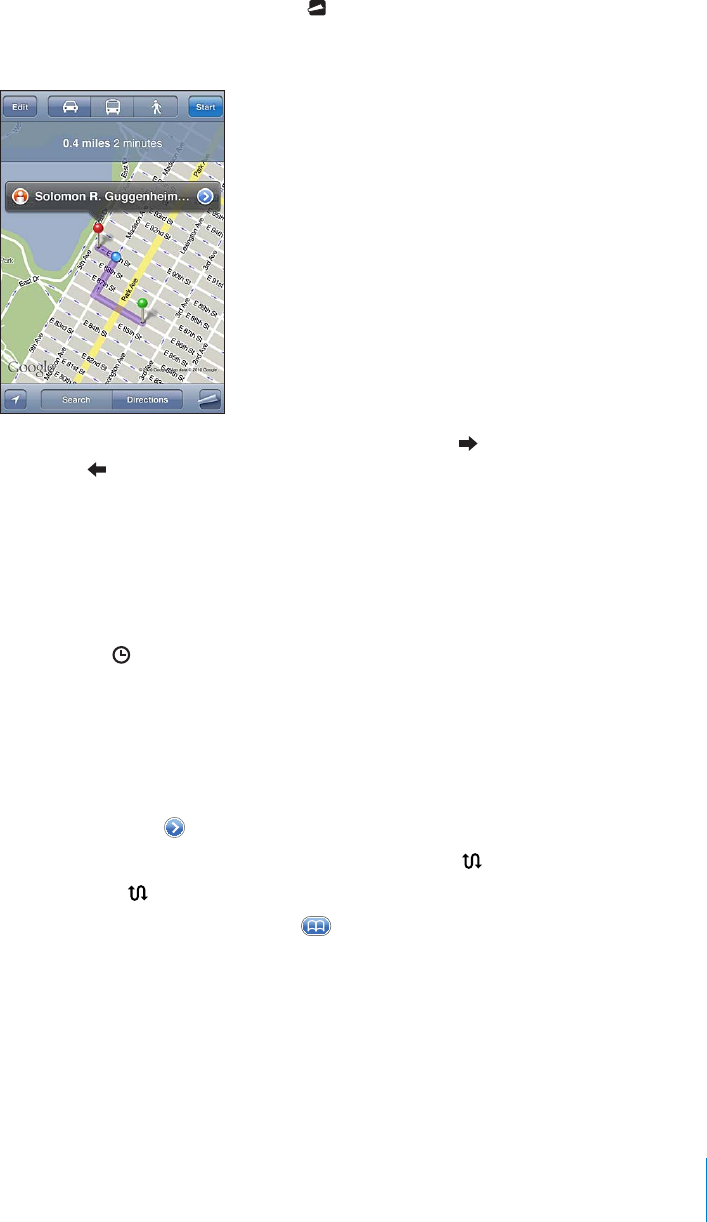
To view all the directions in a list, tap , then tap List. Tap any item in the list to see
a map showing that leg of the trip. Tap Route Overview to return to the overview
screen.
To view directions one step at a time, tap Start, then tap to see the next leg of the
trip. Tap to go back.
If you’re driving or walking, the approximate distance and travel time appear at the top
QHVJGUETGGP+HVTCÓEFCVCKUCXCKNCDNGVJGFTKXKPIVKOGKUCFLWUVGFCEEQTFKPIN[
If you’re taking public transit, the overview screen shows each leg of the trip and the
mode of transportation, including where you need to walk. The top of the screen
UJQYUVJGVKOGQHVJGDWUQTVTCKPCVVJG°TUVUVQRVJGGUVKOCVGFCTTKXCNVKOGCPFVJG
total fare. Tap to set your departure or arrival time, and to choose a schedule for
the trip. Tap the icon at a stop to see the departure time for that bus or train, and to
get a link to the transit provider’s website or contact info. When you tap Start and step
through the route, detailed information about each leg of the trip appears at the top
of the screen.
;QWECPCNUQIGVFKTGEVKQPUD[°PFKPICNQECVKQPQPVJGOCRVCRRKPIVJGRKPVJCV
points to it, tapping , then tapping Directions To Here or Directions From Here.
Switch start and end points, for reverse directions: Tap .
If you don’t see , tap Edit.
See recently viewed directions: Tap KPVJGUGCTEJ°GNFVJGPVCR4GEGPVU
147
Chapter 15 Maps
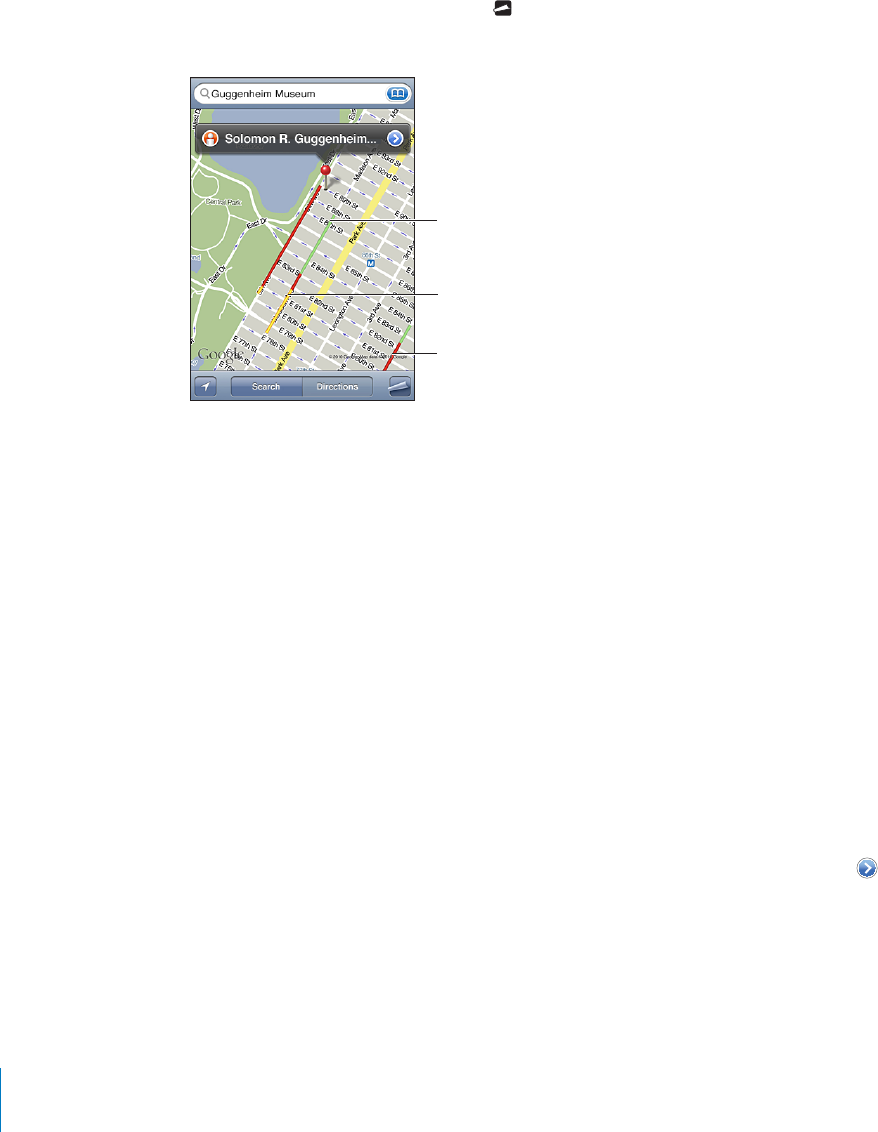
5JQYKPI6TCÓE%QPFKVKQPU
9JGPCXCKNCDNG[QWECPUJQYVTCÓEEQPFKVKQPUHQTOCLQTUVTGGVUCPFJKIJYC[UQP
the map.
5JQYQTJKFGVTCÓEEQPFKVKQPUTap VJGPVCR5JQY6TCÓEQT*KFG6TCÓE
5VTGGVUCPFJKIJYC[UCTGEQNQTEQFGFVQKPFKECVGVJG±QYQHVTCÓE
.YLLU$WVZ[LK
ZWLLKSPTP[
@LSSV^$ZSV^LY
[OHU[OLWVZ[LK
ZWLLKSPTP[
.YH`$UVKH[H
J\YYLU[S`H]HPSHISL
9LK$Z[VWHUKNV
+H[QWFQP¨VUGGVTCÓE[QWOC[PGGFVQ\QQOQWVVQCNGXGNYJGTG[QWECPUGGOCLQT
TQCFU6TCÓEEQPFKVKQPUCTGPQVCXCKNCDNGKPCNNCTGCU
Finding and Contacting Businesses
Find businesses in an area:
1Find a location—for example, a city and state or country, or a street address—or scroll
to a location on a map.
2 6[RGVJGMKPFQHDWUKPGUUKPVJGVGZV°GNFCPFVCR5GCTEJ
Pins appear for matching locations in the area. For example, if you locate your city and
then type “movies” and tap Search, pins mark movie theaters in your city.
Tap the pin that marks a business to see its name or description.
(KPFDWUKPGUUGUYKVJQWV°PFKPIVJGNQECVKQP°TUVType things like:
restaurants san francisco ca
apple inc new york
Contact a business or get directions: Tap the pin that marks a business, then tap
next to the name.
From there, you can do the following:
Tap a phone number to call, an email address to send email to, or a web address
to visit.
For directions, tap Directions To Here or Directions From Here.
148 Chapter 15 Maps
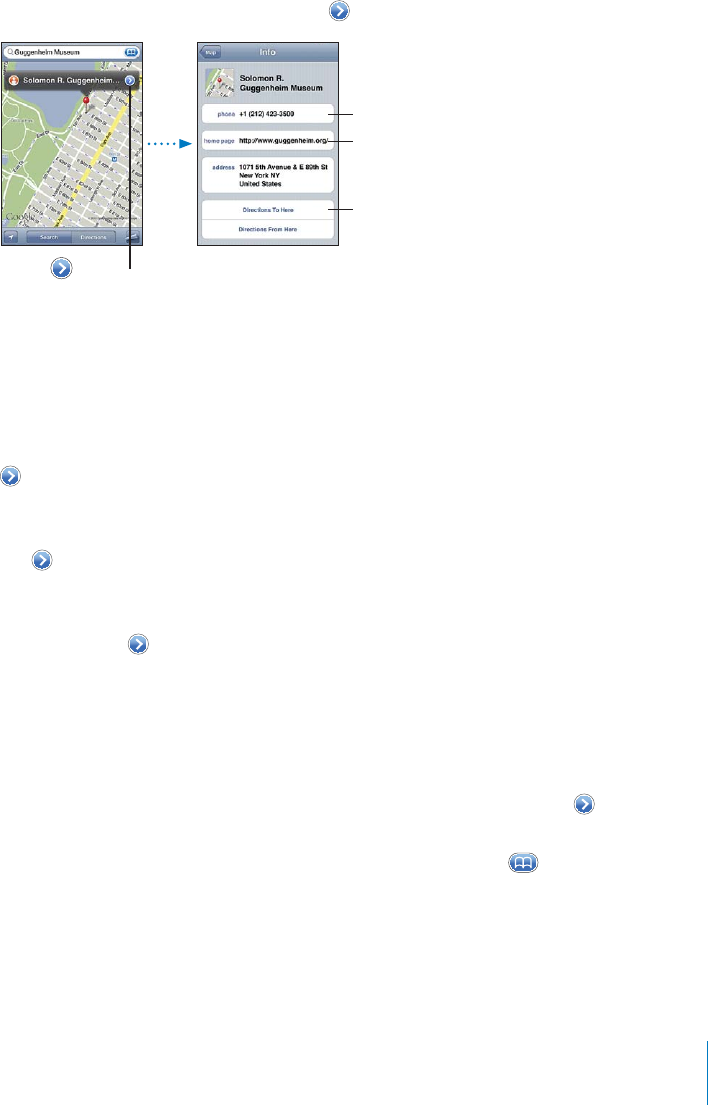
To add the business to your contacts list, tap “Add to Contacts” at the bottom of the
screen, then tap “Create New Contact” or “Add to Existing Contact.”
Share the location of the business by email or text message.
See a list of the businesses found in the search: From the Map screen, tap List.
Tap a business to see its location. Or tap next to a business to see its information.
.L[
KPYLJ[PVUZ
=PZP[
^LIZP[L
;HW[VZOV^
JVU[HJ[PUMV
*HSS
Sharing Location Information
You can add a location you’ve found to your contacts list. You can also send links to a
Google Maps location using email or MMS.
Add a location to your contacts list: Find a location, tap the pin that points to it, tap
next to the name or description, then tap “Add to Contacts” at the bottom of the
screen and tap “Create New Contact” or “Add to Existing Contact.”
Email a link to a Google Maps location: Find a location, tap the pin that points to it,
tap next to the name or description, then tap Share Location at the bottom of the
screen and tap Email.
Send a link via MMS to a Google Maps location: Find a location, tap the pin that
points to it, tap next to the name or description, then tap Share Location at the
bottom of the screen and tap MMS.
Bookmarking Locations
;QWECPDQQMOCTMNQECVKQPUVJCV[QWYCPVVQ°PFCICKPNCVGT
Bookmark a location: Find a location, tap the pin that points to it, tap next to the
name or description, then tap “Add to Bookmarks” at the bottom of the Info screen.
See a bookmarked location or recently viewed location: Tap KPVJGUGCTEJ°GNF
then tap Bookmarks or Recents.
149
Chapter 15 Maps
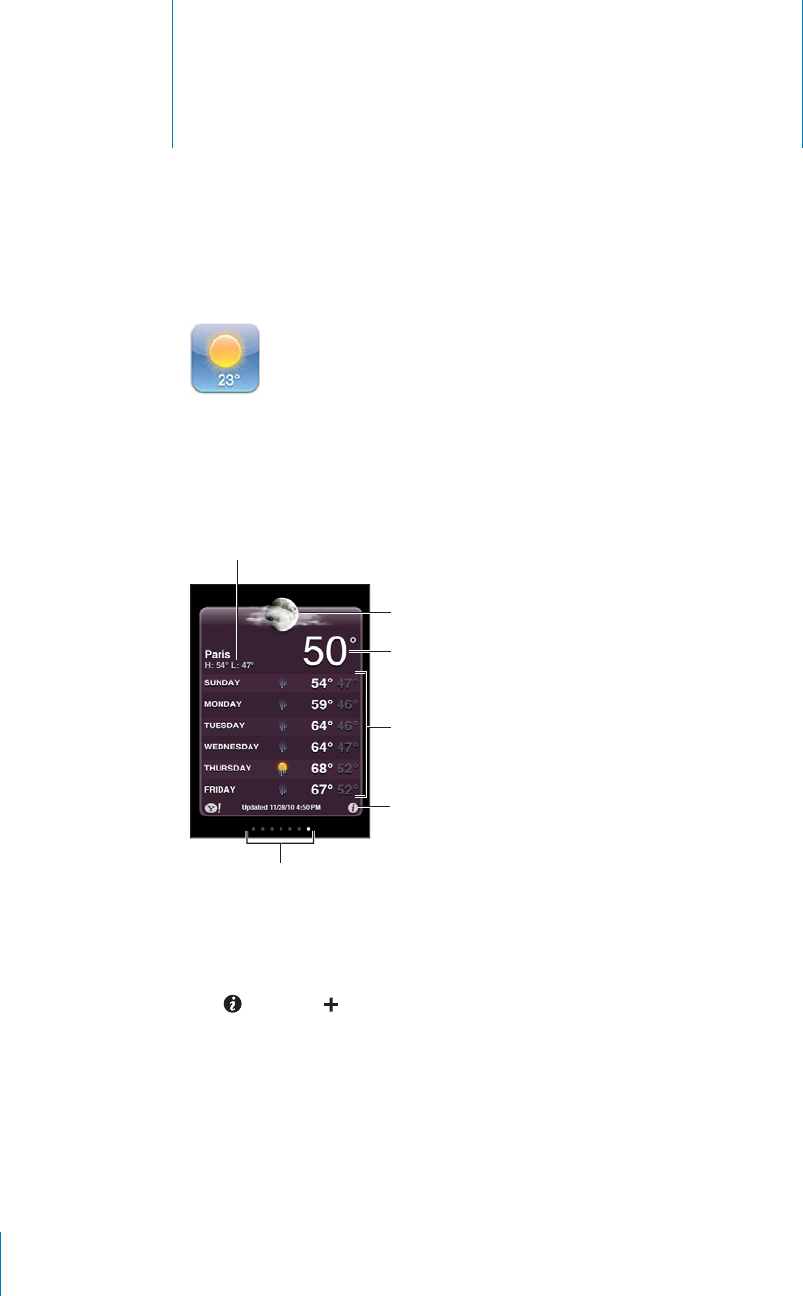
Weathe
r
16
Viewing Weat
h
er Summarie
s
Tap Weather on the Home screen to get the current temperature and six-day
f
orecast
f
or one or more cities around the world
.
:P_KH`MVYLJHZ[
*\YYLU[[LTWLYH[\YL
*\YYLU[JVUKP[PVUZ
(KKHUKKLSL[LJP[PLZ
5\TILYV
M
JP[PLZZ[VYL
K
;VKH`»ZOPNOHUKSV^
I
f
the weather board is light blue, it’s daytime in that city—between 6:00 a.m. and
6:00 p.m. I
f
the board is dark purple, it’s nighttime—between 6:00 p.m. and 6:00 a.m
.
Add
a city
:
1
T
a
p
,
t
h
en ta
p
.
2
Enter a city name or zip co
d
e, t
h
en tap Searc
h.
3
C
h
oose a city in t
h
e searc
h
l
ist
.
Switc
h
to anot
h
er city
:
Flick le
f
t or right, or tap to the le
f
t or right o
f
the row o
f
dots
.
The number o
f
dots below the weather board shows how many cities are stored
.
1
5
0

Reorder cities: Tap , then drag next to a city to a new place in the list.
Delete a city: Tap and tap next to a city, then tap Delete.
Display the temperature in Fahrenheit or Celsius: Tap , then tap °F or °C.
Getting More Weather Information
You can see a more detailed weather report, news and websites related to the city,
and more.
See information about a city at Yahoo.com: Tap .
151
Chapter 16 Weather

N
ote
s
17
A
b
out Note
s
You can create notes on iP
h
one an
d
sync notes wit
h
supporte
d
app
l
ications on your
com
p
uter and online accounts. You can search
f
or text in a list o
f
notes
.
Sync
i
ng Note
s
You can sync Notes in either o
f
the
f
ollowing ways
:
In iTunes, use t
h
e iP
h
one settings panes to sync wit
h
Mai
l
on a Mac or wit
h
Microso
f
t Outlook 2003, 2007, or 2010 on a PC when you connect iPhone to your
com
p
uter. See
“
iPhone Settings Panes in iTunes
”
on pag
e
58
.
In Settings, turn on Notes in Mo
b
i
l
eMe, Goog
l
e, Ya
h
oo!, AOL, or ot
h
er IMAP account
t
o sync your notes over t
h
e air (iP
h
on
e
3
GS or
l
ater) wit
h
t
h
ose accounts. See
“
Adding Mail, Contacts, and Calendar Accounts
“
”
on pag
e
2
5
.
1
5
2

Writing and Reading Notes
When you sync Notes with an application on your computer or with online accounts,
the Accounts screen shows each those accounts, plus a button to display all notes in a
single list.
See all notes: Tap All Notes.
5GGPQVGUHQTCURGEK°ECEEQWPVTap the account name.
Change the font used to display notes: In Settings, choose Notes, then select the font
you want to use.
0QVGUCTGNKUVGFD[NCUVOQFK°GFFCVGYKVJVJGOQUVTGEGPVN[OQFK°GFPQVGCVVJGVQR
;QWECPUGGVJG°TUVHGYYQTFUQHGCEJPQVGKPVJGNKUV4QVCVGK2JQPGVQXKGYPQVGUKP
landscape orientation and type using a larger keyboard.
Add a note: Tap , then type your note and tap Done.
0GYPQVGUCTGCFFGFVQVJGFGHCWNVCEEQWPVURGEK°GFKP0QVGUUGVVKPIU5GG¥Notes” on
page 218.
Read a note: Tap the note. Tap or to see the next or previous note.
Edit a note: Tap anywhere on the note to bring up the keyboard.
Delete a note: Tap the note, then tap .
153
Chapter 17 Notes

Searching Note
s
You can search the text o
f
notes
.
Search
f
or notes
:
1
6CRVJGUVCVWUDCTVQUETQNNVQVJGUGCTEJ
°
GNFCVVJGVQRQ
H
VJGPQVGNKUV
2
'PVGTVGZVKPVJGUGCTEJ
°
GNF
S
earch results appear as you type. Tap Search to dismiss the keyboard and see more o
f
th
e resu
l
ts
.
Notes are included in searches
f
rom the Home screen. See
“
S
earc
h
ing
”
on pag
e
47
.
7
7
Emai
l
ing Note
s
Emai
l
a note
:
Ta
p
t
h
e note, t
h
en ta
p
.
To email a note, iPhone must be set u
p
f
or email. See
“
S
etting Up Emai
l
Accounts
”
on
pag
e
7
9
.
154
C
h
a
p
ter 1
7
N
ote
s

Cloc
k
18
Wor
ld
C
l
oc
ks
You can a
dd
c
l
oc
k
s to s
h
ow t
h
e time in ot
h
er major cities an
d
time zones aroun
d
th
e wor
ld.
View c
l
oc
k
s
:
Ta
p
Wor
ld
C
l
oc
k.
I
f
the clock
f
ace is white, it’s daytime in that city. I
f
the clock
f
ace is black, it’s nighttime
.
+
H
[QWJCXGOQTGVJCP
H
QWTENQEMU
±
KEMVQUETQNNVJTQWIJVJGO
Add
a c
l
oc
k:
1
Ta
p
Wor
ld
C
l
oc
k.
2
T
a
p
,
then type the name of a city
.
Cities matc
h
ing w
h
at you’ve type
d
appear
b
e
l
ow
.
3
Tap a city to add a clock
f
or that city
.
I
f
you don’t see the city you’re looking
f
or, try a major city in the same time zone
.
De
l
ete a c
l
oc
k:
Ta
p
Wor
ld
C
l
oc
k
an
d
ta
p
E
d
it. T
h
en ta
p
next to a clock and tap Delete.
Rearrange c
l
oc
k
s
:
Tap Wor
ld
C
l
oc
k
an
d
tap E
d
it. T
h
en
d
rag next to a c
l
oc
k
to a new
pl
ace in t
h
e
l
ist
.
155

Alarms
You can set multiple alarms. Set each alarm to repeat on days you specify, or to sound
only once.
Set an alarm:
1Tap Alarm and tap .
2Adjust any of the following settings:
To set the alarm to repeat on certain days, tap Repeat and choose the days.
6QEJQQUGVJGTKPIVQPGVJCVUQWPFUYJGPVJGCNCTOIQGUQÒtap Sound.
To set whether the alarm gives you the option to hit snooze, VWTP5PQQ\GQPQTQÒ+H
Snooze is on and you tap Snooze when the alarm sounds, the alarm stops and then
sounds again in ten minutes.
To give the alarm a description, tap Label. iPhone displays the label when the alarm
sounds.
If at least one alarm is set and turned on, appears in the iPhone status bar at the top
of the screen.
Important: Some carriers don’t support network time in all locations. If you’re
traveling, iPhone alerts may not sound at the correct local time. See “Date and Time”on
page 204.
6WTPCPCNCTOQPQTQÒ6CR#NCTOCPFVWTPCP[CNCTOQPQTQÒ+HCPCNCTOKUVWTPGF
QÒKVYQP¨VUQWPFCICKPWPNGUU[QWVWTPKVDCEMQP
+HCPCNCTOKUUGVVQUQWPFQPN[QPEGKVVWTPUQÒCWVQOCVKECNN[CHVGTKVUQWPFU;QWECP
turn it on again to reenable it.
Change settings for an alarm: Tap Alarm and tap Edit, then tap next to the alarm
you want to change.
Delete an alarm: Tap Alarm and tap Edit, then tap next to the alarm and tap Delete.
156 Chapter 18 Clock

Stopwatch
Use the stopwatch to time an event:
1Tap Stopwatch.
2Tap Start to start the stopwatch.
To record lap times, tap Lap after each lap.
To pause the stopwatch, tap Stop. Tap Start to resume.
To reset the stopwatch, tap Reset when the stopwatch is paused.
If you start the stopwatch and switch to another app, the stopwatch keeps running.
Timer
Set the timer: 6CR6KOGTVJGP±KEMVQUGVVJGPWODGTQHJQWTUCPFOKPWVGU6CR5VCTV
to start the timer.
Choose the sound: Tap When Timer Ends.
Set a sleep timer: Set the timer, then tap When Timer Ends and choose Sleep iPod.
When you set a sleep timer, iPhone stops playing music or video when the timer ends.
If you start the timer and then switch to another iPhone app, the timer keeps running.
157
Chapter 18 Clock

Calculato
r
19
Using t
h
e Ca
l
cu
l
ato
r
Tap numbers and
f
unctions in Calculator just as you would with a standard calculator
.
W
h
en you tap t
h
e a
dd
, su
b
tract, mu
l
tip
l
y, or
d
ivi
d
e
b
utton, a w
h
ite ring appears
a
roun
d
t
h
e
b
utton to
l
et you
k
now t
h
e operation to
b
e carrie
d
out. Rotate iP
h
one to
IGVCPGZRCPFGFUEKGPVK
°
EECNEWNCVQT
Stan
d
ar
d
Memory Function
s
C:
Tap to c
l
ear t
h
e
d
isp
l
a
y
e
d
num
b
er
.
MC:
Tap to c
l
ear t
h
e memory
.
M
+
:
Tap to add the displayed number to the number in memory. I
f
no number is in
memor
y
, tap to store t
h
e
d
isp
l
a
y
e
d
num
b
er in memor
y.
M
–
:
Tap to subtract the displayed number
f
rom the number in memory
.
MR:
Tap to replace the displayed number with the number in memory. I
f
the button
h
as a w
h
ite ring aroun
d
it, t
h
ere is a num
b
er store
d
in memor
y.
T
h
e store
d
num
b
er remains in memory w
h
en you switc
h
b
etween t
h
e stan
d
ar
d
an
d
UEKGPVK
°
EECNEWNCVQTU
1
5
8

5EKGPVK°E%CNEWNCVQT-G[U
4QVCVGK2JQPGVQNCPFUECRGQTKGPVCVKQPVQFKURNC[VJGUEKGPVK°EECNEWNCVQT
2nd Changes the trigonometric buttons (sin, cos, tan, sinh, cosh, and tanh) to their inverse
functions (sin-1, cos-1, tan-1, sinh-1, cosh-1, and tanh-1). It also changes ln to log2, and ex to
2x. Tap 2nd again to return the buttons to their original functions.
(Opens a parenthetical expression. Expressions can be nested.
)Closes a parenthetical expression.
%Calculates percentages, adds markups, and subtracts discounts. To calculate a
percentage, use it with the multiplication (x) key. For example, to calculate 8% of 500,
enter
500 x 8 % =
which returns 40.
To add a markup or subtract a discount, use it with the plus (+) or minus (–) key. For
example, to compute the total cost of a $500 item with an 8% sales tax, enter
500 + 8 % =
which returns 540.
1/x Returns the reciprocal of a value in decimal format.
x2Squares a value.
x3Cubes a value.
yx6CRDGVYGGPXCNWGUVQTCKUGVJG°TUVXCNWGVQVJGRQYGTQHVJGUGEQPFXCNWG(QT
example, to compute 34, enter
3 yx 4 =
which returns 81.
x! Calculates the factorial of a value.
3Calculates the square root of a value.
x3yUse between values to calculate the x root of y. For example to compute 4381, enter
81 x3y 4 =
which returns 3.
159
Chapter 19 Calculator

log Returns the log base 10 of a value.
sin Calculates the sine of a value.
sin-1 Calculates the arc sine of a value. (Available when the 2nd button is tapped.)
cos Calculates the cosine of a value.
cos-1 Calculates the arc cosine of a value. (Available when the 2nd button is tapped.)
tan Calculates the tangent of a value.
tan-1 Calculates the arc tangent of a value. (Available when the 2nd button is tapped.)
ln Calculates the natural log of a value.
log2 Calculates the log base 2. (Available when the 2nd button is tapped.)
sinh Calculates the hyperbolic sine of a value.
sinh-1 Calculates the inverse hyperbolic sine of a value. (Available when the 2nd button
is tapped.)
cosh Calculates the hyperbolic cosine of a value.
cosh-1 Calculates the inverse hyperbolic cosine of a value. (Available when the 2nd button
is tapped.)
tanh Calculates the hyperbolic tangent of a value.
tanh-1 Calculates the inverse hyperbolic tangent of a value. (Available when the 2nd button
is tapped.)
exTap after entering a value to raise the constant “e” (2.718281828459045…) to the power
of that value.
2xCalculates 2 to the power of the displayed value. For example, 10 2x = 1024. (Available
when the 2nd button is tapped.)
Rad Changes the mode to express trigonometric functions in radians.
Deg Changes the mode to express trigonometric functions in degrees.
Enters the value of (3.141592653589793…).
EE An operator that multiplies the currently displayed value by 10 to the power of the next
value you enter.
Rand Returns a random number between 0 and 1.
160 Chapter 19 Calculator

C
om
p
as
s
20
Getting Compass Rea
d
ing
s
T
h
e
b
ui
l
t-in com
p
ass (iP
h
on
e
3
GS or later) shows which direction you’re
f
acing, along
with the geographical coordinates o
f
your current location. You can choose magnetic
nort
h
, or
h
ave Compass a
d
just t
h
e
d
ec
l
ination to s
h
ow true nort
h.
I
mportant
:
6JGCEEWTCE[Q
H
VJGFKIKVCNEQORCUUOC[DGPGICVKXGN[C
Ò
GEVGFD[
magnetic or other environmental inter
f
erence, including inter
f
erence caused by the
close proximity o
f
the magnets contained in the iPhone earbuds. The digital compass
s
hould be used only
f
or basic navigation assistance and should not be solely relied on
t
o
d
etermine precise
l
ocations, proximity,
d
istance, or
d
irection
.
;QWPGGFVQECNKDTCVGVJGEQORCUUVJG
°
TUVVKOG[QWWUGKVCPF[QWOC[PGGFVQ
recalibrate it occasionally a
f
ter that. iPhone alerts you i
f
calibration is needed
.
N
ote
:
+
H
NQECVKQPUGTXKEGUKUVWTPGFQ
Ò
YJGP[QWQRGP%QORCUU[QWOC[DGCUMGFVQ
t
urn it on. You can use Compass wit
h
out turning on
l
ocation services. See
“
Locat
i
on
S
ervices
”
on pag
e
200
.
16
1

Calibrate iPhone: 9CXGK2JQPGKPC°IWTGGKIJV;QWOC[DGCUMGFVQOQXGCYC[
from a source of interference.
See the direction you’re facing: Hold iPhone level to the ground. The compass needle
rotates to point north. Your current direction appears at the top of the screen. The
coordinates of your current location are displayed at the bottom of the screen.
Switch between true north and magnetic north: Tap and tap the setting you want.
Compass and Maps
6JG%QORCUUCRRNGVU[QW°PF[QWTEWTTGPVNQECVKQPKP/CRU/CRUCNUQWUGUVJGDWKNV
in compass to show the direction you’re facing.
See your current location in Maps: Tap at the bottom of the Compass screen. Maps
opens and indicates your current location with a blue marker.
162 Chapter 20 Compass

Show the direction you’re facing: In Maps, tap twice. The icon changes to . The
angle shows the accuracy of the compass reading—the smaller the angle, the greater
the accuracy.
See “Finding and Viewing Locations” on page 142.
163
Chapter 20 Compass

Vo
i
ce Memo
s
2
1
Recor
d
ing Voice Memo
s
Voice Memos
l
ets you use iP
h
one as a porta
bl
e recor
d
ing
d
evice using t
h
e
b
ui
l
t-in
micro
ph
one, iP
h
one or B
l
uetoot
h
h
ea
d
set mic, or su
pp
orte
d
externa
l
micro
ph
one
.
N
ote
:
Externa
l
microp
h
ones must
b
e
d
esigne
d
to wor
k
wit
h
t
h
e iP
h
one
h
ea
d
set jac
k
or Doc
k
Connector. T
h
ese inc
l
u
d
e App
l
e-
b
ran
d
e
d
ear
b
u
d
s an
d
aut
h
orize
d
t
h
ir
d
-party
a
ccessories marked with the Apple “Made
f
or iPhone” or “Works with iPhone” logo
.
You can adjust the recording level by moving the microphone closer to or
f
urther
a
way
f
rom what you’re recording. For better recording quality, the loudest level on the
l
eve
l
meter s
h
ou
ld
b
e
b
etween –3
d
B an
d
0
d
B
.
9LJVYKI\[[VU
(\KPVSL]LSTL[LY
.V[V]VPJLTLTVZ

Record a voice memo:
1Tap to start recording. You can also press the center button on the iPhone
earphones.
2Tap to pause or to stop recording. You can also press the center button on the
iPhone earphones.
Recordings using the built-in microphone are mono, but you can record stereo using
an external stereo microphone.
When you start a voice recording, iPhone makes a short ringing sound. The sound isn’t
played if you’ve set the Ring/Silent switch to silent. See “Sounds and the Ring/Silent
Switch” on page 197.
Note: +PUQOGEQWPVTKGUQTTGIKQPUVJGUQWPFGÒGEVUHQT8QKEG/GOQUCTGRNC[GFGXGP
if the Ring/Silent switch is set to silent.
To use other apps while recording your voice memo, you can lock iPhone or press the
Home button.
Play a voice memo you just recorded: Tap .
Listening to Voice Memos
:JY\IILYIHY
7SH`OLHK
Play a voice memo you’ve previously recorded:
1Tap .
/GOQUCTGNKUVGFKPEJTQPQNQIKECNQTFGTYKVJVJGOQUVTGEGPVOGOQ°TUV
2Tap a memo, then tap .
Tap to pause, then tap again to resume playback.
Skip to any point in a voice memo: Drag the playhead along the scrubber bar.
Listen through the built-in speaker: Tap Speaker.
165
Chapter 21 Voice Memos

Managing Voice Memos
Delete a voice memo: Tap a memo in the list, then tap Delete.
See more information: Tap next to the memo. The Info screen displays information
about the length, recording time and date, and provides additional editing and
sharing functions.
Add a label to a voice memo: On the Info screen tap , then select a label in the list
on the Label screen. To create a custom label, choose Custom at the bottom of the list,
then type a name for the label.
166 Chapter 21 Voice Memos

Trimming Voice Memos
You can trim the beginning or ending of a voice memo to eliminate unwanted pauses
or noise.
Trim a voice memo:
1On the Voice Memos screen, tap next to the memo you want to trim.
2Tap Trim Memo.
3Using the time markers as a guide, drag the edges of the audio region to adjust the
beginning and end of the voice memo. To preview your edit, tap .
4Tap Trim Voice Memo.
Important: Edits you make to voice memos can’t be undone.
Sharing Voice Memos
You can share your voice memos as attachments in email or MMS messages.
Share a voice memo:
1Select a voice memo on the Voice Memos screen, then tap Share.
You can also tap Share on the Info screen of a voice memo.
2Choose Email to open a new message in Mail with the memo attached, or choose
MMS to open a new message in Messages.
#OGUUCIGCRRGCTUKHVJG°NG[QW¨TGVT[KPIVQUGPFKUVQQNCTIG
167
Chapter 21 Voice Memos

Syncing Voice Memos
iTunes syncs voice memos to your iTunes library when you connect iPhone to your
computer. This lets you listen to voice memos on your computer and provides a
backup if you delete them from iPhone.
Voice memos are synced to the Voice Memos playlist. iTunes creates the playlist if it
doesn’t exist. When you sync voice memos to iTunes, they remain in the Voice Memos
app until you delete them. If you delete a voice memo on iPhone, it isn’t deleted from
the Voice Memos playlist in iTunes. However, if you delete a voice memo from iTunes, it
is deleted from iPhone the next time you sync with iTunes.
You can sync the iTunes Voice Memos playlist to the iPod app on iPhone using the
Music pane in iTunes.
Sync the Voice Memos playlist to iPhone:
1Connect iPhone to your computer.
2In iTunes, select iPhone in the Devices list.
3Select Music at the top of the screen.
4Select the “Include voice memos” checkbox and click Apply.
168 Chapter 21 Voice Memos

i
Tunes Stor
e
22
A
b
out t
h
e iTunes Stor
e
You can search
f
or, browse, preview, purchase, and download music, ringtones,
a
udiobooks, TV shows, movies, and music videos
f
rom the iTunes Store directly to
iPhone. You can listen to audio or watch video
p
odcasts
f
rom the iTunes Store, either
by streaming them
f
rom the Internet or by downloading them directly to iPhone. And,
[QWECP
H
QNNQY[QWT
H
CXQTKVGCTVKUVUCPF
H
TKGPFUVQ
°
PFQWVYJCVOWUKEVJG[¨TGNKUVGPKPI
VQCPFVCNMKPICDQWV
°
PFQWVYJGP[QWT
H
CXQTKVGCTVKUVUCTGQPVQWTPGCT[QWCPF
w
h
o’s p
l
anning to go, an
d
more
.
N
ote
:
T
h
e iTunes Store may not
b
e avai
l
a
bl
e in a
ll
countries or regions, an
d
iTunes
S
tore content may vary
b
y country or region
.
To access t
h
e iTunes Store, iP
h
one must
b
e connecte
d
to t
h
e Internet. See
“
C
onnecting
t
o t
h
e Internet
”
on pag
e
22
.
To purchase items or write reviews, you need an Apple ID. By de
f
ault, iPhone gets your
Apple ID in
f
ormation
f
rom iTunes. I
f
you don’t have an Apple ID, or i
f
you want to make
purc
h
ases using anot
h
er App
l
e ID, go to Settings > Store. See
“
S
tor
e
”
on pag
e
2
1
8
.
You
d
on’t nee
d
an App
l
e ID to p
l
ay or
d
own
l
oa
d
po
d
casts
.
1
6
9
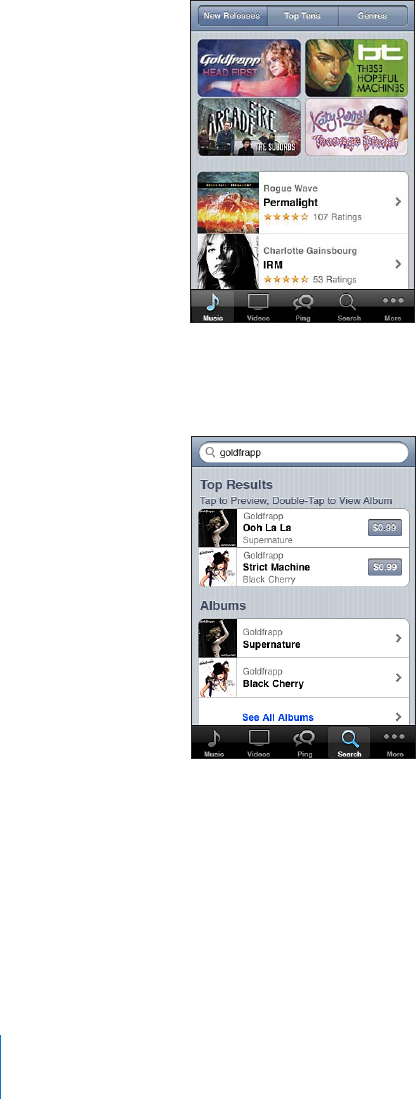
Finding Music, Videos, and More
Browse content: Tap one of the content categories at the bottom of the screen, such
as Music or Videos. Or tap More to browse other content. Choose a sort method at the
top of the screen—for example New Releases or Genres (the categories may vary).
Search for content: 6CR5GCTEJVCR/QTG°TUVKH5GCTEJKUP¨VXKUKDNGVCRVJGUGCTEJ
°GNFCPFGPVGTQPGQTOQTGYQTFUVJGPVCR5GCTEJ5GCTEJTGUWNVUCTGITQWRGFD[
category, such as Movies, Albums, or Podcasts.
Tap an item in a list to see more details on its Info screen. You can read reviews, write
your own review, or email a link about the item to a friend. Depending on the item,
you can also buy, download, or rent it.
Note: If you join a Starbucks Wi-Fi network in a select Starbucks location in the U.S.,
the Starbucks icon appears at the bottom of the screen. You can preview and purchase
the currently playing and other songs from featured Starbucks Collections.
170 Chapter 22 iTunes Store

Explore artist and friend recommendations: 6CR2KPIVCR/QTG°TUVKH2KPIKUP¨V
XKUKDNGVQ°PFQWVYJCV¨UPGYHTQO[QWTHCXQTKVGCTVKUVUQTUGGYJCVOWUKE[QWT
friends are excited about. For information, see the following section, “Following Artists
and Friends.”
Following Artists and Friends
Use iTunes Ping to connect with the world’s most passionate music fans. Follow
favorite artists to learn about new releases and upcoming concerts and tours, get an
insider’s perspective through their photos and videos, and learn about their musical
KP±WGPEGU4GCFHTKGPFU¨EQOOGPVUCDQWVVJGOWUKEVJG[¨TGNKUVGPKPIVQCPFUGGYJCV
they’re buying and which concerts they plan to attend. Finally, express your musical
likes and post comments for your own followers.
6QETGCVGCPFGZRNQTGOWUKECNEQPPGEVKQPU[QWPGGFVQETGCVGCRTQ°NG
%TGCVG[QWTK6WPGU2KPIRTQ°NGOpen the iTunes application on your Mac or PC, click
Ping, and follow the onscreen instructions.
Explore iTunes Ping on iPhone: 1RGPVJGK6WPGUCRRVCR2KPIVCR/QTG°TUVKH2KPI
isn’t visible), then:
Tap Activity to see the latest from and about the people you follow. Updates include
purchases, reviews, likes, comments, and posts.
Tap People to see who you’re following and who’s following you, or to search for
artists or friends.
6CR/[2TQ°NGVQTGXKGY[QWTRTQ°NGKPHQTOCVKQP
171
Chapter 22 iTunes Store

Follow an artist: 6CR(QNNQYQPVJGKTRTQ°NGRCIG
By searching: 6CR2GQRNGGPVGTVJGCTVKUV¨UPCOGKPVJGUGCTEJ°GNFCVVJGVQRQHVJG
page, then tap Search. Tap the artist in the list of results, then tap Follow.
While browsing: 6CR2TQ°NGCVVJGDQVVQOQHCP[CNDWORCIGVJGPVCR(QNNQY
Follow a friend: %JQQUGCUVCTVKPIITQWRQHHTKGPFUYJGP[QWUGVWR[QWTRTQ°NGWUKPI
iTunes on your Mac or PC. After that, you can choose to follow others using Ping on
iPhone.
By searching: 6CR2GQRNGGPVGT[QWTHTKGPF¨UPCOGKPVJGUGCTEJ°GNFVJGPVCR
Search. Tap your friend’s name in the list of matches, then tap Follow.
While exploring Ping: Tap a person’s name, then tap Follow.
9JGP[QWHQNNQYUQOGQPGVJG[FQP¨VCWVQOCVKECNN[HQNNQY[QW+P[QWTRTQ°NG[QWECP
choose to approve or decline requests to be followed as they arrive, or simply accept
all new followers without review (the default).
Share your thoughts: As you browse albums and songs, tap Post to comment on a
piece of music or tap Like just to say you like it. Your friends will see your thoughts in
their iTunes Ping Activity feed.
Share concert plans: 6CR%QPEGTVUQP[QWTRTQ°NGRCIGVQUGGWREQOKPIEQPEGTVUD[
the artists you follow, and see which of your friends are going to a concert. Tap Tickets
to buy your own ticket, or tap I’m Going to let others know you’ll be there too. (Not
available in all countries or regions.)
172 Chapter 22 iTunes Store

Purchasing Ringtones
You can preview and purchase ringtones from the iTunes Store and download them
to iPhone.
Note: Ringtones may not be available in all countries or regions.
Browse for ringtones: 6CR4KPIVQPGUVCR/QTG°TUVKH4KPIVQPGUKUP¨VXKUKDNGQTWUG
5GCTEJVQ°PFCURGEK°EUQPIKPVJGK6WPGU5VQTG
Preview a ringtone: Tap the item to preview. Double-tap the item for more information.
Purchase and download a ringtone:
1Tap the price, then tap Buy Now.
2 5KIPKPWUKPI[QWT#RRNG+&KHTGSWGUVGFVJGPVCR1-
When you purchase a ringtone, you can set it as your default ringtone, or assign it to
a contact.
If you don’t have an Apple ID, tap Create New Apple ID to set one up.
Your purchase is charged to your Apple ID. For additional purchases made within the
PGZV°HVGGPOKPWVGU[QWFQP¨VJCXGVQGPVGT[QWTRCUUYQTFCICKP
You can change your default ringtone or assign individual ringtones to contacts in
Settings > Sounds. See “Sounds and the Ring/Silent Switch” on page 197.
Ringtones you purchase on iPhone are synced to your iTunes library when you
connect iPhone to your computer. You can sync purchased ringtones to more than
one iPhone, if they’re all synced using the Apple ID that you used to purchase the
ringtones. You can’t edit ringtones you purchase from the iTunes Store.
You can create custom ringtones in Garage Band. For information, see Garage Band Help.
Purchasing Music or Audiobooks
9JGP[QW°PFCUQPICNDWOQTCWFKQDQQM[QWNKMGKPVJGK6WPGU5VQTG[QWECP
purchase and download it to iPhone. You can preview an item before you purchase it
to make sure it’s what you want.
Preview a song or audiobook: Tap the item.
Purchase and download a song, album, or audiobook:
1Tap the price, then tap Buy Now.
2 5KIPKPWUKPI[QWT#RRNG+&KHTGSWGUVGFVJGPVCR1-
If you don’t have an Apple ID, tap Create New Apple ID to set one up.
Your purchase is charged to your Apple ID. For additional purchases made within the
PGZV°HVGGPOKPWVGU[QWFQP¨VJCXGVQGPVGT[QWTRCUUYQTFCICKP
173
Chapter 22 iTunes Store

An alert appears if you’ve previously purchased one or more songs from an album.
Tap Buy if you want to purchase the entire album including the songs you’ve already
purchased, or tap Cancel if you want to purchase any remaining songs individually.
Some albums include bonus content. Bonus songs and music videos are downloaded
to iPhone when you purchase the album. Other bonus content—iTunes Extras,
iTunes LP, and digital booklets—can be downloaded and viewed only on your
computer. To download these items to your iTunes library, choose Store > Check for
Available Downloads.
Once you purchase an item, it begins downloading and appears on the Downloads
screen. See “Checking Download Status” on page 176.
Purchased songs are added to a Purchased playlist on iPhone. If you delete the Purchased
playlist, iTunes creates a new one when you buy an item from the iTunes Store.
;QWECPTGFGGOK6WPGU5VQTGIKHVECTFUIKHVEGTVK°ECVGUQTQVJGTRTQOQVKQPCNEQFGUVQ
make purchases. When you’re signed in, your remaining store credit appears with your
Apple ID information at the bottom of most iTunes Store screens.
Enter a redemption code: 6CR/WUKEVCR/QTG°TUVKH/WUKEKUP¨VXKUKDNGVJGPVCR
Redeem at the bottom of the screen and follow the onscreen instructions.
Purchasing or Renting Videos
The iTunes Store lets you purchase and download movies, TV shows, and music videos
(may not be available in all countries or regions). Some movies and TV shows can also
DGTGPVGFHQTCNKOKVGFVKOG8KFGQEQPVGPVOC[DGCXCKNCDNGKPUVCPFCTFFG°PKVKQP5&
QTRHQTOCVJKIJFG°PKVKQP*&QTRHQTOCVQTDQVJ
Preview a video: Tap Preview.
Purchase or rent a video:
1Tap Buy or Rent.
2 5KIPKPWUKPI[QWT#RRNG+&KHTGSWGUVGFVJGPVCR1-
If you don’t have an Apple ID, tap Create New Apple ID to set one up. Your purchase
KUEJCTIGFVQ[QWT#RRNG+&(QTCFFKVKQPCNRWTEJCUGUOCFGYKVJKPVJGPGZV°HVGGP
minutes, you don’t have to enter your password again.
Once you purchase an item, it begins downloading and appears on the Downloads
screen. See “Checking Download Status” on page 176.
Rented movies and TV shows don’t begin playing until the download completes. See
“Watching Rented Movies and TV Shows” on page 107.
When the download is complete, purchased videos are added to the Purchased playlist
on iPhone. Purchased content is synced to the Purchased playlist for your iPhone in
iTunes the next time you connect iPhone to your computer. See “Syncing Purchased
Content” on page 176.
174 Chapter 22 iTunes Store

Note: If you purchase HD video on iPhone 3G or iPhone 3GS, the video is downloaded
to iPhone in SD format.
To view or sync videos in the Purchased playlist in iTunes on your computer, you must
be signed in using your Apple ID.
Sync purchased videos in iTunes: Connect iPhone to your computer. In iTunes, select
iPhone in the Devices list, click the appropriate button (Movies, TV Shows, or Music for
music videos), select the items you want to sync, then click Sync.
If you purchase a video in HD format, you can choose to sync it in either SD or HD
format. You may want to sync an HD video in SD format for a quicker download, or to
save room on iPhone.
Select SD or HD format: In iTunes, Control-click or right-click a video marked “HD-SD”
CPFEJQQUG5VCPFCTF&G°PKVKQPQT*KIJ&G°PKVKQPHTQOVJG8GTUKQPOGPW
;QWECPTGFGGOK6WPGU5VQTGIKHVECTFUIKHVEGTVK°ECVGUQTQVJGTRTQOQVKQPCNEQFGUVQ
make purchases. When you’re signed in, your remaining store credit appears with your
Apple ID information at the bottom of most iTunes Store screens.
Enter a redemption code: 6CR/WUKEVCR/QTG°TUVKH/WUKEKUP¨VXKUKDNGVJGPVCR
Redeem at the bottom of the screen and follow the onscreen instructions.
Streaming or Downloading Podcasts
You can listen to audio podcasts or watch video podcasts streamed over the Internet
from the iTunes Store. You can also download audio and video podcasts to iPhone.
Podcasts you download to iPhone are synced to your iTunes library when you connect
iPhone to your computer.
6CR2QFECUVUVCR/QTG°TUVKH2QFECUVUKUP¨VXKUKDNGVQDTQYUGRQFECUVUKPVJGK6WPGU
Store. To see a list of episodes, tap a podcast. Video podcasts are indicated by the
video icon.
Stream a podcast: Tap the podcast title.
Download a podcast: Tap the Free button, then tap Download. Downloaded podcasts
appear in the Podcasts list in iPod.
Listen to or watch a podcast you’ve downloaded: In iPod, tap Podcasts (tap More
°TUVKH2QFECUVUKUP¨VXKUKDNGVJGPVCRVJGRQFECUV8KFGQRQFECUVUCNUQCRRGCTKP[QWT
list of videos.
Get more episodes of the podcast you’ve downloaded: In the Podcasts list in iPod,
tap the podcast, then tap Get More Episodes.
Delete a podcast: In the Podcasts list in iPod, swipe left or right over the podcast, then
tap Delete.
175
Chapter 22 iTunes Store

Checking Download Status
You can check the Downloads screen to see the status of in-progress and scheduled
downloads, including purchases you’ve pre-ordered.
See the status of items being downloaded: 6CR&QYPNQCFUVCR/QTG°TUVKH
Downloads isn’t visible).
To pause a download, tap .
If a download is interrupted, iPhone starts the download again the next time it has an
Internet connection. Or, if you open iTunes on your computer, iTunes completes the
download to your iTunes library (if your computer is connected to the Internet and
signed in using the same Apple ID).
See the status of pre-ordered items: 6CR&QYPNQCFUVCR/QTG°TUVKH&QYPNQCFU
isn’t visible).
Pre-ordered items appear in a list until the item is released. Tap the item for release date
information. Once the item is available for download, appears next to the download.
Download a pre-ordered item: Tap the item, then tap .
Pre-ordered items don’t download automatically when they’re released. Return to the
Downloads screen to begin the download.
Syncing Purchased Content
iTunes automatically syncs everything you’ve downloaded or purchased on iPhone to
your iTunes library when you connect iPhone to your computer. This lets you access
the downloads on your computer and provides a backup if you delete purchased
content from iPhone.
Purchased content is synced to the “Purchased on <name of your iPhone>” playlist.
iTunes creates the playlist if it doesn’t exist. iTunes also copies your purchases to the
Purchased playlist that iTunes uses for purchases you make on your computer, if that
playlist exists and is set to sync with iPhone.
Downloaded podcasts are synced to the Podcast list in your iTunes library.
Changing the Browse Buttons
You can replace the Music, Podcasts, Videos, and Search buttons at the bottom of
the screen with ones you use more frequently. For example, if you download
audiobooks often but don’t watch many videos, you could replace the Videos button
with Audiobooks.
176 Chapter 22 iTunes Store

Change the browse buttons
:
Tap More, tap Edit, then drag a button to the bottom o
f
th
e screen, over t
h
e
b
utton you want to rep
l
ace
.
You can drag the buttons at the bottom o
f
the screen le
f
t or right to rearrange them
.
9JGP[QW
°
PKUJVCR&QPG
W
h
en you’re
b
rowsing, tap More to access t
h
e
b
rowse
b
uttons t
h
at aren’t visi
bl
e
.
Viewing Account In
f
ormatio
n
To view iTunes Store in
f
ormation
f
or your Apple ID on iPhone, tap your Apple ID (at the
bottom o
f
most iTunes Store screens). Or go to Settings > Store and tap View Apple ID
.
You must be signed in to view your account in
f
ormation. See
“
S
tor
e
”
on pag
e
2
1
8
.
Veri
f
ying Download
s
You can use iTunes on your computer to veri
f
y that all the music, videos, apps, and
other items you bought
f
rom the iTunes Store or App Store are in your iTunes library
.
You might want to do this i
f
a download was interrupted
.
Veri
f
y your purchases
:
1
Ma
k
e sure your computer is connecte
d
to t
h
e Internet
.
2
In iTunes, choose Store > Check
f
or Available Downloads
.
3
Enter your App
l
e ID an
d
passwor
d
, t
h
en c
l
ic
k
C
h
ec
k.
Purc
h
ases not yet on your computer are
d
own
l
oa
d
e
d.
T
h
e Purc
h
ase
d
p
l
ay
l
ist
d
isp
l
ays your purc
h
ases. However,
b
ecause you can a
dd
or
remove items in this list, it might not be accurate. To see all o
f
your purchases, sign in
using your App
l
e ID, c
h
oose Store > View My Account, an
d
c
l
ic
k
Purc
h
ase History
.
177
C
h
a
p
ter 22
i
Tunes Stor
e

App
S
tor
e
23
A
b
out t
h
e A
pp
Stor
e
You can search
f
or, browse, review,
p
urchase, and download a
pp
s
f
rom the A
pp
Store
d
irectly to iPhone. Apps that you download and install
f
rom the App Store on iPhone
a
re
b
ac
k
e
d
up to your iTunes
l
i
b
rary t
h
e next time you sync iP
h
one wit
h
your computer
.
When you sync iPhone, you can also install apps you’ve purchased or downloaded
f
rom
th
e iTunes Store on your computer
.
N
ote
:
T
h
e App Store may not
b
e avai
l
a
bl
e in a
ll
countries or regions, an
d
App Store
content may vary
b
y country or region
.
To
b
rowse t
h
e A
pp
Store, iP
h
one must
b
e connecte
d
to t
h
e Internet. See
“
C
onnecting
t
o t
h
e Internet
”
on pag
e
22
. To
d
own
l
oa
d
apps, you a
l
so nee
d
an App
l
e ID (may not
be available in all countries or regions). By de
f
ault, iPhone gets your Apple ID settings
f
rom iTunes. I
f
you don’t have an Apple ID, or i
f
you want to make purchases using
a
not
h
er App
l
e ID, go to Settings > Store. See
“
S
tor
e
”
on pag
e
2
1
8
.
1
7
8
Browsing and Searching
Browse the featured selections to see new, notable, or recommended apps, or browse
6QRVQUGGVJGOQUVRQRWNCTCRRU+H[QW¨TGNQQMKPIHQTCURGEK°ECRRWUG5GCTEJ
Browse apps: Tap Featured, Categories, or Top 25. Choose a category, or choose a sort
method at the top of the screen to browse by lists such as New, What’s Hot, Genius,
Top Paid, or Top Free.
Browse using Genius: Tap Genius to see a list of recommended apps based on what’s
already in your app collection. To turn Genius on, follow the onscreen instructions.
Genius is a free service, but it requires an Apple ID.
Search for apps: 6CR5GCTEJVCRVJGUGCTEJ°GNFCPFGPVGTQPGQTOQTGYQTFUVJGP
tap Search.
179
Chapter 23 App Store
Info Screen
Tap any app in a list to see more information, such as the app’s price, screenshots,
and ratings.
If you already installed the app, “Installed” appears instead of the price on the Info screen.
View screenshots: Scroll to near the bottom of the Info page. Flick left or right to view
additional screenshot pages. Double-tap to zoom in.
Get ratings and read reviews: Tap Ratings near the bottom of the Info screen.
Email a link to the app’s Info page in iTunes: Tap “Tell a Friend” near the bottom of
the Info screen.
Report a problem: Tap “Report a Problem” near the bottom of the Info screen. Select a
problem from the list or type optional comments, then tap Report.
Send the app to someone as a gift: Tap “Gift This App” near the bottom of the Info
screen, then follow the onscreen instructions.
180 Chapter 23 App Store

Downloading App
s
9JGP[QW
°
PFCPCRR[QWYCPVKPVJG#RR5VQTG[QWECPRWTEJCUGCPFFQYPNQCFKV
t
o iPhone. I
f
the app is
f
ree, you can download it without charge
.
Once you
d
own
l
oa
d
an app, it’s imme
d
iate
l
y insta
ll
e
d
on iP
h
one
.
Purc
h
ase an
d
d
own
l
oa
d
an a
pp:
1
Tap t
h
e price (or tap Free), t
h
en tap Buy Now
.
2
5KIPKPWUKPI[QWT#RRNG+&K
H
TGSWGUVGFVJGPVCR1-
I
f
you don’t have an Apple ID, tap Create New Apple ID to set one up
.
Downloads
f
or purchase are charged to your Apple ID. For additional downloads made
YKVJKPVJGPGZV
°H
VGGPOKPWVGU[QWFQP¨VJCXGVQGPVGT[QWTRCUUYQTFCICKP
S
ome apps a
ll
ow you to ma
k
e purc
h
ases wit
h
in t
h
e app. You can restrict in-app
purc
h
ases in Settings. See
“
R
estr
i
ct
i
ons
”
on pag
e
203
.
5QOGCRRUWUGRWUJPQVK
°
ECVKQPUVQCNGTV[QWQ
H
PGYKP
H
QTOCVKQPGXGPYJGPVJG
CRRKUP¨VTWPPKPI0QVK
°
ECVKQPUXCT[FGRGPFKPIQPVJGCRRDWVOC[KPENWFGVGZV
or soun
d
a
l
erts, an
d
a num
b
ere
d
b
a
d
ge on t
h
e app icon on t
h
e Home screen. See
“
0QVK
°
ECVKQP
U
”
on pag
e
196
.
;QWECPTGFGGOK6WPGU5VQTGIK
H
VECTFUIK
H
VEGTVK
°
ECVGUQTQVJGTRTQOQVKQPCNEQFGUVQ
ma
k
e purc
h
ases. W
h
en you’re signe
d
in, your remaining store cre
d
it appears wit
h
your
A
pp
le ID in
f
ormation at the bottom o
f
most A
pp
Store screens
.
Enter a re
d
em
p
tion co
d
e
:
Ta
p
Redeem near the bottom o
f
the Featured screen, then
f
ollow the onscreen instructions
.
See the status o
f
downloading apps
:
A
f
ter you begin downloading an app, its icon
a
ppears on t
h
e Home screen an
d
s
h
ows a progress in
d
icator
.
I
f
a download is interrupted, iPhone starts the download again the next time it has an
Internet connection. Or, i
f
you open iTunes on your computer, iTunes completes the
d
ownload to your iTunes library (i
f
your computer is connected to the Internet and
s
igne
d
in using t
h
e same App
l
e ID)
.
18
1
C
h
a
p
ter 23 App
S
tor
e

Deleting Apps
You can delete apps you install from the App Store. If you delete an app, data
associated with the app is no longer available to iPhone, unless you reinstall the app
and restore its data from a backup.
You can reinstall an app and restore its data as long as you backed up iPhone with
iTunes on your computer. (If you try to delete an app that hasn’t been backed up to
your computer, an alert appears.) To retrieve the app data, you must restore iPhone
from a backup containing the data. See “Restoring from a Backup” on page 257.
Delete an App Store app:
1Touch and hold any app icon on the Home screen, until the icons start to jiggle.
2Tap in the corner of the app you want to delete.
3Tap Delete, then press the Home button.
If you don’t see on the app icon, either the app wasn’t purchased from the App Store
or deleting apps has been restricted. See “Restrictions” on page 203.
When you delete an app, its data is no longer accessible through the iPhone user
interface, but it isn’t erased from iPhone. For information about erasing all content and
settings, see “Erase All Content and Settings” on page 207.
You can redownload any app that you’ve purchased from the App Store, free of charge.
Replace a deleted app:
On iPhone: Purchase the app again (you won’t be charged).
In iTunes: Connect iPhone to your computer, select iPhone in the Devices list, click
Apps and select the checkbox next to the app, then click Apply.
Writing Reviews
You can write and submit your own app reviews directly on iPhone.
Write a review:
1Tap Ratings near the bottom of the Info screen.
2On the Reviews screen, tap “Write a Review.”
3Select the number of stars (1–5) for your rating of the app, and enter your nickname,
a title for the review, and optional review comments. If you’ve written reviews before,
VJGPKEMPCOG°GNFKUCNTGCF[°NNGFKP1VJGTYKUG[QW¨TGCUMGFVQETGCVGCTGXKGYGT
nickname.
4Tap Send.
You must be signed in to your Apple account and have downloaded the item in order
to submit reviews.
182 Chapter 23 App Store

Updating App
s
Whenever you access the App Store, it checks
f
or updates to apps you’ve installed. The
App Store also automatically checks
f
or updates every week. The App Store icon shows
t
he total number o
f
a
pp
u
p
dates available
.
I
f
an update is available and you access the App Store, the Updates screen appears
imme
d
iate
l
y. App up
d
ates are
d
own
l
oa
d
e
d
an
d
automatica
ll
y insta
ll
e
d
w
h
en you
c
h
oose to u
pd
ate t
h
em
.
App upgra
d
es are new re
l
eases t
h
at can
b
e purc
h
ase
d
or
d
own
l
oa
d
e
d
t
h
roug
h
t
h
e
App Store on iP
h
one or t
h
e iTunes Store on your computer
.
U
pd
ate an a
pp:
1
At the bottom o
f
the screen, ta
p
U
p
dates
.
2
Ta
p
an a
pp
to see more in
f
ormation about the u
p
date
.
3
Ta
p
U
pd
ate
.
U
pd
ate a
ll
a
pp
s
:
At the bottom o
f
the screen, ta
p
U
p
dates, then ta
p
U
p
date All
.
+
H
[QWVT[VQWRFCVGCPCRRRWTEJCUGF
H
TQOCFK
Ò
GTGPV#RRNGCEEQWPV[QW¨TGCUMGF
H
QT
th
at account ID an
d
p
asswor
d
in or
d
er to
d
own
l
oa
d
t
h
e u
pd
ate
.
Syncing Purc
h
ase
d
App
s
W
h
en you connect iP
h
one to your computer, iTunes syncs apps you
d
own
l
oa
d
or
purc
h
ase on iP
h
one to your iTunes
l
i
b
rary. T
h
is
l
ets you access t
h
e
d
own
l
oa
d
s on your
computer and provides a backup i
f
you delete apps
f
rom iPhone
.
Downloaded apps are backed up the next time you sync with iTunes. A
f
terwards, only
a
pp
d
ata is
b
ac
k
e
d
up w
h
en you sync wit
h
iTunes
.
Apps are synced to the Apps list in your iTunes library. iTunes creates the list i
f
it
d
oesn’t exist
.
183
C
h
a
p
ter 23 App
S
tor
e

G
ame
C
ente
r
2
4
A
b
out Game Cente
r
You can discover new games and share your game experiences with
f
riends around
th
e wor
ld
in Game Center (iP
h
on
e
3
GS or later). Invite your
f
riends to play, or use
CWVQOCVEJVQ
°
PFQVJGTYQTVJ[QRRQPGPVU%JGEMNGCFGTDQCTFUVQUGGYJQVJGDGUV
RNC[GTUCTG'CTPDQPWURQKPVUD[CEJKGXKPIURGEK
°
ECEEQORNKUJOGPVUKPCICOG
N
ote
:
G
ame Center may not
b
e avai
l
a
bl
e in a
ll
countries or regions, an
d
t
h
e avai
l
a
bl
e
g
ames may vary
b
y country or region
.
To use Game Center, you need an Internet connection and an Apple ID. I
f
you already
h
ave an iTunes Store, Mo
b
i
l
eMe, or ot
h
er App
l
e account, you can use t
h
at App
l
e ID
with Game Center. I
f
you don’t already have an Apple account, you can create a new
one in Game Center, as
d
escri
b
e
d
b
e
l
ow
.
Sett
i
ng Up Game Cente
r
9JGP[QW
°
TUVQRGP)COG%GPVGT[QW¨TGCUMGFK
H
[QWYCPVVQCNNQYRWUJPQVK
°
ECVKQPU
;QWOC[
°
TUVDGCUMGFK
H
[QWYCPVVQVWTPQP0QVK
°
ECVKQPU0QVK
°
ECVKQPUOC[KPENWFG
al
erts, soun
d
s, an
d
icon
b
a
d
ges t
h
at
l
et you
k
now a
b
out Game Center events even
when you’re not using Game Center. For example, you might receive an alert that a
f
riend has invited you to play a game
.
#NNQYPQVK
°
ECVKQPU
6CR
1
-
+
H
[QWVCR&QP¨V#NNQY[QWYQP¨VTGEGKXGPQVK
°
ECVKQPU
H
QT)COG%GPVGT;QWECP
VWTPPQVK
°
ECVKQPUQPCVCNCVGTVKOGK
H
[QWYCPVCPF[QWECPURGEK
H
[YJCVMKPFUQ
H
PQVK
°
ECVKQPU[QWYCPVVQIGV
6WTPPQVK
°
ECVKQPUQPQTQ
Ò
+P5GVVKPIUEJQQUG0QVK
°
ECVKQPU6WTPKPIQ
Ò
0QVK
°
ECVKQPU
FKUCDNGUCNNPQVK
°
ECVKQPU
H
QTCNNCRRU
18
4

5RGEKH[YJKEJPQVK°ECVKQPU[QWYCPVHQT)COG%GPVGTIn Settings, choose
0QVK°ECVKQPU )COG%GPVGTVJGPEQP°IWTGVJG5QWPFU#NGTVUCPF$CFIGUUGVVKPIU
+H)COG%GPVGTFQGUP¨VCRRGCTVWTPQP0QVK°ECVKQPU
Set up Game Center information for your Apple ID:
1Enter your Apple ID and password, then tap Sign In.
You may be asked to provide additional information. If you don’t have an Apple ID,
you can create one by tapping Create New Account.
2Tap Agree to accept the Game Center Terms & Conditions.
3Enter a nickname—the name others will see and know you by.
4 %QP°IWTG[QWT)COG%GPVGTUGVVKPIU
To allow other users to invite you to play a game, leave Allow Game Invites turned
QP1VJGTYKUGVCRVQVWTPKVQÒ
6QCNNQYQVJGTWUGTUVQ°PF[QWD[[QWTGOCKNCFFTGUUNGCXG(KPF/G$['OCKN
VWTPGFQP1VJGTYKUGVCRVQVWTPKVQÒ
8GTKH[[QWTCEEQWPVGOCKN;QWECPGPVGTCFKÒGTGPVCFFTGUUKH[QWFQP¨VYCPVVQ
WUGVJGQPGHTQOVJG#RRNGCEEQWPV[QWWUGFVQUKIPKP6QEQP°TOVJKUCFFTGUUCU
yours, you’ll need to respond to the email that is sent to that address.
To add more email addresses that people can use to contact you in Game Center,
tap Add Another Email.
5 6CR0GZVYJGP[QWTCEEQWPVKUEQP°IWTGF
Change Game Center settings for your Apple ID:
1Tap Me at the bottom of the screen, then tap your account banner.
2Tap View Account.
3Make your changes, then tap Done.
5KIPKPWUKPICFKÒGTGPV#RRNG+&
1Tap Me, then tap the account banner at the bottom of the screen.
2Tap Sign Out.
3Enter the new Apple ID and password, then tap Sign In.
185
Chapter 24 Game Center

G
ame
s
Purc
h
asing an
d
Down
l
oa
d
ing Game
s
G
ames
f
or Game Center are available
f
rom the App Store. I
f
you haven’t entered credit
card in
f
ormation
f
or your Apple ID, you’re prompted to enter that in
f
ormation be
f
ore
you can purc
h
ase an
d
d
own
l
oa
d
games
.
Purc
h
ase an
d
d
own
l
oa
d
games
:
Ta
p
Games, t
h
en ta
p
Fin
d
Game Center Games
.
The Game Center section o
f
App Store displays games that work with Game Center
.
You can browse this section, and purchase and download games
f
rom it, as you would
f
or other a
pp
s in the A
pp
Store. See Cha
p
te
r
23
,
“
App Store
“
,”
on pag
e
1
7
8
.
I
f
you want to purchase a game that a
f
riend has, tap the game on your
f
riend’s in
f
o
s
creen to go
d
irect
l
y to t
h
at game in t
h
e App Store
.
P
l
aying Game
s
The Games screen displays the games you download
f
rom the iTunes Store. For each
o
f
the games, your number o
f
achievements and your ranking among all the game’s
p
l
ayers are
d
isp
l
aye
d.
G
et in
f
ormation about a game
:
Tap Games, then tap a game. I
f
available, you can
FKURNC[VJGICOG¨UNGCFGTDQCTFUUGG[QWTCEJKGXGOGPVU
H
QTVJGICOGCPF
°
PFQWV
w
h
o’s recent
l
y p
l
aye
d
t
h
e game
.
P
l
ay a game
:
T
ap Games, c
h
oose a game, t
h
en tap P
l
ay
.
Depen
d
ing on t
h
e game, t
h
e
h
ome screen may provi
d
e instructions or ot
h
er
in
f
ormation, and let you view leaderboards and achievements, set game options, and
s
tart a single or multiplayer game. To play against others, you can either invite a
f
riend
QTWUGCWVQOCVEJVQJCXG)COG%GPVGT
°
PFQVJGTRNC[GTU
H
QT[QW(QTKP
H
QTOCVKQP
a
bout making
f
riends in Game Center, see
“
Frien
d
s
”
on pag
e
190
.
186
C
h
a
p
ter 24 Game
C
ente
r

For multiplayer games, you can also send a game invitation from the Friends screen.
Invite a friend to a multiplayer game from the Friends screen:
1Tap Friends at the bottom of the screen.
2Choose a friend.
3Choose a game and tap Play.
If the game allows or requires additional players, you can choose players to invite,
then tap Next.
4Enter and send your invitation, then wait for the others to accept.
5Start the game.
If a friend isn’t available or doesn’t respond to your invitation, you can tap Auto-Match
VQJCXG)COG%GPVGT°PFCPQVJGTRNC[GTHQT[QWQTVCR+PXKVG(TKGPFVQVT[KPXKVKPI
some other friend.
Other players may invite you to play the game.
Respond to an invitation to play a game: Tap Accept or Decline in the alert
that appears.
You can disable multiplayer games in Restrictions. See “Restrictions” on page 203.
;QWECPRTGXGPVQVJGTRNC[GTUHTQOKPXKVKPI[QWVQRNC[ICOGUD[VWTPKPIQÒ#NNQY
Game Invites in Game Center settings. See “Your Status and Account Information” on
page 192.
Return to Game Center: Press the Home button, then tap Game Center on the
Home screen.
On iPhone 3GS or later, you can also press the Home button twice quickly and choose
Game Center from your recent apps.
187
Chapter 24 Game Center

Leaderboard
s
S
ome games provide one or more leaderboards to show the ranking o
f
the game’s
players, with their scores, times, or other measures o
f
the players’ success
.
See a game’s
l
ea
d
er
b
oar
d:
Tap Games, t
h
en c
h
oose t
h
e game an
d
tap Lea
d
er
b
oar
d.
You may also be able to view leaderboards
f
rom within a game
.
I
f
a game has variations (such as Easy, Normal, and Hard), the Categories screen lets
you choose the leaderboard
f
or the game in general, or
f
or one o
f
the variations
.
The leaderboard shows the ranking o
f
your
f
riends, and o
f
all players. You may be able
VQXKGYNGCFGTDQCTFUVCVU
H
QTCURGEK
°
EVKOGRGTKQFUWEJCUVQFC[VJKUYGGMQTCNNVKOG
Rotate iP
h
one to see a
l
ea
d
er
b
oar
d
in
l
an
d
sca
p
e orientation
.
Start playing a game
f
rom the leaderboard
:
Tap P
l
ay in t
h
e upper-rig
h
t corner
.
188
C
h
a
p
ter 24 Game
C
ente
r

A
chievement
s
5QOGICOGUTGYCTF[QWYKVJDQPWURQKPVU
H
QTURGEK
°
ECEJKGXGOGPVU
See the possible achievements
f
or a game
:
Tap Games, c
h
oose a game, t
h
en tap
Ac
h
ievements
.
For eac
h
ac
h
ievement, Game Center s
h
ows
h
ow many
b
onus points are awar
d
e
d
,
a
nd whether you’ve completed the achievement. The total points awarded
f
or your
CEJKGXGOGPVUCRRGCTCVVJGVQR;QWECPIGVDQPWURQKPVU
H
QTCURGEK
°
ECEJKGXGOGPV
on
l
y once
.
You may also be able to view achievements
f
rom within a game
.
Recent
l
y P
l
aye
d
S
ome games let you see which o
f
your
f
riends have recently played the game
.
See w
h
o’s recent
l
y p
l
aye
d
a game
:
Tap Games, tap a game, t
h
en tap Recent
l
y P
l
aye
d.
G
et in
f
ormation about a player
:
Tap a player’s name in the list
.
189
C
h
a
p
ter 24 Game
C
ente
r
Friend
s
G
ame Center puts you in contact with players around the world. You add
f
riends to
G
ame Center by making a request, or by accepting a request
f
rom another player
.
A
dd a
f
riend to Game Center
:
1
Ta
p
Frien
d
s or Re
q
uests
.
2
Ta
p
+, then enter a
f
riend’s email address or Game Center nickname
.
Matching addresses and names
f
rom your contacts appear as you type. Tap a contact
t
o inc
l
u
d
e t
h
at person in your request. Tap to
b
rowse your contacts
.
To add several
f
riends at once, enter additional contacts
.
3
Enter a message
f
or your request, then tap Send
.
In order to become a
f
riend, a person must accept your request
.
Other players might send you a request. I
f
you receive an alert, you can accept the
re
q
uest
f
rom there, or close it and res
p
ond to the re
q
uest later
f
rom the Re
q
uest
s
creen. A badge on the Requests button indicates the number o
f
outstanding
f
riend re
q
uests
.
Res
p
ond to a
f
riend re
q
uest
:
Tap Requests, tap the name o
f
the person making the
request, t
h
en tap Accept, Ignore, or Report a Pro
bl
em
.
When a player accepts another player’s request, they each become the other’s
f
riend
.
Frien
d
s’ names a
pp
ear on t
h
e Frien
d
s screen
.
G
et in
f
ormation about a
f
riend
:
Ta
p
the
f
riend’s name
.
190
C
h
a
p
ter 24 Game
C
ente
r

Se
a
rch
fo
r
a
f
rien
d:
Ta
p
the status bar to scroll to the to
p
o
f
the screen, then ta
p
the
UGCTEJ
°
GNFCPFUVCTVV[RKPI(TKGPFUYJQOCVEJ[QWTUGCTEJCRRGCTCU[QWV[RG
A
f
riend’s in
f
o page shows how many
f
riends (including you) the person has, the
PWODGTQ
H
FK
Ò
GTGPVICOGU[QWT
H
TKGPFJCURNC[GFCPFJQYOCP[CEJKGXGOGPVU[QWT
f
riend has completed. The in
f
o screen may also show
:
T
h
e games you’ve p
l
aye
d
toget
h
e
r
T
h
e games you
h
ave in commo
n
Other games your
f
riend has
You can tap a game in any o
f
the lists to see your position and your
f
riend’s position
on the overall leaderboard, and your respective accomplishments
f
or the game
.
Invite a
f
riend to play a game
:
Tap Friends, tap the
f
riend’s name, tap a game, then
t
ap P
l
a
y
. See
“
P
l
a
y
ing Games
”
on pag
e
186
.
Remove a
f
riend
:
Ta
p
Friends, ta
p
a name, then ta
p
Un
f
riend and ta
p
Remove
.
+
H
CRNC
[
GTKUQ
Ò
GPUKXGQTGZJKDKVUKPCRRTQRTKCVGDGJCXKQT
[
QWECPTGRQTVVJGRTQDNGO
Re
p
ort a
p
roblem with a
f
riend
:
Ta
p
Friends, ta
p
the
f
riend’s name, then ta
p
“Re
p
ort a
Pro
bl
em.” Descri
b
e t
h
e
p
ro
bl
em, t
h
en ta
p
Re
p
ort to sen
d
t
h
e re
p
ort
.
+
H
[QWVWTPQ
Ò
/WNVKRNC[GT)COGUKP5GVVKPIU[QWECP¨VUGPFQTTGEGKXGKPXKVCVKQPUVQ
p
l
a
y
games. See
“
R
estr
i
ct
i
ons
”
on pag
e
203
.
191
C
h
a
p
ter 24 Game
C
ente
r

Your Status and Account In
f
ormatio
n
The Me screen summarizes in
f
ormation about your
f
riends, your games, and your
a
c
h
ievements
.
6JGVGZV
°
GNFKPVJGEGPVGTQ
H
VJGUETGGPNGVU[QWGPVGT[QWTEWTTGPVUVCVWUOGUUCIG
Your status appears a
l
ong wit
h
your nic
k
name in ot
h
er p
l
ayers’ Frien
d
s screens
.
C
h
ange your status
:
6CRVJGUVCVWU
°
GNFCPFWUGVJGMG[DQCTFVQGPVGTQTWRFCVG
your s
t
a
t
us
.
View
y
our account in
f
ormation
:
Ta
p
t
h
e account
b
anner, t
h
en ta
p
View Account
.
You can change or update the
f
ollowing settings
:
Nic
k
nam
e
A
ll
ow
g
ame invites
Fin
d
Me By Emai
l
Your mail address
f
or Game Cente
r
A
dd
itiona
l
emai
l
a
dd
resses
9JGP[QW
°
PKUJVCR&QPG
;QWECPCNUQUKIPQWVCPFUKIPKPVQCFK
Ò
GTGPVCEEQWPVQTETGCVGCPGYCEEQWPV
S
i
gn out
:
Tap t
h
e account
b
anner, t
h
en tap Sign Out
.
To sign in to anot
h
er account, enter your username an
d
passwor
d
, t
h
en tap Sign In. To
create a new account, ta
p
Create New Account and
f
ollow the onscreen instructions
.
192
C
h
a
p
ter 24 Game
C
ente
r

Sett
i
ng
s
2
5
5GVVKPIUCNNQYU[QWVQEWUVQOK\GK2JQPGCRRUUGVVJGFCVGCPFVKOGEQP
°
IWTG[QWT
network connection, and enter other
p
re
f
erences
f
or iPhone
.
Airp
l
ane Mo
de
Air
p
lane mode disables the wireless
f
eatures o
f
iPhone to reduce
p
otential
inter
f
erence with aircra
f
t o
p
eration and other electrical e
q
ui
p
ment
.
Turn on air
pl
ane mo
d
e
:
Tap Settings an
d
turn airp
l
ane mo
d
e on
.
W
h
en air
pl
ane mo
d
e is on,
app
ears in the status bar at the to
p
o
f
the screen. No
phone, radio, Wi-Fi, or Bluetooth signals are emitted
f
rom iPhone and GPS reception is
VWTPGFQ
Ò
FKUCDNKPIOCP[Q
H
K2JQPG¨U
H
GCVWTGU;QWYQP¨VDGCDNGVQ
Ma
k
e or receive
ph
one ca
ll
s
Ma
k
e or receive FaceTime vi
d
eo ca
ll
s
G
et visua
l
voicemai
l
S
en
d
or receive emai
l
Br
o
wse the Internet
S
ync your contacts, ca
l
en
d
ars, or
b
oo
k
mar
k
s (Mo
b
i
l
eMe on
l
y) wit
h
Mo
b
i
l
eMe or
Microso
f
t Exchang
e
S
en
d
or receive text or MMS messages
S
tream YouTu
b
e vi
d
eos
G
et stoc
k
q
uotes
G
et ma
p
l
ocations
G
et weat
h
er re
p
orts
Use t
h
e iTunes Store or t
h
e A
pp
Stor
e
Use Game
C
ente
r
193

If allowed by the aircraft operator and applicable laws and regulations, you can
continue to use iPhone to:
Listen to music and watch videos
Listen to visual voicemail previously received
Check your calendar
Take or view photos or video (iPhone 4 or later)
Hear alarms
Use the stopwatch or timer
Use the calculator
Take notes
Record voice memos
Use Compass
Read text messages and email messages stored on iPhone
If Wi-Fi is available and allowed by the aircraft operator and applicable laws and
regulations, you can turn Wi-Fi back on and:
Make or receive FaceTime video calls
Send and receive email
Browse the Internet
Sync your contacts, calendars, and bookmarks (MobileMe only) with MobileMe and
Microsoft Exchange
Stream YouTube videos
Get stock quotes
Get map locations
Get weather reports
Use the iTunes Store or the App Store
Use Game Center
You may also be allowed to turn on Bluetooth and use Bluetooth devices with iPhone.
194 Chapter 25 Settings

Wi-Fi
Wi-Fi settings determine whether iPhone uses local Wi-Fi networks to connect to the
+PVGTPGV+HPQ9K(KPGVYQTMUCTGCXCKNCDNGQT[QW¨XGVWTPGF9K(KQÒVJGPK2JQPG
connects to the Internet via your cellular data network, when available.
6WTP9K(KQPQTQÒ%JQQUG9K(KCPFVWTP9K(KQPQTQÒ
Join a Wi-Fi network: Choose Wi-Fi, wait a moment as iPhone detects networks in
range, then select a network. If necessary, enter a password and tap Join (networks
that require a password appear with a lock icon).
Once you join a Wi-Fi network manually, iPhone automatically joins it whenever the
network is in range. If more than one previously used network is in range, iPhone joins
the one last used.
When iPhone is joined to a Wi-Fi network, the Wi-Fi icon in the status bar at the top
of the screen shows signal strength. The more bars you see, the stronger the signal.
Set iPhone to ask if you want to join a new network: Choose Wi-Fi and turn “Ask to
,QKP0GVYQTMU¦QPQTQÒ
When you’re trying to access the Internet, by using Safari or Mail for example, and you
aren’t in range of a Wi-Fi network you‘ve previously used, this option tells iPhone to
look for another network. iPhone displays a list of all available Wi-Fi networks that you
can choose from. (Networks that require a password appear with a lock icon.) If “Ask
VQ,QKP0GVYQTMU¦KUVWTPGFQÒ[QWOWUVOCPWCNN[LQKPCPGVYQTMVQEQPPGEVVQVJG
Internet when a previously used network or a cellular data network isn’t available.
Forget a network, so iPhone doesn’t join it: Choose Wi-Fi and tap next to a
network you’ve joined before. Then tap “Forget this Network.”
Join a closed Wi-Fi network: To join a Wi-Fi network that isn’t shown in the list of
scanned networks, choose Wi-Fi > Other, then enter the network name. If the network
requires a password, tap Security, tap the type of security the network uses, and enter
the password.
You must already know the network name, password, and security type to connect to
a closed network.
Some Wi-Fi networks may require you to enter or adjust additional settings, such as a
client ID or static IP address. Ask the network administrator which settings to use.
Adjust settings for connecting to a Wi-Fi network: Choose Wi-Fi, then tap next to
a network.
195
Chapter 25 Settings

V
PN
6JKUUGVVKPICRRGCTUYJGP[QWJCXG820EQP
°
IWTGFQPK2JQPGCNNQYKPI[QWVQVWTP
820
Q
P
Q
T
QÒ
5GG
¥
Netw
o
r
k
”
on pag
e
199
.
Persona
l
Hotspo
t
On a CDMA model, Personal Hotspot settings are available at the top level o
f
Settings,
a
n
d
at Genera
l
> Networ
k
settin
g
s. See
“
Networ
k
”
on pa
ge
199
.
0QVK
°
ECVKQP
U
T
h
is setting appears w
h
en you open an app (suc
h
as Game Center) t
h
at uses t
h
e
#RRNG2WUJ0QVK
°
ECVKQPUGTXKEG
2WUJPQVK
°
ECVKQPUCNGTV[QWVQPGYKP
H
QTOCVKQPGXGPYJGPVJGCRRKUP¨VTWPPKPI
0QVK
°
ECVKQPUXCT[D[CRRDWVOC[KPENWFGVGZVQTUQWPFCNGTVUCPFCPWODGTGFDCFIG
on t
h
e a
pp
icon on t
h
e Home screen
.
;QWECPVWTPPQVK
°
ECVKQPUQ
Ò
K
H
[QWFQP¨VYCPVVQDGPQVK
°
GFQTK
H
[QWYCPVVQ
conserve battery li
f
e
.
6WTPCNNPQVK
°
ECVKQPUQPQTQ
Ò
6C
R
0QVK
°
ECVKQPUVJGPVWTPPQVK
°
ECVKQPUQPQTQ
Ò
6WTPUQWPFUCNGTVUQTDCFIGUQPQTQ
Ò
H
QTCPCRR
6CR0QVK
°
ECVKQPUEJQQUGCPCRR
H
TQOVJGNKUVVJGPEJQQUGVJGV[RGUQ
H
PQVK
°
ECVKQP[QWYCPVVQVWTPQPQTQ
Ò
Carr
i
e
r
T
h
is setting appears on GSM mo
d
e
l
s w
h
en you’re outsi
d
e your carrier’s networ
k
a
nd other local carrier data networks are available to use
f
or your phone calls, visual
voicemai
l
, an
d
ce
ll
u
l
ar networ
k
Internet connections. You can ma
k
e ca
ll
s on
l
y on
carriers that have a roaming agreement with your carrier. Additional
f
ees may apply
.
Roaming c
h
arges may
b
e
b
i
ll
e
d
to you
b
y t
h
e ot
h
er carrier, t
h
roug
h
your carrier
.
For in
f
ormation about out-o
f
-network coverage and how to enable roaming, contact
your carrier or go to your carrier’s we
b
site
.
Se
l
ect a carrier
:
C
h
oose Carrier an
d
se
l
ect t
h
e networ
k
you want to use
.
Once you select a network, iPhone uses only that network. I
f
the network is
unavai
l
a
bl
e, “No service” appears on t
h
e iP
h
one screen an
d
you can’t ma
k
e or receive
ca
ll
s or visua
l
voicemai
l
, or connect to t
h
e Internet via ce
ll
u
l
ar
d
ata networ
k
. Set
Network Settings to Automatic to have iPhone select a network
f
or you
.
196
C
h
a
p
ter 25 Sett
i
ng
s

Sounds and the Ring/Silent Switch
Switch between ring and silent mode: Flip the Ring/Silent switch on the side of iPhone.
9JGPUGVVQUKNGPVK2JQPGFQGUP¨VRNC[CP[TKPICNGTVQTGÒGEVUUQWPFU+VFQGU
however, play alarms set using Clock.
Note: +PUQOGEQWPVTKGUQTTGIKQPUVJGUQWPFGÒGEVUHQT%COGTCCPF8QKEG/GOQUCTG
played even if the Ring/Silent switch is set to silent.
Set whether iPhone vibrates when you get a call: Choose Sounds. To set whether
iPhone vibrates in silent mode, turn Vibrate under Silent QPQTQÒ6QUGVYJGVJGT
iPhone vibrates in ring mode, turn Vibrate under Ring QPQTQÒ
Adjust the ringer and alerts volume: Choose Sounds and drag the slider. Or, if
“Change with Buttons” is turned on, use the volume buttons on the side of iPhone. The
volume buttons don’t change the ringer and alerts volume if a song or video is playing
or if you’re on a call.
Allow the volume buttons to change the ringer or alerts volume: Choose Sounds
and turn on “Change with Buttons.”
Set the ringtone: Choose Sounds > Ringtone.
5GVVJGCNGTVCPFGÒGEVUUQWPFU%JQQUG5QWPFUCPFVWTPKVGOUQPQTQÒWPFGT4KPI .
9JGPVJG4KPI5KNGPVUYKVEJKUUGVVQTKPIK2JQPGRNC[UUQWPFUHQTCNGTVUCPFGÒGEVUVJCV
are turned on.
You can set iPhone to play a sound whenever you:
Get a call
Get a text message
Get a voicemail message
Get an email message
Send an email message
Have an appointment that you’ve set to alert you
Lock iPhone
Type using the keyboard
Brightness
5ETGGPDTKIJVPGUUCÒGEVUDCVVGT[NKHG&KOVJGUETGGPVQGZVGPFVJGVKOGDGHQTG[QW
need to recharge iPhone, or use Auto-Brightness.
Adjust the screen brightness: Choose Brightness and drag the slider.
Set whether iPhone adjusts screen brightness automatically: Choose Brightness
CPFVWTP#WVQ$TKIJVPGUUQPQTQÒ+H#WVQ$TKIJVPGUUKUQPK2JQPGCFLWUVUVJGUETGGP
brightness for current light conditions using the built-in ambient light sensor.
197
Chapter 25 Settings

Wallpaper
Wallpaper settings let you set an image or photo as wallpaper for the Lock screen.
On iPhone 3GS or later, you can also set wallpaper for your Home screen. See “Adding
Wallpaper” on page 36.
General
General settings include network, sharing, security, and other iOS settings. You can also
°PFKPHQTOCVKQPCDQWV[QWTK2JQPGCPFTGUGVXCTKQWUK2JQPGUGVVKPIU
About
Choose General > About to get information about iPhone, including:
Name of your phone network
Number of songs, videos, photos, and apps
Total storage capacity
Space available
Software version
Carrier
Model and serial numbers
Wi-Fi and Bluetooth addresses
GSM Models: IMEI (International Mobile Equipment Identity) and ICCID (Integrated
%KTEWKV%CTF+FGPVK°GTQT5OCTV%CTF
CDMA Model:/'+&/QDKNG'SWKROGPV+FGPVK°GT
/QFGO°TOYCTGXGTUKQPQHVJGEGNNWNCTVTCPUOKVVGT
Legal information
Regulatory information
Usage
Show battery percentage (iPhone 3GS or later): Choose General > Usage and turn
Battery Percentage on.
See your usage statistics: Choose General > Usage. There, you can see:
Usage—Amount of time iPhone has been awake and in use since the last full
charge. iPhone is awake whenever you’re using it—including making or receiving
phone calls, using email, sending or receiving text messages, listening to music,
browsing the web, or using any other iPhone features. iPhone is also awake while
performing background tasks, such as fetching email messages.
Standby—Amount of time iPhone has been powered on since its last full charge,
including the time iPhone has been asleep.
Current period call time and lifetime call time.
Amount of data sent and received over the cellular data network.
198 Chapter 25 Settings

Reset your usage statistics: Choose General > Usage, then tap Reset Statistics to clear
the data and cumulative time statistics. The statistics for the amount of time iPhone
has been unlocked and in standby mode aren’t reset.
Network
7UG0GVYQTMUGVVKPIUVQEQP°IWTGC820XKTVWCNRTKXCVGPGVYQTMEQPPGEVKQPCEEGUU
9K(KUGVVKPIUQTVWTP&CVC4QCOKPIQPQTQÒ
6WTP)QPQTQÒ)5/OQFGNUChoose General > Network, then tap to turn 3G on
QTQÒ
Using 3G loads Internet data faster in some cases, but may decrease battery
RGTHQTOCPEG+H[QW¨TGOCMKPICNQVQHRJQPGECNNU[QWOC[YCPVVQVWTP)QÒVQ
extend battery performance.
6WTP%GNNWNCT&CVCQPQTQÒChoose General > Network, then turn Cellular Data on
QTQÒ
+H%GNNWNCT&CVCKUVWTPGFQÒ[QWYQP¨VDGCDNGVQCEEGUUVJG+PVGTPGVWPNGUU[QWLQKPC
Wi-Fi network. By default, Cellular Data is turned on.
6WTP&CVC4QCOKPIQPQTQÒChoose General > Network, then turn Data Roaming
QPQTQÒ
Data Roaming turns on Internet and visual voicemail access over a cellular data
network when you’re in an area not covered by your carrier’s network. For example,
YJGP[QW¨TGVTCXGNKPI[QWECPVWTPQÒ&CVC4QCOKPIVQCXQKFRQVGPVKCNTQCOKPI
EJCTIGU$[FGHCWNV&CVC4QCOKPIKUVWTPGFQÒ
6WTP+PVGTPGV6GVJGTKPIQPQTQÒ)5/OQFGNUChoose General > Network >
+PVGTPGV6GVJGTKPIVJGPVWTP+PVGTPGV6GVJGTKPIQPQTQÒ
6WTP2GTUQPCN*QVURQVQPQTQÒ%&/#OQFGNChoose General > Network >
2GTUQPCN*QVURQVVJGPVWTP2GTUQPCN*QVURQVQPQTQÒ
See “Personal Hotspot” on page 24.
#FFCPGY820EQP°IWTCVKQPChoose General > Network > VPN > Add VPN
%QP°IWTCVKQP
VPNs used within organizations allow you to communicate private information
UGEWTGN[QXGTCPQPRTKXCVGPGVYQTM;QWOC[PGGFVQEQP°IWTG820HQTGZCORNGVQ
access your work email on iPhone.
iPhone can connect to VPNs that use the L2TP, PPTP, or Cisco IPSec protocols. VPN
works over both Wi-Fi and cellular data network connections.
Ask your network administrator which settings to use. In most cases, if you’ve set up
VPN on your computer, you can use the same VPN settings for iPhone.
Once you enter VPN settings, a VPN switch appears in the Settings menu that you can
WUGVQVWTP820QPQTQÒ
820OC[CNUQDGCWVQOCVKECNN[UGVWRD[CEQP°IWTCVKQPRTQ°NG5GG¥Connecting to
the Internet” on page 22.
199
Chapter 25 Settings

%JCPIGC820EQP°IWTCVKQPChoose General > Network > VPN and tap the
EQP°IWTCVKQP[QWYCPVVQWRFCVG
6WTP820QPQTQÒ%JQQUG820VJGPVCRVQVWTP820QPQTQÒ
&GNGVGC820EQP°IWTCVKQPChoose General > Network > VPN, tap the blue
CTTQYPGZVVQVJGEQP°IWTCVKQPPCOGVJGPVCR&GNGVG820CVVJGDQVVQOQHVJG
EQP°IWTCVKQPUETGGP
Bluetooth
iPhone can connect wirelessly to Bluetooth devices such as headsets, headphones, and
car kits for music listening and hands-free talking. See “Using a Bluetooth Device for
Calls”on page 71.
;QWECPCNUQEQPPGEVVJG#RRNG9KTGNGUU-G[DQCTFXKC$NWGVQQVJ5GG¥Using an Apple
9KTGNGUU-G[DQCTF” on page 44.
6WTP$NWGVQQVJQPQTQÒ%JQQUG)GPGTCN $NWGVQQVJCPFVWTP$NWGVQQVJQPQTQÒ
Location Services
Location services lets apps such as Maps, Camera, Compass, and third-party location-
based apps gather and use data indicating your location. The location data collected
D[#RRNGKUPQVEQNNGEVGFKPCHQTOVJCVRGTUQPCNN[KFGPVK°GU[QW;QWTCRRTQZKOCVG
location is determined using available information from cellular network data,
local Wi-Fi networks (if you have Wi-Fi turned on), and GPS (may not be available in
all locations).
When an app is using location services, appears in the status bar.
Every app that uses location services appears in the Location Services settings screen,
UJQYKPIYJGVJGTNQECVKQPUGTXKEGUKUVWTPGFQPQTQÒHQTVJCVCRR appears for each
app that has requested your location within the last 24 hours. You can turn location
UGTXKEGUQÒHQTUQOGQTHQTCNNCRRUKH[QWFQP¨VYCPVVQWUGVJKUHGCVWTG+H[QWVWTP
NQECVKQPUGTXKEGUQÒ[QW¨TGRTQORVGFVQVWTPKVQPCICKPVJGPGZVVKOGCPCRRVTKGUVQ
use this feature.
6WTPNQECVKQPUGTXKEGUQPQTQÒHQTCNNCRRUChoose General > Location Services and
VWTPNQECVKQPUGTXKEGUQPQTQÒ
6WTPNQECVKQPUGTXKEGUQPQTQÒHQTUQOGCRRU6WTPNQECVKQPUGTXKEGUQPQTQÒHQTVJG
individual apps.
If you have third-party apps on iPhone that use location services, review the third
party’s terms and privacy policy to understand how that app uses your location data.
6QEQPUGTXGDCVVGT[NKHGVWTPNQECVKQPUGTXKEGUQÒYJGP[QW¨TGPQVWUKPIKV
200 Chapter 25 Settings

Home Button
Home Button settings on iPhone 3G let you specify what happens when you double-
click the Home button. The “Spotlight Search” settings, described below, are also
available in the Home Button settings on iPhone 3G.
Set the action performed when you double-click the Home button: Choose General >
Home Button and set the action. You can set double-clicking the Home button to go to:
Home screen
Search screen
Phone Favorites
Camera app
iPod app
Set whether double-clicking the Home button shows iPod controls when playing
music: Choose General > Home Button, then tap the switch to turn iPod controls on
QTQÒ6JKUHGCVWTGQXGTTKFGUVJGCEVKQPHQTFQWDNGENKEMKPIVJG*QOGDWVVQPCPFYQTMU
GXGPKHVJGFKURNC[KUVWTPGFQÒQTK2JQPGKUNQEMGF
Spotlight Search
The Spotlight Search setting lets you specify the content areas searched by Search,
and rearrange the order of the results.
Set which content areas are searched by Search:
1Choose General > Spotlight Search (on iPhone 3G, choose General > Home >
Spotlight Search).
2Tap an item to select or deselect it.
All search categories are selected by default.
Set the order of search result categories:
1Choose General > Spotlight Search (on iPhone 3G, choose General > Home >
Spotlight Search).
2Touch next to an item, then drag up or down.
Auto-Lock
.QEMKPIK2JQPGVWTPUQÒVJGFKURNC[VQUCXG[QWTDCVVGT[CPFVQRTGXGPVWPKPVGPFGF
operation of iPhone. You can still receive calls and text messages, and you can adjust
the volume and use the mic button on the iPhone earphones when listening to music
or on a call.
Set the amount of time before iPhone locks: Choose General > Auto-Lock, then
choose a time.
201
Chapter 25 Settings

Passcode Lock
By default, iPhone doesn’t require you to enter a passcode to unlock it.
On iPhone 3GS or later, setting a passcode enables data protection. See “Security
Features”on page 54.
Important: On iPhone 3GS, you must also restore iOS software to enable data
protection. See “Restoring iPhone” on page 257.
Set a passcode: Choose General > Passcode Lock and enter a 4-digit passcode, then
enter the passcode again to verify it. iPhone then requires you to enter the passcode
to unlock it or to display the passcode lock settings.
6WTPRCUUEQFGNQEMQÒChoose General > Passcode Lock, enter your passcode, and
VCR6WTP2CUUEQFG1ÒVJGPGPVGT[QWTRCUUEQFGCICKP
Change the passcode: Choose General > Passcode Lock, enter your passcode,
and tap Change Passcode. Enter your passcode again, then enter and reenter your
new passcode.
If you forget your passcode, you must restore the iPhone software. See “Updating and
Restoring iPhone Software” on page 256.
Set how long before your passcode is required: Choose General > Passcode Lock and
enter your passcode. Tap Require Passcode, then select how long iPhone can be locked
before you need to enter a passcode to unlock it.
6WTP5KORNG2CUUEQFGQPQTQÒChoose General > Passcode Lock, then turn Simple
2CUUEQFGQPQTQÒ
#UKORNGRCUUEQFGKUCHQWTFKIKVPWODGT6QKPETGCUGUGEWTKV[VWTPQÒ5KORNG2CUUEQFG
and use a longer passcode with a combination of numbers, letters, punctuation, and
special characters.
6WTP8QKEG&KCNQPQTQÒK2JQPG)5QTNCVGTChoose General > Passcode Lock, then
VWTP8QKEG&KCNQPQTQÒ
Erase data after ten failed passcode attempts: Choose General > Passcode Lock,
enter your passcode, and tap Erase Data to turn it on.
After ten failed passcode attempts, your settings are reset to their defaults and all your
information and media are erased:
On iPhone 3GS or later: by removing the encryption key to the data (which is
encrypted using 256-bit AES encryption)
On iPhone 3G: by overwriting the data
Important: You can’t use iPhone while data is being overwritten. This can take up to
two hours or more, depending on the model and storage capacity of your iPhone. (On
iPhone 3GS or later, the encryption key is removed immediately.)
202 Chapter 25 Settings
Restr
i
ct
i
on
s
You can set restrictions
f
or the use o
f
some a
pp
s and
f
or iPod content on iPhone. For
GZCORNGRCTGPVUECPTGUVTKEVGZRNKEKVOWUKE
H
TQODGKPIUGGPQPRNC[NKUVUQTVWTPQ
Ò
YouTu
b
e access entire
l
y
.
Turn on restr
i
ct
i
ons
:
1
C
h
oose Genera
l
> Restrictions, t
h
en ta
p
Ena
bl
e Restrictions
.
2
Enter a
f
our-digit passcode
.
3
Reenter t
h
e
p
assco
d
e
.
6WTPQ
Ò
TGUVTKEVKQPU
C
h
oose Genera
l
> Restrictions, t
h
en enter t
h
e
p
assco
d
e. Ta
p
Disa
bl
e Restrictions, t
h
en reenter t
h
e
p
assco
d
e
.
I
mportant
:
I
f
you
f
orget your passcode, you must restore the iPhone so
f
tware
f
rom
iTunes. See
“
Updating and Restoring iPhone So
f
twar
e
”
on pag
e
2
5
6
.
Set a
pp
restr
i
ct
i
ons
:
S
et t
h
e restrictions you want
b
y tapping in
d
ivi
d
ua
l
contro
l
s on or
Q
Ò
$[FG
H
CWNVCNNEQPVTQNUCTGQPPQVTGUVTKEVGF6CRCPKVGOVQVWTPKVQ
Ò
CPFTGUVTKEV
i
ts use
.
Sa
f
ar
i
S
a
f
ari is disabled and its icon is removed
f
rom the Home screen. You cannot use
S
a
f
ari to browse the web or access web clips. Other third-party apps may allow web
browsing even i
f
Sa
f
ari is disabled
.
YouTu
be
YouTube is disabled and its icon is removed
f
rom the Home screen
.
C
amera
Camera is disabled and its icon is removed
f
rom the Home screen. You cannot take
ph
otos
.
FaceT
i
m
e
You cannot ma
k
e or receive FaceTime vi
d
eo ca
ll
s (iP
h
one 4)
.
i
Tune
s
The iTunes Store is disabled and its icon is removed
f
rom the Home screen. You cannot
p
review,
p
urc
h
ase, or
d
own
l
oa
d
content
.
Insta
ll
ing
Apps
The A
pp
Store is disabled and its icon is removed
f
rom the Home screen. You cannot
insta
ll
a
pp
s on iP
h
one
.
De
l
eting
Apps
You cannot delete a
pp
s
f
rom iPhone
.
d
oesn’t appear on app icons w
h
en you’re
customizing t
h
e Home screen
.
203
C
h
a
p
ter 25 Sett
i
ng
s

Locat
i
o
n
T
h
e current Location Services settings an
d
t
h
e Fin
d
M
y
iP
h
one setting (in Mo
b
i
l
eMe
accounts in ”Mai
l
, Contacts, Ca
l
en
d
ars”) are
l
oc
k
e
d
an
d
cannot
b
e c
h
ange
d.
A
ccount
s
The current Mail, Contacts, Calendar settings are locked and you cannot add, modi
f
y, or
d
e
l
ete accounts
.
Restrict
p
urc
h
ases wit
h
in a
pp
s
:
6WTPQ
Ò
+P#RR2WTEJCUGU9JGPGPCDNGFVJKU
H
GCVWTG
a
llows you to purchase additional content or functionality within apps downloaded
f
rom the A
pp
Store
.
Set content restrictions
:
Tap Ratings For, then select a country
f
rom the list. You can
t
hen set restrictions using that country’s ratings system
f
or the
f
ollowing categories
o
f
content
:
Music & Po
d
casts
Mov
i
es
TV S
h
ows
App
s
In the United States
f
or example, to allow only movies rated PG or below, tap Movies,
t
hen select PG
f
rom the list
.
Content t
h
at you restrict won’t appear on iP
h
one
.
N
ote
:
Not a
ll
countries or regions
h
ave rating s
y
stems
.
Restrict mu
l
tip
l
ayer games
:
6WTPQ
Ò
/WNVKRNC[GT)COGU
9JGP/WNVKRNC[GT)COGUKUVWTPGFQ
Ò
[QWECP¨VTGSWGUVCOCVEJUGPFQTTGEGKXG
invitations to play games, or add
f
riends in Game Center
.
Restrict adding
f
riends
:
6WTPQ
Ò
#FFKPI(TKGPFU
9JGP#FFKPI(TKGPFUKUQ
Ò
[QWECP¨VOCMGQTTGEGKXG
H
TKGPFTGSWGUVUKP)COG%GPVGT
I
f
Multiplayer Games is turned on, you can continue to play with existing
f
riends
.
Date an
d
Tim
e
These settings apply to the time shown in the status bar at the top o
f
the screen, and
in wor
ld
c
l
oc
k
s an
d
ca
l
en
d
ars
.
Set w
h
et
h
er iP
h
one s
h
ows 24-
h
our time or 12-
h
our time
:
C
h
oose Genera
l
> Date
6KOGVJGPVWTP*QWT6KOGQPQTQ
Ò
*QWT6KOGOC[PQVDGCXCKNCDNGKPCNN
countries or regions.
)
Set whether iPhone updates the date and time automatically
:
Choose General >
&CVG6KOGVJGPVWTP5GV#WVQOCVKECNN[QPQTQ
Ò
I
f
iPhone is set to update the time automatically, it gets the correct time over the
cellular network and updates it
f
or the time zone you’re in
.
20
4C
h
a
p
ter 25 Sett
i
ng
s

Some carriers don’t support network time in all locations. If you’re traveling, iPhone
may not be able to automatically set the local time.
Set the date and time manually: Choose General > Date & Time, then turn Set
#WVQOCVKECNN[QÒ6CR6KOG<QPGCPFGPVGTVJGPCOGQHCOCLQTEKV[KP[QWTVKOG\QPG
Tap the “Date & Time” button, then tap “Set Date & Time” and enter the date and time.
Keyboard
6WTPCWVQECRKVCNK\CVKQPQPQTQÒ%JQQUG)GPGTCN -G[DQCTFCPFVWTP
#WVQ%CRKVCNK\CVKQPQPQTQÒ
By default, iPhone capitalizes words after you type sentence-ending punctuation
or a return character.
6WTPCWVQEQTTGEVKQPQPQTQÒ%JQQUG)GPGTCN -G[DQCTFCPFVWTP#WVQ%QTTGEVKQP
QPQTQÒ
Normally, if the default keyboard for the language you select has a dictionary,
iPhone suggests corrections or completed words as you type.
6WTPURGNNEJGEMKPIQPQTQÒ%JQQUG)GPGTCN -G[DQCTFCPFVWTP%JGEM5RGNNKPI
QPQTQÒ
Spell checking underlines misspelled words in text you type. Tap the underlined
word to see suggested corrections. Spell checking is on by default.
Set whether caps lock is enabled: %JQQUG)GPGTCN -G[DQCTFCPFVWTP'PCDNG%CRU
.QEMQPQTQÒ
If caps lock is enabled and you double-tap the Shift key on the keyboard, all letters
you type are uppercase. The Shift key turns blue when caps lock is on.
6WTPVJG¥¦UJQTVEWVQPQTQÒ%JQQUG)GPGTCN -G[DQCTFCPFVWTP¥¦5JQTVEWVQP
QTQÒ
The “.” shortcut lets you double-tap the space bar to enter a period followed by a
space when you’re typing. It’s on by default.
Add international keyboards:
1 %JQQUG)GPGTCN -G[DQCTF +PVGTPCVKQPCN-G[DQCTFU
The number of active keyboards appears before the right arrow.
2 6CR¥#FF0GY-G[DQCTF¦VJGPEJQQUGCMG[DQCTF
You can add as many keyboards as you want. To learn about using international
keyboards, see “+PVGTPCVKQPCN-G[DQCTFU” on page 40.
Edit your keyboard list: %JQQUG)GPGTCN -G[DQCTF +PVGTPCVKQPCN-G[DQCTFUVJGP
tap Edit and do one of the following:
To delete a keyboard, tap , then tap Delete.
To reorder the list, drag next to a keyboard to a new place in the list.
205
Chapter 25 Settings

Change a keyboard’s layout: +P5GVVKPIUEJQQUG)GPGTCN -G[DQCTF +PVGTPCVKQPCN
-G[DQCTFUCPFUGNGEVCMG[DQCTF;QWECPOCMGUGRCTCVGUGNGEVKQPUHQTDQVJVJGQP
screen software and external hardware keyboards for each language.
The software keyboard layout determines the layout of the keyboard that appears on
the iPhone screen. The hardware keyboard layout determines the layout of an Apple
9KTGNGUU-G[DQCTFEQPPGEVGFVQK2JQPG
The Edit User Dictionary setting appears when you have any of the following
keyboards turned on:
%JKPGUG5KORNK°GF2KP[KP
Chinese - Traditional (Pinyin)
Chinese - Traditional (Zhuyin)
Japanese (Romaji)
,CRCPGUG6GP-G[
Add a word to the dictionary: +P5GVVKPIUEJQQUG)GPGTCN -G[DQCTF 'FKV7UGT
&KEVKQPCT[6CRVCRVJG9QTF°GNFCPFGPVGTVJGYQTFVJGPVCRVJG;QOK2KP[KPQT
<JW[KP°GNFCPFGPVGTVJGKPRWV
You can have multiple inputs for each word, depending on the keyboards that are
turned on.
See “+PVGTPCVKQPCN-G[DQCTFU” on page 40.
International
7UG+PVGTPCVKQPCNUGVVKPIUVQUGVVJGNCPIWCIGHQTK2JQPGVWTPMG[DQCTFUHQTFKÒGTGPV
NCPIWCIGUQPQTQÒCPFUGVVJGFCVGVKOGCPFVGNGRJQPGPWODGTHQTOCVUHQT[QWT
country or region.
Set the language for iPhone: Choose General > International > Language, choose the
language you want to use, then tap Done.
Set the Voice Control language for iPhone: Choose General > International > Voice
Control, then choose the language you want to use (iPhone 3GS or later).
Add international keyboards:
1 %JQQUG)GPGTCN +PVGTPCVKQPCN -G[DQCTFU
The number of active keyboards appears next to the right arrow.
2 6CR¥#FF0GY-G[DQCTF¦VJGPEJQQUGCMG[DQCTF
You can add as many keyboards as you want. To learn about using international
keyboards, see “+PVGTPCVKQPCN-G[DQCTFU” on page 40.
Edit your keyboard list: %JQQUG)GPGTCN +PVGTPCVKQPCN -G[DQCTFUVJGPVCR'FKV
and do one of the following:
To delete a keyboard, tap , then tap Delete.
To reorder the list, drag next to a keyboard to a new place in the list.
206 Chapter 25 Settings

Change a keyboard layout: +P5GVVKPIUEJQQUG)GPGTCN +PVGTPCVKQPCN -G[DQCTFU
and select a keyboard. You can make separate selections for both the on-screen
software and external hardware keyboards for each language.
The software keyboard layout determines the layout of the keyboard that appears on
the iPhone screen. The hardware keyboard layout determines the virtual layout of an
#RRNG9KTGNGUU-G[DQCTFEQPPGEVGFVQK2JQPG
Set the date, time, and telephone number formats: Choose General > International >
Region Format, and choose your region.
The Region Format also determines the language used for the days and months that
appear in native iPhone apps.
Set the calendar format: Choose General > International > Calendar, and choose
the format.
Accessibility
To turn on accessibility features (iPhone 3GS or later), choose Accessibility and choose
the features you want. See Chapter 29,“Accessibility,” on page 235.
2TQ°NGU
6JKUUGVVKPICRRGCTUKH[QWKPUVCNNQPGQTOQTGRTQ°NGUQPK2JQPG6CR2TQ°NGUVQUGG
KPHQTOCVKQPCDQWVVJGRTQ°NGU[QW¨XGKPUVCNNGF
Resetting iPhone
Reset all settings: Choose General > Reset and tap Reset All Settings.
All your preferences and settings are reset. Information (such as contacts and
ECNGPFCTUCPFOGFKCUWEJCUUQPIUCPFXKFGQUCTGP¨VCÒGEVGF
Erase all content and settings: Connect iPhone to your computer or a power adapter.
Choose General > Reset and tap “Erase All Content and Settings.”
This resets all settings to their defaults and erases all your information and media:
On iPhone 3GS or later: by removing the encryption key to the data (which is
encrypted using 256-bit AES encryption)
On iPhone 3G: by overwriting the data
Important: You can’t use iPhone while data is being overwritten. This can take up to
two hours or more, depending on the model and storage capacity of your iPhone. (On
iPhone 3GS or later, the encryption key is removed immediately.)
Reset network settings: Choose General > Reset and tap Reset Network Settings.
When you reset network settings, your list of previously used networks and VPN
UGVVKPIUPQVKPUVCNNGFD[CEQP°IWTCVKQPRTQ°NGCTGTGOQXGF9K(KKUVWTPGFQÒCPF
then back on, disconnecting you from any network you’re on. The Wi-Fi and “Ask to
Join Networks” settings are left turned on.
207
Chapter 25 Settings

6QTGOQXG820UGVVKPIUKPUVCNNGFD[CEQP°IWTCVKQPRTQ°NGEJQQUG5GVVKPIU )GPGTCN
2TQ°NGVJGPUGNGEVVJGRTQ°NGCPFVCR4GOQXG
Reset the keyboard dictionary: %JQQUG)GPGTCN 4GUGVCPFVCR4GUGV-G[DQCTF
Dictionary.
You add words to the keyboard dictionary by rejecting words iPhone suggests as you
type. Tap a word to reject the correction and add the word to the keyboard dictionary.
Resetting the keyboard dictionary erases all words you’ve added.
Reset the Home screen layout: Choose General > Reset and tap Reset Home Screen
Layout.
Reset location warnings: Choose General > Reset and tap Reset Location Warnings.
Location warnings are requests made by apps (such as Camera, Compass, and Maps)
VQWUGNQECVKQPUGTXKEGUK2JQPGRTGUGPVUCNQECVKQPYCTPKPIHQTCPCRRVJG°TUVVKOG
the app makes a request to use location services. If you tap Cancel in response to the
request, the request isn’t presented again. To reset the location warnings so that you
get a request for each app again, tap Reset Location Warnings.
Mail, Contacts, Calendars
7UG/CKN%QPVCEVU%CNGPFCTUUGVVKPIUVQUGVWRCEEQWPVUCPFVWTPQPURGEK°ECEEQWPV
services (such as mail, contacts, calendars, bookmarks, and notes) for iPhone:
Microsoft Exchange (mail, contacts, and calendars)
MobileMe (mail, contacts, calendars, bookmarks, notes, and Find My iPhone)
Google (mail, calendars, and notes)
Yahoo! (mail, calendars, and notes)
AOL (mail and notes)
Other POP and IMAP mail systems
LDAP or CardDAV accounts for Contacts
CalDAV or iCalendar (.ics) accounts for Calendars
Accounts
6JG#EEQWPVUUGEVKQPNGVU[QWUGVWRCEEQWPVUQPK2JQPG6JGURGEK°EUGVVKPIUVJCV
appear depend on the type of account you’re setting up. Your service provider or
system administrator should be able to provide the information you need to enter.
For more information, see:
“Adding Mail, Contacts, and Calendar Accounts” on page 25
“Adding Contacts” on page 219
“Subscribing to Calendars” on page 120
Change an account’s settings: Choose “Mail, Contacts, Calendars,” choose an account,
then make the changes you want.
208 Chapter 25 Settings

Changes you make to an account’s settings on iPhone aren’t synced to your computer,
UQ[QWECPEQP°IWTG[QWTCEEQWPVUVQYQTMYKVJK2JQPGYKVJQWVCÒGEVKPIVJGCEEQWPV
settings on your computer.
Stop using an account service: Choose “Mail, Contacts, Calendars,” choose an account,
VJGPVWTPCPCEEQWPVUGTXKEGUWEJCU/CKN%CNGPFCTUQT0QVGUQÒ
+HCPCEEQWPVUGTXKEGKUQÒK2JQPGFQGUP¨VFKURNC[QTU[PEKPHQTOCVKQPYKVJVJCV
account service until you turn it back on.
Adjust advanced settings: Choose “Mail, Contacts, Calendars,” choose an account,
then do one of the following:
To set whether drafts, sent messages, and deleted messages are stored on iPhone or
remotely on your email server (IMAP accounts only), tap Advanced and choose Drafts
Mailbox, Sent Mailbox, or Deleted Mailbox.
If you store messages on iPhone, you can see them even when iPhone isn’t
connected to the Internet.
To set how long before messages are removed permanently from Mail on iPhone, tap
Advanced and tap Remove, then choose a time: Never, or after one day, one week,
or one month.
To adjust email server settings, tap Host Name, User Name, or Password under
Incoming Mail Server or Outgoing Mail Server. Ask your network administrator or
Internet service provider for the correct settings.
To adjust SSL and password settings, tap Advanced. Ask your network administrator or
Internet service provider for the correct settings.
Delete an account from iPhone: Choose “Mail, Contacts, Calendars,” choose an
account, then scroll down and tap Delete Account.
Deleting an account means you can no longer access the account with your iPhone.
All email and the contacts, calendar, and bookmark information synced with the
account are removed from iPhone. However, deleting an account doesn’t remove the
account or its associated information from your computer.
Fetch New Data
6JKUUGVVKPINGVU[QWVWTP2WUJQPQTQÒHQT/QDKNG/G/KETQUQHV'ZEJCPIG;CJQQ
and any other push accounts on iPhone. Push accounts deliver new information to
iPhone whenever new information appears on the server (some delays may occur).
;QWOKIJVYCPVVQVWTP2WUJQÒVQUWURGPFFGNKXGT[QHGOCKNCPFQVJGTKPHQTOCVKQPQT
to conserve battery life.
9JGP2WUJKUQÒCPFYKVJCEEQWPVUVJCVFQP¨VUWRRQTVRWUJFCVCECPUVKNNDG
fetched—that is, iPhone can check with the server and see if new information is
available. Use the Fetch New Data setting to determine how often data is requested.
For optimal battery life, don’t fetch too often.
209
Chapter 25 Settings

Turn Push on: Choose “Mail, Contacts, Calendars” > Fetch New Data, then tap to turn
Push on.
Set the interval to fetch data: Choose “Mail, Contacts, Calendars” > Fetch New Data,
then choose how often you want to fetch data for all accounts.
To conserve battery life, fetch less frequently.
Setting Push to OFF (or setting Fetch to Manually on the Fetch New Data screen)
overrides individual account settings.
Mail
Mail settings, except where noted, apply to all accounts you’ve set up on iPhone.
6QVWTPCNGTVUUQWPFUHQTPGYQTUGPVOCKNQPQTQÒWUGVJG5QWPFUUGVVKPIU
Set the number of messages shown on iPhone: Choose “Mail, Contacts, Calendars” >
Show, then choose a setting.
Choose to see the most recent 25, 50, 75, 100, or 200 messages. To download
additional messages when you’re in Mail, scroll to the bottom of your inbox and tap
Load More Messages.
Note: For Microsoft Exchange accounts, choose “Mail, Contacts, Calendars” and choose
the Exchange account. Tap “Mail days to sync” and choose the number of days of mail
you want to sync with the server.
Set how many lines of each message are shown in the message list: Choose “Mail,
Contacts, Calendars” > Preview, then choose a setting.
;QWECPEJQQUGVQUGGWRVQ°XGNKPGUQHGCEJOGUUCIG6JCVYC[[QWECPUECPCNKUVQH
messages in a mailbox and get an idea of what each message is about.
Set a minimum font size for messages: Choose “Mail, Contacts, Calendars” > Minimum
Font Size, then choose Small, Medium, Large, Extra Large, or Giant.
Set whether iPhone shows To and Cc labels in message lists: Choose “Mail, Contacts,
%CNGPFCTU¦VJGPVWTP5JQY6Q%E.CDGNQPQTQÒ
If Show To/Cc Label is on, or next to each message in a list indicates whether
the message was sent directly to you or you received a copy.
5GVYJGVJGTK2JQPGEQP°TOUVJCV[QWYCPVVQFGNGVGCOGUUCIGChoose “Mail,
%QPVCEVU%CNGPFCTU¦CPFKPVJG/CKNUGVVKPIUVWTP#UM$GHQTG&GNGVKPIQPQTQÒ
Set whether iPhone automatically loads remote images: Choose “Mail, Contacts,
%CNGPFCTU¦VJGPVWTP.QCF4GOQVG+OCIGUQPQTQÒ
Set whether mail messages are organized by thread: Choose “Mail, Contacts,
%CNGPFCTU¦VJGPVWTP1TICPK\G$[6JTGCFQPQTQÒ
Set whether iPhone sends you a copy of every message you send: Choose “Mail,
%QPVCEVU%CNGPFCTU¦VJGPVWTP#NYC[U$EE/[UGNHQPQTQÒ
210 Chapter 25 Settings

Add a signature to your messages: Choose “Mail, Contacts, Calendars” > Signature,
then type a signature.
You can set iPhone to add a signature—your favorite quote, or your name, title, and
phone number, for example—to the bottom of every message you send.
Set the default email account: Choose “Mail, Contacts, Calendars” > Default Account,
then choose an account.
This setting determines which of your accounts an email message is sent from when
you create a message from another iPhone app—for example, when you send a photo
from Photos or tap the email address of a business in Maps. To send the message from
CFKÒGTGPVCEEQWPVVCRVJG(TQO°GNFKPVJGOGUUCIGCPFEJQQUGCPQVJGTCEEQWPV
Contacts
Set how contacts are sorted: Choose “Mail Contacts, Calendars,” then under Contacts
tap Sort Order and do one of the following:
6QUQTVD[°TUVPCOG°TUVtap First, Last.
6QUQTVD[NCUVPCOG°TUVtap Last, First.
Set how contacts are displayed: Choose “Mail Contacts, Calendars,” then under
Contacts tap Display Order and do one of the following:
6QUJQY°TUVPCOG°TUVtap First, Last.
6QUJQYNCUVPCOG°TUVtap Last, First.
Import contacts from a SIM card (GSM models): Choose “Mail, Contacts, Calendars,”
then tap Import SIM Contacts.
The contact information on the SIM card is imported to iPhone. If Contacts is enabled
for MobileMe, Microsoft Exchange, or a CardDAV account, you’re asked to choose
which account you want to add the SIM contacts to.
Calendars
Set alerts to sound when you receive a meeting invitation: Choose “Mail, Contacts,
Calendars,” and under Calendar, tap “New Invitation Alerts” to turn it on.
Set how far back in the past to show your calendar events on iPhone: Choose “Mail,
Contacts, Calendars” > Sync, then choose a period of time.
Turn on Calendar time zone support: Choose “Mail, Contacts, Calendars” > Time Zone
Support, then turn Time Zone Support on. Select a time zone for calendars by tapping
Time Zone and entering the name of a major city.
When Time Zone Support is on, Calendar displays event dates and times in the time
\QPGQHVJGEKV[[QWUGNGEVGF9JGP6KOG<QPG5WRRQTVKUQÒ%CNGPFCTFKURNC[UGXGPVU
in the time zone of your current location as determined by the network time.
Set a default calendar: Choose “Mail, Contacts, Calendars,” and under Calendar, tap
Default Calendar to choose the default calendar for new events. This setting appears
when more than one calendar is synced to iPhone.
211
Chapter 25 Settings

Important: Some carriers don’t support network time in all locations. If you’re traveling,
iPhone may not display events or sound alerts at the correct local time. To manually
set the correct time, see “Date and Time” on page 204.
Notes
The Default Account setting appears when you set up more than one account that
syncs notes.
Set which account a new note is assigned to: Choose “Mail, Contacts, Calendars,” and
under Notes, tap Default Account and choose an account.
Phone
7UG2JQPGUGVVKPIUVQHQTYCTFKPEQOKPIECNNUVWTPECNNYCKVKPIQPQTQÒEJCPIG[QWT
password, and other things. Some settings are available only on GSM models, as noted.
Additional fees may apply. Contact your carrier for pricing and availability.
FaceTime
Activate or deactivate FaceTime (iPhone 4): 6WTP(CEG6KOGQPQTQÒ+H(CEG6KOGKUQP
your phone number will be shared with people you call.
Call Forwarding
Forward your calls (GSM models):
1Choose Phone > Call Forwarding and turn Call Forwarding on.
2On the “Forward to” screen, enter the phone number you want calls forwarded to.
For more information about call forwarding, including how to forward calls on a CDMA
model, see “Call Forwarding” on page 74.
Call Waiting
Activate or deactivate call waiting (GSM models): Choose Phone > Call Waiting, then
VWTP%CNN9CKVKPIQPQTQÒ
For more information about call waiting, including how to activate or deactivate call
waiting on a CDMA model, see “Call Waiting” on page 75.
Show My Caller ID
Show or hide your caller ID (GSM models): Choose Phone > Show My Caller ID, then
VWTP5JQY/[%CNNGT+&QPQTQÒ
For more information about caller ID, including how to show or hide your caller ID on a
CDMA model, see “Caller ID” on page 75.
212 Chapter 25 Settings

Using iPhone with a Teletype (TTY) Machine
In some countries or regions, Teletype (TTY) machines are used by deaf or hearing-
impaired people to communicate by typing and reading text. You can use iPhone
with a TTY machine if you have the iPhone TTY Adapter cable, available for purchase
separately in many countries. Go to www.apple.com/store (may not be available in all
countries or regions) or check with your local Apple retailer.
Connect iPhone to a TTY machine: Choose Phone, then turn TTY on. Then connect
iPhone to your TTY machine using the iPhone TTY Adapter.
For information about using a TTY machine, see the documentation that came with
the machine.
For information about other accessibility features of iPhone, see Chapter 29,
“Accessibility,” on page 235.
Calling from Abroad
5GVK2JQPGVQCFFVJGEQTTGEVRTG°ZYJGPFKCNKPIHTQOCPQVJGTEQWPVT[In Settings,
tap Phone, then turn International Assist on. This lets you make calls to your home
country using the numbers in your contacts and favorites lists, without having to add a
RTG°ZQT[QWTEQWPVT[EQFG+PVGTPCVKQPCN#UUKUVYQTMUHQT75VGNGRJQPGPWODGTUQPN[
For more information, see “Using iPhone Abroad” on page 77.
Changing Your Voicemail Password
A voicemail password helps prevent others from access your voicemail. You need to
enter the password only when you’re calling in to get your messages from another
phone. You won’t need to enter the password when using voicemail on iPhone.
Change your voicemail password: Choose Phone > Change Voicemail Password.
Locking Your SIM Card
You can lock your SIM card (GSM models) so it can’t be used without a Personal
+FGPVK°ECVKQP0WODGT2+0;QWOWUVGPVGTVJG2+0GCEJVKOG[QWVWTPK2JQPGQÒCPF
turn it back on again. Some carriers require a SIM PIN in order to use iPhone.
Important: If you enter the PIN incorrectly three times, you may need to enter a
2GTUQPCN7PNQEMKPI-G[27-VQGPCDNG[QWT5+/ECTFCICKP4GHGTVQVJG5+/ECTF
documentation or contact your carrier. Some cellular networks may not accept an
emergency call from iPhone if the SIM card is locked.
6WTPVJG5+/2+0QPQTQÒ
1 %JQQUG2JQPG 5+/2+0VJGPVWTP5+/2+0QPQTQÒ
2 'PVGT[QWT2+0VQEQP°TO7UGVJG2+0CUUKIPGFD[[QWTECTTKGTQT[QWTECTTKGT¨U
default PIN.
213
Chapter 25 Settings

Change the PIN for your SIM card:
1Choose Phone > SIM PIN.
2Turn SIM PIN on, then tap Change PIN.
3Enter your current PIN, then enter your new PIN.
4 'PVGT[QWTPGY2+0CICKPVQEQP°TOVJGPVCR&QPG
Accessing Your Carrier’s Services
Depending on your carrier, you may be able to access some of your carrier’s services
directly from iPhone. For example, you may be able to check your bill balance, call
directory assistance, or view how many minutes you have left.
Access your carrier’s services: Choose Phone. Then scroll down and tap the button for
your carrier’s services.
When you request information such as your bill balance, your carrier may provide the
KPHQTOCVKQPKPCVGZVOGUUCIG%QPVCEV[QWTECTTKGTVQ°PFQWVKHVJGTGCTGCP[EJCTIGU
for these services.
Safari
Safari settings let you select your Internet search engine, set security options, and for
developers, turn on debugging.
General
Select a search engine: Choose Safari > Search Engine and select the search engine
you want to use.
;QWECPUGV5CHCTKVQCWVQOCVKECNN[°NNQWVYGDHQTOUWUKPIEQPVCEVKPHQTOCVKQPPCOGU
and passwords you previously entered, or both.
Enable AutoFill: Choose Safari > AutoFill, then do one of the following:
To use information from contacts, turn Use Contact Info on, then choose My Info and
select the contact you want to use.
5CHCTKWUGUKPHQTOCVKQPHTQO%QPVCEVUVQ°NNKPEQPVCEV°GNFUQPYGDHQTOU
To use information from names and passwords, turn Names & Passwords on.
When this feature is on, Safari remembers names and passwords of websites you
XKUKVCPFCWVQOCVKECNN[°NNUKPVJGKPHQTOCVKQPYJGP[QWTGXKUKVVJGYGDUKVG
To remove all AutoFill information, tap Clear All.
214 Chapter 25 Settings

Security
By default, Safari is set to show features of the web, such as some movies, animation,
and web apps. You may wish to change security settings to help protect iPhone from
possible security risks on the Internet.
Change security settings: Choose Safari, then do one of the following:
To be warned when visiting potentially fraudulent websites, turn Fraud Warning on.
Fraud warning protects you from potentially fraudulent Internet sites. When you visit
a suspicious site, Safari warns you about its suspect nature and doesn’t load the page.
To enable or disable JavaScript, VWTP,CXC5ETKRVQPQTQÒ
JavaScript lets web programmers control elements of the page—for example, a
page that uses JavaScript might display the current date and time or cause a linked
page to appear in a pop-up.
To block or allow pop-ups, VWTP$NQEM2QRWRUQPQTQÒ$NQEMKPIRQRWRUUVQRUQPN[
pop-ups that appear when you close a page or open a page by typing its address.
It doesn’t block pop-ups that open when you tap a link.
To set whether Safari accepts cookies, tap Accept Cookies and choose Never, “From
visited,” or Always.
A cookie is a piece of information that a website puts on iPhone so the website can
remember you when you visit again. That way, webpages can be customized for you
based on information you may have provided.
Some pages won’t work correctly unless iPhone is set to accept cookies.
To clear a database, tap Databases, then tap Edit. Tap next to a database, then
tap Delete.
Some web apps use databases to store app information on iPhone.
To clear the history of webpages you’ve visited, tap Clear History.
To clear all cookies from Safari, tap Clear Cookies.
To clear the browser cache, tap Clear Cache.
The browser cache stores the content of pages so the pages open faster the next
time you visit them. If a page you open doesn’t show new content, clearing the
cache may help.
Developer
The debug console can help you resolve webpage errors. If it’s turned on, the console
appears when a webpage error occurs.
TurnVJGFGDWIEQPUQNGQPQTQÒChoose Safari > Developer, and turn Debug
%QPUQNGQPQTQÒ
215
Chapter 25 Settings

Messages
Use Messages settings to adjust settings for SMS and MMS messages.
Note: The MMS Messaging and Show Subject Field settings don’t appear if MMS isn’t
supported by your carrier.
Choose whether or not to see a preview of messages on the Home screen: Choose
/GUUCIGUCPFVWTP5JQY2TGXKGYQPQTQÒ
Choose whether or not to repeat message alerts: Choose Messages and turn Repeat
#NGTVQPQTQÒ+H[QWKIPQTGCOGUUCIGCNGTV[QW¨NNDGCNGTVGFVYQOQTGVKOGU
6WTP//5OGUUCIKPIQPQTQÒChoose Messages and turn MMS Messaging on or
QÒ+H//5OGUUCIKPIKUQÒ[QWYQP¨VDGCDNGVQTGEGKXG//5°NGCVVCEJOGPVUUWEJCU
images or audio.
6WTP)TQWR/GUUCIKPIQPQTQÒChoose Messages and turn Group Messaging on or
QÒ)TQWROGUUCIKPIOC[PQVDGCXCKNCDNGKPCNNEQWPVTKGUQTTGIKQPU
Show a subject line for messages you send or receive: Choose Messages and turn
Show Subject Field on.
Show a character count for messages you send or receive: Choose Messages and
turn Character Count on. The character count includes all characters—including
spaces, punctuation, and returns—and appears as you type when your message
exceeds two lines.
iPod
Use iPod Settings to adjust settings for music and video playback on your iPod.
Music
Music settings apply to songs, podcasts, and audiobooks.
6WTP5JCMGVQ5JWÔGQPQTQÒ%JQQUGK2QFVJGPVWTP5JCMGVQ5JWÔGQPQTQÒ
9JGP5JCMGVQ5JWÔGKUQP[QWECPUJCMGK2JQPGVQUJWÔGCPFKOOGFKCVGN[EJCPIG
the currently playing song.
Set iTunes to play songs at the same sound level: In iTunes, choose iTunes >
Preferences if you’re using a Mac, or Edit > Preferences if you’re using a PC. Then click
Playback and select Sound Check.
Set iPhone to use the iTunes volume settings (Sound Check): Choose iPod and turn
Sound Check on.
Use the equalizer to customize the sound on iPhone: Choose iPod > EQ and choose
a setting.
Set a volume limit for music and videos: Choose iPod > Volume Limit and drag the
slider to adjust the maximum volume.
Tap Lock Volume Limit to assign a code to prevent the setting from being changed.
216 Chapter 25 Settings

Setting a volume limit only limits the volume for music (including podcasts and
audiobooks) and videos (including rented movies and TV shows), and only when
headphones, earphones, or speakers are connected to the headset jack on iPhone.
WARNING: For important information about avoiding hearing loss, see the Important
Product Information Guide at www.apple.com/support/manuals/iphone.
Show song lyrics and podcast information: Choose iPod and turn Lyrics & Podcast
Info on.
Video
Video settings apply to video content, including rented movies and TV shows. You can
set where to resume playing videos that you previously started, turn closed captioning
QPQTQÒCPFUGVWRK2JQPGVQRNC[XKFGQUQP[QWT68
Set where to resume playing videos: Choose iPod > Start Playing, then select
whether you want videos that you previously started watching to resume playing from
VJGDGIKPPKPIQTYJGTG[QWNGHVQÒ
6WTPENQUGFECRVKQPKPIQPQTQÒ%JQQUGK2QFCPFVWTP%NQUGF%CRVKQPKPIQPQTQÒ
Note: Not all video content is encoded for closed captioning.
TV Out
Use these settings to control how iPhone plays videos on your TV.
6WTPYKFGUETGGPQPQTQÒ%JQQUGK2QFCPFVWTP9KFGUETGGPQPQTQÒ
Set TV signal to NTSC or PAL: Choose iPod > TV Signal and select NTSC or PAL.
NTSC and PAL are TV broadcast standards. iPhone displays NTSC 480p/PAL 576p
when attached to a TV using a Component AV Cable, or NTSC 480i/PAL 576i using a
Composite AV Cable. Your TV might use NTSC or PAL, depending on where you bought
it. If you’re not sure which to use, check the documentation that came with your TV.
For more information about using iPhone to play videos on your TV, see “Watching
Videos on a TV” on page 108.
Photos
Slideshow
Use the Slideshow settings to specify how slideshows display your photos.
Set the length of time each slide is shown: Choose Photos > Play Each Slide For and
select the length of time.
5GVCVTCPUKVKQPGÒGEV%JQQUG2JQVQU 6TCPUKVKQPCPFUGNGEVCVTCPUKVKQPGÒGEV
Set whether to repeat slideshows: %JQQUG2JQVQUCPFVWTP4GRGCVQPQTQÒ
Set photos to appear randomly or in order: %JQQUG2JQVQUCPFVWTP5JWÔGQPQTQÒ
217
Chapter 25 Settings

HDR
The HDR setting on iPhone 4 lets you choose whether to save the normal-exposure
photo in addition to the HDR version of a photo when HDR is turned on. See “Taking
Photos and Recording Videos” on page 130.
Choose whether to save both the normal-exposure version and the HDR version of
photos (iPhone 4): +P5GVVKPIUEJQQUG2JQVQUVJGPVWTP-GGR0QTOCN2JQVQQPQTQÒ
+HVJGUGVVKPIKUQÒQPN[VJG*&4XGTUKQPQHCRJQVQKUUCXGF
If you save both versions, appears in the upper-left corner of the HDR photo
when the controls are visible.
Notes
Use Notes settings to change the font used to display your notes, and to set the
default account for notes you add on iPhone.
Change the font: Choose Notes, then select the font you want to use.
Set the default account for new notes: Choose Notes and tap Default Account. Then
select an account, or tap On My iPhone if you don’t want notes you add on iPhone to
be synced with an account.
Store
Use Store settings to change or create an Apple ID. By default, the Apple ID you’re
signed in to when you sync iPhone with your computer appears in Store settings. You
can change Apple IDs on iPhone to purchase music or apps using another Apple ID. If
you don’t have an Apple ID, you can create one in Store settings.
Sign in: Choose Store and tap Sign In, then enter your Apple ID and password.
View your account information: Choose Store and tap View Apple ID, then type your
password and follow the onscreen instructions.
5KIPKPWUKPICFKÒGTGPV#RRNG+&Choose Store and tap Sign Out, then tap Sign In
and enter the Apple ID and password.
Create a new Apple ID: Choose Store and tap Create New Apple ID, then follow the
onscreen instructions.
Nike + iPod
Use Nike + iPod settings to activate and adjust settings for the Nike + iPod app
(iPhone 3GS or later). See Chapter 27,“Nike + iPod,” on page 225.
218 Chapter 25 Settings

C
ontact
s
26
A
b
out Contact
s
Contacts makes it easy to call, email, or text your
f
riends and associates. You can add
contacts directly on iPhone, or sync contacts
f
rom applications on your computer
.
I
f
you have a MobileMe or Microso
f
t Exchange account with Contacts enabled, or
a
supporte
d
Car
d
DAV account, you can sync your contacts over t
h
e air wit
h
out
connecting iP
h
one to your computer
.
You can o
p
en Contacts
f
rom the Home screen, or
f
rom the Phone a
pp.
A
dd
ing Contact
s
You can add contacts to iPhone in the
f
ollowing ways
:
In iTunes, sync contacts
f
rom Google or Yahoo!, or sync with applications on your
com
p
uter
(
see
“
iP
h
one Settings Panes in iTunes
”
on pag
e
58
)
S
et up a MobileMe or Microso
f
t Exchange account on iPhone, with Contacts
ena
bl
e
d
(see
“
S
etting Up Mo
b
i
l
eMe Accounts
”
on pag
e
26
or
“
S
etting Up Microso
f
t
Exc
h
ange Accounts
”
on pag
e
27
)
+PUVCNNCRTQ
°
NGVJCVUGVUWRCP'ZEJCPIGCEEQWPVYKVJ%QPVCEVUGPCDNGFIQVQ
www.a
ppl
e.com/i
ph
one/
b
usines
s
)
S
et u
p
an LDAP or Car
d
DAV account on iP
h
on
e
Enter contacts
d
irect
l
y on iP
h
on
e
Im
p
ort contacts
f
rom a SIM card (GSM models
)
The number o
f
contacts you can add is limited only by the amount o
f
memory
on iP
h
one
.
2
1
9

Set up an LDAP or CardDAV account:
1In Settings, tap “Mail Contacts, Calendars,” then tap Add Account.
2Tap Other, then tap Add LDAP Account or Add CardDAV Account.
3Enter your account information and tap Next to verify the account.
4Tap Save.
When you set up an LDAP account, you can view and search for contacts on your
company or organization’s LDAP server. The server appears as a new group in Contacts.
Since LDAP contacts aren’t downloaded to iPhone, you must have an Internet
EQPPGEVKQPVQXKGYVJGO%JGEMYKVJ[QWTU[UVGOCFOKPKUVTCVQTHQTURGEK°ECEEQWPV
settings and other requirements (such as VPN).
When you set up a CardDAV account, your account contacts are synced with iPhone
over the air. If it’s supported, you can also search for contacts on your company or
organization’s CardDAV server.
Import contacts from another phone’s SIM card (GSM models only): In Settings, tap
“Mail, Contacts, Calendars,” then tap Import SIM Contacts.
The contact information on the SIM card is imported to iPhone. If you have Contacts
enabled for both MobileMe and Microsoft Exchange, you’re asked to choose which
account you want to add the SIM contacts to.
Important: iPhone doesn’t store contacts on its SIM card.
Searching Contacts
;QWECPUGCTEJ°TUVNCUVCPFEQORCP[PCOGUKP[QWTEQPVCEVUQPK2JQPG+H[QWJCXG
a Microsoft Exchange account set up on iPhone, you may also be able to search your
enterprise Global Address List (GAL) for contacts in your organization. If you have
an LDAP account on iPhone, you can search contacts on your organization’s LDAP
server. If you have a CardDAV account, you can search contacts synced to iPhone, or
searchable contacts on a supported CardDAV server.
;QWECPUGCTEJVJG°TUVNCUVCPFEQORCP[PCOG°GNFU#U[QWV[RGKPVJGUGCTEJ°GNF
contacts with matching information appear immediately.
Search contacts: +P%QPVCEVUVCRVJGUGCTEJ°GNFCVVJGVQRQHCP[NKUVQHEQPVCEVU
and enter your search. (To scroll quickly to the top of the list, tap the status bar.)
Search a GAL: Tap Groups, tap Directories at the bottom of the list, then enter
your search.
You can’t edit GAL contacts or save them to iPhone.
Search an LDAP server: Tap Groups, tap the LDAP server name, then enter your search.
You can’t edit LDAP contacts or save them to iPhone.
220 Chapter 26 Contacts

Search a CardDAV server: Tap Groups, tap the searchable CardDAV group at the
bottom of the list, then enter your search.
You can’t edit searchable CardDAV contacts from the server, but you can edit synced
CardDAV contacts on iPhone.
Contacts are included in searches from the Home screen. See “Searching” on page 47.
Managing Contacts on iPhone
Add a contact on iPhone: Tap Contacts and tap .
Delete a contact In Contacts, choose a contact, than tap Edit. Scroll down and
tap Delete Contact.
Add a contact from the
numeric keypad
6CR-G[RCFGPVGTCPWODGTVJGPVCR . Tap Create New
Contact and enter the caller’s information, or tap “Add to
Existing Contact” and choose a contact.
Enter a pause in a number Tap , then tap Pause. One or more pauses may be required
by a phone system before dialing an extension, for example.
Pauses appear as commas when the number is saved.
Enter a hard pause in a number
(CDMA model)
Tap , then tap Wait. A hard pause appears as a semicolon
when the number is saved. When dialing, iPhone pauses when
it reaches the semicolon and waits until you tap the Dial
button to continue.
Add a recent caller’s phone
number to your contacts
Tap Recents and tap next to the number. Then tap
Create New Contact, or tap “Add to Existing Contact” and
choose a contact.
Edit contact information: Choose a contact, then tap Edit.
Add information:(KNNKPCDNCPM°GNF
Add an address: Tap Add New Address.
#FFC°GNFVJCV¨UPQVUJQYKPI Tap Add Field.
Change the ringtone for the contact:6CRVJGTKPIVQPG°GNFVJGPEJQQUGCTKPIVQPG
6QWUGVJGFGHCWNVTKPIVQPGURGEK°GFKPVJG5QWPFUUGVVKPIUEJQQUG&GHCWNV
Delete an item: Tap , then tap Delete.
;QWECPEJCPIG°GNFNCDGNUD[VCRRKPIVJGNCDGNCPFEJQQUKPICFKÒGTGPVQPG6Q
create a custom label, scroll to the bottom of the list and tap Add Custom Label.
If you sync contacts from your computer and also over the air, you can link contacts to
ETGCVGCUKPINGWPK°GFEQPVCEV
Link a contact: In edit mode, tap Link Contact, then choose a contact.
See “7PK°GF%QPVCEVU” on page 223.
221
Chapter 26 Contacts
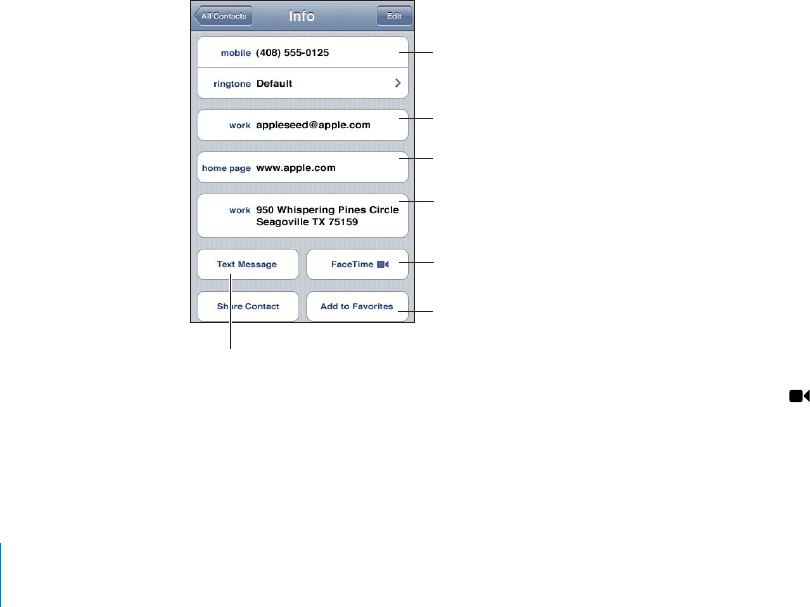
Assign a photo to a contact:
1Tap Contacts, then choose a contact.
2Tap Edit and tap Add Photo, or tap the existing photo.
3Tap Take Photo and take a photo with the camera. Or tap Choose Existing Photo and
choose a photo.
4Drag and scale the photo as desired.
5Tap Use Photo (new photo) or Choose (existing photo).
Using Contact Information
You can use the information on a contact’s Info screen to:
Call the contact
Create an email message in Mail, addressed to the contact
Open the contact’s home page in Safari
Find the location of the contact’s address in Maps, and get directions
Send a text message to the contact
Share the contact information with others
Add a phone number for the contact to your favorites list
Make a FaceTime video call
Use a contact’s info screen: Tap Contacts and choose a contact. Then tap an item.
=PZP[[OL^LIZP[L
*HSS
:LUKHULTHPS
:LUKH[L_[TLZZHNL
(KKHWOVUL
U\TILY[V`V\Y
MH]VYP[LZSPZ[
:LLHTHWHUK
NL[KPYLJ[PVUZ
4HRLH
-HJL;PTL
]PKLVJHSS
A star next to a phone number means the number is in your favorites list. appears
on the FaceTime button if you’ve ever had a FaceTime call with the contact.
See your own phone number: Tap Contacts and scroll to the top of the list. (Not
available in all countries or regions.)
222 Chapter 26 Contacts
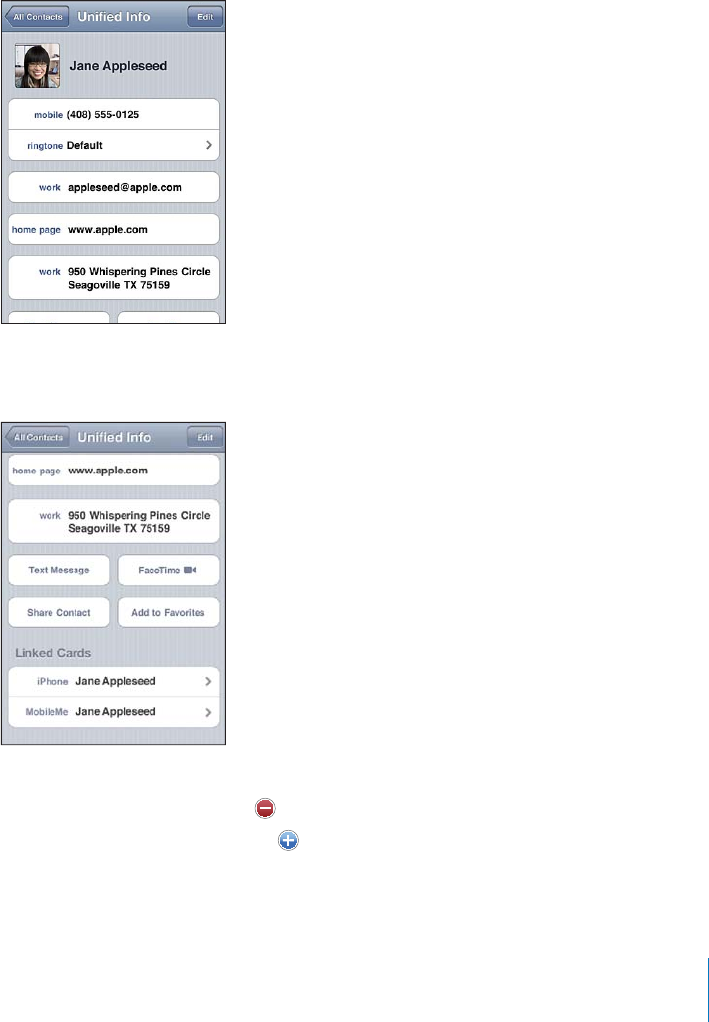
7PK
°
GF%QPVCEV
U
When you sync contacts with multiple accounts, you might have entries
f
or the same
person in more than one account. To help keep redundant contacts
f
rom appearing
KPVJG#NN%QPVCEVUNKUVQPK2JQPG
EQPVCEVU
H
TQOFK
Ò
GTGPVCEEQWPVUVJCVJCXGVJGUCOG
°
TUVCPFNCUVPCOGUCTGNKPMGFCPFFKURNC[GFCUCUKPING
WPK°GFEQPVCEV
(unless they
V
JCXGFK
Ò
GTGPVOKFFNGPCOGU9JGP[QWXKGYCWPK
°
GFEQPVCEVVJGVKVNG7PK
°
GF+P
H
Q
CRRGCTUCVVJGVQRQ
H
VJGUETGGP7PK
°
GFEQPVCEVUCRRGCTQPN
[
KPVJG#NN%QPVCEVUNKUV
6JGUQWTEGCEEQWPVUQ
H
CWPK
°
GFEQPVCEVC
RR
GCTCVVJGDQVVQOQ
H
VJGUETGGPWPFGT
Lin
k
e
d
Car
d
s
.
View contact in
f
ormation
f
rom a source account
:
Ta
p
one o
f
the source accounts
.
Un
l
in
k
a contact
:
Ta
p
E
d
it, ta
p
,
t
h
en ta
p
Un
l
in
k.
Lin
k
a contact
:
Ta
p
E
d
it, t
h
en ta
p
an
d
c
h
oose a contact
.
223
C
h
a
p
ter 2
6
C
ontact
s

+H[QWNKPMEQPVCEVUYKVJFKÒGTGPV°TUVQTNCUVPCOGUVJGPCOGUQPVJGKPFKXKFWCN
EQPVCEVUYQP¨VEJCPIGDWVQPN[QPGPCOGCRRGCTUQPVJGWPK°GFECTF6QEJQQUG
YJKEJPCOGCRRGCTUYJGPXKGYKPIVJGWPK°GFECTFVCRVJGNKPMGFECTFYKVJVJG
PCOG[QWRTGHGTVJGPVCR7UG6JKU0COG(QT7PK°GF%CTF
.KPMGFEQPVCEVUCTGP¨VOGTIGF7PNGUU[QWGFKVCWPK°GFEQPVCEVVJGEQPVCEVKP
the source account remains separate and unchanged. If you change information
KPCWPK°GFEQPVCEVVJGEJCPIGUCTGEQRKGFVQGCEJUQWTEGCEEQWPVKPYJKEJVJCV
KPHQTOCVKQPCNTGCF[GZKUVU+H[QWCFFKPHQTOCVKQPVQCWPK°GFEQPVCEVVJCVKPHQTOCVKQP
is added to the contact in each source account.
Linked contact information also appears at the bottom of an individual contact’s Info
UETGGPYJGPKV¨UXKGYGFKPCURGEK°EUQWTEGCEEQWPVVJCVKUPQVKPVJG#NN%QPVCEVU
NKUVYJKEJNGVU[QWUGGVJG7PK°GF+PHQUETGGPCPFVJGNKPMGFEQPVCEVHTQOGCEJQHVJG
other source accounts.
224 Chapter 26 Contacts
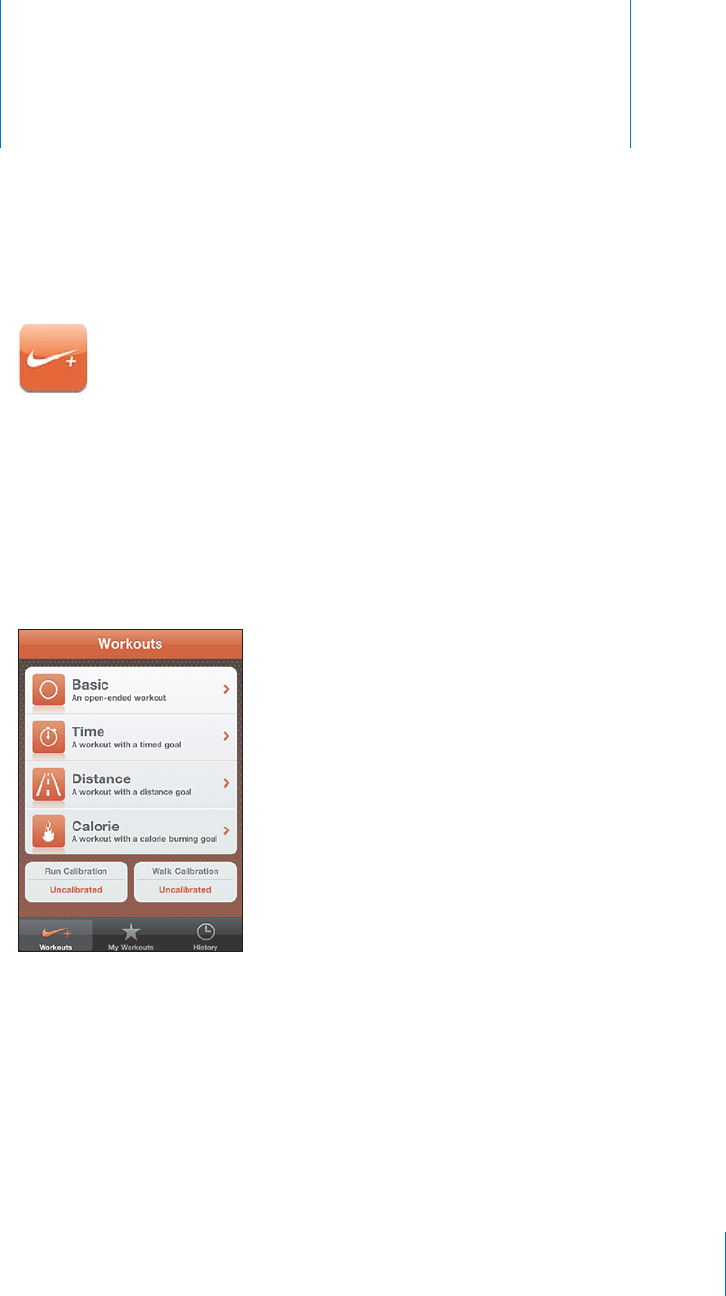
Nike + iPod
27
Activating Ni
k
e + iPo
d
W
h
en turne
d
on in Settings, t
h
e Ni
k
e + iPo
d
app appears on t
h
e Home screen
(iP
h
on
e
3
GS or
l
ater). Wit
h
a Ni
k
e + iPo
d
Sensor (so
ld
separate
l
y), t
h
e Ni
k
e + iPo
d
app
provides audible
f
eedback on your speed, distance, time elapsed, and calories burned
d
uring a run or walk. You can send your workout in
f
ormation to ni
k
e
pl
us.c
o
m
,
w
h
ere
you can trac
k
your progress, set goa
l
s, an
d
participate in c
h
a
ll
enges
.
6WTP0K
MG
K2QFQPQTQ
Ò
In Settings, c
h
oose Ni
ke
+
iPo
d
an
d
turn Ni
ke
+
iPo
d
on or
Q
Ò
9JGP0KM
G
K2Q
F
KUVWTPG
F
QPKVUCRRKEQPCRRGCTUQPV
J
G*QOGUETGGP
S
ee the Nike + iPod documentation
f
or in
f
ormation about setting up and using
Ni
ke
+
iPo
d.
22
5

Linking a Sensor
6JG°TUVVKOG[QWUVCTVCYQTMQWV[QW¨TGRTQORVGFVQCEVKXCVG[QWTUGPUQTYJKEJ
automatically links the sensor with iPhone. You can also use Nike + iPod settings to
link a sensor with iPhone.
0KMGK2QFECPNKPMVQQPN[QPGUGPUQTCVCVKOG6QWUGCFKÒGTGPVUGPUQTWUG
Nike + iPod settings to link the new sensor.
Link a sensor to iPhone:
1Put the Nike + iPod sensor in your shoe.
2In Settings on iPhone, choose Nike + iPod > Sensor.
3Tap Link New, then walk around as instructed.
4Tap Done when the sensor is linked.
Working Out with Nike + iPod
After activating Nike + iPod and inserting the Nike + iPod Sensor in your Nike+ ready
shoe, you can use Nike + iPod for your workouts.
Work out using Nike + iPod:
1In Nike + iPod on iPhone, tap Workouts, then choose a type of workout.
2Depending on the workout, you may need to set a time, distance, or calorie goal.
3Choose a playlist or other audio selection, then start your workout.
4 9JGP[QW°PKUJ[QWTYQTMQWVVCR'PF9QTMQWV
To turn on spoken feedback or set other options, see “Nike + iPod Settings” on
page 228.
226 Chapter 27 Nike + iPod

Sending Workouts to Nikeplus.com
6JG°TUVVKOG[QWEQPPGEVK2JQPGVQK6WPGUCHVGTCYQTMQWV[QW¨TGCUMGFKH[QWYCPV
to automatically send your workouts to Nike+ when you sync iPhone. Click Send to
send your current workout to nikeplus.com and set iTunes to automatically send future
workouts when you sync iPhone with iTunes.
If you click Don’t Send, you can set iTunes to do this later.
Set iTunes to automatically send workouts to nikeplus.com when you sync iPhone
with iTunes:
1Connect iPhone to your computer.
Make sure your computer is connected to the Internet.
2In iTunes, click Nike + iPod at the top of the screen, then select “Automatically send
workout data to nikeplus.com.”
3Click “Visit nikeplus.com” or click Visit in the dialog that appears.
4Click Save Your Runs and log in, or register if you haven’t already done so.
Send workout data wirelessly to nikeplus.com from iPhone:
1In Nike + iPod on iPhone, tap History.
Make sure iPhone is connected to the Internet.
2Tap “Send to Nike+.”
3Enter your email address and nikeplus.com account password, then tap “Login to
Nike +.”
If you don’t already have a nikeplus.com account, tap Join Nike+ to set one up.
To see your workouts on nikeplus.com, log in to your account and follow the
onscreen instructions.
Calibrating Nike + iPod
You calibrate Nike + iPod using a workout you just completed. You can only calibrate
workouts of a quarter mile or more.
Calibrate iPhone:
1Run or walk a known distance, then tap End Workout.
2Tap Calibrate, then enter the distance and tap Done.
Reset Nike + iPod to the default calibration: In Settings, choose Nike + iPod, then tap
Reset Calibration.
227
Chapter 27 Nike + iPod

Nike + iPod Settings
In Settings, choose Nike + iPod to activate and adjust settings for the Nike + iPod app.
Choose a PowerSong: Choose PowerSong and select a song from your music library.
6WTPURQMGPHGGFDCEMQPQTQÒChoose Spoken Feedback and select a male or
HGOCNGXQKEGVQCEEQORCP[[QWTYQTMQWVQT1ÒVQVWTPQÒURQMGPHGGFDCEM
Set a distance preference: %JQQUG&KUVCPEGVJGPUGNGEV/KNGUQT-KNQOGVGTUVQ
measure your workout distance.
Set your weight: %JQQUG9GKIJVVJGP±KEMVQGPVGT[QWTYGKIJV
Set the screen orientation: Choose Lock Screen, then select a screen orientation
preference.
Set up the Nike + iPod Sensor: Choose Sensor, then follow the onscreen instructions
to set up your sensor (sold separately).
You can use a Nike+ compatible remote (sold separately) to control Nike + iPod
YKTGNGUUN[$GHQTGWUKPICTGOQVGHQTVJG°TUVVKOG[QWOWUVUGVKVWRQPK2JQPG
Set up the Nike + iPod remote: Choose Remote, then follow the onscreen instructions
to set up your remote (third-party product sold separately).
Reset Nike + iPod to the default calibration: Tap Reset Calibration.
228 Chapter 27 Nike + iPod

iBook
s
28
A
b
out iBoo
ks
iBooks is a great way to read and buy books. Download the
f
ree iBooks app
f
rom
t
he App Store, and then get everything
f
rom classics to best sellers
f
rom the built-in
iBookstore. Once you download a book, it’s displayed on your bookshel
f.
Add ePub books and PDFs to your bookshel
f
using iTunes. Then tap a book or PDF to
s
tart rea
d
ing. iBoo
k
s remem
b
ers your
l
ocation, so you can easi
l
y return to w
h
ere you
NG
H
VQ
Ò
#YKFGTCPIGQ
H
FKURNC[QRVKQPUOCMGUVJGDQQMUGCU[VQTGCF
N
ote
:
T
h
e iBoo
k
s app an
d
t
h
e iBoo
k
store may not
b
e avai
l
a
bl
e in a
ll
l
anguages
or
l
ocations
.
(
]H
PS
H
IS
LVU[
O
L
P)
VV
R
Z[VYL
;P
[
S
LH]H
PS
H
IPSP
[`
P
Z
Z\
IQ
LJ[[VJ
O
HUNL
To
d
own
l
oa
d
t
h
e iBoo
k
s app an
d
use t
h
e iBoo
k
store, you nee
d
an Internet connection
a
nd an Apple account. I
f
you don’t have an Apple account, or i
f
you want to make
purchases
f
rom another Apple account, go to Settings > Store. See
“
S
tor
e
”
on pag
e
2
1
8
.
229

Syncing Books and PDFs
Use iTunes to sync your books and PDFs between iPhone and your computer.
When iPhone is connected to your computer, the Books pane lets you select which
items to sync.
You can sync books that you download or purchase from the iBookstore. You can also
add DRM-free ePub books and PDFs to your iTunes library. There are several websites
VJCVQÒGTDQQMUKPG2WDCPF2&(HQTOCV
Sync an ePub book or PDF to iPhone: Download the book or PDF using your
EQORWVGT6JGPKPK6WPGUEJQQUG(KNG #FFVQ.KDTCT[CPFUGNGEVVJG°NG%QPPGEV
iPhone to your computer, select the book or PDF in the Books pane in iTunes, and then
sync iPhone.
If a PDF doesn’t appear in the Books pane, you need to change its type in iTunes.
5GCTEJ[QWTK6WPGUNKDTCT[VQ°PFVJG2&(UGNGEVKVVJGPEJQQUG(KNG )GV+PHQ+PVJG
1RVKQPUUGEVKQPQHVJG°NGKPHQTOCVKQPYKPFQYEJQQUG$QQMHTQOVJG/GFKC-KPF
RQRWROGPWVJGPENKEM1-
Using the iBookstore
In the iBooks app, tap Store to open the iBookstore. From there, you can browse
HGCVWTGFDQQMUQTDGUVUGNNGTUCPFDTQYUGHQTDQQMUD[CWVJQTQTVQRKE9JGP[QW°PF
a book you like, you can purchase and download it.
Note: Some features of the iBookstore may not be available in all locations.
Get more information: In the iBookstore, you can read a summary of the book, read
or write a review, and download a sample of the book before buying it.
Purchase a book: Find a book you want, tap the price, then tap Buy Now. Sign in to
[QWT#RRNGCEEQWPVVJGPVCR1-5QOGDQQMUOC[DGHTGGHQTFQYPNQCFKPI
The purchase is charged to your Apple account. If you make additional purchases
YKVJKPVJGPGZV°HVGGPOKPWVGU[QWFQP¨VJCXGVQGPVGT[QWTRCUUYQTFCICKP
If you’ve already purchased a book and want to download it again, tap Purchases in
VJGK$QQMUVQTGCPF°PFVJGDQQMKPVJGNKUV6JGPVCR4GFQYPNQCF
Books that you purchase are synced to your iTunes library the next time you sync
iPhone with your computer. This provides a backup in case you delete the book
from iPhone.
230 Chapter 28 iBooks

Reading Books
Reading a book is easy. Go to the bookshelf and tap the book you want to read. If you
don’t see the book you’re looking for, tap the name of the current collection at the top
of the screen to go to other collections.
Turn pages: 6CRPGCTVJGTKIJVQTNGHVOCTIKPQHCRCIGQT±KEMNGHVQTTKIJV6QEJCPIG
the direction the page turns when you tap the left margin, go to Settings > iBooks.
)QVQCURGEK°ERCIGTap near the center of the current page to show the controls.
Drag the page navigation control at the bottom of the screen to the desired page,
then let go.
Go to the table of contents: Tap near the center of the current page to show the
controls, then tap . Tap an entry to jump to that location, or tap Resume to return to
the current page.
Add or remove a bookmark: Tap the ribbon button to set a bookmark. You can have
multiple bookmarks. To remove a bookmark, tap it. You don’t need to set a bookmark
YJGP[QWENQUGCDQQMDGECWUGK$QQMUTGOGODGTUYJGTG[QWNGHVQÒCPFTGVWTPU
there when you open the book again.
Add, remove, or edit a highlight: Touch and hold any word until it’s selected. Use the
grab points to adjust the selection, then tap Highlight. To remove a highlight, tap the
highlighted text, then tap Remove Highlight. To change the color of a highlight, tap
the highlighted text, then tap Colors and select a color from the menu.
Add, remove, or edit a note: Touch and hold any word until it’s selected. Use the grab
points to adjust the selection, then tap Note. Type some text, then tap Done. To view
a note, tap the indicator in the margin near the highlighted text. To remove a note,
tap the highlighted text, then tap Delete Note. To change the color of a note, tap the
highlighted text, then tap Colors and select a color from the menu.
231
Chapter 28 iBooks

See all your bookmarks, highlights and notes: To see the bookmarks, highlights, and
notes you’ve added, tap , then tap Bookmarks. To view a note, tap its indicator.
Enlarge an image: Double-tap the image.
To read a book while lying down, use the portrait orientation lock to prevent
iPhone from rotating the screen when you rotate iPhone. See “Viewing in Portrait or
Landscape Orientation” on page 32.
Reading PDFs
You can use iBooks to read PDFs. Go to the bookshelf and tap Collections, select a
collection, then tap the PDF you want to read.
Turn pages: Flick left or right.
Enlarge a page: Pinch to zoom in on the page, then scroll to see the portion you want.
)QVQCURGEK°ERCIGTap near the center of the current page to show the controls.
Then, in the page navigation controls at the bottom of the page, drag until the desired
page number appears, or tap a thumbnail to jump to that page.
Add or remove a bookmark: Tap the ribbon button to set a bookmark. You can have
multiple bookmarks. To remove a bookmark, tap it.
You don’t need to set a bookmark when you close a PDF, because iBooks remembers
YJGTG[QWNGHVQÒCPFTGVWTPUVJGTGYJGP[QWQRGPKVCICKP
Go to the table of contents: Tap near the center of the current page to show the
controls, then tap . Tap an entry to jump to that location, or tap Resume to return to
VJGEWTTGPVRCIG+HVJGCWVJQTJCUP¨VFG°PGFCVCDNGQHEQPVGPVU[QWECPVCRCRCIG
icon instead to go to that page.
Changing a Book’s Appearance
To change the appearance of a book, access the controls by tapping near the center
of a page.
Change the font or type size: Tap , then in the list that appears, tap or to
reduce or enlarge the type size. To change the font, tap Fonts, then select one from the
list. Changing the font and size also changes text formatting.
Change the brightness: Tap , then adjust the brightness. This setting applies only
in iBooks.
Change the page and type color: Tap , then turn the Sepia option on to change
the color of the page and type. This setting applies to all books.
;QWECPEJCPIGVJGYC[VJCVK$QQMULWUVK°GUVJGVGZVQHRCTCITCRJUKP5GVVKPIU K$QQMU
232 Chapter 28 iBooks

Searching Books and PDFs
You can search for the title or author of a book to quickly locate it on the bookshelf.
;QWECPCNUQUGCTEJVJGEQPVGPVUQHCDQQMVQ°PFCNNVJGTGHGTGPEGUVQCYQTFQT
RJTCUG[QW¨TGKPVGTGUVGFKP;QWECPCNUQUGPFCUGCTEJVQ9KMKRGFKCQT)QQINGVQ°PF
other related resources.
Search for a book: Go to the bookshelf. If necessary, change to the collection that
you want to search. Tap the status bar to scroll to the top of the screen, then tap the
magnifying glass. Enter a word that’s in the title of a book, or the author’s name, then
tap Search. Matching books appear on the bookshelf.
Search in a book: Open a book and tap near the center of the page to show the
controls. Tap the magnifying glass, then enter a search phrase and tap Search. Tap a
search result to go to that page in the book.
To send your search to Google or Wikipedia, tap Search Google or Search Wikipedia.
Safari opens and displays the result.
To quickly search for a word in a book, touch and hold the word, then tap Search.
.QQMKPIWRVJG&G°PKVKQPQHC9QTF
;QWECPNQQMWRVJGFG°PKVKQPQHCYQTFWUKPIVJGFKEVKQPCT[
Look up a word: Select a word in a book, then tap Dictionary in the menu that
appears. Dictionaries may not be available for all languages.
Having a Book Read to You
If you have a visual impairment, you can use VoiceOver to read a book aloud. See
“VoiceOver” on page 236.
Some books may not be compatible with VoiceOver.
Printing or Emailing a PDF
You can use iBooks to send a copy of a PDF via email, or to print all or a portion of the
PDF to a supported printer.
Email a PDF: Open the PDF, then tap and choose Email Document. A new message
CRRGCTUYKVJVJG2&(CVVCEJGF9JGP[QW°PKUJCFFTGUUKPICPFYTKVKPI[QWTOGUUCIG
tap Send.
Print a PDF: Open the PDF, then tap and choose Print. Select a printer and the page
range and number of copies, then tap Print. For more information, see “Printing” on
page 45.
You can only email or print PDFs. These options aren’t available for ePub books.
233
Chapter 28 iBooks

Organizing the Bookshelf
Use the bookshelf to browse your books and PDFs. You can also organize items
into collections.
Sort the bookshelf: Go to the bookshelf and tap the status bar to scroll to the top of
the screen, then tap and select a sort method from the choices at the bottom of
the screen.
Rearrange items on the bookshelf: Touch and hold a book or PDF, then drag it to a
new location on the bookshelf.
Delete an item from the bookshelf: Go to the bookshelf and tap Edit. Tap each book
or PDF that you want to delete so that a checkmark appears, then tap Delete. When
[QW°PKUJFGNGVKPIVCR&QPG+H[QWFGNGVGCDQQM[QWRWTEJCUGF[QWECPFQYPNQCF
it again from Purchases in the iBookstore. If you’ve synced your device with your
computer, the book also remains in your iTunes Library.
Create, rename, or delete a collection: Tap the name of the current collection you’re
viewing, such as Books or PDFs, to display the collections list. Tap New to add a new
collection. To delete a collection, tap Edit, then tap and tap Delete. You can’t edit or
remove the built-in Books and PDFs collections. To edit the name of a collection, tap its
PCOG9JGP[QW°PKUJVCR&QPG
Move a book or PDF to a collection: Go to the bookshelf and tap Edit. Tap each book
or PDF that you want to move so that a checkmark appears, then tap Move and select
a collection. Items can be in only one collection at a time. When you add a book or
2&(VQ[QWTDQQMUJGNHHQTVJG°TUVVKOGKV¨URWVKPVQVJG$QQMUQT2&(EQNNGEVKQP(TQO
VJGTG[QWECPOQXGKVVQCFKÒGTGPVEQNNGEVKQP;QWOKIJVYCPVVQETGCVGEQNNGEVKQPUHQT
work and school, for example, or for reference and leisure reading.
View a collection: Tap the name of the current collection at the top of the screen,
then pick a new one from the list that appears.
Bookmark and Note Syncing
iBooks saves your bookmarks, notes, and current page information in your Apple
account, so they’re always up to date and you can read a book seamlessly across
multiple devices. For PDFs, the bookmarks and current page information are synced.
6WTPDQQMOCTMU[PEKPIQPQTQÒGo to Settings > iBooks, then turn Sync Bookmarks
QPQTQÒ
You must have an Internet connection to sync your settings. iBooks syncs information
for all of your books when you open or quit the app. Information for individual books
is also synced when you open or close the book.
234 Chapter 28 iBooks

Accessibility 29
Universal Access Features
In addition to the many features that make iPhone easy to use for everyone,
accessibility features (iPhone 3GS or later) are designed to make it easier for users
with visual, auditory, or other physical disabilities to use iPhone. These accessibility
features include:
VoiceOver
Zoom
Large Text
White on Black
Mono Audio
Speak Auto-text
Support for braille displays
With the exception of VoiceOver, these accessibility features work with all iPhone
apps, including third-party apps you download from the App Store. VoiceOver works
with all apps that come preinstalled on iPhone, and with many third-party apps.
For more information about iPhone accessibility features, go to
www.apple.com/accessibility.
'CEJCEEGUUKDKNKV[HGCVWTGECPDGVWTPGFQPQTQÒKP#EEGUUKDKNKV[UGVVKPIUQPK2JQPG
;QWECPCNUQVWTPCEEGUUKDKNKV[HGCVWTGUQPQTQÒKPK6WPGUYJGPK2JQPGKUEQPPGEVGF
to your computer.
235

6WTPCEEGUUKDKNKV[HGCVWTGUQPQTQÒKPK6WPGU
1Connect iPhone to your computer.
2In iTunes, select iPhone in the Devices list.
3 +PVJG5WOOCT[RCPGENKEM%QP°IWTG7PKXGTUCN#EEGUUKPVJG1RVKQPUUGEVKQP
4 5GNGEVVJGCEEGUUKDKNKV[HGCVWTGUVJCV[QWYCPVVQWUGCPFENKEM1-
.CTIG6GZVECPQPN[DGVWTPGFQPQTQÒWUKPIK2JQPGUGVVKPIU5GG¥Large Text” on
page 249.
;QWECPVWTPENQUGFECRVKQPKPIQPQTQÒKPK2QFUGVVKPIU5GG¥Videos” on page 105.
VoiceOver
VoiceOver describes aloud what appears onscreen, so that you can use iPhone without
UGGKPIKV8QKEG1XGTURGCMUKPVJGNCPIWCIGURGEK°GFKP+PVGTPCVKQPCNUGVVKPIUYJKEJ
OC[DGKP±WGPEGFD[VJG4GIKQP.QECNGUGVVKPI
Note: VoiceOver is available in many languages, but not all.
VoiceOver tells you about each element on the screen as it’s selected. When an
GNGOGPVKUUGNGEVGFKV¨UGPENQUGFD[CDNCEMTGEVCPINGHQTVJGDGPG°VQHVJQUGYJQECP
see the screen) and VoiceOver speaks the name or describes the item. The enclosing
rectangle is referred to as the VoiceOver cursor. If text is selected, VoiceOver reads the
text. If a control (such as a button or switch) is selected and Speak Hints is turned on,
VoiceOver may tell you the action of the item or provide instructions for you—for
example, “double-tap to open.”
When you go to a new screen, VoiceOver plays a sound and then selects and speaks
VJG°TUVGNGOGPVQHVJGUETGGPV[RKECNN[VJGKVGOKPVJGWRRGTNGHVEQTPGT8QKEG1XGT
also lets you know when the screen changes to landscape or portrait, and when it is
locked or unlocked.
236 Chapter 29 Accessibility

Setting Up VoiceOver
Important: VoiceOver changes the gestures used to control iPhone. Once VoiceOver
is turned on, you have to use VoiceOver gestures to operate iPhone—even to turn
8QKEG1XGTQÒCICKPVQTGUWOGUVCPFCTFQRGTCVKQP
6WTP8QKEG1XGTQPQTQÒIn Settings, choose General > Accessibility > VoiceOver and
VCRVJG8QKEG1XGT1P1ÒUYKVEJ
;QWECPCNUQUGV6TKRNGENKEM*QOGVQVWTP8QKEG1XGTQPQTQÒ5GG¥Triple-Click
Home”on page 251.
Note: You can’t use VoiceOver and Zoom at the same time.
6WTPURQMGPJKPVUQPQTQÒIn Settings, choose General > Accessibility > VoiceOver,
CPFVCRVJG5RGCM*KPVU1P1ÒUYKVEJ9JGP5RGCM*KPVUKUVWTPGFQP8QKEG1XGTOC[
tell you the action of the item or provide instructions for you—for example, “double-
tap to open.” Speak Hints is turned on by default.
Set the VoiceOver speaking rate: In Settings, choose General > Accessibility >
VoiceOver, and adjust the Speaking Rate slider.
Add speaking rate to the rotor: In Settings, choose General > Accessibility and tap to
turn on “Include in Rotor.”
You can choose the kind of feedback you get when you type. You can set VoiceOver to
speak characters, words, both, or nothing. If you choose to hear both characters and
words, VoiceOver speaks each character as you type it, then speaks the whole word
YJGP[QW°PKUJKVD[GPVGTKPICURCEGQTRWPEVWCVKQP
Choose typing feedback: In Settings, choose General > Accessibility > VoiceOver >
Typing Feedback. You can choose Characters, Words, Characters and Words, or Nothing
HQTUQHVYCTGMG[DQCTFUCPFHQTCP#RRNG9KTGNGUU-G[DQCTFUGG¥Using an Apple
9KTGNGUU-G[DQCTF” on page 44).
Use phonetics In Settings, choose General > Accessibility > VoiceOver, then
tap the Use Phonetics switch to turn it on.
Use this feature when you type or read character-by-character,
to help make clear which characters were spoken. When Use
2JQPGVKEUKUVWTPGFQP8QKEGQXGT°TUVURGCMUVJGEJCTCEVGT
then speaks a word beginning with the character. For example,
if you type the character “f,” VoiceOver speaks “f,” and then a
moment later, “foxtrot.”
Use pitch change In Settings, choose General > Accessibility > VoiceOver, then
tap the Use Pitch Change switch to turn it on.
VoiceOver uses a higher pitch when entering a letter, and a
lower pitch when deleting a letter. VoiceOver also uses a higher
RKVEJYJGPURGCMKPIVJG°TUVKVGOQHCITQWRUWEJCUCNKUVQT
table) and a lower pitch when speaking the last item of a group.
237
Chapter 29 Accessibility

$[FGHCWNV8QKEG1XGTWUGUVJGNCPIWCIGVJCV¨UUGVHQTK2JQPG;QWECPUGVCFKÒGTGPV
language for VoiceOver.
Set the language for iPhone: In Settings, choose General > International > Language,
VJGPUGNGEVCNCPIWCIGCPFVCR1-5QOGNCPIWCIGUOC[DGKP±WGPEGFD[VJG4GIKQP
Local setting. In Settings, choose General > International > Region Format and select
the format.
Set the language for VoiceOver: In Settings, choose General > International >
Voice Control, then choose the language.
If you change the language for iPhone, you may need to reset the language for
VoiceOver.
Set the rotor options for web browsing: In Settings, choose General > Accessibility >
VoiceOver > Web Rotor. Tap to select or deselect options. To change the position of an
item in the list, touch next to the item, then drag up or down.
Select the languages available in the Language rotor: In Settings, choose General
> Accessibility > VoiceOver > Language Rotor and tap to select the language or
languages you want to appear in the Language rotor. To change the position of a
language in the list, touch next to the language and drag up or down.
The Language rotor is always available when you’ve selected more than one language.
VoiceOver Gestures
9JGP8QKEG1XGTKUVWTPGFQPVJGUVCPFCTFVQWEJUETGGPIGUVWTGUJCXGFKÒGTGPVGÒGEVU
These and some additional gestures let you move around the screen and control
individual elements when they’re selected. VoiceOver gestures include two- and
VJTGG°PIGTUIGUVWTGUVQVCRQT±KEM(QTDGUVTGUWNVUYJGPWUKPIVYQCPFVJTGG°PIGT
IGUVWTGUTGNCZCPFNGV[QWT°PIGTUVQWEJVJGUETGGPYKVJUQOGURCEGDGVYGGPVJGO
You can use standard gestures when VoiceOver is turned on, by double-tapping and
JQNFKPI[QWT°PIGTQPVJGUETGGP#UGTKGUQHVQPGUKPFKECVGUVJCVPQTOCNIGUVWTGUCTG
KPHQTEG6JG[TGOCKPKPGÒGEVWPVKN[QWNKHV[QWT°PIGT6JGP8QKEG1XGTIGUVWTGUTGUWOG
;QWECPWUGFKÒGTGPVVGEJPKSWGUVQGPVGT8QKEG1XGTIGUVWTGU(QTGZCORNG[QWECP
GPVGTCVYQ°PIGTVCRWUKPIVYQ°PIGTUHTQOQPGJCPFQTQPG°PIGTHTQOGCEJJCPF
;QWECPCNUQWUG[QWTVJWODU/CP[°PFVJG¥URNKVVCR¦IGUVWTGGURGEKCNN[GÒGEVKXG
instead of selecting an item and double-tapping, you can touch and hold an item with
QPG°PIGTVJGPVCRVJGUETGGPYKVJCPQVJGT°PIGT6T[FKÒGTGPVVGEJPKSWGUVQFKUEQXGT
which works best for you.
If your gestures don’t work, try quicker movements, especially for double-tapping and
±KEMKPIIGUVWTGU6Q±KEMVT[SWKEMN[DTWUJKPIVJGUETGGPYKVJ[QWT°PIGTQT°PIGTU
When VoiceOver is turned on, the VoiceOver Practice button appears, which gives you
a chance to practice VoiceOver gestures before proceeding.
238 Chapter 29 Accessibility

Practice gestures: In Settings, choose General > Accessibility > VoiceOver, then tap
8QKEG1XGT2TCEVKEG9JGP[QW°PKUJRTCEVKEKPIVCR&QPG
If you don’t see the VoiceOver Practice button, make sure VoiceOver is turned on.
Here’s a summary of key VoiceOver gestures:
Navigating and Reading
Tap: Speak item.
Flick right or left: Select the next or previous item.
Flick up or down: Depends on the Rotor Control setting. See “Rotor Control” on
page 240.
6YQ°PIGTVCR Stop speaking the current item.
6YQ°PIGT±KEMWR Read all from the top of the screen.
6YQ°PIGT±KEMFQYP Read all from the current position.
6YQ°PIGT¥UETWD¦/QXGVYQ°PIGTUDCEMCPFHQTVJVJTGGVKOGUSWKEMN[OCMKPIC
“z”) to dismiss an alert or go back to the previous screen.
6JTGG°PIGT±KEMWRQTFQYP Scroll one page at a time.
6JTGG°PIGT±KEMTKIJVQTNGHV Go to the next or previous page (such as the Home
screen, Stocks, or Safari).
6JTGG°PIGTVCR Speak the scroll status (which page or rows are visible).
(QWT°PIGT±KEMWR5GNGEVVJG°TUVGNGOGPVQPVJGUETGGP
(QWT°PIGT±KEMFQYP Select the last element on the screen.
Activating
Double-tap: Activate the selected item.
Triple-tap: Double-tap an item.
Split-tap: An alternative to selecting an item and double-tapping is to touch an item
YKVJQPG°PIGTVJGPVCRVJGUETGGPYKVJCPQVJGTVQCEVKXCVGCPKVGO
6QWEJCPKVGOYKVJQPG°PIGTVCRVJGUETGGPYKVJCPQVJGT°PIGT¥URNKVVCRRKPI¦
Activate the item.
Double-tap and hold (1 second) + standard gesture: Use a standard gesture.
The double-tap and hold gesture tells iPhone to interpret the subsequent gesture as
UVCPFCTF(QTGZCORNG[QWECPFQWDNGVCRCPFJQNFVJGPYKVJQWVNKHVKPI[QWT°PIGT
FTCI[QWT°PIGTVQUNKFGCUYKVEJ
6YQ°PIGTFQWDNGVCR Answer or end a call. Play or pause in iPod, YouTube, Voice
Memos, or Photos. Take a photo (Camera). Start or pause recording in Camera or
Voice Memos. Start or stop the stopwatch.
6JTGG°PIGTFQWDNGVCR Mute or unmute VoiceOver.
6JTGG°PIGTVTKRNGVCR6WTPVJGUETGGPEWTVCKPQPQTQÒ
239
Chapter 29 Accessibility

Rotor Control
The rotor control is a virtual dial that you can use to change the results of up and
FQYP±KEMIGUVWTGUYJGP8QKEG1XGTKUVWTPGFQP
Operate the rotor: 4QVCVGVYQ°PIGTUQPVJGK2JQPGUETGGPVQ¥VWTP¦VJGFKCNVQ
choose between options.
The current setting appears on the screen and is spoken aloud.
6JGGÒGEVQHVJGTQVQTFGRGPFUQPYJCV[QW¨TGFQKPI(QTGZCORNGKH[QW¨TGTGCFKPI
text in an email you received, you can use the rotor to switch between hearing text
URQMGPYQTFD[YQTFQTEJCTCEVGTD[EJCTCEVGTYJGP[QW±KEMWRQTFQYP+H[QW¨TG
browsing a webpage, you can use the rotor setting to hear all the text (either word-by-
word or character-by-character), or to jump from one element to another of a certain
type, such as headers or links.
The following lists show the available rotor options, depending on the context of what
you’re doing.
Reading text
Select and hear text by:
Character
Word
Line
Browsing a webpage
Select and hear text by:
Character
Word
Line
Heading
Link
Visited link
Non-visited link
In-page link
Form control
Table
240 Chapter 29 Accessibility

Row (when navigating a table)
List
Landmark
Image
Static text
Zoom in or out
Entering text
Move insertion point and hear text by:
Character
Word
Line
Select edit function
Select language
Using a control (such as the spinner for setting the time in Clock)
Select and hear values by:
Character
Word
Line
Adjust the value of the control object
Speaking (available only with the Apple Wireless Keyboard)
Adjust VoiceOver speaking by:
Volume
Rate
Typing echo
Use pitch change
Use Phonetics
See “%QPVTQNNKPI8QKEG1XGT7UKPICP#RRNG9KTGNGUU-G[DQCTF” on page 245.
You can select which rotor options appear for web browsing, and arrange their order.
See “Setting Up VoiceOver” on page 237.
241
Chapter 29 Accessibility

Using VoiceOver
Select items on the screen: &TCI[QWT°PIGTQXGTVJGUETGGP8QKEG1XGTKFGPVK°GU
each element as you touch it. You can move systematically from one element to the
PGZVD[±KEMKPINGHVQTTKIJVYKVJCUKPING°PIGT'NGOGPVUCTGUGNGEVGFHTQONGHVVQ
TKIJVVQRVQDQVVQO(NKEMTKIJVVQIQVQVJGPGZVGNGOGPVQT±KEMNGHVVQIQVQVJG
previous element.
7UGHQWT°PIGTIGUVWTGUVQUGNGEVVJG°TUVQTNCUVGNGOGPVQPCUETGGP
5GNGEVVJG°TUVGNGOGPVQPCUETGGP(NKEMWRYKVJHQWT°PIGTU
Select the last element on a screen: (NKEMFQYPYKVJHQWT°PIGTU
“Tap” a selected item when VoiceOver is turned on: Double-tap anywhere on
the screen.
“Double-tap” a selected item when VoiceOver is turned on: Triple-tap anywhere
on the screen.
Speak the text of an element, character-by-character or word-by-word: With
VJGGNGOGPVUGNGEVGF±KEMWRQTFQYPYKVJQPG°PIGT(NKEMFQYPVQTGCFVJGPGZV
EJCTCEVGTQT±KEMWRVQTGCFVJGRTGXKQWUEJCTCEVGT7UGRJQPGVKEUVQJCXG8QKEG1XGT
also speak a word beginning with the character being spoken. See “Setting Up
VoiceOver” on page 237.
Twist the rotor control to have VoiceOver read word-by-word.
Adjust a slider: 9KVJCUKPING°PIGT±KEMWRVQKPETGCUGVJGUGVVKPIQTFQYPVQ
decrease the setting. VoiceOver announces the setting as you adjust it.
Scroll a list or area of the screen (NKEMWRQTFQYPYKVJVJTGG°PIGTU(NKEMFQYPVQRCIG
FQYPVJTQWIJVJGNKUVQTUETGGPQT±KEMWRVQRCIGWR9JGP
paging through a list, VoiceOver speaks the range of items
displayed (for example, “showing rows 5 through 10”).
You can also scroll continuously through a list, instead of
paging through it. Double-tap and hold. When you hear a
UGTKGUQHVQPGU[QWECPOQXG[QWT°PIGTWRQTFQYPVQUETQNN
VJGNKUV%QPVKPWQWUUETQNNKPIUVQRUYJGP[QWNKHV[QWT°PIGT
Use a list index Some lists have an alphabetical index along the right side.
6JGKPFGZECP¨VDGUGNGEVGFD[±KEMKPIDGVYGGPGNGOGPVU
you must touch the index directly to select it. With the index
UGNGEVGF±KEMWRQTFQYPVQOQXGCNQPIVJGKPFGZ;QWECP
CNUQFQWDNGVCRVJGPUNKFG[QWT°PIGTWRQTFQYP
Reorder a list Some lists, such as Favorites in Phone, and Web Rotor and
Language Rotor in Accessibility settings can be reordered.
Select on the right side of an item, double-tap and hold
until you hear a sound, then drag up or down. VoiceOver
speaks the item you’ve moved above or below, depending
on the direction you’re dragging.
Unlock iPhone: Select the Unlock switch, then double-tap the screen.
242 Chapter 29 Accessibility

Rearrange the Home screen: On the Home screen, select the icon you want to move.
Double-tap and hold the icon, then drag it. VoiceOver speaks the row and column
position as you drag the icon. Release the icon when it’s in the location you want. You
can drag additional icons. Drag an item to the left or right edge of the screen to move
KVVQCFKÒGTGPVRCIGQHVJG*QOGUETGGP9JGP[QW°PKUJRTGUUVJG*QOG button.
Mute VoiceOver &QWDNGVCRYKVJVJTGG°PIGTU&QWDNGVCRCICKPYKVJVJTGG
°PIGTUVQVWTPURGCMKPIDCEMQP6QVWTPQÒQPN[8QKEG1XGT
sounds, set the Ring/Silent switch to Silent.
If an external keyboard is connected, you can also press the
Control key on the keyboard to mute or unmute VoiceOver.
Stop speaking an item 6CRQPEGYKVJVYQ°PIGTU6CRCICKPYKVJVYQ°PIGTUVQ
resume speaking. Speaking automatically resumes when you
select another item.
6WTPVJGUETGGPEWTVCKPQPQTQÒ 6TKRNGVCRYKVJVJTGG°PIGTU9JGPUETGGPEWTVCKPKUQP
the screen contents are active even though the display is
VWTPGFQÒ
Speak the entire screen from the top (NKEMWRYKVJVYQ°PIGTU
Speak from the current item to the
bottom of the screen
(NKEMFQYPYKVJVYQ°PIGTU
You can hear iPhone status information by touching the top of the screen. This
information can include the time, battery life, Wi-Fi signal strength, and more.
Making Phone Calls with VoiceOver
&QWDNGVCRVJGUETGGPYKVJVYQ°PIGTUVQCPUYGTQTGPFCECNN9JGPCRJQPGECNN
is established with VoiceOver on, the screen displays the numeric keypad by default,
instead of showing call options. This makes it easier to use the keypad to respond to a
menu of options when you reach an automated system.
Display call options: 5GNGEVVJG*KFG-G[RCFDWVVQPKPVJGNQYGTTKIJVEQTPGTCPF
double-tap.
Display the numeric keypad again: 5GNGEVVJG-G[RCFDWVVQPPGCTVJGEGPVGTQHVJG
screen and double-tap.
Entering and Editing Text
9JGP[QWGPVGTCPGFKVCDNGVGZV°GNF[QWECPWUGVJGQPUETGGPMG[DQCTFQTCP
external keyboard connected to iPhone to enter text.
There are two ways to enter text in VoiceOver—standard typing and “touch” typing.
With standard typing, you select a key, then double-tap the screen to enter the
character. With touch typing, you touch to select a key and the character is entered
CWVQOCVKECNN[YJGP[QWNKHV[QWT°PIGT6QWEJV[RKPIECPDGSWKEMGTDWVOC[TGSWKTG
more practice than standard typing.
243
Chapter 29 Accessibility

VoiceOver also lets you use the editing features of iPhone to cut, copy, or paste in a
VGZV°GNF
Enter text:
1 5GNGEVCVGZV°GNFVQDTKPIWRVJGQPUETGGPMG[DQCTF
You may need to double-tap to bring up the keyboard, if it doesn’t appear
CWVQOCVKECNN[8QKEG1XGTYKNNVGNN[QWKHVJGVGZV°GNF¥KUGFKVKPI¦QTKH[QWPGGFVQ
“double-tap to edit.”
+HVJG°GNFCNTGCF[EQPVCKPUVGZVVJGKPUGTVKQPRQKPVKURNCEGFGKVJGTCVVJGDGIKPPKPI
or at the end of the text. Double-tap to move the insertion point to the opposite end.
VoiceOver tells you the position of the insertion point.
2Use the keyboard to type characters:
Standard typing: 5GNGEVCMG[QPVJGMG[DQCTFD[±KEMKPINGHVQTTKIJVVJGPFQWDNG
VCRVQGPVGTVJGEJCTCEVGT1TOQXG[QW°PIGTCTQWPFVJGMG[DQCTFVQUGNGEVCMG[
CPFYJKNGEQPVKPWKPIVQVQWEJVJGMG[YKVJQPG°PIGTVCRVJGUETGGPYKVJCPQVJGT
°PIGTVQGPVGTVJGEJCTCEVGT8QKEG1XGTURGCMUVJGMG[YJGPKV¨UUGNGEVGFCPFCICKP
when the character is entered.
Touch typing: 6QWEJCMG[QPVJGMG[DQCTFVQUGNGEVKVVJGPNKHV[QWT°PIGTVQGPVGT
VJGEJCTCEVGT+H[QWVQWEJVJGYTQPIMG[OQXG[QWT°PIGTQPVJGMG[DQCTFWPVKN
you select the key you want. VoiceOver speaks the character for each key as you
VQWEJKVDWVFQGUP¨VGPVGTCEJCTCEVGTWPVKN[QWNKHV[QWT°PIGT
Note: Touch typing works only for the keys that actually enter text. Use standard
typing for other keys such as Shift, Delete, and Return.
VoiceOver tells you when it thinks you’ve misspelled a word.
Choose standard or touch typing: With VoiceOver turned on and a key selected on
VJGMG[DQCTFWUGVJGTQVQTVQUGNGEV6[RKPI/QFGVJGP±KEMWRQTFQYP
Move the insertion point: Use the rotor to choose whether you want to move the
insertion point by character, by word, or by line. By default, VoiceOver moves the
insertion point character-by-character.
Flick up or down to move the insertion point forward or backward in the text.
VoiceOver makes a sound when the insertion point moves, and speaks the character
that the insertion point moves across.
When moving the insertion point by word, VoiceOver speaks each word as you
move across it. When moving forward, the insertion point is placed at the end of
the traversed word, before the space or punctuation that follows it. When moving
backward, the insertion point is placed the end of the word preceding the traversed
word, before the space or punctuation that follows it. To move the insertion point
past the punctuation at the end of a word or sentence, use the rotor to switch back to
character mode.
244 Chapter 29 Accessibility

When moving the insertion point by line, VoiceOver speaks each line as you move
across it. When moving forward, the insertion point is placed at the beginning of the
next line (except when you reach the last line of a paragraph, when the insertion point
is moved to the end of the line just spoken). When moving backward, the insertion
point is placed at the beginning of the line that’s spoken.
Delete a character: Select the , then double-tap or split-tap. You must do this
even when touch typing. To delete multiple characters, touch and hold the Delete
MG[VJGPVCRVJGUETGGPYKVJCPQVJGT°PIGTQPEGHQTGCEJEJCTCEVGT[QWTYCPVVQ
delete. VoiceOver speaks the character as it’s deleted. If Use Pitch Change is turned on,
VoiceOver speaks deleted characters in a lower pitch.
Select text: 5GVVJGTQVQTVQ'FKV±KEMWRQTFQYPVQEJQQUG5GNGEVQT5GNGEV#NNVJGP
double tap. If you chose Select, the word closest to the insertion point is selected
when you double-tap. If you chose Select All, the entire text is selected.
Pinch apart or together to increase or decrease the selection.
Cut, copy, or paste: /CMGUWTGVJGTQVQTKUUGVVQGFKV9KVJVGZVUGNGEVGF±KEMWRQT
down to choose Cut, Copy, or Paste, then double-tap.
Undo: 5JCMGK2JQPG±KEMNGHVQTTKIJVVQEJQQUGVJGCEVKQPVQWPFQVJGPFQWDNGVCR
Enter an accented character: In standard typing mode, select the plain character,
then double-tap and hold until you hear a sound indicating alternate characters have
CRRGCTGF&TCINGHVQTTKIJVVQUGNGEVCPFJGCTVJGEJQKEGU4GNGCUG[QWT°PIGTVQGPVGT
the current selection.
Change the language you’re typing in: 5GVVJGTQVQTVQ.CPIWCIGVJGP±KEMWRQT
FQYP%JQQUG¥FGHCWNVNCPIWCIG¦VQWUGVJGNCPIWCIGURGEK°GFKP+PVGTPCVKQPCNUGVVKPIU
Note: The Language rotor appears only if you select more than one language in the
VoiceOver Language Rotor setting. See “Setting Up VoiceOver” on page 237.
Controlling VoiceOver Using an Apple Wireless Keyboard
;QWECPEQPVTQN8QKEG1XGTWUKPICP#RRNG9KTGNGUU-G[DQCTFRCKTGFYKVJK2JQPG5GG
“7UKPICP#RRNG9KTGNGUU-G[DQCTF” on page 44.
The VoiceOver keyboard commands let you navigate the screen, select items, read
screen contents, adjust the rotor, and perform other VoiceOver actions. All the
keyboard commands (except one) include Control-Option, abbreviated in the table
below as “VO.”
VoiceOver Help speaks keys or keyboard commands as you type them. You can
use VoiceOver Help to learn the keyboard layout and the actions associated with
key combinations.
245
Chapter 29 Accessibility

VoiceOver Keyboard Commands
VO = Control-Option
Read all, starting from the current position VO–A
Read from the top VO–B
Move to the status bar VO–M
Press the Home button VO–H
Select the next or previous item VO–Right Arrow or VO–Left Arrow
Tap an item VO–Space bar
&QWDNGVCRYKVJVYQ°PIGTU VO–”-”
Choose the next or previous rotor item VO–Up Arrow or VO–Down Arrow
Choose the next or previous speech rotor item VO–Command–Left Arrow or VO–Command–
Right Arrow
Adjust speech rotor item VO–Command–Up Arrow or VO–Command–
Down Arrow
Mute or unmute VoiceOver VO–S
6WTPVJGUETGGPEWTVCKPQPQTQÒ VO–Shift-S
Turn on VoiceOver help 81£-
4GVWTPVQVJGRTGXKQWUUETGGPQTVWTPQÒ
VoiceOver help
Escape
Quick Nav
6WTPQP3WKEM0CXVQEQPVTQN8QKEG1XGTWUKPIVJGCTTQYMG[U3WKEM0CXKUQÒD[FGHCWNV
6WTP3WKEM0CXQPQTQÒ Left Arrow–Right Arrow
Select the next or previous item Right Arrow or Left Arrow
5GNGEVVJGPGZVQTRTGXKQWUKVGOURGEK°GFD[
the rotor setting
Up Arrow or Down Arrow
5GNGEVVJG°TUVQTNCUVKVGO Control–Up Arrow or Control–Down Arrow
"Tap” an item Up Arrow–Down Arrow
Scroll up, down, left, or right Option–Up Arrow, Option–Down Arrow, Option–
Left Arrow, or Option–Right Arrow
Change the rotor Up Arrow–Left Arrow or Up Arrow–Right Arrow
246 Chapter 29 Accessibility

Using Maps
With VoiceOver, you can zoom in or out, select pins, and get information about locations.
Zoom in or out: 7UGVJGTQVQTVQEJQQUG\QQOOQFGVJGP±KEMWRQTFQYPVQ\QQO
in or out.
Select a pin: 6QWEJCRKPQT±KEMNGHVQTTKIJVVQOQXGHTQOQPGKVGOVQCPQVJGT
Get information about a location: With a pin selected, double-tap to display the
KPHQTOCVKQP±CI(NKEMNGHVQTTKIJVVQUGNGEVVJG±CIVJGPFQWDNGVCRVQFKURNC[VJG
information page.
Editing Videos and Voice Memos
You can use VoiceOver gestures to trim Camera videos and Voice Memo recordings.
Trim a voice memo: On the Voice Memos screen, select the button to the right of the
memo you want to trim, then double-tap. Then select Trim Memo and double-tap.
5GNGEVVJGDGIKPPKPIQTGPFQHVJGVTKOVQQN(NKEMWRVQFTCIVQVJGTKIJVQT±KEMFQYP
to drag to the left. VoiceOver announces the amount of time the current position will
trim from the recording. To execute the trim, select Trim Voice Memo and double-tap.
Trim a video: While viewing a video, double-tap the screen to display the video
EQPVTQNU5GNGEVVJGDGIKPPKPIQTGPFQHVJGVTKOVQQN6JGP±KEMWRVQFTCIVQVJGTKIJV
QT±KEMFQYPVQFTCIVQVJGNGHV8QKEG1XGTCPPQWPEGUVJGCOQWPVQHVKOGVJGEWTTGPV
position will trim from the recording. To execute the trim, select Trim and double-tap.
Using a Braille Display with VoiceOver
Setting Up a Braille Display
You can use a refreshable Bluetooth braille display to read VoiceOver output in braille.
In addition, braille displays with input keys and other controls can be used to control
iPhone when VoiceOver is turned on. iPhone works with many wireless braille displays.
For a list of supported displays, go to www.apple.com/accessibility.
Set up a braille display:
1Turn on the braille display.
2On iPhone, turn on Bluetooth.
In Settings, choose General > Bluetooth, then tap the Bluetooth switch.
3In Settings, choose General > Accessibility > VoiceOver > Braille, then choose the
braille display.
6WTPEQPVTCEVGFDTCKNNGQPQTQÒIn Settings, choose General > Accessibility >
VoiceOver > Braille, then tap the Contracted Braille switch.
247
Chapter 29 Accessibility

Choosing a Language
The braille display uses the language that’s set for Voice Control. By default, this
is the language set for iPhone in Settings > International > Language. You can
WUGVJG8QKEG1XGTNCPIWCIGUGVVKPIVQUGVCFKÒGTGPVNCPIWCIGHQT8QKEG1XGTCPF
braille displays.
Set the language for VoiceOver: In Settings, choose General > International >
Voice Control, then choose the language.
If you change the language for iPhone, you may need to reset the language for
VoiceOver and your braille display.
Controlling VoiceOver with Your Braille Display
You can set the leftmost or rightmost cell of your braille display to provide system
status and other information:
Announcement History contains an unread message
The current Announcement History message hasn’t been read
VoiceOver speech is muted
The iPhone battery is low (less than 20% charge)
iPhone is in landscape orientation
6JGUETGGPFKURNC[KUVWTPGFQÒ
The current line contains additional text to the left
The current line contains additional text to the right
Set the leftmost or rightmost cell to display status information: In Settings, choose
General > Accessibility > VoiceOver > Braille > Status Cell, then tap Left or Right.
See an expanded description of the status cell: On your braille display, press the
status cell’s router button.
248 Chapter 29 Accessibility

Zoom
/CP[K2JQPGCRRUNGV[QW\QQOKPQTQWVQPURGEK°EGNGOGPVU(QTGZCORNG[QWECP
double-tap or use the pinch gesture to expand webpage columns in Safari.
Zoom is also a special accessibility feature that lets you magnify the entire screen of
any app you’re using, to help you see what’s on the display.
6WTP<QQOQPQTQÒIn Settings, choose General > Accessibility > Zoom and tap the
<QQO1P1ÒUYKVEJ
Note: You can’t use VoiceOver and Zoom at the same time.
Zoom in or out: &QWDNGVCRVJGUETGGPYKVJVJTGG°PIGTU$[FGHCWNVVJGUETGGPKU
OCIPK°GFRGTEGPV+H[QWOCPWCNN[EJCPIGVJGOCIPK°ECVKQPD[WUKPIVJGVCR
CPFFTCIIGUVWTGFGUETKDGFDGNQYK2JQPGCWVQOCVKECNN[TGVWTPUVQVJCVOCIPK°ECVKQP
YJGP[QW\QQOKPD[FQWDNGVCRRKPIYKVJVJTGG°PIGTU
+PETGCUGOCIPK°ECVKQP9KVJVJTGG°PIGTUVCRCPFFTCIVQYCTFVJGVQRQHVJG
UETGGPVQKPETGCUGOCIPK°ECVKQPQTVQYCTFVJGDQVVQOQHVJGUETGGPVQFGETGCUG
OCIPK°ECVKQP6JGVCRCPFFTCIIGUVWTGKUUKOKNCTVQCFQWDNGVCRGZEGRV[QWFQP¨V
NKHV[QWT°PIGTUQPVJGUGEQPFVCR¤KPUVGCFFTCI[QWT°PIGTUQPVJGUETGGP1PEG
[QWUVCTVFTCIIKPI[QWECPFTCIYKVJCUKPING°PIGT
Move around the screen: 9JGP\QQOGFKPFTCIQT±KEMVJGUETGGPYKVJVJTGG°PIGTU
1PEG[QWUVCTVFTCIIKPI[QWECPFTCIYKVJCUKPING°PIGTUQVJCV[QWECPUGGOQTG
QHVJGUETGGP*QNFCUKPING°PIGTPGCTVJGGFIGQHVJGFKURNC[VQRCPVQVJCVUKFGQH
VJGUETGGPKOCIG/QXG[QWT°PIGTENQUGTVQVJGGFIGVQRCPOQTGSWKEMN[9JGP[QW
open a new screen, Zoom always goes to the top-middle of the screen.
9JKNGWUKPI<QQOYKVJCP#RRNG9KTGNGUU-G[DQCTFUGG¥Using an Apple Wireless
-G[DQCTF” on page 44), the screen image follows the insertion point, keeping it in the
center of the display.
Large Text
Large Text lets you make the text larger in alerts, and in Calendar, Contacts, Mail,
Messages, and Notes. You can choose 20-point, 24-point, 32-point, 40-point, 48-point,
or 56-point text.
Set the text size: In Settings, choose General > Accessibility, tap Large Text, then tap
the text size you want.
249
Chapter 29 Accessibility

White on Black
Use White on Black to invert the colors on the iPhone screen, which may make it
easier to read the screen. When White on Black is turned on, the screen looks like a
photographic negative.
Invert the screen’s colors: In Settings, choose General > Accessibility and tap the
“White on Black” switch.
Mono Audio
Mono Audio combines the sound of the left and right channels into a mono signal
played on both sides. This enables users with hearing impairment in one ear to hear
the entire sound signal with the other ear.
6WTP/QPQ#WFKQQPQTQÒIn Settings, choose General > Accessibility and tap the
Mono Audio switch.
250 Chapter 29 Accessibility

Speak Auto-text
Speak Auto-text speaks the text corrections and suggestions iPhone makes when
you’re typing.
6WTP5RGCM#WVQVGZVQPQTQÒIn Settings, choose General > Accessibility and tap
the Speak Auto-text switch.
Speak Auto-text also works with VoiceOver or Zoom.
Triple-Click Home
Triple-click Home provides an easy way to turn some of the Accessibility features on
QTQÒYJGP[QWRTGUUVJG*QOG button quickly three times. You can set Triple-click
*QOGVQVWTP8QKEG1XGTQPQTQÒVWTP9JKVGQP$NCEMQPQTQÒQTRTGUGPVVJGQRVKQPUVQ
6WTP8QKEG1XGTQPQTQÒ
6WTP<QQOQPQTQÒ
6WTP9JKVGQP$NCEMQPQTQÒ
6TKRNGENKEM*QOGKUVWTPGFQÒD[FGHCWNV
Set the Triple-click Home function: In Settings, choose General > Accessibility >
Triple-click Home and choose the function you want.
Closed Captioning and Other Helpful Features
Many iPhone features help make iPhone accessible to all users, including those with
visual or auditory impairments.
Closed Captioning
You can turn on closed captioning for videos in iPod settings. See “Video” on page 217.
Note: Not all video content is encoded for closed captioning.
Voice Control
Voice Control (iPhone 3GS or later) lets you make phone calls and control iPod music
playback by using voice commands. See “Voice Dialing” on page 65, and “Using Voice
Control with iPod” on page 100.
Large Phone Keypad
Make phone calls simply by tapping entries in your contacts and favorites lists. When
you need to dial a number, iPhone’s large numeric keypad makes it easy. See “Phone
Calls”on page 64.
251
Chapter 29 Accessibility

Widescreen Keyboards
Several apps let you rotate iPhone when you’re typing, so you can use a larger keyboard:
Mail
Safari
Messages
Notes
Contacts
Visual Voicemail
The play and pause controls in visual voicemail let you control the playback of
messages. Drag the playhead on the scrubber bar to repeat a portion of the message
that’s hard to understand. See “Checking Voicemail” on page 72.
Assignable Ringtones
You can assign distinctive ringtones to individuals in your contacts list for audible
caller ID. You can purchase ringtones from the iTunes Store on iPhone. See “Purchasing
Ringtones” on page 173.
Instant Messaging (IM) Chat
The App Store features many Internet Messaging (IM) apps, such as AIM, BeejiveIM,
ICQ, and Yahoo! Messenger, that are optimized for iPhone.
Minimum Font Size for Mail Messages
To increase readability, set a minimum font size for Mail message text to Large, Extra
Large, or Giant. See “Mail” on page 210.
TTY Support (Available in Some Areas)
Use iPhone in TTY mode with the iPhone TTY Adapter (available separately) to use
a Teletype (TTY) machine. See “Using iPhone with a Teletype (TTY) Machine” on
page 213.
Universal Access in Mac OS X
Take advantage of the Universal Access features in Mac OS X when you use iTunes to
sync information and content from your iTunes library to iPhone. In the Finder, choose
Help > Mac Help, then search for “universal access.”
For more information about iPhone and Mac OS X accessibility features, go to
www.apple.com/accessibility.
252 Chapter 29 Accessibility

Hearing Aid Compatibility
The FCC has adopted hearing aid compatibility (HAC) rules for digital wireless phones.
These rules require certain phones to be tested and rated under the American National
Standard Institute (ANSI) C63.19 hearing aid compatibility standards. The ANSI standard
for hearing aid compatibility contains two types of ratings: an “M” rating for reduced
radio frequency interference to enable acoustic coupling with hearing aids that don’t
operate in telecoil mode, and a “T” rating for inductive coupling with hearing aids
operating in telecoil mode. These ratings are given on a scale from one to four, where
four is the most compatible. A phone is considered hearing aid compatible under FCC
rules if it is rated M3 or M4 for acoustic coupling and T3 or T4 for inductive coupling.
For current iPhone hearing aid compatibility ratings, go to
www.apple.com/iphone/specs.html.
Hearing aid compatibility ratings aren’t a guarantee that a particular hearing aid works
with a particular phone. Some hearing aids may work well with phones that don’t
meet particular ratings. To ensure interoperability between a hearing aid and a phone,
use them together before purchasing them.
This phone has been tested and rated for use with hearing aids for some of the
wireless technologies that it uses. However, there may be some newer wireless
technologies used in this phone that have not been tested yet for use with hearing
CKFU+VKUKORQTVCPVVQVT[VJGFKÒGTGPVHGCVWTGUQHVJKURJQPGVJQTQWIJN[CPFKP
FKÒGTGPVNQECVKQPUWUKPI[QWTJGCTKPICKFQTEQEJNGCTKORNCPVVQFGVGTOKPGKH[QWJGCT
any interfering noise. Consult your service provider or the manufacturer of this phone
for information on hearing aid compatibility. If you have questions about return or
exchange policies, consult your service provider or phone retailer.
253
Chapter 29 Accessibility

Support and Other Information A
Appendix
Apple iPhone Support Site
Comprehensive support information is available online at
www.apple.com/support/iphone. You can also use Express Lane for personalized
support (not available in all countries or regions). Go to expresslane.apple.com.
Restarting and Resetting iPhone
If something isn’t working right, try restarting iPhone, force quitting an app,
or resetting iPhone.
Restart iPhone: 2TGUUCPFJQNFVJG1P1Ò5NGGR9CMGDWVVQPWPVKNVJGTGFUNKFGT
CRRGCTU5NKFG[QWT°PIGTCETQUUVJGUNKFGTVQVWTPQÒK2JQPG6QVWTPK2JQPGDCEMQP
RTGUUCPFJQNFVJG1P1Ò5NGGR9CMGDWVVQPWPVKNVJG#RRNGNQIQCRRGCTU
+H[QWECP¨VVWTPQÒK2JQPGQTKHVJGRTQDNGOEQPVKPWGU[QWOC[PGGFVQTGUGVK2JQPG
#TGUGVUJQWNFDGFQPGQPN[KHVWTPKPIK2JQPGQÒCPFQPFQGUP¨VTGUQNXGVJGRTQDNGO
Force quit an app: 2TGUUCPFJQNFVJG1P1Ò5NGGR9CMGDWVVQPHQTCHGYUGEQPFU
until a red slider appears, then press and hold the Home button until the app quits. On
iPhone 3GS or later, you can also remove an app from the recents list to force it to quit.
See “Opening and Switching Apps” on page 29.
Reset iPhone: 2TGUUCPFJQNFVJG1P1Ò5NGGR9CMGDWVVQPCPFVJG*QOGDWVVQPCV
the same time for at least ten seconds, until the Apple logo appears.
254

Backing Up iPhone
iTunes creates backups of settings, downloaded apps and data, and other information
on iPhone. You can use a backup to restore these items to your iPhone after a software
restore or to transfer the information to another iPhone. See “Updating and Restoring
iPhone Software” on page 256.
Backing up iPhone or restoring from a backup isn’t the same as syncing content and
other items (such as music, podcasts, ringtones, photos, videos, and apps that you
download via iTunes) with your iTunes library. Backups include settings, downloaded
apps and data, and other information on iPhone. After you restore iPhone, you need to
sync again to get your music, videos, photos, apps, and other content back on iPhone.
See “Restoring from a Backup” on page 257.
Apps downloaded from the App Store are backed up the next time you sync with
iTunes. Afterwards, only app data is backed up when you sync with iTunes.
Creating a Backup
iTunes creates a backup of iPhone when you:
Sync with iTunes
By default, iTunes syncs iPhone each time you connect iPhone to your computer.
See “Syncing with iTunes” on page 57. iTunes won’t automatically back up an iPhone
VJCVKUP¨VEQP°IWTGFVQU[PEYKVJVJCVEQORWVGT;QWECPCNUQU[PEOCPWCNN[D[
clicking Sync in iTunes. Note that iTunes creates a backup only once each time
K2JQPGKUEQPPGEVGFVQ[QWTEQORWVGTDGHQTGVJG°TUVU[PEVJCVQEEWTU+H[QWU[PE
again, iTunes doesn’t create another backup.
Update iPhone
K6WPGUDCEMUWRK2JQPGDGHQTGWRFCVKPIK2JQPGGXGPKHKVKUP¨VEQP°IWTGFVQU[PE
with iTunes on that computer.
Restore iPhone (if you choose to back up)
iTunes asks if you want to back up iPhone before restoring it.
For more information about backups, including the settings and information stored in
a backup, go to support.apple.com/kb/HT1766.
Removing a Backup
You can remove a backup of iPhone from the list of backups in iTunes. You may want
to do this, for example, if a backup was created on someone else’s computer.
Remove a backup:
1In iTunes, open iTunes Preferences.
Mac: Choose iTunes > Preferences.
Windows: Choose Edit > Preferences.
2Click Devices (iPhone doesn’t need to be connected).
255
Appendix A Support and Other Information

3Select the backup you want to remove, then click Delete Backup.
4 %QP°TO[QWYKUJVQTGOQXGVJGUGNGEVGFDCEMWRD[ENKEMKPI&GNGVG$CEMWR
5 %NKEM1-VQENQUGVJGK6WPGU2TGHGTGPEGU9KPFQY
Updating and Restoring iPhone Software
You can use iTunes to update or restore iPhone software.
If you update, the iPhone software is updated. Your downloaded apps, settings, and
FCVCCTGP¨VCÒGEVGF
Note: In some cases, an update may also involve restoring iPhone.
If you restore, the latest version of iPhone software is reinstalled, settings are restored
to their default, and all data stored on iPhone is deleted, including downloaded
apps, songs, videos, contacts, photos, calendar information, and any other data. If
you’ve backed up iPhone with iTunes on your computer, you can restore data from
the backup at the end of the restore process.
Deleted data is no longer accessible via the iPhone user interface, but it isn’t erased
from iPhone. For information about erasing all content and settings, see “Resetting
iPhone”on page 207.
If you use a Bluetooth headset or car kit with iPhone and you restore settings, you
must pair the Bluetooth device with iPhone again to use it.
For more information about updating and restoring iPhone software, go to
support.apple.com/kb/HT1414.
Updating iPhone
Make sure you have an Internet connection and have installed the latest version of
iTunes from www.apple.com/itunes.
Update iPhone:
1Connect iPhone to your computer.
2In iTunes, select iPhone in the Devices list, then click Summary at the top of the screen.
3Click “Check for Update.” iTunes tells you if there’s a newer version of the iPhone
software available.
4Click Update to install the latest version of the software.
256 Appendix A Support and Other Information

Restoring iPhone
Make sure you have an Internet connection and have installed the latest version of
iTunes from www.apple.com/itunes.
Restore iPhone:
1Connect iPhone to your computer.
2In iTunes, select iPhone in the Devices list, then click Summary at the top of the screen.
3Click “Check for Update.” iTunes tells you if there’s a newer version of the iPhone
software available.
4Click Restore. Follow the onscreen instructions to complete the restore process. When
restoring, it is recommended that you back up iPhone when prompted.
When the iPhone software has been restored, you can either set it up as a new iPhone,
or restore your music, videos, app data, and other content from a backup.
After you restore from a backup, previous data is no longer accessible through the
iPhone user interface, but it isn’t erased from iPhone. For information about erasing all
content and settings, see “Resetting iPhone”on page 207.
Restoring from a Backup
You can restore the settings, app data, and other information from a backup, or use
this feature to transfer these items to another iPhone. Make sure you have an Internet
connection and have installed the latest version of iTunes from www.apple.com/itunes.
Important: Restoring from a backup is not the same as restoring iPhone from the
Summary pane in iTunes. See “Restoring iPhone”on page 257. Restoring from a backup
does not fully restore iPhone software. Also, restoring iPhone from a backup restores
all data in the backup, including data for apps. If you choose an old backup, restoring
from it could replace the app data with data that is not current.
If you restore iPhone from a backup of some other iPhone or iPod touch, some
passwords and settings may not be restored. (Additional, but still not all, passwords
and settings may be restored if the backup is encrypted.) For more information about
the settings and information stored in a backup, go to support.apple.com/kb/HT1766.
Restore iPhone from a backup:
1Connect iPhone to the computer you normally sync with.
2In iTunes, Control-click iPhone in the Devices list and choose “Restore from Backup”
from the menu that appears.
3Choose the backup that you want to restore from the pop-up menu, then click Restore.
If your backup is encrypted, enter your password.
257
Appendix A Support and Other Information

Safety, Software, and Service Information
This table describes where to get more iPhone-related safety, software, and
service information.
To learn about Do this
Using iPhone safely See the Important Product Information Guide at
www.apple.com/support/manuals/iphone for the
latest safety and regulatory information.
iPhone service and support, tips, forums,
and Apple software downloads
Go to www.apple.com/support/iphone.
Service and support from your carrier Contact your carrier or go to your carrier’s
website.
The latest information about iPhone Go to www.apple.com/iphone.
Using iTunes Open iTunes and choose Help > iTunes Help.
For an online iTunes tutorial (may not be
available in all countries and regions), go to
www.apple.com/support/itunes.
Creating an Apple ID Go to appleid.apple.com.
MobileMe Go to www.me.com.
Using iPhoto on Mac OS X Open iPhoto and choose Help > iPhoto Help.
Using Address Book on Mac OS X Open Address Book and choose Help >
Address Book Help.
Using iCal on Mac OS X Open iCal and choose Help > iCal Help.
Microsoft Outlook, Windows Address Book,
or Adobe Photoshop Elements
See the documentation that came with
those apps.
Finding your iPhone serial number,
International Mobile Equipment Identity (IMEI),
QT/QDKNG'SWKROGPV+FGPVK°GT/'+&
;QWECP°PF[QWTK2JQPGUGTKCNPWODGTCPF+/'+
(GSM models) or MEID (CDMA model) on the
iPhone packaging. Or, on iPhone, choose Settings
> General > About. In iTunes on your computer,
hold down the Control key and choose Help
> About iTunes (Windows) or iTunes > About
iTunes (Mac), then release the Control key. (Press
the Space bar to pause the scrolling.)
Obtaining warranty service First follow the advice in this guide and online
resources. Then go to www.apple.com/support
or see the Important Product Information Guide at
www.apple.com/support/manuals/iphone.
Battery replacement service Go to
www.apple.com/support/iphone/service/battery.
258 Appendix A Support and Other Information

Using iPhone in an Enterprise Environment
Go to www.apple.com/iphone/business to learn more about enterprise features of
iPhone, including:
Microsoft Exchange
+PUVCNNKPIEQP°IWTCVKQPRTQ°NGU
CalDAV
CardDAV
IMAP
LDAP
VPN
Using iPhone with Other Carriers
Some carriers let you unlock iPhone for use with their network. To determine if your
ECTTKGTQÒGTUVJKUQRVKQPIQVQsupport.apple.com/kb/HT1937.
Contact your carrier for authorization and setup information. You’ll need to connect
iPhone to iTunes to complete the process. Additional fees may apply.
For troubleshooting information, go to support.apple.com/kb/TS3198.
Disposal and Recycling Information
Apple Used Mobile Phone Recycling Program (available in some areas): For free
recycling of your old mobile phone, a prepaid shipping label, and instructions, see:
www.apple.com/recycling
iPhone Disposal and Recycling: You must dispose of iPhone properly according to
local laws and regulations. Because iPhone contains electronic components and a
battery, iPhone must be disposed of separately from household waste. When iPhone
reaches its end of life, contact local authorities to learn about disposal and recycling
QRVKQPUQTUKORN[FTQRKVQÒCV[QWTNQECN#RRNGTGVCKNUVQTGQTTGVWTPKVVQ#RRNG6JG
battery will be removed and recycled in an environmentally friendly manner. For more
information, see: www.apple.com/recycling
259
Appendix A Support and Other Information

European Union—Electronics and Battery Disposal Information:
This symbol means that according to local laws and regulations your product and
its battery should be recycled separately from household waste. When this product
reaches its end of life, take it to a collection point designated by local authorities for
the recycling of electronic equipment. The improper disposal of waste electronic
GSWKROGPVHTQOVJGEQPUWOGTOC[DGUWDLGEVVQ°PGU6JGUGRCTCVGEQNNGEVKQPCPF
recycling of your product and its battery at the time of disposal will help conserve
natural resources and ensure that it is recycled in a manner that protects human
health and the environment.
For collection and recycling services for iPhone, go to:
www.apple.com/recycling/nationalservices/europe.html
Battery Replacement for iPhone: The rechargeable battery in iPhone should be
replaced only by an authorized service provider. For battery replacement services go
to: www.apple.com/support/iphone/service/battery
Deutschland: Dieses Gerät enthält Batterien. Bitte nicht in den Hausmüll werfen.
Entsorgen Sie dieses Gerätes am Ende seines Lebenszyklus entsprechend der
maßgeblichen gesetzlichen Regelungen.
Nederlands: Gebruikte batterijen kunnen worden ingeleverd bij de chemokar of in een
speciale batterijcontainer voor klein chemisch afval (kca) worden gedeponeerd.
Türkiye: EEE yönetmeliğine (Elektrikli ve Elektronik Eşyalarda Bazı Zararlı Maddelerin
Kullanımının Sınırlandırılmasına Dair Yönetmelik) uygundur.
Taiwan:
Brazil—Disposal Information:
Brasil—Informações sobre descarte e reciclagem: O símbolo indica que este produto
e/ou sua bateria não devem ser descartadas no lixo doméstico. Quando decidir
descartar este produto e/ou sua bateria, faça-o de acordo com as leis e diretrizes
ambientais locais. Para informações sobre o programa de reciclagem da Apple, pontos
de coleta e telefone de informações, visite www.apple.com/br/environment.
260 Appendix A Support and Other Information

Apple and the Environment
At Apple, we recognize our responsibility to minimize the environmental
impacts of our operations and products. For more information, go to:
www.apple.com/environment
iPhone Operating Temperature
If the interior temperature of iPhone exceeds normal operating temperatures, you may
experience the following as it attempts to regulate its temperature:
iPhone stops charging
the screen dims
the cellular signal is weak
a temperature warning screen appears
Important: You cannot use iPhone while the temperature warning screen is displayed,
except to make an emergency call. If iPhone can’t regulate its internal temperature, it
goes into deep sleep mode until it cools. You cannot make an emergency call when
iPhone is in this mode. Move iPhone to a cooler location and wait a few minutes
before trying to use iPhone again.
261
Appendix A Support and Other Information

Index
1xRTT
network 22, 23, 67
status icon 17
3G
enabling 23
network 22, 23, 67
status icon 17
12-hour time 204
24-hour time 204
A
accessibility
features 235
hearing aid compatibility 253
Large Text 249
Mono Audio 250
setting up iPhone using VoiceOver 21
settings 207
Speak Auto-text 251
Triple-click Home 251
TTY machine 213
VoiceOver 236
White on Black 250
Zoom 249
accounts 25, 27, 208
“push” 56, 209
restricting 204
activating iPhone 21
adding a call 67
adjusting brightness 197
Adobe Photoshop 121
Adobe Photoshop Elements 61
airplane mode
settings 193
status icon 17
turning on 193
AirPlay
music playback 97
playing YouTube videos 134
streaming to a TV 108
video playback 105
viewing photos 124
AirPrint 45
See also printing
alarm status icon 18
alarms
deleting 156
setting 156
VWTPKPIQPQTQÒ156
album artwork 101
album tracks 102
alerts
adjusting volume 12, 197
calendar 120
VWTPKPIQPQTQÒ197
voicemail 72
alternate audio language 106
answering calls 50
anti-phishing. See Safari fraud warning
AOL 152
App Store
about 178
browsing 179
deleting apps 182
Genius 179
restricting 203
store account 178, 218
syncing 57
syncing purchased content 183
updating apps 183
verifying purchases 177
Apple ID
about 258
creating in App Store 181
creating in Game Center 185
creating in iTunes 21
creating in iTunes Store 173, 174
creating in MobileMe 26
creating in Store settings 218
#RRNG9KTGNGUU-G[DQCTF44
apps
deleting 182
opening 29
overview 14
restricting deletion 203
attachments, email 83
Index
262

audio
alternate language 106
mono 250
audiobooks, syncing 57
Auto-Brightness 197
AutoFill 92, 214
auto-lock, setting time for 201
AV cables 108, 124
B
backing up iPhone 59
backups
creating 255
removing 255
restoring from 257
battery
charging 52
low on power 53
maximizing life 53
replacing 53, 258
status icon 18
birthdays, viewing in Calendar 116
Bluetooth
car kit 51, 200, 256
°PFKPICFFTGUU198
headset 165, 256
pairing devices 51
status 52
status icon 18
VWTPKPIQPQTQÒ200
unpairing device 52
using with Phone 67
bookmarking
map locations 149
webpages 93
YouTube videos 135
bookmarks, syncing 57, 60, 93
books
accessibility 233
annotating 231
brightness 232
FG°PKPIYQTFU233
°PFKPI230
iBooks 229
purchasing 230
reading 231, 232
searching 233
syncing 57, 230
text size 232
braille, display using VoiceOver 247
brightness
adjusting 197
iBooks 232
setting to adjust automatically 197
browse buttons, changing 109
browser cache, clearing 215
browsing
album artwork 101
App Store 179
iTunes Music Store 170
YouTube videos 133
business, using iPhone 259
DWUKPGUUGU°PFKPI148
C
cable, Dock Connector to USB 11, 21
cache, clearing browser 215
Calculator
UEKGPVK°E159
standard 158
CalDAV 115
Calendar
about 115
adding an event 117
birthdays 116
CalDAV 115
deleting an event 118
KORQTVKPIKEU°NGUHTQOGOCKN120
searching 117
updating an event 118
views 116
calendars, syncing 57, 59, 115
calibrating Nike + iPod 227
call forwarding 212
setting up 74
status icon 17
call options 66
call waiting
VWTPKPIQPQTQÒ75
ECNNYCKVKPIVWTPKPIQPQTQÒ212
caller ID
VWTPKPIQPQTQÒ75, 212
Camera
deleting photos 131
exposure 131
±CUJUGVVKPIU131
focus 131
front camera 70, 131
HDR photos 130
main camera 70, 131
restricting 203
seeing photos and videos you’ve taken 131
taking photos 130
upload photos to your computer 132
Cangjie 42
caps lock, enabling 205
car kit 51, 200, 256
CardDAV 219
carrier services 214
Cc 210
cell signal, status icon 17
cellular data network 23
Index 263

charging battery 52
Chinese keyboard 42, 43
cleaning iPhone 55
clearing playlists 104
clocks, adding 155
ENQUGFECRVKQPKPIVWTPKPIQPQTQÒ217
Compass
current coordinates 162
heading 162
True and Magnetic North 162
Component AV Cable 108, 124
Composite AV Cable 108, 124
computer requirements 19
conference calls 68
connecting to Internet 22
contacts
adding and editing 221
adding from Maps 149
adding from text messages 114
assigning photo to 127
CardDAV 219
favorite 74
GAL (Global Address List) 85, 220
LDAP (Lightweight Directory Access
Protocol) 220
seeing info from Phone 67
seeing location of 142
send info by email 86
setting how displayed 211
setting how sorted 211
syncing 57, 59, 219
using to call someone 64
using to make a FaceTime video call 69
Yahoo! Address Book 59
controls, using 29
converting, videos 108
cookies 215
copying
images 125
photos and videos in MMS messages 112
text 39
Cover Flow 101
current approximate location 146, 162
cutting and pasting text 39
D
data protection 54, 202
data roaming 23, 77, 199
data, erasing 26, 54, 202, 207
date and time, setting 204
date format 207
debug console 215
declining calls 66
deleting
alarms 156
all content and settings 54, 207
apps 182
clocks 155
contacts 221
contacts from Favorites 74
email account 209
email messages 87
notes 153
photos 131
playlists 104
removing 255
songs from a playlist 104
videos 108
YouTube playlists 137
YouTube videos from a playlist 137
developer settings 215
dialing
hard pause 221
pause 221
phone number 64
dictionary 43
directions, getting 146
disconnecting iPhone from computer 22
Dock Connector 164
Dock Connector to USB cable 11, 21
downloading
apps 181
podcasts 175
E
earphones
about 11, 50
center button 11, 65, 66, 67, 97, 100, 105
See also headset
EDGE
network 22, 23, 67
status icon 17
editing
playlists 104
text 39
text conversations 113
text using VoiceOver 243
videos 132
GÒGEVUUQWPFUVWTPKPIQPQTQÒ197
emergency calls 71
Emoji 41
ending calls 50
enterprise, using iPhone in 259
ePub books 230
equalizer 216, 217
erasing data 26, 54, 202, 207
EV-DO
network 22, 23, 67
status icon 17
Exchange. See Microsoft Exchange
exposure 131
external keyboards 44
Index
264

F
facemarks 41
FaceTime 69, 222
calling someone you've texted 114
restricting 203
saving as favorite 74
VWTPKPIQPQTQÒ212
favorites 222
calling a contact from 64, 74
managing 74
sending text messages 111
Fetch New Data 209
°NGHQTOCVUUWRRQTVGF84
°NGUJCTKPI60
Find My iPhone 26, 55
±CUJUGVVKPIUHQT%COGTC131
focus 131
folders, Home screen 33
force quitting an app 55, 254
formats
date, time, and telephone number 207
forwarding messages 86
G
GAL (Global Address List) 85, 220
Game Center
about 184
account information 192
achievements 189
downloading games 186
friends 190
inviting friends 187
leaderboards 188
playing games 186
recently played games 189
restricting friend requests 204
restricting multiplayer games 204
setting up 184
status information 192
Genius Mixes 96, 103
Genius playlists 62, 99, 102
Genius, App Store 179
gestures, VoiceOver 238
getting help 258
getting started 19
Google 152
Contacts 59
searching the web 92
GPRS
network 22, 23, 67
status icon 17
GPS 143
grab points 40
H
HAC 253
hands-free phone calls 67, 200
hard pause 221
hardware keyboards 44
HDR photos 130, 218
headset
center button 131, 134, 165
using with Voice Memos 164
See also earphones
headset button. See mic button
hearing aid compatibility 253
help, getting 258
hold, putting calls on 67
Home button, double-click settings 201
Home screen 12, 29
adding web clips 94
customizing 33
folders 33
wallpaper 36, 128, 198
hybrid view 145
I
iBooks 229
iBookstore 229
iCal 59, 258
ICCID number 198
icons
apps 14
status 17
images
copying 125
pasting 125
IMAP
accounts 79, 152
searching email 88
IMEI number 198, 258
installing apps from the App Store 181
international keyboards 40, 205, 206
Internet connection, sharing 24
Internet Tethering 24
Internet, connecting to 22
iPhoto 61, 258
iPod
changing browse buttons 109
converting videos for iPhone 108
deleting videos 108
Genius Mixes 103
Genius playlists 102
headset controls 50
on-the-go playlists 137
playing songs using Voice Control 100
playlists 104
TGRGCVKPIQTUJWÔKPIUQPIU99
searching 102, 106
Index 265

settings 216
5JCMGVQ5JWÔG96, 216
sleep timer 109
iTunes Store
about 169
account 20, 169, 174, 178, 218
browsing 170
checking download status 176
purchasing ringtones 173
purchasing songs and albums 173
restricting 203
streaming or downloading podcasts 175
syncing purchased content 176
verifying purchases 177
iTunes U, syncing 57, 60
iTunes
getting help 258
settings panes 58
J
Japanese keyboard 41, 43
JavaScript 215
K
-CPC41
kaomoji (facemarks) 41
keyboards
#RRNG9KTGNGUU-G[DQCTF44
Emoji 41
external 243
hardware 44
international 40
layouts 44
switching 41
switching languages 44
typing on 37
keypad
adding a contact from 221
dialing manually 64, 251
displaying by default with VoiceOver 243
entering information during a call 67
making an emergency call 71
pasting a number to 65
-QTGCMG[DQCTF41
L
languages, switching keyboard 44
Large Text 249
LDAP (Lightweight Directory Access Protocol) 220
.'&±CUJ131
links
in email 82
on webpages 90
location. See Maps
location services
resetting location warnings 208
restricting 204
settings 200
status icon 18, 143
using with Camera 129
using with Compass 161
using with Maps 141
location warnings 208
Lock screen wallpaper 36, 128, 198
lock status icon 17
locking iPhone 11, 12, 17
lyrics, displaying 98
M
Mac system requirements 19
magnetic north 161
Mail
account setup 79, 208
attachments 83
Cc 210
checking for new messages 80, 87
deleting email account 209
deleting messages 87
forwarding messages 86
links 82
load additional messages 81
marking messages as unread 81
opening drafts 86
organizing email 87
password settings 209
printing messages and attachments 85
reading messages 81
replying to messages 86
resizing text column 81
saving drafts 86
searching 88
seeing recipients 81
sending email to someone you’ve texted 114
sending messages 85
sending photos and videos 86
sending webpage URL via email 90
sending YouTube video links 135
settings 208, 209
sharing contact information 86
signatures 211
storing email on iPhone or server 209
syncing email account settings 57
Yahoo! email account 56
zooming in a message 81
Maps
adding location to a contact 149
bookmarking location 149
current approximate location 143, 146
dropped pin 144
°PFKPICNQECVKQP142
°PFKPIDWUKPGUUGU148
Index
266

getting directions 146
GPS 143
hybrid view 145
satellite view 145
seeing location of a contact 142
sharing a location 149
VTCÓEEQPFKVKQPU148
zooming 142
MEID number 198, 258
merging calls 68
Messages
contacting someone you’ve texted 114
editing conversations 113
following links in messages 114
previews 114
replying to messages 111
saving a photo or video clip 112
saving conversations 111
sending a photo or video clip 112, 113
sending messages 110
sending messages to a group 111
setting alert sounds 114
settings 216
show earlier messages 111
mic button 50
microphone
about 50
built-in 164
muting 67
microphone, external 164
Microsoft Exchange 85, 219
push accounts 56
searching email 88
setting up account 27
syncing 27, 115
Microsoft Internet Explorer 60, 93
Microsoft Outlook 59, 60, 152
missed calls
number of 72
returning 64
MMS
about 110
sending a link to a location 149
sending an address 144
sending a voice memo 167
sending photos and videos 121
settings 216
See also Messages
MobileMe 26, 152, 219
getting help 258
push accounts 56
searching email 88
security features 26, 55
sending photos to a gallery 126
setting up account 27
syncing 93, 115
model number 198
OQFGO°TOYCTGXGTUKQP198
Mono Audio 250
movies
rented 60, 107, 108
syncing 57
music
lyrics 98
managing manually 59
previewing 173
purchasing 173
searching 102
syncing 57, 60
See also iPod
music videos, syncing 57
muting a call 67, 70
N
navigating. See panning, scrolling
network activity status icon 17
networks 195
Nike + iPod
activating 225
calibrating 227
linking a sensor 226
sending workouts to nikeplus.com 227
settings 218, 228
working out with 226
nikeplus.com 227
north, true and magnetic 161
Notes 153
searching 154
syncing 57, 152
NTSC 217
numeric keypad
adding a contact from 221
dialing manually 64, 251
displaying by default with VoiceOver 243
entering information during a call 67
making an emergency call 71
pasting a number to 65
O
1P1Ò5NGGR9CMGUYKVEJ12 , 131
opening apps 29
orientation, changing 89
Outlook Express. See Windows Address Book
Outlook. See Microsoft Outlook
overview, iPhone apps 14
P
pairing with Bluetooth headset 51
PAL 217
panning
maps 142
Index 267

webpages 90
parental controls. See Restrictions
passcode 202
password, changing voicemail 213
pasting
images 125
photos and videos in MMS messages 112
text 39
pause, while dialing 221
pausing songs and videos 50
PC system requirements 19
PDF books 230
Personal Hotspot 24
phone network name 198
Phone
adding and editing contacts 221
adding calls 67
answering calls 50, 66
call waiting 75, 212
caller ID 75
calling internationally 77
calling someone you’ve texted 114
carrier services 214
changing voicemail password 213
conference calls 68
declining calls 50, 66
emergency calls 71
ending calls 50, 67
FaceTime video calls 69, 203
forwarding calls 74, 212
hands-free 67
locking SIM card 213
making calls 64
merging calls 68
missed calls 72
muting calls 67, 70
putting calls on hold 67
ring mode 76
second calls 67
setting up voicemail 72
settings 212
silencing calls 66
silent mode 76
switching between calls 50, 68
VWTPKPIECNNGT+&QPQTQÒ212
turning on vibrate 76
unpairing Bluetooth device 52
using Bluetooth devices 67
using favorites 74
using speakerphone 67
using TTY machine 213
video calls 203, 212
voice dialing 65
voicemail 72
voicemail alerts 72
photo albums 124
photos
assigning to contacts 127
emailing 125
printing 127
saving MMS attachments 112
sending in email messages 86
sending in MMS messages 112
syncing 57, 61, 121
taking 130
using as wallpaper 36, 128, 198
Photos
playing music during slideshow 124
settings 124, 217
viewing slideshows 124
zooming photos 123
See also Camera
pictures. See Camera, Photos
PIN number 214
Pinyin 41, 43
play, status icon 18
playlist folders 60, 96
playlists 104
podcasts
downloading 175
streaming 175
syncing 57, 60
pop-ups 215
Portrait orientation lock status icon 18
power adapter 11
power, low 53
previewing
music 173
ringtones 173
text messages 114
videos 174
Print Center 46
printing
AirPrint printers 45
cancelling 46
email messages and attachments 85
overview 45
photos 127
setting up 45
status 46
webpages 92
RTQ°NGUUGVVKPIU207
purchased content, syncing 176, 183
purchasing
apps 178
music 169, 173
ringtones 173
videos 174
push accounts 56, 209
R
reading email 81
Index
268

recent calls 64
rechargeable batteries 53
removing backups 255
renting movies and TV shows 60, 107, 108, 174
repeating songs 99
replacing battery 53, 258
replying to messages 86
requirements for using iPhone 19
resetting iPhone 55, 254
resizing webpage columns 90
restarting 55, 254
restoring iPhone software 256
restoring settings and information 257
restrictions, setting 203
ring mode 13, 76, 197
ringer
adjusting volume 12, 197
VWTPKPIQPQTQÒ197
Ring/Silent switch 13, 76
ringtones
previewing 173
purchasing 173
setting 76, 197
syncing 57
roaming 77
Romaji 43
rotor control 240
S
Safari
anti-phishing 215
AutoFill 92, 214
bookmarking webpages 93
clearing cache 215
cookies 215
creating a new or adding to an existing
contact 90
creating a preaddressed Mail message 90
Debug Console 215
developer settings 215
fraud warning 215
Home screen web clips 94
JavaScript 215
navigating 90
opening webpages 89, 91
pop-ups 215
printing webpages 92
reloading webpages 90
TGUK\KPIEQNWOPUVQ°VUETGGP90
restricting 203
saving images to your Photo Library 90
searching 92
security 215
settings 214
stopping webpages from loading 90
syncing bookmarks 57, 60
V[RKPIKPVGZV°GNFU91
zooming webpages 90
satellite view 145
screen 197
setting to adjust automatically 197
using 29
screen reader 21
screenshot, taking a 131
scrolling
about 30
maps 142
webpages 90
search engine 214
searching
App Store 179
audio content 102
calendars 117
global 47
iTunes Store 170
Mail messages 88
notes 154
Spotlight Search setting 201
video content 106
webpage text 92
Wikipedia 47
YouTube videos 134
security
erase data after ten failed passcode attempts 202
features 54
Find My iPhone 26, 55
setting passcode for iPhone 202
web 215
selecting text 39
sending
email 85
photos and video clips 112
photos from Photos 125
text messages 110
voice memos 113
sensor, Nike + iPod 226
UGTKCNPWODGT°PFKPI198, 258
service and support information 258
settings
accessibility 207
accounts 208
airplane mode 193
alarms 156
alerts 114, 120
auto-capitalization 205
auto-correction 39, 205
auto-lock 201
Bluetooth 200
brightness 197
Calendar 116, 120
data roaming 199
date and time 116, 204
Index 269

developer 215
email server 209
Fetch New Data 209
HDR photos 218
Home button 201
international 206
iPod 216
keyboard 205
language 206
location services 200
Mail, Contacts, Calendars 208
Mail 208
messages 216
network 199
Nike + iPod 218, 228
PQVK°ECVKQPU196
passcode lock 202
Phone 212
Photos 124, 217
RTQ°NGU207
resetting 207
restrictions 203
Safari 92, 214
screen brightness 197
search 201
security 215
5JCMGVQ5JWÔG216
slideshow 124
sound 114, 120
Store 218
temperature 151
TV out 217
usage statistics 198
vibrate 76
video 217
VoiceOver 235
VPN 199
wallpaper 36, 198
Wi-Fi 195
5JCMGVQ5JWÔG96, 216
sharing Internet connection 24
sharing photos and videos
in email messages 86
in MMS messages 112
UJWÔKPIUQPIU99
signatures, email 211
silencing calls 66
silent mode 13, 76, 197
SIM card, locking 213
5KORNK°GF%JKPGUG42
sleep. See locking iPhone
sleep timer 109
slideshows 124
settings 217
viewing 124
SMS 110
See also Messages
software
getting help 258
updating and restoring 256
version 198
sound
adjusting ringer and alerts volume 197
adjusting volume 12, 50
calendar alert 120
setting limit 216
setting ringtone 197
VWTPKPIQPQTQÒ197
Sound Check 216
UQWPFGÒGEVU12
Speak Auto-text 251
speakerphone 67
spell checking 39
Spotlight Search settings 201
SSL 209
star next to a phone number 222
Starbucks, browsing and purchasing music 170
status icons 17
stock information, Yahoo! 140
Stocks, adding and deleting quotes 139
stopwatch, using 157
storage capacity 198
Store, settings 218
streaming podcasts 175
subtitles 106
UWT°PIVJGYGD89
switching between calls 68
switching between cameras 70, 131
syncing
calendars 115
getting calls during 22
Google Contacts 59
iTunes library contents 57
Microsoft Exchange 27, 115
MobileMe 26, 27, 115
notes 152
photos 121
preventing 61
purchased songs 176
“Sync in progress” message 22
voice memos 168
webpage bookmarks 93
system requirements 19
T
taking photos 130
telephone. See Phone
telephone number format 207
6GP-G[43
text
cutting or copying 39
entering and editing using VoiceOver 243
Index
270

increasing size 249
pasting 39
typing 37
typing in webpages 91
text messaging. See Messages
time format 207
time zone support 116, 120, 204, 211
time, setting 204
timer
setting 157
sleep 157
touchscreen, using 29
Traditional Chinese 42
VTCÓEEQPFKVKQPUEJGEMKPI148
transferring
°NGU60
purchased content 62, 176, 183
settings and information 255, 257
VTCPUKVKQPGÒGEVUUGVVKPI217
trimming videos 132
Triple-click Home setting 251
troubleshooting
backing up 255
restarting 55, 254
software update and restore 256
true north 161
TTY machine, using 213
TTY status icon 17
VWTPKPIK2JQPGQPQTQÒ11
TV shows
rented 60, 107, 108
TV shows, syncing 57
TV signal settings 217
TV, viewing content on 108, 124
typing
facemarks 41
international keyboards 40
keyboard 37
spell checking 39
KPYGDRCIGVGZV°GNFU91
word substitution 43
U
UMTS
network 22, 23, 67
status icon 17
undoing edits 40
unlocking iPhone 12
unpairing Bluetooth device 52
unread messages, marking 81
updating iPhone software 256
usage statistics
battery percentage 198
resetting 199
seeing 198
USB
cable 11, 21
port 21
power adapter 11
user dictionary 43
V
vibrate, setting 76, 197
video calls 69, 222
restricting 203
VWTPKPIQPQTQÒ212
video settings 217
videos
alternate audio language 106
converting for iPhone 108
deleting 108
editing 132
previewing 174
purchasing 174
saving MMS attachments 112
searching 106
sending in MMS messages 112
subtitles 106
syncing 57, 60
trimming 132
watching on a TV 108
See also iPod, Music, YouTube
Vietnamese keyboard 43
virtual private network. See VPN
Voice Control
making a FaceTime call 69
making phone calls 48, 65
playing songs 48, 100
using with headset 50
Voice Memos
attaching to MMS messages 167
emailing 167
recording 164
syncing 168
trimming 167
voicemail
about 72
alerts 72
changing password 213
checking and managing 72
greeting 72
setting up 72
VoiceOver
about 236
braille displays 247
entering and editing text 243
gestures 238
rotor control 240
setting up iPhone using 21
volume
adjusting 12, 50
adjusting for ringer and alerts 197
Index 271

setting limit 216
VPN
accessing networks using 24
EQP°IWTKPI199
status icon 17
VWTPKPIQPQTQÒ200
W
waking iPhone 12
wallpaper 36, 128, 198
warranty service 258
watching videos on a TV 108
weather information, Yahoo! 151
Weather
adding cities 150
deleting cities 151
temperature settings 151
viewing 150
web. See Safari
web clips, adding to Home screen 94
webpages
bookmarking 93
syncing 57, 60
White on Black 250
Wi-Fi
addresses 198
forgetting a network 195
joining a network 23, 195
settings 195
status icon 17
VWTPKPIQPQTQÒ195
Wikipedia, searching 47
Windows Address Book 59
Windows system requirements 19
“Works with iPhone” logo 164
World Clock 155
Wubi Hua 42
Y
Yahoo! 152
Address Book 59
search using 92
stock information 140
weather information 151
Yomi 44
YouTube
bookmarking videos 135
browsing videos 133
emailing links 135
playing videos 134
restricting 203
searching for videos 134
Z
Zhuyin 42, 43
Zoom (accessibility feature) 249
zooming
camera 131
email messages 81
maps 142
photos 123
webpages 90
Index
272
%Apple Inc.
© 2011 Apple Inc. All rights reserved.
Apple, the Apple logo, AirPlay, Apple TV, Cover Flow,
FaceTime, Finder, iBooks, iCal, iPhone, iPhoto, iPod,
K6WPGU-G[PQVG/CE/CEKPVQUJ/CE150WODGTU
Pages, QuickTime, Safari, Spotlight, and the Works with
iPhone logo are trademarks of Apple Inc., registered in
the U.S. and other countries.
AirPrint, iPad, the Made for iPhone logo, Multi-Touch,
4GVKPCCPF5JWÔGCTGVTCFGOCTMUQH#RRNG+PE
Apple, Apple Store, iDisk, and iTunes Store are service
marks of Apple Inc., registered in the U.S. and other
countries.
App Store, iBookstore, and MobileMe are service marks
of Apple Inc.
IOS is a trademark or registered trademark of Cisco in
the U.S. and other countries and is used under license.
2KPIKUCTGIKUVGTGFVTCFGOCTMQH-CTUVGP/CPWHCEVWTKPI
Corporation and is used in the U.S. under license.
6JG0KMGK2QF5RQTV-KVKUEQXGTGFD[QPGQTOQTG
of U.S. patent numbers 6,018,705, 6,052,654, 6,493,652,
6,298,314, 6,611,789, 6,876,947, and 6,882,955, either
alone or when used in combination with a Nike + iPod
enabled iPod media player or iPhone 3GS or later.
The Bluetooth® word mark and logos are registered
trademarks owned by Bluetooth SIG, Inc. and any use of
such marks by Apple Inc. is under license.
Adobe and Photoshop are trademarks or registered
trademarks of Adobe Systems Incorporated in the U.S.
and/or other countries.
Other company and product names mentioned herein
may be trademarks of their respective companies.
Mention of third-party products is for informational
purposes only and constitutes neither an endorsement
nor a recommendation. Apple assumes no responsibility
with regard to the performance or use of these
products. All understandings, agreements, or warranties,
if any, take place directly between the vendors and the
RTQURGEVKXGWUGTU'XGT[GÒQTVJCUDGGPOCFGVQGPUWTG
that the information in this manual is accurate. Apple is
not responsible for printing or clerical errors.
019-2005/2011-02